

Page 1

User’s Guide
Creative Video Blaster WebCam Go Plus
Information in this document is subject to change without notice and does not represent a commitment on the part of Creative Technology Ltd. No part of this
manual may be reproduced or transmitted in any form or by any means, electronic or mechanical, including photocopying and recording, for any purpose
without the written permission of Creative Technology Ltd. The software described in this document is furnished under a license agreement and may be used
or copied only in acco rdance with the terms of the license agreement. It is again s t th e la w to copy the software on an y other m edium except as specifically
allowed in the license agreement. The licensee may make one copy of the software for backup purposes.
Copyright © 2000 by Creative Technology Ltd. All rights reserved.
Version 1.5
November 2000
Video Blaster and Sound Blaster are registered trademarks of Creative Technology, Ltd. Blaster and LAVA! are trademarks of Creative Technology Ltd.
MediaRing Talk is a trademark of MediaRing.com Ltd/MediaRing.com, Inc. PixAround, PixMaker and PixScreen are trademarks of PixAround.com.
IBM is a registered trademark of International Business Machines Corporation.
Intel and Penti um ar e registered trademar ks of Intel Corporation.
Microsoft, MS-DOS, Windows, and the Windows Logo are registered trademarks of Microsoft Corporation.
All other products ar e tr ad e m ark s or re g ist er ed trad em a r ks of th ei r resp ec tive owner s.
Page 2

Creative End-User Software License Agreement
Version 2.4, June 2000
PLEASE READ THIS DOCUMENT CAREFULLY BEFORE INSTALLING THE SOFTWARE. BY INSTALLING AND USING THE SOFTWARE,
YOU AGREE TO BE BOUND BY THE TERMS OF THIS AGREEMENT. IF YOU DO NOT AGREE TO THE TERMS OF THIS AGREEMENT, DO
NOT INST ALL OR USE THE SOFTWARE. PROMPTLY RETURN, WITHIN 15 D A YS, THE SOFTWARE, ALL RELATED DOCUMENT ATION AND
ACCOMPANYING ITEMS TO THE PLACE OF ACQUISITION FOR A FULL REFUND.
This is a legal agreement between you and Creative
Technology Ltd. and its subsidiaries (“Creative”).
This Agreement states the terms and conditions
upon which Creative offers to license the software
sealed in the disk pack ag e to gether with all related
documentation and accompanying items including,
but not limited to, the executable programs, drivers,
libraries and data files associated with such
programs (collectively, the “Software”).
LICENSE
1.Grant of License
The Software is licensed, not sold, to you for use
only under the terms of this Agreement. You own
the disk or other medi a on which the Software is
originally or subsequently recorded or fixed; but,
as between you and Creative (and, to the extent
applicable, its licensors), Creative retains all ti tle
to and ownership of the Software and reserves all
rights not e x p r es s l y gr anted to you.
2.For Use on a Single Computer
The Software may be used only on a sin g le
computer by a single us er at any time. You may
transfer the machine-readable portion of the
Software fr om one comp uter to anot her comput er,
provided that (a) the Software (inc luding any
portion or copy thereof) is erased from the first
computer and (b) the re is no possibility that the
Software will be used on more than one computer
at a time.
3.Stand-Alone Basis
You may use the Software only on a stand-alone
basis, such that the Software and the functions it
provides are acc essi b le o nly to per so n s who ar e
physically p rese nt at th e lo cati on o f th e com pute r
on which the Software is loaded. You may not
allow the Software or its functions to be accessed
remotely, or transmit all or any porti on of the
Software through any network or communication
line.
4.Copyright
The Software is owned by Creative and/or it s
licensees and is protected by United States
copyright laws and international treaty provisions.
You may not remove the copyright notice from
any copy of the Software or any copy of the
written materials, if any, accompanying the
Software.
5.One Archival Copy
You may make one (1) archival copy of the
machine-readable portion of the Software for
backup purposes only in support of your use of the
Software on a single computer, provided that you
reproduce on the copy all copyright and other
proprietary rights notices included on the
originals of the Software.
6.No Merger or Integration
You may not merge any portion of the Software
into, or integ rate any portion of th e Software with,
any other program, except to the extent expressly
permitted by the laws of the jurisdiction where
you are located. Any portion of the Software
merged into or integrated with another program, if
any, will continue to be subject to the terms and
conditions of this Agreement, and you must
reproduce on the merged or integrated portion all
copyright and other prop rietary rights notice s
included in the originals of the Software.
7.Network Version
If you have purchased a “network” version of the
Software, this Agreement applies to the
installat ion of the Software on a single “file
server”. It may not be copied onto multiple
systems. Each “node” connected to the “file
server” must also have its own license of a “node
copy” of the Software, which becomes a license
only for that specific “node”.
8.Transfer of License
You may transfer your lic ense of the Software,
provided that (a) you tran s f er all portions of the
Software or co pies thereof, (b) you do no t re ta in
any portion of the Software or any copy thereof,
and (c) the transferee r eads and agrees to be bound
by the terms and conditions of this Agreemen t.
9.Limitations on Using, Copying, and Modifying
the Software
Except to the extent expr essly permitted by this
Agreement or by the laws of the jurisdiction
where you acquired th e Software, you may not
use, copy or modify the Soft ware. Nor may you
sub-license any of your rights under this
Agreement. You may use the software for your
personal use only, and not for public performance
or for the creation of publicly displayed
videotapes.
10.Decompiling, Disassembling, or Reverse
Engineering
Page 3

Y ou acknowledge that the Software contains trade
secrets and other proprietary information of
Creative and its licensors. Exce pt to th e e x tent
expressly permitted by this Agreement or by the
laws of the jur isdiction where yo u are located, you
may not decompile, disassemble or otherwise
reverse engineer the Software, or enga ge in any
other activities to obta in underlying information
that is not visible to the user in connection with
normal use of the Software.
In particular, you agree not for any purpose to
transmit the Software or dis play the Software's
object code on any computer screen or to make
any hardcopy memory dumps of the Software's
object code. If you believe you require
information related to the interoperability of the
Software with other program s, you shall not
decompile or disassemble the Software to obta in
such information, and you agree to request such
information from Creative at the address listed
below. Upon receiving such a request, Creative
shall determine whether you require such
information for a legitimate purpose and, if so,
Creative will provide such informa tion to you
within a reason able time and on rea sonable
conditions.
In any event, you will notify Creative of any
information derived from reverse engineerin g or
such other acti v i ti es, an d the r esu lt s the reo f w il l
constitute the confidential information of Creative
that may be used only i n connection with the
Software.
11.For Software With CDDB Features.
This package includ es applications whic h m ay
contain software f r om CDDB, Inc.of Berkeley
California (“CDDB”). The software from CDDB
(the “CDDB Client”) enables the application to do
online disc identification and obtain music-related
information, including name, artist, track and title
information (“CDDB Data”) from online servers
(“CDDB Servers”) and to perform other
functions.
You agree that you will use CDDB Data , the
CDDB Client and CDDB Servers for your own
personal non-commercial use only. Y ou agree not
to assign, copy, transfer or transmit the CDDB
Client or any CDDB Data to any third party. YOU
AGREE NOT TO USE OR EXPLOIT CDDB
DATA, THE CDDB CLIENT,OR CDDB
SERVERS,EXCEPT AS EXPRESSLY
PERMITTED HEREIN.
You agree that your no n -exclusive license to use
the CDDB Data, the CDDB Client and CDDB
Servers will terminate if you violate these
restrictions. If your license terminates, you agree
to cease any and all use of the CDDB Data, the
CDDB Client and CDDB Servers. CDDB
reserves all rights in CDDB Data, the CDDB
Client and the CDDB Servers, including all
ownership rights.
You agree th at CDD B, I nc. may en fo rce its rig hts
under this Agreeme nt against you directly in its
own name.
The CDDB Client and each item of CDDB Data
are licensed to you “AS IS.” CDDB makes no
representations or warranties, express or implied,
regarding the accuracy of any CDDB Data from in
the CDDB Servers. CDDB reserves the right to
delete data from the CDDB Servers or to change
data categories for any ca use that CDDB deems
sufficient. No warranty is made that the CDDB
Client or CDDB S er v ers are error-fr ee or that
functioning of CDDB Client or CDDB Servers
will be uninterrupted. CDDB is not obligated to
provide you with any new enhanced or additional
data types or categories that CDDB may chose to
provide in the future.
CDDB DISCLAIMS ALL WARRANTIES
EXPRESS OR IMPLIED, INCLUDING, BUT
NOT LIMITED TO, IMPLIED WARR ANTIES
OF MERCHANT ABILITY, FITNESS FOR A
P ARTICULAR PURPOSE, TITLE AND NONINFRINGEMENT. CDDB does not warrant the
results that will be obtained by your use of the
CDDB Client or any CDDB Server. IN NO CASE
WILL CDDB BE LIABLE FOR ANY
CONSEQUENTIAL OR INCIDENTIAL
DAMAGES OR FOR ANY LOST PROFITS, OR
LOST REVENUES.
TERMINATION
The license grante d to you is effective until
terminated. You may terminate it at any t ime by
returning the Software (including any portions or
copies thereof) to Creative. The license will also
terminate autom atically without any notice from
Creative if you fail to compl y w it h any term or
condition of this Ag reement. You agree upon such
termination to return the Software (including any
portions or copies thereof) to Creative. Upon
termination, Cr eative may also enforce any rights
provided by law. The provisions of this Agreement
that protect the proprietary rights of Creative will
continue in force after termination.
LIMITED WARRANTY
Creative warrants, as the so le warranty, that the
disks on which the Software is furnished will be free
of defects, as set forth in the Warranty Card or
printed manual included with the Software. No
distributor, dealer or any other entity or person is
authorized to expand or alter this warranty or any
other provisions of this Agreement. Any
representation, other than the warranties set forth in
this Agreement, will not bind Crea tive.
Creative does not warrant that the fu nctions
contained in the Software will meet your
requirement s or that the operation of the Software
will be uninterrupted, error-free or free from
malicious code. For purposes of this paragraph,
Page 4

“malicious code” means any program code designed
to contaminate other computer programs or
computer data, consume computer resources,
modify, destroy, record, or transmit data, or in some
other fashion usurp the normal operation of the
computer, computer sys tem, or computer networ k,
including viruses, Trojan horses, droppers, worms,
logic bombs, and the like. EXCEPT AS STATED
ABOVE IN THIS AGREEMENT, THE
SOFTWARE IS PROVIDED AS-IS WITHOUT
WARRANTY OF ANY KIND, EITHER
EXPRESS OR IMPLIED, INCLUDING, BUT
NOT LIMITED TO, ANY IMPLIED
WARRANTIES OF MERCHANTABILITY
AND FITNESS FOR A PARTICULAR
PURPOSE. CREATIVE IS NOT OBLIGATED
TO PROVIDE ANY UPDATES, UPGRADES
OR TECHNICAL SUPPORT FOR THE
SOFTWARE.
Further, Creative shall not be liable for the accuracy
of any information provided by Creative or third
party technical support personnel, or any damages
caused, eith er d irec tl y or i ndi re ctly, b y act s ta ke n or
omissions made by you as a result of such technical
support.
You assume full responsibility for the selection of
the Software to achieve your intended results, and
for the installation, use and results obtained from the
Software. You also assume the entire risk as it
applies to the quality and performance of the
Software. Should the Software prove defective, you
(and not Creative, or its distributors or dealers)
assume the entire cost of all necessary servicing,
repair or correction.
This warranty gives you specific legal rights, and
you may also have other rights which vary from
country/state to country/state. Some countries/states
do not allow the exclusion of implied warranties, so
the above exclusion may not apply to you. Creative
disclaims all warranties of any kind if the Software
was customized, repackaged or altered in any way
by any third party other than Cre ative.
LIMITATION OF REMEDIES AND
DAMAGES
THE ONLY REMEDY FOR BREACH OF
WARRANTY WILL BE THAT SET FORTH IN
THE WARRANTY CARD OR PRINTED
MANUAL INCLUDED WITH THE
SOFTWARE. IN NO EVENT WILL
CREATIVE OR ITS LICENSORS BE LIABLE
FOR ANY INDIRECT, INCIDENTAL,
SPECIAL OR CONSEQUENTIAL DAMAGES
OR FOR ANY LOST PROFITS, LOST
SAVINGS, LOST REVENUES OR LOST DATA
ARISING FROM OR RELATING TO THE
SOFTWARE OR THIS AGREEMENT, EVEN
IF CREATIVE OR ITS LICENSORS HAVE
BEEN ADVISED OF THE POSSIBILITY OF
SUCH DAMAGES. IN NO EVENT WILL
CREATIVE’S LIABILITY OR DAMAGES TO
YOU OR ANY OTHER PERSON EVER
EXCEED THE AMOUNT PAID BY YOU TO
USE THE SOFTWARE, REGARDLESS OF
THE FORM OF THE CLAIM.
Some countries/states do not allow the limitation or
exclusion o f liab ilit y for in cident al or c onseq uenti al
damages, so the above limitation or exclusion may
not apply to you.
PRODUCT RETURNS
If you must ship the software to Creative or an
authorized Creative distributor or dealer, you mus t
prepay shipping and either insure the software or
assume all risk of loss or damage in transit.
U.S. GOVERNMENT RESTRICTED RIGHTS
All Software and related documentation are
provided with restricted rights. Use, duplication or
disclosure by the U.S. Government is subject to
restrictions as set forth in subdivision (b)(3)(ii) of
the Rights in Technical Data and C o mputer
Software Clause at 252.227-7013. If you are sublicensing or using the Software outside of the United
States, you will comply with the applicable local
laws of your country, U.S. export control law, and
the English version of this Agreement.
CONTRACTOR/MANUFACTURER
The Contractor/Manufacturer for the Software is:
Creativ e Technology Ltd
31, Internationa l Business Park
Creative Resource
Singapore 609921
GENERAL
This Agreement is binding on you as well as your
employees, employers, contractors and agents, and
on any successors and ass ignees. Neither the
Software nor any information derived therefrom
may be exported except in accordance with the laws
of the U.S. or other applicable provisions . This
Agreement is go verned by the law s of th e St at e of
California (except to the extent federal law governs
copyrights and federally registered tradem arks).
This Agreeme nt is the entire agr eement between us
and supersedes any othe r understandings or
agreements, including, but not limited to,
advertising, with respect to the Software. If any
provision of this Agreem ent is deemed invalid or
unenforceable by any country or government agency
having jurisdiction, that particular provision will be
deemed modif ied to the ex tent necessary to make the
provision v alid and enforceabl e, and the remaining
provisions will remain in full force and effect.
For questions concerning this Agreement, p lease
contact Creative at the address stated above. For
questions on product or technical matte r s, contact
the Creative technical support center nearest you.
ADDENDUM TO THE MICROSOFT
Page 5

SOFTWARE LICENSE AGREEMENT
(WINDOWS 95)
IMPORTANT: By using the Microsoft software
files (the “Microsoft Software”) provided with this
Addendum, you are agreeing to be bound by the
following terms. If you do not agree to be bound by
these terms, you may not use the Microsoft
Software.
The Microsoft Software is provided for the sole
purpose of replacing the corresponding files
provided with a previously licensed copy of the
Microsoft software pr oduct identified above
(“ORIGINAL PRODUCT”). Upon installation, the
Microsoft Software files become part of the
ORIGIN AL PR OD UCT and ar e subject t o the same
warranty and license terms and conditions as the
ORIGINAL PRODUCT. If you do not have a valid
license to use the ORIGINAL PRODUCT , you may
not use the Microsoft Software. Any other use of the
Microsoft Software is prohibited.
SPECIAL PROVISIONS APPLICABLE TO
THE EUROPEAN UNION
IF YOU ACQUIRED THE SOFTWARE IN THE
EUROPEAN UNION (EU), THE FOLLOWING
PROVISIONS ALSO APPLY TO YOU. IF THERE
IS ANY INCONSISTENCY BETWEEN THE
TERMS OF THE SOFTWARE LICENSE
AGREEMENT SET OUT EARLIER AND IN THE
FOLLOWING PROVISIONS, THE FOLLOWING
PROVISIONS SHALL TAKE PRECEDENCE.
DECOMPILATION
You agree not for any purpose to transmit the
Software or display the Software’s object code on
any computer screen or to make any hard copy
memory dumps of the Software’s object code. If you
believe you require information related to the
interoperability of the Software with other
programs, you shall not decompile or disasse m ble
the Software to obtain such information, and you
agree to requ est such information from Creative at
the address listed earlier. Upon receiving such a
request, Creative shall determine whether you
require such information for a legitimate purpose
and, if so, Creative will provide such information to
you within a reas onable time and o n reasonable
conditions.
LIMITED WARRANTY
EXCEPT AS STATED EARLIER IN THIS
AGREEMENT, AND AS PROVIDED UNDER
THE HEADING “STATUTORY RIGHTS”,
THE SOFTWARE IS PROVIDED AS-IS
WITHOUT WARRANTY OF ANY KIND,
EITHER EXPRESS OR IMPLIED,
INCLUDING, BUT NOT LIMITED TO, ANY
IMPLIED WARRANTIES OR CONDITIONS
OF MERCHANTABILITY, QUALITY AND
FITNESS FOR A PARTICULAR PURPOSE.
LIMITATION OF REMEDY AND DAMAGES
THE LIMITATIONS OF REMEDIES AND
DAMAGES IN THE SOFTWARE LICENSE
AGREEMENT SHALL NOT APPLY TO
PERSONAL INJURY (INCLUDING DEA TH)
TO ANY PERSON CAUSED BY CREATIVE’S
NEGLIGENCE AND ARE SUBJECT TO THE
PROVISION SET OUT UNDER THE
HEADING “STATUTORY RIGHTS”.
STATUTORY RIGHTS
Irish law provides that ce rtain conditions and
warranties may be implied in contracts for the sale
of goods and in contracts for the supply of services.
Such conditions and warranties are hereby excluded,
to the extent such exclusion, in the context of this
transaction, is lawful under Irish law. Conversely,
such conditions and warranties, insofar as they may
not be lawfully exclu d ed, shall apply.
Accordingly nothi ng in this Agreement shall
prejudice any rights that you may enjoy by virtue of
Sections 12, 13, 14 or 15 of the Irish Sale of Goods
Act 1893 (as amended).
GENERAL
This Agreement is governed by the laws of the
Republic of Ireland. The local language version of
this agreement sh all apply to Software acquired in
the EU. This Agreement is the entire agreement
between us, and you agree that Creative will not
have any liability for any untrue sta tement or
representation made by it, its agents or anyone else
(whether innocently or negligently) upon which you
relied upon enteri ng this Agreement, unle ss such
untrue statement or representation was made
fraudulently.
Safety Information
The following sections contain notices for
various countries:
CAUTION: This device is intended to be insta lled
by the user in a CSA/TUV/UL certified/listed IBM
AT or compatible personal computers in the
manufacturer’s defined operator access area. Check
the equipment operating/installation manual and/or
with the equipment manufacturer to verify/confirm
if your equipment is s uitable for user-installed
applicatio n car d s .
Modifications
Any changes or modifications not expressly
approved by the grantee of this device could void the
user’s authority to oper a te th e device.
Compliance
This product conform s to the following Council
Directive:
❑
Directive 89/336/EEC, 92/31/EEC (EMC)
Page 6

Contents
Introduction
About the Applications..........................................................................................................xii
Creative WebCam PhotoEditor™............................................................................. xii
Creative WebCam Go Control.................................................................................. xii
Creative WebCam Monitor ....................................................................................... xii
PixAround™ PixMaker™ CE.................................................................................. xii
PixAround PixScreen™ CE...................................................................................... xi i
MediaRing Talk™.................................................................................................... xiii
Microsoft® NetMeeting®........................................................................................ xiii
Microsoft Internet Explorer...................................................................................... xiii
Creative LAVA!™ Player..........................................................................................xiv
Before You Begin....................................................................................................................xv
README File............................................................................................................xv
System Requirements.................................................................................................xv
Document Conventions............................................................................................ xvi
1 Installing WebCam Go Plus
In Your Package.................................................................................................................... 1-1
About W ebCam Go Plus...................................................................................................... 1-2
Inserting or Changing Batteries............................................................................................ 1-4
Installing WebCam Go Plus................................................................................................. 1-5
In Windows 98 and W indo ws Millennium..............................................................1-5
In Windows 2000...................................................................................................... 1-7
Page 7

2 Using WebCam Go Plus as a Web Camera
Starting WebCam Go Control...............................................................................................2-2
T aking a picture......................................................................................................................2-3
Recording a video clip...........................................................................................................2-3
Vie wing an image in its actual size.......................................................................................2-3
Selecting the video capture device........................................................................................2-4
Starting WebCam Go Control Help......................................................................................2-4
3 Using WebCam Go Plus as a Digital Camera
T aking pictures.......................................................................................................................3-2
Recording audio.....................................................................................................................3-3
Downloading pictures and audio from the camera..............................................................3-3
Customizing camera settings ................................................................................................3-4
A Technical Specifications
B Troubleshooting
Problem Installing Software.................................................................................................B-1
Problems Using WebCam Go Plus......................................................................................B-1
C Note on USB Compatibility
D Technical Support
If You Have a Problem.........................................................................................................D-2
Returning a product for repair .................................................................................D-4
Limited Warranty..................................................................................................................D-5
Creative European Help Line
Page 8

xi
Introduction
Creative Video Blaster WebCam Go Plus is an Internet video camera that allows you to capture
images in both 16-bit and 24-bit (16.7 million) colours. It also records videos in full-co lo ur.
The following are just some of the things you can do with your WebCam:
❑ Video-conferencing. Want to chat face-to-face with someone over the Internet? Used
together with Microsoft NetMeeting, your WebCam allows you to have real-time videoconferencing with virtually anybody over the Internet!
❑ Security Camera. W orried that someone will use your computer without your kno wledge?
When used together with WebCam Monitor, WebCam Go Plus can function as a security
camera, recording short videos of any movement that is in its field of view. It can also be
programmed to take pictures automatically at regular intervals.
❑ Portable Digital Camera. As WebCam Go Plus is detachable, you can disconnect it from
the computer and use it as a digital camera to take pictures anywhere you like! With
W ebCam Go Plus’ focu s-free lens, you don’ t need to manually f ocus your camera. Just s nap
your pictures and the images will turn out sharp every time! Downloading images from
WebCam Go Plus is a breeze with WebCam Go Control.
Page 9

xii
About the
Applications
Creative WebCam
PhotoEditor
™
Creative W eb Cam PhotoEditor is an image editing and enhancing application that complements
your WebCam. Its many nifty features include a suite of special effects tools and a set of
designer-loo king templates, useful for creating impr essi ve personal greet ings and presentat ions.
Creative WebCam Go
Control
This powerful appli cation lets you take pictures or recor d video clips and store t hem in albums .
Use this application to download pictures you have taken when the camera was disconnected
from the computer. You can also export these pictures or vid eo clips to other programs , or se nd
them as attachments to your e-mail message. There are v arious settings for you to adjust so that
you can optimize the quality of your pictures and video clips.
Creative WebCam
Monitor
If you are thinking of putting a live snapshot of your office, garden, or even your hamster cage
on your web page, use WebCam Monitor! Just point your camera at the desired s ubject, speci fy
some settings, and WebCam Monitor does the rest, including automatically uploading the
snapshots to your website. It can even act as a motion-detecting security system that
automatically sends an e-mail message to notify you whenever anybody moves within the
camera’s field of view.
PixAround™
PixMaker™ CE
PixMaker CE lets you create your own 360° interactive PixAround scenes, web pages and
postcards in 3 easy steps — just snap, stitch and publish! Now, you can create immersive and
interactive 360° web pages easily, without the need for expensive professional equipment or
additiona l plug-ins.
PixAround
PixScreen™ CE
PixScreen lets you view PixAround scenes without the need of additional plug-ins. Navigate
around a 360° PixAround scene with the help of buttons built into PixScreen's friendly user
interface, or print out your PixAround scenes in normal or panoramic view!
Page 10

xiii
MediaRing Talk
™
With MediaRing Talk, you can literally call somebody half a world away without worrying
about exorbitant phone charges. MediaRing Talk uses sophisticated patent “knocking”
technology to call the other party’s PC or phone. The party you are calling does not need to be
connected to the Internet. That means you don’t have to waste time pre-scheduling Internet
phone conversations. In addition to making Internet phone calls, MediaRing Talk also lets you
leave voice messages and engage in text chat.
In addition, if you are a Sound Blaster Li ve! user, y ou can use Creativ e VoicePersonas, a feature
incorporated into MediaRing Talk that allows you to disguise or distort your voice. This cool
feature lev erages on S ound B laster Live! po werful au dio proces sing techno logy to provide you
with a range of VoicePersonas such as Chipmunk, Male to Female, or Female to Male.
Microsoft
®
NetMeeting
®
Microsoft NetMeeting is a voice communications client that includes support for international
conferencing standards and provides true multi-user application sharing and d ata con feren cing
capabilities.
It supports one-w ay or two-w ay video-conf erencing, so your f riends can see y ou ev en if they do
not have a camera. Audio-only conversations and text chats are also supported. Two or more
users can collaborate on a document, doodle on a whiteboard, or even share any Windows
application in real-time over the Internet or a corporate intranet.
Microsoft Internet
Explorer
Microsoft Internet Explorer is an Internet browser that features ActiveX technology, so web
pages can combine interactive ActiveX Controls, Java applets, and more to create interactive
content. Activ eMov ie technology allo ws you to vie w mu ltimedia conten t on the web, i ncluding
MPEG audio and video.
Page 11

xiv
Creative LAVA!™ Player
An advanced software developed at the prestigious Creative-EMU Technology Center,
LAVA! Player lets you create and p l ay s tunn ing animated 3D videos to accompany your music
files. It combines textures, images and colours to create mesmerizing forms that dance and
groove — all in a matter of secon ds. LAV A! videos are relativ ely compact and may be sent easily
through the Internet.
LAVA! Player requires a 3D graphics card.
Page 12

xv
Before You Begin
README File
❑ The README file on the WebCam Go Plus installation CD contains information not
available at the time of printing. Read the file before connecting your WebCam to the PC.
System Requirements
❑ 166 MHz Intel
®
Pentium® or higher 100% IBM®-compatible PC
❑ 32 MB RAM
❑ 70 MB free hard disk space for installation of all software titles
❑ Available USB port or self-powered USB hub
❑ Microsoft Windows
®
98, Windo w s Millenni um or Windows 2000
❑ Display adapter that supports16-bit colour at a resolution of 640 x 480 pixels
❑ CD-ROM drive installed
❑ Sound Blaster
®
or other Windows-compatible sound card and microphone
(required for videoconferencing)
❑ Modem or LAN access to the Internet at 28.8 Kbps or faster (required for
videoconferencing)
For optimal performance
❑ 200 MHz Intel Pentium or higher 100% IBM-compatible PC
❑ 32 MB RAM
❑ Display adapter that supports 24-bit colour at a resolution of 800 x 600 pixels
❑ Sound Blaster 16 or higher, or other Windows-compatible sound card with full-duplex
support for simultaneous two-way conversations
Page 13
xvi
Document Conventions
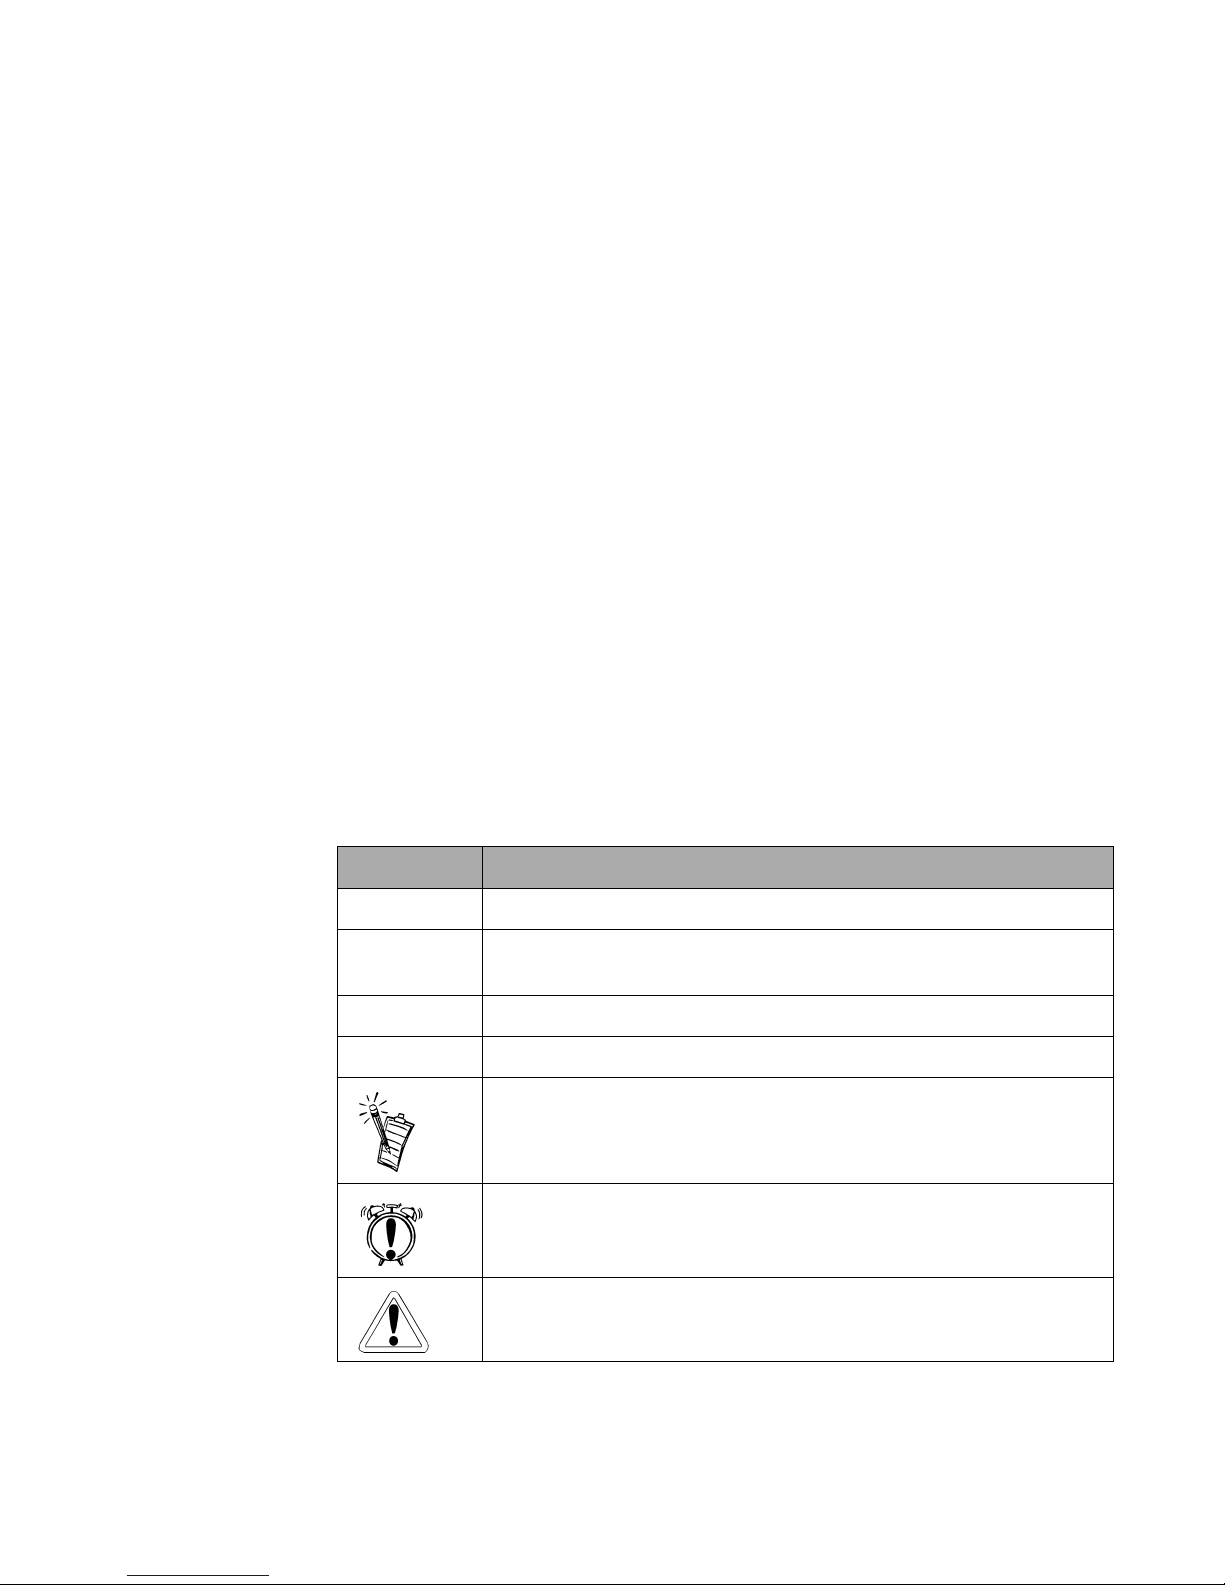
The following typographical conventions are used throughout this document:
T ab le i: Document con ventio ns
This Represen ts
bold Text that must be entered exactly as it appears.
italic
Title of a book or a placeholder, which represents the information you
must provide.
UPPERCASE Directory nam e, file name , or a cro nym.
< > Symbols, let te rs, a nd key names on the keyboar d.
This notepad icon indicates information that is of particular importance
and should be co ns i dere d befo re cont in uin g.
This alarm clock icon indicates that failure to adhere to directions may
result in loss of data or damage to your system.
The warning sign indicates that failure to adhere to d irections may result
in bodily harm or life-threatening situations.
Page 14

Installing WebCam Go Plus 1-1
1
Installing WebCam Go Plus
This chapter consists of the following sections:
❑ In Your Package
❑ About WebCam Go Plus
❑ Inserting or Changing Batteries
❑ Installing WebCam Go Plus.
In Your Package
Your package contains the following items:
❑ One WebCam Go Plus camera
❑ One USB cable
❑ One WebCam Go Plus installation CD
❑ Quickstart Leaflet
❑ One carrying case with belt loop
Page 15
1-2 Installing WebCam Go Plus
About
WebCam Go Plus
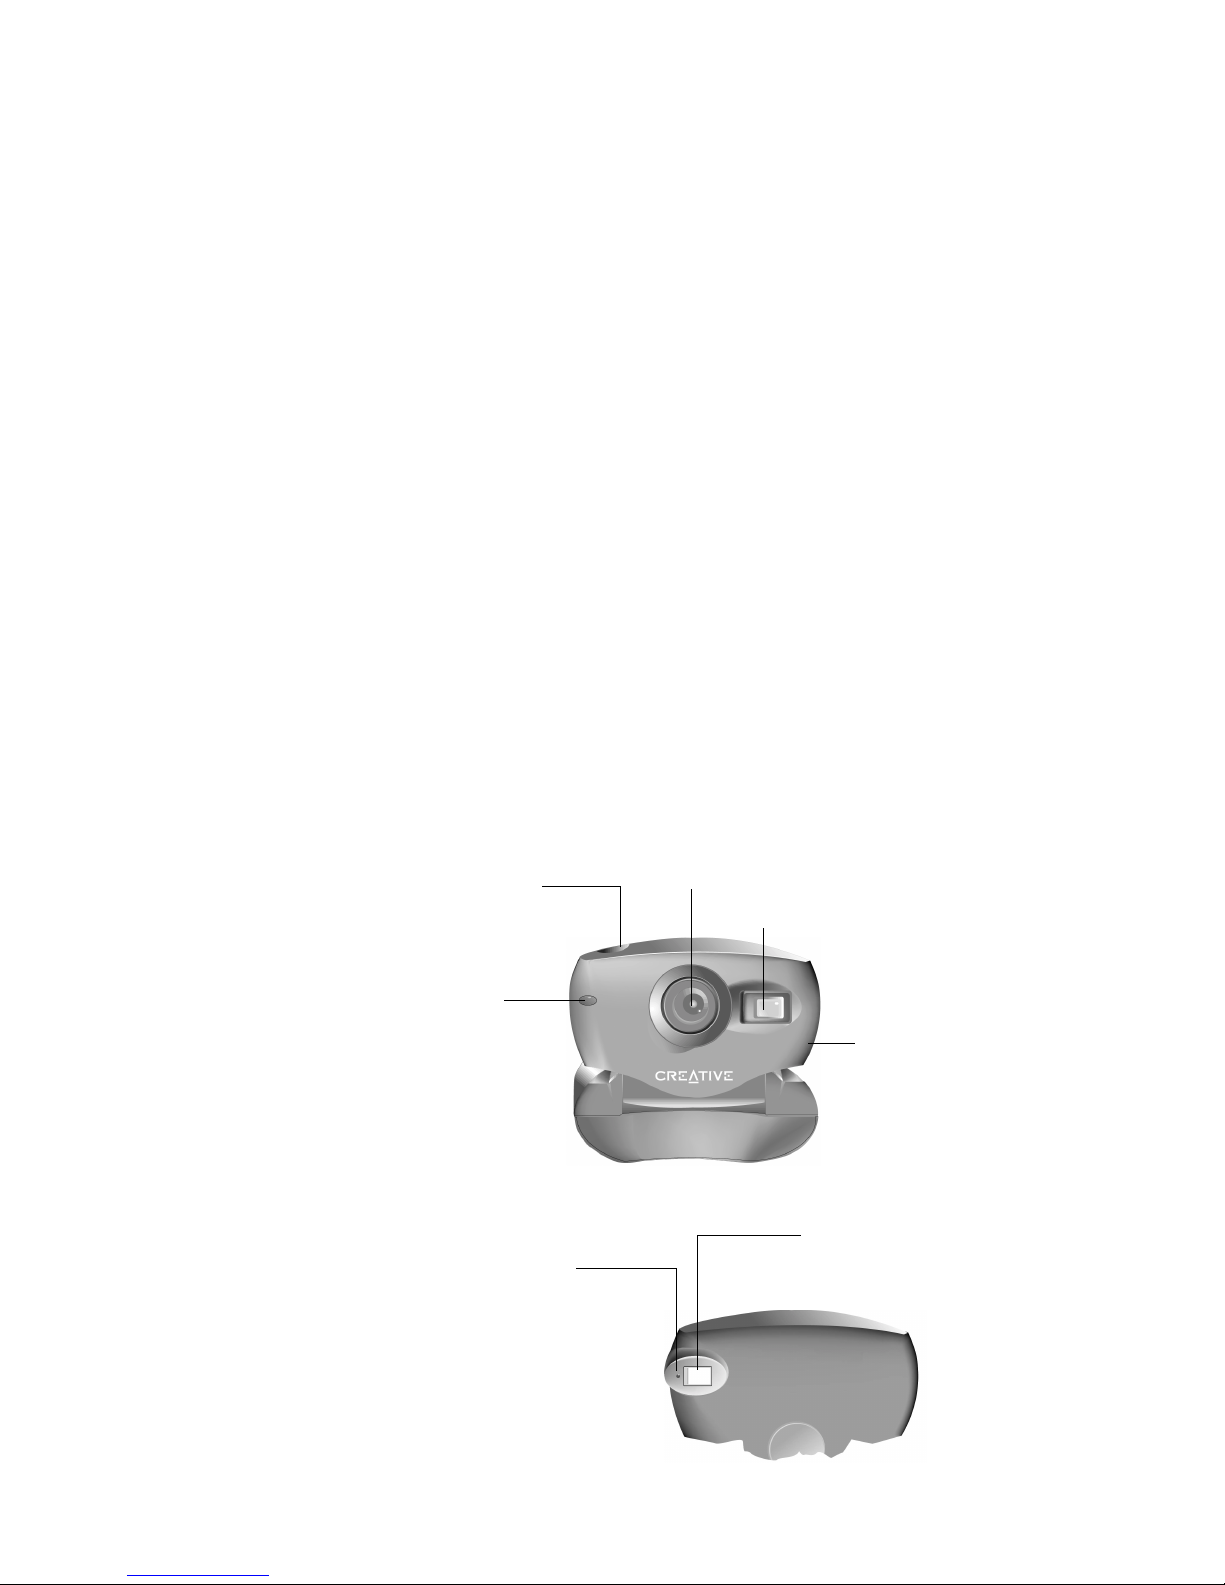
Figure 1-1 shows you the front and back views of the camera.
Figure 1-1: Front and back views of WebCam Go Plus.
LED light
Lights up w h en t he
camera is turned
on.
Snapshot button
After you have st arted
WebCam Go Control,
press this button to
capture a still image.
Viewfinder
Focus-free Lens
Objects m ust be at l eas t 2 f ee t
(61cm) from the lens for the
images to be sharp.
Front view
Back view
Viewfinder (back view)
When taking snapshots with the camera
disconnected, use this to verify that the
object of your snapshot is in view.
Camera busy LED indicator
When the camera is connected to the
system, this indicator blinks when
commands are sent from the system to
the camera.
When the camera is disconnected, this
indicator blinks briefly after you press and
release the Snapshot button. At this point,
do not shake the camera. The indicator
will remain lit for a while. When the
indicator is turned off, you can take
another snapshot.
Built-in Microphone fo r
annotation recording
Press the Audio Record
button near the LCD
display to recor d your
voice or sounds.
Page 16
Installing WebCam Go Plus 1-3
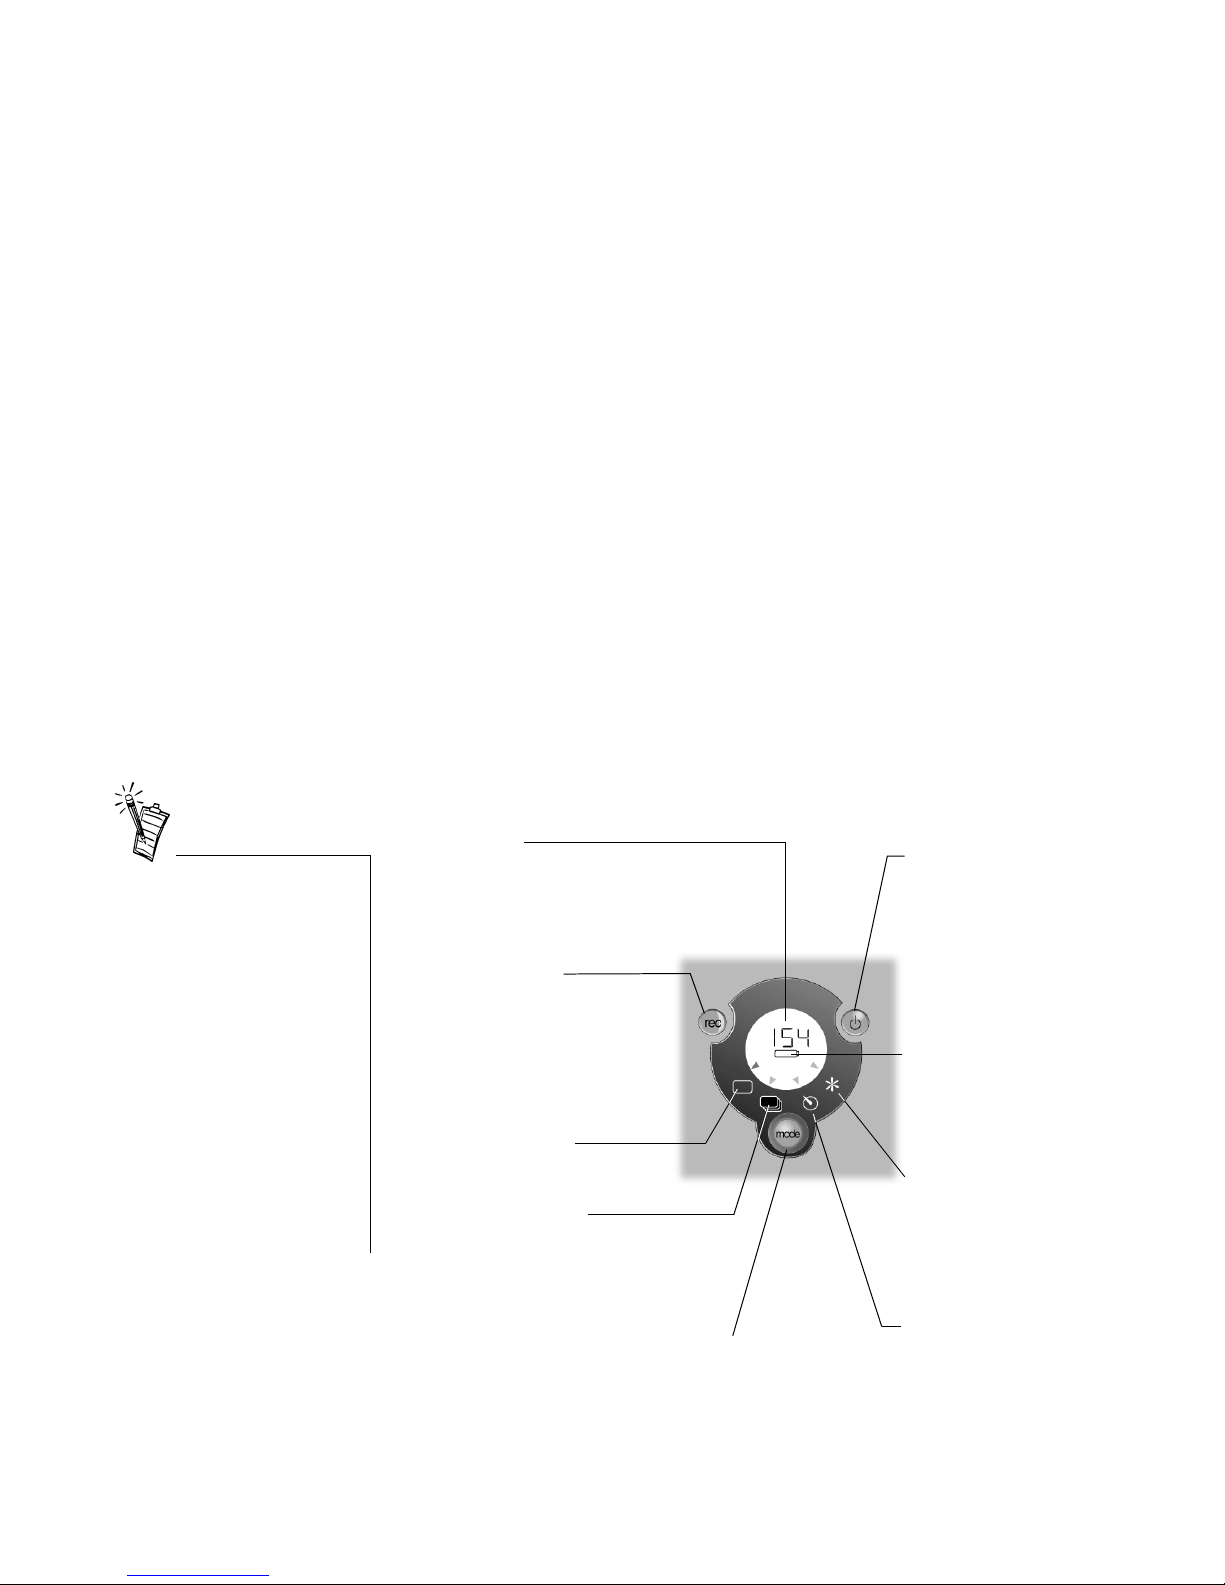
Figure 1-2 shows the buttons and LCD display on the camera.
• To view pictures that you have
taken while using the camera
on-the-go, you must connect
the camera to the computer
and download the pictures
using WebCam Go Control.
• As JPEG compresses an image
according to its details, colours
and compression ratio, the file
size varies according to the
picture taken.
• The counter value decreases
by one every time a picture is
taken. However, if there is
insufficient m emory, the
counter will drop to zero
immediately.
Figure 1-2: Buttons and LCD display on WebCam Go Plus.
Multiple-Snapshot mode
In this mode, the camera takes a series
of pictures, with a constant interval
between consecutive takes. By default,
the total number of pictures taken is 10
and the int erval is 0.5 seconds.
If the interval is set to zero seconds, a
video is created. You can change this
interval using WebCam Go Control.
Self-timer Multiple-Snapshot mode
In this mode, the camera takes a series of
pictures after a specified length of time,
with a constant interval between
consecutive takes. The default delay time
is eight seconds, the total number of
pictures taken is 10, and the interval is 0.5
seconds.
Single-Snapshot mode
In this mode, the camera captures the
view in one single shot.
Self-timer mode
In this mode, the camera takes a picture
after a specified leng th of time. The
default delay time is eight seconds.
Image counter
Shows the remaining number of pictures that
can be taken with the camera undocked.
When the counter reaches “000”, you cannot
take any more pictures until you have cleared the
camera’s memory by downloading or removing
the existing pictures.
Audio Record button
Press and release to start recording
your voice or sounds. The displayed
counter shows the remaining time left to
do audio recording.
Press again to stop recording.
Note:
Just position the camera near the
sound source. You need not position it
directly at the microphone.
On/Off button
To turn on the camera, press this button.
Y ou can only turn it on when the camera is
disconnected from the system.
To turn off the camera, press and hold for
two seconds.
Note:
The camera will turn itself off if it is
left idle for one minute. This length of time
can be changed by using WebCam Go
Control.
Battery-low indicator
Lights up when the battery is running low.
When the battery is low:
i. the idle-timeout is set to 10 seconds;
ii. the Power LED blinks rapidly;
iii. no pictures can be taken.
Mode button
Press to switch to one of the
following four modes of the
camera: single-snapshot mode,
multiple-snapshot mode, selftimer mode or self-timer
multiple-snapshot mode.
Page 17
1-4 Installing WebCam Go Plus
Inserting or
Changing Batteries
For WebCam Go Plus to function as a portable digital camera when it is disconnected from the
computer, you need to insert two 1.5 V “AAA” alkaline batteries into its battery compartment.
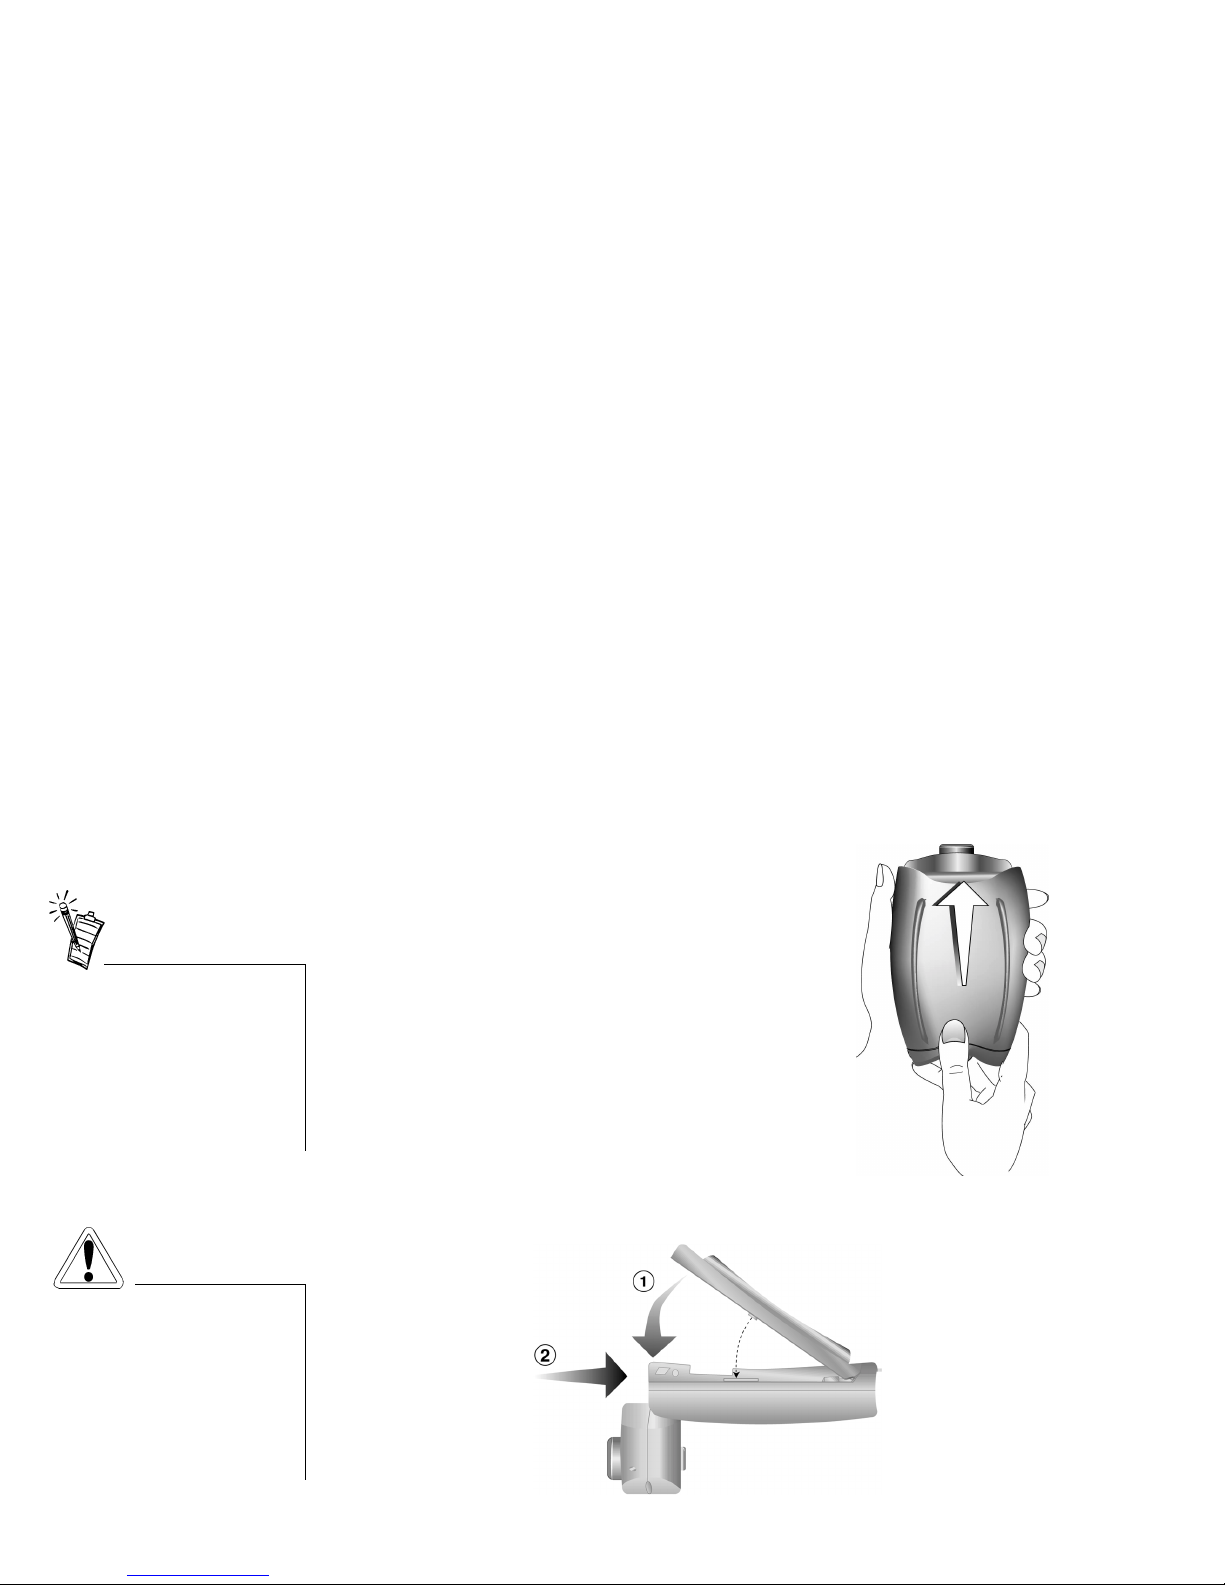
To insert or replace batteries
1. Press the On/Off button to turn off the camera.
2. Flip the camera’s head unit upwards.
3. Hold the camera in one hand and press the bottom
area of the back cover with your thumb until the
catches on the cover are detached from the groo v es.
See Figure 1-3.
4. Push and lift the cover outwards.
5. Remove the old batteries (if any).
6. Insert the new batteries according to the directions
shown in the battery compartment.
7. Align the catches on the cover with the respective
grooves in the casing and slide the cover until it
snaps back into place (see Figure 1-4).
Figure 1-3: Removing the bac k co ver of
the camera.
• No batteries are required when
the camera is connected to the
system.
• If the camera is to be
connected to the system for a
long period of time, remove
the batteries to prevent battery
leakage.
• Make sure that you insert the
batteries in the correct
direction. If not, they may leak
and cause damage to the
camera.
• Do not mix old batteries with
new ones or batteries of
different types together.
Figure 1-4: Slipping the back cover of the camera back into place.
Page 18

Installing WebCam Go Plus 1-5
Installing WebCam
Go Plus
Use the installation procedure for your operating system.
For users of Windows 98 and Windows Millennium, see “In Windows 98 and Windows
Millennium” in the section that follows.
For users of Windows 2000, see “In Windows 2000” on page 1-7.
In Windows 98 and
Windows Millennium
1. Do not connect WebCam Go Plus to your computer before installing the drivers.
If you accidentally begin installation with WebCam Go Plus connected, the Add New
Hardware Wizard dialog box appears.
Click the Cancel button and disconnect WebCam Go Plus from your system.
2. Insert the WebCam Go Plus installation CD into your CD-ROM drive.
3. Click the names of the drivers and applications you want to install on your system.
Page 19
1-6 Installing WebCam Go Plus
4. Follow the instructions on the screen to complete the installation.
You may be asked, after an application is installed, if you want to restart your computer.
Click the No button until all the drivers and applications are installed.
i. If you are prompted to insert the Windows 98 CD, replace the WebCam Go Plus installation CD
with the appropriate CD.
Note: Window s 98 is available in various editions. Be sure to use the correct editi on for your
system.
• The USB port(s) on your
computer may be found on the
front panel instead of the back
panel.
• Y ou can also attach the camera
to a self-powered USB hub.
• You can connect the camera
while the computer is
switched on.
• If you have a microphone,
connect it to the external
microphon e jack of your au dio
card.
• Consult the documenta tion for
your audio card for more
information concerning the
use of a microphone and, in
particular, how to adjust the
volume.
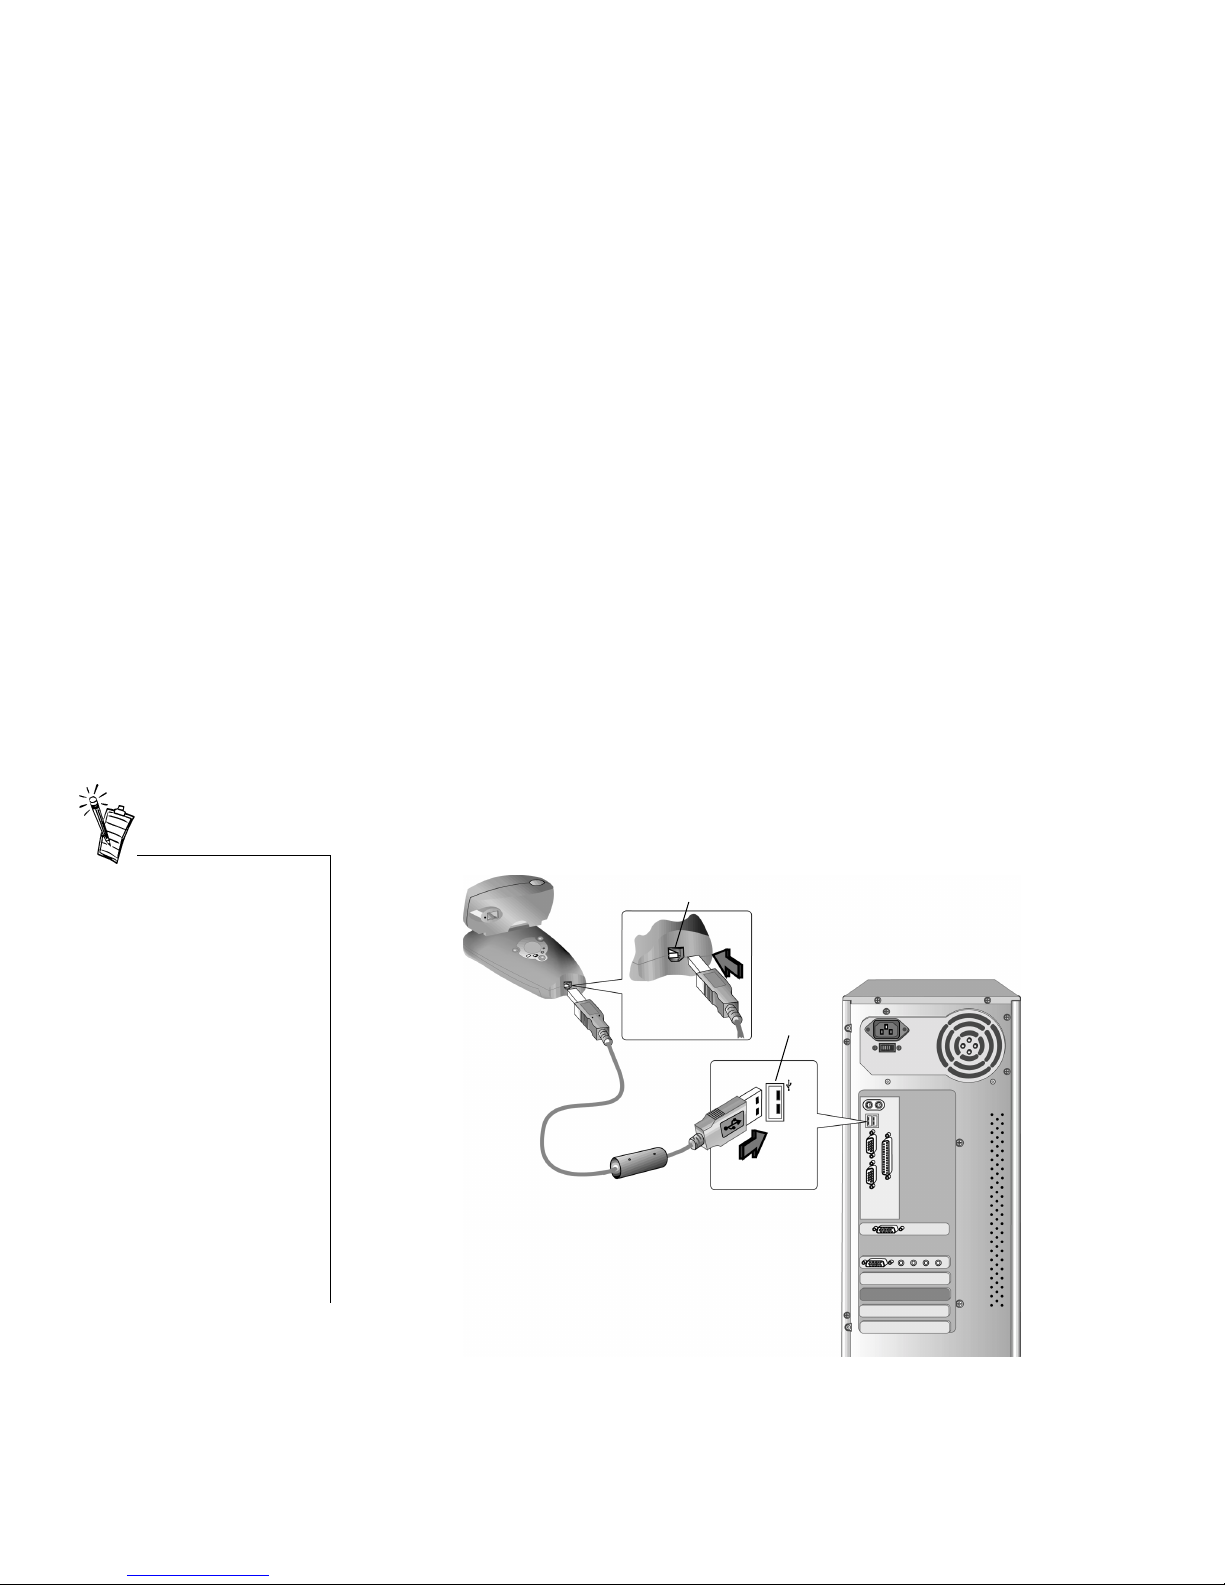
Figure 1-5: Connecting WebCam Go Plus to the computer.
USB port
USB connector
USB cable
Page 20
Installing WebCam Go Plus 1-7
ii. In the Insert Disk dialog box, c lick the OK button.
iii. Follow the instructions on the screen.
5. Restart your comput er.
6. Connect Webcam Go Plus to available USB port.
Verifying the installation
in Windows 98 and
Windows Millennium
1. Right-click the My Computer icon on your desktop.
2. On the menu that appears, click Properties.
3. In the System Properties dialog box, click the Device Manager tab.
4. Click th e plus (+) sign next to the Imaging Device icon.
The entry “Video Blaster WebCam Go Plus (WDM)” should appear.
If the entry does not appear, repeat the installation procedure in “In Windows 98 and
Windows Millennium” on page 1-5.
In Windows 2000 1. Do not connect WebCam Go Plus to your
computer before installing the drivers.
If you accidentally begin installation with
WebCam Go Plus connected, the Found
New Hardware Wizard dialog box
appears. Click the Cancel button and
disconnect WebCam Go Plus from your
system.
2. Insert the W ebCam Go Plus installation CD
into your CD-ROM drive. Choose your
language and proceed to inst all dr ivers and
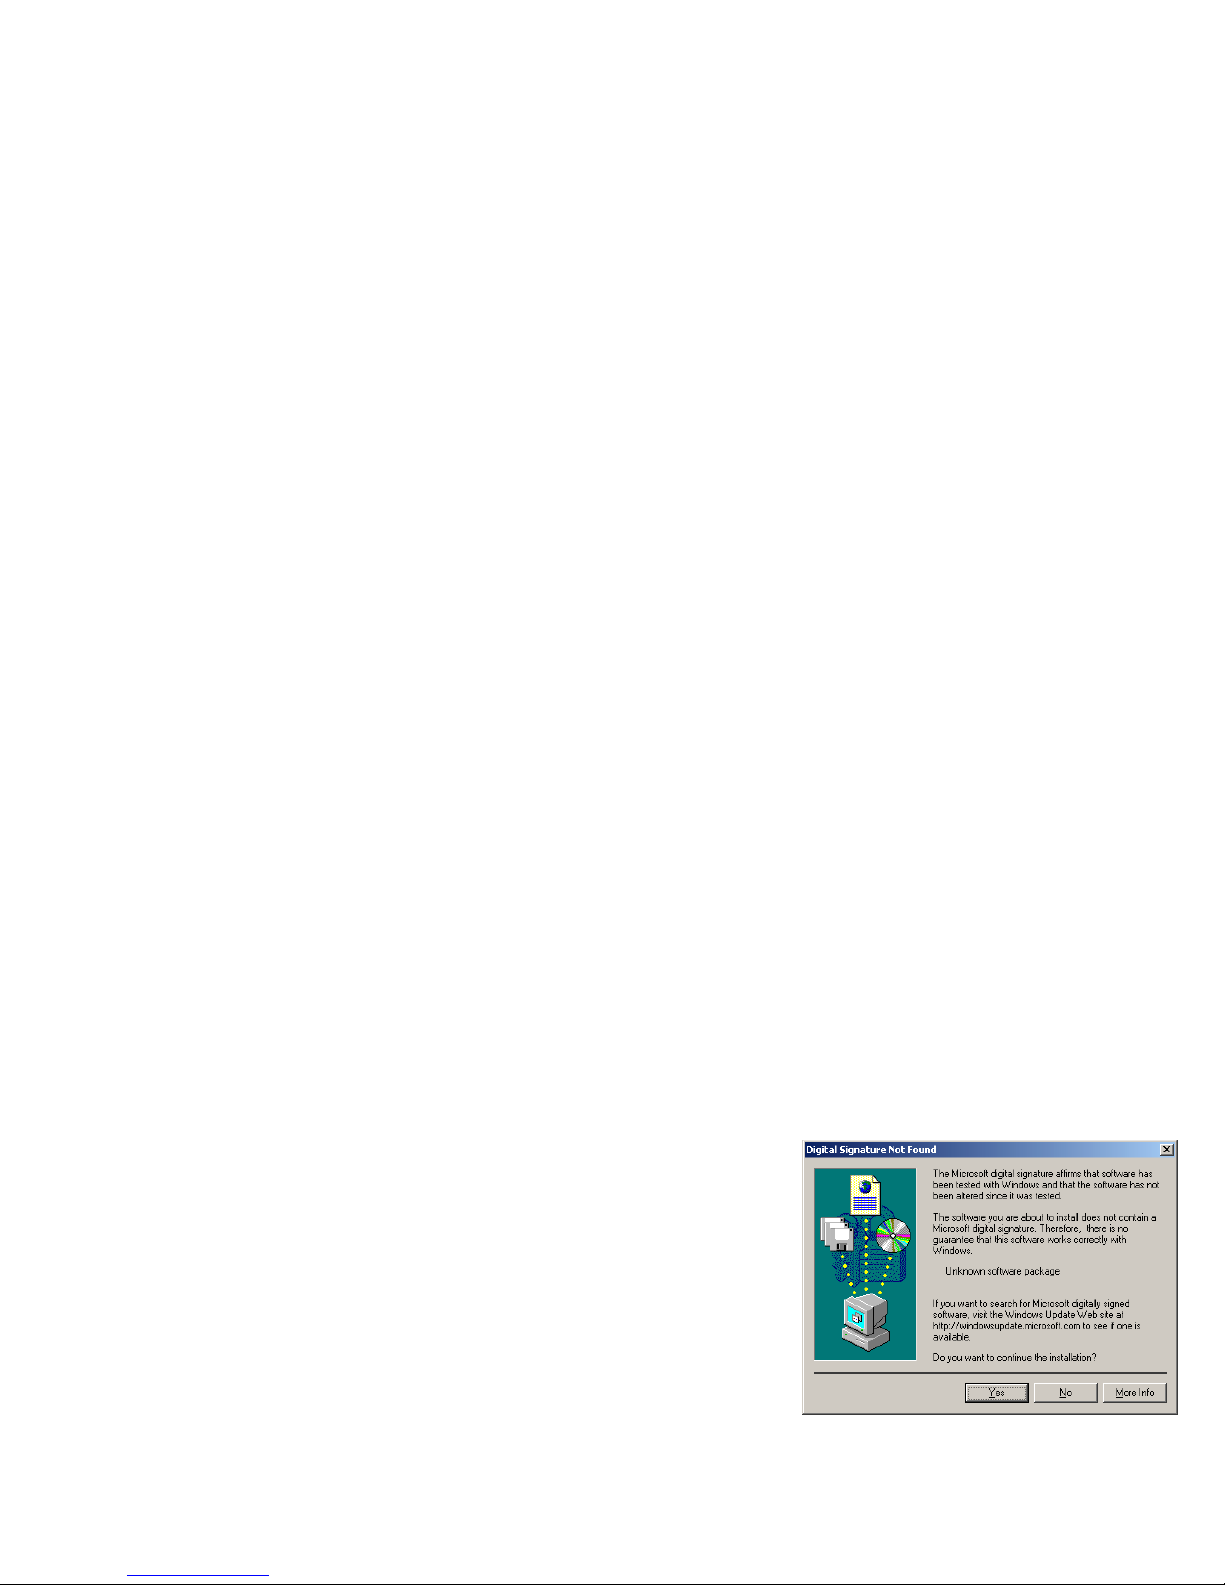
applications. When the Digital Signature
Not Found dialogue box appears, cli ck the
Yes button. You may be asked after an
application is installed if you want to restart
your computer. Click the No button until all drivers and applications are installed.
Figure 1-6: Digital Signature Not Found
dialog box.
Page 21
1-8 Installing WebCam Go Plus
3. Restart your computer.
4. Connect WebCam Go Plus’s USB cable to
an available USB port on your computer
(see Figure 1-5 on page 1-6). Place
WebCam Go Plus on t op of y our computer
monitor or another flat surface.
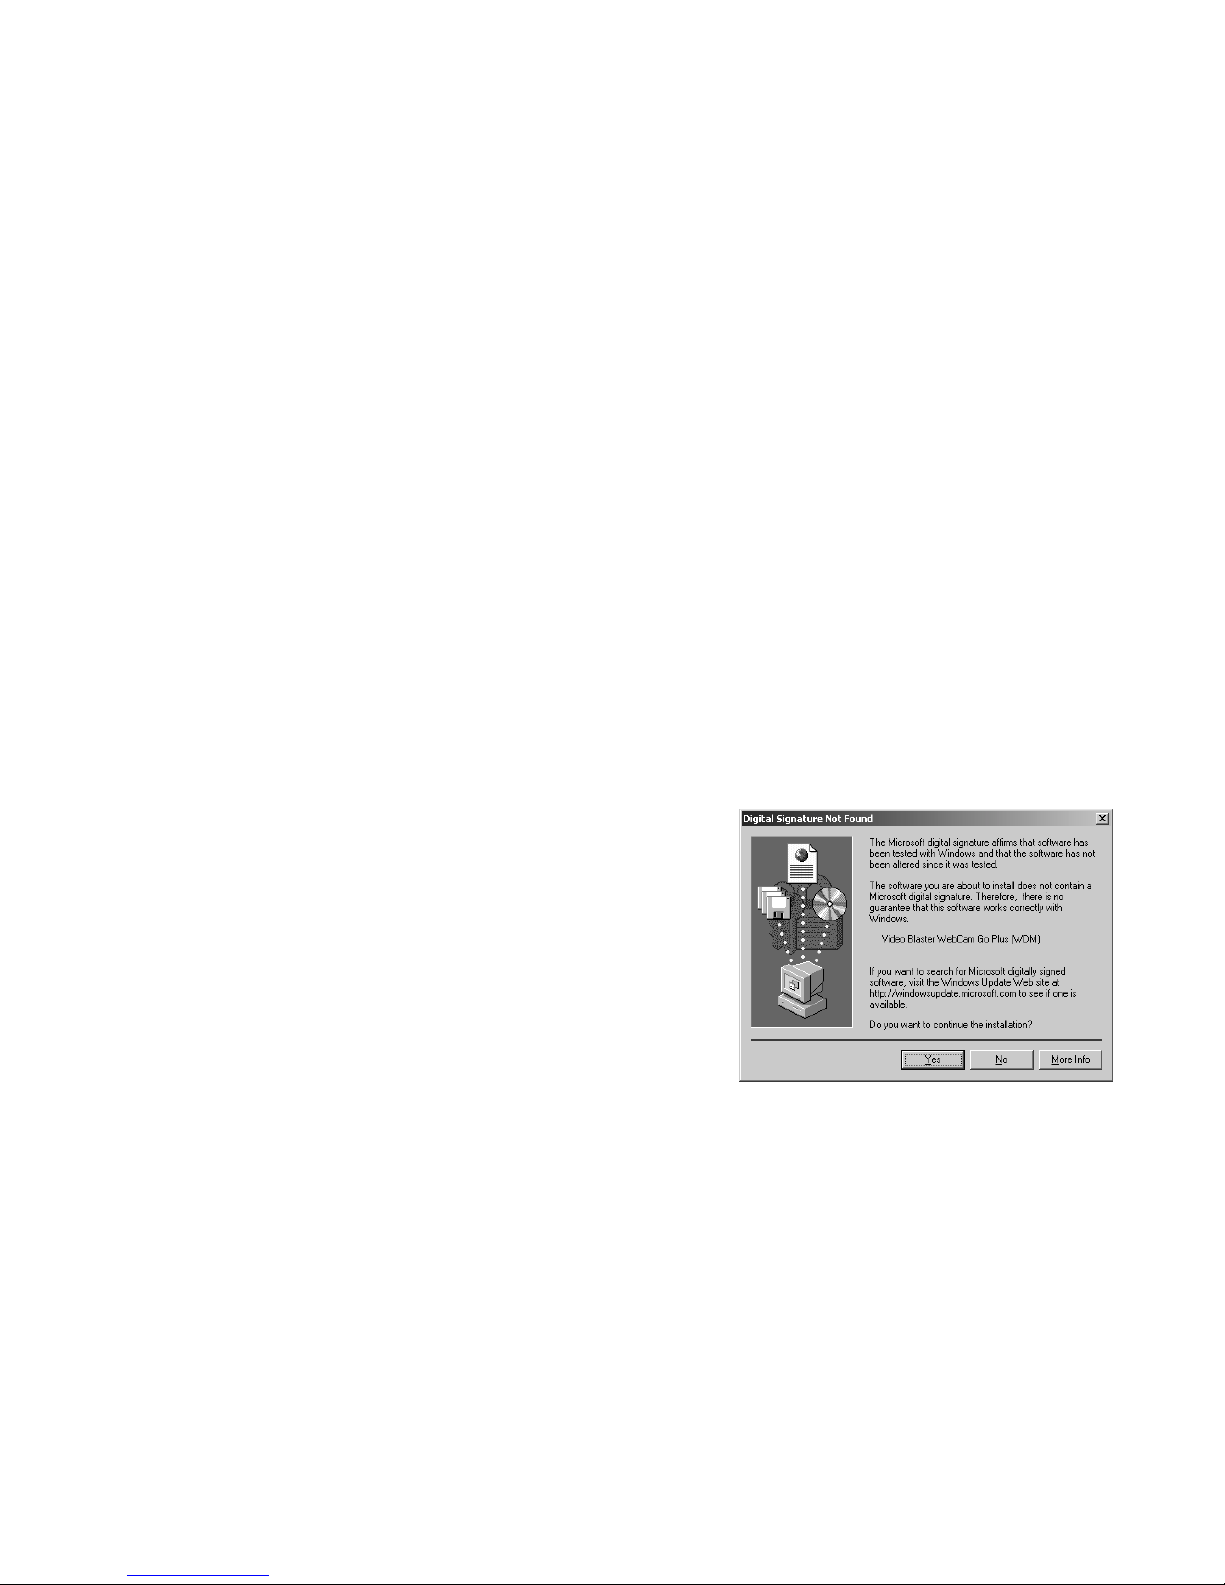
The Digital Signature Not Found dialog
box appears (Figure 1-7) again, telling yo u
that Video Blaster WebCam Go Plus
(WDM) has been detected.
5. Ignore the message and click the Yes
button. Installation will be complete in a
while.
Verifying the installation
in Windows 2000
1. Right-click the My Computer icon on your desktop.
2. On the menu that appears, click Properties.
3. In the System Properties dialog box, click the Hardware tab.
4. Click the Device Manager button. A window appears.
5. Click the plus (+) sign next to the Imaging Device icon.
The entry “Video Blaster WebCam Go Plus (WDM)” should appear.
If the entry does not appear , repeat the installation procedur e in “In Win dows 2000” on p age
1-7.
Figure 1-7: Digital Signature Not Found
dialog box.
Page 22

Using WebCam Go P l us as a Web Camera 2-1
2
Using WebCam Go Plus as a Web Camera
When you connect WebCam Go Plus to the computer, you can use it as a Web camera.
Read the following sections on how you can do that:
❑ Starting WebCam Go Control
❑ Taking a picture
❑ Recording a video clip
❑ Viewing an image in its actual size
❑ Selecting the video capture device
❑ Starting WebCam Go Control Help
Page 23
2-2 Using WebCa m G o Plus as a Web Camera
Starting WebCam
Go Control
WebCam Go Control is an easy-to-use application that enables you to take pictures and record
short videos with the WebCam Go Plus camera. You can also view the pictures and videos,
create and manage albums, and download image files from the camera.
To start WebCam Go Control, do one of the following:
❑ Click Start -> Programs -> Creative -> Video Blaster WebCam ->
WebCam Go Control.
❑ Press the Snapshot button on the camera.
❑ If, during installation, you opted for WebCam Control to launch automatically at Windows
startup, you will have an icon on your taskbar. Click this icon.
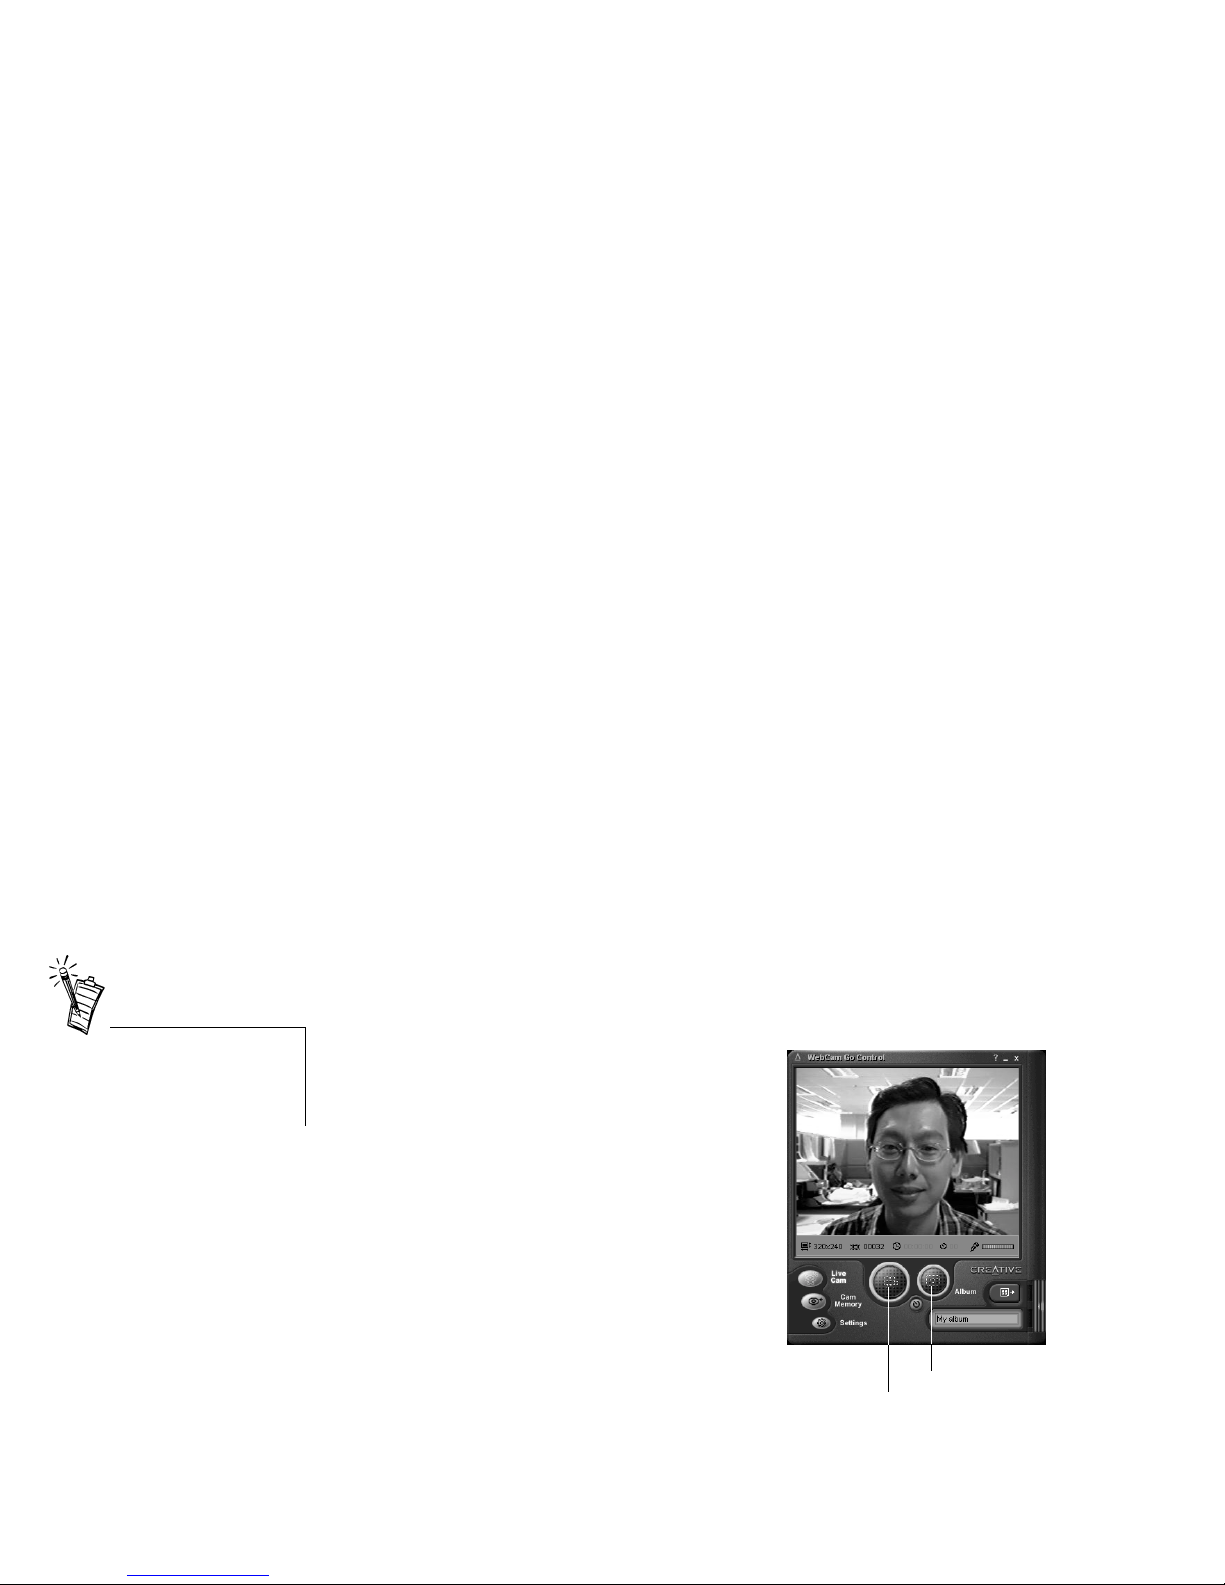
After WebCam Go Control is started, the
W ebCam Go Control screen similar to Figure
2-1 appears, displaying the view that the
camera is capturing currently.
The following sections describe the more
commonly used operations. For more details
on how to use WebCam Go Control, see the
section “Starting W ebCam Go Control Help”
on page 2-4.
If WebCam Go Control does not
recognize the camera correctl y,
see Appendix B,
“Troubleshooting”.
Figure 2-1: WebCam Go Control screen.
Record a video
button
Snap an image
button
Page 24
Using WebCam Go P l us as a Web Camera 2-3
Taking a picture
1. In the WebCam Go Control window, click the Live Cam button.
The current view of the camera is displayed in the Preview window.
2. To capture an image of the preview shown, click the Snap an image button.
You can also press the Snapshot button on the camera.
The image is captured and sa v ed as an image f ile with an automatically generated f ile name.
It is added to the current album, where its name is prefixed with the still image icon .
Recording a video
clip
1. In the WebCam Go Control window, click the Live Cam button.
The window displays the current view of the camera.
2. To start recording a video, click the Record a video button.
The button starts blinking to indicate that recording is now in progress.
3. To stop the recording, click the button again.
The button stop s blinking.
The video is saved as an AVI file with an automatically generated file name.
It is added to the album, where its name is prefixed with the video icon .
Viewing an image in
its actual size
1. Click the Album button.
2. Select the desired album.
3. Double-click the thumbnail of the image that is displayed in the Thumbnail list.
The image is displayed in the Video window, in its actual size.
If you are not satisfied with the result, adjust the appropriate settings in order to get the
desired result, and then capture the image again.
The built-in microphone in the
camera cannot be used to record
audio while the camera is
connected to the computer.
You need to use the microphone
which is connected to the audio
card.
Page 25
2-4 Using WebCa m G o Plus as a Web Camera
Selecting the video
capture device
To do so
1. In WebCam Go Control, click the Settings button.
2. Click the Camera docked settings button.
3. Click the scroll button until you get to the General tab.
4. Click the General tab.
5. In the Video device list box, select the desired video capture device.
The change is applied.
Note: The WDM driver gives better performance in terms of frame rate and is the
recommended choice.
Starting WebCam
Go Control Help
This Help file contains instructions on how to use WebCam Go Control to take pictures and
record short videos. It also teaches you how to chan ge settings so as to achieve op timum quality
for your pictures and videos.
To start the Help file
1. Click the Creative logo at the top left corner of WebCam Go Control’s main window.
2. On the WebCam Go Control menu, click Help.
• If you select the VFW driver,
some of the settings in the
General and Source tab may
not be available. If so, go to
the General tab and click the
Format or Source buttons to
change settings.
• The VFW drive r is compat ible
only with software that
supports Video For Windows.
Page 26

Using WebCam Go Plus as a Digital Camera 3-1
3
Using WebCam Go Plus as a Digital Camera
To use WebCam Go Plus as a portable digital camera, simply disconnect it from the computer.
Note: Remember to insert two 1.5 V “AAA” alkaline batteries into the camera’s battery
compartment.
This chapter provides instructions on the following aspects of using WebCam Go Plus as a
digital camera:
❑ Taking pictures
❑ Recording audio
❑ Downloading pictures and audio from the camera
❑ Customizing camera settings
Page 27
3-2 Using WebCa m G o P l us as a D igital Camer a
Taking pictures
1. Unplug the USB cable from the camera.
2. Press the On/Off button on the camera.
The number of images you can take is shown by the Image counter on the LCD display.
See Figure 1-2 on page 1-3.
3. To change the mode of the camera, press the Mode butt on:
❑ Single snapshot
Select this mode if you want to take single snapshots instantly.
❑ Multiple snapshot
Select this mode if you want to take a series of successive snapshots.
If the interval is set to zero (using WebCam Go Control), a video sequence will be
created.
❑ Self-timer single snapshot
Select this mode if you want a snapshot to be taken after a specified length of time.
You can use this feature to take pictures of yourself.
❑ Self-timer multiple snapshot
Select this mode when you want a series of snapshots to be taken after a specified leng th
of time. You can create an AVI file out of these snapshots.
After pressing the Mode button, the LCD displays one of the following codes which
represents the current video setting for the mode:
• You can only turn on the
camera when it is
disconnected from the syst em.
• The counter value decreases
by one every time a picture is
taken. However, if there is
insufficient memory in the
camera, the counter drops to
“000” immediately.
• When the counter value
reaches “000”, you cannot take
any more pictures until yo u
have cleared the camera’s
memory by deleting existing
pictures.
• The Multiple snapshot mode
consumes more battery power.
• The camera turns i tself o ff if it
is left idle after a specified
amount of time.
Codes Video Setting
1L or 1H 160 x 120, Low/High quality
3L or 3H 320 x 240, Low/High quality
6L, 6H or 6U 640 x 480, Low/High/Uncom pressed quality
Page 28

Using WebCam Go Plus as a Digital Camera 3-3
4. Aim the camera at the desired object, using the camera’ s vie wf inder to ver ify that the object
is in the camera’s view.
Note: The object should be at least 2 feet (61 cm) from the camera.
5. Hold the camera still and press the Snapshot button.
6. Continue holding the camera until the Camera busy LED (red light) goes off.
The picture taken is stored in the camera’s memory, and the image counter value also
decreases.
7. To take another picture, repeat steps 4 through 6.
8. To switch off the camera, press and hold the On/Off button for two seconds.
Recording audio
To start recording voice or sounds, position the camera near the sound source, and then press
and release the Rec (Audio Recording) button on the cam era. The co unter on the LCD display
shows the remaining recording time (in seconds). A blinking dot also appears on the LCD.
To stop the audio recording, press and release the Rec button again.
Note: If you do an audio recording after taking a picture, the audio file will be linked to that
image.
Downloading
pictures and audio
from the camera
After taking pictures, connect the camera to th e computer and then use WebCam Go Control to
download the pictures and audio recordings.
To do so
1. In the WebCam Go Control window, click the Cam Memory button.
A thumbnail view of the pictures and audi o files stored in the camera’s memory is displayed.
2. If the album is not displayed yet, click the Album button to display it.
3. From the Album list, select the album that you want to store the pictures and audio files in.
4. Select the desired files and click the Download selected image(s) button.
Page 29
3-4 Using WebCa m G o P l us as a D igital Camer a
Customizing
camera settings
Use WebCam Go Control to adjust the following camera settings for photo-taking:
❑ Image size
❑ Number of frames in multiple snapshots
❑ Time interval between successive frames for multiple snapshots
❑ Level of quality
❑ Beep mode enabled or disabled
❑ Duration of the delay for taking delayed (self timer) snapshots
❑ Power -s aving enabled or disabled
❑ Length of time before the camera is switched off
You can set different settings of image size and quality for each of the four camera modes.
For more information on
downloading pictures and
customizing the camera, refer to
the Help file in WebCam Go
Control.
Page 30

Technical Specifications A-1
A
Technical Specifications
Features and
Specifications
❑ colour VGA (640 x 480) CMOS image sensor
❑ 8 MB of on-board non-volatile memory for image storage
❑ LCD counter display to indicate number of pictures left and mode of stills captured
❑ Snapshot button
❑ LEDs to indicate powered-on state and camera-readiness state
❑ High-quality, focus-free, scratch-resistant glass lens
❑ Built-in optical viewfinder
❑ Built-in Piezo transducer to provide audio cues
❑ Built-in microphone for audio recording
❑ Mode selector for four different modes of still capture
❑ When detached:
• Capable of capturing in excess of 92 (JPEG format) 640 x 480 still pictures
• Images are stored natively in JPEG format
• Draws power from two “AAA” batteries
(Note: Battery life in this mode depends on the battery type.
Two “AAA” alkaline batteries can last for up to 300 snapshots.)
• Auto shut off after a specified length of idle time (software-configurable)
Page 31

A-2 Technical Specifications
❑ When attached:
• Captures video at up to 30 frames per second at resolutions of 352 x 288, 320 x 240,
176 x 144 and 160 x 120 and up to 15 frames per second at 640 x 480
• Captures still images in 24-bit colour at all resolutions up to 640 x 480
❑ Attaches to the PC via the Universal Serial Bus (USB) port
Driver and Operating
System Compatibility
❑ USB model supports Windows 98, Windows Millennium and Windows 2000
❑ WDM MiniDriver for DirectShow, and Video For Windows compatibility.
❑ TWAIN support
❑ Standard interface works with virtually all camera applications including Microsoft
NetMeeting.
❑ Microsoft Still Image (STI) support
Power
From USB port or self-powered USB hub (powered by an external power source).
Sensor
CMOS image sensor
Resolution
(for both Video mode
and Still mode)
❑ 640 x 480
❑ 352 x 288
❑ 320 x 240
❑ 176 x 144
❑ 160 x 120
Resolution
(for Undocked mode)
❑ 640 x 480
❑ 320 x 240
❑ 160 x 120
Sensitivity
6 lux
Page 32

Technical Specifications A-3
Video formats
❑ 24- and 16-bit RGB
❑ 4:2:0 YUV Planar
❑ JPEG
Exposure control
Automatic (optional manual control with software)
colour balance
Automatic (optional manual control with software)
Colour matrix
Preset and integral to camera
Field-of-view
52 degrees (horizont al)
Depth-of-field
2 feet (61 centimeters) to infinity
Port compatibility
Universal Serial Bus port
Page 33

Troubleshooting B-1
B
Troubleshooting
Problem Installing
Software
The setup program for WebCam Go Plus does not run automatically after you insert the
installation CD into the drive.
Cause The AutoPlay feature in your Windows system may not be enabled.
Solution To install the software from the CD:
1. Leave the installation CD in the CD-ROM drive.
2. Click Start -> Run.
3. In the Run dialog box, click D:\CTRUN\CTRUN.EXE.
4. Follow the instructions on the screen to complete the installation.
Problems Using
WebCam Go Plus
There is no USB port available to connect the USB cable.
Solution Do one of the following:
❑ Unplug the device currently connected to the USB port.
❑ Add a self-powered USB hub.
❑ Add a PCI USB card.
Page 34

B-2 Troubleshooting
An application reports that th e video driv er is already in use, or that the camera can not be
found.
Solution Do the following:
❑ The camera is not properly connected. T o resolve this problem, ensure that the
camera’s USB connector is inserted, and that the USB host controller is
enabled in the BIOS. Refer to your PC’s documentation for information on
the BIOS.
❑ Reinstall the video capture drivers and reboot.
The image is too bright e ven thoug h e xposure and brightness lev els ha ve been adjusted.
Cause The amount of light entering the camera has exceeded the e xposur e control limit.
There may be a very bright object in the camera’s view.
Solution A void point ing the camera at very brig ht objects (for examp le, sunlight, lights, or
highly reflective surfaces).
Insufficient system reso urces re served for the USB port, causing the sy stem to be unab le
to function.
Cause There are too many devices in the system, causing IRQ problems with the
system’s USB controller.
Solution Do the following:
1. Remove some devices from the system.
2. Restart the system.
The system will automatically re-allocate the resources.
When the camera is con nected to the system, press ing the Snapshot butto n does not start
an application.
Cause The application to be activated has not been pre-selected.
Page 35
Troubleshooting B-3
Solution Do the following:
1. Click Start -> Settings -> Control Panel.
2. In the Control Panel window, double-click the Scanners & Cameras icon.
The Scanners & Cameras Properties dialog box appears.
3. On the Devices tabbed page, select the entry Video Blaster WebCam Go
Plus (WDM) and then click the Properties button.
4. In the Video Blaster WebCam Go Plus (WDM) Properties dialog box, click
the Events tab.
5. On the Events tabbed page, ensure that the Disable de vice ev ents check box
is not selected.
6. In the Camera events list, select “Open Application”.
7. In the Send to this application list, select WebCam Go Control and/or other
applications that you want to activate by pressing the Snapshot button.
8. Ensure that you have selected an application for taking pictures.
See the following problem description and solution.
When the camera is c onnected to the syste m, pressing the Snapsh ot button does n ot take
a picture after WebCam Go Control is started.
Cause The application for taking pictures has not been selected.
Solution Verify that pressing the Snapshot button starts the correct application.
If it does not, see the solution on page B-2.
To select an application for taking pictures:
1. Do steps 1 through 5 above.
2. In the Camera events list, select “New Picture Captured”.
3. In the Send to this application list, select WebCam Go Control and/or other
applications that you want to use to take a picture.
If you select more than one
application, yo u will be prom pted
to choose one of them when you
press the Snapshot button.
If a selected application is
already running, pressing the
Snapshot button will n ot start an y
other applications. Instead, the
current running application will
be used to take a picture.
Page 36

Note on USB Compatibility C-1
C
Note on USB Compatibility
While testing WebCam Go Plus on PC motherboards with integrated Universal Serial Bus
(USB) ports, we encountered a small number of motherboards that do not meet the USB
specification exactly. These and other non-USB-compliant motherboards may not operate
correctly with WebCam Go Plus. Fortunately, the manufacturers of some of these
motherboards have released new versions of motherboards or BIOS to address the problem.
If the setup program warns you that your motherboard’s USB port is incompatible, or if the
camera does not work on you r s ys tem and you suspect that the prob le m may be rel at ed to your
PC’s USB port, the following is a list of available options:
1. Contact your PC vendor.
Your PC vendor may be able to upgrade your motherboard or its BIOS to a newer version
that addresses USB incompatibilities.
2. Use a PCI host adapter which provides USB connectors.
If you are not able to upgrad e you r mot h erbo ard or its BIOS, we recommend this approach.
3. Attach the WebCam Go Plus to a powered USB hub.
Some USB devices (such as monit ors) also operat e as po wered USB hu bs; you can al so b uy
dedicated power ed USB hubs which are to be attached to your PC’s USB port. However , in
some cases, attaching a powered USB hub to a non-USB-compliant USB motherboard
connector will not solve the problem.
To look for a USB compatible
product, you can visit the product
search page at the official USB
Web site: http://www.usb.org/
app/search/products.
Page 37

Technical Support D-1
D
Technical Support
We are committed t o giving you the best produ ct a s wel l as t he be st tec hnica l su ppor t.
For fast and efficient Technical Support solutions, please use the Creative
Web Support services in the first instance. If your Creative product was
pre-installed in y our computer, your primary source of technical support is
the Personal Computer supplier who provided the system.
The European support area on our web site at www.creative.com is continuously
updated and contains the follo win g:
FAQ: Access the latest information on Creative
products with advice on how to resolve
commonly asked q u estions
Solve Your Own Problem: Enter keywords to search the comprehensive
library of product and technical information
Download Drivers: Quick access to the latest Creative drivers
Library: Find the documents for a wide range of
Creative prod uct s
Before contacting “European
Help Line”, please ensure that
you have read the
‘Troubleshooting’ Appendix.
The Creative web site at
www.creative.com
gives you
access to the latest drivers and
troubleshooting tips.
Page 38

D-2 Technical Support
Email Your Problem: Complete the technical support web form
and submit for a response
Telephone Support: European Telephone Support contact details.
See also European Helpline section in manual
for contact details.
If You Have a
Problem
Please retain all content s including packag ing and proof of purcha se until you are fully
satisfied with product.
If you have a pro blem installing or usi ng your Creati ve product, ple ase use the Creati ve
Web Support and/or Telephone Support services for assistance. Note the following
information for reference should you require technical assistance:
❑
The model and serial number of your Creative product
❑
Error information on the screen and how it came about
❑
Information on the adapter cards which may be causing a conflict
❑
Hardware configuration information such as the base I/O address,
IRQ line, DMA channels used
❑
Motherboard information: BIOS manufacturer/version and chipset manufacturer
❑
T ype and ver sion of your operating system , e.g., DOS 6.0, Windo ws 3.1x, W indo ws
95, Windows 98 or Windows NT
If, after using the Creative support services, you believe your Creative product to be
defective, you should verify the purchase date and the take the appropriate action as
detailed below:
Page 39

Technical Support D-3
Less than 30 days since
date of purchase
Should your store rece ipt indicate that th e product is less than 3 0 days old, you ha ve the
option of retur ning the full prod uct to the dealer/r etailer for a repl acement or credit. The
30-day time period may not apply in all instances, so please check the seller’s
replacement/credit terms.
More than 30 days since
date of purchase
Contact European Technical Support to clarify the natur e of the prob le m and to obtain
details of our r epair retu rns procedure. Cre ativ e Labs requires that all return s for repair /
replacement must first be issued with an authorisation number.
Page 40

D-4 Technical Support
Returning a product
for repair
❑
Contact Technical Support to receive your authorisation number for
repair/replacement of product.
❑
Technical Support will communicate how to return the product in question for
repair/replacement.
❑
You should only return the hardware item in question and return it to the address
detailed by Technical Support. Please retain all software, accessories and the
original packaging.
❑
Please quote the authorisation number clearly on the outside of the packaging
in which you return the hardware item in question.
❑
Upon receipt of the faul ty item, Creati ve Labs wil l process your request and arrange
a return or replacement.
Creative may replace or repair the product with new or re-conditioned parts, and the
faulty parts will become the property of Creative. The warranty period for your
repaired/replace ment ite m is 90 days fr om the dat e of shipmen t from Creat i ve, or wha t
is left on the original item’s warranty, whichever is longer.
T o avoid ta riffs when shipping a product to Creati ve Labs from outside the E.U., you must
complete the relevant customs d ocum ent ation before shipping the product (p lea se a llow
30 days).
Page 41
Technical Support D-5
Limited Warranty
Creative Labs (Ireland) Limited (“Creative”) warrants to you, the original purchaser
only, that the hardware product will be free of defects in materials and workmanship
for a period of two years after the date of purchase, or such other period as may be
expressly specified by Creative or required by applicable law (“Warranty Period”).
Creative’s entire liability and your remedy will be, at Creative’s sole discretion, the
repair or replacement (with the same or similar model) of any hardware or
accompanying item(s) not meeting the “Limited Warranty” explained above that is
returned to Creative’s authorised distributor or dealer during the W arranty Period with
a copy of your receipt.
What this warranty does
not cover
To the maximum extent permitted by applicable law, Creative disclaims all other
warranties and conditions, expressed or implied, including the conditions of quality,
merchantability or fitness for a particular purpose with respect to the use of this
product. Creative also disclaims any obligation to support products for all operating
environments - for example, by ensuring interoperability with future versions of
software or hardware. In no event shall Creative or its licensors be liable for any
indirect, incident al, specia l or consequ ential loss or for an y lost pro fi ts, savi ngs or data
arising from or relati ng to the use of this produc t, e v en if Cre ati v e or its lic ensors ha v e
been advised of the possibility of such loss.
Specifically, this warranty does not cover failures of the product which result from
accident, abuse, misuse, alterations (by persons other than Creative or its authorized
repair agents), moisture, corrosive environments, shipping, high voltage surges, or
abnormal workin g conditi ons. This warra nty does not co ver no rmal wea r and tear. Y ou
are specifically advised to take a backup copy of any software provided with the
Creative product for security purposes.
This warranty gi v e s you s pe cific
legal rights. You may have other
rights which vary from country to
country. Ce rtain limitations in this
warranty are not permitted by the
jurisdiction of some countries, so
some limitations here may not
apply to you.
Page 42

CREA TIVE LABS (IRELAND) L TD.,
T echnical Support Department,
Ballycoolin Business Park, Blanchardstown,
Dublin 15, Ireland.
Fax: +353 1 8205052
United Kingdom
Tel + 44 (0) 870-876 08 76
Germany
Tel + 49 69-66982900
Ireland
Tel +353 1 820 7555
France
Tel + 33 1 55 46 87 77
Spain
Tel +34 (91) 66 25 116
Italy
Tel +39 02 4828 0000
Austria
Tel +43 (01) 589 244 320
Belgium
Tel +32 (02) 7171 198
Denmark
Tel +45 3525 9498
Finland
Tel +358 (09) 2294 3101
Norway
Tel +47 2305 0401
Sweden
Tel +46 (08) 7519 147
Holland
Te l +31 (0) 205040616
Switzerland
Tel +41 (01) 2121 868
Portugal
Tel 800 8 53066
Czech Republic
Tel + 353 1 8066964
Poland
Freephone 00 800 353 1229
Hungary
Freephone 06 800 12222
Russia
Tel + 353 1 8066967
Operating Hours / Heures d’ouverture / Öffnungszei ten / Ore d’ufficio / Horario de oficina / Openingstijden / Horário de abertura
EUROPE
Mon-Fri : Business Hours Sat-Sun & Public Holidays : Closed
Lun. au vend. : Heures de bureau Sam., dim. et jours fériés : Fermé
Mo-Fr : Geschäftszeiten Sa, So & gesetzl. Feiertage : Geschlossen
Lunedì-venerdì : Orario d’ufficio Sa b at o , do me n ic a e fes t i vi : Chiuso
Lunes-Viernes : Horario de oficina Sábados, domingos y festivos : Cerrado
Maandag-Vrijdag : Kantooruren Zat.-Zon. & Nationale Feestdagen : Gesloten
Segunda a sexta-feira : Horário de expediente Sábado, domingo e feriados : Fechado
Internet T o rec eive technical support via the Inter net, please e- mail: support@eur ope.cr eative.com
Web Site www.creative.com
Creative European Help Line
 Loading...