

Page 1
PC-CAM 930 Slim.book Page 0 Monday, February 14, 2005 11:42 AM
Information in this document is subject to change without notice and does not represent a commitment on the part of Creative
Technology Ltd. No part of this manual may be r eproduced or transmitted in any form or by any means, electronic or mechanical ,
including photocopying and recording, for any purpose without the written permission of Creative Technology Ltd. The software
described in this document is furnished under a license agreement and may be used or copied only in accordance with the terms
of the license agreement. It is against the law to copy the software on any other medium except as specifically allowed in the
license agreement. The licensee may make one copy of the software for backup purposes.
Copyright © 1998-2005 Creative Technology Ltd. All rights reserved.
Version 1.0
February 2005
Sound Blaster and Blaster are registered trademarks of Creative Technology Ltd. in the United States and/or other countries.
Microsoft, and Windows are registered trademarks of Microsoft Corporation. All rights reserved. All other products are trademarks
or registered trademarks of their respective owners.
User’s Guide
Creative PC-CAM 930 Slim
Page 2
PC-CAM 930 Slim.book Page 1 Monday, February 14, 2005 11:42 AM
Page 3
PC-CAM 930 Slim.book Page 0 Monday, February 14, 2005 11:42 AM
Contents
Page 4
PC-CAM 930 Slim.book Page 1 Monday, February 14, 2005 11:42 AM
Contents
1 Introduction
Before You Begin ............................................................................................................ 1-1
Package Contents ......................................................................................................................... 1-1
Minimum System Requirements ............................................................................... 1-2
Document Conventions ............................................................................................................. 1-2
2 About Your Camera
About Creative PC-CAM 930 Slim ........................................................................... 2-1
About the Mode button ............................................................................................... 2-3
Using the Functions buttons ..................................................................................................... 2-4
Inserting an SD Memory Card (optional) ............................................................................. 2-5
Turning on Your Camera ............................................................................................. 2-6
3 Using Creative PC-CAM 930 Slim as a Digital
Camera
Turning on your Camera ............................................................................................. 3-1
Taking a Photo ................................................................................................................. 3-1
Previewing a Photo ...................................................................................................................... 3-2
Flash Modes ...................................................................................................................... 3-2
i
Page 5

PC-CAM 930 Slim.book Page 2 Monday, February 14, 2005 11:42 AM
Recording a Video ........................................................................................................... 3-2
Replaying a Recording ........................................................................................................... 3-3
Deleting a Photo or Recording ................................................................................ 3-3
Configuring Your Camera 3-4
Image Settings ................................................................................................................................ 3-4
Quick Settings presets .......................................................................................................... 3-4
General Camera Settings ........................................................................................................... 3-5
4 Installing Creative PC-CAM 930 Slim
Installing your camera .................................................................................................... 4-1
In Windows XP / 2000 / Me / 98 SE ....................................................................................... 4-1
Installing as a PC-CAM ................................................................................................................ 4-2
Installing as a Mass Storage Device ......................................................................................... 4-5
Verifying the installation in Windows XP and Windows 2000 ................................ 4-7
5 Printing from your Creative PC-CAM 930 Slim
Setting up Digital Print Order Format (DPOF) ..................................................... 5-1
Selecting individual photos ......................................................................................................... 5-1
Selecting all photos ....................................................................................................................... 5-2
Adding a date stamp .................................................................................................................... 5-2
Using PictBridge ............................................................................................................... 5-3
Printing selected photos ............................................................................................................. 5-3
Printing all photos ......................................................................................................................... 5-4
ii
Page 6
PC-CAM 930 Slim.book Page 3 Monday, February 14, 2005 11:42 AM
Printing a date stamp ................................................................................................................... 5-4
A Technical Specifications
Dimensions ............................................................................................................................... A-1
Weight ....................................................................................................................................... A-1
Power ......................................................................................................................................... A-1
Sensor ........................................................................................................................................ A-1
LCD Display ............................................................................................................................. A-1
Video Resolution .................................................................................................................... A-1
Still Picture Resolution .......................................................................................................... A-1
Focus range .............................................................................................................................. A-1
Focus length ............................................................................................................................. A-1
Self-timer ................................................................................................................................... A-2
File formats ............................................................................................................................... A-2
Exposure control .................................................................................................................... A-2
White balance .......................................................................................................................... A-2
Port compatibility ................................................................................................................... A-2
Storage Media .......................................................................................................................... A-2
Software compatibility .......................................................................................................... A-2
iii
Page 7

PC-CAM 930 Slim.book Page 0 Monday, February 14, 2005 11:42 AM
Introduction
1
Page 8
PC-CAM 930 Slim.book Page 1 Monday, February 14, 2005 11:42 AM
Introduction
Creative PC-CAM 930 Slim is a digital video camera that gives you everything you
need to capture 24-bit still images and video in 16.7 million colors. Not only that, it
Applications
included on your
Installation CD
may vary
depending on
camera model and
region of purchase.
Before You
Begin
Package
Contents
1-1 Introduction
also allows you to communicate face-to-face with others on the Internet!
Creative PC-CAM 930 Slim comes with the following applications:
❑ Presto! VideoWorks 6
❑ Presto! Mr Photo Platinum Edition
Your Creative PC-CAM 930 Slim package contains the following items:
❑ Creative PC-CAM 930 Slim
❑ USB cable
❑ Installation CD
❑ Quick Start leaflet
❑ Soft camera case
❑ 2 x AAA batteries
❑ Wrist strap
Page 9
PC-CAM 930 Slim.book Page 2 Monday, February 14, 2005 11:42 AM
Minimum System
Requirements
Document
Conventions
®
❑ Intel
Pentium® running at 166 MHz
❑ 64 MB RAM or higher
❑ 100 MB free hard disk space on a hard disk drive (for installation of all
applications)
❑ Available USB port
❑ Microsoft Windows
❑ CD-ROM drive installed.
For Videoconferencing
❑
Modem or LAN access to the Internet at 56 Kbps or faster
®
XP, Windows 2000, Windows Me or Windows 98 SE
Tip. This tells you about short cuts or hints relating to a
feature.
Note. This highlights additional or important information about
a feature.
Caution! This highlights proper usage of your product. Use this
information to avoid risky situations.
Warning! This warns you of possible hazards to yourself or your
product, that may result in injury or damage.
Introduction 1-2
Page 10
PC-CAM 930 Slim.book Page 3 Monday, February 14, 2005 11:42 AM
1-3 Introduction
Page 11
PC-CAM 930 Slim.book Page 0 Monday, February 14, 2005 11:42 AM
About Your Camera
2
Page 12
PC-CAM 930 Slim.book Page 1 Monday, February 14, 2005 11:42 AM
About Your Camera
About Creative
PC-CAM 930
Slim
2-1 About Your Camera
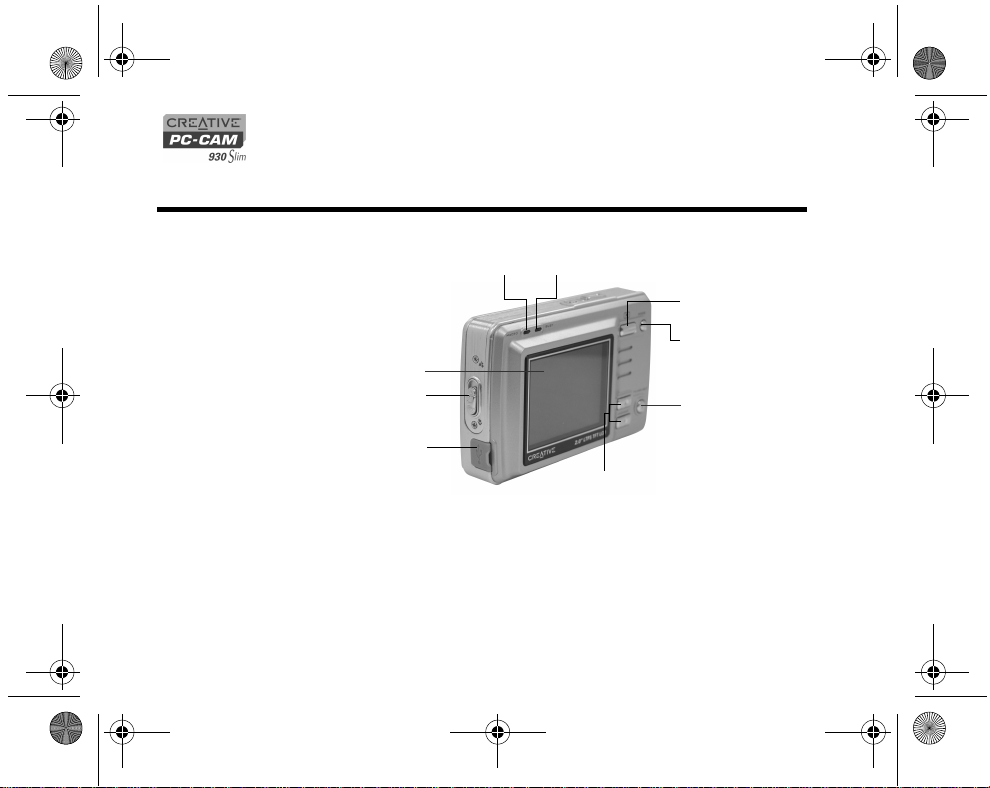
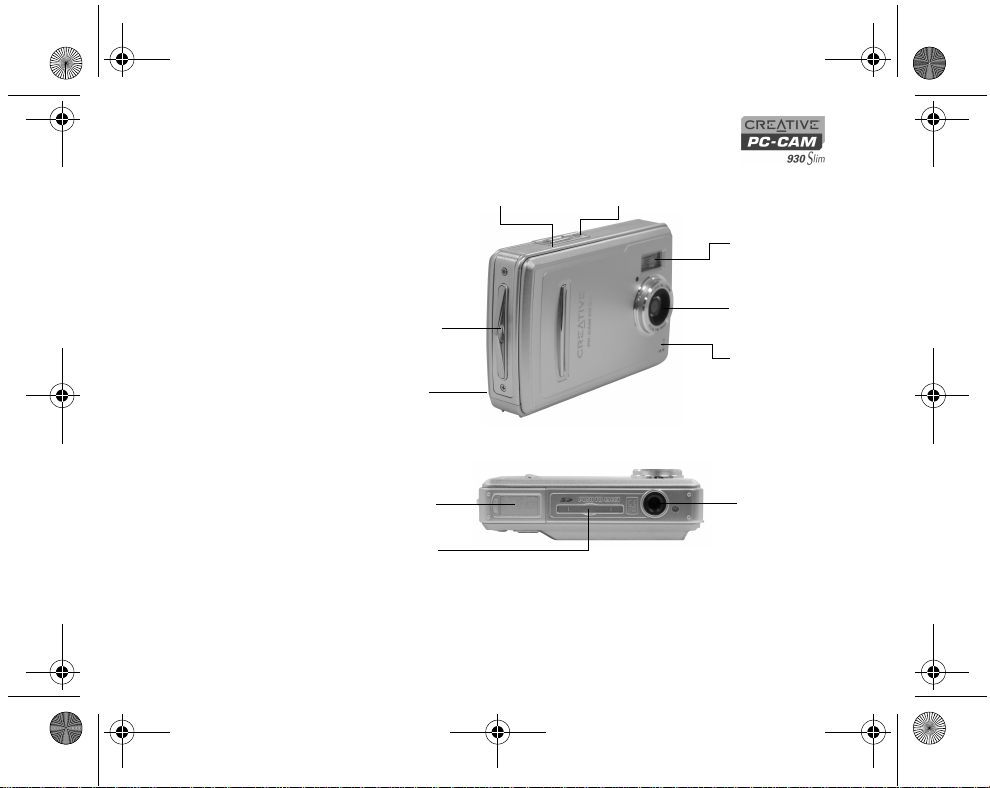
Figure 2-1 and Figure 2-2 highlight the features of Creative PC-CAM 930 Slim.
LCD screen
Standard/
Macro
switch
USB port
cover
Macro LED
Figure 2-1: Creative PC-CAM 930 Slim back view
Busy LED
Function
buttons
Playback button
Mode button
Flash/Set button
Page 13
PC-CAM 930 Slim.book Page 2 Monday, February 14, 2005 11:42 AM
Strap lug
Strap lug
Battery cover
Memory card
slot
Shutter button
Figure 2-2: Creative PC-CAM 930 Slim front and bottom views
Power button
Front View
Bottom View
Flash
Camera
lens
Microphone
Tripod socket
About Your Camera 2-2
Page 14

PC-CAM 930 Slim.book Page 3 Monday, February 14, 2005 11:42 AM
About the Mode
button
2-3 About Your Camera
With your camera’s Mode button, you can access many features of your Creative
PC-CAM 930 Slim:
• Playback mode — view photos and videos with audio streams
• Capture mode — take photos using the camera’s automatic exposure and
white balance settings
• Movie mode — record short videos
• Setup mode — adjust your camera settings
• PC mode — transfer photos and audio/video recordings, or use your
camera as a PC-CAM.
Page 15
PC-CAM 930 Slim.book Page 4 Monday, February 14, 2005 11:42 AM
Using the
Functions
buttons
For more details on
using the Function
buttons with your
Onscreen Display
menu, see "Using
Creative PC-CAM
930 Slim as a Digital
Camera" on page
3-1.
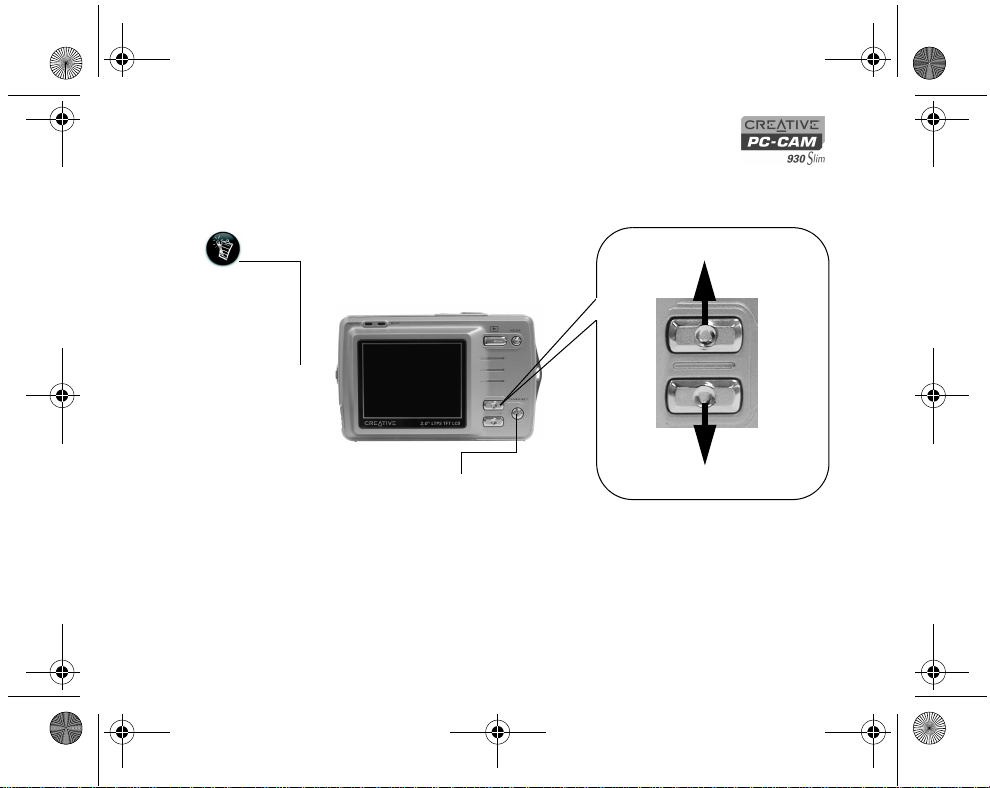
Use the Function buttons to locate options on your Onscreen Display (OSD) menu,
and press the Flash/Set button to select an option.
Up button
Flash/Set button
Figure 2-3: Function buttons
Down button
About Your Camera 2-4
Page 16
PC-CAM 930 Slim.book Page 5 Monday, February 14, 2005 11:42 AM
Inserting an SD
Memory Card
(optional)
• The SD memory
card has a
write-protect
switch to prevent
the accidental
deletion of
valuable data.
This switch is
disabled by
default.
• When the SD card
is protected,
images cannot be
recorded. If you
try to record or
delete an image
with the camera,
the "SD Card
Locked" message
will appear in the
LCD screen.
• To write or erase
data from the SD
memory card,
release the
write-protect
switch.
2-5 About Your Camera
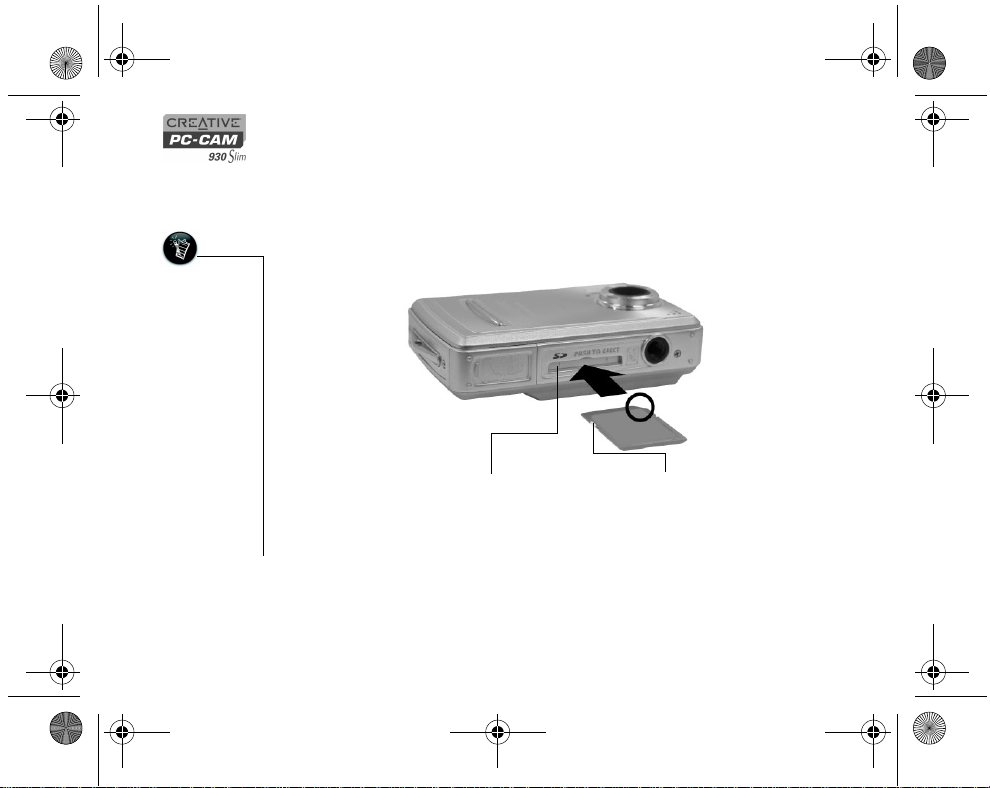
You can purchase a Secure Digital (SD) memory card to extend the image storage
capacity of your camera.
To install your SD card, insert the SD card as shown.
To remove the card, push the card.
SD removable card slot
Figure 2-4: Inserting a Memory card
Write-protect switch
Page 17
PC-CAM 930 Slim.book Page 6 Monday, February 14, 2005 11:42 AM
Turning on Your
Camera
• Be sure to insert
the batteries
according to the
polarity indicated.
If not, the
batteries may leak
and damage your
camera.
• Do not mix old
and new batteries
together.
•To conserve
battery power,
your camera turns
the LCD off if no
operation is made
within 60 seconds.
See "Auto Power
Off" on page 3-5
for more
information.
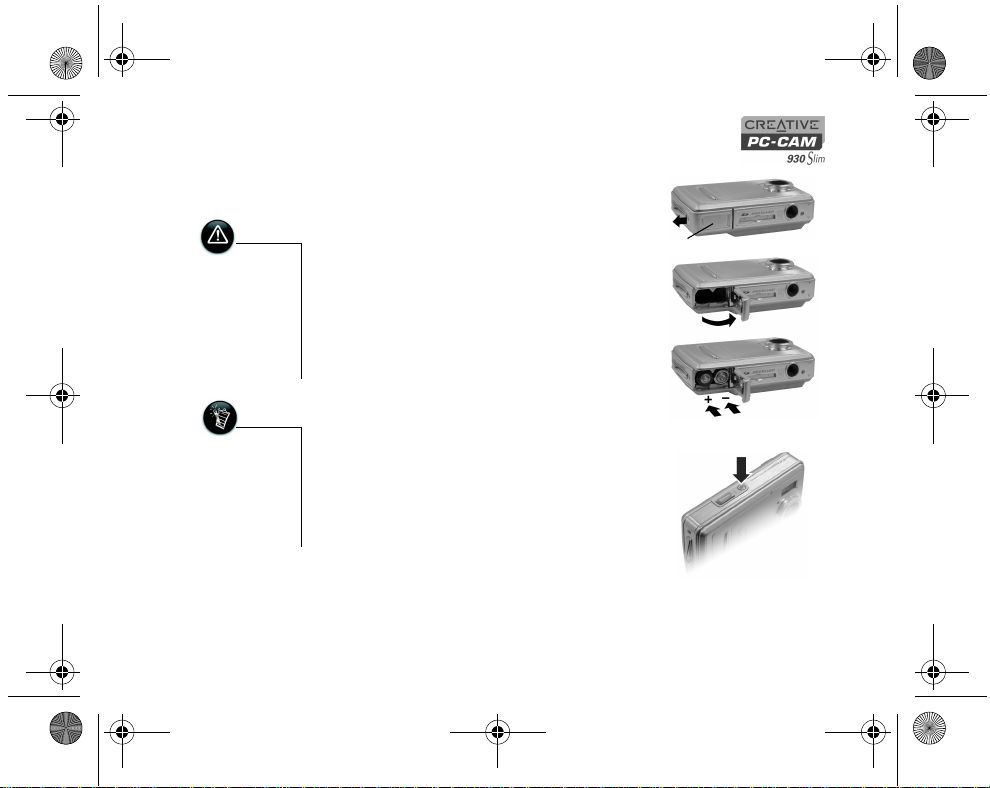
1. Slide and swing open the battery
compartment cover.
2. Insert the batteries according to the + and
- symbols indicated on the inside of the
battery compartment cover (see Figure
2-5).
3. Close the battery compartment cover.
4. Press and hold down the Power button to
turn on your camera.
The LED lights up in red and the LCD
monitor is activated.
The LED turns green.
Battery compartment cover
Figure 2-5: Inserting batteries
Power button
Figure 2-6: Power button
About Your Camera 2-6
Page 18
PC-CAM 930 Slim.book Page 7 Monday, February 14, 2005 11:42 AM
2-7 About Your Camera
Page 19
PC-CAM 930 Slim.book Page 0 Monday, February 14, 2005 11:42 AM
Using Creative PC-CAM 930
3
Slim as a Digital Camera
Page 20
PC-CAM 930 Slim.book Page 1 Monday, February 14, 2005 11:42 AM
Using Creative PC-CAM 930 Slim as a Digital Camera
To use Creative PC-CAM 930 Slim as a portable digital camera, simply disconnect it
from the computer. Use your camera’s default settings in Capture mode to take
photos. For finer control, adjust exposure and white balance settings, see
"Configuring Your Camera" on page 3-4 for more information.
Note: Remember to insert two fresh 1.5 V AAA alkaline batteries into the camera’s
battery compartment.
Tur ning o n you r
Camera
Taking a Photo
• While composing
your picture, use
the Function
buttons to zoom
in and out.
• To take close-up
pictures, move
the Standard /
Macro focus
switch to . The
Macro LED lights
up.
3-1 Using Creative PC-CAM 930 Slim as a Digital Camera
To turn on your camera: press and hold down the Power button on the camera
until the LED turns red.
Taking a photo:
1. Make sure that your camera is not connected to your computer.
2. Press and hold the Power button to turn on your camera.
You are in Record Mode.
For standard pictures, make sure that the Standard / Macro mode switch is
moved toward .
3. Compose your picture and press the Shutter button halfway.
A yellow box appears in the center of the LCD.
4. Fully press the shutter button and release it.
Your camera beeps when you take a picture.
Page 21
PC-CAM 930 Slim.book Page 2 Monday, February 14, 2005 11:42 AM
Previewing a
Photo
Flash Modes
Recording a
Video
Replaying a Recording 1. Press and hold the Mode button.
1. Press and hold the Mode button.
The mode selection menu appears.
2. Use the Function buttons to select the Playback Mode icon.
3. Press the Flash/Set button.
4. Use the Function buttons to locate your picture on the LCD screen.
5. To exit Play Mode, press and hold the Mode button.
In Capture mode , press the Flash/Set button to choose a flash mode:
• Auto flash — the flash is used automatically when required
• No flash — the flash is disabled
1. Make sure that your camera is not connected to your computer.
2. Press and hold the Power button to turn on your camera.
3. Press and hold the Mode button.
The mode selection menu appears.
4. Use the Function buttons to select the Movie Mode icon.
5. Press the Flash/Set button
6. Compose your picture and press the Shutter button to begin recording
The elapsed time, in seconds, is shown at the upper right corner of the LCD.
7. Press the Shutter button again to stop recording.
The mode selection menu appears.
2. Use the Function buttons to select the Playback Mode icon.
3. Press the Flash/Set button.
Using Creative PC-CAM 930 Slim as a Digital Camera 3-2
Page 22
PC-CAM 930 Slim.book Page 3 Monday, February 14, 2005 11:42 AM
4. Use the Function buttons to locate your video recording on the LCD screen.
5. Press the Shutter button to play back the video.
To pause playback, press the Shutter button again.
To continue playback, press the Shutter button once.
6. To stop playback, press one of the Function buttons.
7. To exit Playback Mode, press and hold the Mode button.
Deleting a
Photo or
Recording
• To exit the Delete
menu, press the
Mode button.
3-3 Using Creative PC-CAM 930 Slim as a Digital Camera
1. Press the Playback button.
2. Press the Flash/Set button.
3. Locate the photo or recording you want to delete.
4. Press the Flash/Set button.
The Delete menu appears.
5. Use the Function buttons to select one of the delete options and press the Flash/
Set button.
A delete confirmation appears.
6. Use the Function buttons to select the OK option and press the Flash/Set
button.
The picture or recording is deleted.
Page 23
PC-CAM 930 Slim.book Page 4 Monday, February 14, 2005 11:42 AM
Configuring
Your Cam era
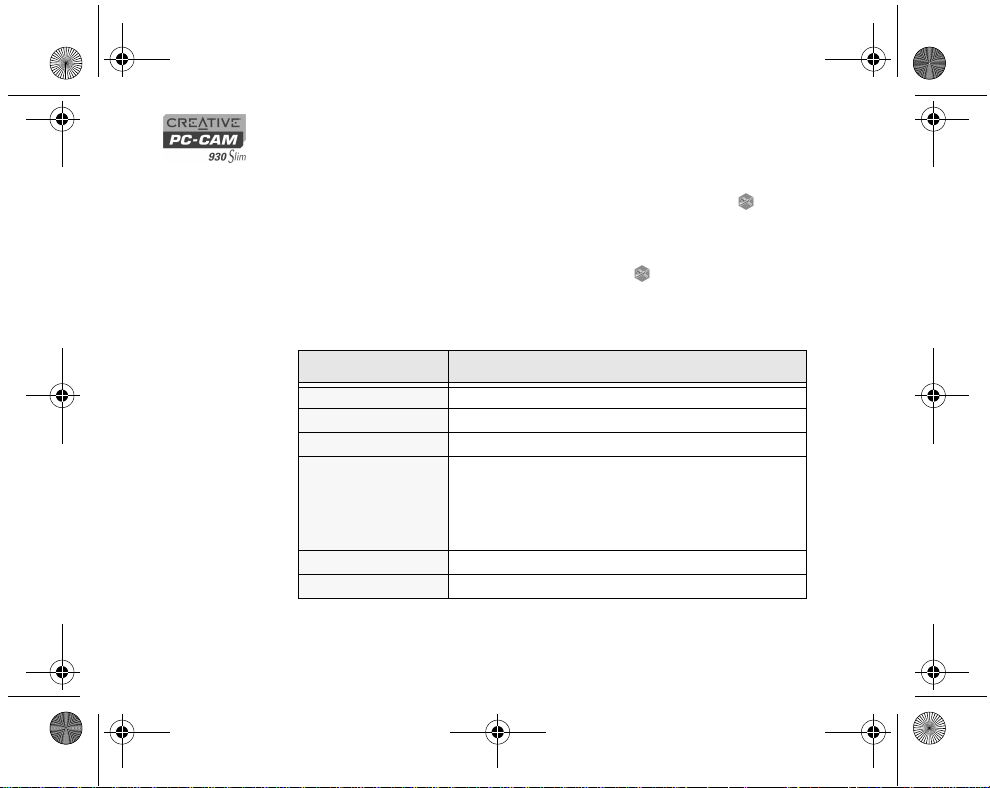
Image Settings You can adjust image resolution, image quality and white balance settings while you
You can change Resolution, Image Quality and White Balance settings in Capture
mode .
capture a photo.
1. Make sure that your camera is in Capture mode icon.
2. Press the Mode button quickly.
A Quick Settings menu appears.
3. Use the “up” Function button to select the preset that you want to apply.
Use the “down” Function button to skip to the next Quick Settings option.
4. Press the Flash/Set button to save the setting.
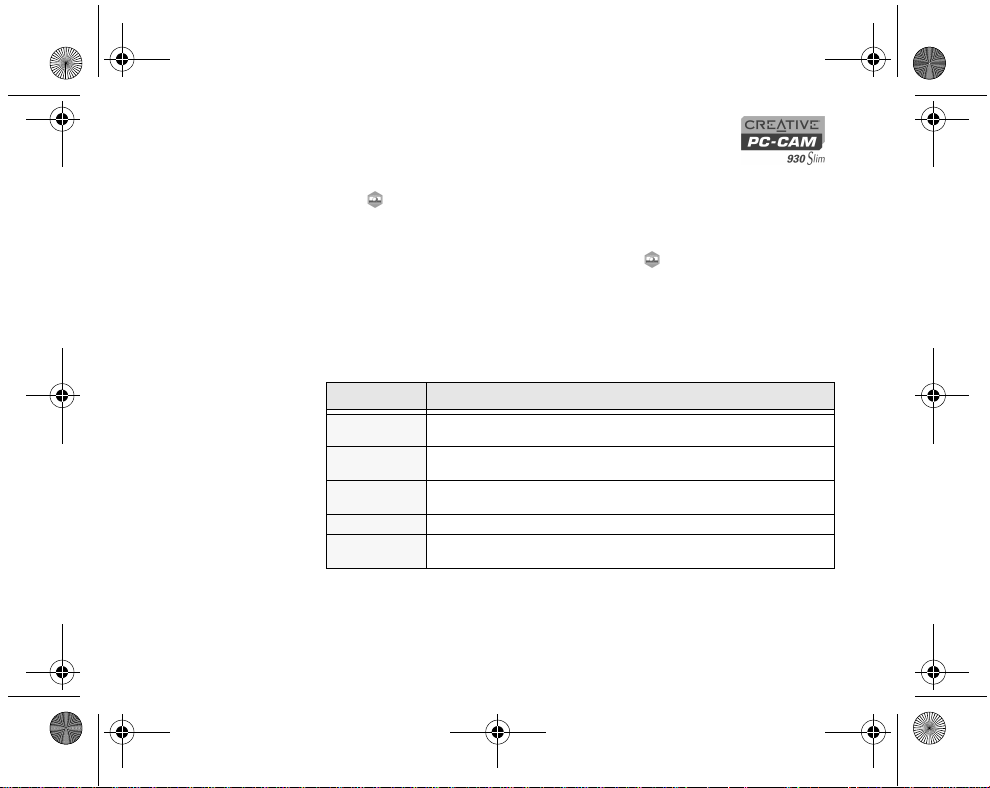
Quick Settings
presets
Preset Options
Image
Resolution
Image
Quality
White
Balance
Timer On, Off
Exposure
Value
1280 x 960, 2048 x 1536, 2592 x 1944, 3264 x 2448
Normal, Fine.
Auto, Sunny, Tungsten, Fluorescent
-2.0 to +2.0
Using Creative PC-CAM 930 Slim as a Digital Camera 3-4
Page 24
PC-CAM 930 Slim.book Page 5 Monday, February 14, 2005 11:42 AM
General Camera
Settings
You can configure how your camera provides date and time, language, formatting,
plus other useful settings. You can access these settings in Setup mode .
1. Make sure that your camera is not connected to your computer.
2. Press and hold the Mode button.
The mode selection menu appears.
3. Use the Function buttons to select the Setup Mode icon.
4. Press the Flash/Set button.
5. Use the Function buttons to select a setting and press the Flash/Set button.
6. Use the Function buttons to adjust a setting.
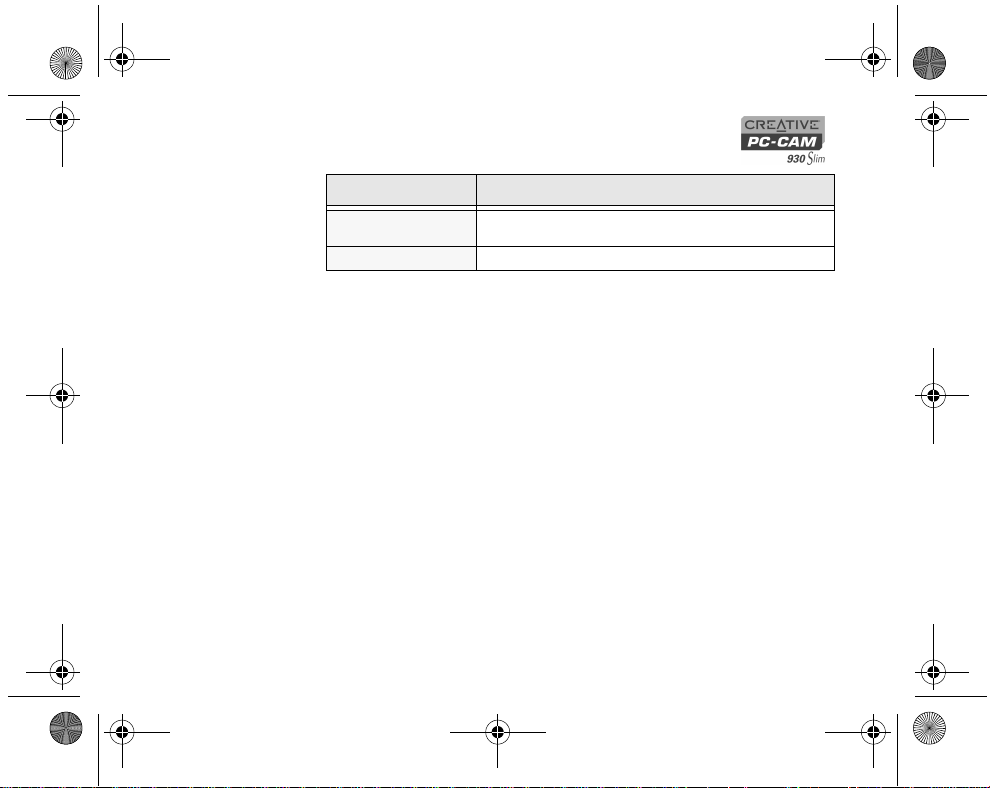
Setting Description
Copy to Card Copy a photo or video file to the media card.
Date and Time Set the date and time
Format Format the inserted media card.
Auto Power Off
Language Set the default OSD display language.
TV Set the TV system you are connecting your camera to.
3-5 Using Creative PC-CAM 930 Slim as a Digital Camera
Set the default idle time before your camera
automatically turns off the LCD. Choose a time
interval or disable power saving.
For all settings except Off, the camera automatically
switches itself off one minute after turning off the
LCD.
Page 25
PC-CAM 930 Slim.book Page 6 Monday, February 14, 2005 11:42 AM
Setting Description
Power Frequency
Default Restore all factory settings.
Set the correct TV frequency type according to your
region’s settings.
Using Creative PC-CAM 930 Slim as a Digital Camera 3-6
Page 26
PC-CAM 930 Slim.book Page 7 Monday, February 14, 2005 11:42 AM
3-7 Using Creative PC-CAM 930 Slim as a Digital Camera
Page 27
PC-CAM 930 Slim.book Page 0 Monday, February 14, 2005 11:42 AM
Installing Creative PC-CAM
4
930 Slim
Page 28
PC-CAM 930 Slim.book Page 1 Monday, February 14, 2005 11:42 AM
Installing Creative PC-CAM 930 Slim
This chapter tells you how to quickly install Creative PC-CAM 930 Slim, as both a
PC-CAM and Mass Storage device, and the software that comes with it.
Installing your
camera
In Windows XP /
2000 / Me / 98 SE
4-1 Installing Creative PC-CAM 930 Slim
Use the installation procedures for your operating system.
1. Do not connect your camera to your computer before installing the drivers.
If you accidentally begin installation with your camera connected, the Add New
Hardware Wizard or Found New Hardware Wizard dialog box may appear.
If you are using Windows 98 or Windows 98 SE, click the Cancel button. For all
other operating systems, follow the instructions on the screen and disconnect
your camera from your computer.
2. Insert the installation CD into your CD-ROM or CD-ROM/DVD-ROM drive. Your
CD should start automatically. If it does not, follow the steps below:
i. Start Windows Explorer.
ii. On the left pane, click the My Computer icon.
iii. Right-click the CD-ROM/DVD-ROM drive icon, and then click AutoPlay.
3. Click the options for installing drivers and applications.
4. Follow the instructions on the screen to complete the installation. You may be
asked, after an application is installed, if you want to restart your computer. Do
not restart your computer until all the drivers and applications are installed.
Page 29
PC-CAM 930 Slim.book Page 2 Monday, February 14, 2005 11:42 AM
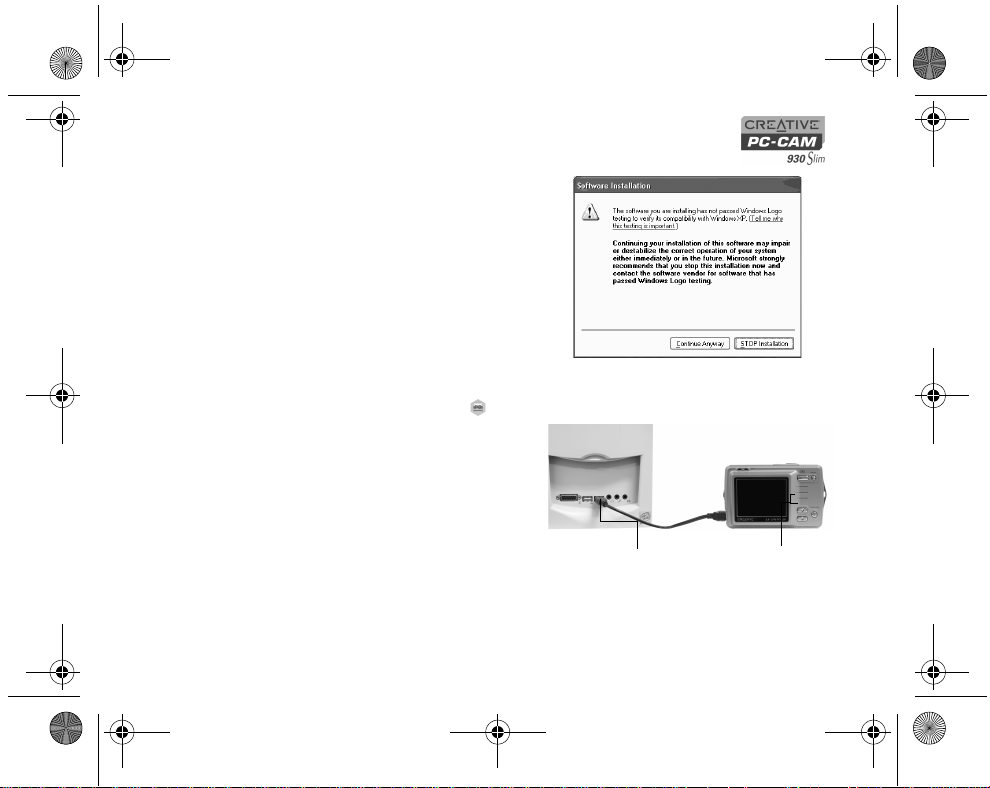
5. If a Software Installation
dialog box appears (Figure
4-1), click the Continue
Anyway button.
6. Press and hold the Mode
button.
The mode selection menu
appears.
Installing as a
PC-CAM
1. Use the Function buttons to
select the PC Mode icon.
A PC Connect menu appears.
2. With a USB cable, connect your
camera to an available USB
port on your computer (Figure
4-2).
Follow the steps below that are for
your operating system.
For Windows XP only
2. Use the Function buttons to
select PC-CAM mode.
Windows loads camera and
video drivers for your camera.
Figure 4-1: Software Installation dialog box
USB connector
Figure 4-2: Connecting your camera to your computer
Installing Creative PC-CAM 930 Slim 4-2
Function
buttons
Page 30
PC-CAM 930 Slim.book Page 3 Monday, February 14, 2005 11:42 AM
3. When the Found New Hardware Wizard dialog boxes appear, select the
Install the software automatically (Recommended) option, and click the
Next button.
4. If a Hardware Installation dialog box appears, click the Continue Anyway
button.
5. Click the Finish button and restart your computer if you are prompted to do so.
For Windows 2000 only
2. Use the Function buttons to select PC-CAM mode.
Windows loads camera and video drivers for your camera.
3. If an Unsafe Removal of Device dialog
box appears, click the OK button.
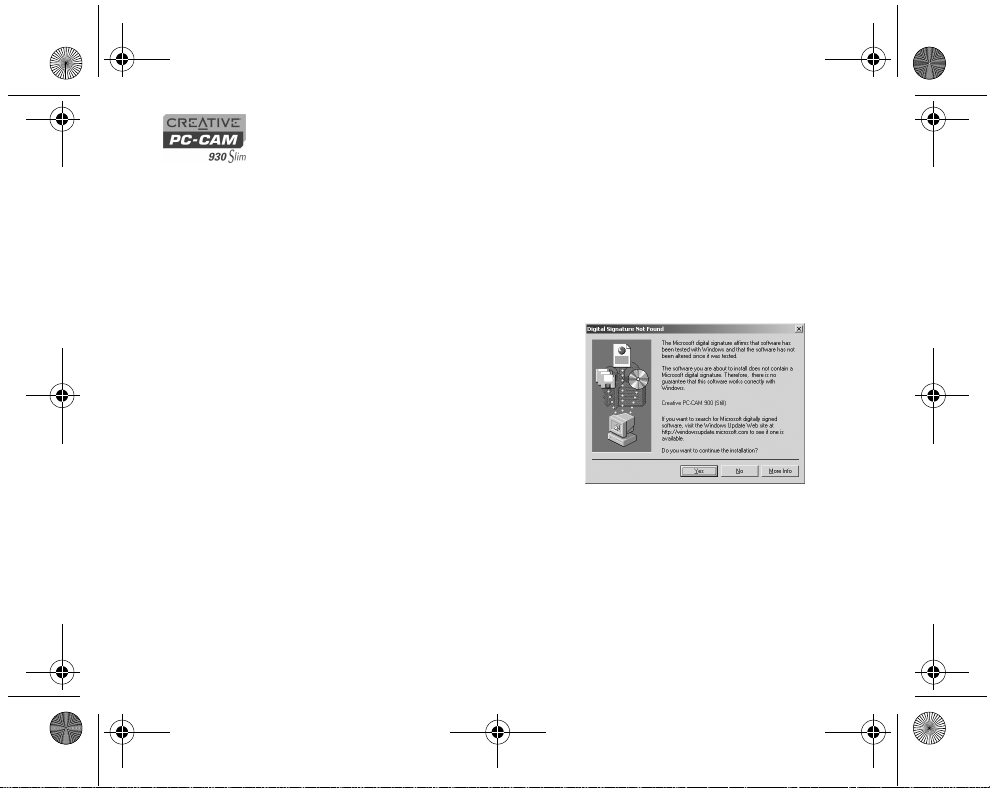
4. When Digital Signature Not Found
dialog boxes (Figure 4-3) appear, telling
you that Creative PC-CAM 930 Slim has
been detected, click the Yes button.
5. Click the Finish button and restart your
computer if you are prompted to do so.
For Windows Me and Windows 98 SE
only
1. If you are prompted to insert the
Windows 98 SE Installation CD, replace
the Creative PC-CAM 930 Slim
Installation CD with the appropriate CD.
If you did not receive a Windows 98 SE installation CD with your computer but
4-3 Installing Creative PC-CAM 930 Slim
Figure 4-3: Digital Signature Not Found
dialog box
Page 31
PC-CAM 930 Slim.book Page 4 Monday, February 14, 2005 11:42 AM
received a Recovery Disk, the necessary Windows files may already be located
at c:\windows\options\cabs (replace c:\ with the drive letter of your hard
disk drive).
Note: Windows 98 is available in various editions. Be sure to use the correct
edition for your system.
2. In the Insert Disk dialog box, click the OK button.
3. When the New Hardware Found message boxes close, wait approximately 5
seconds.
4. Press and hold the Mode button.
The mode selection menu appears.
5. Use the Function buttons to select the PC Mode icon.
6. Use the Function buttons to select PC-CAM mode.
Windows loads camera and video drivers for your camera.
7. If an Unsafe Removal of Device dialog box appears, click the OK button.
8. If Windows starts copying captured images to your computer, click the Cancel
button.
9. Click the Finish button and restart your computer if you are prompted to do so.
Installing as a
Mass Storage
Device
1. Use the Function buttons to select the PC Mode icon.
A PC Connect menu appears.
Installing Creative PC-CAM 930 Slim 4-4
Page 32
PC-CAM 930 Slim.book Page 5 Monday, February 14, 2005 11:42 AM
2. Use the Function buttons to
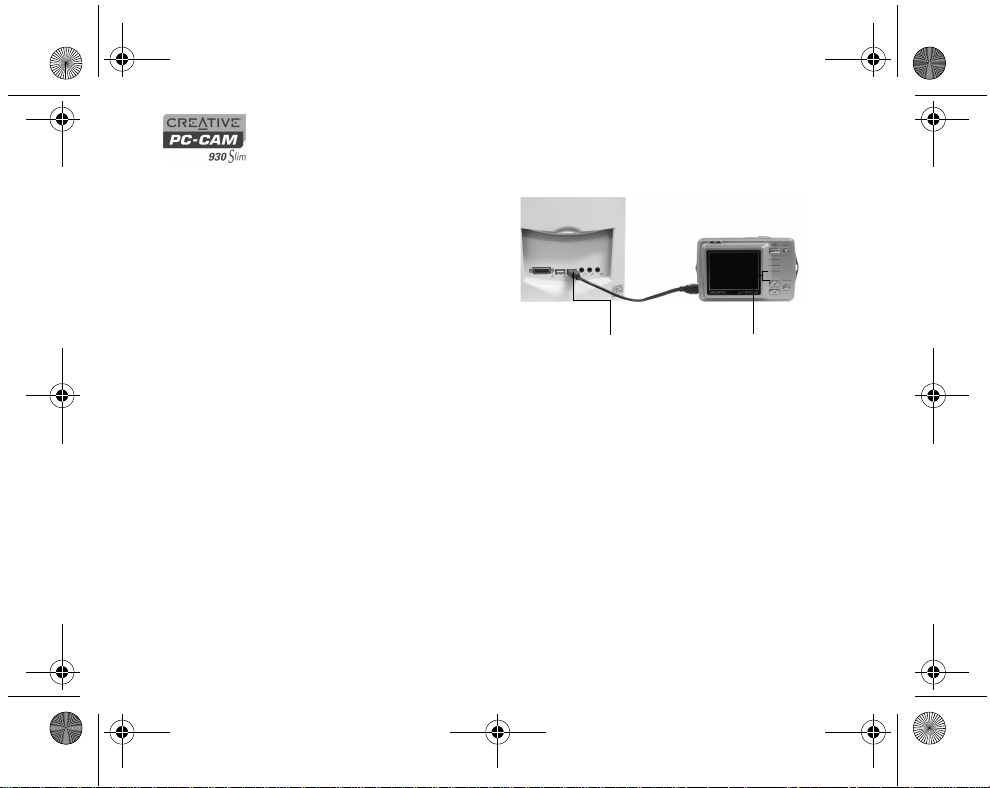
select Mass Storage mode.
3. With a USB cable, connect your
camera to an available USB
port on your computer (Figure
4-4).
4. Use the installation procedures
for your operating system.
For Windows XP only
5. The Found New Hardware
message box appears on your
Windows taskbar, telling you
that Windows has detected
your camera as a USB Mass
Storage Device.
6. After Windows finishes loa ding
USB Mass Storage Device drivers for your camera, close any Removable Disk,
Scanner and Camera, Photo Printing or folder view dialog boxes that appear.
If a slide show appears, press the Esc key on your keyboard to close the slide
show.
7. When a message box appears, displaying the message “Your new hardware is
installed and ready to use.”, wait approximately 5 seconds.
For Windows 2000 only
5. The Found New Hardware message box appears, telling you that Windows is
installing software for a USB Mass Storage Device.
6. When the Found New Hardware message box closes, wait approximately 5
seconds.
4-5 Installing Creative PC-CAM 930 Slim
USB connector
Figure 4-4: Connecting your camera to your computer
Function
buttons
Page 33
PC-CAM 930 Slim.book Page 6 Monday, February 14, 2005 11:42 AM
For Windows Me and Windows 98 SE only
5. If you are prompted to insert the Windows 98 SE Installation CD, replace the
Creative PC-CAM 930 Slim Installation CD with the appropriate CD. If you did
not receive a Windows 98 SE installation CD with your computer but received a
Recovery Disk, the necessary Windows files may already be located at
c:\windows\options\cabs (replace c:\ with the drive letter of your hard disk
drive).
Note: Windows 98 is available in various editions. Be sure to use the correct
edition for your system.
6. In the Insert Disk dialog box, click the OK button.
7. When the New Hardware Found message boxes close, wait approximately 5
seconds.
Installing Creative PC-CAM 930 Slim 4-6
Page 34
PC-CAM 930 Slim.book Page 7 Monday, February 14, 2005 11:42 AM
Verifying the
installation in
Windows XP and
Windows 2000
4-7 Installing Creative PC-CAM 930 Slim
1. Make sure that your camera is PC-CAM mode.
2. Right-click on the My Computer icon on your desktop.
3. On the menu that appears, click Properties.
4. In the System Properties dialog box, click the Hardware tab.
5. Click the Device Manager button. A window appears.
6. Click the plus (+) sign next to the Imaging Device icon.
The entries “Creative PC-CAM 930 Slim” and “Creative PC-CAM 930 Slim #2”
should appear.
Page 35
PC-CAM 930 Slim.book Page 0 Monday, February 14, 2005 11:42 AM
Printing from your Creative
5
PC-CAM 930 Slim
Page 36
PC-CAM 930 Slim.book Page 1 Monday, February 14, 2005 11:42 AM
Printing from your Creative PC-CAM 930 Slim
This chapter tells you how to quickly set up Creative PC-CAM 930 Slim so that you
can order professional digital printing of your photos, or use PictBridge to print
directly to a printer without using a computer.
Setting up
Digital Print
Order Format
(DPOF)
Selecting
individual photos
• DPOF settings are
disabled if no
memory card is
detected in your
camera.
5-1 Printing from your Creative PC-CAM 930 Slim
DPOF settings allow you to select the photos that you wish to send for professional
printing. You can also choose to include the recorded date for each photo.
To select individual photos for DPOF:
1. Press and hold the Mode button.
The mode selection menu appears.
2. Use the Function buttons to select the Playback Mode icon.
3. Press the Flash/Set button.
A menu appears.
4. Press the "up" Function button to select
the DPOF settings menu.
5. Press the down button to select the Set
One option.
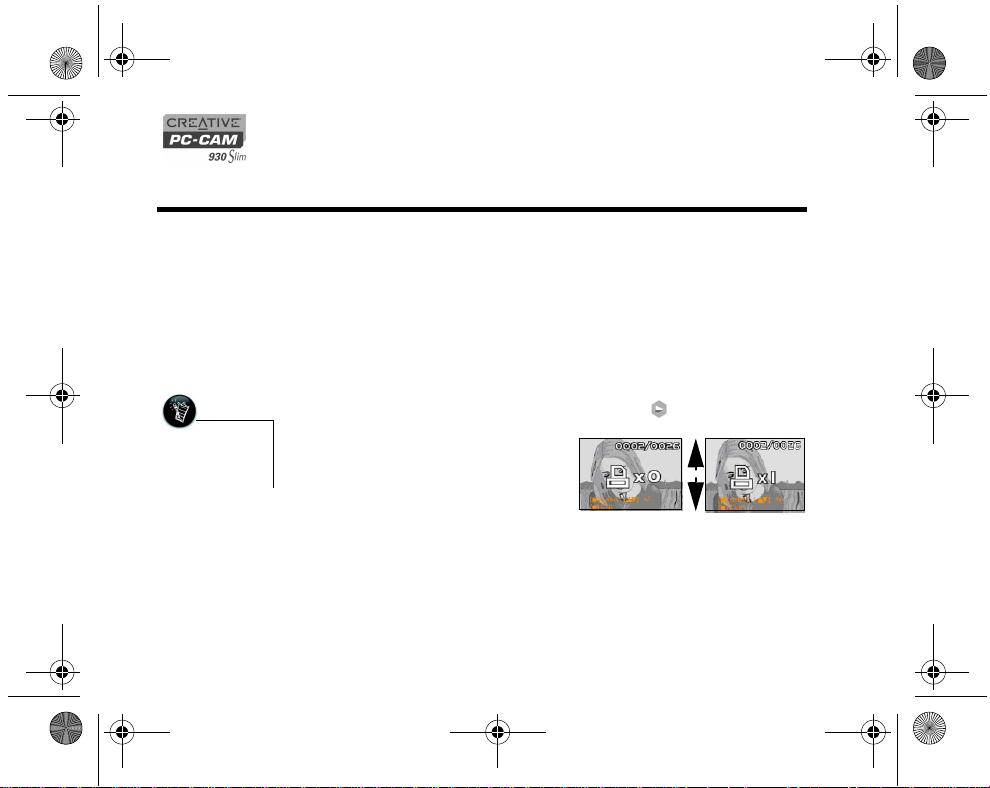
The last viewed photo appears with
selection icons (see Figure 5-1).
6. Use the Function buttons to select the
quantity to print.
7. Press the Flash/Set button to select the next photo.
Figure 5-1: DPOF photo selection screen.
Up
Down
Page 37
PC-CAM 930 Slim.book Page 2 Monday, February 14, 2005 11:42 AM
Selecting all
photos
Adding a date
stamp
To select all photos for DPOF:
1. Press and hold the Mode button.
The Mode Selection menu appears.
2. Use the Function buttons to select the Playback Mode icon.
3. Press the Flash/Set button.
A menu appears.
4. Press the "up" Function button to select the DPOF settings menu.
5. Press the "down" button to select the Set All option.
6. Press the Flash/Set button.
A sub menu appears.
7. Use the Function buttons to select the Set All option, and then press the Flash/
Set button to confirm your selection.
To add a date stamp for each photo selected:
1. In the DPOF settings menu, use the "down" button to select the Date option.
A sub menu appears.
2. Use the Function buttons to select the Stamp option, and then press the Flash/
Set button to confirm your selection.
Printing from your Creative PC-CAM 930 Slim 5-2
Page 38
PC-CAM 930 Slim.book Page 3 Monday, February 14, 2005 11:42 AM
Using
PictBridge
• PictBridge settings
are disabled if your
camera is not
connected to a
PictBridge
compatible printer.
Printing selected
photos
The PictBridge function allows you to connect your camera directly to a PictBridge
compatible printer in order to print without having to use a computer. You can select
the photos that you wish to print, or you can print all. You can also choose to print
the recorded date on each photo.
To print selected photos directly to a printer:
1. Press and hold the Mode button.
The mode selection menu appears.
2. Use the Function buttons to select the Playback Mode icon.
3. Press the Flash/Set button.
A menu appears.
4. Press the "up" Function button to select
the PictBridge menu.
5. Press the down button to select the Set
Print option.
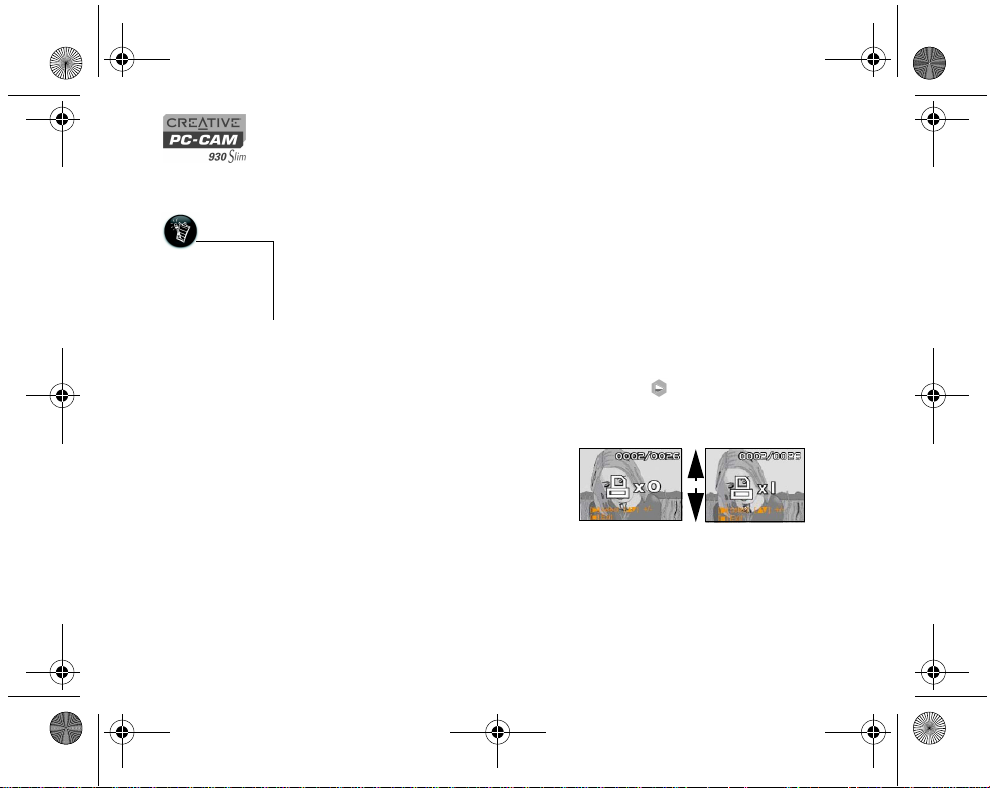
The last viewed photo appears with
selection icons (see Figure 5-2).
6. Use the Function buttons to select the
quantity to print.
7. Press the Flash/Set bu tton to select the
next photo.
5-3 Printing from your Creative PC-CAM 930 Slim
Up
Figure 5-2: PictBridge photo selection screen.
Down
Page 39
PC-CAM 930 Slim.book Page 4 Monday, February 14, 2005 11:42 AM
Printing all
photos
Printing a date
stamp
To print all photos directly to a printer:
1. Press and hold the Mode button.
The Mode Selection menu appears.
2. Use the Function buttons to select the Playback Mode icon.
3. Press the Flash/Set button.
A menu appears.
4. P ress the "u p" Function button to select the PictBridge menu.
5. Press the "down" button to select the Print All option.
6. Press the Flash/Set button.
A sub menu appears.
7. Use the Function buttons to select the Print All option, and then press the
Flash/Set button to confirm your selection.
To add a date stamp for each photo selected:
1. In the PictBridge menu, use the "down" button to select the Date option.
A sub menu appears.
2. Use the Function buttons to select the Stamp option, and then press the Flash/
Set button to confirm your selection.
Printing from your Creative PC-CAM 930 Slim 5-4
Page 40
PC-CAM 930 Slim.book Page 5 Monday, February 14, 2005 11:42 AM
5-5 Printing from your Creative PC-CAM 930 Slim
Page 41
PC-CAM 930 Slim.book Page 0 Monday, February 14, 2005 11:42 AM
Appendixes
6
Page 42
PC-CAM 930 Slim.book Page 1 Monday, February 14, 2005 11:42 AM
6-1
Page 43
PC-CAM 930 Slim.book Page 0 Monday, February 14, 2005 11:42 AM
Technical Specifications
A
Page 44
PC-CAM 930 Slim.book Page 1 Monday, February 14, 2005 11:42 AM
Technical Specifications
Dimensions 92 mm (W) x 57 mm (H) x 27 mm (D)
Weight Approx. 87g (without batteries)
Power AAA size x 2 batteries (alkaline or NiMH)
Sensor 3.1 Megapixel CMOS sensor
LCD Display 2" LTPS TFT Color LCD
Video Resolution ❑ PC-CAM Mode: Up to 22fps (320 x 240 resolution)
❑ Video Capture DSC Mode: 320 x 240 resolution
Still Picture
Resolution
Focus range ❑ Normal (120 cm to inifinity)
Focus length ❑ F / 3.0
A-1 Technical Specifications
❑ 3264 x 2448 (software enhanced)
❑ 2592 x 1944 (software enhanced)
❑ 2048 x 1536
❑ 1280 x 960
❑ Macro (17 cm to 22 cm)
Up to 10fps (640 x 480 resolution)
640 x 480 resolution
Page 45
PC-CAM 930 Slim.book Page 2 Monday, February 14, 2005 11:42 AM
Self-timer 10 second delay
File formats ❑ JPEG (EXIF, DCP, DPOP)
❑ AVI
Exposure control ❑ Automatic
White balance ❑ Automatic
Port compatibility ❑ Universal Serial Bus port v1.1
Storage Media ❑ Built-in 16MB Flash Memory
Software
compatibility
❑ Manual (sunny/tungsten/fluorescent)
❑ TV Out (NTSC/PAL selectable)
❑ SD Memory Card Interface (supports 16MB to 512MB)
Yahoo!® Messenger, AIM, MSN® Messenger, Windows® Messenger, and other
compatible instant messenger services.
Technical Specifications A-2
Page 46
PC-CAM 930 Slim.book Page 3 Monday, February 14, 2005 11:42 AM
Notes
A-3 Technical Specifications
Page 47
PC-CAM 930 Slim.book Page 4 Monday, February 14, 2005 11:42 AM
Notes
Technical Specifications A-4
Page 48
PC-CAM 930 Slim.book Page 5 Monday, February 14, 2005 11:42 AM
Notes
A-5 Technical Specifications
 Loading...