

Creative Muvo Muvo TX 256MB, Muvo Muvo TX FM 1GB, MUVO TX, Muvo TX FM, DAP-TD0004 - MuVo TX FM 256 MB MP3 Player User Manual
...Page 1
Page 2

User’s Guide
MuVo TX FM
Information in this document is subject to change without notice and does not represent a commitment on the part of Creative
Technology Ltd. No part of this manual may be reproduced or transmitted in any form or by any means, electronic or mechanical,
including photocopying and recording, for any purpose without the written permission of Creative Technology Ltd. The software
described in this document is furnished under a license agreement and may be used or copied only in accordance with the terms of
the license agreement. It is against the law to copy the software on any other medium except as specifically allowed in the license
agreement. The licensee may make one copy of the software for backup purposes.
The Software License Agreement is found in a separate folder on the installation CD.
Copyright © 2004 Creative Technology Ltd. All rights reserved.
Version 1.0
April 2004
MuVo and the Creative logo are trademarks or registered trademarks of Creative Technology Ltd. in the United States and/or other
countries.
Microsoft and Windows are registered trademarks of Microsoft Corporation. All rights reserved.
Intel and Pentium are trademarks of Intel Corporation in the U.S. and other countries.
CDDB is a trademark of CDDB, Inc.
All other products are trademarks or registered trademarks of their respective owners.
Page 3

Contents
Page 4

ii
Contents
Safety and Handling Instructions
Caring For Your Player ................................................................ vi
Introduction
Before You Begin
Package Contents ..................................................................... viii
Software Included ...................................................................... viii
Creative Media Detector ................................................ viii
Creative MediaSource ..................................................... ix
Creative MediaSource Player .............................. ix
Creative MediaSource Organizer ........................ ix
Adobe Acrobat Reader ..................................................... x
Minimum System Requirements ................................................. x
Document Conventions ............................................................... xi
Web Information ......................................................................... xii
Online Registration ..................................................................... xii
1 A Tour of Your Player
Your Player at a Glance ........................................................... 1-1
Using the Scroller ..................................................................... 1-3
Scroll Select .................................................................. 1-3
Selecting menu options ................................................ 1-3
Page 5

iii
2 Getting Started
Inserting the Battery ................................................................. 2-1
Power Source and Level Indicators .............................. 2-2
Installing Drivers and Software ................................................. 2-3
Connecting the USB Flash Drive to your Computer ................. 2-4
3 Transferring Tracks or Files
Downloading from the internet ................................................. 3-2
Creative MediaSource .............................................................. 3-3
Transferring Tracks or Files .......................................... 3-3
Editing audio track information ..................................... 3-4
Ripping Audio CD Tracks ............................................. 3-5
4 Using Your Player
Turning On/Off your Player ...................................................... 4-2
Disconnecting your Player ........................................................ 4-3
Music Playback ........................................................................ 4-4
Playing music tracks ..................................................... 4-5
Play Modes ............................................................................... 4-6
Repeating music ........................................................... 4-7
Shuffling music ............................................................. 4-9
Playing a track once ................................................... 4-10
Normal mode .............................................................. 4-11
Listening to FM Radio ............................................................ 4-11
Voice Recording ..................................................................... 4-17
Making a voice recording ............................................ 4-17
Recording FM Radio ................................................... 4-18
Playing Recordings ................................................................ 4-19
Page 6

iv
EQ Settings ............................................................................ 4-21
Enhancing Your Music ................................................ 4-21
Skipping Folders ..................................................................... 4-23
Deleting Tracks ...................................................................... 4-23
User Preferences ................................................................... 4-24
Rotating the LCD screen ............................................ 4-25
Locking and unlocking your Player ......................................... 4-27
Formatting Your Player .......................................................... 4-28
Appendixes
A Technical Specifications
Size ................................................................... A-1
Weight ............................................................... A-1
Capacity ............................................................ A-1
Battery type ....................................................... A-1
Battery Life (playback time) .............................. A-1
Playback Formats ............................................. A-1
Recording Formats ........................................... A-1
Signal to Noise Ratio ........................................ A-1
Channel Separation .......................................... A-2
Frequency Response ........................................ A-2
Harmonic Distortion .......................................... A-2
Operating System/Firmware ............................. A-2
Headphone Out ................................................ A-2
LCD Display ...................................................... A-2
Data Connector ................................................. A-2
Firmware Support ............................................. A-2
Page 7

v
B Onscreen Diagram and Icon Guide
Information Diagrams ............................................................... B-1
Playback Icons ......................................................................... B-2
Play Mode Icons ....................................................................... B-3
Error Diagrams ......................................................................... B-4
C FAQs and Troubleshooting
AutoPlay ................................................................................... C-1
General ..................................................................................... C-2
Usage ....................................................................................... C-3
Digital Rights Management ...................................................... C-4
Page 8
vi
Safety and Handling Instructions
Caring For
Your Player
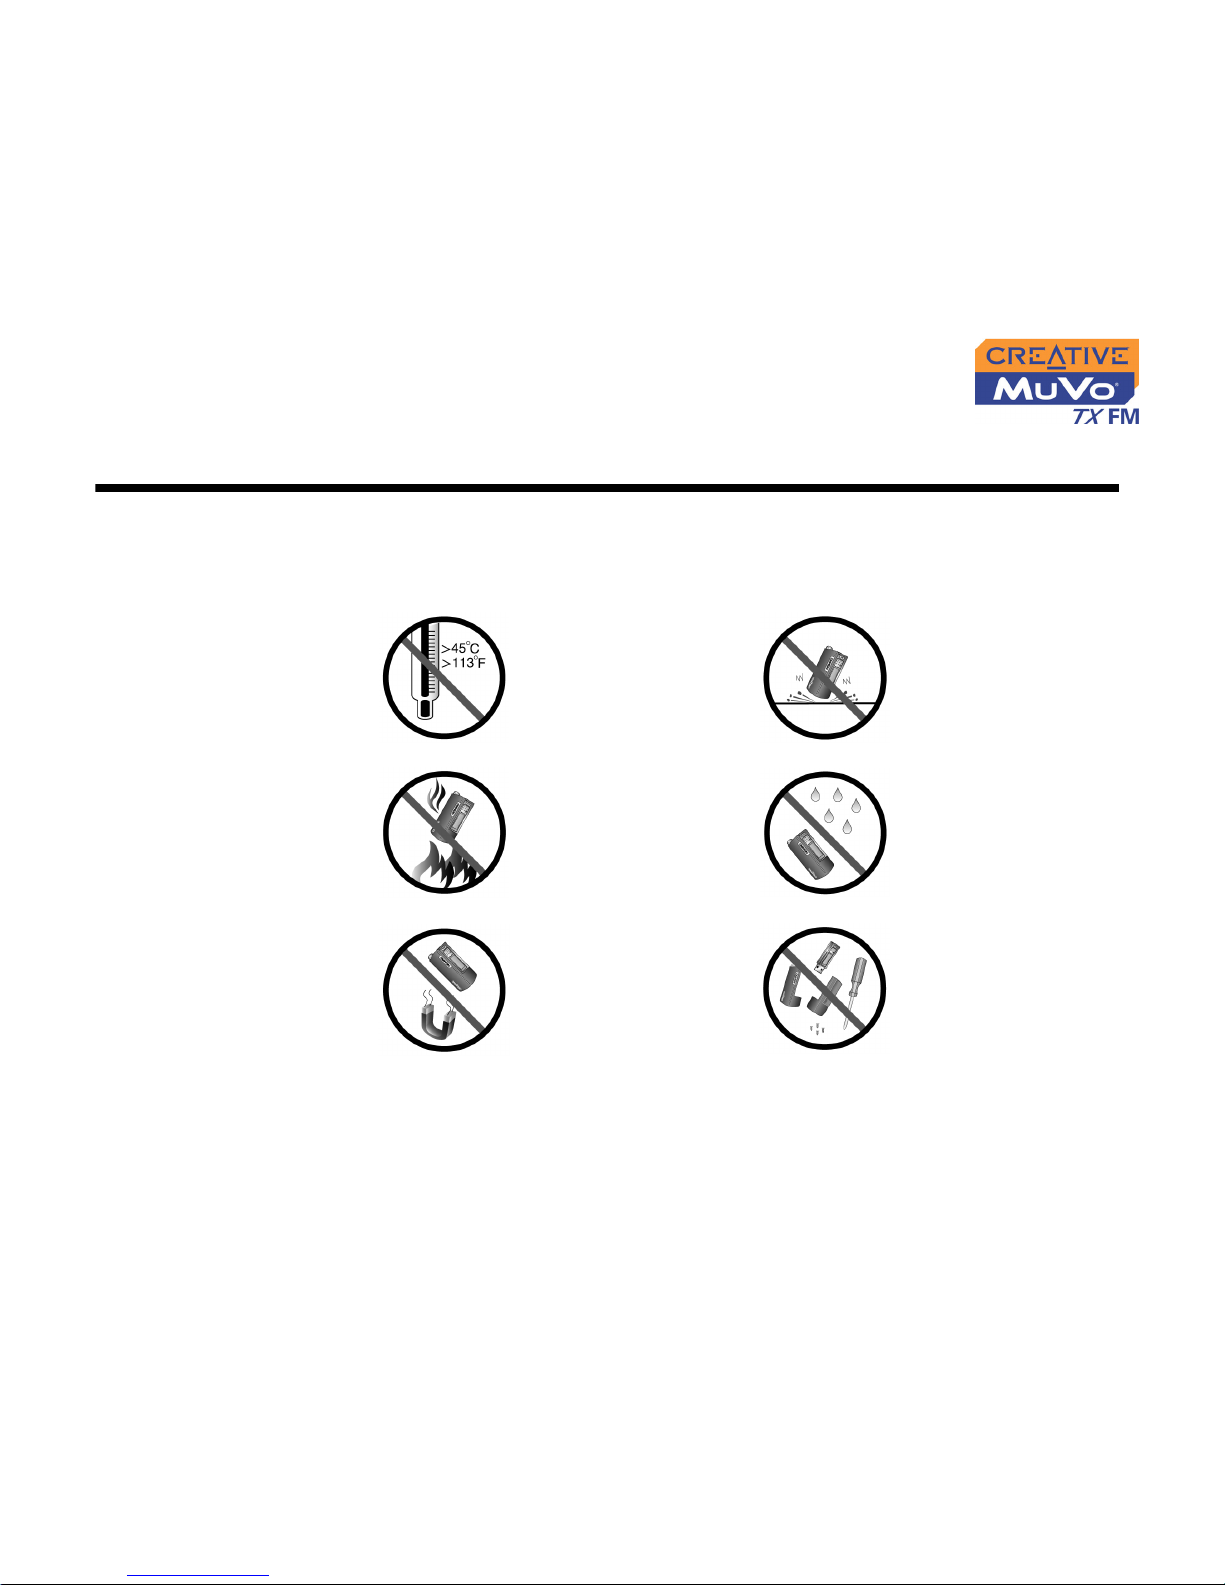
While your player is quite robust, observing these handling procedures will
prolong its life.
Do not store or
use in areas
exceeding 45ºC or
113ºF.
Do not subject to
excessive force or
impact.
Do not expose to
heat or incinerate.
Keep away from
excessive
moisture.
Keep away from
strong magnetic
fields.
Do not dismantle.
Page 9

vii
Introduction
Congratulations on making an excellent decision in purchasing the Creative
MuVo® TX FM!
Your new multi-format portable player allows you to store songs in the
player’s Music Library and also comes equipped with an USB 2.0™
connector, so you can transfer audio tracks and dat a quickly and easily. With
your player’s built-in microphone you can record your voice, and with the FM
radio, you can listen to and record your favorite radio stations.
Your player also supports Advanced EQ features for audio enhancement.
Your portable digital audio player supports multiple audio file formats,
including MP3 and WMA. Recordings are saved in IMA ADPCM formats —
mono for voice and stereo for FM radio.
Your player supports
WMA files protected
with Digital Rights
Management (DRM).
Page 10
viii
Before You Begin
Package
Contents
❍ MuVo TX FM (consists of one USB Flash Drive and one battery module)
❍ Armband or neckstrap
❍ Installation CD incorporating PDF User’s Guide
❍ Quick Start Booklet
❍ Stereo earphones
❍ One AAA size battery
Software
Included
❍ Creative Media Detector
❍ Creative MediaSource
❍ Adobe Acrobat Reader
Creative Media
Detector
Media Detector makes it easy for you to access multimedia content from
various internal or external media. There is no need to hunt through a maze
of different software to play different types of files.
Media Detector automatically recognizes the insertion or connection of CDs,
VCDs, and external devices like Creative digital audio players. Upon
recognition, the content in the media automatically starts playing.
Contents may vary
depending on
product model and
region of purchase.
Page 11

ix
Creative
MediaSource
Creative MediaSource is your ultimate all-in-one digital entertainment
software, designed for playing, creating, organizing and transferring digital
music. It includes several applications like the MediaSource Player and
Organizer.
For more information and usage details on Creative MediaSource, refer to its
online Help.
Creative
MediaSource
Player
Unlike other media players, Creative MediaSource Player provides exclusive
features (such as SmartFit), specially designed to manage and configure
your MuVo TX FM more efficiently. With Creative MediaSource Player, you
can play back a wide variety of digital audio and video formats such as MP3,
WMA, WAV, Audio CD, Midi, VCD and AVI on the computer. You can also
use the integrated recorder in Creative MediaSource to record audio.
Creative
MediaSource
Organizer
Creative MediaSource Organizer is an extended view of the Creative
MediaSource Player, as it provides additional features to help you manage a
huge music library more easily. With it, you can:
❍ rip Audio CDs and create high quality digital audio files (up to 320 kbps
for MP3 and 160 kbps for WMA).
❍ configure the settings for the MuVo TX FM with Creative MediaSource
while it is connected to your computer.
❍ "squeeze" more audio tracks into your player with SmartFit, which
employs intelligent track management and WMA compression.
❍ view the contents of your computer and your MuV o TX FM using the dual-
window transfer panel, convenient for file transfer.
❍ locate songs in a few seconds, just by typing some keywords into the
sophisticated music search engine.
Page 12

x
Adobe Acrobat
Reader
Adobe Acrobat Reader is a software application that enables you to view and
print Adobe Portable Document Format (PDF) files on all major computer
platforms.
Minimum
System
Requirements
❍ Microsoft
®
Windows® XP, Windows 2000, Windows Millennium Edition
(Me) or Windows 98 Second Edition (SE)
❍ Intel
®
Pentium® II 350 MHz, AMD® K6-2® 450 MHz or better processor
(Pentium III 450 MHz or higher recommended for MP3 encoding)
❍ CD-ROM drive with digital audio extraction support
❍ USB 1.1 port (USB 2.0 port recommended)
❍ 64 MB RAM (128 MB recommended)
❍ 30 MB free hard disk space (more needed for storing audio)
❍ Installed mouse
❍ SVGA graphics adapter (256 colors, 800 x 600 resolution or better)
The software
applications on the
installation CD may
have higher
requirements for
basic functionality.
Refer to each
application’s
documentation for
details.
Page 13
xi
Document
Conventions
We use icons to highlight useful or urgent information for you:
Tip. This tells you about shortcuts or hints relating to a feature.
Note. This highlights additional or important information about
a feature.
Caution! This highlights proper usage of your product. Follow
these directions to prevent the loss of data, or damage to your
product or system.
Warning! This warns you of possible hazards that may result
in bodily harm or life-threatening situations.
Page 14

xii
Web
Information
Visit www.creative.com regularly for information on:
❍ Firmware updates
❍ MuVo accessories
❍ Tips and tricks
❍ FAQs
❍ Troubleshooting
❍ Documentation updates
❍ Software updates or purchases
❍ Technologies used in your player
❍ An online glossary
Online
Registration
Enjoy a host of benefits by registering your product during installation, or at
www.creative.com/register.
Benefits include:
❍ Service and Product support from Creative
❍ Exclusive updates on promotions and events
The driver updates
only work with
MuVo TX FM
players. Do not
install these
updates if you own
a NOMAD MuVo or
NOMAD MuVo NX
player.
Page 15

A Tour of Your Player
Page 16
A Tour of Your Player 1-1
A Tour of Your Player
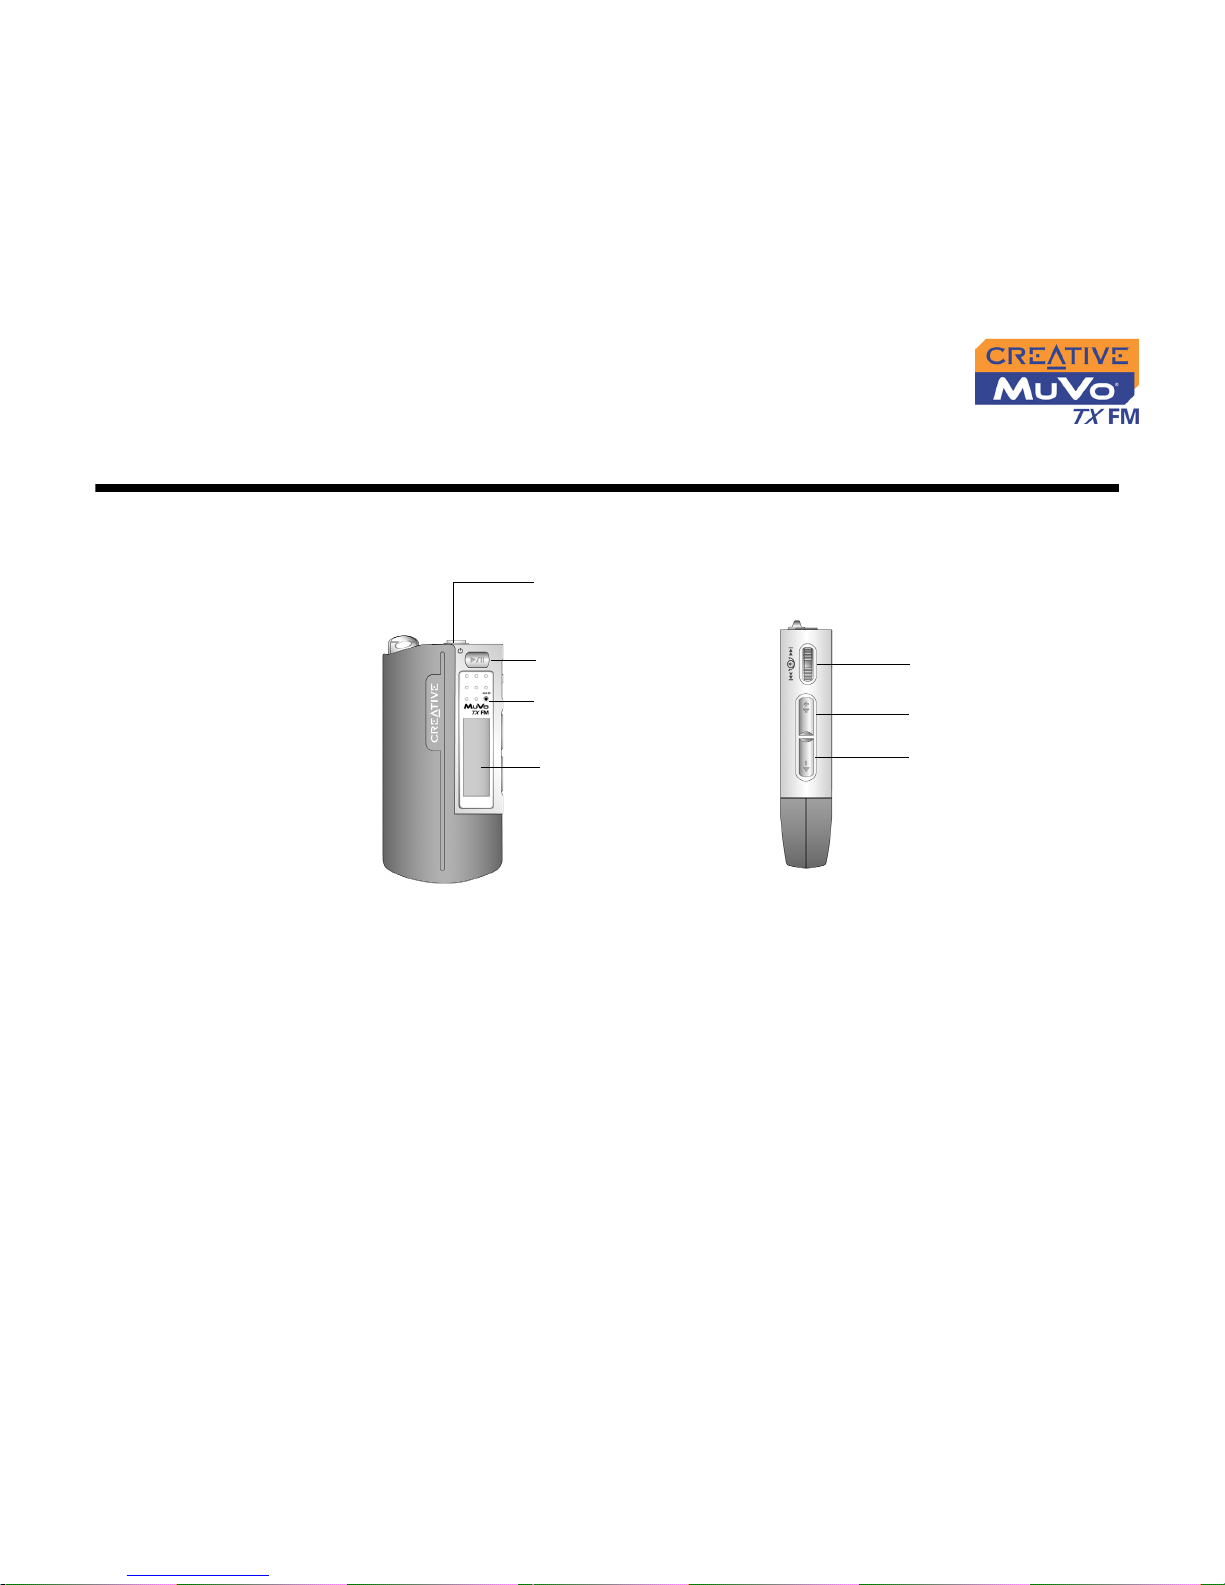
Your Player at
a Glance
Play/Pause
button
LCD screen
Earphone connector
Microphone
Scroller
Volume Decrease button
Volume Increase button
Front View Side View
Page 17
A Tour of Your Player 1-2
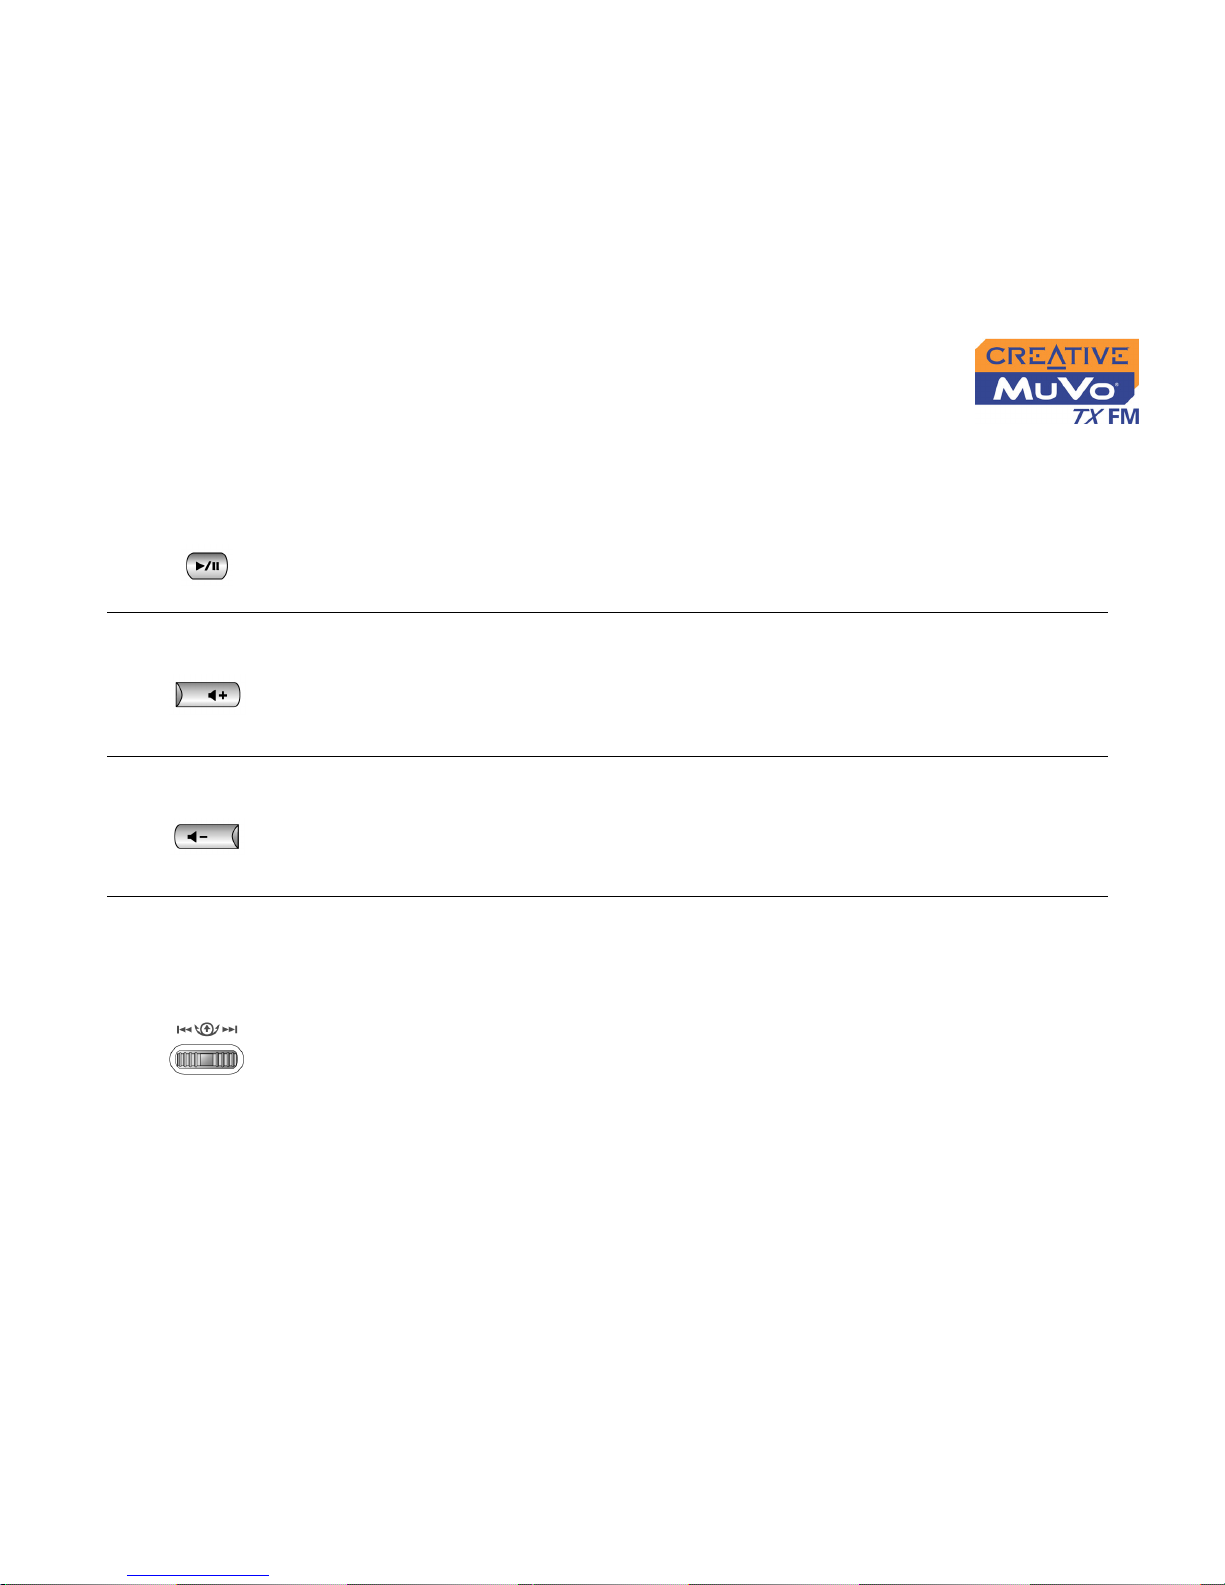
Button What It Does Usage Tips
PLAY/PAUSE
❍ turns the player on and off
❍ activates the LCD backlight
❍ starts, pauses or continues playback
❍ press and hold until the player
turns on or off
❍ when your player is locked,
press to turn LCD backlight on
VOLUME
INCREASE
❍ increases the volume
❍ press and hold to increase the
volume quickly
VOLUME
DECREASE
❍ decreases the volume
❍ press and hold to decrease the
volume quickly
SCROLLER
❍ skips to the previous/next track
❍ fast-forwards/rewinds a track
❍ scrolls through menu options
❍ selects menu options
❍ during playback, turn the Scroller
to go to the previous or next
track.
❍ during playback, turn and hold
the Scroller to fast-forward or
rewind the track
❍ turn the Scroller to scroll through
menu options and press the
Scroller to select them. This
action is also referred to as
"Scroll Select"
Page 18

A Tour of Your Player 1-3
Using the
Scroller
Scroll Select The Scroller is one of the most important features of your MuVo TX FM. In
this document, we will use a new term, “Scroll Select”, to indicate that you
should use the Scroller to scroll through options and then select the option by
pressing the Scroller.
Depending on the screen you are in, you can have different menu options.
You can also choose options from a list or a confirmation box.
Selecting menu
options
You can use the Scroller to make selections in menus. For example, if you
are looking at the Menu screen:
1. Use the Scroller to scroll through the menu options.
2. Press the Scroller to select the menu item.
To "Scroll Select",
use the Scroller to
scroll to the option
you want, and select
the option by
pressing the Scroller.
Use the Scroller to scroll
through options
Press the Scroller to select an
option
The Scroller
(side view)
From the Menu screen to the Play Mode Options screen
Page 19

Getting Started
Page 20
Getting Started 2-1
Getting Started
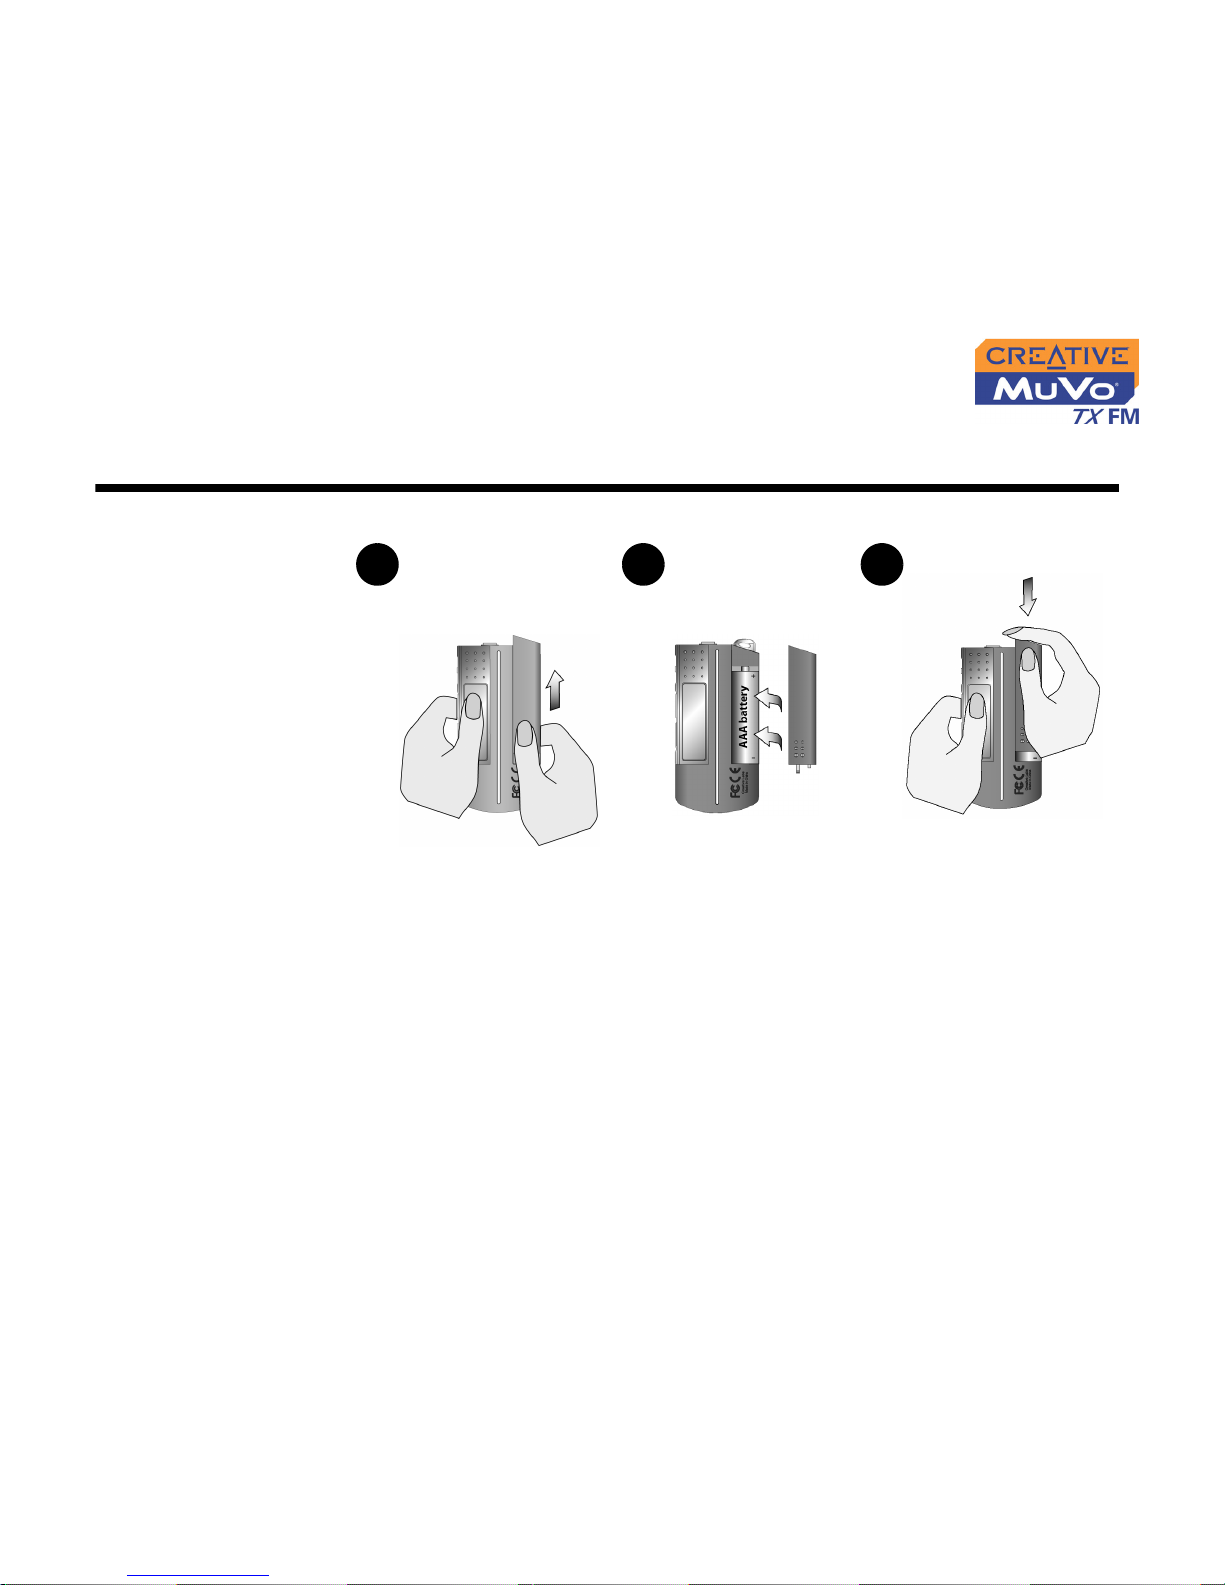
Inserting the
Battery
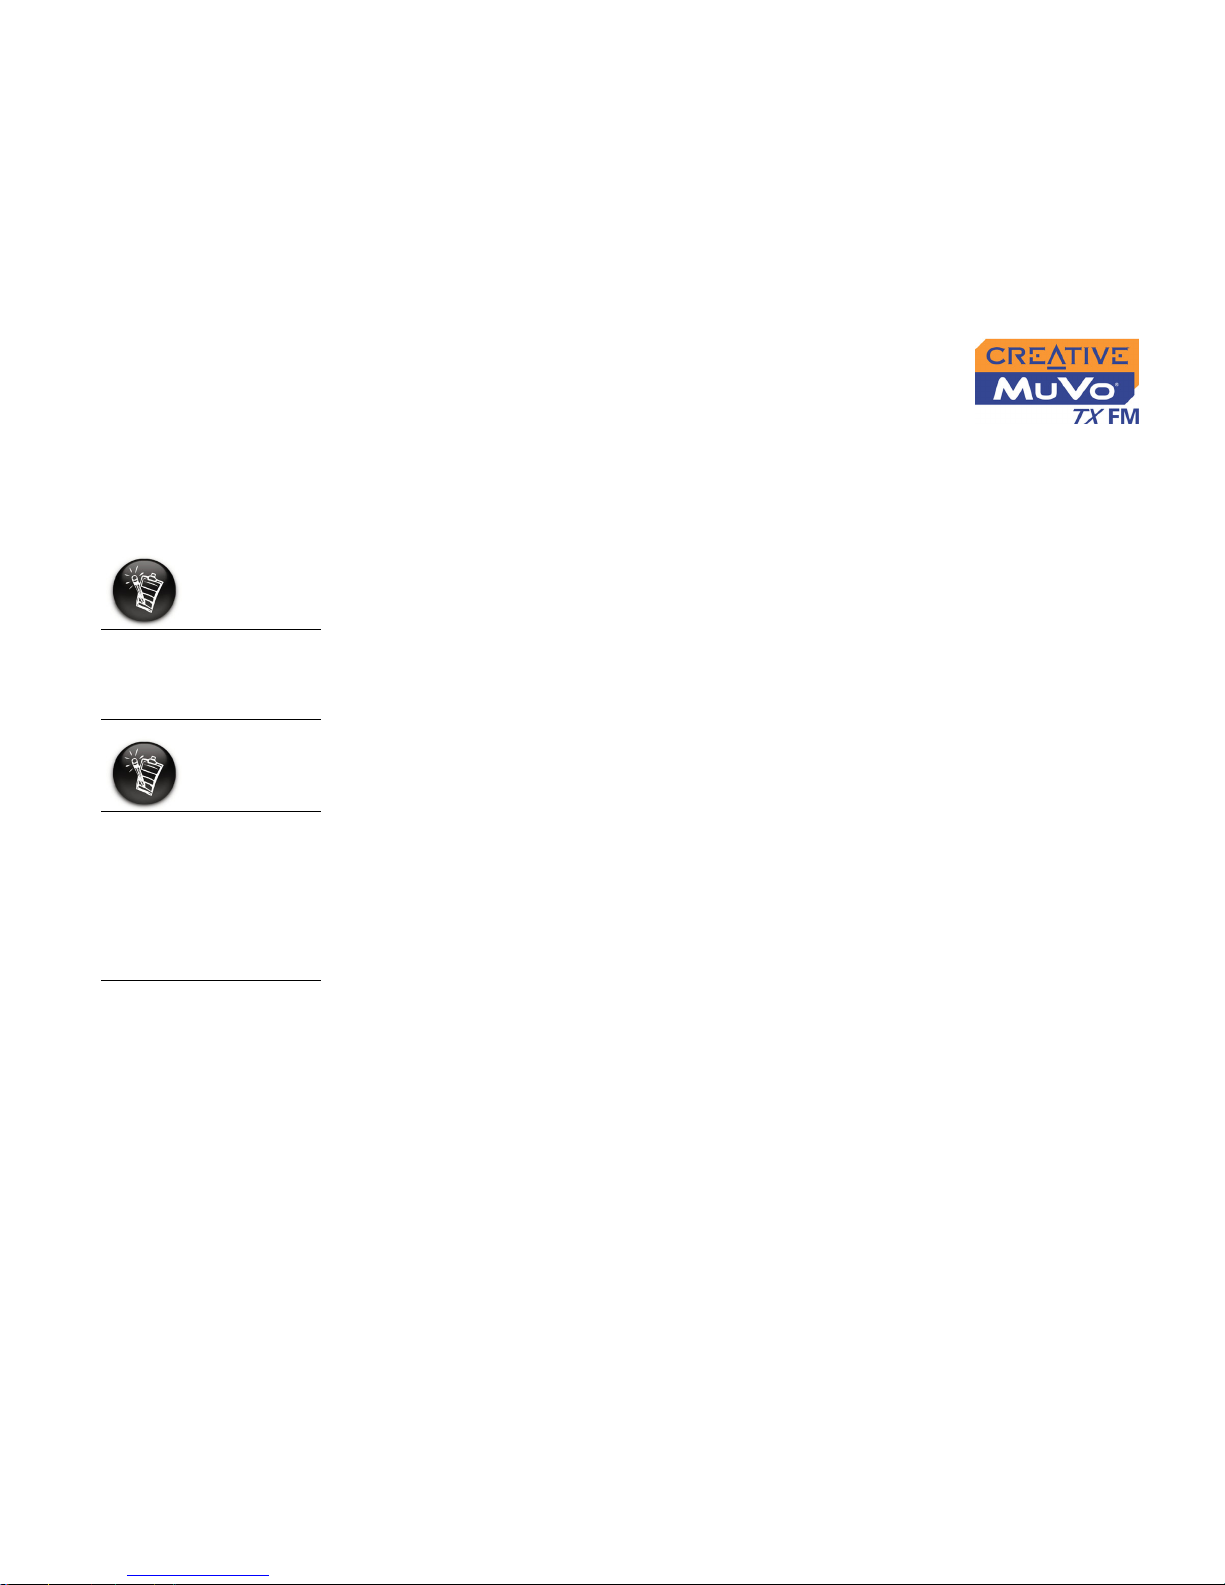
cba
Page 21
Getting Started 2-2
Power Source
and Level
Indicators
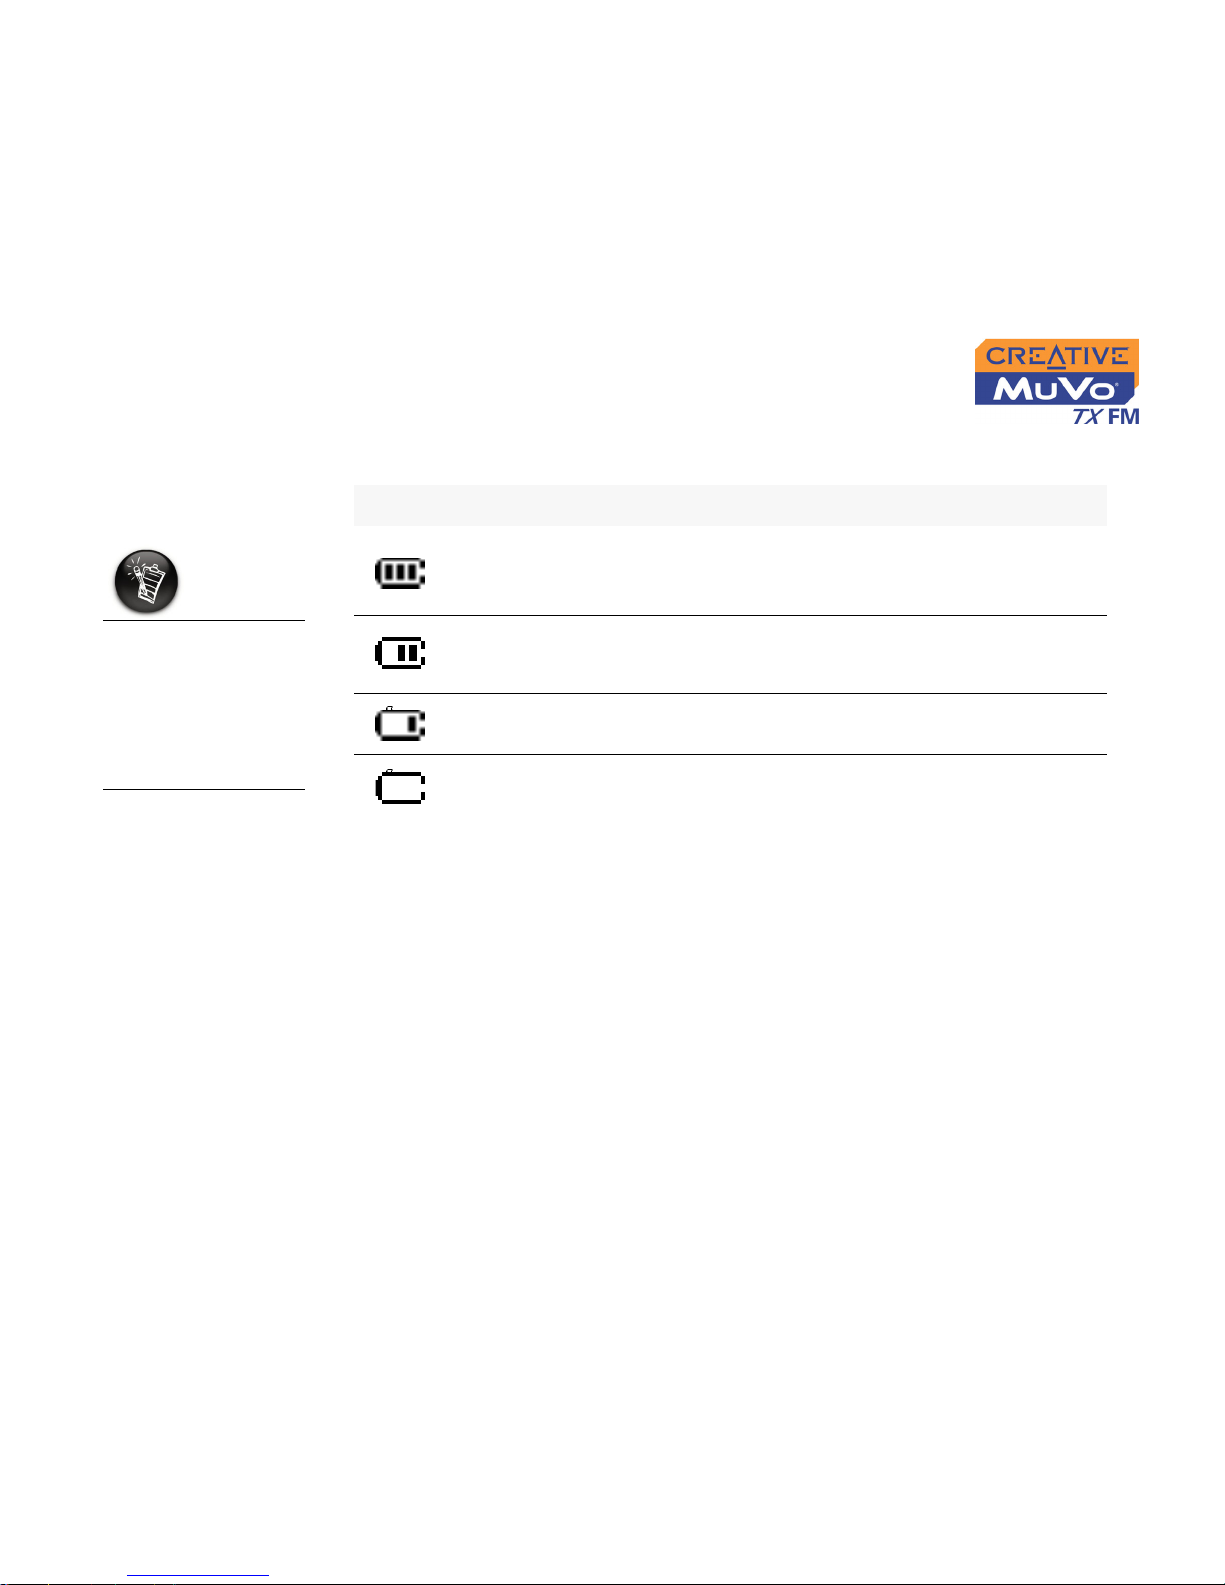
After inserting the battery, your player displays one of the following icons,
depending on the battery’s status.
The amount of
playback time
available depends on
various factors (for
example, volume
level used). For more
information, see
"Usage" on page C-3.
Icon What the icon means Notes
❍ your player’s battery is full
❍ this battery state icon
shows that the battery is
full
❍ your player’s battery is 60% full
❍ your player’s battery is 30% full
❍ your player’s battery is nearly
empty
❍ change the battery at the
earliest opportunity
Page 22
Getting Started 2-3
Installing
Drivers and
Software
Your MuVo TX FM comes with drivers for Windows 98 SE, together with
software that helps you create audio tracks, manage your music library and
use your player. Windows XP, Windows 2000 and Windows Me users do not
need to install drivers.
1. Make sure that your player is not connected to your computer.
2. Insert the Installation CD into your CD-ROM drive.
The disc supports Windows AutoPlay mode and starts running
automatically. If not, you need to enable your CD-ROM drive's autoinsert notification feature. For more details see "AutoPlay" on page C-1.
3. Click the MuVo TX FM software option to select it.
4. Click the OK button.
5. Follow the onscreen instructions to complete the installation.
6. If prompted, restart your computer.
Windows 98 SE users
must install the drivers
to transfer tracks or
files to the player.
To install the software,
Windows 2000/XP
users must log in as
the computer
administrator. For
more information,
refer to your operating
system’s online Help.
Page 23
Getting Started 2-4
Connecting the
USB Flash
Drive to your
Computer
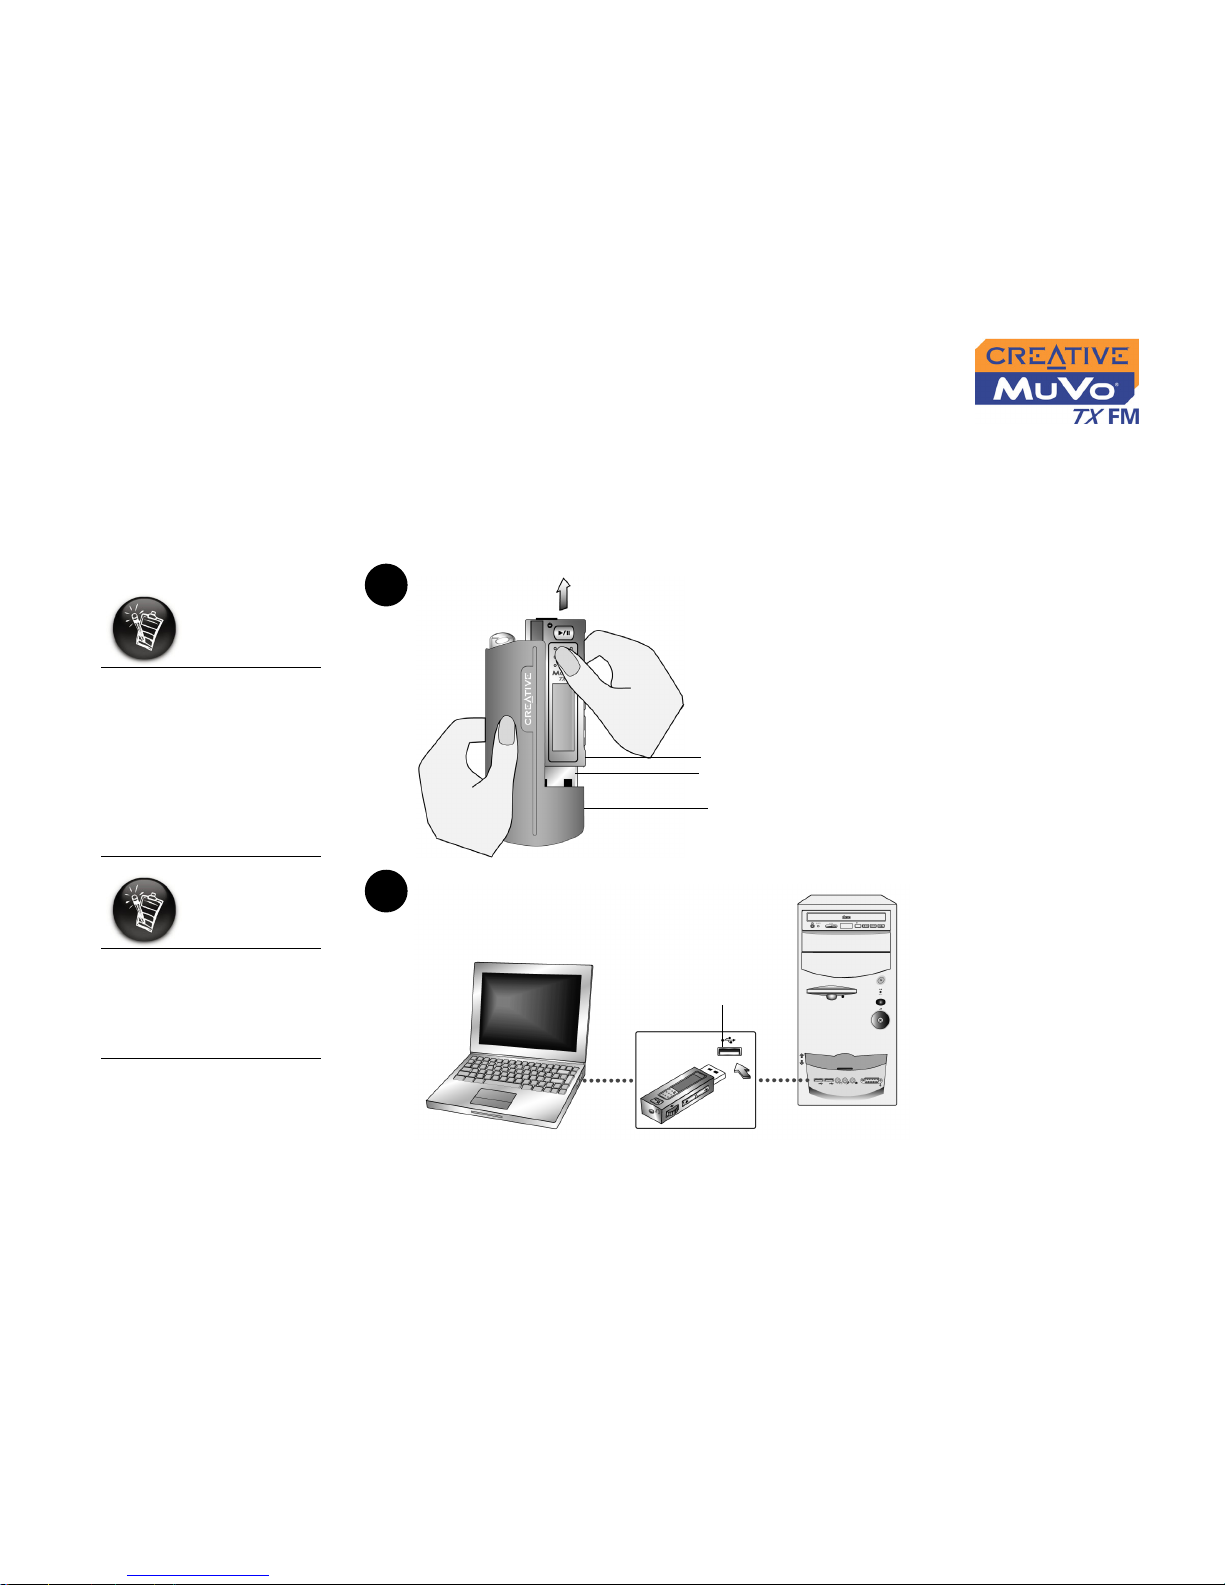
You are now ready to connect your player to your computer. Your MuVo TX
FM features a USB 2.0 port for data transfers to and from your computer . Be
sure that you have installed Creative MediaSource before connecting your
player. To transfer audio or data files to your player, refer to "Transferring
Tracks or Files" on page 3-3.
Your computer’s USB
port may be located on
the back panel. If your
USB Flash Drive does
not fit into the USB
port located on the
front panel, connect it
to the USB port located
on the back panel.
Do not press the
buttons on your USB
Flash Drive while
connecting it to your
computer.
b
a
Battery module
USB Flash Drive
USB port
USB port
Page 24

Transferring Tracks or Files
Page 25
Transferring Tracks or Files 3-1
Transferring Tracks or Files
Creative MediaSource is included on your installation CD (see "Installing
Drivers and Software" on page 2-3).
Creative MediaSource is the best way to organize and transfer audio to and
from your player. This chapter includes basic instructions on using
MediaSource to rip audio CDs, transfer tracks by manual selection, edit track
information as well as to create and edit playlists.
Alternatively , you can use Windows Media Player to transfer tracks or files. If
you have tracks or files without Digital Rights Management (DRM) content
protection, you can use Windows Explorer to transfer them.
If you wish to download additional music tracks to your player, you can either
download music tracks from Internet music sites (see "Downloading from the
internet" on page 3-2) or rip them from audio CDs to your computer.
Music files must, however, be encoded into the supported formats (MP3 or
WMA file formats), then transferred to your player with Creative
MediaSource Organizer.
Data files can also be transferred and stored in your player. For example, if
you want to transfer a large presentation or graphic file from one computer to
another.
To listen to transferred
audio tracks, your
player must be in Music
mode. For more
information, refer to
"Using Your Player" on
page 4-1.
Before disconnecting
your player from your
computer, make sure
that you stop your
player properly first
(see "Usage" on page C3" for more details).
Page 26
Transferring Tracks or Files 3-2
Downloading
from the
internet
To get MP3 files from the Internet, use a search engine to locate sites with
MP3 content. You can use your MuVo TX FM player to download audio files
from all the major Internet music download services. Follow the instructions
on the site and download the music files to your computer.
It is illegal to encode
MP3 files for trade or
sale unless you have
the express or explicit
permission of the
copyright holder(s).
Page 27

Transferring Tracks or Files 3-3
Creative
MediaSource
Only basic instructions on how to use Creative MediaSource with your player
are provided in this chapter— extensive instructions are found in the
MediaSource Help file.
Transferring
Tracks or Files
With Creative MediaSource, you can transfer files and audio tracks to and
from your player.
Using Creative MediaSource
1. If you are not already in Creative MediaSource Organizer, click the
Player/Organizer View button.
2. Click the Show/Hide Right Panel button.
3. In the Sources window, select the source device.
If you are transferring files from PC Music Library to a portable hard disk,
select PC Music Library as your source.
4. In the Content window, select the tracks to transfer.
CTRL-click to select multiple tracks.
5. In the Right Panel window, click the Source bar and select the
destination.
6. Click the Destination Transfer button to transfer the selected tracks.
The Now T ransferring dialog box appears, showing the current transfer
status.
Using Windows Explorer
1. On your desktop, right-click the My Computer icon, and then click
Explore.
2. Drag and drop tracks/files into your player.
After installation, you
must restart your
computer before trying
out any of the installed
applications.
Page 28

Transferring Tracks or Files 3-4
Editing audio
track information
You may need to edit track information when the information is incomplete or
wrong.
To edit information about a track
1. If you are not already in Creative MediaSource Organizer, click the
Player/Organizer View button.
2. In the Content window, locate the track you want to edit, and right-click
it.
3. Select the Properties option. A dialog box appears.
4. Select the Tag Information tab.
5. Click any of the track properties under the Property column. The entire
row of information is highlighted.
6. Click on information in the Value field to edit the information.
7. Repeat steps 5 and 6 to change other track properties.
8. Click the OK button when all changes have been made.
The new track information will be stored.
To edit information about multiple tracks
1. If you are not already in Creative MediaSource Organizer, click the
Player/Organizer View button.
2. In the Content window , locate the tracks you want to edit, hold down the
CTRL key and select them.
3. Right-click to edit the Album, Artist or Genre.
4. Type in the new Album, Artist or Genre.
5. Click the OK button.
Page 29
Transferring Tracks or Files 3-5
Ripping Audio
CD Tracks
The first phase in making an MP3 file is extracting audio data from an audio
CD. To extract audio data, you will need a CD-ROM drive that can extract
digital audio data, and a program known as a Ripper. With Creative
MediaSource Organizer, you can rip tracks from most audio CDs. This
application uses the CD-ROM drive to read the audio tracks from the audio
CD and stores it on your hard disk or directly into your player.
The time needed for a successful audio extraction depends on:
❍ CD-ROM drive speed
❍ defects, like scratches on the audio CD
❍ error-checking features on the CD-ROM drive
Encoding is the second phase of making an MP3 file. Encoders are used to
convert the stored audio tracks, usually WAV files, into MP3 files. MP3
encoding is a lossy compression method where some data is lost during
compression. However, using the standard sampling rate and bitrates will
ensure that your MP3 files retain much of their audio quality. The standard
bitrate of most MP3 files is 128 Kbps, although some are set higher , at 160 or
192 Kbps. Higher bitrates will result in larger MP3 file sizes, and may result in
better audio quality. Use Creative MediaSource Organizer to extract audio
tracks and encode MP3s.
You can rip an audio CD’s tracks to your player, hard disk or PC Music
Library . You can choose to rip an entire CD, or selected tracks from the audio
CD.
Rather than manually
entering track
information, retrieve
such audio CD
information from CDDB
before ripping tracks.
Change the default
ripping format and
bitrate for higher or
lower quality audio.
See Creative
MediaSource’s Help file
for details
Page 30

Transferring Tracks or Files 3-6
To rip a CD
1. Insert an audio CD into your CD-ROM drive.
2. If you are not already in Creative MediaSource Organizer, click the
Player/Organizer View button.
3. In the Sources window, select [e:] Audio CD (where "e:" represents
your CD-ROM drive).
4. In the Task bar, click the Rip Now button.
To rip tracks from an audio CD
1. Insert an audio CD into your CD-ROM drive.
2. If you are not already in Creative MediaSource Organizer, click the
Player/Organizer View button.
3. In the Sources window, select [e:] Audio CD (where e: represents your
CD-ROM drive).
4. In the Content window, select the tracks to rip.
Ctrl-click or Shift-click to select multiple tracks.
5. Drag the selected tracks to PC Music Library in the Source window.
The Transfer Queue dialog box appears, showing the current ripping
status.
Page 31

Using Your Player
Page 32

Using Your Player 4-1
Using Your Player
Your player can function in Music, Recordings, Microphone or FM Radio
mode. In Music mode, only MP3 or WMA files are played back and in
Recordings mode, only microphone and FM radio recordings that are
recorded by the player, are played back. To switch between modes, see
"Music Playback" on page 4-4.
Your player also has Play Modes that allow you to change how your tracks
are played back. For more information, see "Play Modes" on page 4-6.
Page 33
Using Your Player 4-2
Turning On/Of f
your Player
Remember to unplug the USB Flash Drive from your computer and insert it
into the battery module before turning on the player.
To turn on your player
Press and hold the Play/Pause button until your player turns on.
The CREATIVE logo appears onscreen, followed by the MuVo TX FM
logo. Music tracks stored in your player are automatically played back.
To turn off your player
Press and hold the Play/Pause button until the Power off
message disappears.
If your player contains
no audio tracks, the
message "No Music" or
"No Recording" will
appear onscreen,
depending on whether
you are in Music or
Recordings mode.
Audio track filenames
are sorted in
alphanumeric order.
Page 34
Using Your Player 4-3
Disconnecting
your Player
To disconnect your player in Windows XP, Windows 2000 or
Windows Me
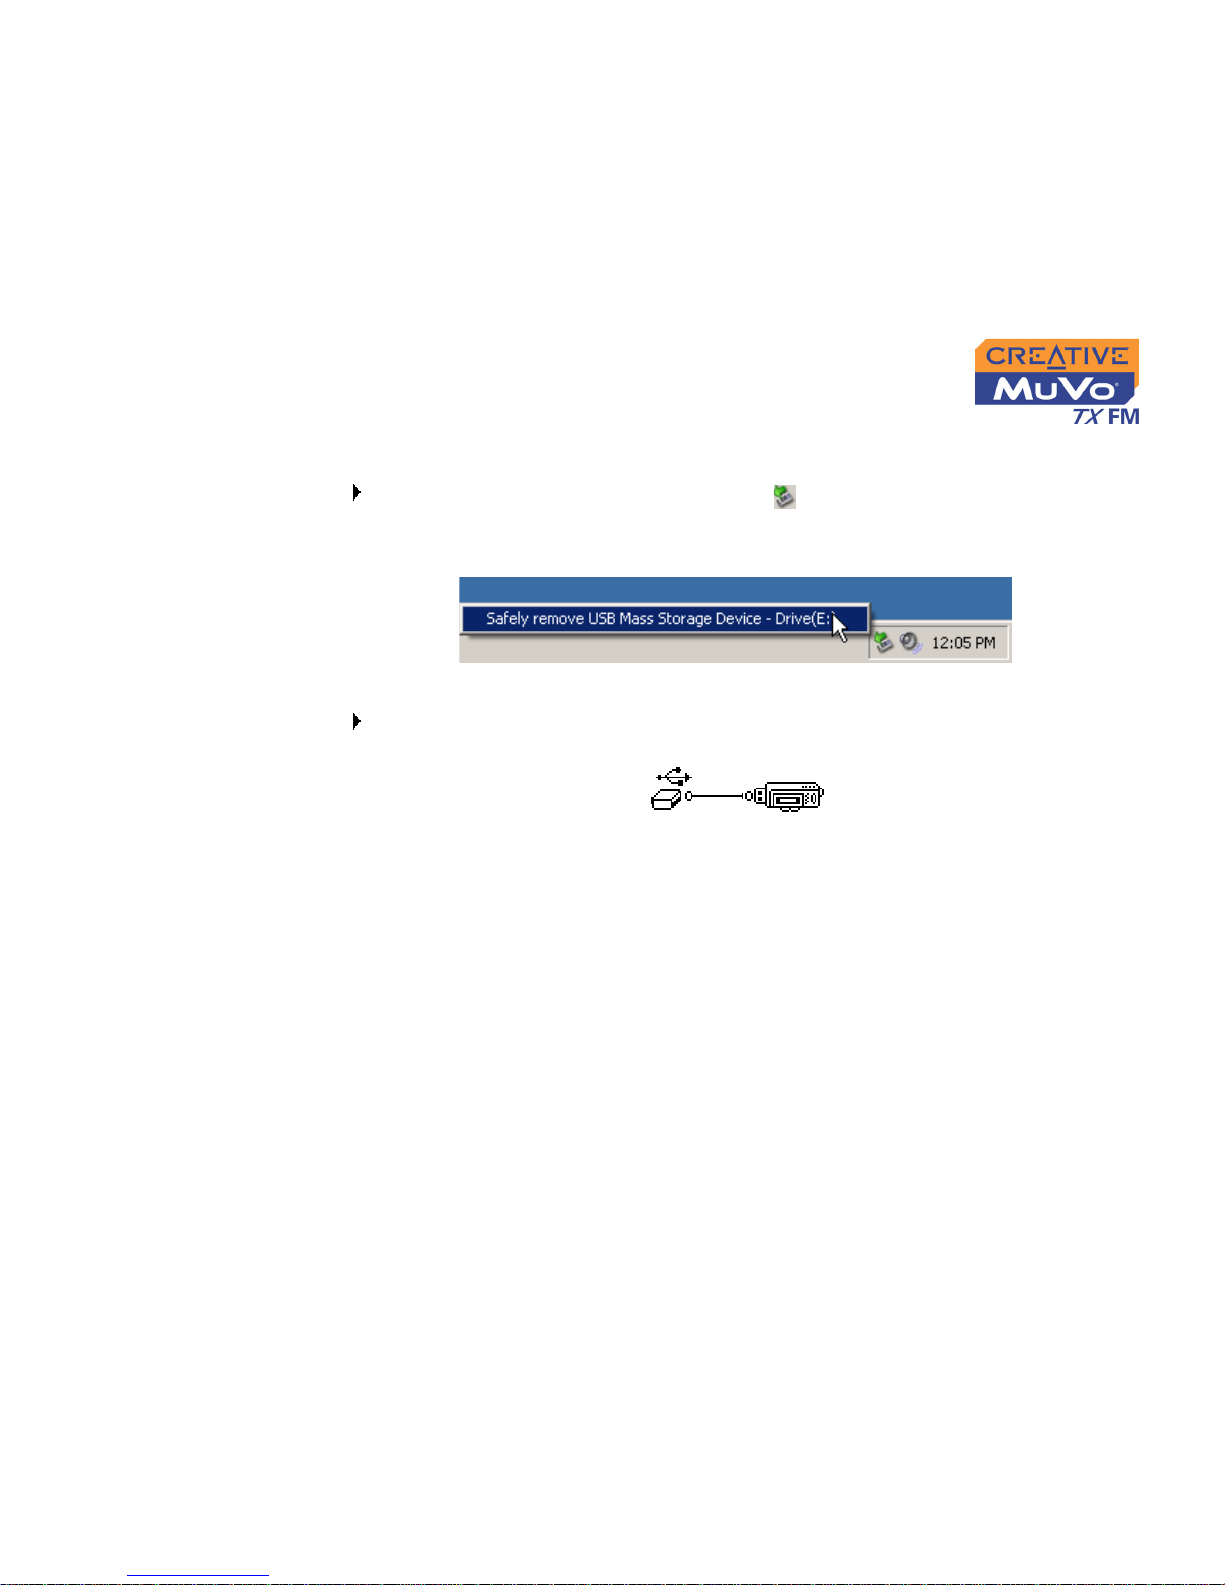
Click the Safely Remove Hardware icon on the Taskbar, click Safely
remove USB Mass Storage Device, and disconnect your player when you are
prompted to do so.
To disconnect your player in Windows 98 SE
Make sure that the icon below appears on the LCD screen for at least five
seconds before disconnecting your player.
Page 35
Using Your Player 4-4
Music
Playback
To add audio tracks to your player, see "Transferring Tracks or Files" on
page 3-3.
If you are in Recordings mode and the Recordings Mode icon appears
onscreen, do the following to return to Music mode.
To enable Music mode
1. Press the Scroller.
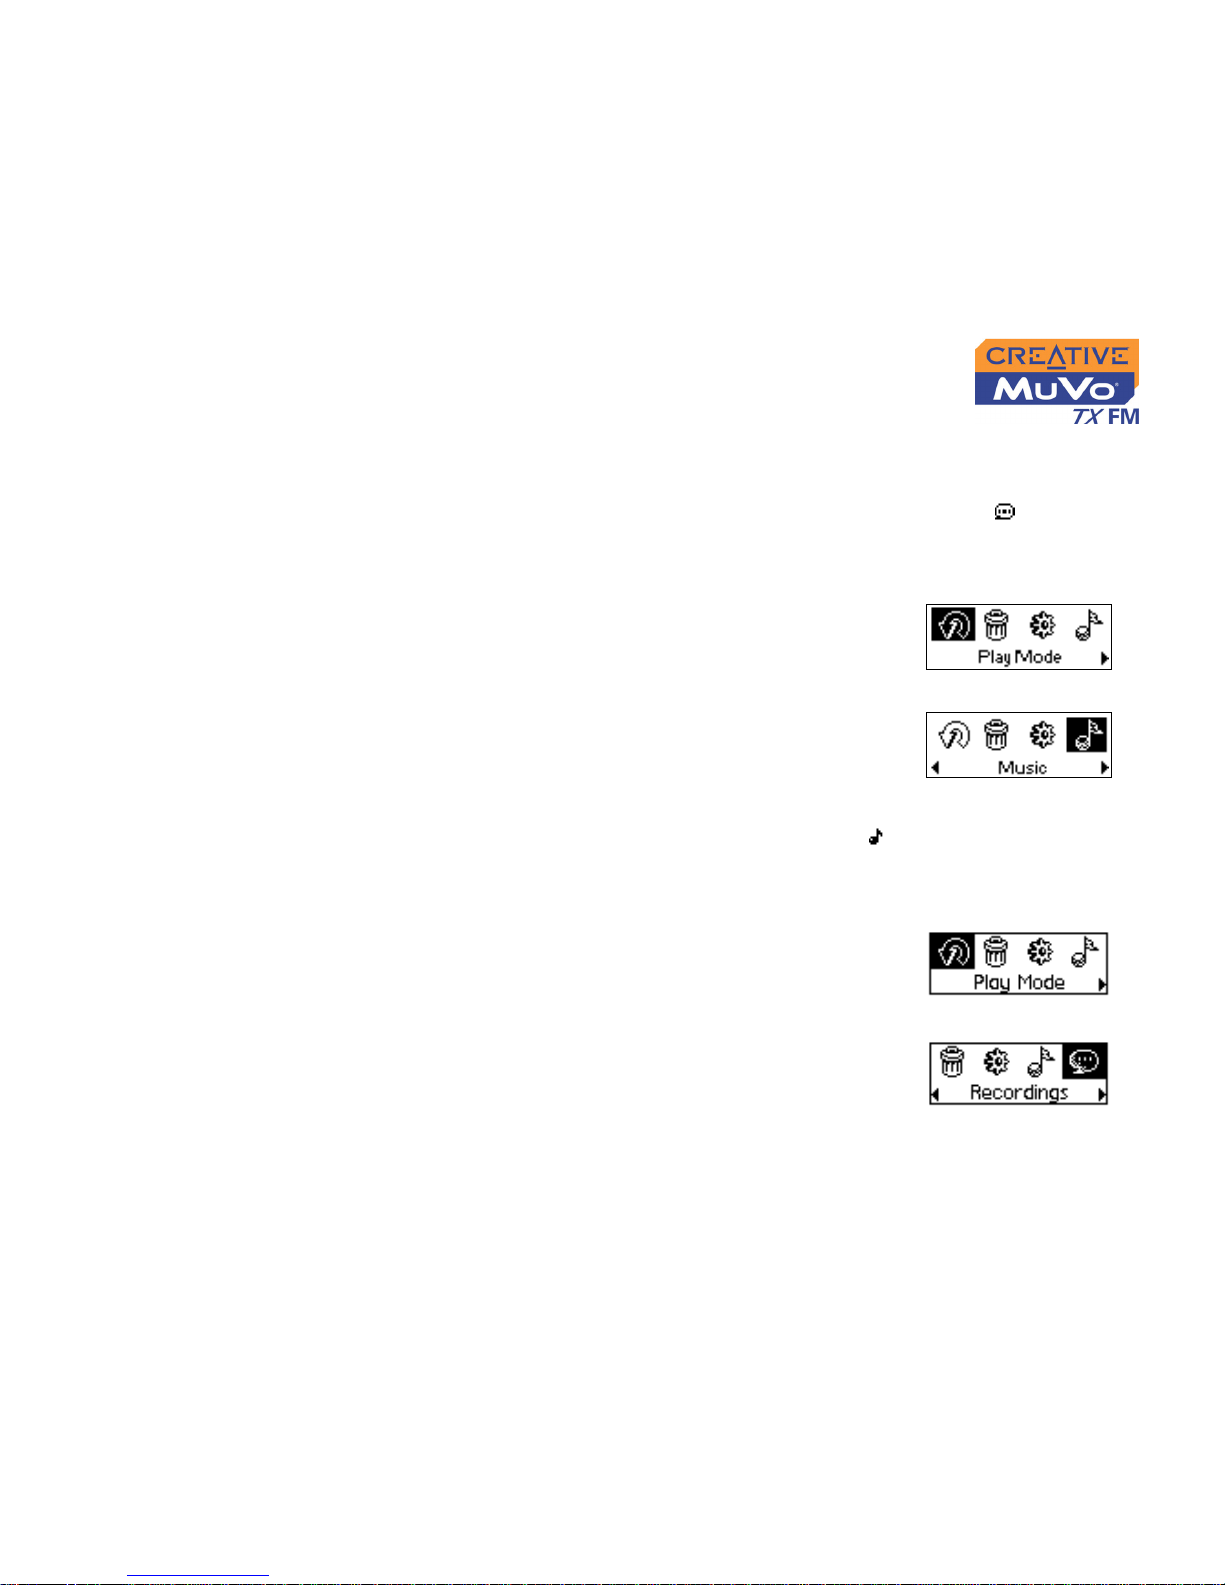
The Main Menu (Figure 4-1) appears.
2. Scroll Select the Music icon (Figure 4-2).
If you are in Music mode and the Music Mode icon appears onscreen, do
the following to return to Recordings mode.
To enable Recordings mode
1. Press the Scroller.
The Main Menu (Figure 4-3) appears.
2. Scroll Select the Recordings icon (Figure 4-4).
Figure 4-1
Figure 4-2
Figure 4-3
Figure 4-4
Page 36
Using Your Player 4-5
Playing music
tracks
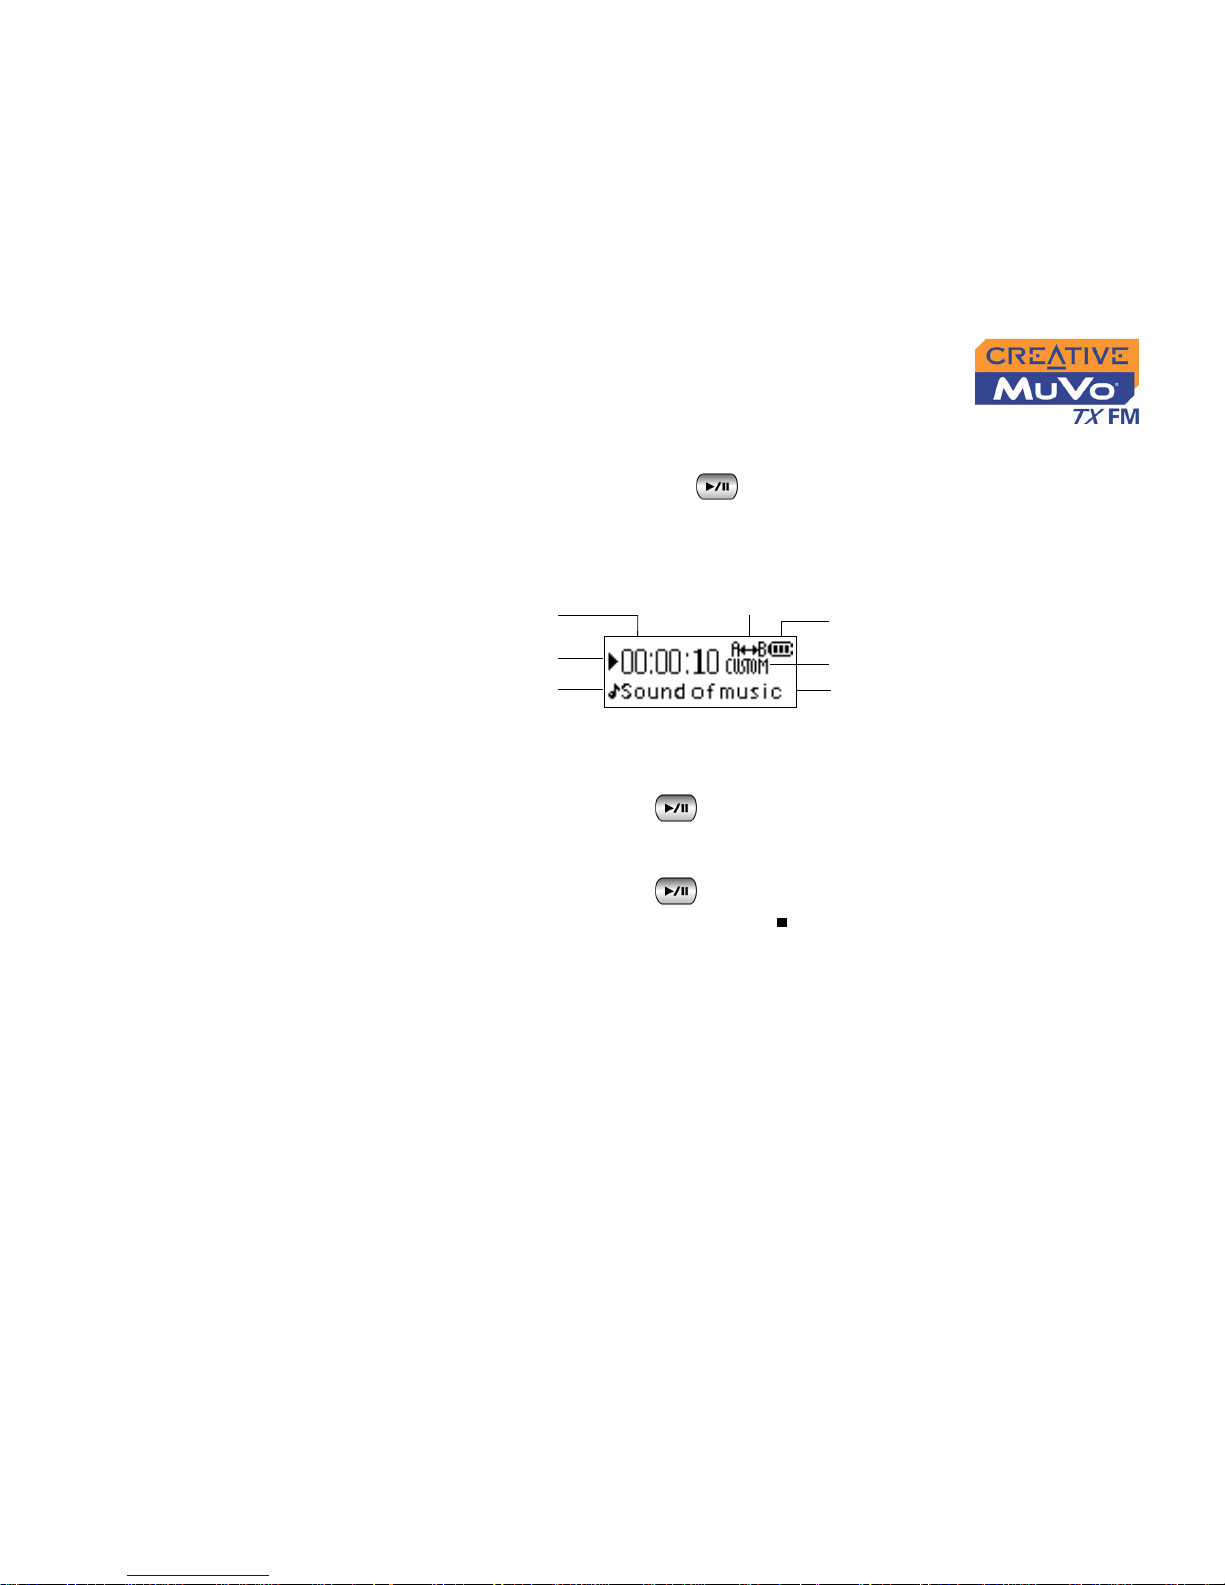
Follow these steps to play music tracks.
1. Press the Play/Pause button for a few seconds.
The MuVo TX FM logo appears onscreen, and music tracks stored in
your player are automatically played back.
To pause a track
Press the Play/Pause button .
To stop a track
Press the Play/Pause button to pause the track, and then turn the
Scroller towards the right. The Stop icon appears onscreen.
Play Mode
Icon
Play Status Icon
EQ Setting Icon
Battery Level
Indicator
Track Title
Elapsed time
Music Mode Icon
Page 37

Using Your Player 4-6
Play Modes
Your player has Play Modes that allow you to change how your tracks are
played back.
The following Play Modes are available:
❍ A-B
❍ Repeat Track
❍ Repeat All
❍ Repeat Folder
❍ Track Once
❍ Shuffle Repeat
❍ Shuffle Once
❍ Shuffle Folder
❍ Normal
Play Modes are disabled by setting the “Normal” mode as described in
"Normal mode" on page 4-11.
Only one Play Mode
can be enabled at a
time.
Page 38
Using Your Player 4-7
Repeating music You can choose to repeat a track, folder, all tracks or a portion of a track.
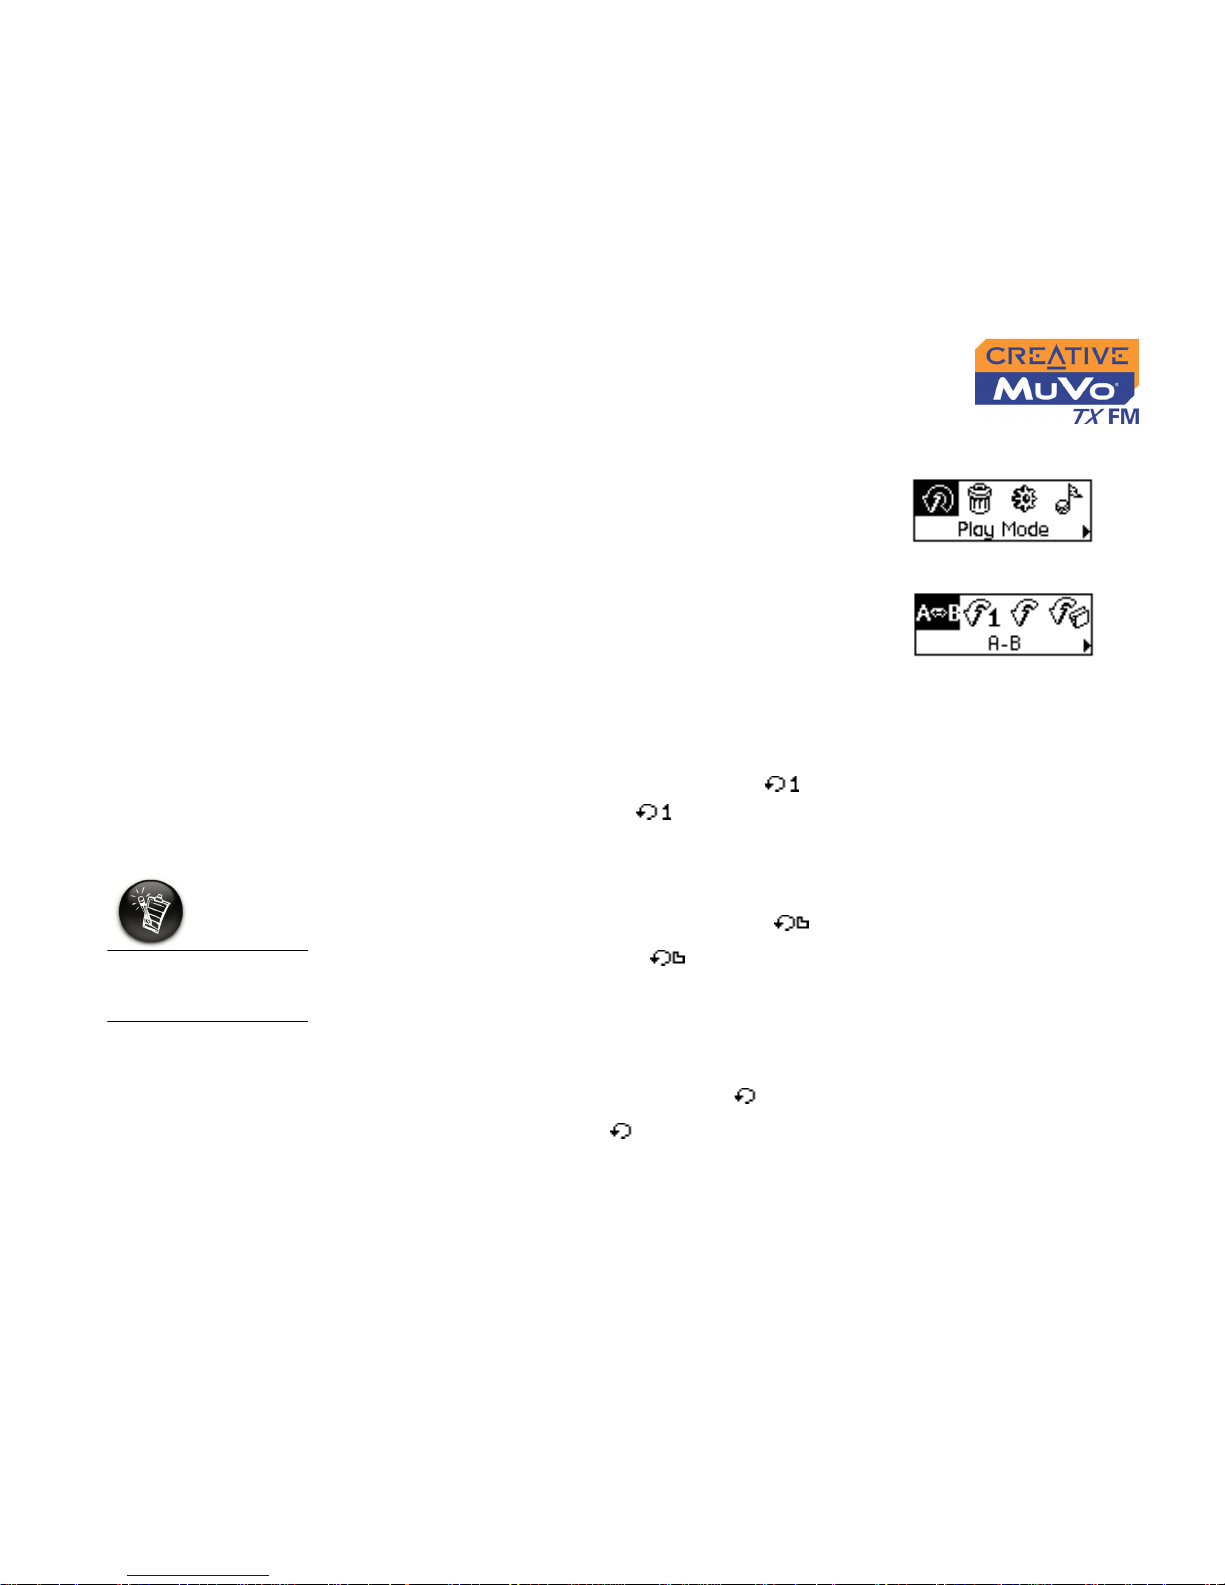
1. Press the Scroller.
The Main Menu (Figure 4-5) appears.
2. Scroll Select the Play Mode icon. A list appears
(Figure 4-6).
3. Depending on which mode you want, follow the
corresponding step:
To repeat a track in the Playing List
Scroll Select the Repeat Track icon .
The Repeat T rack icon appears onscreen and the track is repeated
continuously until you stop it or skip to another track.
To repeat a folder
Scroll Select the Repeat Folder icon .
The Repeat Folder icon appears onscreen and tracks in the
current folder are repeated continuously until you stop them or skip to
another folder.
To repeat all tracks
Scroll Select the Repeat All icon .
The Repeat All icon appears onscreen and all tracks are repeated
continuously until you stop playback.
Figure 4-5
Figure 4-6
Repeat Folder Mode
is only available in
Music mode.
Page 39
Using Your Player 4-8
To repeat a portion of a track
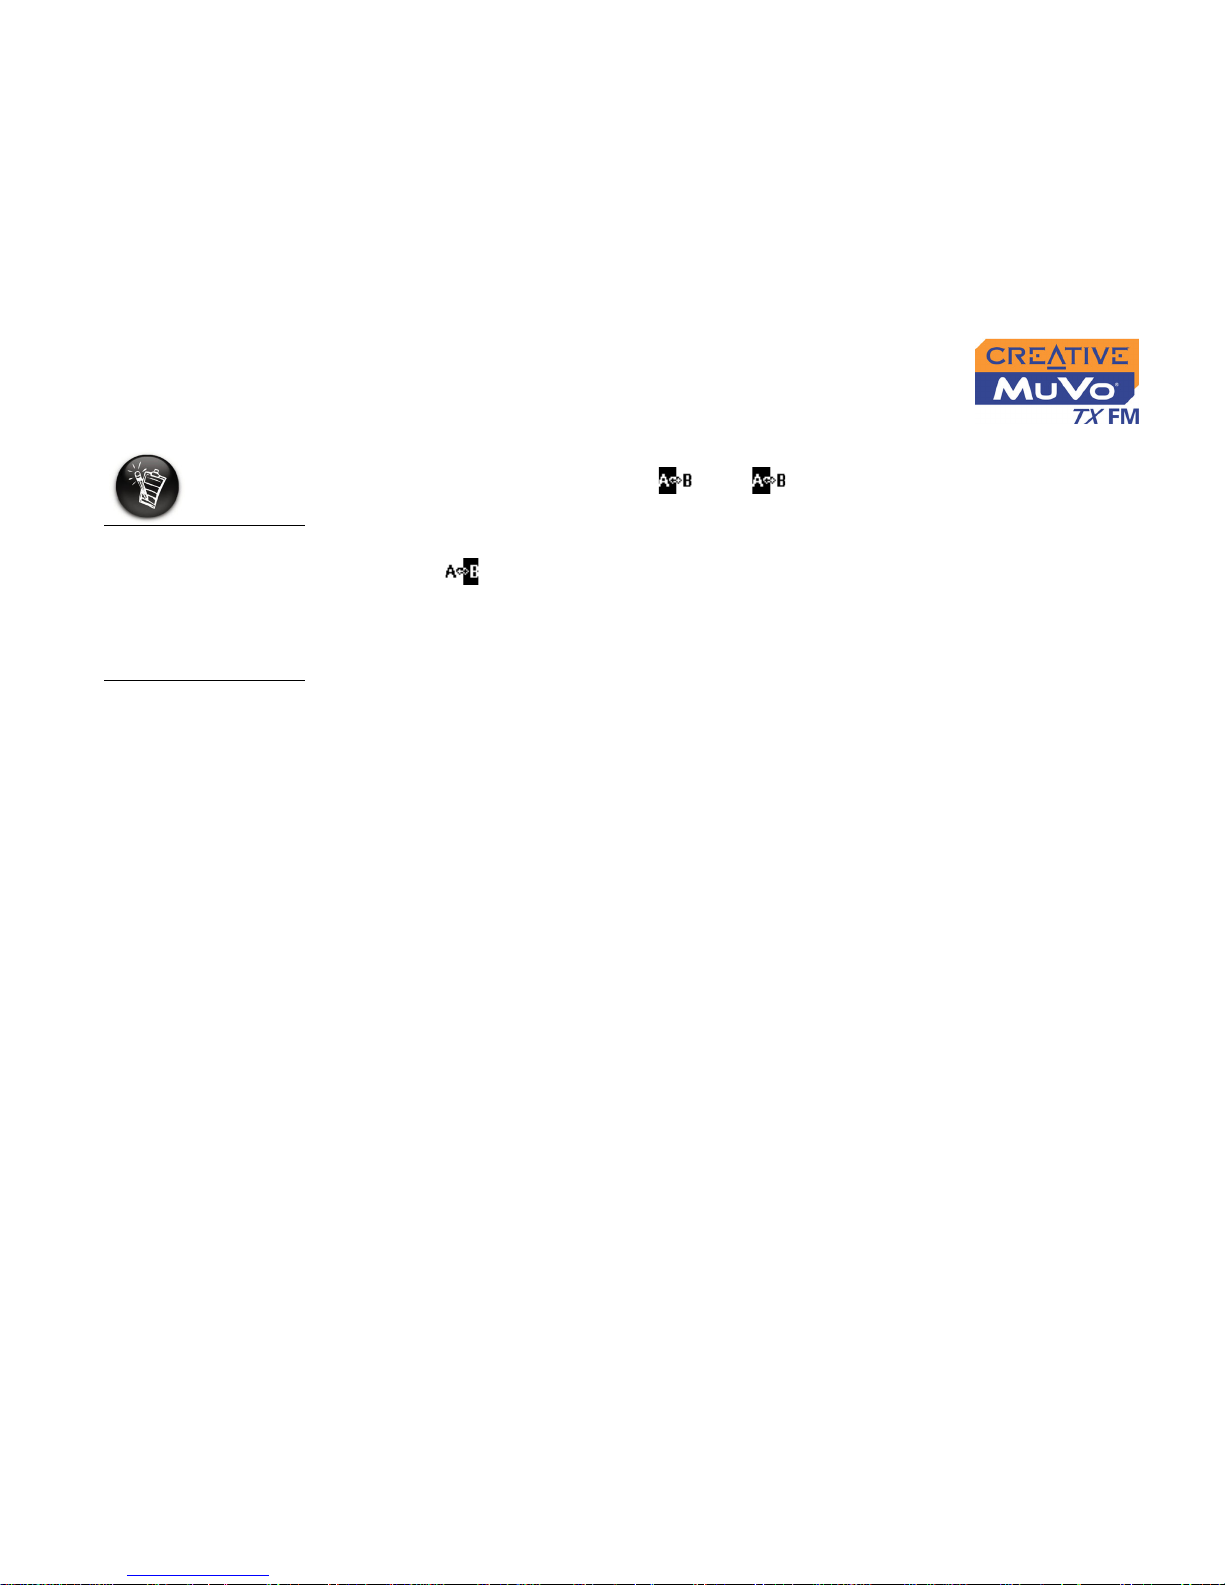
1. Scroll Select the A-B icon . The icon appears, prompting you to
select a start point for the portion of music to repeat.
2. Press the Scroller to mark the begining of the portion you wish to repeat.
The icon appears, prompting you to select an end point for the
repeat function.
3. Press the Scroller again, to mark the end point of the portion of music to
repeat. The marked portion of music is played back repeatedly.
4. To resume normal playback, enable “Normal” mode as described in
"Normal mode" on page 4-11.
A portion of a track
can only be repeated
once; marking a new
portion will
automatically
remove any markers
in the track.
Page 40
Using Your Player 4-9
Shuffling music The Shuffle Play Mode can be used to shuffle all tracks (or tracks in a folder)
once, or to repeatedly shuffle all tracks.
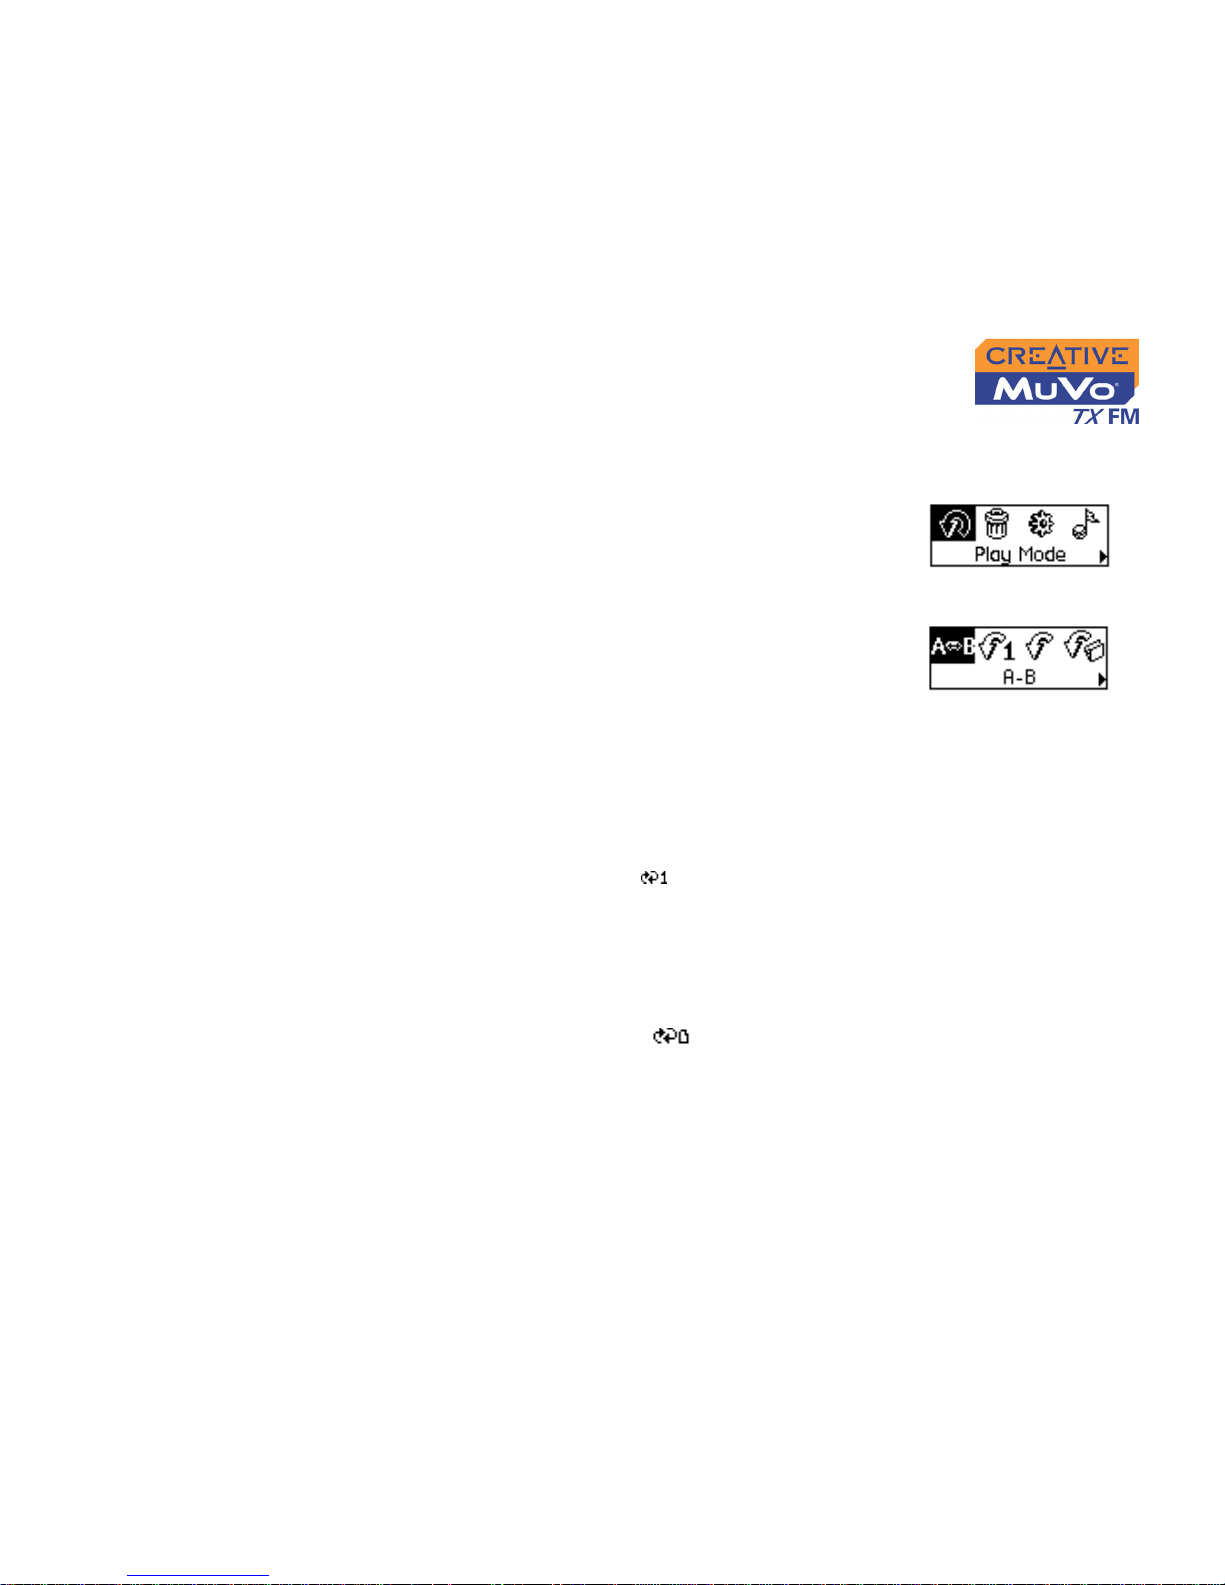
1. Press the Scroller.
The Main Menu (Figure 4-7) appears.
2. Scroll Select the Play Mode icon. A list appears
(Figure 4-8).
Depending on which mode you want, follow the corresponding step:
To shuffle all tracks once
Scroll Select the Shuffle Once icon.
The Shuffle Once icon appears onscreen and a track is selected in
random sequence and played back. Playback stops once all the tracks in
your player are played back once.
To shuffle a folder once
Scroll Select the Shuffle Folder icon.
The Shuffle Folder icon appears onscreen and all tracks in the
folder are selected at random and played back. Playback stops once all
the tracks in the folder are played back once.
Figure 4-7
Figure 4-8
Page 41
Using Your Player 4-10
To Shuffle Repeat all tracks continuously
Scroll Select the Shuffle Repeat icon.
The Shuffle Repeat icon appears onscreen. Tracks are in random
sequence and played back continuously until you stop playback.
Playing a track
once
When the Track Once Play Mode is enabled, playback stops once the
current track ends.
1. Press the Scroller.
The Main Menu (Figure 4-9) appears.
2. Scroll Select the Play Mode icon. A list appears.
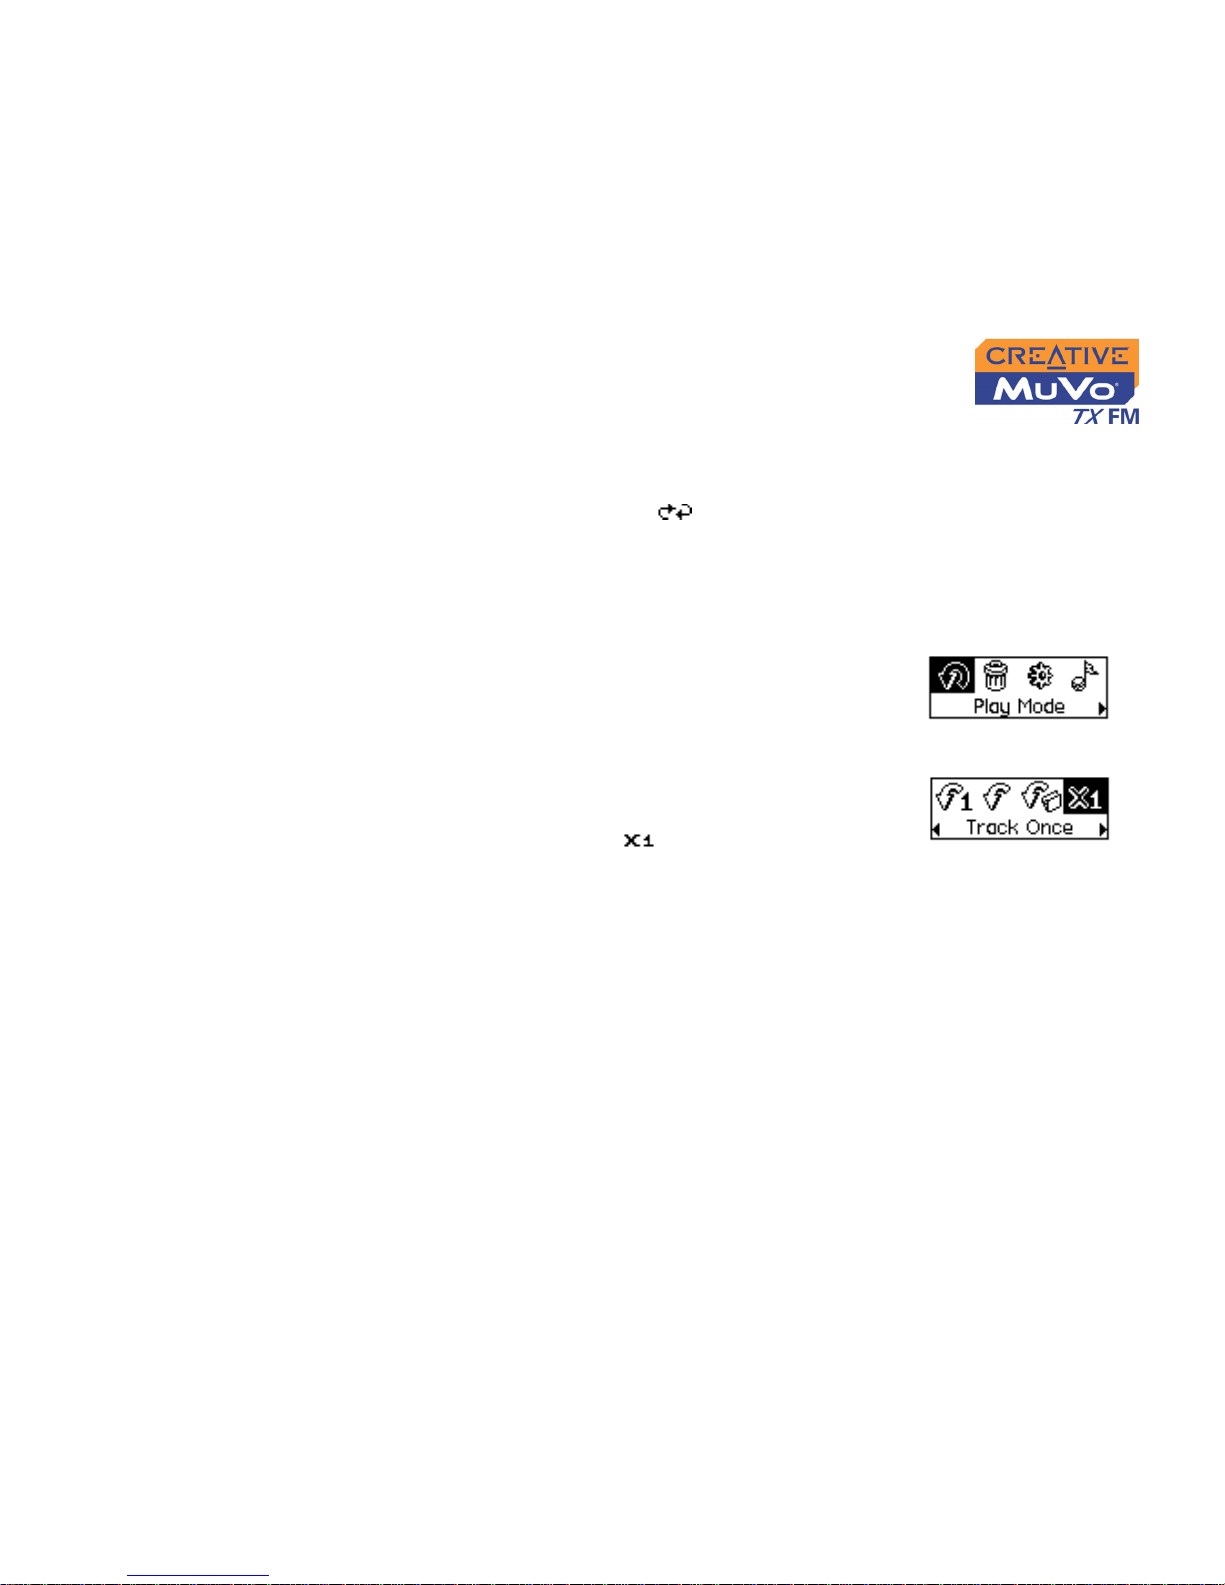
3. Scroll Select the Tr ack Once icon (Figure 4-10).
The Track Once icon appears onscreen.
Playback stops once the track ends.
Figure 4-9
Figure 4-10
Page 42
Using Your Player 4-11
Normal mode Once the "Normal" mode is enabled, each track is played back, from the first
track to the last.
1. Press the Scroller.
The Main Menu (Figure 4-11) appears.
2. Scroll Select the Play Mode icon. A list appears.
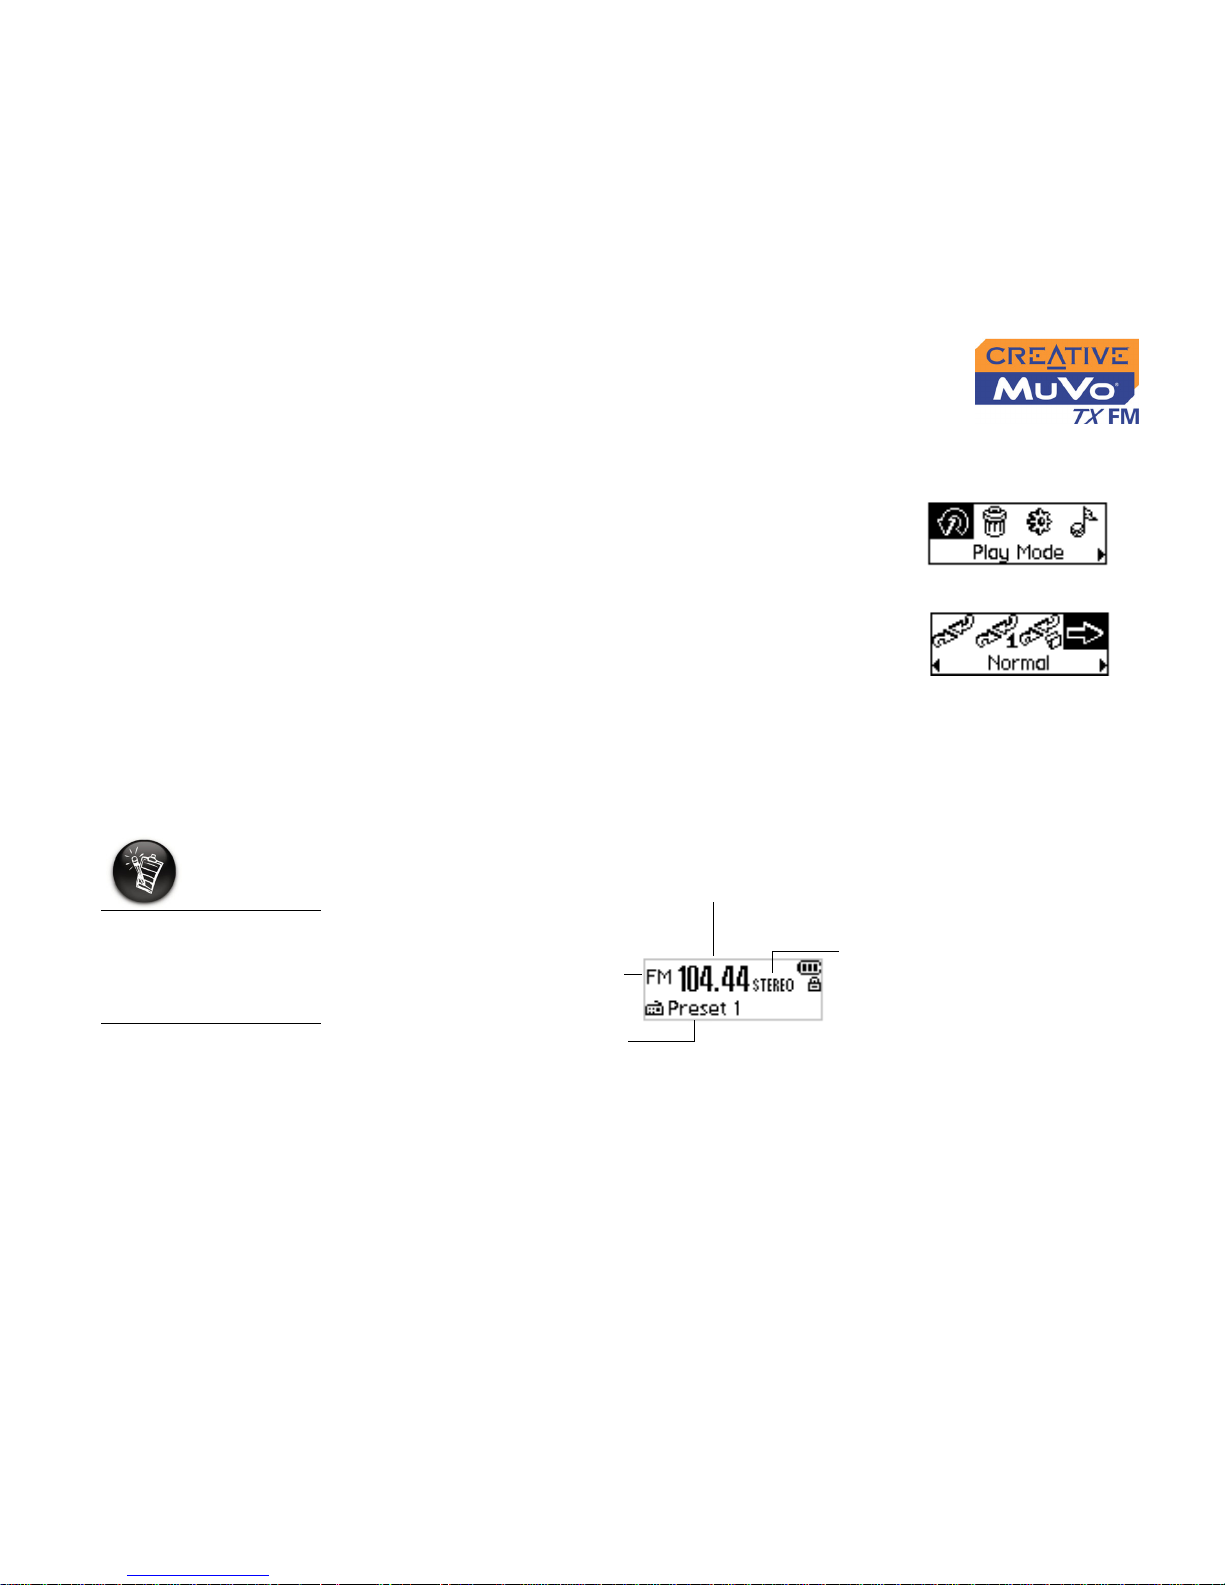
3. Scroll Select the Normal icon (Figure 4-12). All
tracks play back normally.
Listening to FM
Radio
With MuVo TX FM, you can listen to your favorite radio station. Your player
can automatically scan for stations available in your region, and store the
stations as presets for you. In FM Radio mode, your player will display the
current radio channel and its preset number.
To change the FM region
Perform these steps first when scanning for stations for the first time.
Figure 4-11
Figure 4-12
If there are no saved
preset channels in your
player, the "No preset
found" message will
appear on the screen.
Preset number
FM radio channel
FM radio mode
FM tuning status
Figure 4-13
Page 43
Using Your Player 4-12
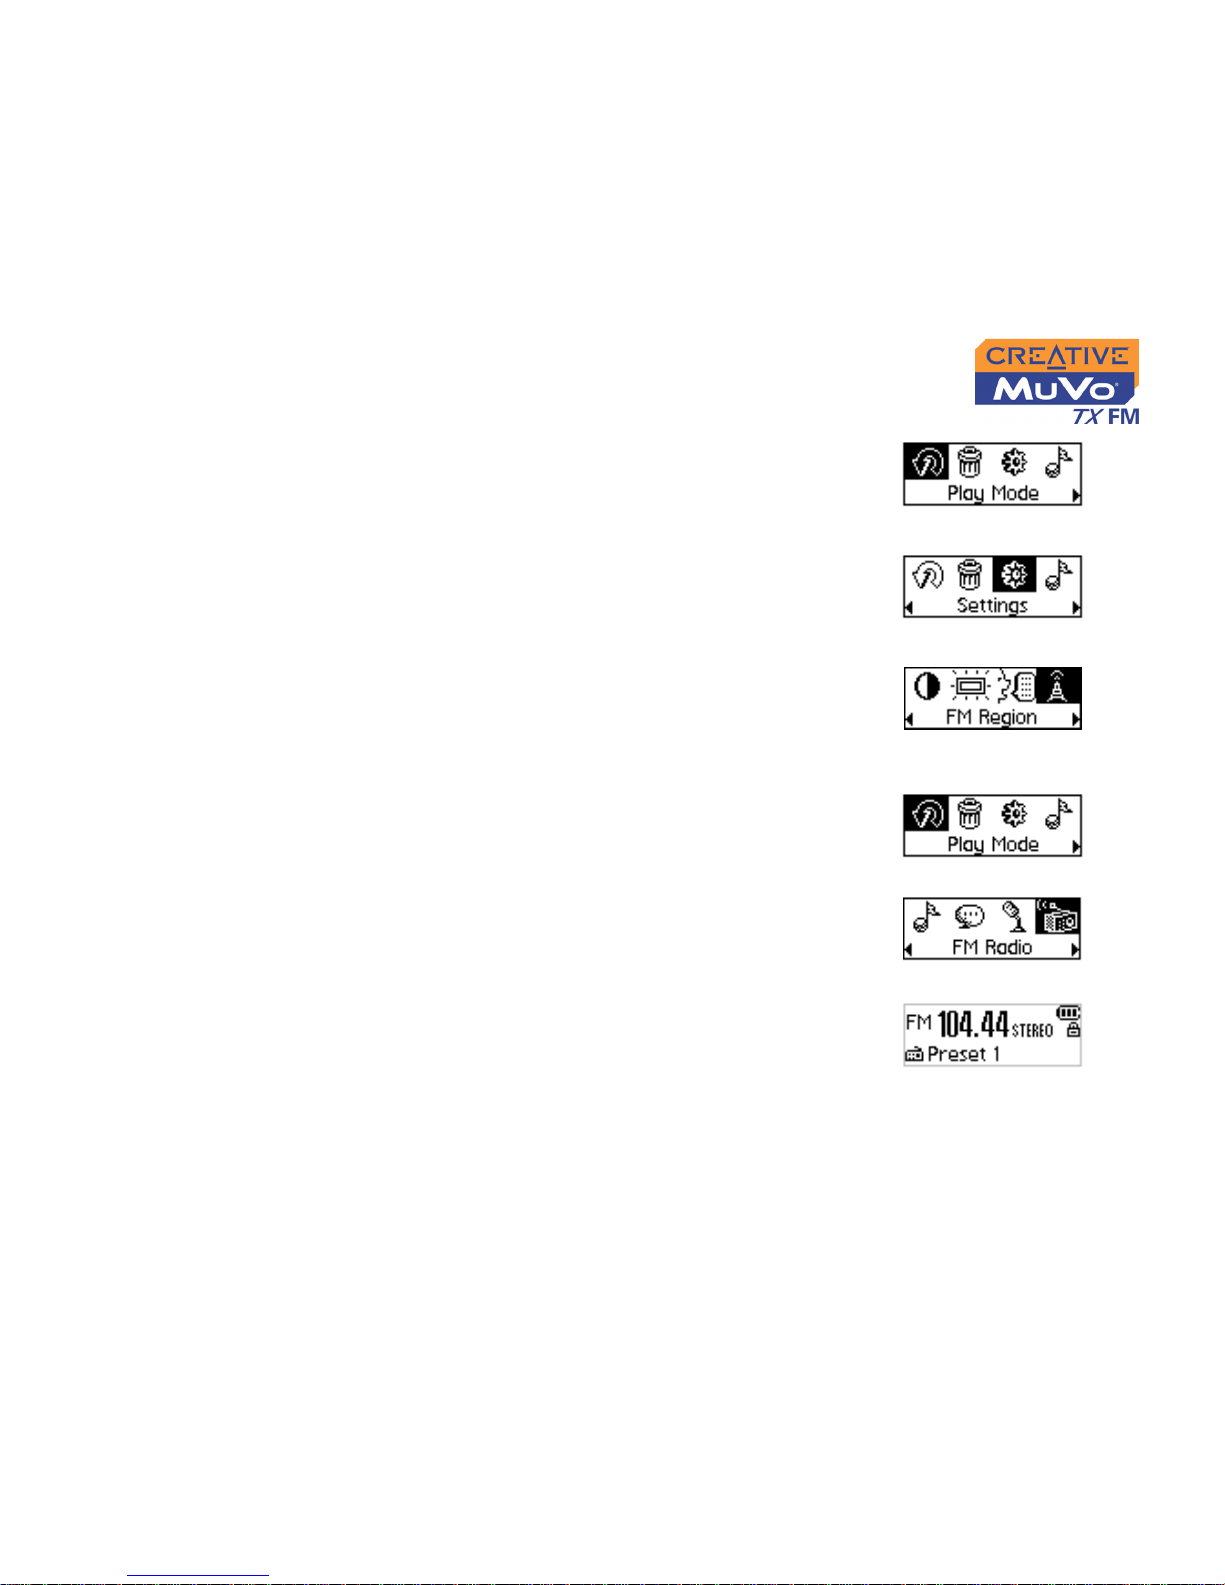
1. Press the Scroller.
The Main Menu (Figure 4-14) appears.
2. Scroll Select the Settings icon (Figure 4-15).
A list appears.
3. Scroll Select the FM Region icon (Figure 4-
16). A list appears.
4. Scroll Select the region that you are in.
To perform an autoscan and autosave
1. Press the Scroller.
The Main Menu similar to Figure 4-17
appears.
2. Scroll Select the FM Radio icon (Figure 4-18).
A radio frequency appears on the LCD screen
(Figure 4-19).
3. Press the Scroller.
Figure 4-14
Figure 4-15
Figure 4-16
Figure 4-17
Figure 4-18
Figure 4-19
Page 44
Using Your Player 4-13
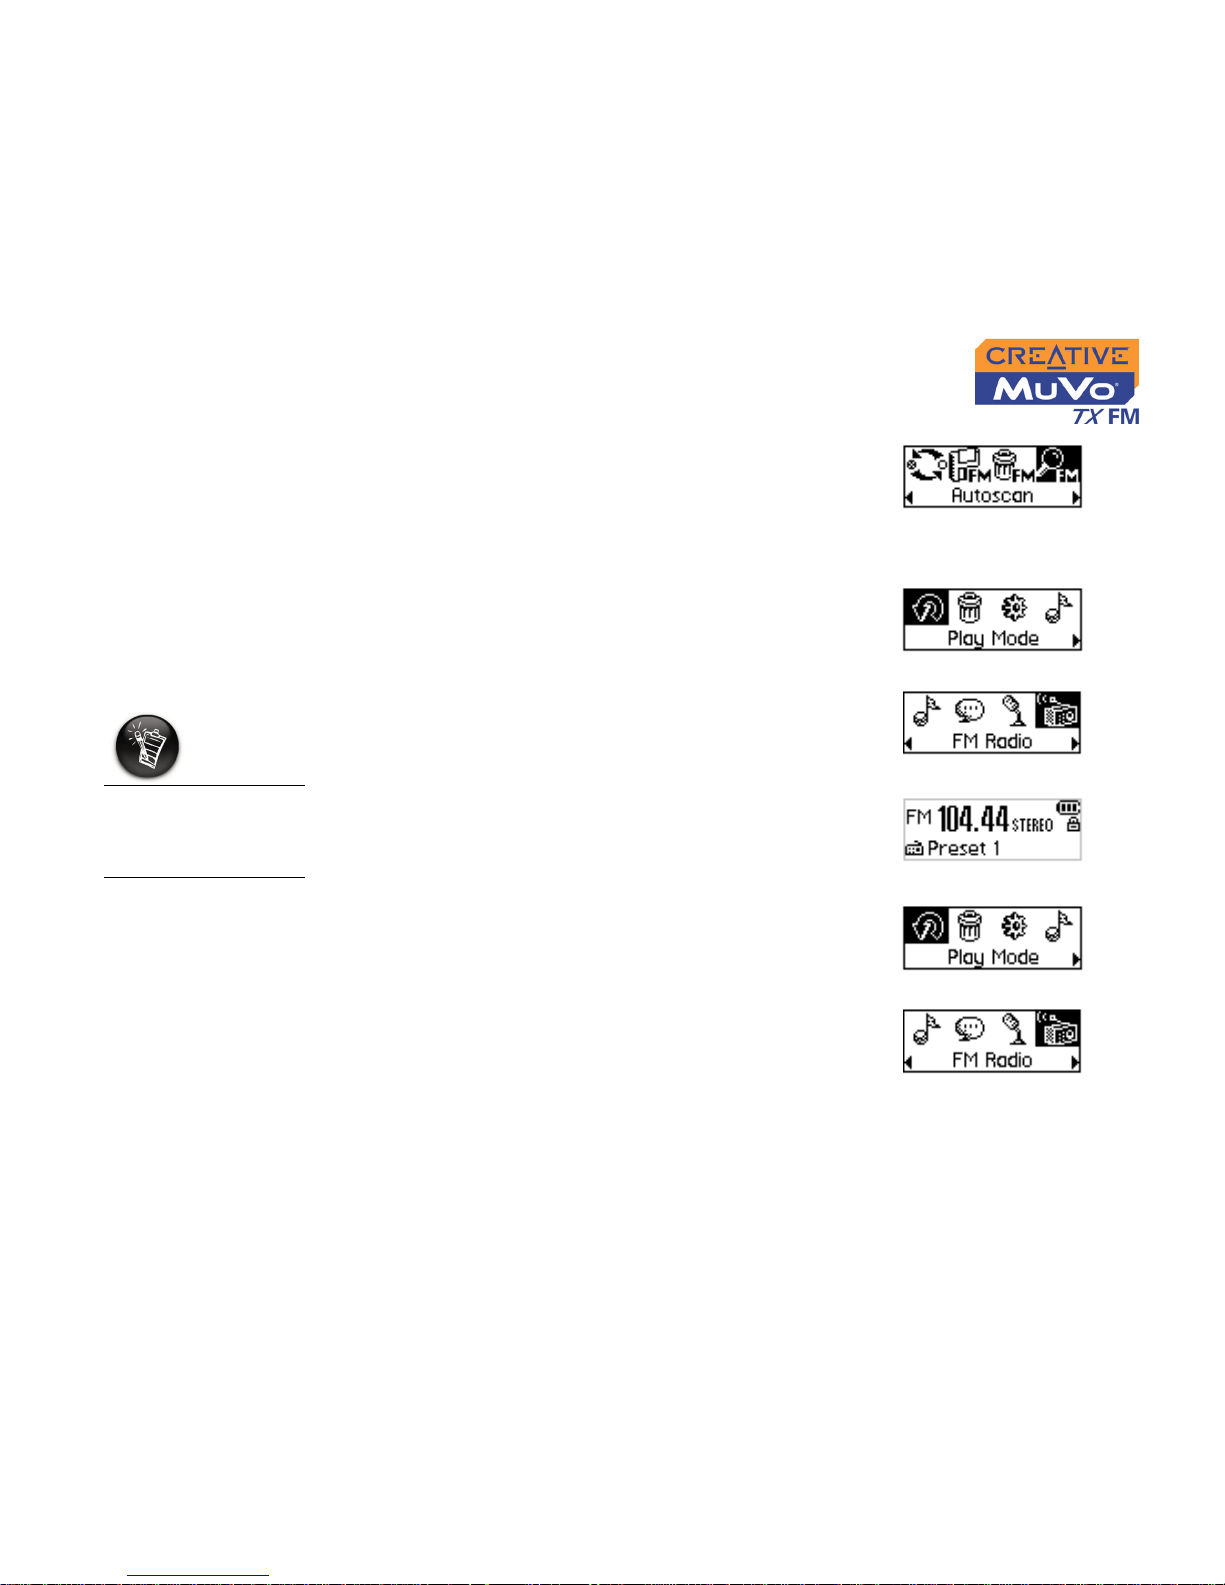
4. Scroll Select the Autoscan icon (Figure 4-20).
The player scans and stores channels it
detects. At the end of the autoscan, it plays
the first channel.
To select a channel
1. Press the Scroller.
The Main Menu similar to Figure 4-21
appears.
2. Scroll Select the FM Radio icon (Figure 4-22).
A radio frequency appears on the LCD screen
(Figure 4-23).
3. Turn the Scroller to select the preset channel
you want.
To set a preset channel
1. Press the Scroller.
The Main Menu similar to Figure 4-24
appears.
2. Scroll Select the FM Radio icon (Figure 4-25).
A radio frequency appears on the LCD screen
(Figure 4-26).
Figure 4-20
Figure 4-21
Figure 4-22
If you do not see a
preset channel, press
the Play/Pause
button.
Figure 4-23
Figure 4-24
Figure 4-25
Page 45
Using Your Player 4-14
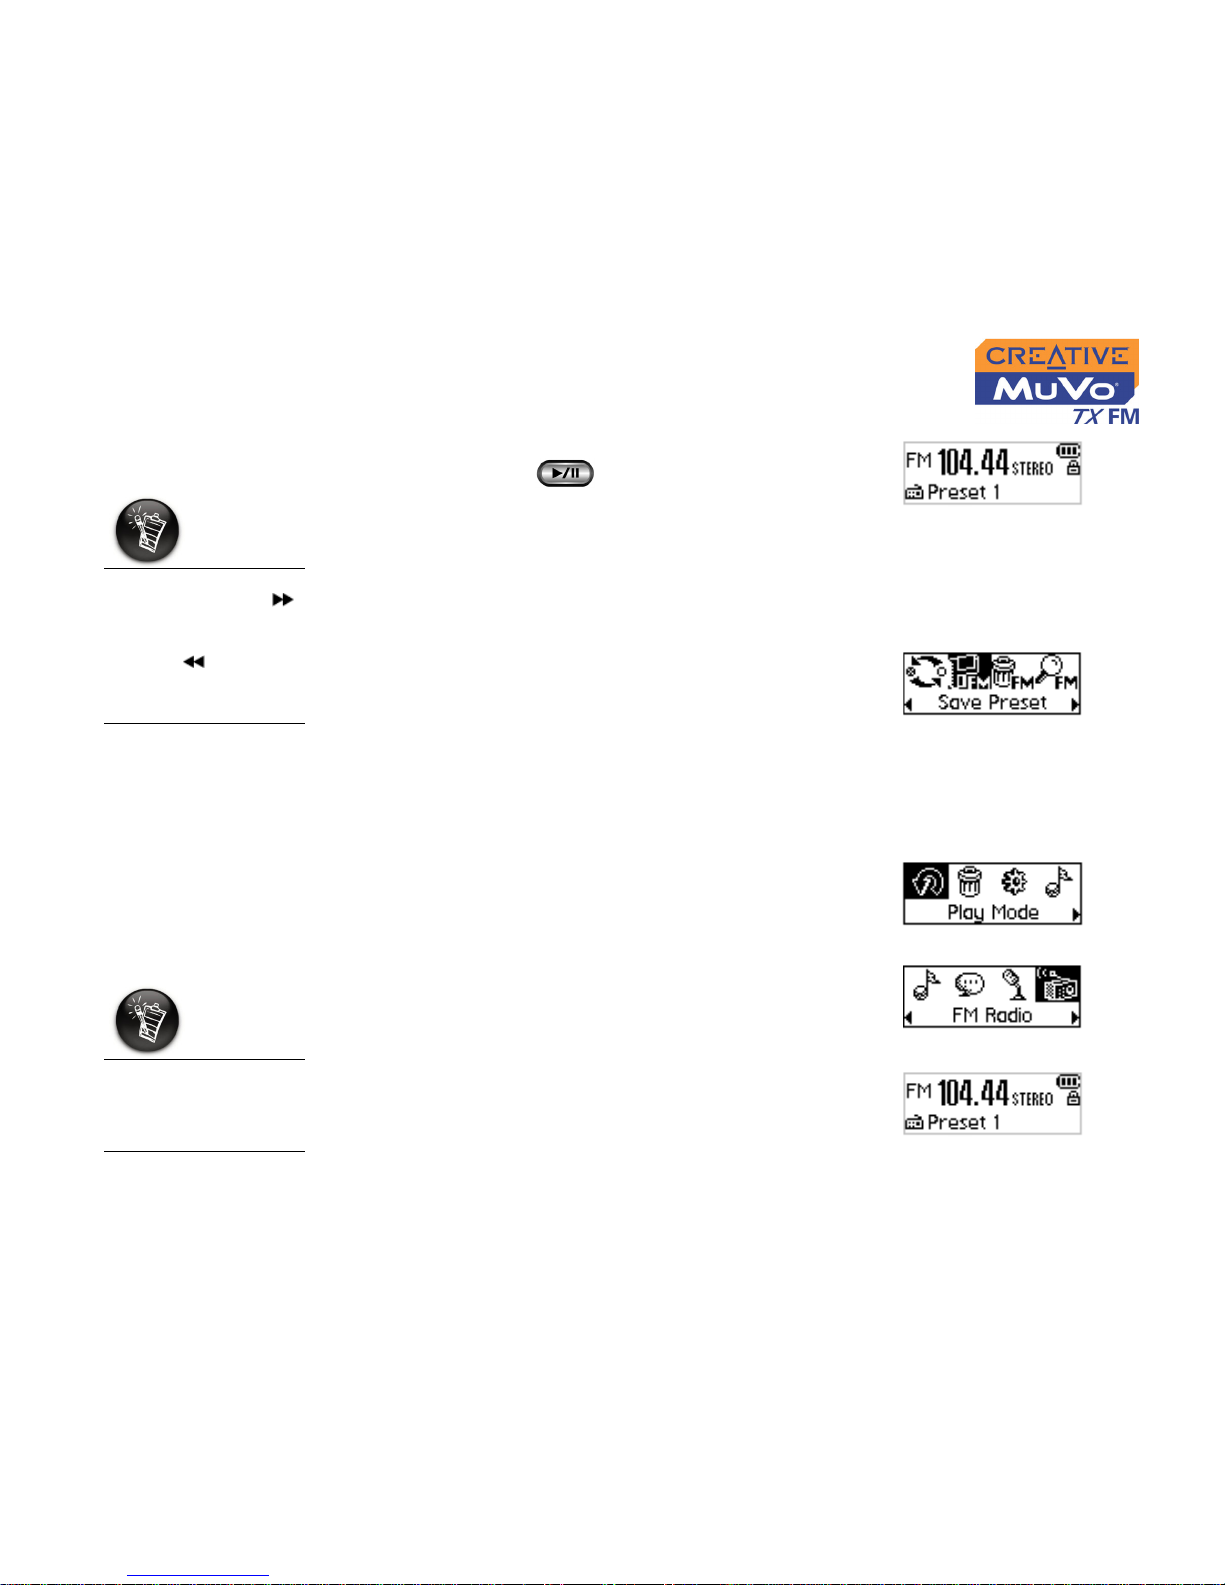
3. If you see a preset channel, press the Play/
Pause button to switch to Manual Scan
view. The preset channel disappears.
4. To scan for a channel, move the Scroller
towards the right or left, and hold for one
second.
5. Press the Scroller.
6. Scroll Select the Save Preset icon (Figure 4-
27).
7. Turn the Scroller to select the preset number
you want. Your channel is stored and appears
at the bottom-left corner of your screen.
8. Repeat steps 2 to 6 to store another channel.
To delete a preset channel
1. Press the Scroller.
The Main Menu similar to Figure 4-28
appears.
2. Scroll Select the FM Radio icon (Figure 4-29).
A radio frequency appears on the LCD screen
(Figure 4-30).
3. Turn the Scroller to select the preset channel
you want.
4. Press the Scroller.
Figure 4-26
Turn the Scroller
towards the right
to increase the
frequency or towards
the left to
decrease the
frequency.
Figure 4-27
Figure 4-28
Figure 4-29
If you do not see a
preset channel, press
the Play/Pause
button.
Figure 4-30
Page 46
Using Your Player 4-15
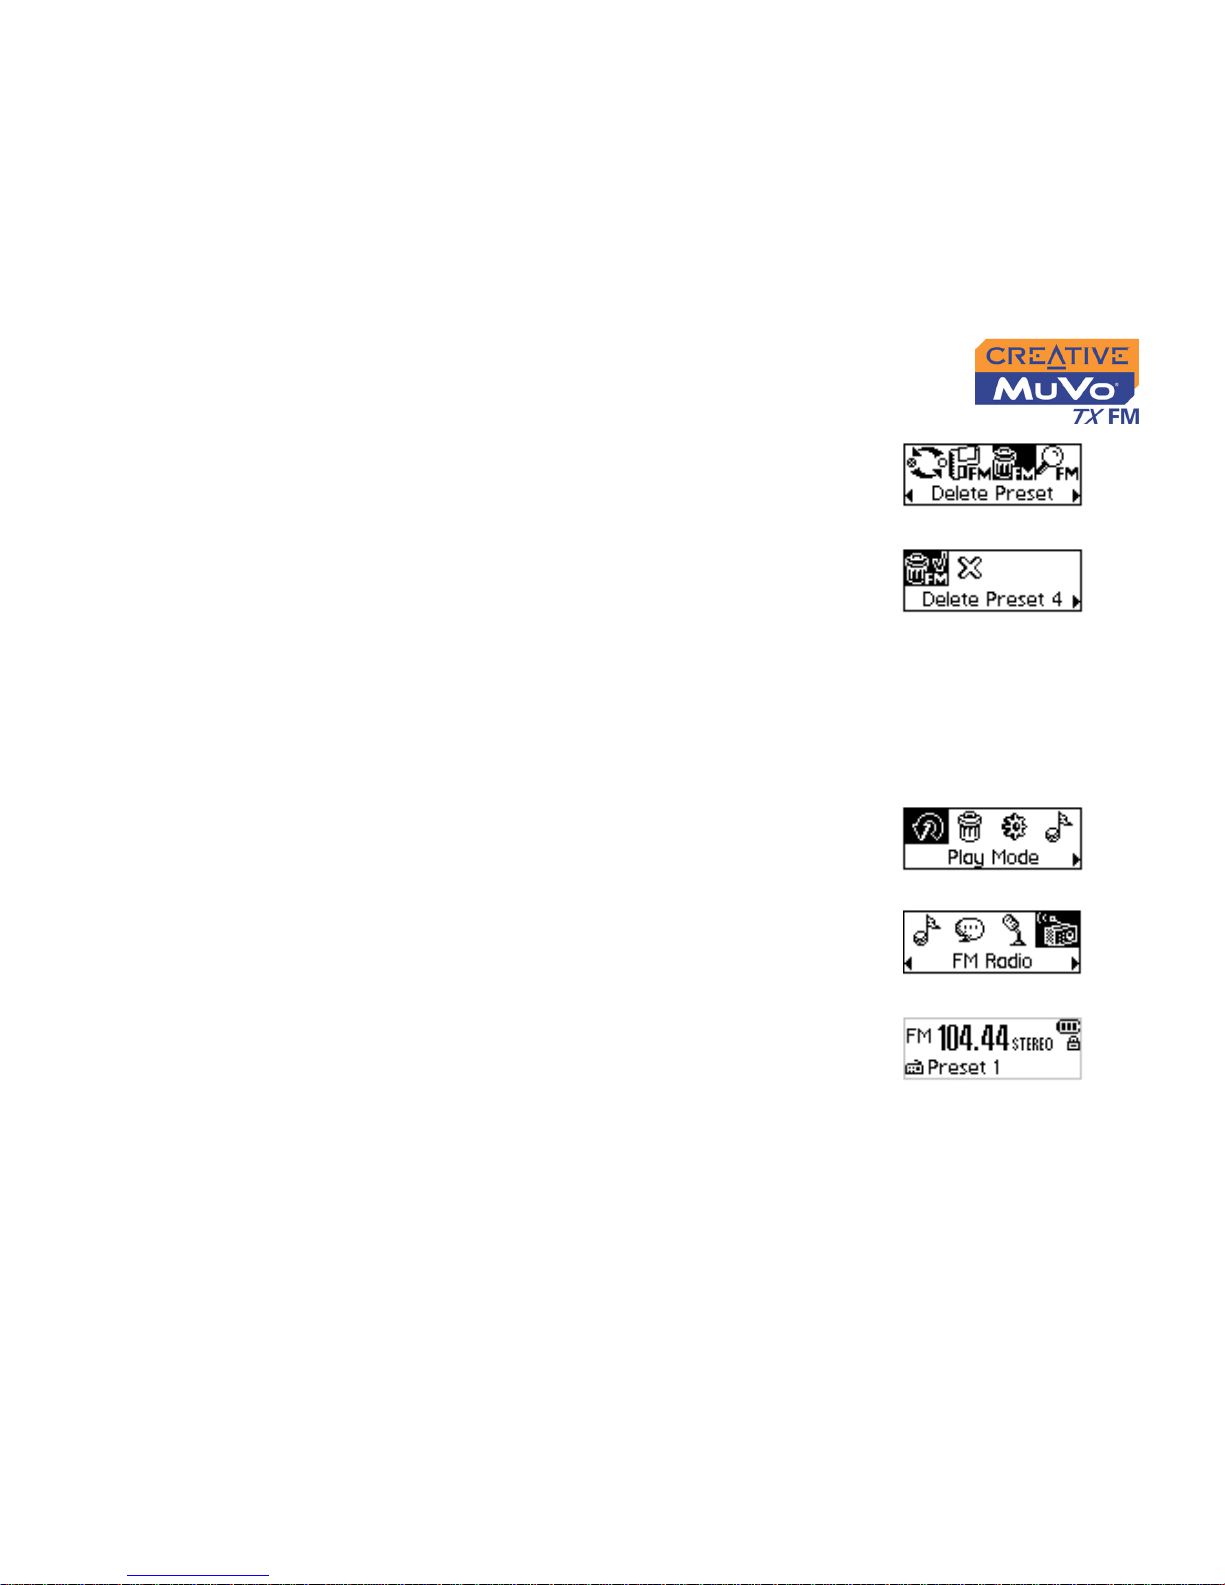
5. Scroll Select the Delete Preset icon (Figure
4-31).
6. Scroll Select the Delete Preset x icon (Figure
4-32). The preset channel is deleted and your
MuVo TX FM plays the next available preset
channel.
To s witch to FM P r eset view or M anual Scan
view
In FM Preset view, you can see the preset channels and scroll from one
preset channel to another. If you need to fine-tune the radio channel, switch
to Manual Scan view.
1. Press the Scroller.
The Main Menu similar to Figure 4-33
appears.
2. Scroll Select the FM Radio icon (Figure 4-34).
A radio frequency appears on the LCD screen
(Figure 4-35).
3. Press the Scroller.
Figure 4-31
Figure 4-32
Figure 4-33
Figure 4-34
Figure 4-35
Page 47
Using Your Player 4-16
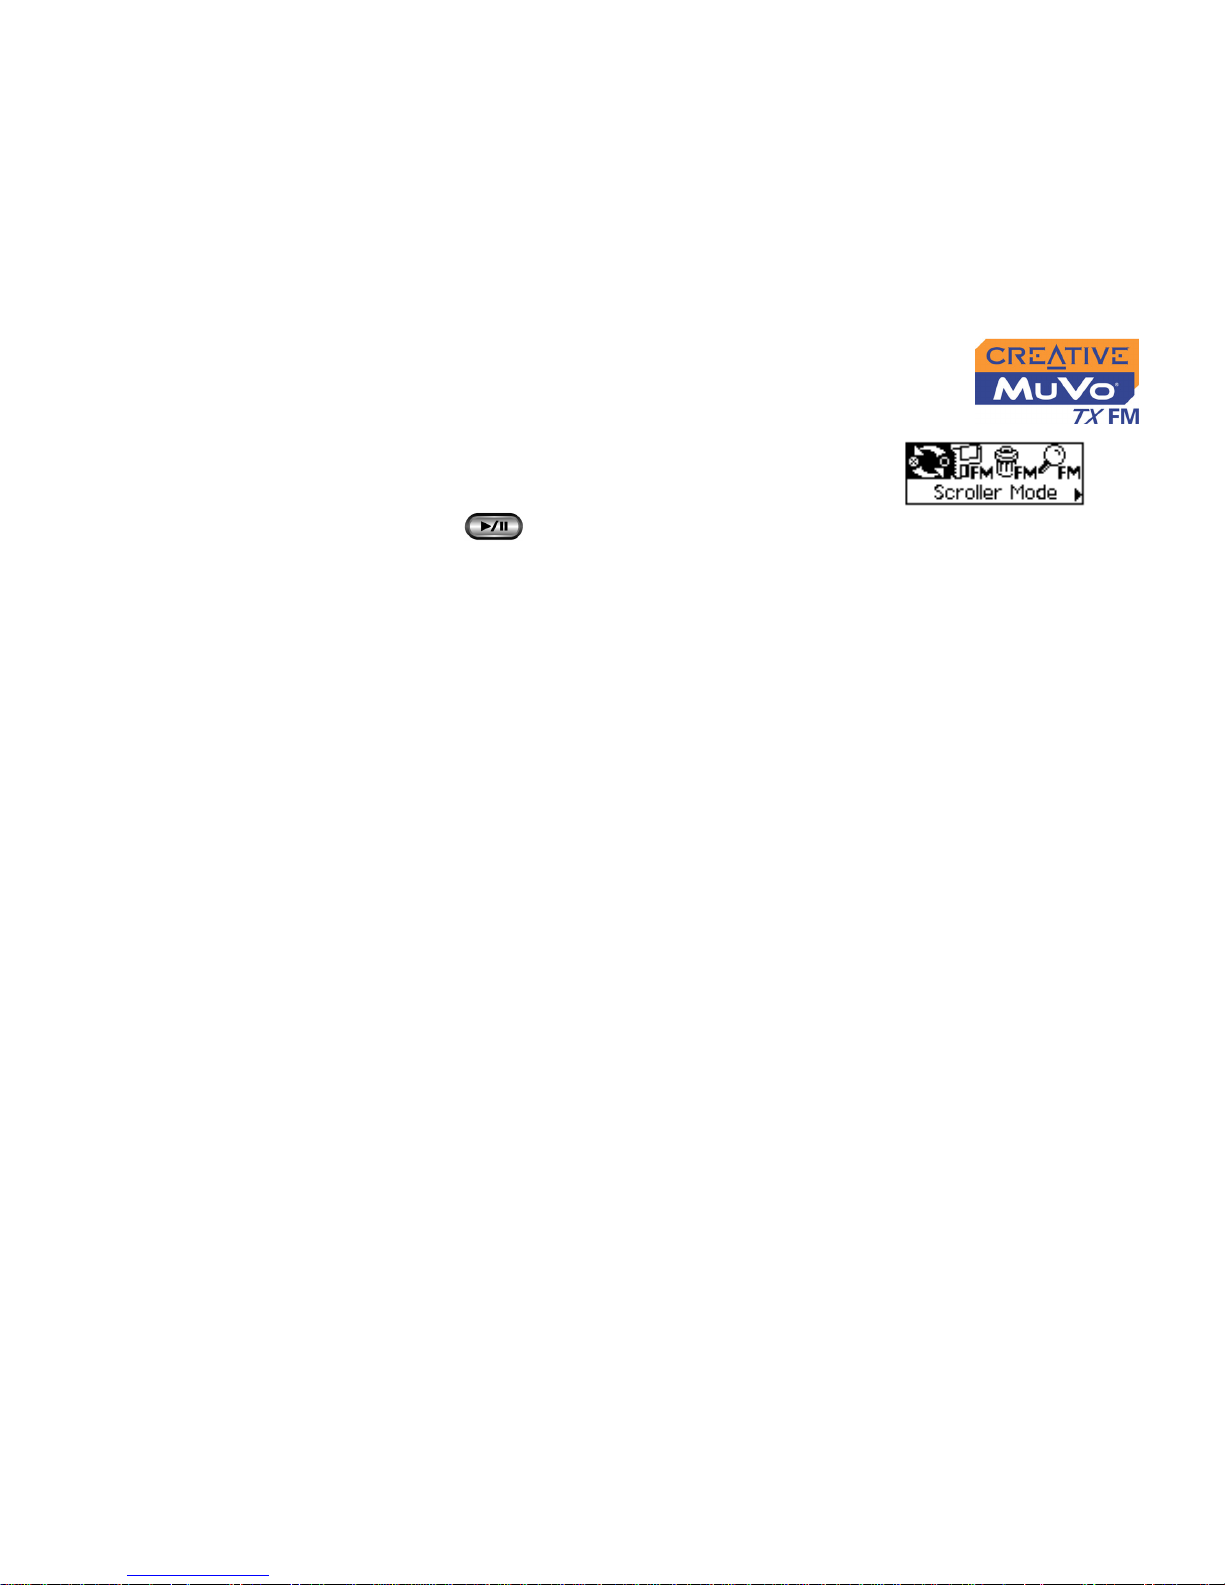
4. Scroll Select the Scroller mode icon (Figure
4-36) to switch to the different views.
Alternatively, you can press the Play/Pause
button to switch to the different views
while playing a station.
Figure 4-36
Page 48
Using Your Player 4-17
Voice
Recording
Another great MuVo TX FM feature is it s ability to record voice and FM radio.
Recorded voice is encoded directly into IMA ADPCM (at 8 kHz, 4-bit, Mono)
file format and recorded FM radio is encoded directly into IMA ADPCM (at 16
kHz, 4-bit, Stereo) file format.
When recording, note that the available recording time is determined by:
❍ available space in your player
❍ battery power remaining in your player
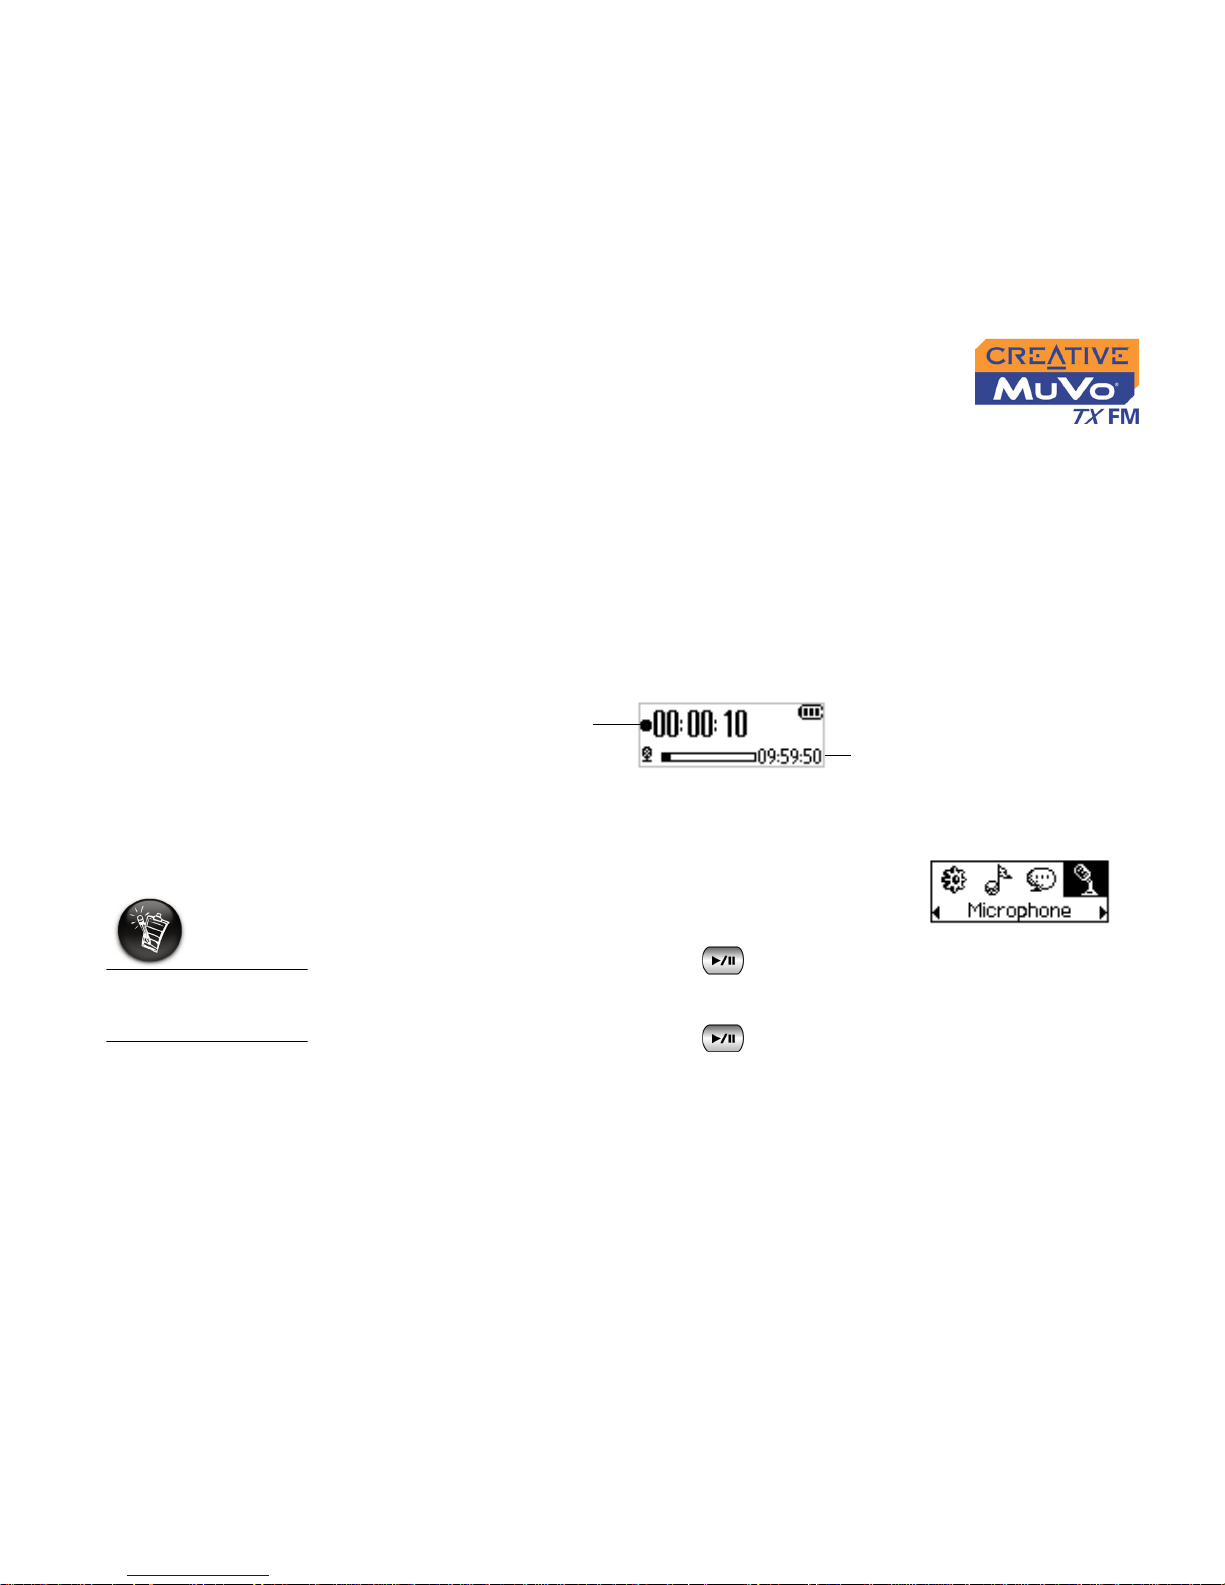
When recording, you will see the time available for recording. You will also
see a bar showing you the elapsed recording time.
Making a voice
recording
To make a voice recording
1. Press the Scroller.
Scroll Select the Microphone icon (Figure 4-37).
The recording bar appears onscreen.
2. Press the Play/Pause button to start the
recording.
3. Press the Play/Pause button again to end the recording. A name
is automatically assigned to your recording and it is saved in your player.
The naming convention used is: VOC [Current File Number].
Elapsed Recording
Time
Remaining Time Available
For Recording
Figure 4-37
You cannot pause
and continue a voice
recording.
Page 49
Using Your Player 4-18
Recording FM
Radio
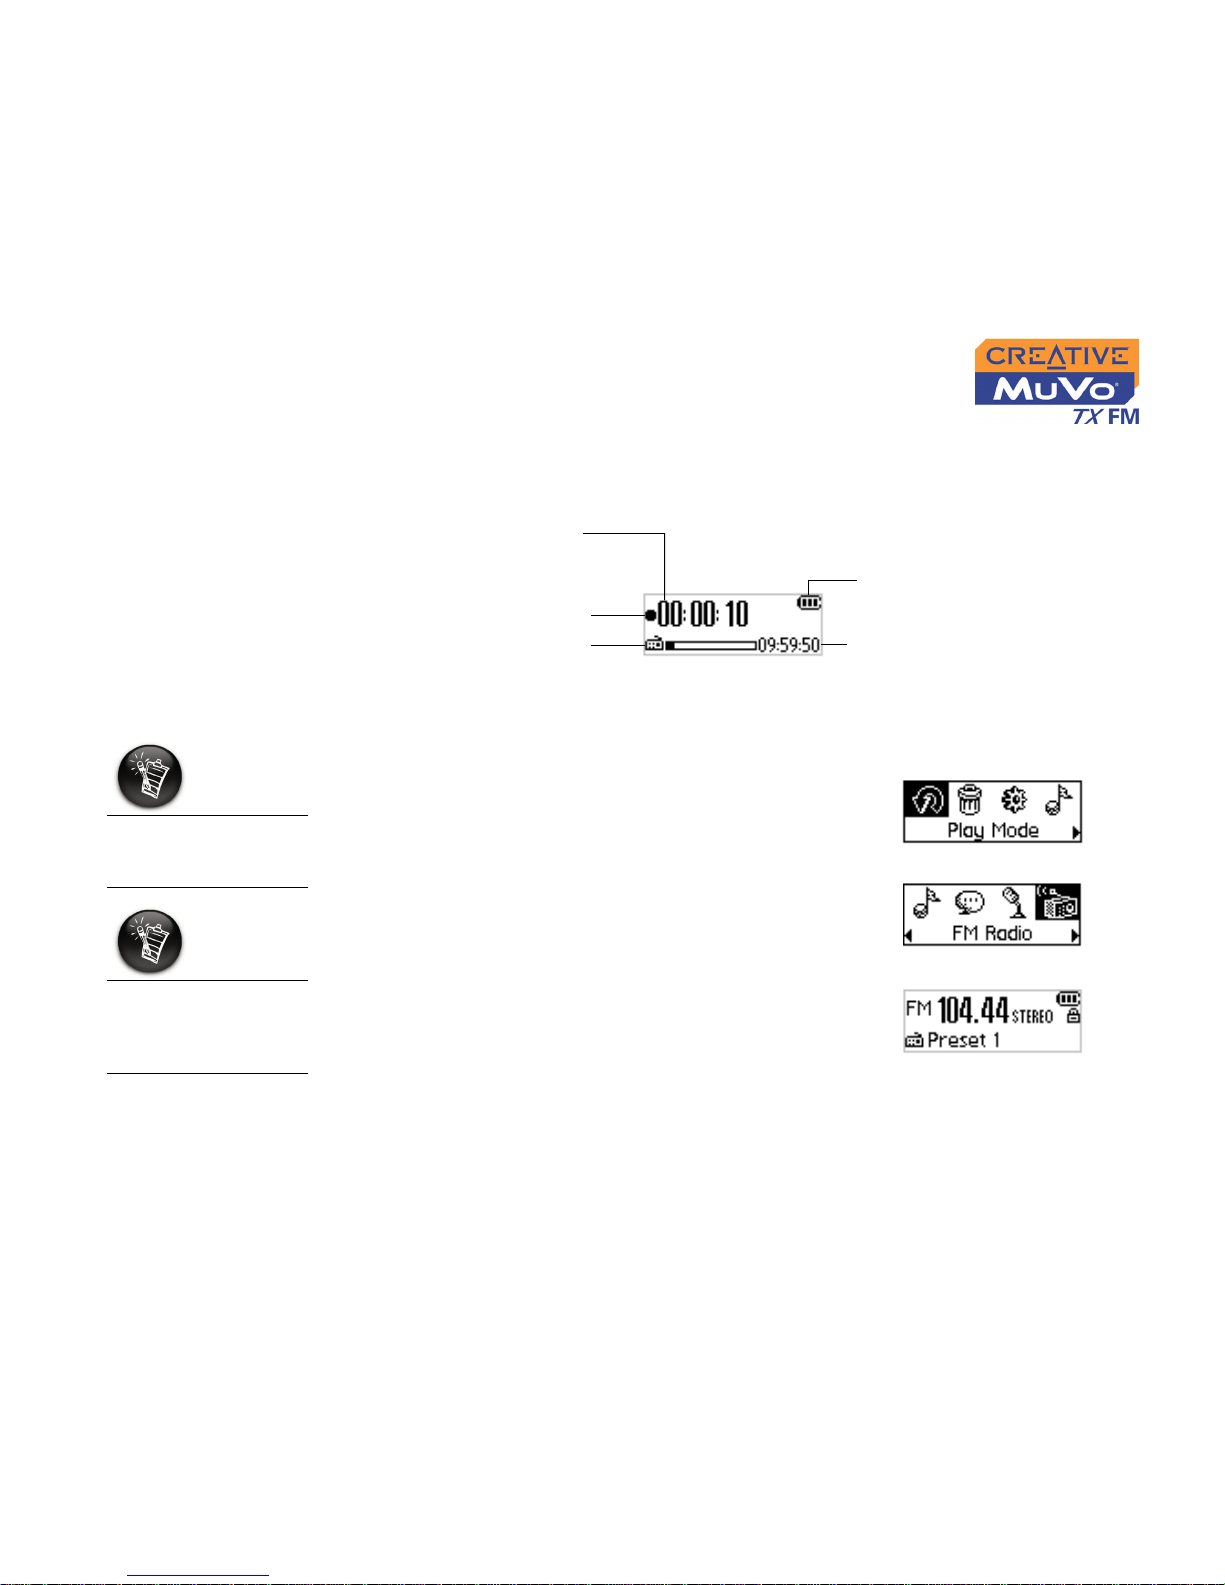
When recording FM radio, you will see one bar showing you the time
available for recording, and another showing you the elapsed recording time.
Also the FM Radio icon appears in the bottom-left corner of the LCD screen.
To make an FM radio recording
1. Press the Scroller.
The Main Menu similar to Figure 4-39
appears.
2. Scroll Select the FM Radio icon (Figure 4-40).
A radio frequency appears on the LCD screen
(Figure 4-41).
3. Turn the Scroller to select the preset channel
you want.
4. Press the Scroller.
Remaining time available
for recording
FM Radio mode
Figure 4-38
Battery level
indicator
Elapsed recording
time
Play status icon
You cannot pause
and continue a FM
radio recording.
If you do not see a
preset channel, press
the Play/Pause
button.
Figure 4-39
Figure 4-40
Figure 4-41
Page 50
Using Your Player 4-19
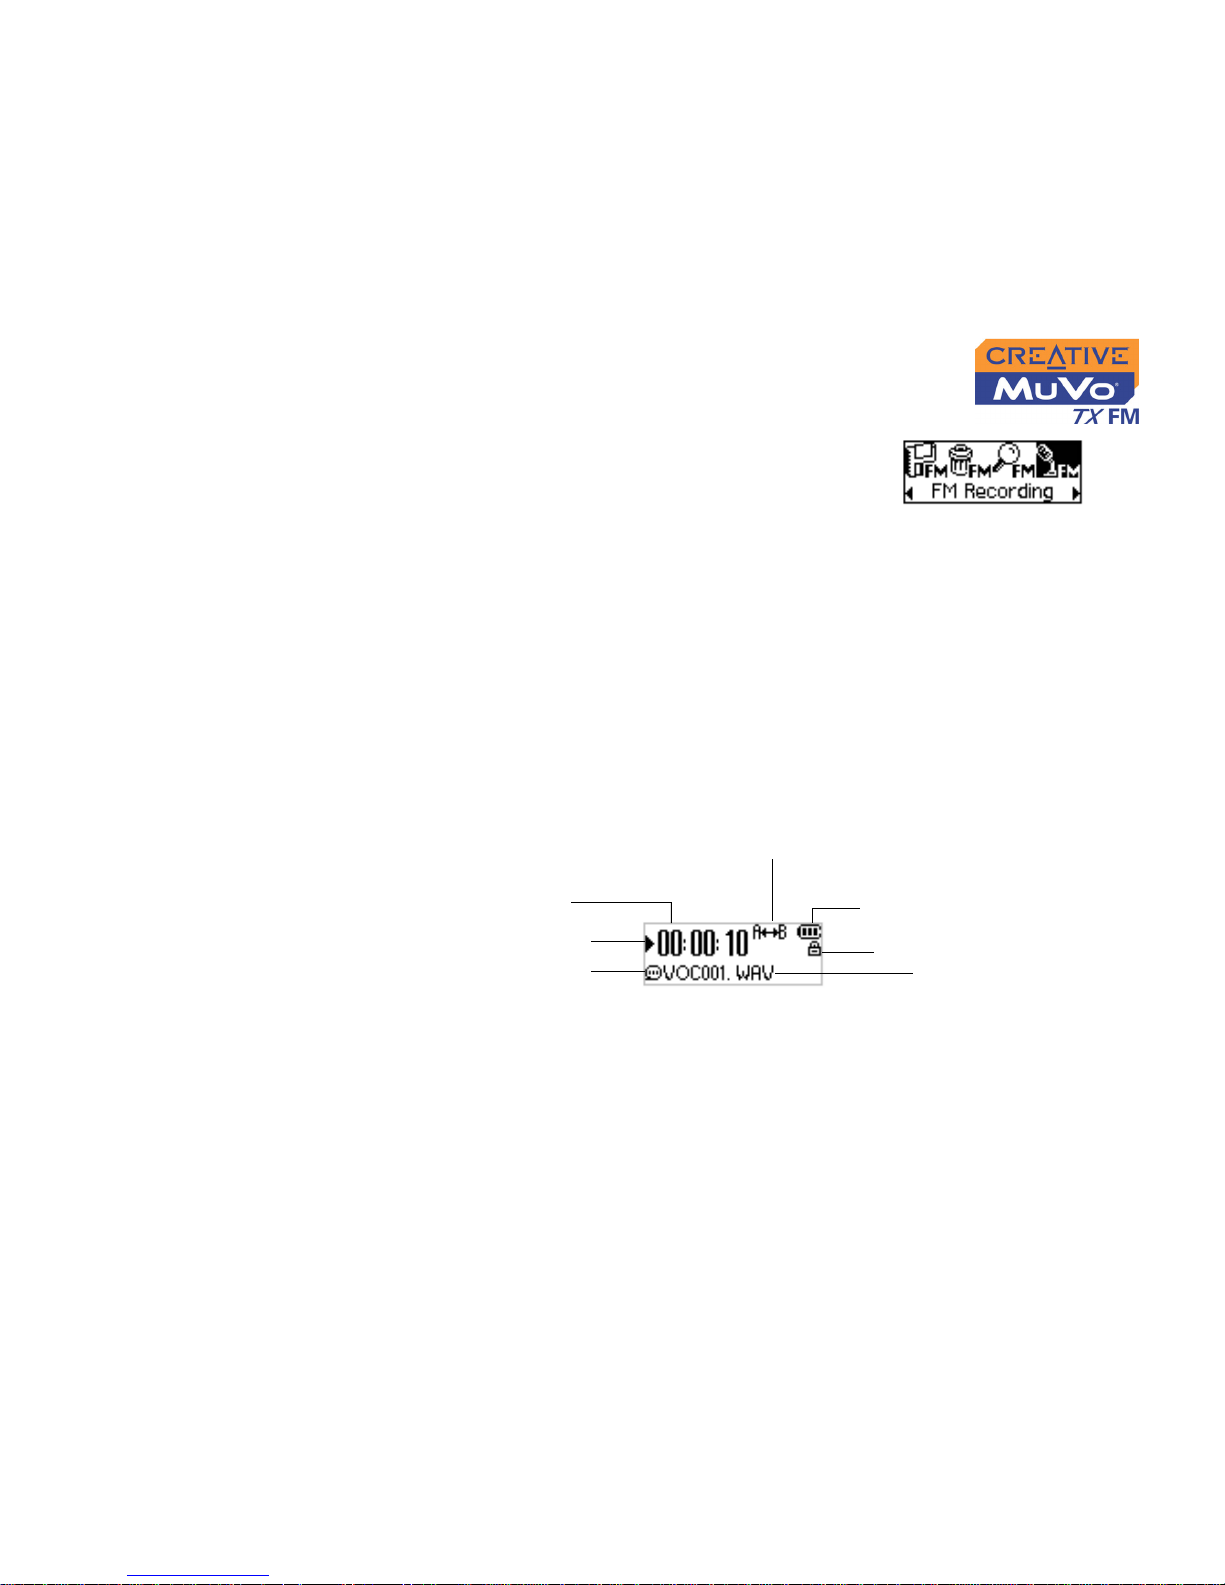
5. Scroll Select the FM Recording icon (Figure
4-42).
A recording bar appears on the LCD screen
and recording starts.
6. Press the Play/Pause button to end the
recording. A name is automatically assigned to your FM radio recording
and the file is saved in your player. The naming convention typically
used is: FM [Current File Number].
To play voice and FM Radio tracks that you have recorded on your player,
see "Playing Recordings" on page 4-19.
Playing
Recordings
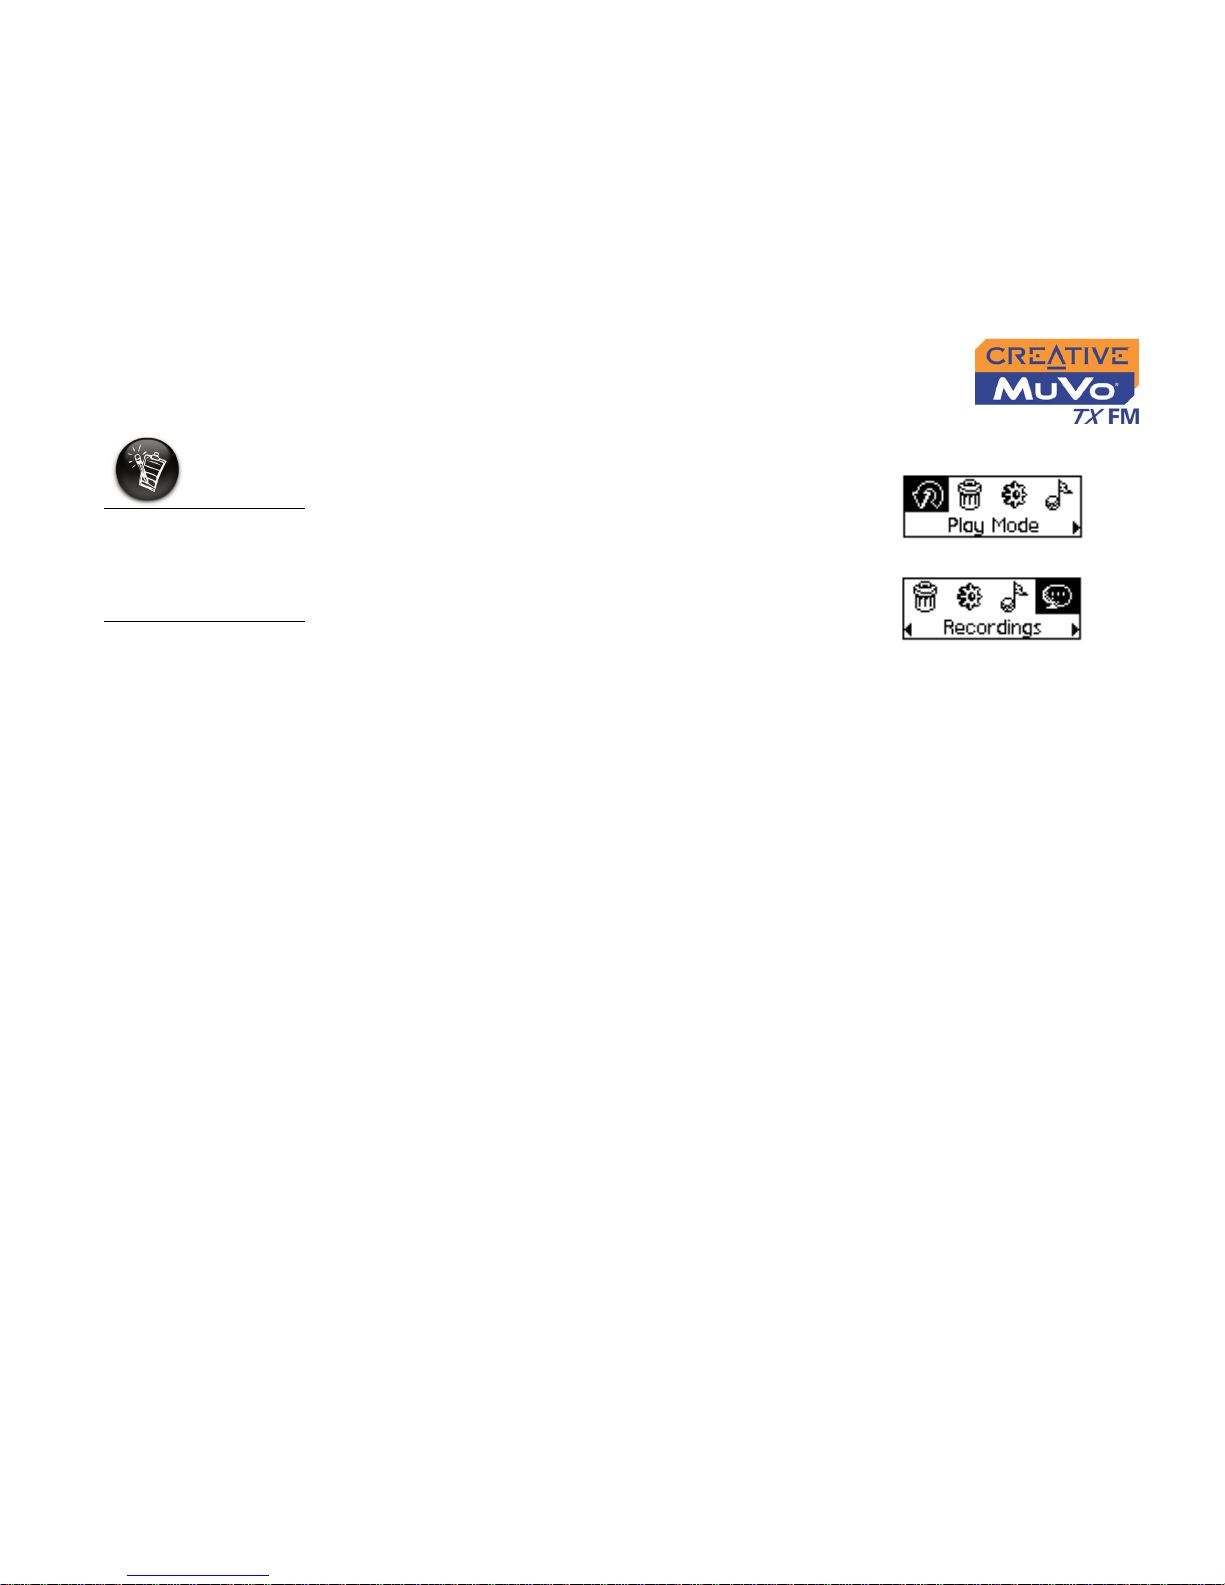
It is simple to play back the voice and FM Radio tracks you have recorded. In
Recordings mode, your player will display the elapsed time, track number
and file name of the recorded track.
Figure 4-42
Recordings mode
Figure 4-43
Play status icon
Elapsed time
Play mode
icon
Battery level
indicator
Lock
Current playing track
name
Page 51
Using Your Player 4-20
To play a recording
1. Press the Scroller.
The Main Menu similar to Figure 4-44
appears.
2. Scroll Select the Recordings icon (Figure 4-
45).
3. Scroll Select a recording you want to listen to.
The track is played back automatically.
To delete a recording, see "Deleting Tracks" on page 4-23.
A recorded voice file
name starts with
"VOC" and an FM
radio file name starts
with "FM".
Figure 4-44
Figure 4-45
Page 52
Using Your Player 4-21
EQ Settings
Enhancing Your
Music
Your player allows you to enhance your listening experience with EQ
settings. EQ settings available in your player include:
❍ Normal
❍ Rock
❍ Pop
❍ Classical
❍ Jazz
❍ Custom EQ
You can use EQ settings while audio is being played back. This process is
described in the following instructions.
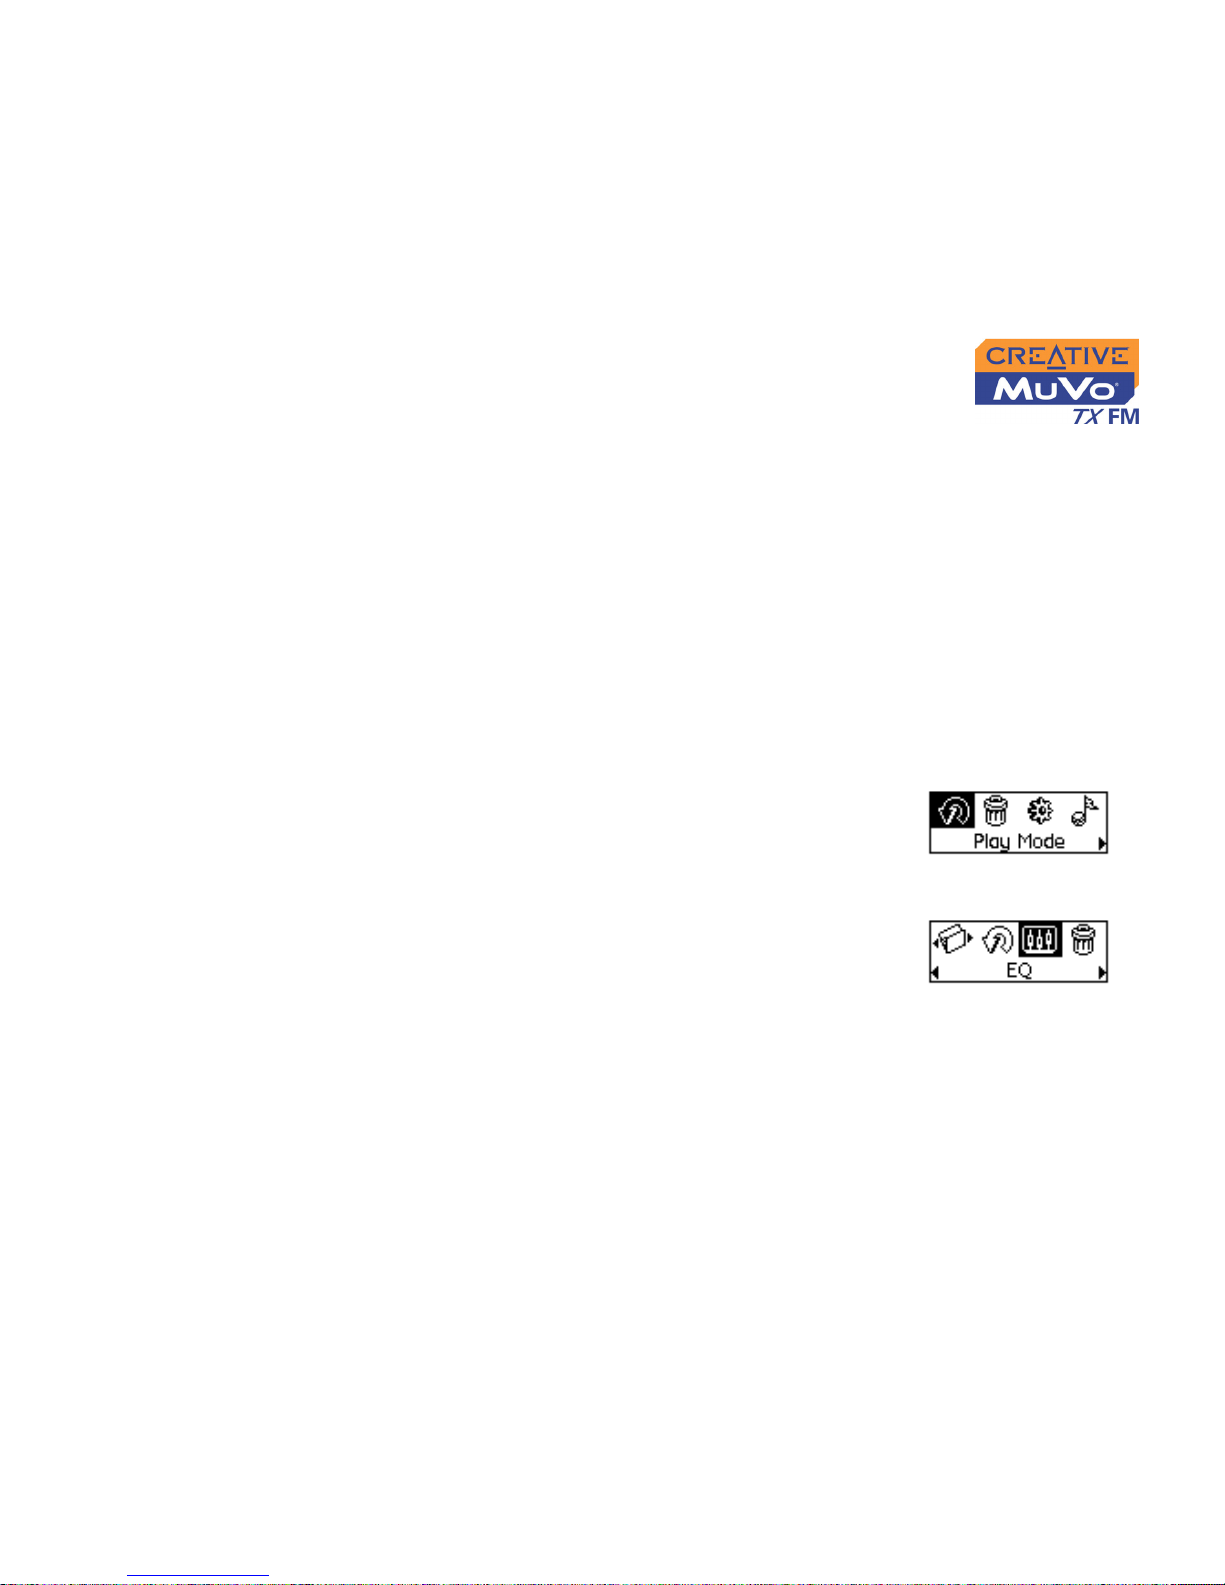
1. Press the Scroller. The Main Menu (Figure 4-46)
appears.
2. Scroll Select the EQ icon (Figure 4-47).
Figure 4-46
Figure 4-47
Page 53
Using Your Player 4-22
Depending on which EQ setting you want, follow the corresponding step:
To select Normal, Rock, Pop, Classical or Jazz
Scroll Select the EQ setting you want.
The selected EQ setting icon appears onscreen.
To define your own EQ settings
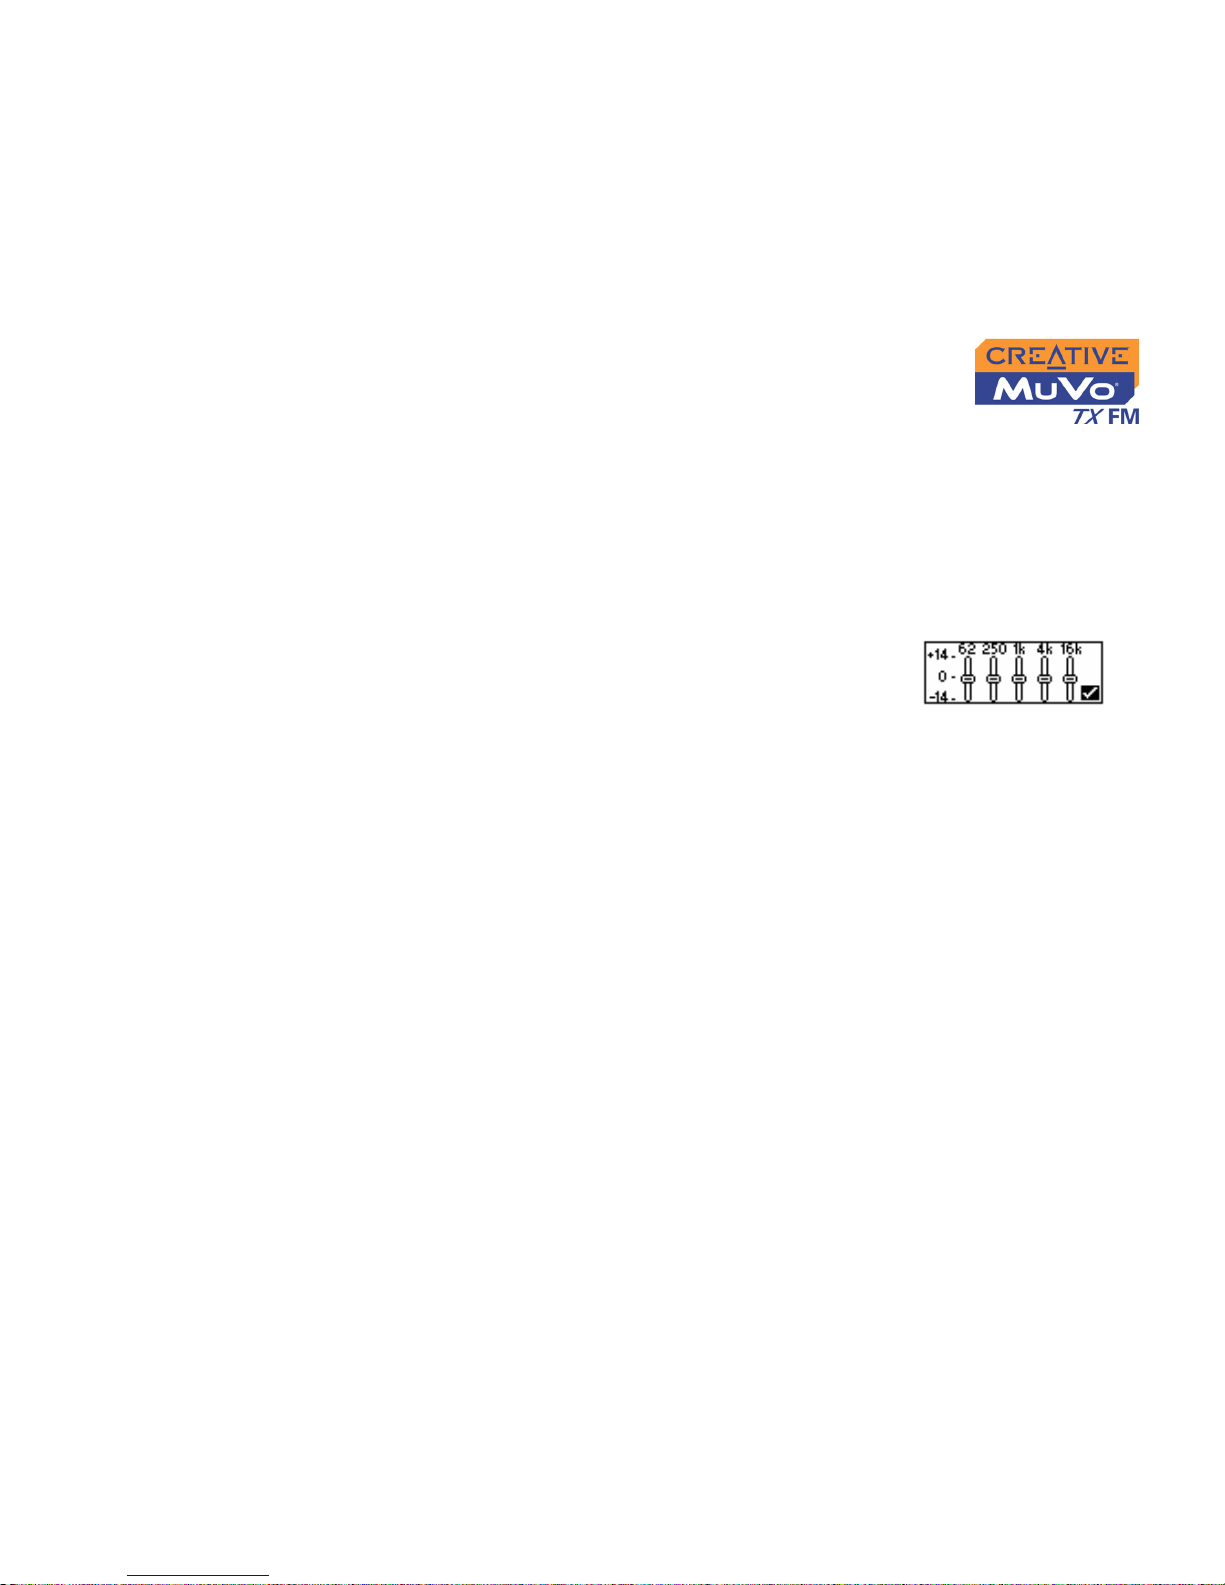
1. Scroll Select the Custom EQ icon. The Custom
EQ screen (Figure 4-48) appears.
2. Five vertical control levers appears in the display.
Each lever represents successively higher
frequencies that can be controlled. 62 Hz controls
bass frequency, 250 Hz adjusts the low mid-range frequency, 1 kHz
adjusts the mid-range frequency, 4 kHz adjusts the upper mid-range
frequency and 16 kHz adjusts the treble frequency.
3. Scroll Select each vertical control level. Use the Scroller to move the
control knob up or down to vary the amount of boost or reduction in the
selected frequency range.
4. Scroll Select the check mark to exit the Custom EQ window.
Figure 4-48
Page 54
Using Your Player 4-23
Skipping
Folders
This action skips the playback to a selected folder.
To skip to the next folder
1. Press the Scroller.
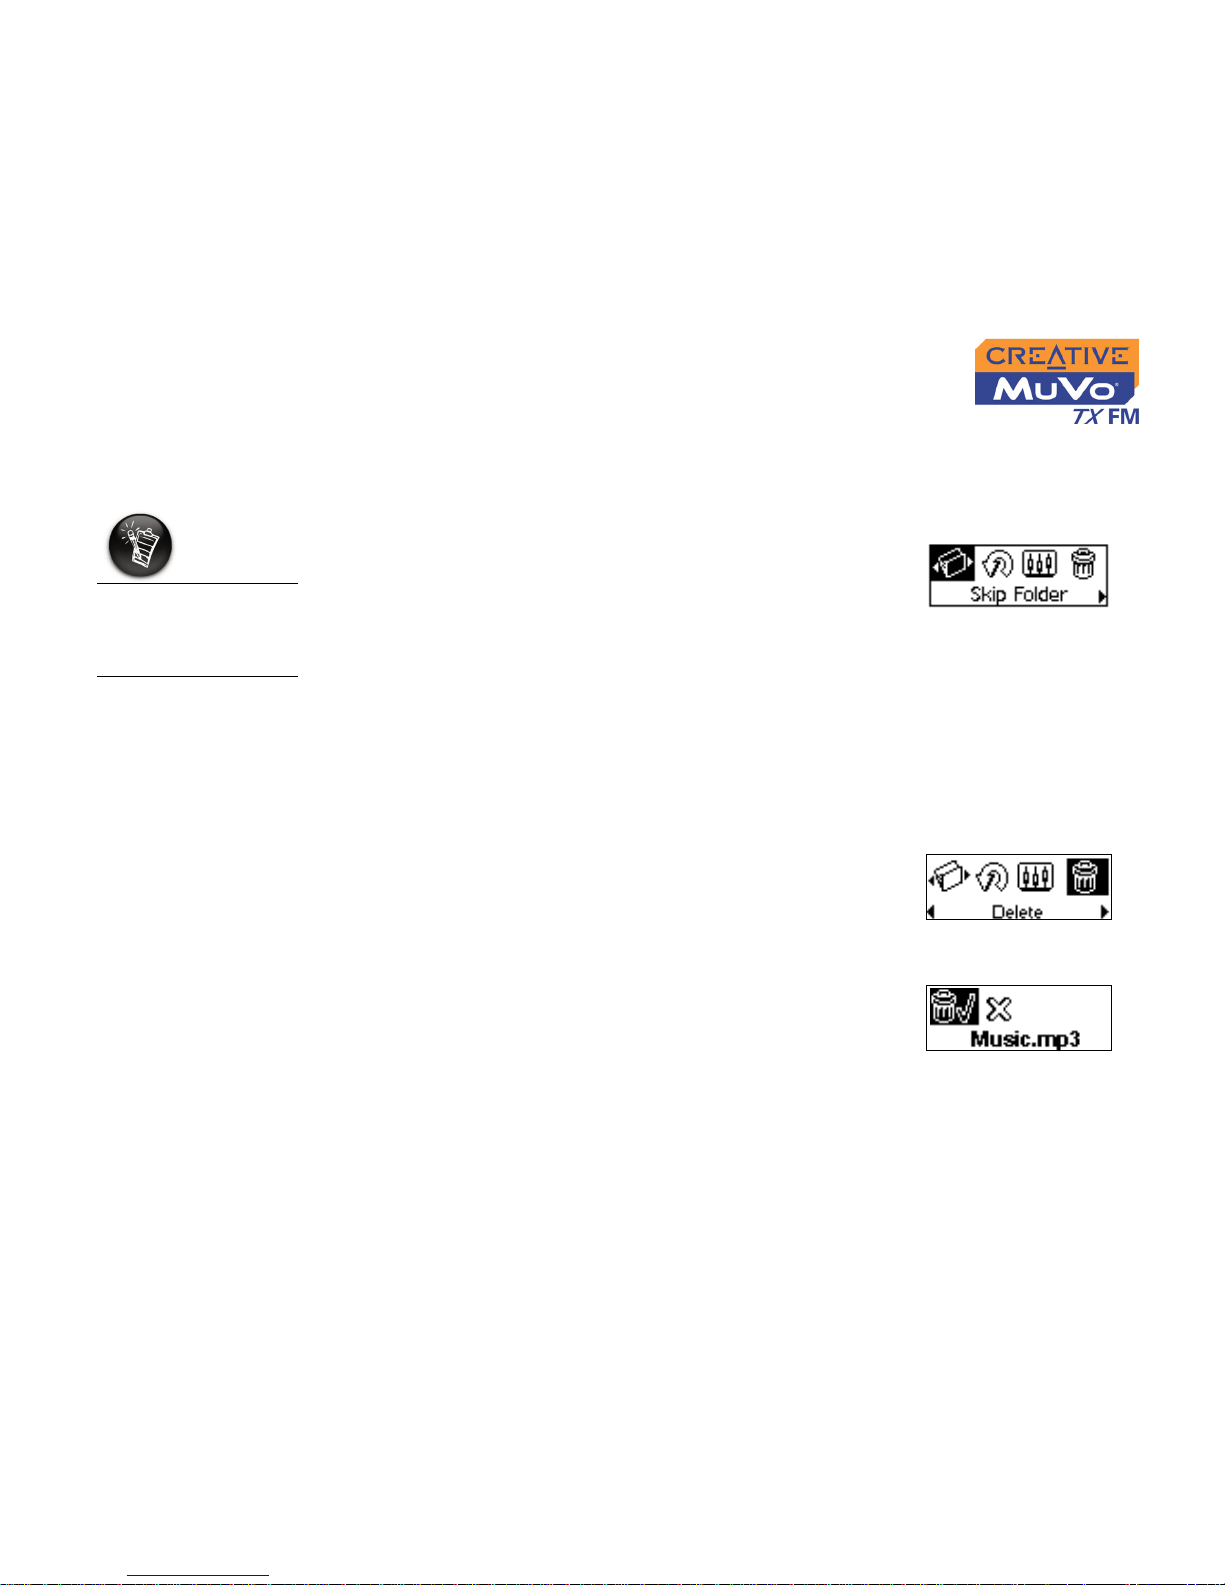
2. Scroll Select the Skip Folder icon (Figure 4-49).
3. Scroll to the folder that you want to skip to.
4. To resume normal playback, press the Scroller
again.
Deleting
Tracks
This action permanently deletes tracks from your MuVo TX FM.
To delete a track
1. In Music mode, select the track that you want to delete.
2. Press the Scroller.
3. Scroll Select the Delete icon (Figure 4-50). A list
appears.
4. Scroll Select the Delete icon (Figure 4-51). The
track’s name appears onscreen and the track is
permanently deleted from your player.
Your player can only
recognize up to one
sub folder level in
the root directory.
Figure 4-49
Figure 4-50
Figure 4-51
Page 55
Using Your Player 4-24
User
Preferences
Your player offers many configuration options. You can:
❍ Change the LCD orientation
❍ Specify contrast settings
❍ Change the LCD screen’s backlight duration
❍ Specify idle time duration before the player automatically shuts down
❍ Select the default language
❍ Access the information screen
❍ Select the FM region
1. Press the Scroller.
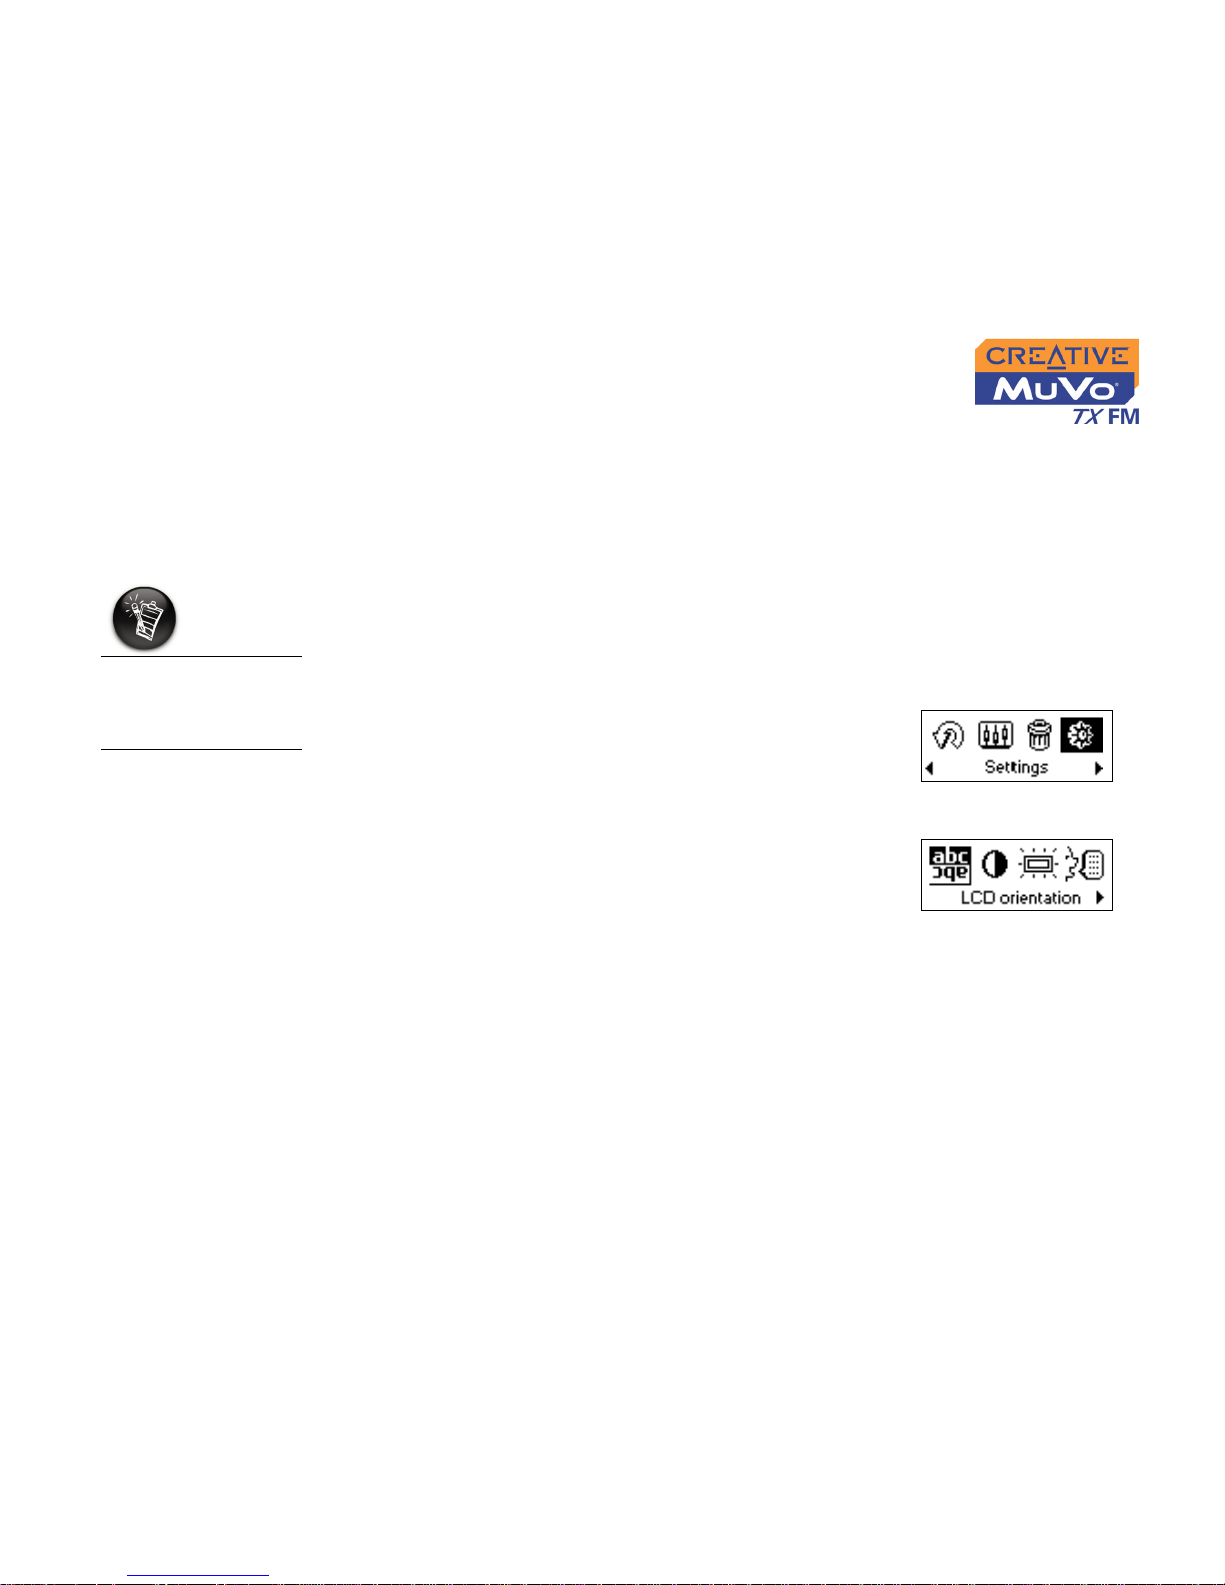
2. Scroll Select the Settings icon (Figure 4-52).
A list appears (Figure 4-53).
These features are
only available in
Music Mode and
Voice Mode.
Figure 4-52
Figure 4-53
Page 56
Using Your Player 4-25
Rotating the LCD
screen
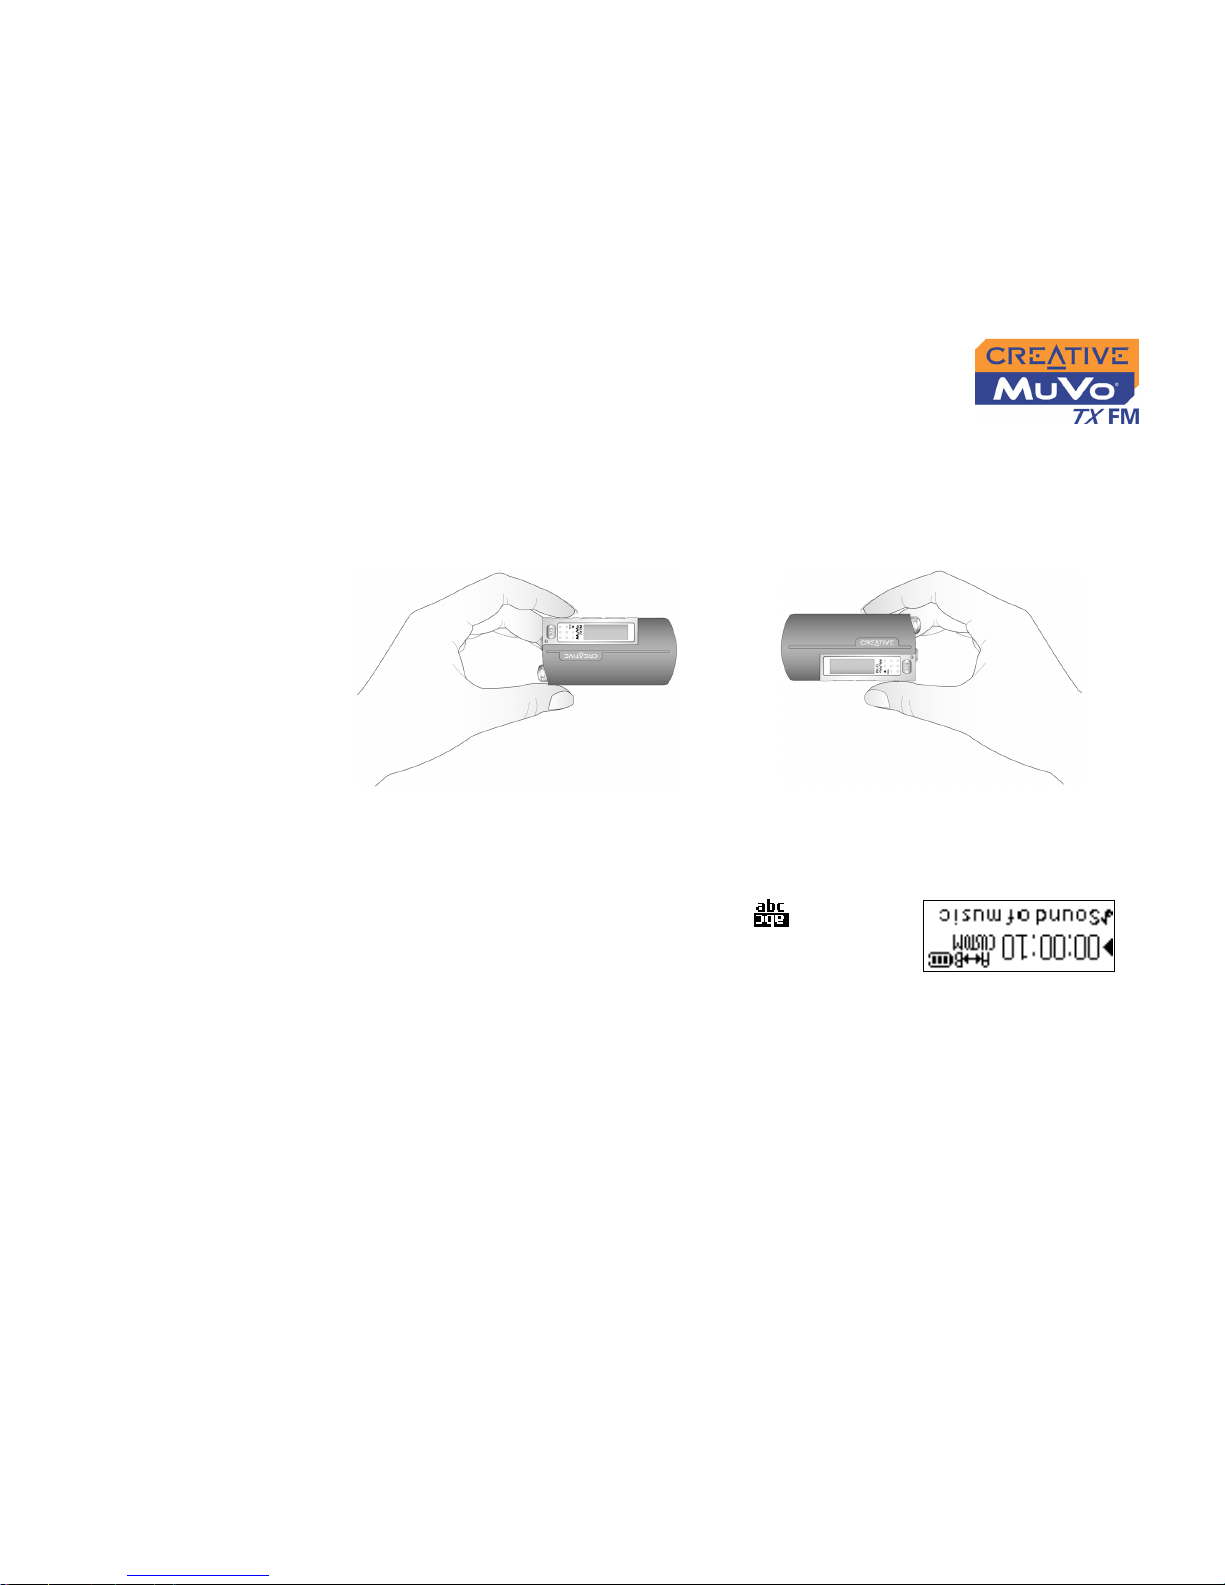
MuVo TX FM has a handy feature: you can rotate the LCD screen by 180
degress. This may be useful for left-handed users. Follow the step below to
rotate the LCD on your player.
To rotate the LCD screen 180 degrees
Scroll Select the LCD Orientation icon .
The LCD screen rotates 180 degrees (Figure 4-54).
Using your left hand Using your right hand
Figure 4-54
Page 57
Using Your Player 4-26
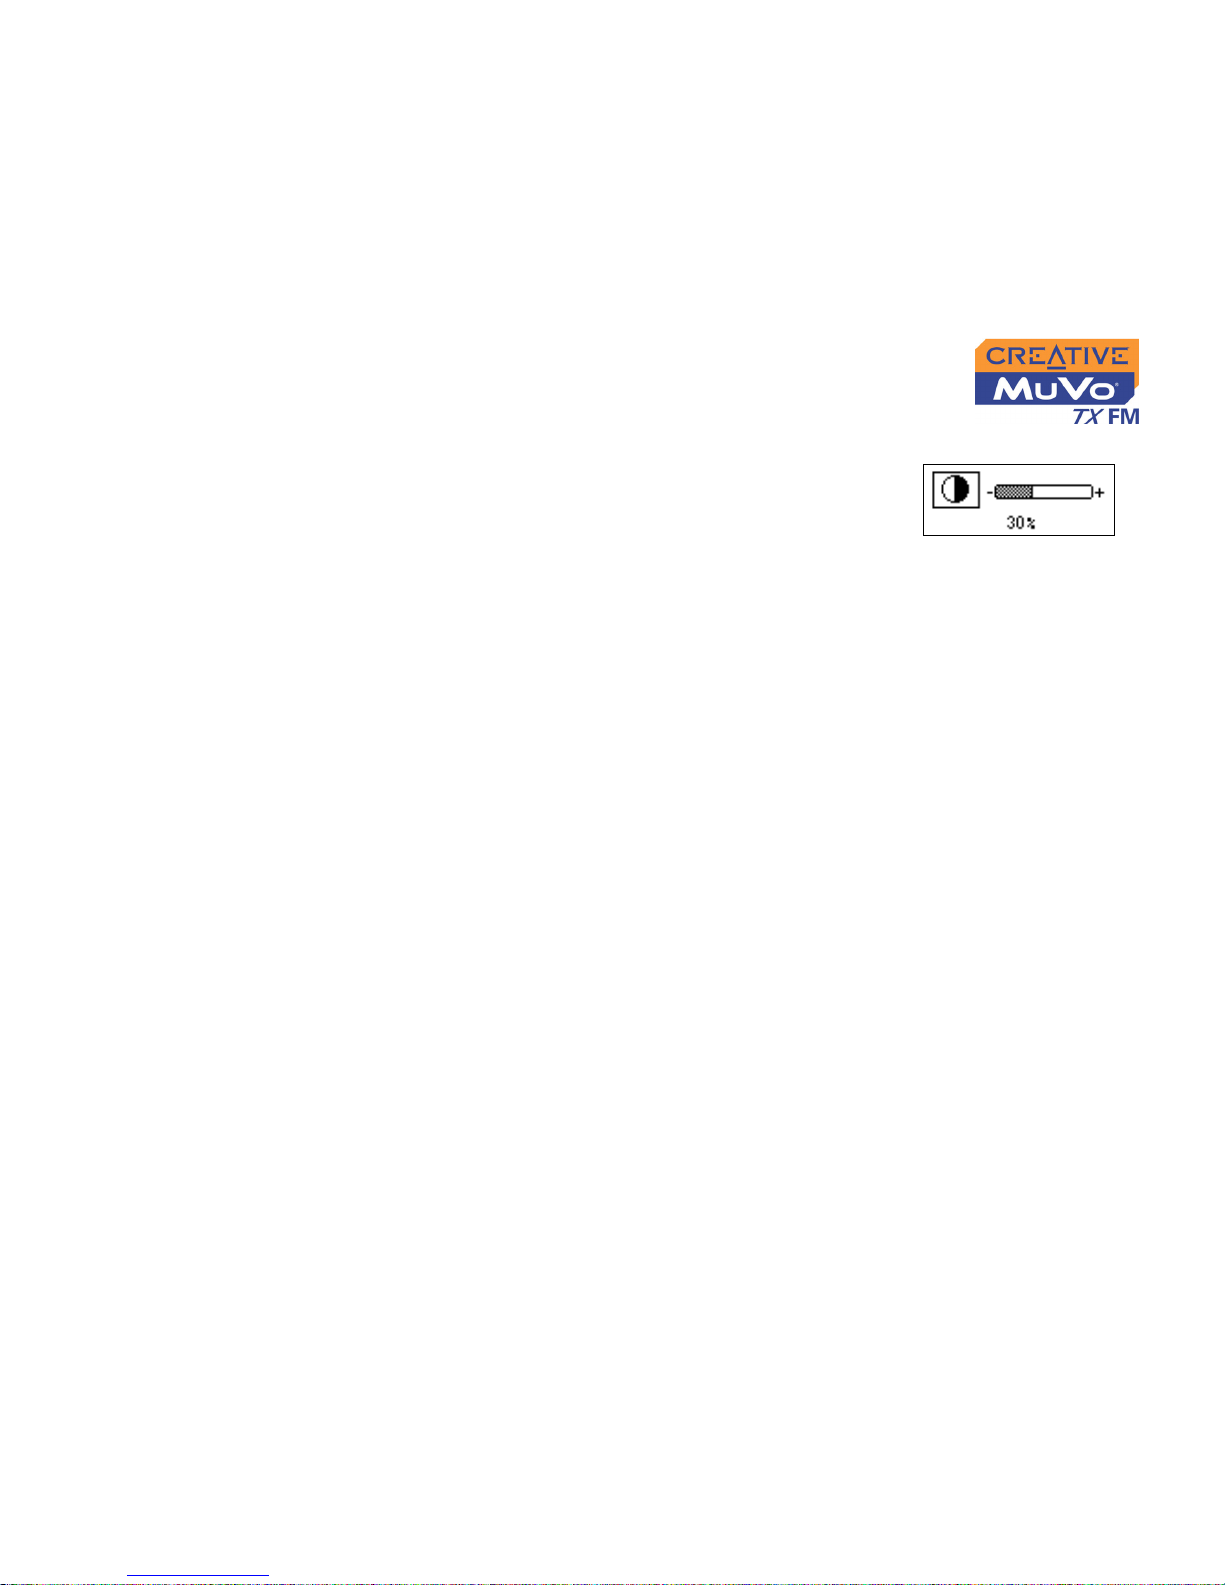
To set the contrast level for your player’s screen
1. Scroll Select the Contrast icon. The Contrast
screen (Figure 4-55) appears.
2. Use the Scroller to increase or decrease the LCD
contrast. The lower the number, the lower the LCD
contrast.
To adjust the screen backlight duration
1. Scroll Select the Backlight icon.
2. Scroll Select the backlight duration or disable it. A lower number setting
conserves battery power for longer playback time.
To specify how long the player remains inactive before it
automatically shuts down
1. Scroll Select the Idle Shutdown icon.
2. Scroll Select the duration you want the player to wait before
automatically shutting down.
To change the default language
1. Scroll Select the Language icon.
2. Scroll Select the language that you want.
To view firmware version, total storage space, remaining available
space and track count
1. Scroll Select the Information icon.
Figure 4-55
Page 58
Using Your Player 4-27
Locking and
unlocking your
Player
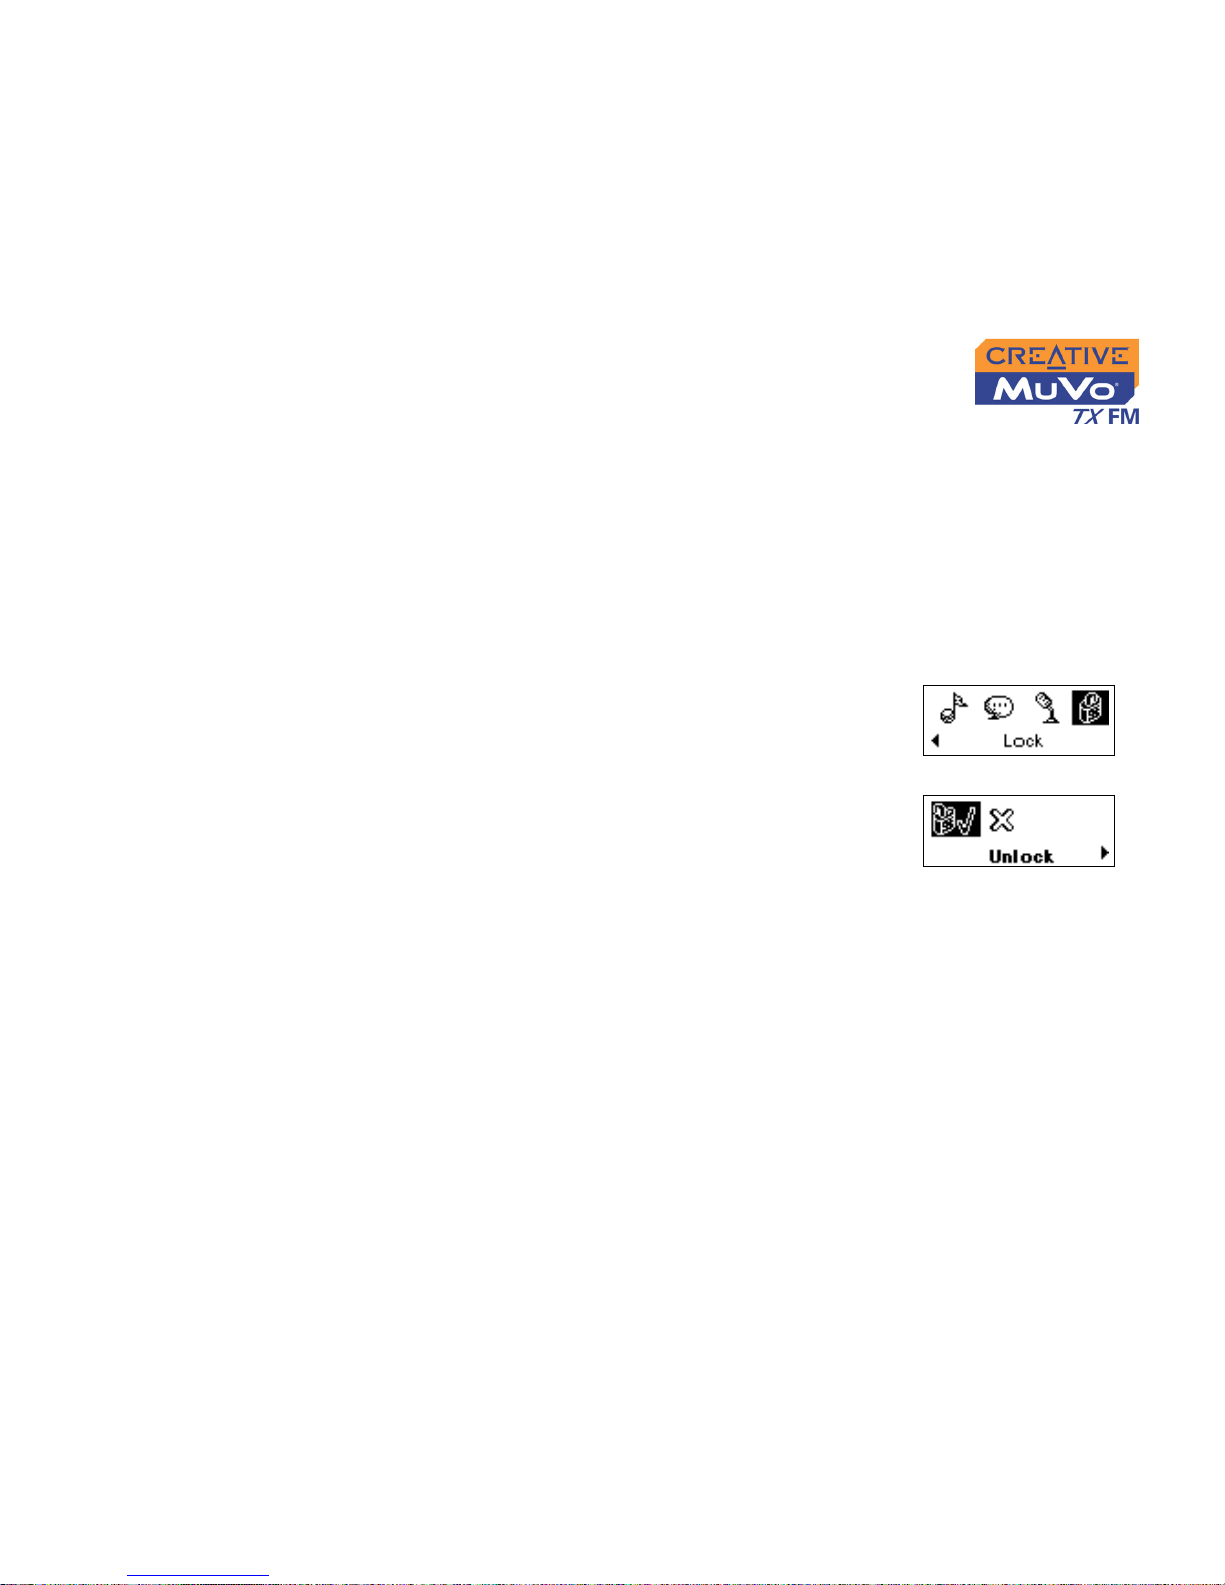
Locking your MuVo TX FM will disable all buttons except the scroller on the
player. This feature is useful when you do not want any buttons (for example,
Pause) pressed accidentally.
If you press a button while the player is locked, a popup window appears,
prompting you to unlock the player. This popup is only displayed for five
seconds.
To lock your player
1. Press the Scroller.
2. Scroll Select the Lock icon (Figure 4-56). The
player is locked.
To unlock your player
1. Press any button. A popup appears (Figure 4-57).
2. Scroll Select the Unlock icon. The player is
unlocked.
Figure 4-56
Figure 4-57
Page 59
Using Your Player 4-28
Formatting
Your Player
If you need to format your player, first backup the files on your player to your
computer. When you format your player, all songs and files will be deleted.
By default, your player is already formatted.
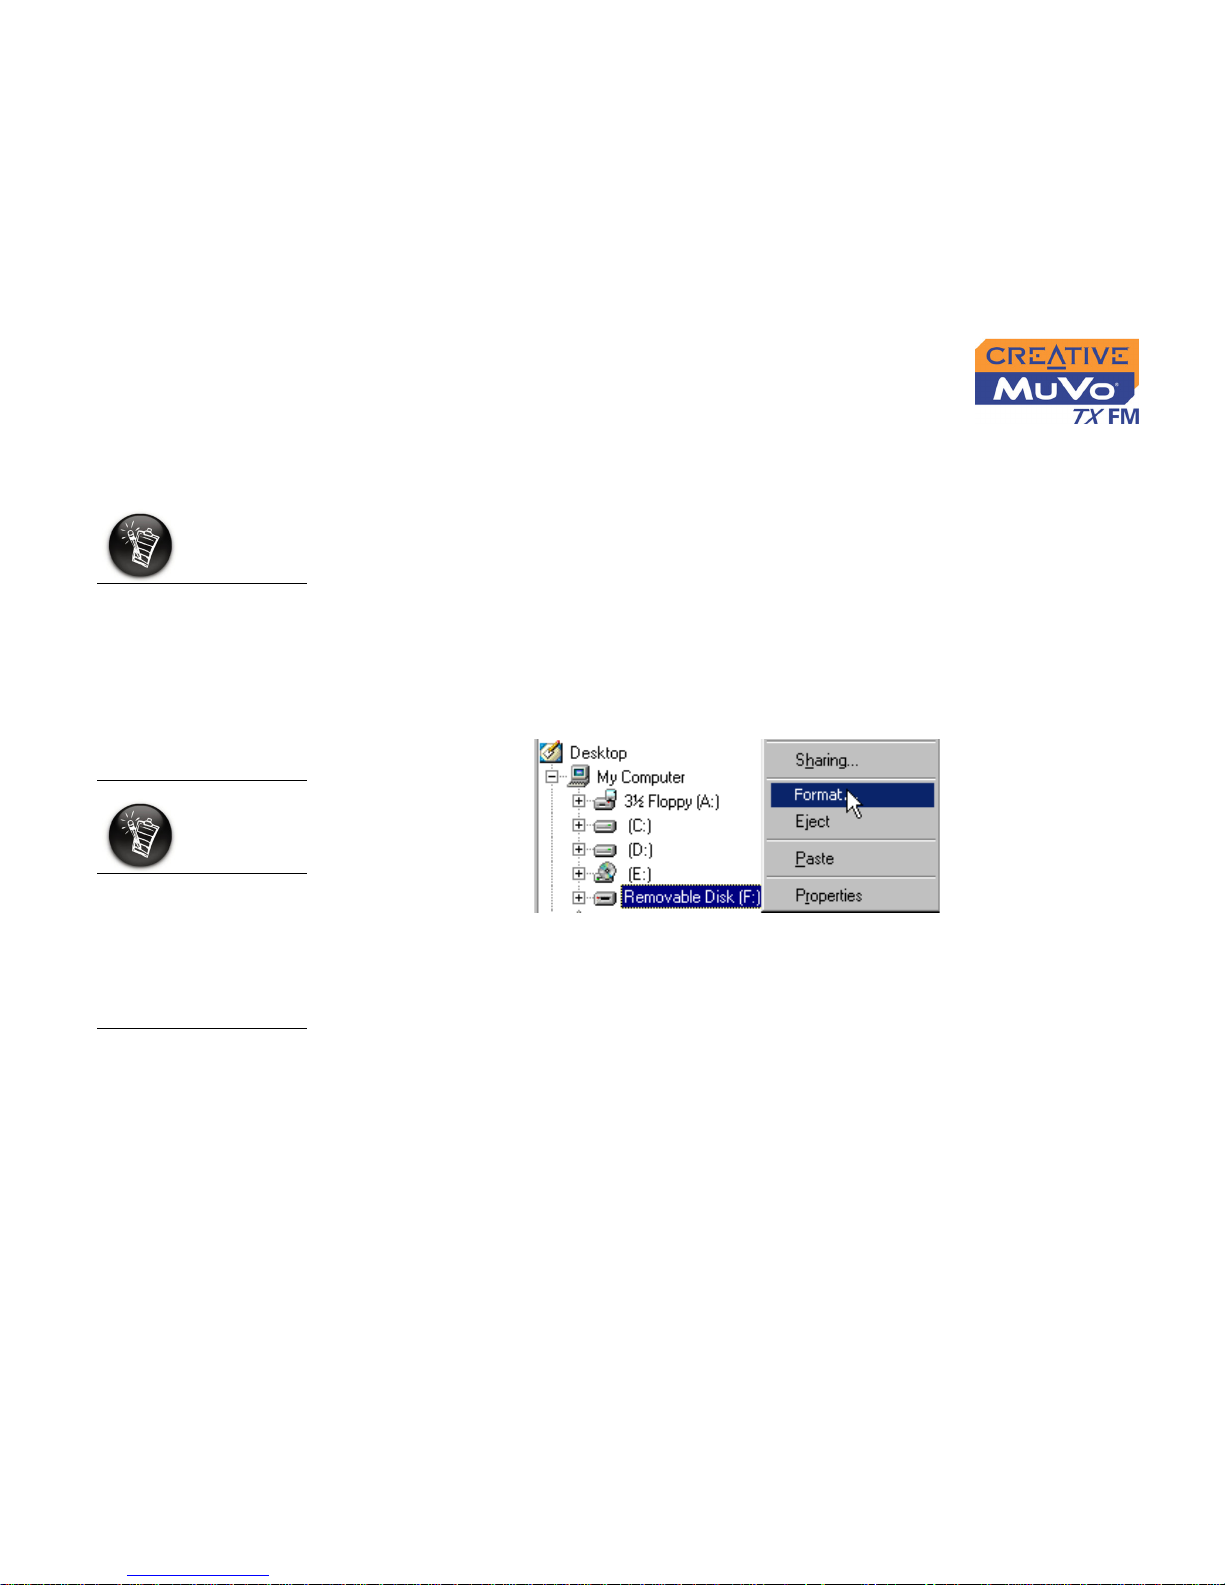
1. Connect your player to your computer’s USB port.
2. Launch Windows Explorer on your computer. Your player is recognized
as a Removable Disk in Windows Explorer.
3. Right-click the Removable Disk icon and click the Format option.
The Format f:\ dialog box appears (replace f:\ with the drive letter of
your player).
4. Follow the onscreen instructions to format your player.
5. After the formatting is complete, make sure you stop your player before
disconnecting it from your computer. See "Usage" on page C-3 for
instructions on stopping your player.
For more information about using Windows Explorer, refer to its online Help.
Windows 98 SE users
must install the MuVo
TX FM drivers before
formatting the player.
For more information
on driver installation,
see "Installing
Drivers and Software"
on page 2-3".
Windows 2000 and
Windows XP users
must select the FAT
file system only in the
Format F:\ dialog box
before formatting the
player.
Figure 4-58
Page 60

Technical Specifications
Page 61

Technical Specifications A-1
Technical Specifications
Size
❑ 36.7 mm (L) x 74.0 mm (H) x 16.0 mm (W)
Weight
❑ 32 g (without the battery) or 43 g (with a AAA battery)
Capacity
❑ 128 or 256 MB built-in memory
Battery type
❑ One Alkaline AAA size battery
Battery Life
(playback time)
❑ MP3 128 kbps, up to 15 hours of continuous playback from new AAA alkaline batteries.
❑ WMA 64 kbps, up to 11 hours of continuous playback from new AAA alkaline batteries.
The following may reduce the playback time:
• skipping, fast forward or reverse during playback
• using passive speakers or high-power headphones
• long backlight timeout setting (more than 10 secs)
• playback of .WMA files with a high bitrate and/or heavy bass
❑ FM radio, up to 12 hours of continuous playtime from new AAA alkaline batteries.
Playback Formats
❑ MP3 (at 8, 11.025, 12, 16, 22.05, 24, 32, 44.1 and 48 kHz)
❑ WMA (at 8, 11.025, 16, 22.05, 32, 44.1 and 48 kHz)
❑ WMA with Digital Rights Management (at 16, 22.05, 24, 32 and 44.1 kHz)
Recording Formats
❑ Voice: IMA ADPCM (at 8 kHz, 4-bit, Mono)
❑ FM Radio: IMA ADPCM (at 16 kHz, 4-bit, Stereo)
Signal to Noise
Ratio
❑ Up to 90 dB
Page 62

Technical Specifications A-2
Channel
Separation
❑ Up to 63 dB
Frequency
Response
❑ 20 Hz~20000 Hz
Harmonic
Distortion
❑ <0.05%
Operating System/
Firmware
❑ Upgradeable via Internet
Headphone Out
❑ 1/8" stereo minijack, 5~7 mW
LCD Display
❑ Large 96 x 32 pixel, blue EL backlit display
Data Connector
❑ USB 1.1
❑ USB 2.0
Firmware Support
*
❑ Programmable
* Firmware upgrades are available from www.creative.com
Page 63

Onscreen Diagram and Icon
Guide
Page 64
Onscreen Diagram and Icon Guide B-1
Onscreen Diagram and Icon Guide
Information
Diagrams
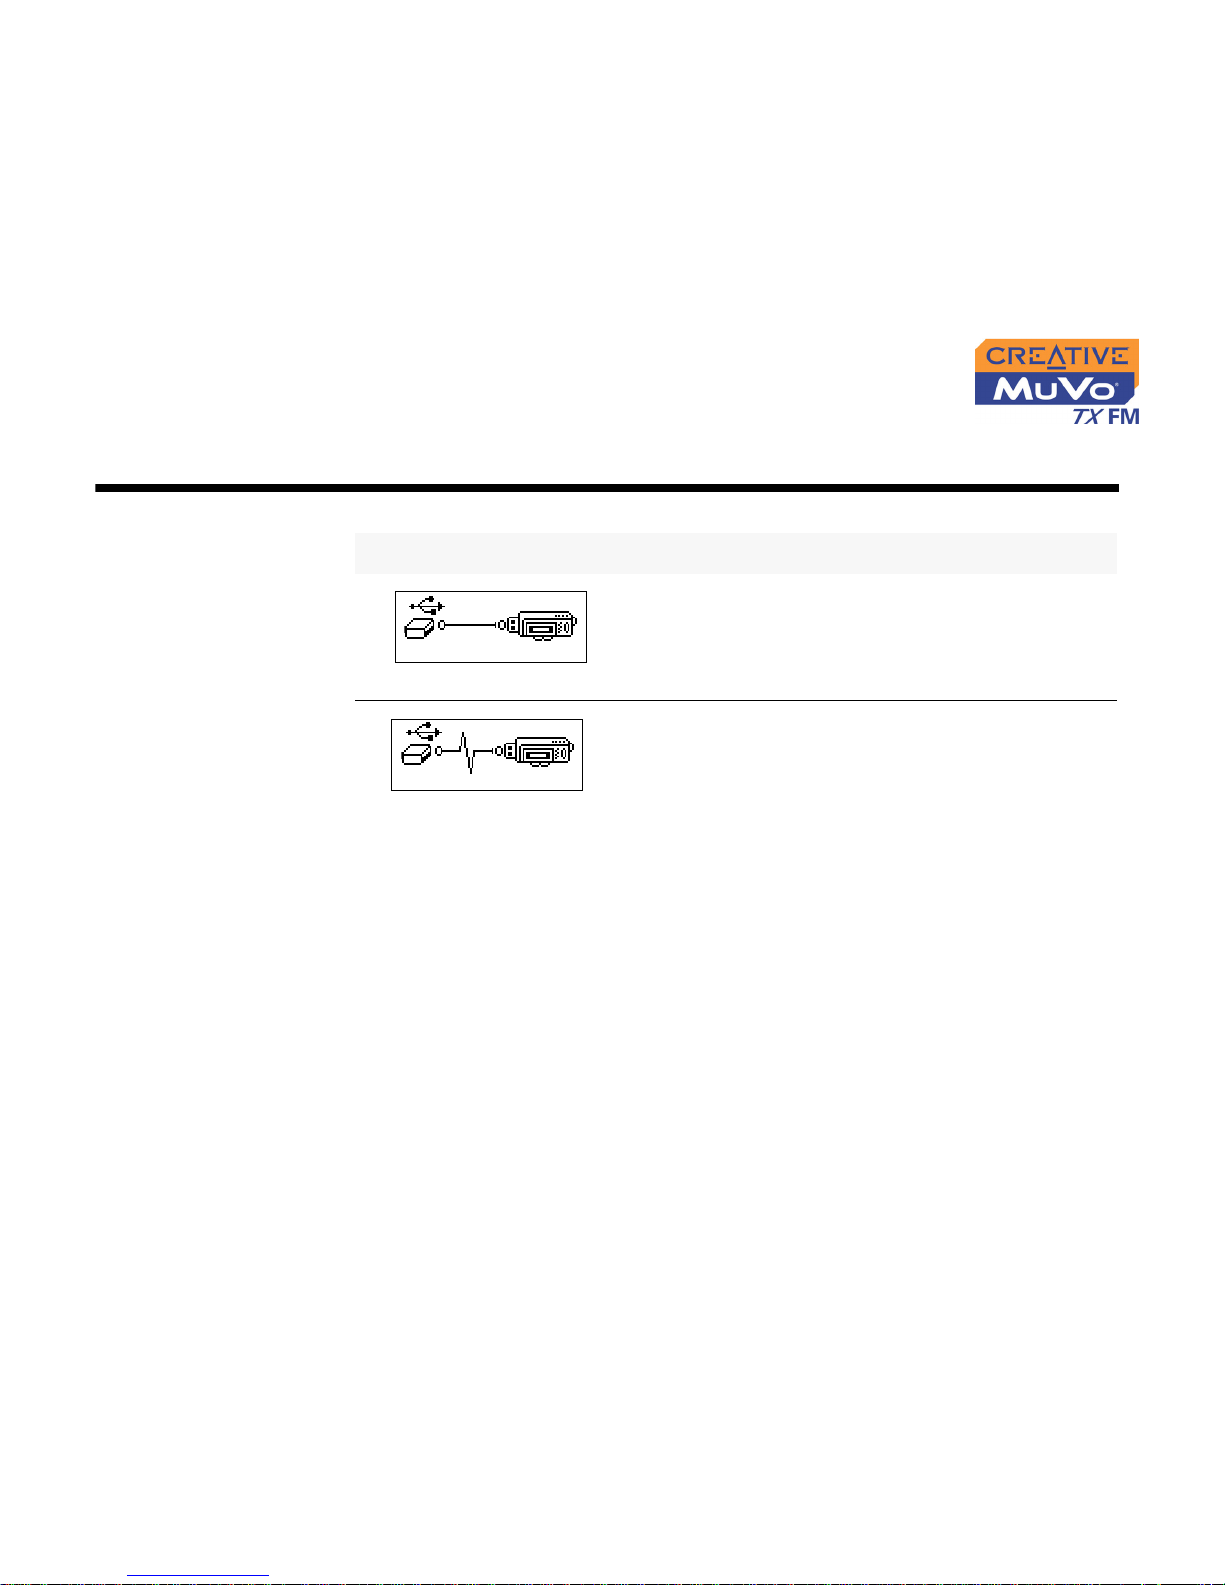
Diagram Action/Meaning
❍ your player is connected to your computer. To
use your player, disconnect it from your
computer.
❍ files are being transferred to your player.
Page 65
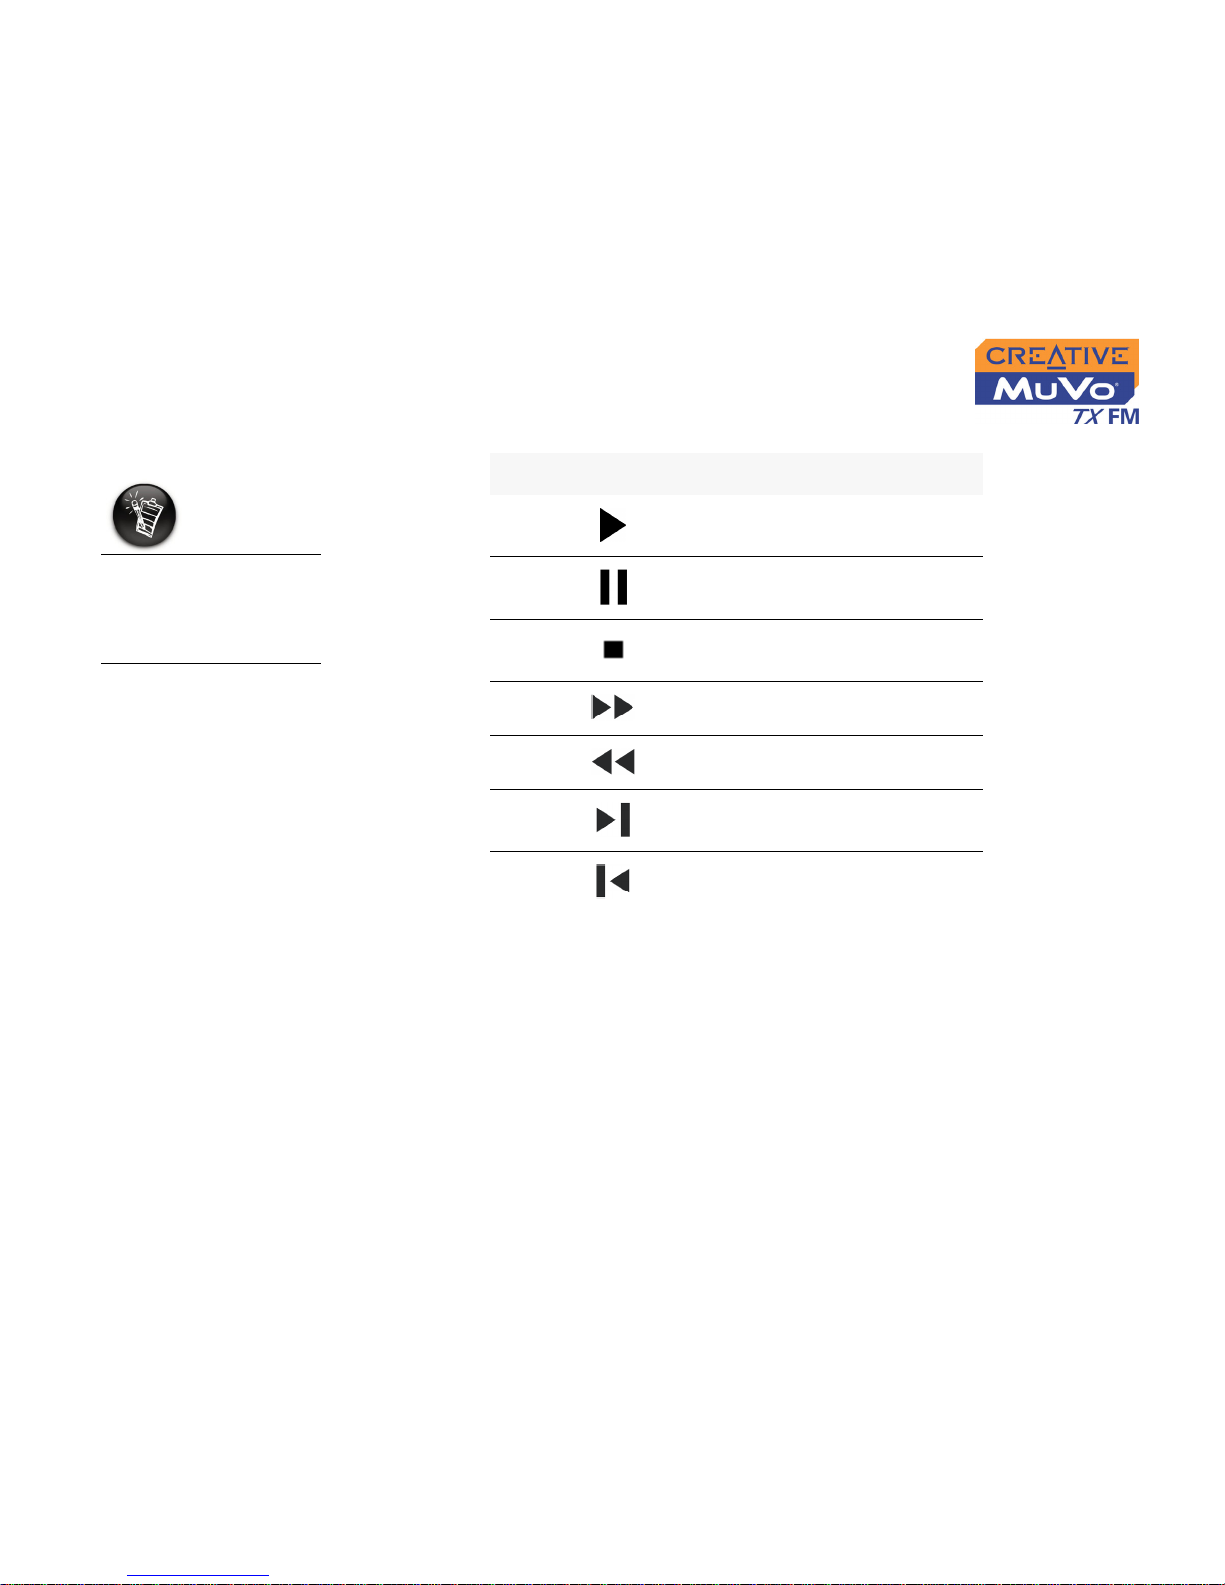
Onscreen Diagram and Icon Guide B-2
Playback Icons
The following icons
appear onscreen when
the associated
playback action is
used.
Icon Action/Meaning
❍ Play
❍ Pause
❍ Stop
❍ Forward
❍ Reverse
❍ Skip forward
❍ Skip back
Page 66
Onscreen Diagram and Icon Guide B-3
Play Mode
Icons
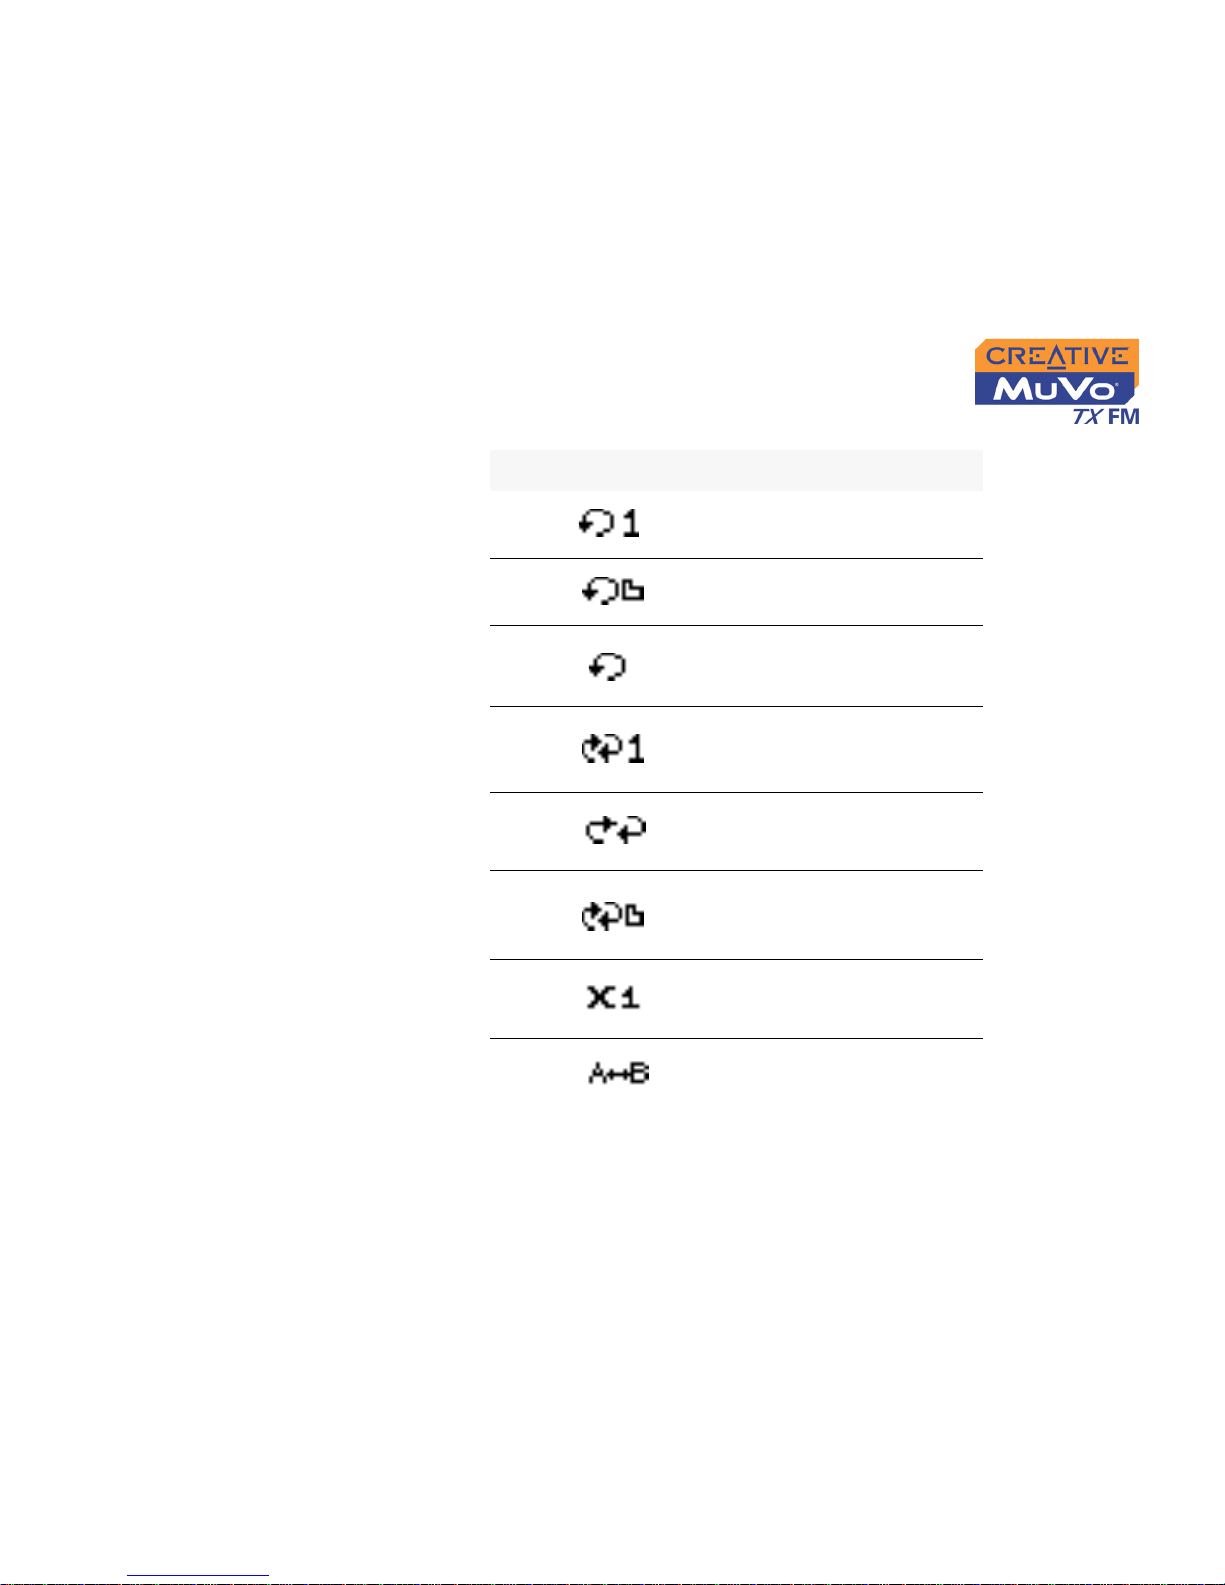
Icon Action/Meaning
❍ Repeat Track
❍ Repeat Folder
❍ Repeat All
❍ Shuffle Once
❍ Shuffle Repeat
❍ Shuffle Folder
❍ Track Once
❍ Repeats a selected
section of a track
Page 67
Onscreen Diagram and Icon Guide B-4
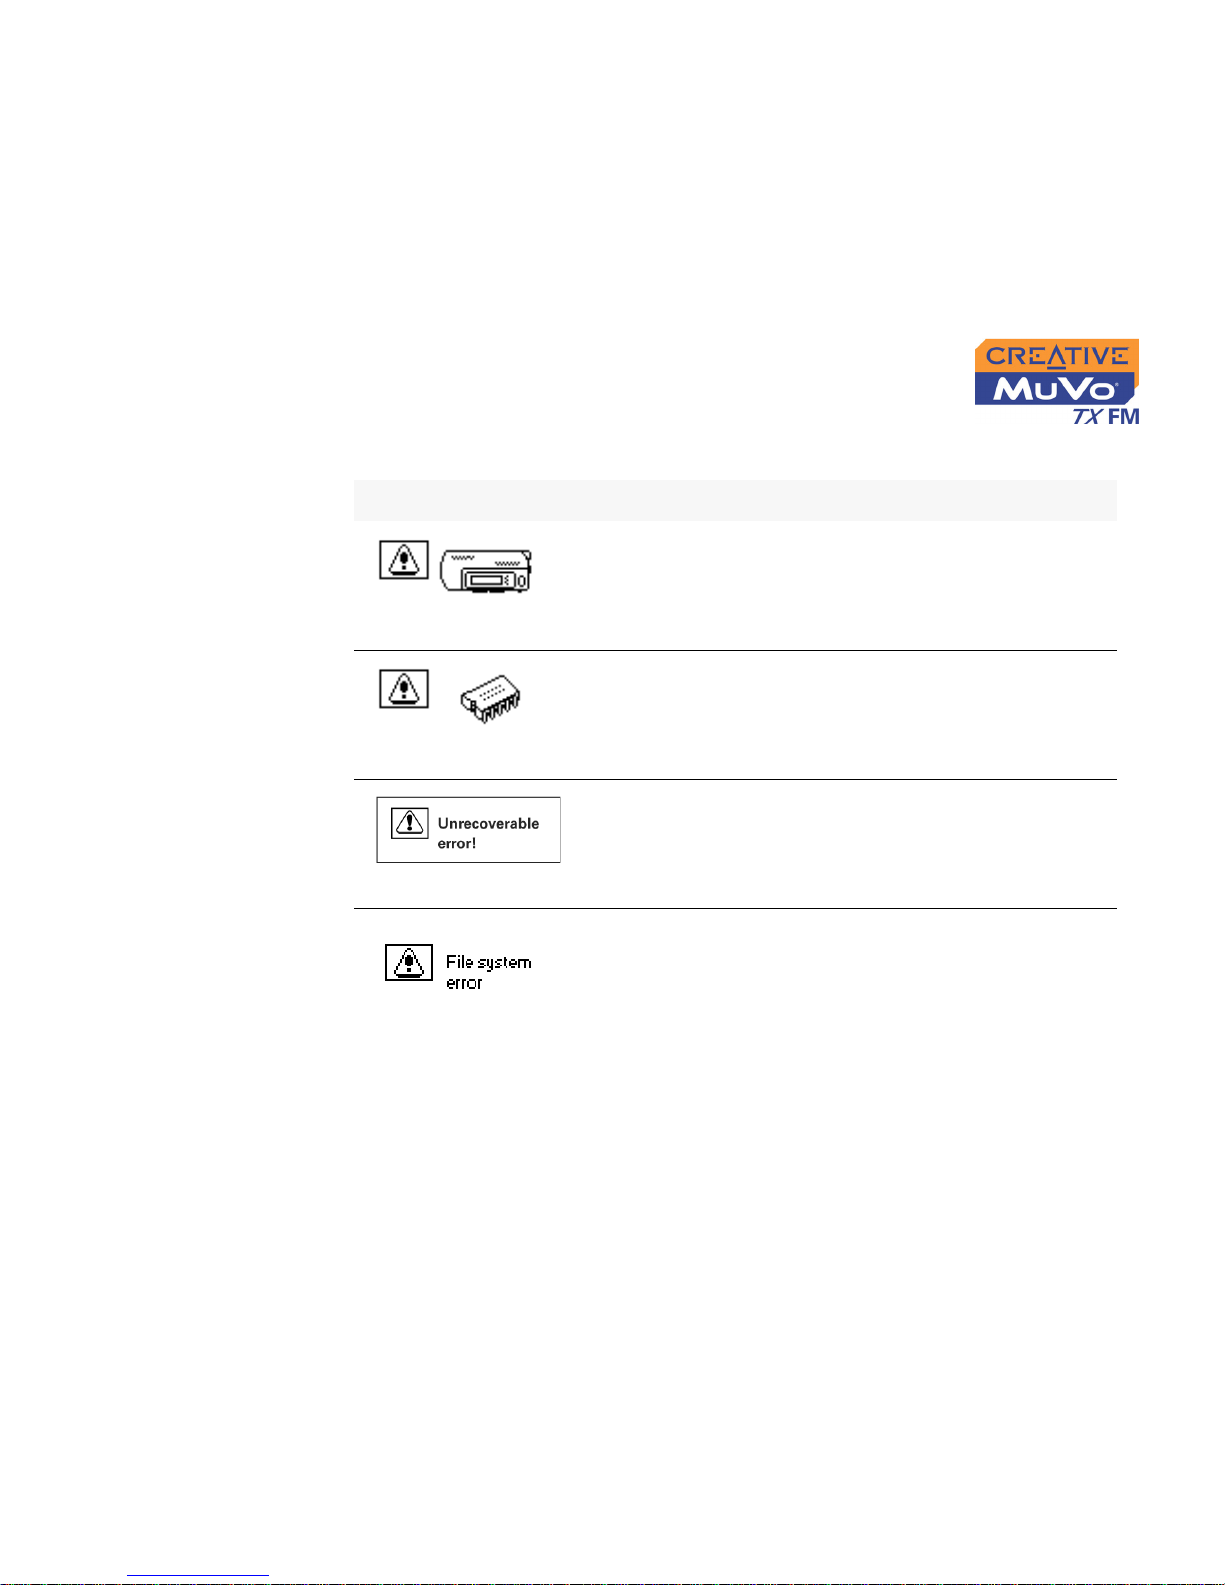
Error Diagrams
If an error occurs, you may see the following diagram, indicating the general
nature of the problem.
Diagram Likely Causes Suggested Action
❍ physical defects
❍ numerous high-
impact shocks
❍ call Technical Support
❍ unexpected power
loss while saving
settings
❍ download a newer
firmware version
❍ reload firmware
❍ call Technical Support
❍ player is unable to
perform the selected
task (for example,
deleting a file)
❍ clear your player’s
memory
❍ call Technical Support
❍ unsupported file
system
❍ corrupted file system
❍ check that the file
system you have
selected during
formatting is FAT only
❍ use ScanDisk to check
your player
Page 68
Onscreen Diagram and Icon Guide B-5
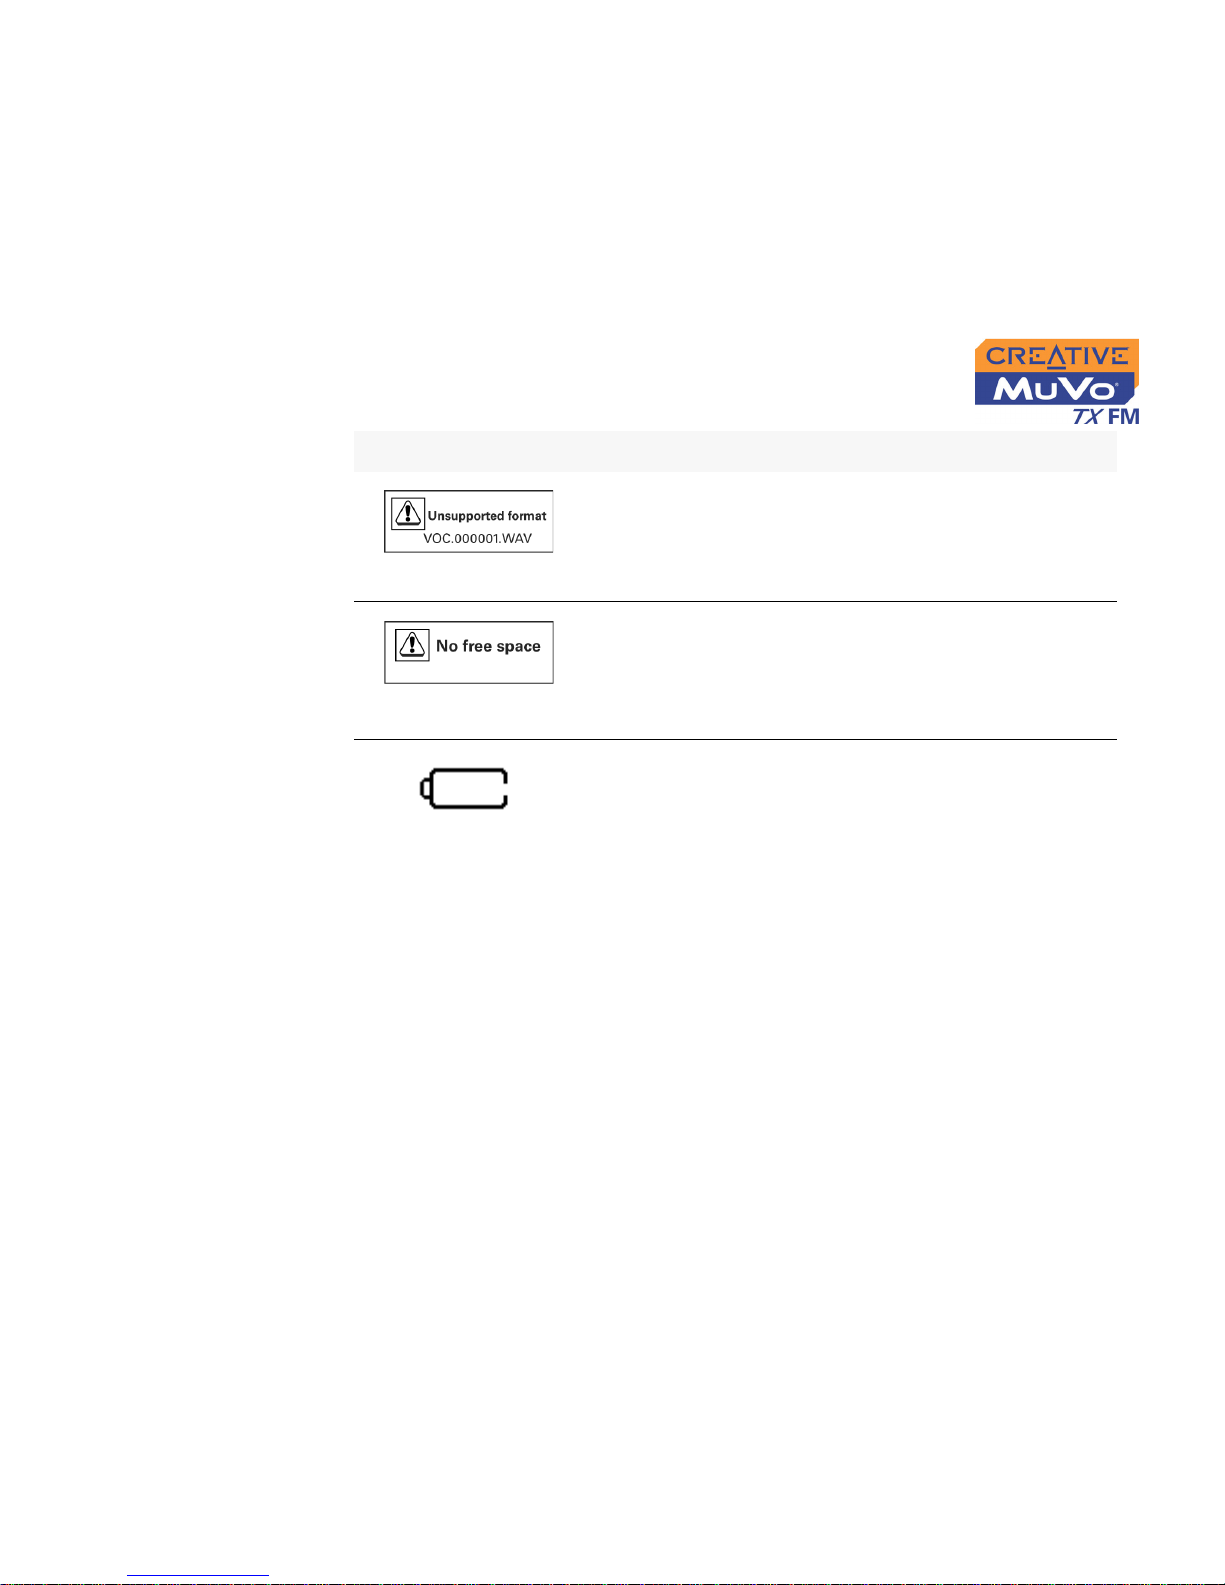
❍ unsupported file
format
❍ check that the file you
are trying to play back is
a .WMA, .MP3 or
recorded voice file
❍ the player’s low
remaining storage
space is depleted;
recording cannot
proceed
❍ delete some files
❍ battery is depleted,
player cannot start
up
❍ insert a new battery
Diagram Likely Causes Suggested Action
Page 69

Frequently Asked Questions and
Troubleshooting
Page 70

FAQs and Troubleshooting C-1
FAQs and Troubleshooting
AutoPlay
What do I do when the installation does not start automatically after the
Installation CD is inserted?
The AutoPlay feature in your Windows system may not be enabled.
To start the installation program through the My Computer
shortcut menu
1. On your Windows desktop, double-click the My Computer icon.
2. Right-click the CD-ROM drive icon, and then click AutoPlay.
3. Follow the onscreen instructions.
To enable AutoPlay through Auto Insert Notification
1. Click Start -> Settings -> Control Panel.
2. Double-click the System icon. The System Properties dialog box
appears.
3. Click the Device Manager tab and select your CD-ROM drive.
4. Click the Properties button.
5. Click the Settings tab, and then select Auto Insert Notification.
6. Click the OK button.
To start the installation program through Windows Explorer
1. in Windows Explorer, search and locate the d:\ctrun folder (replace d:\
with the drive letter of your CD-ROM drive).
2. Double-click the ctrun.exe file.
Page 71
FAQs and Troubleshooting C-2
General
Where can I get official information on all MuVo products?
Visit www.creative.com for updates and downloads relating to all MuVo
products, Creative’s MP3 players and accessories.
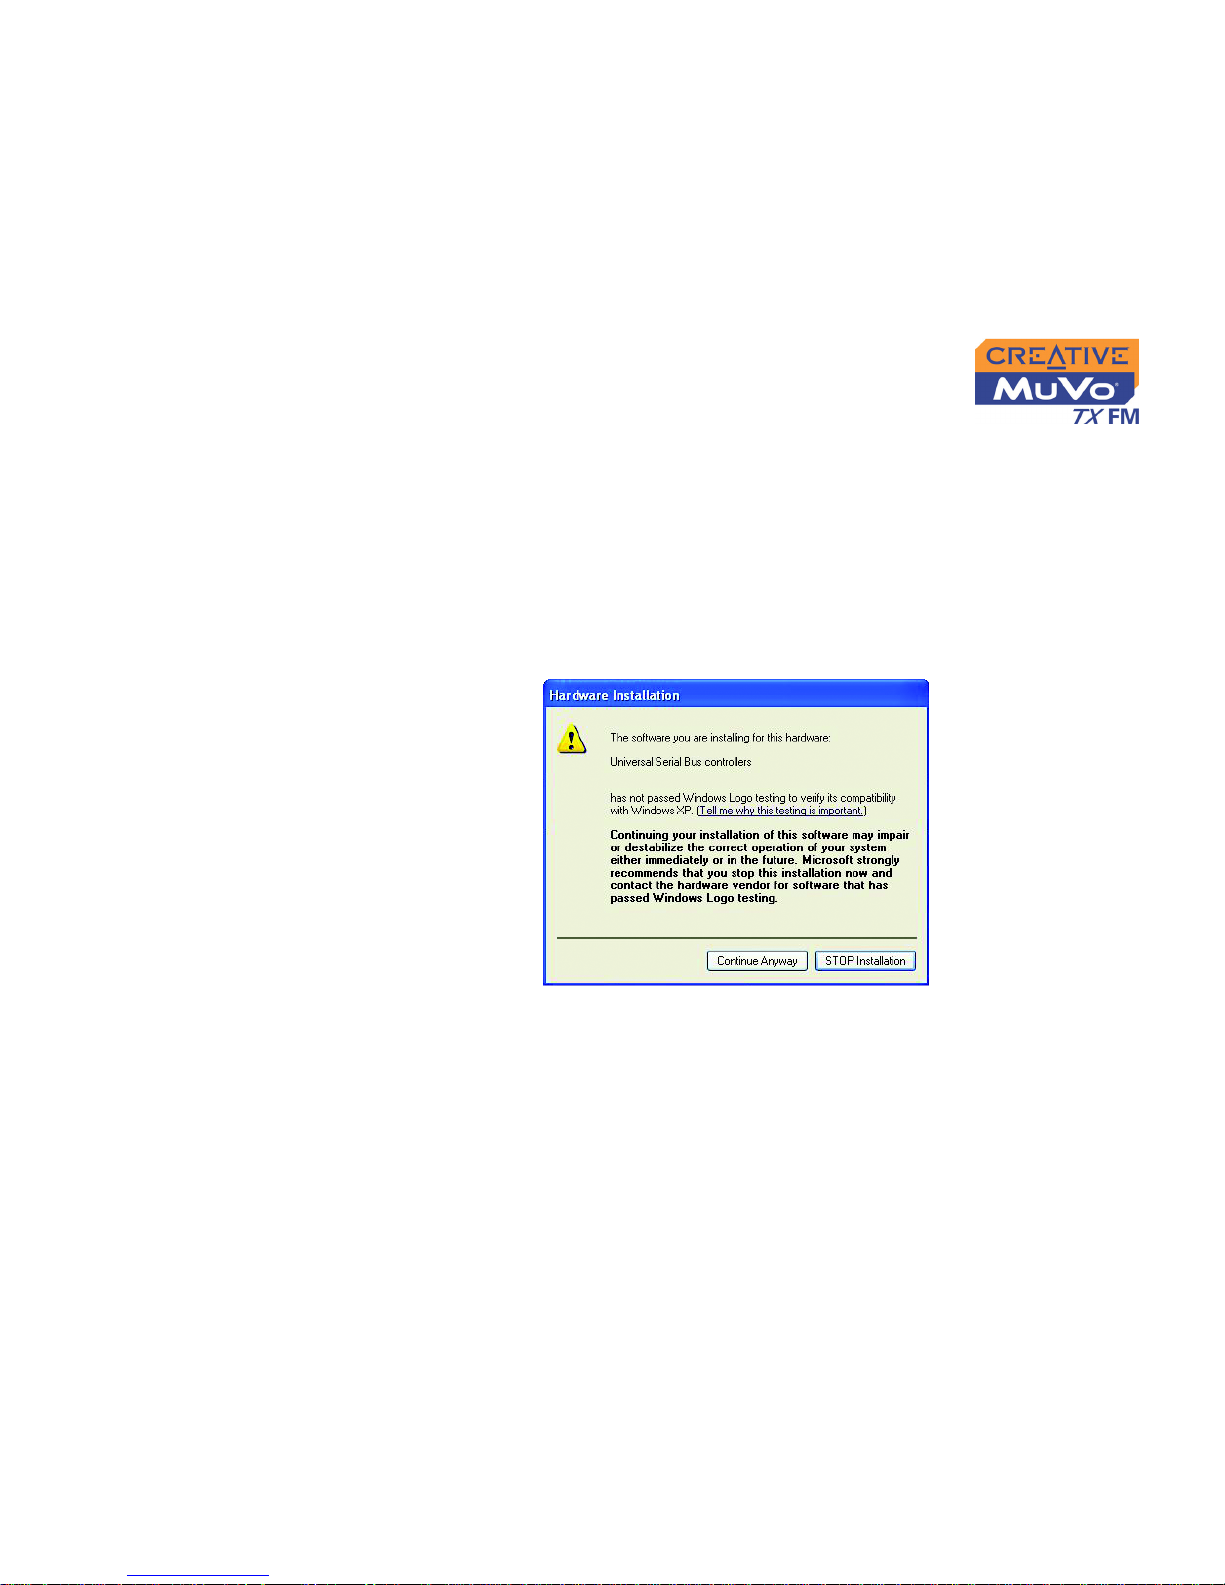
Windows XP tells me that the software for the player is not certified.
What do I do?
At the time of this product's release, Microsoft strongly encouraged
companies to submit their hardware solutions for certification. If a hardware
device driver is not submitted, or does not qualify , for Microsoft certification, a
warning message similar to the one below appears.
You may see this message when installing this driver or update. If you do,
you may choose to click the Continue Anyway button. Creative has tested
this driver or update on Windows XP, and it does not impair or destabilize
your computer.
Page 72
FAQs and Troubleshooting C-3
Usage
After playing a sequence of tracks, the player skips a track.
The player will only play valid formats (.MP3, .WMA or .WAV recordings).
Other types of files will be skipped.
Files/tracks are corrupted when transferred to the player.
Transfer may have been interrupted. Before disconnecting your player from
your computer, make sure that you stop your player properly first.
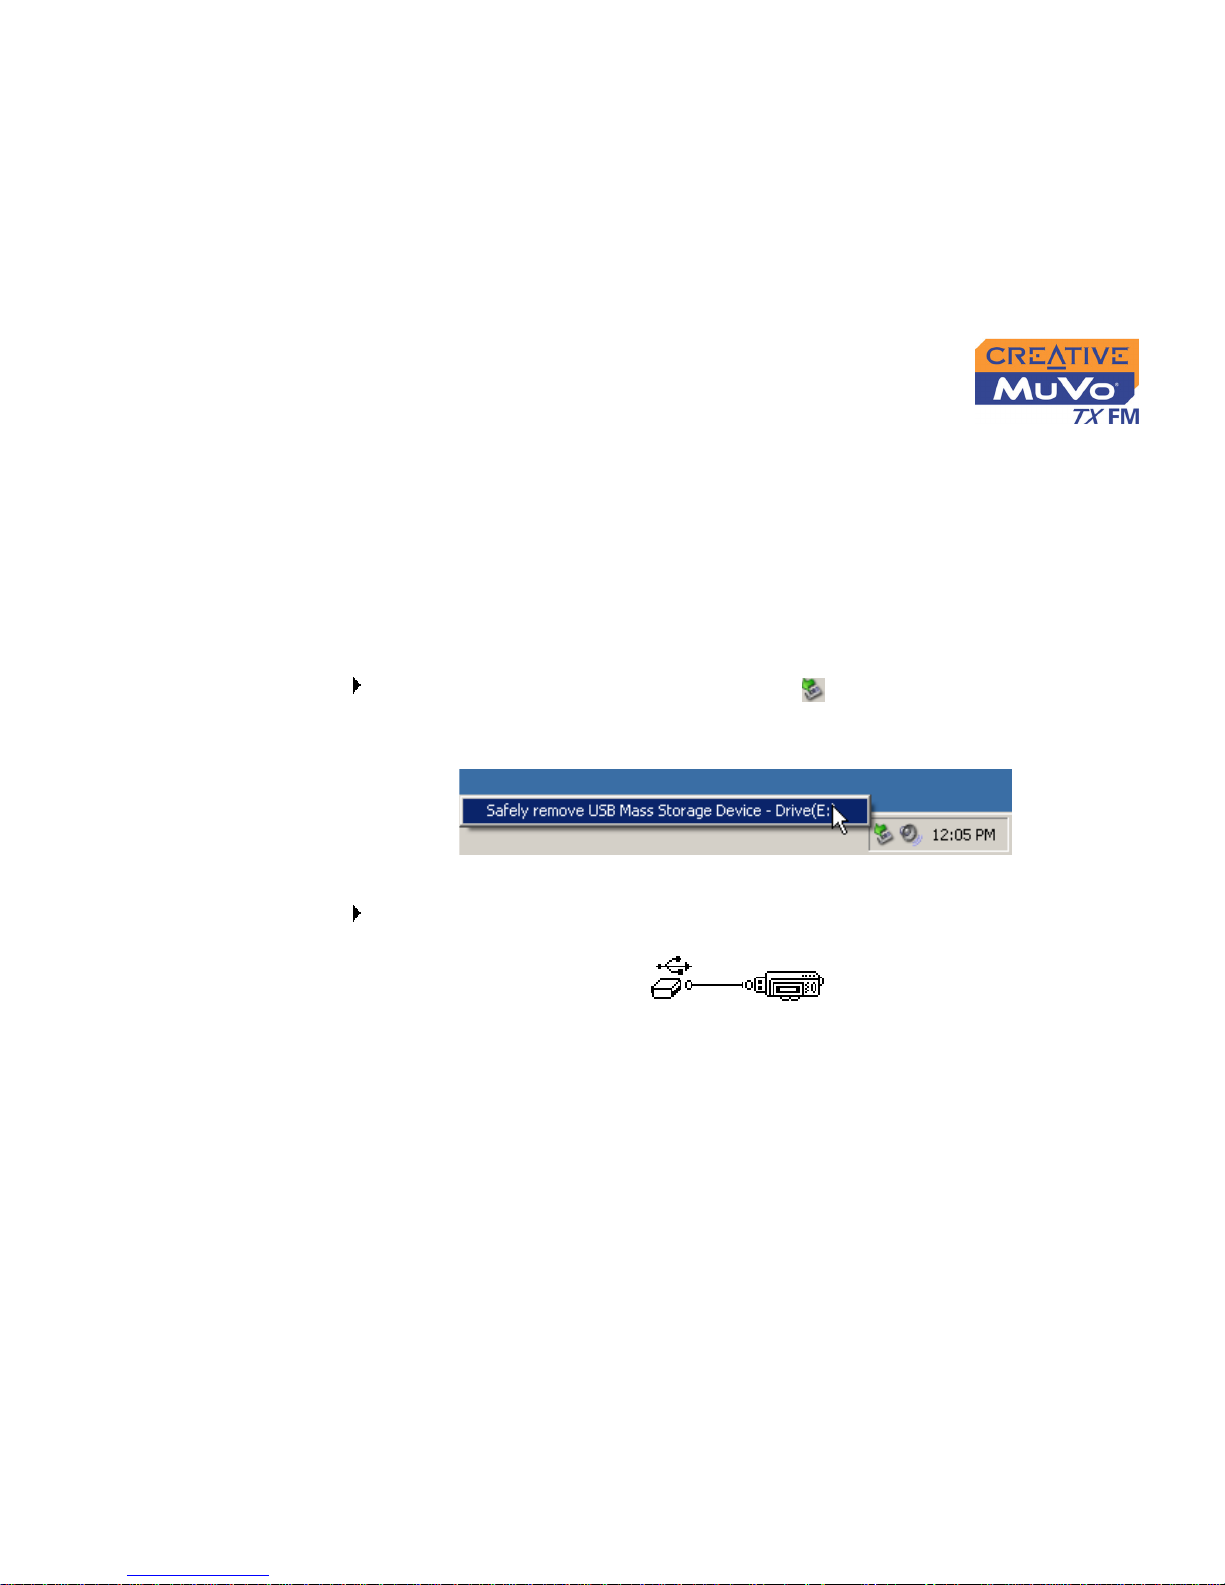
To stop your player in Windows XP, WIndows 2000 or Windows Me
Click the Safely Remove Hardware icon on the Taskbar, click Safely
remove USB Mass Storage Device, and disconnect your player when you
are prompted to do so.
To stop your player in Windows 98 SE
Make sure that the icon below appears on the LCD screen again for at least
five seconds before disconnecting your player.
The player turns off immediately after it is turned on.
Do one or more of the following:
❍ format your player. For more information, refer to "Formatting Your Player" on
Page 73

FAQs and Troubleshooting C-4
page 4-28.
❍ use fresh batteries if batteries used are depleted.
Can I use the MuVo TX FM for portable data storage?
Yes, you can.
I have to change the battery quite often. Is there anything I can do to
make it last longer?
Some operations consume more battery power:
❍ a long backlight timeout setting. A shorter timeout conserves battery power.
❍ a high contrast setting. Position the player so that you can read the display
without using a high contrast setting.
❍ too much use of fast forward/reverse.
❍ turning the player on/off too many times.
❍ use of passive speakers or high-powered headphones.
❍ playback of .WMA files
Digital Rights
Management
Can I play DRM-protected WMA files on my MuVo TX FM?
Yes.
 Loading...