

Page 1

How to use this manual
This document has been designed to provide you with complete product knowledge. You can resize the
document window or print this document, access linked web sites and get information from specially
prepared graphics.
To jump to a linked topic or a web site, click the underlined blue text, or the hand symbol
whenever it appears.
To show a short description (tooltip) of an object, move your mouse cursor over it. A tooltip
appears after a few seconds.
You can choose to print portions of this document:
On the Contents tabbed page to your left, click a topic heading.
1.
On the menu, click the Print button.
2.
In the dialog box that appears, click the option to print one topic only, or all topics under a
3.
heading.
Page 1
Page 2

Introduction
Your player can store hundreds of songs in its music library, and comes equipped with a USB 2.0 port,
so you can transfer music and data quickly and easily. Your player can also display music lyrics, so you
can sing along to your favorite songs!
Note
Your player plays back MP3 and WMA files, including those protected with Digital Rights
Management (DRM) technology.
Page 2
Page 3

Minimum System Requirements
Microsoft® Windows® XP Professional x64 Edition, Windows XP (Service Pack 1 or later) or
Windows 2000
Intel® Pentium® III 1GHz or AMD Duron 1GHz
CD-ROM or DVD-ROM drive with digital audio extraction support
USB 1.1 port (USB 2.0 port recommended)
128 MB RAM (256 MB recommended)
170 MB available hard disk space (more space needed for storing audio)
SVGA graphics adapter (256 colors, 800 x 600 resolution or better)
Note
The software applications on the MuVo V100 CD may have higher requirements for basic
functionality. Refer to each application's documentation for details.
Page 3
Page 4

Your Player At A Glance
Overview
Using the Scroller
LCD Guide
Page 4
Page 5
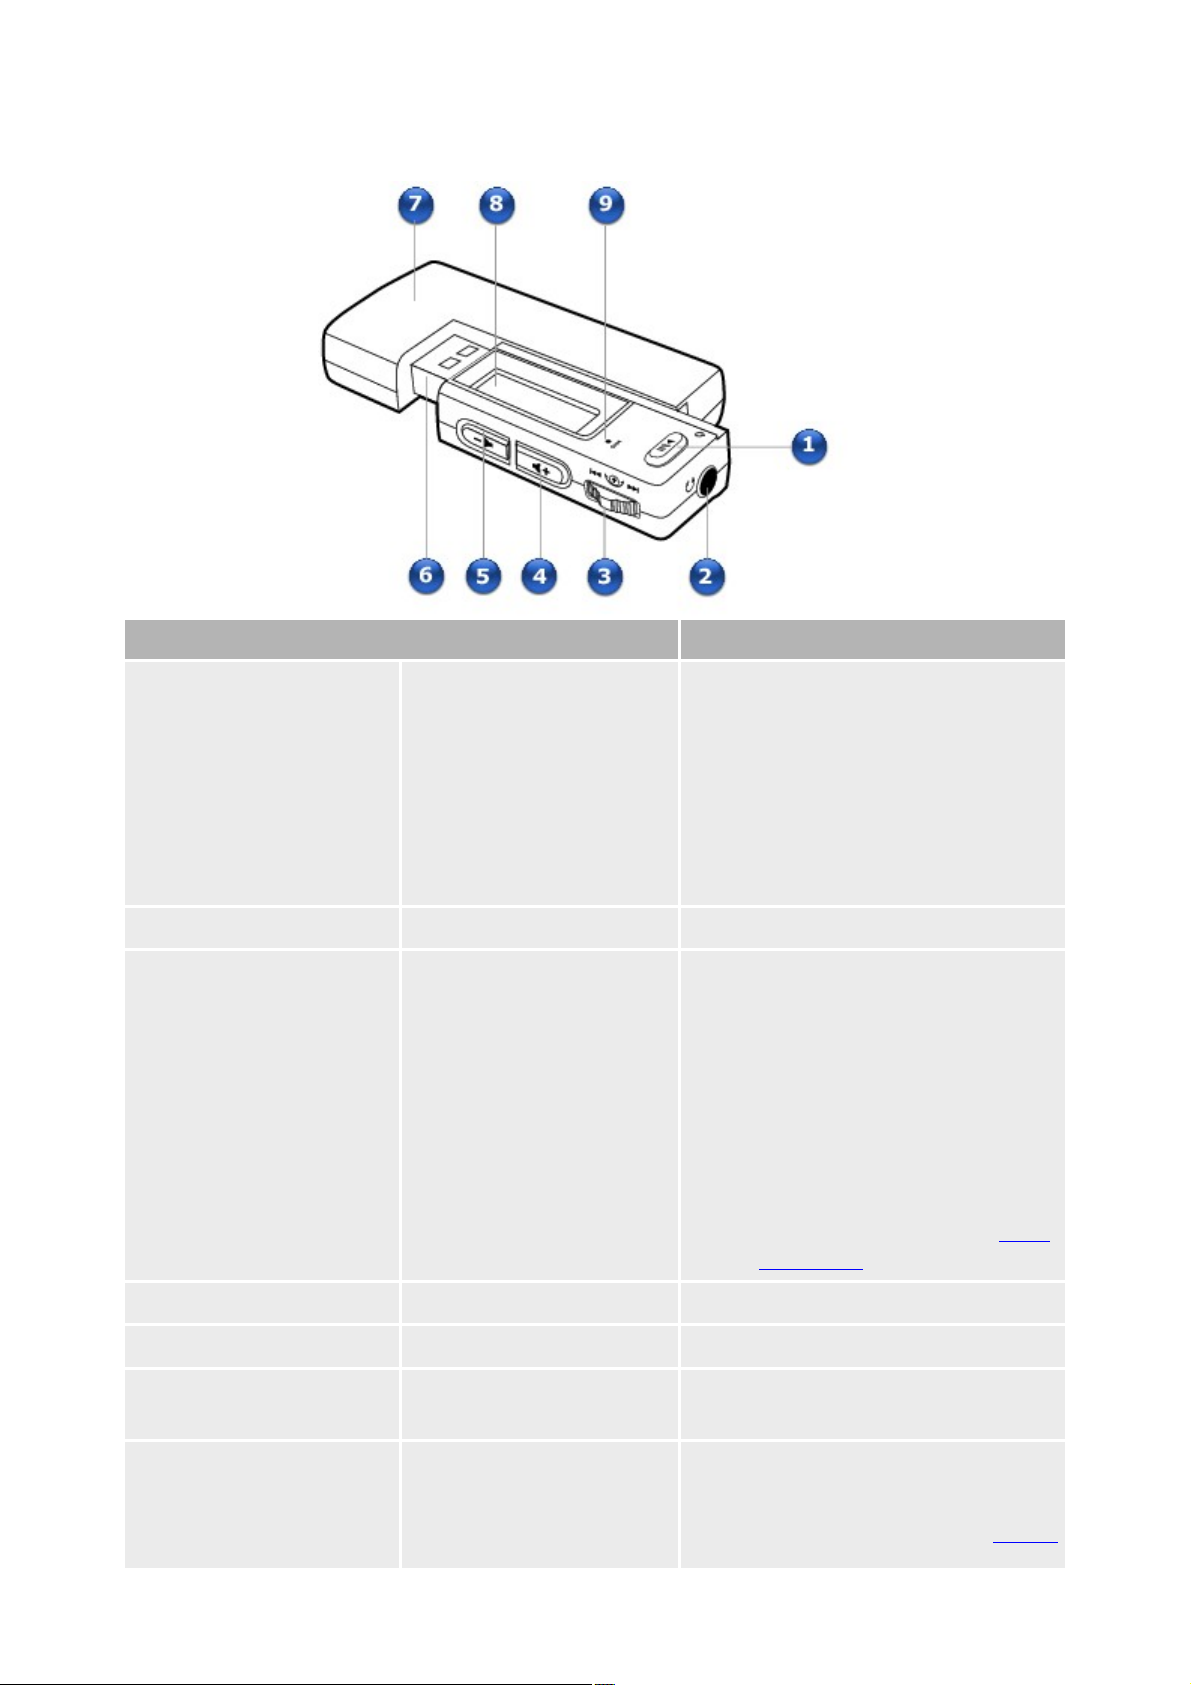
Overview
Component
Usage
1
Play/Pause button
Press and hold to turn the player
on and off.
Press once to start playing
tracks, and press again to pause
playback.
When your player is locked,
press to turn on the Liquid
Crystal Display (LCD) backlight.
2
Headphone jack
Connect earphones to this jack.
3
Scroller
Turn the Scroller to scroll
through menu options and press
the Scroller to select them. This
action is also referred to as
"Scroll Select".
During playback, turn the
Scroller to move between tracks,
or turn and hold the Scroller to
move within a track.
For more information, see Using
the Scroller.
4
Volume Increase button
Press to increase the volume.
5
Volume Decrease button
Press to decrease the volume.
6
USB connector
Connect this connector to your
computer's USB port.
7
Battery module
Insert a AAA alkaline battery
into this module.
For more information see Step 2:
Page 5
Page 6

Turn on your player.
8
Liquid Crystal Display
(LCD)
Displays menu options.
9
Microphone
A built-in microphone that lets
you make digital voice
recordings.
Page 6
Page 7

Using the Scroller
Most of the player's functions are accessed using the Scroller
. It is therefore important that you learn how to use the Scroller.
Select menu options
Control playback
Page 7
Page 8
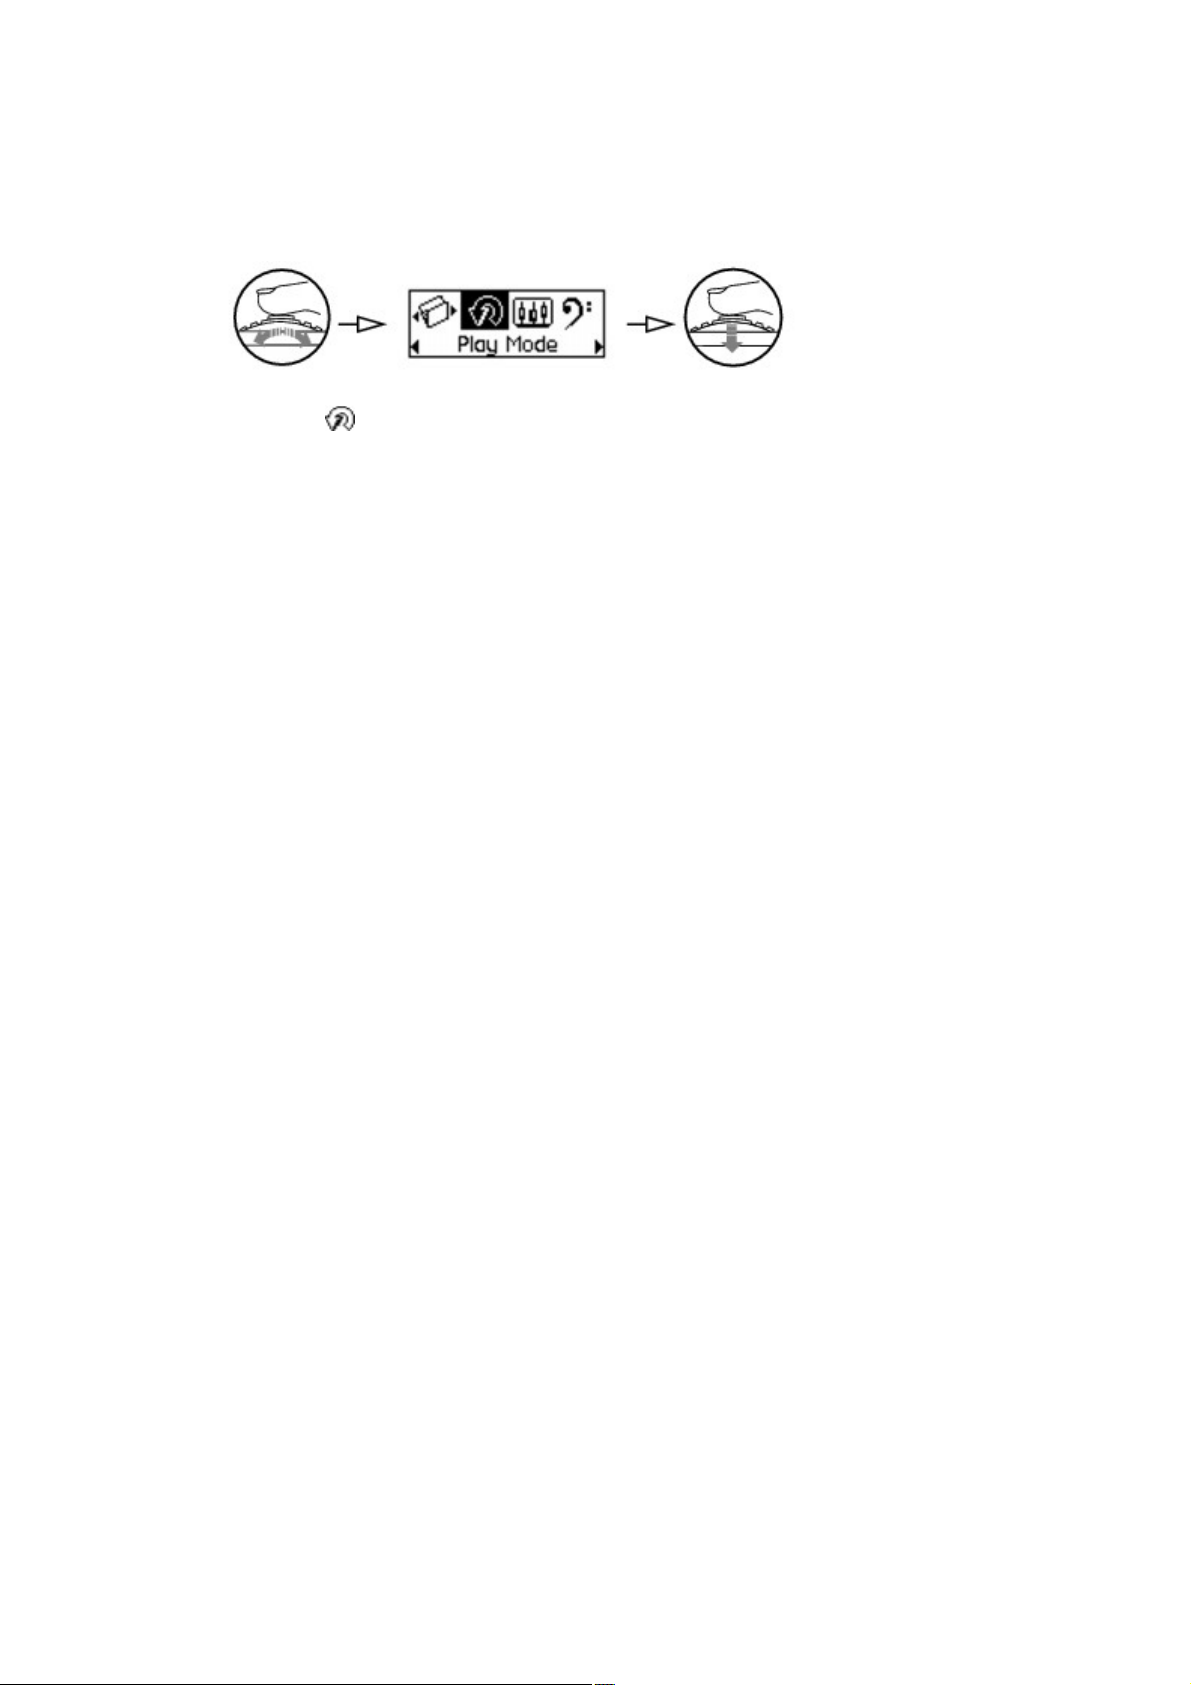
Select menu options
You can use the Scroller to select menu options. In this User's Guide, we use the term "Scroll Select"
when we want you to use the Scroller to scroll to a menu option, and then select it by pressing the
Scroller.
Turn the Scroller to scroll through menu options on your LCD until the option that you want, such
1.
as Play Mode , is highlighted.
Press the Scroller to select this menu option.
2.
Page 8
Page 9

Control playback
During playback, you can use the Scroller to move between tracks, or to move quickly within a track.
To go to the next or previous track during playback
Turn the Scroller right or left respectively
To move forward or back within a track during playback
Turn and
hold the Scroller right or left respectively.
Page 9
Page 10

LCD Guide
Battery Icons
Status Diagrams
Play Status Icons
Play Mode Icons
Information Diagrams
Page 10
Page 11

Battery Icons
This icon
Means this
Battery is full
Battery is 60% full
Battery is 30% full
Battery is nearly empty. Change the battery at
the earliest opportunity
After inserting the battery, your player displays one of the following icons, depending on the battery's
status.
Tip
Playback time depends on factors like the volume level. For more information, see Frequently
Asked Questions.
Page 11
Page 12

Status Diagrams
This diagram
Means this
Your player is connected to your
computer. To use your player,
disconnect it from your computer. For
more information, see Step 4:
Disconnect player.
Files are being transferred to your
player.
Page 12
Page 13

Play Status Icons
This icon
Means this
Play
Pause
Stop
Record
Move forward within a track
Move back within a track
Next track
Previous track
Page 13
Page 14

Play Mode Icons
This icon
Means this
Repeat track
Repeat folder
Repeat all
Shuffle once
Shuffle repeat
Shuffle folder
Track once
Repeat selected section of a track
Page 14
Page 15
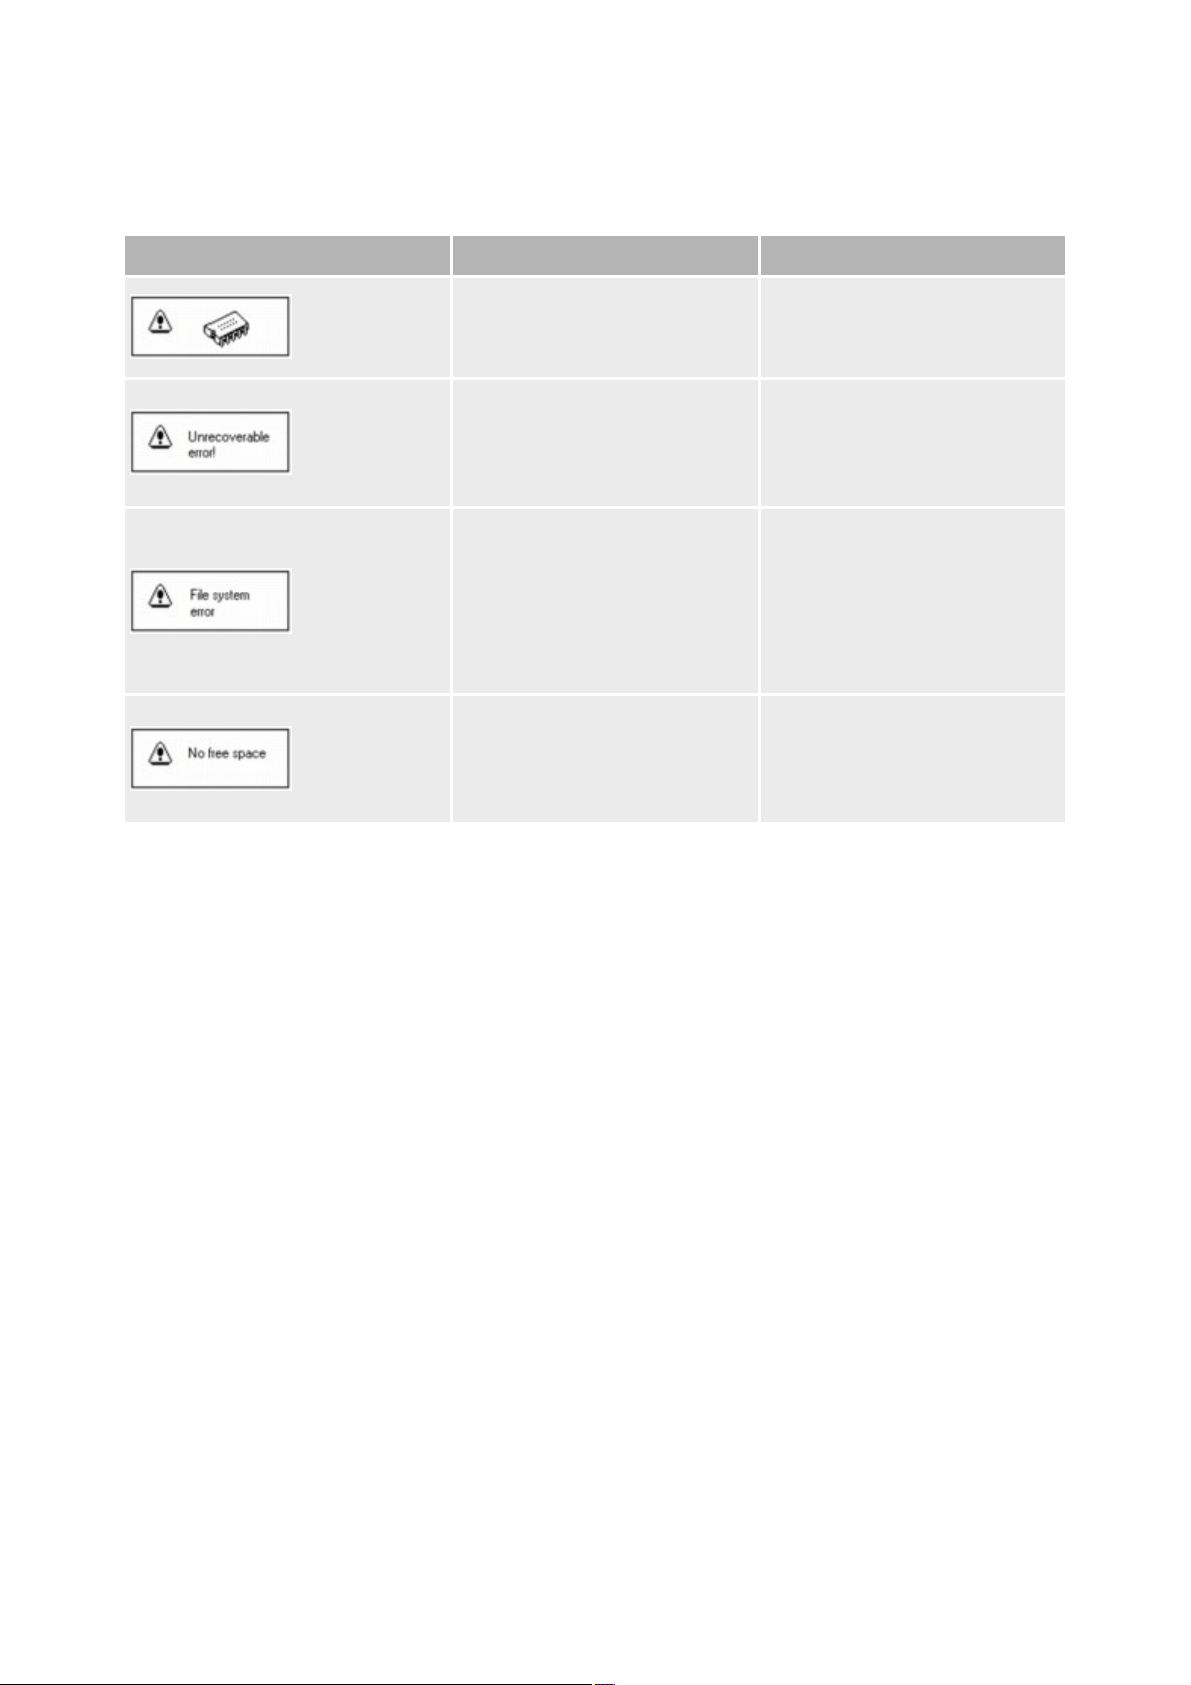
Information Diagrams
This diagram
Means this
Advice
Unexpected power loss
while saving settings
Download a newer
firmware version
Reload firmware
Player is unable to
perform the selected
task, such as deleting a
file
Clear your player's
memory
Unsupported file
system
Corrupted file system
Check that the file
system you selected
during formatting is FAT
or FAT32
Use ScanDisk to scan
your player
The player's remaining
storage space is low or
depleted; recording
cannot proceed
Delete some files to free
storage space
If an error occurs, you may see one of the following information diagrams that indicate the general nature
of the problem.
Page 15
Page 16

Getting Started
Step 1: Set up software
Step 2: Turn on your player
Step 3: Rip and copy music
Step 4: Disconnect player
Page 16
Page 17
Step 1: Set up software
DO NOT connect your player to your computer before setting up the software.
Turn on your computer.
1.
You must log in as an administrator in Windows® before you can set up the software. For more
1.
information, refer to your operating system's online Help.
Insert the Installation CD into your CD-ROM/DVD-ROM drive. Your CD should start
2.
automatically. If it does not, follow the steps below:
Double-click the My Computer icon.
i.
Alternatively, click Start My Computer.
i.
Right-click the CD-ROM/DVD-ROM drive icon, and then click AutoPlay.
ii.
Follow the instructions on the screen and when prompted, restart your computer.
3.
When your computer restarts, follow the product registration instructions on the screen.
4.
When prompted, connect your player to your computer's USB port. Do not press the buttons on
5.
your player while connecting it to your computer.
5.
Page 17
Page 18
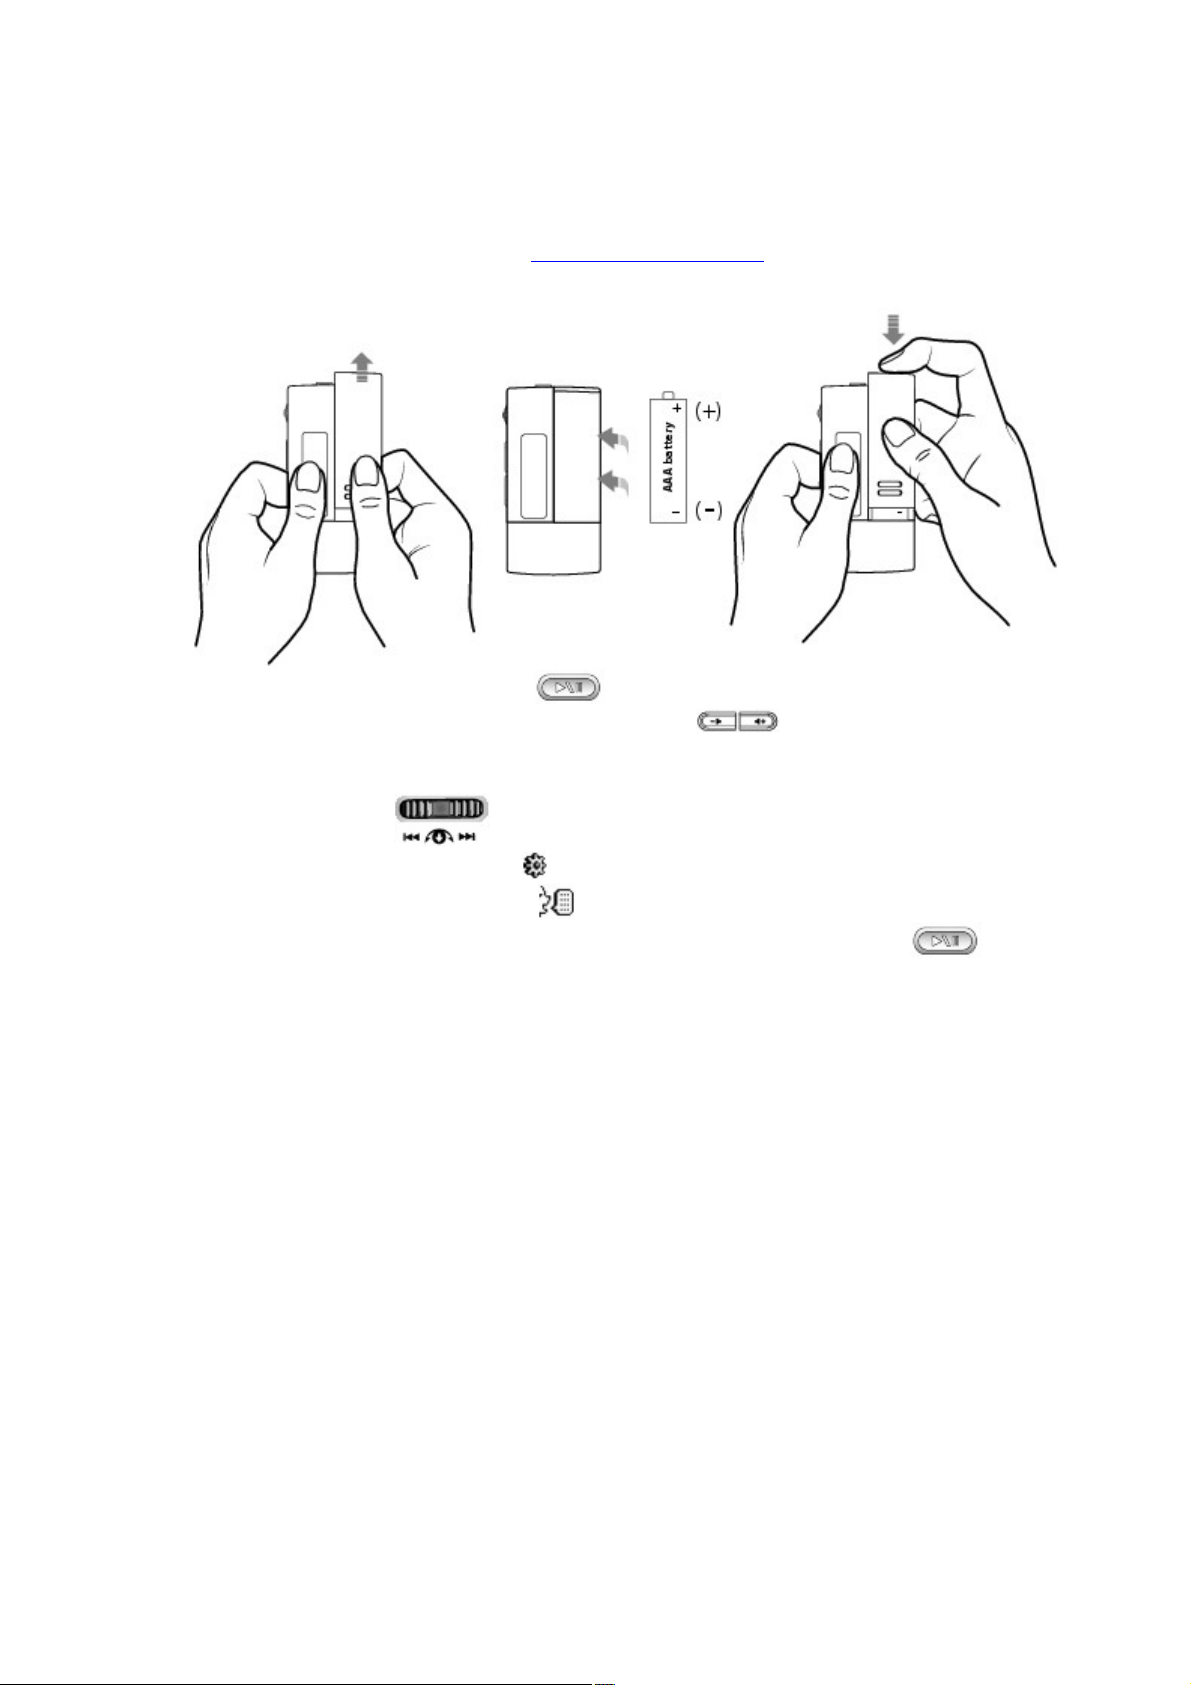
Step 2: Turn on your player
Your player automatically plays preloaded music to get you started immediately.
If your player is connected to your computer, make sure it is disconnected properly from your
1.
computer. For more information, see Step 4: Disconnect player.
Insert a AAA alkaline battery into your player.
2.
2.
Press and hold the Play/Pause button until your player turns on.
3.
Connect your earphones and press the Volume buttons to adjust the volume.
4.
When you turn on the player for the first time, the menu will be in English. To change the
5.
language:
i.
ii.
iii.
After you have finished using your player, press and hold the Play/Pause button until the
6.
Power off message disappears.
Warning!
Remember to set the volume at a moderate level. Listening to music at high volumes can impair
your hearing.
For your safety and the safety of others, do not use earphones while driving, cycling or any other
activity that requires your full attention.
Press the Scroller . The main menu appears.
Scroll Select the Settings option .
Scroll Select the Language option , and then Scroll Select the langauge that you want.
Page 18
Page 19

Step 3: Rip and copy music
Rip music from your CD collection to your player, or copy audio files (such as music you have purchased
online) from your computer.
To rip music from your CD collection
Make sure your player is connected to your computer as shown in Step 1: Set up software.
1.
Double-click the My Computer icon on your desktop.
2.
Double-click the Creative MuVo V100 Media Explorer icon .
3.
Click the Rip Audio CDs icon.
4.
Follow the instructions on the screen.
5.
Album information is automatically retrieved if you are connected to the Internet, and have
6.
registered with a music information provider.
To copy audio or data files from your computer
Make sure your player is connected to your computer as shown in Step 1: Set up software.
1.
Double-click the My Computer icon on your desktop. You will notice that your player is
2.
recognized as a Removable Disk.
Double-click the Creative MuVo V100 Media Explorer icon .
3.
Click the Browse Data icon.
4.
Copy files using the drag-and-drop or copy-and-paste method.
5.
Note
WMA files protected by Digital Rights Management (DRM) technology cannot be copied to
your player using Windows Explorer. You can only do so with applications that support this
technology, such as Creative Media Explorer, Creative MediaSourceTM Player/Organizer, or
Windows Media® Player.
Page 19
Page 20

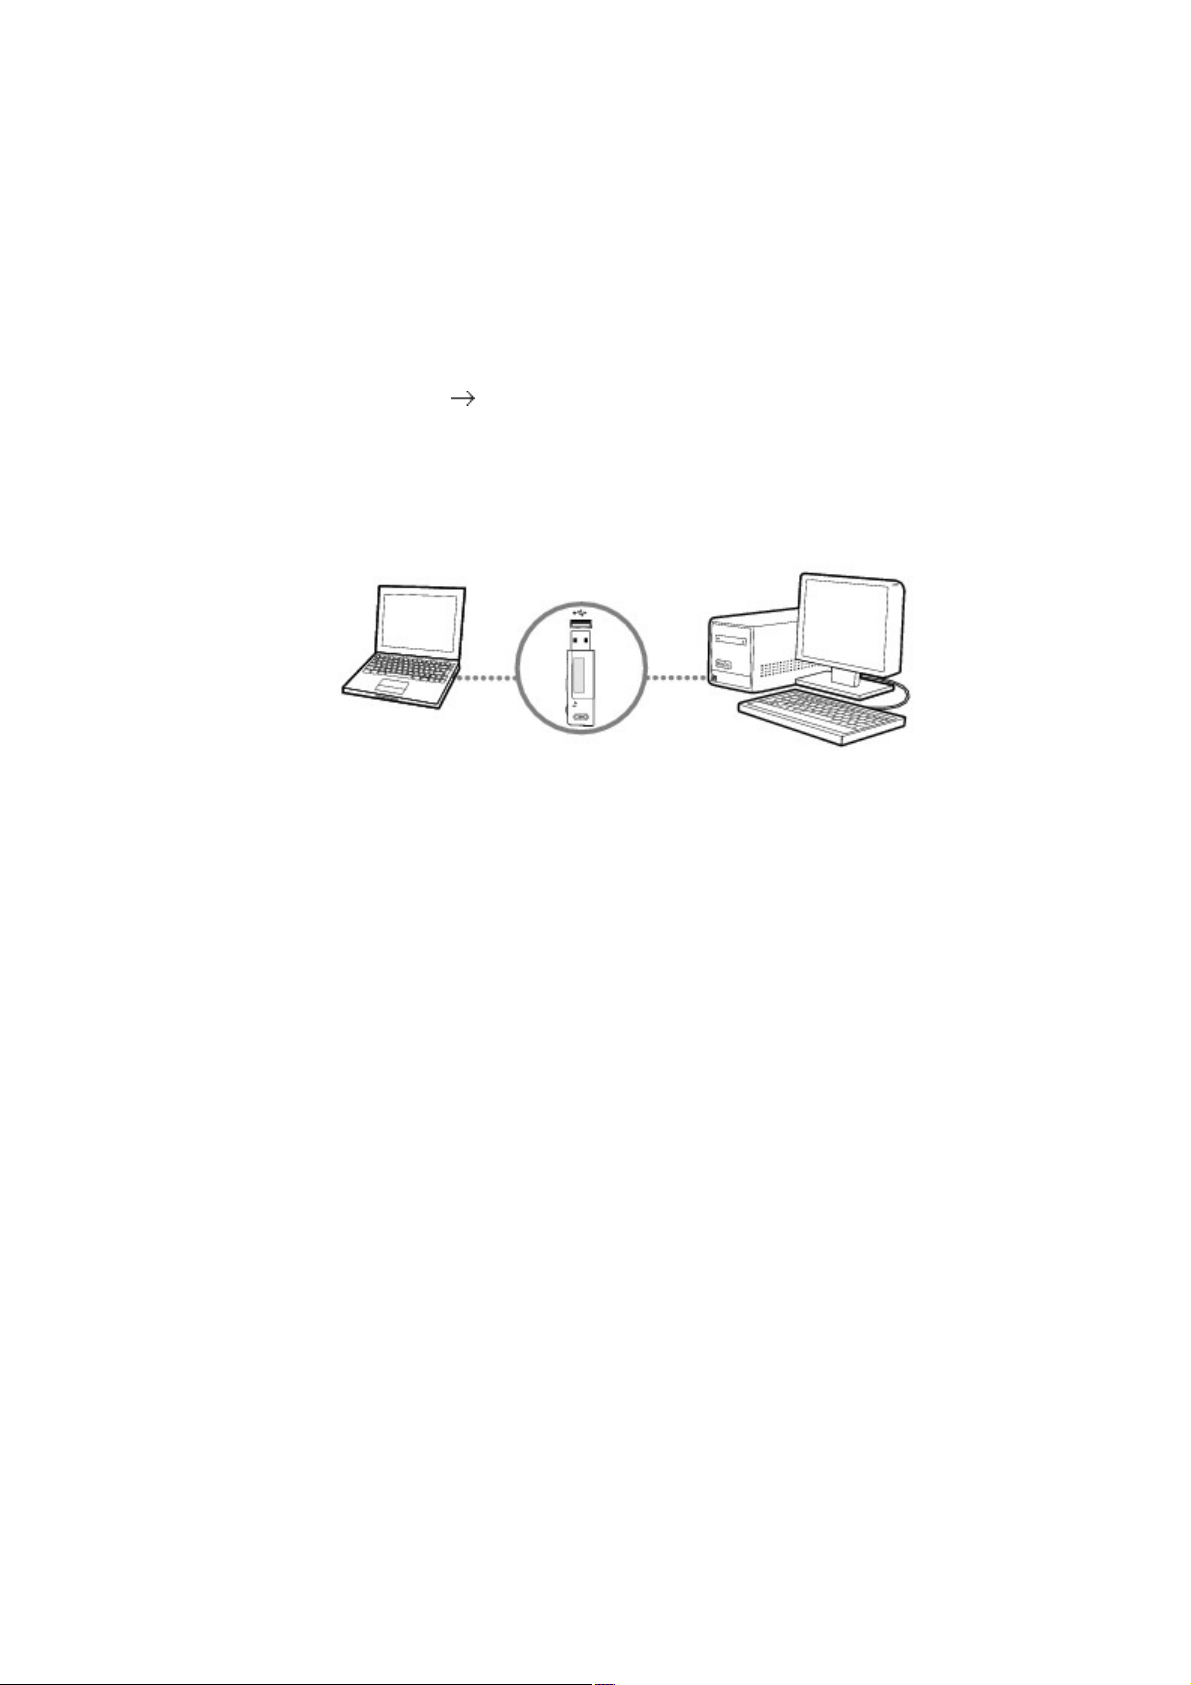
Step 4: Disconnect player
When disconnecting your player from your computer, always use the Windows Eject or Safely Remove
Hardware icon
on the Taskbar. If not, your player may not function normally. Follow these steps below to safely
disconnect your player.
To safely disconnect your player in Windows XP Professional x64 Edition, Windows XP or Windows
2000
Click the Safely Remove Hardware icon on the Taskbar.
1.
Select Safely remove USB Mass Storage Device, and disconnect your player when you are
2.
prompted to do so.
2.
Page 20
Page 21

Using Your Player
Turning your player on and off
Managing music and data
Transferring music and data
Playing music
Displaying lyrics
Enabling Favorites mode
Recording with the built-in microphone
Playing recorded tracks
Locking your player
Deleting tracks
Formatting your player
Cleaning up your player's firmware
Caution!
As with any digital media-based storage device, data should be backed up regularly. We strongly
recommend that you observe the usage precautions laid out in this document, and also back up
the data in your player regularly. In no event will Creative be liable for any indirect, incidental,
special or consequential damages to any persons caused by Creative's negligence, or for any lost
profits, lost savings, loss of use, lost revenues or lost data arising from or relating to this device,
even if Creative has been advised of the possibility of such damages. In no event will Creative's
liability or damages to you or any other person ever exceed the amount paid by you for the
device, regardless of the form of the claim. Some countries/states do not allow the limitation or
exclusion of liability for incidental or consequential damages, so the above limitation or exclusion
may not apply to you.
Page 21
Page 22

Turning your player on and off
Press and hold the Play/Pause button until your player turns on.
1.
The CREATIVE logo appears on the LCD, followed by the MuVo V100 logo. Music stored in
1.
your player starts playing automatically.
After you have finished using your player, press and hold the Play/Pause button until the
2.
Power Off message disappears.
Page 22
Page 23

Managing music and data
Creative Media Explorer and Creative MediaSource Player/Organizer are included with your player.
Install and try out both applications to decide which one is more suitable for your needs.
Page 23
Page 24

Creative Media Explorer
Use Creative Media Explorer if you are new to digital music and want to transfer music from your CDs
to your player, and if you prefer to manage your player in the familiar "Windows Explorer" environment.
To start Creative Media Explorer
Double-click the My Computer icon on your desktop.
1.
Double-click the Creative MuVo V100 Media Explorer icon.
2.
For more information about using Creative Media Explorer, refer to its online Help.
Page 24
Page 25

Creative MediaSource Player/Organizer
Creative MediaSource Player/Organizer, a full-featured media organizer/player allows you to do the
following:
access additional features such as recording, automatic playlist generation and audio format
conversion
manage a music library on your computer
To start Creative MediaSource, double-click the Creative MediaSource Player/Organizer
shortcut icon on your desktop. For more information about using Creative MediaSource, refer to its
online Help.
Page 25
Page 26

AudibleManager
Install AudibleManager® to manage Audible
files. After downloading Audible audio to your player, search for Audible files by title.
To skip sections within an Audible track
You can skip one or more sections in your Audible file, instead of moving forward or backward within a
track.
Press the Scroller.
1.
Scroll Select the Skip Section icon .
2.
Turn the Scroller towards the right or left to skip sections within the track.
3.
Note
The Skip Section icon is only available when an Audible file is being played.
Audible files are currently available to selected regions only.
You can search within a section in Audible files.
®
Page 26
Page 27

Transferring music and data
Audio selections have been preloaded to your player to get you started quickly. If you wish to listen to
music immediately, see Playing music
.
If you wish to download music tracks to your player, you can download music from Internet music sites
(see Downloading from the Internet), or rip them from your audio CDs to create digital files on your
computer (see Ripping audio CDs
).
You can also use your player as a portable data storage device to transfer large files from one computer
to another. Use Windows Explorer or Creative Media Explorer to transfer data files.
Note
Do not press the buttons on your player while connecting it to your computer.
Page 27
Page 28

Playing music
Press the Scroller.
1.
The main menu appears.
1.
Scroll Select the Music option .
2.
Scroll to the audio track that you want to play and press the Play/Pause button .
3.
Note
You can select different play modes to vary the playback order. For more information, see Play
mode.
Page 28
Page 29

Overview of the Music screen
1
Play mode
2
EQ setting
3
Track information
4
Play status
5
Elapsed time
Page 29
Page 30

Storing Tracks in Folders
Description
1.
Root folder
2.
Default folder
Your player stores audio tracks in folders. You can store tracks in the root (first level) folder or default
library folders (Library A, Library B or Library C) created by your player. You can only store up to a
maximum number of 500 tracks per folder. If an error message appears, telling you that a folder has
exceeded the maximum number of allowed tracks, transfer the additional tracks to another folder
containing less than 500 tracks.
Note
When you select Repeat all, Shuffle repeat and Shuffle once play modes, you can only play
tracks from one default library folder. To play tracks from another folder, see Skipping Folders.
The LRC folder contains lyrics that were imported to audio files in Lyrics Editor. For more
information about Lyrics Editor, refer to its online Help.
Page 30
Page 31

Skipping Folders
During music playback, you can choose between different folders of music tracks.
During music playback, press the Scroller and Scroll Select the Skip Folder option .
1.
Scroll to the folder that you want to go to.
2.
To resume normal playback, press the Scroller again.
3.
Note
Your player can only recognize up to three subfolder levels in the root directory. See Storing
Tracks in Folders for more information on root folders and folders.
You cannot skip folders when playing back microphone recordings.
Page 31
Page 32

Displaying lyrics
Your player can display the lyrics of songs being played.
Press the Scroller.
1.
The main menu appears.
1.
Scroll Select the Settings option .
2.
Scroll Select Lyrics Display and select Lyrics On.
3.
To hide the lyrics display later, repeat steps 1 to 3 and Select Lyrics Off.
3.
Press the Scroller.
4.
The main menu appears.
4.
Scroll Select the Music option .
5.
Scroll Select the audio track that you want to play.
6.
The audio track is played back automatically.
6.
If lyrics do not appear, or you want to edit the lyrics on display, see Editing lyrics.
6.
If lyrics appear but are not displayed properly, make sure your player's language is the same as
6.
the song being played. To change the language, see Step 2: Turn on your player.
Page 32
Page 33

Displaying lyrics during playback
During playback, press and hold the Scroller.
1.
A list appears.
1.
Scroll Select Lyrics On.
2.
To hide the lyrics display, repeat steps 1 and 2 and Scroll Select Lyrics Off.
3.
Page 33
Page 34

Editing lyrics
Connect your player to your computer.
1.
Double-click the My Computer icon on your desktop.
2.
Alternatively, click Start My Computer. You will notice that your player is recognized as a
2.
Removable Disk.
Double-click Creative MuVo V100 Media Explorer.
3.
Click the Browse Data icon.
4.
Locate and select the WMA or MP3 file you want to edit.
5.
Click the Lyrics Editor button on the Creative Media Explorer toolbar.
6.
Add or edit your audio file's lyrics and click the OK button.
7.
Note
For more information about Lyrics Editor, see Using Lyrics Editor.
Page 34
Page 35

Using Lyrics Editor
Lyrics Editor is included with your player. Using Lyrics Editor you can:
import LRC or TXT (plain text) files
synchronize lyrics and songs
edit lyrics.
For more information about Lyrics Editor, refer to its online Help.
Page 35
Page 36

Enabling Favorites mode
When Favorites mode is enabled, only tracks in the Favorites mode folder are played back.
Page 36
Page 37

Adding tracks to the Favorites mode folder
Press the Scroller.
1.
The main menu appears.
1.
Scroll Select the Music option .
2.
Scroll to the audio track that you want to add.
3.
Press and hold the Scroller. A list appears.
4.
Scroll Select Add Favorite.
5.
Note
You can add tracks from outside the default library folders, or tracks from only one default
library folder to the Favorites mode folder.
Page 37
Page 38

Selecting Favorites mode
Press the Scroller.
1.
The main menu appears.
1.
Scroll Select the Favorites option . The Favorites mode icon appears on the LCD and all
2.
tracks in the Favorites mode folder are played back.
Page 38
Page 39

Deleting tracks from Favorites mode
Press the Scroller.
1.
The main menu appears.
1.
Scroll Select the Favorites option . The Favorites mode icon appears on the LCD and all
2.
tracks in the Favorites mode folder are played back.
Scroll to the audio track that you want to delete.
3.
Press and hold the Scroller. A list appears.
4.
Scroll Select Remove Favorite.
5.
Note
Tracks deleted from the Favorites mode folder are still accessible from the Music folder.
Page 39
Page 40

Recording with the built-in microphone
Press the Scroller.
1.
The main menu appears.
1.
Scroll Select the Microphone option . The recording bar appears on the LCD.
2.
Press the Play/Pause button to start the recording.
3.
Press the Play/Pause button again to end the recording. A name is automatically assigned
4.
to your recording and it is saved in your player. The naming convention used is: VOC [Current
File Number].
Page 40
Page 41

Overview of the Voice recording screen
1
Remaining recording time
2
Recording file name
3
Elapsed recording time
4
Recording status
Note
Recorded tracks are saved in the Recorded Tracks folder in your player's root directory.
To view and play back recordings, Scroll Select the Recorded Tracks option . For more
information, see Playing recorded tracks.
Page 41
Page 42

Playing recorded tracks
Press the Scroller.
1.
The main menu appears.
1.
Scroll Select the Recorded Tracks option .
2.
Scroll to a recording that you want to play and press the Play/Pause button .
3.
Page 42
Page 43

Overview of the Recorded Tracks screen
1
Elapsed time
2
Play mode
3
Currently playing track
4
Play status
Page 43
Page 44

Locking your player
Locking your player disables the functions of all buttons and the Scroller on your player. Locking your
player is useful when you do not want to accidentally activate functions on your player.
Press the Scroller.
1.
The main menu appears.
1.
Scroll Select the Lock option .
2.
appears at the top right corner of the LCD.
2.
To unlock your player, press the Scroller or any button on your player and Scroll Select the
3.
Unlock option .
Page 44
Page 45

Deleting tracks
Press the Scroller.
1.
The main menu appears.
1.
Scroll Select the Delete option .
2.
Scroll Select to permanently delete the currently playing audio track or recording.
3.
Page 45
Page 46

Formatting your player
If you need to format your player, back up the files in your player first. When you format your player, all
songs and data files are deleted. Your new player is already formatted.
Connect your player to your computer's USB port.
1.
DO NOT press the buttons on your player while connecting it to your computer.
1.
1.
Double-click the My Computer icon on your desktop.
2.
Alternatively, click Start My Computer. You will notice that your player is recognized as a
2.
Removable Disk.
Right-click the Removable Disk option, select the Format option, and follow the instructions on
3.
the screen to format your player.
Make sure you select FAT32 when formatting the player. NTFS is NOT supported on your
3.
player.
3.
After the formatting is complete, make sure you stop your player before disconnecting it from
4.
your computer. For instructions on stopping your player, see Step 4: Disconnect player.
Page 46
Page 47

Cleaning up your player's firmware
After you have finished using your player, press and hold the Play/Pause button until the
1.
Power Off message disappears.
Press and hold the Play/Pause button and Scroller simultaneously. The
2.
Recovery Mode screen appears when your player turns on. Two menu items are available in the
Recovery Mode screen: Clean Up and Reboot.
Scroll Select Clean Up.
3.
When the clean up is complete, select Reboot. Your player restarts.
4.
Page 47
Page 48

Settings and Preferences
Play mode
EQ
Bass Boost
Settings
Page 48
Page 49

Play mode
Press the Scroller.
1.
The main menu appears.
1.
Scroll Select the Play mode option .
2.
Scroll Select one of the following options:
3.
A-B
o
Repeats a selected section of a track. When you select this, appears at the top right
o
corner of the LCD.
Press the Scroller when A is highlighted to mark the start point of the repeat, and press the
o
Scroller again when B is highlighted to mark the end point.
Repeat track
o
Repeats the current song. When you select this, appears at the top right corner of the
o
LCD.
Repeat all
o
Repeats all songs in your player. When you select this, appears at the top right corner of
o
the LCD.
Repeat folder
o
Repeats all songs in a folder. When you select this, appears at the top right corner of the
o
LCD.
Note
Track once
o
Stops playing after the current song ends. When you select this, appears at the top right
o
corner of the LCD.
Shuffle repeat
o
Plays and repeats all songs, in random order. When you select this, appears at the top
o
right corner of the LCD.
Shuffle once
o
Plays all songs in random order, once only. When you select this, appears at the top right
o
corner of the LCD.
Shuffle folder
o
Plays folders of songs in random order. When you select this, appears at the top right
o
corner of the LCD.
Normal
o
Resumes playing songs in sequence.
o
Repeat folder and Shuffle folder modes are only available in Music mode.
Page 49
Page 50

EQ
EQ is a collection of equalizer presets that can enhance the sound of your music. Select presets such as
Rock or Jazz, or customize your own equalizer setting.
Press the Scroller.
1.
The main menu appears.
1.
Scroll Select the EQ option .
2.
Scroll Select one of the following options:
3.
Rock
o
When you select this, appears at the top right corner of the LCD.
o
Pop
o
When you select this, appears at the top right corner of the LCD.
o
Classical
o
When you select this, appears at the top right corner of the LCD.
o
Jazz
o
When you select this, appears at the top right corner of the LCD.
o
Custom
o
When you select this, appears at the top right corner of the LCD.
o
Normal
o
Plays songs without EQ enhancements.
o
Defining Custom EQ
Scroll Select the Custom EQ option . The Custom EQ settings appear.
1.
1.
Five vertical control levers appears in the display. Each lever represents successively higher
2.
frequencies that can be adjusted.
62 controls bass frequency, 250 adjusts the low mid-range frequency, 1k adjusts the mid-range
2.
frequency, 4k adjusts the upper mid-range frequency and 16k adjusts the treble frequency.
Scroll Select a vertical control lever. Use the Scroller to move the control knob up or down to
3.
vary the amount of boost or reduction in the selected frequency range.
Scroll Select the check mark to save the settings and exit.
4.
Page 50
Page 51

Bass Boost
Bass Boost enhances the bass when you play back music in Favorites and Music mode.
Press the Menu button.
1.
The main menu appears.
1.
Select the Bass Boost icon . The Bass Boost options appear.
2.
Select the On option to turn on bass boost and return to Favorites or Music mode.
3.
appears at the top right corner of the display.
Note
The Bass Boost icon is hidden by the Lock icon when you lock your player.
Page 51
Page 52

Settings
Press the Scroller.
1.
The main menu appears.
1.
Scroll Select the Settings option .
2.
Scroll Select one of the following options:
3.
Rotate Display
o
Flips the display for right-handed or left-handed use. The default orientation is for
o
right-handed use. If you are left-handed, you can switch the orientation if you prefer to use
the controls of your player with your left hand.
o
Contrast
o
Adjusts the contrast of the LCD.
o
Backlight
o
Adjusts backlight duration.
o
Language
o
Sets the default language displayed on the LCD.
o
Lyrics Display
o
Displays lyrics (if available) on your player's LCD.
o
Restrict Volume
o
Restricts your player's maximum playback volume. For more information, see Enabling
o
volume restriction.
Cue/Review
o
Sets whether you can use the Scroller to cue or review.
o
Idle Shutdown
o
Adjusts how long your player remains inactive before it automatically shuts down.
o
Information
o
Displays your player's firmware version, total memory space and available memory space.
o
Page 52
Page 53

Enabling volume restriction
Listening to audio at high levels for prolonged periods may damage your hearing. To protect your
hearing, you can restrict your player's maximum playback volume.
Press the Scroller.
1.
The main menu appears.
1.
Scroll Select the Settings option .
2.
Scroll Select the Restrict Volume option .
3.
The current status is displayed.
3.
Scroll Select On.
4.
The volume bar appears.
4.
Scroll Select the maximum volume level that you want.
5.
You will be prompted to set a password.
5.
Scroll Select Yes.
6.
Use the Scroller to set a password.
7.
When you enter the last digit, a message appears to tell you that the password is enabled.
7.
Note
For more information about volume restriction, see www.creative.com/volume_restriction
Page 53
Page 54

Disabling volume restriction
WARNING! Stop audio playback on your player and take off your earphones before disabling this
feature. Your player will play back audio at maximum levels when you disable this feature.
Press the Scroller.
1.
The main menu appears.
1.
Scroll Select the Settings option .
2.
Scroll Select the Restrict Volume option .
3.
You will be prompted for your password, if you set one.
3.
Use the Scroller to enter your password.
4.
The current status is displayed.
4.
Scroll Select Off.
5.
Note
If you forget your password, clean up your player's firmware. For more information, see
Cleaning up your player's firmware.
Page 54
Page 55

About Music Files
You can download music files from Internet music sites, or "rip" music files from audio CDs to your
computer. Music files that you transfer to your player must, however, be MP3 or WMA files if you want
to play them back.
WMA files are music files that have lossy compression encoding, which means that some data is lost
during compression. The standard bitrate for most WMA files is 128 kbps. Higher bitrates will result in
better audio quality, but file sizes will be larger as a consequence.
Downloading from the Internet
Ripping audio CDs
Page 55
Page 56

Downloading from the Internet
To get digital music files from the Internet, use a search engine to locate sites with digital music content.
You can use the supplied software to download audio files from any major Internet music download site.
Follow the instructions on the site to download the music files to your computer.
Note
It may be illegal to encode audio files for trade or sale unless you have the express or explicit
permission of the copyright holder(s).
WMA files protected by Digital Rights Management (DRM) technology cannot be copied to
your player using Windows Explorer. You can only do so with applications that support this
technology, such as Creative Media Explorer, Creative MediaSource Player/Organizer, or
Windows Media Player.
Page 56
Page 57

Ripping audio CDs
To get music tracks from your CDs to your player, you will need a CD-ROM or DVD-ROM drive that
can extract digital audio data, and Creative MediaSource Player/Organizer. Creative MediaSource
Player/Organizer will read the audio information on your CD and convert it to the WMA format using the
bitrate you choose.
The standard bitrate of most WMA files is 128 Kbps, although some are set higher, at 160 or 192
Kbps. Using the standard bitrate will ensure that your WMA files retain much of their audio quality.
Higher bitrates will result in larger WMA file sizes, with better audio quality.
The time needed to successfully extract audio from a CD depends on:
CD-ROM/DVD-ROM drive speed
defects, like scratches on the audio CD
error-checking features on the CD-ROM/DVD-ROM drive
bitrate selected for encoding
To rip an audio CD using Creative MediaSource Player/Organizer
Insert an audio CD into your CD-ROM/DVD-ROM drive.
1.
Start Creative MediaSource Player/Organizer by clicking the Creative MediaSource
2.
Player/Organizer shortcut icon on your desktop.
If Creative MediaSource Player/Organizer is in Player view, click the Player/Organizer View
3.
button to switch to Organizer view.
3.
In the Sources window, select [d:] Audio CD (replace d: with your CD-ROM/DVD-ROM
4.
drive).
In the Task bar, click the Rip Now button.
5.
For more information about using Creative MediaSource Player/Organizer, refer to its online Help.
Tip
Instead of manually entering track information, retrieve audio CD information from your music
information provider before ripping tracks.
Page 57
Page 58

Frequently Asked Questions
This section covers questions you might have while using your player.
Why does my player skip certain tracks?
The player will only play valid media formats (MP3 and WMA files). Other types of media formats are
skipped.
Why are some files/tracks corrupted when transferred to my player?
Transfer may have been interrupted. Before disconnecting your player from your computer, stop your
player first. For more information on stopping your player, refer to Step 4: Disconnect player
.
Why does my player turn off immediately after it is turned on?
The battery may be too depleted to power your player. Replace the battery with a fresh one and try
again.
File transfers to the player are very slow (less than 100 KB/Sec). What do I do?
Try formatting your player. For more information, refer to Formatting your player
.
Can I use my player as a portable data storage device?
Yes, you can. You can transfer data files using Windows Explorer. To access Windows Explorer,
right-click the My Computer icon on your desktop and select Explore. Alternatively, click Start
My Computer. Your player is recognized as a Removable Disk.
I have to change the battery quite often. Is there anything I can do to make it last longer?
The following will make your batteries last longer.
Set a shorter idle shutdown time.
Set a shorter backlight duration.
Set a lower contrast setting.
Avoid unnecessarily skipping ahead and back within tracks.
Avoid unnecessarily turning the player on and off.
Avoid using passive speakers or high-powered headphones.
Avoid playing back tracks with high bitrates or heavy bass.
Can I play DRM-protected WMA files on my player?
Yes, to transfer DRM protected WMA files to your player, you can use Creative Media Explorer,
Creative MediaSource Player/Organizer or Windows Media Player.
Page 58
Page 59

General Specifications
Size (WxHxD)
36.5 mm (1.4") x 74.5 mm (2.9") x 15 mm (0.6")
Weight
33 g (1.2 oz) without battery
Power Source
Battery: 1 x AAA alkaline battery
USB bus powered when connected to computer
Storage Media
Built-in NAND Flash memory chip
Battery Life
MP3 128 kbps: Up to 18 hours of continuous playback with a new AAA alkaline battery
WMA 64 kbps: Up to 14 hours of continuous playback with a new AAA alkaline battery
Playback Formats
MP3: Up to 320 kbps
WMA: Up to 320 kbps
Recording Formats
Voice (via built-in microphone): IMA ADPCM (8 kHz, 4-bit, Mono)
Lyrics Format
LRC
ID3 lyrics
MP3 Playback Performance
Signal-to-Noise Ratio: Up to 90 dB
Channel Separation: Up to 60 dB
Frequency Response: 20 Hz ~ 20 kHz
Harmonic Distortion Output: <0.1%
Connectors
Headphone jack: 3.5 mm (1/8") stereo minijack, 5~7 mW per channel
USB 2.0 (Full speed)
USB 1.1
LCD
96 x 32 pixel blue backlit display
Headphone Specifications
Frequency Range: 20 Hz ~ 20 KHz
Sensitivity: 111 dB ±3 dB SPL at 1 KHz
Impedance: 32 W ±15%
Plug: 3.5 mm (1/8") stereo minijack
Page 59
Page 60

Safety Information
Refer to the following information to use your product safely, and to reduce the chance of electric shock,
short-circuiting, damage, fire, hearing impairment or other hazards. Improper handling may void the
warranty for your product.
For more information, read the warranty available with your product.
Do not dismantle or attempt to repair your product.
Refer all servicing to authorized repair agents.
Do not expose your product to temperatures outside the range of 0°C to 45°C (32°F to 113°F).
Do not pierce, crush or set fire to your product.
Keep your product away from strong magnetic objects.
Do not subject your product to excessive force or impact.
Do not expose your product to water or moisture.
If your product is moisture-resistant (see product packaging for details), take care not to
immerse your product in water or expose it to rain.
Do not listen to audio at high volume for prolonged periods of time.
When a conductive apparatus such as earphones, is used in close proximity with a CRT
television or CRT monitor, the latter may emit an electrostatic discharge. This electrostatic
discharge can be felt as a static shock. While this static shock is usually harmless, it is good
practice to avoid close contact with CRT devices when using earphones.
The battery must be recycled or disposed of properly. Contact local agencies for recycling and
disposal information.
Do not allow metal objects to touch the terminals of your battery.
If there is leakage, an offensive odor, discoloration or deformation during use, remove the battery
and do not use it again. Clean your hands well before touching food or sensitive areas, for
example, your eyes.
Page 60
Page 61

License and Copyright
Information in this document is subject to change without notice and does not represent a commitment on
the part of Creative Technology Ltd. No part of this manual may be reproduced or transmitted in any
form or by any means, electronic or mechanical, including photocopying and recording, for any purpose
without the written permission of Creative Technology Ltd.
The Software License Agreement is found in a separate folder on the Installation and Applications CD.
Copyright © 2006 by Creative Technology Ltd. All rights reserved. MuVo, Creative MediaSource, and
the Creative logo are trademarks or registered trademarks of Creative Technology Ltd. in the United
States and/or other countries. Microsoft and Windows are registered trademarks of Microsoft
Corporation. All rights reserved. Intel and Pentium are trademarks of Intel Corporation in the U.S. and
other countries. Audible and AudibleManager are registered trademarks of Audible, Inc. in the U.S.
and/or other countries.
Version 1.1
August 2006
Page 61
 Loading...