

Page 1

How to use this manual
This document has been designed to provide you with complete product knowledge. You can resize the
document window, print this document, access linked web sites and get information from specially
prepared graphics.
To jump to a linked topic or a web site, click the underlined blue text, or the hand symbol
whenever it appears.
To show a short description (tooltip) of an object, move your mouse cursor over it. A tooltip
appears after a few seconds.
You can choose to print portions of this document:
On the Contents tabbed page to your left, click a topic heading.
1.
On the menu, click the Print button.
2.
In the dialog box that appears, click the option to print one topic only, or all topics under a
3.
heading.
Page 1
Page 2

A Tour of Your Player
Button/Connector
What It Does
1.
Power/Play/Pause
Turns player on or off. Press and
hold until display screen lights up
or turns off.
Plays or pauses music during
playback.
2.
LED
Indicates power or charging
status when the display turns off
to save power.
3.
My Shortcut
Press to access a feature
quickly.
Press and hold to change
shortcut.
4.
Display
Turns off automatically when not
in use. Press any button to turn
on the display again.
5.
USB connector
To charge your player or transfer
files, connect this end to your
computer's USB port.
6.
Microphone
Use for voice recordings.
7.
Headphone jack
Connect your player's earphones
to this jack.
8.
Menu/Select
See Navigating the Menu.
9.
Direction/Function pad
Use and to scroll left and
right. Has additional functions in
Page 2
Page 3

selected menus.
Use and to adjust the
volume level.
10.
Reset Hole
To reset player, insert a
straightened paperclip.
11.
Cover
Use this to protect the USB
connector when it is not in use.
Page 3
Page 4
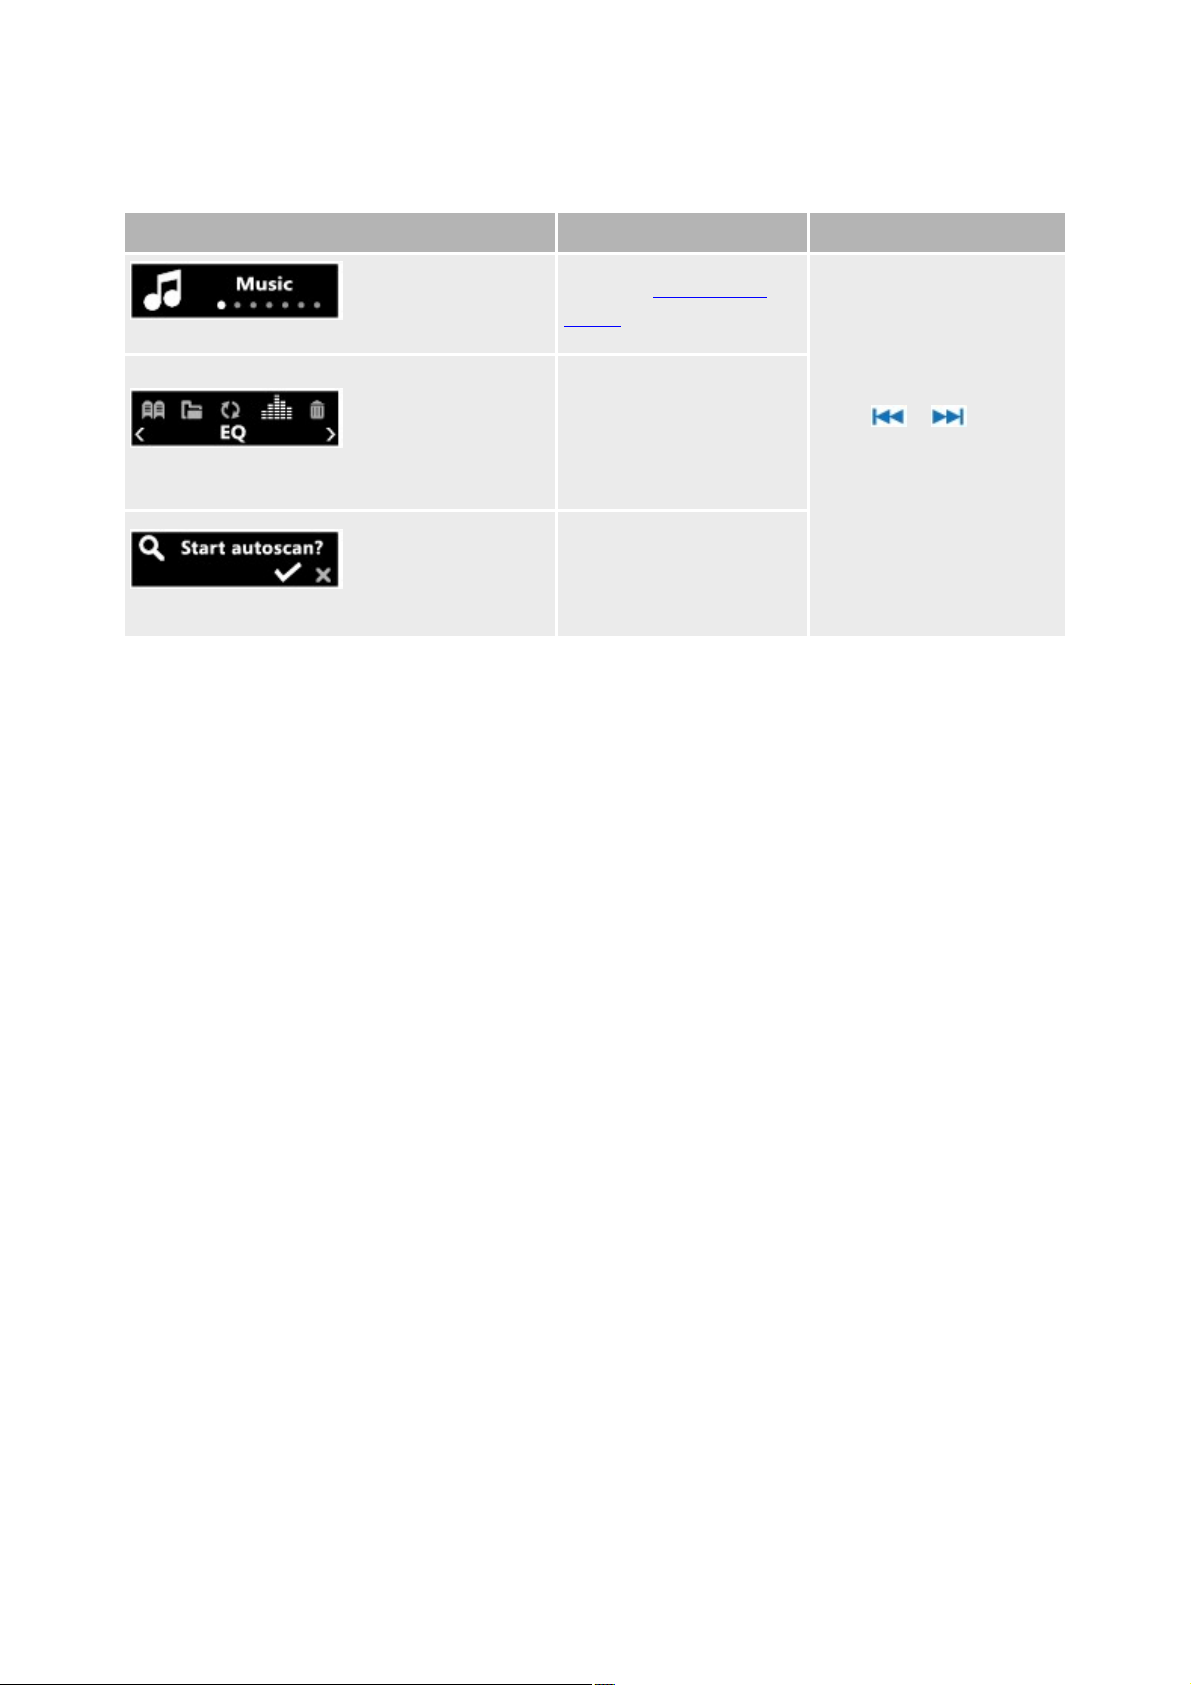
Navigating the Menu
Screen Type
To View
To Navigate
Main Menu
Press the Menu/Select
button.
Press or .
To select an item, press
the Menu/Select button.
Option Menu
Press and hold the
Menu/Select button.
The option menu can also
be accessed from the
main menu.
Options
(Applicable for some
Option Menu items only)
Press the Menu/Select
button.
Your player's menu is organized as such:
Page 4
Page 5
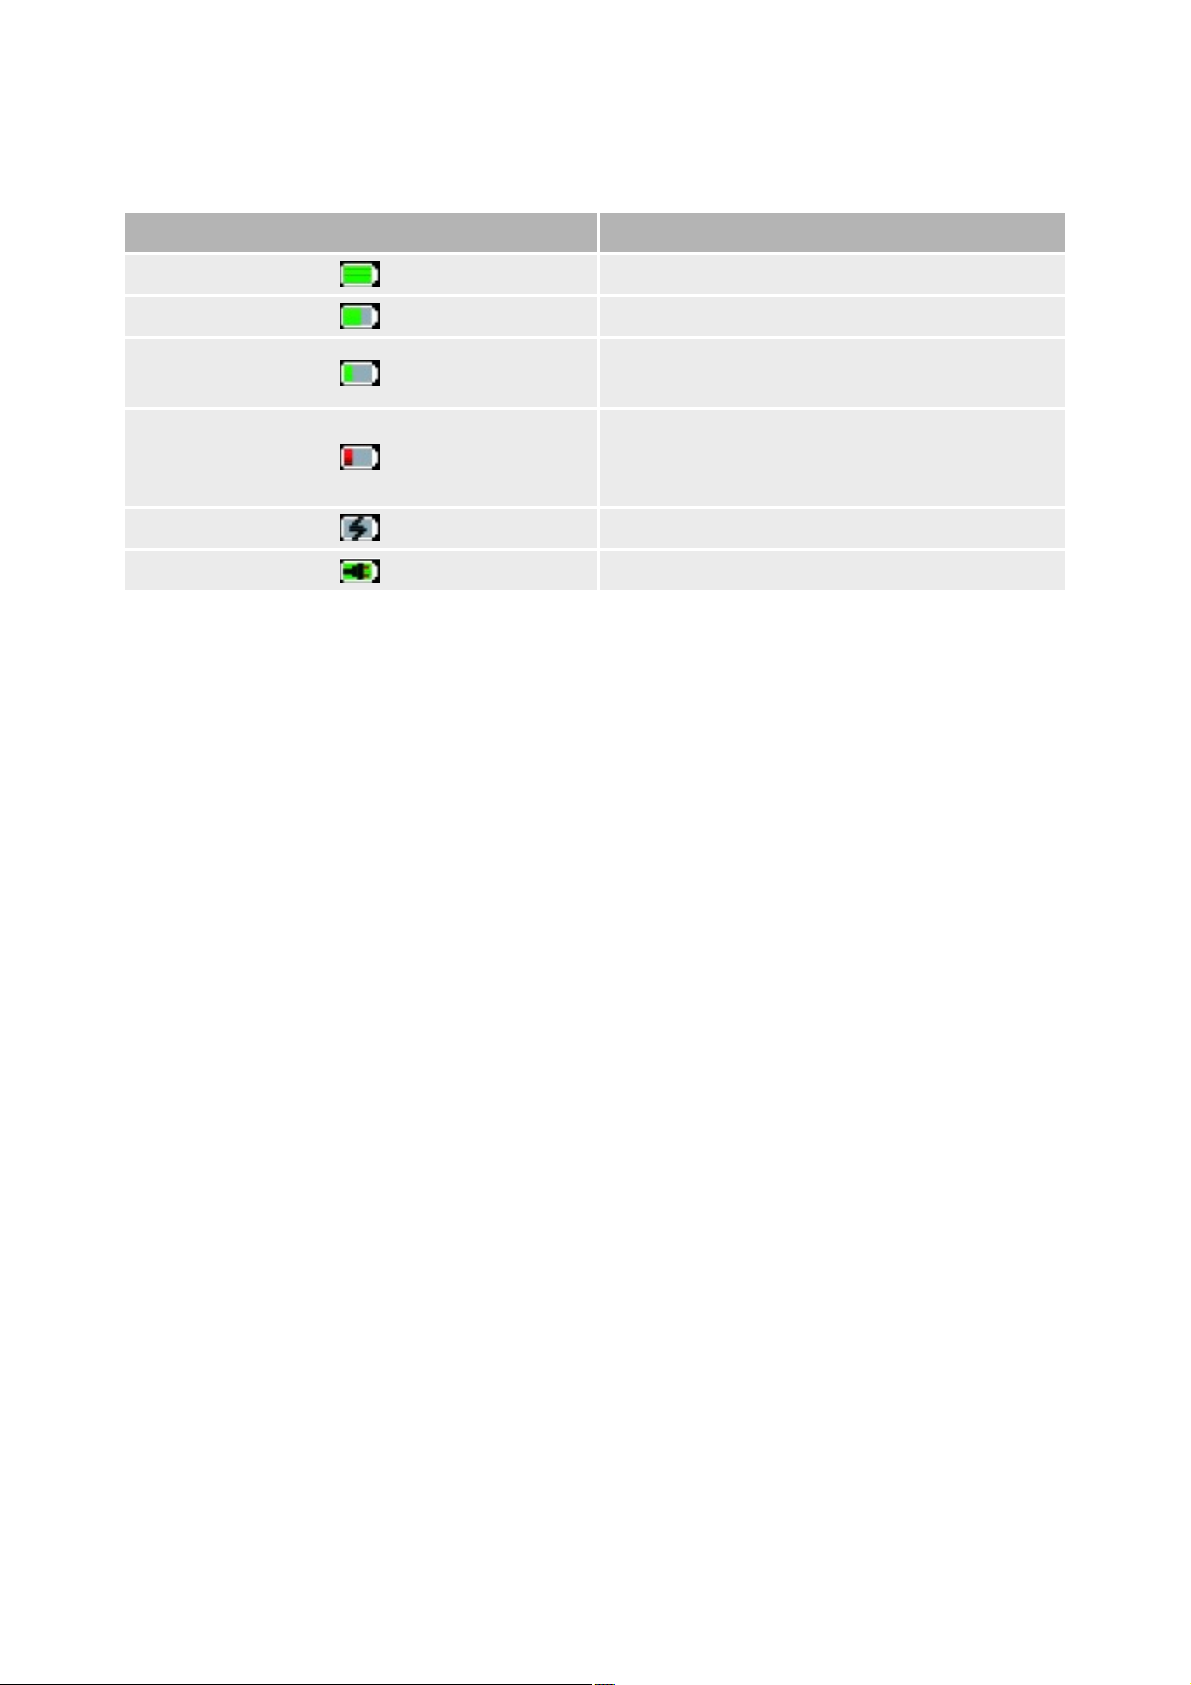
Power source and level indicator
Icon
Power status
Full battery level.
Good battery level.
Low battery level.
Charge as soon as possible.
Extremely low battery level.
Player may turn off automatically anytime.
Charge immediately.
Charging is in progress.
Charging is complete.
Your player displays one of the following icons, depending on the power source or level.
Page 5
Page 6

Getting Content
Your player plays back audio tracks in MP3 or WMA format. You can acquire audio tracks from online
music stores, or by ripping personal audio CDs.
Page 6
Page 7

Ripping CDs
Launch Creative Media Lite.
1.
Click the Rip Audio CD button .
2.
Follow the instructions on the screen, and select the My Computer and/or Music Device
3.
checkbox to indicate where your tracks will be ripped to. You can also select to retrieve album
information (subject to availability) from the Internet.
Note
It is important to disconnect your player properly.
Creative Media Lite uses MusicIDSM from Gracenote® to get artist and title information about the
CDs you play. You must be connected to the Internet when using this service.
Page 7
Page 8
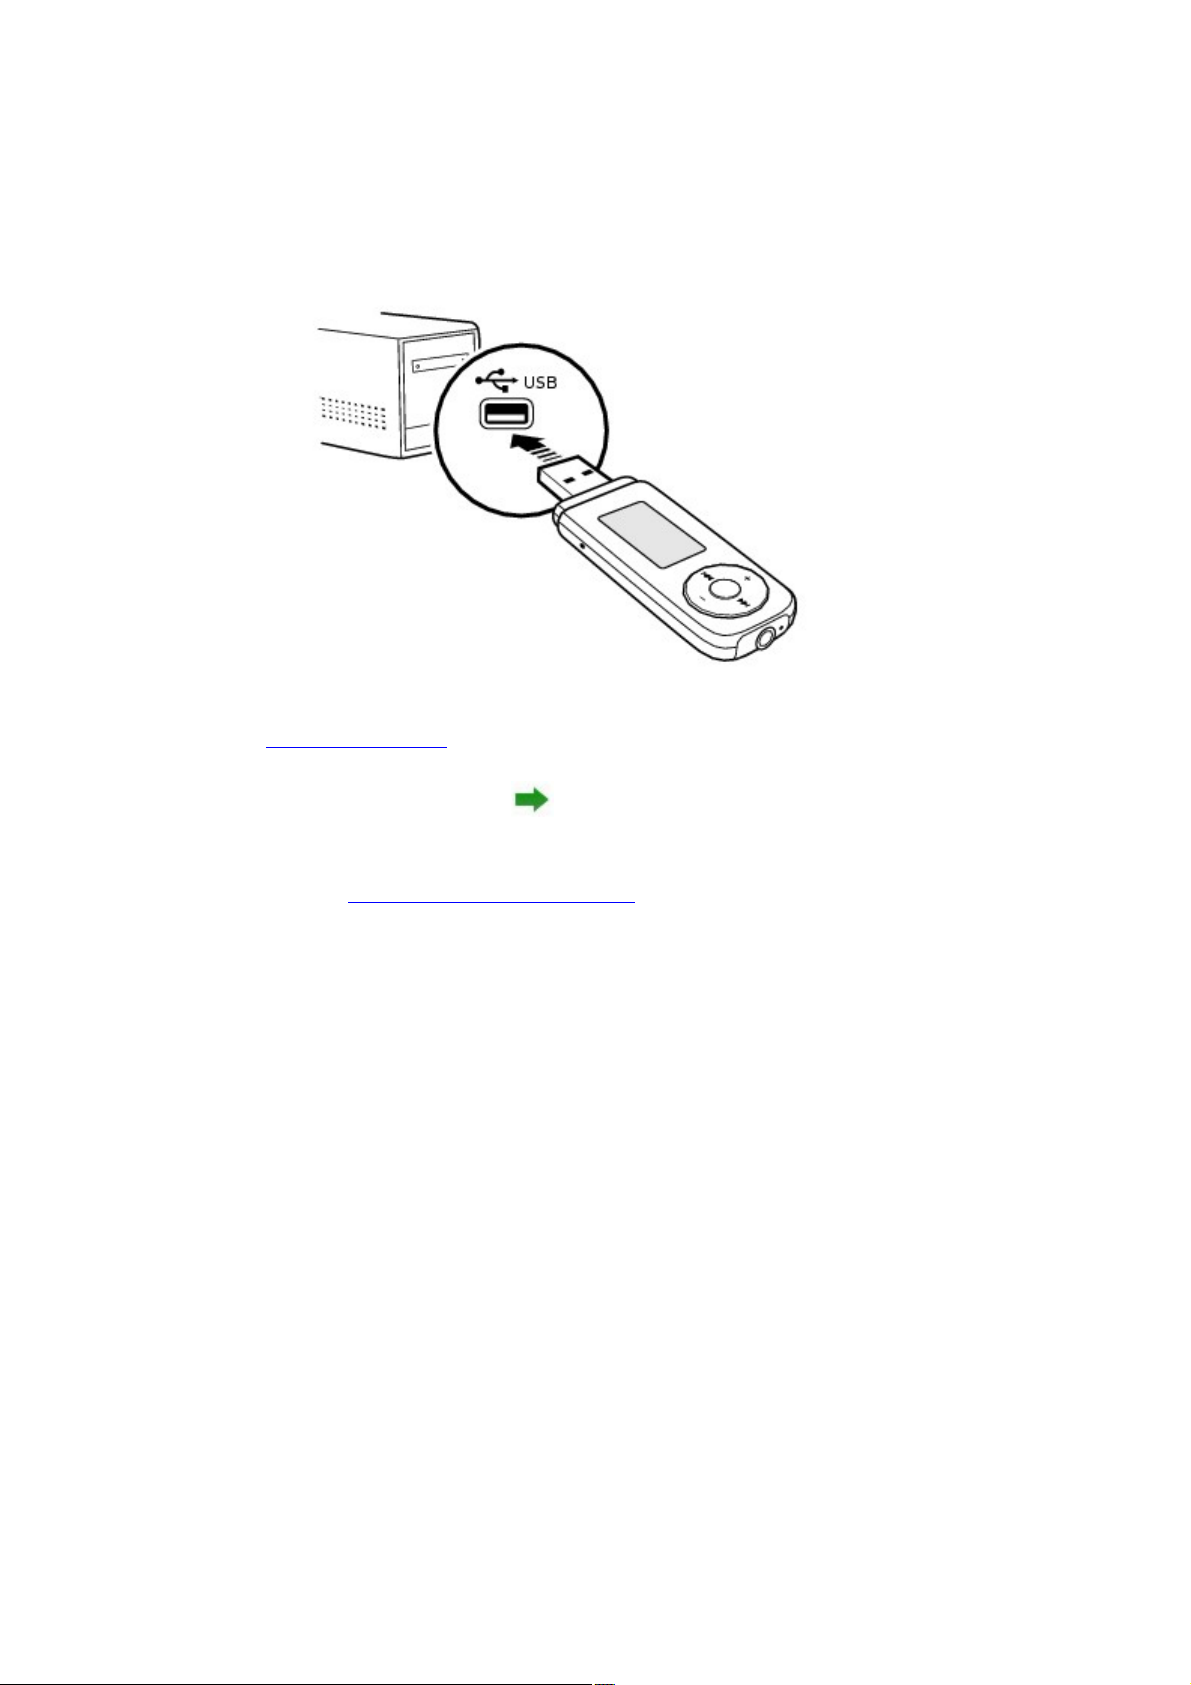
Transferring Music
Connect your player to your computer as shown.
1.
1.
Launch Creative Media Lite and click the My Computer drop-down box.
2.
Locate and select the music files you want.
3.
4.
4.
Note
Click the Transfer to Player button .
Alternatively, use the drag-and-drop method to transfer the files to your player.
It is important to disconnect your player properly.
Page 8
Page 9

Transferring Data
You can use your player as a removable disk to transfer data.
In Creative Media Lite, click the Views button and select View All
Files.
Note
It is important to disconnect your player properly.
You can use familiar Windows® operations to transfer files between your player and computer.
For example, you can drag and drop files in Windows Explorer to transfer them.
Page 9
Page 10

Disconnecting Your Player Safely
When you see this icon on the player's display,
DO NOT disconnect your player. Songs are being ripped or transferred.
When you see this icon
on the display, you can disconnect your player safely in the following ways:
In Creative Media Lite, click the Disconnect Player button .
From the Taskbar, click the Safely Remove Hardware icon and then select Safely remove USB
Mass Storage Device.
Page 10
Page 11

Creative Media Lite
Creative Media Lite is specially designed to rip CDs and transfer files to your player. Creative Media
Lite supports the transfer of Windows Media® Digital Rights Management (WMDRM) 9 or
copy-protected music. Other software may not.
To launch Creative Media Lite, click the Creative Media Lite icon on your desktop.
Alternatively, click Start Alle programma's Creative
Creative Media Lite.
Note
Before installing Creative Media Lite, make sure you log on to your computer in Administrator
mode. For details about Administrator mode, see your operating system's documentation.
For details about using Creative Media Lite, click the Access How-To Online button in the
application.
Page 11
Page 12

Playback Order
You can customize your music playback experience by naming and organizing your music according to
the following guidelines:
Your player plays back music in alphanumeric order.
For example, Autumn.mp3, 02 Summer.mp3 and 01 Spring.mp3 will be played back in the
following order:
01 Spring.mp3, 02 Summer.mp3, Autumn.mp3.
If there are tracks and folders in the same location, tracks will be played back first.
Your player supports up to three levels of folders from the root. For details, see Folder Structure
.
Page 13
Folder Structure
Your player supports up to three levels of folders from the root. Any tracks placed outside this structure,
for example in a fourth level folder from the root, will not be played back.
Page 13
Page 14

Deleting Files and Folders
Launch Creative Media Lite.
1.
Select the file or folder you want.
2.
Click the Delete button in the same window as the selected file or folder.
3.
Page 14
Page 15

Using Your Player
To navigate your player's controls, see A Tour of Your Player
.
To organize music and customize playback order, see Playback Order
.
Page 15
Page 16

Playing Audio Tracks
Item
Function
a
Press to move to the previous track.
Press and hold to move backward within a track.
(Press to stop the track when playback is paused)
b
Press to increase volume.
c
Press to move to the next track.
Press and hold to move forward within a track.
(Press to stop the track when playback is paused)
d
Press to decrease volume.
Press the Menu/Select button to display the main menu.
1.
Scroll to Music and press the Menu/Select button.
2.
Press to play or pause audio tracks.
3.
Using the Direction/Function pad during audio playback
Page 16
Page 17

Browsing Music Folders
When playing audio tracks, you can browse your music folders and select a folder to start the playback
from.
Press and hold the Menu/Select button to display the option menu.
1.
Scroll to Browse Music and press the Menu/Select button.
2.
Scroll to the folder you want. If audio playback does not start, press .
3.
Audio playback starts from the first track in the folder.
3.
Note
Audio tracks that are not stored in any folders can be found in the Root folder.
You can only browse by folders.
Page 17
Page 18
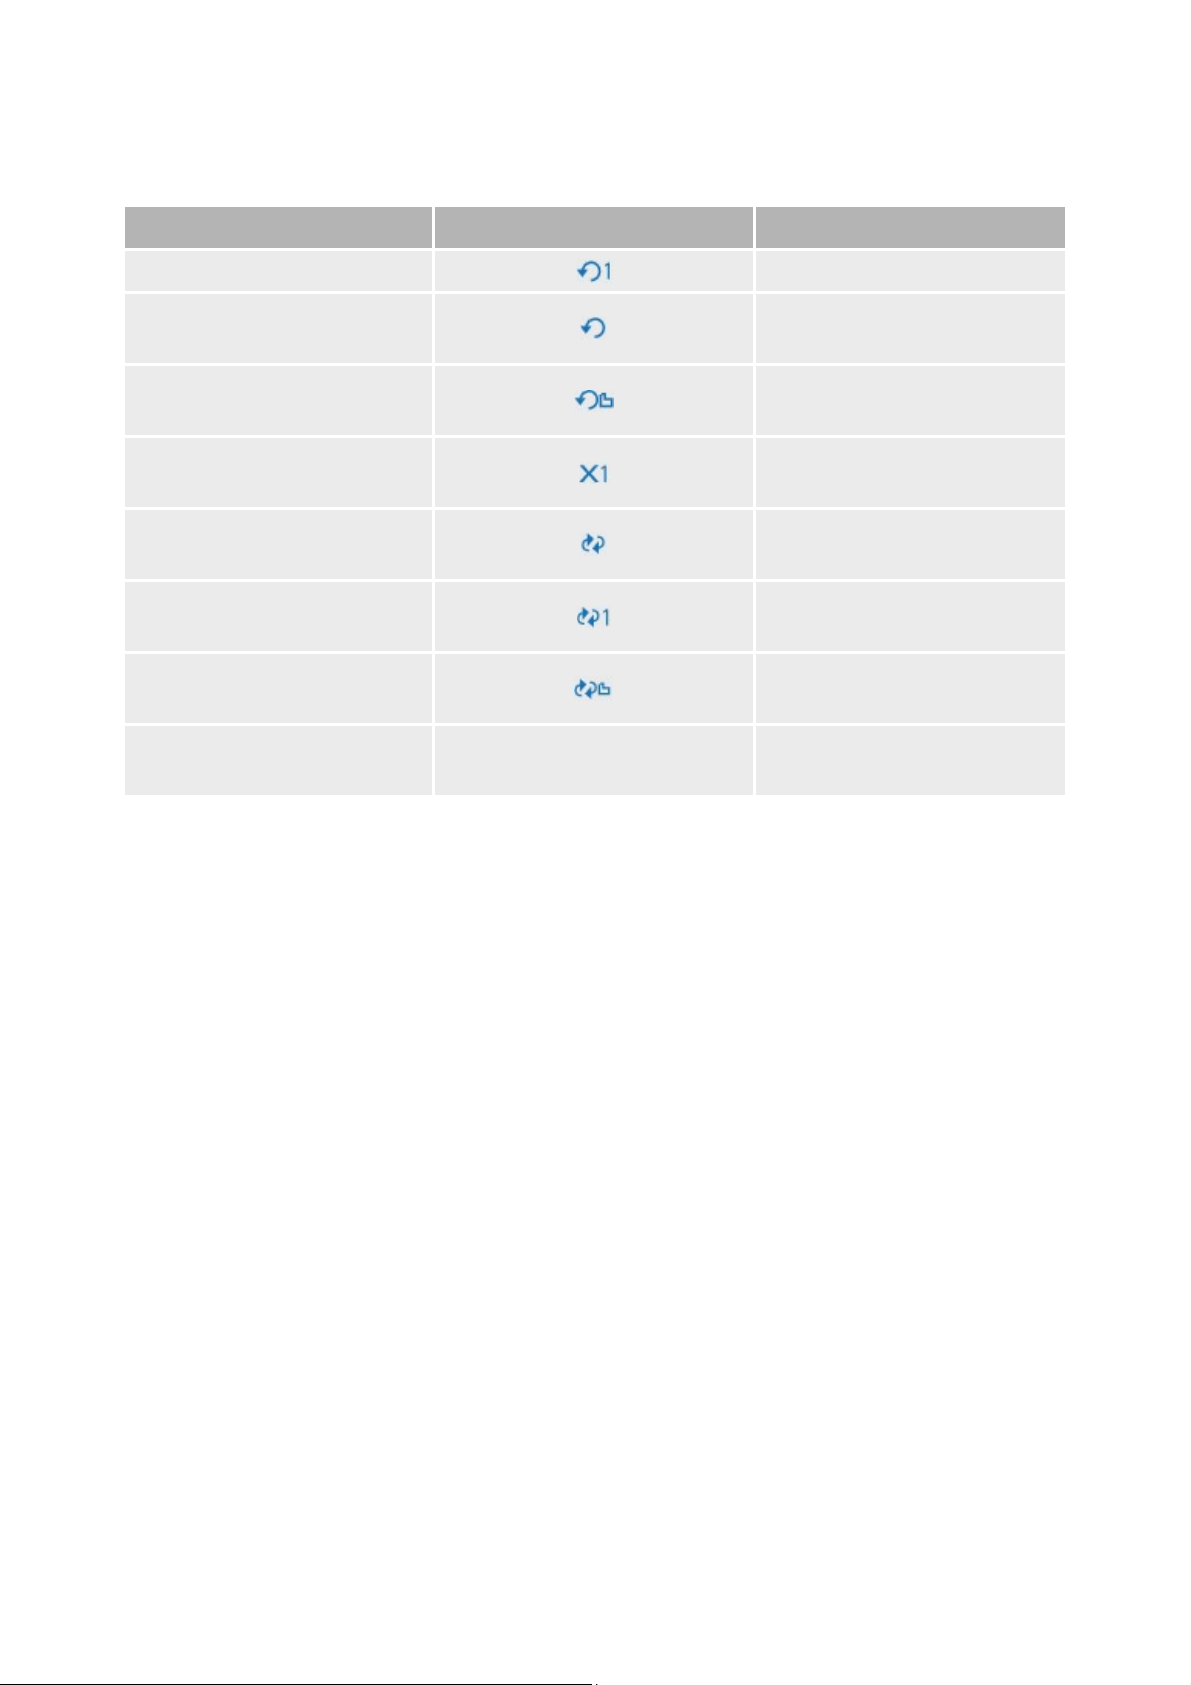
Shuffling and Repeating Tracks
Play Mode
Icon
Playback Behavior
Repeat Track
Repeats the current track.
Repeat All
Repeats all tracks in sequential
order.
Repeat Folder
Repeats all tracks in the current
folder.
Track Once
Stops after playing the current
track.
Shuffle Repeat
Repeats all tracks in random
order.
Shuffle Once
Plays all tracks once in random
order.
Shuffle Folder
Plays all tracks in the current
folder once, in random order.
Normal
Plays all tracks once in
sequential order.
When playing audio tracks, you can select the following play modes:
To select a play mode
Press and hold the Menu/Select button to display the option menu.
1.
Scroll to Play Mode and press the Menu/Select button.
2.
Scroll to the play mode you want and press the Menu/Select button.
3.
Page 18
Page 19

Enhancing Audio with EQ
When playing audio tracks, you can enhance your audio by selecting the following preset or custom
equalizer settings:
Rock
o
Jazz
o
Classical
o
Pop
o
Custom EQ
o
To select an equalizer setting
Press and hold the Menu/Select button to display the option menu.
1.
Scroll to EQ and press the Menu/Select button.
2.
Scroll to the setting you want and press the Menu/Select button.
3.
If Custom EQ is selected:
4.
Press or to highlight an equalizer bar.
i.
Press or to adjust the equalizer level.
ii.
When you are done, press or to navigate to the check mark icon and press the
iii.
Menu/Select button.
Page 19
Page 20

Deleting Tracks
Press or to go to the track you want to delete.
1.
Press and hold the Menu/Select button to display the option menu.
2.
Select Delete, and then select the check mark icon.
3.
Note
You can also delete tracks from Creative Media Lite.
Page 20
Page 21

Playing Audible Tracks
Audible tracks have predefined track sections that you can skip to.
You can play an Audible track the way you play a music track. See Playing Audio Tracks
.
Page 21
Page 22

Skipping to another section
When playing an Audible file, press and hold the Menu/Select button to display the option menu.
1.
Scroll to Skip Section and press the Menu/Select button.
2.
The current section is highlighted.
2.
Scroll to the section you want to skip to and press .
3.
Page 22
Page 23

Using FM Radio
(This section is only applicable for selected player models with FM Radio.)
The FM frequency range on your player is set to "International" by default. Most regions in the world
receive FM broadcasts in this range.
If you are using your player in Japan, make sure you have selected "Japanese" as your player's menu
language before selecting "Japan" as your FM region
.
In FM Radio mode, there are two submodes: Tuning and Preset
. Select Tuning to scan for and save channel presets. Select Preset to select and play a channel preset.
Page 23
Page 24

Selecting FM Radio Submode
Submode
Function
Example Screen
Tuning
For tuning channels.
See Setting Channel
Presets.
Preset
For selecting channel
presets.
See Listening to FM
Radio.
Press the Menu/Select button to display the main menu.
1.
Scroll to FM Radio and press the Menu/Select button.
2.
Press to switch between the two submodes:
3.
Page 24
Page 25

Setting Channel Presets
You can set channel presets manually or automatically.
Manual tuning allows for fine-tuning but may be slower.
Automatic tuning is quicker but usually omits channels with weaker frequencies.
To set your channel presets manually
In FM Radio mode, select the Tuning submode.
1.
To tune to a lower or higher channel, press or .
2.
When you have found the channel you want, press and hold the Menu/Select button to display
3.
the option menu.
Scroll to Save Preset and press the Menu/Select button.
4.
Scroll to a preset slot and press the Menu/Select button to save.
5.
To set your channel presets automatically
In FM Radio mode, select the Tuning submode.
1.
Press and hold the Menu/Select button to display the option menu.
2.
Select Autoscan, and then select the check mark icon.
3.
When autoscan completes, Preset 1 is selected.
3.
Note
Performing an autoscan overrides all current channel presets. New channel presets are arranged
in order of frequency.
Your player can store up to 32 channel presets.
Page 25
Page 26

Listening to FM Radio
In FM Radio mode, select the Preset submode.
1.
Press or to go to the previous or next channel preset.
2.
Press and hold or to scroll more quickly.
2.
Page 26
Page 27

Deleting Channel Presets
In FM Radio mode, select the Preset submode.
1.
Press or to go to the channel preset you want to delete.
2.
Press and hold the Menu/Select button to display the option menu.
3.
Select Delete Preset, and then select the check mark icon.
4.
Page 27
Page 28

Making a Recording
Press the Menu/Select button to display the main menu.
1.
Scroll to Microphone and press the Menu/Select button.
2.
Press to start recording.
3.
To end the recording, press again.
3.
The recording is saved as a WAV file with an automatically generated file name.
3.
Note
If you want to delete a recording immediately,
Press and hold the Menu/Select button to display the option menu.
i.
Select Delete, and then select the check mark icon.
ii.
When your player is connected to the computer, you can find your recordings in a folder called
"Recordings".
Page 28
Page 29

Listening to Recordings
Press the Menu/Select button to display the main menu.
1.
Scroll to Recordings and press the Menu/Select button.
2.
Press or to go to the recording you want to listen to and press .
3.
Note
You can select most play mode options while listening to recordings.
Page 29
Page 30

Deleting Recordings
Press the Menu/Select button to display the main menu.
1.
Scroll to Recordings and press the Menu/Select button.
2.
Press or to go to the recording you want to delete.
3.
Press and hold the Menu/Select button to display the option menu.
4.
Select Delete, and then select the check mark icon.
5.
Page 30
Page 31

Adjusting Volume
When listening to tracks, FM radio or recordings, adjust volume level by pressing or
.
Note
FM Radio is only available for selected player models.
Page 31
Page 32

Setting Display Orientation
Rotating the display makes it easier for left-handed users to handle the player.
To rotate your player's display
Press the Menu/Select button to display the main menu.
1.
Select Settings Orientation.
2.
Page 32
Page 33

Setting Display Brightness
Press the Menu/Select button to display the main menu.
1.
Select Settings Brightness.
2.
Scroll to the brightness level you want and press the Menu/Select button.
3.
Page 33
Page 34

Setting Display Timer
You can set the duration that the display stays on before the screensaver settings apply.
Press the Menu/Select button to display the main menu.
1.
Select Settings Display Timer.
2.
Scroll to the duration you want and press the Menu/Select button.
3.
Page 34
Page 35

Setting Menu Language
Press the Menu/Select button to display the main menu.
1.
Select Settings Language.
2.
Scroll to the language you want and press the Menu/Select button.
3.
Page 35
Page 36

Setting Region for FM Radio
(This section is only applicable for selected player models with FM Radio, AND when your player's
menu language
is set to "Japanese".)
Press the Menu/Select button to display the main menu.
1.
Select .
2.
To set the FM region to "Japan", scroll to .
3.
To set the FM region to "International", scroll to .
3.
Press the Menu/Select button.
4.
Page 36
Page 37

Setting Display Theme
You can personalize your player by giving your player's display a different look.
Press the Menu/Select button to display the main menu.
1.
Select Settings Theme.
2.
Scroll to the theme you want and press the Menu/Select button.
3.
Page 37
Page 38

Configuring the My Shortcut Button
Press the Menu/Select button to display the main menu.
1.
Select Settings My Shortcut.
2.
Scroll to the feature you want and press the Menu/Select button.
3.
Page 38
Page 39

Setting Date and Time
Press the Menu/Select button to display the main menu.
1.
Select Settings Date & Time.
2.
Press or to navigate to a time or date field.
3.
Press or to change the value of the field.
4.
To confirm the changes, navigate to the Year field and press the Menu/Select button.
5.
Page 39
Page 40

Setting Screensaver Duration
Before the player display turns off, the screensaver appears with the date and time. You can set how long
the screensaver appears for.
Press the Menu/Select button to display the main menu.
1.
Select Settings Screensaver.
2.
Scroll to the duration you want and press the Menu/Select button.
3.
Page 40
Page 41

Setting Idle Shutdown Duration
You can set the duration of inactivity before the player turns off to save power.
Press the Menu/Select button to display the main menu.
1.
Select Settings Idle Shutdown.
2.
Scroll to the duration you want and press the Menu/Select button.
3.
Page 41
Page 42

Viewing Player Information
You can view information, such as firmware version, about your player.
Press the Menu/Select button to display the main menu.
1.
Select Settings Information.
2.
Scroll and view various types of information.
3.
Page 42
Page 43

Locking and Unlocking Your Player
You can lock your player to prevent any buttons from being pressed accidentally.
To lock your player
Press the Menu/Select button to display the main menu.
1.
Scroll to Lock and press the Menu/Select button.
2.
To unlock your player
If your player's display is turned off, press any button to view the current status. Press the button
1.
again to view the unlock options.
If your player's display is turned on, press any button once to view the unlock options.
1.
Scroll to the check mark icon and press the Menu/Select button.
2.
Page 43
Page 44

Volume Restriction
Protect your hearing using the Volume Restriction feature on your player. You can set your player's
maximum volume to a comfortable level.
This feature is especially useful for parents who want to protect their children's hearing. You can also
select to set a password to lock the volume restriction level setting.
To adjust the volume restriction level, launch Creative Media Lite and click the Set Volume Restriction
Limit button . For details, click the Access How-To Online button
in the application.
Page 44
Page 45

Troubleshooting
My player is not responding, what do I do?
If your player stops responding, reset the player. This should not cause you to lose any data or audio
tracks, unless you were in the middle of transferring files.
Insert and remove a straightened paperclip from the Reset Hole.
1.
If this does not work, proceed to Formatting Your Player.
2.
Formatting Your Player
WARNING: This step deletes all your player's content. If possible, back up all your player's content on
your computer before proceeding.
Make sure your player is connected to your computer and you are logged on in Administrator
1.
mode. For details about Administrator mode, see your operating system's documentation.
In Windows Explorer, right-click your player and select Format.
2.
Why does formatting my player in Windows Vista take a long time?
Windows Vista formats devices differently from earlier versions of Windows. As such, your player may
take a significantly longer time to perform a full format. Rest assured that once formatted, your player will
perform as expected. To format your player in considerably less time, use the Quick Format option
instead.
Page 45
Page 46

Information Diagrams
Screen
Description
The file system is corrupted.
The player may have been formatted to
an unsupported file system such as
NTFS.
Reformat your player.
The firmware is corrupted.
Reset your player, download the
firmware from
www.creative.com/support or contact
Customer Support Services.
An unexpected power loss occurred
when settings were being saved.
Reset your player, download the
firmware from
www.creative.com/support or contact
Customer Support Services.
There is no free disk space for
recording. Try deleting some tracks to
free up some space.
The player is loading or saving a track,
or updating track information.
The following screens may appear on your player's display.
Page 46
Page 47

Regulatory Information
The following sections contain notices for various countries:
CAUTION: This product is intended for use with FCC/CE certified computer equipment. Please check
the equipment operating/installation manual and/or with the equipment manufacturer to verify/confirm if
your equipment is suitable prior to the installation or use of the product.
Page 47
Page 48

Notice for the USA
FCC Part 15: This equipment has been tested and found to comply with the limits for a Class B digital
device, pursuant to Part 15 of the FCC Rules. These limits are designed to provide reasonable protection
against harmful interference in a residential installation. This equipment generates, uses and can radiate
radio frequency energy and, if not installed and used in accordance with the instructions, may cause
harmful interference to radio communications. However, there is no guarantee that interference will not
occur in a particular installation. If this equipment does cause harmful interference to radio or television
reception, which can be determined by turning the equipment off and on, the user is encouraged to try to
correct the interference by one or more of the following measures:
Reorient or relocate the receiving antenna.
Increase the separation between the equipment and receiver.
Connect the equipment into an outlet on a circuit different from that to which the receiver is
connected.
Consult the dealer or an experienced radio/TV technician for help.
This device complies with part 15 of the FCC Rules. Operation is subject to the following two
conditions:
This device may not cause harmful interference, and
1.
This device must accept any interference received, including interference that may cause
2.
undesired operation.
CAUTION: To comply with the limits of the Class B digital device, pursuant to Part 15 of the FCC
Rules, this device must be installed with computer equipment certified to comply with Class B limits.
All cables used to connect to the computer and peripherals must be shielded and grounded. Operation
with non-certified computers or non-shielded cables may results in interference to radio or television
reception.
MODIFICATION: Any changes or modifications not expressly approved by the grantee of this device
could void the user's authority to operate the device.
Page 48
Page 49

Notice for Canada
This Class B digital apparatus complies with Canadian ICES-003.
Cet appareil numérique de la classe B est conforme à la norme NMB-003 du Canada.
CANADIAN CLASS B STATEMENT: This digital device does not exceed the Class B limits for radio
noise emissions from digital apparatus as set out in the interference-causing equipment standard entitled
"Digital Apparatus," ICES-003 of the Department of Communications.
Cet appareil numerique respecte les limites de bruits radioelectriques applicables aux appareils
numeriques de Classe B prescrites dans la norme sur le materiel brouilleur: "Appareils Numeriques,"
NMB-003 edictee par le ministre des Communications.
MODIFICATION: Any changes or modifications not expressly approved by the grantee of this device
could void the user's authority to operate the device.
Toute modification non approuvée explicitement par le fournisseur de licence de l'appareil peut entraîner
l'annulation du droit de l'utilisateur à utiliser l'appareil.
Page 49
Page 50

European Compliance
This product conforms to the following:
EMC Directive 2004/108/EC.
Mains operated products for the European market comply with Low Voltage Directive 2006/95/EC.
Communication / RF wireless products for the European market comply with R&TTE Directive
1999/5/EC.
CAUTION: To comply with the Europe CE requirement, this device must be installed with CE certified
computer equipment which meet with Class B limits.
All cables used to connect this device must be shielded, grounded and no longer than 3m in length.
Operation with non-certified computers or incorrect cables may result in interference to other devices or
undesired effects to the product.
MODIFICATION: Any changes or modifications not expressly approved by Creative Technology
Limited or one of its affiliated companies could void the user's warranty and guarantee rights.
Page 50
Page 51

Safety Information
Refer to the following information to use your product safely, and to reduce the chance of electric shock,
short-circuiting, damage, fire, hearing impairment or other hazards.
Improper handling may void the warranty for your product. For more information, read the warranty
available with your product.
Do not dismantle or attempt to repair your product.
Refer all servicing to authorized repair agents.
Do not expose your product to temperatures outside the range of 0°C to 45°C (32°F to 113°F).
Do not pierce, crush or set fire to your product.
Keep your product away from strong magnetic objects.
Do not subject your product to excessive force or impact.
Do not expose your product to water or moisture.
If your product is moisture-resistant, take care not to immerse your product in water or expose it
to rain.
When a conductive apparatus such as earphones, is used in close proximity with a CRT
television or CRT monitor, the latter may emit an electrostatic discharge. This electrostatic
discharge can be felt as a static shock. While this static shock is usually harmless, it is good
practice to avoid close contact with CRT devices when using earphones.
Do not listen to audio on your earbuds or headphones at high volume for prolonged periods of
time as hearing loss may result. For users in the United States, go to www.hei.org.
Do not attempt to remove the embedded battery.
The product must be disposed of according to local environmental regulations. To replace the
battery, return your product to your regional support office. For product service information, go
to www.creative.com.
Page 51
Page 52

General Specifications
Size (WxHxD)
25 mm (1") x 77.7 mm (3") x 11 mm (7/16")
Screen
128 x 32 pixel (65K CSTN color display)
Weight (approximate)
20.6 g (3/4 ounce)
Power Source
Battery: 1 x Rechargeable Lithium Ion battery
USB bus powered when connected to a power outlet or powered USB port on a computer
Audio Playback Formats
Audible Format 2, 3 and 4
MP3 (Up to 320 kbps)
WMA (Up to 320 kbps)
WMA with Windows Media Digital Rights Management (WMDRM) 9
Recording Formats
Voice (via built-in microphone): IMA-ADPCM (8kHz, 4-bit Mono)
MP3 Playback Performance
Signal-to-Noise Ratio: Up to 90 dB
Channel Separation: Up to 60 dB
Frequency Response: 20 Hz ~ 20 kHz
Harmonic Distortion Output: <0.1%
Connectors
Headphone jack: 3.5 mm (1/8") stereo minijack, 5 ~ 7 mW per channel
USB connector
Firmware Support
Upgradable via USB (firmware upgrades are available from www.creative.com/support).
Earphone Specifications
Frequency Range: 20 Hz ~ 20 KHz
Sensitivity: 109 dB ±3 dB SPL at 1 KHz
Impedance: 32 W ±15%
Plug: 3.5 mm (1/8") stereo minijack
Page 52
Page 53

License and Copyright
Information in this document is subject to change without notice and does not represent a commitment on
the part of Creative Technology Ltd. No part of this manual may be reproduced or transmitted in any
form or by any means, electronic or mechanical, including photocopying and recording, for any purpose
without the written permission of Creative Technology Ltd. The software described in this document is
furnished under a license agreement and may be used or copied only in accordance with the terms of the
license agreement. It is against the law to copy the software on any other medium except as specifically
allowed in the license agreement. The licensee may make one copy of the software for backup purposes
only.
This product is not intended for the unauthorized recording or distribution of copyrighted material.
MuVo and the Creative logo are trademarks or registered trademarks of Creative Technology Ltd. in the
United States and/or other countries. Microsoft, Windows, Windows Media, Windows Vista and
PlaysForSure are trademarks or registered trademarks of Microsoft Corporation. All rights reserved.
Intel and Pentium are trademarks of Intel Corporation in the U.S. and other countries.
Audible and AudibleManager are registered trademarks of Audible, Inc. in the U.S. and/or other
countries.
Gracenote is CDDB, Inc. d/b/a ""Gracenote."" CD and music-related data from Gracenote CDDB®
Music Recognition Service
© 2000, 2001, 2002 Gracenote. Gracenote CDDB Client Software © 2000, 2001, 2002 Gracenote.
U.S. Patents Number #5,987,525; #6,061,680; #6,154,773, and other patents issued or pending.
CDDB is a registered trademark of Gracenote. The Gracenote logo and logotype, the Gracenote CDDB
logo and logotype, and the "Powered by Gracenote CDDB" logo are trademarks of Gracenote. Music
Recognition Service and MRS are service marks of Gracenote.
RealPlayer is a trademark or a registered trademark of RealNetworks, Inc.
Winamp is a trademark or registered trademark of Nullsoft, Inc. in the United States and/or other
countries.
All other products are trademarks or registered trademarks of their respective owners.
Copyright © 2008 by Creative Technology Ltd. All rights reserved.
Version 1.0
January 2008
SM
Page 53
 Loading...