

Page 1
Page 2

Contents
Important Safety Instructions
Basic Safety Precautions... ... ... ... ... ... ... ... ... ... ...3
Maintaining Your Camera... ... ... ... ... ... ... ... ... ... ...3
Using Your Camera... ... ... ... ... ... ... ... ... ... ... ... ...3
Copyright... ... ... ... ...... ... ... ... ... ... ... ... ... ... ... ...4
Notes on the LCD Screen... ... ... ... ... ... ... ... ... ... ...4
Before You Begin
Package Contents... ... ... ... ... ... ... ... ... ... ... ... ...5
Minimum System Requirements... ... ... ... ... ... ... ...5
For PC computers... ... ... ...... ... ... ... ... ... ... ...5
For Macintosh computers... ... ... ... ... ... ... ... ...5
Chapter 1: About Your Camera
Front View... ... ... ... ... ... ... ... ... ... ... ... ... ... ... ...6
Rear View... ... ... ... ... ... ... ... ... ... ... ... ... ... ... ...7
About Your Camera’s Controls... ... ... ... ... ... ... ... …8
LEDS... ... ... ... ... ... ... ... ... ... ... ... ... ... ... ...8
Mode display button.. ... ... ... ... ... ... ... ... .. ...8
Mode button... ... ... ... .. ... ... ... ... ... ... ... ... ..8
Set button... ... ... ... ... ... ... ... ... ... ... ... ... ..9
Standard/Macro switch... ... ... ... ... ... ... ... ...9
LCD screen... ... ... ... ... .. ... ... ... ... ... ... ... ...9
Shutter button… ... ... ... ... ... ... ... ... ... ... ...10
Lens cover... ... ... ... ... ... ... ... ... ... ... ... ... .10
Chapter 2: Installing Your Camera
Step 1 : Installing drivers and software... ... ... ... ...11
Step 2 : Installing Hardware... ... ... ... ... ... ... ... ...11
Step 3 : Inserting the batteries... ... ... ... ... ... ... ...12
Step 4 : Setting the date and time... ... ... ... ... ... ...13
Step 5 : Inserting a memory card (optional) ... ... ...14
Step 6 : Attaching the neck strap... ... ... ... ... ... ...15
.Chapter 3: Using the Modes
Play Mode... ... ... ... ... ... ... ... ... ... ... ... ... ... ...16
To enter Play mode... ... ... ... ... ... ... ... ... ...16
To delete a photo... ... ... ... ... ... ... ... ... ... ...16
To delete all photos... ...... ... ... ... ... ... ... ...17
To view all photos as a slideshow... ... ... ... ...17
To print photos using Digital Print Order Format
(DPOF) Settings... ... ... ... ... ... ... ... ... ... ...18
Setup Mode... ... ... ... ... ... ... ... ... ... ... ... ... ... ...20
To enter Setup mode... ... ... ... ... ... ... ... ... ...20
To set the image resolution... ... ... ... ... ... ...20
To select the image quality... ... ... ... ... ... ....20
To adjust the white balance... ... ... ... ... ... ... .21
To adjust the exposure value... ... ... ... ... ... ...21
To change the default language... ... ... ... ... ...21
To set the date and time... ... ... ... ... ... ... ...22
To adjust the light frequency... ... ... ... ... ... ...22
To format your memory card... ... ... ... ... ... ...22
To restore the default settings... ... ... ... ... ...23
Movie Mode... ... ... ... ... ... ... ... ... ... ... ... ... ... ...24
To record a video... ... ... ... ... ... ... ... ... ... ...24
Record Mode... ... ... ... ... ... ... ... ... ... ... ... ... ...25
To take a photo... ... ... ... ... ... ... ... ... ... ... ...25
PC Mode... ... ... ... ... ... ... ... ... ... ... ... ... ... ... ...26
To use your camera as a removable hard disk
drive .. .. .. .. .. .. .. .. .. .. .. .. .. ... ... ... ... ... ...26
1
Page 3

To use your camera as a WebCam .. .. .. .. .. .. ..26
Appendix A: Technical Specifications
Lens... ... ... ... ... ... ... ... ... ... ... ... ... ... ... ... ...27
Sensor... ... ... ... ... ... ... ... ... ... ... ... ... ... ... ...27
Focal range... ... ... ... ... ... ... ... ... ... ... ... ... ... ...27
Sensitivity... ... ... ... ... ... ... ... ... ... ... ... ... ... ...27
White balance... ... ... ... ... ... ... ... ... ... ... ... ... ...27
Shutter... ... ... ... ... ... ... ... ... ... ... ... ... ... ... ...27
Shutter speed... ... ... ... ... ... ... ... ... ... ... ... ... ...27
Storage... ... ... ... ... ... ... ... ... ... ... ... ... ... ... ...27
Image file format... ... ... ... ... ... ... ... ... ... ... ... ...27
Picture resolution... ... ... ... ... ... ... ... ... ... ... ... ...27
Digital zoom... ... ... ... ... ... ... ... ... ... ... ... ... ...27
Focal range... ... ... ... ... ... ... ... ... ... ... ... ... ... ...27
Self-timer... ... ... ... ... ... ... ... ... ... ... ... ... ... ...27
PC-CAM mode... ... ... ... ... ... ... ... ... ... ... ... ... ...28
Flash mode... ... ... ... ... ... ... ... ... ... ... ... ... ... ...28
Port compatibility... ... ... ... ... ... ... ... ... ... ... ... ...28
Videos... ... ... ... ... ... ... ... ... ... ... ... ... ... ... ...28
Recordable image numbers... ... ... ... ... ... ... ... ...28
2
Page 4

Important Safety Instructions
Read all safety and operating instructions before using
your camera.
Basic Safety Precautions
• The Installation CD included with your camera is
designed for PC use only. Playing the Installation CD
on a stereo or CD player may cause permanent
damage.
• Your camera is a precision electronic device. Do not
attempt to service the camera yourself, as opening
or removing parts may expose you to dangerous
voltage points or other risks. Refer all servicing to
qualified servicing personnel.
• Avoid dropping the camera or subjecting it to heavy
force.
• Avoid using or placing the camera in the following
locations:
o Damp and dusty places.
o Sealed vehicles, or areas exposed to direct
sunlight.
o Environments with violent turbulence.
o Locations with smoke, oil fumes or steams.
o Locations subject to strong magnetic fields.
o Places with extreme temperatures, rain or
• Do not open the battery cover when the camera is
• If the camera comes into contact with water, turn
snow.
turned on.
the power off and remove the batteries immediately.
Maintaining Your Camera
• If the lens, Liquid Crystal Display (LCD) screen or
flash light surface is dirty, use a lens brush or soft
cloth to wipe it clean. Avoid touching the lens with
your fingers.
• Avoid scratching the lens, LCD screen or flash light
surface, by placing the camera away from solid
objects.
• Do not use any detergent or volatile solution on your
camera, as this will distort the camera and damage
its surface. Use a soft cloth only.
Using Your Camera
• Before using this camera for an important occasion,
such as a wedding ceremony or an overseas trip,
test it to ensure that it functions properly. Any
additional loss caused by the malfunction of this
product, such as costs of photography or any loss of
benefit generated by the photography, is not the
responsibility of Creative Technology Ltd. and no
compensation will be provided.
3
Page 5

Copyright
• Copyright ownership should be respected at all
times, and where applicable, permission should be
sought when the use of this camera may violate
copyright law.
• Where there is a "No Photography" restriction, this
camera should not be used to record any live
performance, or be used for exhibition, even for
personal purposes.
• Any transfer of pictures or data must be conducted
under the constraints of copyright law.
Notes on the LCD Screen
• In the rare event that the LCD screen breaks and the
liquid within spills, follow the care instructions
below:
o If the liquid makes contact with the skin:
Wipe the skin dry and wash it thoroughly
with water.
o If the liquid gets into the eye, rinse with
water immediately for at least 15 minutes.
Consult a physician as soon as possible.
o If the liquid is accidentally swallowed, rinse
your mouth with water, drink large amounts
of water and induce vomiting. Consult a
physician as soon as possible.
4
Page 6
Before You Begin
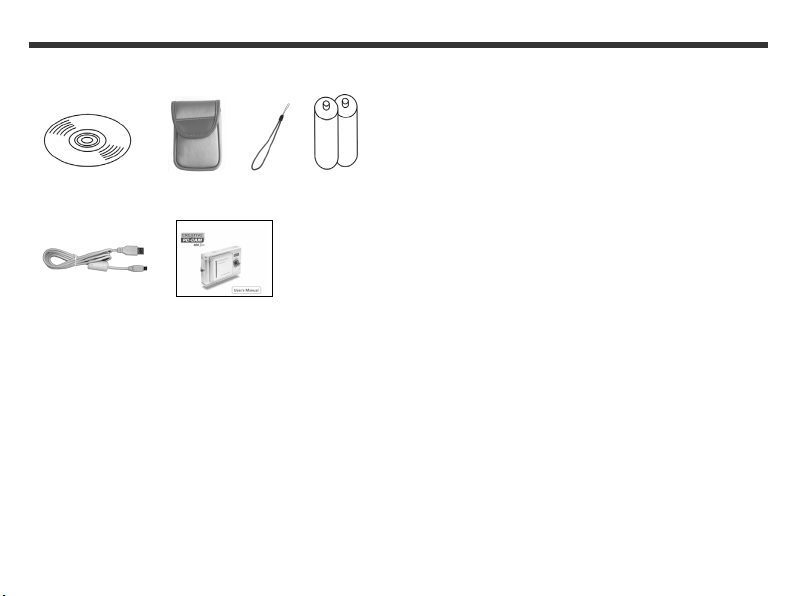
Package Contents
Installation CD Pouch Wrist 2 x AAA
strap alkaline
batteries
USB cable User's Manual
Minimum System
Requirements
When using your camera, use a better computer
system for optimal performance.
For PC computers
• Microsoft® Windows® XP, Windows 2000, Windows
Millennium Edition (Me) or Windows 98 Second
Edition (SE)
• Genuine Intel® Pentium® II 166 MHz or higher
processor
• 32 MB RAM
• 10 MB free hard disk space
• USB port (version 1.1 or later)
• CD-ROM/CD-RW or DVD-ROM drive required for
software installation
For Macintosh® computers
• Mac® OS X 10.1 or later
• PowerPC® 601 processor or higher
• 64 MB RAM
• 10 MB free hard disk space
• USB port (version 1.1 or later)
• CD-ROM/CD-RW or DVD-ROM drive required for
software installation
Note:
• For Macintosh computers, you can only use your
camera as a mass storage device.
5
Page 7

1. About Your Camera
Front View
(1) Shutter button
(2) Flash light
(3) Lens
(4) Lens cover/Power switch
(5) Strap holder
(6) Battery cover
(7) Memory card slot
(8) Tripod socket
6
Page 8
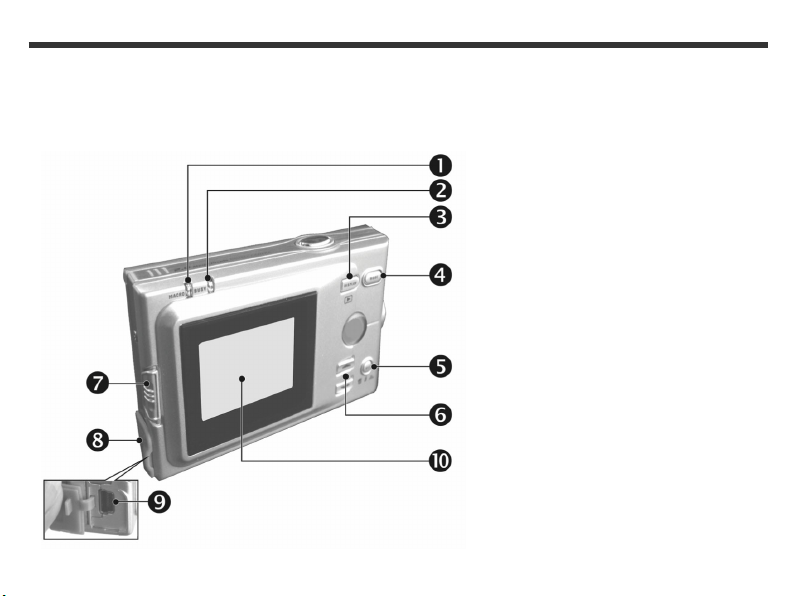
Rear View
(1) Macro LED
(2) Busy LED
(3) Mode display
button
(4) Mode button
(5) Set button
(6) Function keys
(7) Standard/Macro
mode switch
(8) USB cover
(9) USB port
(10) LCD screen
7
Page 9

About Your Camera’s Controls
LEDs
The LEDs located on your camera are described in
detail below:
LED Indication
Macro LED Lights up green when your camera is in
Busy LED
Macro LED Busy LED
Macro mode.
Lights up red when your camera is
recording or when the batteries for the
flash lights are charging.
Blinks red every 10 seconds when your
camera is in normal standby mode.
Mode display button
To change the LCD screen display, press the Mode
display button. The LCD screen displays available are:
• Standard Display
• Full Display
• Image Only
• LCD Monitor Off
• Operation Settings Only
Mode button
To select a mode, press and hold the Mode button for at
least two seconds. The modes available are:
• Play mode
• Setup mode
• Movie mode
• Record mode
• PC mode
8
Page 10

SET button
To select a menu option, press the Set button.
In Record mode, the Set button is also the Flash
button.
Function keys
Use the Function keys to select menu options.
Standard/Macro switch
To select Standard or Macro mode in Record and
Movie mode, move the Standard/Macro switch
upwards or downwards as shown below. In Macro
mode, the Macro LED lights up green.
Standard mode
Note:
• In Macro mode, your camera’s flash is automatically
disabled.
Macro mode
LCD screen icons
(1) Image resolution
(2) Image quality
(3) Current working mode
(4) Memory status
(5) Number of shots
(6) White balance display
(7) Self-timer photography
(8) Morning/afternoon display
(9) Time display
(10) Date display
(11) Remaining battery power
(12) Zoom indicator
(13) Flash light status
9
Page 11

Shutter button
2. To turn off the camera, gently slide the lens
cover to the right.
Your camera has a 2-step shutter function.
To automatically focus on your subject, press and hold
the Shutter button down halfway. The "[ ]" icon
appears on the LCD.
To take a picture, press the Shutter button down fully.
Your camera beeps.
Lens cover
1. Gently slide the lens cover to the left as shown
below. A long beep indicates that the camera is
turned on.
Notes:
• When the camera is turned on, the Busy LED blinks
red and the last recorded image appears on the LCD
screen.
• If there is no activity on the camera for
approximately 60 seconds, the power is turned off to
save battery power. To use your camera, turn on
your camera.
• The following settings are automatically saved
before your camera is turned off, unless “Reset
Default" is selected:
o Resoluti on
o Image Quality
o Language
o White balance
o EV value
o Frequency
o PC mode
10
Page 12

2. Installing Your Camera
Step 1: Installing drivers and
software
DO NOT connect the camera to your computer
yet!
1. Do not connect the camera to your computer
before installing the drivers.
If you accidentally begin installation with your
camera connected, the Add New Hardware
Wizard or Found New Hardware dialog box
may appear. Click the Cancel button and
disconnect your camera from your computer.
2. Insert the Installation CD into your CD-ROM
drive. Your CD should start automatically. If it
does not, follow the steps below:
i. Start Windows Explorer.
ii. On the left pane, click My Computer.
iii. Right-click the CD-ROM/DVD-ROM drive
3. Follow the instructions on the screen to complete
4. Repeat steps 2 to 3 to install the software.
5. Restart your computer after the software is
icon, and then click AutoPlay.
the driver installation.
installed.
Step 2: Installing hardware
1. Slide the lens cover to the left to turn on your
camera.
2. Press and hold the Mode button until the Mode
menu appears on the LCD screen.
3. Use the Function keys to select the PC Mode
4. Press the Set button.
5. Use the Function keys to select Mass Storage.
6. Press the Set button. The USB Connection icon
7. Open the USB port cover.
8. Connect the provided USB cable to your camera
9. Windows automatically detects the camera and
icon.
flashes on the LCD screen.
and computer’s USB ports as shown below.
your camera appears as a removable disk in
Windows Explorer.
11
Page 13

Step 3: Inserting the batteries
1. Disconnect and turn off your camera.
2. Gently slide open the battery cover.
a.
b.
3. Insert two AAA alkaline batteries according to
the polarity directions shown on the battery
cover.
4. Close the battery cover.
Notes:
• If the remaining battery power icon on the LCD
screen displays one bar, your camera’s flash light is
disabled. For more information on your LCD screen’s
icons, see “LCD screen icons” on page 9.
• If your batteries are depleted, the remaining
battery power icon turns red and your camera is
turned off.
• Your camera’s date and time is stored for
approximately three minutes when the batteries are
removed. If you remove the batteries for longer than
three minutes, you will have to reprogram the date
and time. For more information, see “To set the date
and time” on page 22.
12
Page 14

Step 4: Setting the date and
time
1. Press and hold the Mode button until the Mode
menu appears on the LCD screen.
2. Use the Function keys to select the Setup
Mode icon.
3. Press the Set button. The following LCD screen
appears.|
4. Use the Function key to select SYSTEM
OPT.
5. Use the Function key to select
Date/Time.
6. Press the Set button. The following LCD screen
appears.
7. Use the Function keys to adjust the date, and
then press the Mode display button. The
following LCD screen appears.
8. Use the Function keys to adjust the time, and
then press the Mode display button.
9. Press the Set button.
13
Page 15

Step 5: Inserting a memory card
(optional)
1. Make sure that your camera is turned off.
2. Insert a memory card (available separately) into
your camera’s memory card slot.
Notes:
• To remove the memory card, gently push in the
memory card. It should pop out automatically.
• The memory card slot is located next to the battery
compartment.
• Your camera’s internal memory is 16 MB. If a
memory card is inserted into your camera, all photos
and videos are stored to the memory card.
• Your camera can only accept SD or MMC memory
cards, with a capacity of 4 to 512 MB.
• To avoid permanent damage, do not remove the
memory card when your camera is turned on.
• Do not force the memory card into the memory card
slot. If it does not fit properly, gently remove it and
try again.
• If your camera does not detect the memory card,
gently wipe the memory card’s metal interface with
a soft cloth and try inserting it again.
14
Page 16

Step 6: Attaching the neck strap
(optional)
1. Insert the thin end of the neck strap into your
camera’s strap holder.
3. Pull the neck strap tightly.
2. Make a loop with the other end of the neck strap.
15
Page 17

3. Using the Modes
Play Mode
In Play mode, you can delete photos, view photos as a
slideshow and print photos. In Play mode, the icons
below are displayed on your LCD.
(1) Current photo/Number of photos taken
(2) Remaining battery power
To enter Play mode
1. Press and hold the Mode button until the Mode
menu appears on the LCD screen.
2. Use the Function keys to select the Play Mode
3. Press the Set button to enter Play mode.
icon.
To delete a photo
1. In Play mode, use the Function keys to go to
the photo that you want to delete.
2. Press the Set button. The following LCD screen
appears.
3. Use the Function key to select Delete
One and press the Set button. The following LCD
screen appears.
4. Use the Function keys to select OK.
5. Press the Set button.
16
Page 18

To delete all photos
1. In Play mode, press the Set button. The
following LCD screen appears.
To view all photos as a slideshow
1. In Play mode, press the Set button. The
following LCD screen appears.
2. Use the Function key to select Delete
All and press the Set button. The following LCD
screen appears.
3. Use the Function keys to select OK and press
the Set button. All photos in your camera are
deleted.
2. Use the Function key to select Auto Play
and press the Set button. The following LCD
screen appears.
3. Press the Set button. Your photos are displayed
as a slideshow.
4. To exit the slideshow, press the Set button.
17
Page 19

To print photos using Digital Print Order Format
(DPOF) Settings
With DPOF, you can print all or one photo, with or
without the date.
Note:
• If your memory card is not inserted into your camera,
DPOF is disabled, even if there are photos in your
camera’s internal memory.
To print a photo
1. Make sure that your camera is connected to your
computer’s USB port and that your printer is
functioning properly.
2. In Play mode, use the Function keys to go to
the photo that you want to print.
3. Press the Set button.
4. Press the Function key. The
following LCD screen appears.
6. Use the Function keys to select On and if you do
not want the date to appear on your printed
photo, select Off.
7. Press the Set button.
8. Use the Function key to select Select
One. The following LCD screen appears.
9. Press the Set button. The following LCD screen
appears.
5. If you want the date to appear in your printed
photo, press the Function key to select
Date On/Off, and then press the Set button.
The following LCD screen appears.
10. Press any Function key to specify the number of
copies, and then press the Set button.
18
Page 20

To print all photos
1. Make sure that your camera is connected to your
computer’s USB port and that your printer is
functioning properly.
2. In Play mode, press the Set button. The
following LCD screen appears.
5. Use the Function keys to select On and if you do
not want the date to appear on your printed
photo, select Off.
6. Press the Set button.
7. Use the Function key to select Select
All/None. The following LCD screen appears.
3. Press the Function key. The
following LCD screen appears.
4. If you want the date to appear in your printed
photo, press the Function key to select
Date On/Off, and then press the Set button.
The following LCD screen appears.
8. Use the Function keys to select All, and then
press the Set button. All photos are printed.
19
Page 21

Setup Mode
In Setup mode, you can adjust your camera’s image
resolution, white balance, exposure value, language,
date, time and light frequency. You can also use Setup
mode to format your memory card or restore the
default settings.
To enter Setup mode
1. Press and hold the Mode button until the Mode
menu appears on the LCD screen.
2. Use the Function keys to select the Setup
Mode icon.
3. Press the Set button. The following LCD screen
appears.
To set the image resolution
1. In Setup mode, use the Function key to
select Resolution.
2. Press the Set button. The following LCD screen
appears.
3. Use the Function keys to select the image
resolution that you want, and then press the Set
button.
To select the image quality
1. In Setup mode, use the Function key to
select Quality.
2. Press the Set button. The following LCD screen
appears.
3. Use the Function keys to select the image
quality that you want, and then press the Set
button.
20
Page 22

To adjust the white balance
1. In Setup mode, use the Function key to
select White Balance.
2. Press the Set button. The following LCD screen
appears.
To adjust the exposure value
1. In Setup mode, use the Function key to
select Exposure Value.
2. Press the Set button. The following LCD screen
appears.
3. Use the Function keys to select the white
balance that you want.
• Select Auto to automatically adjust the white
balance when taking a photo.
• Select Sunny if you are taking a photo in direct
sunlight.
• Select Tungsten if you are taking a photo in
overcast conditions.
• Select Fluorescent if you are taking a photo in
fluorescent lighting.
4. Press the Set button.
3. Use the Function keys to increase or decrease
the exposure value.
4. Press the Set button.
To change the default language
1. In Setup mode, use the Function key to
select SYSTEM OPT.
2. Use the Function key to
select Language.
3. Press the Set button. The following LCD screen
appears.
4. Use the Function keys to select the language
that you want, and then press the Set button.
21
Page 23

To set the date and time
1. In Setup mode, use the Function key to
select SYSTEM OPT.
2. Use the Function key to select
Date/Time.
3. Press the Set button. The following LCD screen
appears.
To adjust the light frequency
1. In Setup mode, use the Function key to
select SYSTEM OPT.
2. Use the Function key to select
Frequency.
3. Press the Set button. The following screenshot
appears.
4. Use the Function keys to adjust the date, and
then press the Mode display button. The
following LCD screen appears.
5. Use the Function keys to adjust the time, and
then press the Mode display button.
6. Press the Set button.
4. Use the Function keys to select the frequency
that you want and press the Set button.
To format your memory card
1. In Setup mode, use the Function key to
select OPTION.
2. Use the Function key to select Format.
3. Press the Set button. The following screenshot
appears.
4. Use the Function keys to select OK.
5. Press the Set button.
22
Page 24

To restore the default settings
1. In Setup mode, use the Function key to
select OPTION.
2. Use the Function key to select Default.
3. Press the Set button. The following screenshot
appears.
4. Use the Function keys to select OK.
5. Press the Set button.
23
Page 25

Movie Mode
Use Movie mode to record a video. In Movie mode,
the icons below are displayed on your LCD.
(1) Movie Mode icon
(2) Recorded video (seconds)
(3) Recording status
(4) Remaining battery power
(5) Date display
To record a video
1. Press and hold the Mode button until the Mode
menu appears on the LCD screen.
2. Use the Function keys to select the Movie
Mode icon.
3. Press the Set button.
4. Press the Shutter button down fully to start
recording a video.
5. To stop the recording, release the Shutter
button.
Notes:
• This camera does not record audio.
• If a “Memory full” message appears on the LCD
screen, the recording is stopped.
• The maximum recording time depends on the
amount of available free space.
• When recording a video, the digital zoom function is
automatically disabled.
24
Page 26

Record Mode
Use Record mode to take photos. In Record mode,
the icons below are displayed on your LCD.
(1) Image resolution
(2) Image quality
(3) Current working mode
(4) Memory status
(5) Number of shots
(6) White balance display
(7) Self-timer photography
(8) Morning/afternoon display
(9) Time display
(10) Date display
(11) Remaining battery power
(12) Zoom indicator
(13) Flash light status
To take a photo
1. Press and hold the Mode button until the Mode
menu appears on the LCD screen.
2. Use the Function keys to select the Record
Mode icon.
3. Press the Shutter button down fully to take a
photo.
25
Page 27

PC Mode
Use PC mode to switch between using your camera as
a removable hard disk drive (Mass Storage Device) or
webcam.
To use your camera as a removable hard disk
drive
1. Press and hold the Mode button until the Mode
menu appears on the LCD screen.
2. Use the Function keys to select the PC mode
3. Press the Set button. The following LCD screen
icon.
appears.
Note:
• Make sure that you have inserted a memory card
into your camera before selecting MASS STORAGE
and if you intend to transfer photos from your
memory card to your computer.
To use your camera as a webcam
1. Press and hold the Mode button until the Mode
menu appears on the LCD screen.
2. Use the Function keys to select the PC mode
3. Press the Set button. The following LCD screen
icon.
appears.
4. Select MASS STORAGE, and then press the Set
button. The USB Connection icon flashes on
the LCD screen.
5. Connect your camera to your computer’s USB
port.
You can start using your camera as a removable
hard disk drive.
4. Select PC CAMERA, and then press the Set
button. The USB Connection icon flashes on
the LCD screen. Connect your camera to your
computer’s USB port.
You can start using your camera as a webcam.
Note:
For Macintosh computers, you can only use your
camera as a mass storage device.
26
Page 28

A. Technical Specifications
Size
• 93 mm (L) x 56 mm (H) x 38 mm (W)
Weight
• Approximately 120 g (without the batteries)
Power
• 2 x AAA alkaline batteries
Lens
• F=8.79 mm
Sensor
• 1/2” CMOS with 2.0 mega pixels
Focus range
• F/2.8
Sensitivity
• ISO 100
White balance
• Auto
• Sunny
• Tungsten
• Fluorescent
Shutter
• Electrical
Shutter speed
• 1/4 seconds ~ 1/2000 seconds
Storage
• 16 MB Internal Flash Memory
• SD or MMC card slot (supports 4 to 512 MB)
File format
• Still image - JPEG
• Video - Motion JPEG
Picture resolution
• 2048 x 1536 pixels with software interpolation
• 1600 x 1200 pixels
• 1280 x 960 pixels
• 800 x 600 pixels
Digital zoom
• 10-step, 4x digital zoom
Focal range
• Standard: 1.2 m ~ infinity
• Macro: 15 cm ~ 20 cm
Self-timer
• 10 seconds delay
27
Page 29

PC-CAM mode
• QVGA (320 x 240 pixels)
• VGA (640 x 480 pixels)
Flash mode
• Auto
• Off
Port compatibility
• Universal Serial Bus (USB) 1.1
Videos
• Records videos for 60 seconds continuously, with
QVGA (320 x 240 pixels) format
• 16 MB internal memory
Recordable image numbers
Fine 60 25 15 10
16
MB
Normal 130 60 35 25
800 x
600
1280 x
960
1600 x
1200
2048 x
1536
28
 Loading...