

Page 1
User’s Guide
Page 2

User’s Guide
Creative PC-CAM 900
Information in this document is subject to change without notice and does not represent a commitmen t on t he p a rt o f Cre a tiv e Technology
Ltd. No part of this manual may be reproduced or transmitted in any form or by any means, electronic or mechanical, including
photocopying and recording, for any purpose without the written permission of Creative Technology Ltd. The software described in this
document is furnished under a license agreement and may be used or copied only in accordance with the terms of the license agreement.
It is against the law to copy the software on any other medium except as specifically allowed in the license agreement. The licensee may
make one copy of the software for backup purposes.
The Software License Agreement is found in a separate folder on the Installation CD.
Copyright © 1998-2003 Creative Technology Ltd. All rights reserved.
Version 1.0
November 2003
Sound Blaster and Blaster are registered trademarks of Creative Technology Ltd. in the United States and/or other countries. Microsoft,
MS-DOS, and Windows are registered trademarks of Microsoft Corporation. All rights reserved. All other products are trademarks or
registered trademarks of their respective owners.
Page 3

Contents
Page 4

Contents
1 Introduction
Before You Begin ...................................................................................................................................... 1-1
Package Contents ........................................................................................................................... 1-1
README file ..................................................................................................................................... 1-2
Minimum System Requirements ................................................................................................ 1-2
Document Conventions ............................................................................................................... 1-3
Handling Your Camera ........................................................................................................................... 1-4
2 About Your Camera
About Creative PC-CAM 900 .............................................................................................................. 2-1
About the Mode Selector dial ................................................................................................... 2-3
Using the Multi-Selector button ................................................................................................ 2-4
Inserting an SD Memory Card (optional) ............................................................................... 2-6
Turning on Your Camera ............................................................................................................ 2-7
Usage Precautions .................................................................................................................................... 2-8
Disconnecting your camera properly ...................................................................................... 2-8
Windows XP, Windows 2000 and Windows Me .................................................... 2-8
Windows 98 SE ..................................................................................................................... 2-9
3 Using Creative PC-CAM 900 as a Digital Camera
Turning on your Camera ....................................................................................................................... 3-1
Taking a Photo ........................................................................................................................................... 3-1
Previewing a Photo ....................................................................................................................... 3-2
Flash Modes ................................................................................................................................................ 3-2
Recording Audio or Video .................................................................................................................... 3-3
Replaying a Recording ................................................................................................................... 3-3
i
Page 5

Deleting a Photo or Recording ......................................................................................................... 3-4
Protecting a photo or recording ........................................................................................................ 3-4
Configuring Your Camera ..................................................................................................................... 3-5
Exposure Compensation Settings ............................................................................................. 3-5
White Balance Settings ................................................................................................................. 3-5
General Camera Settings ............................................................................................................. 3-6
Format .............................................................................................................................................. 3-8
4 Installing Creative PC-CAM 900
Installing Creative PC-CAM 900 ......................................................................................................... 4-1
In Windows XP / 2000 / Me / 98 SE /98 .............................................................................. 4-1
Verifying the installation in Windows XP and 2000 .................................................. 4-5
Verifying the installation in Windows Me and 98/98 SE ........................................... 4-5
5 Using Creative PC-CAM 900 as a Web Camera
Starting PC-CAM Center ...................................................................................................................... 5-1
Capturing Images and Video ................................................................................................................. 5-2
Taking a Photo ................................................................................................................................. 5-2
Recording a Video .......................................................................................................................... 5-2
Viewing a Photo ........................................................................................................................................ 5-3
Viewing a Video ........................................................................................................................................ 5-4
Transferring files from your camera ................................................................................................... 5-4
Reactivating the Camera ........................................................................................................................ 5-5
Starting PC-CAM Center Help ............................................................................................................ 5-5
6 Creative PC-CAM 900 Applications
PC-CAM Center ....................................................................................................................................... 6-1
WebCam Monitor ................................................................................................................................... 6-1
ii
Page 6

ArcSoft PhotoImpression ...................................................................................................................... 6-1
ArcSoft VideoImpression ....................................................................................................................... 6-1
ArcSoft Panorama Maker ....................................................................................................................... 6-1
ArcSoft Multimedia Email ....................................................................................................................... 6-2
Appendixes
A Technical Specifications
Dimensions ............................................................................................................................ A-1
Weight .................................................................................................................................... A-1
Power ...................................................................................................................................... A-1
Sensor ...................................................................................................................................... A-1
LCD Display .......................................................................................................................... A-1
Video Resolution ................................................................................................................. A-1
Picture Resolution - Still mode ........................................................................................ A-1
Picture Resolution - PC-Cam Center ........................................................................... A-1
Video Resolution - WebCam Monitor ......................................................................... A-1
Focus range ............................................................................................................................ A-2
Focal length ............................................................................................................................ A-2
Aperture ................................................................................................................................. A-2
Self-timer ................................................................................................................................ A-2
Video formats ....................................................................................................................... A-2
File formats ............................................................................................................................ A-2
Exposure control ................................................................................................................. A-2
White balance ....................................................................................................................... A-2
Audio Recording .................................................................................................................. A-2
Multi Snap Mode .................................................................................................................. A-2
Port compatibility ................................................................................................................ A-2
Storage Media ....................................................................................................................... A-2
iii
Page 7

Software compatibility ........................................................................................................ A-3
B Troubleshooting
Problem Installing Software ................................................................................................................... B-1
Problems Using Creative PC-CAM 900 ............................................................................................ B-1
Problems in Windows XP ..................................................................................................................... B-3
C Note on USB Compatibility
iv
Page 8
Introduction
Page 9

Introduction
Creative PC-CAM 900 is a digital video camera that gives you everything you need
to capture 24-bit still images and video in 16.7 million colors. Not only that, it also
allows you to communicate face-to-face with others on the Internet!
Applications included
on your Installation
CD may vary
depending on camera
model and region of
purchase.
Before You Begin
Package Contents Your Creative PC-CAM 900 package contains the following items:
Creative PC-CAM 900 comes with the following software:
❑ Creative PC-CAM Center
❑ Creative WebCam Monitor
❑ ArcSoft® PhotoImpression
❑ ArcSoft VideoImpression
❑ ArcSoft Panorama Maker
❑ ArcSoft Multimedia Email
For more information, see "Creative PC-CAM 900 Applications" on page 6-1.
❑ Creative PC-CAM 900
❑ USB cable
❑ Creative PC-CAM 900 Installation CD
❑ Application CD
❑ Quick Start booklet
❑ Soft camera case
❑ PC-CAM 900 stand
❑ 4 AAA batteries
❑ Wrist strap
❑ Video cable
Introduction 1-1
Page 10

README file The README file on the CD-ROM contains information not available at the time of
printing. Read the file before you begin installing Creative PC-CAM 900.
Minimum System Requirements
❑ 233 MHz Intel® Pentium® II or higher IBM® compatible PC
❑ 64 MB RAM
❑ 600 MB free hard disk space on a hard disk drive (for installation of all software
titles)
❑ Available USB port or USB hub with an external power supply
❑ Microsoft Windows® XP, Windows 2000, Windows Me or Windows 98/98 SE
❑ AGP display adapter that supports 16-bit color at a resolution of 1024 x 768 pixels
❑ CD-ROM drive installed
❑ Sound Blaster® or other Windows-compatible audio card. Sound Blaster 16 or
higher required for simultaneous two-way conversation with full-duplex support.
For Videoconferencing
❑ Modem or LAN access to the Internet at 28.8Kb or faster
Introduction 1-2
Page 11

Document Conventions
Tip. This tells you about short cuts or hints relating to a feature.
Note. This highlights additional or important information about a
feature.
Caution! This highlights proper usage of your product. Use this
information to avoid risky situations.
Warning! This warns you of possible hazards to yourself or your
product, that may result in injury or damage.
Introduction 1-3
Page 12
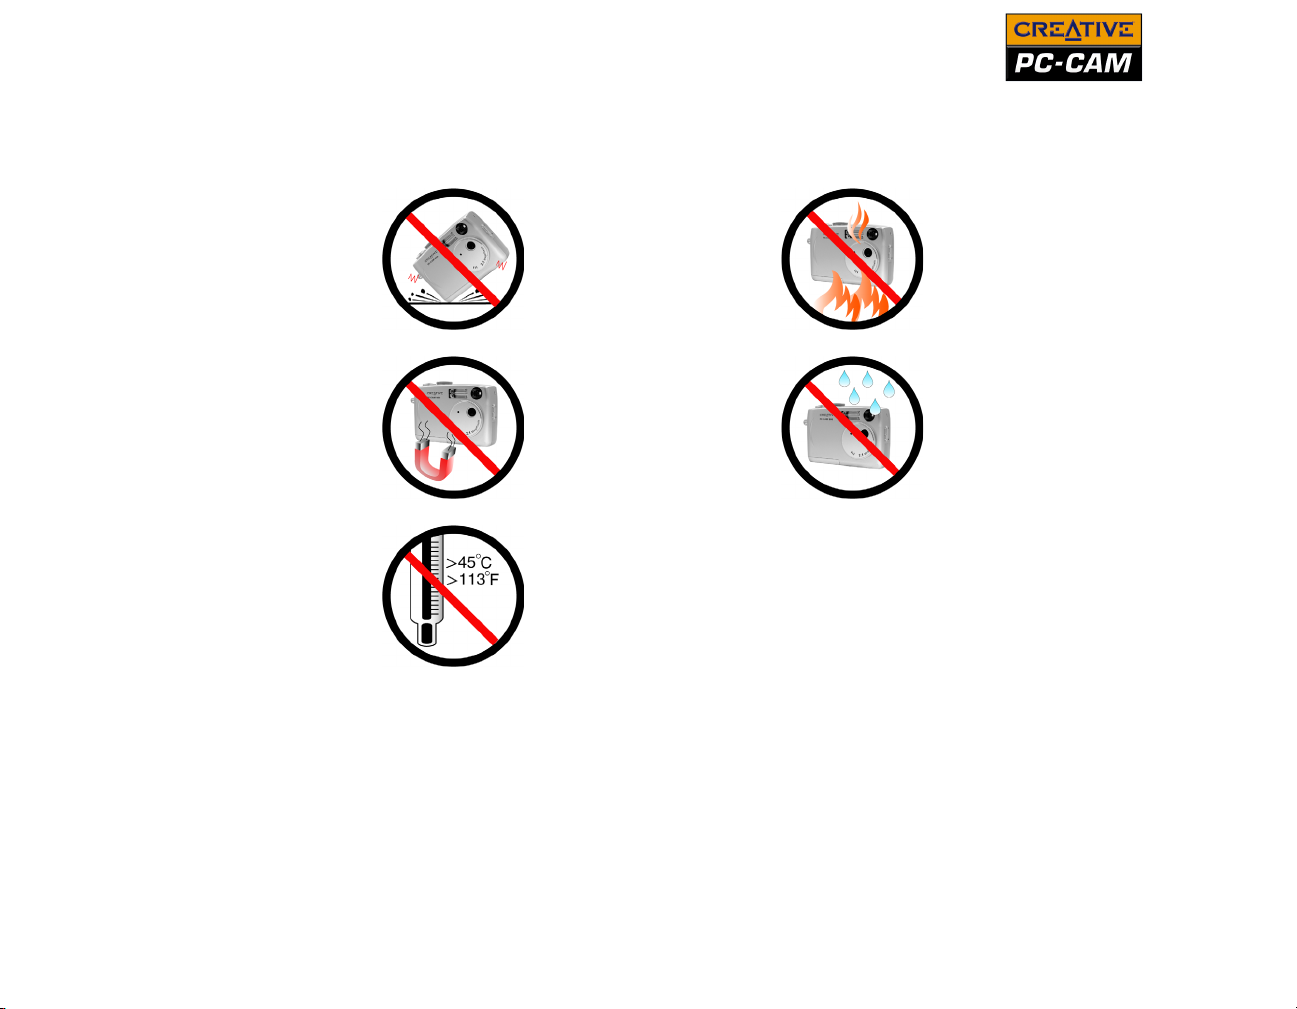
Handling Your Camera
❍ Do not subject to
excessive force or
impact.
❍ Keep away from
strong magnetic
fields.
❍ Do not store or
use in areas
exceeding 45° C
or 113° F.
❍ Do not incinerate or
expose to excessive
heat.
❍ Keep away from
excessive moisture.
Introduction 1-4
Page 13

About Your Camera
Page 14
About Your Camera
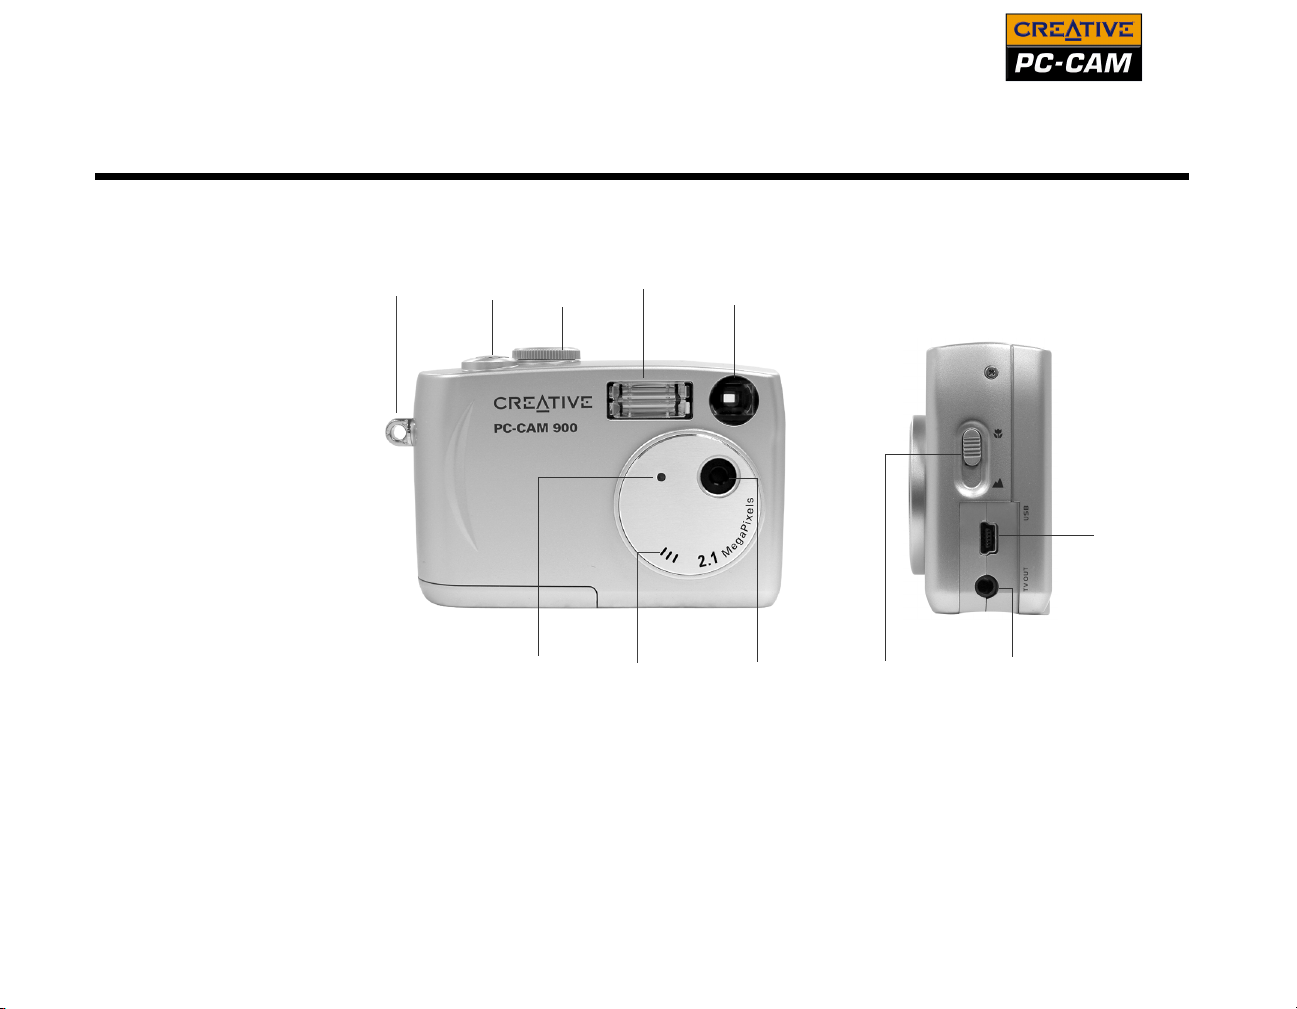
About Creative PC-CAM 900
Figure 2-1 and Figure 2-2 highlight the features of Creative PC-CAM 900.
Strap lug
Snap
button
Mode
Selector
dial
LED
Front View
Flash
MicrophoneSelf-Timer
Figure 2-1: Creative PC-CAM 900 front and side views
Optical
viewfinder
Camera
lens
Normal /
Macro focus
switch
TV out connector
Side View
USB
connector
About Your Camera 2-1
Page 15
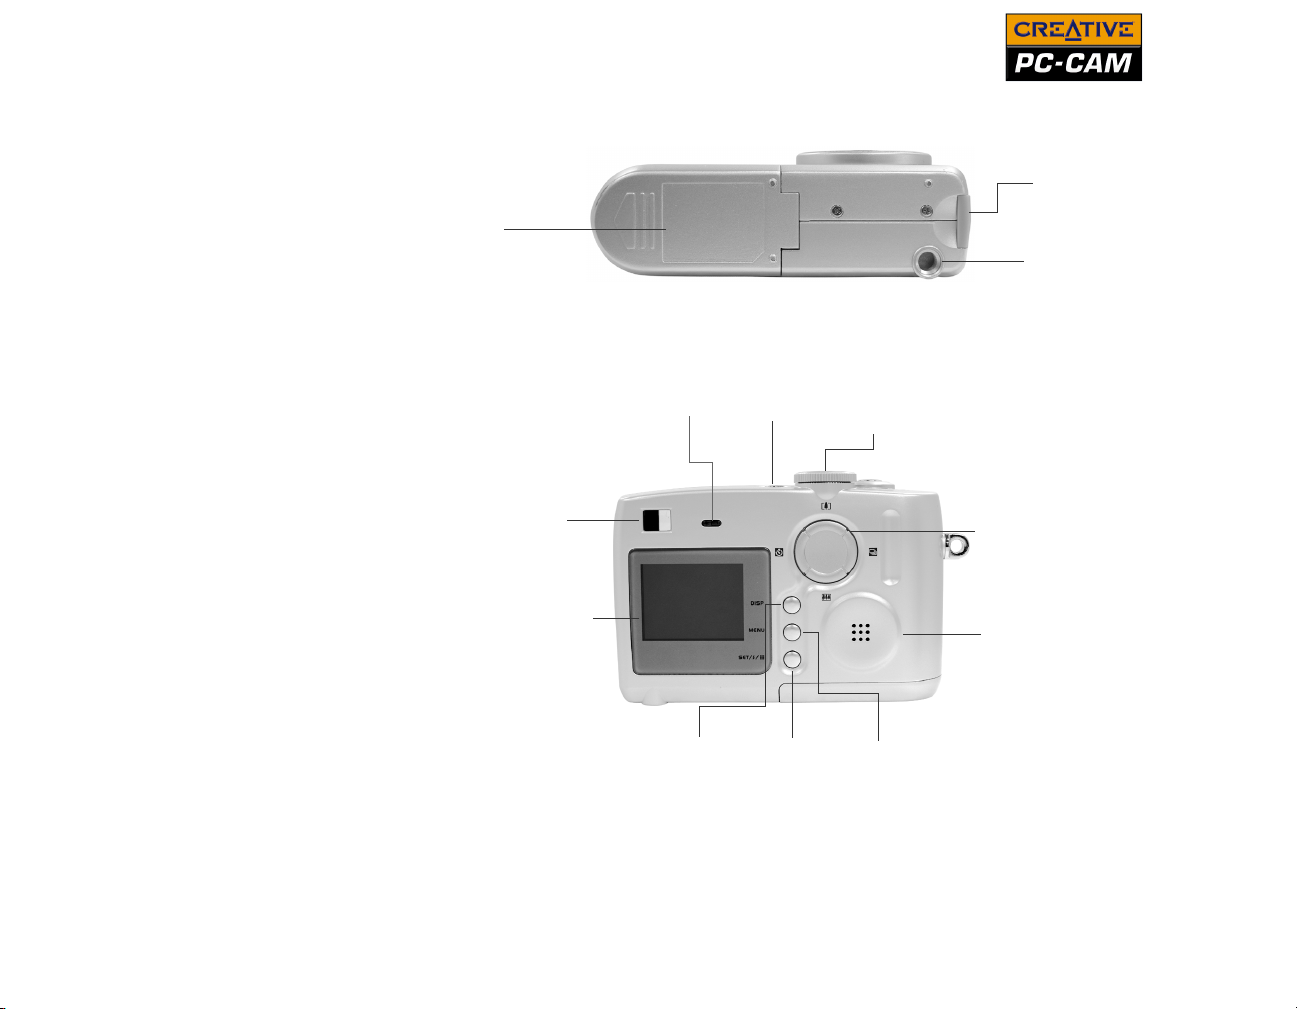
Battery
compartment
Bottom View
TV out and USB
connector
protector
Camera-stand
socket
Optical
viewfinder
Liquid Crystal
Display (LCD)
Figure 2-2: Creative PC-CAM 900 bottom and back views
LED indicator
Display
button
Power
button
Set/Flash/
Thumbnail
button
Back View
Mode
Selector dial
Menu
button
MultiSelector
button
Integrated
speaker
About Your Camera 2-2
Page 16
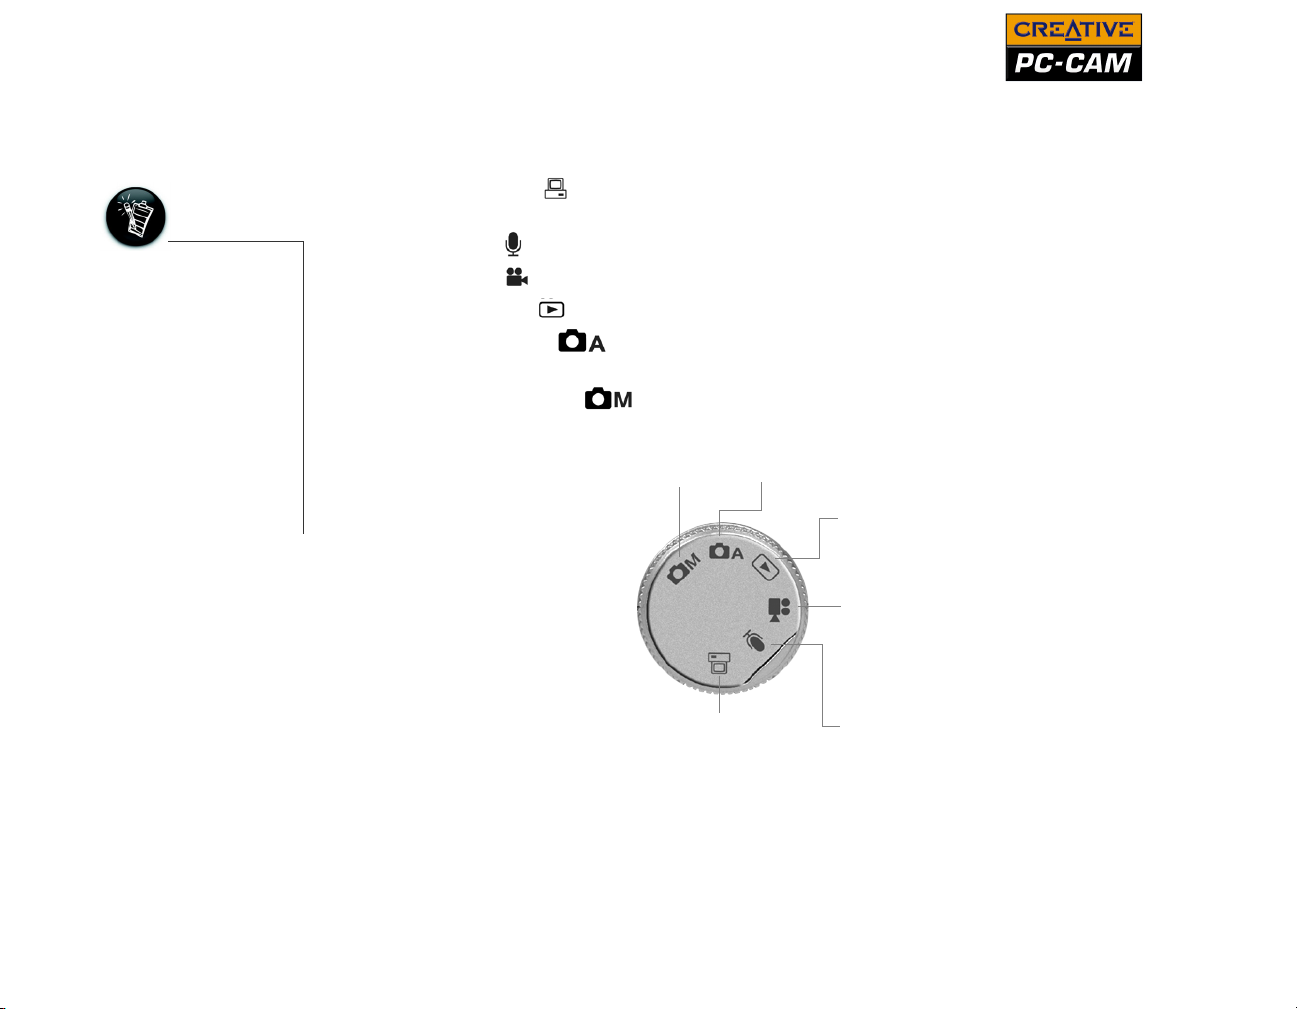
About the Mode Selector dial
• To select a mode,
turn the Mode
Selector dial so that
the mode icon is
aligned with the red
dot next to the dial.
• In any mode except
Web Cam mode,
and when connected
to your computer,
the camera
functions as a mass
storage device.
With your camera’s Mode Selector dial, you can access many features of your
Creative PC-CAM 900:
•Web Cam mode — transfer photos and audio/video recordings with PC-CAM
Center, or use your camera as a webcam.
•Audio mode — create audio recordings with the integrated microphone
• Video mode — record short videos
• Playback mode — view photos and videos and hear audio recordings
• Auto Photo mode — take photos using the camera’s automatic exposure
and white balance settings
• Manual Photo mode — take photos with your custom exposure and white
balance settings
Manual
Photo mode
Auto Photo
mode
Playback
mode
Video
mode
Web Cam
mode
Figure 2-3: Mode Selector dial
Audio
mode
About Your Camera 2-3
Page 17

Using the
Multi-Selector
button
For more details on
using the
Multi-Selector button
with your Onscreen
Display menu, see
"Using Creative PCCAM 900 as a Digital
Camera" on page 3-1.
The Multi-selector button is one of the most important features of your camera. Use
the directional keys to locate options on your Onscreen Display (OSD) menu, and
press the Set/Flash/Thumbnail button to select an option.
Up Key
Left Key Right Key
Set/Flash/Thumbnail
button
Figure 2-4: Multi-Selector button
Down Key
Key Description
❍ Playback mode: zoom in on displayed photo, or highlight menu
Up
Down
options
❍ Auto or Manual Photo mode: zoom in
❍ Playback mode: zoom out of displayed photo, or highlight menu
options
❍ Auto or Manual Photo mode: zoom out
About Your Camera 2-4
Page 18

Multi Snap and Self-Timer
modes cannot be enabled
at the same time.
Selecting either mode will
disable the other.
Key Description
❍ In all modes except Playback, Menu: move to Exposure, White
Left
Right
Balance, Settings or Format options
❍ Auto or Manual Photo modes: enable or disable Self-Timer
❍ In all modes except Playback, Menu: move to Exposure, White
Balance, Settings or Format options
❍ Auto or Manual Photo modes: enable or disable Multi Snap mode
About Your Camera 2-5
Page 19

Inserting an SD Memory Card (optional)
• Your camera will
turn itself off
automatically, if the
SD removable card
slot cover is opened.
• The SD memory
card has a writeprotect switch to
prevent the
accidental deletion
of valuable data.
This switch is
disabled by default.
•When the SD card is
protected, images
cannot be recorded.
If an attempt is
made to record or
delete an image
with the camera, the
"Card Protect"
message will appear
in the LCD screen.
• To write or erase
data from the SD
memory card,
release the writeprotect switch.
You can purchase a Secure Digital (SD) memory card to extend the image storage
capacity of your camera.
To install your SD card:
1. Be sure that your camera is turned off.
2. Push and slide open the battery compartment door.
3. Insert the SD card as shown.
To remove the card, push the card.
4. Close the battery compartment door.
Write-protect switch
SD removable card slot
Figure 2-5: Inserting a Memory card
About Your Camera 2-6
Page 20

Turning on Your Camera
• Be sure to insert the
batteries in the
correct direction. If
not, they may leak
and damage your
camera.
• Do not mix old and
new batteries
together.
1. Push and slide open the battery
compartment door.
2. Insert the batteries according to the
battery polarity (+ and -) symbols
indicated (see Figure 2-6).
3. Close the battery compartment door.
Battery
compartment
door
Figure 2-6: Inserting batteries
Battery
polarity
symbols
To conserve battery
power, your camera
turns the LCD off if no
operation is made
within 60 seconds. See
"Power Saving" on
page 3-7 for more
information.
4. Press and hold down the Power button to
turn on your camera.
The LED turns red and the LCD monitor is
activated.
The LED turns green.
Power
button
Figure 2-7: Power button
About Your Camera 2-7
Page 21

Usage Precautions
Before switching modes, disconnecting your camera from your computer or turning
your camera off, note the color of the LED indicator. Wait until the LED indicator
turns green before attempting any other action with the camera.
Disconnecting your camera properly
Windows XP, Windows 2000 and Windows Me
This prompt appears
on the Taskbar in
Windows XP. On other
operating systems, a
message box appears
on the desktop
instead.
Before disconnecting your camera from your computer, use the Windows Eject or
Safely Remove Hardware icon
camera. If not, your camera may not be able to function normally. Follow these
steps below to safely disconnect your camera:
1. Click the Safely Remove Hardware icon on the Taskbar and click Safely
remove USB Mass Storage Device as shown.
Figure 2-8: Choosing a USB Mass Storage Device to
disconnect
2. Unplug your player when you are prompted to do so.
Figure 2-9: Disconnecting your camera
on the Taskbar to safely disconnect your
About Your Camera 2-8
Page 22

Windows 98 SE 1. Wait at least 10 seconds after all file
transfers are completed, or until the
LED indicator turns green.
2. In Windows Explorer, right-click the
Removable Disk icon and click Eject.
3. Unplug your camera after 10 seconds.
Figure 2-10: Disconnecting your camera in
Windows 98 SE
About Your Camera 2-9
Page 23

Using Creative PC-CAM 900 as a Digital Camera
Page 24

Using Creative PC-CAM 900 as a Digital Camera
To use Creative PC-CAM 900 as a portable digital camera, simply disconnect it from
the computer. Use your camera’s default settings in Auto Photo mode
photos. For finer control, adjust exposure and white balance settings in Manual
Photo
information.
Note: Remember to insert four fresh 1.5 V AAA alkaline batteries into the camera’s
battery compartment.
mode, see "Configuring Your Camera" on page 3-5 for more
to take
Turning on your Camera
Taking a Photo
• While composing
your picture, use
the Up and Down
keys on the Multi
Selector button to
zoom in and out.
• To take close-up
pictures, move the
Normal / Macro
focus switch to
. The Macro
icon appears on
the Onscreen
Display (OSD) .
To turn on your camera: press and hold down the Power button on the camera
until the LED turns red.
Taking a photo:
1. Be sure that your camera is not connected to your computer.
2. Turn the Mode Selector dial to Auto Photo or Manual Photo mode.
For normal focus pictures, ensure that the Normal / Macro focus switch is
moved toward
3. Compose your picture and press the Snap button.
You can also take multiple pictures in quick succession in Multi Snap mode.
In Multi Snap mode, pictures are taken at 800 x 600 resolution, overriding the
default picture settings.
Taking a photo in Multi Snap mode:
1. Be sure that your camera is not connected to your computer.
2. Turn the Mode Selector dial to Auto Photo or Manual Photo mode.
3. Press the Right key on your Multi Selector button. The Multi Snap mode
icon appears on your camera’s OSD.
4. Compose your picture and press the Snap button.
The camera takes five consecutive pictures.
.
Using Creative PC-CAM 900 as a Digital Camera 3-1
Page 25

Previewing a Photo 1. Turn the Mode Selector dial to Playback mode to view your picture on the
LCD.
2. Press the Left and Right keys on your Multi Selector button and locate your
photo on the LCD.
• Press the Set/
Flash/Thumbnail
button to switch
between full view
and thumbnail
view.
• You can also
preview a photo
immediately after
taking it by
enabling the
QuickView function.
See "General
Camera Settings"
on page 3-6 for
more information.
If you have a large number of photos or videos, press the Set/Flash/Thumbnail
button to display a Set/Flash/Thumbnail of nine thumbnails on the LCD. Use
the Multi Selector button to locate the photo.
Flash Modes
In Auto Photo or Manual Photo mode, press the Set/Flash/Thumbnail
button to choose a flash mode:
• Auto flash — the flash is used automatically when required
• Forced flash — the flash is always used
• No flash — the flash is disabled
Using Creative PC-CAM 900 as a Digital Camera 3-2
Page 26

Recording Audio or Video
• A "Disk Full"
message appears
when there is
insufficient
remaining memory
in your camera.
•All videos are
recorded at 320 x
240 resolution.
1. Be sure that your camera is not connected to your computer.
2. Turn the Mode Selector dial to Audio or Video mode .
3. For videos, compose your picture and press the Snap button to begin recording.
For audio recordings, place the camera close to the audio source and press the
Snap button.
You can see both the elapsed and remaining recording times, shown in
seconds, at the upper right corner of the LCD.
Press the Snap button again to stop recording.
Replaying a Recording
1. Turn the Mode Selector dial to Playback mode .
2. Use the Left and Right keys on your Multi Selector button and locate your
recording on the LCD screen.
3. Press the Snap button to start playback.
To stop playback, press the Left key.
To pause playback, press the Right key To continue playback, press the Right
key again.
Using Creative PC-CAM 900 as a Digital Camera 3-3
Page 27

Deleting a Photo or Recording
To delete all photos or
recordings, highlight
the icon and
press the Set/Flash/
Thumbnail button
twice.
1. Be sure that your camera is not connected to your computer.
2. Turn the Mode Selector dial to Playback mode .
3. Locate the photo or recording you want to delete.
4. Press the Menu button.
5. Use the Down key on your Multi Selector button to highlight the icon and
press the Set/Flash/Thumbnail button.
The picture or recording is deleted.
Protecting a photo or recording
When you want to
quickly erase all
photos and
recordings, regardless
of protection, you can
format your camera’s
memory. See
"Format" on page 3-8
for more information.
1. Be sure that your camera is not connected to your computer.
2. Turn the Mode Selector dial to Playback mode .
3. Use the Left and Right keys on your Multi Selector button and locate your photo
or recording on the LCD screen.
4. Press the Menu button.
5. Use the Down key on your Multi Selector button to highlight the icon and
press the Set/Flash/Thumbnail button.
The photo or recording is protected from accidental erasure.
Using Creative PC-CAM 900 as a Digital Camera 3-4
Page 28

Configuring Your Camera
You can change Exposure and White Balance settings only in Manual Photo
mode.
Exposure Compensation Settings
White Balance Settings
Adjust exposure compensation settings so that the subject is lit correctly against a
bright background. Over exposure can lead to photos that are too bright, or whiteout objects in your photo, while under exposure can lead to photos that are too
dark.
1. Be sure that your camera is not connected to your computer.
2. Turn the Mode Selector dial to Manual Photo mode .
3. Press the Menu button.
4. Use the Up or Down keys on your Multi Selector to select a exposure setting.
5. Press the Set/Flash/Thumbnail button to save the setting.
Adjust white balance settings so that your camera reproduces colors more
accurately. Choose a white balance that closely matches the ambient lighting. If you
are taking a photo in a room with lots of fluorescent lighting, choose the
Fluorescent option.
1. Be sure that your camera is not connected to your computer.
2. Turn the Mode Selector dial to Manual Photo mode .
3. Press the Menu button.
4. Press the Right key on your Multi Selector until the White Balance icon is
highlighted.
5. Use the Up or Down keys to select a white balance setting.
6. Press the Set/Flash/Thumbnail button to save the setting.
Using Creative PC-CAM 900 as a Digital Camera 3-5
Page 29

General Camera Settings
You can configure how your camera provides audio feedback, image quality and
size, plus other useful settings. You can access these settings in Audio
, Video
, Auto Photo or Manual Photo mode.
1. Be sure that your camera is not connected to your computer.
2. Turn the Mode Selector dial to any of the modes listed above.
3. Press the Menu button.
4. Press the Right key on your Multi Selector button until the Settings icon is
highlighted.
5. Press the Up or Down key to select a setting and press the Set/Flash/Thumbnail
button.
6. Use the specified control to adjust a setting.
7. Press the Set/Flash/Thumbnail button to save the setting.
Setting Description Control to use
Beep
Date and Time Set the date and time
Date Style
Image Size
Language
Enable or disable audio feedback
when using controls
Select the date style, for example,
dd/mm/yyyy or mm/dd/yyyy
Select a default image resolution for
photo-taking. High resolution photos
take up more space in your camera.
Set the default OSD display
language
❍ Up or Down keys
❍ Multi Selector button
❍ Up or Down keys
❍ Up or Down keys
❍ Up or Down keys
Using Creative PC-CAM 900 as a Digital Camera 3-6
Page 30

Setting Description Control to use
Set your camera’s internal storage
Media
Power Saving
Quality
or an SD memory card to be the
default storage media for photos or
recordings.
Set the default idle time before your
camera automatically turns off the
LCD. Choose a time interval or
disable power saving.
For all settings except Off, the
camera automatically switches itself
off one minute after turning off the
LCD.
Select the default quality for phototaking. Photos taken with the FINE
setting take up more space in your
camera.
❍ Up or Down keys
❍ Up or Down keys
❍ Up or Down keys
QuickView
Self-Timer
Video System
Enable or disable the automatic
image preview after taking a photo.
Set the default time delay for the
timer. Choose a delay between 2
and 10 seconds.
Select the NTSC or PAL video
system, for video playback on a TV
set
Using Creative PC-CAM 900 as a Digital Camera 3-7
❍ Up or Down keys
❍ Up or Down keys
❍ Up or Down keys
Page 31

Format With the Format function, you can quickly erase all photos and recordings from the
camera’s internal memory or SD memory card. Be sure to choose the default media
before using this function.
See "Media" on page 3-7 for more information on choosing a default media.
This method of
formatting erases
protected photos or
recordings.
1. Press the Right key on your Multi Selector button until the Format icon is
highlighted.
2. Select NO to cancel the formatting.
Otherwise, select YES.
Using Creative PC-CAM 900 as a Digital Camera 3-8
Page 32

Installing Creative PC-CAM 900
Page 33

Installing Creative PC-CAM 900
This chapter tells you how to quickly install Creative PC-CAM 900 and the software
that comes with it.
Installing
Creative PCCAM 900
In Windows XP / 2000 / Me / 98 SE / 98
You can attach
Creative PC-CAM 900
to a USB hub with an
external power supply.
Use the installation procedures for your operating system.
1. Do not connect Creative PC-CAM 900 to your computer before installing the
drivers.
If you accidentally begin installation with Creative PC-CAM 900 connected, the
Add New Hardware Wizard or Found New Hardware Wizard dialog box
may appear. Click the Cancel button and disconnect your camera from your
computer.
2. Insert the Creative PC-CAM 900 Installation CD into your CD-ROM drive. If it
does not run automatically, click Start
(replace d:\ with the drive letter of your CD-ROM drive).
3. Click the options for installing drivers and applications.
4. Follow the instructions on the screen to complete the installation. You may be
asked, after an application is installed, if you want to restart your computer. Do
not restart your computer until all the drivers and applications are installed.
→ Run and type d:\ctrun\ctrun.exe
Installing Creative PC-CAM 900 4-1
Page 34

5. If a Software Installation
dialog box appears (Figure
4-1), click the Continue
Anyway button. For more
details on this warning
message, see "Problems in
Windows XP" on page B-3.
6. Turn your camera’s Mode
Selector dial to Manual
Photo
mode.
7. With a USB cable, connect
Creative PC-CAM 900 to an
available USB port on your
computer (Figure 4-2).
Follow the steps below that are
for your operating system.
Figure 4-1: Software Installation dialog box
Mode Selector
dial
For Windows XP only
8. The Found New Hardware
message box appears on
your Windows taskbar,
Figure 4-2: Connecting Creative PC-CAM 900 to your
computer
telling you that Windows
has detected your camera as a USB Mass Storage Device.
USB connector
Installing Creative PC-CAM 900 4-2
Page 35

9. After Windows finishes loading USB Mass Storage Device drivers for your
camera, close any Removable Disk, Scanner and Camera, Photo Printing
or folder view dialog boxes that appear.
If a slide show appears, press the Esc key on your keyboard to close the slide
show.
10. When a message box appears, displaying the message “Your new hardware
is installed and ready to use.”, wait approximately 5 seconds and then turn
your camera’s Mode Selector dial to Web Cam
mode. Windows loads
camera and video drivers for your Creative PC-CAM 900.
11. When the Found New Hardware Wizard dialog boxes appear, select the
Install the software automatically (Recommended) option, and click the
Next button.
12. If a Hardware Installation dialog box appears, click the Continue Anyway
button.
13. Click the Finish button and restart your computer if you are prompted to do so.
For Windows 2000 only
8. The Found New Hardware message box appears, telling you that Windows is
installing software for a USB Mass Storage Device.
9. When the Found New Hardware message box closes, wait approximately 5
seconds, and then turn your camera’s Mode Selector dial to Web Cam
mode.
Installing Creative PC-CAM 900 4-3
Page 36

10. If an Unsafe Removal of Device
dialog box appears, click the OK
button.
11. When Digital Signature Not
Found dialog boxes (Figure 4-3)
appear, telling you that Creative
PC-CAM 900 has been detected,
click the Yes button.
12. Click the Finish button and restart
your computer if you are prompted
to do so.
Figure 4-3: Digital Signature Not Found
dialog box
For Windows 98/98 SE and Windows Me only
8. If you are prompted to insert the Windows 98/98 SE Installation CD, replace
the Creative PC-CAM 900 Installation CD with the appropriate CD. If you did not
receive a Windows 98 SE installation CD with your computer but received a
Recovery Disk, the necessary Windows files may already be located at
c:\windows\options\cabs (replace c:\ with the drive letter of your hard
disk drive).
Note: Windows 98 is available in various editions. Be sure to use the correct
edition for your system.
9. In the Insert Disk dialog box, click the OK button.
10. When the New Hardware Found message boxes close, wait approximately 5
seconds, and then turn your camera’s Mode Selector dial to Web Cam
mode.
11. If an Unsafe Removal of Device dialog box appears, click the OK button.
Installing Creative PC-CAM 900 4-4
Page 37

12. Click the Finish button and restart your computer if you are prompted to do so.
Ver i fy in g th e installation in Windows XP and 2000
Ver i fy in g th e installation in Windows Me and 98/98 SE
1. Be sure that your camera’s Mode Selector dial is turned to Web Cam mode.
2. Right-click on the My Computer icon on your desktop.
3. On the menu that appears, click Properties.
4. In the System Properties dialog box, click the Hardware tab.
5. Click the Device Manager button. A window appears.
6. Click the plus (+) sign next to the Imaging Device icon.
The entries “Creative PC-CAM 900 (Still)” and “Creative PC-CAM 900 (Video)”
should appear.
1. Be sure that your camera’s Mode Selector dial is turned to Web Cam mode.
2. Right-click the My Computer icon on your desktop.
3. On the menu that appears, click Properties.
4. In the System Properties dialog box, click the Device Manager tab.
5. Click the plus (+) sign next to the Imaging Device icon.
The entries “Creative PC-CAM 900 (Still)” and “Creative PC-CAM 900 (Video)”
should appear.
Installing Creative PC-CAM 900 4-5
Page 38

Using Creative PC-CAM 900 as a Web Camera
Page 39

Using Creative PC-CAM 900 as a Web Camera
This chapter tells you how to quickly set up Creative PC-CAM 900 as a Web Camera
using the PC-CAM Center software. For detailed information about the application’s
features and settings, refer to its Help file. (See “Starting PC-CAM Center Help” on
page 5-5.)
Starting
PC-CAM
Center
• If PC-CAM Center
does not recognize
the camera
correctly, see
Appendix B,
Troubleshooting.
• PC-CAM Center
automatically
detects your
installed model of
Creative PC-CAM,
and disables any
unsupported
features in the user
interface.
PC-CAM Center is an easily usable application that enables you to take photos and
record videos with Creative PC-CAM 900. You can also view photos and videos, and
create and manage albums.
You can start PC-CAM Center in any of the following ways:
❑ Click Start → Programs →
Creative → Creative PC-CAM
→ Creative PC-CAM Center.
❑ Double-click the Creative Cam
Detector icon
taskbar.
This icon appears if, during
installation, you clicked the
option for Creative Cam
Detector to load automatically
at Windows startup.
❑ Turn your camera’s Mode
Selector dial to Web Cam
mode and plug your camera
into the USB port and let
Windows auto-detect it.
Press your camera’s Snap
button.
in your
Figure 5-1: PC-CAM Center screen.
Using Creative PC-CAM 900 as a Web Camera 5-1
Page 40

Capturing Images and Video
With PC-CAM Center, you can take photos and record videos.
For more instructions on how to take a photo or record a video, refer to the PC-CAM
Center Help file. To launch PC-CAM Center Help, see"Starting PC-CAM Center Help"
on page 5-5.
Taking a Photo To take a photo:
1. In the PC-CAM Center window, click the Live Video button . The current
camera view is displayed in the Viewing window.
2. In the Save photo in box, select the destination album for your photo.
3. To capture the image shown in the viewing window, click the Snap an image
button at the bottom of the window. By default, the photo is saved
automatically and added to the destination album.
To preview a photo:
1. Click the Save automatically check box to clear it, if you want to preview
each photo before deciding whether to save it to the destination album.
2. Click the Snap an image button to take a photo. A preview of the
photo is shown in the Preview pane of the Live Video window.
3. Click the Save button if you wish to store it in the destination album.
Recording a Video To record a video:
1. In the PC-CAM Center window, click the Live Video button . The current
camera view is displayed in the Viewing window.
2. In the Video size box, select a suitable resolution.
3. In the Save video in box, select a destination album for your video.
4. To start recording a video, click the Record video button .
The button starts blinking to indicate that recording is now in progress.
Using Creative PC-CAM 900 as a Web Camera 5-2
Page 41

5. To stop the recording, click the button again.
The button stops blinking. By default, the video is saved automatically and
added to the destination album.
To preview a video:
1. Click the Save automatically check box to clear it, if you want to preview
each video before deciding whether to save it to the destination album.
2. Click the Record video button to start recording.
3. After you stop recording, click the Play button in the Preview pane of the
Live Video window.
4. If you wish to store it in the destination album, click the Save button after
previewing the video.
Viewing a Photo
1. Click the My Album button . PC-CAM Center is now in My Album mode.
2. In the My Album box, click the My Photo folder and then click the album that
contains the photos that you want to view.
Thumbnails of photos in the album are displayed in the Thumbnails window.
3. Double-click the thumbnail of the photo displayed in the Thumbnails window.
The photo is displayed in the PC-CAM Center Viewing window.
If you are not satisfied with the result, you can select a higher resolution, and
then capture the image again.
Using Creative PC-CAM 900 as a Web Camera 5-3
Page 42

Viewing a Video
1. Click the My Album button . PC-CAM Center is now in My Album mode.
2. In the My Album box, click the My Video folder and then click the album that
contains the video that you want to view.
Thumbnails of videos in the album are displayed in the Thumbnails window.
3. Double-click the thumbnail of the video you want to view.
The video plays in the Viewing window.
If you are not satisfied with the result, you can select a higher resolution, and
then capture the video again.
Transferring files from your camera
With PC-CAM Center, you can transfer photos and videos you took while your
camera was detached from your computer.
To transfer files to PC-CAM Center:
1. Connect your camera to your computer and start PC-CAM Center.
2. Turn your camera’s Mode Selector dial to Web Cam mode.
3. In PC-CAM Center, click the Digital Camera button.
PC-CAM Center is now in Digital Camera mode.
Temporary copies of your camera’s file are created automatically, and displayed
as thumbnails in the thumbnails window.
4. Click the box above the thumbnails window, and select the type of media files
you want to download.
The thumbnails window shows the relevant media files.
5. Click the Transfer to button.
The Transfer dialog box appears.
6. Click the Photo, Video or Voice tab.
The tab page for the chosen media appears.
7. Click the album you want to transfer the files to.
8. Click the OK button.
Using Creative PC-CAM 900 as a Web Camera 5-4
Page 43

Reactivating the Camera
If your computer goes into standby mode, your camera will go into suspend mode.
You can reactivate the camera and computer by moving the mouse or pressing a
key on the keyboard.
Starting
PC-CAM
Center Help
This Help file contains instructions on how to use PC-CAM Center to take photos and
record videos. It also teaches you how to optimize settings to take high quality
photos and videos.
To start the Help file:
1. Click the PC-Cam Center logo at the top left corner of PC-CAM Center’s main
window.
2. On the PC-CAM Center menu, click Help.
Using Creative PC-CAM 900 as a Web Camera 5-5
Page 44

Creative PC-CAM 900 Applications
Page 45

Creative PC-CAM 900 Applications
PC-CAM Center
WebCam Monitor
ArcSoft PhotoImpression
ArcSoft VideoImpression
ArcSoft Panorama Maker
This powerful application lets you take pictures or record videos and store them in
albums. You can also export pictures or videos to other programs, or send them as
attachments in your e-mail message. There are various settings for you to adjust,
allowing you to optimize the quality of your pictures and videos. For usage
instructions, see "Using Creative PC-CAM 900 as a Web Camera" on page 5-1.
Want to put a live snapshot of your office, coffee pot, or even your fishtank on your
Web page? Creative WebCam Monitor is the application to look at. Just point your
camera at your subject and pick a time interval. WebCam Monitor does the rest,
including uploading the snapshots to the Internet. WebCam Monitor also acts as a
motion-detecting security system which automatically e-mails you when somebody
comes near your PC while you are not present.
ArcSoft PhotoImpression offers a comprehensive range of photo-editing tools for
cropping, retouching, and adding special effects. These fun and easy-to-use editing
tools let you create dynamic images you’ll be proud to share with family and
friends.
ArcSoft VideoImpression is an easy-to-use application that allows you to create
home movies and presentations using your personal collection of photos, videos
and audio tracks. Make unforgettable home movies to share with friends and
family!
ArcSoft Panorama Maker seamlessly combines horizontal, vertical, or tiled sets of
images to create gorgeous panoramic photos. The program automatically processes
your images, requiring little or no post-process modification. You can even create
360° panoramas.
Creative PC-CAM 900 Applications 6-1
Page 46

ArcSoft Multimedia Email
ArcSoft Multimedia Email is a unique program that enables home and business
Windows users to create and send digital postcards featuring their own photos,
audio messages, text, music and digital video clips.
Creative PC-CAM 900 Applications 6-2
Page 47

Appendixes
Page 48

Technical Specifications
Page 49

Technical Specifications
Dimensions 97 mm (W) x 63 mm (H) x 28 mm (D)
Weigh t Approx. 110g (without batteries)
Power AAA size x 4 batteries (alkaline or NiMH) or USB (connected to PC)
Sensor Progressive Scan 2.1 Megapixels CMOS
LCD Display 1.5" Color LCD
Video Resolution ❑ WebCam Mode: Up to 24fps (320 x 240 resolution)
❑ Video Capture DSC Mode: Up to 15fps (320 x 240 resolution)
Picture Resolution Still mode
Picture Resolution PC-Cam Center
Video Resolution WebCam Monitor
❑ Super Fine: 2048 x 1536 (software enhanced)
❑ Fine: 1600 x 1200
❑ Normal: 800 x 600
❑ 2048 x 1536 (software enhanced)
❑ 1600 x 1200
❑ 1024 x 768
❑ 800 x 600
❑ 640 x 480
❑ 640 x 480
❑ 352 x 288
❑ 320 x 240
❑ 176 x 144
❑ 160 x 120
Technical Specifications A-1
Page 50

Focus range ❑ Normal (100 cm to inifinity)
❑ Macro (20 cm)
Focal length f = 8.47 mm
Aperture F/2.8
Self-timer Adjustable 2 to 10 second delay
Video formats ❑ RGB24
❑ I420
File formats ❑ JPEG (DPOF compliant)
❑ AVI
Exposure control ❑ Automatic
❑ Manual (-2EV to +2EV in 1/3 steps)
White balance ❑ Automatic
❑ Manual (daylight/shade/tungsten/fluorescent)
Audio Recording Voice Recording (IMA-ADPCM)
Multi Snap Mode 5 images at 800 x 600
Port compatibility ❑ Universal Serial Bus port v1.1
❑ TV Out (NTSC/PAL selectable)
Storage Media ❑ Built-in 16MB Flash Memory
❑ SD Memory Card Interface
Technical Specifications A-2
Page 51

Software compatibility
TWAIN, Video for Windows, WDM Mini Driver for DirectShow and STI (Still Image)
driver that runs in Windows 98, Windows 98 SE, Windows 2000, Windows Me and
Windows XP
Windows Image Acquisition (WIA) driver runs in Windows XP and Windows Me only.
Technical Specifications A-3
Page 52

Troubleshooting
Page 53

Troubleshooting
If you have a technical problem with this product, you may wish to consult our selfhelp tool “Knowledgebase” for online troubleshooting and solutions. Go to
www.creative.com and select your region.
Problem Installing Software
Problems Using Creative PC-CAM 900
The setup program for Creative PC-CAM 900 does not run automatically
after you insert the installation CD into the drive.
The AutoPlay feature in your Windows system may not be enabled.
To install the software from the CD:
1. Leave the installation CD in the CD-ROM drive.
2. Click Start → Run.
3. In the Run dialog box, click d:\ctrun\ctrun.exe.
4. Follow the instructions on the screen to complete the installation.
There is no USB port available to connect the USB cable.
Do one of the following:
❑ Unplug the device currently connected
❑ Add a self-powered USB hub
❑ Add a PCI USB card
An application reports that the video driver is already in use, or that the
camera cannot be found.
Do the following:
❑ The camera module is not properly connected. To resolve this problem, ensure that the
camera’s USB connector is inserted, and that the USB connector is enabled in the BIOS.
Refer to your PC’s documentation for information on the BIOS.
❑ Reinstall the video capture drivers and reboot.
❑ Check that no other webcam is connected to your computer.
Troubleshooting B-1
Page 54

The image is too bright.
The amount of light entering the camera has exceeded the exposure control limit.
There may be a very bright object in the camera’s view.
Avoid pointing the camera at very bright objects (for example, sunlight, lights, or
highly reflective surfaces).
Insufficient system resources reserved for the USB port, causing the
system to be unable to function.
There are too many devices in the system, causing IRQ problems with the system’s
USB controller.
Do the following:
1. Remove some devices from the system.
2. Restart the system.
The system will rearrange the resources automatically.
Troubleshooting B-2
Page 55

Problems in Windows XP
A Hardware Installation error message appears on a Windows XP
operating system when applications are being installed.
At the time of this product's release, Microsoft strongly encouraged companies to
submit their hardware solutions for certification. If a hardware device driver is not
submitted, or does not qualify, for Microsoft certification, a warning message similar
to the one below appears.
You may see this message when installing a driver. If you do, you may choose to
click the Continue Anyway button. Creative has tested the driver on Windows XP,
and it does not impair or destablize your computer.
Troubleshooting B-3
Page 56

Note on USB Compatibility
Page 57

Note on USB Compatibility
To look for a USB
compatible product,
you can visit the
product search page at
the official USB Web
site: http://
www.usb.org/app/
search/products.
While testing Creative PC-CAM 900 on PC motherboards with integrated Universal
Serial Bus (USB) ports, we encountered a small number of motherboards that do
not meet the USB specification exactly. These and other non-USB-compliant
motherboards may not operate correctly with Creative PC-CAM 900. Fortunately,
the manufacturers of some of these motherboards have released new versions of
motherboards or BIOS to address the problem.
If the setup program warns you that your motherboard’s USB port is incompatible
with Creative PC-CAM 900, or if the camera does not work on your system and you
suspect that the problem may be related to your PC’s USB port, the following is a
list of available options:
1. Contact your PC vendor.
Your PC vendor may be able to upgrade your motherboard or its BIOS to a
newer version that addresses USB incompatibilities.
2. Use a PCI host adapter that provides USB connectors.
If you are not able to upgrade your motherboard or its BIOS, we recommend
this approach.
3. Attach the Creative PC-CAM 900 to a powered USB hub.
Some USB devices (such as monitors) also operate as powered USB hubs; you
can also buy dedicated powered USB hubs which are to be attached to your
PC’s USB port. However, in some cases, attaching a powered USB hub to a nonUSB-compliant USB motherboard connector will not solve the problem.
Note on USB Compatibility C-1
 Loading...