

Page 1
User’s Guide
Page 2

User’s Guide
3D Blaster GeForce2 GTS
Information in this docu ment is subject to change wit hout notice an d does not repr es ent a commitment on the part of Cr e ative Technology Lt d. No part of t his
manual may be reproduced or trans mitted in any form or by any means, electronic or mechanical, includ ing photocopying and recording, for any purpose
without the writte n permis sio n of Crea tive Technology Ltd. The software de sc ribed in this docu me nt is furnishe d und er a licens e agreement and may be used
or copied only in accordance with the terms of the license agreement. It is against th e law to copy the software on any other medium except as specifically
allowed i n the license agree m ent. The licensee may make one copy of the software for backup purposes.
Copyright © 1998-2000 by Creative Technology Ltd. All rights reserved.
Version 1.0
May 20 0 0
3D Blaster GeForce2 GTS is a tradema rk of Creative Technol ogy Ltd.
Graphics Blaster, 3D Blaster and BlasterControl are trademarks of Creative Technology Ltd.
NVIDIA and GeForce2 GTS are trademarks of NVIDIA Corporation.
Microsoft, MS-DOS, and Windows are registered trademarks of Microsoft Corporation.
All other pro ducts are trademarks or register ed trademarks of t heir respective owners.
Page 3

Creative End -User Soft ware Licens e Agreement
PLEASE READ THIS DOCUMENT CAREFULLY BEFORE INST ALLING THE SOFTWARE. BY INSTALLING AND USING THE SOFTWARE,
YOU AGREE TO BE BOUND BY THE TERMS OF THIS AGREEMENT. IF YOU DO NOT AGREE TO THE TERMS OF THIS AGREEMENT, DO
NOT INST ALL OR USE THE SOFTWARE. PROMPTLY RETURN, WITHIN 15 DA YS, THE SOFTW ARE, ALL RELA TED DOCUMENTATION AND
ACCOMPANYING ITEMS TO THE PLACE OF ACQUISITION FOR A FULL REFUND.
This is a lega l agree ment bet ween you and
Technology Ltd.
This Agreement states the terms and conditions
upon which Creative offers to license the software
sealed in the disk package together wi th all related
documentation and accompanying items including,
but not limited to, the executable programs, drivers,
libraries and data files associated with such
programs (col lectively, the “S oftware”).
LICENSE
1.
Grant of License
The Softwa re is licensed, not sold, to you for use
only under the te rms of this Agreemen t . You o wn
the disk or other media on which the Software is
originall y or subsequent ly recorded or fixed; but,
as between you an d Creative ( and, to the extent
applicable, its licensors), Creative retains all title
to and ownership of the Software and reserves all
rights not expressly granted to you.
2.
For Use on a Single Computer
The Softwa re may be used only on a single
computer by a single user at any time. You may
transfer the machi ne-readable por tion of the
Software f rom one co mputer to a nothe r computer ,
provided that (a) the Software (includ ing any
portion or copy thereof) is erased from the fi r s t
computer and (b) there is no possibility that the
Software will be used on more than one computer
at a time.
and its subsidiaries (“Creative”).
Creative
Version 2 .3, Januar y 2000
3.
Stand-Alone Basis
You may use the So ftware only on a stand-alone
basis, such that the Software and the functions it
provides are accessible only to persons who are
physically present at the locati on of the comp uter
on which the Sof tware is loaded. You may not
allow the Softw are or its funct ion s to be access ed
remotely, or transmit all or any portion of the
Software through any network or communication
line.
4.
Copyright
The Software is owned by Creative and/or its
licensees and is protected by United States
copyr ight l aws an d inter nat ional treaty pro visio ns.
You may not remo ve the copyri ght notice from
any copy of the Software or any copy of the
written materials, if any, accompanying the
Software.
5.
One Archival C opy
You may make one (1) archival copy of the
machine-readable portion of the Software for
backup purpo ses o nly in s upport of your use of the
Software on a single computer, pro vided that you
reproduce on the copy all copyri ght and other
proprietar y r ights notices included on the
originals of the Software.
6.
No Merger or Integration
You may not mer ge any portion of the Software
into, or integrate any portion of the Software with,
any other prog ram, ex cept to the ext ent exp res sly
permitted by the laws of the jurisdiction where
you are located. Any portion of the Software
merged into or integrated with another program, if
any, will continue to be subject to the terms and
conditions of this Agreement, and you must
reproduce on the merged or integrated port ion all
copyrig ht and other propr ietary rights notices
included in the originals of the Software.
7.
Network Version
If you have purchased a “network” versi on of the
Software, this Agreement applies to the
installation of the Software on a single “file
server”. It may not be copie d onto multiple
systems. Ea ch “node” connect ed to the “file
server” mus t also have its own li cens e of a “node
copy” of the Software, which becomes a license
only for that specific “node”.
8.
Transfer of License
You may transf er your license of the Software,
provid ed that (a) you transf er all portions of the
Software or copies thereof, (b) you do not retain
any port i on of the So f t w ar e or a ny co py there of,
and (c) th e transfer ee read s and ag rees to be b ound
by the terms and conditions of this Agreement.
9.
Limitat ions on Usi n g, C opyi ng , an d Mo dif ying
the Software
Except to the extent expressly permitted by this
Agreement o r by the laws of the jurisdictio n
where you acquired the Softw are, you may not
Page 4

use, copy or modify the Softw a r e . Nor may you
sub-licen s e any of your rights under this
Agreement. You may use the software for your
personal use onl y, and not for publ ic pe rfo rmanc e
or for the creation of publicly displayed
videotapes.
10.Decompiling, Disassembling, or Reverse
Engineering
Y ou ac knowled ge that t he Softwar e contai ns trad e
secrets and oth er proprietary information of
Creativ e and its licensors. Except to the extent
expressly permitted by this Agreement or by the
laws of t he jur isdiction where you are located , you
may not de c o m pile, dis a s s e m bl e or otherw is e
rever s e engineer the Software, or engage in any
other activities to ob tain underlying informati on
that is not visi ble to the user in connection with
nor m al use of the Soft w a r e .
In particular, you agr ee not for any pur pos e to
transmit the Software or display the Software's
object code on any computer screen or to make
any hardcopy memory dumps of the Software's
object code. If you believe you require
information related to the interoperability of the
Softwar e w it h other programs , you shall not
decompile or disassemble the Software to obtain
such information, and you agree to request such
information from Cr eative at the add ress listed
below. Upon re ceiving such a request, Creative
shall determine whether you require such
information for a legitimate purpose and, if so,
Creative will provide such information to you
within a reasonable time and on reasonable
conditions.
In any event, you will notify Creative of any
information derived from reverse engineering or
such other activitie s, and the results there o f will
constitute the confidential information of Creative
that may be used onl y in connection with the
Software.
TERMINA TION
The license grant ed to you is effective until
terminated. You may terminate it at any time by
returning t he Software (including any portions or
copies thereof ) to Creative. The license will al s o
terminate automatically without any notice from
Creative if you fail to comply with any term or
condition of this A greement. You agree upon such
termination to return the Software (including any
portions or copies thereof) to Creativ e. Upon
termination, Creative may also enforce any rights
provided by law. The provisions of this Agreement
that protect the proprietary rights of Creat ive will
continue in force after termination.
LIMITED WARRANTY
Creativ e w arrants, as the sol e w arranty, that the
disks on whic h the So ftware is furni shed wil l be free
of defects, as set forth in the Warranty Card or
printed manual included with the Software. No
dist r ibutor, deale r or a ny ot her entity or pers o n is
authorized to expand or alter this warranty or any
other provisions of this A greement. Any
representation, other than the warranties set forth in
this Agreemen t, w ill not bi nd Creative.
Creative does not warrant that the functions
contained in th e Sof tware will meet your
requirements or that the operation of the Software
will be uninterrupted, error-free or free from
malicious code. For purposes of this paragraph,
“malicious code” mea ns any program c ode desi gned
to contaminate other computer programs or
computer data, consume computer r e sources,
modify , dest ro y , record , or t ransmi t dat a, or in some
other fashion usurp the normal operation of the
computer, computer sys tem, or computer network,
includi ng viruses, Trojan hors es , droppers, worms,
logic bombs, and th e like. EXCEPT AS STA TED
ABOVE IN THIS AGREEMENT, THE
SOFTWARE IS PROVIDED AS-IS WITHOUT
WARRANTY OF ANY KIND, EITHER
EXPRESS OR IMPLIED, INCLUDING, BUT
NOT LIMITED TO, ANY IMPLIED
WARRANTIE S OF MERCHANTABILITY
AND FITNESS FOR A PARTICULAR
PURPOSE. CREATIVE IS NOT OBLIGATED
TO PROVIDE ANY UPDATES, UPGRADES
OR TECHNICAL SUPPORT FOR THE
SOFTWARE.
Further, Creative shall not be liable for the accuracy
of any inf or m a t i o n pr ov ided by Cre ative or th ir d
party technical support personnel, or any damages
caused, either directly or indirectly, by acts taken or
omissions made b y you as a result of such techni cal
suppor t.
You assume full respons ibi lity f or the select ion of
the Softw are to achieve your intended results , and
for the ins tallation , use an d results o btained from the
Software. You also assume the entire risk as it
applies to the qualit y and perform a nc e of the
Software. Should the Software prove defective, you
(and not Creative, or its distributors or dealers)
assume the enti re cost of all necessary servicing,
repair or correction.
This warr anty gives you specific legal rights, and
you may also have other r ig ht s w hich vary fr o m
Page 5

country/state to country/state. Some countries/states
do not allo w the ex clus ion of impl ied w arran ties , s o
the above exclusion may not apply t o you. Creati ve
disclaims all warranties of any kind if the Software
was customized, repackage d or altered in any w ay
by any third party other than C reative .
LIMITATION OF REMEDIES AND
DAMAGES
THE ONLY REMEDY FOR BREACH OF
WARRANTY WILL BE THAT SET FORTH IN
THE WARRANTY CARD OR PRINTED
MANUAL INCLUDED WITH THE
SOFTWARE. IN NO EVENT WILL
CREATIVE OR ITS LICENSORS BE LIABLE
FOR ANY INDIRECT, INCIDENTAL,
SPECIAL OR CONSEQUENTIAL DAMAGES
OR FOR ANY LOST PROFITS, LOST
SAVINGS, LOST REVENUES OR LOST DATA
ARISING FROM OR RELATING TO THE
SOFTWARE OR THIS AGREEMENT, EVEN
IF CREATIVE OR ITS LICENSORS HAVE
BEEN ADVISED OF THE POSSIBILITY OF
SUCH DAMAGES. IN NO EVENT WILL
CREATIVE’S LIABILITY OR DAMAGES TO
YOU OR ANY OTHER PERSON EVER
EXCEED THE AMOUNT PAID BY YOU TO
USE THE SOFTWARE, REGARDLESS OF
THE FORM OF THE CLAIM.
Some countries/states do not allow the limitation or
exclusion of liab i lity for inci dent al or cons equent ial
damages, so the above limita tion or exclusion may
not apply to you.
PRODUCT RETURNS
If you must ship the software to Creative or an
authorized Creative distributor or dealer, you must
prepay shipping and either insure the software or
assume all risk of loss or damage in transit.
U.S. GOVERNMENT RESTRICTED RIGHTS
All Software and related documentation are
provided with restricted rights. Use, duplication or
disclosure by the U.S. Government is subject to
restrictions as set forth in subdivision (b)(3)(ii) of
the Rights in Technical Data and Computer
Software Clause at 252.227-7013. If you are sublicensing o r using the Soft ware out side of th e United
States, you will comply with the applicable local
laws of your country, U.S. exp ort control la w, and
the En gl ish vers ion of this Ag r e e me n t .
CONTRACTOR/MANUFACTURER
The Contractor/Manufacturer for the Software is:
Creative Technology Ltd
31, International Business Park
Creative Resource
Singapor e 609921
GENERAL
This Agreement is binding on you as w e ll as your
employees, empl oyers, contractors and agents, and
on any successors and assignees. Neither the
Software nor any information derived therefrom
may be expo rte d exce pt in ac corda nce wi th t he l aws
of the U.S. or other applicable provisions. This
Agreement is governed by the laws of the State of
California (except to the extent federal law governs
copyrights and federally registered trademar ks ) .
This Agreemen t i s the entire agr eement between us
and supersedes any other understandings or
agreemen ts, inc ludin g , but not limit ed to,
advertising, with respect to the Software. If any
provision of this Agr eeme n t is deem ed invalid or
unenforceab le by any country o r gov ernment agency
having jurisdiction, that particular provision will be
deemed modi fied to the e xtent necess ary to mak e the
provision valid and enforceable, and the remaining
provisions will remain in full force and effect.
For questions concernin g th is Agr eement, please
contact Cre ative at the addres s s tated above. For
questions on product or technical matters, contact
the Creative technical support center nearest you.
ADDENDUM TO THE MICROSOFT
SOFTWARE LICENSE AGREEMENT
(WINDOWS 95)
IMPORTANT: By using the Microsoft software
files (the “Microsoft Software”) provided with this
Addendum, you are agreeing to be b ound by the
follow ing terms. If you d o not agree t o be bound by
these terms, you may not use the Microsoft
Software.
The Microsoft Software is provided for the sole
purpose of replacing the corresponding files
provid ed w ith a previ ous ly licensed copy of the
Microsoft software product identified above
(“ORIGINAL PRODUCT”). Upon installation, the
Microsoft Software files become part of the
ORIGINAL PRODUCT and are subject to the same
warrant y and license terms and conditions as the
ORIGINAL PRODUCT. If you do not have a valid
license to use the ORIGINAL PRODUCT , you may
not use the Mi crosoft Softw are. An y other us e of the
Microsof t Software is prohibited.
SPECIAL PROVISIONS APPLICABLE TO
THE EUROPEAN UNION
IF YOU ACQUIRED THE SOFTWARE IN THE
EUROPEAN UNION (EU), THE FOLLOWING
Page 6

PROVISIONS ALSO APPLY TO YOU. IF THERE
IS ANY INCONSISTENCY BETWEEN THE
TERMS OF THE SOFTWARE LICENSE
AGREEMENT SET OUT EARLIER AND IN THE
FOLLOWING PROVISIONS, THE FOLLOWING
PROVISIONS SHALL TAKE PRECEDENCE.
DECOMPILATION
You agree not f or any purp os e to t r a n s mit the
Software or display the Software’s object code on
any computer s c r een or to make any hard copy
memory dumps of the Soft ware ’s o bject co de. If you
believe you require information related to the
interoperability of the Software with other
programs, you s hall not decompile or disassemble
the Software to obtain suc h infor mation, and you
agree to request such information from Creative at
the address listed earlier. Upon recei ving such a
request, Creative shall determine whether you
require such information for a legitimate pur pose
and, if so, Creative will provide such information to
you within a reasonable time and on reasonable
conditions.
LIMITED WARRANTY
EXCEPT AS STATED EARLIER IN THIS
AGREEMENT, AND AS PROVIDED UNDER
THE HEADING “STATUTORY RIGHTS”,
THE SOFTWARE IS PROVIDED AS-IS
WITHOUT WARRANTY OF ANY KIND,
EITHER EXPRESS OR IMPLIED,
INCLUDING, BUT NOT LIMITED TO, ANY
IMPLIED WARRANTIES OR CONDITIONS
OF MERCHANTABILITY, QUALITY AND
FITNESS FOR A PARTICULAR PURPOSE.
LIMITATION OF REMEDY AND DAMAGES
THE LIMITATIONS OF REMEDIES AND
DAMAGES IN THE SOFTWARE LICENSE
AGREEMENT SHALL NOT APPLY TO
PERSONAL INJURY (INCLUDING DEATH)
TO ANY PERSON CAUSED BY CREATIVE’S
NEGLIGENCE AND ARE SUBJECT TO THE
PROVISION SET OUT UNDER THE
HEADING “STATUTORY RIGHTS”.
STATUTORY RIGHTS
Iris h law provide s that certain co n ditions a nd
warranties may be implied in contracts for the sale
of goods and in contracts for the supply of services.
Such condition s and warranties are hereby excl uded,
to the extent such exclusion, in the context of this
transaction, is lawful under Irish law. Conversely,
such conditions and warranties, insofar as they may
not be lawfully excluded, shall apply.
Accordingly nothing in this Agr eement shall
prejudice any rig ht s that y ou may enjoy by virtu e of
Sections 12, 13, 14 or 15 of the Iri s h Sale of Goods
Act 1893 (as amended).
GENERAL
This Ag reement is governed by the la ws of the
Republic of Ir eland. The local la nguage version of
this agreement shall apply to Software acquired in
the EU. This Agreem ent is the entire agree m ent
between us, and you agree that Creative will not
have any liability for any untrue statement or
representation made by it, its agents or anyone else
(whether inno cently or negli gently ) upon whic h you
relied upon entering this Agreement, unless such
untrue statement or represent ation was made
fraudule ntly.
Safety Inf orm a tion
The following sections contain notices
for various countries:
CAUTION: This device is intended to be installed
by the user in a CSA/TUV/UL cert ified/li s ted IBM
AT or compatible pers ona l com pute rs in the
manufacturer’s defined operato r access area. Check
the equipment ope ra tin g/ in sta llatio n manua l and/ or
with the equipment manufacturer to verify/confirm
if your equi pment is suitabl e f or user-installed
applicat ion cards.
Modifications
Any chang e s or modifications not expressly
approv ed by the gra ntee of th is de vice c ould vo id the
user’s authority to operate the device.
Compliance
This product conf orms to th e following Counc il
Directive:
Directive 89/336/EEC, 92/31/EEC (EMC)
❑
Page 7

Contents
Introduction ................................................................................................................. 1
Preliminary step for Windows 95 users.......................................................................3
Step 1: Installing Your Graphics Card......................................................................... 4
Step 2: Installing Software .......................................................................................... 6
Step 3: Changing the Display Settings......................................................................11
Step 4 : Changing p er f o rm a nc e s et t in g s....... .. .......... .......... ................. .......... ......... ....12
About E-Color Colorific/3Deep................................................................................ 12
Getting More Information .........................................................................................14
Technical Specifications ............................................................................................16
Troubleshooting.........................................................................................................21
Technical Support.................................. .................... ............................... .................27
Introduction
The 3D Blaster™ GeForce2 GTS™ is a quality 2D /3D video accelerator that uses NVIDIA™’s
latest GeForce 2GTS
archit ecture combines 2
Nvidia Shad ing Ras teri ze r (NSR) that ena bles per -pi xe l sh ading, e spec ially dual-t e xtu ring (tw o
textures per-pixel at full speed).
NVIDIA’ s GeForce 2 GTS graphi cs control ler del iv e rs stunnin g visua l quali ty a nd performanc e
with its 256-bit graphics engine. W ith GeForce2 GTS, developers can creat e special effec ts
such as multi-texture, bump mappi ng to s im ulate rough surfaces , an d environmental mapping
that gives objects reflect ive propert ies. Developers ca n take advantage of high quality texture
filtering modes (including 8-tap anisotropic f iltering) with hardware anti-aliasi ng to create
realistic images that rival more expensive graphics works tations.
The 3D Blaster GeForce2 GTS provides outstanding 2D and video acceleration as well. It
supports motion co mpensation for MPEG-2 decoding . It guarantees a high level of 2D
performance, while programmable gamma table s optimize image qualit y for both text- and
image-based ap plications.
™
chipset. GeForce 2GTS is the ultimate 3D processor. Its innovative
nd
Generation Tr ansform and Lighting (T&L) tec hnology with the
Page 8
Serial and Model Numbers
Your card’s serial an d model numbers can be found at the back of the card . We recommend
that you record the serial and model number below. This information will be useful in the
event that you need to contact our Technical Support staff for troubleshooting or your dealer
for warranty service.
Table 1: Serial numbers and model numbers.
Hardware Product Codes Numbers
3D Blast er GeF o rc e2 GT S
Serial Number
Model Number
Before You Begin
Minimum System Requirements
Updating Drivers
2 3D Blaster GeF orce2 GTS Installation Guide
The README file on the CD-ROM contains information no t available at the time of printing.
Read the file before you continue.
❑ IBM
❑ Pen tium
❑ 64 MB RAM
❑ 50 MB available hard disk space (for full installation)
❑ An AGP 2.0 compliant slot or better
❑ CD-ROM drive installed
❑ Windows 95, Windows 98, Wi ndows NT 4.0 (with Service Pa ck 5),
❑ Standard VGA monitor or multi-frequency VGA monitor
T o do wnload the latest dri v ers for 3D Blaster GeForc e2 GTS, visit Creative’ s Web site (refer to
the
®
PC 100% compatible
®
II, Pentium III, AMD-K6® class processors or compatible
or Windo ws 2000
Technical Support
leaflet for details).
Page 9

Preliminary step for Windows 95 users
Check the ap propr iate box so th at
you can refer to the Windows’
version number quickly during
the softw ar e in stallati o n process .
Since Windows automa tically detects new hard ware and starts the software installation
procedure upon startu p, you should verify your W indows version num ber before installing the
graphics card.
To verify your Windows 95 version number
1. Click Start -> Settings -> Control Panel.
2. In the Control Panel window, double-click the System icon.
Your Windows 95 versi on number is displayed in the General tabbed page of the System
Properties dialog box.
3. Note the version number.
The following are the possible Windows 95 version numbers:
❑ 4.00.950 (Retail versio n)
❑ 4.00.950A (Retail version)
❑ 4.00.950B (OSR version 2 and 2.1)
❑ 4.00.950C (OSR version 2.5)
3D Blaster GeForce2 GTS Installation Guide 3
Page 10
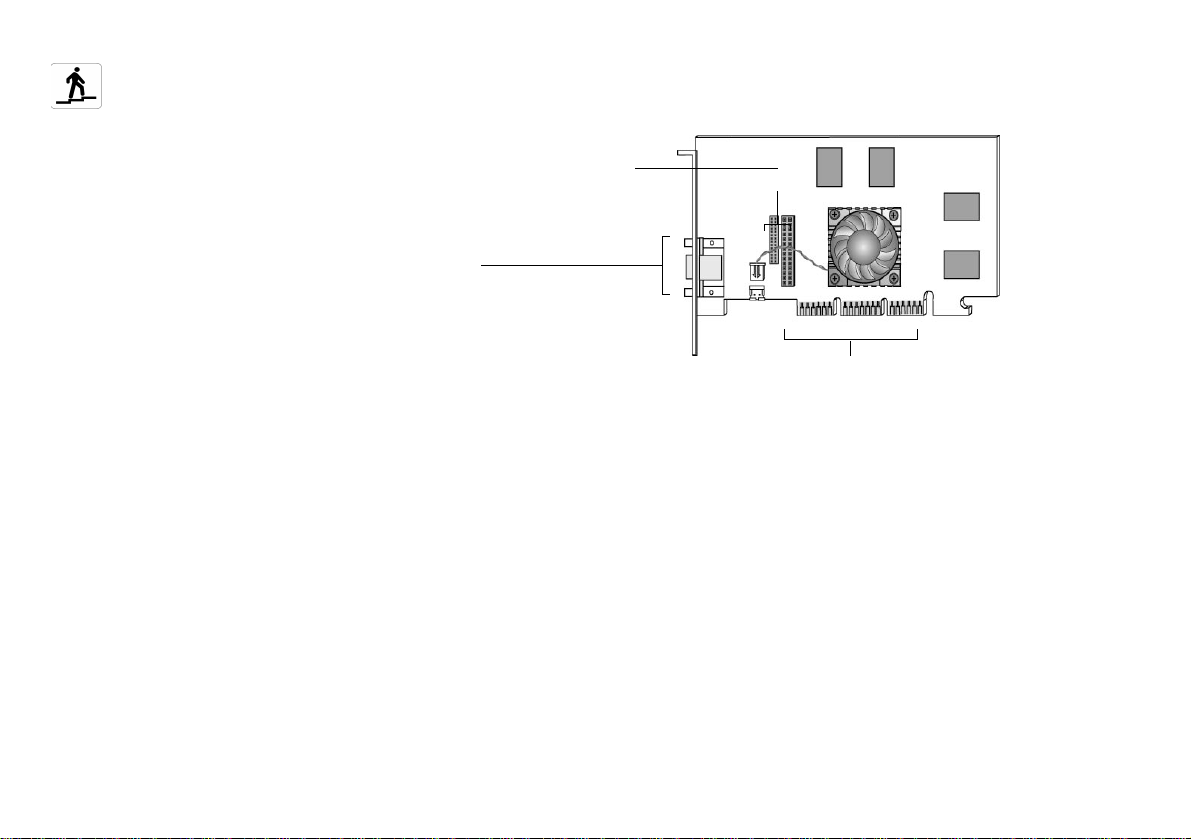
Step 1: Installing Your Graphics Card
This section shows you the connectors on the 3D Blaster GeForce2 GTS card.
Video Expansion connectors
Connect to a video expansion daughterboard.
VGA Out connector
Connects to your monitor via a monitor cable.
Figure 1: The 3D Blaster GeForce2 GTS card.
AGP bus connector
To install the graphics card
1. Switch off your computer and all peripheral devices.
2. Touch an y met allic surface on your comput er to discharge any s tatic electricit y.
3. Disconnect the power cord from the wall outlet.
4. Remove the computer cover.
4 3D Blaster GeF orce2 GTS Installation Guide
Note:
If you are replacing an existing V G A card with a 3D Blaster GeForce2 GTS, please
remember to remove the existing VGA card.
Page 11
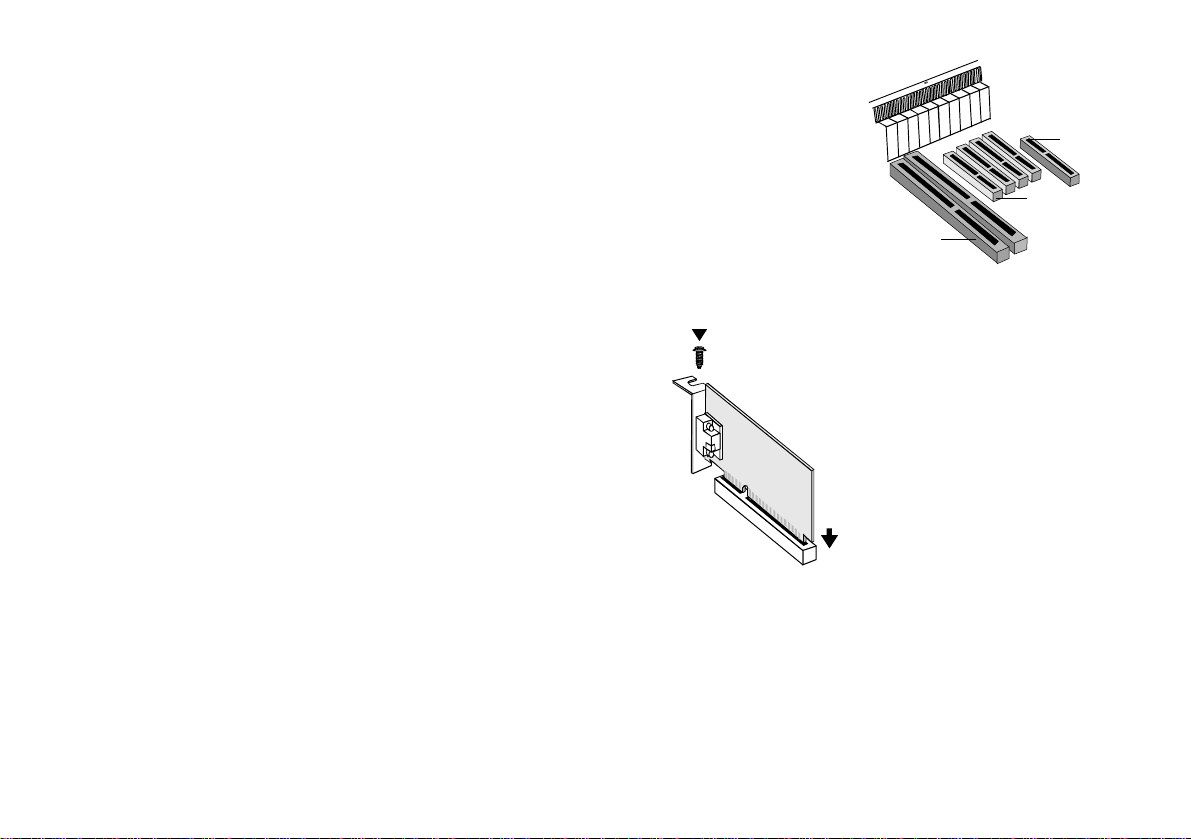
5. Locate a free AGP expansion slot.
Figure 2: Types of expa ns ion slots.
An AGP slot
A PCI slot
An ISA slot
Figure 2 shows the various types of expansion slots.
6. Remove the metal plate from the free AGP slot.
Keep the screw and metal plat e for future use.
7. Align the bus conn ector of th e graphi cs car d wit h th e
expansion slot.
8. Press the card’ s bu s conne ctor f ir mly and ev en ly i nto
the slot, making sure tha t the bus connecto r com es
into full contact with the slot. Then, secure the card
to the compu ter casin g with a screw. See Figur e 3
below.
ii.Secure the card to the slot
with a screw.
Figure 3: Securing t he graphics card to the slot.
i. Press the card into the slot. Ensure that
the bus connector has been pressed in as
far as it will go and is sitting firmly inside
the expansion slot.
Warning: However do not force the
graphics card into place. If it does not fit
properly, remove it and try again.
3D Blaster GeForce2 GTS Installation Guide 5
Page 12
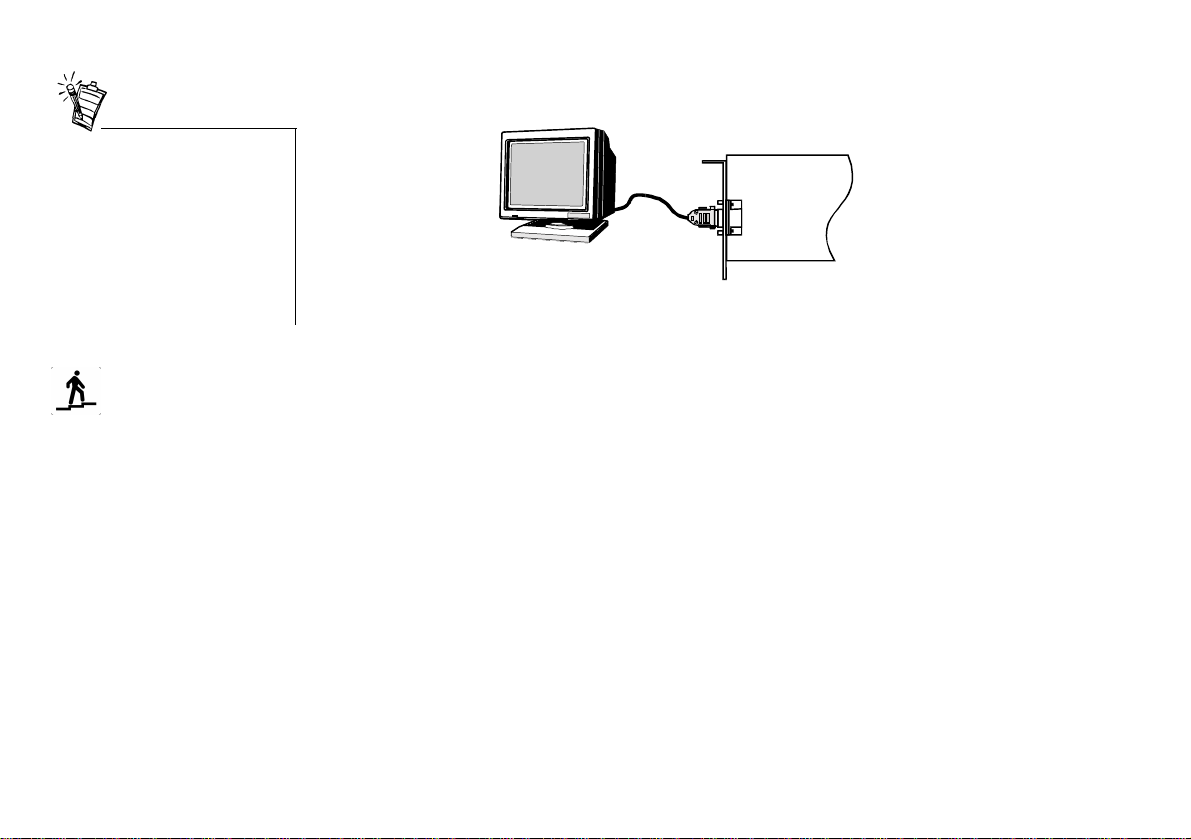
9. Connect the monitor cable to the VGA Out conn ector of the graphics card, as shown in
Figure 4.
If you are using a multifrequenc y monit or , you may ne ed
a special 15-pin DIN VGA c able.
If your mul ti-freque ncy monitor
allow s you to switch between
‘TTL’ and ‘analog’ operation
modes, set the switch to ‘analog’.
For details, re fer to your
monitor’s manual.
Step 2: Installing Software
VGA Monitor
cable
VGA Out
connector
VGA monitor
Figure 4: Connecting your VGA monitor to the graphics card.
3D Blaster GeForce2 GTS
10.Replace the computer cover and plug the power cord back into the wall outlet.
After installing the graphics ca rd, you can install the software. The 3D Blaster GeF orce2 GTS
CD contains the following:
❑ Drivers for Windo ws 95 and Windows 98 (common to both)
❑ Drivers for Windo ws NT 4.0 and Windows 2000
™
❑ Creative Enhanced BlasterControl
for Windo ws 95 and Windows 98, Windows NT 4.0 and
Window s 20 00
❑ E-Color Colorific
❑ Creative Lava!
®
/3Deep™ for Windo ws 95 and Windows 98
™
Player for Windows 95 and Windows 98
❑ Game Launcher
This section is organized as follows:
❑ To instal l in Win d ows 95 (R et ai l version )
❑ To install in Windows 95 (OSR version 2.0 and later)
❑ To instal l in Win d ows 98
6 3D Blaster GeF orce2 GTS Installation Guide
Page 13

❑ To install in Windows NT 4.0 (Service Pack 5)
Figure 5: Selectin g the
Driver from disk provided by
hardware manufacturer
option.
❑ To instal l in Win d ows 20 00
To install in Windows 95 (Retail version)
1. Switch on your system.
Windows 95 automatically detects the
graphics card.
A New Hardware Found message box
appears, informing you that a display
adapter has been detected.
2. When a dialog box similar to Figure 5
appears, ensure that the Driver fro m disk
provided by hardware manufacturer
option is selected.
3. Click the OK button.
4. Insert the 3D Blaster GeForce2 GTS CD
into your CD-ROM drive.
5. In the Inst all From Disk dialog box, type D:\GRAPHICS\ENGLISH\WIN9XDRV
(where D: represents your
CD-ROM drive) and click the OK button.
6. If prompted to select drivers, click the Creative GB0010 drivers.
The drivers are copied to your system.
7. When prompted to restart your system, cli ck the Yes button.
8. After the system has restarte d, proceed to install the applications. Click Start -> Run.
9. In the Run dialog box, type D:\GRAPHICS\ENGLISH\SETUP and click the OK butto n.
10.Follo w the instructions on the screen to complete the setup.
If you do not install al l the applications now, you can install them later.
3D Blaster GeForce2 GTS Installation Guide 7
Page 14

To install in Windows 95 (OSR version 2.0 and later)
1. Switch on your system.
Windows 95 automatically detects the graphics card.
A New Hardware Found message box appears, informing you that a display adapter has
been detected.
2. When a dialog box similar to Figure 6
appear s, click the Nex t button.
3. Click the Other Locat ions button wh en it
appe ar s in the Update Device Driver
Wizard dialog box.
4. Insert the 3D Blaster GeForce2 GTS CD
into yo u r C D - ROM dr ive.
5. In the Select Other Location dialog box,
type
D:\GRAP H I CS\ENGLISH\WIN9 XDRV
(where D: represents your CD-ROM drive)
and click the OK button.
6. In the Update Device Driver Wizard
dialog box, click the Finish button.
7. In the Inse rt Disk message box, click the OK button.
8. In the Copying Files dialog box, type D:\GRAPHICS\ENGLISH\WIN9XDR V a nd click
the OK butt o n.
The drivers are copied to your system.
9. In the Update Device Driver Wizard dialog box, click the OK button.
10.When prompted to restart your system, click the Yes button.
11.After the system has restarted, proceed to inst all the applications . Click Start -> Run.
12.In the Run dialog box, type D:\GRAPHICS\ENGLISH\SETUP and click the OK button.
13.Follow the instructions on the screen to complete the setup.
If you do not install al l the applications now, you can install them later.
Figure 6: Th e Update Device Driver Wizard dialog box.
8 3D Blaster GeF orce2 GTS Installation Guide
Page 15

To install in
Figure 7: Selecting the option
Display a list of all the
drivers in a specific location, so you can
select the driver you want
.
Windows 98
1. Switch on your system.
Windows 98 automatically detects the graphics card.
An Add New Hardware Wizard message box appe ars, informing you tha t a display adapte r
has been detected.
2. When a dialog box similar to Figure 7
appears, select the option Display a list of
all the drivers in a specific location, so
you can select the driver you want.
3. Click the Next butto n.
4. Insert the 3D Blaster GeForce2 GTS CD
into your CD-ROM drive.
5. In the Models lis t b ox, cli ck th e Have Disk
button.
6. In the Insta ll From Disk dialog box, type
D:\GRAPHICS\ENGLISH\WIN9XDRV
(where D: represents your
CD-ROM drive) and click the OK button.
If you are installing 3D Blas ter GeForce2
GTS as a second or subsequent card to
make use of Wind ows 98’ s multi-monitor capa bility, you will see an Update Driver
Warning message telling yo u tha t the dri ve r you ha ve sele cted may not wo rk co rrectl y. Y ou
click th e Yes button to conf irm t hat you wa nt t o use t he sele ct ed dri v e r . Othe rwise , the
must
system will ins tall t he wrong d riv er and wil l not rec ognize the card as a 3D Blaster GeForce2
GTS card (for details, see “Windows 98 Multi-Monitor Displa y Problems” on page 21).
7. In the Models list box of the Select Device dialog box, make sure the Creative GB0010
entry is selected and click t h e OK button.
8. Click the Next butto n.
3D Blaster GeForce2 GTS Installation Guide 9
Page 16

9. Click the Finish button.
The drivers are copied to your system.
10.When prompted to restart your s ystem, click the Yes button.
11.After the system has restarted, proceed to inst all the applications . Click Start -> Run.
12.In the Run dialog box, type D:\GRAPHICS\ENGLISH\SETUP and click the OK button.
13.Follow the instructions on the screen to complete the setup.
If you do not install al l the applications now, you can install them later.
To install in Windows NT 4.0 (Service Pack 5)
To install in Windows 2000
10 3D Blaster GeForce2 GTS Installation Guide
1. Switch on your system.
2. Click Start -> Run.
3. In the Run dialog box, type D:\GRAPHICS\ENGLISH\SETUP and click the OK button.
4. Follow the instructions on the sc r een to complete the setup.
5. If the Invalid Display Settings message box appears after your system has restarted, click
1. Switch on your system.
2. Click Start -> Run.
3. In the Run dialog box, type D:\GRAPHICS\ENGLISH\SETUP and click the OK button.
4. Follow the instructions on the sc r een to complete the setup.
5. If the Invalid Display Settings message box appears after your system has restarted, click
If you do not install al l the applications now, you can install them later.
the OK button and change the display settings.
For details , see “Right-click your desktop, and then cli ck Properties on the shor tcut menu.”
on page 11.
If you do not install al l the applications now, you can install them later.
the OK button and change the display settings.
For details , see “Right-click your desktop, and then cli ck Properties on the shor tcut menu.”
below.
Page 17

Step 3: Changing the Display Settings
To do so in Windows 98 and Wi n dows 95 and Windows 2000:
1. Right-click your desktop, and then click Properties on the shortcut menu .
2. In the Display Properties dialog box, click the Settings tab.
3. In the Screen Area group box, move the slider to set the desired resolution.
4. In the Colors group box, select the desired color. Certain colors may not be avail able for
some display reso lut ions.
5. Cick the Apply button.
6. If you change the colors sett ing, you m ay see a ‘Compa tabil ity W a rni ng’. Sele ct Apply the
new color settings without re starting and click OK.
7. If you change the Screen Area a message will be displayed statin g Wi ndows wi ll resize your
desktop. Click OK.
8. If your screen becomes corrupt, wait 15 seconds and Windows will restore your original
settings.
For Windows NT 4.0:
1. Right-click your desktop, and then click Properties on the shortcut menu .
2. In the Display Properties dialog box, click the Settings tab.
3. In the Desktop Area group box, move the slider to set the desired resolution.
4. In the Color Palette gro up box, select the desired color . Certain colo rs may not be av ailable
for some display resolutions.
5. In the Refresh Frequency group box, select the desired refresh rate.
6. To test the se tt ings, cli c k th e Test button, and then click the OK button.
When the Testing Mo de dialog box re-appears:
• If the test bi tmap is properly displayed, click the Yes button.
• If not, click the No button. A warning message will be displayed. Click the OK button
and repeat steps 3 through 6, changing one or more of the settings .
7. Click the OK button to cl ose the Display Prop er ties dialog box.
3D Blaster GeF orce2 GTS Installation Guide 11
Page 18

Step 4: Changing performance settings
1. Click Start -> Programs -> Creative -> BlasterControl Display Cente r.
2. Click the Tweak bu tt o n to s ta r t Blaste r C ontrol Tweak Ce n t er.
3. Select the desired settings and click the OK button.
• If your monitor has a color
temperature contro l, adjust it
to 6500 K to get the best
results.
• When printing to an inkjet
printer, it is best to us e special
coated paper.
About E-Color Colorific/3Deep
About Colorific
12 3D Blaster GeForce2 GTS Installation Guide
Colorific® color management software is the industry-standa rd process for monitor-tomonitor and monitor-to-printer color management. It gives you accurate, predictable co lormatching betwe en your screen and printer o r over t he Internet b y calibrating the colors on your
monitor . The soft ware leads you thro ugh a seri es of simple choices about wha t you see on your
screen. From this inform ation, Colorif ic builds a precis e de sc ription of how your monitor
displays color, taking into account variable viewing conditions, monitor control settings, and
video card adjustments.
Page 19

Running Colorific
You can customize t he se tti ngs of
your graphics card for optimal
performance with applications.
Howev er, if your monitor d is pla y
exhibits pixel drop (that is,
pixels , usually white in color,
appear on th e screen) or any
About 3Deep
other abnormal behavior, revert
to the fa ctory def aul t sett ings (se e
“Troublesh ooting” on page 21).
You should calibrate with Colori fic before doing critical color w ork and whenever you change
monitor color sett ings.
To run Colorific in Windows 95/98
1. Click the Colorific Control Panel icon in the taskbar.
The Display Properties dialog box appears.
2. Click the Colorific tab.
™
3. Click the Run Color Wizard
button.
The Colorifi c C o lor Wizard is opened.
4. Follow the ins truction s on the screen to complete the process.
3Deep™ is an excitin g n ew to o l th a t al low s ga mers to expe rience 3D ga mes as the ga me
developers intended. Only 3De ep can provide accurate 3D lighting and shading for 3D games
because it adjusts the user’s monitor to match the game developer’s monitor — not too dark
and not washed out.
3Deep uses the Color Wizard to measure the unique char acteristics of each gamer’s display.
No more dark games, and no more washed out games when you inc r ease the contrast of your
monitor. The results are awes ome 3D lighting and shading ef fects. 3Deep is a consist ent and
high-quality solution for improving the 3D effect of your games!
Using 3Deep
To use 3Deep to calibrate your monitor’s gamma value
1. Click Start -> Settings -> Control Panel.
2. In the Control Panel window, double-click the 3Deep icon.
3. On the 3Deep Control Panel, move the Tweak slider or click the Calibrate Disp lay b u tto n.
4. Before playing a game, click Default System Gamma.
3D Blaster GeF orce2 GTS Installation Guide 13
Page 20

You can also displ ay the 3Deep Control Panel by doing the following:
1. Right-click your desktop, and then click Properties on the shortcut menu.
2. In the Display Properties dialog box, click the 3Deep tab.
To uninstall Colorific and 3Deep in Windows 95 and Windows 98
Getting More Information
For 3D Blaster GeForce2 GTS
For Creative B la st er Co nt rol
1. Right-click the Colorific Control Panel icon in the taskbar.
2. On the menu that appears, click Exit.
3. Click Start -> Settings -> Control Panel.
4. In the Control Panel window, double-click the Add/Remove Programs icon.
The Add/ Remove Programs Properties dialog box appears with the Install/Uninstall
tabbed page displayed.
5. Select the ent r y Colorific For Windows from the list, and then click the Add/Remove
button.
6. After Colorific For Windows is rem oved, select the entry 3Deep from the list, and then
click the Add/Remove button.
The Help file for 3D Blaste r GeForce 2 GTS giv es a brief i ntroduct ion to the features suppor ted
by this graphics card.
To open the Help file for 3D Blaster GeForce2 GTS
The Help file for Creative BlasterControl shows you how to use the BlasterControl utility to
customize your screen resolution, color depth, and refr es h rate in Windows .
To open the Help file for BlasterControl
14 3D Blaster GeForce2 GTS Installation Guide
Page 21

Click Start -> Programs -> Creative -> BlasterContro l Help .
For Help topics specific to a BlasterControl module
In the BlasterControl module you w ant, click the Help button.
For LAVA! Player
For Colorific and 3Deep
Technical Support for
Colorific and 3Deep
The Help file for LAVA! Player shows you how to use the multimedia player.
To open the Help File for LAVA! Player
Click Start -> Programs -> Creative -> Creative LAVA! -> LAVA! Help.
The Help file for Colorific contains the User’s Manual.
To open the Help file for Colorif i c
1. Click Start -> Programs -> Colorific.
The Colorific calibration utility is opened.
2. On the right-hand corner of the menu bar, click Help.
3. On the Help menu, click Help Contents.
To open the Help file for 3Deep
1. Click Start -> Settings -> Control Panel.
2. In the Control Panel window, double-click the 3Deep icon.
3. On the 3Deep Control Panel, click the Help button.
Updated information about using Colorific and 3Deep can be obtained fr om E-Color’s Web
site at www.e-color.com/tech_support.
3D Blaster GeF orce2 GTS Installation Guide 15
Page 22

Technical Specifications
Architecture Highlights
3D Features
❑ Nvidia Shading Rasteriz er (NSR)
nd
-Generation Transform and Lighting (T&L) engine
❑ 2
❑ Double Data Rate (DDR) memory
❑ DirectX Texture Compression
❑ Fu l l S c re en A nt i - al ia s ing (H a r d wa r e)
• Multi-sample, full scene, order independent
❑ 1.6 Gtexel fill rate
❑ 25M triangles/sec through T&L and setup
❑ 5.3 GB/sec total memory bandwidth
❑ NVIDIA Unified Driver Architecture™
❑ Optimized DirectX and OpenGL acceleration
❑ 256-bit graphics engine
❑ 8 texture-mapped, filtered, lit tex els per clock cycle
❑ Single pass multi-texturi ng
❑ 32-bit colors Z/Stencil (floating point or integer)
❑ High quality texture fi ltering, including anisotropic
❑ Advanced per-pixel, perspective-correct texturing
• Cube environment mapping
• Projectiv e textures
• Procedura l textures
• Multi- texture and multi-pas s
• Texture modulation
16 3D Blaster GeForce2 GTS Installation Guide
Page 23

• Per-pixel dot product 3 bump mapping
• Per-pixel lighting and shading
• Light maps
• Reflection maps
• Bi-directional Reflectance Distribution Functions (BRDF) support
• DirectX 6 text u r e co m p r ession
❑ Fog and depth cueing
• Radial or linear
• Per-vertex or per-pixel
2D Features ❑ High performance 2D/GUI/DirectDraw acceleration
❑ Fast 32, 24, 16, 15 and 8-bit VGA/SVGA suppo rt
❑ True-color hardware cursor
❑ Multi-buffering (Double, Triple, Quad buffering) for smooth animation and video playback
Video Support ❑ Video acceleration for DirectShow, MPEG-1, MPEG-2 and Indeo
❑ X and Y smooth up and down scaling with filtering
❑ P e r- pixel co lor key i ng
❑ Multiple vide o windo ws with ha rdware color s pace con ve rsion and filte ring (YUV 4:2 :2 and
4:2:0) and 5-tap horizontal by 3-tap vertical filtering
❑ DVD sub-picture alpha blended compositing
Specifications ❑ AGP 1X, 2X and 4X support, including Fast Writes and Execute Mode*
❑ VESA DDC 2B + DPMS
❑ Single slot 2D, 3D graphics, and video accelerator
❑ 256-bit graphics engine
❑ Integrated 350 MHz RAMDAC supporting up to a 2048x1536 resolution at 75Hz
3D Blaster GeF orce2 GTS Installation Guide 17
Page 24

❑ Memory configurations of up to 128 MB of SDR or DDR SDRAM/SGRAM
❑ MPEG-1, MPEG-2, and full-motion video
❑ Motion Compensation for MPEG-2 decoding
❑ Ful l Plug and Play compliant
On supported motherboards
*
Drivers ❑ Windows NT 4.0 and Windows 2000 display drivers
❑ Windows 95 and Wi ndows 98 displ ay driv er supporti ng DirectDra w , Direct3D, Dire ctV ideo
and A ctiveX
❑ OpenGL ICD for Windows 95 and Windows 98, Windows NT 4.0, Windows 2000 and
Linux
❑ Fully PC00, PC99, PC99a and VBE 3.0 compliant
Utilities ❑ Creative Enhanced BlasterControl™
❑ E-Color Colorific/3Deep
❑ Creative Lava!™ Player
Applications Supported ❑ All Windows 95 applications, including DirectDraw and Direct3D games and applications
❑ OpenGL applications under Windows 95 and Windows 98
18 3D Blaster GeForce2 GTS Installation Guide
Page 25

Table 2: Refresh rates supported by di ff erent video modes (based on 350 MHz RAMDAC).
The refresh rates shown in the
table are the highest obtainable
and are monitor-dependent.
Resolutions, pixe l depths, and
refre sh rates are also driverdependen t and may not be
availabl e fo r so m e app l ications
or operating system s.
Refresh
Rates
Number of Colors
Resolution 256 (8-bit) 64k (16-bit) 16.7 million (32-bit)
640x480
800x600
1024x768
1152x864
1280x720
1280x960
1280x1024
1600x960
1600x1200
60, 70, 72, 7 5, 85, 100,
120, 140, 144, 150,
170, 200, 240
60, 70, 72, 7 5, 85, 100,
120, 140, 144, 170,
200, 240
60, 70, 72, 7 5, 85, 100,
120, 140, 144, 150,
170, 200, 240
60, 70, 72, 7 5, 85, 100,
120, 140, 144, 150,
170, 200
60, 70, 72, 7 5, 85, 100,
120, 140, 144, 150, 170
60, 70, 72, 7 5, 85, 100,
120, 140, 144, 150, 170
60, 70, 72, 7 5, 85, 100,
120, 140, 144, 150, 170
60, 70, 72, 7 5, 85, 100,
120, 140, 144, 150
60, 70, 72, 7 5, 85, 100,
120
60, 70, 72, 7 5, 85, 100,
120, 140, 144, 150,
170, 200, 240
60, 70, 72, 7 5, 85, 100,
120, 140, 144, 170,
200, 240
60, 70, 72, 7 5, 85, 100,
120, 140, 144, 150,
170, 200
60, 70, 72, 7 5, 85, 100,
120, 140, 144, 150, 170
60, 70, 72, 7 5, 85, 100,
120, 140, 144, 150, 170
60, 70, 72, 7 5, 85, 100,
120, 140, 144, 150, 170
60, 70, 72, 7 5, 85, 100,
120, 140, 144, 150, 170
60, 70, 72, 7 5, 85, 100,
120, 140, 144, 150
60, 70, 72, 7 5, 85, 100,
120
60, 70, 72, 7 5, 85, 100,
120, 140, 144, 150,
170, 200, 240
60, 70, 72, 7 5, 85, 100,
120, 140, 144, 150,
170, 200, 240
60, 70, 72, 7 5, 85, 100,
120, 140, 144, 150,
170, 200
60, 70, 72, 7 5, 85, 100,
120, 140, 150, 170
60, 70, 72, 7 5, 85, 100,
120, 140, 150
60, 70, 72, 7 5, 85, 100,
120, 140, 150
60, 70, 72, 7 5, 85, 100,
120, 140, 150
60, 70, 72, 7 5, 85, 100,
120
60, 70, 72, 75, 85, 100
3D Blaster GeF orce2 GTS Installation Guide 19
Page 26

Table 2: Refresh rates supported by di ff erent video modes (based on 350 MHz RAMDAC).
Refresh
Rates
Number of Colors
Resolution 256 (8-bit) 64k (16-bit) 16.7 million (32-bit)
1920x1080 60, 70, 72, 75, 85, 100 60, 70, 72, 75, 85, 100 60, 70, 72, 75, 85
1920x1200 60, 70, 72, 75, 85, 100 60, 70, 72, 75, 85 60, 70, 72, 75, 85
1920x1440 60, 70, 72, 75, 85 60, 70, 72, 75 60, 70, 75
2048x1536 60, 70, 72, 75 60, 70, 72, 75 60
20 3D Blaster GeForce2 GTS Installation Guide
Page 27

Troubleshooting
System Hangs, Blank Screen
or Corrupted Display
Windows 98 Multi-Monitor
Display Problems
After installing 3D Blaster GeForce2 GTS and starting your system, the monitor
displays a blank screen.
Solutions Try the fo llowing:
❑ Switch off your system and wait a while before switching it on again.
❑ Verify that any built- in VGA on your motherboard is disabled and that you
have removed any other video display card from your system.
❑ Ensure that your 3D Blaster GeForce2 GTS card’s bus connector is fully
inserted into the expansion slot. Ensure this by pressing it gently a nd evenly
into th e sl o t.
❑ Verify that the pins of your monitor’s VGA Input connector are not bent and
that the connector is properly connected to th e VGA Out con nector of 3D
Blaster GeForce2 GTS.
In a multi-monitor setting, the monitor connected to the 3D Blaster GeForce2 GTS card
remains blank even though the card and its drivers have been installed.
Cause If 3D Blaster GeForce2 GTS’s drivers are not specified during the software
installation, the system installs it as a standard VGA card that does
Windows 98’s multi-monitor feature.
Solution Update the device drivers to 3D Blaste r GeForce2 GTS’s drivers:
1. Right-clic k your desktop, and then click Properties on the shortcut me nu.
2. In the Display Properties dialog box, click the Settings tab.
3. On the Settings tabbed page, click the Advanced Properties button.
4. In the Advanced Displa y Pr op erties dialog box, click the Change butto n.
5. In the Select Device dialog box, click the Have Disk button.
6. Insert the 3D Blaster GeForce2 GTS CD into your CD-ROM dri ve.
3D Blaster GeF orce2 GTS Installation Guide 21
support
not
Page 28

7. Follow steps 6 through 13 of the proc edure in “To install in Windows 98” on
page 9 to complete the update.
Other Display Problems
For the resolutions supported by
your mo nitor, refer to its manua l.
Monitor display flickers or the screen goes blank after Windows starts.
Cause Your monitor may not support the resolution or refresh rate that you have set.
Solution Use display setting s supported by the monitor.
To change the displ ay s ettings:
1. Restart your system in Windows 98 Safe mode. To do so:
i. Restart your system and when the message “Starting Windows 98...”
appears, press <F8> .
A list of options su ch as Safe Mode and Command Prompt Only Mode
appears.
ii. Select Safe Mode and press <Enter>.
2. After your system has resta r ted, right-click the desktop and click Properties.
3. In the Display Properties dia log box, click the Settings tab.
4. Try the following:
❑ Make sure that the correct monito r i s selected.
To verify, click the Change Display Type butt on o r th e Advanced
Propertie s button on the Settings tabbed page.
❑ Use a lower refresh rate or the adapter’s default.
For details on this, refer to the topic “Using Blast erControl Display
Cente r ” in th e Bl asterCo n trol Help file.
❑ Lower your monitor’s res olution.
To do so, adjust the co lor depth and desktop area on the Settings tabbed
page.
22 3D Blaster GeForce2 GTS Installation Guide
Page 29

Monitor display exhibits pixel drop (that is, pixels, usually white in color, appear on the
screen) or other abnormal behavior.
Cause The settings that you have select ed for your graphics card may be incompat ible
with one or more games or applications that you are running.
Solution Use the factory default settings:
1. Click Start -> Programs -> Creative -> BlasterControl Display Center.
2. Click the Tweak button to start Blaste rControl Tweak Center.
3. Click the Defaul ts button.
Beeping Sounds During
System Startup
Problems Installing Software
When the system is starting up, there is a series of prolonged beeps.
Cause Your 3D Blaster GeForce2 GTS card may not be firmly inserted into the
expansion slot.
Solution Ensure that the bus connector of the graphics card is fully inserted into the
expansion slot. Ensure this by pressing the ca rd gently and evenly into the slot.
You can also try removing the card and re-inserting it.
In Windows 95 or Windows 98, the installation program for BlasterControl does not run
automatically after you have inserted the installation CD into your drive.
Cause The AutoPlay feature in your Windows 95 or Windows 98 s ystem is not e nabled.
Solution To install the software from the CD:
1. Double-click the My Computer icon on your Windows desktop.
2. In the My Computer window, double-click the Creativ e 3D Blaste r
GeForce2 GTS icon.
If the installation program does not run, double-click the Windows folder
icon followed by the Setup icon.
3. Follow the instructions on the screen to complete the installation.
3D Blaster GeF orce2 GTS Installation Guide 23
Page 30

Problems Using Software
When you restart Windows, one of the following error messages appears:
❑ “BlasterControl will only work on Creative graphics product drivers.
Do you want Blaster Control to be loaded the next time you start Windows?”
❑ “BlasterControl will only work on Creative graphics product drivers.”
Cause 3D Blaster GeForce2 GTS drive rs, required by BlasterC ontrol, may have been
replaced by other dri vers when you installed DirectX application s.
Solution Re-install or revert to the 3D Blaster GeForce2 GTS drivers.
To revert to the drivers:
1. Right-click your desktop, and then click Properties on the shortcut menu.
2. In the Display Properties dia log box, click the Settings tab, and then click
the Change Display Type button or the Advanced Prop er t ie s button.
3. In the Adapter Type group box or on the Adapter tabbed page, click the
Change button.
4. In the Select Device dialog box, click Creative GB0010, and then click the
OK butto n.
5. In the Insert Dis k message box, click the OK button without inserting any
CD.
6. If 3D Blaster GeForce2 GTS drive rs and la ter ver sions of Direc tX dri ver s are
already i nstalle d, clic k the Skip File bu tton un til t he Adapter T ype gro up box
or the Adapter tabbed page appears.
7. Click the two Close buttons to close the Display Properties dialog box.
8. When prompted to restart your system, click the Yes button.
After you have restarted your system, the newer DirectX drivers will work
with the la test 3D Blaster GeForce2 GTS drivers.
24 3D Blaster GeForce2 GTS Installation Guide
Page 31

Problem with OpenGL
Applications
When starting OpenGL Screen Saver or applic ations in Windows 98, the message “No
local buffer memory available” appears.
Solution Set a lower resolution and color depth:
1. Right-clic k your desktop, and then click Properties on the shortcut me nu.
2. In the Display Properties dialog box, click the Settings tab.
3. In the Desktop Area group box, mov e the slider to set a lower resolution.
4. In the Color Pal ette grou p box, s et to 64 0x480 a nd 1 6-bit co lor (h ig h col or)
for OpenGL applications to work properly.
OpenGL applications run uncharacteristically slowly in Windows 98.
Cause OpenGL applications do not support Wi ndows 98’ s multi-monitor fea ture.
Consequently, Windows 98 disables all hardware acceleration when the multimonitor option is enabled.
Solution Disable the multi-monitor option:
1. Right-clic k your desktop, and then click Properties on the shortcut me nu.
2. In the Display Properties dialog box, click the Settings tab.
3. Clear the Extend my Windows desktop onto this monitor check box.
Problem with PCI Bridge
(in Windows 95)
After inst alling 3D Blast er GeForce 2 GTS onto a Pentium II LX syst e m or any ot h er
AGP system, the Resources tabbed page of the 3D Blaster GeF orce2 GTS P roperties
dialog box in Windows 95 shows resource conflicts similar to the following:
Memory Range used FEDC0000 - FEDDFFFF used by PCI standard PCI-to-PCI
bridge.
Memory Range used FD800000 - FDFFFFFF used by PCI standard PCI-to-PCI bridge.
Memory Range used FE000000 - FE7FFFFF used by PCI standard PCI-to-PCI bridge.
Cause The “PCI standard PCI-to-PCI bridge” is the CPU chipset to AGP controlle r,
which Wind ows 95 cannot identify properly.
3D Blaster GeF orce2 GTS Installation Guide 25
Page 32

Solution No action required.
A conflict between the AGP video controlle r and the “PCI standard PCI-to-PC I
bridge” in the Windows 95 Device Manager does not affect the functionality of
the AGP ca rd within Windows 95. This problem is common to a ll AGP graphics
cards and does not affect 3D Blaster GeForce2 GTS’s functionality.
It has been resolved in W indows 98.
Problem with AGP
Aperture Size
DirectDraw/Direct3D fails to use hardware acceleration (HAL).
Cause Th e CM OS setting for th e AGP Ap er t ure size is less than 8 MB.
Solution Set the AGP Aperture size to 8 MB or more.
Changing settings in CMOS
incorr ectly can cause the system
to stop functioning.
Some of the steps from st ep 3
onwards may not apply to your
system’s CMOS. Refer to your
system’s CMOS documentat ion
for more details.
26 3D Blaster GeForce2 GTS Installation Guide
Do the following in CMOS:
1. Restart your system.
2. During the memory check, press <Delete> .
The CMOS setup menu appear s.
3. Select Chipset Features Setup and press <Enter>.
4. Set your AGP Aperture Size (MB) to 8 MB or more.
5. Press <Esc> to return to the CMOS setup menu.
6. Select Save & Exit Setup, and then press <Enter>.
7. Press <Y> and then press <Enter>.
Page 33

Technical Support
W e are committed to giving you the best produc t as well as the best t echnical support.
For fast and efficient Technical Support solutions, please use the Creative
Web Support services in the first instance. If your Creative product was
pre-installed in your computer , your primary source of technical support is
the Personal Compute r supp lie r who provided the system.
Before contacting “Eur opean
Help Line”, please ensure that
you have read the
‘Troubleshooting’ Appendix.
The Creative web site at
www.creative.com
access to the latest drivers and
troubleshooting ti ps.
gives you
The European support area on our web site at
updated and contains the following:
FAQ:
Access the latest information on Creative
products with advice on how to r esolve
commonly asked questions
Solve Your Own Problem:
Enter keywords to s earc h the comp re h en sive
library of product and technic a l information
Download Drivers:
Library:
Quick access to the latest Creative drivers
Find the documents for a wide range of
Creative products
www.creative.com
3D Blaster GeF orce2 GTS Installation Guide 27
is continuously
Page 34

Email Your Problem: Complete the technical support web form
and submit for a response
T elephone Support: Euro pean Telephone Support contact details.
See also European He lpline sec tion in manual
for contact details.
If You Have a Problem
Please retain a ll c ontents includi ng pa ckaging a nd pro of of purcha se unti l you are full y
satisfied with pr oduct.
If you have a prob lem installing or using your Creative product, please use the Creative
W eb Support and/or Telephone Support serv ices f or assistance. Note the follo wing
information for reference should you require technical assistance:
❑
The model and serial number of your Creative product
❑
Error information on the screen and how it came about
❑
Information on the adapter cards which may be causing a conflict
❑
Hardware configuration information such as the base I/O address,
IRQ line, DMA channels used
❑
Motherboard information: BIOS manufacturer/version an d chipset manufacturer
❑
Type and version of your operating system, e.g., DOS 6.0, Windows 3.1x,
Windows 95, Windows 98 or Windows NT
If, after using the Creative support services, you believe your Creative pr oduct to be
defectiv e, you should verify the purchase date and the take the appropriate action as
detailed below:
28 3D Blaster GeForce2 GTS Installation Guide
Page 35

Less than 30 days since date
of purchase
Should your store re ceipt indicate that the produc t is less th an 30 days old, you ha ve t he
option of returning the full product to the dealer/retaile r for a replacement or credit. The
30-day time period may not apply in all instances, so please check the seller’s
replacement/cred it terms.
More than 30 days since
date of purchase
Returning a product for repair
Contact European Technical Support to clarify the nature of the problem and to obta in
details of our re pair returns procedure. Crea tive Labs requir es that all re turns for repair /
replacement must first be issued with an authorisation number.
❑
Contact Technical Support to receive your authorisa tion number for
repair/replacement of product.
❑
T echnical Support will communicate how to return the product in question for
repair/replacement.
❑
You should only return the hard ware item in question and return it to the address
detailed by Technical Support. Please retain all software , accessories and the
original packaging.
❑
Please quote the authorisation number clearly on the outside of the packaging
in which you return the hardware item in question.
❑
Upon receipt of the fa ulty item, Creati v e Labs will process you r request and arrange
a return or replacement.
Creative ma y re p lace o r r epair th e product with new or re-conditioned parts, and the
faulty parts will become the property of Creative. The war ranty period for your
repaired/repla cement ite m is 90 days from the dat e of shipment f rom Crea ti ve , or what
is left on the original item’s warranty, whichever is longer.
T o avoid tariffs when shipping a product to Creative Labs from outside the E.U., you must
complete the relevant customs documentation before shipping the product (please allow
30 days).
3D Blaster GeF orce2 GTS Installation Guide 29
Page 36

Limited Warranty
Creative Labs (Ireland) Limited (“Creative”) warrants to you, the original purchaser
only , that the hardware product will be fr ee of defec ts in materials and workmanship
for a period of three years after the date of purcha se, or such othe r period as may be
expressly specified by Creative or required by applicable law (“Warranty Per iod”).
Creative’s enti re liab i lity and your remedy will be, at Creative’ s sole discr etion, the
repair or replacement (with the same or similar model) of any hardware or
accompanying item(s ) not meeting the “Limited W arranty” explained above that is
returned to Crea tive’s authorised distributor or dealer du ri ng the Warranty Per iod with
a copy of your receipt.
What this warranty does
not cover
T o the maximum extent permitted by applicable law, Creative disclaims all other
warranties and conditions, expressed or implied, incl uding the conditions of quality,
merchantability or f itness for a particular purpose with respe ct to the use of this
product. Creative also disclaims any obligation to support products for all oper ating
environments - for example, by ensuring interoperability with future versions of
software or ha rdwa re. In no event shall Creat ive or its licen sor s be liab le fo r any
This warranty gives you specific
legal rights. You may have other
rights which vary from country to
country. Certain limitations in this
warranty are not permitted by the
jurisdiction of some countries, so
some limitations here may not
apply to you.
indirect, inciden tal, sp ecial or c onseque ntial los s or for a ny lost p rof it s, sa vings or data
arising from or relating to the use of this produc t, even if Creative or its licensors have
been advised of the possibilit y of such loss.
Specifically, this warranty does not cover failures of the product which result from
accident, abuse, misuse, alterations (by persons other than Creative or its authorized
repair agents), moisture, corrosive environments, shipping, high voltage surges, or
abnormal working c onditions. Thi s warranty does not cover normal wear and tear. You
are specifically advised to take a backup copy of any software provided with the
Creative product for security purposes.
30 3D Blaster GeForce2 GTS Installation Guide
Page 37

Creative European Help Line
CREA TIVE LABS ( IRELAND) L TD. ,
T ec hnical Support Departm ent,
Ballycoolin Bus ine ss P a rk, Bla nchard sto w n,
Dublin 15 , I rel a nd.
Fax: +353 1 8 205 05 2
United Kingdom
Tel +44 1189 344 744
Germany
Tel +49 69-66982900
Ireland
Tel +353 1 820 7555
France
Tel +33 1 55 46 87 77
Spain
Tel +34 (91) 66 25 116
Italy
Tel +39 02 4828 0000
Austria
Tel +43 (01) 589 244 320
Belgium
Tel +32 (02) 7171 198
Denmark
Tel +45 3525 9498
Finland
Tel +358 (09) 2294 3101
Norway
Tel +47 2305 0401
Sweden
Tel +46 (08) 7519 147
Holland
Tel +31 (0) 205040616
Switzerland
Tel +41 (01) 2121 868
Portugal
Tel 800 8 53066
Czech Republic
Tel +353 1 8066964
Poland
Freephon e 00 800 353 1229
Hungary
Freephon e 06 800 1222
Russia
Tel +353 1 8066967
Operating Hours / Heures d’ouverture / Öffnungszeiten / Ore d’ufficio / Horario de oficina / Openingstijden / Horário de abe rtura
EUROPE
Mon-Fri : Business Hours Sat-Sun & Public Holidays : Closed
Lun. au vend. : Heures de bureau Sam., dim. et jours fériés : Fermé
Mo-Fr : Geschäftszeiten Sa, So & gesetzl. Feiertage : Geschlossen
Lunedì-venerdì : Orario d’ufficio Sabato, domenica e festivi : Chiuso
Lunes-Viernes : Horario de oficina Sábados, domingos y festivos : Cerrado
Maandag-Vrijdag : Kantooruren Zat.-Zon. & Nationale Feestdagen : Gesloten
Segunda a sexta-feira : Horário de expediente Sábado, domingo e feriados : Fechado
Internet T o r ec eiv e technical supp ort via the Internet , plea se e- mail: suppo rt@euro pe.cr eativ e.co m
Web Site www.creative.com
 Loading...