

Page 1

16-Bit Sound Card
User Guide
On-line Version
Page 2

16-bit Audio Card User’s Guide
Information in this document is subject to change without notice and does not represent
a
commitment on the part of Creative Technology Ltd. The software described in this
document is furnished under a license agreement and may be used or copied only in
accordance with the terms of the license agreement. It is against the law to copy the
software on any other medium except as specifically allowed in the license agreement.
The licensee may make one copy of the software for backup purposes. No Part of this
manual may be reproduced or transmitted in any form or by any means, electronic or
mechanical, including photocopying and recording, for any purpose without the written
permission of Creative Technology Ltd.
Copyright 1994 by Creative Technology Ltd. All rights reserved.
Printed in Singapore.
Version 1.0
September 1994
Sound Blaster and Sound Blaster 16 are trademarks of Creative Technology Ltd.
IBM and PS/2 are registered trademarks of International Business Machines
Corporation.
MS-DOS is a registered trademark and Windows is a trademark of Microsoft
Corporation.
All other products are trademarks or registered trademarks of their respective owners.
Page 3

iii
Introduction ............................................................................................................. vii
Document Conventions .......................................................................................... viii
Text Conventions ....................................................................................... viii
Key Combinations ....................................................................................... ix
Icons ............................................................................................................. ix
WW
WW
W
indows Applicationsindows Applications
indows Applicationsindows Applications
indows Applications
WW
WW
W
aveEditoraveEditor
aveEditoraveEditor
aveEditor
Starting WaveEditor ............................................................................................... 1-2
Understanding the WaveEditor Interface .............................................................. 1-2
Toolbar ....................................................................................................... 1-2
Edit Window .............................................................................................. 1- 4
Status Bar ................................................................................................... 1-4
Using the Mouse ..................................................................................................... 1- 5
Understanding WaveEditor Menus ........................................................................ 1-5
File Menu ................................................................................................... 1-5
Edit Menu................................................................................................... 1- 6
View Menu ................................................................................................. 1 -6
Special Menu ............................................................................................. 1-7
Options Menu ............................................................................................. 1-7
Window Menu ............................................................................................ 1-8
Help Menu.................................................................................................. 1-8
Context-Sensitive Menu ............................................................................ 1-8
Working With WaveEditor .................................................................................... 1-9
Specifying Wave Formats ......................................................................... 1-9
Opening Wave Files ................................................................................ 1-10
Recording Wave Files .............................................................................. 1-11
Saving Wave Files ................................................................................... 1-12
Mixing Data of Wave Files ..................................................................... 1-14
Adding Special Effects ............................................................................ 1-15
Reverse ........................................................................................ 1-15
Add Echo ..................................................................................... 1-16
Rap!.............................................................................................. 1-16
Insert Silence ............................................................................... 1-17
Force to Silence ........................................................................... 1-17
Fade In and Fade Out .................................................................. 1-18
Amplify Volume ......................................................................... 1-19
ContentsContents
ContentsContents
Contents
Page 4

iv
Customizing WaveEditor ..................................................................................... 1-19
Recording ................................................................................................. 1-19
Mixer ........................................................................................................ 1-20
Using WaveEditor Effectively ............................................................................. 1-20
Memory Requirements ............................................................................ 1-20
File Management ..................................................................................... 1-20
System Optimizing ...................................................................... 1-21
Number of Open Files ................................................................. 1-21
Use of DOS SHARE Utility........................................................ 1-21
Compressed Wave Files .......................................................................... 1-21
Opening Compressed Files ......................................................... 1-21
Editing Compressed Files ........................................................... 1-22
Using CD Sync ..................................................................................................... 1-22
Quitting WaveEditor ............................................................................................ 1-22
QuickCDQuickCD
QuickCDQuickCD
QuickCD
Setting Up QuickCD ............................................................................................... 2- 2
Starting QuickCD ................................................................................................... 2-4
The QuickCD Window ........................................................................................... 2-4
The Playlist Button .................................................................................... 2-5
Using the Keyboard and Mouse ............................................................................. 2- 6
Using the Control Menu ......................................................................................... 2 -7
Customizing QuickCD ........................................................................................... 2-8
Quitting QuickCD ................................................................................................... 2-8
WW
WW
W
ave’OLEave’OLE
ave’OLEave’OLE
ave’OLE
Starting Wave’OLE ................................................................................................ 3-2
The Wave’OLE Menus ........................................................................................... 3-2
The File Menu ............................................................................................ 3 -2
The Edit Menu ........................................................................................... 3 -3
The Options Menu ..................................................................................... 3-3
The Help Menu .......................................................................................... 3- 3
Opening a Wave File .............................................................................................. 3 -4
Playing a Wave File ............................................................................................... 3- 4
Recording a Wave File ........................................................................................... 3 -5
Selecting Recording Characteristics ...................................................................... 3-5
Embedding a Wave File ......................................................................................... 3-6
Linking a Wave File ............................................................................................... 3-7
Quitting Wave’OLE ............................................................................................... 3-8
Page 5

v
Mixer ControlMixer Control
Mixer ControlMixer Control
Mixer Control
Starting the Mixer ................................................................................................... 4-2
The Mixer Control Window................................................................................... 4- 2
Device Control Group Box ........................................................................ 4-3
Master Volume Group Box ....................................................................... 4- 3
Output Group Box...................................................................................... 4-4
Menu Bar.................................................................................................... 4-4
The Settings Menu ........................................................................ 4 -4
The Options Menu......................................................................... 4-5
The Help Menu.............................................................................. 4- 5
Using the Keyboard and Mouse ............................................................................. 4- 5
Selecting a Recording Source ................................................................................ 4-6
Saving the Mixer Settings ...................................................................................... 4-7
Quitting the Mixer .................................................................................................. 4-7
QuickPlayerQuickPlayer
QuickPlayerQuickPlayer
QuickPlayer
Starting QuickPlayer .............................................................................................. 5-2
Playing Multimedia Files ....................................................................................... 5-2
Playing Audio CDs ................................................................................................. 5 -3
Adjusting the Volume and Tone ............................................................................ 5- 4
Quitting QuickPlayer.............................................................................................. 5-4
Dos UtilitiesDos Utilities
Dos UtilitiesDos Utilities
Dos Utilities
PLPL
PLPL
PL
AA
AA
A
Y UtilityY Utility
Y UtilityY Utility
Y Utility
Knowing the PLAY Command .............................................................................. 6 -2
Command Line for Playing Sound Files................................................... 6- 2
Command Line for Playing Audio CDs .................................................... 6 -3
Using PLAY ........................................................................................................... 6-4
Controlling Playback .............................................................................................. 6-5
Wave File Control Hot Keys ..................................................................... 6- 5
Voice File Control Hot Keys ..................................................................... 6 -5
MIDI File Control Hot Keys ..................................................................... 6-6
CMF File Control Hot Keys ...................................................................... 6- 6
Audio CD Control Hot Keys ..................................................................... 6-7
RECORD UtilityRECORD Utility
RECORD UtilityRECORD Utility
RECORD Utility
Knowing the RECORD Command ........................................................................ 7- 2
Using RECORD...................................................................................................... 7- 3
Page 6

vi
MIXERSET UtilityMIXERSET Utility
MIXERSET UtilityMIXERSET Utility
MIXERSET Utility
Knowing the MIXERSET Command .................................................................... 8- 2
Using the MIXERSET Command.......................................................................... 8-3
Starting the MIXERSET Control Screen............................................................... 8-4
Knowing the MIXERSET Control Screen............................................................. 8-4
Volume Slider ............................................................................................ 8-5
Balance Slider ............................................................................................ 8-5
Automatic Gain Control Check Box ......................................................... 8 -5
Save Button ................................................................................................ 8 -5
Input Box.................................................................................................... 8- 5
Output Box ................................................................................................. 8- 5
Using the Mouse and Keyboard ............................................................................. 8- 6
GlossarGlossar
GlossarGlossar
Glossar
yy
yy
y
Page 7

vii
IntroductionIntroduction
IntroductionIntroduction
Introduction
This User’s Guide provides you information on how to use the
Windows and DOS applications included in your package. The
chapters are organized as follows:
Chapter 1, “WaveEditor” presents a Windows application for
recording, playing, and editing wave data.
Chapter 2, “QuickCD” presents a Windows application for playing
audio CDs.
Chapter 3, “Wave’OLE” introduces a Windows application for
recording and playing wave data, and how objects can be inserted
into various applications.
Chapter 4, “Mixer Control” describes an audio Mixer in Windows
that allows you to control sound levels of various audio sources, and
to select audio sources for recording and muting.
Chapter 5, “QuickPlayer” describes a Windows application that
plays multimedia files.
Chapter 6, “PLAY Utility” presents a DOS utility that plays sound
files and audio CDs.
Chapter 7, “RECORD Utility” presents a DOS utility that records
sound in wave or voice file format.
Chapter 8, “MIXERSET Utility” describes an audio Mixer in DOS
that allows you to control the volume of various audio sources.
Page 8

Document Conventions
This guide follows certain conventions to help you locate and identify
the information that you need. These conventions are described in the
following sections:
q Text Conventions
q Key Combinations
q Icons
Text Conventions
The following text conventions are used to help distinguish elements of
the text in this guide (see Table I-1.)
Table I-1: Text Conventions.
Text Element Use
bold
italics
UPPERCASE Directory name, file name, or acronym.
< > Symbols, letters, and key names on the keyboard.
Command names, switches, and any text that must
be entered exactly as it appears.
Title of a book. When presented at the DOS
command line, it is a placeholder that represents
information you must provide. This information
usually appears in the parameter listing after the
command is presented.
viii
Page 9

Key Combinations
In this guide, the following conventions are used to help you identify
different key combinations (see Table I-2.)
Table I-2: Key Combinations.
Combination Use
<Key1+Key2> A plus sign (+) between key names means you must
press the keys at the same time. For example,
“Press <Ctrl+Z>” means press the <Ctrl> key and
hold it down while you press the <Z> key.
<Key1,Key2> A comma sign (,) between key names means you
must press the keys in sequence. For example,
“Press <Alt,F>” means press the <Alt> key and
release it, and then press the <F> key and release it.
Icons
In this guide, icons are used to highlight areas of text that require your
attention (see Table I-3.)
Table I-3: Icons.
Icon Use
Information or instructions that must not be taken
lightly and should be noted.
Cautions or warnings that you must pay attention to.
Information highlighted by this icon tells you how to
avoid situations such as the risk of not enough
memory or even damages to your system.
ix
Page 10

Page 11

WaveEditor
WaveEditor brings you to the next wave of sound editing. This
easy-to-use yet powerful application allows you to record, play, and
edit 8-bit (tape quality) and 16-bit (CD quality) wave data in the
Windows environment. It also allows you to enhance your wave data
with special effects.
This chapter provides you information on using WaveEditor and all
its powerful features. It is organized as follows:
q Starting WaveEditor
q Understanding the WaveEditor Interface
q Using the Mouse
q Understanding the WaveEditor Menus
q Working with WaveEditor
q Customizing WaveEditor
q Using WaveEditor Effectively
q Using CD Sync
q Quitting WaveEditor
1
WaveEditor 1-1
Page 12

Starting WaveEditor
To start WaveEditor:
1. Double-click the WaveEditor icon in your audio card’s group
window.
The WaveEditor window similar to Figure 1-1 appears.
Figure 1-1: The WaveEditor window.
Understanding the WaveEditor Interface
The WaveEditor interface has three main features. They are the
Toolbar, Edit Window, and Status Bar.
Toolbar
The Toolbar comprises several buttons and control boxes for file and
wave operations (see Figure 1-2.)
Figure 1-2: The Toolbar.
1-2 16-bit Audio Card User’s Guide
Page 13
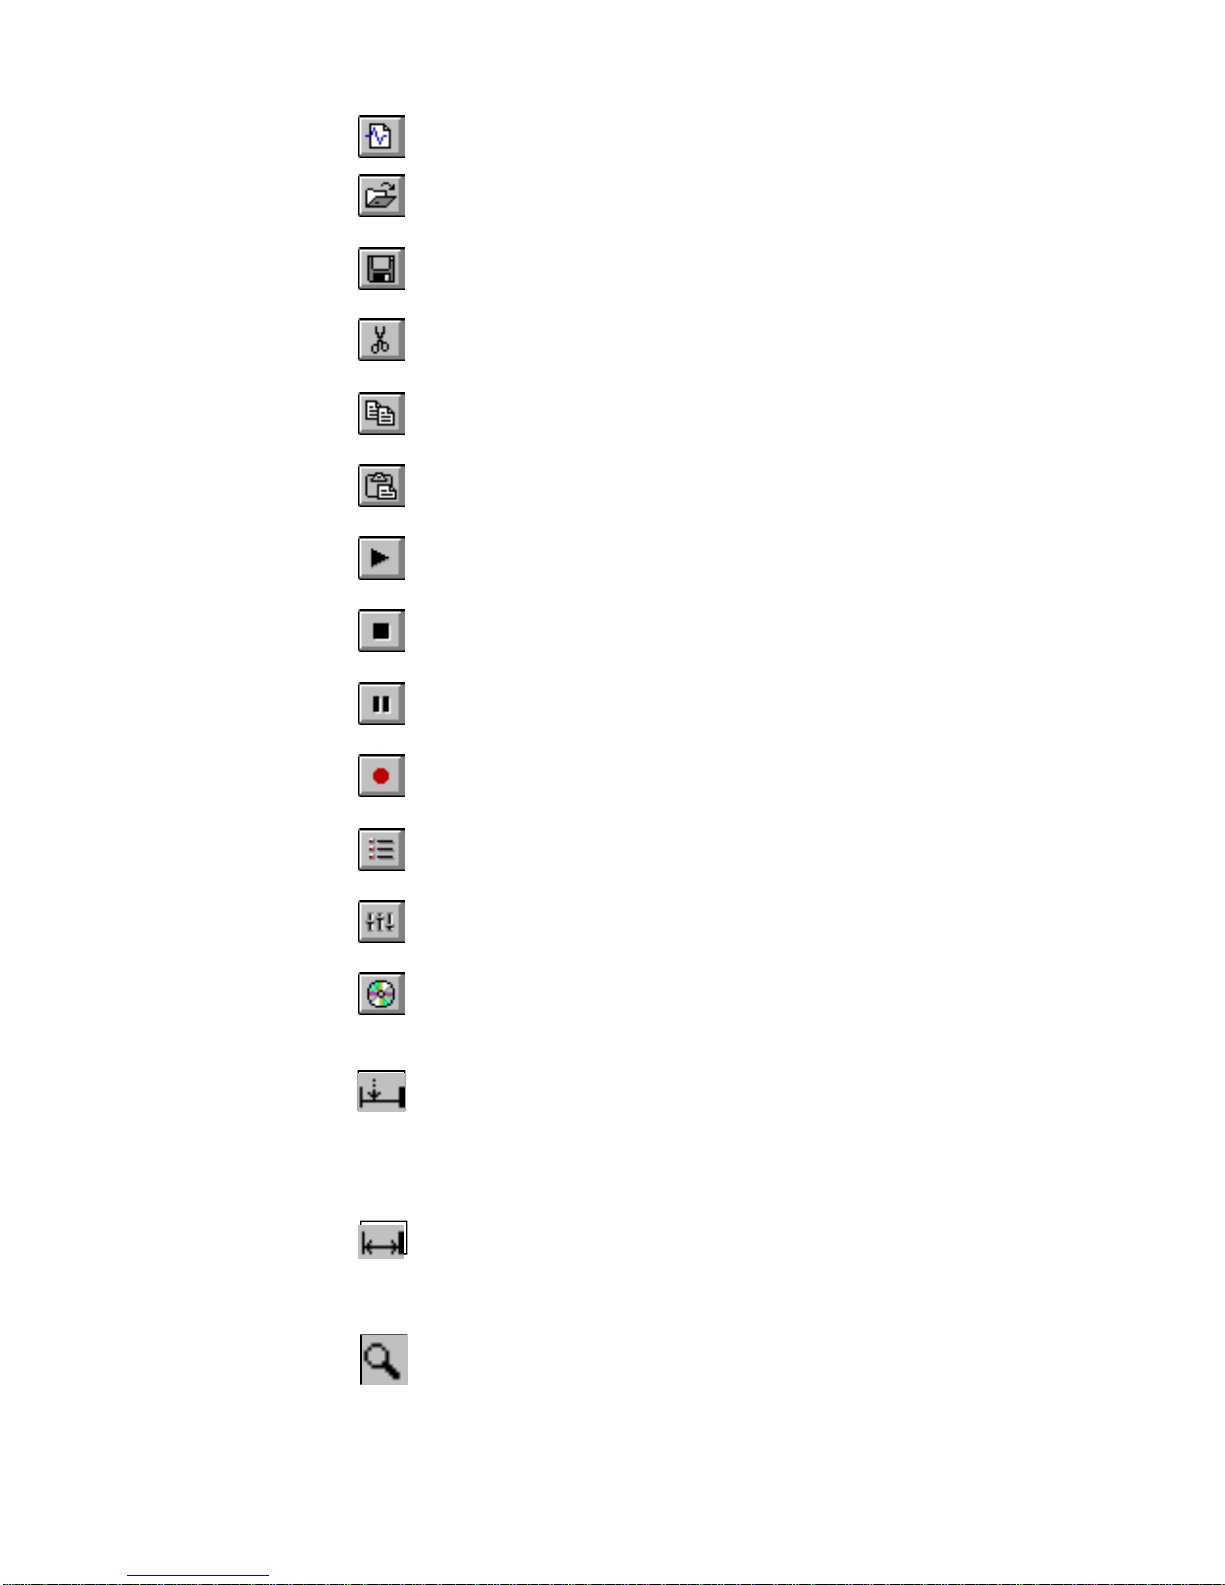
Creates a new window without any data.
Loads an existing wave file.
Saves changes made to the wave file.
Cuts the selected data of the wave file.
Copies the selected data of the wave file.
Pastes cut or copied data onto the wave file.
Plays the wave file that is currently active in WaveEditor.
Stops the playback of a wave file.
Pauses/Resumes the playback of a wave file.
Records a wave file.
Sets the default recording format.
Activates Mixer.
Activates the CD player. (This button will appear only if
you have a CD-ROM drive installed.)
Displays the starting position of the wave data selection.
You can specify the position by typing a numerical value
in the text box or using the scroll arrows to select the
starting position.
Displays the size of the wave data selection. You can type
the size in the text box or use the scroll arrows to increase
or decrease the size.
Displays the zoom ratio of the wave file displayed. You
can type the ratio in the text box or use the scroll arrows
to increase or decrease the ratio. The smaller the value,
the larger the magnification.
WaveEditor 1-3
Page 14

Edit Window
The Edit Window is the area where the content of a wave file is
displayed (see Figure 1-3.) You can open several Edit Windows at a
time and display them in cascades, vertical or horizontal tiles, or as
icons. This allows you to perform editing functions like copying
data from one file to another easily and quickly.
For a better view of the data displayed in the Edit Window, use the
horizontal scroll bar to select the data for viewing and the vertical
scroll bar to zoom into (or out of) the data.
Status Bar
The Status Bar displays information related to the wave file in the
active Edit Window and each menu command when selected (see
Figure 1-4.) A window has to contain data before the information
relevant to the file is displayed in the Status Bar.
Figure 1-3: The Edit Window.
Figure 1-4: The Status Bar.
1-4
Page 15

Using the Mouse
An easy way of selecting wave files for editing is to use the mouse.
The following shows you how to use the mouse to select the data.
To select a portion of the data:
q Hold down the left mouse button anywhere on the Edit
Window and drag the mouse. Once the desired portion of the
data has been selected, release the left mouse button.
To select the entire data:
q Double-click the wave data in the Edit Window.
To select data from a specific position to the beginning of the data:
q Hold down the left mouse button at the specific position and
drag the mouse above the Edit Window.
To select data from a specific position to the end of the data:
q Hold down the left mouse button at the specific position and
drag the mouse below the horizontal scroll bar.
Understanding WaveEditor Menus
WaveEditor has seven menus: File, Edit, View, Special, Options,
Window, and Help; and a context-sensitive menu.
File Menu
The File menu contains the following commands:
New Creates a new window without any data.
Open Loads an existing wave file.
Close Closes an open wave file.
Close All Closes all open wave files.
Save Saves changes made to the wave file.
Save As Saves the wave file with a new name.
Save All Saves all open wave files.
Exit Quits WaveEditor.
WaveEditor keeps a record of the last four wave files you have
opened by displaying them on the File menu after the Exit command.
To open any of the files, select the file with the left mouse button.
WaveEditor 1-5
Page 16

Edit Menu
The Edit menu contains the following editing commands:
Undo Restores the wave file to the state last
Cut Copies and then removes the selected
Copy Copies the selected portion of the data.
Paste Pastes cut or copied wave data into the Edit
Paste Mix Mixes cut or copied wave data with the one
Delete Deletes a selected portion of the data.
saved.
portion of the wave data.
Window. If you have selected a portion of
the data, that portion is replaced.
Otherwise, WaveEditor pastes the data at
the cursor.
in the Edit Window. When you play the
wave file, you will hear both sounds
together.
Unlike the Cut command, the data is not
copied first.
Crop To Selection Deletes the entire data except the portion
Select All Selects the entire wave file in the Edit
View Menu
The following commands on the View menu allow you to customise
the WaveEditor workspace:
Toolbar Toggles the Toolbar on or off.
Status Bar Toggles the Status Bar on or off.
Fit Wave In Window Scales (adjusts the zoom ratio) the wave
Actual Size Resets the zoom ratio of the wave display in
Cursor Position Displays the wave file at the starting
selected.
Window. You can also do this by doubleclicking the mouse anywhere within the Edit
Window.
display to fit the size of the Edit Window.
the Edit Window to its actual size (1:1).
position of the wave selection.
Cursor End Displays the wave file at the ending position
of the wave selection.
1-6
Page 17

Zoom Zooms into the portion of the wave file
Special Menu
The commands on the Special menu allow you to add special effects
to wave files. These commands are:
Reverse Reverses the playback of the entire or
Add Echo Adds echo effect to the entire or selected
Rap! Repeats the selected portion of the wave
selected.
(You should select the desired portion
before using this function.)
selected portion of the wave file. For stereo
files, there are options for reversing either
channel.
portion of the wave file. For stereo files,
there are options for adding echo to either
channel.
file.
Insert Silence Inserts silence into the portion of the wave
Force to Silence Silences the portion of the wave file
Fade In Fades into the entire or selected portion of
Fade Out Fades out the entire or selected portion of
Amplify Volume Changes the volume level of the entire or
Options Menu
The following commands on the Options menu allow you to change
WaveEditor’s default settings:
file selected.
selected. For stereo files, there are options
for silencing either channnel.
the wave file. For stereo files, there are
options for fading either channel.
the wave file. For stereo files, there are
options for fading either channel.
selected portion of the wave file.
Record Settings Sets the default record settings.
Mixer Settings Activates Mixer.
WaveEditor 1-7
Page 18

Display in Bytes Displays wave selection information in
Display in Samples Displays wave selection information in
Display in Milliseconds Displays wave selection information in
Always on Top Toggles WaveEditor as the topmost window.
Window Menu
The commands on the Window menu allow you to organize the Edit
Windows when several wave files are open. For more information
regarding these commands, refer to your Microsoft Windows manual.
Help Menu
The descriptions of the commands on the Help menu are:
bytes.
samples.
milliseconds.
Contents Displays WaveEditor Help menu’s contents.
Search Searches the Help menu based on the topic
System Information Displays information about Windows and
About WaveEditor Opens a window displaying copyright
Context-Sensitive Menu
The context-sensitive menu appears when you click the right mouse
button in the Edit Window. The commands that appear on the menu
depend on the content of the Edit Window. The commands include:
Play Plays the entire or selected portion of the
Record Records the wave file. If the current active
Stop Stops the playback of a wave file.
you type or select.
your system such as CPU and available
memory.
information.
wave file in the Edit Window.
window in the Edit Window is an open file,
the content in the open file will be replaced
by the recorded file.
Mixer Settings Activates Mixer.
Fit Wave In Window Scales (adjusts the zoom ratio) the wave
display to fit the size of the Edit Window.
1-8
Page 19

Actual Size Resets the zoom ratio of the wave display in
the Edit Window to its actual size (1:1).
Cursor Position Displays the wave file at the starting
position of the wave selection.
Zoom Zooms into the portion of the wave file
selected.
New Creates a new window without any data.
Open Loads an existing wave file.
Save Saves changes made to the wave file.
Working with WaveEditor
WaveEditor has a user-friendly interface and working with it is easy.
This section shows you how to specify the format for wave files and
open, save, and mix wave files.
Specifying Wave Formats
Before recording a wave file, you need to ensure the format of the
file is specified correctly. Wave format refers to the sound channel
and sampling rate and size of the file.
To specify the wave format:
1. Select Record Settings from the Options menu.
The Record Settings dialog box similar to Figure 1-5 appears.
Figure 1-5: The Recording Settings dialog box.
WaveEditor 1-9
Page 20

2. Select the format for the wave file.
q Select Mono for one sound channel and Stereo for two
sound channels.
q Select 11025 Hz for voice, 22050 Hz for cassette, and
44100 Hz for CD quality recording.
q Select 8 bits for cassette and 16 bits for CD sound quality.
3. Choose OK.
There is a correlation between the quality of a wave file and the size
of the file. A wave file with better sound quality requires a larger
storage space because of its high sampling rate.
Opening Wave Files
You can open existing wave files using the Open command from the
File menu or the drag-and-drop method.
To use the Open command:
1. Select Open from the File menu.
The Open Sound File dialog box similar to Figure 1-6
appears.
2. Select the file you to open from the File Name list. (You may
have to specify the directory in which the file (.WAV) resides.
To listen to the playback of the wave file, choose Play.)
3. Choose OK.
If you select a file with raw data (.RAW) or Creative’s Voice
format (.VOC), a dialog box prompting you to confirm the
conversion of the file to .WAV format is displayed.
Figure 1-6: The Open Sound File dialog box.
1-10
Page 21

To use the drag-and-drop method:
1. Start File Manager and open the wave file's directory.
2. Arrange both windows so that the file and the WaveEditor
window can be seen.
3. Hold down the left mouse button as you drag the file into the
WaveEditor window.
A icon appears while you are dragging the file.
4. Drop the file by releasing the mouse button.
The file opens automatically.
You can also open multiple files using the drag-and-drop method by
holding down <Shift> and clicking on the files in the File Manager.
Recording Wave Files
WaveEditor allows you to record new wave files or over existing
files.
To record a new file:
1. Choose New on the Toolbar.
2. Choose Record on the Toolbar.
The New Recording dialog box similar to Figure 1-7 appears.
Figure 1-7: The New Recording dialog box.
3. Ensure the settings in the dialog box are specified correctly.
q Check the Recording Level group box. If the recording
level is too low or high, adjust it using the Mixer button.
WaveEditor 1-11
Page 22

q Check the path and file name created in the Record To File
group box. You can change the file name and directory by
using the Browse button.
q Check the recording format shown at the bottom of the
dialog box. You can change the format by choosing the
Settings button.
q Check your system’s storage space shown at the bottom of
the dialog box. If there is insufficient storage space for
your file, free up more disk space or choose another drive
before recording the file.
4. Choose Start.
If you have a CD-ROM drive installed, you can choose the CD
Player button to activate the CD player. Also, you can select
the CD Sync check box to synchronise the start of the
recording and playback of audio CDs.
To record over an existing file:
1. Activate the file you want to record over.
2. Choose Record on the Toolbar.
The Record Over dialog box similar to Figure 1-8 appears.
Figure 1-8: The Record Over dialog box.
3. Choose Start.
1-12
Page 23

Saving Wave Files
To save a wave file:
1. Choose Save on the Toolbar or select Save from the File
menu.
2. Enter the name of the file and the path if prompted.
3. Choose OK.
To save a wave file with a new name or format:
1. Select Save As from the File menu.
The Save Sound File dialog box similar to Figure 1-9 appears.
Figure 1-9: The Save Sound File dialog box.
2. Enter a new name for the file and the path if prompted.
WaveEditor 1-13
Page 24

3. Select the desired file format and compression method from
the Save File as Type and Compression/Conversion dropdown list boxes respectively.
4. Choose OK.
Compression is not available for 8-bit wave files. Also, you
can convert a Windows wave file to a different format by
selecting PCM Conversion from the Compression/Conversion
drop-down list box.
Mixing Data of Wave Files
When you mix the data of two wave files, you are actually adding the
data of one file to another to create a new file. After mixing, you
can play back the new file to hear the new sound generated.
To mix the data contents of two wave files:
1. Activate the first (source) file and select the desired portion
of the data for mixing.
2. Select Copy from the Edit menu.
The data copied is stored in an internal buffer.
3. Activate the second (target) file and select the location where
you want the copied data to be mixed.
4. Select Paste Mix from the Edit menu.
The Paste Mix dialog box similar to Figure 1-10 appears.
Figure 1-10: The Paste Mix dialog box.
1-14
Page 25

5. Select the desired channels for copying data from the source
file in the From Buffer Use group box and for mixing data
with the target file in the Mix With Wave group box.
q Select Mono Channel for mono file.
q Select Left Channel, Right Channel, or both channels for
stereo file.
6. Choose OK.
If a portion of the target file is not selected, the data is mixed at the
cursor position. If a portion of the target file is selected, the copied
data in the buffer is mixed with the portion selected.
You cannot mix 8-bit with 16-bit wave data. However, you
can convert both files to either 16-bit or 8-bit sampling size
before mixing them.
Adding Special Effects
Reverse
WaveEditor allows you to enhance your wave files with special
effects
from the Special menu. These effects include Reverse, Add Echo,
Rap!, Insert Silence, Force to Silence, Fade In, Fade Out, and
Amplify Volume.
This effect reverses the sequence of the data in the wave file such
that the sound is played backwards. You can specify a selected
portion of the file to be reversed. If a portion of the file is not
selected, the entire file will be reversed.
To reverse a file:
1. Select Reverse from the Special menu.
The Reverse dialog box similar to Figure 1-11 appears.
WaveEditor 1-15
Page 26

Add Echo
Figure 1-11: The Reverse dialog box.
2. Select the desired channels. (No options are available for
editing a mono file.)
q Select Left Channel, Right Channel, or both channels for
stereo file.
3. Choose OK.
This effect modifies data in the wave file to give an echo effect. You
can create a metallic sound effect by continually applying Add Echo
to the same wave file until you have achieved the desired result.
To add echo to a file:
1. Select Add Echo from the Special menu.
The Add Echo dialog box similar to Figure 1-12 appears.
Figure 1-12: The Add Echo dialog box.
1-16
Page 27

2. Enter the echo magnitude (loudness of the echo) in the
3. Enter the echo delay (the time between the actual sound and
4. Select the desired channel for stereo file.
5. Choose OK.
Rap!
This feature repeats the selected portion of the wave file. This is
useful when you want to create a jerky or stuttering effect for your
voice files.
To repeat a selection:
1. Select a portion of the file.
2. Select Rap! from the Special menu.
Insert Silence
Magnitude text box.
the echo) in the Echo Delay text box.
This effect inserts silence into a selected portion of the wave file.
To insert silence into a file:
1. Select a portion of the wave file.
(The length of the silence depends on the length of the portion
selected.)
2. Select Insert Silence from the Special menu.
You will see a straight line representing the silence inserted into the
portion selected.
Force to Silence
This effect mutes the selected portion of the wave file such that the
selected portion will not be heard during playback.
To mute a file:
1. Select a portion of the file.
2. Select Force to Silence from the Special menu.
The Force to Silence dialog box similar to Figure 1-13
appears.
WaveEditor 1-17
Page 28

Figure 1-13: The Force To Silence dialog box.
3. Select the desired channels. (No options are available for
editing a mono file.)
q Select Left Channel, Right Channel, or Both Channels for
stereo wave file
4. Choose OK.
The selected portion is replaced by a straight line.
Fade In and Fade Out
You can create a fading in (soft to loud) or fading out (loud to soft)
effect for your wave files.
To use Fade In (or vice-versa):
1. Select Fade In from the Special menu.
The Fade In dialog box similar to Figure 1-14 appears.
2. Enter the starting magnitude in the Magnitude text box.
3. Select the desired channels for stereo files.
4. Choose OK.
Figure 1-14: The Fade In dialog box.
1-18
Page 29

Amplify Volume
This effect allows you to change the volume of wave files. It can be
applied to the entire or selected portion of the wave file.
To change the volume of a file:
1. Select Amplify Volume from the Special menu.
For Fade In, the file will be linearly faded in from the starting
magnitude (volume) to a 100% magnitude (volume). For Fade
Out, the file will be linearly faded out from a 100%
magnitude (volume) to the ending magnitude (volume).
The Amplify Volume dialog box similar to Figure 1-15
appears.
Figure 1-15: The Amplify Volume dialog box.
2. Enter the magnitude in the Magnitude text box.
3. Select the desired channels.
4. Choose OK.
Customizing WaveEditor
WaveEditor allows you to customize the default settings for
recording and Mixer.
Recording
When you customize the record settings, future recordings of wave
files will be based on those settings.
WaveEditor 1-19
Page 30

Mixer
To customize the record settings:
1. Select Record Settings from the Options menu.
The Record Settings dialog box similar to Figure 1-2 appears.
2. Specify the desired settings.
3. Choose OK.
To adjust the settings for Mixer:
1. Choose Mixer on the Toolbar.
The Mixer window appears.
2. Specify the desired settings.
For more information on using the Mixer, refer to the relevant
chapter in this guide.
Using WaveEditor Effectively
To use WaveEditor effectively, you need to know the amount of
memory needed to run WaveEditor, how to manage your files and
work with compressed files.
Memory Requirements
WaveEditor requires about 1MB of memory. Memory requirement
increases when you play back or record wave files as sufficient
memory is needed for the buffers. It is recommended that you run
WaveEditor on at least a 386-based system with 4 MB of RAM and
under Windows 3.1.
When you open a file for editing, WaveEditor will only allocate
certain amount of memory for storing the necessary information and
will not load the entire file into memory. The file will be edited
directly from your hard disk. As such, you can edit files as large as
your hard disk can contain.
1-20
Page 31

File Management
This section explains how you can optimise your system for speed
and manage your wave files effectively.
System Optimizing
When you record wave data, WaveEditor will store recorded data
directly to the hard disk. High resolution recording of data,
particularly 16-bit data at 44 kHz, would take longer to write to your
disk if it is not optimized for speed.
You can reduce the time your system spends reading and writing data
by compacting your hard disk using a disk-compaction utility such as
DEFRAG and installing a hard disk cache such as SMARTDrive.
Number of Open Files
WaveEditor does not limit the number of files you can open. But the
number of files WaveEditor can open at a time depends on how you
specify your operating system configuration. For more information
on how to do that, consult your operating environment’s
documentation.
Use of DOS SHARE Utility
It is recommended you use the DOS SHARE utility to allow proper
file sharing and locking. This will prevent you from accidentally
deleting a file while WaveEditor is accessing it. For more
information on how to uses this utility, consult your DOS
documentation.
Compressed Wave Files
To work effectively with compressed wave files, you need to know
how compressed files are opened and edited.
Opening Compressed Files
WaveEditor currently supports 5 compression formats: Microsoft
ADPCM, CCITT A-Law, CCITT µ-Law, IMA/DVI ADPCM, and
Creative ADPCM.
WaveEditor 1-21
Page 32

When you open a compressed wave file, WaveEditor will decompress
the file first before displaying it. You must ensure that the file
resides on a drive that has sufficient disk space to accommodate the
uncompressed data.
The amount of space required depends on the compression format
adopted. For CCITT A-Law and µ-Law, the compression ratio is 1:2
(compressed:uncompressed). For ADPCM, the ratio is 1:4. For
example, if you are working with a 1 MB ADPCM file, you need to
have at least 4 MB of free disk space.
Editing Compressed Files
When you open a compressed wave file for editing, WaveEditor will
automatically compress the file when you save it. As this can be
time consuming for large files, you should save your work as an
uncompressed wave (PCM) file first. Once you have finished
editing, save the file with the desired compression format.
Using CD Sync
CD Sync allows you to synchronise the start of the recording and
playback of audio CDs. This option is only available if you have a
CD-ROM drive installed in your system.
If you have mistakenly placed a CD-ROM disk in your drive, the
program will inform you of the error. But the recording will still
continue. To stop the recording, choose Stop on the Toolbar. Insert
the correct audio CD and then choose Record on the Toolbar to
record over your file. If you do not want the CD Sync option,
uncheck it before you proceed with the recording.
Quitting WaveEditor
To quit WaveEditor:
1. Select Exit from the File Menu.
If changes to the file have not been saved, a dialog box will prompt
you to save the changes.
1-22
Page 33

Wave’OLE
Wave’OLE plays and records wave data. There are six buttons that
allow you to control the wave files. They are Play, Pause, Rewind,
Forward, Stop, and Record. When you play a wave file, the LED
Display shows the amplitude of the sound.
Wave’OLE supports Object Linking and Embedding (OLE). With this
capability, you can insert sound into other applications such as Write
by linking or embedding them. For more information about Object
Linking and Embedding, refer to the Microsoft Windows manual.
This chapter is organized as follows:
q Starting Wave’OLE
3
q The Wave’OLE Menus
q Opening a Wave File
q Playing a Wave File
q Recording a Wave File
q Selecting Recording Characteristics
q Embedding a Wave File
q Linking a Wave File
q Quitting Wave’OLE
Wave’OLE 3-1
Page 34

Starting Wave’OLE
To start Wave’OLE:
1. Double-click the Wave’OLE icon in your audio card’s group
window.
The Wave’OLE window similar to Figure 3-1 appears.
Figure 3-1: The Wave’OLE window.
The Wave’OLE Menus
Wave’OLE has four menus: File, Edit, Options, and Help.
The File Menu
The commands on the File menu are:
New Creates a new wave file.
Open Opens an existing wave file.
Save Saves the wave file.
Save As Saves the wave file with a new name.
Exit Quits Wave’OLE.
Wave’OLE keeps a record of the last four wave files you have
opened. They are displayed at the end of the pull-down menu
in the File menu. To open one of these files, click the file
with the left mouse button.
3-2
Page 35

The Edit Menu
The command on the Edit menu is:
Copy Sound as an Object Copies the sound data and OLE information
The Options Menu
The commands on the Options menu are:
Wave Info... Displays information about the sound data
Mixer Settings... Runs the Mixer application. For more
Recording Settings... Allows the sampling size, frequency, and
to the clipboard. The sound data can then be
pasted onto an OLE client as an embedded
or linked object.
such as the sampling rate and size.
information, refer to the chapter on
Windows Mixer.
mono or stereo mode to be selected for
recording.
Always on Top Toggles Wave’OLE as the topmost window.
The Help Menu
The command on the Help menu is:
Contents Displays Wave’OLE Help menu’s contents.
About Wave’OLE Opens a window displaying copyright
information.
Wave’OLE 3-3
Page 36

Opening a Wave File
To open a wave file:
1. Select Open from the File menu.
The File Open dialog box similar to Figure 3-2 appears.
Figure 3-2: The File Open dialog box.
2. Type or select the wave file you want to open.
You can preview the file before opening it by choosing Play.
You can also refer to information like the wave format, data
size and its file date displayed in the dialog.
3. Choose OK.
Playing a Wave File
To play a wave file:
1. Open the wave file.
2. Choose Play.
To stop playing the wave file, choose Stop.
You can use the keyboard to perform operations in Waveo’LE.
For instance, you can use either <Tab> or the left and right
arrow keys to move to the buttons on the Waveo’LE window.
To choose a button, press <Spacebar>.
You can also move around the opened wave file with the aid of the
slider. Simply select the slider thumb and drag with the mouse.
Alternatively, you can use the left and right arrow keys.
3-4
Page 37

Recording a Wave File
To record a wave file:
1. Select New from the File menu.
2. Choose Record.
The Recording dialog box similar to Figure 3-3 appears.
Figure 3-3: The Recording dialog box.
To stop the recording, choose Stop.
Selecting Recording Characteristics
To select recording characteristics:
1. Select Recording Settings from the Options menu.
The Recording Settings dialog box similar to Figure 3-4
appears.
Figure 3-4: The Recording Settings dialog box.
Wave’OLE 3-5
Page 38

2. Select the desired settings.
q Select mono for one sound channel and stereo for two
sound channels.
Mono is suitable if you want to perform voice recording,
while stereo is more suitable for music recording.
q If you do not select a compression method, select the 8
bits option for normal recording and 16 bits for highquality recording.
If you select a compression method from the Compression
drop-down list box, the 8 bit and 16 bit options will be
grayed out.
q Select 8 kHz or 11 kHz frequency for voice-quality
sampling rate, 22 kHz for tape-quality sampling rate, and
44 kHz for CD-quality sampling rate.
q Choose OK.
Embedding a Wave File
When you embed a wave file, you load a copy of the wave file in
Wave’OLE and transfer it to an application such as Write that
supports Object Linking and Embedding (OLE). If you edit the wave
file in Wave’OLE, the wave file in Write will not be affected because
you no longer have any connection to the file in Write.
You can embed a wave file using two methods:
q From a document (Write for example).
q From Wave’OLE.
To embed a wave file starting from Write:
1. Open the Write document where you want to embed a wave
file.
2. Select Insert Object from the Edit menu.
The Insert Object dialog box similar to Figure 3-5 appears.
Figure 3-5: The Insert Object dialog box.
3-6
Page 39

3. Select Wave’OLE.
4. Choose OK.
The Wave’OLE application opens.
5. Select Open from the File menu to select an existing wave
file. Alternatively, you can do a recording and save it into a
new file before you include the file in the document.
6. Choose OK.
7. Select Update Write from the File menu.
This embeds the wave file into the Write document and an
icon representing the wave file will be placed in Write.
8. Select Exit & Return to Write from the File menu.
This returns to the Write document.
To embed a wave file starting from Wave’OLE:
1. Open Wave’OLE.
2. Record a new wave file or open an existing wave file you
want to embed.
3. Choose Copy Sound as an Object from the Edit menu.
The wave file is placed onto the Clipboard.
4. Open the Write document where you want to embed the wave
file.
5. Select Paste Special from the Edit menu in Write.
The icon representing the embedded wave file appears.
Linking a Wave File
When you link a wave file, you are not making a copy of the wave
file. You are only making a reference to the wave file. If you edit
the wave file in Wave’OLE, the wave file in an application such as
Write will be updated to reflect the changes.
To link a wave file in Write:
1. Open Wave’OLE.
2. Create a new wave file or open an existing file that you want to
link.
3. Save the wave file.
The wave file must be saved before you can link it to an OLE
client.
4. Choose Copy Sound as an object from the Edit menu.
5. Open the Write document where you want to link the wave
The wave file is placed onto the Clipboard.
file.
Wave’OLE 3-7
Page 40

6. Select Paste Link from the Edit menu in Write.
The icon representing the wave file appears.
Quitting Wave’OLE
To quit Wave’OLE:
1. Select Exit from the File menu.
The Wave’OLE dialog box similar to Figure 3-6 appears if the
latest changes have not been saved.
Figure 3-6: The Wave’OLE dialog box.
2. Choose Yes to save the changes, No if you do not want to
save the changes, or Cancel if you want to continue working
in Wave’OLE.
3-8
Page 41

Mixer Control
Mixer Control is a powerful Windows-based audio mixer that allows
you to combine and manipulate sound from various audio sources.
With the Mixer, it is possible to control the volume of an audio
source while running other Windows applications. You can also
select and mix different audio sources during playback and
recording.
This chapter provides you with information on using the Mixer, and
is organized as follows:
q Starting the Mixer
q The Mixer Control Window
q Using the Keyboard and Mouse
4
q Selecting a Recording Source
q Saving the Mixer Settings
q Quitting the Mixer
In this chapter, you will encounter mono and stereo sources.
A stereo source uses two channels (left and right) to transfer
audio, while a mono source uses one channel.
Mixer Control 4-1
Page 42

Starting the Mixer
To start the Mixer:
1. Double-click the Mixer Control icon in your audio card’s
group window.
The Mixer Control window similar to Figure 4-1 appears.
Figure 4-1: The Mixer Control window.
The Mixer Control Window
The Mixer Control window consists of the following:
q Device Control group box
q Master Volume group box
q Output group box
q Menu Bar
4-2
Page 43

Device Control Group Box
The Device Control group box contains sliders that control the
volume of various sources that your audio card supports (see Figure
4-2.)
Figure 4-2: The Device Control Group Box.
All of the above sources are in stereo except Microphone and
PC Speaker. Stereo sources have two sliders to control the
volume from the left and right channels. Mono sources have
one slider to control one channel.
Master Volume Group Box
The Master Volume group box contains sliders that control the
overall volume of the audio you hear from your external speakers
(see Figure 4-3.)
Figure 4-3: The Master Volume Control Box.
Mixer Control 4-3
Page 44

Output Group Box
The Output group box contains check boxes that allow you to listen
to or mute the audio from the CD-audio, Line-in, and Microphone
(see
Figure 4-4.)
You cannot mute the other Mixer sources. For example, if
you play audio from a MIDI source, you will hear the audio if
the volume is at an audible level.
Figure 4-4: The Output Group Box.
Menu Bar
The Menu Bar consists of three drop-down menus. These menus are:
q Settings
q Options
q Help
The Settings Menu
The Settings menu contains the following commands:
Recording Displays the Recording Control window.
Exit Quits the Mixer.
4-4
Page 45

The Options Menu
The Options menu contains the following commands:
Lock L/R Vol Locks both left and right channels of all
Always On Top Displays the Mixer as the top-most window.
Save Setting On Exit Saves all changes made to the Mixer. The
The Help Menu
The Help menu contains the following command:
Contents Displays Mixer Control Help menu’s
stereo sources, so that both channels move
at the same time when you drag the slider
thumb.
new setting is used as the default setting
when you next run the Mixer.
contents.
About Mixer ControlStates copyright and credit information
about the Mixer.
Using the Keyboard and Mouse
You can use the mouse or the keyboard to select the options on
Mixer.
Click the option if it is in a check box.
Move the slider thumb by dragging it or by clicking above or
below the slider to increase or decrease the volume.
Press <Tab> to move to the option.
Use the up or down arrow key to increase or decrease the
volume.
Press <Shift+Tab> to move through the options backwards.
Mixer Control 4-5
Page 46

Selecting a Recording Source
The Mixer allows you to select one or a combination of the following
audio sources for recording:
q Microphone
q Line-in
q MIDI device
q CD-audio
To select a recording source:
1. Select Recording from the Settings menu.
The Recording Control dialog box similar to Figure 4-5
appears.
Figure 4-5: The Recording Control dialog box.
2. Click the desired check boxes in the Left In and Right In
group boxes. These group boxes allow you to record selected
sources to the left and right channels.
The audio source you select will be indicated with a red dot.
To get stereo recording, click the check boxes as shown in
Figure 4-5.
3. If you want to automatically adjust input from the Microphone
to a level suitable for recording, click the AGC check box.
You need to select at least one of the Microphone check boxes
before the AGC check box is effective for the recording.
4-6
Page 47

Saving the Mixer Settings
You can save the Mixer settings before you exit.
To do so:
1. Select Save Setting On Exit from the Options menu.
Any Mixer settings that you have made will be saved when
you exit Windows.
Quitting the Mixer
To quit the Mixer, do one of the following:
q Select Exit from the Settings menu.
q Double-click the Control-menu box.
Mixer Control 4-7
Page 48

QuickPlayer
QuickPlayer allows you to play a wide range of multimedia files
consisting of sound, animation, movie, and video files. But, before
you play a file, you should have the appropriate software setup that
accomodates the type of file you want to play.
Within QuickPlayer, you can start the Mixer to adjust the volume and
tone of multimedia files. If you have installed a CD-ROM drive in
your system, you can also start QuickCD to play audio CDs.
This chapter is organized as follows:
q Starting QuickPlayer
q Playing Multimedia Files
5
q Playing Audio CDs
q Adjusting the Volume and Tone
q Quitting QuickPlayer
QuickPlayer 5-1
Page 49

Starting QuickPlayer
To start QuickPlayer:
1. Double-click the QuickPlayer icon in your audio card’s group
window.
The QuickPlayer window similar to Figure 5-1 appears.
Figure 5-1: The QuickPlayer window.
Playing Multimedia Files
You can quickly and easily play multimedia files using controls on
the QuickPlayer window.
To play a multimedia file:
1. Drop the Drives list box and select the drive that contains the
file.
2. Drop the List Files of Type list box and select the type of file
to play.
3. Select the directory path where you stored the file from the
Directories list box.
The available multimedia files for that path appears in the
File Name list box.
5-2
Page 50

4. Select a file in the list box.
The selected file appears in the File Name text box.
5. Choose Play.
Alternatively, double-click the file in the File Name list box.
6. Choose Stop when you want to stop the file.
You can also play all or a selection of the multimedia files in the File
Name list box in sequence.
If you want to play a selection of the multimedia files in the File
Name list box, replace Step 4 with the following:
q Press and hold down <Ctrl> while you select the desired files
with your mouse.
When you play a sequence of multimedia files, you can skip a file
and go to the next one if you desire.
To skip a file in sequence:
1. Choose Skip.
Playing Audio CDs
If you have installed a CD-ROM drive in your system, you can play
audio CDs using QuickCD.
To start QuickCD:
1. Choose the CDPlayer button to display the QuickCD window.
For more information, refer to the chapter on QuickCD.
QuickPlayer 5-3
Page 51

Adjusting the Volume and Tone
You can adjust the volume and tone of sound files using the
Windows Mixer.
To start the Mixer:
1. Choose the Mixer button to display the Mixer Control
window.
For more information, refer to the chapter on Mixer Control.
Quitting QuickPlayer
To quit QuickPlayer, do one of the following:
q Choose Quit.
q Double-click the Control-menu box.
5-4
Page 52

QuickPlayer 5-5
Page 53

PLAY Utility
The PLAY utility allows you to play audio CDs and a wide range of
sound files. By simply entering a command, you can now play
Microsoft Wave (.WAV), Creative Voice (.VOC), MIDI (.MID) and
Creative Music (CMF) files. And if you want to play a set of files
with the same file extension, the utility gives you the flexibility to
play them in sequence without requiring you to specify each file
individually.
This chapter provides you with detailed information on using PLAY.
It is organized as follows:
q Knowing the PLAY Command
q Using PLAY
6
q Controlling Playback
PLAY Utility 6-1
Page 54

Knowing the PLAY Command
Before you play sound files or audio CDs, you should be familiar
with the command line of PLAY.
Command Line for Playing Sound Files
The command line for playing sound files is:
PLAY file1 [file2...] [/Q] [/H] [/?]
file1 Name of the first file you want to play.
file2... Names of additional files of the same type to play.
/Q Disables display of playback information (file
format, play time, filenames, key menu, and the
copyright messages) while a file is playing.
/H or /? Displays description for using PLAY.
You need to take note of the following when using PLAY:
q If you enter PLAY without any parameters, a description for
using PLAY appears.
q If you enter a filename without specifying an extension,
PLAY will search the current directory for that filename. If
more than one extension for the filename exist, the utility will
play only one file in the following order of preference: .WAV,
.VOC, MID and CMF.
q Before you play a Creative Music (.CMF) file, you have to
load the SBFMDRV.COM driver into memory. This is done
by typing SBFMDRV at the directory where the driver is
found.
q When you enter a filename, you can specify part of the
filename and use the * or ? character to represent the
remaining missing characters. The * character represents one
or more characters while the ? character represents only a
single character.
For example, if you enter PLAY *.WAV, all wave files will
be played. If you enter PLAY TEST*.WAV, all wave files
with filename beginning with TEST will be played. If you
enter PLAY TEST?.WAV, all wave files with filenames
6-2
Page 55

containing five characters and beginning with TEST will be
played.
PLAY *.* or PLAY TEST.* will not work because
PLAY can only work with files of one type
collectively.
q When you play a MIDI file, the program searches for the
MIDI environment variable.
The MIDI environment variable specifies the MIDI file format
used and where MIDI data is sent to. The MIDI data can be
sent to the FM chip, Sound Blaster MIDI, or MPU-401 port.
Generally, there are three MIDI file formats available:
General MIDI, Extended MIDI and Basic MIDI.
The command for setting the MIDI environment is:
SET MIDI=SYNTH:x MAP:y MODE:z
SYNTH:x
x = 1 specifies internal synthesizer (default).
x = 2 specifies MIDI port.
MAP:y
y = G specifies General MIDI file format.
y = E specifies Extended MIDI file format
(default).
y = B specifies Basic MIDI file format.
MODE:z
z = 0 supports General MIDI (default).
z = 1 supports Roland Sound Canvas GS.
z = 2 supports Roland MT32.
MODE: z only applies to Sound Blaster AWE32.
Command Line for Playing Audio CDs
The command line for playing audio CDs is:
PLAY CD [/T:xx] [/Q] [/H] [/?]
CD Enables the CD-ROM Drive.
/T:xx Specifies the CD track which you wish to start
playing at (xx is the track number).
/Q Disables display of playback information (current
track, total tracks, playing time, and the key menu)
while a track is playing.
PLAY Utility 6-3
Page 56

Using PLAY
The following are some examples of how you can play sound files
and audio CDs in DOS:
q To play a Creative Music File (SONG.CMF):
q To play three voice files (TEST1.VOC, TEST2.VOC, and
/H or /? Displays description for using PLAY.
If you do not specify the track number (/T:xx) option,
you must press <P> to start playing the CD.
1. Make sure SBFMDRV.COM is loaded in memory.
2. Type PLAY SONG.CMF and press <Enter>.
TEST3.VOC) in sequence:
1. Type PLAY TEST1.VOC TEST2.VOC TEST3.VOC and
press <Enter>.
If a file specified does not exist in the directory, the
command will not be executed.
q To play a voice file (TEST1.VOC) without displaying the
playback information:
1. Type PLAY TEST1.VOC /Q and press <Enter>.
q To play a CD without specifying the starting track:
1. Type PLAY CD and press <Enter>.
q To play a CD starting at track 5:
1. Type PLAY CD /T:5 and press <Enter>.
q To play a CD starting at track 5 without displaying the CD hot
keys:
1. Type PLAY CD /T:5 /Q and press <Enter>.
6-4
Page 57

Controlling Playback
You can control the playback of files using hot keys. A menu of the
available hot keys appears when you enter PLAY without the /Q
switch.
Wave File Control Hot Keys
The following are the hot keys you can use while playing wave files:
<C> Resumes the paused wave file.
<Esc> Stop playing the wave file and exits the
<N> Plays the next wave file in a specific set.
<P> Plays the previous wave file in a
<Spacebar> Pauses the playing wave file.
program.
specified set.
<<> or <>>, and Selects and plays another wave file if
press <Enter> than one file is specified.
Voice File Control Hot Keys
The following are the hot keys you can use while playing voice files:
<B> Stops a repeating section of the voice
<C> Resumes the paused voice file.
<Esc> Stops playing the voice file and exits the
<N> Plays the next voice file in a specified
<P> Plays the previous voice file in a
more
file and proceeds to the next section.
program.
set.
specified set.
<Spacebar> Pauses the playing voice file.
<<> or <>>, Selects and plays another voice file if
and press <Enter> more than one file is specified.
PLAY Utility 6-5
Page 58

MIDI File Control Hot Keys
The following are the hot keys you can use while playing MIDI files:
<C> Resumes playing the paused MIDI file.
<Esc> Stops the MIDI file (if one is playing)
Left or Right Arrow Reproduces the sound in a different key
<M> Changes to a different set of musical
<N> Plays the next MIDI file in a specified
<P> Plays the previous MIDI file in a
and exits the program.
by raising or lowering the pitch.
instruments based on the Basic, General,
and Extended standards on the MIDI
mapper.
set.
specified set.
<Spacebar> Pauses the playing MIDI file.
Up or Down Arrow Changes the tempo of the MIDI file.
<
<> or <>>, Selects and plays another MIDI file if
and press <Enter> than one file is specified.
CMF File Control Hot Keys
The following are the hot keys you can use while playing CMF files:
<C> Resumes playing the paused CMF file.
<Esc> Stops the CMF file (if one is playing)
Left or Right Arrow Reproduces the sound in a different key
<N> Plays the next CMF file in a specified
more
and exits the program.
by raising or lowering the pitch.
set.
<P> Plays the previous CMF file in a
<Spacebar> Pauses the playing CMF file.
specified set.
6-6
Page 59

<<> or <>>, and Selects and plays another CMF file if
press <Enter> more than one file is specified.
Audio CD Control Hot Keys
The following are the hot keys you can use while playing audio CDs:
<C> Resumes playing the track.
<Esc> Stops the track (if one is playing) and exits the
program.
<F> Fast-forwards the track.
<L> Plays the previous track in a specified set.
<N> Plays the next track in a specified set.
<P> Plays the track.
<R> Rewinds the track.
<S> Stops the track.
<Spacebar> Pauses the playing track.
<X> Exits the program.
PLAY Utility 6-7
Page 60

RECORD Utility
The RECORD utility allows you to record sound to a file by
specifying the file type and recording parameters such as sampling
rate and recording mode.
Sound is recorded into a sound file in Microsoft Wave (.WAV) or
Creative Voice (.VOC) file format.
This chapter provides you detailed information on using RECORD.
It is organized as follows:
q Knowing the RECORD Command
q Using RECORD
7
RECORD Utility 7-1
Page 61

Knowing the RECORD Command
Before you record a sound file in wave or voice format, you should
be familiar with the command line syntax of RECORD.
The command line for recording wave or voice files is:
RECORD file [/A:xx] [/C:xx] [/M:xx] [/R:xx] [/S:x] [/Q] [/H] [/?]
file Specifies the name of the file and its extension,
.WAV or .VOC you want to record sound data into.
/A:xx Sets the recording source.
xx = MIC, CD, LINE or FM
You can record from more than one source.
/C:xx Sets the compression format.
xx = ALAW, MULAW or CTADPCM
/M:xx Sets the recording mode.
xx = MONO or STEREO
/R:xx Sets the sample size.
xx = 8 or 16 bits
The higher the sampling resolution, the
better is the recording quality.
/S:xx Sets the sampling rate.
For .VOC format: xx = 5000 to 44100 Hz
For .WAV format: xx = 11025, 22050 or
44100 Hz
The higher the sample size, the better is the
recording quality.
/Q Disables display of recording information.
/H or /? Displays a description on using RECORD.
7-2
Page 62

You need to take note of the following when using RECORD:
q If you enter RECORD without any parameters, the online
description for using RECORD appears.
q If you did not specify the recording mode, sampling rate and
sample size, the sound will be recorded in mono 8–bit wave
file format with 11025 Hz sampling rate.
q If you want to stop the recording, press <Esc>.
q The recording will stop when the disk is full.
q A new file will be created or an existing file will be
overwritten for recording.
Using RECORD
The following are some examples of how you can record sound files
in DOS:
q To record from CD into a sound file (SONG.VOC) in .VOC
format:
1. Play your CD in the background.
2. Type RECORD SONG.VOC /A:CD and press <Enter>.
q To record a sound file without displaying the recording
information:
1. Type RECORD SONG.VOC /A:CD /Q and press <Enter>.
q To record a stereo sound file from a Line-in source in .WAV
format with MULAW compression:
1. Type RECORD SONG.WAV /A:LINE /M:STEREO
/C:MULAW and press <Enter>.
RECORD Utility 7-3
Page 63

MIXERSET Utility
The MIXERSET utility allows you to interactively control the Mixer
settings. With the mixer, you can control the volume of various
audio sources supported by the card.
You can use the utility as a command at the DOS prompt or invoke
the MIXERSET interface to control the Mixer settings through a fullscreen window consisting of check boxes and sliders.
The chapter provides you detailed information on using MIXERSET.
It is organized as follows:
q Knowing the MIXERSET Command
q Using the MIXERSET Command
8
q Starting the MIXERSET Control Screen
q Knowing the MIXERSET Control Screen
q Using the Mouse and Keyboard
MIXERSET Utility 8-1
Page 64

Knowing the MIXERSET Command
The Mixer is configured using switches that follow the MIXERSET
command.
To use the MIXERSET command:
1. Change to your sound directory.
2. Type MIXERSET [switches] ... and press <Enter>.
where switches can be one or a combination of any of the
following:
/? or /H Displays help messages.
/Q Runs MIXERSET without displaying the setting
information.
/P Sets the Mixer according to the PRESET settings in
the CTMIX.CFG file.
/MA:n;x Sets the MASTER volume and balance of left and
right channels.
/VO:n;x Sets the VOICE volume and balance of left and
right channels.
/MI:n;x Sets the MIDI volume and balance of left and right
channels.
/CD:n;x Sets the CD volume and balance of left and right
channels.
/LI:n;x Sets the LINE-in volume and balance of left and
right channels.
/MIC:n Sets the MICrophone volume.
/SP:n Sets the PC SPEAKER volume.
n specifies the volume level and ranges from 0 to 255.
x specifies the balance of the left and right channels,
and ranges from -5 to +5. x must be preceded by ‘;’.
8-2
Page 65

For example, /MA:200;5 sets the master volume at 200 and the
balance at 5 (this means that the volume will be reduced in the
left channel). /MA:;-5 setting reduces the volume in the right
channel.
/OPS:ss Sets the audio output switches (OPSW) on or off.
ss represents one or a combination of CDz, LIz and
MICz, where z is + (on) or - (off).
For example, /OPS:CD+ MIC- allows you to
receive CD-audio output. It does not allow any
sound passed through the microphone to be sent to
the speakers.
/IPL:ss Turns Left Input switches (IPLSW) on or off.
ss represents one or a combination of CDRz, CDLz,
MDLz, MDRz, LIR z, LILz, and MICz, where z is +
(on) or - (off).
/IPR:ss Turns Right Input switches (IPRSW) on or off.
Same as /IPL.
/AGC:+|- Turns Automatic Gain Control (AGC) on (+) or off
(-).
Using the MIXERSET Command
The following are some examples on how you can use MIXERSET:
q To set the PC speaker volume to 200:
1. Type MIXERSET /SP:200 and press <Enter>.
q To set the master volume to 200 with balanced output through
the left and right channels:
1. Type MIXERSET /MA:200 and press <Enter>.
If balance is not specified, both channels will be set
equally.
q To set all the above in one command:
1. Type MIXERSET /SP:200 /MA:200;0 and press <Enter>.
MIXERSET Utility 8-3
Page 66

Starting the MIXERSET Control Screen
To start the MIXERSET Control Screen:
1. Change to your sound directory.
2. Type MIXERSET and press <Enter>.
The MIXERSET Control Screen shown in Figure 8-1 appears.
Figure 8-1: The MIXERSET Control Screen.
Knowing the MIXERSET Control Screen
The MIXERSET Control Screen consists of the following
components:
q Volume Slider
q Balance Slider
q Automatic Gain Control Check Box
q Save Button
q Input Box
q Output Box
8-4
Page 67

Volume Slider
Controls the volume levels of the input sources.
Balance Slider
The sliders control the balance of the left and right speakers for
audio sources with stereo capability. Moving the slider to the left
decreases the volume of the right speaker but the left speaker volume
is left consistent. The opposite applies when you move the slider to
the right.
Automatic Gain Control Check Box
The Automatic Gain Control (AGC) check box automatically adjusts
input gain from the microphone to a level suitable for recording.
Save Button
The Save button saves all changes made to the Mixer to the
CTMIX.CFG file. The new setting will be used the next time you
preset the mixer setting with the command MIXERSET /P.
Input Box
The Input Box enables you to select the audio sources you want to
control as input to the Mixer. The audio sources available are MIDI,
Line and Microphone input, and CD-audio. You can direct these
audio sources through the left or/and right input channels of your
Mixer.
Output Box
The Output Box enables you to select the audio sources you want to
control as output from the microphone, Line-in, and CD-audio to the
left and right speakers. You can select one or a combination of the
above audio sources playing through the card.
To get a stereo sound effect, make sure that the left channel
signal of the audio source is directed to the Left-In channel
and the right signal to the Right-In channel.
MIXERSET Utility 8-5
Page 68

Using the Mouse and Keyboard
Using the MIXERSET interface, the Mixer can be configured with a
mouse or a keyboard.
q Choose the option if it is a check box.
q Move the slider by the click and drag method or click at
the extreme end of the slider to increase or decrease the
Volume.
q To quit MIXERSET, click the Control-menu box.
q Press <Tab> to move from one group to another.
q Press <Shift+Tab> to move backwards to a previous group.
q Press the up or down arrow keys to move from one option
to another within a group.
q Press the left or right arrow keys to adjust volume.
q Press <Spacebar> or <Enter> to select or deselect a check
box.
q To quit MIXERSET, press <Esc>.
8-6
Page 69

Glossary
The following are descriptions of some terms used in the User’s
AGC Automatic Gain Control. Automatically
Amplifier A device that increases the power of
Bits Per Sample A measure of the sampling rate (number of
Guide:
adjusts the input from the microphone to a
suitable level for recording.
electical signal in a sound system.
bits used to record a wave taken from one
sample). The higher the sampling rate, the
higher the rate at which disk space is used
up. But, reproduction of sound recorded at a
high sampling rate is better than that of a
lower sampling rate.
Channel A path through which sound passes between
two devices within a system. Multichannel
system can transfer independent sound
through each channel concurrently. Mono
recording uses one channel. Stereo
recording uses two channels. See also
Balance.
.CMF Filename extension for sound files saved in
the Creative Labs, Inc. music data file
format.
Compression A technique for compacting data for more
efficient transmission or storage. The sound
quality of compressed data is generally
reduced.
Glossary
Page 70

Embed To insert an object in a document that
supports Object Linking and Embedding
(OLE). An embedded object becomes a part
of the document. Objects can be embedded
using methods such as drag and drop or
copy and paste using the Clipboard. See
also Linking; Object Linking and
Embedding.
Embedded Object Sound objects, charts, drawings, or text that
can be copied from one application or
document and inserted in a document that
supports Object Linking and Embedding
(OLE). An embedded object becomes part
of the document. Changing an embedded
object will not affect the original object.
See also Linking; Object Linking and
Embedding.
Fade In Uniformly increases the volume level of a
sound to an audible level.
Fade Out Uniformly decreases the volume level of a
sound until it is not audible anymore.
Frequency A measure of how often a vibration or
oscillation takes place. Frequency is
measured in hertz (Hz).
Hot Key One- or two- key command that initiates a
function.
Icon A graphical representation of an object.
Input Source Sound sources like microphone, cassette
deck, or compact disc player that can be
attached to a Line-In port.
Line-In The input jack of the audio card for
connection to a high impedence external
audio device.
Page 71

Linking To insert an object in a document using
Object Linking and Embedding (OLE) where
subsequent changes made to the object will
reflect in the document. An object is linked
using methods such as drag and drop or
copy and paste using the Clipboard. The
linked object remains a separate file.
Consequently, if you transfer a document
that contains a linked object to another
computer, you must also transfer the
original file to which the object is linked.
Both the object and target document must be
created in a Windows-based application that
supports OLE.
Microsoft ADPCM The ADPCM compression technique by
Microsoft.
.MID Extension of files that contain sythesized
music in the MIDI format.
MIDI Musical Instrument Digital Interface. It is
an international hardware/software standard
that specifies the cable and hardware
interface for several devices, instruments,
and computers to interchange music codes/
events.
Mixing To combine sound using several sources to
produce a recording.
Mono To record sound using one channel. See
also Channel.
OLE Object Linking and Embedding. A
technology that allows objects to be linked
or embedded into host applications
supporting OLE. With OLE, sound and
video can be incorporated into documents.
Recording Source Sound sources like microphone, compact
disc player, and cassette deck that are
available for recording.
Glossary
Page 72

Sampling The process of converting analog signal into
digital data.
Sampling Rate The frequency at which samples of sound is
taken. A higher sampling rate produces
results close to the original but it requires
more memory.
Sound File Files containing sound data. Sound files are
usually stored in four formats with .WAV,
.MID, .VOC and .CMF extensions.
Stereo To record sound using two channels. See
also Channel.
.VOC Extension for sound data saved in Creative
Labs, Inc. Voice format.
.WAV Extension for sound data saved in Microsoft
wave format.
16-bit Produces a rich, detailed sound that
embodies more than 65,000 possible digital
configurations.
 Loading...