

Page 1

Table of contents
1. Safety precautions… … … … … … … … … … … … … … … … … … … … … … … .… … … .1
2. Standard accessories… … … … … … … … … … … … … … … … … … … … … … … … .… .3
3. Install machine… … … … … … … … … … … … … … … … … … … … … … … … … … .… ..5
3.1 Installation and connection… … … … … … … … … … … … … … … … … … … … .… ..5
3.2 Install cutting tool… … … … … … … … … … … … … … … … … … … … … … … .… … 6
4. Features of interface… … … … … … … … … … … … … … … … … … … … … .… … … … .7
5. Cutting plotter PCUT CT operating instructions… … … … … … … … … … .… … … … .9
5.1 Name and functions of parts… … … … … … … … … … … … … … … … … … … … … 9
5.2 Basic operation… … … … … … … … … … … … … … … … … … … … … … … … … … 11
5.3 Operating instructions… … … … … … … … … … … … … … … … … … … … … … … .14
5.4 Technical features… … … … … … … … … … … … … … … … … … … … … … … … … 21
6. Plotting servo machine PCUT S operating instructions… … … … … … … … … … … ..22
6.1 Name and functions of parts… … … … … … … … … … … … … … … … … … … … ...22
6.2 Basic operation… … … … … … … … … … … … … … … … … … … … … … … … … ..24
6.3 Operating instructions… … … … … … … … … … … … … … … … … … … … … … … 27
6.4 Technical features… … … … … … … … … … … … … … … … … … … … … … … … ..36
7. Troubleshooting… … … … … … … … … … … … … … … … … … … … … … … … … … ..37
Page 2
1.Safety precautions
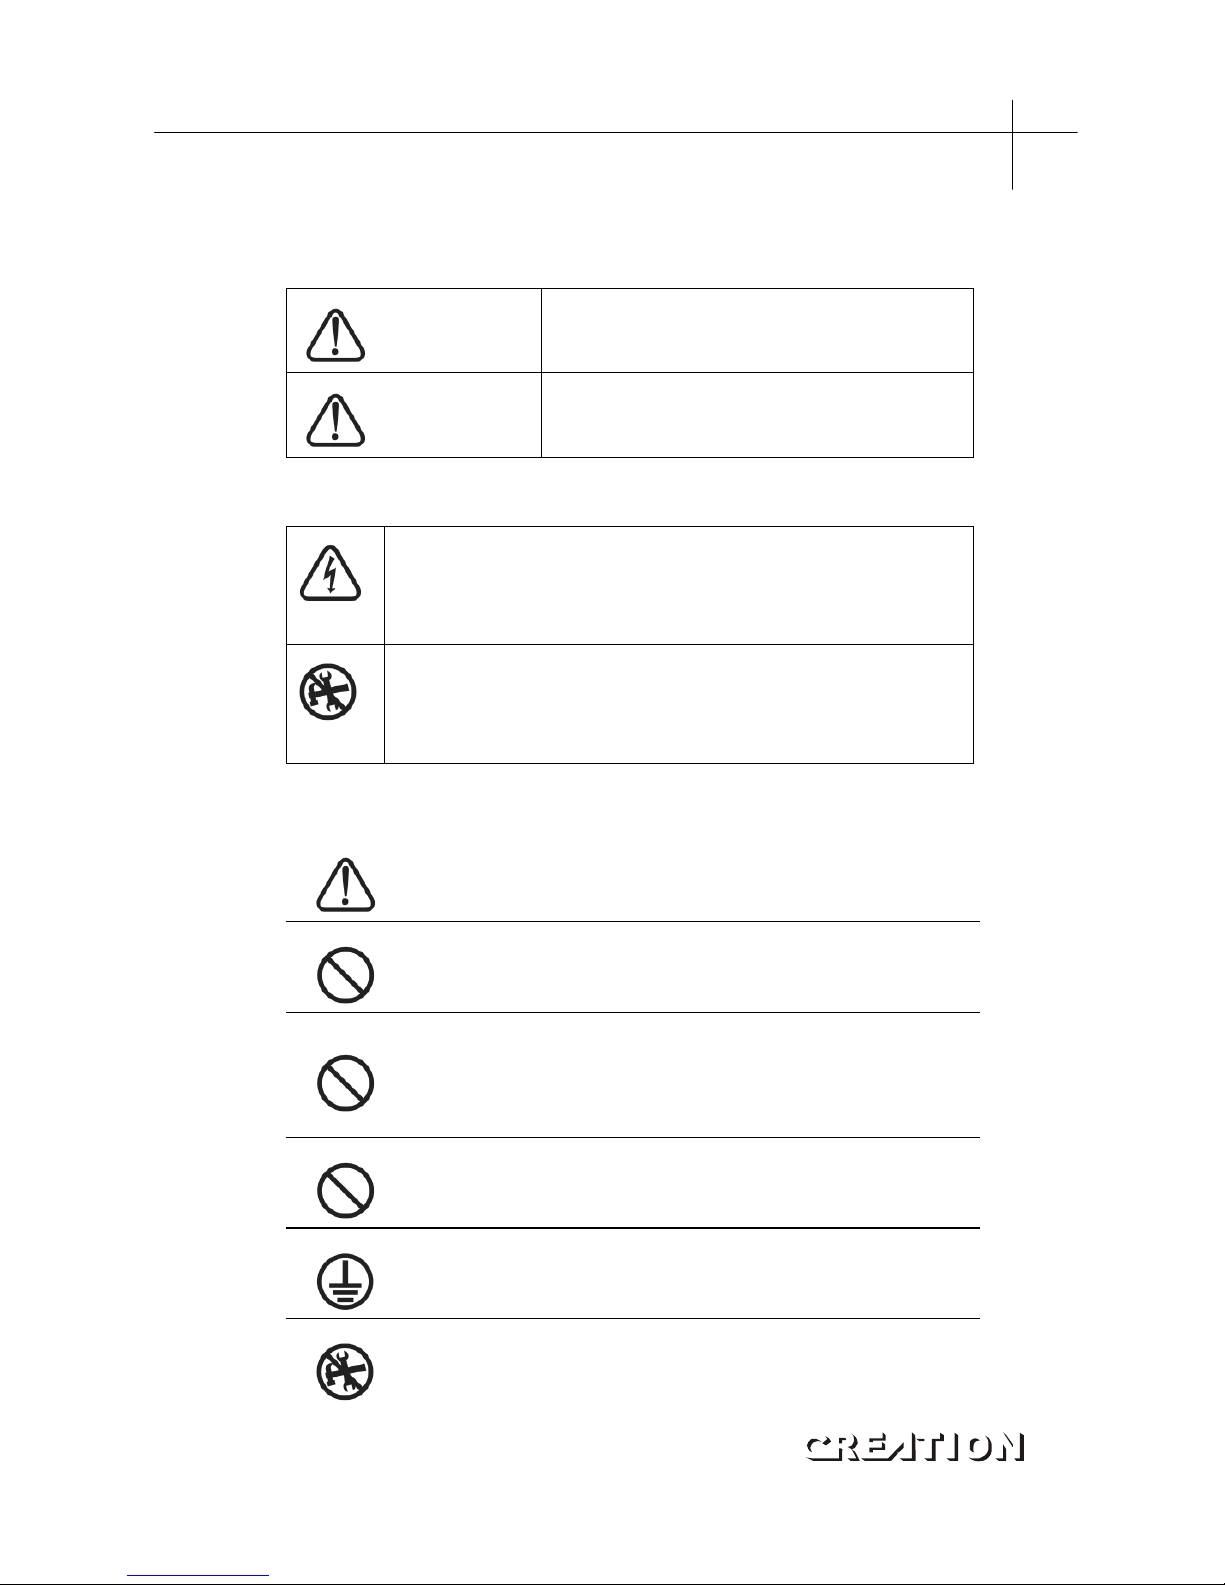
Definition of warning symbols:
WARNING
Any improper operation possibly results in hazard
of life or damage of equipment。
CAUTION
Any improper operation possibly results in hazard
of life or other objects。
Definition of sign symbols:
The symbol is prepared to arouse operator's highly attention. The
symbols in triangles specify the cases to be attentive. The symbol in the
left warns you of electric shock。
The symbol specifies the activities to be forbidden. The symbol in the
circle specifies the acts to be forbidden. The symbol in the left tells you
no detachment。
WARNING
Do not use the power source not meeting rating voltage, otherwise
fire or electric shock may be resulted in。
If the machine gives out smoke or unpleasing smell, or noise sounds
please do not use it .in such cases, continuing using it may result in
fire or electric shock。
Do not put out the plug when the power is on to avoid damage to the
machine。
Make sure the machine grounded otherwise electric shock or
mechanic default may be resulted in。
Do not detach, repair or reconstruct the machine, otherwise fire,
electric shock, hazard of life may be resulted in。
PCUT SERIES USER‘S MANUAL Safety precautions
1
Page 3
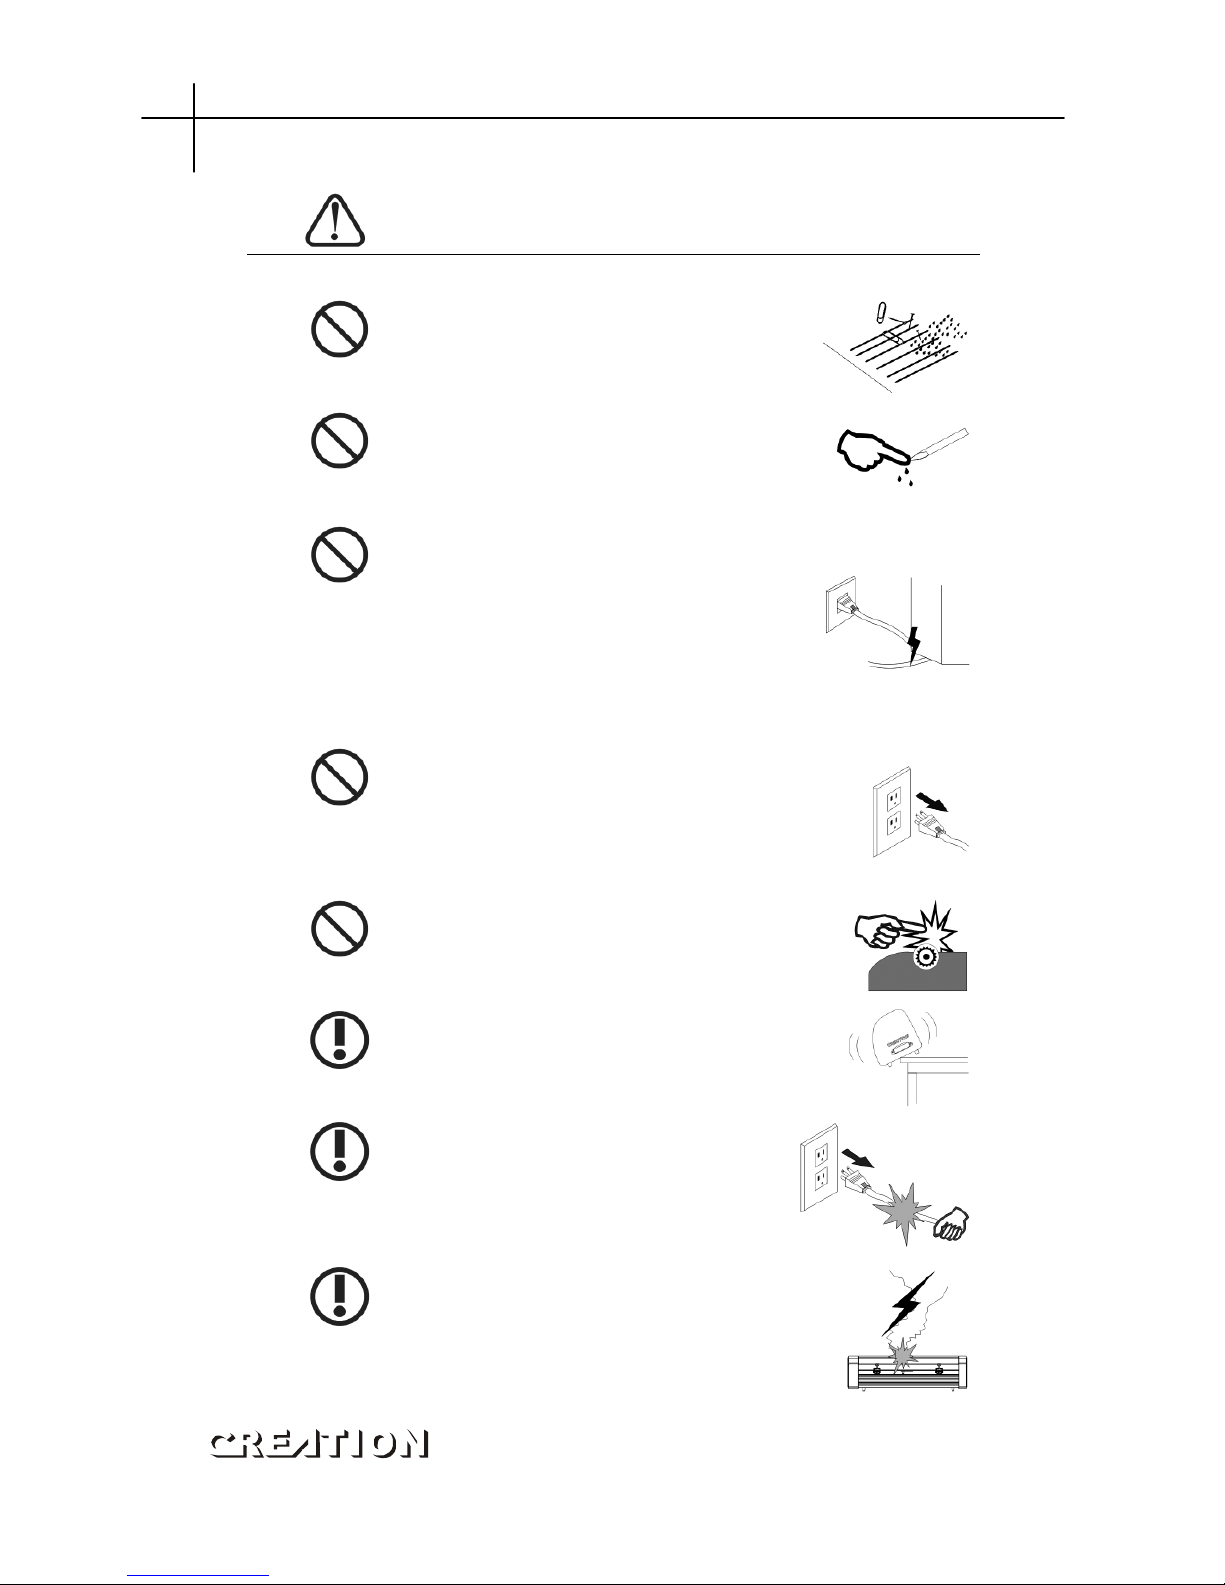
CAUTION
Do not leak any liquid or drop metal into
the machine, such things may result in
fire。
Do not touch the knife top with your
finger to prevent injury or perspiration
of knife head。
Do not damage or random replace the
supplied power cable. Do not excessively
bend, pull, bundle the power cable or
place weight on it, otherwise the power
source may be damaged even fire or
electric shock is thus incurred。
If you are not going to use the machine
for a long time, please unplug the power
cable from the receptacle, otherwise fire
possibly happens。
When operating the machine, do not
place either of your hands on capstan to
avoid injury。
Place the machine on a stable surface,
otherwise the machine may fall therefore
get damaged。
To unplug the power cable fromreceptacle,
please hold the plug instead of the cable,
strongly pulling of the cable possibly
results in electric shock or fire。
Any operation is forbidden in case of
storm or lighting to prevent damage of
the machine。
Safety precautions PCUT SERIES USER‘S MANUAL
2
Page 4
2.Standard accessories
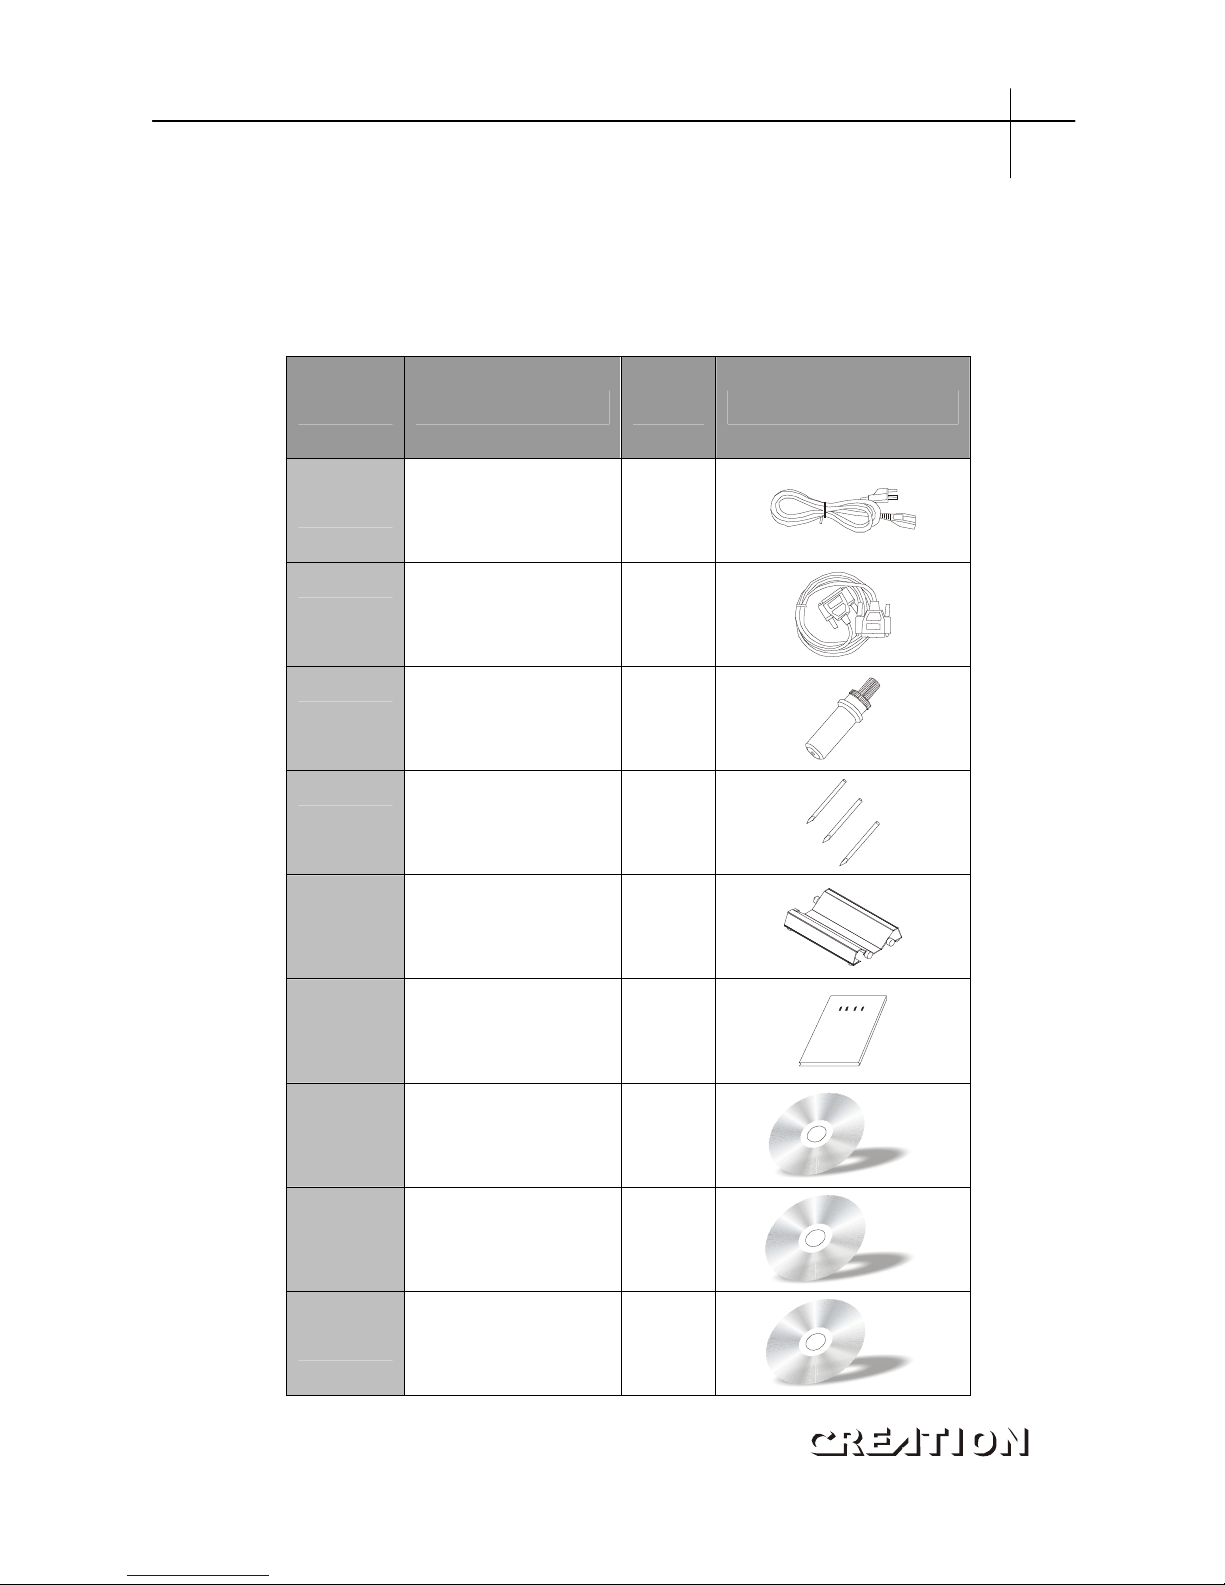
Please first check following accessories after unpacking, please contact the seller or
our company if you find anything missing。
Serial No Item Quantity Icon
1 Power cable 1
2 Signal cable 1
3 Rotary tool apron 1
4
High-speed tungsten
steel knife
3
5
Paper-tube bracket
(desktop’s machine
special fitting)
1
6 Operating manual 1
7
Wentai software
(optional)
1
8
Cutting& plottingmaster
(optional)
1
9
PLTDraw Software
(optional)
1
PCUT SERIES USER‘S MANUAL Standard accessories
3
Page 5
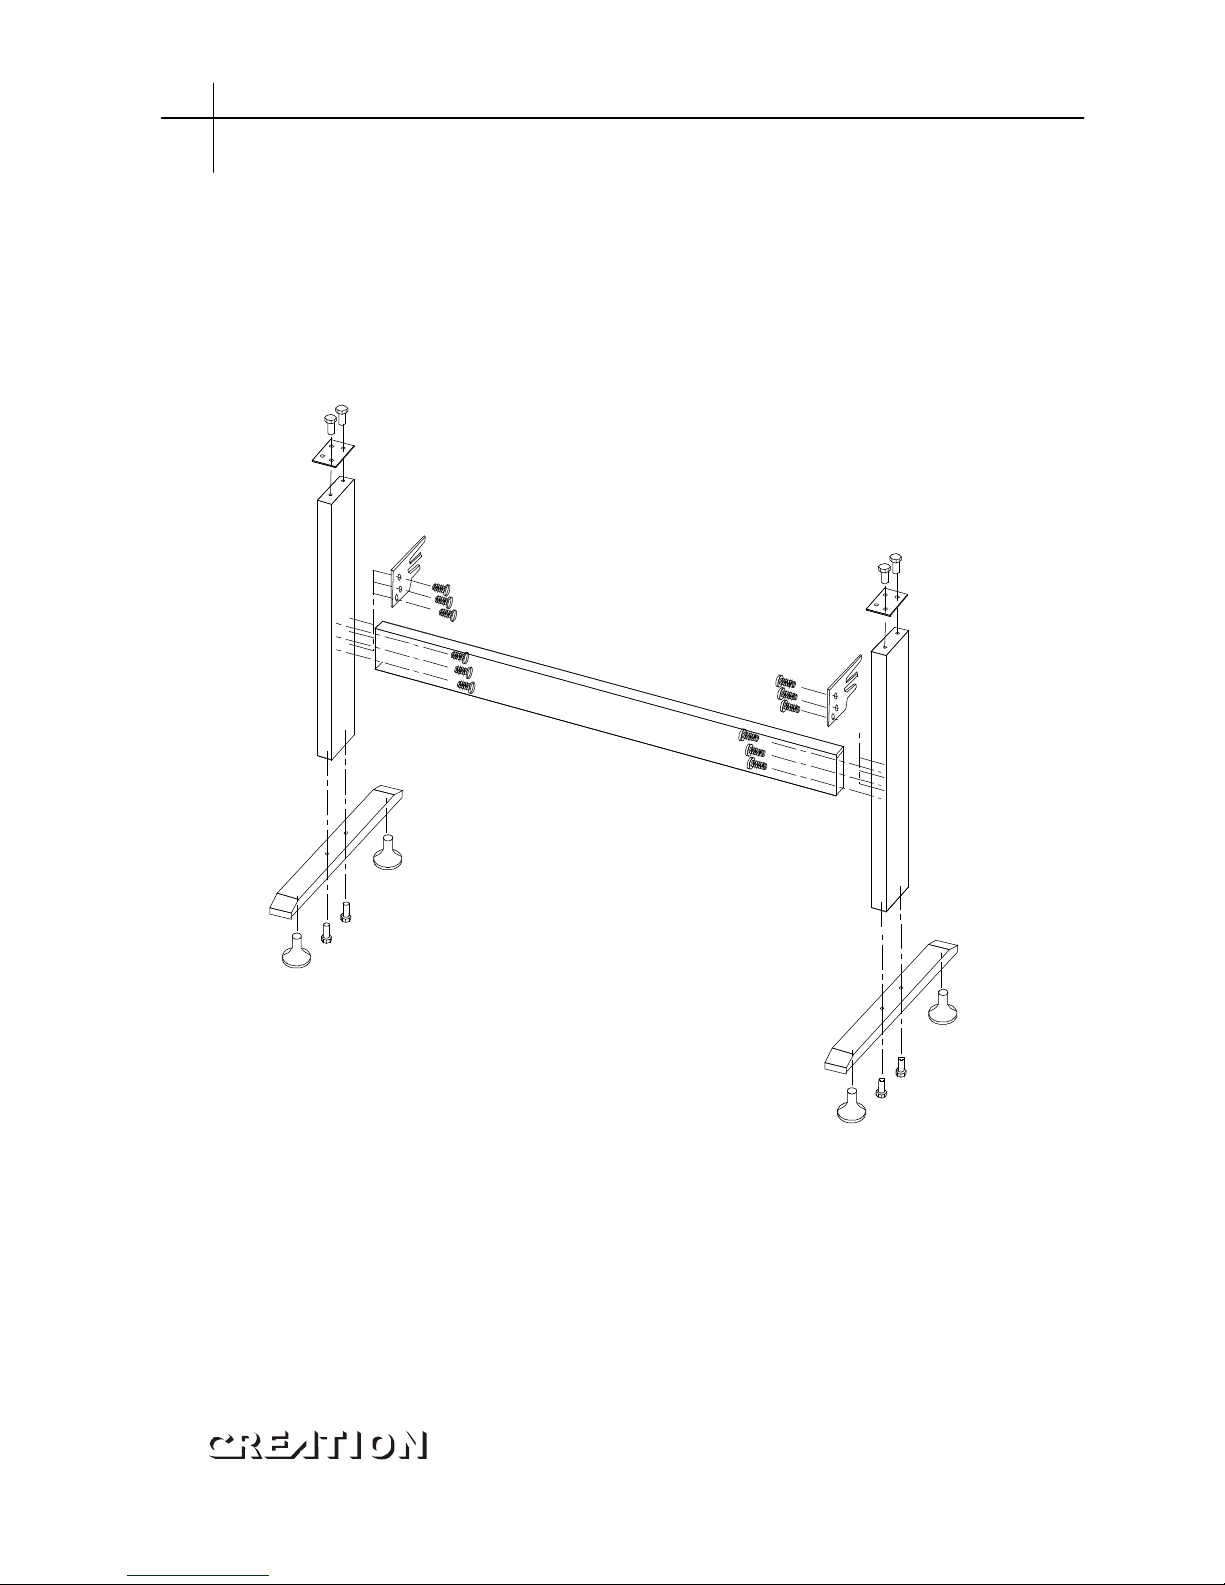
10 Vertical Foot Stool and Installation Sketch Map
(Available to the type with minimum width of 1000mm only)
Take parts of the foot stool out of the pack, open the parts bag, install the foot stool as
the map shows. After installation place the host on the support with screw hole targeted, then
fasten it with screw。
Standard accessories PCUT SERIES USER‘S MANUAL
4
Page 6
3.Basic operation
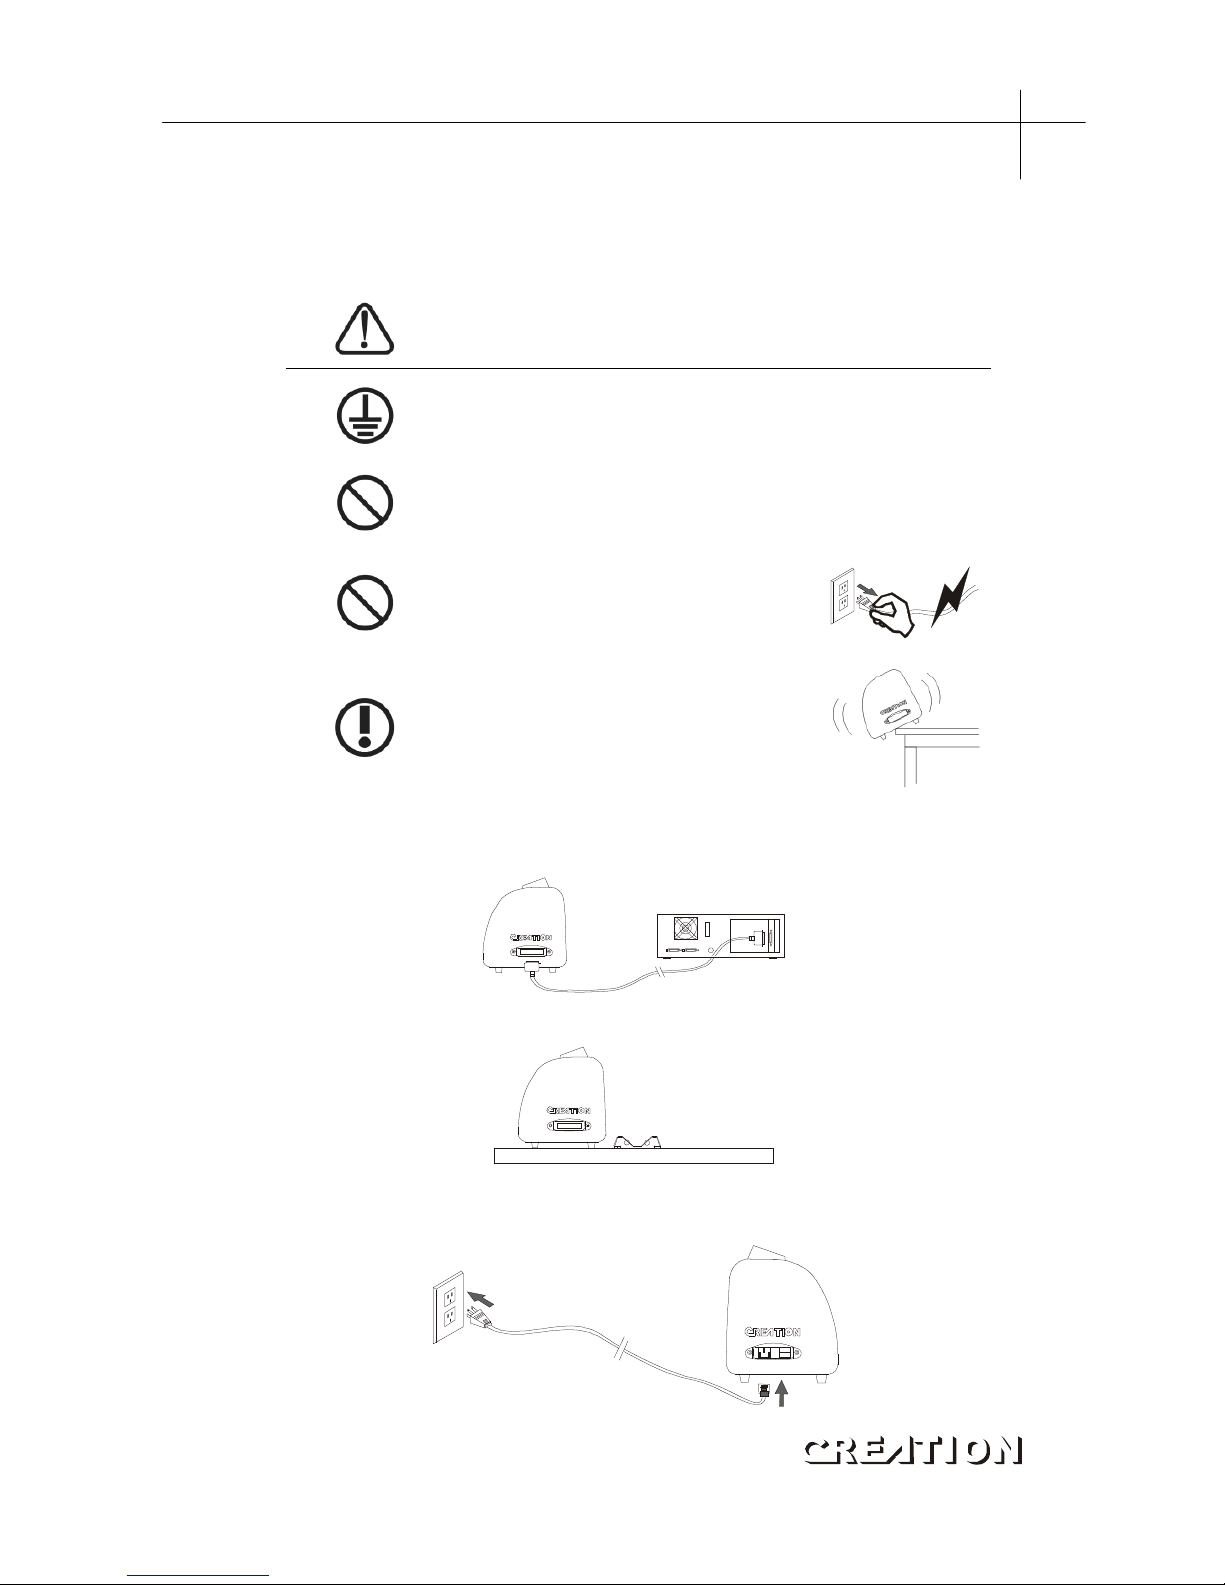
3.1 Installation and connections
WARNING
Make sure this machine is grounded, otherwise electric shock or
mechanic default is possibly resulted in。
Do not use the power source not meeting rating voltage Using
the wrong power source may result in fire or electric shock。
Do not put out the plug when the
power is on to avoid damage to the
machine。
Place the machine on a stable
surface, otherwise the machine
may fall therefore get damaged。
3.1.1 Place the cutter in a plane and roomy place。
3.1.2 Connect signal cable to COM1 or COM2 port of the computer host。
3.1.3 Place the bracket behind the host, ensure it is parallel to the host。
3.1.4 Check voltage of the power source and whether it is grounded, do not
connect to power until all are in a good condition。
PCUT SERIES USER‘S MANUAL Basic operation
5
Page 7
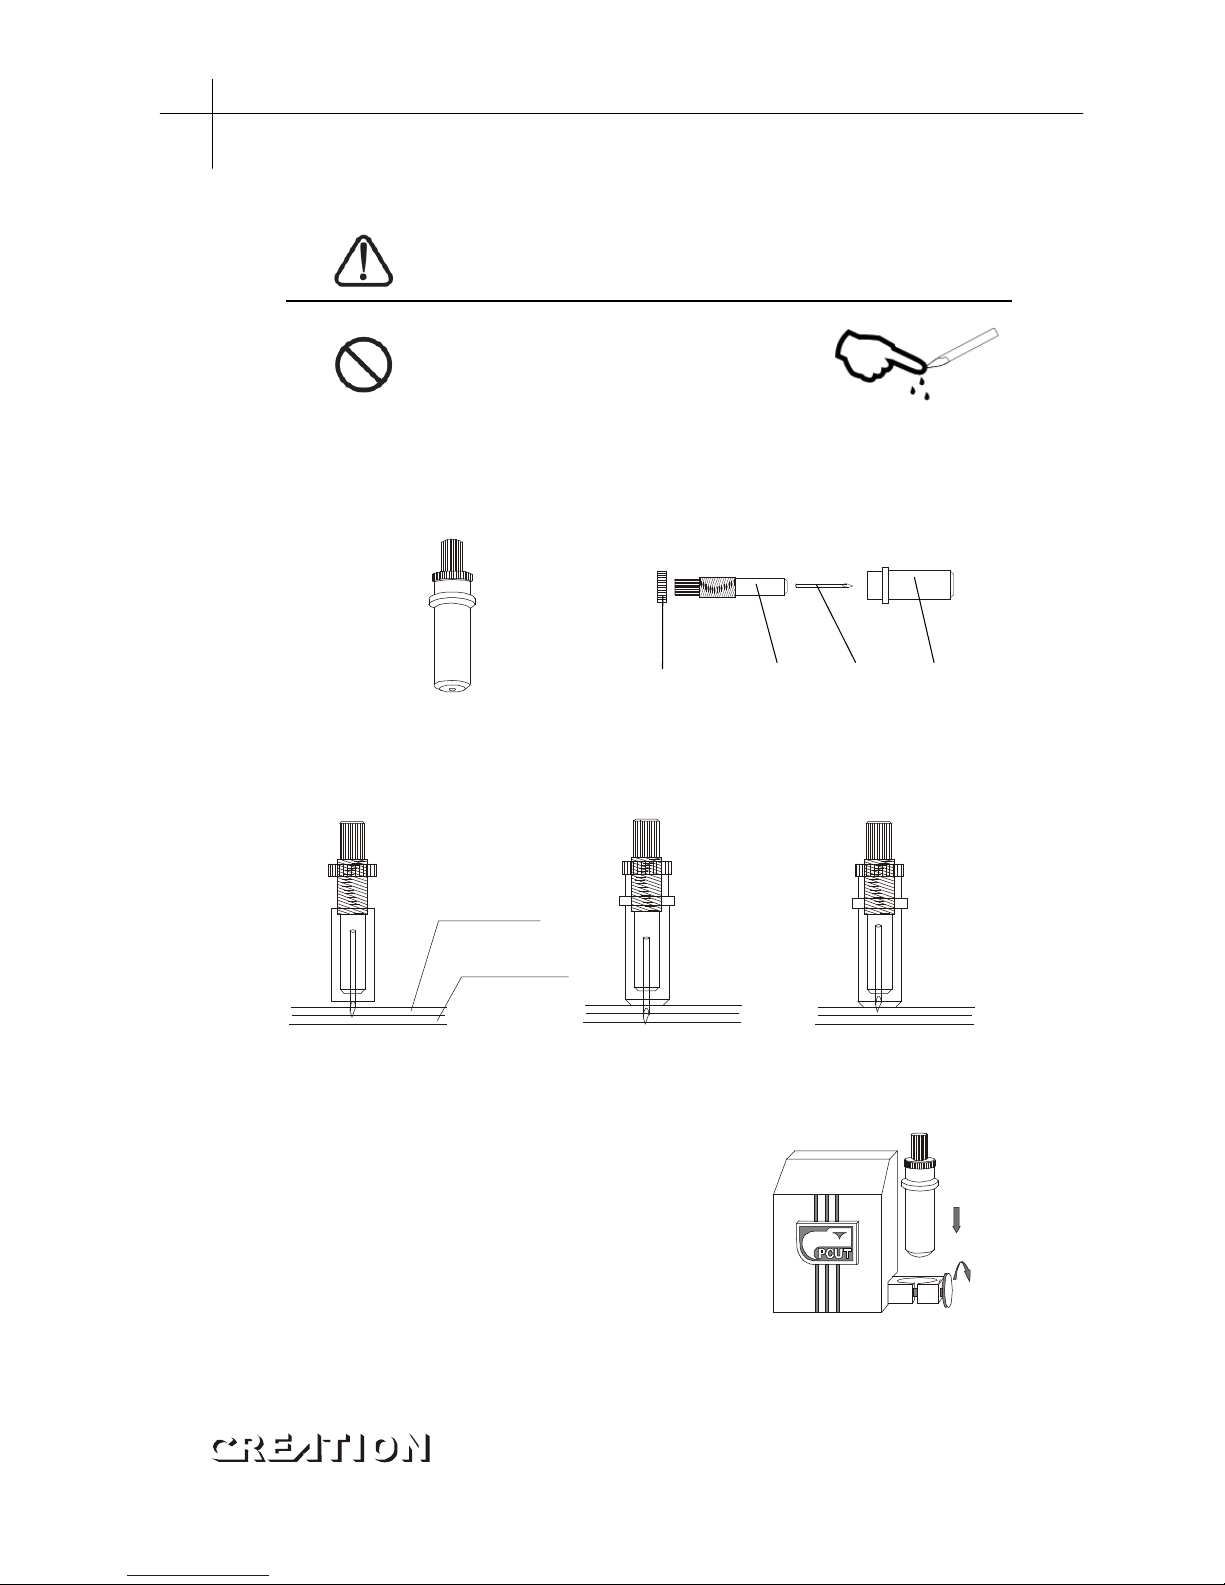
3.2 Installation of tool
CAUTION
Do not touch the knife top with your
finger to prevent injury or passivation
of knife head。
3.2.1 Fit cutter into rotary tool, the knife and tool are as shown in following
drawings:
(outside drawing) (exploded view)
3.2.2 Adjust the protruding length of the knife top as required for specific cutting
media。
Correct Too long protruding Too short protruding
length of knife point length of knife point
3.2.3 (1) Loosen the screw of tool carrier.
(2) Assembly the tool with knife into the tool
carrier。
(3) When the tool is in appropriate position screw
it and fix the screw。
Knife adjusting screw
Knife handle
Knife Knife sheath
Basic operation PCUT SERIES USER‘S MANUAL
6
Superficial
materials
Base paper
Page 8
4.Features of interface
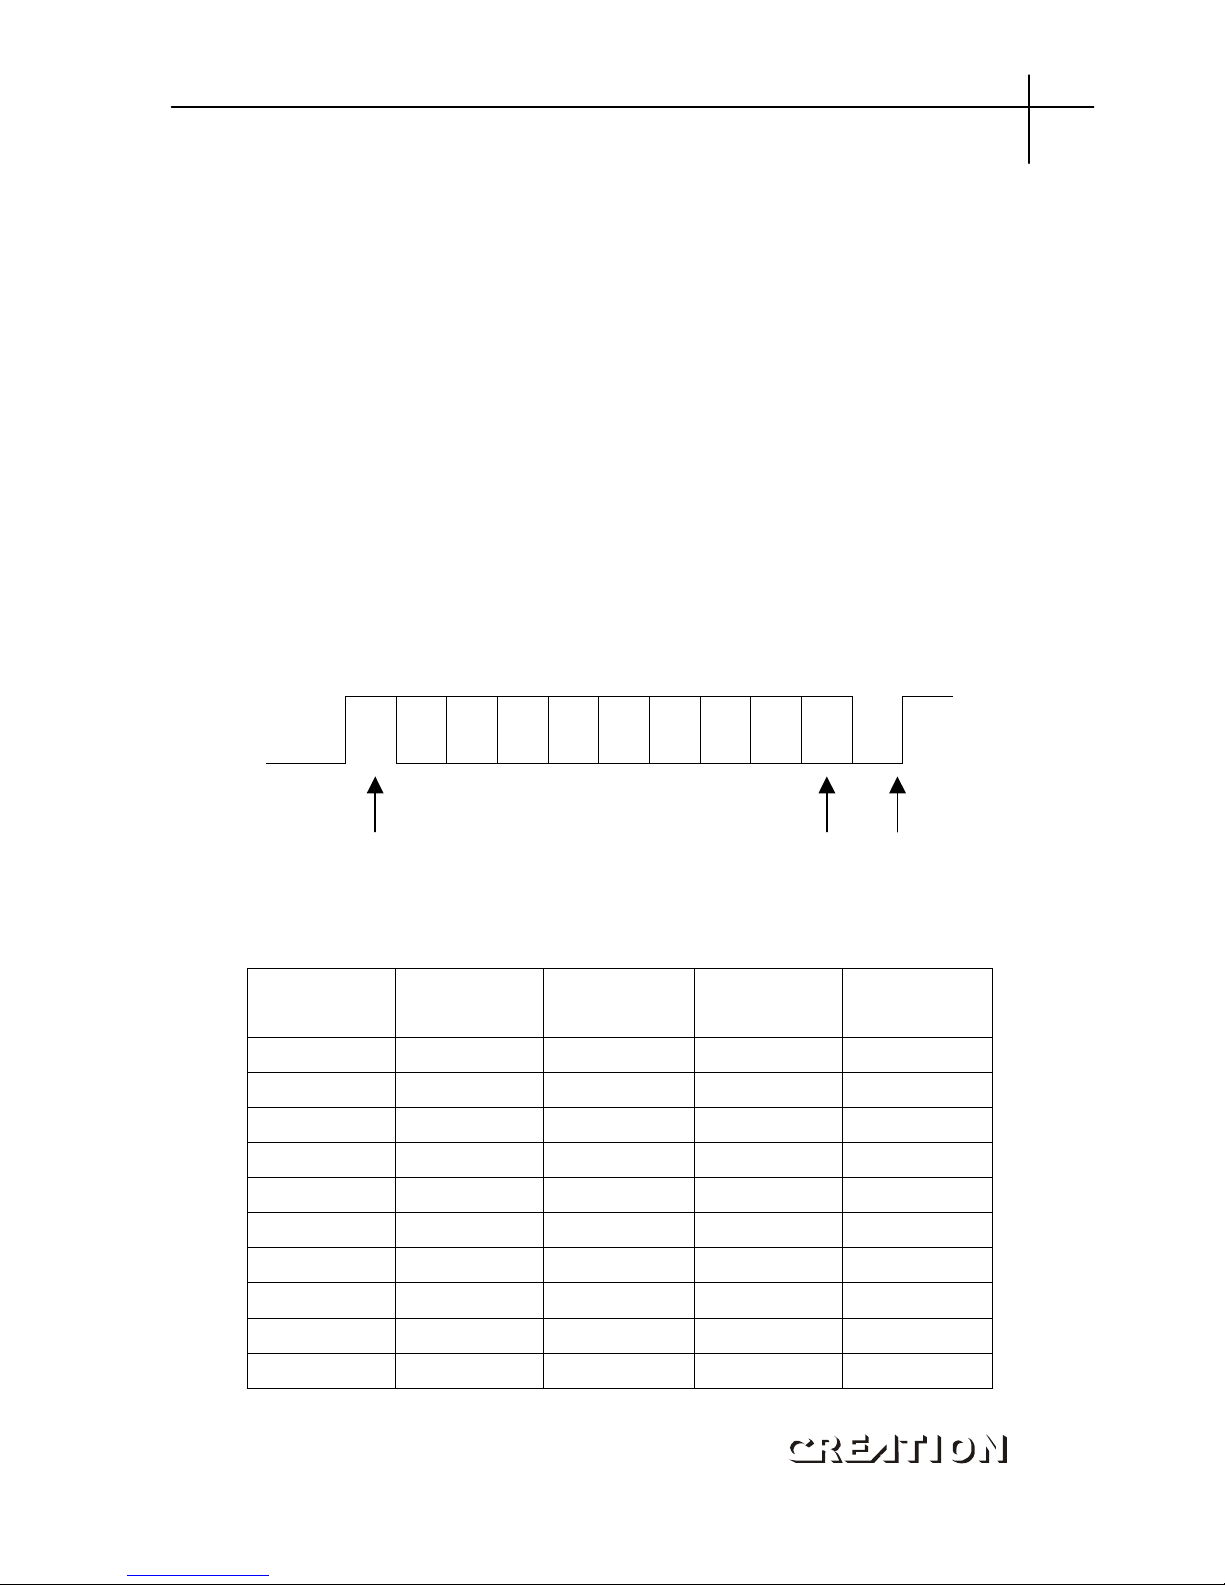
Cutting plotter PCUT provides an input interface, serial RS-232 interface, which is
connectable with a wide range of computers。
Properly connect signal cable of the interface will enable the cutter accurately
respond to plotting and engraving command from computer. Improper connection of the
cable may result in trouble even lock up of the machine。
RS-232 Serial Interface:
RS-232 Serial Interface meets features of ELA (Electric Industries Association)。
General features:
Standard: CCITT V14,EIA RS-232C,JIS×5101
Baud rate: 300、600、1200、4800、9600baud
Stop bit: odd/even/none
Word length: 8bit
1 2 3 4 5 6 7 8
RS232C foot definition:
Pin
No
Sign
SYS
RS232C
CCITT
24
Signal
Dissection
1 FG AA 101
2 SD BA (TDATA) 103 ← P
3 RD BB (RDATA) 104 → P
4 RS CA (RTS) 105 ← P
5 CS (CTS) 106 → P
6 DR (DSR) 107
7 SG AB (SGND) 102
8-19
20 ER CT ( ) 108 ← P
21-25
Start bit check bit stop bitdata bit
PCUT SERIES USER‘S MANUAL Features of interface
7
Page 9
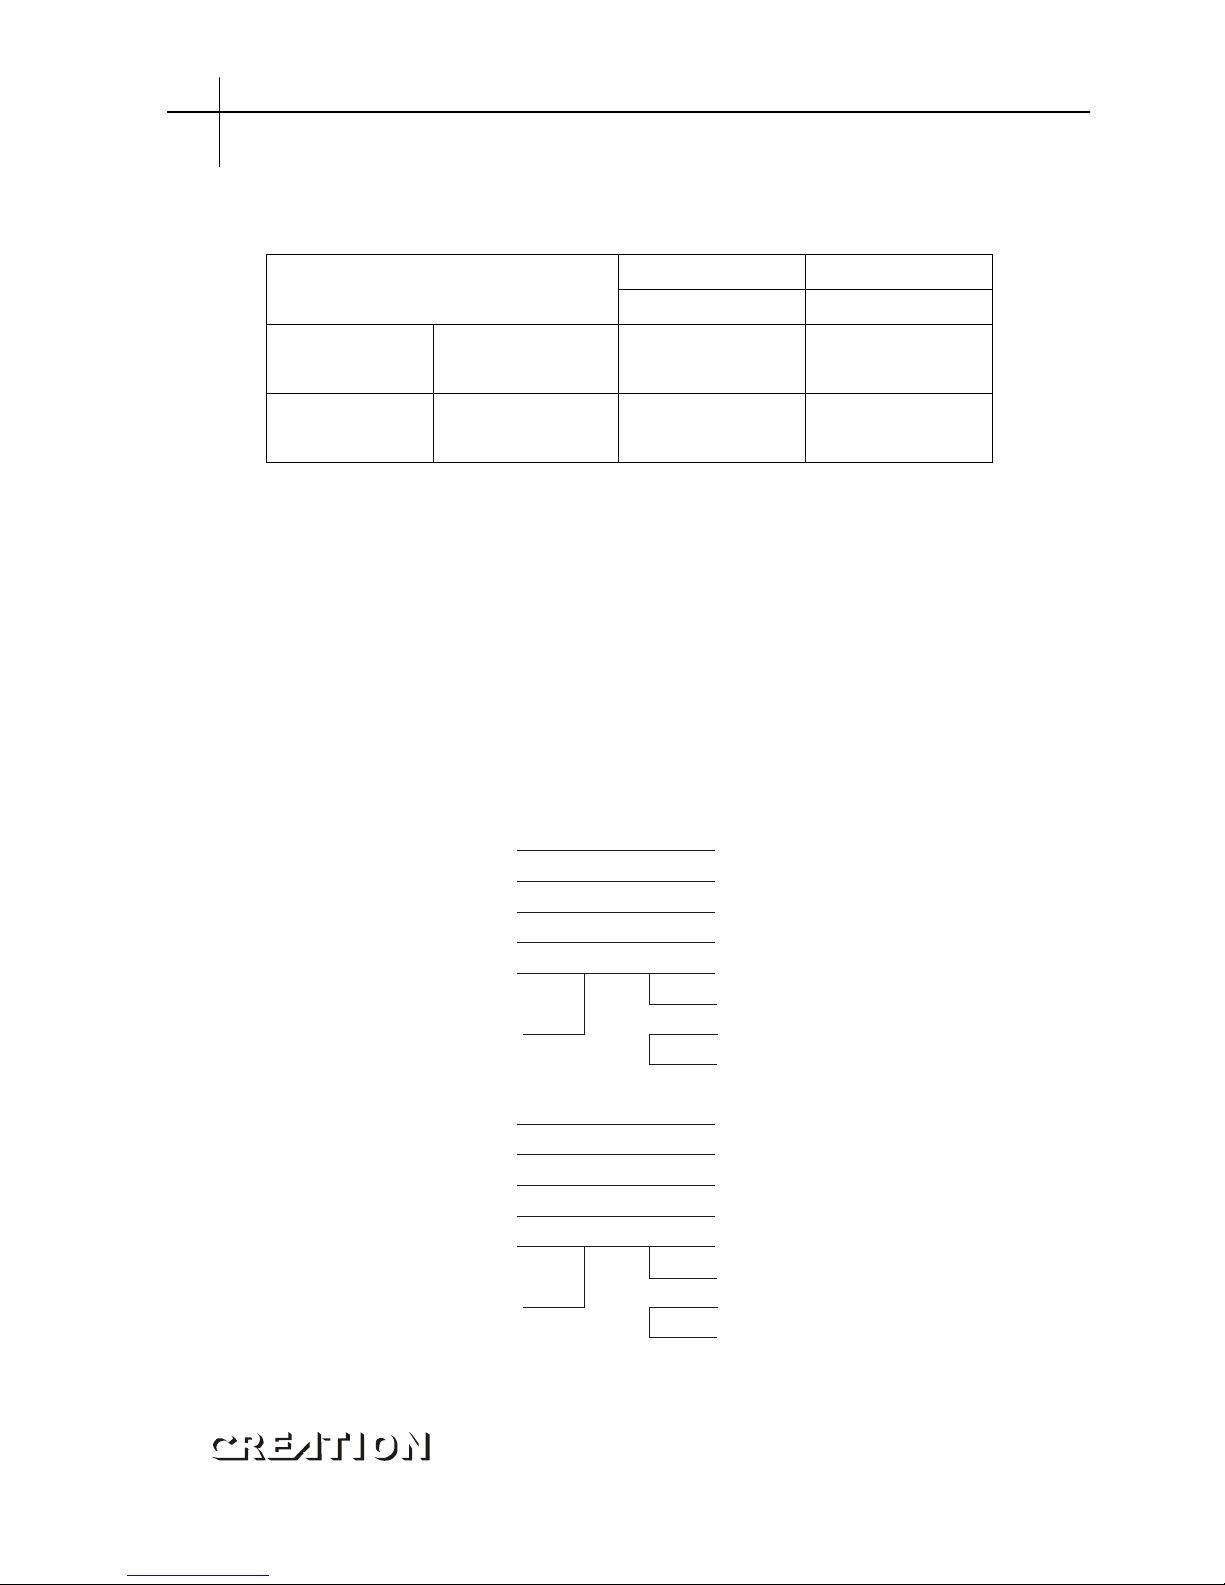
Electric parameters:
RC,SD RS,CS,DS,ER
Negative Positive logic
Input voltage
level
+5v to +12v
-5v to -12v
Logical “0”
Logical “1”
“ON”
“OFF”
Input voltage
level
+5v to +12v
-5v to -12v
Logical “0”
Logical “1”
“ON”
“OFF”
Connector:
Cutting plotter port: DB-25S
Signal computer port: DB-25P
Map of serial interface cable connecting between IBM-PC computer and cutting
plotter。
Cutting plotter port Signal computer port
Signal Foot Foot Signal
Chassis GND
Signal GND
RX Data
TX Data
RTS
DTR
Chassis GND
RX Data
TX Data
GND
RTS
DTR
(DB25B)
1
7
2
2
4
20
(DB25B)
1
2
3
7
4
20
(DB25P)
N/C
7
3
3
5
8
6
20
(DB9P)
N/C
2
3
5
7
8
4
6
Shield
Signa GND
TX Data
RX Data
CTS
DCD
DSR
Shield
TX Data
RX Dats
GND
RTS
CTS
DTR
DSR
Features of interface PCUT SERIES USER‘S MANUAL
8
Page 10
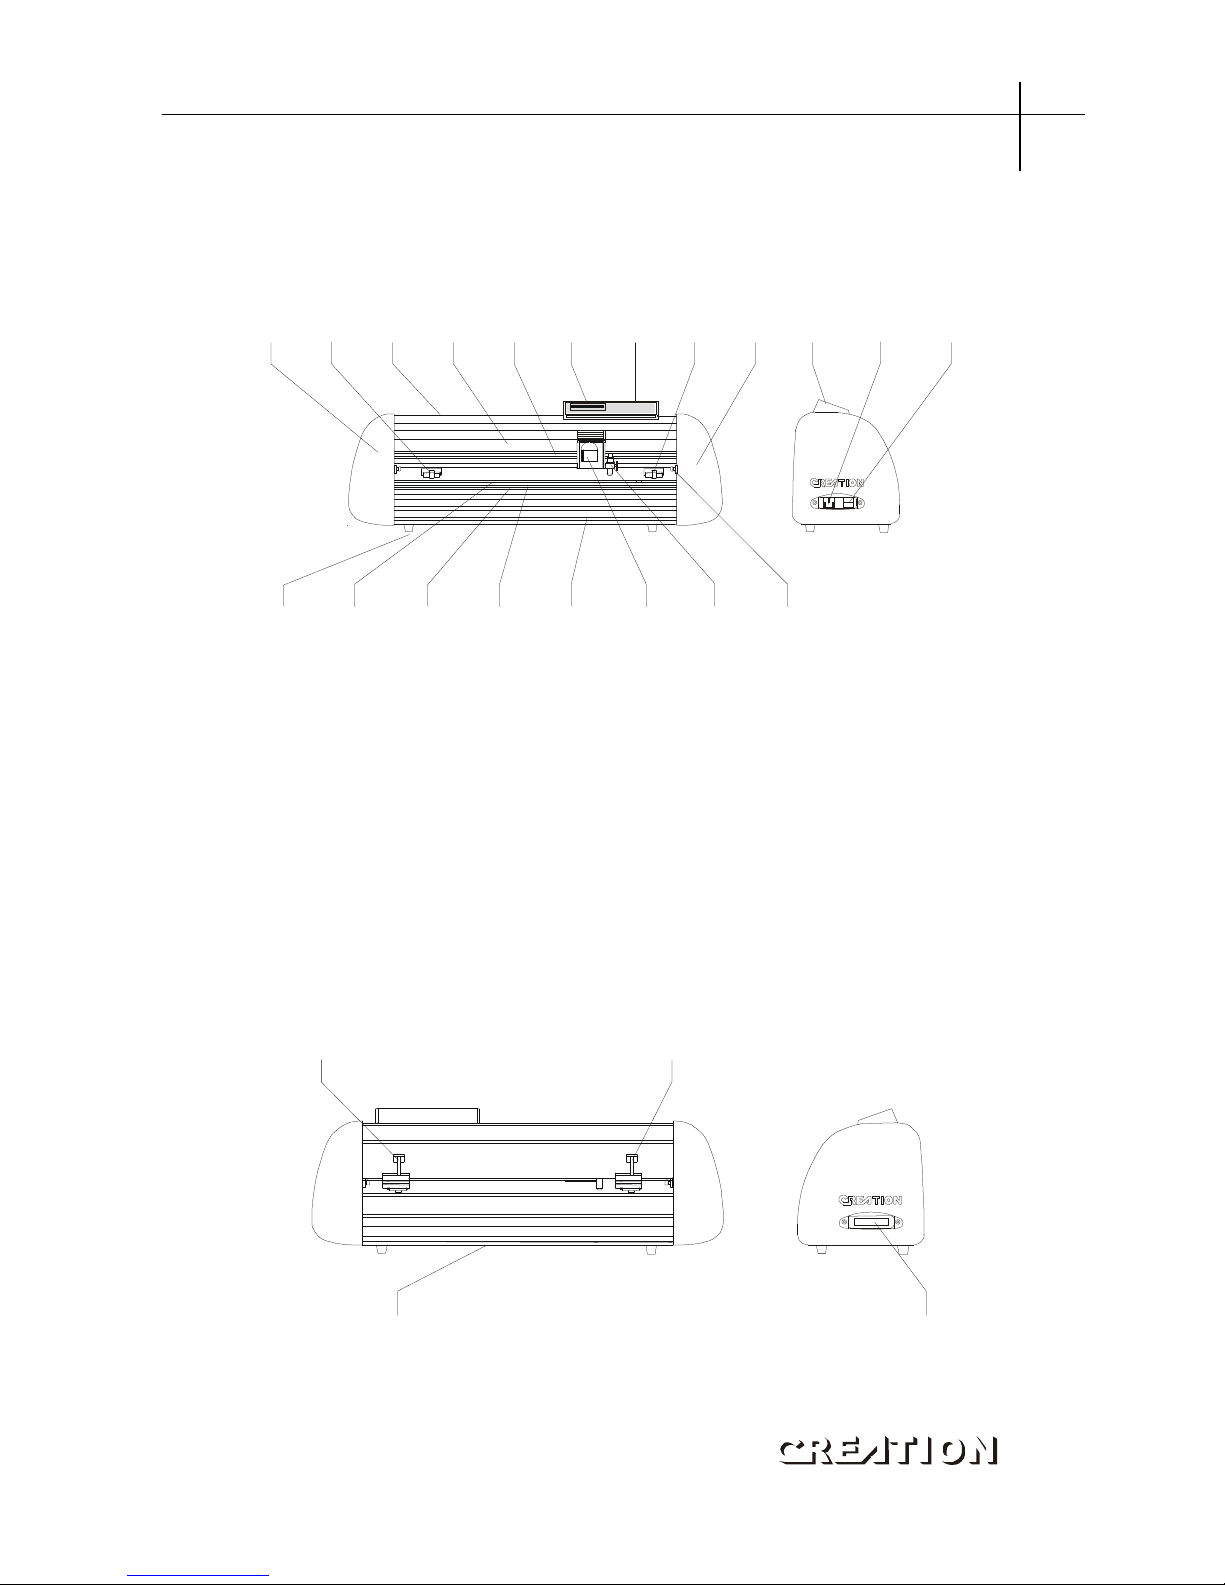
5.Cutting plotter PCUT CT operating instructions
5.1 Names and functions of parts
5.1.1 Frontal view
1 2 3 4 5 6 7 2 8 9 10 11
12 13 14 15 16 17 18 19
1.Left cabinet 11.Power on/off
2.Paperweight wheel 12.Foot cushion
3.Upper cover 13.Y Transmission Shaft
4.Beam 14.Scale
5.Tooth profile transmission belt 15.Strip cushion
6.LCD (Liquid Crystal Display) 16.Trimming groove
7.Control keyboard 17.Slider
8.Right cabinet 18.Knife clip
9.Keyboard base 19.Reset
10.Receptacle of power source
5.1.2 Back view
背面
右侧
1
1
2
3
1.Handle of paperweight wheel 3.RS232 Receptacle
2.Baseboard (containing main
PCUT SERIES USER
‘
S MANUAL Cutting plotter PCUT CT operating instructions
9
Reverse side Right side
Page 11
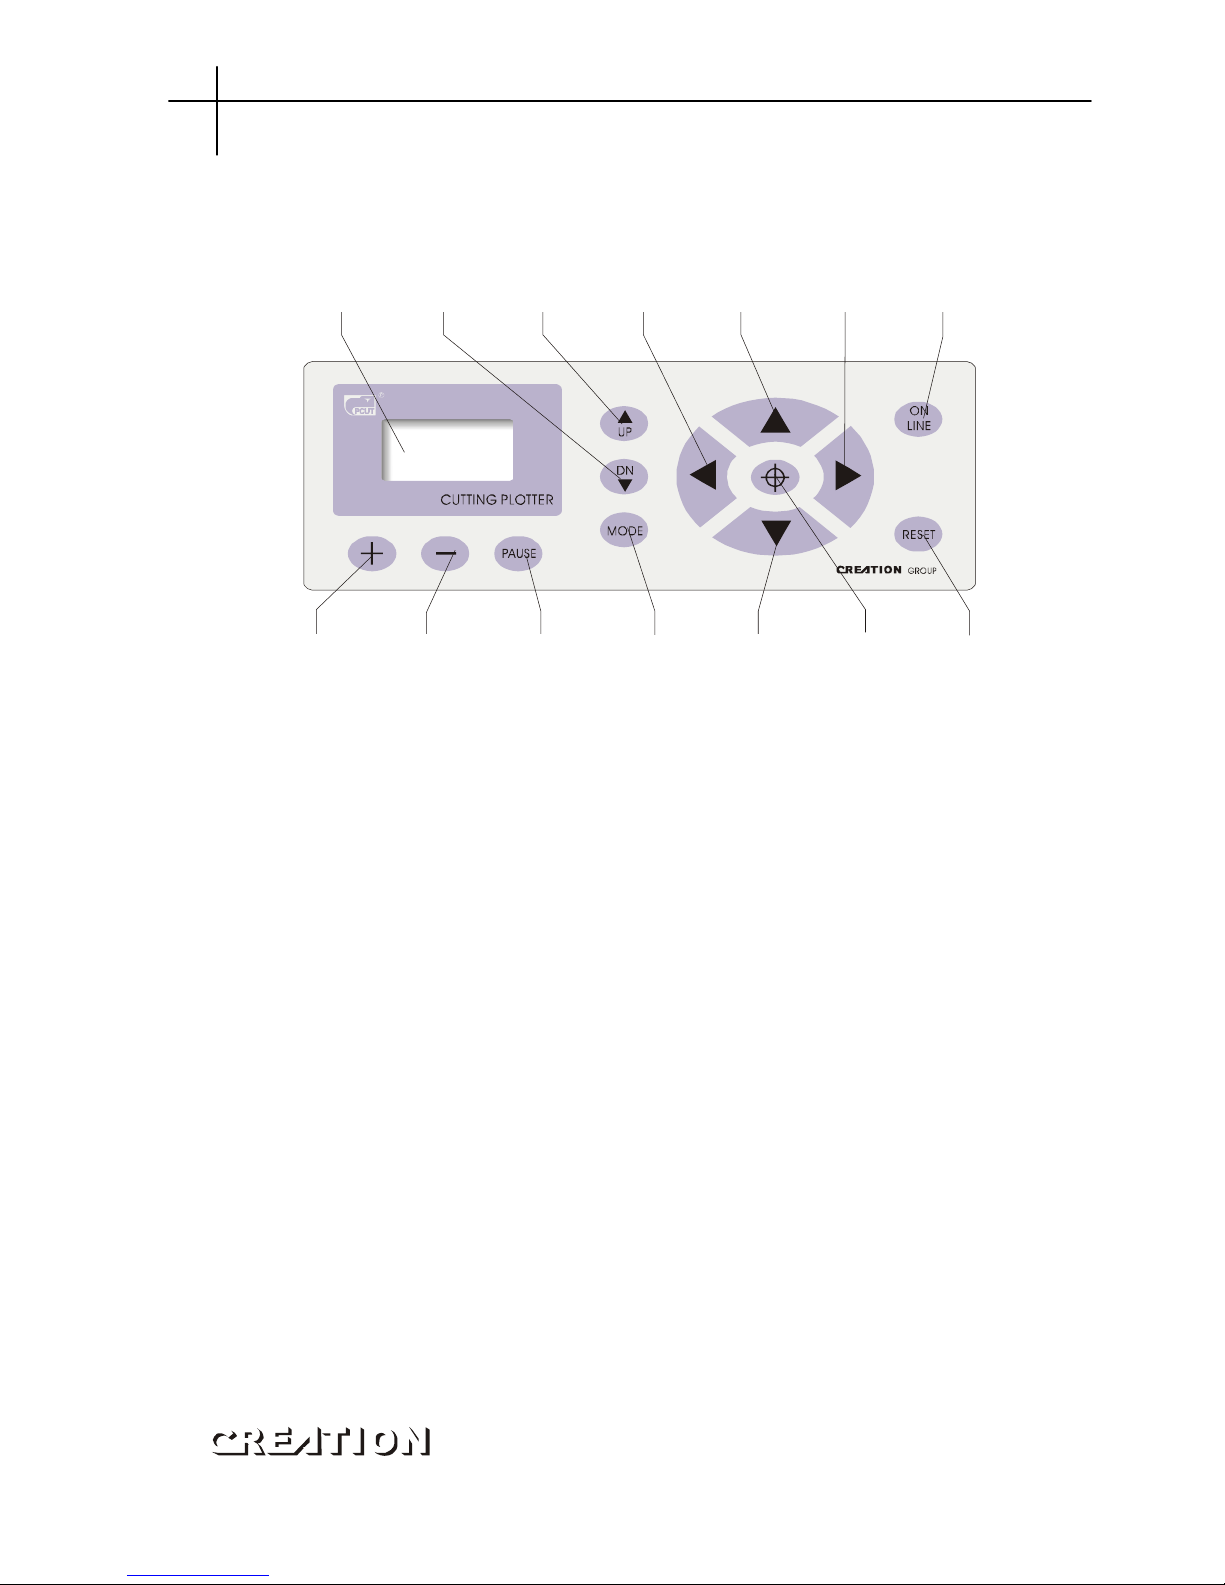
5.1.3 Control panel
14 13 12 11 10 9 8
1 2 3 4 5 6 7
1.LCD Display 8.Host reset
2.Knife-dropping button 9.Origin setting button
3.Knife-raising button 10.Paper-feeding button
4.Leftward button 11.Systemic parameter setting button
5.Paper-withdrawal button 12.Pause
6.Rightward button 13.Value +
7.Online/offline button 14.Value -
Cutting plotter PCUT CT operating instructions PCUT SERIES USER‘S MANUAL
10
Page 12
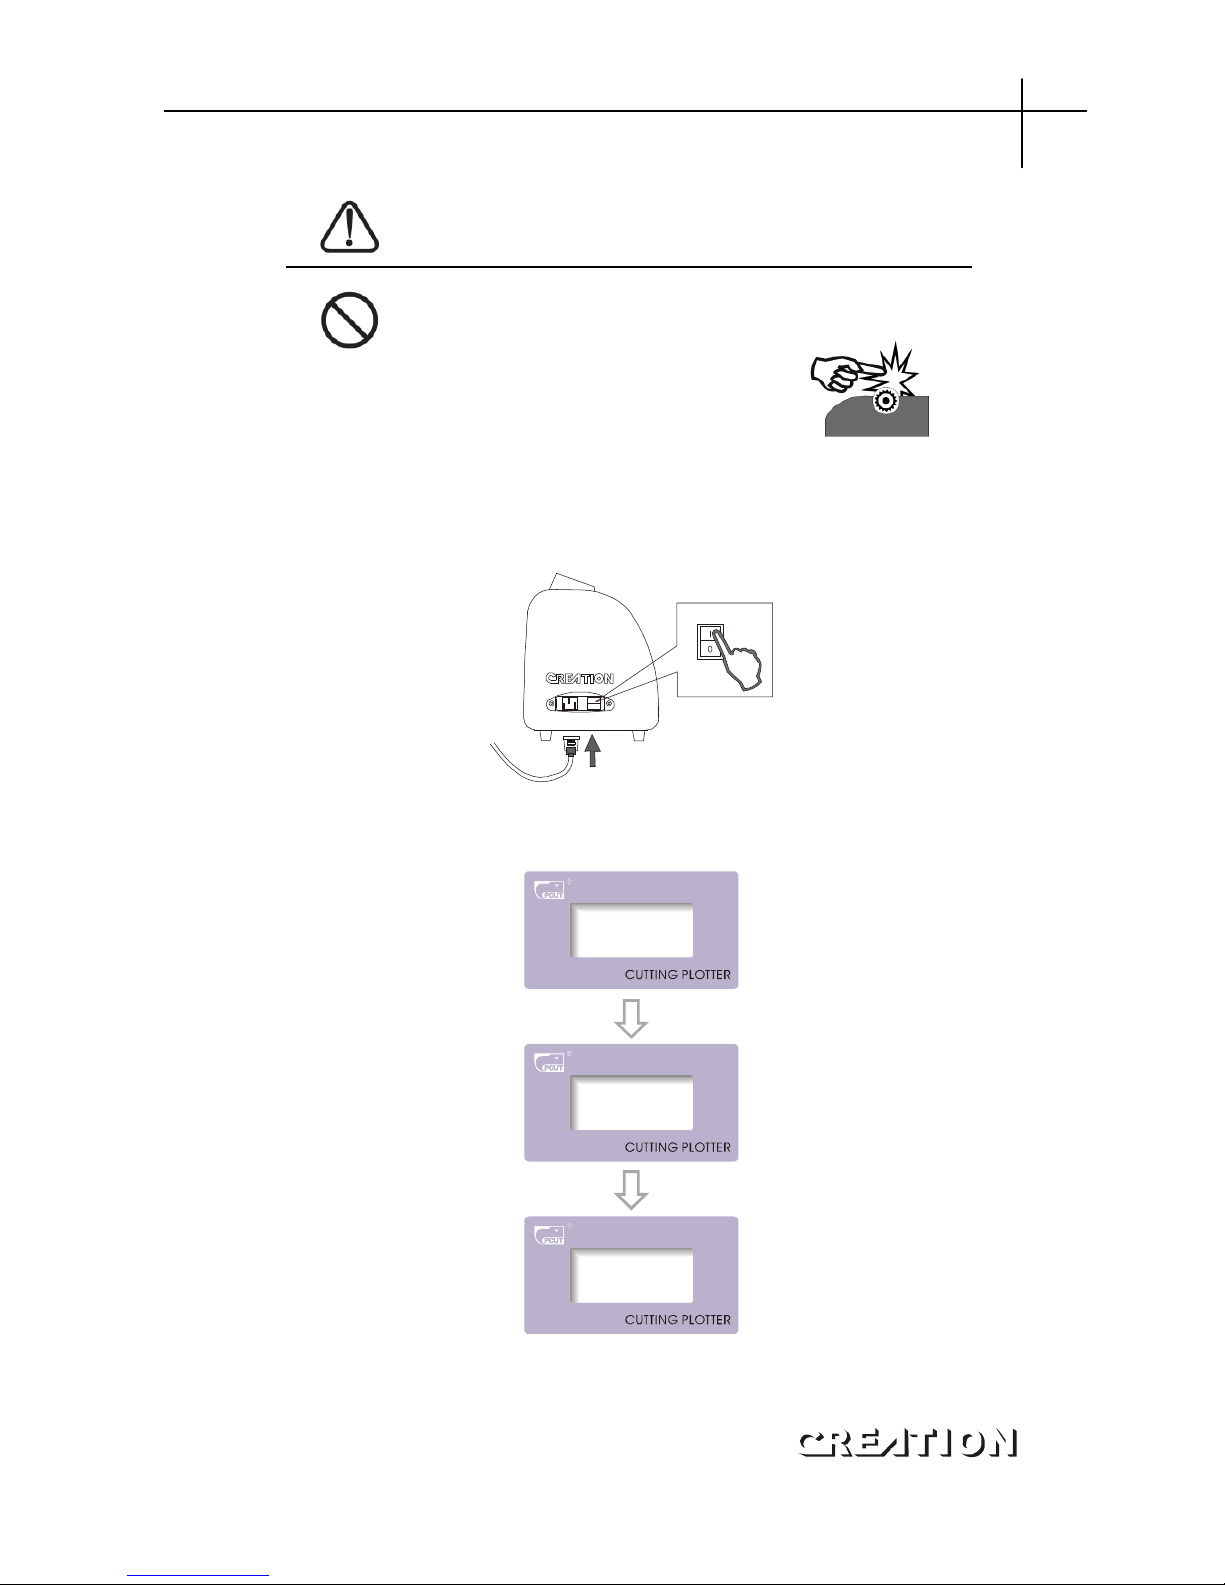
5.2 Basic Operation
CAUTION
When switching on the power, make sure your hands and other
articles are out of reach of such running parts as
main shaft and slider to prevent injury。
5.2.1 Turn on the machine
5.2.1.1 Checkwhether the power is in OFF position.
5.2.1.2 Plug the cable into the receptacle of the host power source, press the power
on/off on the left。
ON
5.2.1.3 LCD in the control panel is ON and displays the initializing process of the
host and shows following information:
Ver4.11a
00123456
--*-PCUT-*--
CT-630* *
On Line
5.2.1.4 When the initializing is over, the machine is in online state and connectable
with the computer to be operable。
PCUT SERIES USER‘S MANUAL Cutting plotter PCUT CT operating instructions
11
Page 13
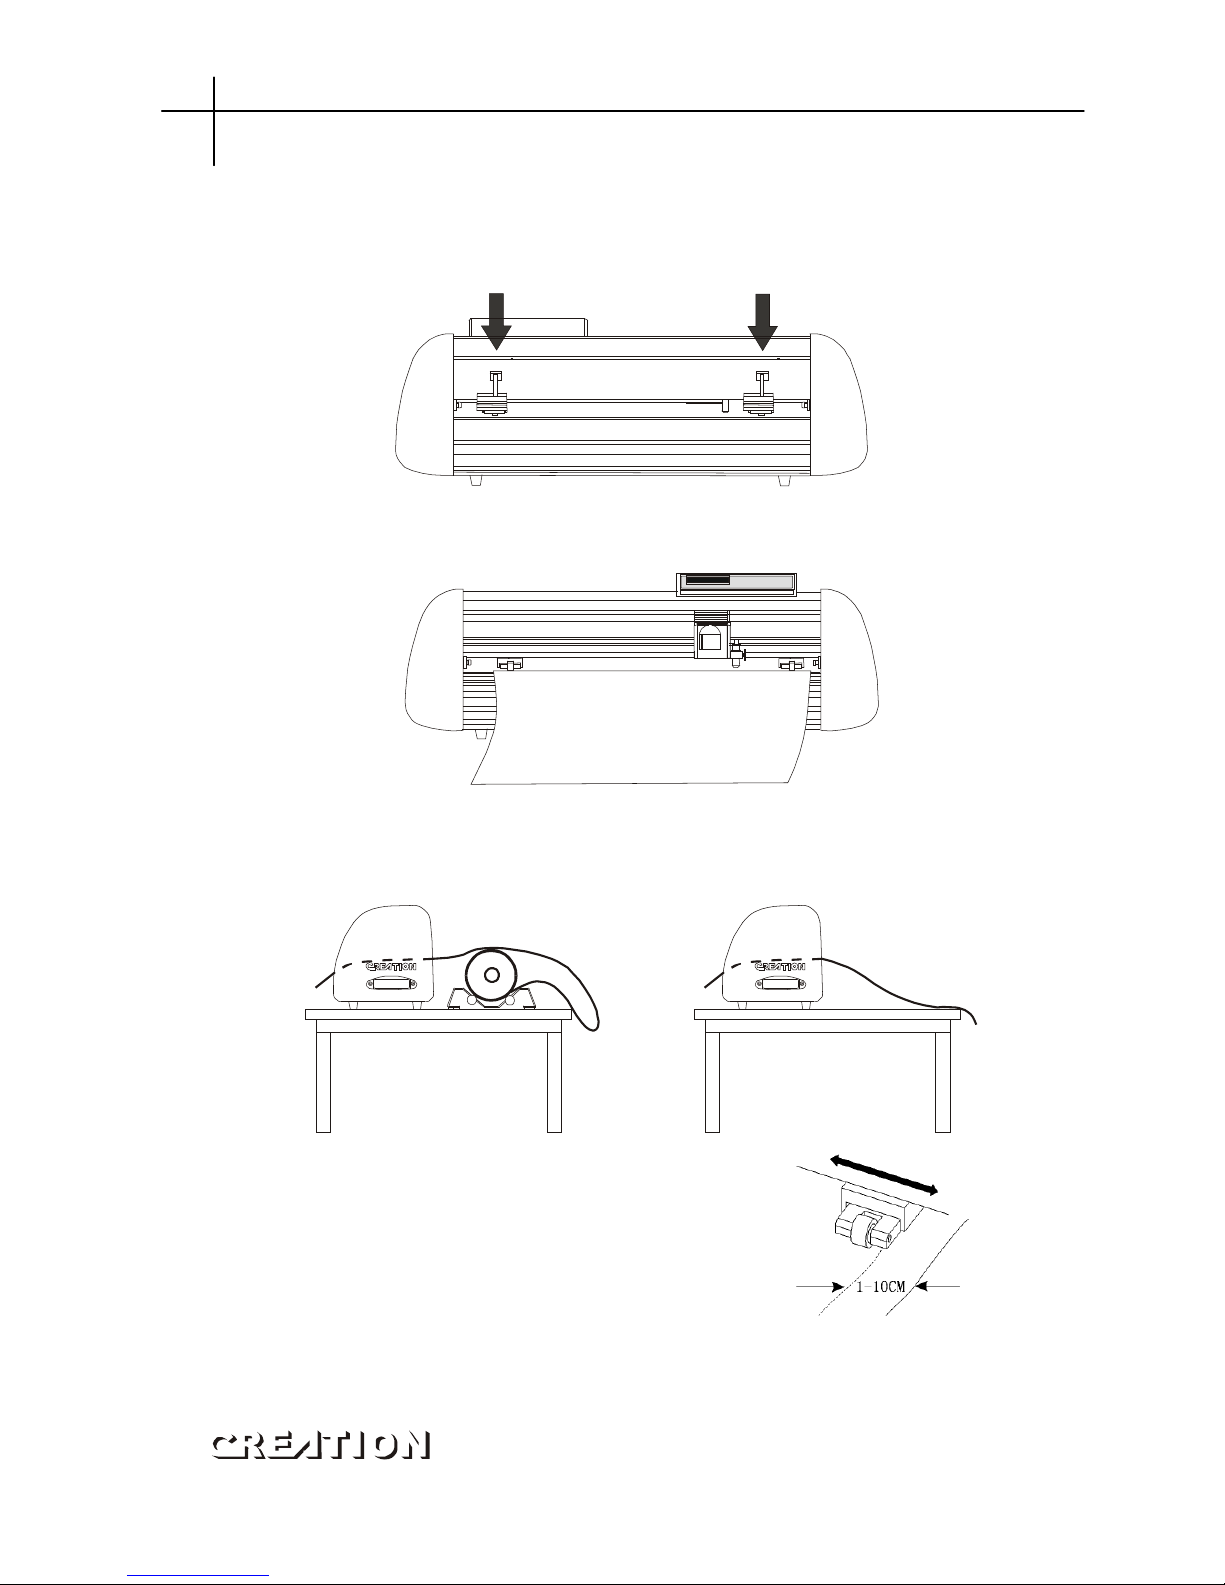
5.2.2 Installation of cutting media
This machine is suitable not only for single-sheet media, but also a roll of media。
5.2.2.1 Press down the handle of paperweight wheel behind the machine to raise
the paperweight wheel。
5.2.2.2 Insert the media into the space between paperweight wheel and main shaft,
and pull out the media to appropriate length from the front of the host。
Using roll of media Using single sheet of media
Pulling it out to required length Cutting required length from paper roll
5.2.2.3 Adjust horizontal position of paperweight
wheel according to width of paper. a distance
of minimum 1-10CM is set between paperweight wheel and paper edge to ensure good
running of paper。
5.2.2.4 Raise two handles of paperweight wheel, to
make paperweight wheel down to press paper。
Cutting plotter PCUT CT operating instructions PCUT SERIES USER‘S MANUAL
12
Page 14
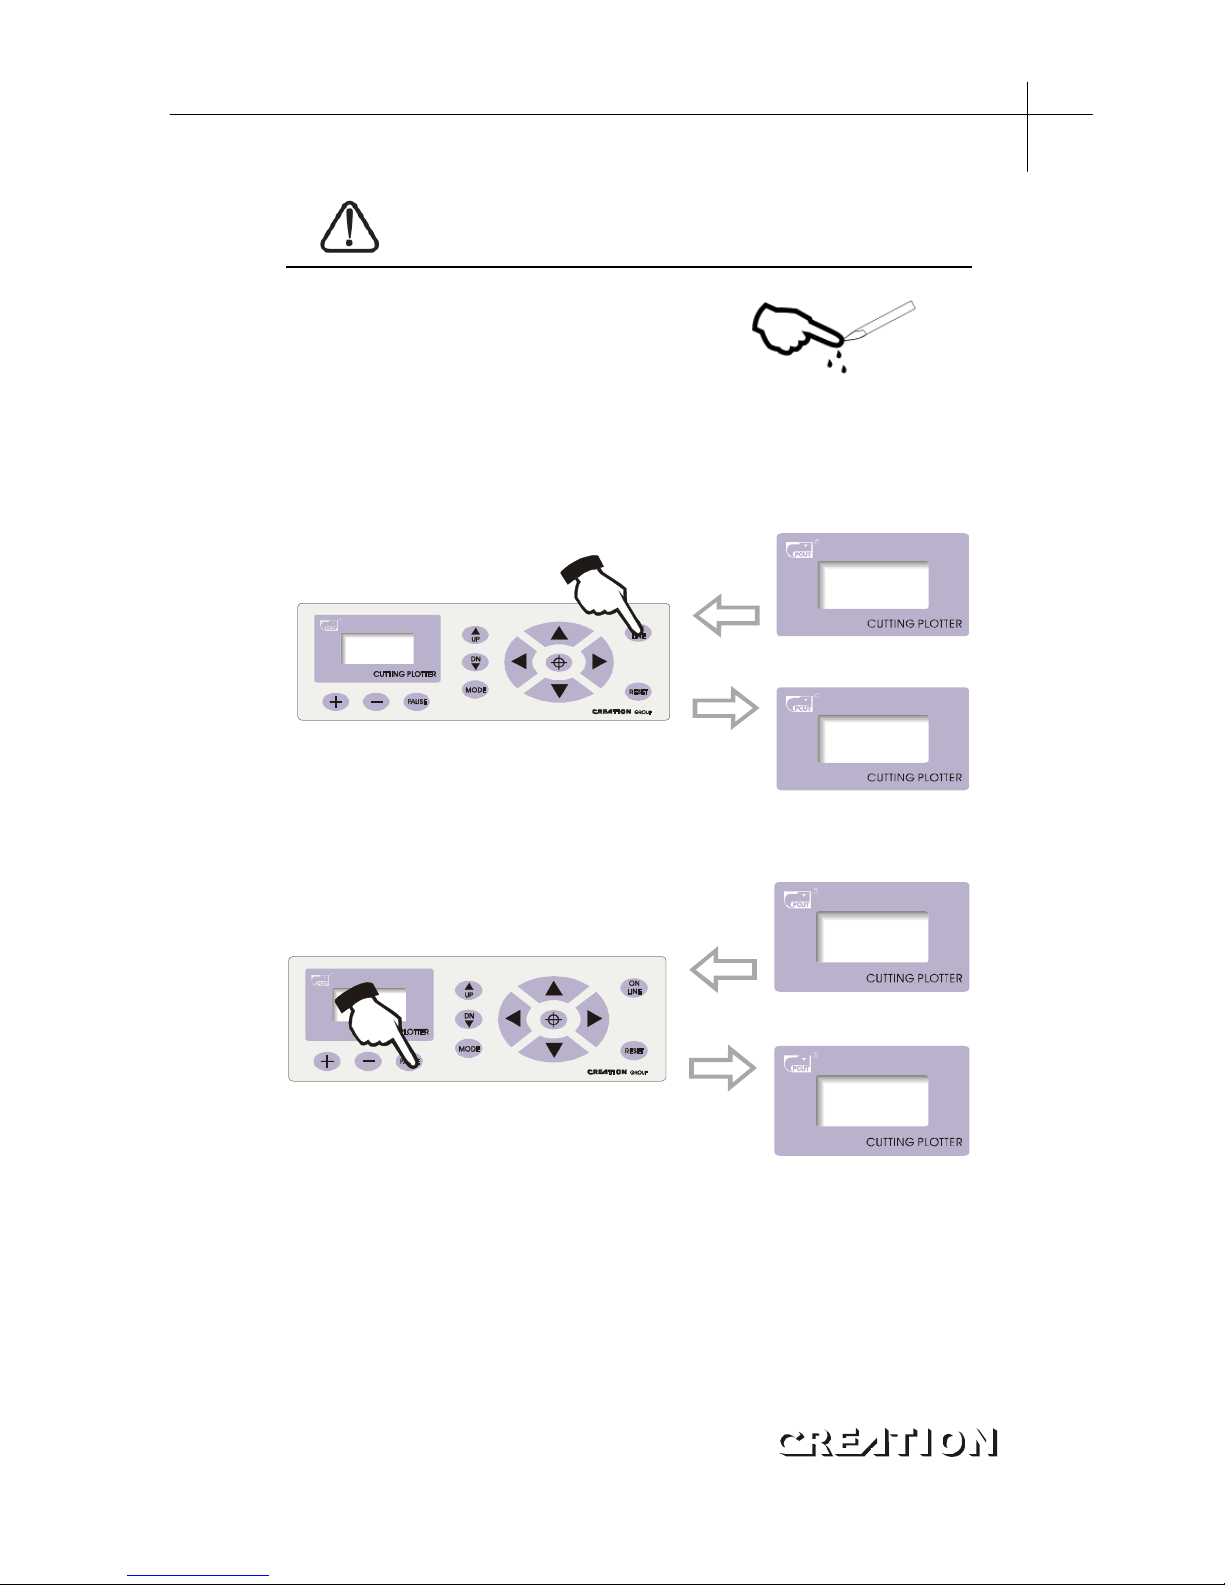
5.2.3 Trial run (adjusting knife press and tool)
CAUTION
Do not touch the knife top with your
finger to prevent injury。
Quality of knife immediately relates to cutting precision and life of machine. To
better your work, please use the standard knives we confirm, but not those with poor
quality。
5.2.3.1 Press ON LINE button to make the machine in off-line state。
On Line...
X=+00000
Y=+00000
5.2.3.2 While in off-line state, press PAUSE twice, the machine will automatically
cut a small square from the media。
X=+00000
Y=+00000
X=+00000
Y=+00000
5.2.3.3 Take off the square, if you fail, the square need to be further cut, because the
press is low or the protruding length of knife top is too short; If the base paper is pierced
through, it signifies that the protruding length of knife top is too long and the press is too
big. Adjust the protruding length of knife top and knife press according to result of trial
run and the description of tool installation。
5.2.3.4 Press + or - to adjust knife press, for common materials the knife press
value ranges from 100 to 120。
PCUT SERIES USER‘S MANUAL Cutting plotter PCUT CT operating instructions
1
3
Page 15
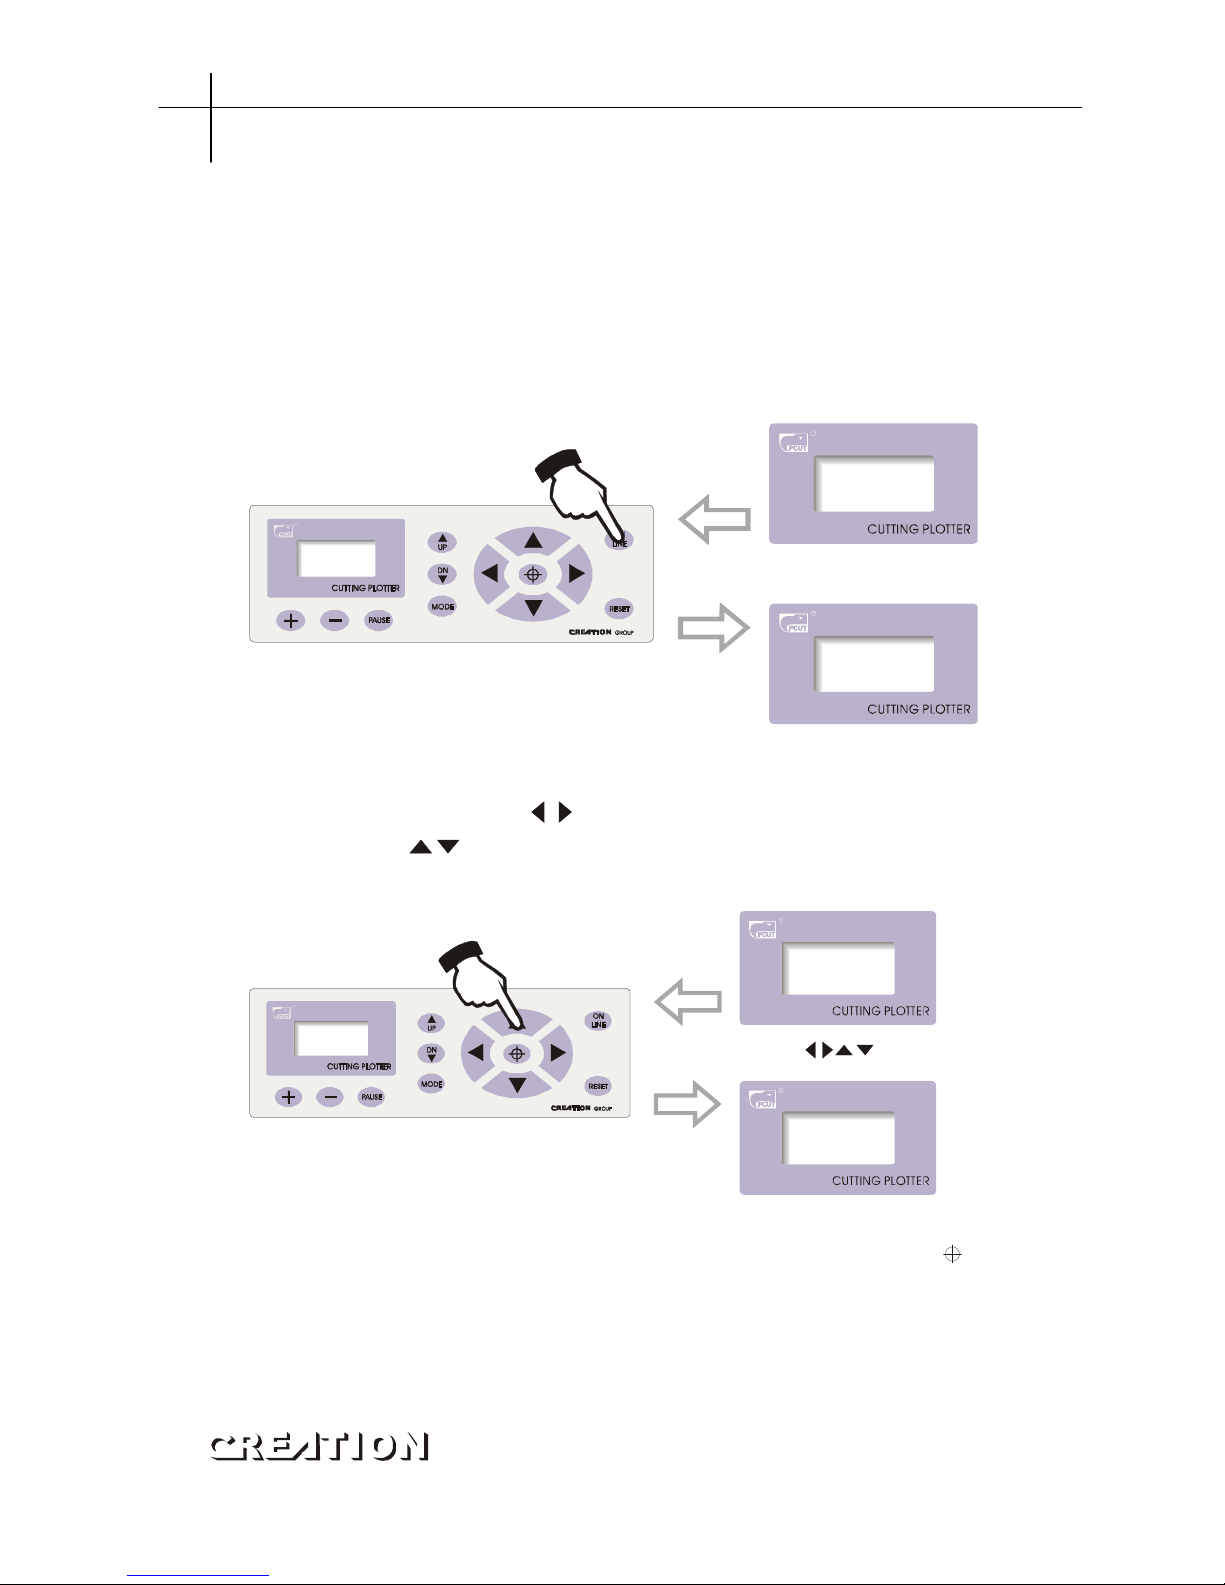
5.3 Operating instructions
5.3.1 On-line / off-line
When the cutter starts reset, it becomes in online state. Press ON LINE to switch
between online and off-line state. When computer transmits information to the
cutting plotter, the cutting plotter must be in online state. However, when setting
parameters for the machine or operating it by hand, you should set it in off-line state.
The LCD will display the following information。
On L i ne . ..
X=00000
Y=00000
On line
Off line
5.3.2 Moving knife top
While in off-line state, press“ ”buttons to move the slider leftward or rightward。
When pressing “ ” buttons the main shaft will rotate forward or backward, and the
step value of “ X, Y” in the LCD will change accordingly。
X=+00500
Y=+00500
X=+00000
Y=+00000
Press to change
value in shaft X, Y .
“ ”
“ ”
5.3.3 Setting origin of plotting
When move the knife top to the starting position, press the origin setting button“ ”,
thevalues of“X,Y” willbe set as 0 , the setting of new origin is completed.The machine
will start plotting from the new origin. To save the present origin please refer to chapter
“ saving and using relative origin”。
Cutting plotter PCUT CT operating instructions PCUT SERIES USER‘S MANUAL
14
Page 16
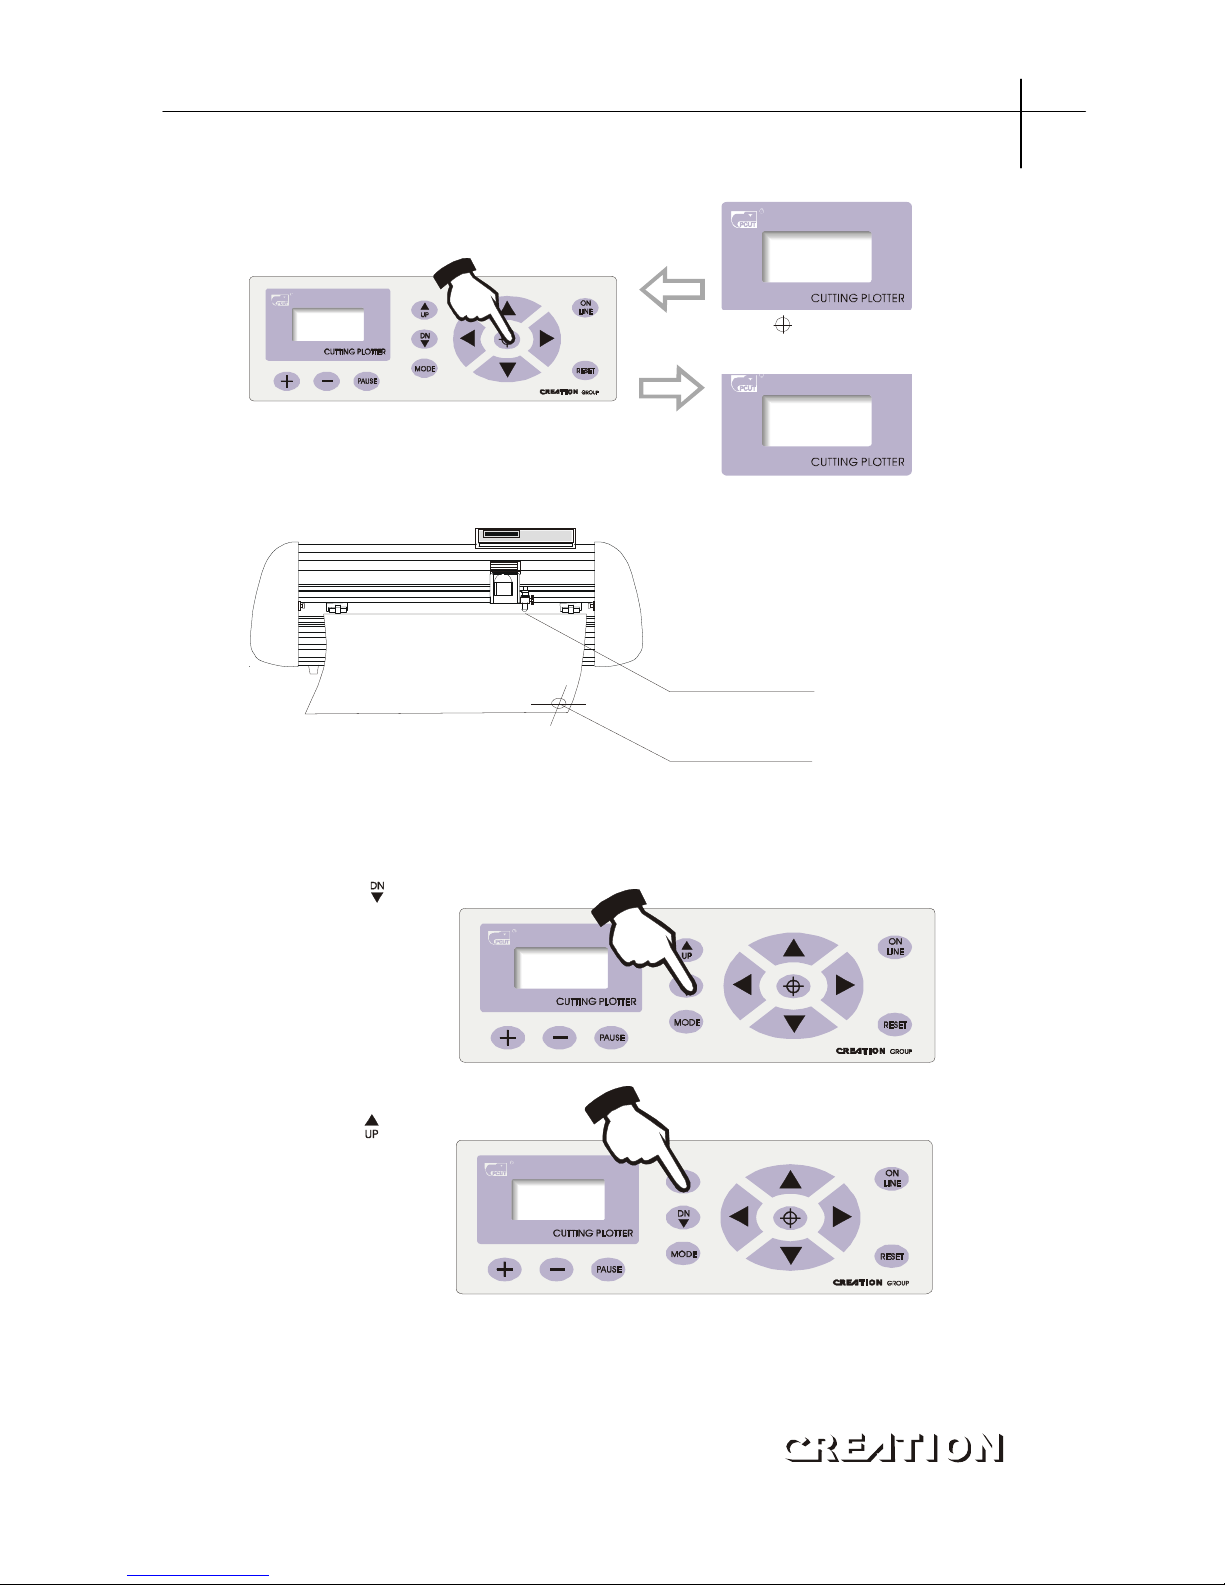
Setting arbitrary origin
X=+00000
Y=+00000
X=+00500
Y=+00500
Press ,fhe values X Y
wiel be 0
“ ” “ , ”
Relational map between absolute origin and arbitrary relative origin。
Arbitrary origin
Absolute origin
5.3.4 Raising knife, dropping knife
While in off-line state, press DN button, the knife will fall, then press UP button to raise
the knife。
Press to drop the knife
Press to raise the knife
“ ”
“ ”
5.3.5 RESET
Press RESET button, the machine will reinitialize, the present position of knife top
will be set as new starting origin, all data in buffer memory will be cleared。
PCUT SERIES USER‘S MANUAL Cutting plotter PCUT CT operating instructions
1
5
Press“ ”.The values of“x,y”
axis will be 0
Page 17
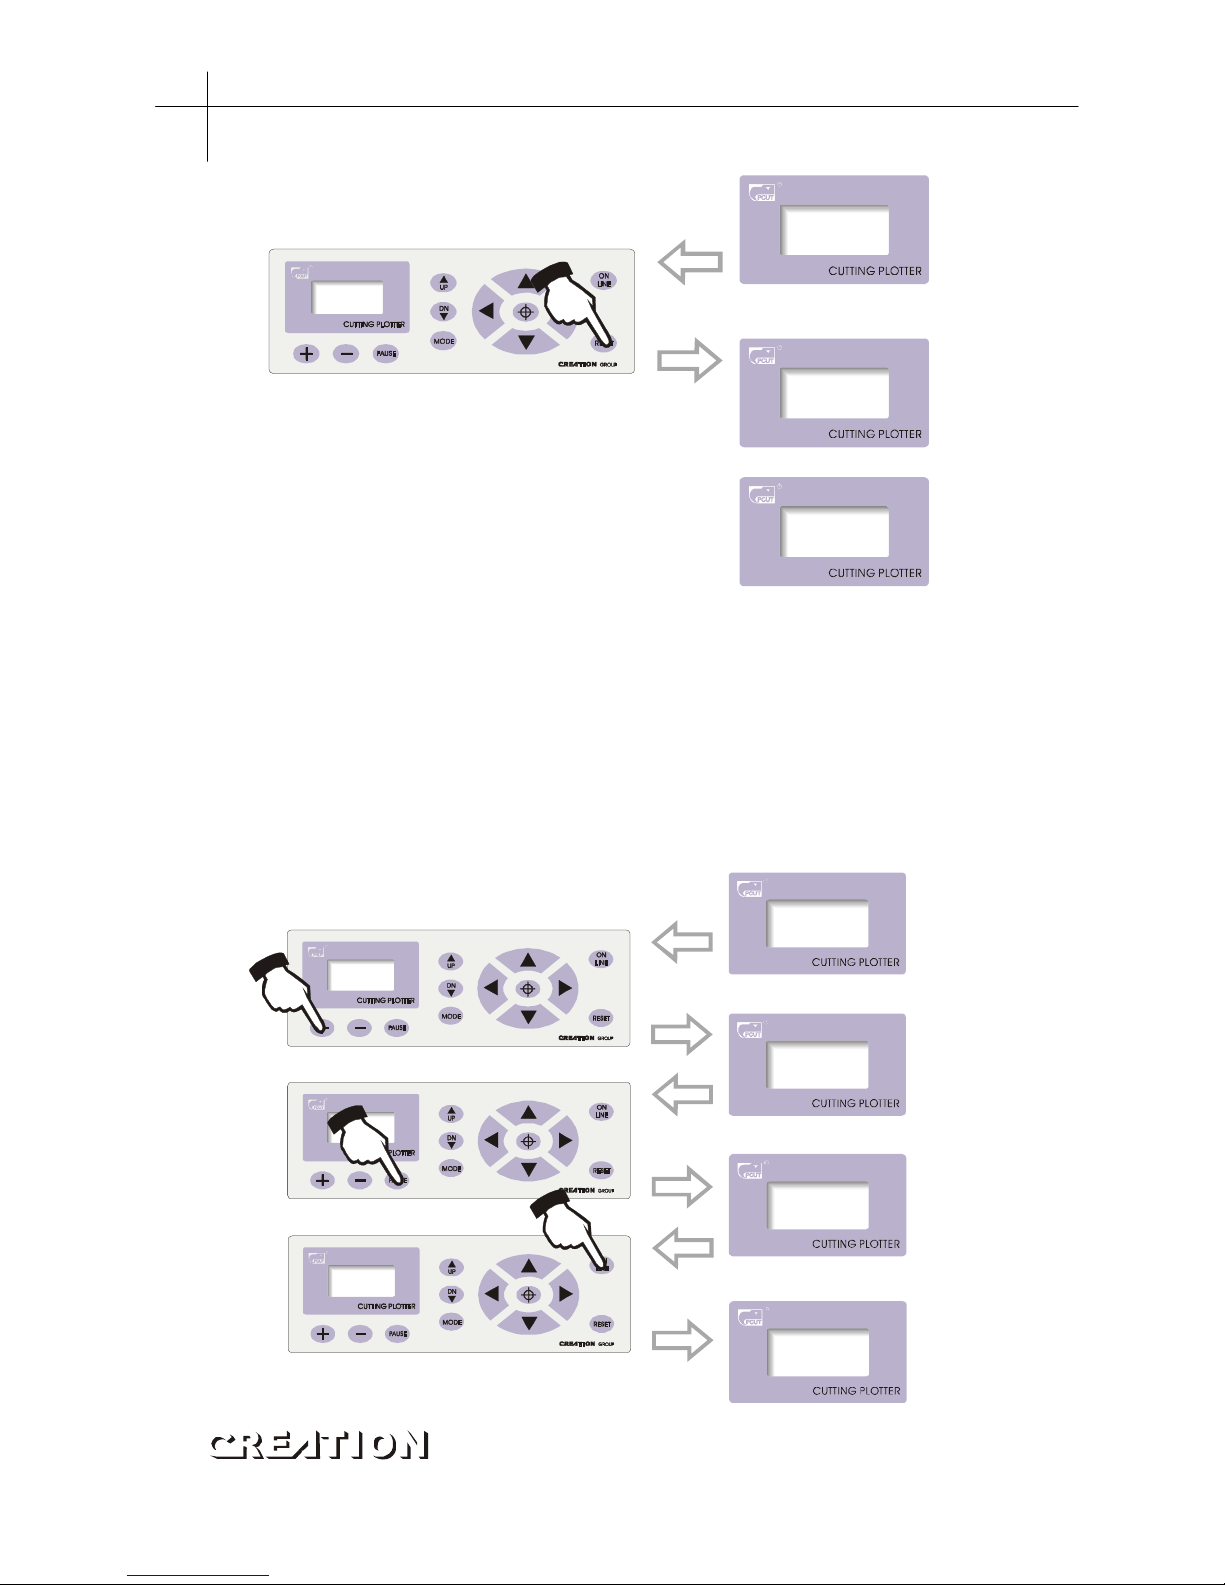
-*-PCUT-*-
*CT-630*
Ver4.11a
0012345
Wait......
While the cutting plotter is working,
press RESET ,the machine will
reinitialize and reset.
“ ”
Working state
5.3.6 System setting and storage
While in off-line state, press“MODE”button to set system parameters, the LCD will
displaythe options of systemparameters. Press“ MODE”button to show the options in
urn, press“ +”or“ -”to change the parameter value of selected option. When the
setting is completed, press“PAUSE”to escape setting mode, press“ ON LINE”and
save the setting value。
For example, in speed setting state:
CutSpeed
+ 70 -
CutSpeed
+ 80 -
X=+00000
Y=+00000
On Line...
Press + to change the speed value
Press PAUSE to back to offline
state
Press ON LINE to save present
system parameters.
“ ”
“ ”
“ ”
Cutting plotter PCUT CT operating instructions PCUT SERIES USER‘S MANUAL
1
6
Page 18
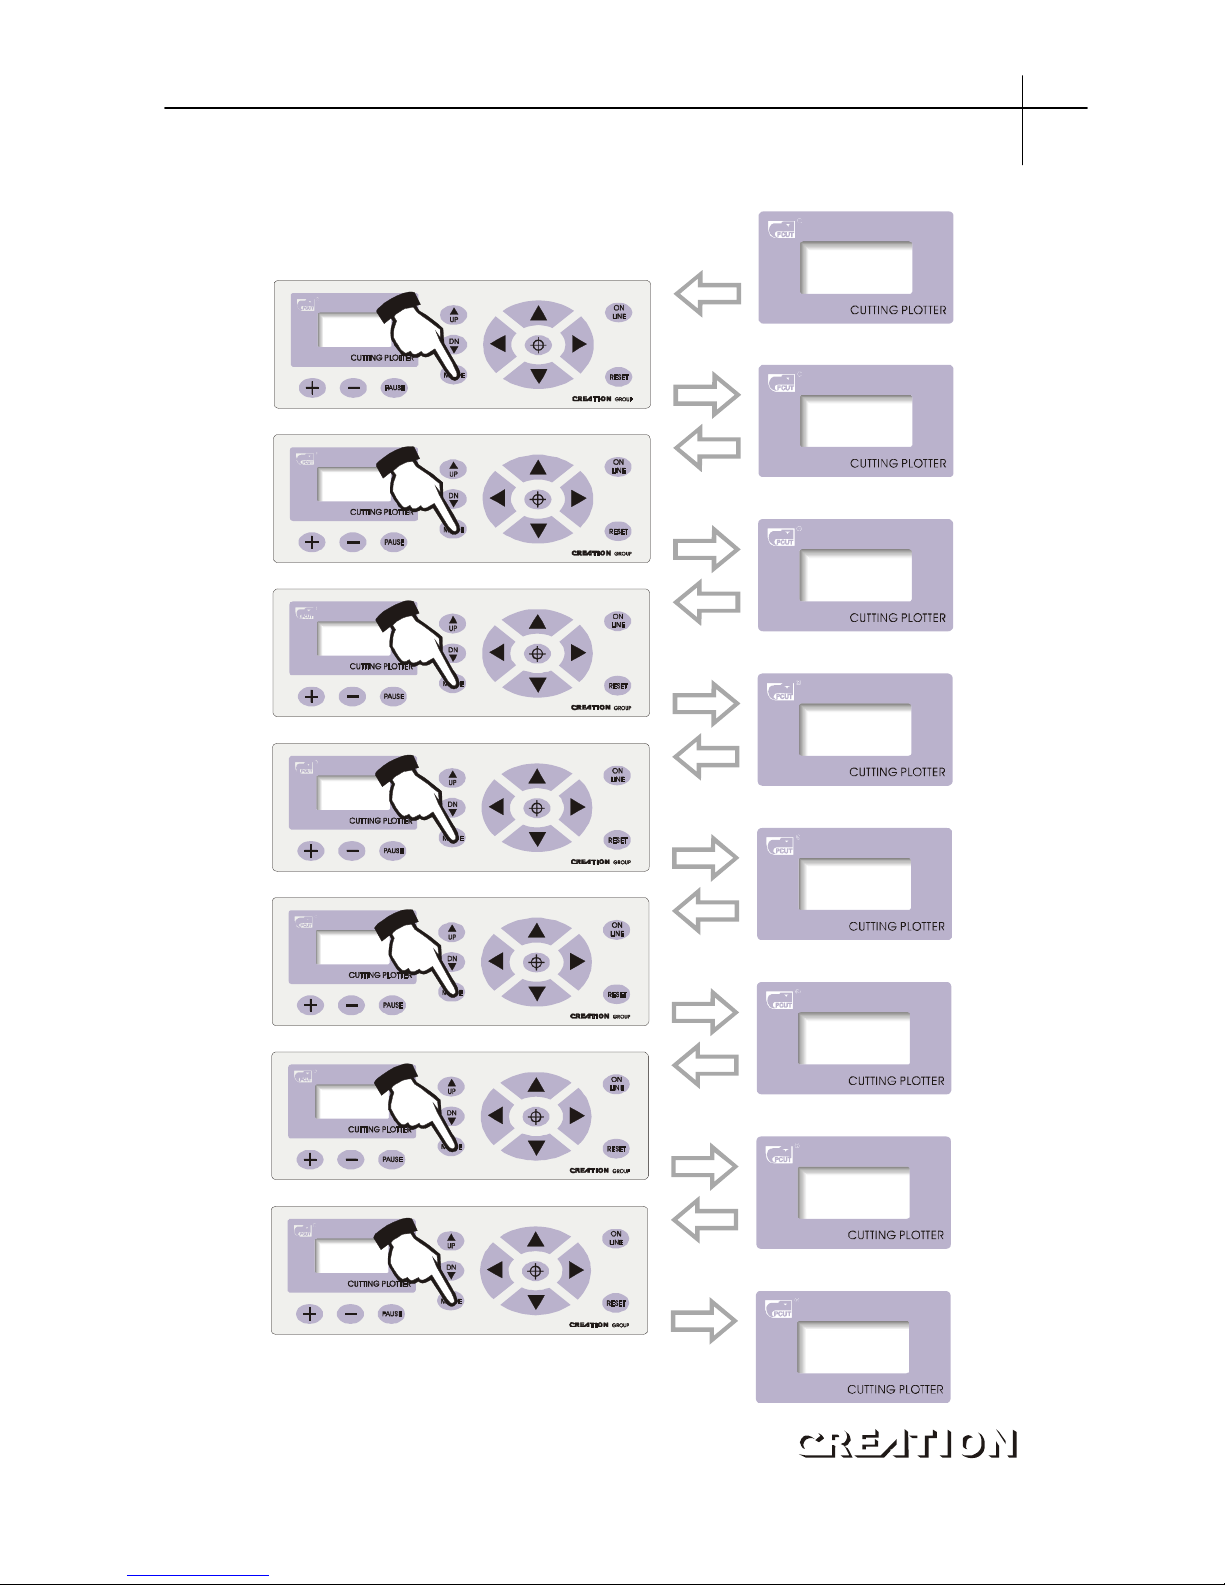
Flow chart of system setting
X=+00000
Y=+00000
Press
+ 100 -
Test
+ 001 -
Repeat
+ 001 -
CutSpeed
+ 50 -
X-Scale
+ 25795 -
Y-Scale
+ 25637 -
X=+00000
Y=+00000
In off-line state
Knife press setting interface
Self Test setting interface
Setting interface of repeat cutting
Speed setting interface
X-axis setting interface
Y-axis setting interface
In off-line state
PCUT SERIES USER‘S MANUAL Cutting plotter PCUT CT operating instructions
1
7
Page 19
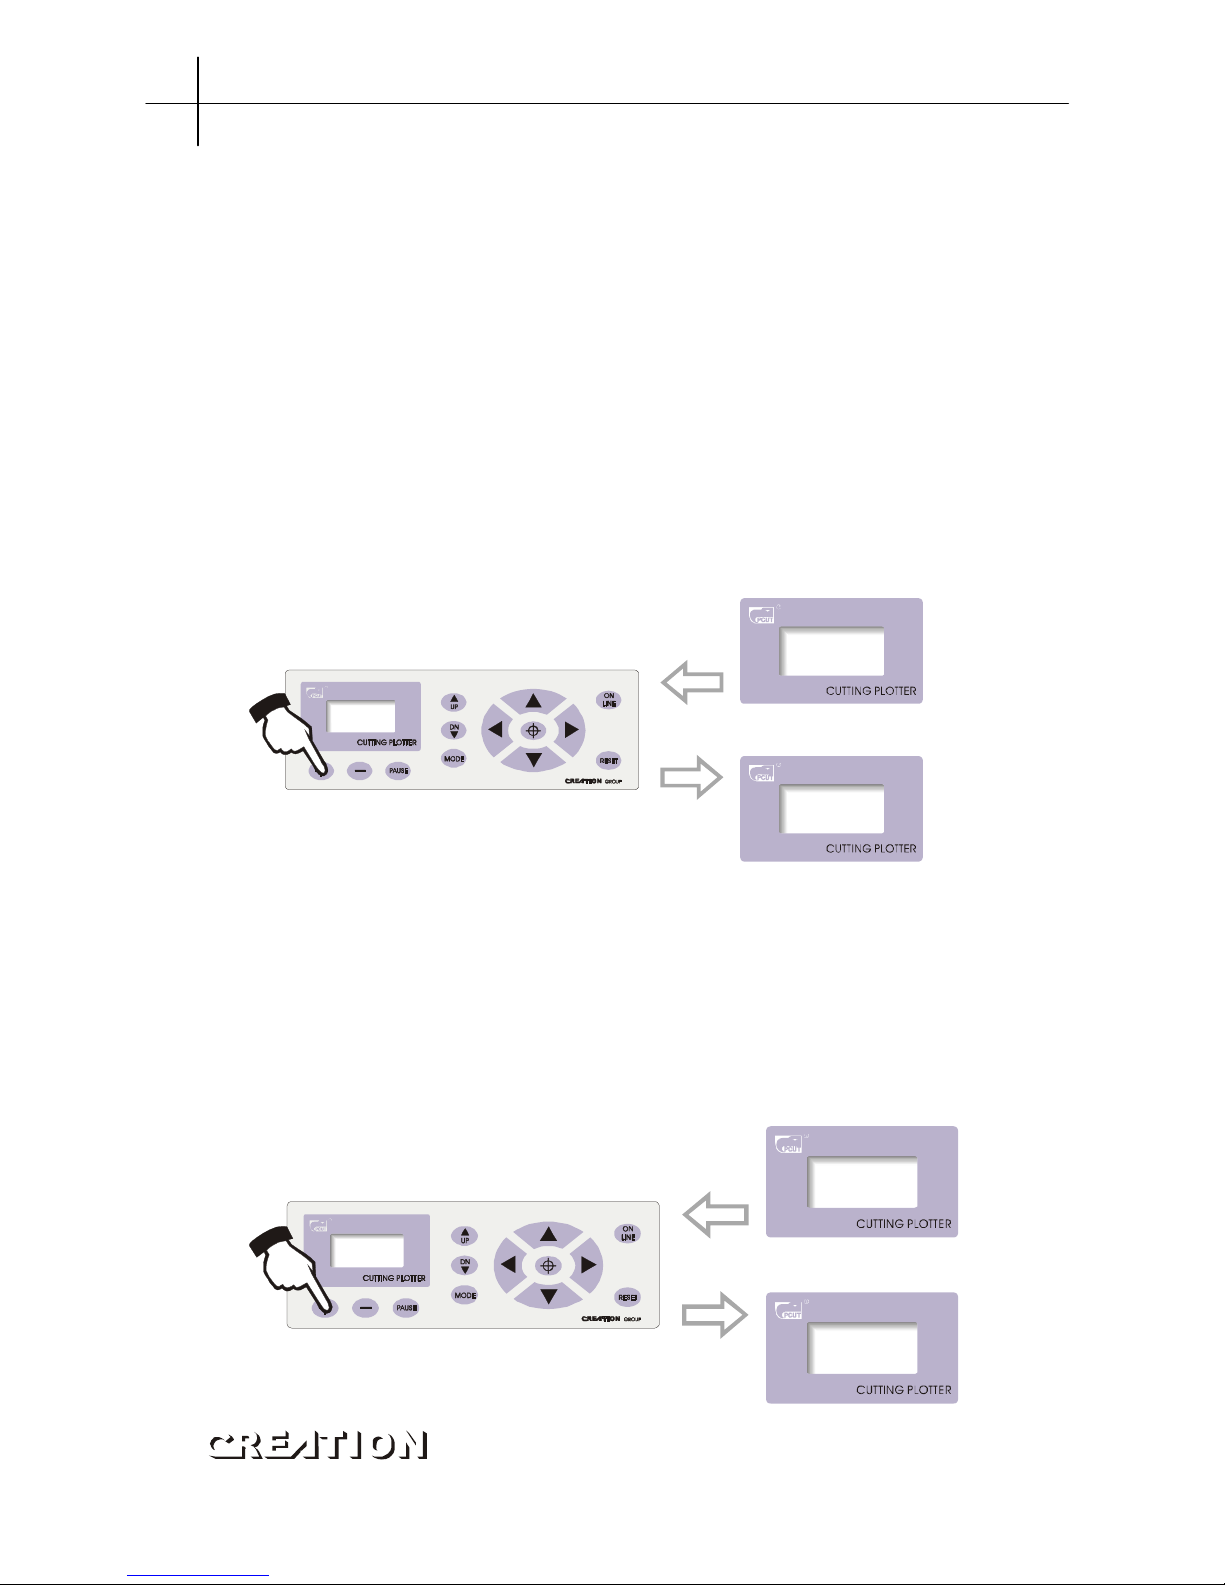
Press“+”and“-”to change the parameters of system. To save present set system
parameters, press“PAUSE”button to escape setting mode in off-line state, then press“ON
LINE”button once. When switching on machine next time, it will automatically call in the
parameters which were set last time as default for starting up。
5.3.7 Diagrammatic demonstration of setting parameters for different states
5.3.7.1 Setting knife press
In off-line state, The value of“Press”signifies knife press, press“+”to increase
it, press“-”to lower it. the setting values range is 0~255, namely the knife press can
range within0~800g. When the machine runs, if the knife press is found unsuitable,
press“PAUSE”button, then press“+”or“-”to make press up or down。
Press
+ 087 -
Pres s
+ 110 -
press + or - to make press
up or down
“ ” “ ”
5.3.7.2 Setting Self Test interface
In“Test”state, press“+”to increase testing times while press“-”to decrease testing
times, the range of testing times is 0 ~ 255. Press ON LINE button to start plot Demo
Test graph. Testing with knife installed can be done one time only. To repeat the testing,
please replace the knife with plot pen, with which you can test repeating precision of
the machine. If the Self Test meets requirement, it indicates that parts of the machine
are in good condition。
Test
+ 001 -
Test
+ 088 -
Press + or - to change
testing times.
“ ” “ ”
In Demo Test state
Cutting plotter PCUT CT operating instructions PCUT SERIES USER‘S MANUAL
1
8
Page 20
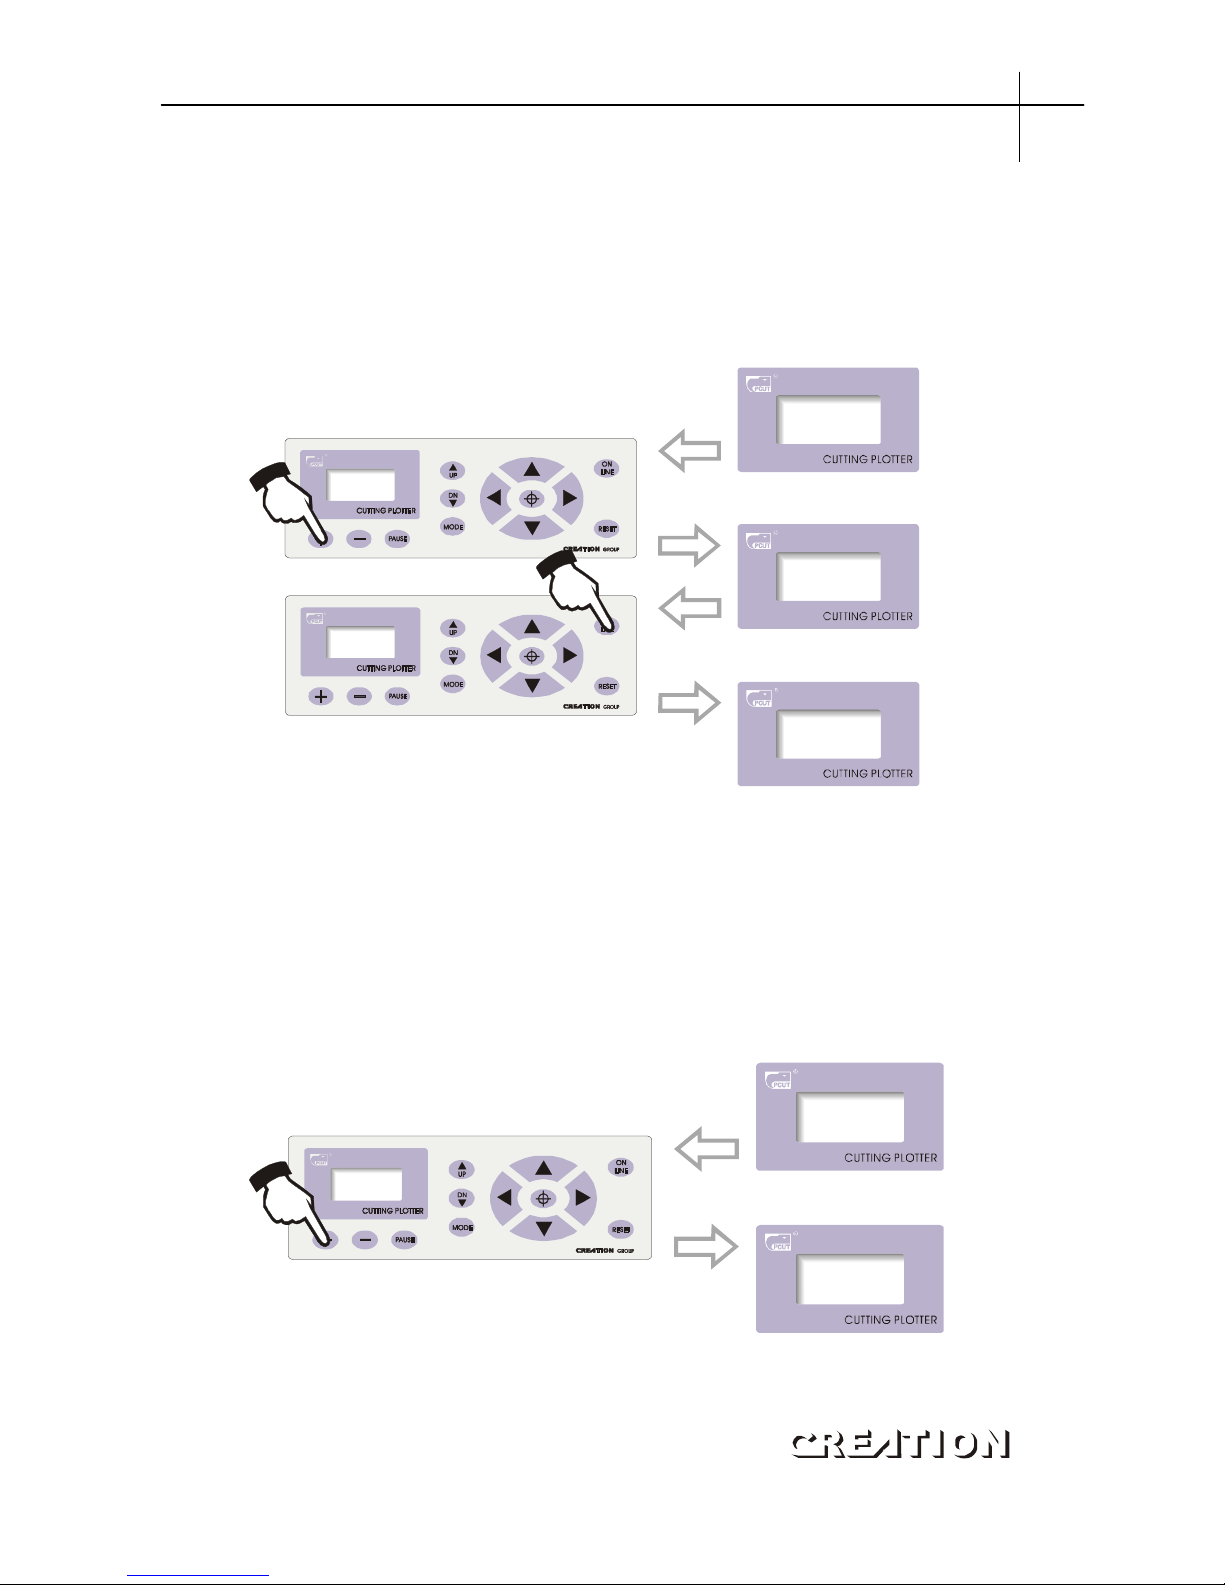
5.3.7.3 Repeat cutting
When the data computer transmits can be totally stored into memory of the
machine, this function can be used to plot more than one copy. In“Repeat”state, press
“+/-”to adjust total copies to be duplicated, press“ON LINE”to start plotting. The
maximum 255 copies can be duplicated. At one time (this function is limited to memory,
the capacity of the document shall be low 1024kb)。
Repe at
+ 001 -
Repe at
+ 018 -
Repe at
+ 018 -
Press + button to increase
cutting copies
“ ”
Press ON LINE to start cutting.
“ ”
5.3.7.4 Cutting speed
In speed setting mode, press“+”or“-”to adjust cutting speed, high speed is suitable
for cutting big characters or image, while low speed is suitable for exquisite small
character or image. 10-shift speed is available for your choice:
10 → 20 → 30 → 40 → 50 → 60 → 70 → 80
CutSpeed
+ 70 -
CutSpeed
+ 80 -
Press + to lift cutting speed
“ ”
Interface of cutting speed
When cutting at high speed, curve may look zigzag, but it is not a trouble, lowering the
speed will eliminate the indention。
PCUT SERIES USER‘S MANUAL Cutting plotter PCUT CT operating instructions
1
9
Page 21
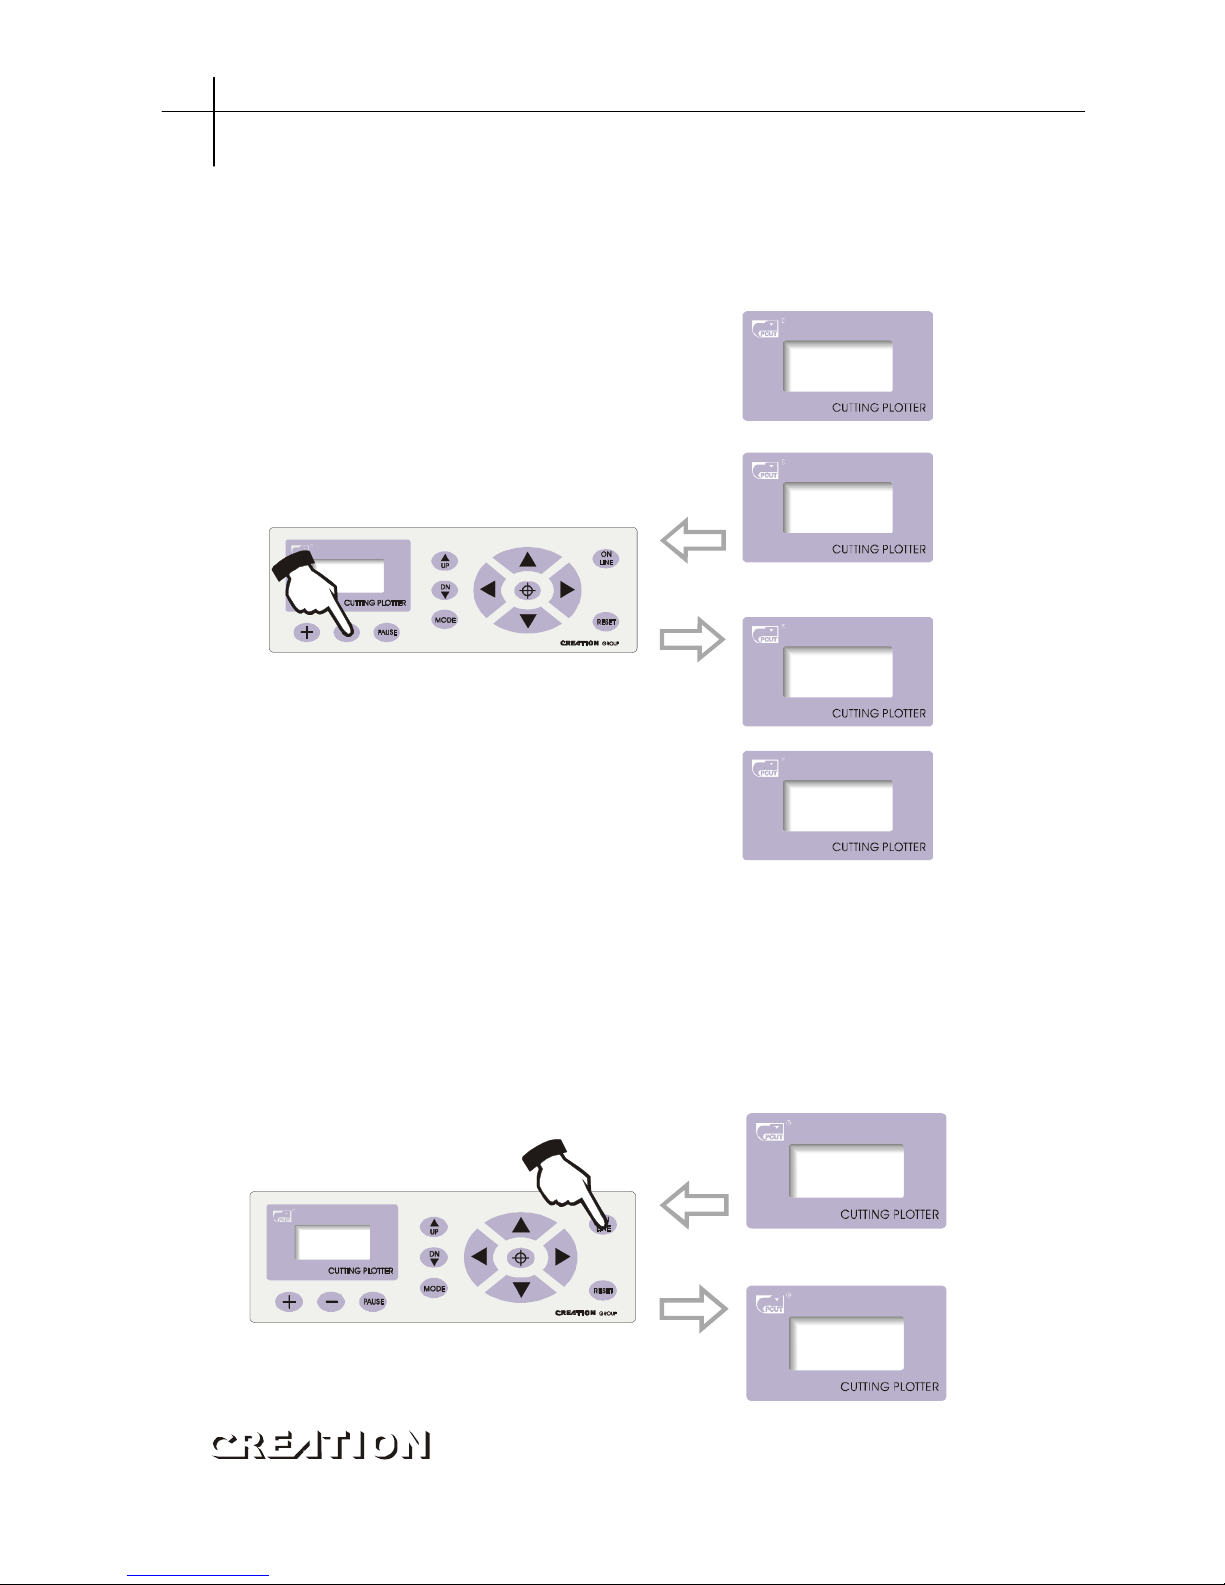
5.3.7.5 Interface for setting X-axis, Y-axis
To minimize the error in mechanic size, set ratio of“X, Y”to be adjustable, and
make composing size conformed to plotting size。
When real size of shaft“X”or“Y”exceeds composing size。
X-Scale
+ 25795 -
X-Sc ale
+ 25780 -
Y-Scale
+ 25637 -
Y-Scale
+ 25537 -
Or Y-Scale
“ ”
When displaying X-Scale
“ ”
Press - button to lower the
value
“ ”
Contrarily, in“X-axis”or“Y-axis”state press“+”to increase the value。
Notes: when using this function, meticulous adjustment to specific speed and media
is desirable。
5.3.7.6 Readjustment of initial value
When client disorders speed and other parameters therefore having no way to work
and lack experience to back to ideal cutting state, he can adjust it to initial value.
Operating procedures: press“MODE”button to“CUT SPEED”state。
CutSpeed
+ 50 -
Loadata
Press ON LINE to readjust
initial value.
“ ”
Cutting plotter PCUT CT operating instructions PCUT SERIES USER‘S MANUAL
20
Page 22
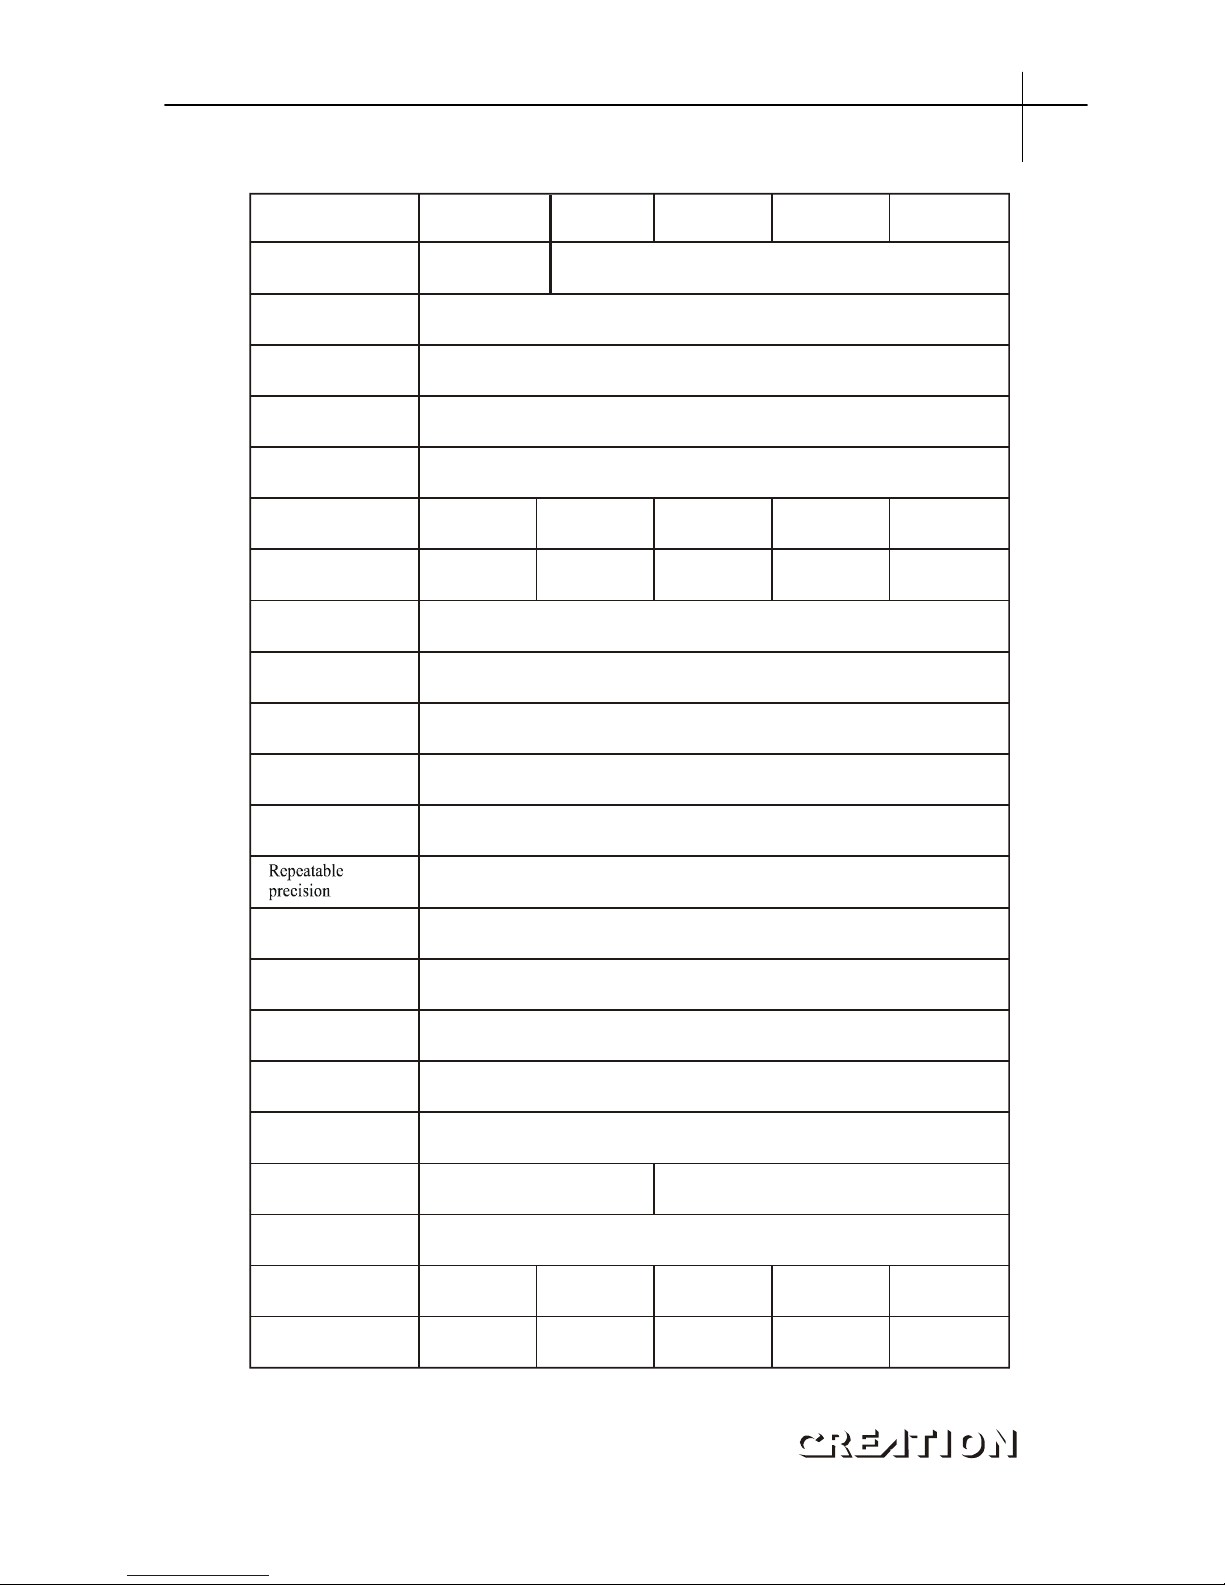
5.4 Technical features
External size
Transporting
weight
Type CT 630 CT 900 CT 1080 CT 1200 CT 1500
Bracket and paper Table-type M
feeding mode paper foot stool
Vertical feed paper foot stool
Main board 16-bit CPU, 1Mb High-speed CACHE memory
Control panel
Over-head, 2 x 8 Liquid Crystal Display,13-button touch thin-film keyboard
Drive Main shaft double high torsional motor, micro-step and subdivision driving
Positioning mode Bounded system, arbitrary origin setting,10 Couples origin saving and transfer
Maximum paper
feed width
730mm 1000mm 1100mm 1300mm 1625mm
Maximum cutting
width
640mm 910mm 1010mm 1210mm 1535mm
Maximum cutting
speed
600mm/s
Maximum cutting
length
1500mm (rate <=20 hours) / 15000mm (20 <rate <=60 hours)
/ 5000mm (rate)>=70hours
Maximum cutting
thickness
1mm
Knife press 0-800g (digital adjustment)
Mechanism
precision
0.025mm
<+-0.1mm
Type of tool Sweden SANDWIK hard alloy steel knife
Type of plot pen Atom plot pen and poster pen with a diameter of 11.4mm, watery or oily
Plotting instruction DM-PL/HT-GL(TM) automatic identification
Interface Standard RS232 (serial) / Centronics (parallel)
Power source Ac220 10%. 50Hz±
Power consumption < 100VA < 120VA
Operating
environment
Temperature: +5 - +35, relative temperature 30% -70%
1030X275 1200X260 1300X260 1500X260 1825X260
X380mm X1070mm X1070mm X1070mm X1070mm
22kg 40kg 42kg 45kg 55kg
PCUT SERIES USER‘S MANUAL Cutting plotter PCUT CT operating instructions
21
Page 23

7.Troubleshooting
7.1 Question: will the characters below 1CM be deformed?
Answer: when graving small characters, please set sharp-angle compensation in the
software, for example, in Wentai plotting software:
(1). Click“plotting output”once, a plotting output picture will pop up。
(2). Click“set”once, a picture of setting plotter will pop up。
(3). Click“compensation setting”, a dialog box will pop up。
(4). Select“sharp-angle compensation”, adjust the value to required level。
The compensation ranges within 0.1-0.7, more often we set it to be 0.25. in addition, the
plotting speed of the cutter shall be set below 20。
7.2 Question: Why there is an additional stroke after finishing cutting
Answer: 1. check if the tip of cutter is flexible when it is up and down 。
2. change the Master software if there are some deviant letters。
3. check if there are some problems on the files you are ready to output。
7.3 Question: why does zigzag happen to the cutter?
Answer: as cutter PUCT motor features high power and speed, so the cutting speed shall be
adjusted according to size of character. Generally, to cut small glossy characters with
high requirement for precision, thespeed shallnot exceed 40. In most cases, thespeed at
the shift 50-60 is favorable. To cut big characters of large quantity within shortest time,
the speed can be 70, 180, but since step distance of motor is so longthat evident zigzag
occur. Therefore, you should set the speed to specific size of characters, and the
relationship between speed and sizeof charactersplease refer to followingtable:
Size of font(mm) SPEED
<10 10-20
10-30 30
30-50 40-50
50-500 60
>500 70-80
7.4 Question: why do the paper deviate when it runs by a large margin?
Answer:the paper feed bracket containing paper roll shall be completely parallel to paperweight
wheel, for big roll of materials, loosen it prior graving to prevent excessive obstruction
whenplotting or graving.Forthe machines withfourpaperweight wheels, when plotting
big image or characters back and forth, use the two paperweight wheels at sides instead
of press the four down simultaneously. Unequal abrasion of the two wheels also may
resultin deviationofthepaper;in worsecasereplacingwheelsis needed。
Troubleshooting PCUT SERIES USER‘S MANUAL
22
Page 24

7.5 Question: why does lock up happen in plotting output?
Answer:(1). Exterior 220 V input voltage is too low (150V), the plotter will restart thus
lock up happen。
(2). When disturbance of exterior 220 V input voltage is too high, lock up may
happen, to resolve it you can use purified regulated power source。
7.6 Question: Why does the machine feel tingle?
Answer: the machine might be improperly grounded, make sure central line of the power
source grounded。
7.7 Question: why does the job feel not smooth with sharp-angle raised when plotting?
Answer: (1). The protruding length of knife top is too long, please adjust it as required.
(2). The knife is abraded, replace it。
7.8 Question: why does the plotter first scratch a line before plotting?
Answer: because the machine illegally escape last time, there is still knife-dropping
instruction existing in the memory of plotter. To resolve it power off the
machine and turn it on again。
7.9 Question: No LCD display or a black row of blocks are displayed?
Answer: (1). In case of no display, check whether the power work well。
(2). If black blocks are displayed, check whether voltage is at required level. If
troubles remainafter the above operation, please contactmaintenance center。
7.10 Question: why can not some characters close in strokes when it is plotting?
Answer: because the knife of the plotter is eccentric knife with a eccentric value, to
resolve it, set“closing compensation”in the software. For example: in
Wentai software:
(1). Click“plotting output”once, a plotting output picture will pop up。
(2). Click“set”once, a picture of setting plotter will pop up。
(3). Click“compensation setting” a dialog box will pop up。
(4). Select closing compensation, adjust the value to required level,
generally the value is set to be 0.5。
7.11 Question: Why the machines have missed some pave of letter when cutting?
Answer:(1). Check the machine if it presses enough。
(2). Reinstall the software。
(3). Chook the head of the knife。
(4). If the problem is still in existence, please contact with repair center。
7.12 Question: why is the machine in low-speed state after start-up?
Answer: Because paper sensor fails to detect the fore end of paper. When feeding
paper make fore end of paper cover hole of paper sensor, then perform
another automatic paper testing。
PCUT SERIES USER‘S MANUAL Troubleshooting
23
Page 25

7.13 Question: why do some nicks deep, while some shallow when cutting?
Answer: as PCUT employs upscale soft PVC materials as knife strip cushion to protect
knife. But long period using it may produce a trace therefore roughing the
stripe cushion, so some nicks become deep, while some become shallow. To
resolve it replace a stripe cushion. If is not so worse, adjust knife as described
in section 3.2.B, increase knife press (some 120 -150)。
7.14 Question: why can not the plotter run when it is outputting?
Answer:(1). Check whether the plotter is properly connected with computer. PCUT is
connected with COM1 or COM2 of computer; check whether the set ports
are conformed to those connected。
(2). Check whether the plotter is in online state, namely whether the LCD
displays“ON LINE”。
(3). Check whether the encryption card of software is properly. If not please
turn off the power and reinstall it. Check driving program of the plotter is
for PCUT series。
7.15 Question: why can not the instant-glue be taken off?
Answer:(1). Perform trial run prior output, adjust press to appropriate level.
(2). Check whether the knife is used too long, or whether the knife top is broken.
For new ones the nick is thin in the instant-glue, while for old ones the nick
is thick and impressive. To resolve it replace it with a new knife。
7.16 Question: what is attentive when cutting big characters?
Answer: (1). When cutting big characters, the system can automatically How to setup
page, you can cut a big character in several pages, but it is notable that the
setting of output width shall be conformed to the width of instant-glue in
addition, when cutting big characters and output it, you should widen pages or
set seaming distance。
(2). When you use the special wide machine to cut the big characters, especially
the long big characters Before cutting input, you shall instead the paper first
look careful the paper if the paper deviates then deviate the big characters into
somepouts to input, it can makesure it won’t deviate and wastepaper。
7.17 Question: how do we maintain the plotter?
Answer:PCUTseries plotterallemploy upscale oil bearing fromJapan, no oilis needed even
itworks fora long time. After operation everyday, clean the dustwith softbrush.The
glue remainingin engine base can be cleaned with alcohol. If frequentlyoperated in
dusty environment above two years, please have maintenance technicians clean the
dust in machine. If plotting precision degrades, the maintenance of running parts
aredesirable (firming and replacingthe abradedparts)。
Troubleshooting PCUT SERIES USER‘S MANUAL
24
Page 26

7.18 Question: Why does the plotter is out of our control sometimes?
Answer: maybe while transporting or using it, the signal line is improperly connected,
open the machine properly plug all lines. If the problem still fails to be solved
after the above operation, please contact local agent or maintenance center。
7.19 Question: Why does the plotter come to halt?
Answer: because it encounters vibrate for a long period, or has been used for a long
period, or is affected by temperature, so dielectric displacement happen to the
servo driving board, therefore resulting in halt, please contact local agent or
customer maintenance center。
PCUT SERIES USER‘S MANUAL Troubleshooting
25
 Loading...