

Page 1
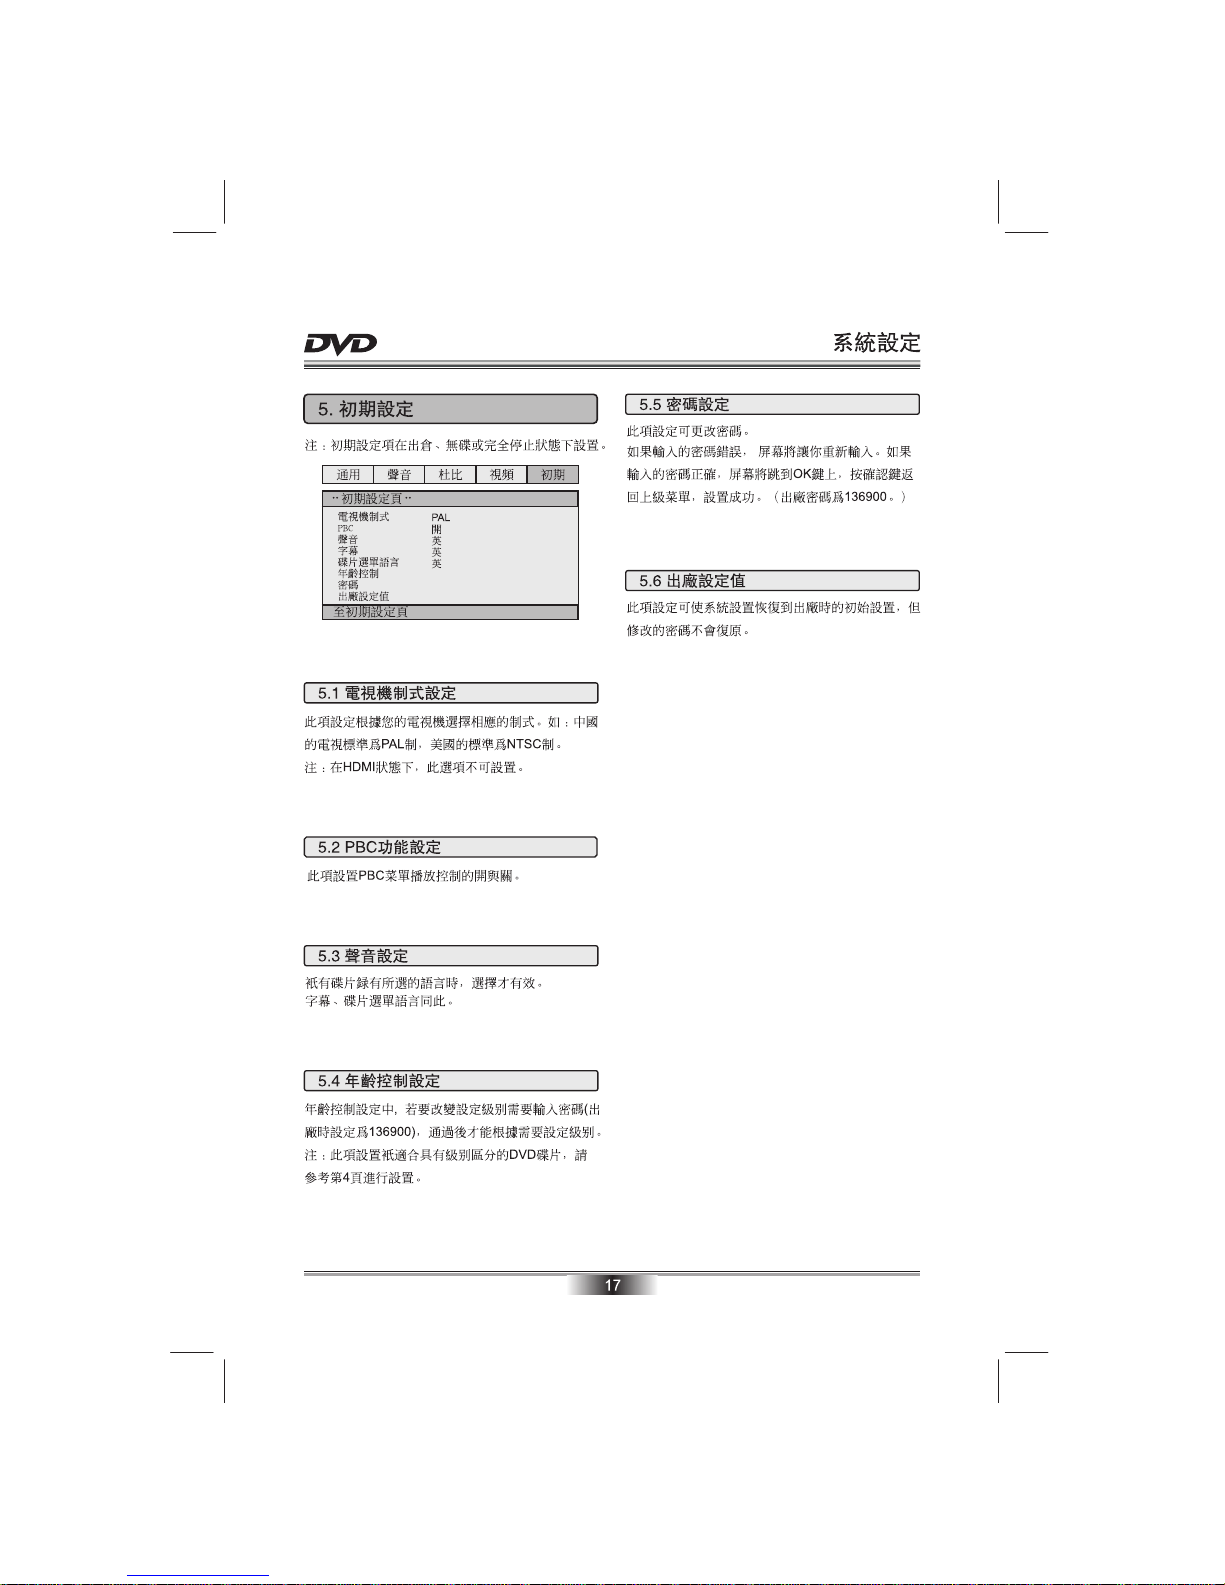
Page 2
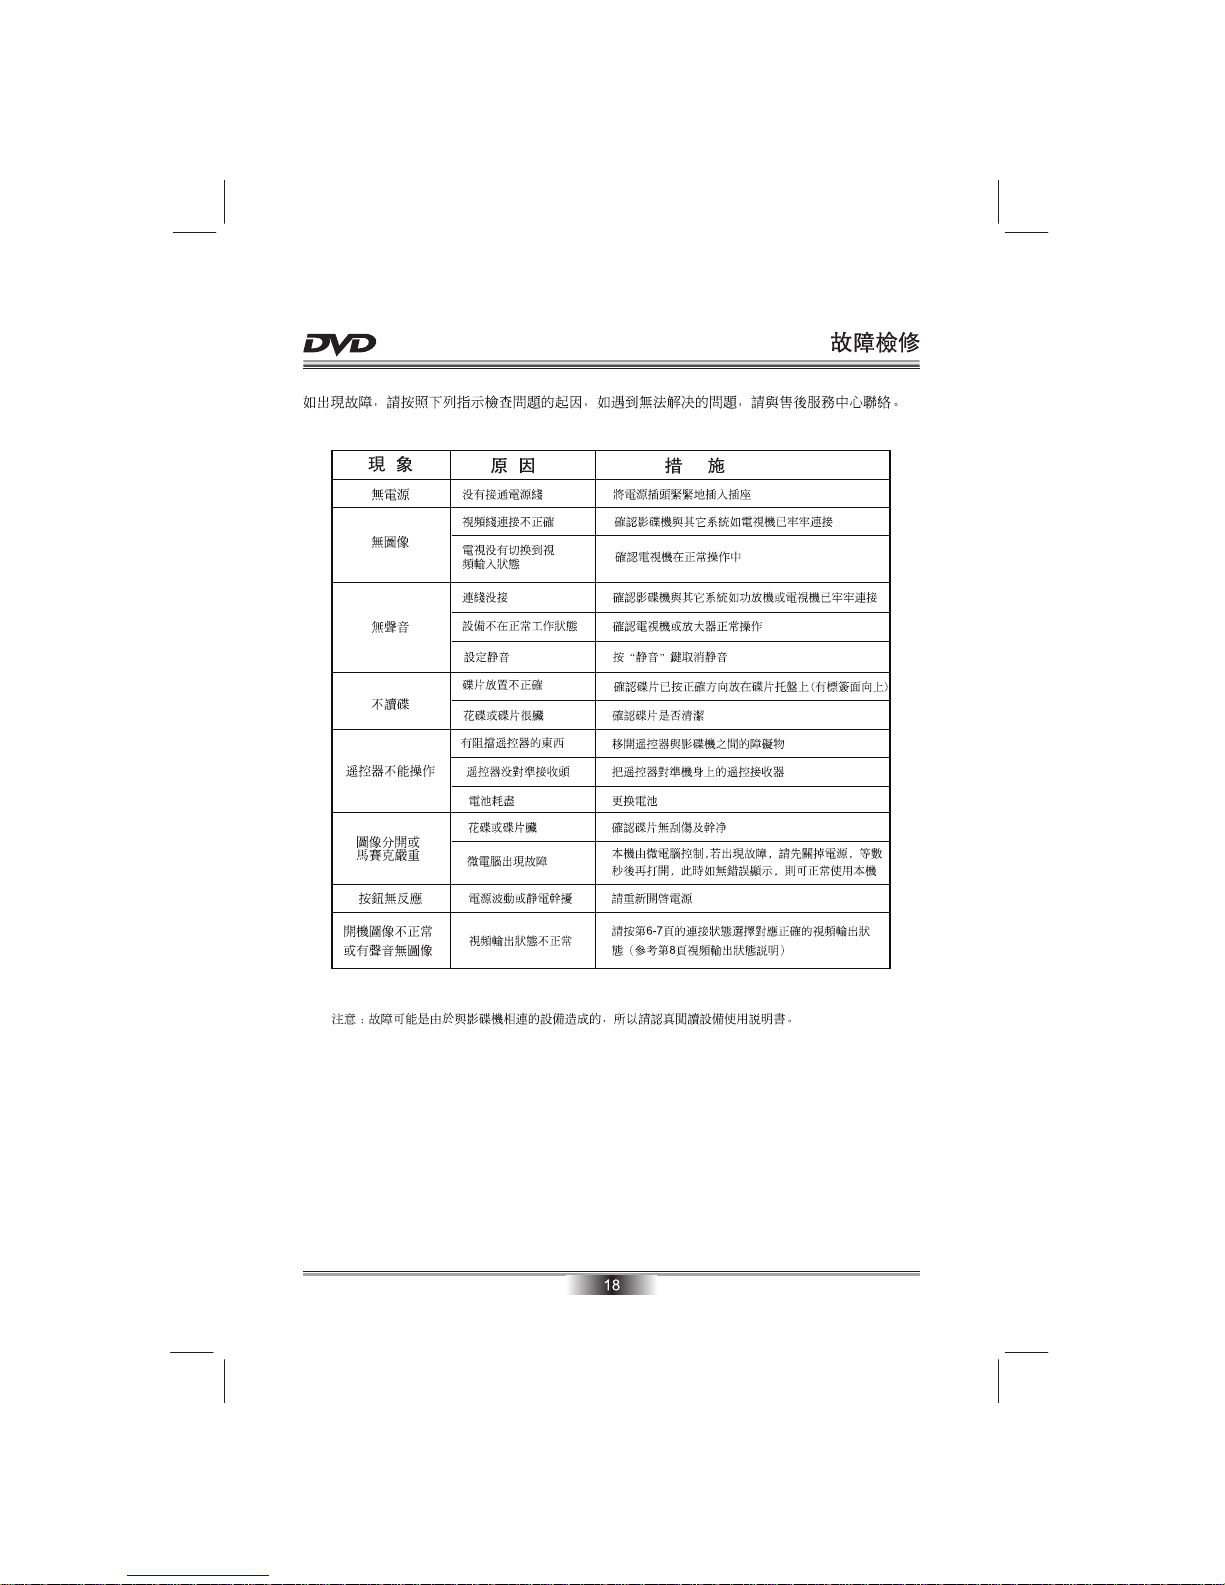
Page 3
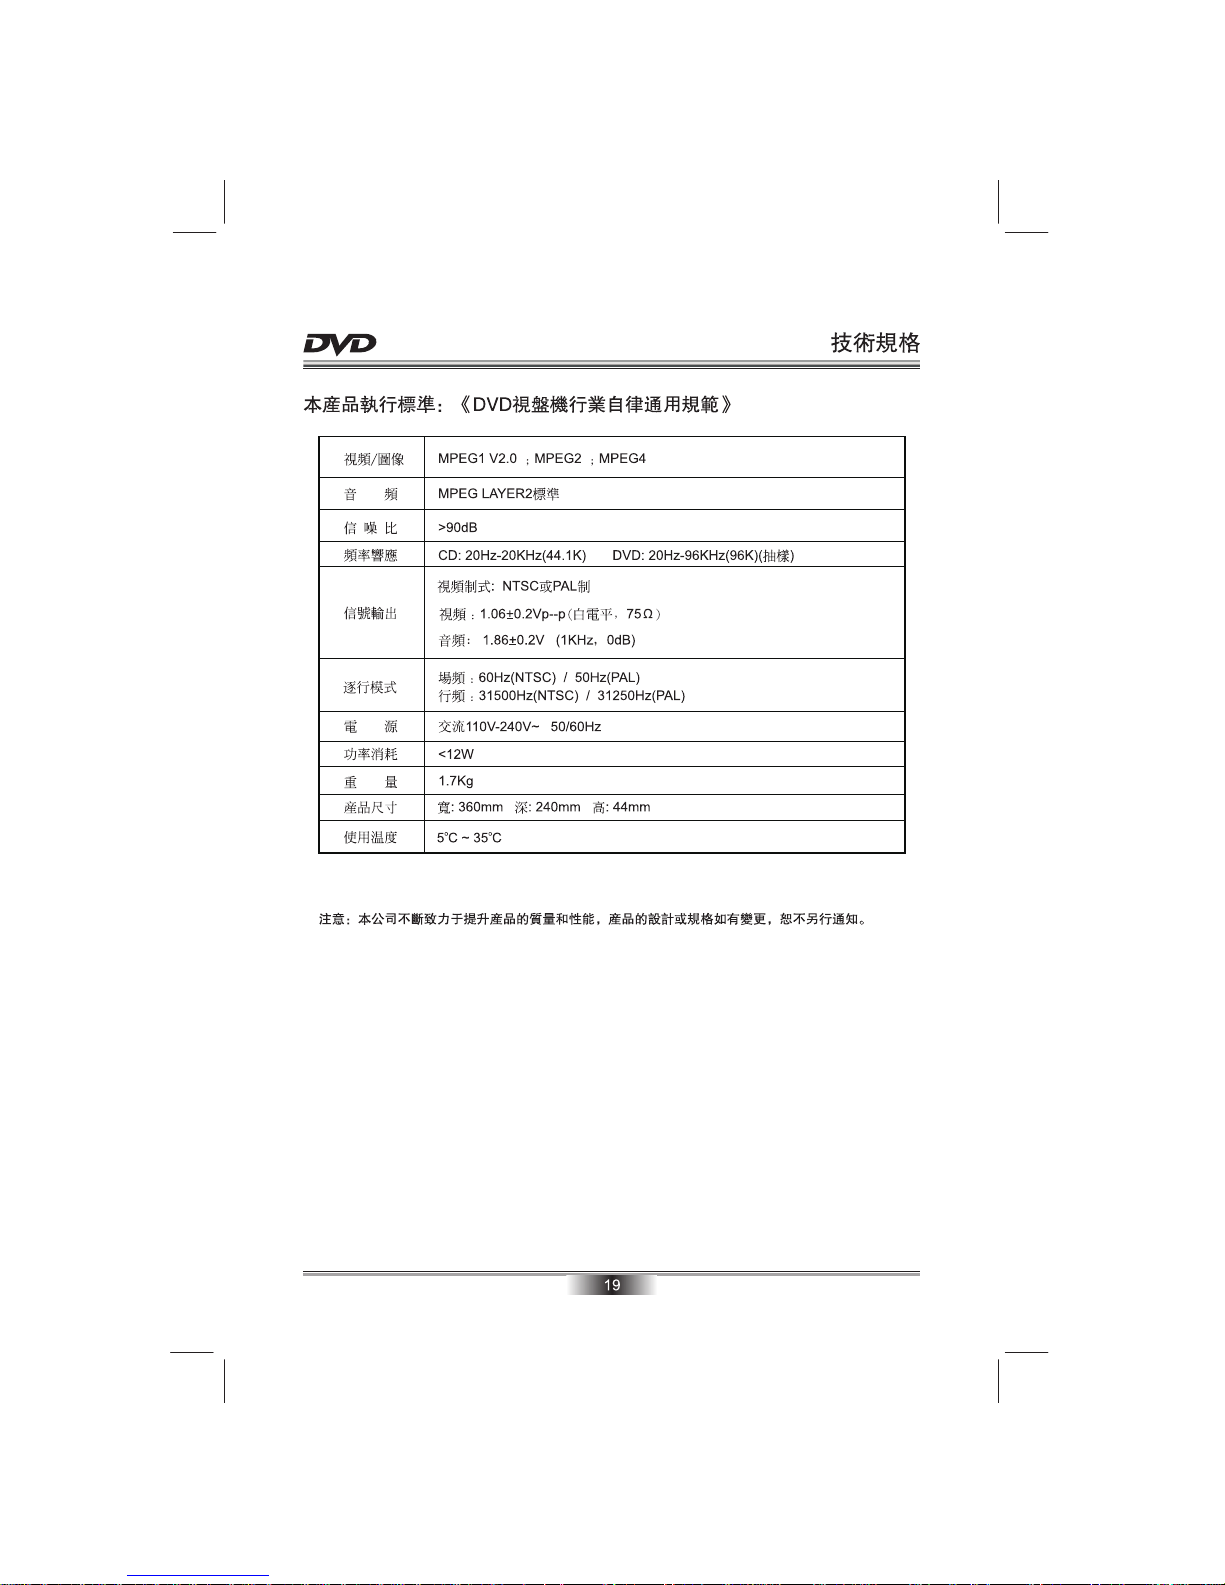
Page 4

Page 5
USB
SD/MS/MMC CARD
USER MANUAL
MODEL: A243
Page 6

TABLE OF CONTENTS
01-02
SAFETY PRECAUTIONS
IMPORTANT SAFETY INSTRUCTIONS
03
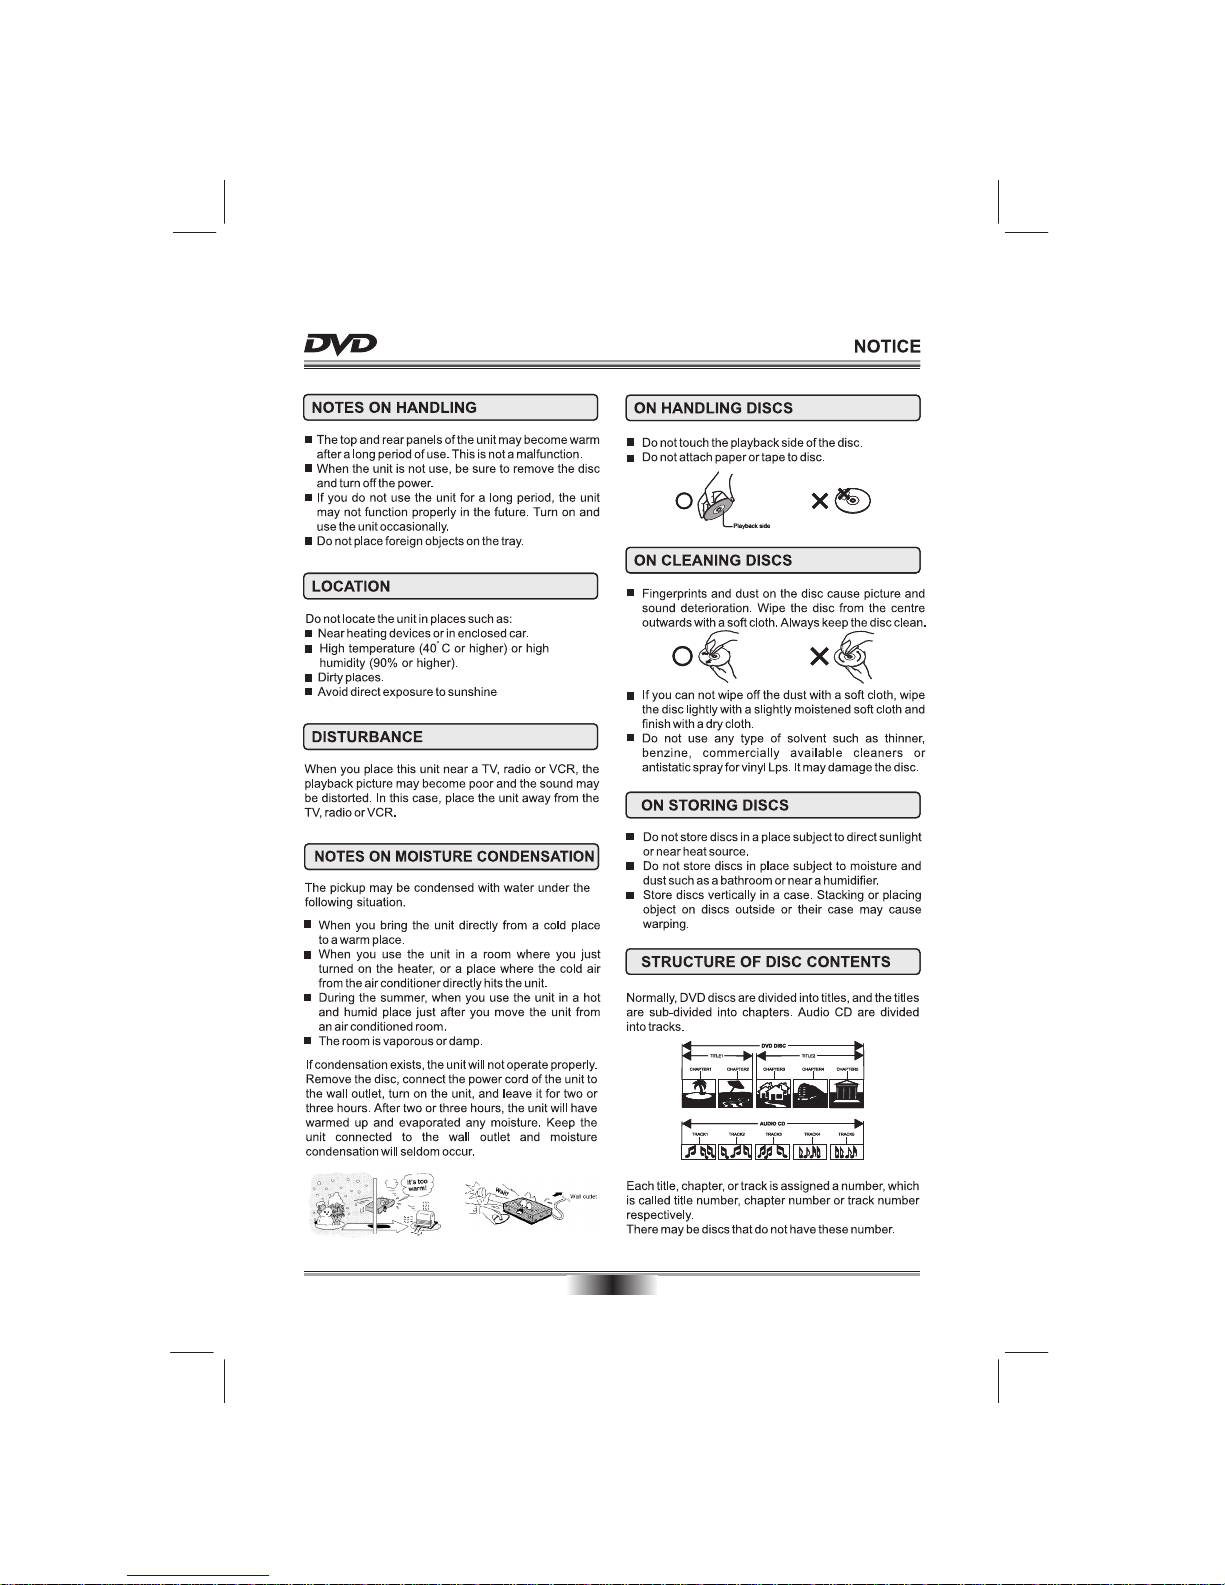
NOTICE
04
05
ACCESSORIES and PANEL
06-07
BASIC CONNECTION
08
REMOTE CONTROL
09
BASIC PLAYBACK
10-11
ADVANCED PLAYBACK
11-13
SPECIAL FUNCTION PLAYBACK
14-17
SYSTEM SETUP
SPECIFICATIONS
19
18
TROUBLE SHOOTING
Page 7
SAFETY PRECAUTIONS
01
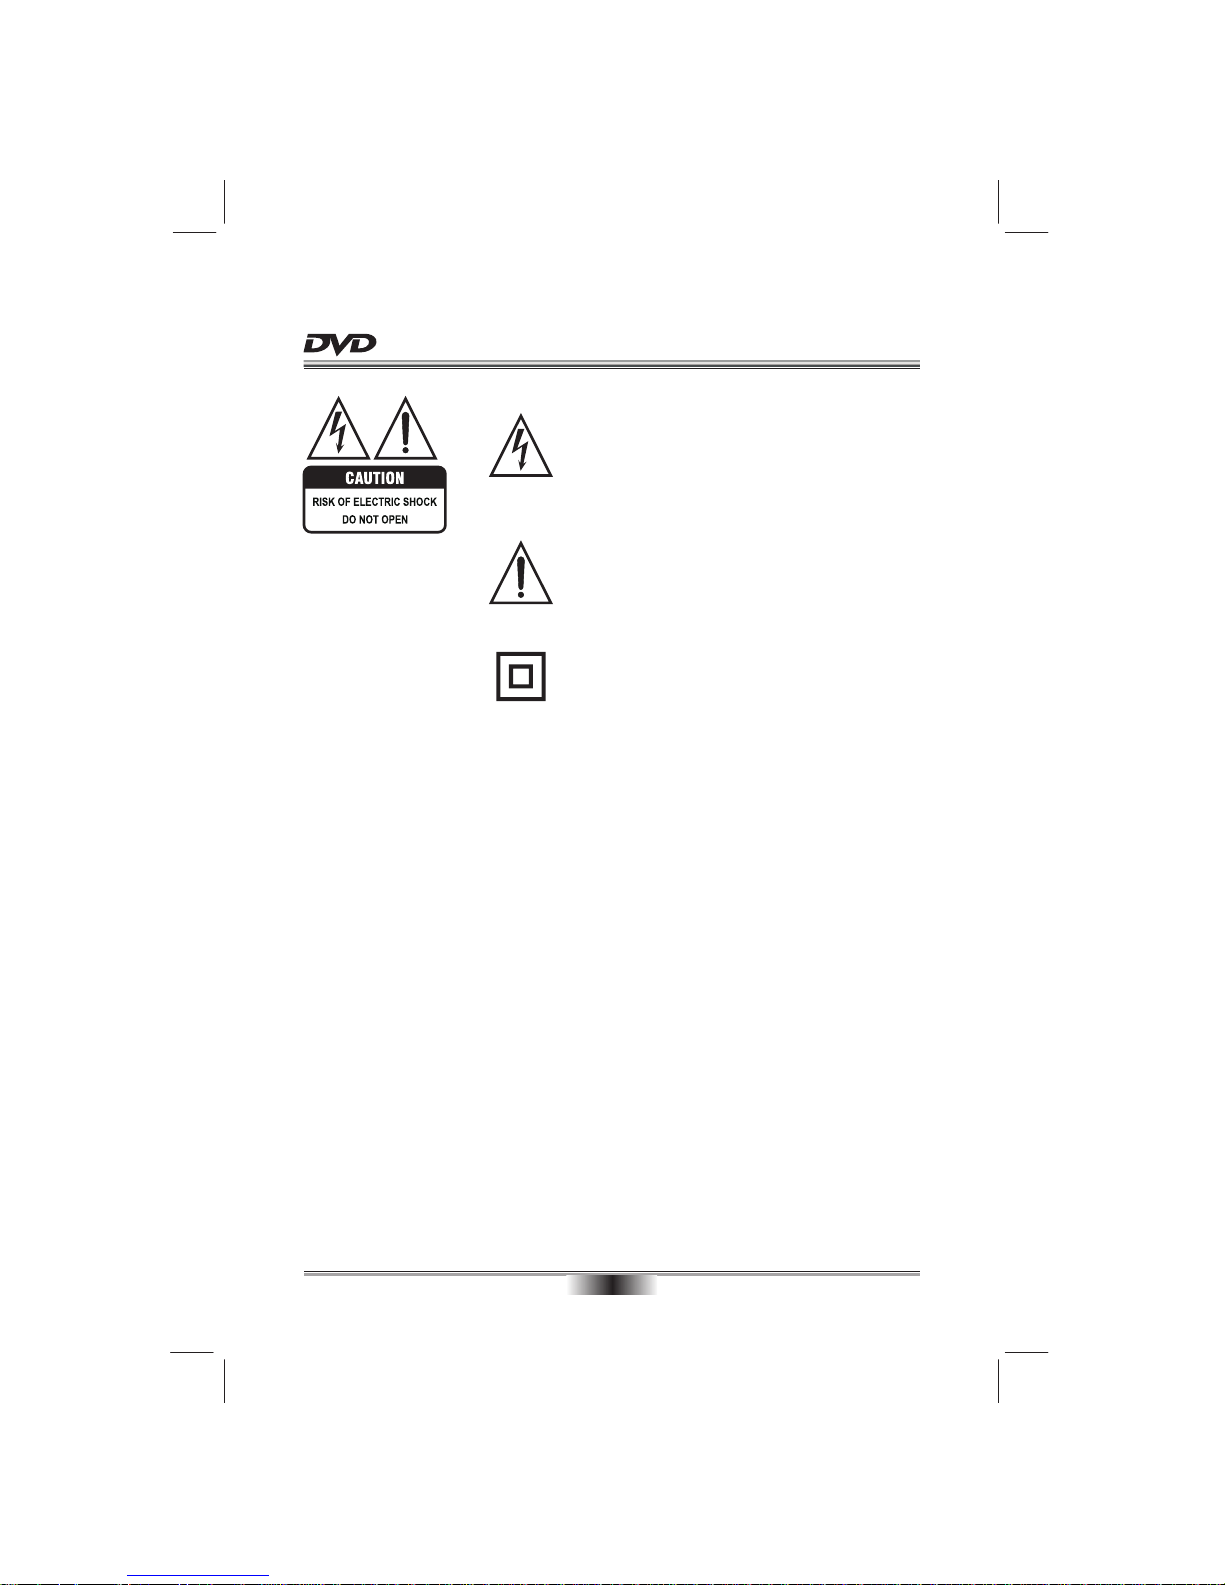
The lightning flash with arrowhead symbol, within an equila-
teral triangle, is intended to alert the user to the presence
of uninsulated "dangerous voltage " within the product's en-
closure that may be of sufficient magnitude to constitute a
risk of electric shock to persons.
The exclamation point within an equilateral triangle is
intended to alert the user to the presence of important
operating and maintenance (servicing) instructions in the
literature accompanying the appliance.
TO PREVENT ELECTRIC SHOCK, MATCH WIDE BLADE OF PLUG TO WIDE
SLOT, FULLY INSERT.
The symbol for CLASS II (Double Insulation).
TO REDUCE THE RISK OF FIRE OR ELECTRIC SHOCK, DO NOT EXPOSE THIS
APPLIANCE TO RAIN OR MOISTURE, DANGEROUS HIGH VOLTAGES ARE
PRESENT INSIDE THE ENCLOSURE. DO NOT OPEN THE CABINET, REFER
SERVICING TO QUALIFIED PERSONNEL ONLY.
WARNING:
When replace the direct plug in power supply or a separable, cord-connected power
supply, the replacement must be exact duplicate, or one recommended by the manu-
facturer.
CAUTION:
This product utilizes a laser.
Use of controls or adjustments or performance of procedures other than those
specified here in may result in hazardous radiation exposure.
Do not open the cover and do not repair yourself. Refer servicing to
qualified personnel.
DANGER: Visible and invisible laser radiation when open and interlock failed or
defeated. Avoid direct exposure to beam.
Page 8
SAFETY PRECAUTIONS
02
Disposal of your old appliance
1. When this crossed-out wheeled bin symbol is attached to a product, it means the
product is covered by the European Directive 2002/96/EC.
2. All electrical and electronic products should be disposed of separately from the
municipal waste stream via designated collection facilities appointed by the government
or the local authorities.
3. The correct disposal of your old appliance will help prevent potential negative
consequences for the environment and human health.
4. For more detailed information about disposal of your old appliance, please contact
your city office, waste disposal service or the shop where you purchased the product.
This product incorporates copyright protection technology that is protected by U.S.
patents and other intellectual property rights. Use of this copyright protection technology
must be authorized by Macrovision, and is intended for home and other limited viewing
uses only unless otherwise authorized by Macrovision. Reverse engineering or
disassembly is prohibited.
Manufactured under license from Dolby Laboratories. Dolby and the double-D symbol are
trademarks of Dolby Laboratories.
Page 9
03
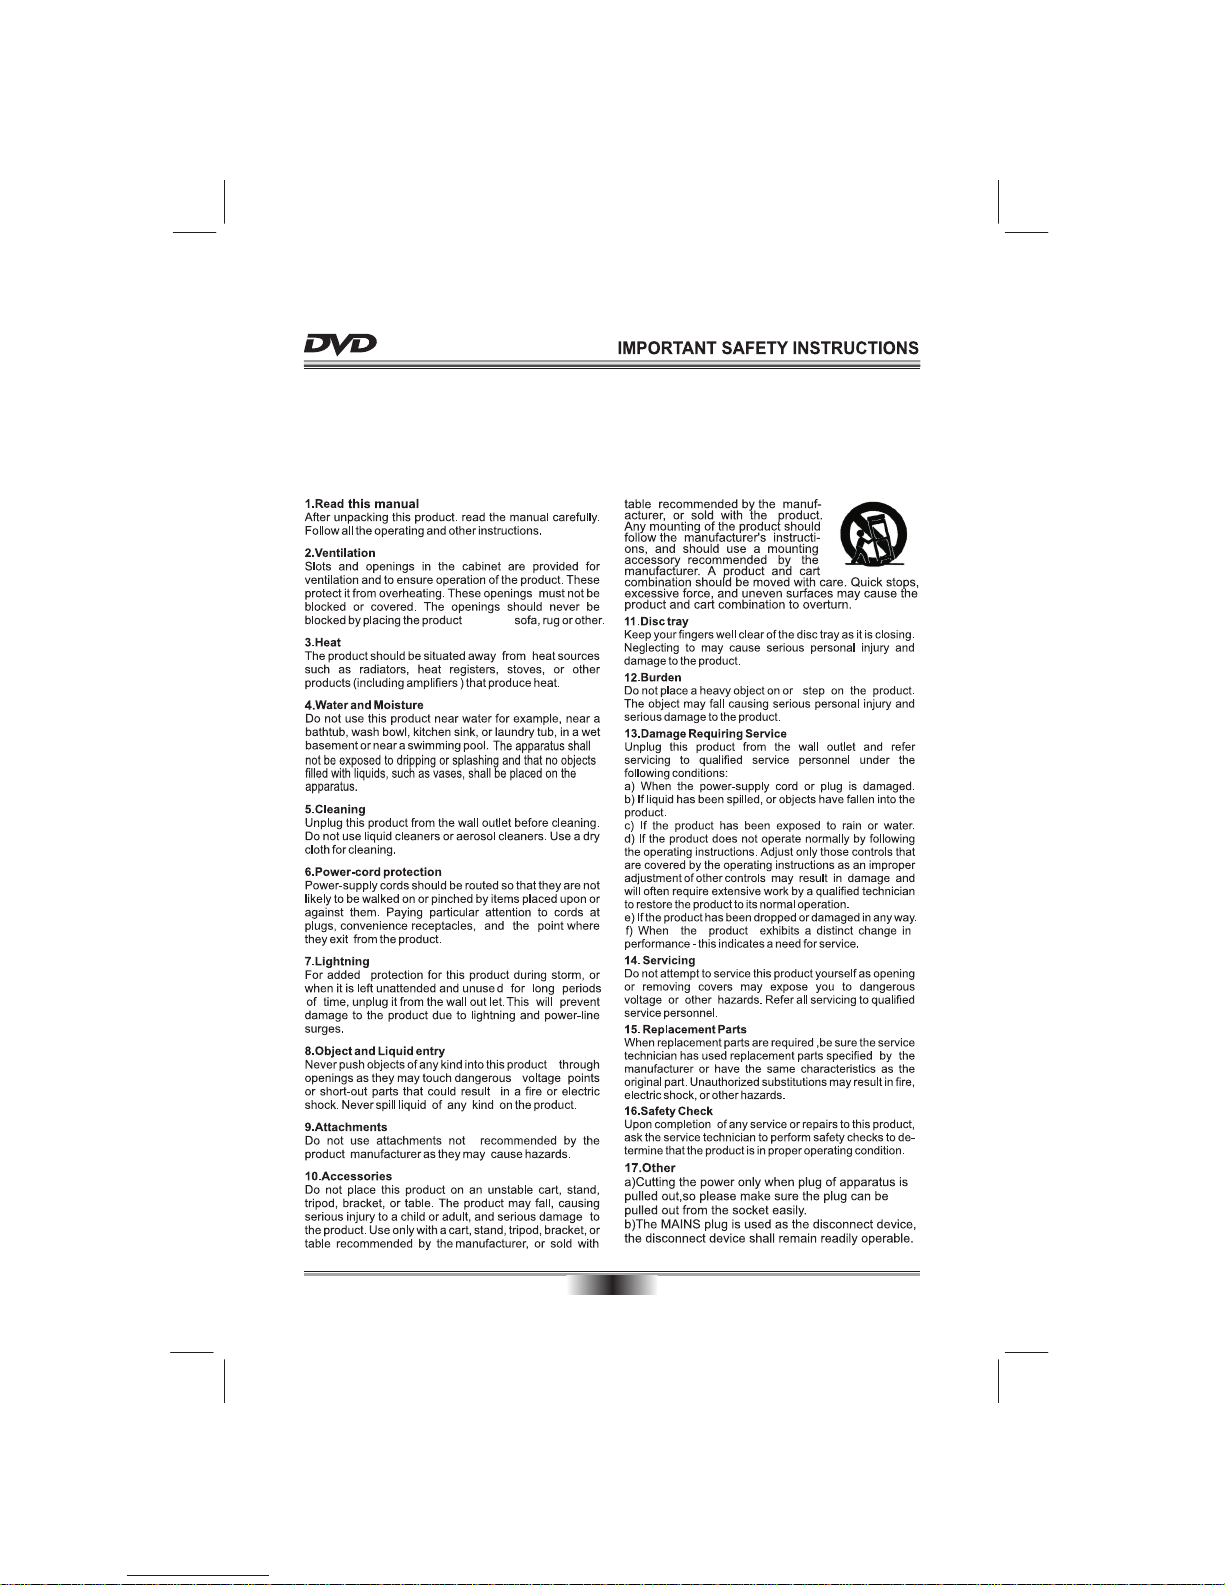
CAUTION: PLEASE READ AND OBSERVE ALL WARNINGS AND INSTRUCTIONS GIVEN IN THIS MANUAL AND
THOSE MARKED ON THE UNIT. RETAIN THIS BOOKLET FOR FUTURE REFERENCE.
This set has been designed and manufactured to assure personal safety. Improper use can result in electric shock or fire
hazard. The safeguards incorporated in this unit will protect you if you observe the following procedures for installation,
use and servicing. This unit is fully transistorized and does not contain any parts that can be repaired by the user.
DO NOT REMOVE THE CABINET COVER OR YOU MAY BE EXPOSED TO DANGEROUS VOLTAGE. REFER
SERVICING TO QUALIFIED SERVICE PERSONNEL ONLY.
on a bed,
Page 10
04
Page 11
DIGITAL AUDIO OUT / VIDEO OUT
COAXIAL
S-VIDEO
L
R
VIDEO
Y
CB / PB
CR / PR
2-CH AUDIO OUT
HDMI
110V-240V~ 50/60Hz
RISK OF ELECTRIC SHOCK
DO NOT OPEN
CAUTION
CLASS 1
LASER PRODUCT
3
U.S. Patent Nos. 6,836,549; 6,381,747;
7,050,698; 6,516,132; and 5,583,936.
Dolby and the double-D symbol are
registered trademarks of Dolby
Laboratories.
MODEL: A243
AC: 110V-240V~ 50/60Hz
S/N:
POWER: 12W
DVD PLAYER
USB
SD/MS/MMC CARD
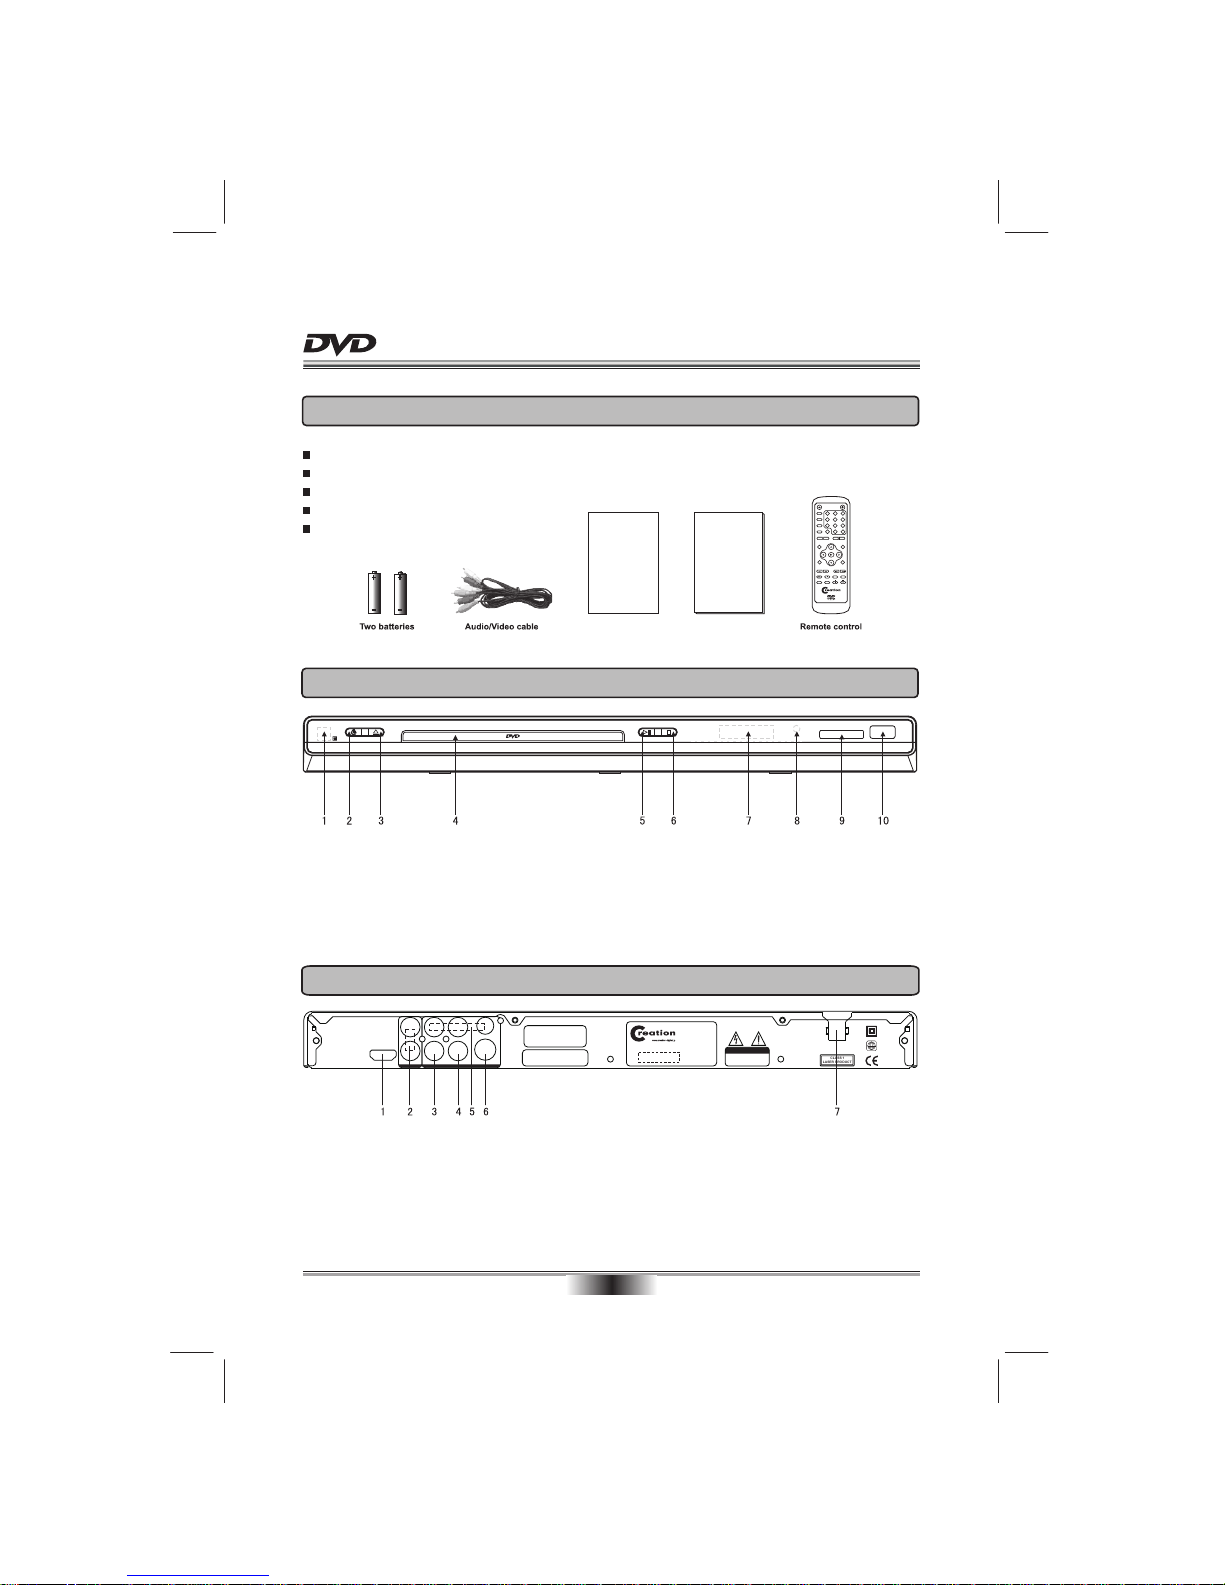
6. STOP
7. LED SCREEN
8. POWER INDICATOR
9. SD/MS/MMC CARD SOCKET
10. USB INTERFACE
1. REMOTE CONTROL SENSOR
2. STANDBY/ON
3. OPEN/CLOSE
4. TRAY
5. PLAY/PAUSE
ACCESSORIES and PANEL
05
ACCESSORIES
Remote control x 1
User manual x 1
Audio/Video cable X 1
Guarantee x 1
Batteries x 2
REAR PANEL OUTPUT
1. HDMI OUTPUT
2. 2 CHANNELS AUDIO OUTPUT
3. COAXIAL OUTPUT
4. VIDEO OUTPUT
5. Y, CB/PB, CR/PR OUTPUT
6. S-VIDEO OUTPUT
7. POWER LINE INPUT
FRONT PANEL
User manual
USER
MANUAL
Guarantee
Guarantee
SEARCH
REPEAT A-B RPT
MENU
CLEAR
DVD/USB/CARDSTOPPAUSE/STEP
VOLUME
PAL/NTSC
ANGLE
MUTE
AUDIO
F.FWDF.REV NEXTPREV
ZOOM
SETUP
1 2
3
4
5
6
7 8 9
0 10+
SUBTITLE
OSD
V.MODE
PROG
TITLE/PBC
Page 12
06
BASIC CONNECTION
BASIC CONNECTION
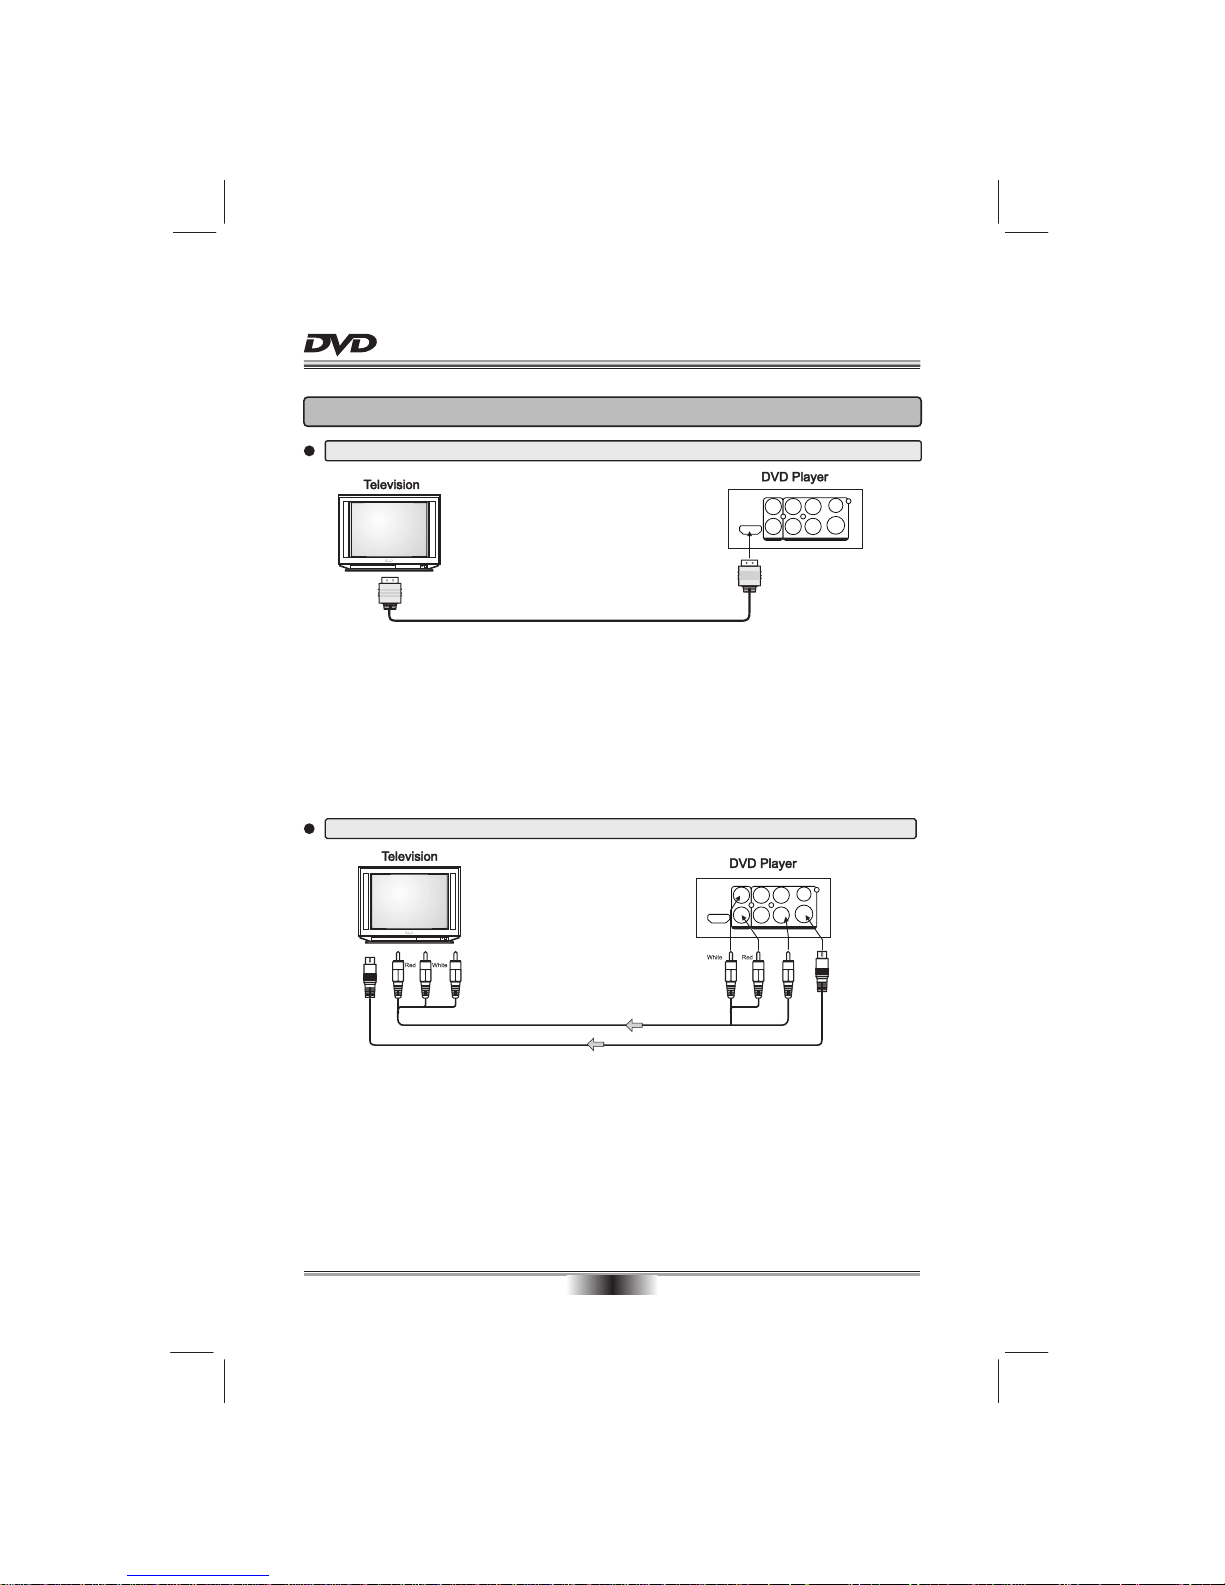
Connecting to a devices with HDMI faucet
Easy DVD hook-up guide: For the best possible picture, simply follow these guidelines and use the best
cables your TV accepts: Normal: Composite video Good: S-video
Better: Component video Best: HDMI video
HD DVD playback: Enjoy your entire DVD collection in brilliant high definition format. This DVD player
upconvert DVDs to your HDTV's native resolution, whether it's 480p, 720p, 576p, 1080i and 1080P.
HDMI output: Use this output for HD conversion and experience stunning HD images and crisp digital audio.
Connecting to a TV with Audio/Video cable
If the TV has an S-video input, connect the DVD player with an S-video cable.
When using an S-video cable, do not connect the yellow video cable.
DIGITAL AUDIO OUT / VIDEO OUT
COAXIAL
S-VIDEO
L
R
VIDEO
Y
CB / PB
CR / PR
2-CH AUDIO OUT
HDMI
To audio inputs(red, white)
To video inputs(yellow)
To S-video input
To S-video
output
Yellow
Yellow
DIGITAL AUDIO OUT / VIDEO OUT
COAXIAL
S-VIDEO
L
R
VIDEO
Y
CB / PB
CR / PR
2-CH AUDIO OUT
HDMI
Page 13
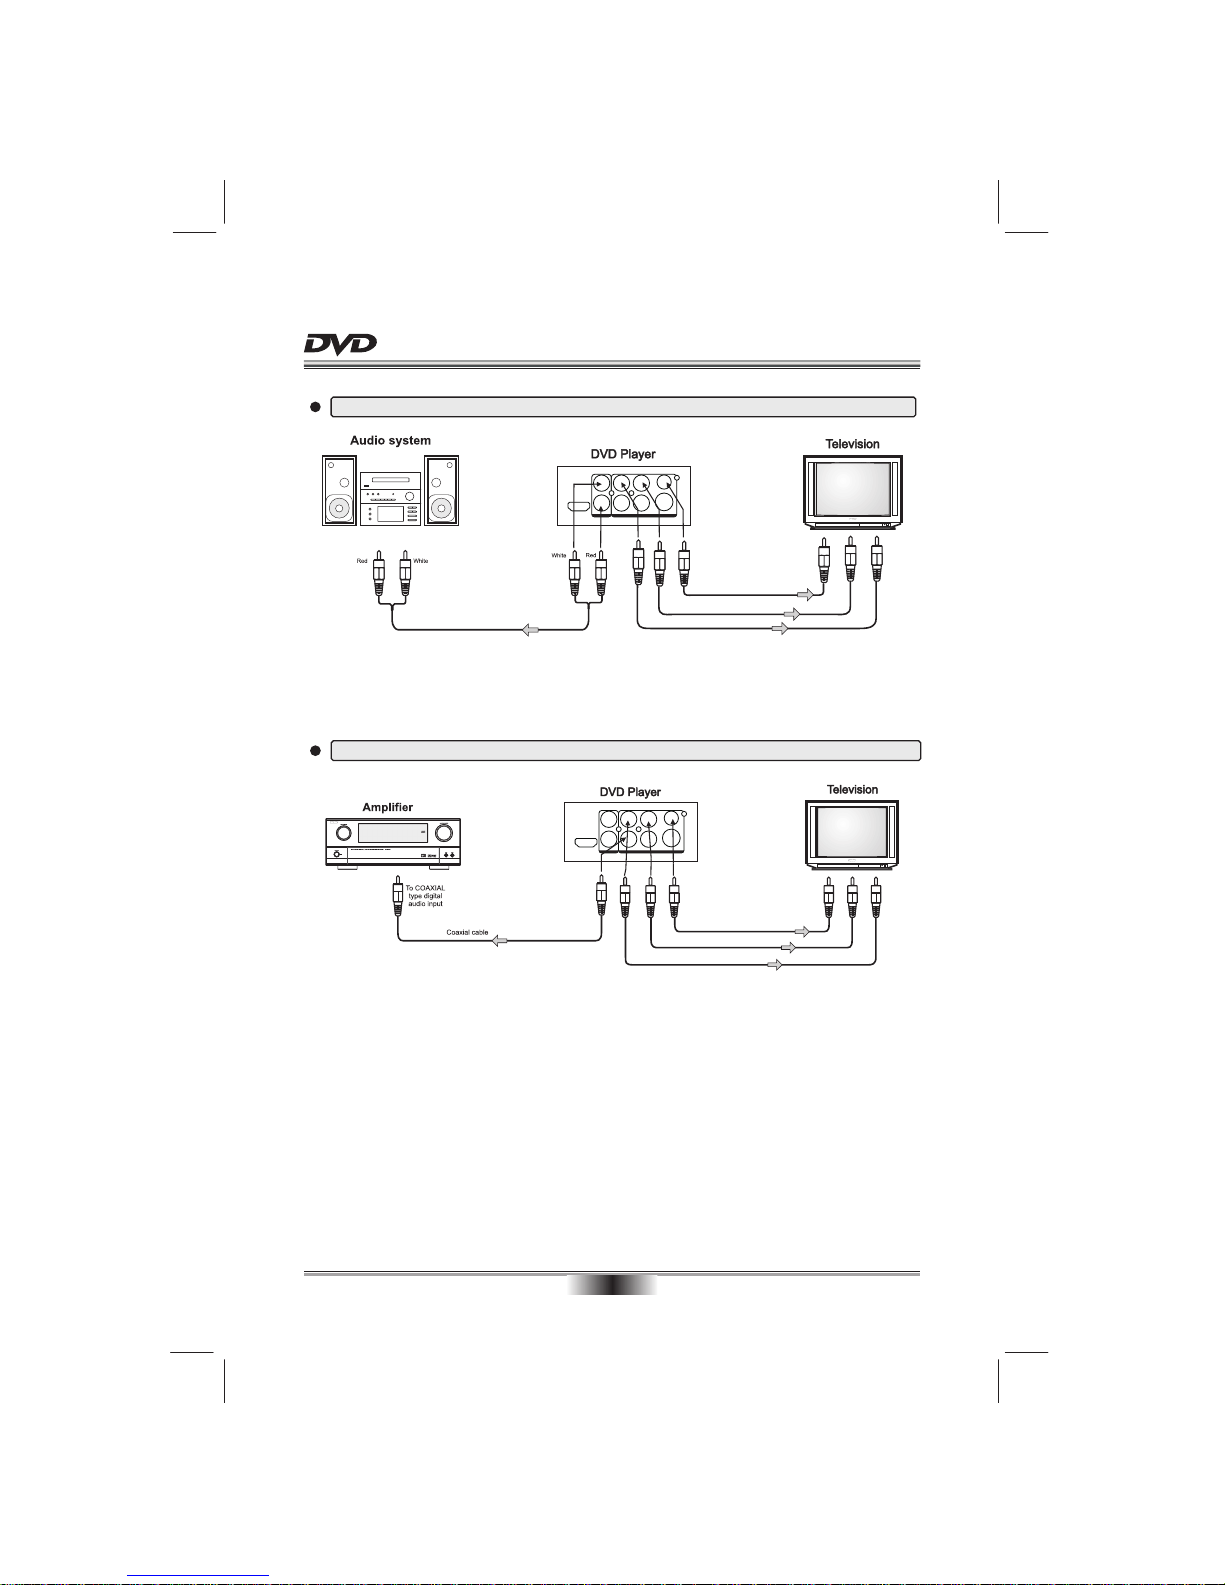
Connecting to a audio system and TV equipped with YUV video input
07
BASIC CONNECTION
Connecting to an amplifier equipped with a digital audio input and TV
DIGITAL AUDIO OUT / VIDEO OUT
COAXIAL
S-VIDEO
L
R
VIDEO
Y
CB / PB
CR / PR
2-CH AUDIO OUT
HDMI
To CR/PR video input
To CB/PB video input
To Y video input
To Y video output
To CB/PB video output
To CR/PR video output
To audio inputs of the amplifier
DIGITAL AUDIO OUT / VIDEO OUT
COAXIAL
S-VIDEO
L
R
VIDEO
Y
CB / PB
CR / PR
2-CH AUDIO OUT
HDMI
To CR/PR video input
To CB/PB video input
To Y video input
To Y video output
To CB/PB video output
To CR/PR video output
Page 14
REMOTE CONTROL
08
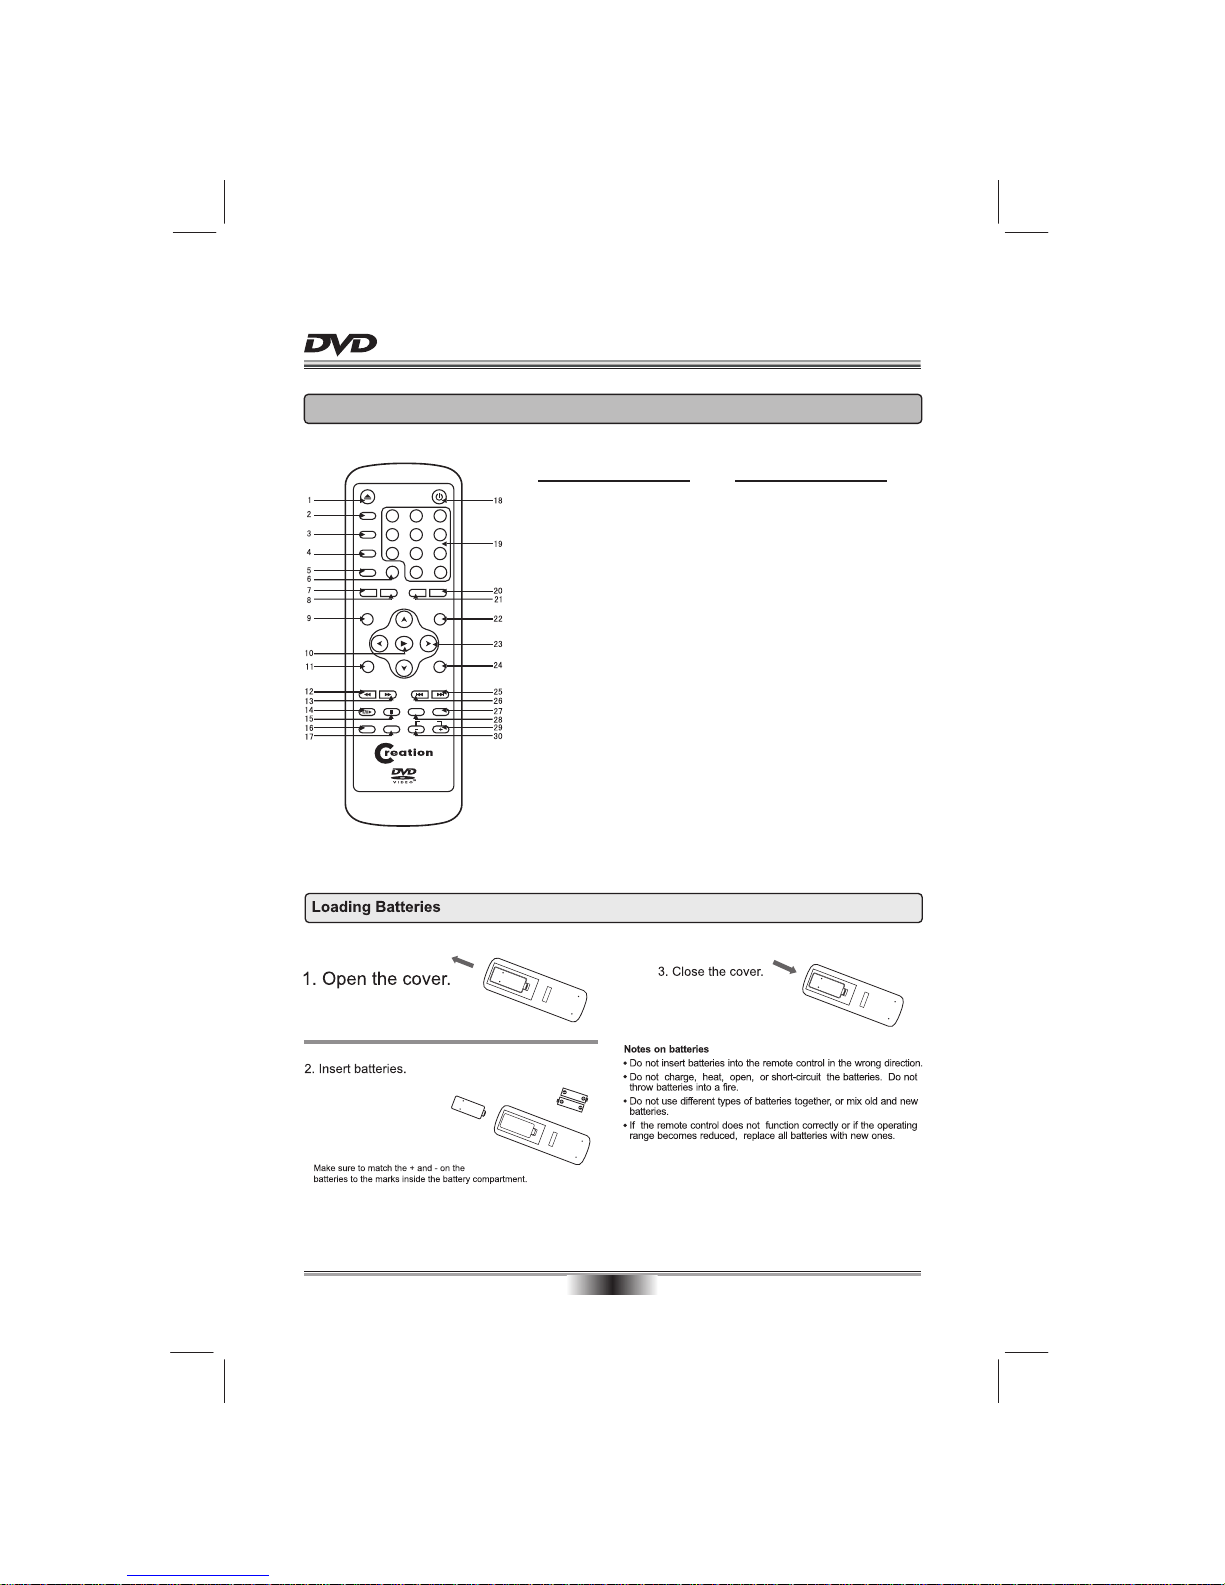
REMOTE CONTROL
SEARCH
REPEAT A-B RPT
MENU
CLEAR
DVD/USB/CARDSTOPPAUSE/STEP
VOLUME
PAL/NTSC
ANGLE
MUTE
AUDIO
F.FWDF.REV NEXTPREV
ZOOM
SETUP
1 2
3
4
5
6
7
8 9
0 10+
SUBTITLE
OSD
V.MODE
PROG
TITLE/PBC
Function
16. MUTE
17. ANGLE
18. STANDBY
19. DIGITS AND 10+ BUTTONS
20. PAL/NTSC
21. CLEAR
22. MENU
23. CURSOR
24. PROGRAM
25. NEXT
26. PREVIOUS
27. AUDIO
28. DVD/USB/CARD
29. VOLUME +
30. VOLUME -
Function
1. OPEN/CLOSE DISC TRAY
2. V.MODE
3. OSD (On Screen Display)
4. SUBTITLE
5. TITLE/PBC
6. SEARCH
7. REPEAT
8. A-B REPEAT
9. SETUP
10. ENTER/PLAY
11. ZOOM
12. FAST REVERSE
13. FAST FORWARD
14. PAUSE/STEP
15. STOP
Page 15
Preparations
When you want to view a disc, turn on the TV and
select the video input connected to the DVD player.
BASIC PLAYBACK
09
NOTES:
1.
1. Press STOP button to go to stop mode, the TV
screen will show the start logo. As some disc the
unit can recall the location where stopped, such
as DVDs and audio CDs.
2. Press ENTER/PLAY to playback to resume play-
back from the location where playback is stopped
or from the beginning of the disc.
3. Press STOP twice to stop completely.
Stop playback
Fast forward and Fast reverse
1. Press F.FWD to fast forward through the disc.
Each time the F.FWD button is pressed, the
fast forward motion speed changes.
2. Press ENTER/PLAY to resume normal playback.
3. Press F.REV to fast reverse through the disc.
Each time the F.REV button is pressed, the
fast reverse motion speed changes.
4. Press ENTER/PLAY to resume normal playback.
Basic playback
1. Press STANDBY/ON in the front panel, the DVD
player turns on and the TV screen will display the
start logo. If a disc is already in the tray, it will
begin to play automatically.
2. Press OPEN/CLOSE to open the disc tray,
place a disc on the disc tray.
There are two different disc sizes. Place the
disc in the correct guide on the disc tray. If the
disc is out of the guide, it may damage the disc
and cause the DVD player to malfunction.
Do not place a disc which is unplayable in this
DVD player.
3. Press OPEN/CLOSE to close the disc tray, the
playback will automatically start.
Some discs may not playback automatically,
you can press ENTER/PLAY button to start
playback.
4. Some discs may start playback with a menu,
use the cursor button on the remote control to
select menu options and press ENTER/PLAY
to start, or press digits to select a menu options
directly.
Pause/step playback
1. Press PAUSE/STEP first time to pause play-
back (still mode). The sound will be muted during
still mode.
2. Press PAUSE/STEP continuous to single
step forward to the next frame in the video.
3. Press ENTER/PLAY to resume normal playback.
Previous and Next
During playing, press PREV key will go to the start
of the previous chapter still the start of the disc.
Each press of NEXT during playing will skip
the current chapter and play the next one.
key
Page 16
ADVANCED PLAYBACK
10
REPEAT
Follow this operation :
first Chapter
twice Title
third All
the fourth pressed will cancel repeat.
A-B REPEAT
Press " A-B RPT " to begin start-point, press again
to set an end point and complete setting. The
selected section A-B will be repeated. The third
press will cancel this function.
MENU
Press this button and the screen will display " Root
Menu ", select item according to your preference.
(This key is valid to DVD disc possessing multi-layer
menu.)
IMPORTANT NOTE:
THE FOLLOWING FUNCTIONS ARE APPLICABLE ONLY TO DVD DISCS. IF OTHER DISC FORMATS ARE
PLAYED, SCREEN DISPLAY AND OPERATION WILL BE DIFFERENT.
OSD
Press this button and the screen will display some
information about disc, such as : " Title Elapsed " ,
" Title Remain ", " Chapter Elapsed ", " Chapter
Remain " and " Display Off ".
SUBTITLE
Press this button and the screen will display "SUBTITLE 01/XX XXXXX", "01" indicates the ordinal
number of this language; "XX" indicates total number
of language; "XXXXXX" indicates the language of
country. (the number of language depends on disc).
This button can set VIDEO output among CVBS
or YUV .
Note: The screen disappear when press this button,
press this button continuously until the screen turn
normal. If there are picture interferences or no picture,
please press "V.MODE" to correct it.
V.MODE
PROGRAM
Press this button and the screen will display info
window , press digits button to input the program
number what you want, when finished, move the
cursor to select the " Start " logo, at this time the unit
will start program playback and the screen will display
"Program" logo.
Press "STOP" two times can cancel it or press PRG
again and select STOP selection to cancel this
function.
According to some DVD discs, Press this button to
display the title menu, you can press digits to select
the chapters preferred.
The PBC allows the user to play Video CDs interactively. If PBC is ON, the user can use the digits buttons
to select track only in the menu, if PBC is OFF, the
user can select the track directly.
TITLE/PBC(Playback Control)
SEARCH
Press this button one time, the screen will display
search menu, the second will cancel. In search menu,
you can use UP/DOWN cursor button to select item
what you wanted, then press ENTER/PLAY button
to confirm.
CLEAR
This button can cancel the mistake information you
input.
PAL/NTSC
Press this button will switch among NTSC and PAL.
Page 17
SPECIAL FUNCTION PLAYBACK
11
ANGLE
For discs with this feature, press this key to view
action from different angles.(Depending on the DVD)
VOLUME and MUTE
Press " + " at the right of VOLUME to increase
volume, " - " to decrease to volume. The first press
of MUTE will display MUTE (no voice), the second
press will return to normal playback.
Each time pressed, the picture enlarges. In this mode,
you can move the picture with CURSOR button.
ZOOM
AUDIO CHANNEL CHOOSE
Press this button on remote control to change the
mode of audio.
For example: Audio 1/2: Dolby D 2 CH English
Audio 2/2: Dolby D 5.1 CH English
Note: When press this button continuously, you must
above 3 seconds interval.
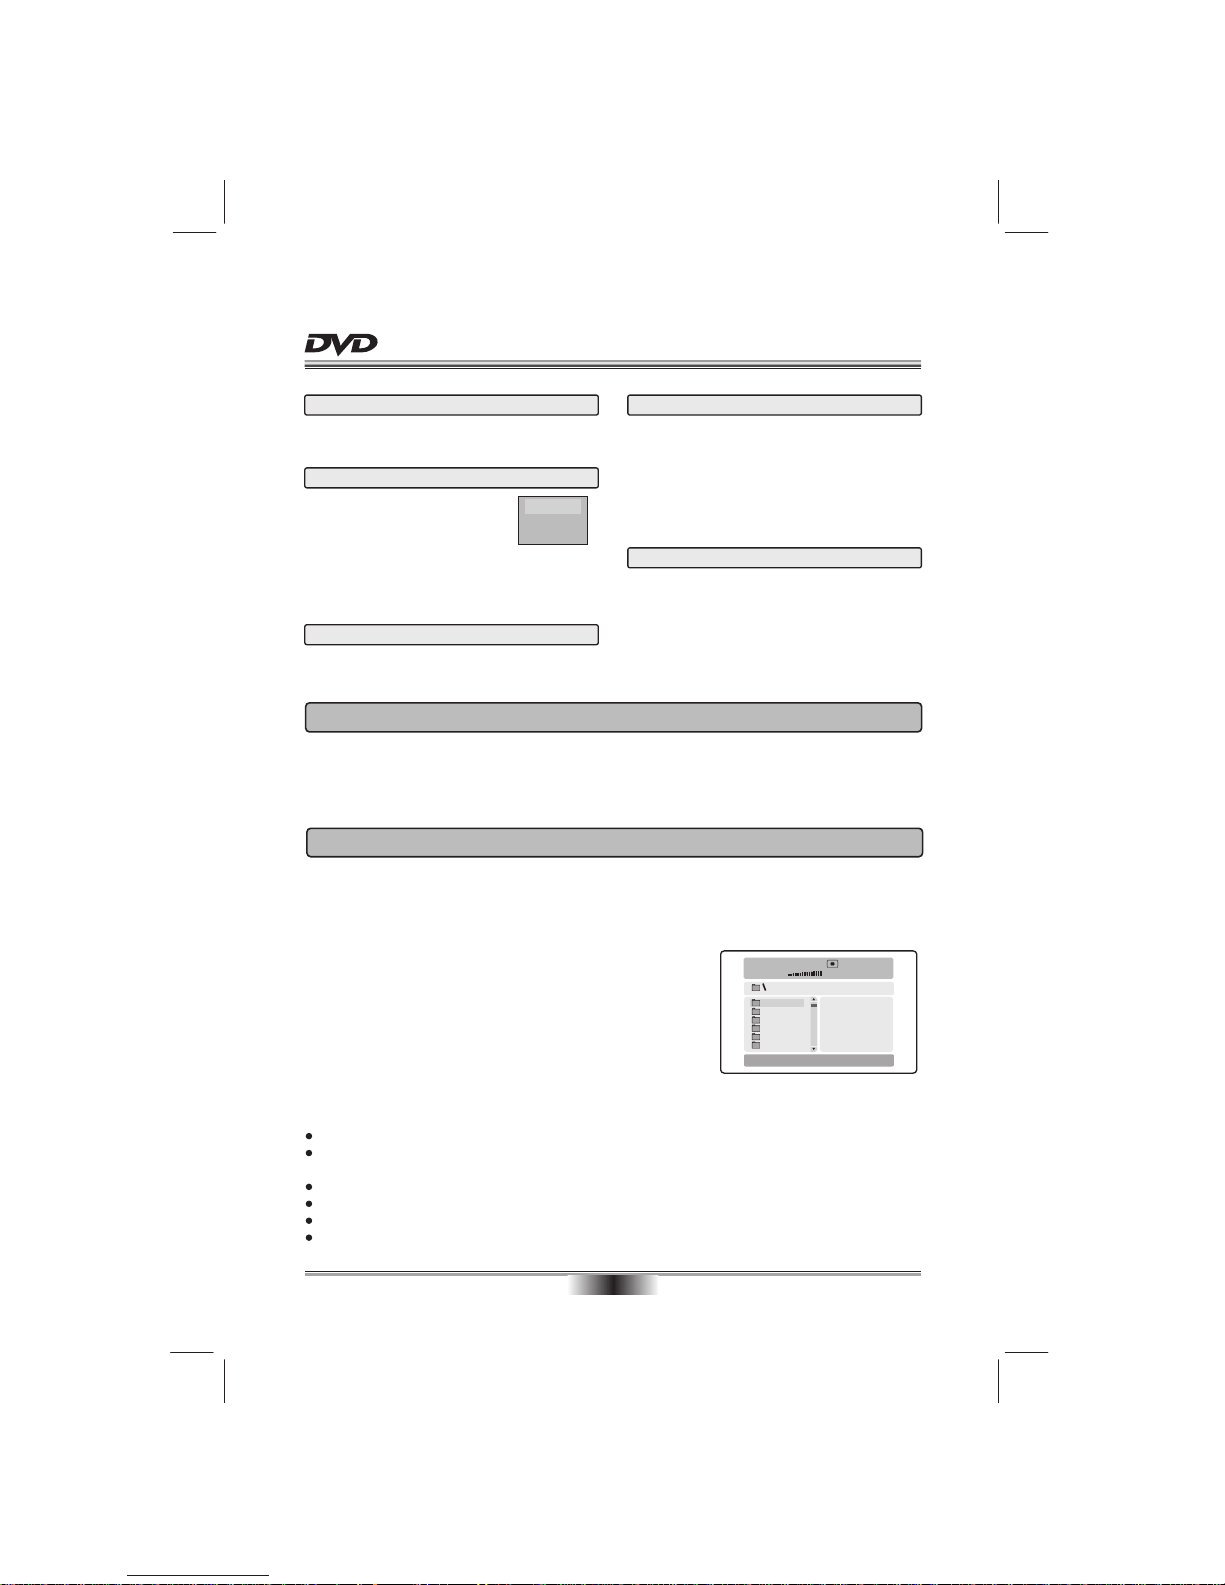
1. Turn on the player.
2. Please insert the cards (SD, MS, MMC).
3. U
After loaded,
se "DVD/USB/CARD" button switch DVD to CARD or USB (if you
insert plural cards, use DVD/USB/CARD button choose among cards),
a navigation menu will be displayed automatically
if card is loaded in succession. In the menu, use UP or DOWN in the
cursor to select a fold, then press "ENTER/PLAY" to confirm, in the
fold, use UP or DOWN button in the cursor to select the file, then
press "ENTER/PLAY" to play. In this page, use LEFT button can
return previous menu, press PREV or NEXT can go to the previous or
next page.
3 IN 1 CARDS FUNCTION
001
002
003
004
005
006
00:00 00:00
001/010
The unit support the following cards:
MS CARD: MEMORY STICK CARD
SD CARD: SD MEMORY CARD
MMC CARD: MULTI MEDIA CARD
Notice:
When playing disc, the unit will be stop a moment.
W
When the unit is in stop mode, You could insert or evulse card.
hen the disc is working in the tray and the card function at the same time, the unit will play disc first. In
that case, you can use "DVD/USB/CARD" button switch DVD to CARD or USB, the card function is valid.
DVD player will load disc priorly, press 'DVD/USB/CARD' to select different situation.
When reading card, there is no marker. You can press' DVD/USB/CARD 'to switch to DVD situation.
When play disc, please do not insert any card lest it load unsuccessfully.
1.USB device available on sale now are version 1.1 and 2.0. The DVD unit mainly supports 1.1 version, but
due to multifunctional design of this version, some non-compatibility case may happen.
2.Due to various compact format and parameter without a standard, so it is inevitable that if some problems
happen during playbacking.
USB FUNCTION INTRODUCTION
DVD/USB/CARD
Press DVD/USB/CARD button will
display the screen menu, you can
use UP/DOWN buttons on the
remote control to move the cursor, and then press
the ENTER/PLAY button to make your selection.
Note: please don't pull out the USB or CARD when
reading in order to avoid damage.
MCR
DVD
USB
Page 18
MPEG4 DISC FUNCTION INTRODUCTION
MPEG-4 is the forth video and audio encoding standard released by
MPEG (The abbreviation of " Moving Pictures Experts Group"). VCD is
based on MPEG-1 technology and DVD is based on MPEG-2. MPEG-4
takes advantage of narrow bandwidth, pursue the best picture quality by
compress and transmit the data in frame reconstruct technology. The
audio data is compressed by WMA standard. MPEG-4 is the most
advanced compression technology standard in AV field. It has the
highest compression rate. By MPEG-4 technology, we can encode and
compress a DVD film into one or two CD-R disc with pretty good picture quality, or can burn several films that
has same quality as VCD into one CD-R disc, or can burn several films that has similar quality to DVD into
DVD-ROM disc.
Note:
1. The MPEG-4 discs in market now have many different formats, such as XVID, AVI, DIVX, RM etc. But
some discs with "MPEG4" logo in market are not encoded by MPEG technology. It is normal that some of
the discs can't be played well in this player because of the incorrect encoding standard.
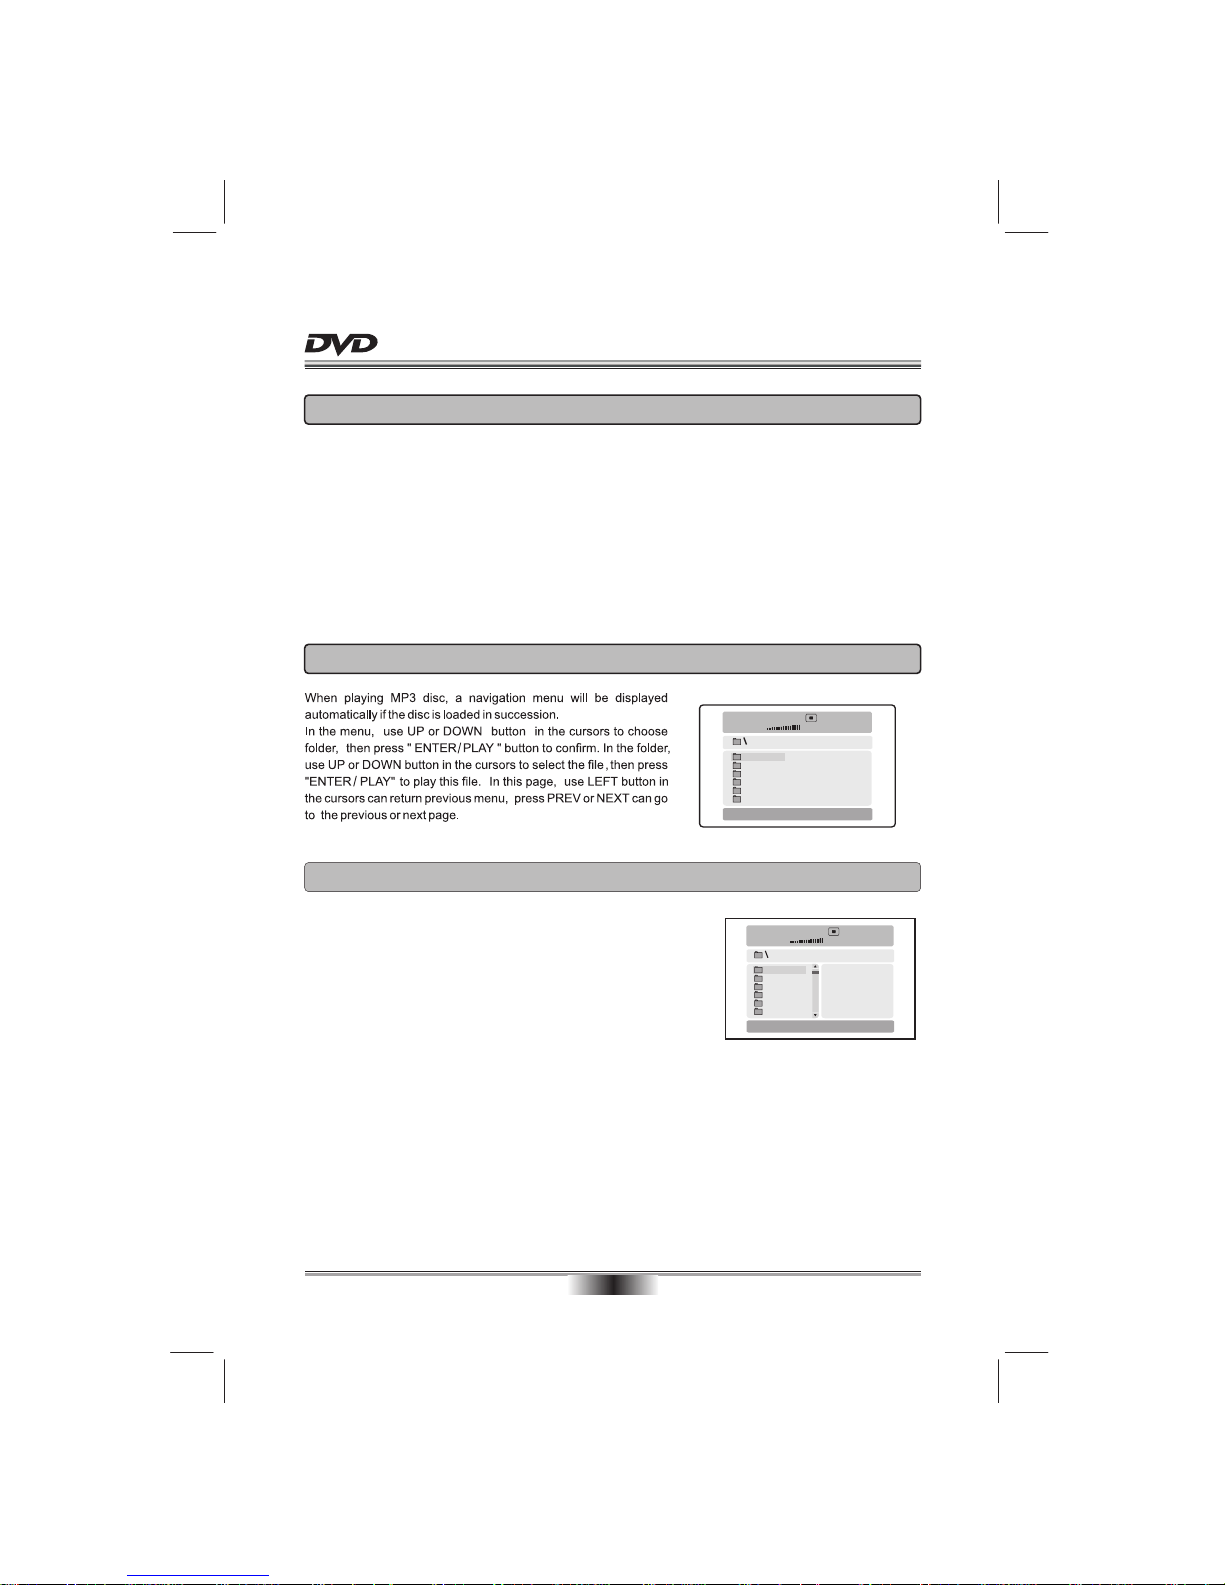
2. The MPEG-4 files are displayed as a list in the screen, choose the icon by the cursors and press ENTER/
PLAY button to playback the movie.
AVi_1
AVi_2
AVi_3
AVi_4
AVi_5
AVi_6
00:00 00:00
001/010
SPECIAL FUNCTION PLAYBACK
12
HDMI FUNCTION
HDMI, Hi Definition Digital Multimedia Interface supports EDID and DDC2B. This connection operates quickly
and conveniently, providing the best in both audio and video playback.
HDMI can transfer uncompressed, high-resolution picture and multi-channel audio digitally up to speeds of
5 GBps. HDMI can support all ATSC HDTV standards not only meet resolution 1080i/1080P, which can supply
the highest picture quality. but also support DVD Audio and other most advanced digital audio format, and
support 8 channel 96kHz digital audio transmission. You only need one HDMI line connected, relieve audio
connected. At the same time, the spare space which HDMI standard supplied can apply in the video updating.
HDMI can collocate with HDCP (High-bandwidth Digital Content Protection), avoid copyright film being copyed
without authorization.
MP3_01
MP3_02
MP3_03
MP3_04
MP3_05
MP3_06
00:00 00:00
001/010
MP3 PLAYBACK
Page 19
SPECIAL FUNCTION PLAYBACK
13
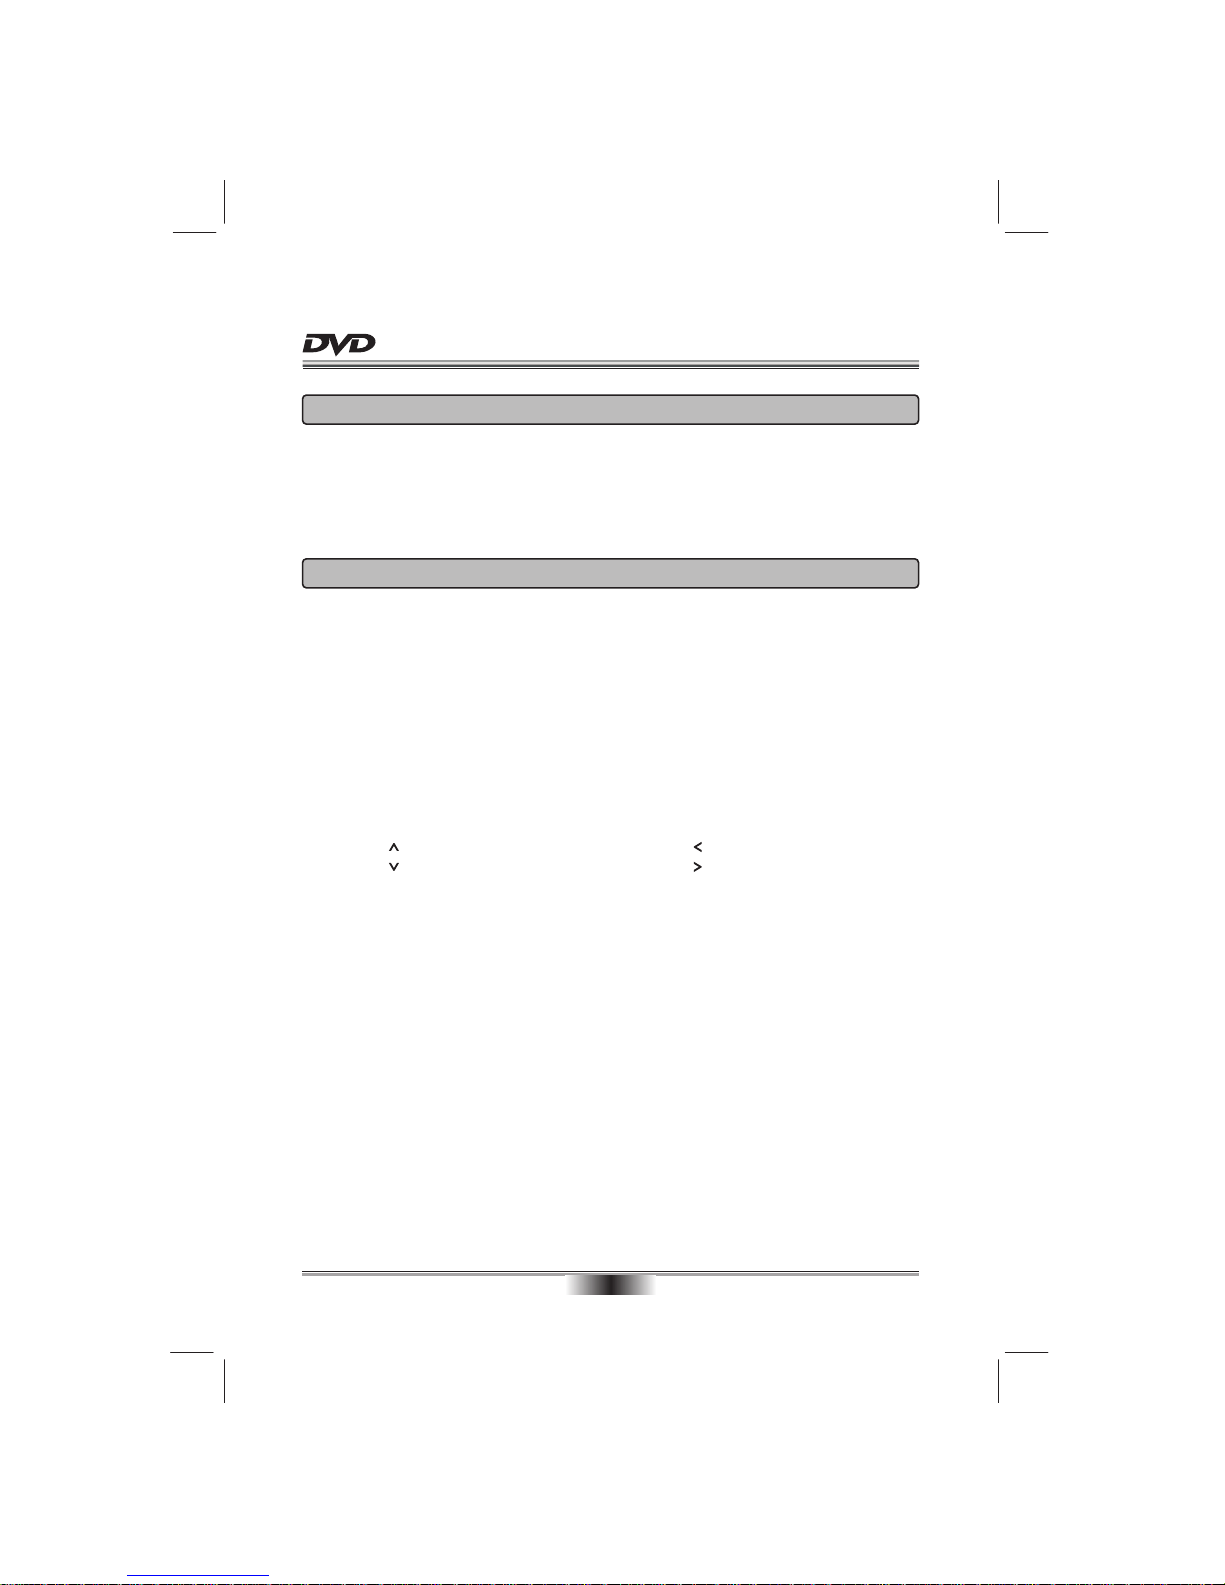
When playing JPEG disc, a navigation menu will be displayed automatically if the disc is loaded in succession.
In the menu, use UP or DOWN in the cursor to select a file, then press ENTER/PLAY, the file will be play with
a slide-show. Press PREV or NEXT to select the previous or the next picture. Press to pause
the current picture for enjoying, when press ENTER/PLAY, it will return to normal playing.
PAUSE/STEP
JPEG DISC PLAYBACK
Kodak Picture CD Playback
Playback (Normal)
When a Kodak Picture CD is inserted on the unit, an automatic slide show is launched. Each picture in the
Kodak Picture CD will be displayed consecutively in a slide-show fashion and will be scaled to fit in the whole
TV screen. some slide-show transition modes are provided, use "PROG" key to select.Customer can set
transition effects for each picture.
To display an image indefinitely, press the "PAUSE" key. To view the next or previous picture, press "NEXT" or
"PREV" key. To resume the slideshow, press the "ENTER/PLAY" key.
Image Rotation
There are four modes to rotate a picture: "Invert", "Mirror", Left", and "Right". These operations are allowed
only when a picture is being displayed normally and will be cancelled automatically when a new picture is
displayed. The arrow key is used to select the different rotation modes:
Up - Invert/Normal Left - Turn left
Down - Mirror/Normal Right - Turn right
Zoom
The "ZOOM" key is used to turn on or off this function. When this mode is on, any picture will be displayed at
the last ratio selected by the user. A message on the screen will indicate the current zoom ratio.
If zoom mode is on, "F.FWD" and "F.REV" key are used to control the ratio of zoom in/out. With ZOOM mode
off, a picture is scaled to fit the whole TV screen.
Notes: During zoom function, slide-show transition and image rotation are disabled. To cancel the zoom
function press the "ZOOM" key again to resume the slide-show.
Digest
The "STOP" key is used to display thumbnail size pictures. After it is enabled, some scaled-down thumbnail
pictures will be displayed on the screen. The "NEXT" and "PREV" keys can be used to display the next/prev
pictures in the Kodak Picture CD.
You can select any of the displayed thumbnails by using the Arrow Keys and pressing the "ENTER/PLAY" key.
The thumbnail will be enlarged to fit the TV screen and the slide show will start. If you desire to display an
image indefinitely, press the "PAUSE/STEP" key. To view the next or previous picture press "NEXT" or " PREV"
key. To resume the slide show press the "ENTER/PLAY" key.
IMPORTANT NOTE: Quality of pictures displayed on the screen is highly dependent on the viewing device.
Page 20
General
Audio
Dolby D
Video
Preferen
General
Audio
Dolby D
Video
Preferen
SYSTEM SETUP
14
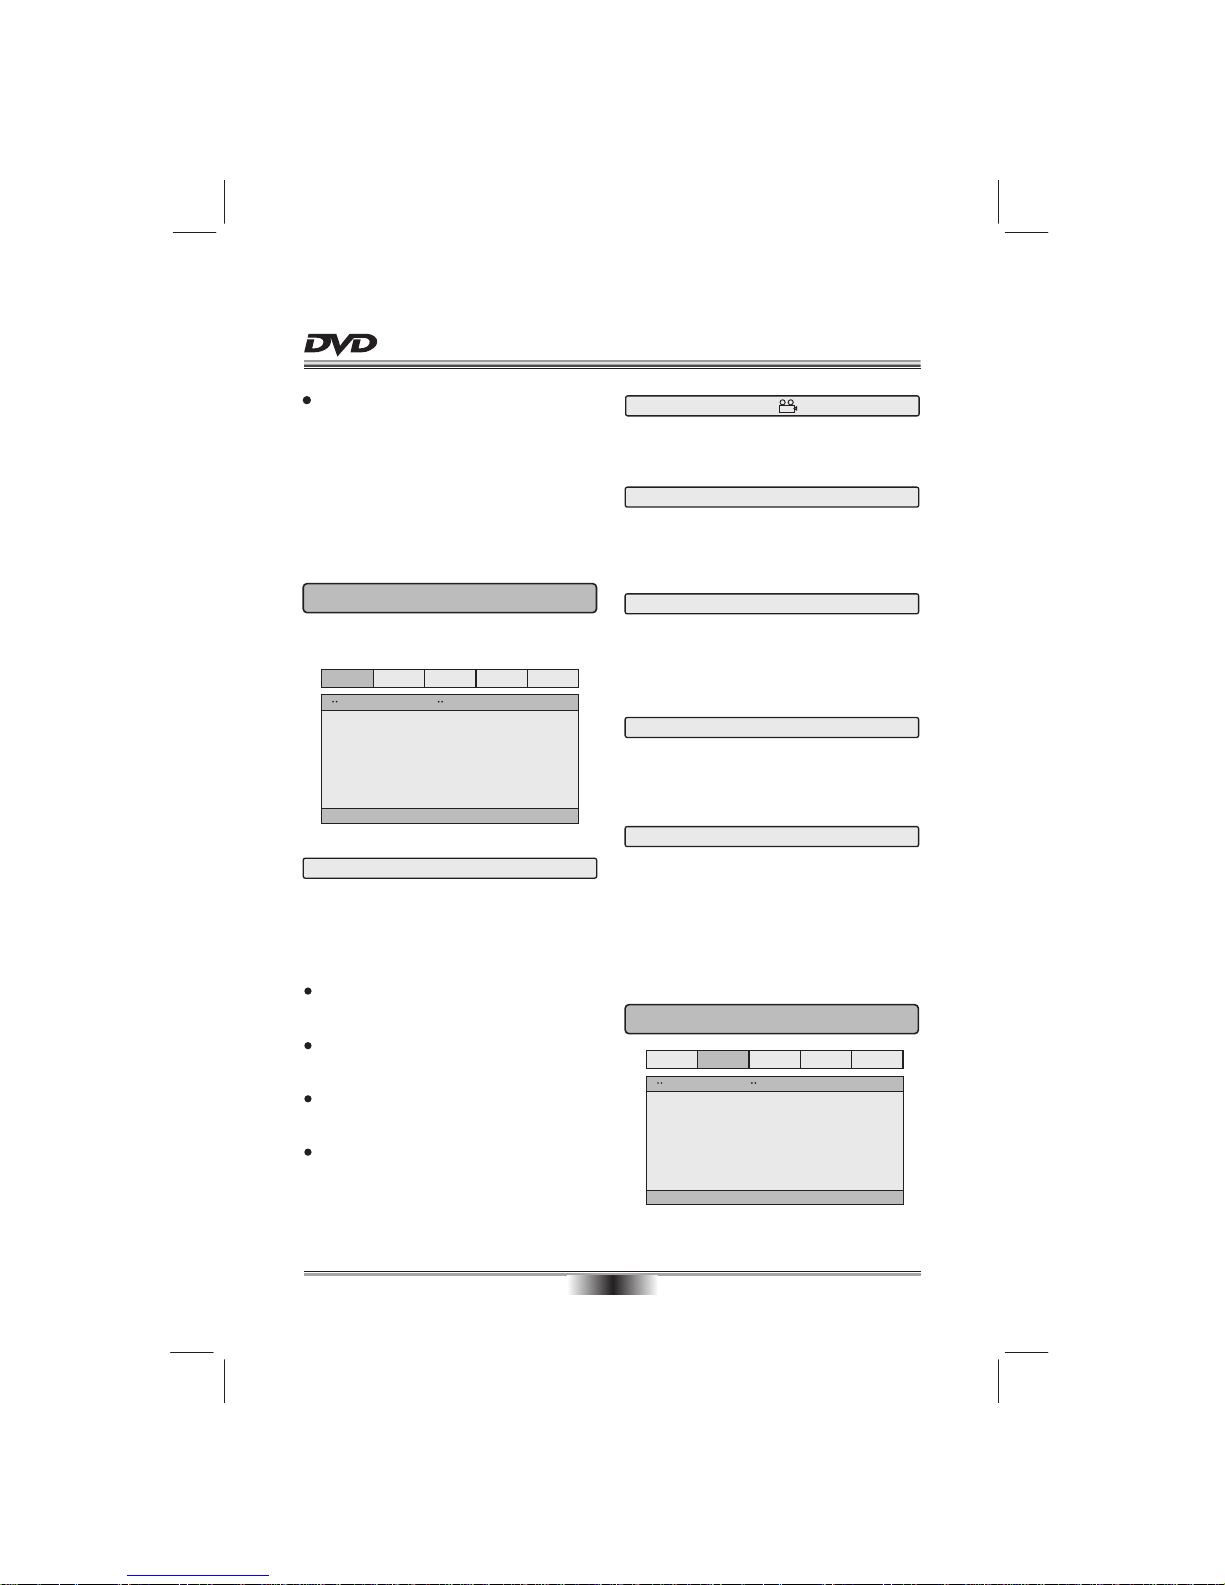
1.5 SCREEN SAVER
SCREEN SAVER: If the screen saver is on,then there
will be an animated picture on the screen whenever
the DVD player is idle for a certain time.
1.3 OSD LANGUAGE
On Screen Display (OSD) Language: Users can
select the whole setup menu and on-screen display
language.
When you press SETUP key on the remote control,
the setup menu will be displayed.
1.Within the setup menu, you can use UP, DOWN,
LEFT and RIGHT buttons on the remote control
to move the cursor, and then press the
ENTER/PLAY button to make your selection.
Press LEFT can return the previous menu.
2.To exit setup menu, you can press SETUP
menu.
The TV Display which select the different ratio of
display format and the screen of TV, There are
various types of display on screen for different
matches between Disc and TV .
1.1 TV DISPLAY
Note:
No matter which display format is selected, a
picture recorded in standard 4:3 format always
displays in the 4:3 aspect ratio.
The display format of DVD titles may vary; please
refer to the information that accompanies your
specific DVD title.
If the DVD title is recorded in 16:9 wide display
format while the TV is a standard 4:3 screen,
horizontal compression of the image will result.
Some DVD titles may be recorded in special
formats. In such cases, the DVD titles will always
appear on the screen in their original format,
regardless of which TV display format you select.
Setup TV screen format, video type and all DVD
functions.
1. GENERAL SETUP PAGE
TV Display
Angle Mark
Osd Lang
Captions
Screen Saver
Last Memory
PS
On
ENG
Off
On
On
Go To General Setup Page
General Setup Page
1.2 ANGLE MARK
ANGLE MARK: Users can select a particular camera
angle when playing a DVD that offers multiple angles.
1.4 CAPTIONS
CAPTIONS: For hearing-impaired people.
The program can be displayed with recorded
explanatory captions.
Note: This is valid for a disc that has captions.
1.6 Last Memory
LAST MEMORY: This function is convenient when
you want to continue viewing a disc from the point
where you were watching before. Unlike the resume
function, the Last Memory function is effective even
the DVD is removed from the player.
Last Memory may not work reliably with some VCD
that feature PBC.
2. AUDIO SETUP PAGE
Go To Audio Setup Page
Audio Setup Page
Speaker Setup
Spdif Setup
Equalizer
Hdcd
Off
Page 21
General
Audio
Dolby D
Video
Preferen
General
Audio
Dolby D
Video
Preferen
SYSTEM SETUP
15
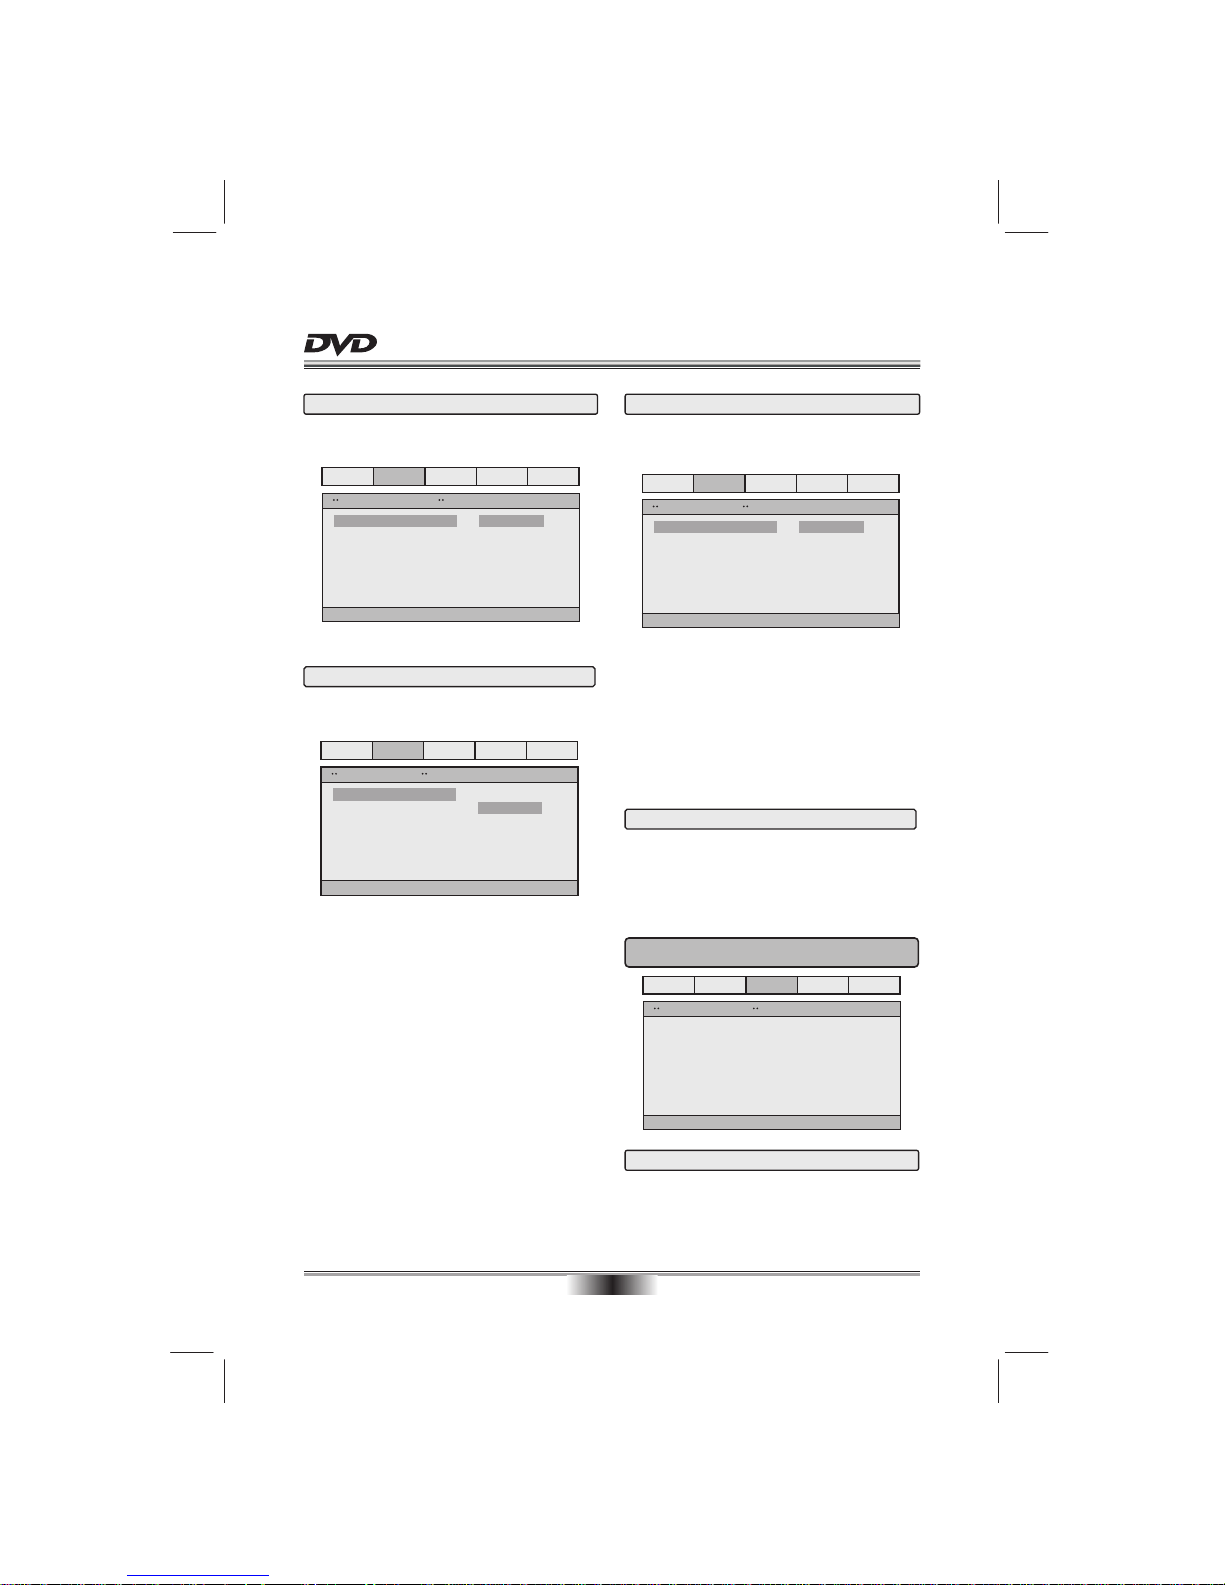
DOWNMIX MODE: Sets front speakers to Lt/Rt
STEREO.
2.1 DOWNMlX SETUP
Lt/Rt
Stereo
Set Downmix Mode
Speaker Setup Page
Downmix
Lt/Rt
2.2 SPDIF SETUP PAGE
2.2.1 SPDlF OUTPUT
SPDlF OUTPUT MODE: Sets the audio outputs.
Spdif Off
Spdif/Raw
Spdif/Pcm
Setup Spdif
Spdif Setup Page
Spidf Output
Lpcm Out
48k
This DVD player includes three kinds of audio output:
1. SPDlF OFF: An analog surround sound format is
output through the back-paneI connections for 2-CH
audio out.
2. SPDIF/RAW or SPDIF/PCM: This surround sound
format is output to a Dolby Digital / DTS decoder
through the coaxial connectors on the back-panel
of the product.
2.2.2 LPCM OUTPUT
LPCM (Linear Pulse Code Modulation) OUTPUT:
Includes LPCM 48K , LPCM 96K for audio format.
Please choose the sampling frequences of digital
filter, the higher the sampling frequences are, the
clearer the audio quality is. When default setting is
off, it will display "CD" by reading HDCD, for HDCD
playback, please choose 44.1K or 88.2K.
2.4 HDCD
DUAL MONO: If your amplifier / decoder has
Dolby Digital output, you may select stereo, left
mono, right mono, or mixed mono mode for your
amplifier decoder.
3.1 DUAL MONO
General
Audio
Dolby D
Video
Preferen
Dual Mono
DRC
Dolby Digital Setup
Go To Dolby Digital Setup
3. DOLBY DIGITAL SETUP PAGE
2.3.2 BASS BOOST
BASS BOOST: Enhance the bass degree.
2.3.3 SUPER BASS
SUPER BASS: Enhance the super bass degree.
2.3.4 TREBLE BOOST
TREBLE BOOST: Enhance the Treble boost
degree.
2.3 EQUALIZER SETUP PAGE
2.3.1 EQ TYPE
EQ TYPE: Sets the audio output to simulate the
various kinds of music effect.
General
Audio Video
None
Rock
Pop
Live
Dance
Techno
Classic
Soft
Select Equalizer Type
Equalizer Page
EQ Type
Bass Boost
Super Bass
Treble Boost
None
Off
Off
Off
Preferen
Dolby D
Page 22
General
Audio Dolby D Video
Preferen
SYSTEM SETUP
16
General
Audio Dolby D Video
Preferen
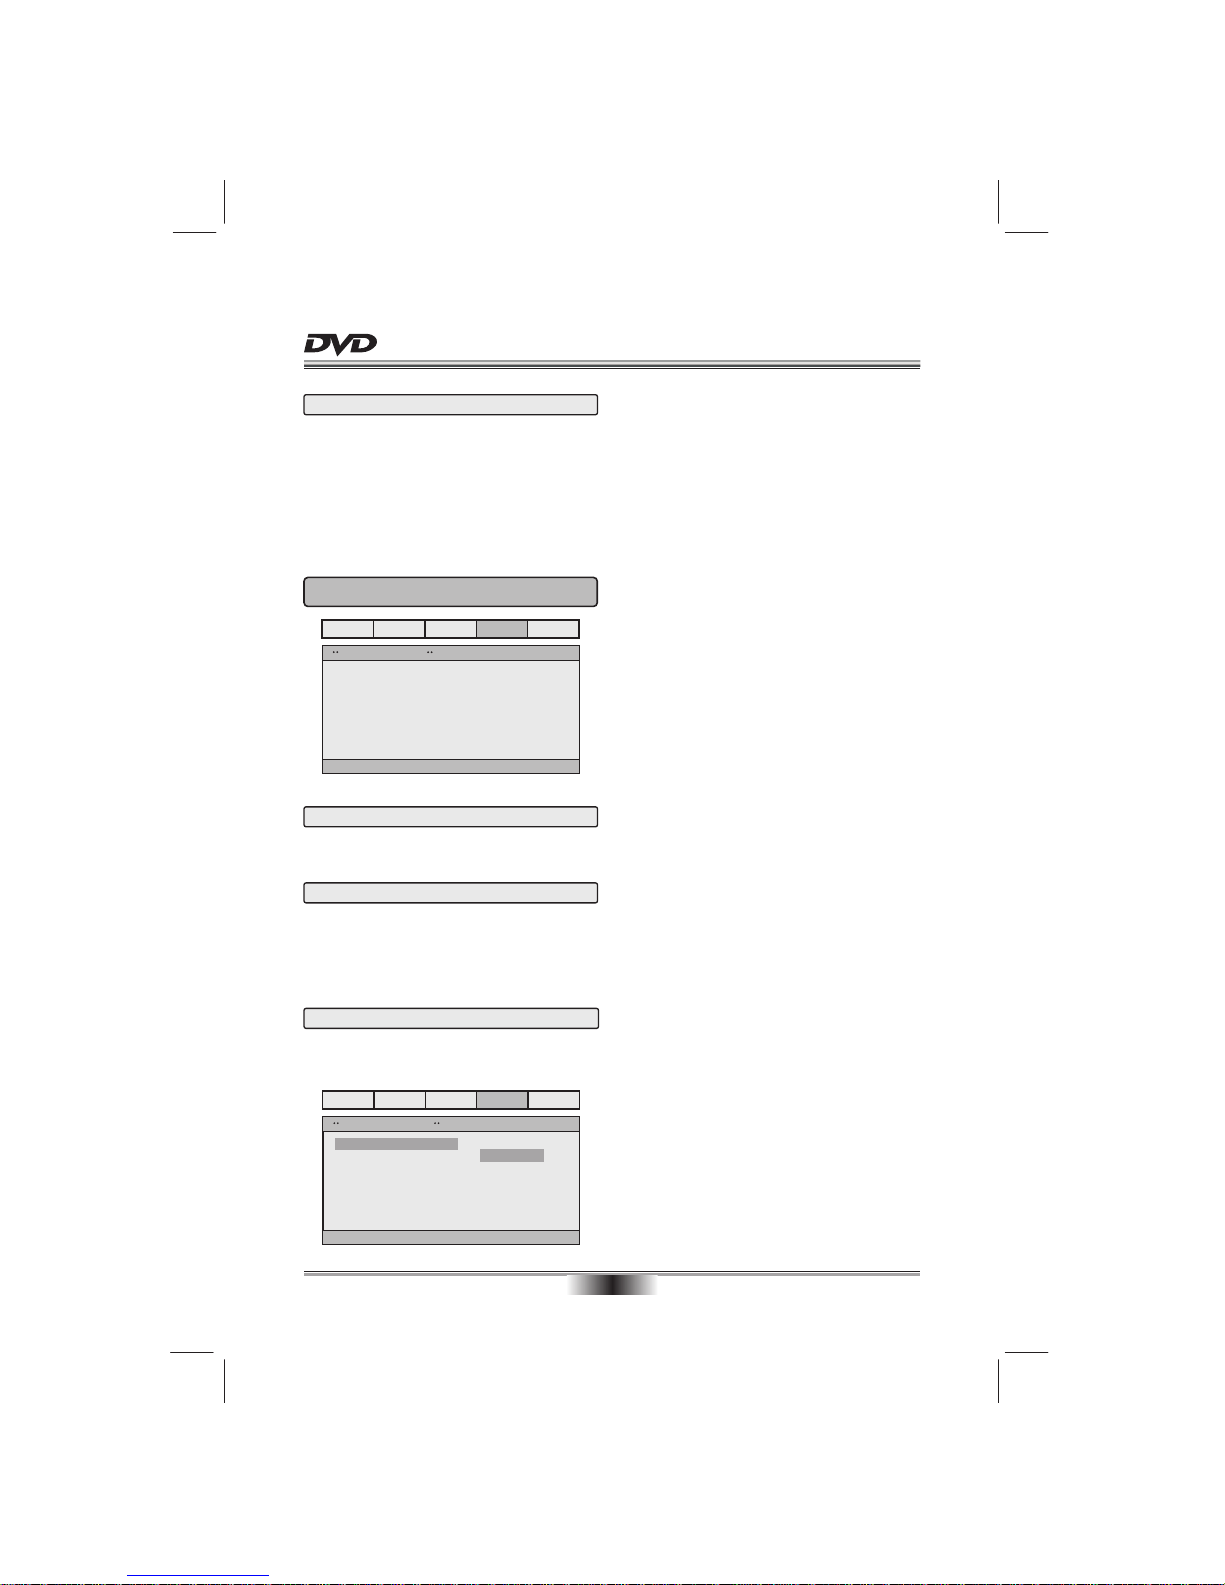
4. VIDEO SETUP PAGE
Video Setup Page
Video Output
Resolution
Quality
HDMI Setup
YUV
Go To Video Setup Page
VIDEO OUTPUT: Sets the video output.
4.1 VIDEO OUTPUT
4.2 RESOLUTION SETUP PAGE
RESOLUTION: You can select the resolution output
of the player to match your TV. (The Video Output
option must select “HDMI”, the Resolution option is
valid. )
4.3.2 BRlGHTNESS
BRIGHTNESS: Sets the brightness level of video
output.
Press right button the TV will display a value
Press LEFT/RIGHT button to adjust, then press
ENTER/PLAY button to confirm and return upon
menu.
4.3 VIDEO QUALITY SETUP PAGE
4.3.1 SHARPNESS
SHARPNESS: Sets the sharpness level of video
output.
High
Medium
Low
Sharpness
Video Quality Setup
Sharpness
Brightness
Contrast
Gamma
Hue
Saturation
Luma Delay
MID
00
00
None
00
00
1 T
4.3.7 LUMA DELAY
LUMA ( Luminance ) DELAY: Sets the luminance
delay of video output depend on the TV's brightness,
color. It sets 1T commonly for DVD.
4.3.6 SATURATION
SATURATION: sets the saturation of the video.
Press right button the TV will display a value. Press
LEFT/RIGHT button to adjust, then press ENTER/
PLAY button to confirm and return upon menu.
4.3.4 GAMMA
GAMMA: Sets the gamma value of the Video.
Press right button the TV will display a value. Press
LEFT/RIGHT button to adjust, then press ENTER/
PLAY button to confirm and return upon menu.
4.3.3 CONTRAST
CONTRAST: Sets the contrast level of Video output.
4.3.5 HUE
HUE: Sets the hue value of the Video.
Press right button the TV will display a value. Press
LEFT/RIGHT button to adjust, then press ENTER/
PLAY button to confirm and return upon menu.
DYNAMIC: This function is generally used when
playing high volume programs at night, in order
to minimize disturbances . This setting can dynamically lower the volume and still keep the original
tone quality. This is the range, measured in decibels(dB), between the loudest and the quietest
sound registers in a soundtrack.
3.2 DYNAMIC
Page 23
General
Audio Dolby D Video
Preferen
5.4 SUBTITLE
SUBTITLE: Sets the preferred subtitle language as
the default when playing DVD.( If the DVD supports
the languages)
5.5 DISC MENU
DISC MENU: Sets the preferred menu language as
the default when playing DVD. (If the DVD supporst
the languages)
5.3 AUDIO
AUDIO: Sets the preferred audio language as the
default when playing DVD. (If the DVD supports the
languages)
5.2 PBC
PBC MODE: Sets the PBC (Playback Control) to be
on or off .
General
Audio Dolby D Video
Preferen
SYSTEM SETUP
17
The preference setting is only active with no disc,
and the setting is effective on each time power on
till exchanging the saved setting.
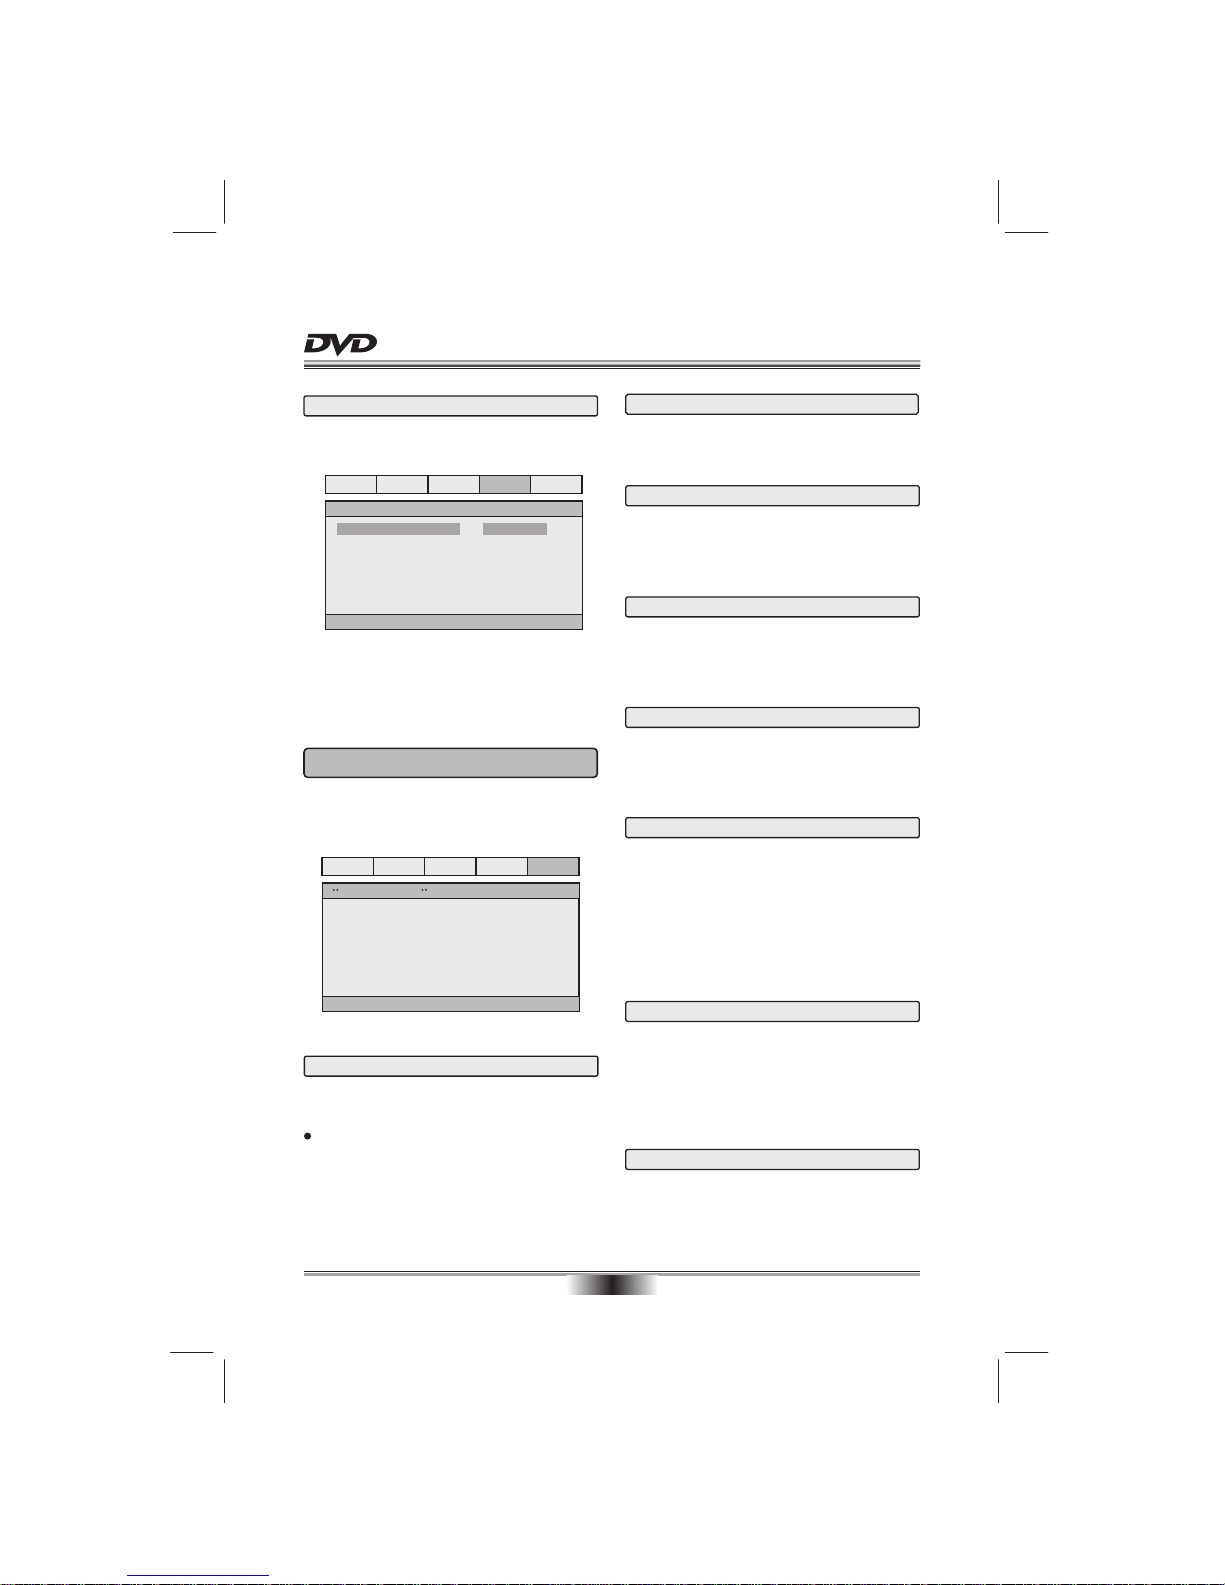
5. PREFERENCE SETUP PAGE
Preference Page
Tv Type
Pbc
Audio
Subtitle
Disc Menu
Parental
Password
Default
PAL
On
ENG
ENG
ENG
Go To Preference Page
TV TYPE: This player supports different TV output,
including MULTI(Auto), NTSC, and PAL systems.
If your TV support only NTSC or PAL and you have
inadvertently selected the wrong TV type, the TV
image will flicker and become black-and-white.
In this case, you should press the SETUP button
to set as following Note.
5.1 TV TYPE
4.4.2 AUDIO SOURCE
AUDIO SOURCE: You can set the audio source.
4.4 HDMI SETUP PAGE
On
Off
HDMI Setup
HDMI Setup
HDMI Setup
Audio Source
On
Auto
4.4.1 HDMI
HDMI: You can turn HDMI On or Off.
5.6 PARENTAL
PARENTAL: The parental control function works in
conjunction with the different censorship classes
assigned to DVDs. These classes help to control the
types of DVDs that the family watches, There are up
to 8 censorship classes for DVDs.
Note: If you change this set, you must input password.
(Initial password : 136900)
5.7 PASSWORD MODE
PASSWORD CHANGE: You can change the pass-
word, please type 6 numerals as new password.
Note: (Initial password : 136900)
Be sure remember new password. When set parental
control function you must input new password .
5.8 DEFAULT
DEFAULT: Resets to all the manufacturer's original
settings for this DVD player Press ENTER/PLAY to
perform the reset.
Page 24
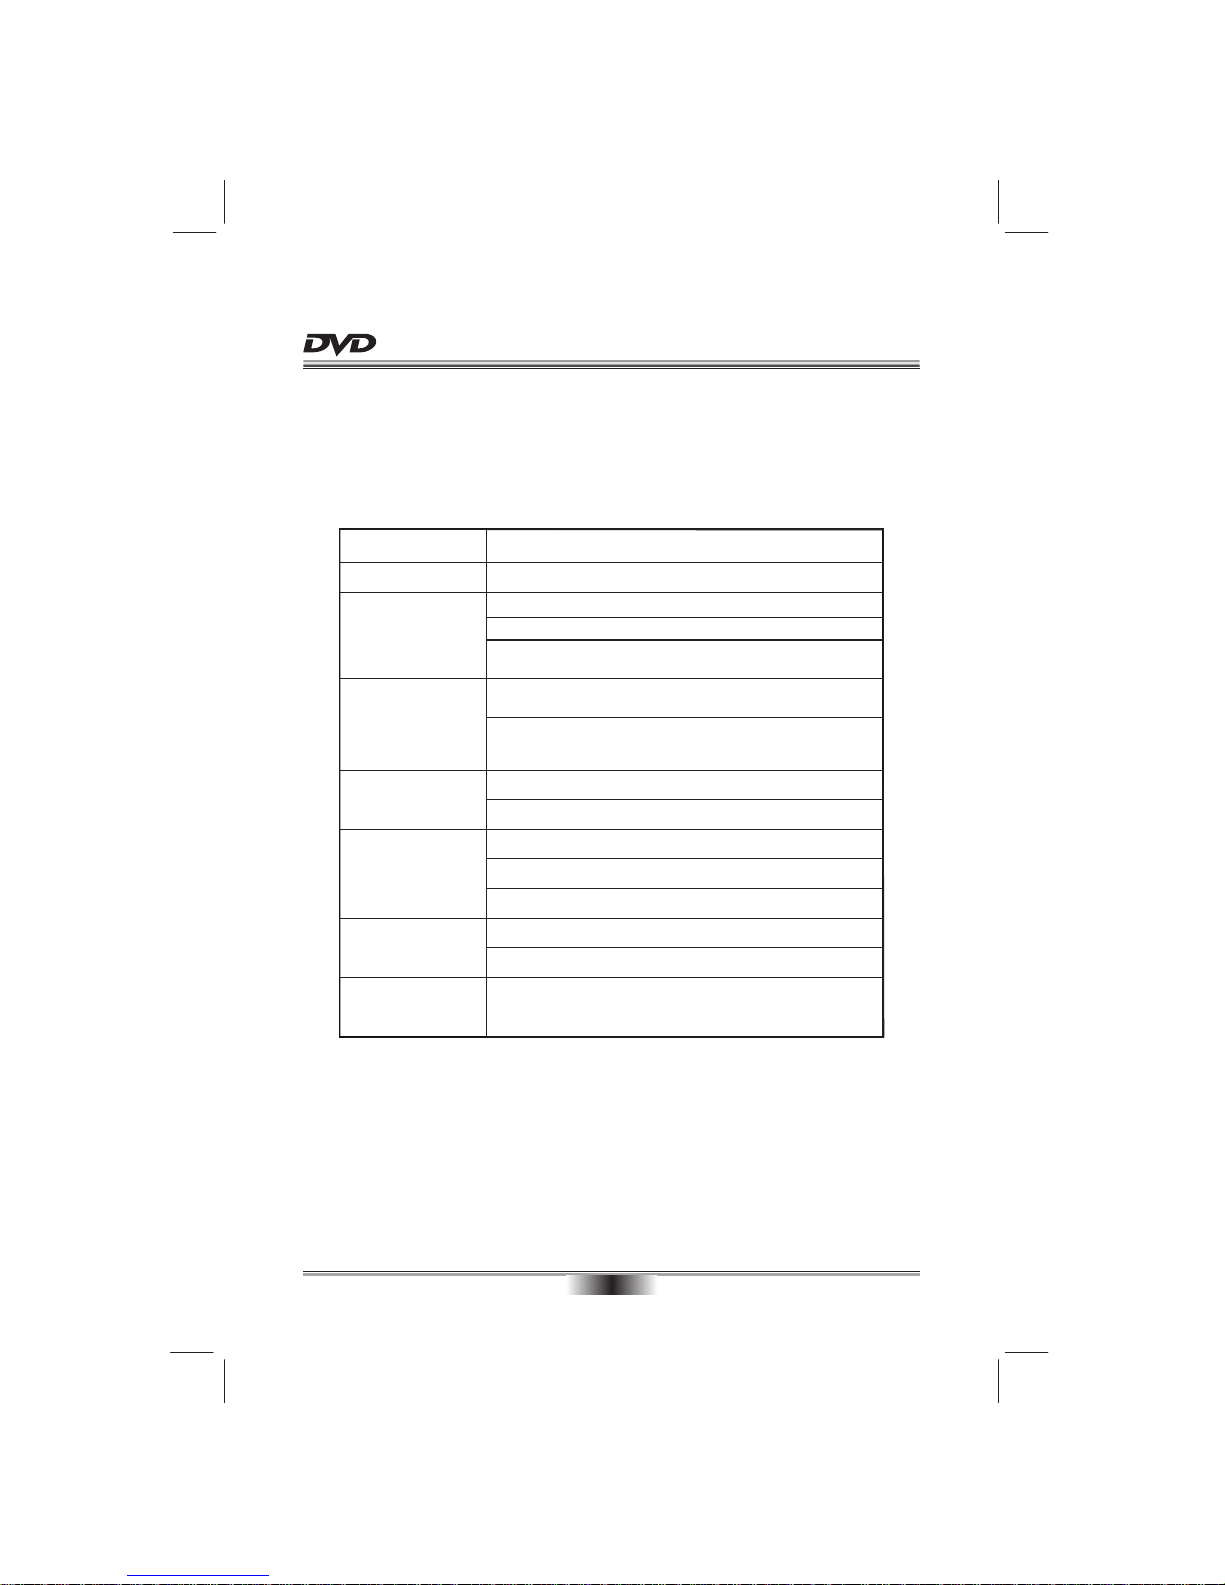
Please check the following guide for the possible cause and solution for a problem before contacting the
nearest service center or dealer for repairs.
SYMPTOMS AND CORRECTIONS
Check to make sure that the power connection is secure.
No power
SYMPTOMS CORRECTIONS
No picture
No sound
Failed to Play
Make sure the connection between the player and the TV is secure.
Make sure that the TV is in good working condition.
Make sure that the TV and AMP are in good working condition
and setup properly.
Check that the disc is properly inserted.
Clean the disc.
Failed to respond to
remote control
Remove obstacles between remote control and unit.
Aim remote control at the sensor on the front panel.
Check batteries and replace them if necessary.
Picture Disturbance
Check the disc for dirt and scratches. Clean or replace disc.
Shut down the unit, wait ten seconds, and restart the unit.
Failed to work
with keys
Power surges or other electrical phenomena.
Shut down the unit, wait ten seconds, and restart the unit.
Make sure the connection between the player and other devices
are secure.
Please press "V.MODE" button continuously until the picture returns
to normal.
18
TROUBLE SHOOTING
Page 25
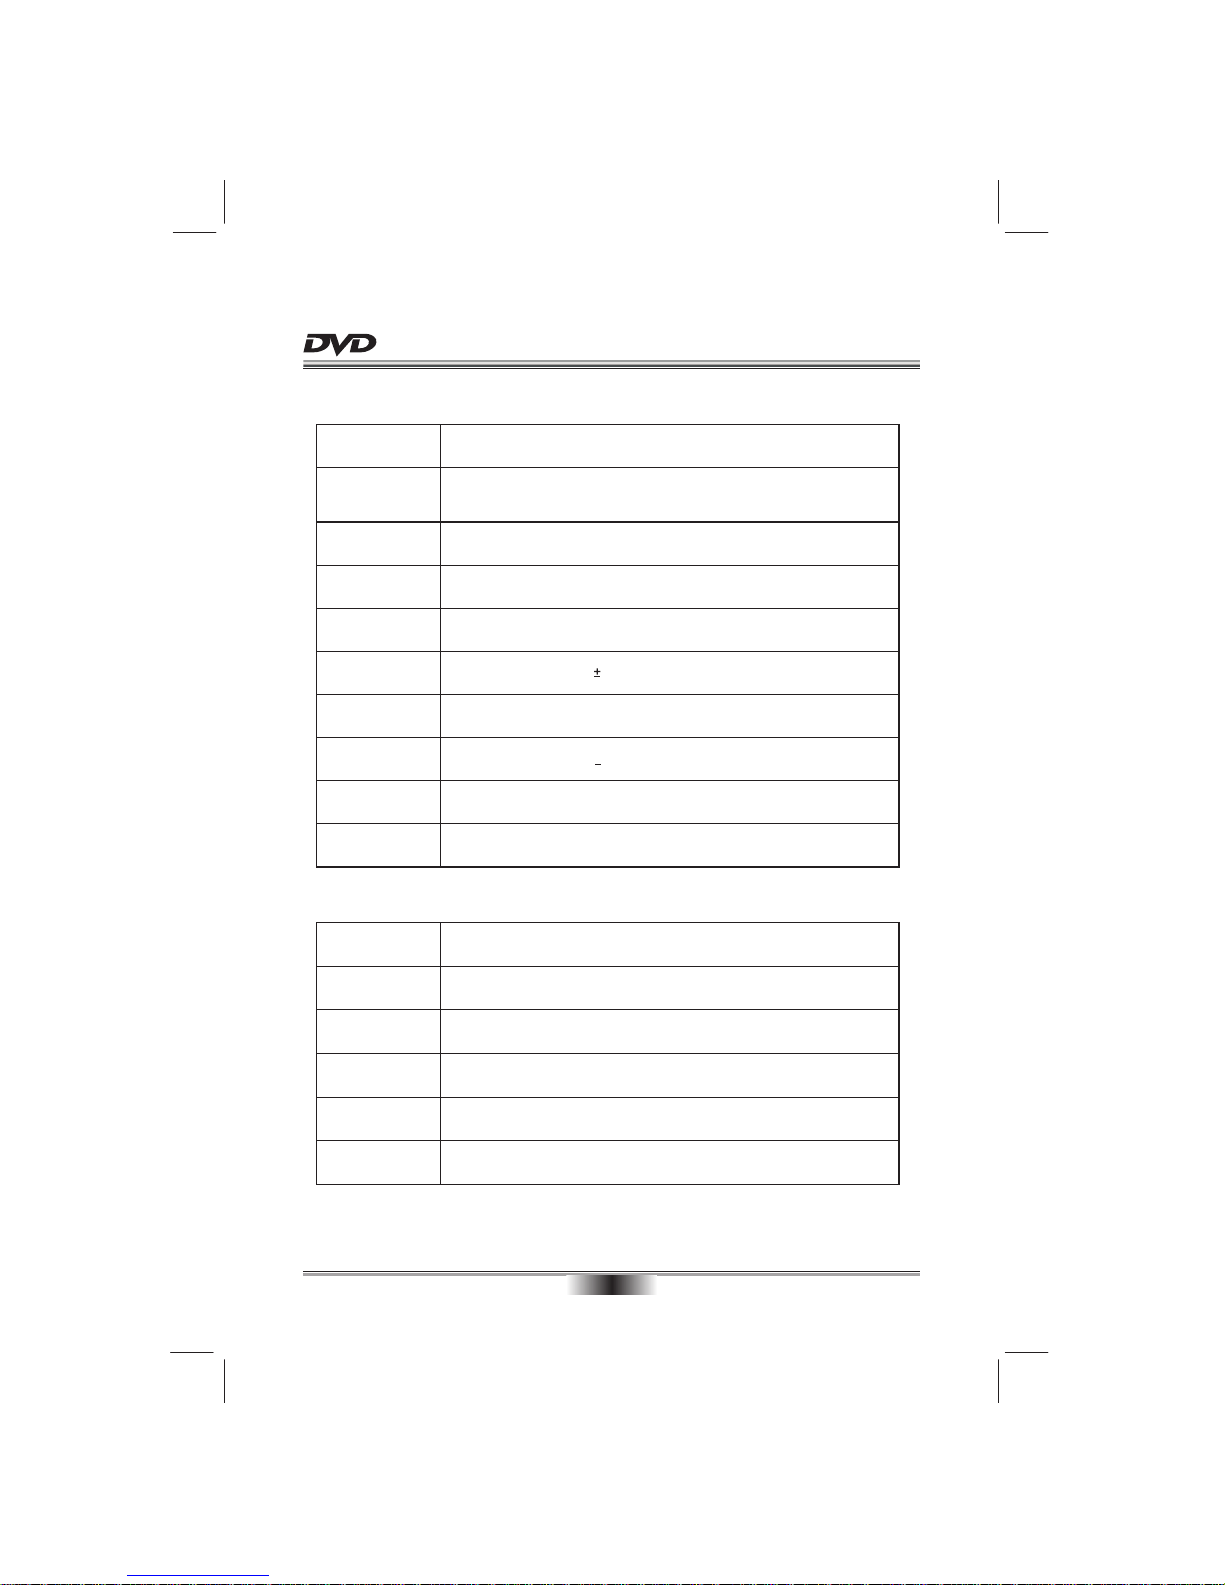
SPECIFICATIONS
19
Note: We reserve the right to modify the design without advice!
VF Signal
system
NTSC/PAL
Audio S/N ratio
> 90 dB
System and Outputs
Audio output
(analog audio)
Audio output
(digital audio)
Video output
S-Video output
Component video
(Y, CB,CR)
Electric level output: Brightness(Y)1.0Vp--p,
Chrominance (C): 0.286Vp--p, esistance: 75S
Resistance: 75S
R
Electric level output: 0.7Vp--p, resistance: 75S
Power
Power
consumption
Product
Dimensions
Weight
Electric level output: 1.8 0.2V Resistance: 10KS
Electric level output: 0.5Vp--p esistance: 75SR
Electric level output: (1.0 0.2)Vp--p esistance: 75S Unbalanced negativeR
Operating
temperature
oooo
5 C to 35 C (41 F to 95 F)
Operating
humidity
5% to 90%
Frequence
response
CD: 20Hz-20KHz(EIAJ)
DVD:
20Hz-22KHz(48KHz)(Sample result)
20Hz-44KHz(96KHz)(Sample result)
Video/Picture
MPEG1 V2.0; MPEG2
Audio
MPEG LAYER2 standard
General
+
12W
110V - 240V ~ 50/60Hz
L: 360mm W: 240mm H: 44mm
1.7 Kg
Page 26

P
N
1-3090-A581-0000-R
 Loading...