

Page 1
Thanks for your purchase of our Max 3d printers.
MaxI Operation Manual
Page 2

Thanks for your purchase of our Max 3d printers.
Content
I. Software Installation............................................................1
II. Printer Model Choose.........................................................5
III. Language Choose...............................................................7
IV. Rotation Operation.............................................................8
V. Proportional Scale...............................................................11
VI. Mirror Operation ..............................................................13
VII. Mode View.........................................................................15
VIII. Support Setting................................................................17
IX. Platform Adhesion ..............................................................20
X. Offline Printing .....................................................................22
XI. Multi-Models Printing ........................................................27
XII. Dual-Color Printing............................................................29
XIII. Filament Installation.........................................................32
XIV. Machine Operation ............................................................36
Page 3
Thanks for your purchase of our Max 3d printers.
1
I. Software Installation
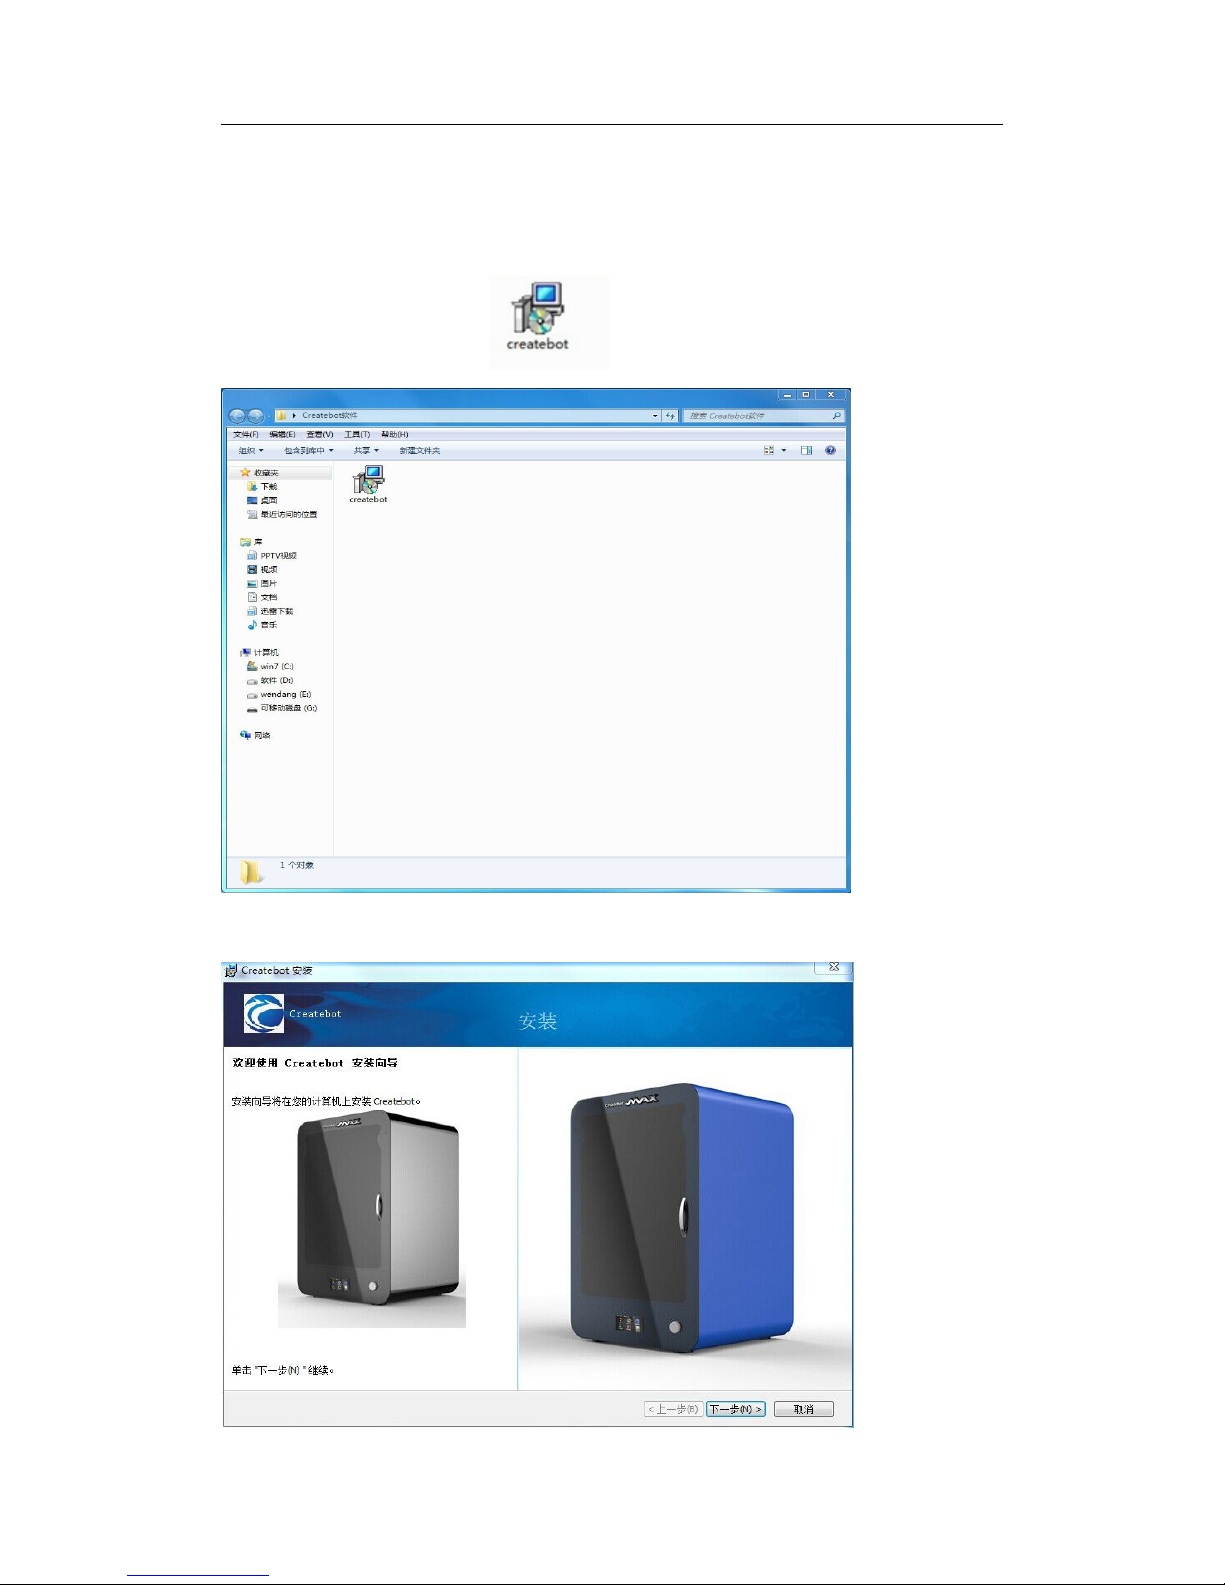
Our MAX 3d printers use Createbot software. (Copy Createbot software from SD
card into computer.)
1. Double-click this image:
2. Single-click “下一步(N)〉”(in blue box)
Page 4
Thanks for your purchase of our Max 3d printers.
2
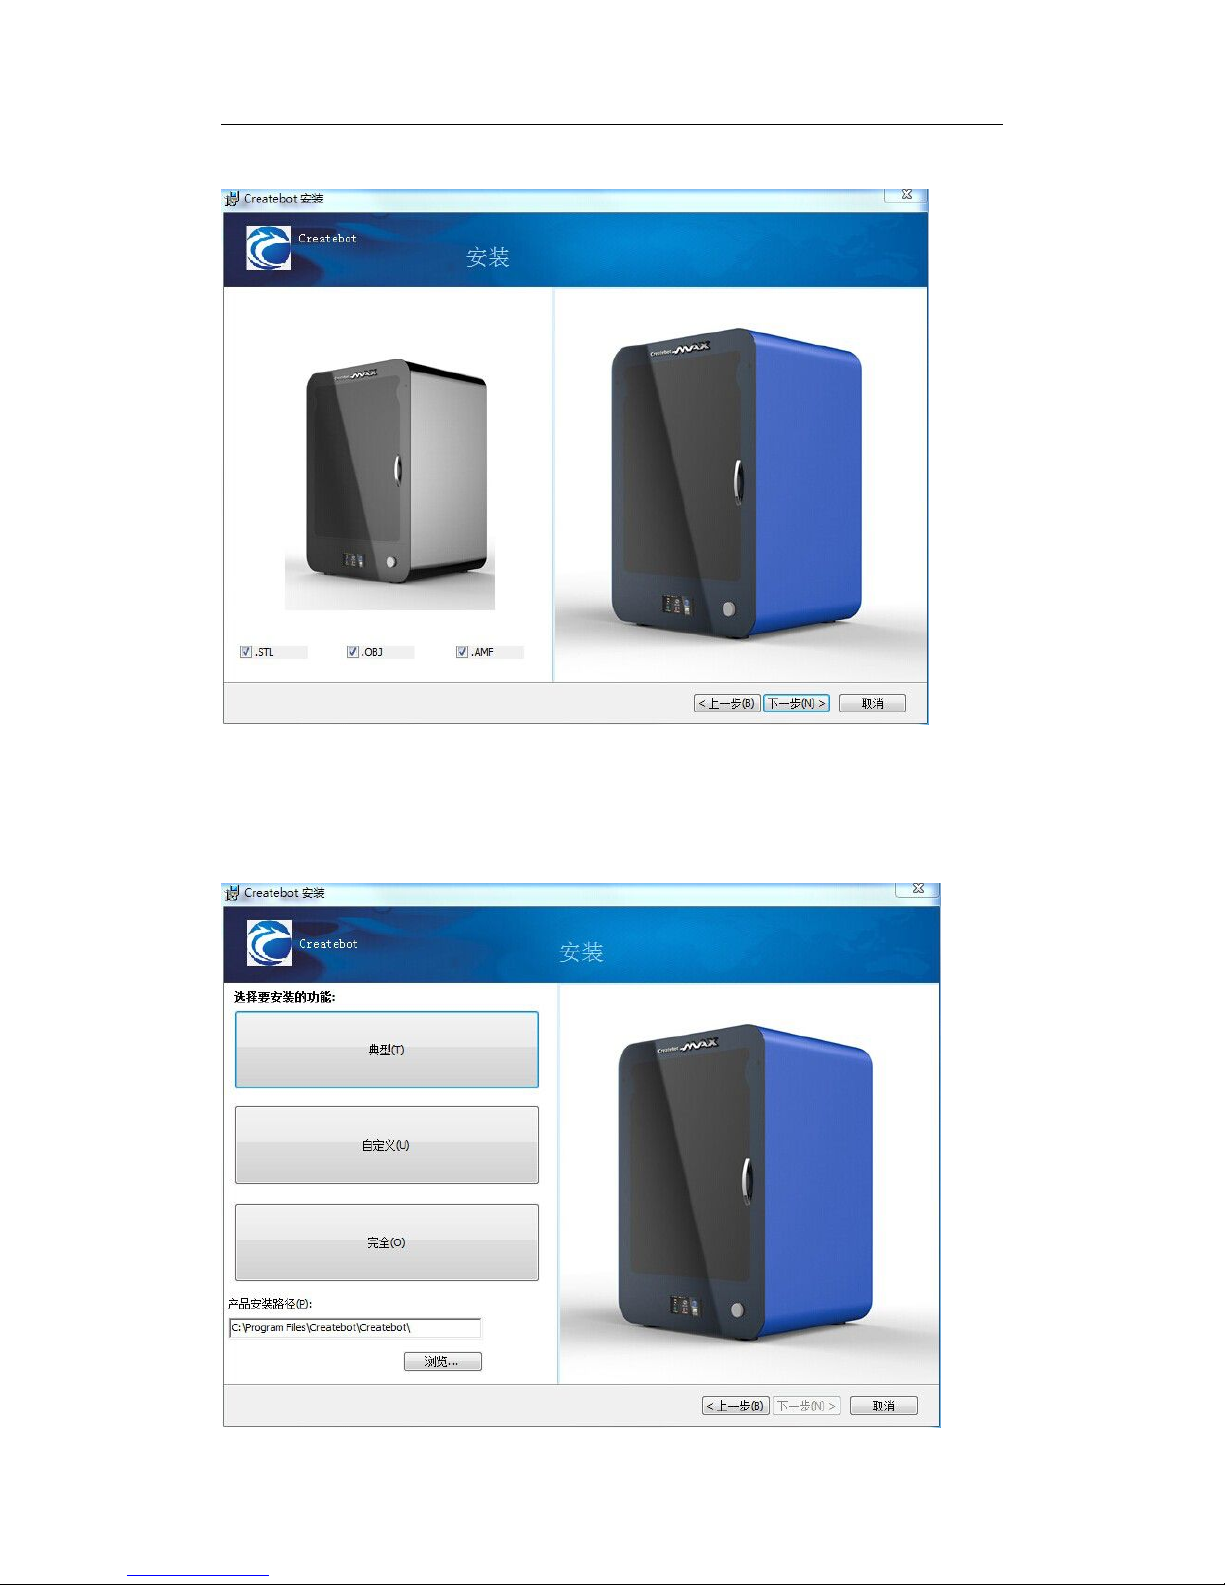
3. Single-click “
下一步
(N)〉”(in blue box)
4. (1)click “浏览...” to choose software path you want.
(2)choose “典型(T)”(in blue box)
(3)Single-click “
下一步
(N)〉”(in blue box)
Page 5
Thanks for your purchase of our Max 3d printers.
3
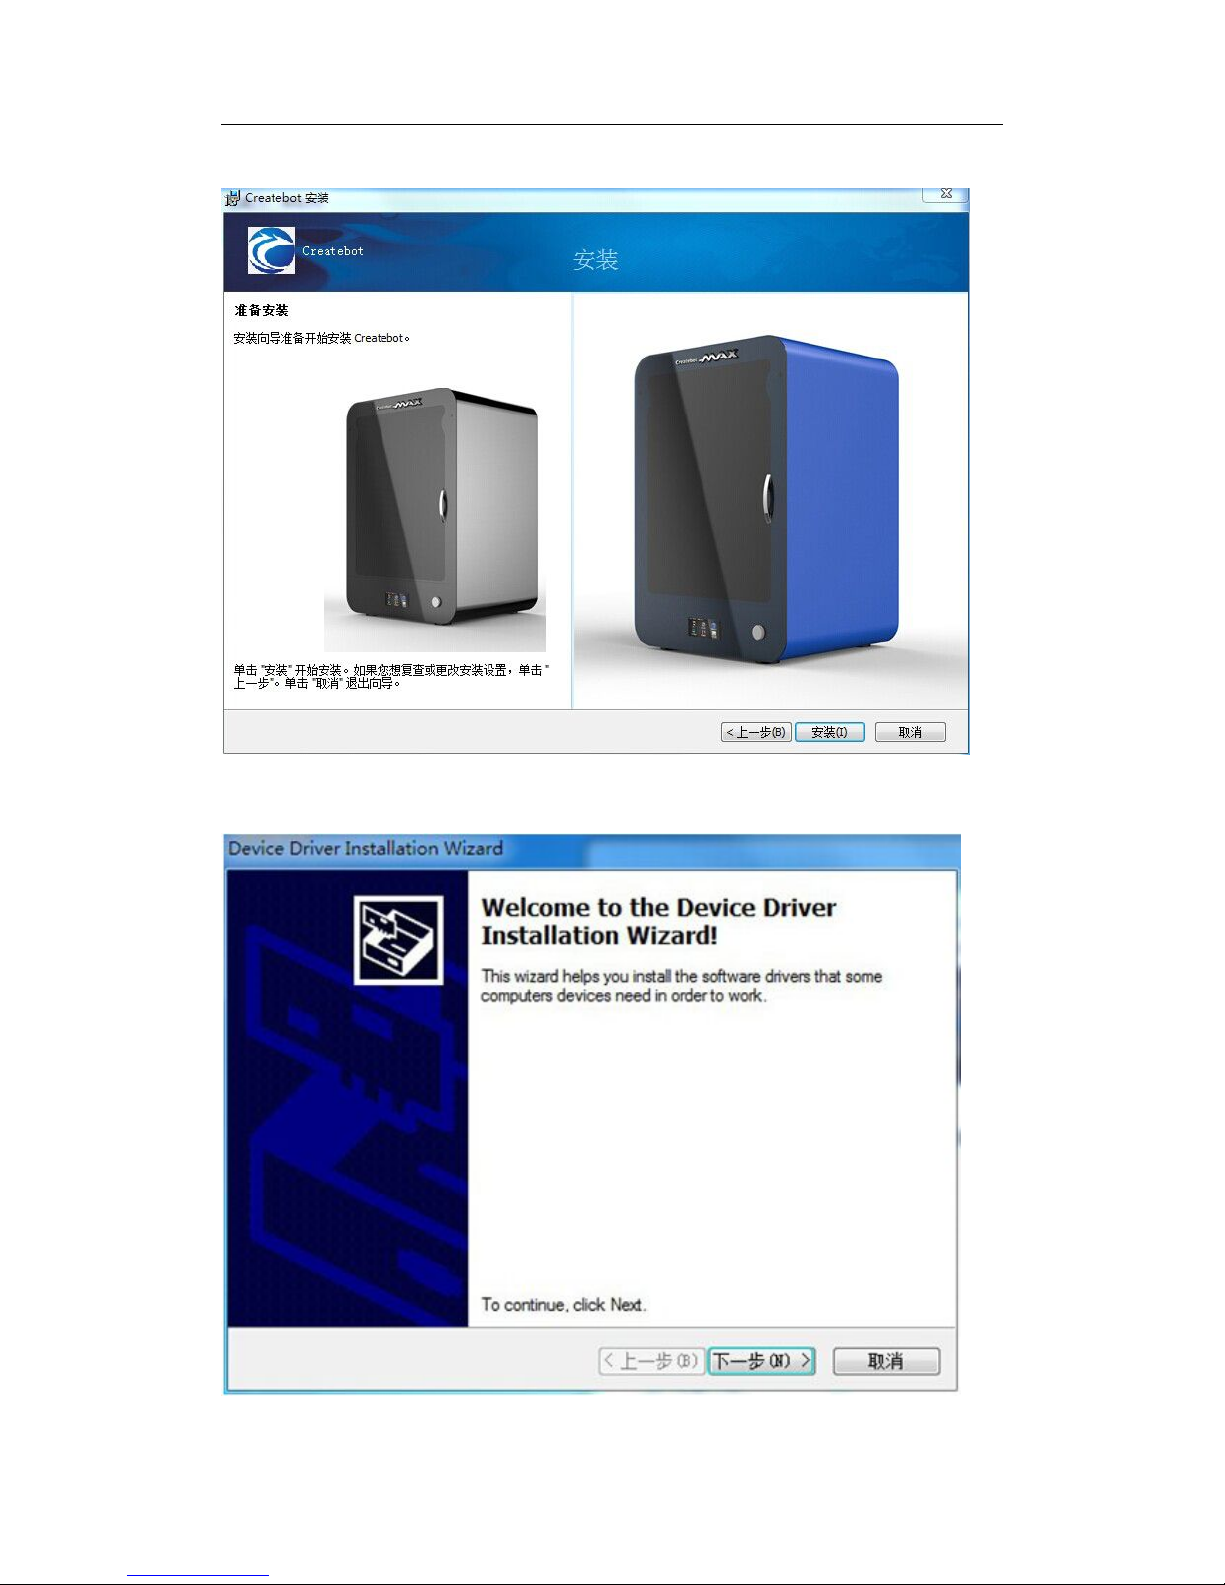
5. Single-click “
安装
(I)”(in blue box)
6. A dialogue box appears as below. Single-click “下一步(N)〉”(in blue box)
Page 6
Thanks for your purchase of our Max 3d printers.
4
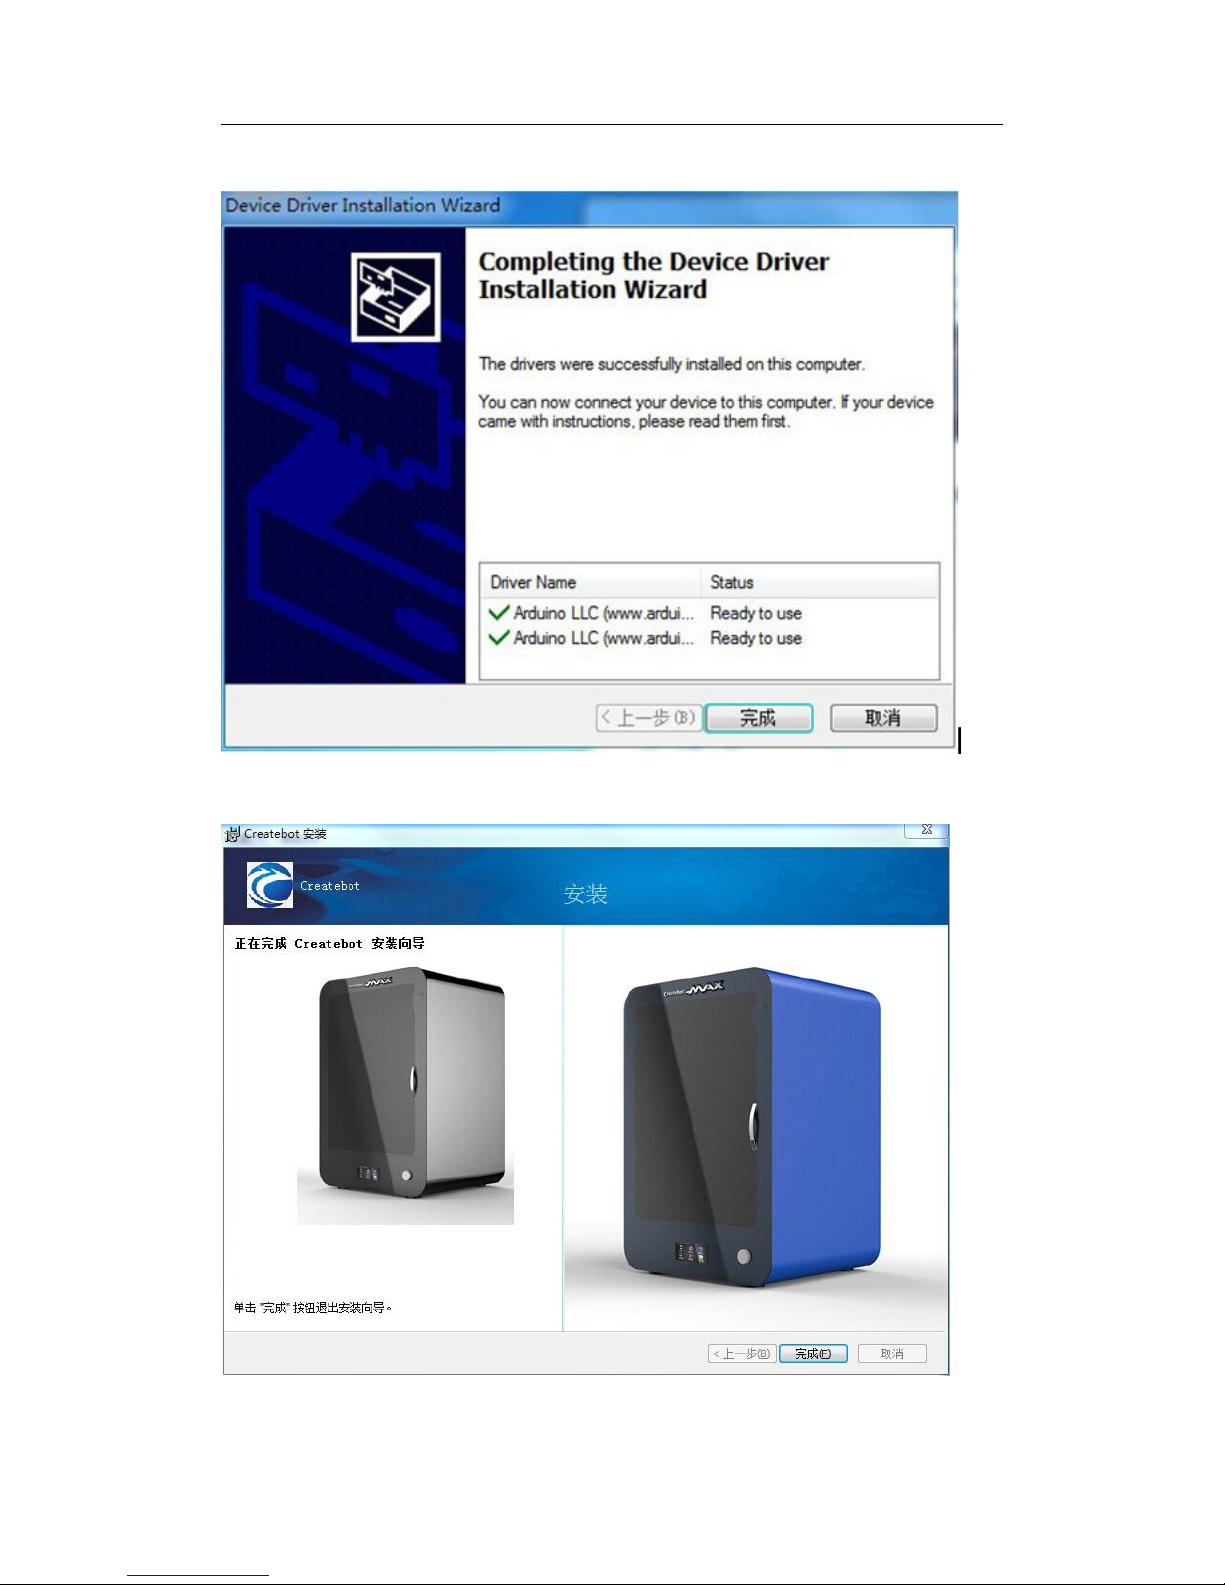
7. Single-click “
完成
” (in blue box)
8. Single-click “完成(F)” (in blue box)
Page 7
Thanks for your purchase of our Max 3d printers.
5
II. Printer Model Choose
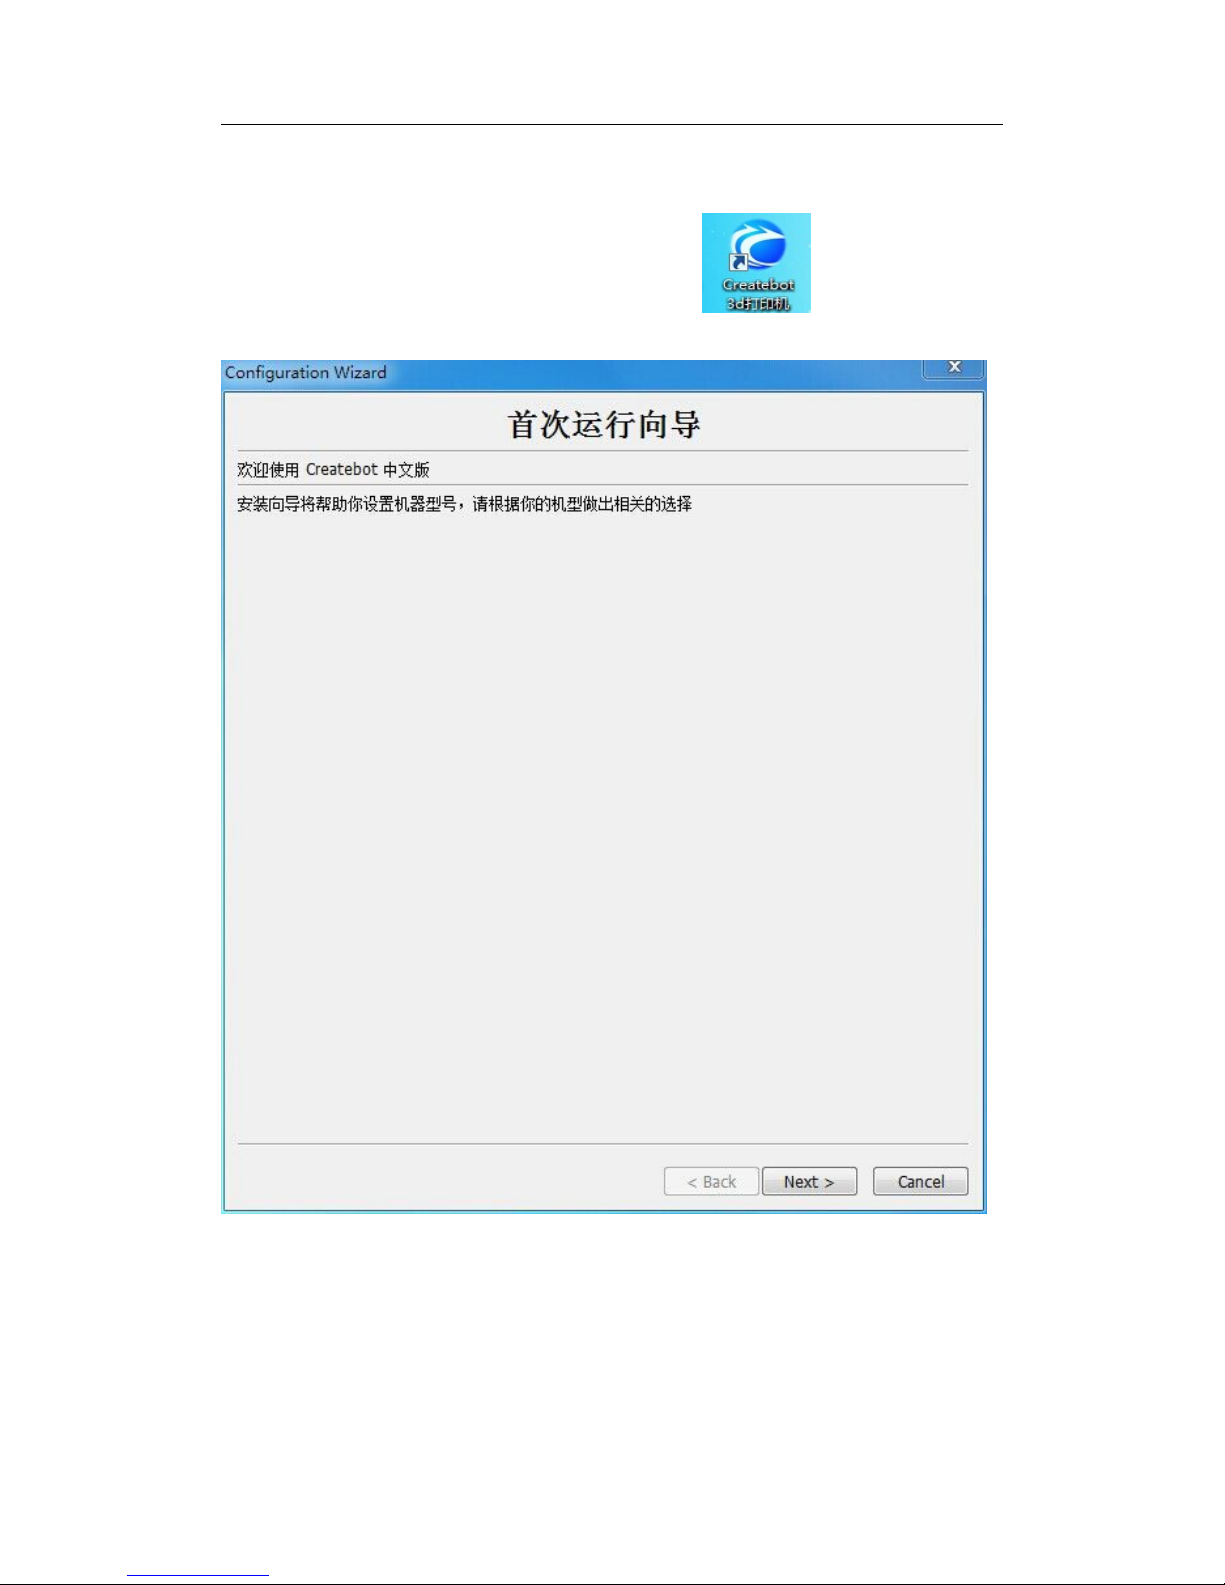
1. Double-click this image on the computer desktop:
2. Single-click “Next〉”
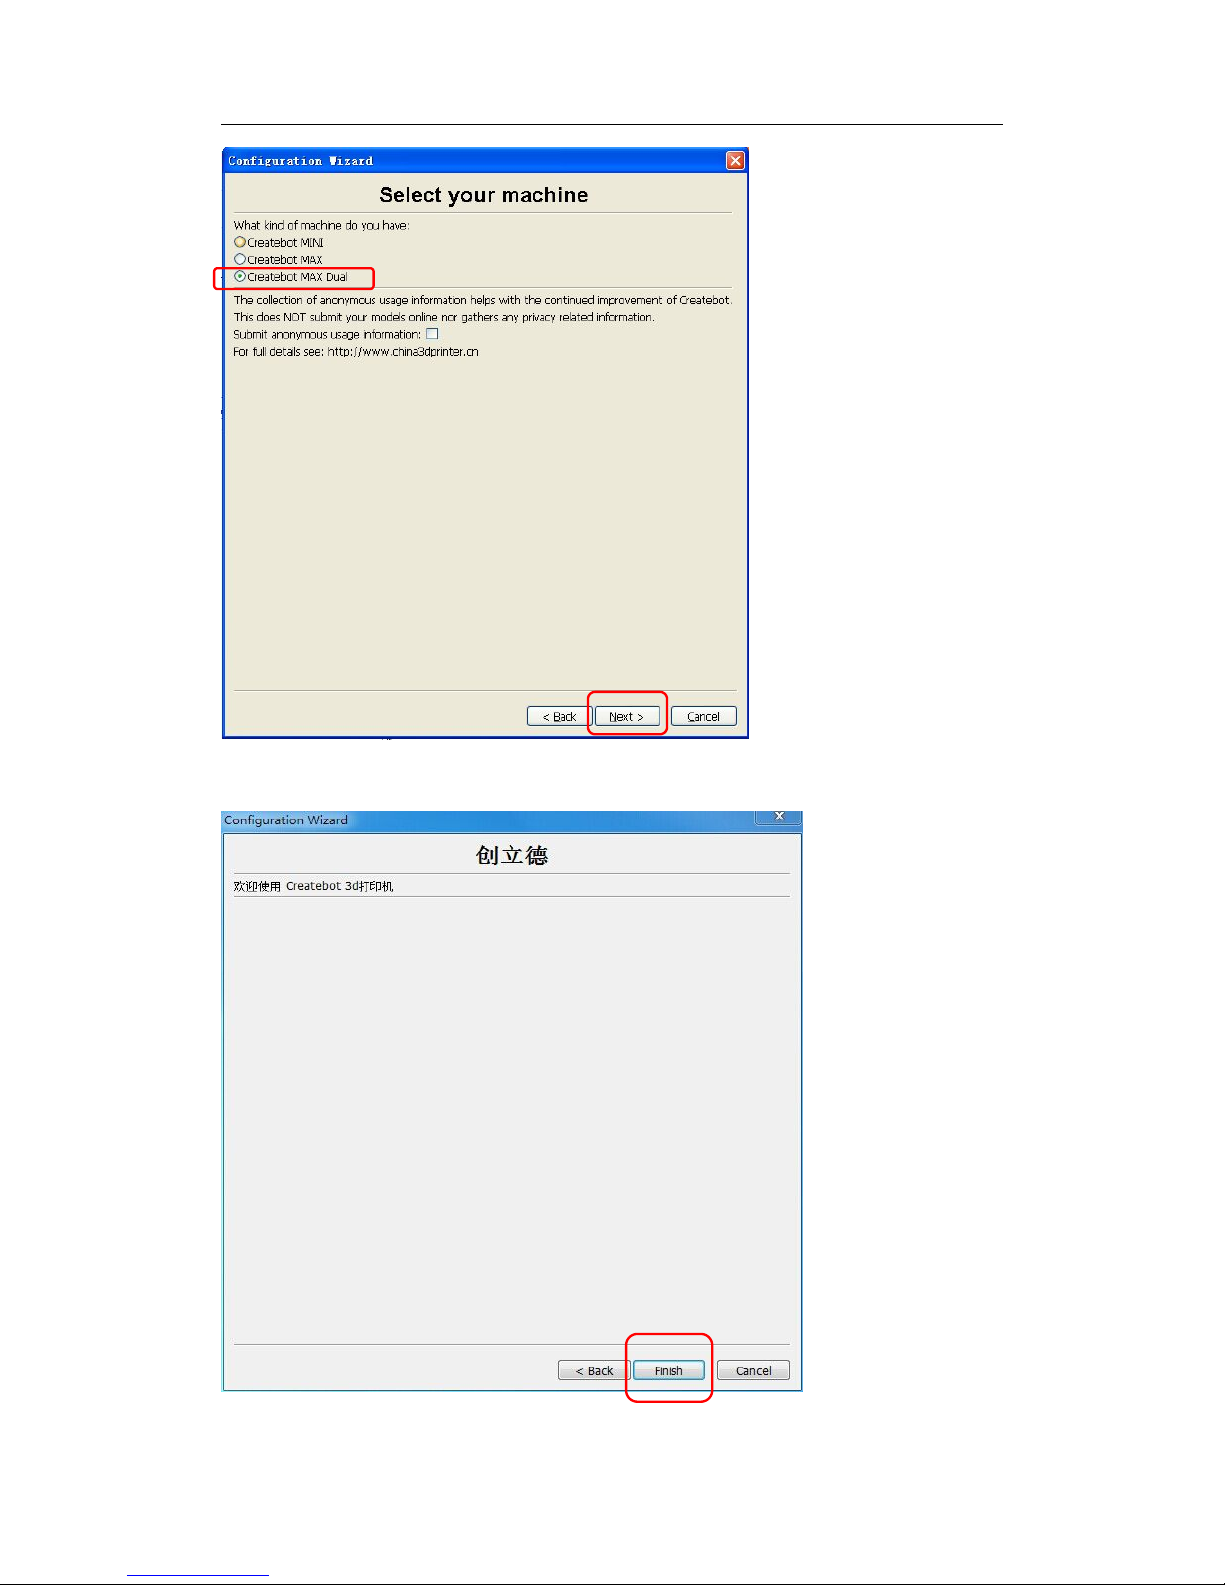
3. Choose “Createbot Max Dual”. Single-click “Next〉”
Page 8
Thanks for your purchase of our Max 3d printers.
6
3. Single-click “Finish”
Page 9

Thanks for your purchase of our Max 3d printers.
7
III. Language Choose
1. Double-click this image on the computer desktop:
2. Single-click “
文件
”. Choose “
参数设置
...”(in red box)
3. A dialogue box appears as below. Choose the language you want in Language(语言)
menu. Then click “OK” button.
4. Close this software. Reopen this software and the interface will appear the language
you set right now.
Page 10
Thanks for your purchase of our Max 3d printers.
8
IV. Rotation Operation
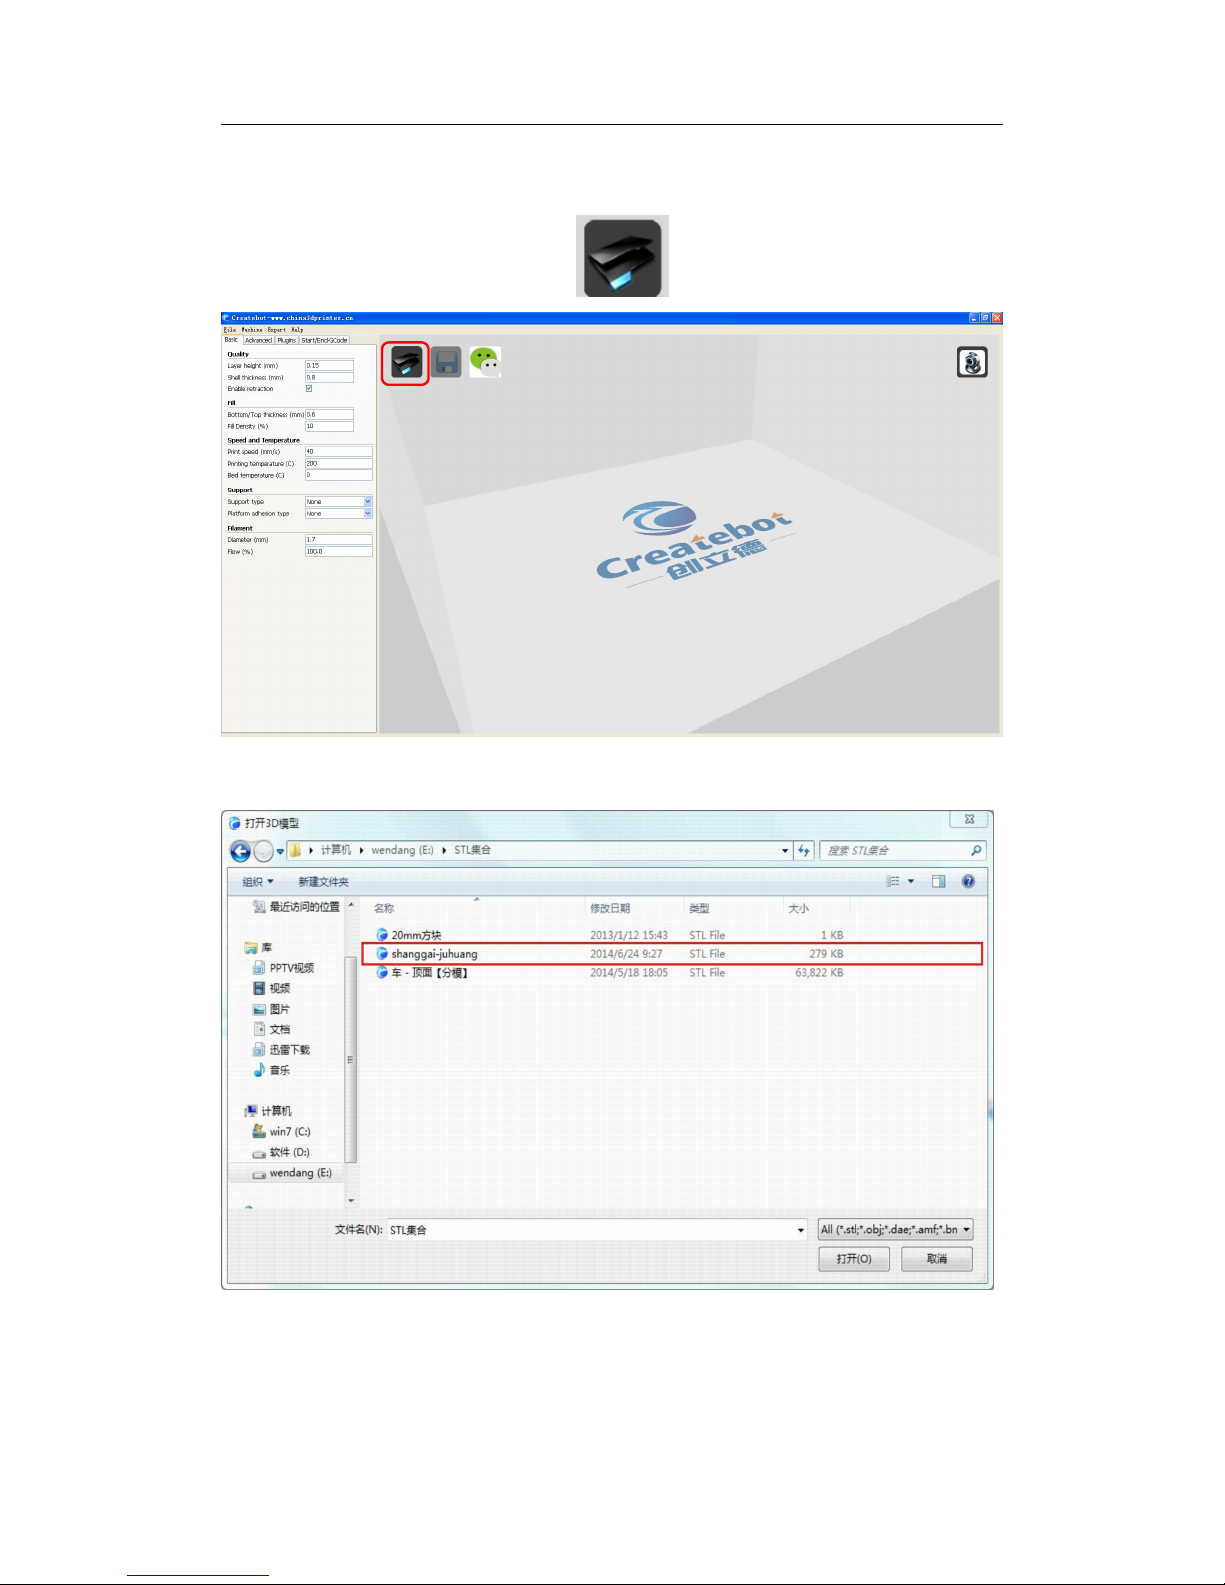
1. Single-click this image (in red box):
2. Import a file in STL format.
3. Click imported model. The interface will appear as below:
Page 11
Thanks for your purchase of our Max 3d printers.
9
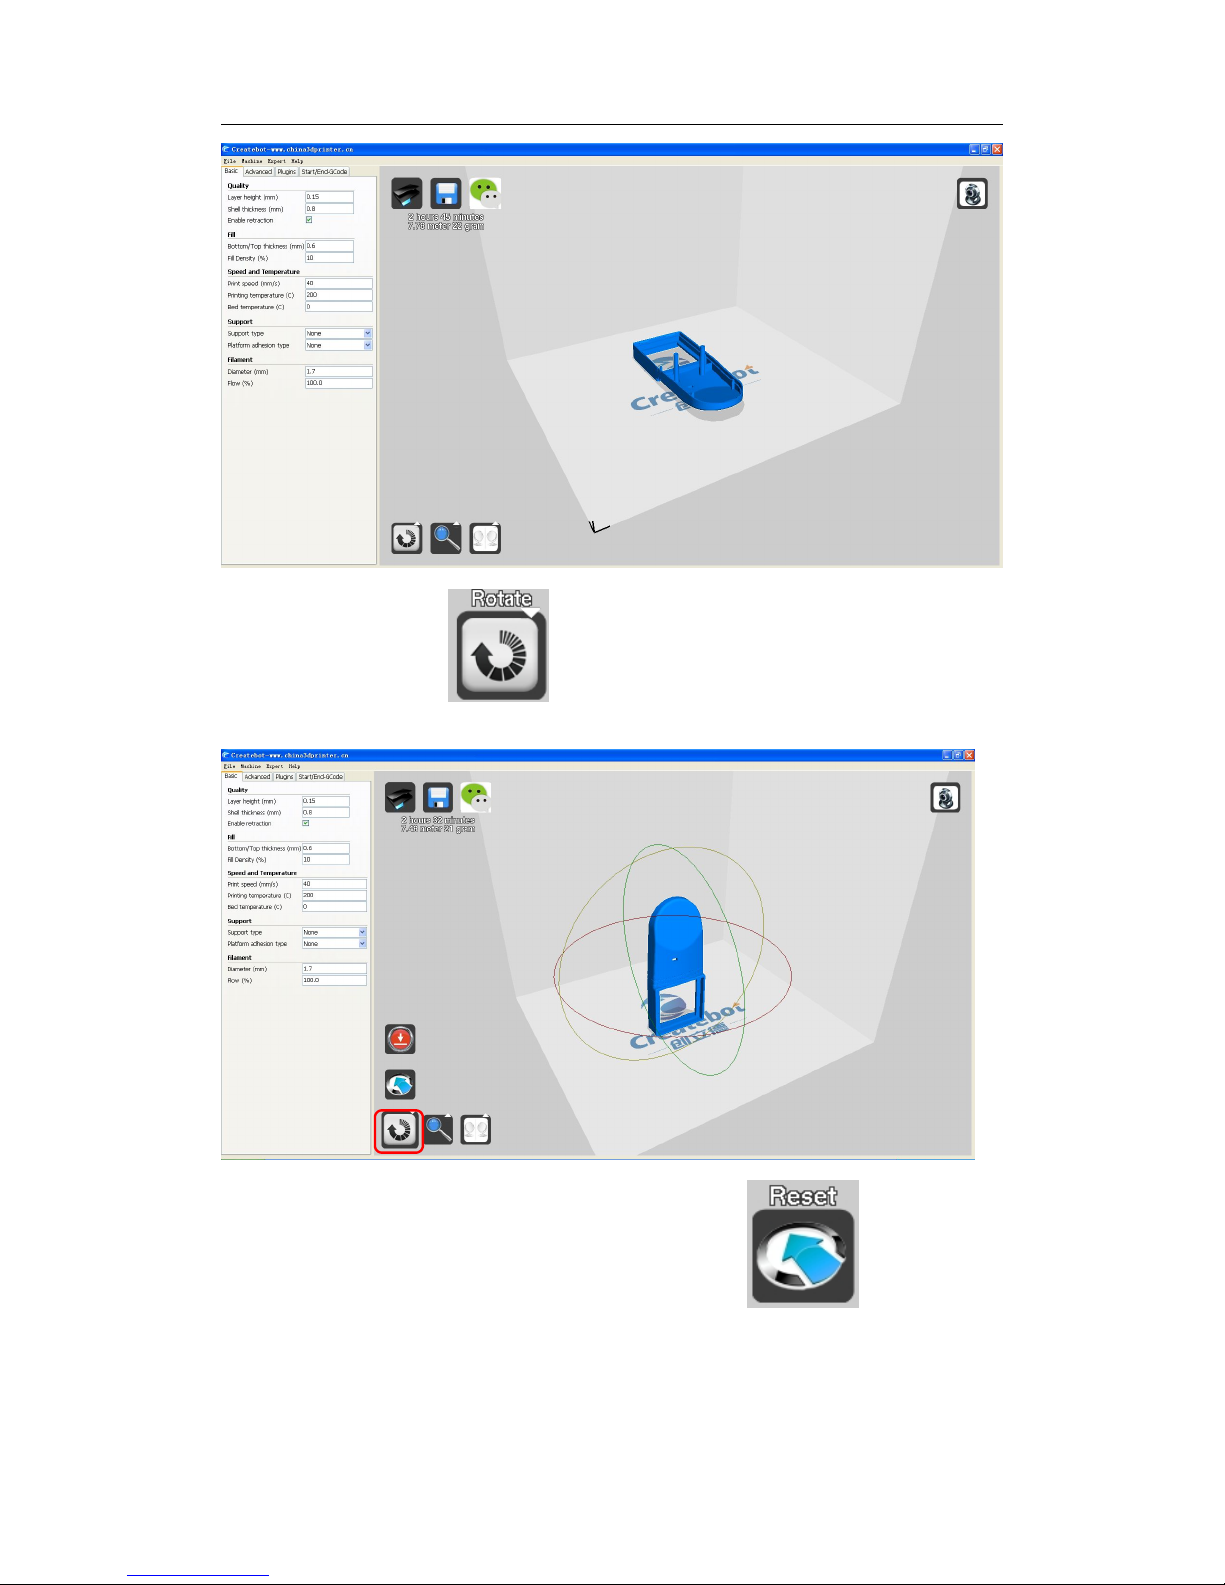
4. Click “rotate” button . Clicking and moving the button along the curve Rotate
the model you want.
5. You can reset rotation direction by click “reset” button
Page 12
Thanks for your purchase of our Max 3d printers.
10
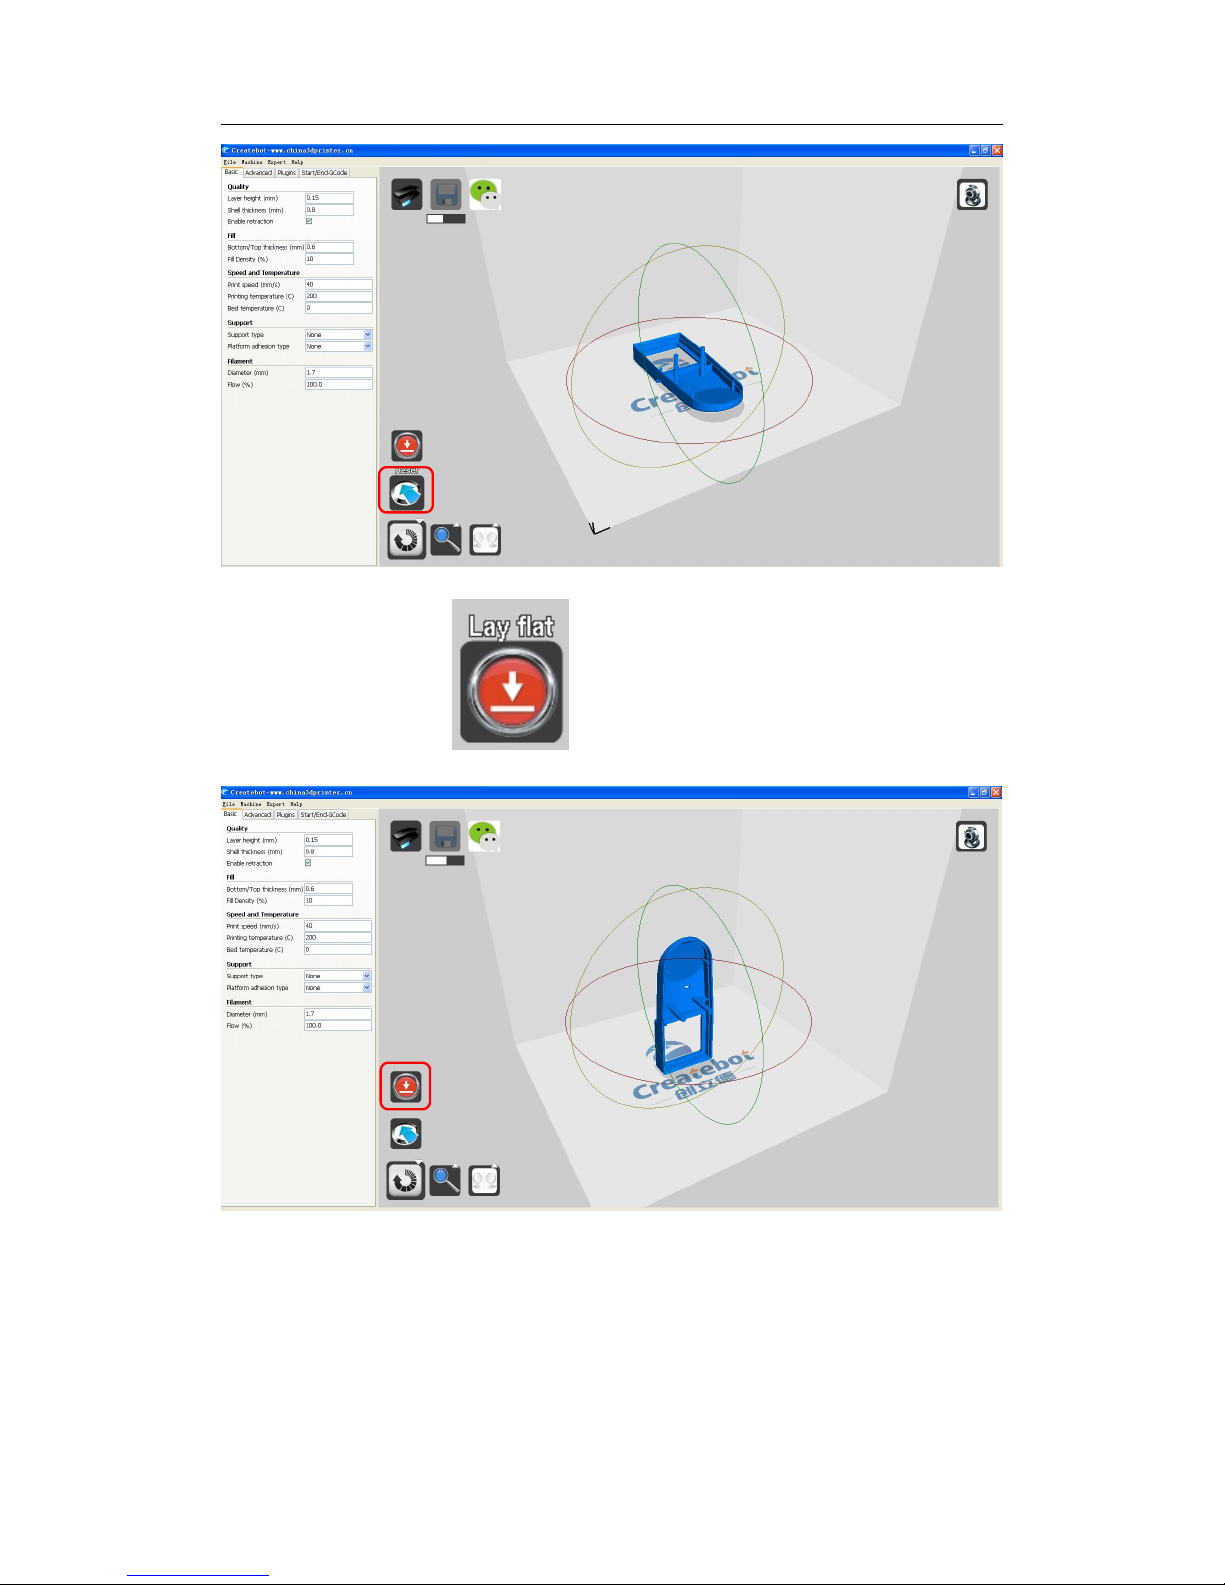
6. Click “Lay flat” button if you don not want the model tiled.
Page 13
Thanks for your purchase of our Max 3d printers.
11
V. Proportional Scale
1. Click imported model. The interface will appear as below:
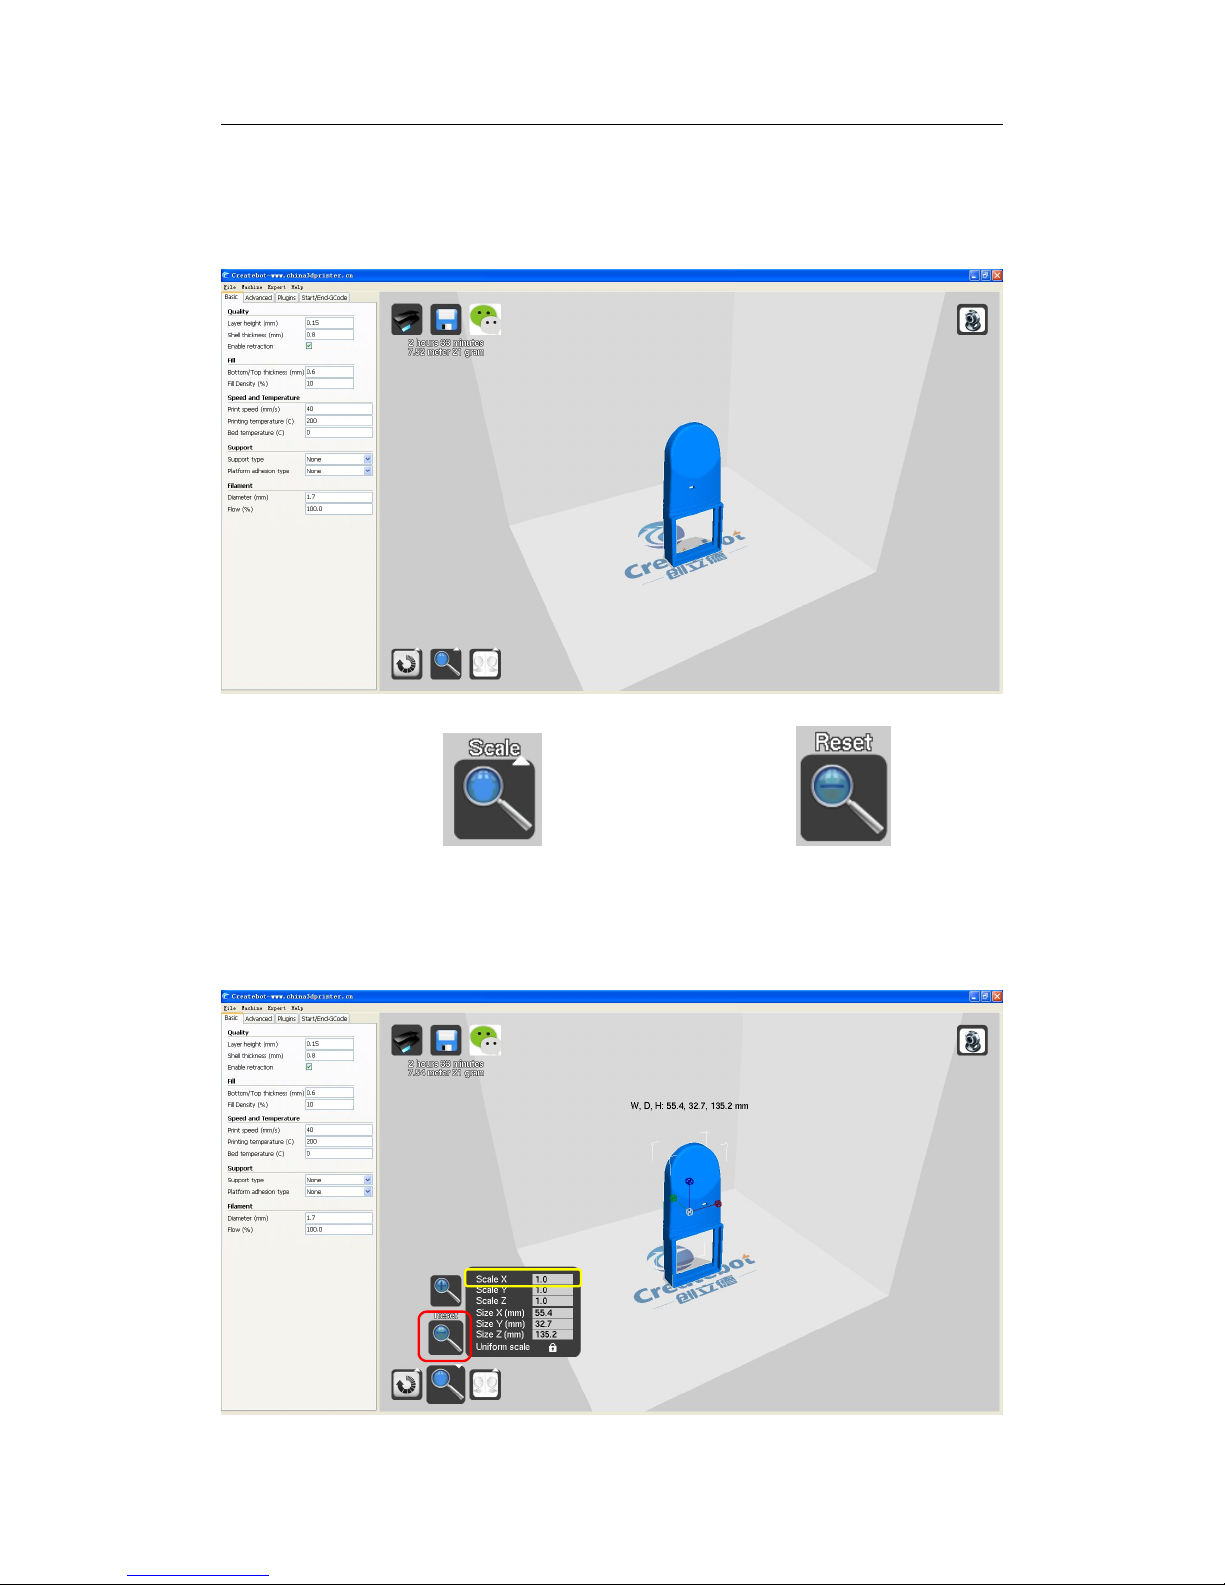
2. Click “Scale” button . Then Click “Reset” button (in red box).
Input the number in the “Scale X ” box (in yellow box).
eg: half size----input “0.5”; a magnification of 2 times----input “2”
Page 14
Thanks for your purchase of our Max 3d printers.
12
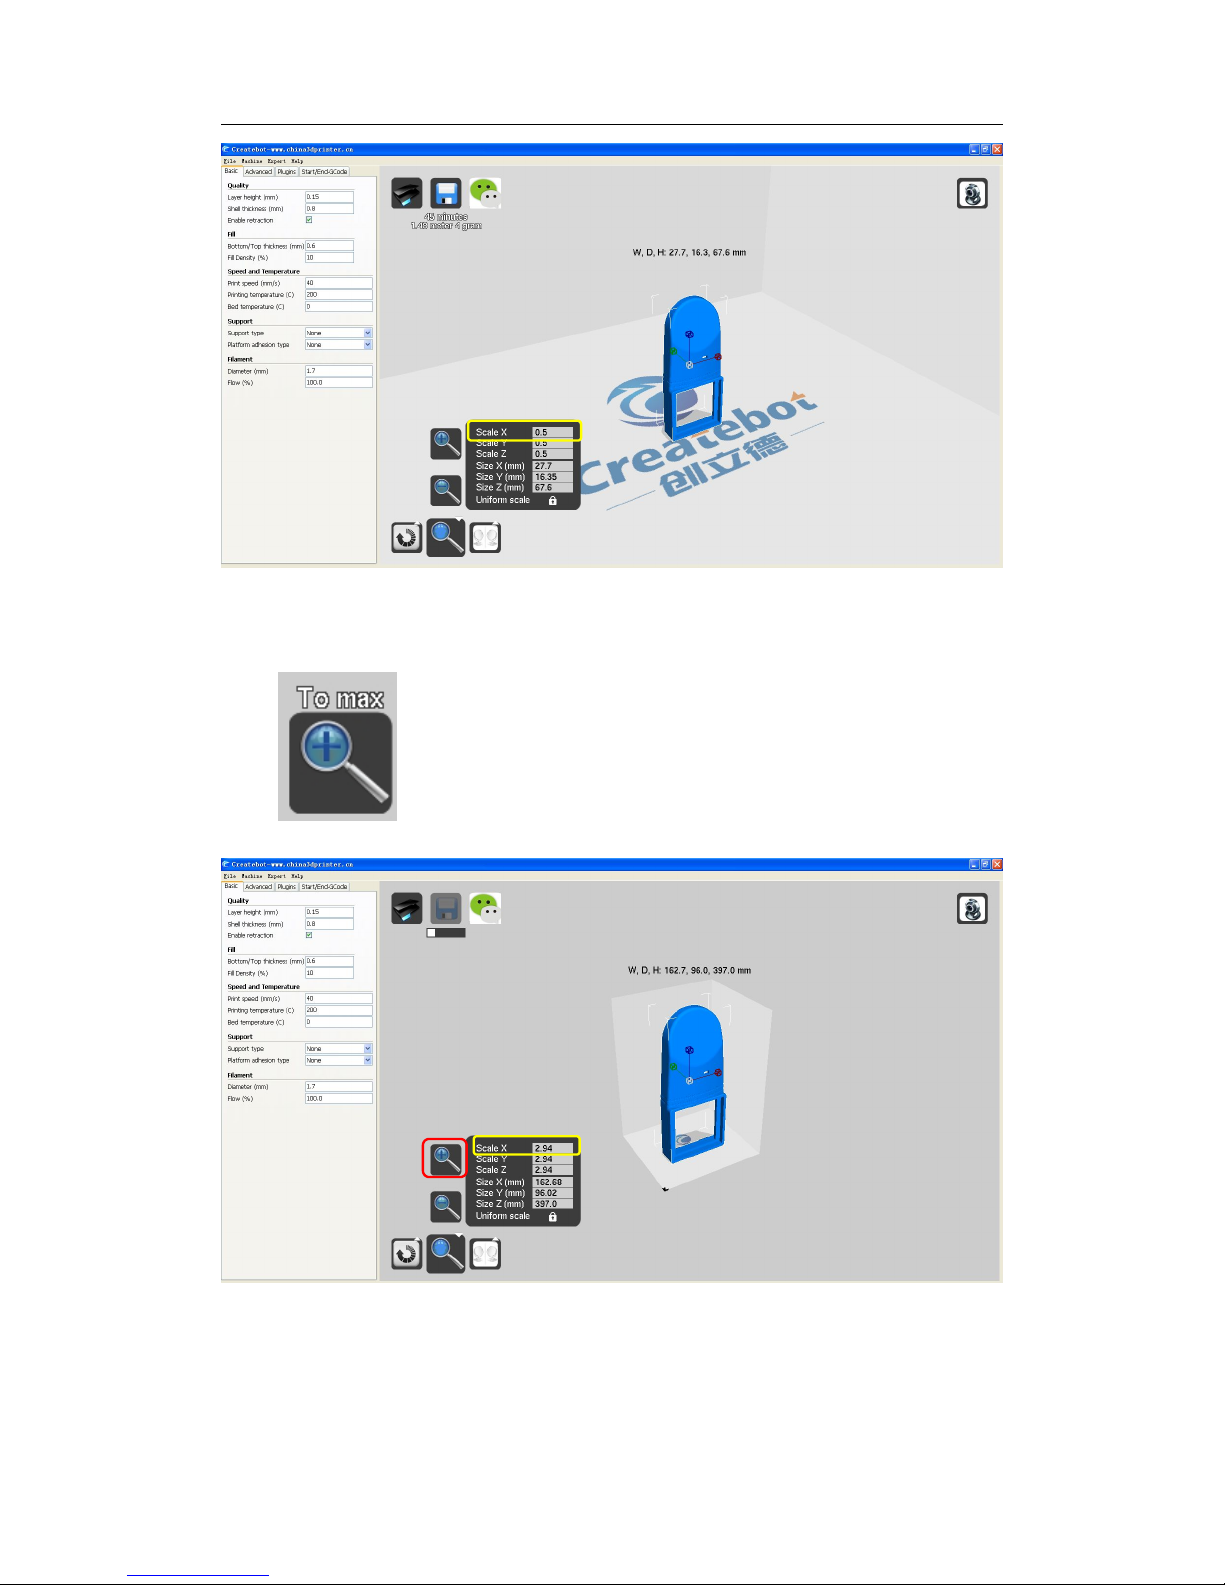
3. If you want to print a max model within printer largest build size, click “To max”
button (in red box) and you can see the largest scale in the yellow box.
Page 15
Thanks for your purchase of our Max 3d printers.
13
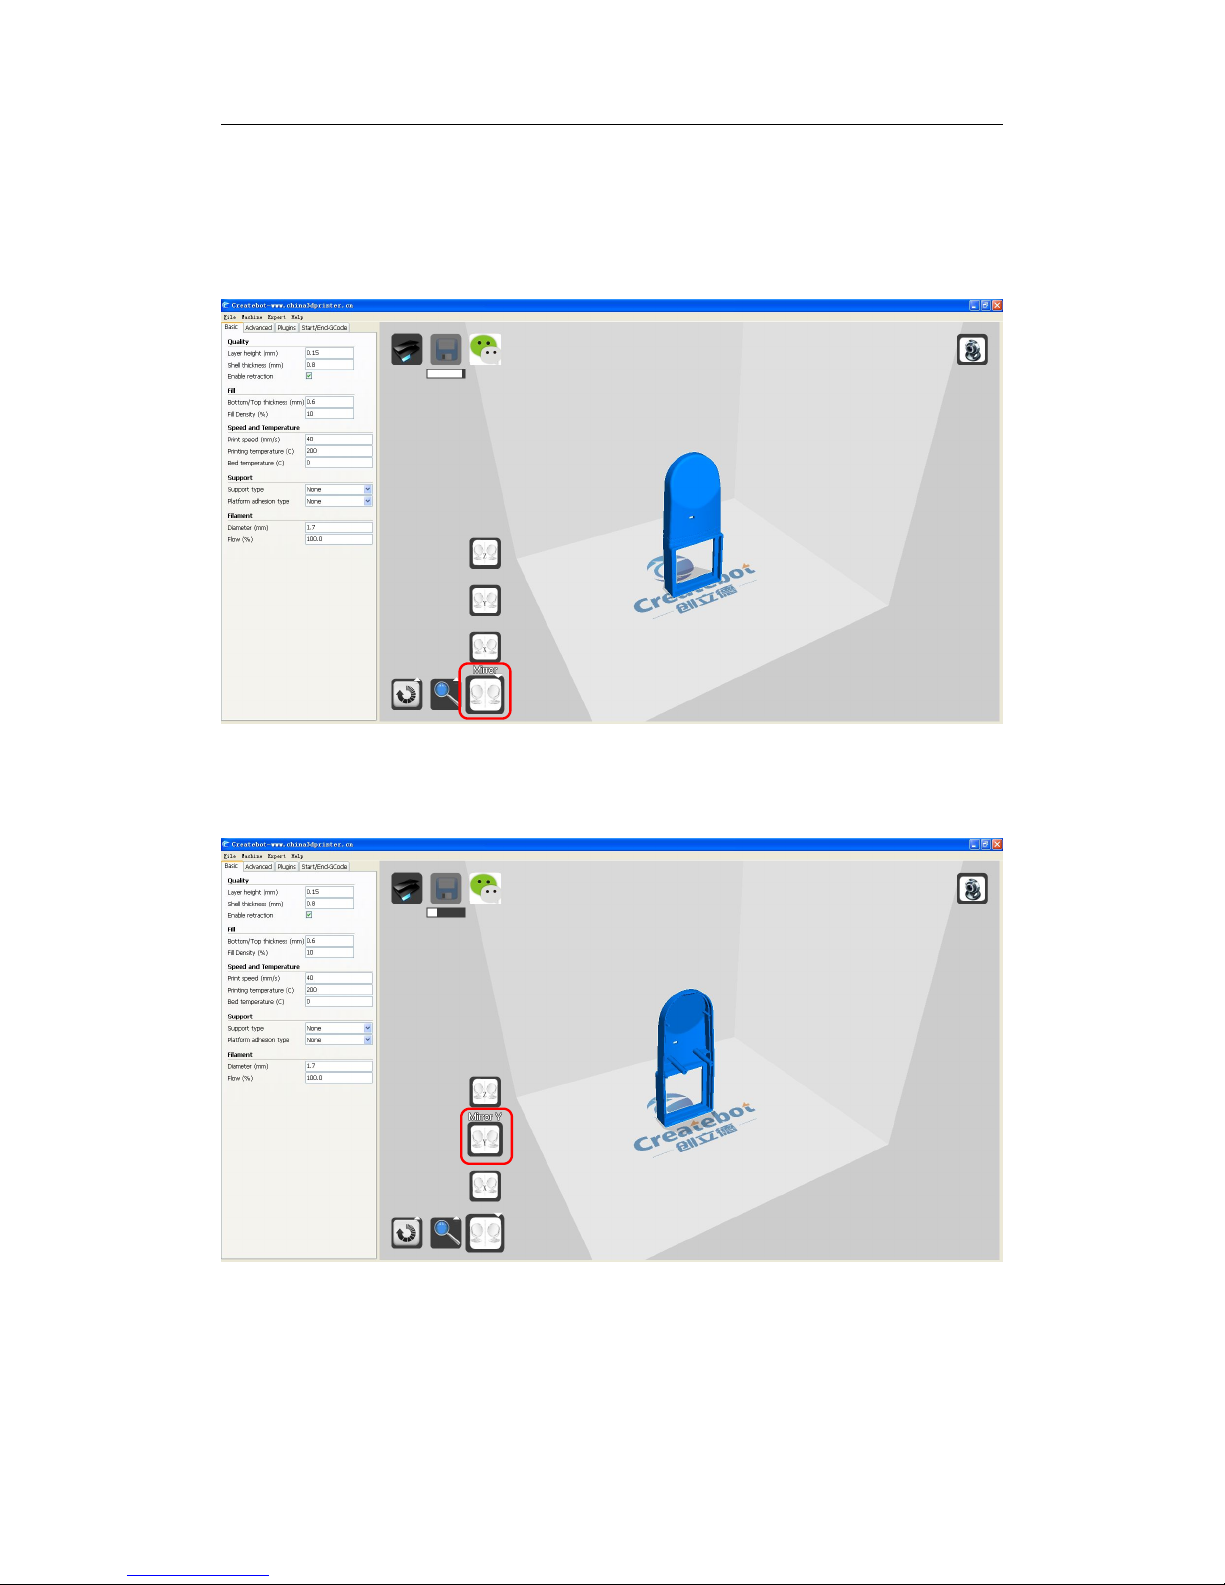
VI. Mirror Operation
1. Click imported model. Then click “Mirror” button(in red box). The interface will
appear as below:
2. Click “Mirror Y” button(in red box). The interface will appear as below:
Page 16
Thanks for your purchase of our Max 3d printers.
14
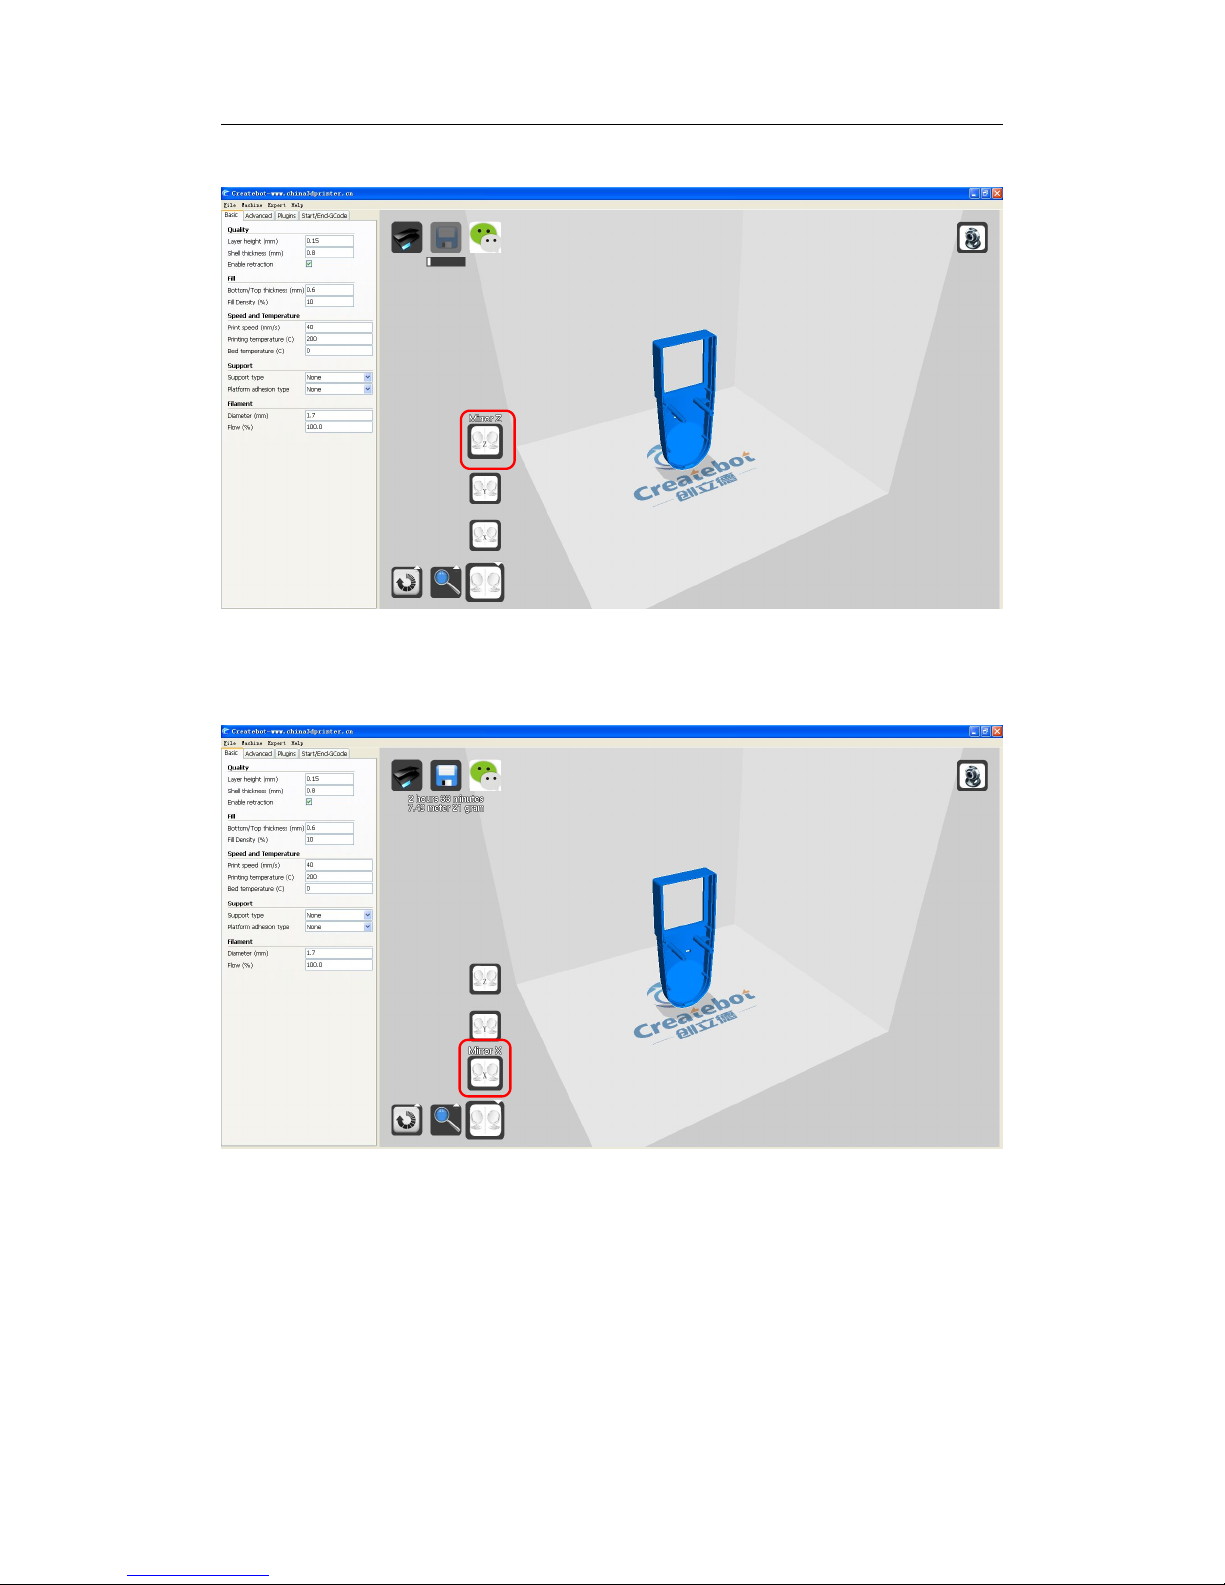
3. Click “Mirror Z” button(in red box). The interface will appear as below:
4. Click “Mirror X” button(in red box). The interface will appear as below:
Page 17
Thanks for your purchase of our Max 3d printers.
15
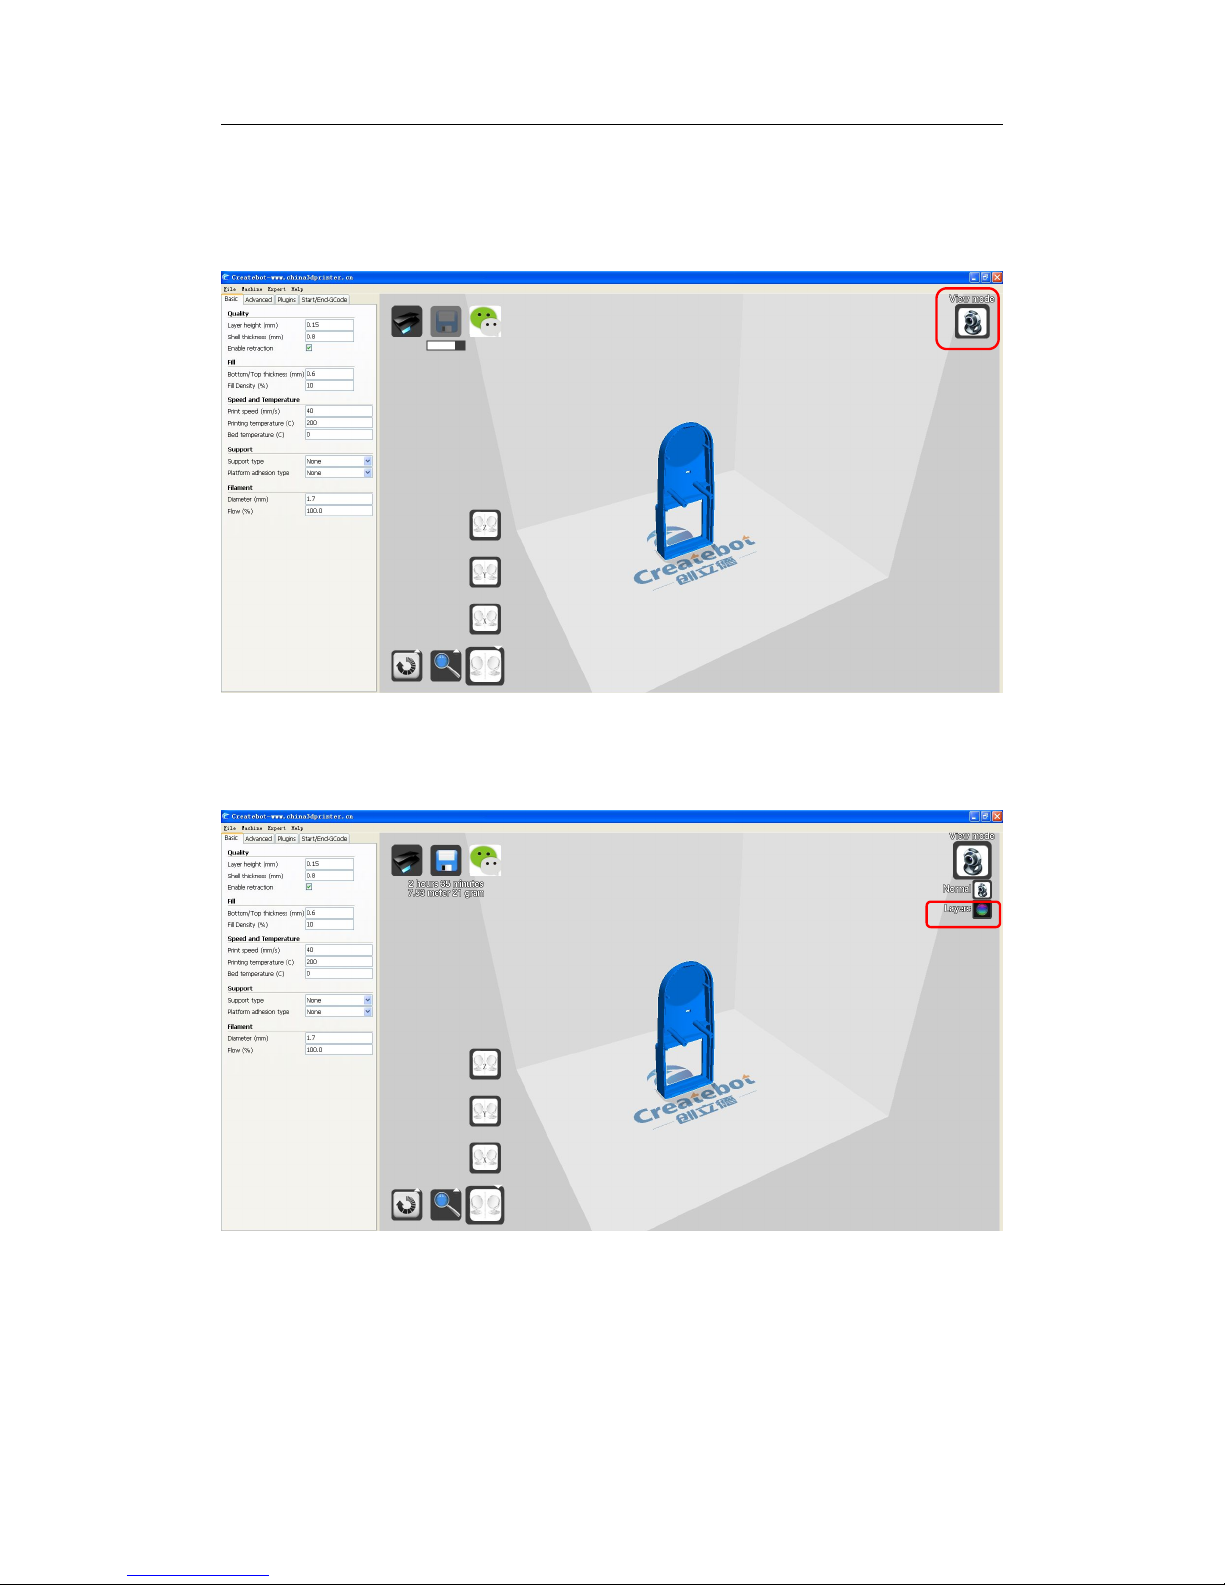
VII. Mode View
1. Click “View mode” button (in red box).
2. Click “Layers” button (in red box). The interface will appear as below:
Page 18
Thanks for your purchase of our Max 3d printers.
16
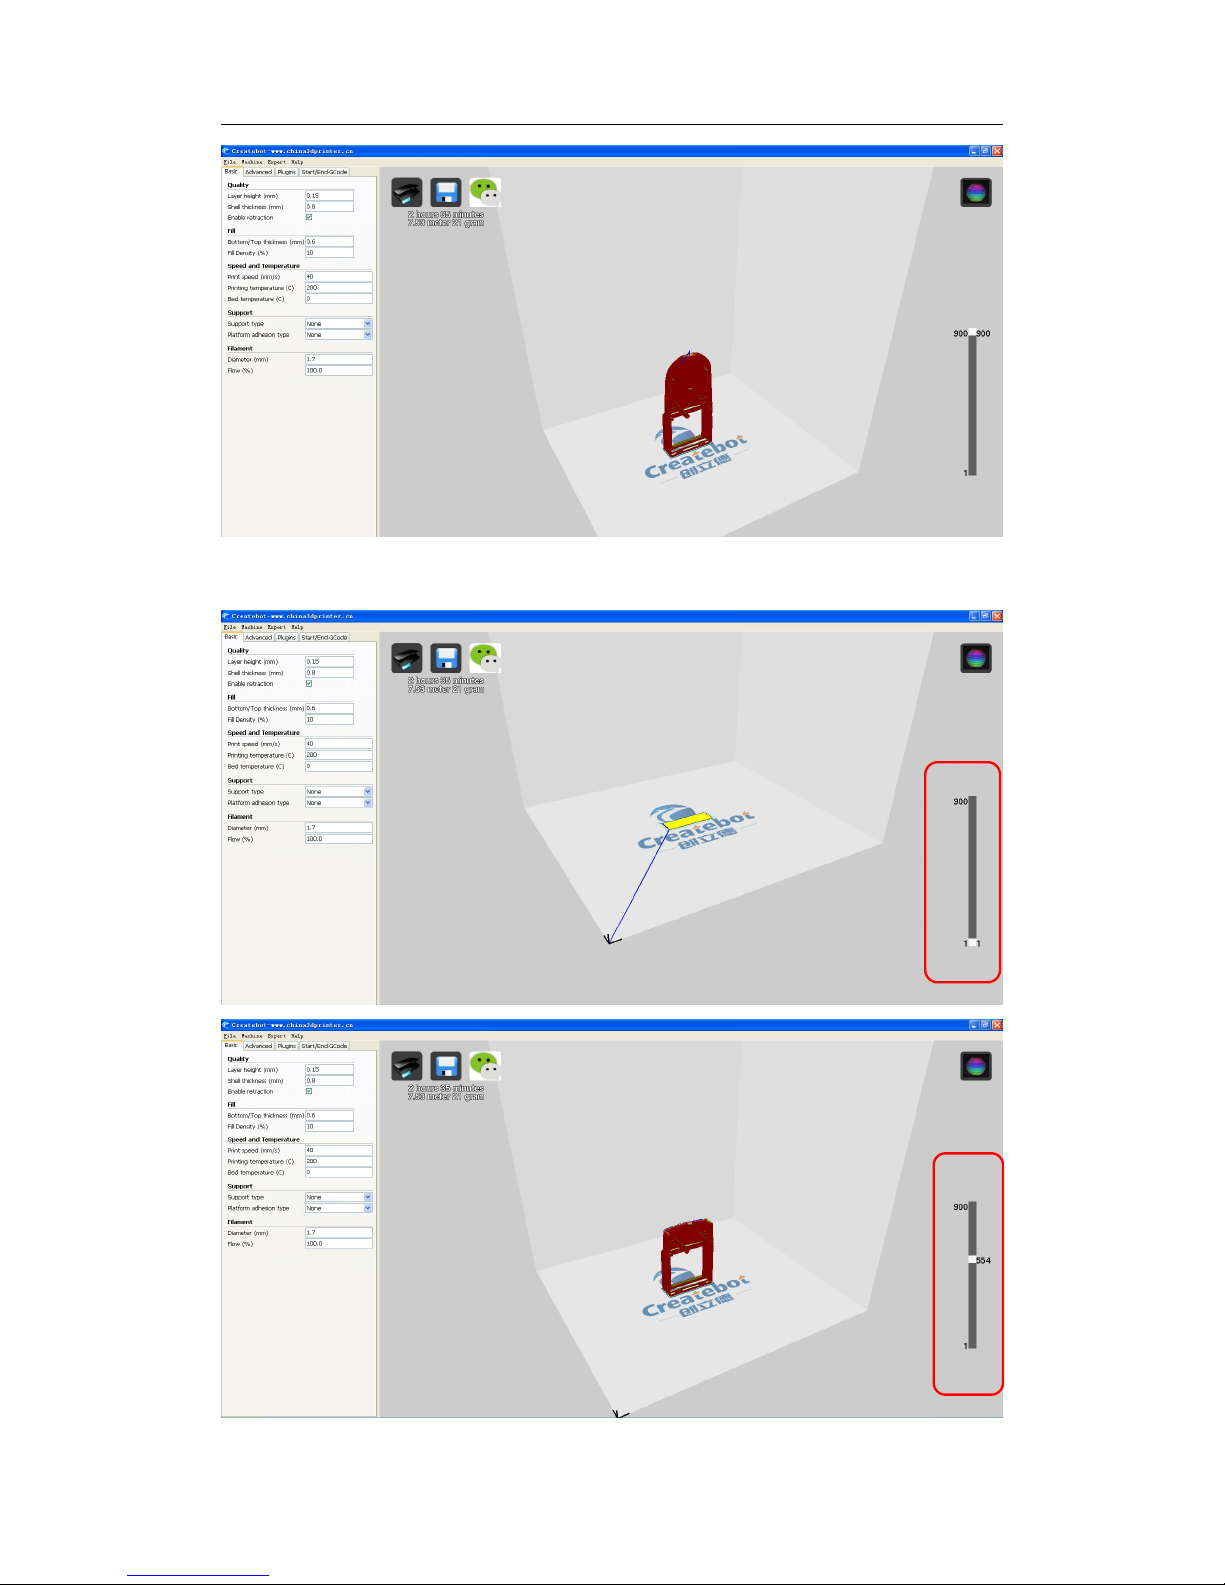
3. Click the button up or down in the red box, and we can see all printing path.
Page 19
Thanks for your purchase of our Max 3d printers.
17
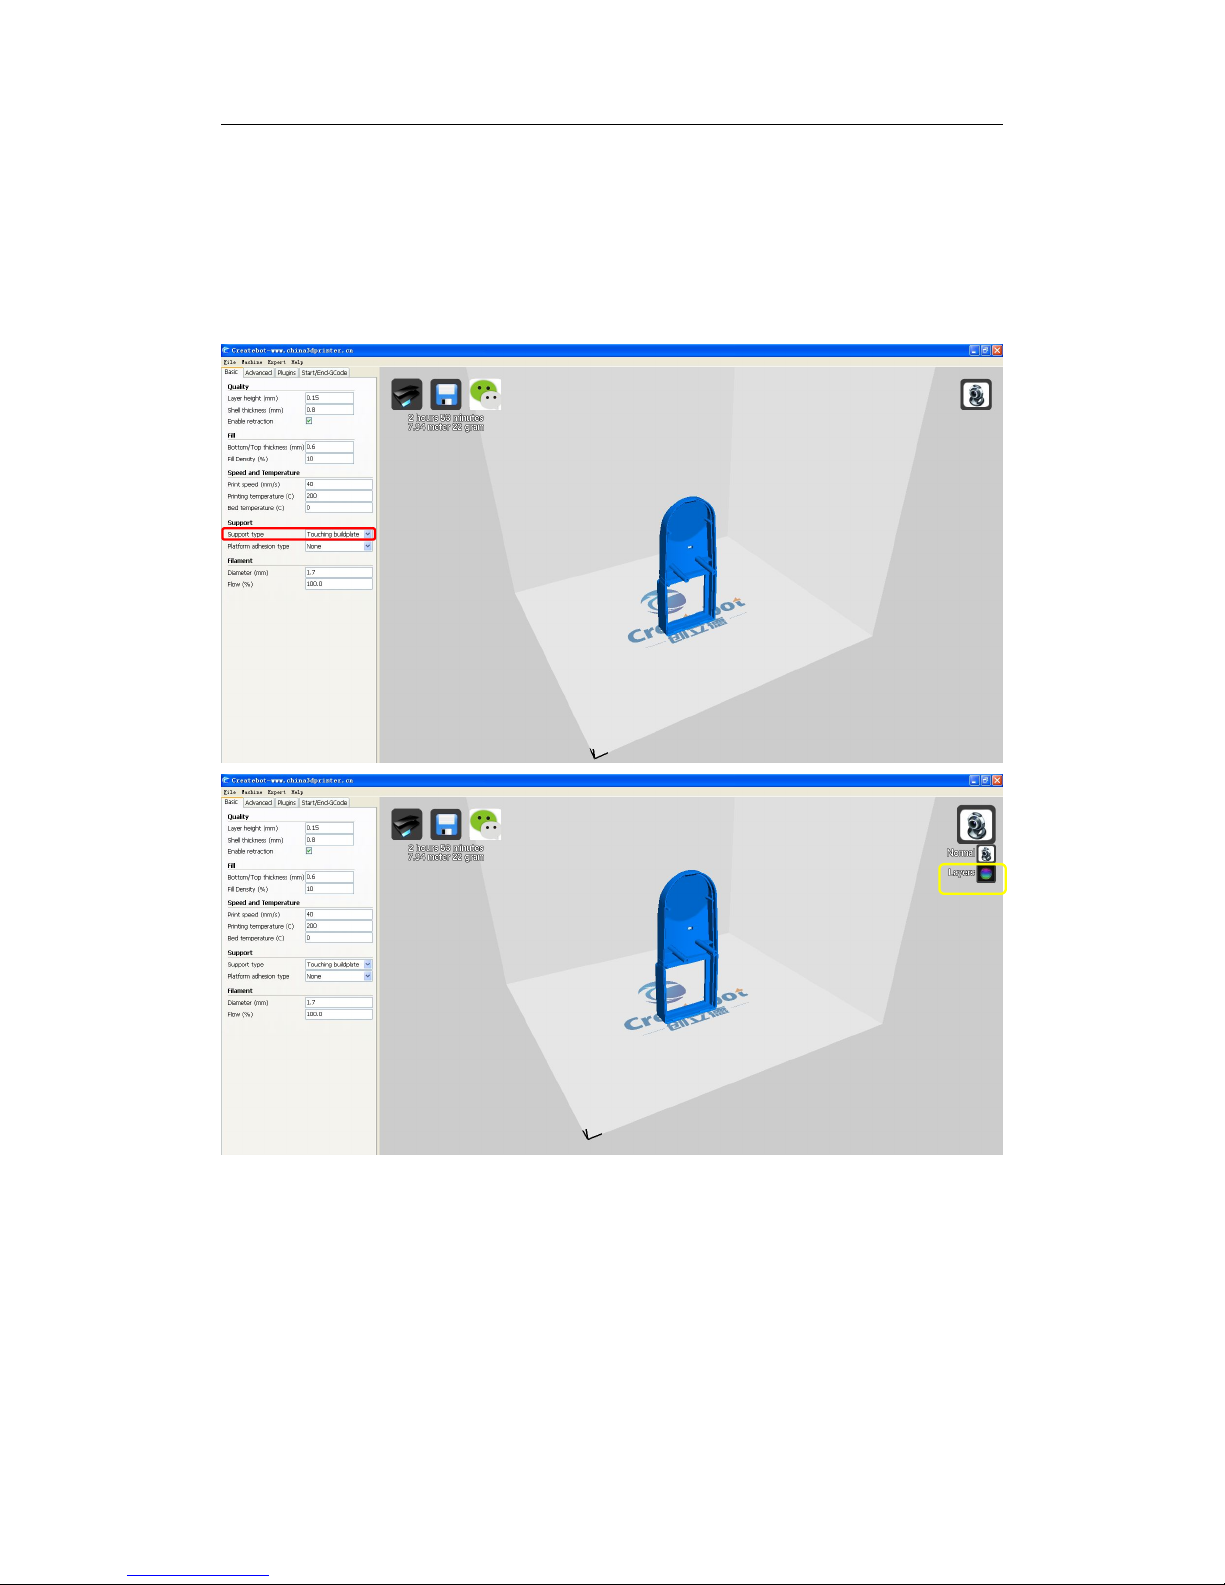
VIII. Support Setting
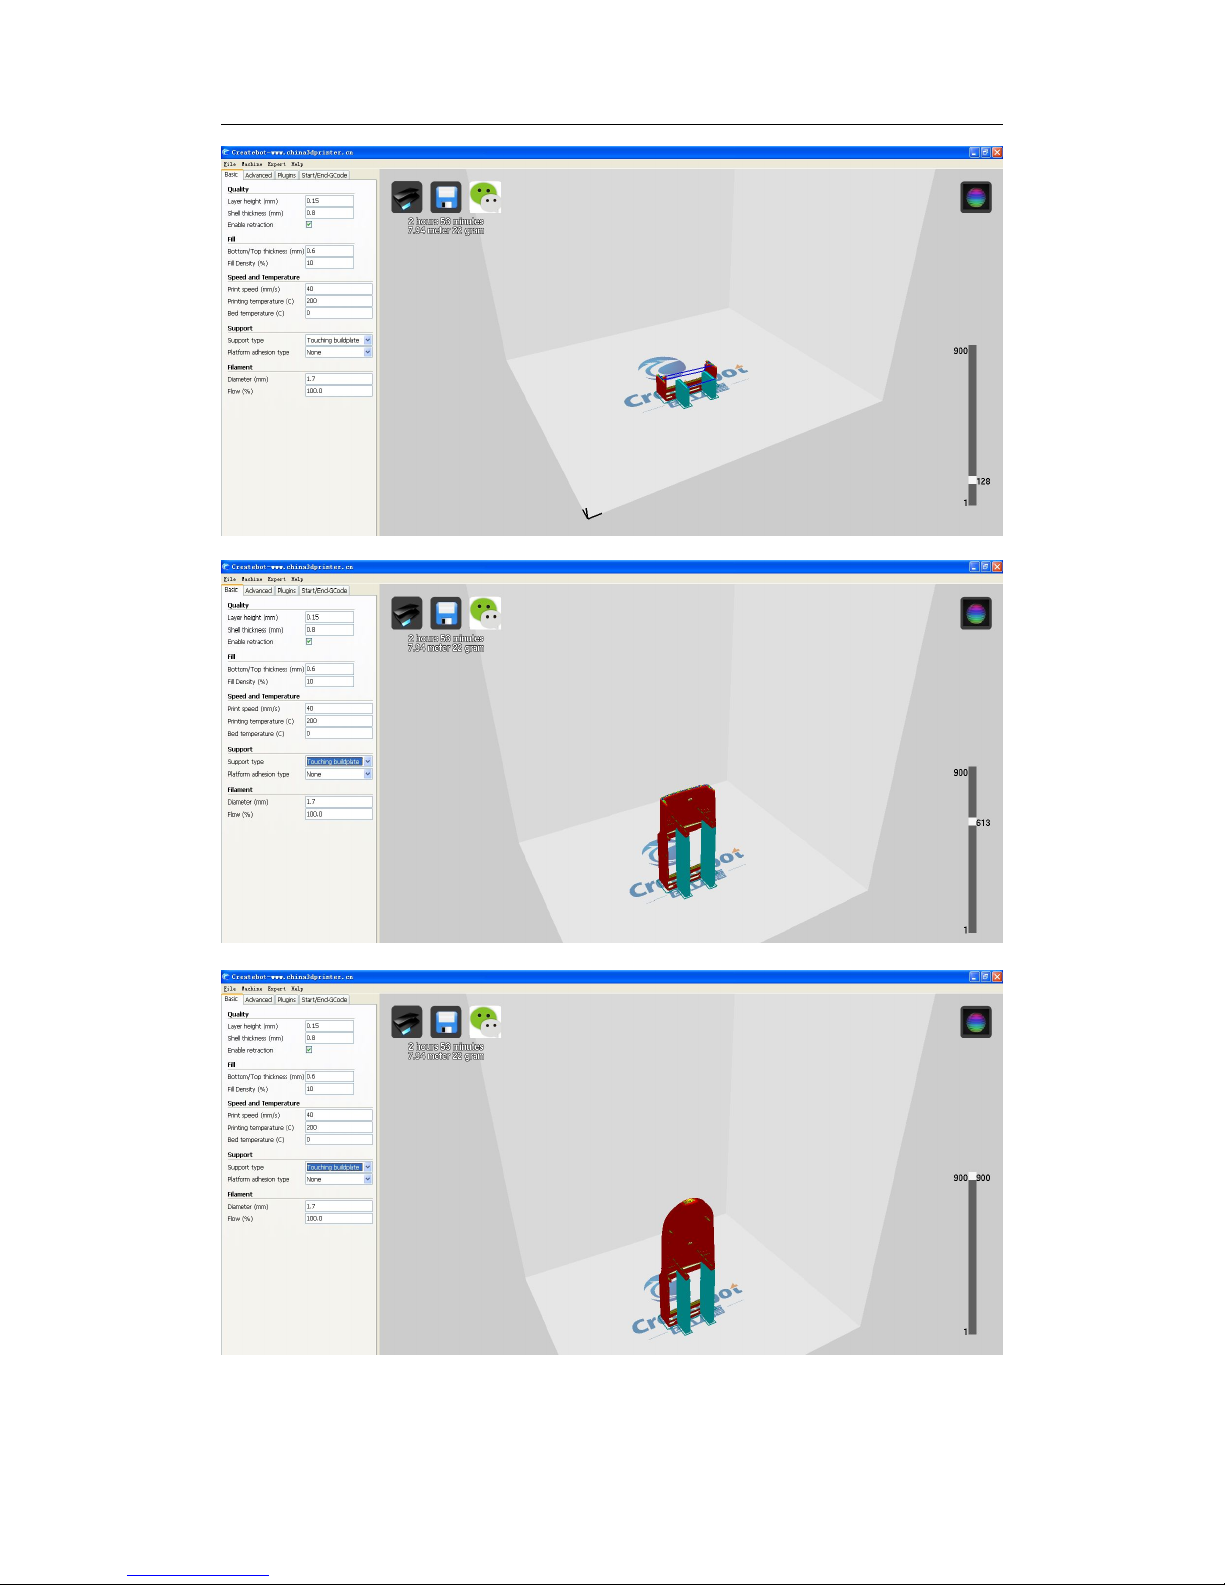
How to set exterior support
1. Choose “Support type” → “touching buildplate” (in red box) → choose “Layers”
(in yellow box) to view all printing path.
Page 20
Thanks for your purchase of our Max 3d printers.
18
Page 21
Thanks for your purchase of our Max 3d printers.
19
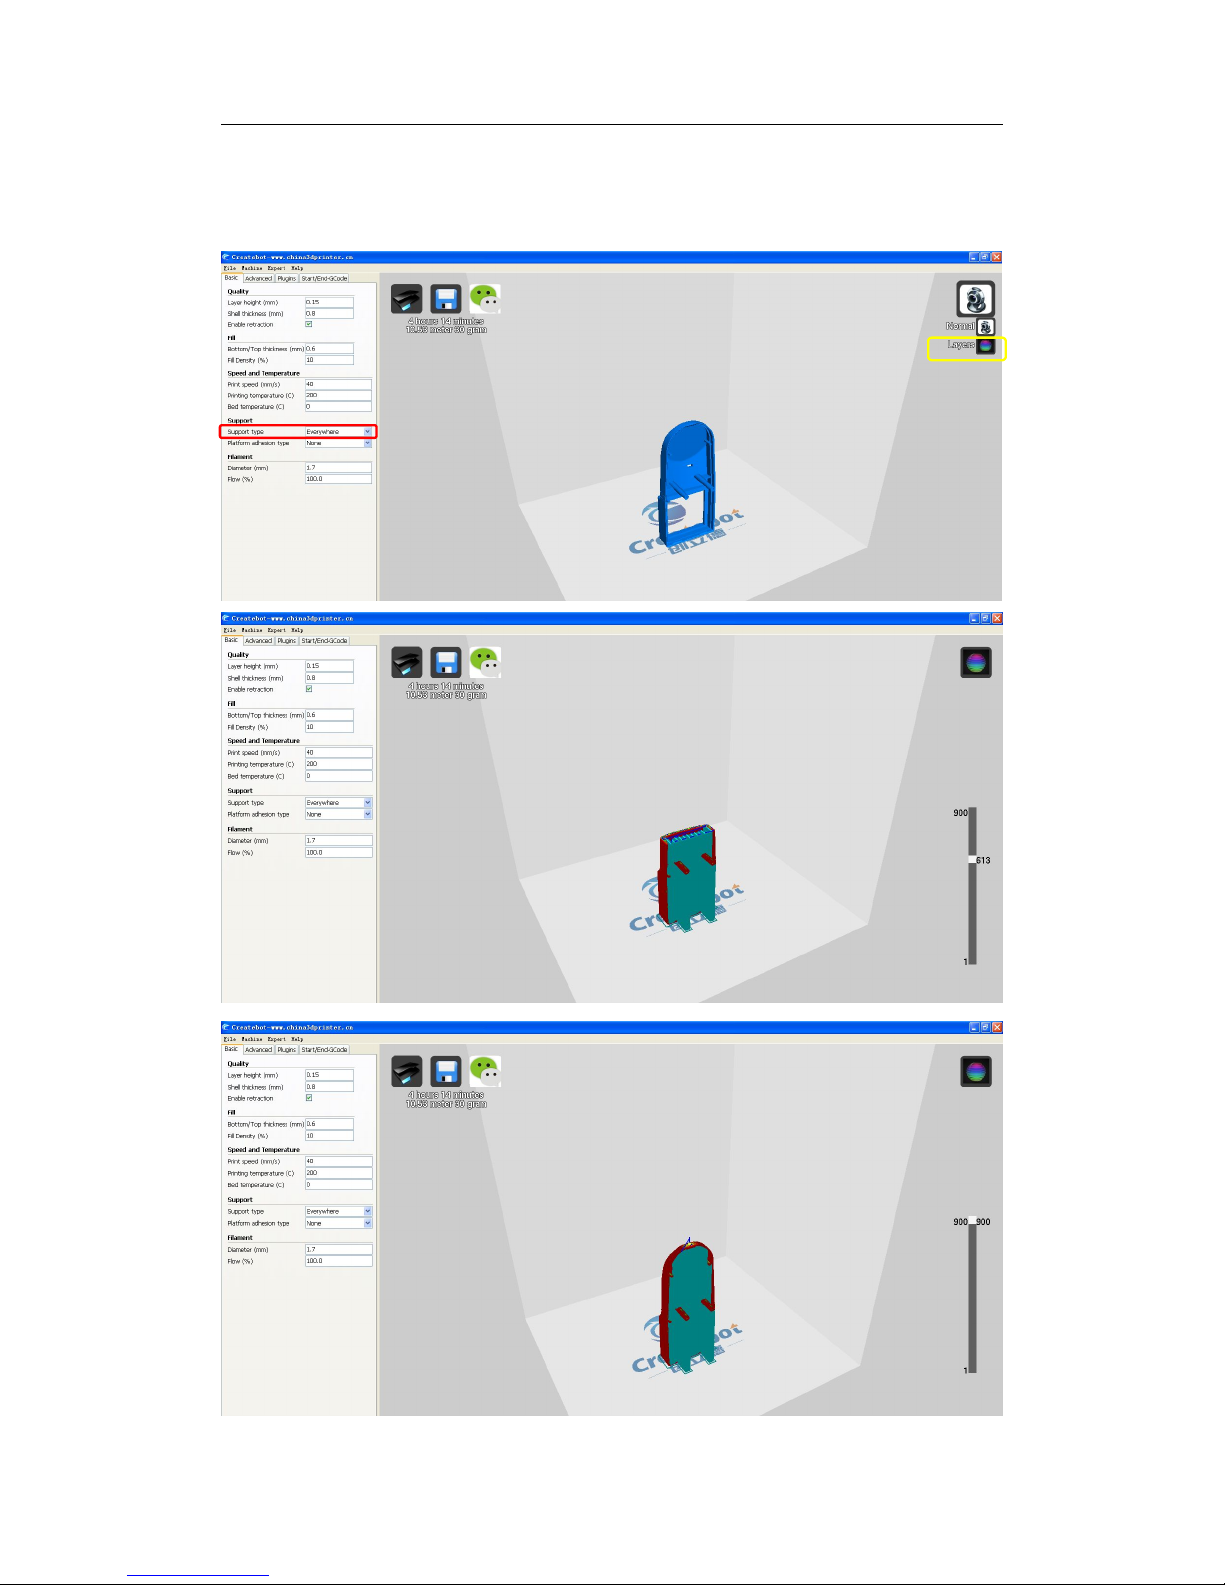
How to set full support
2. Choose “Support type”
→
“Everywhere” (in red box)
→
choose “Layers” (in
yellow box) to view all printing.
Page 22
Thanks for your purchase of our Max 3d printers.
20
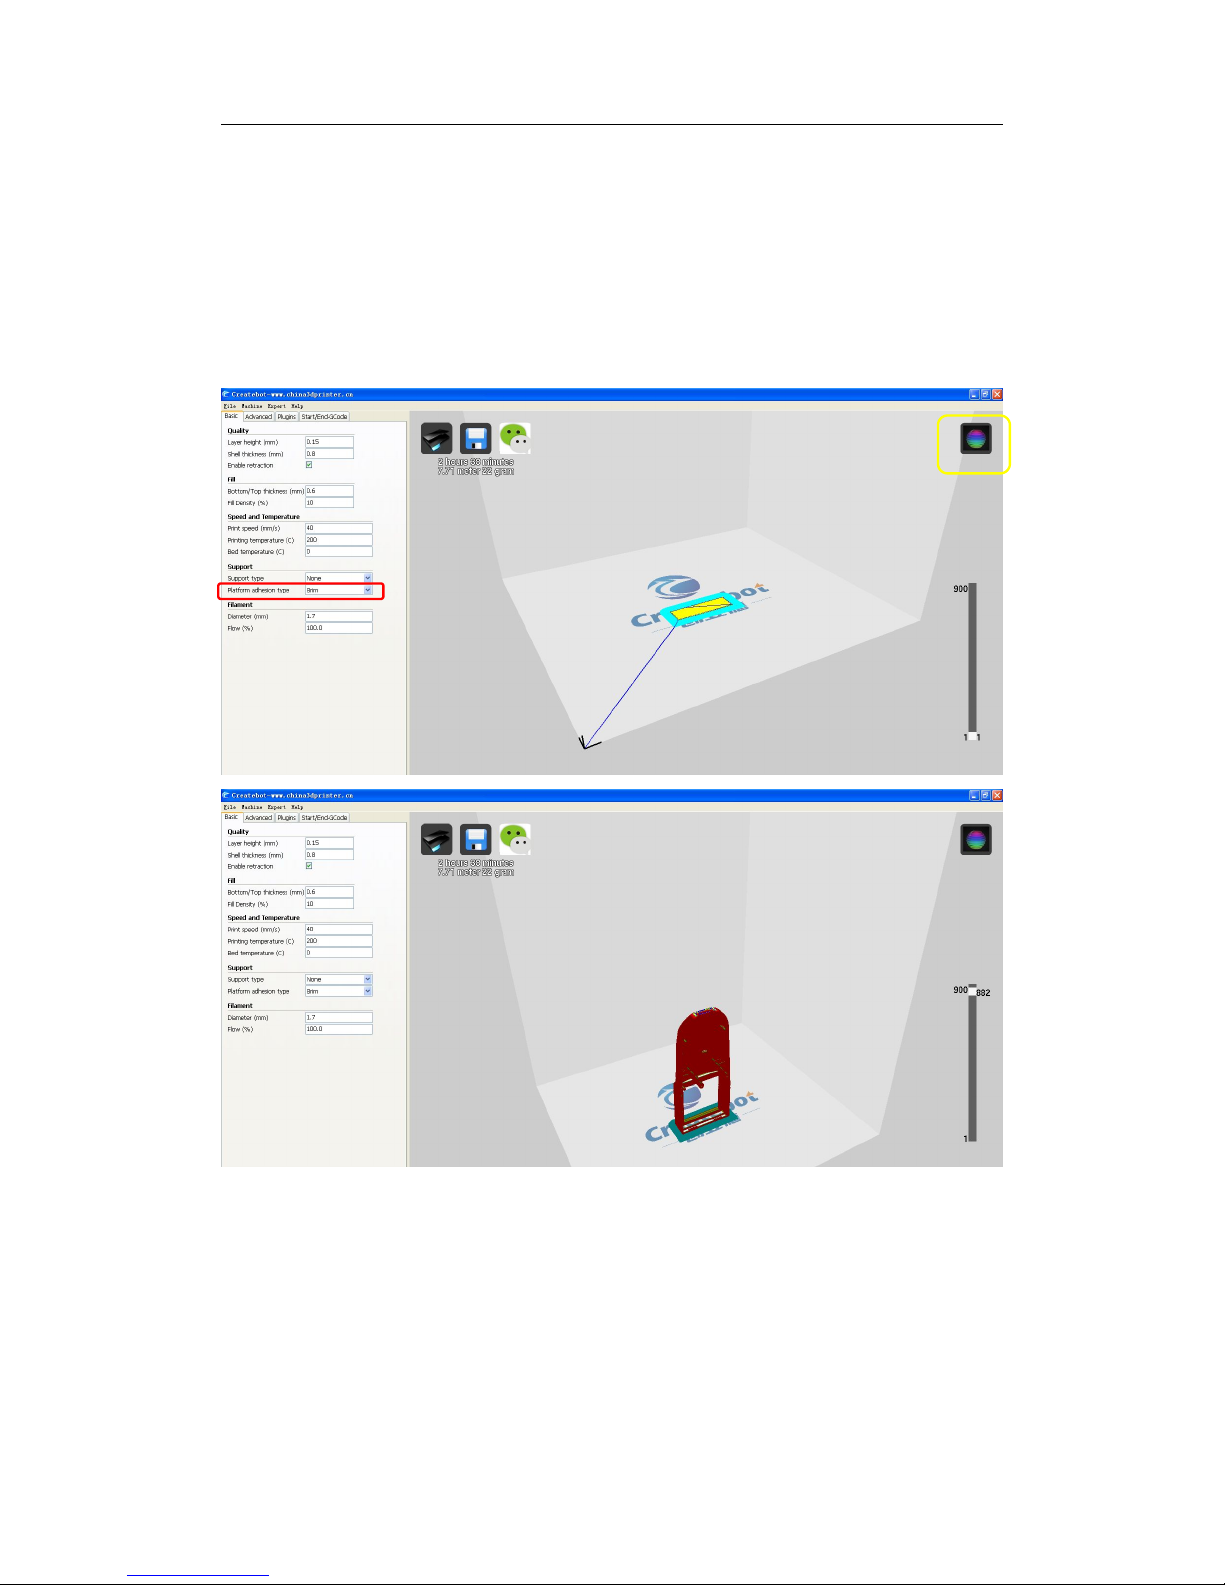
IX. Platform Adhesion
Platform adhesion: brim
1. Choose “Platform adhesion type” → “Brim” (in red box) → choose “View
mode” → choose “Layers” (in yellow box) to view all printing path.
(Attention: the green colored region is brim platform adhesion)
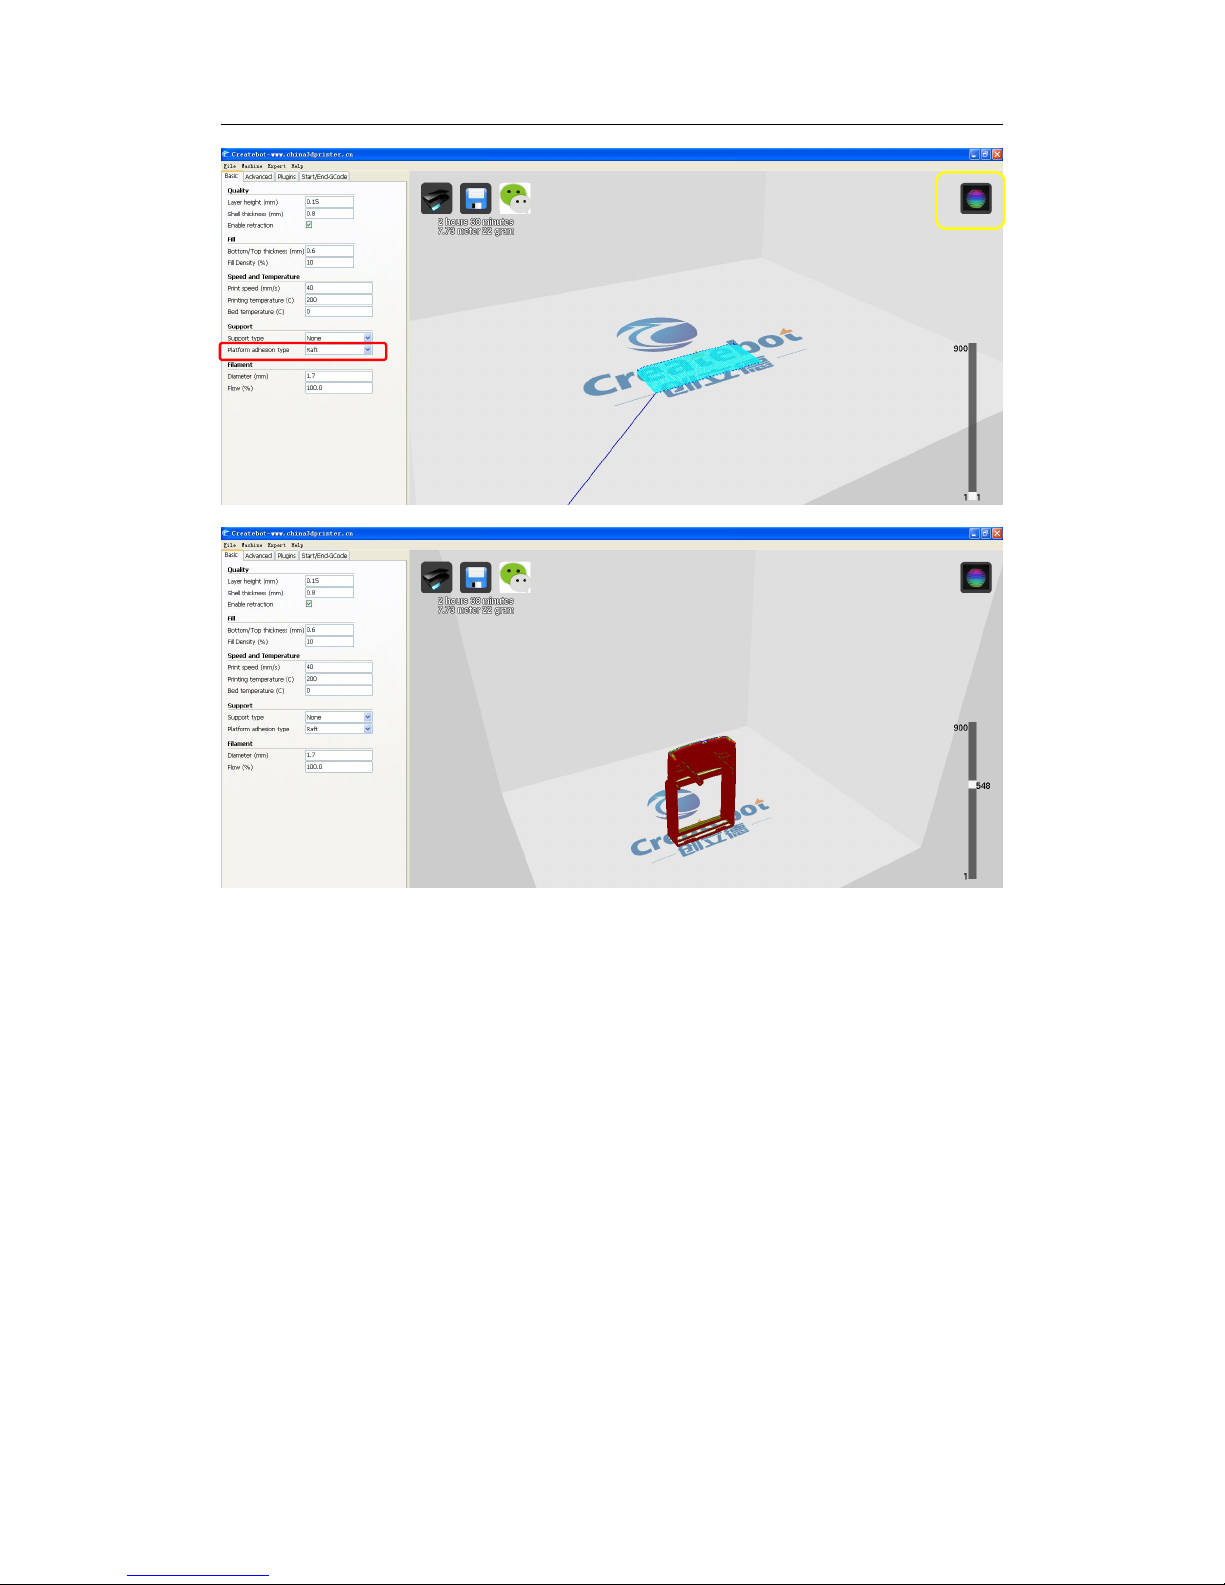
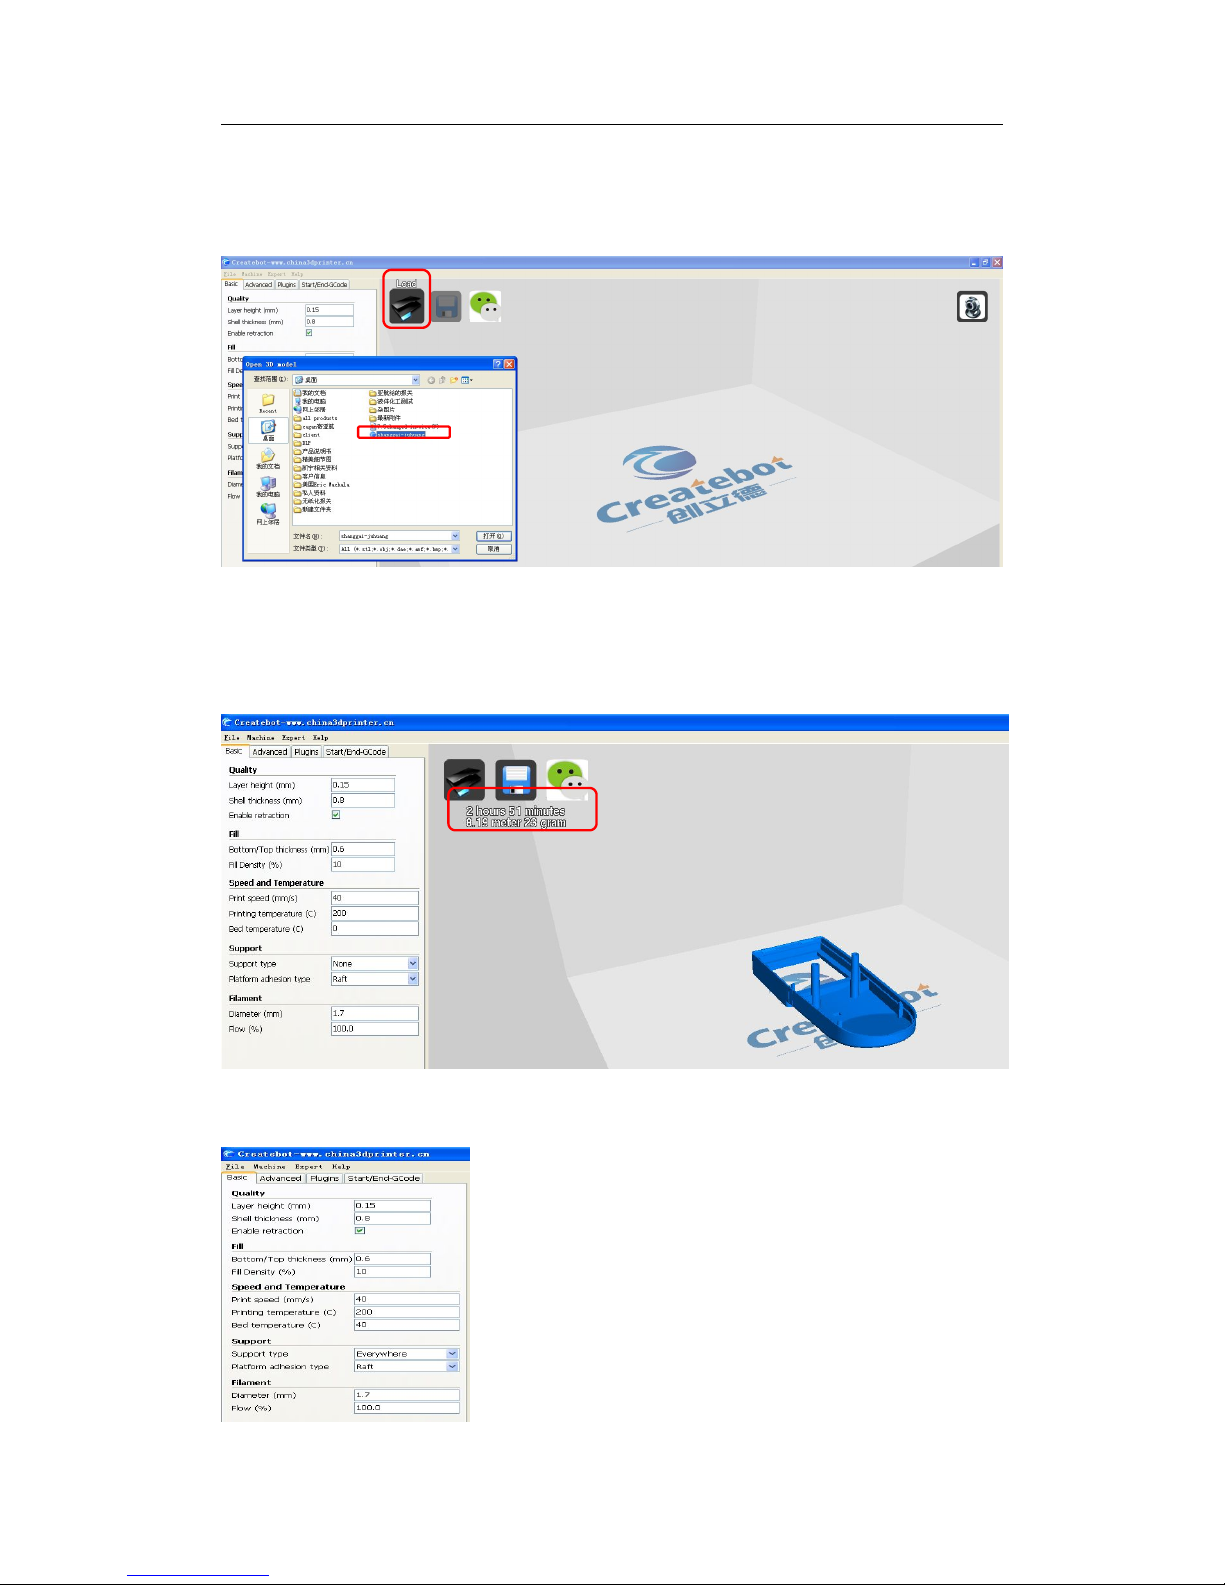
Platform adhesion: raft
1. Choose “Platform adhesion type” → “Raft” (in red box) → choose “View mode”
→choose “Layers” (in yellow box) to view all printing path.
(Attention: model is built based on the raft platform adhesion, which makes model
firm during printing)
Page 23
Thanks for your purchase of our Max 3d printers.
21
Page 24
Thanks for your purchase of our Max 3d printers.
22
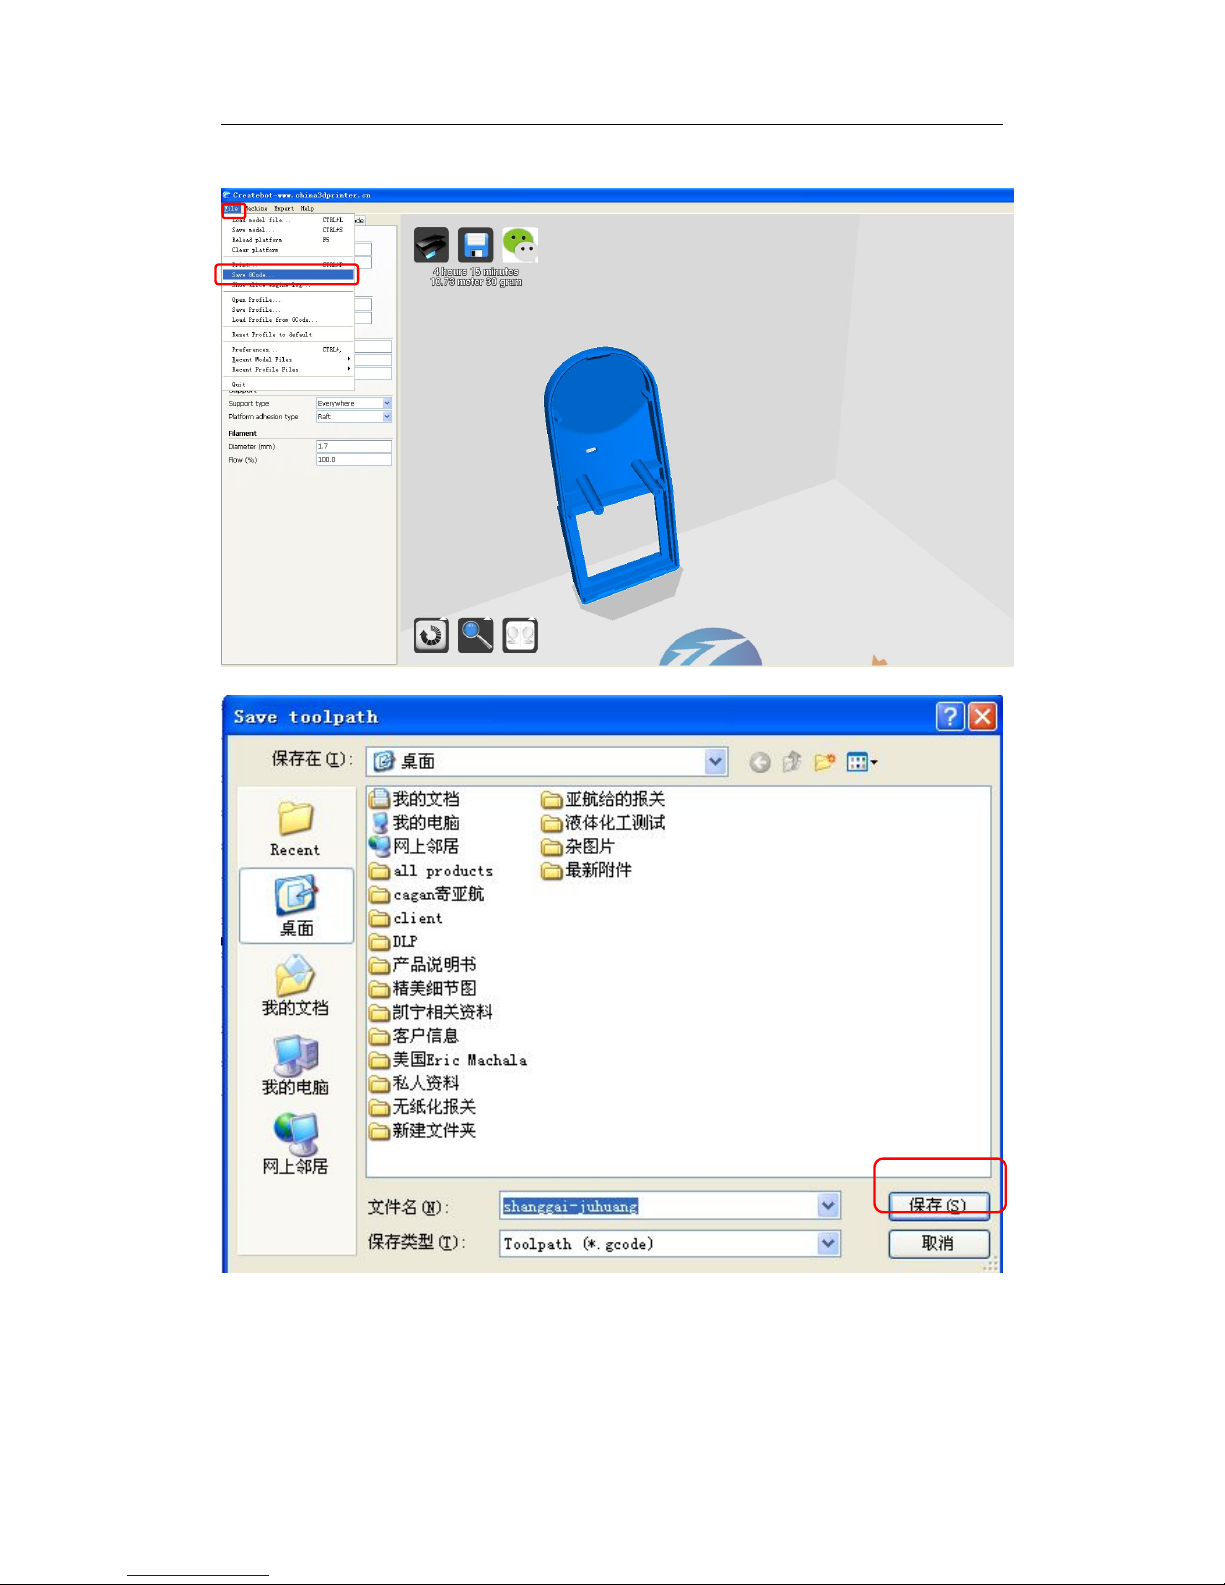
X. Offline Printing
1. Choose “Load” button (in red box)
→
import a STL. File
2. After importing the STL. File, our software will generate gcode automatically (in
red box).
3. Set parameters in red box.
Page 25
Thanks for your purchase of our Max 3d printers.
23
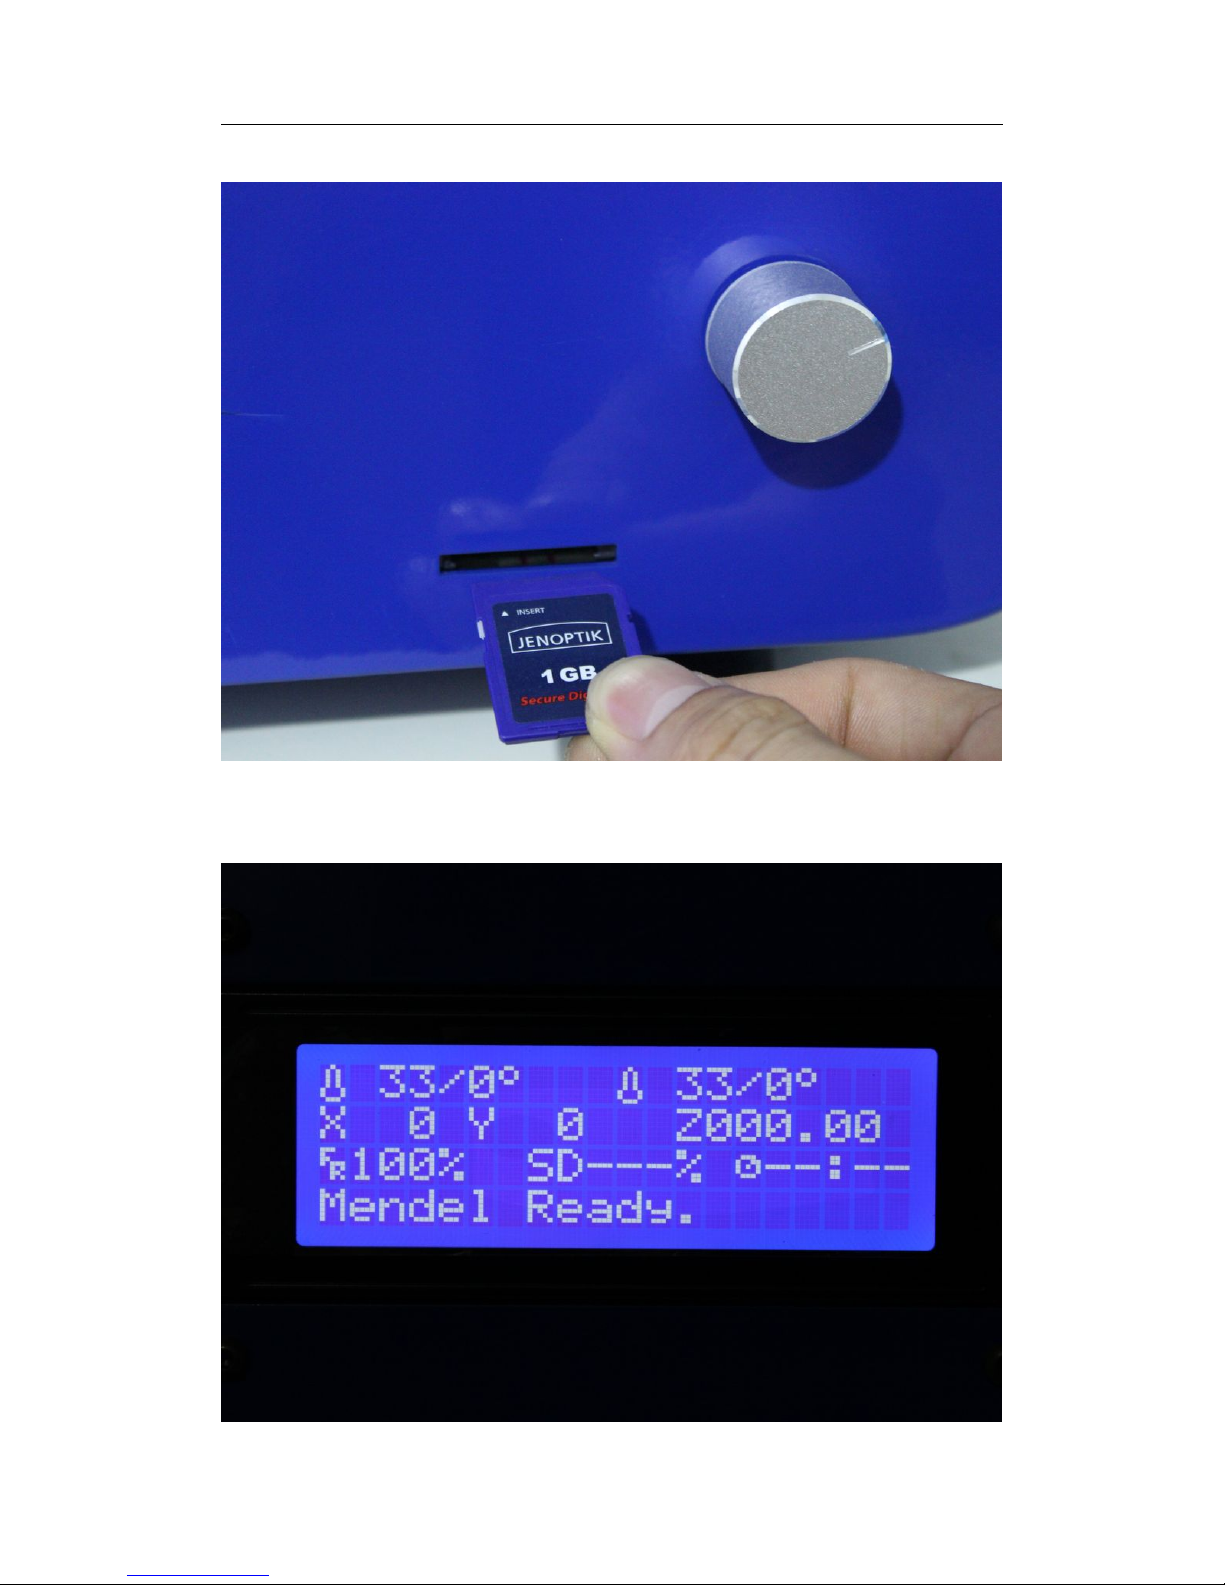
4. Choose “File”
→
“Save GCode...” (in red box)
→
Choose “Save”
Page 26
Thanks for your purchase of our Max 3d printers.
24
5. Copy this file into SD card
→
Insert SD card into 3d printer slot
6. Turn on the printer. The LCD screen will show as follows:
Page 27
Thanks for your purchase of our Max 3d printers.
25
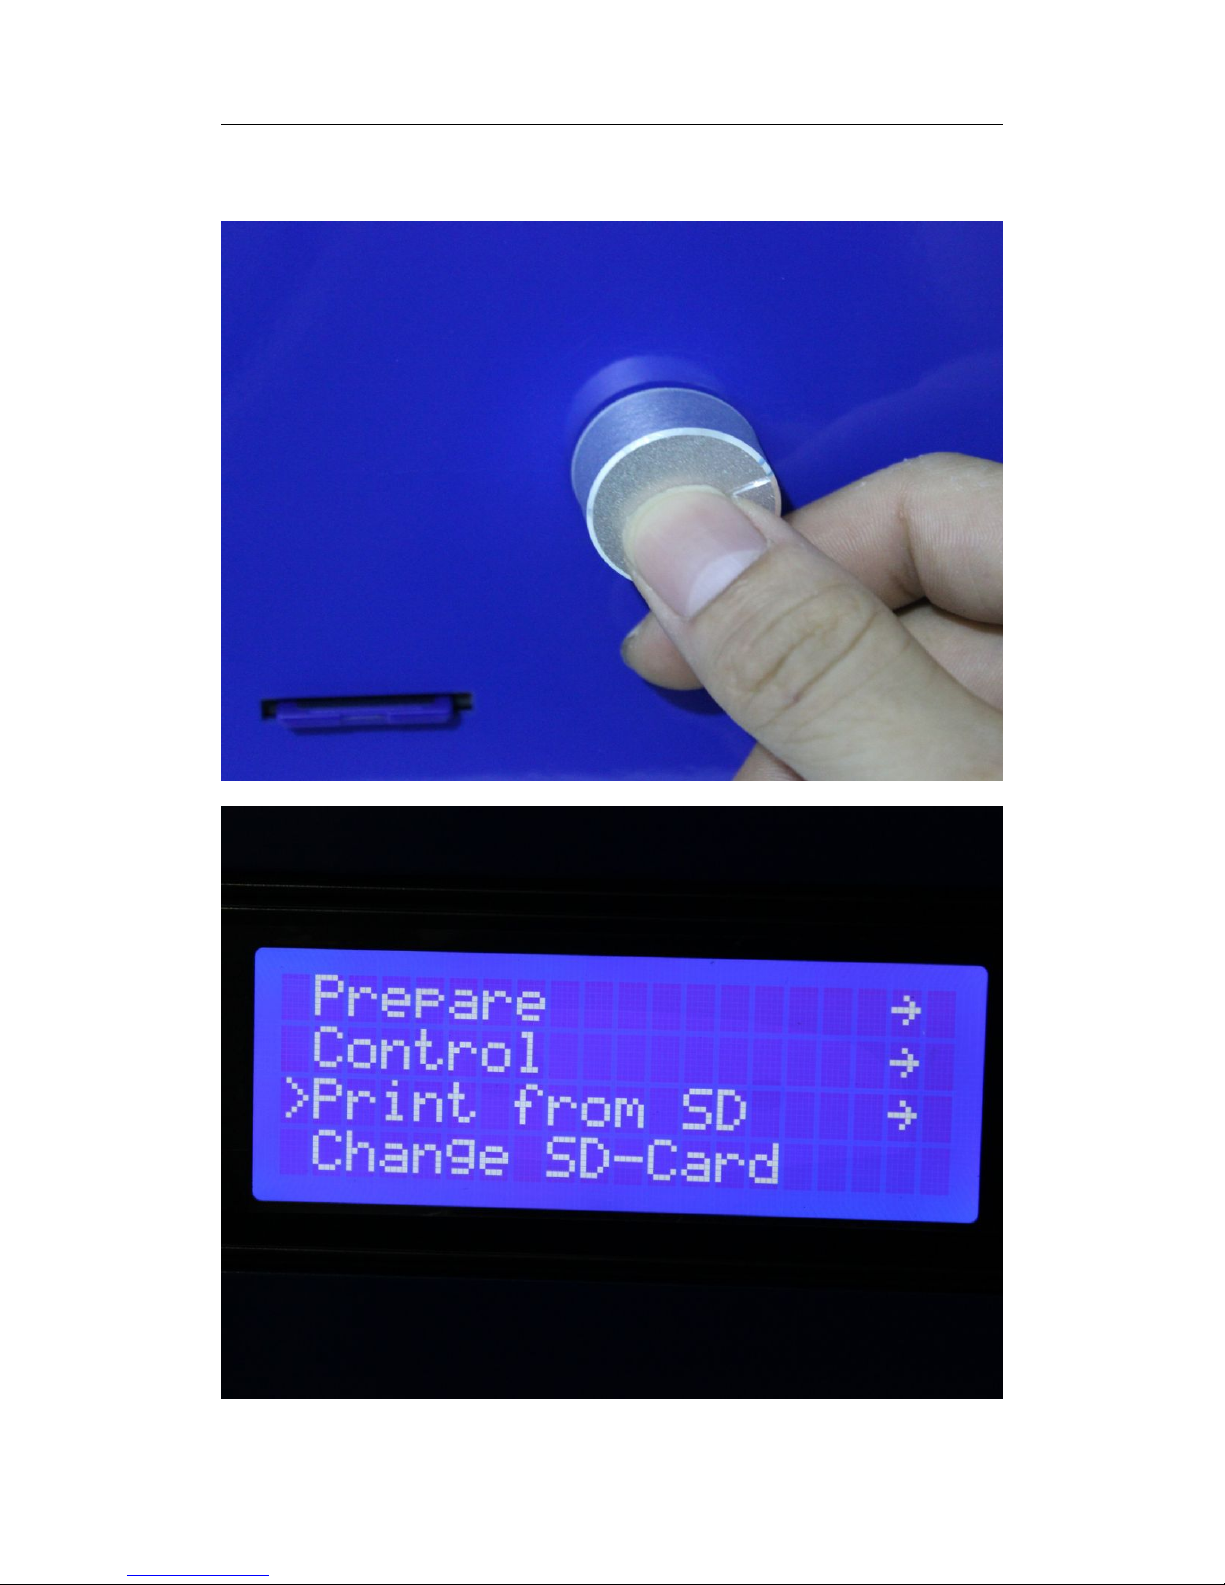
7. Press the button
→
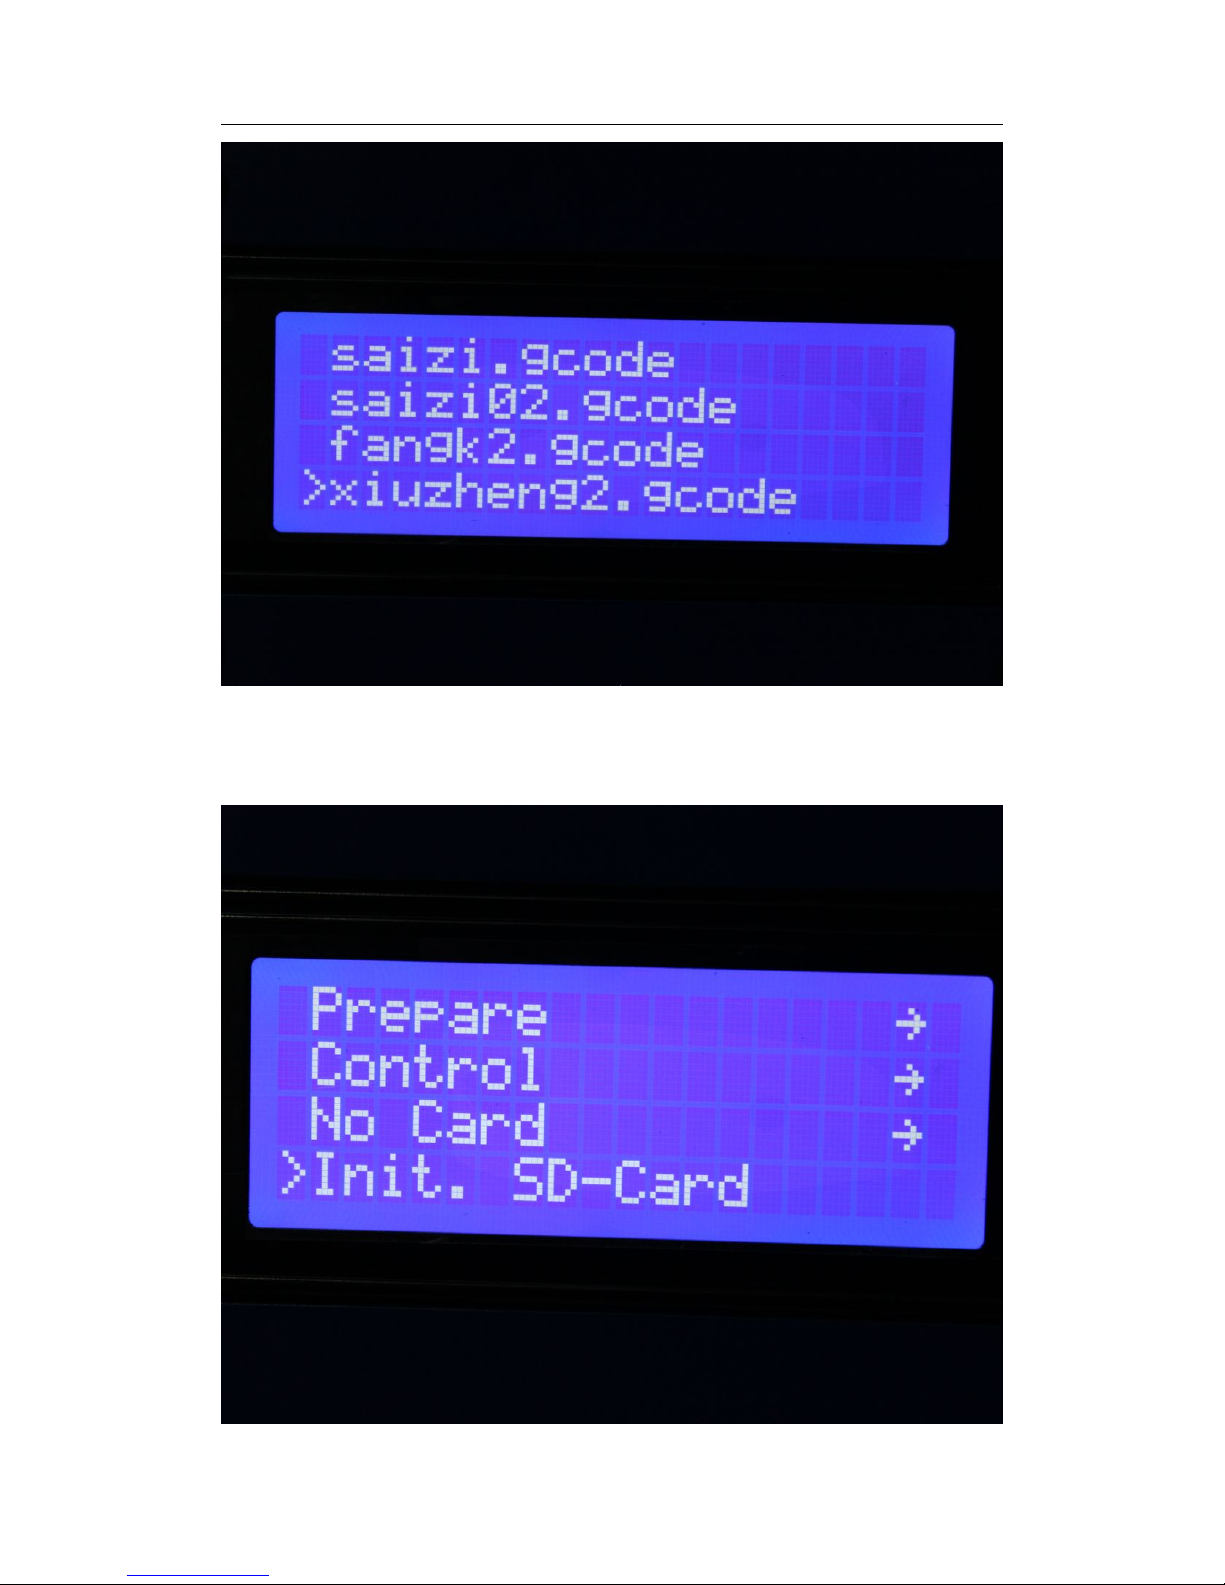
Rotate button and choose “Print from SD”
→
Choose file
you want to print.
Page 28
Thanks for your purchase of our Max 3d printers.
26
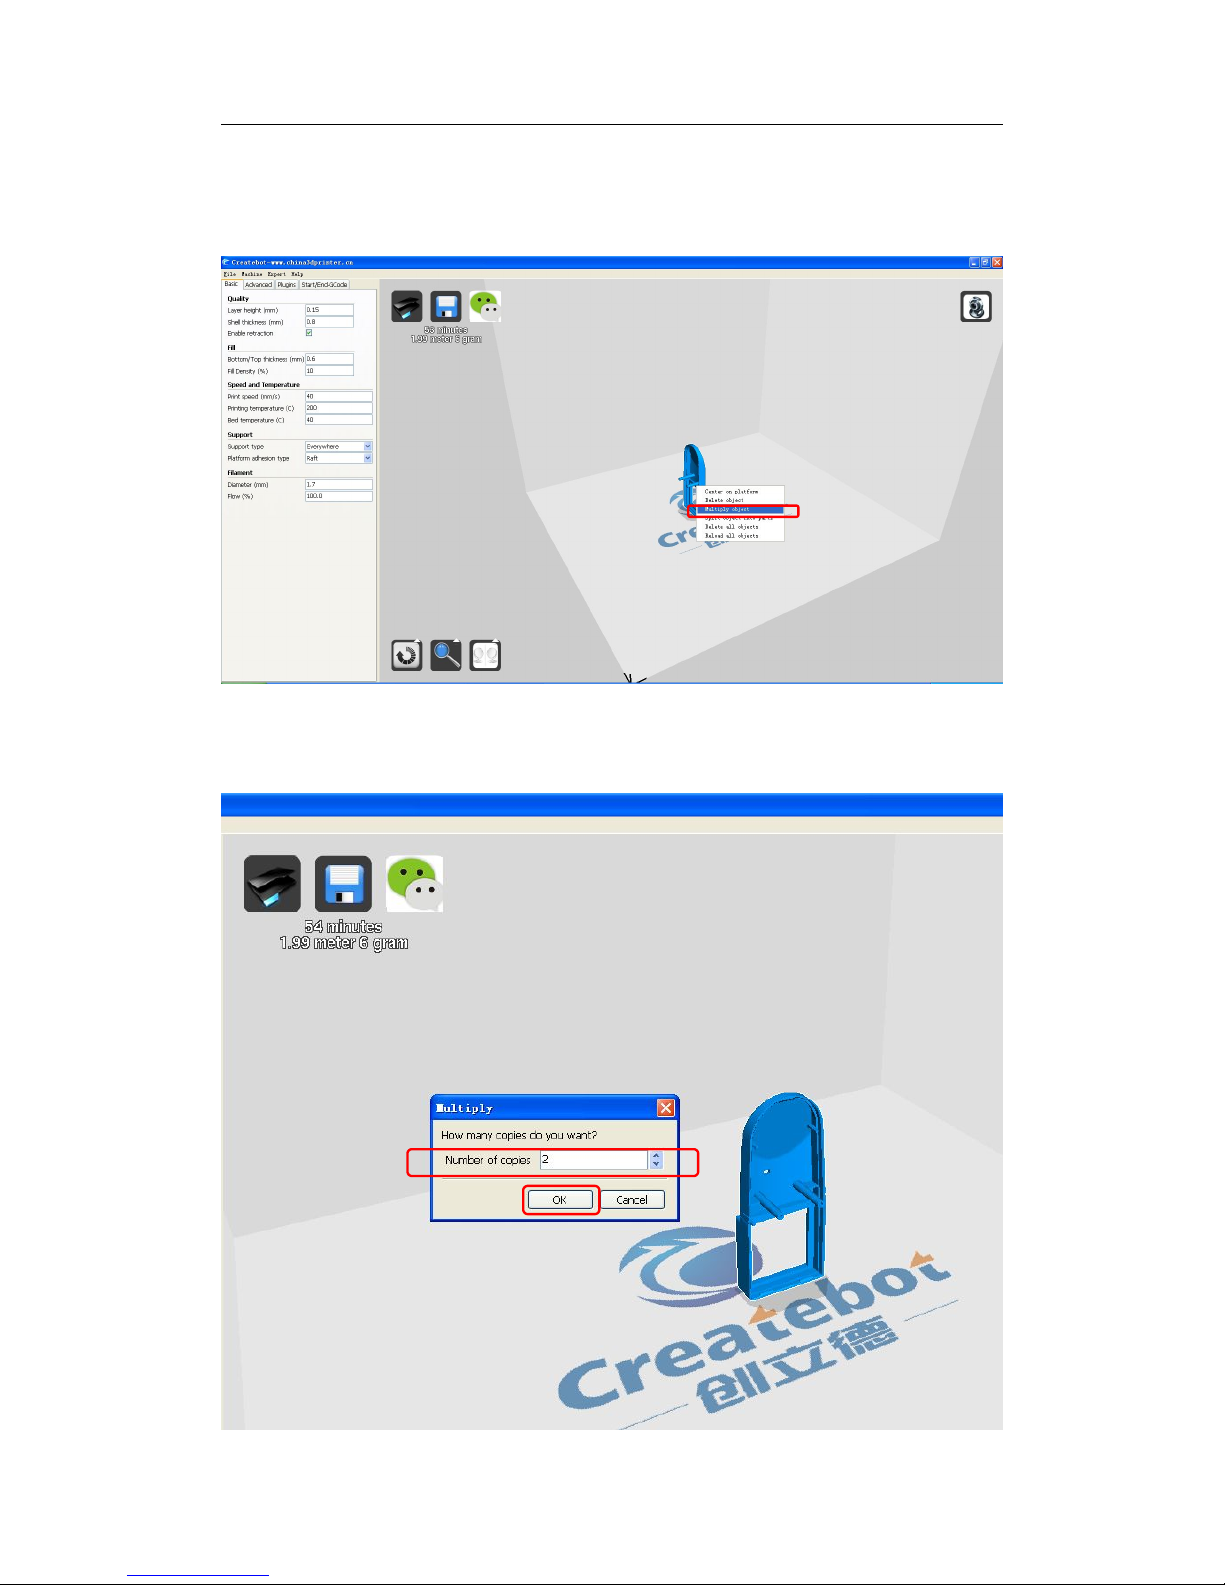
If you can’t find any gcode file on screen, please choose “Init. SD-Card”
Page 29
Thanks for your purchase of our Max 3d printers.
27
XI. Multi-Models Printing
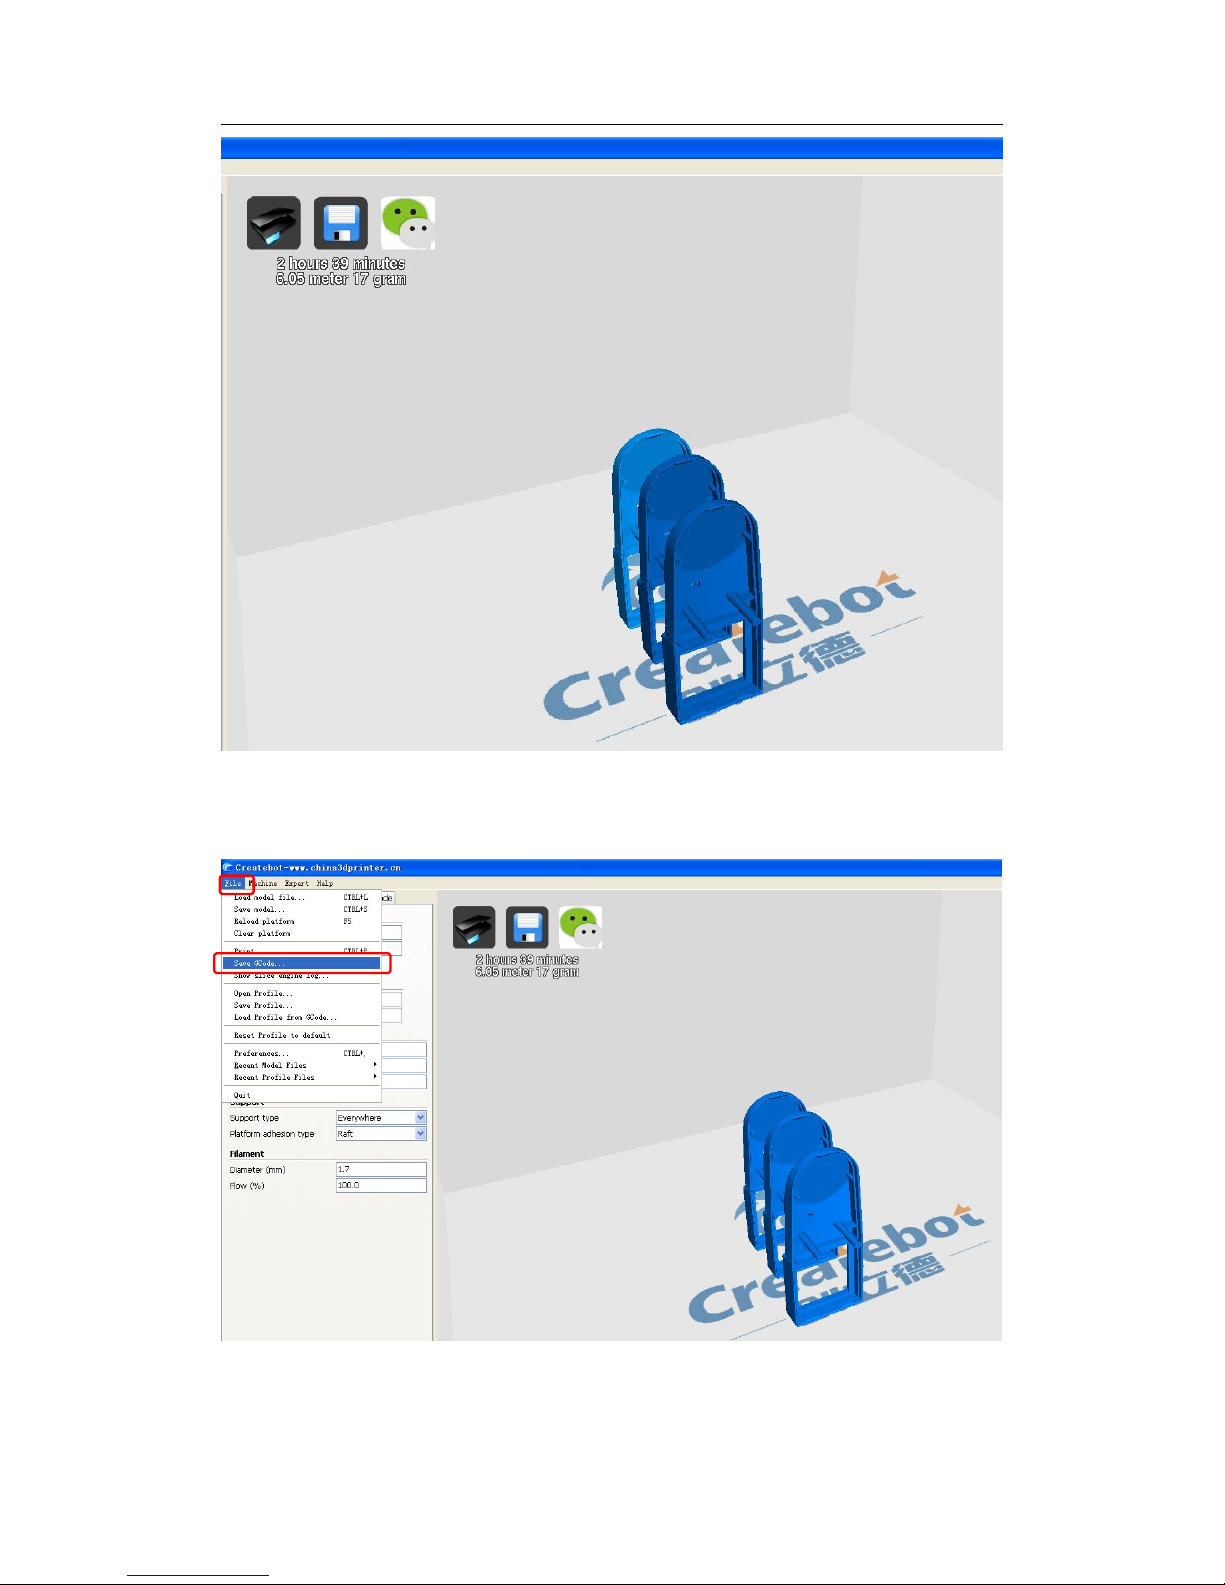
1. Import a STL file. Right-click model
→
Choose “Multiply object”
2. Input the copy model quantity you want in red box
→
Choose “OK” button
Page 30
Thanks for your purchase of our Max 3d printers.
28
3. Choose “File” → “Save GCode...” (in red box) → Choose “Save”
Page 31
Thanks for your purchase of our Max 3d printers.
29
XII. Dual-Color Printing
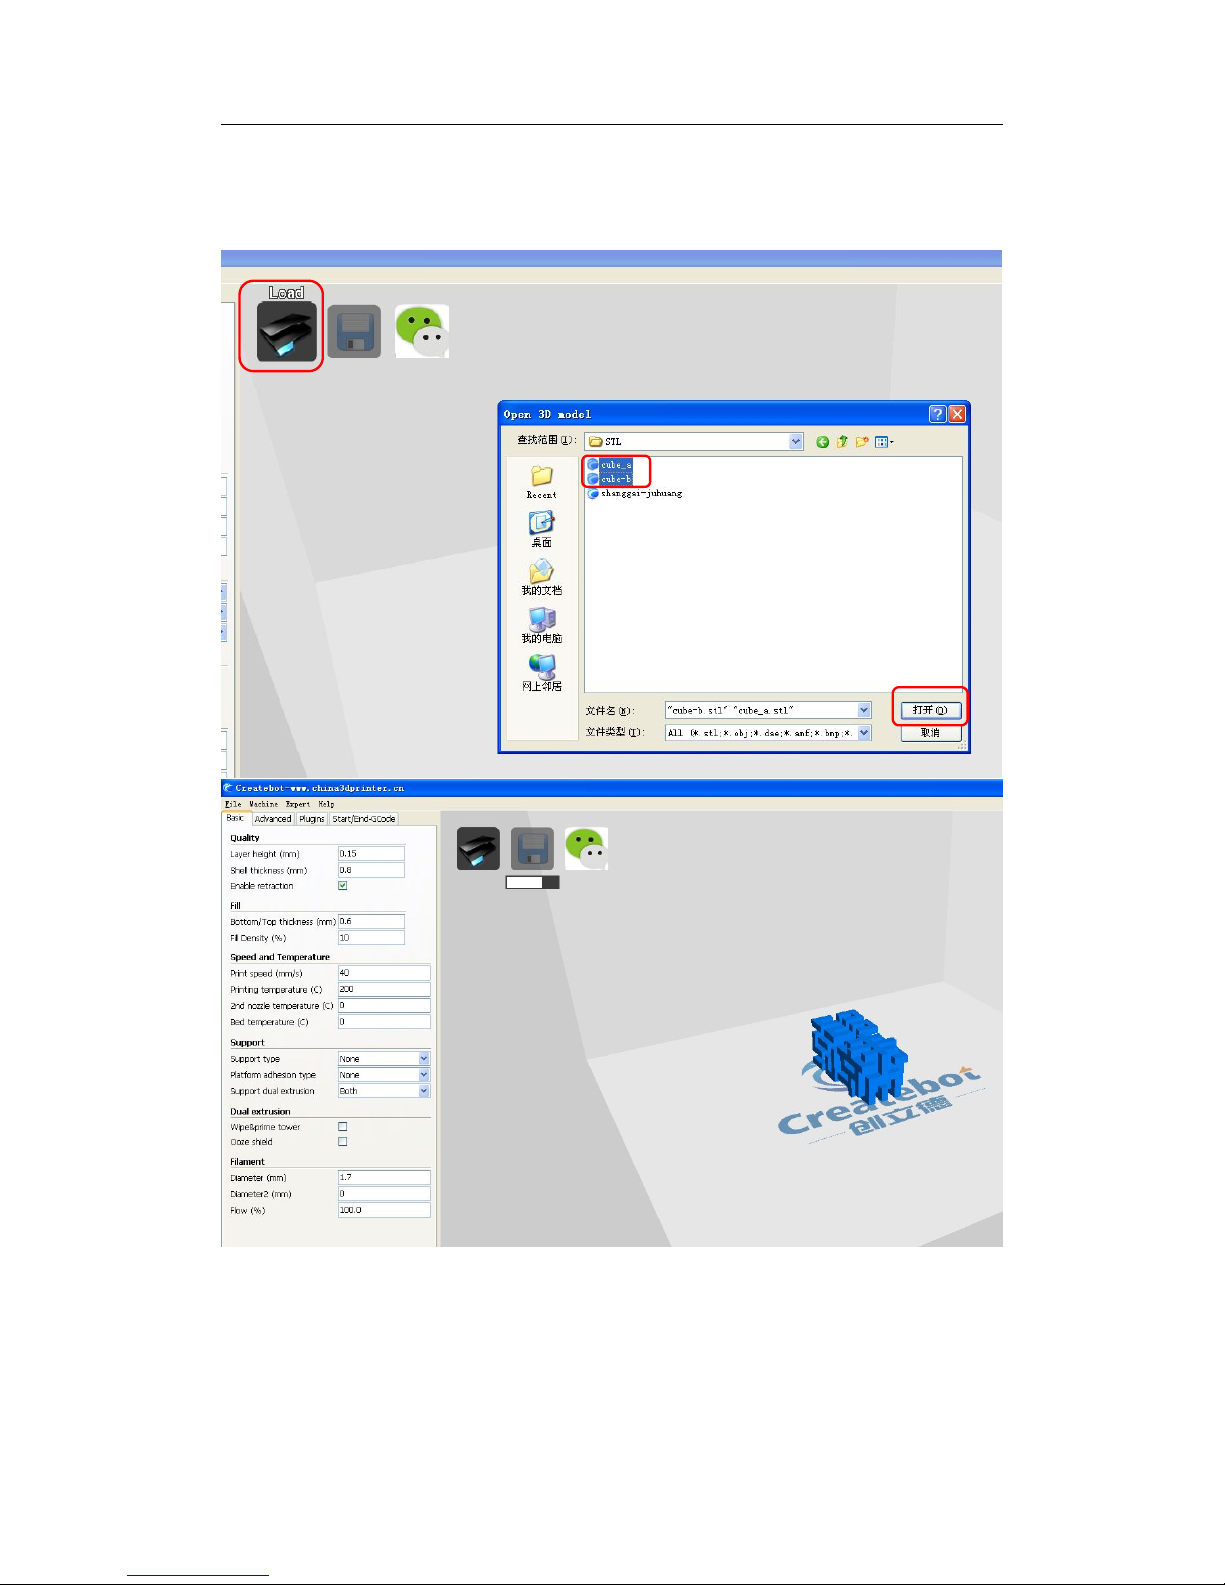
1. Import two files (ex. “cube-a” and “cube-b”)
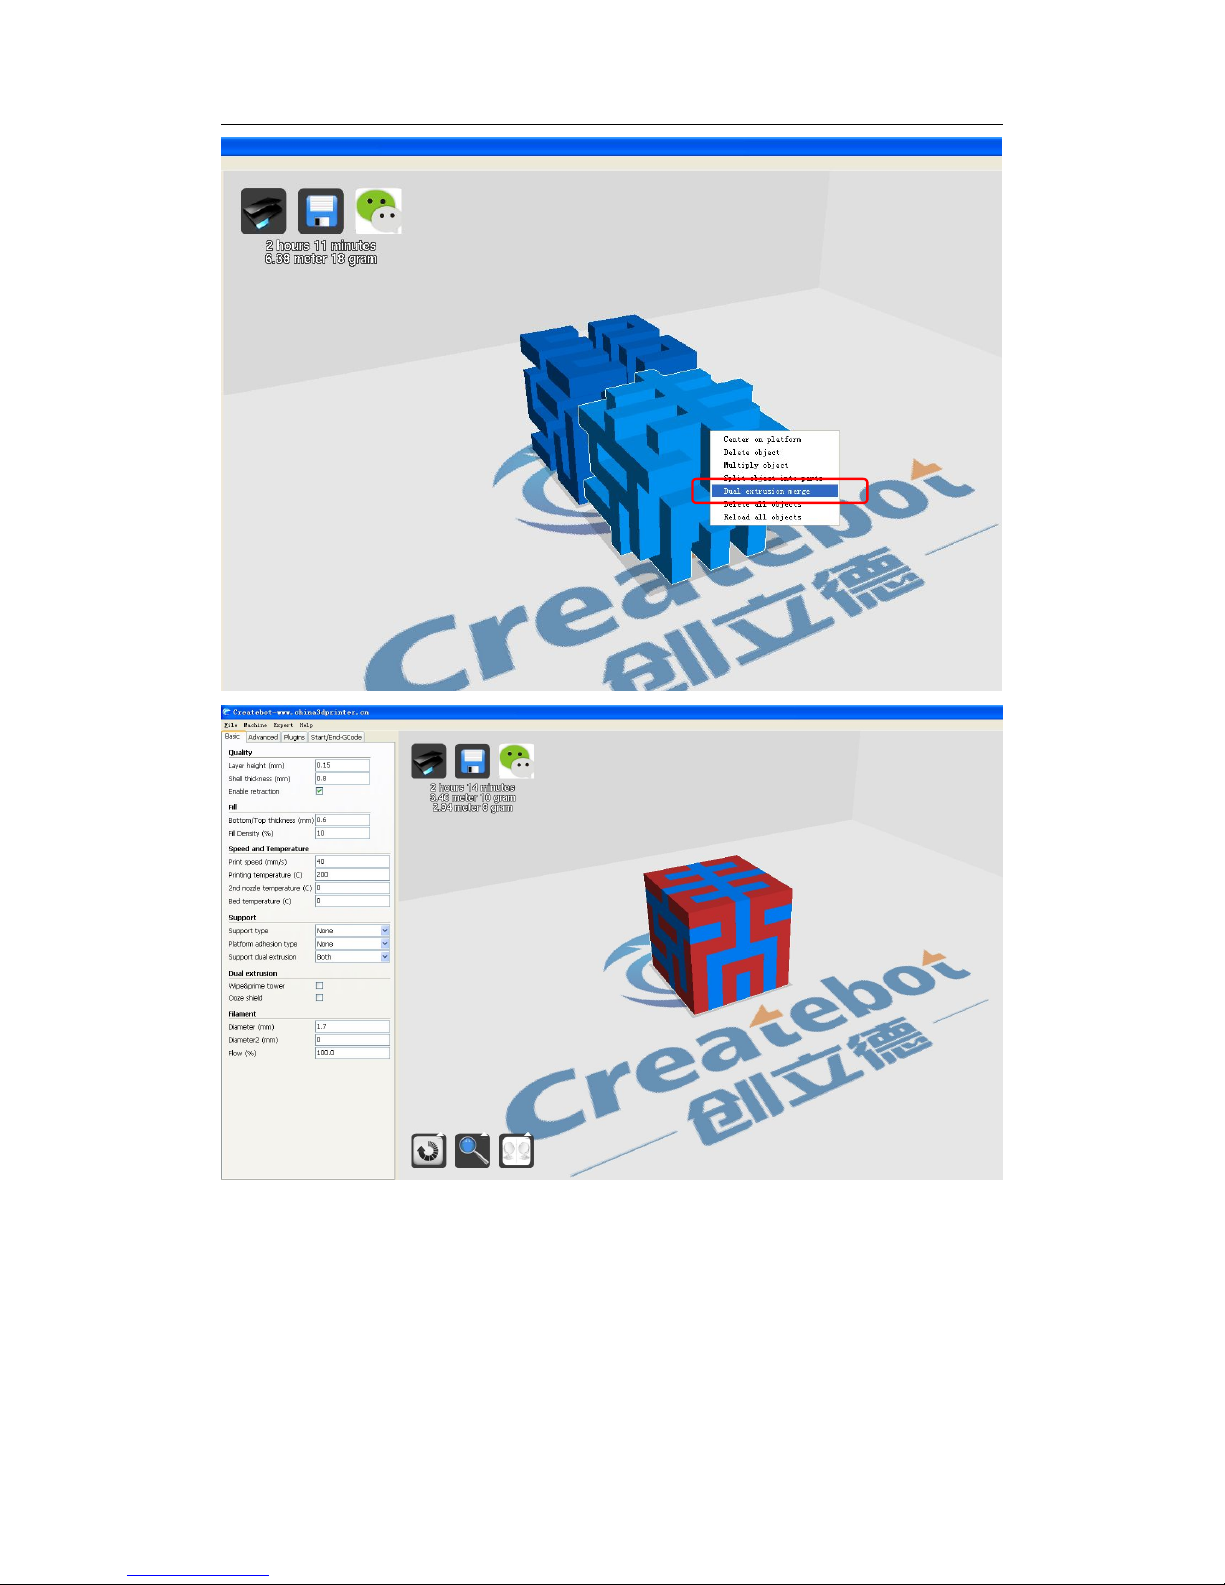
2. Right-click “cube-a” or “cube-b”
→
choose “Dual extrusion merge”
→
the
merged model as follows:
Page 32
Thanks for your purchase of our Max 3d printers.
30
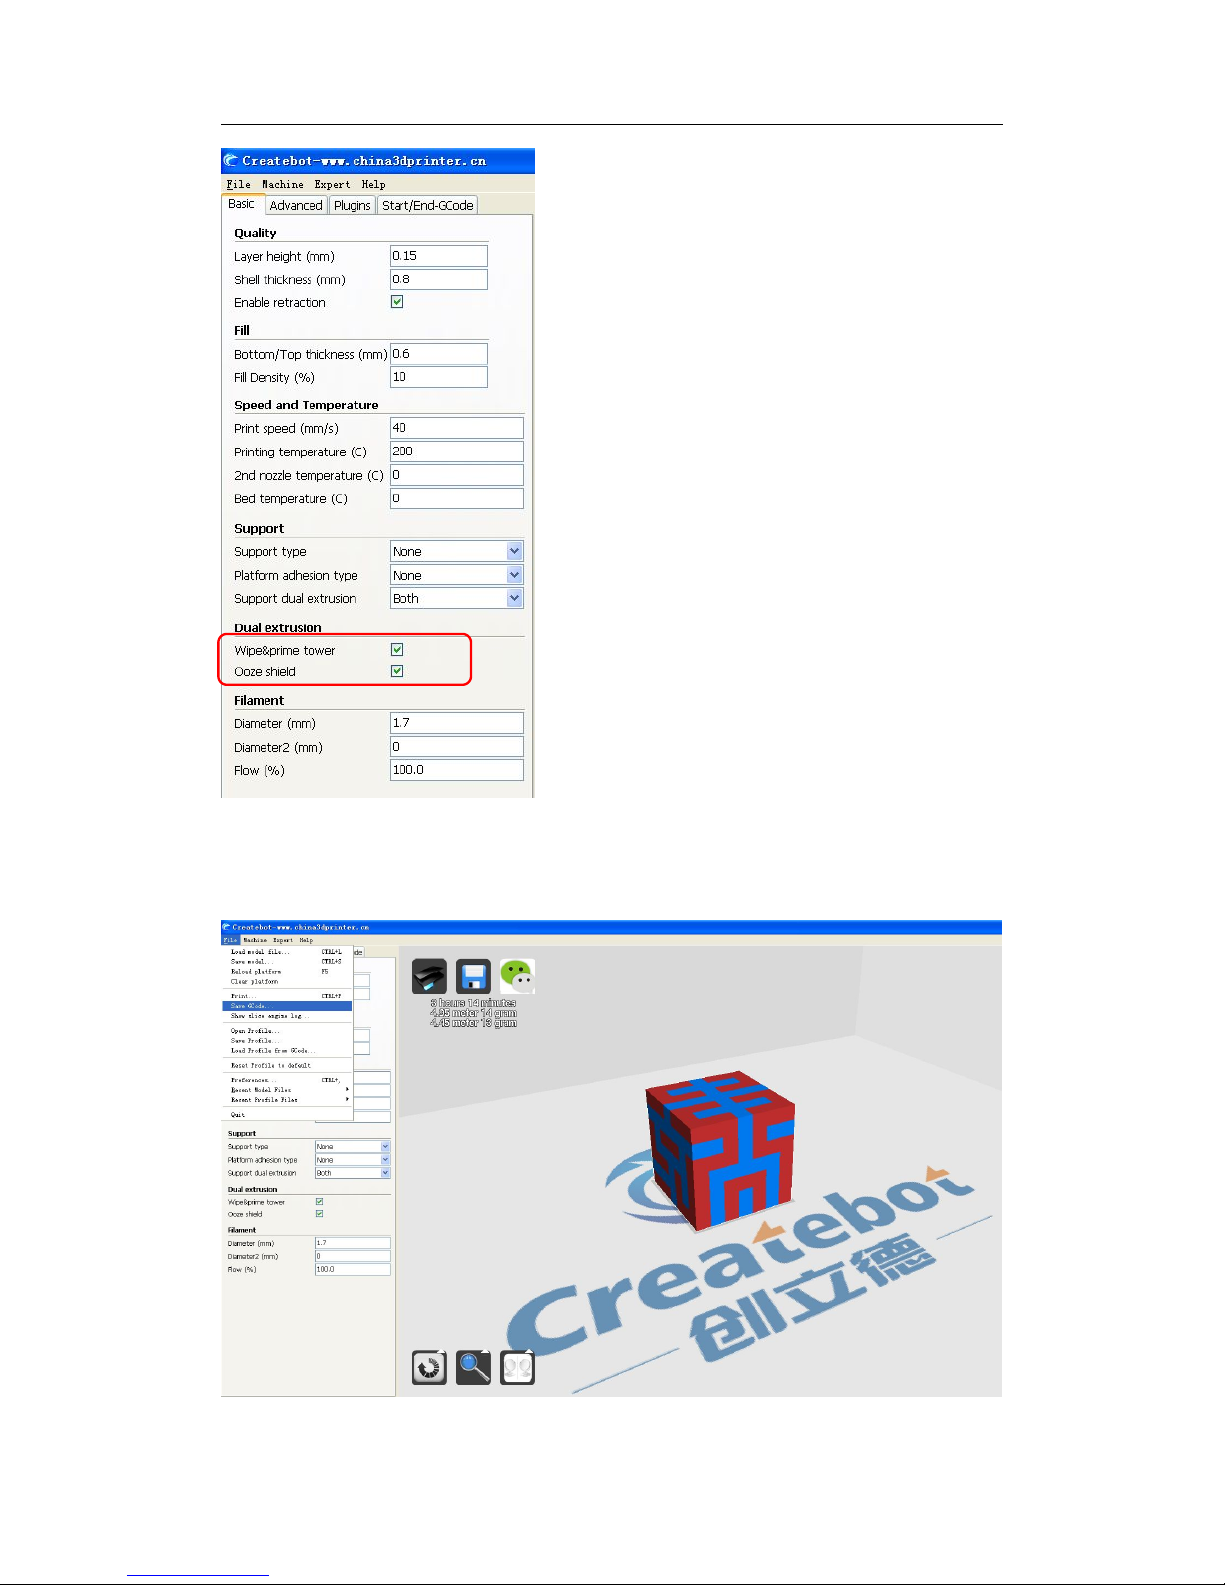
3. Please choose “Wipe&prime tower” and “Ooze shield” (in the red box)
Page 33
Thanks for your purchase of our Max 3d printers.
31
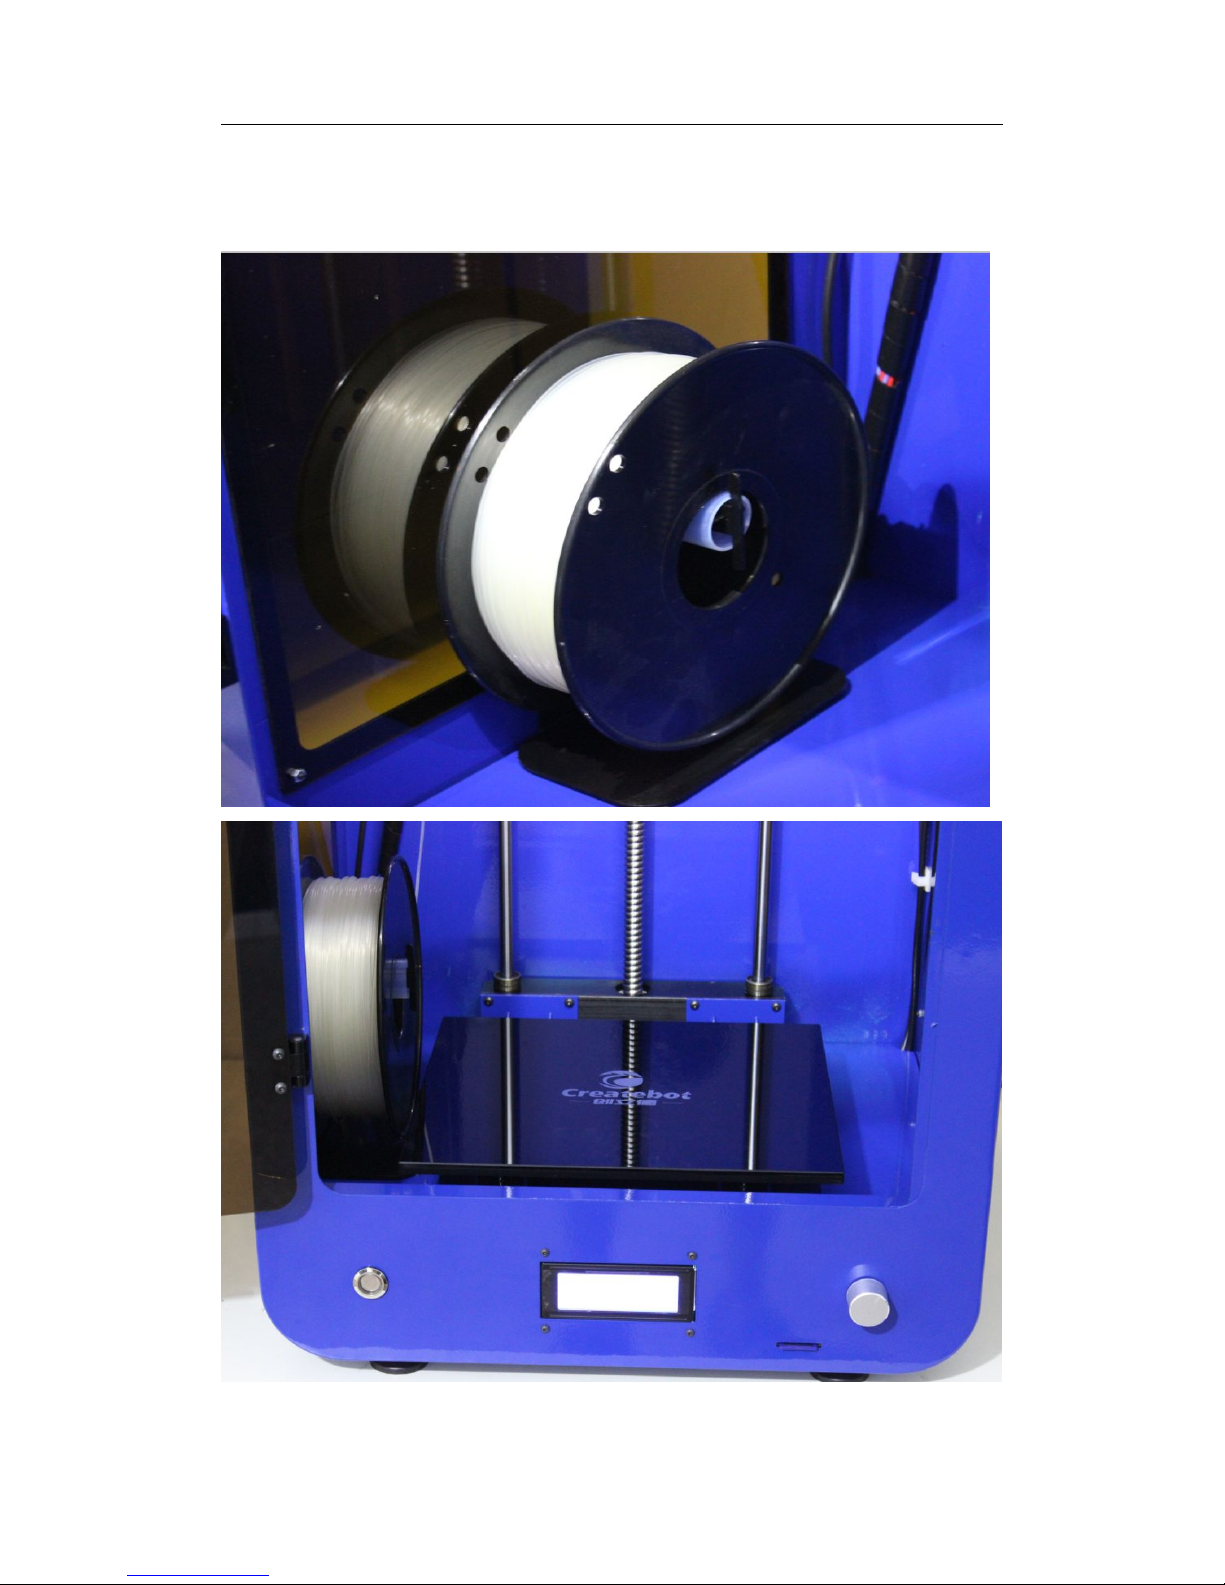
4. Choose “File” → choose “Save Gcode...”
Page 34
Thanks for your purchase of our Max 3d printers.
32
XIII. Filament Installation
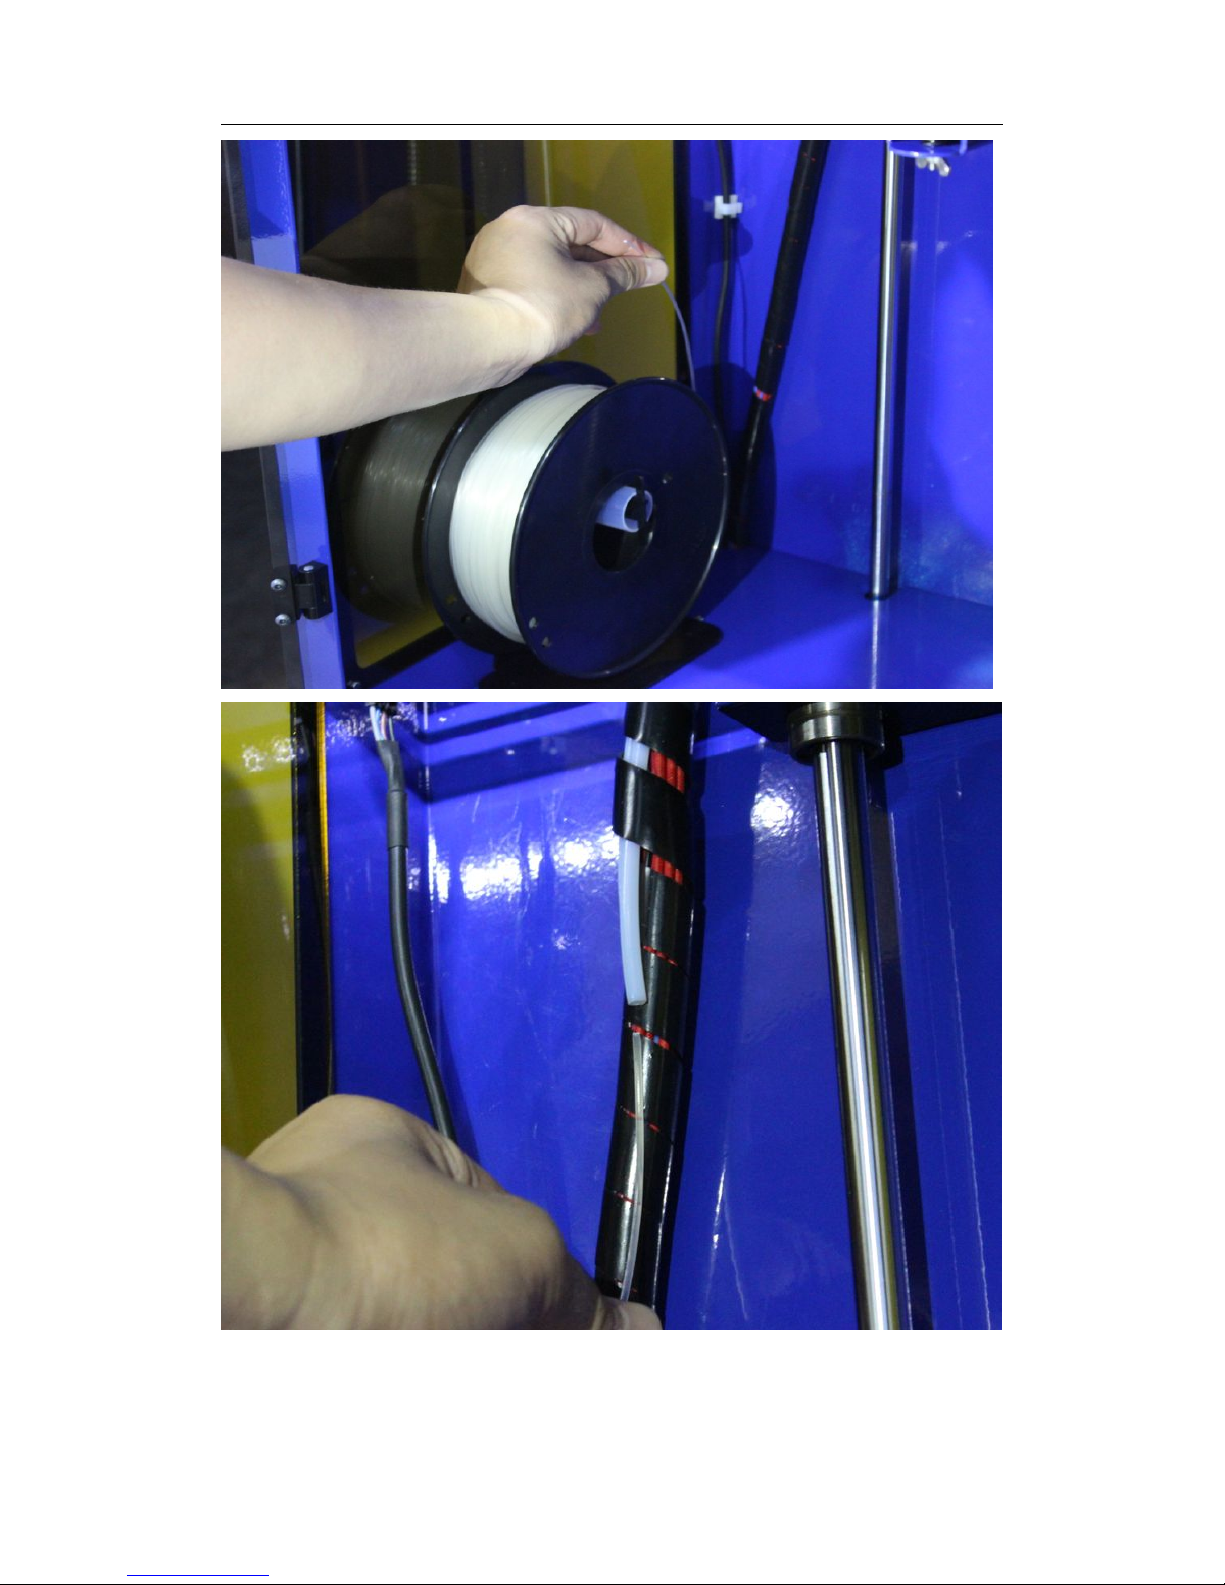
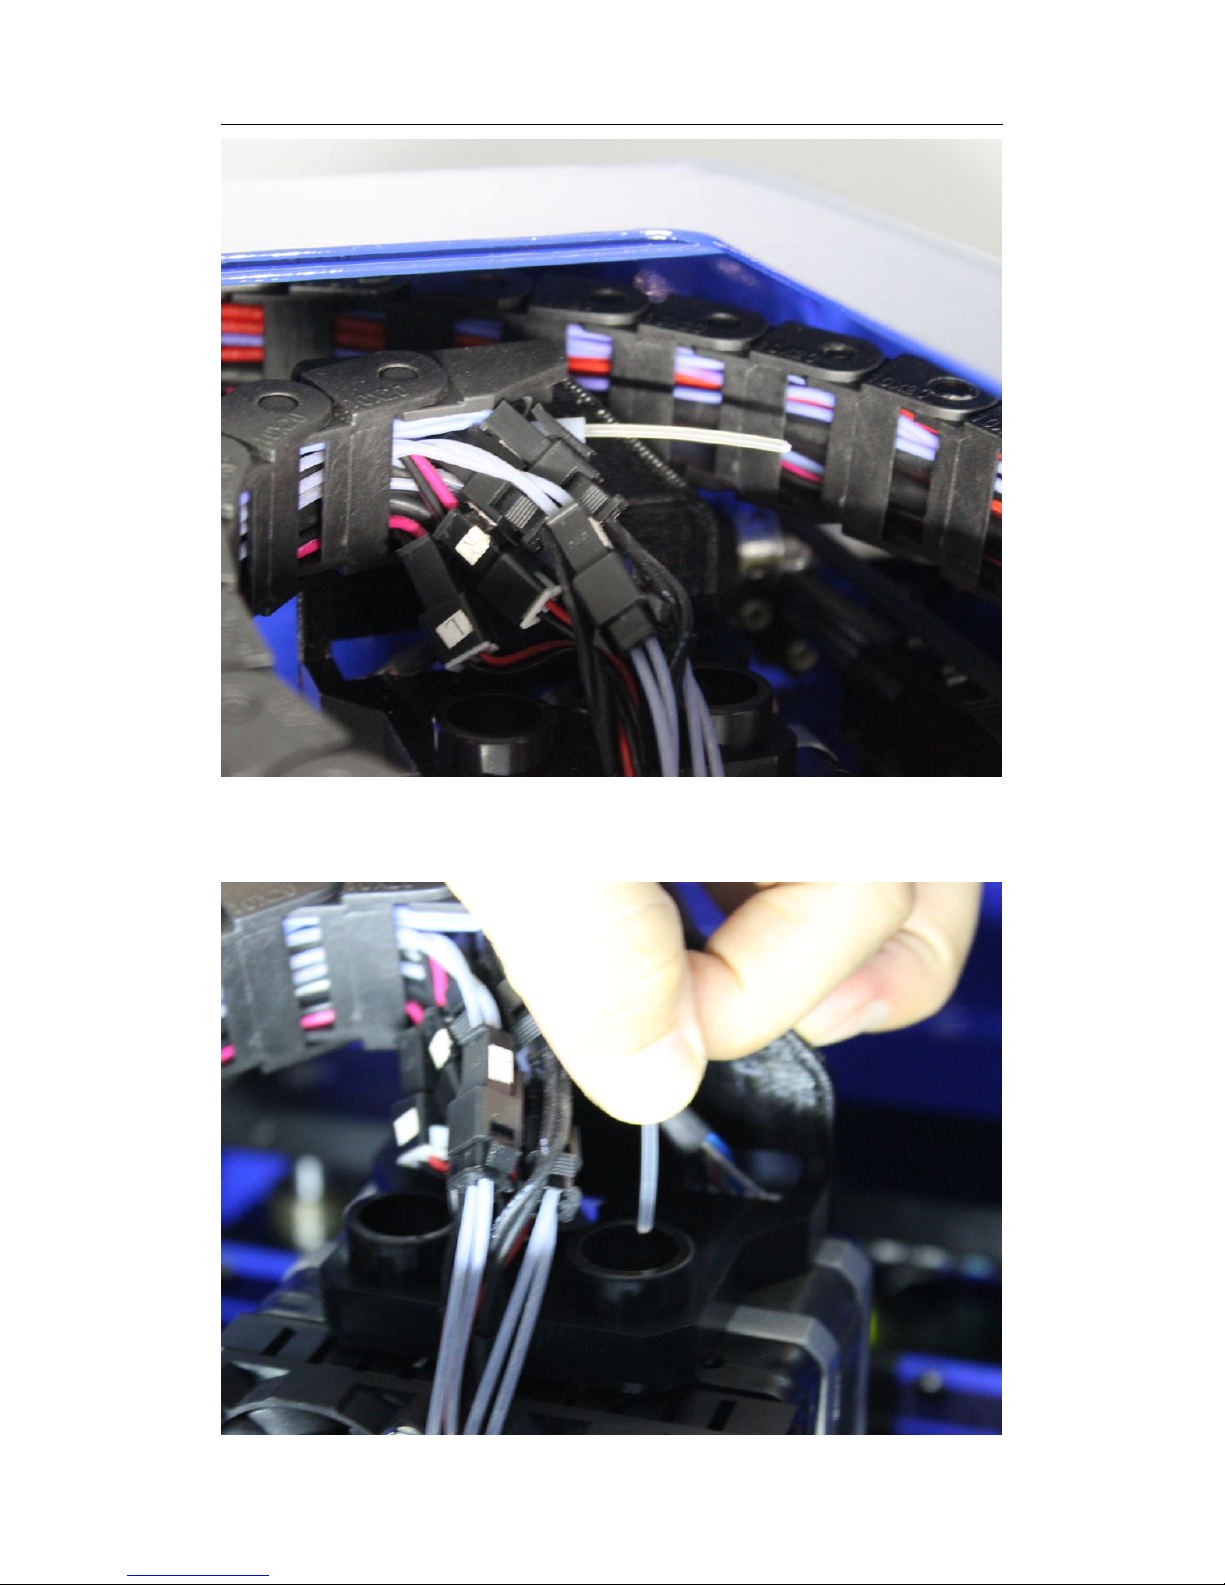
1. Install filament on the filament bracket
→
put filament into white tube
Page 35
Thanks for your purchase of our Max 3d printers.
33
Page 36
Thanks for your purchase of our Max 3d printers.
34
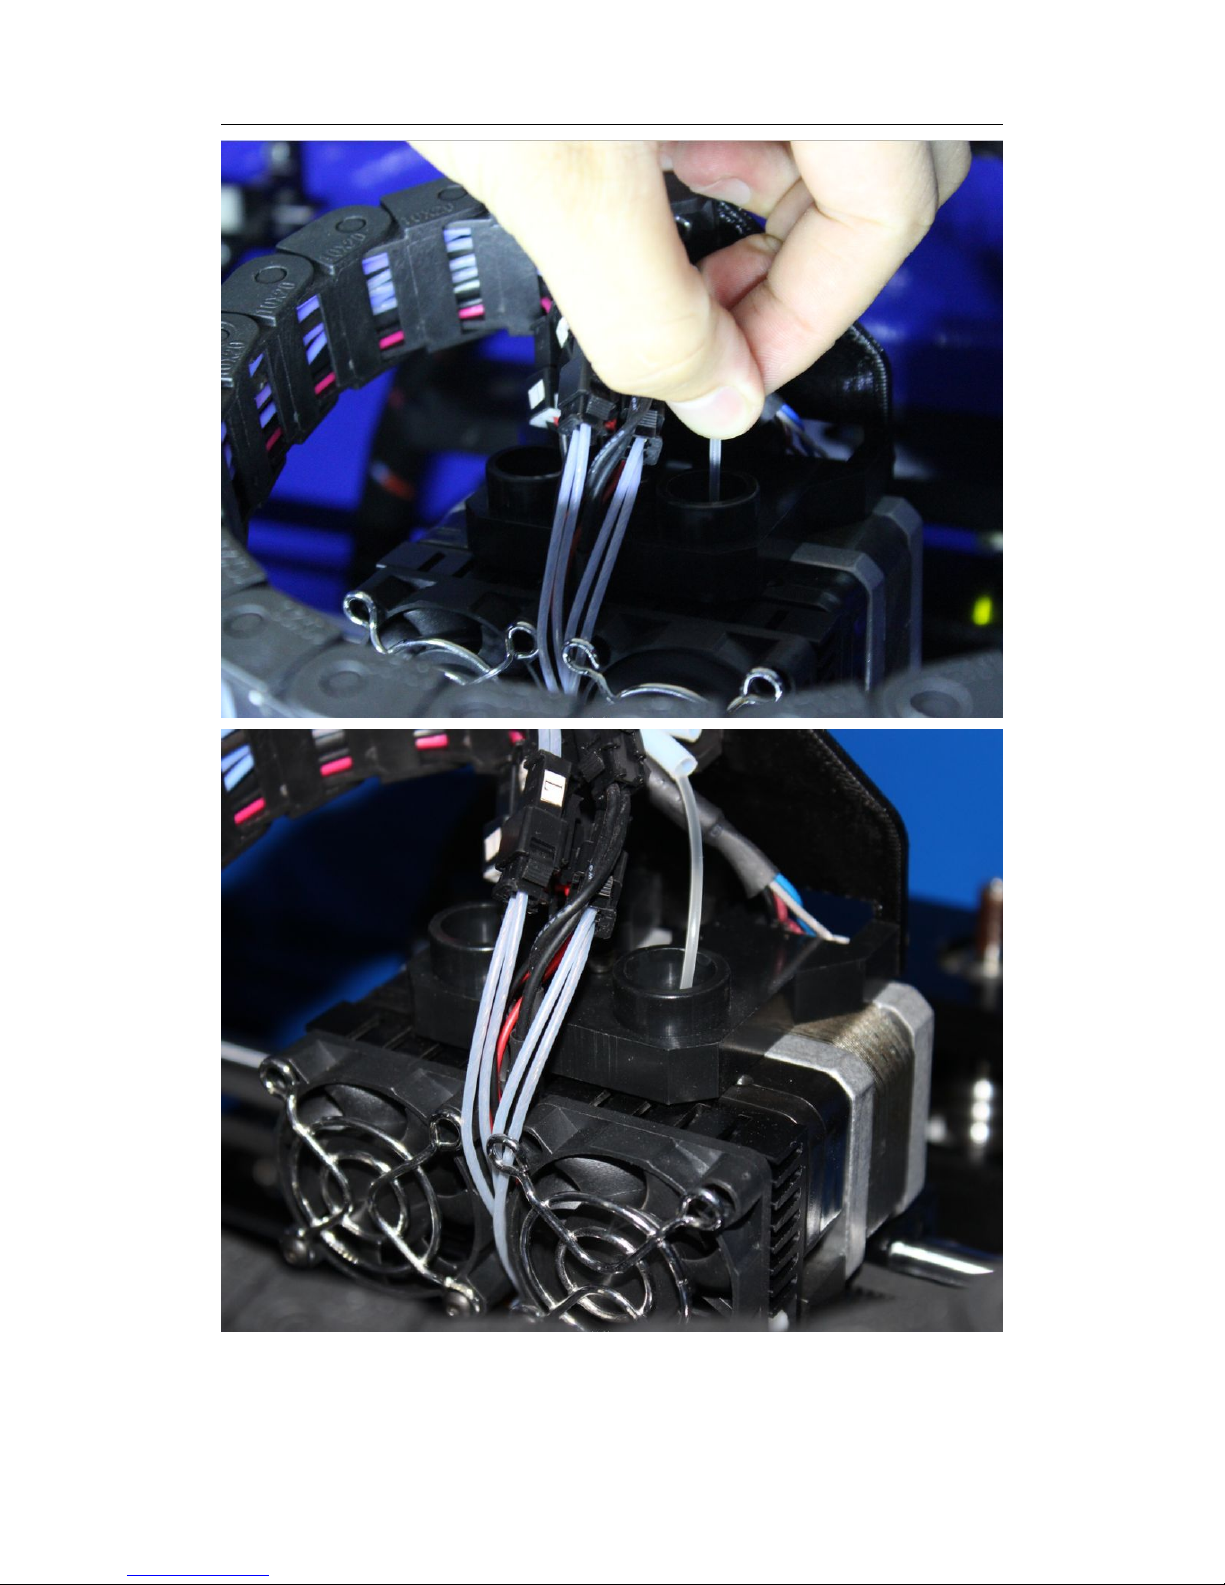
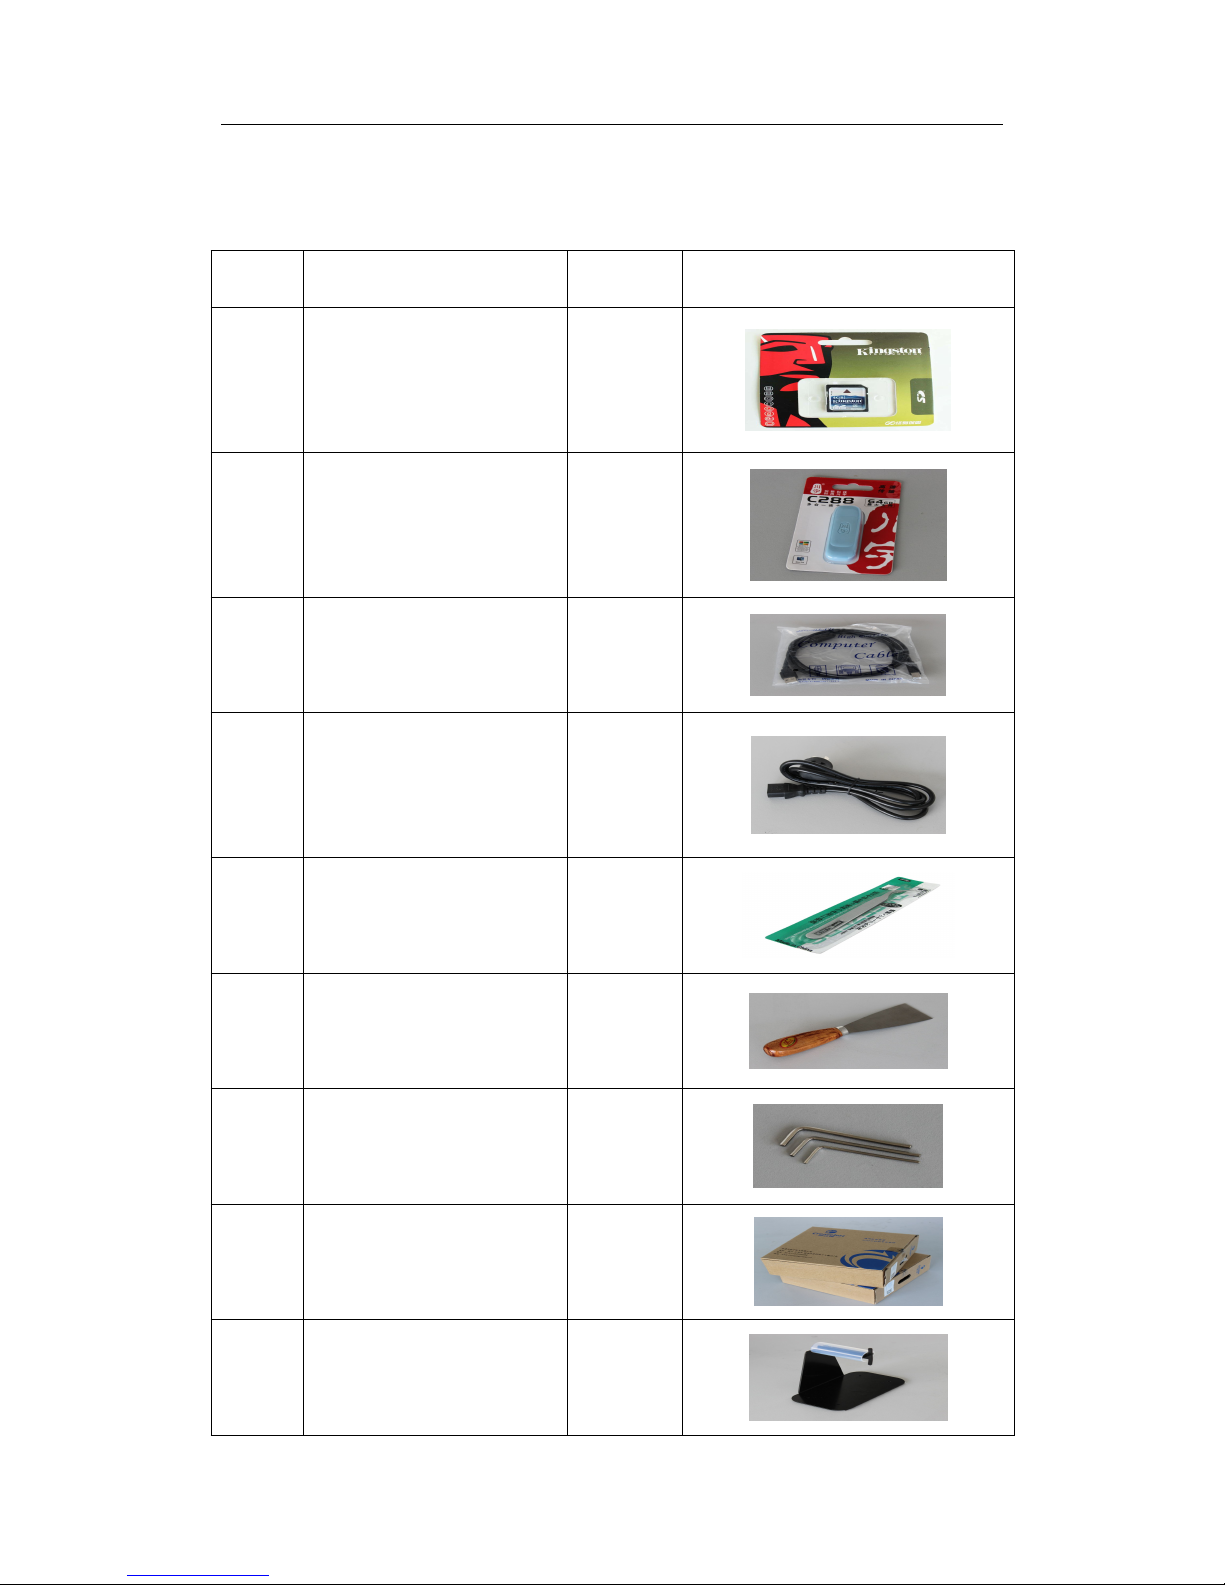
2. Put filament into the extruder hole.
Page 37
Thanks for your purchase of our Max 3d printers.
35
Page 38
Thanks for your purchase of our Max 3d printers.
36
XIV. Machine Operation
1. List:
No. Name Qty. Image
1 SD card 1
2 SD card reader 1
3 USB line 1
4 Power line 1
5 nipper 1
6 knife 1
7 mini lever 3
8 PLA/ABS filament 2
9 filament bracket 2
Page 39
Thanks for your purchase of our Max 3d printers.
37
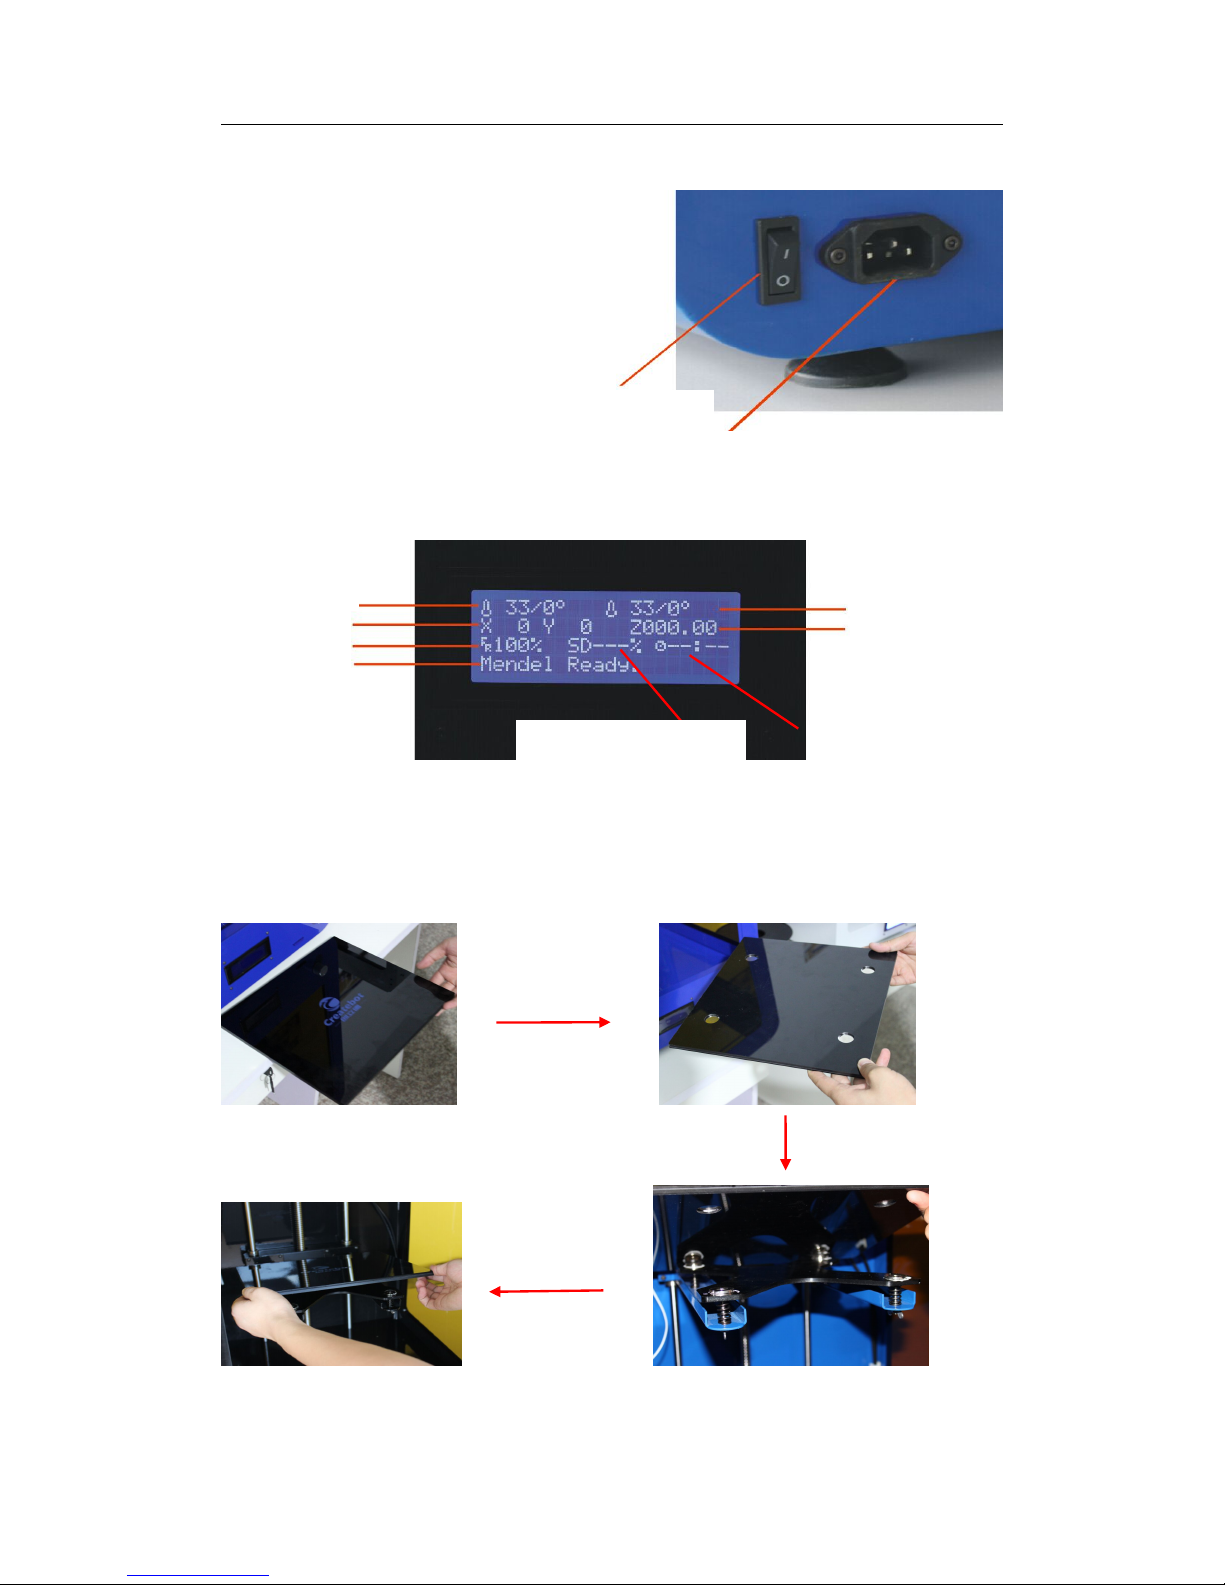
2. Machine Illustration:
When we turn on the machine, the LCD screen will show as follows:
3. How to install platform
Take out the platform → put platform on the printer base slightly (4 magnets on
platform and printer base)
switch
power plug
left nozzle temp.
right nozzle temp.
X Y Z location
printing speed
information
completed process(%)
printing time
Page 40
Thanks for your purchase of our Max 3d printers.
38
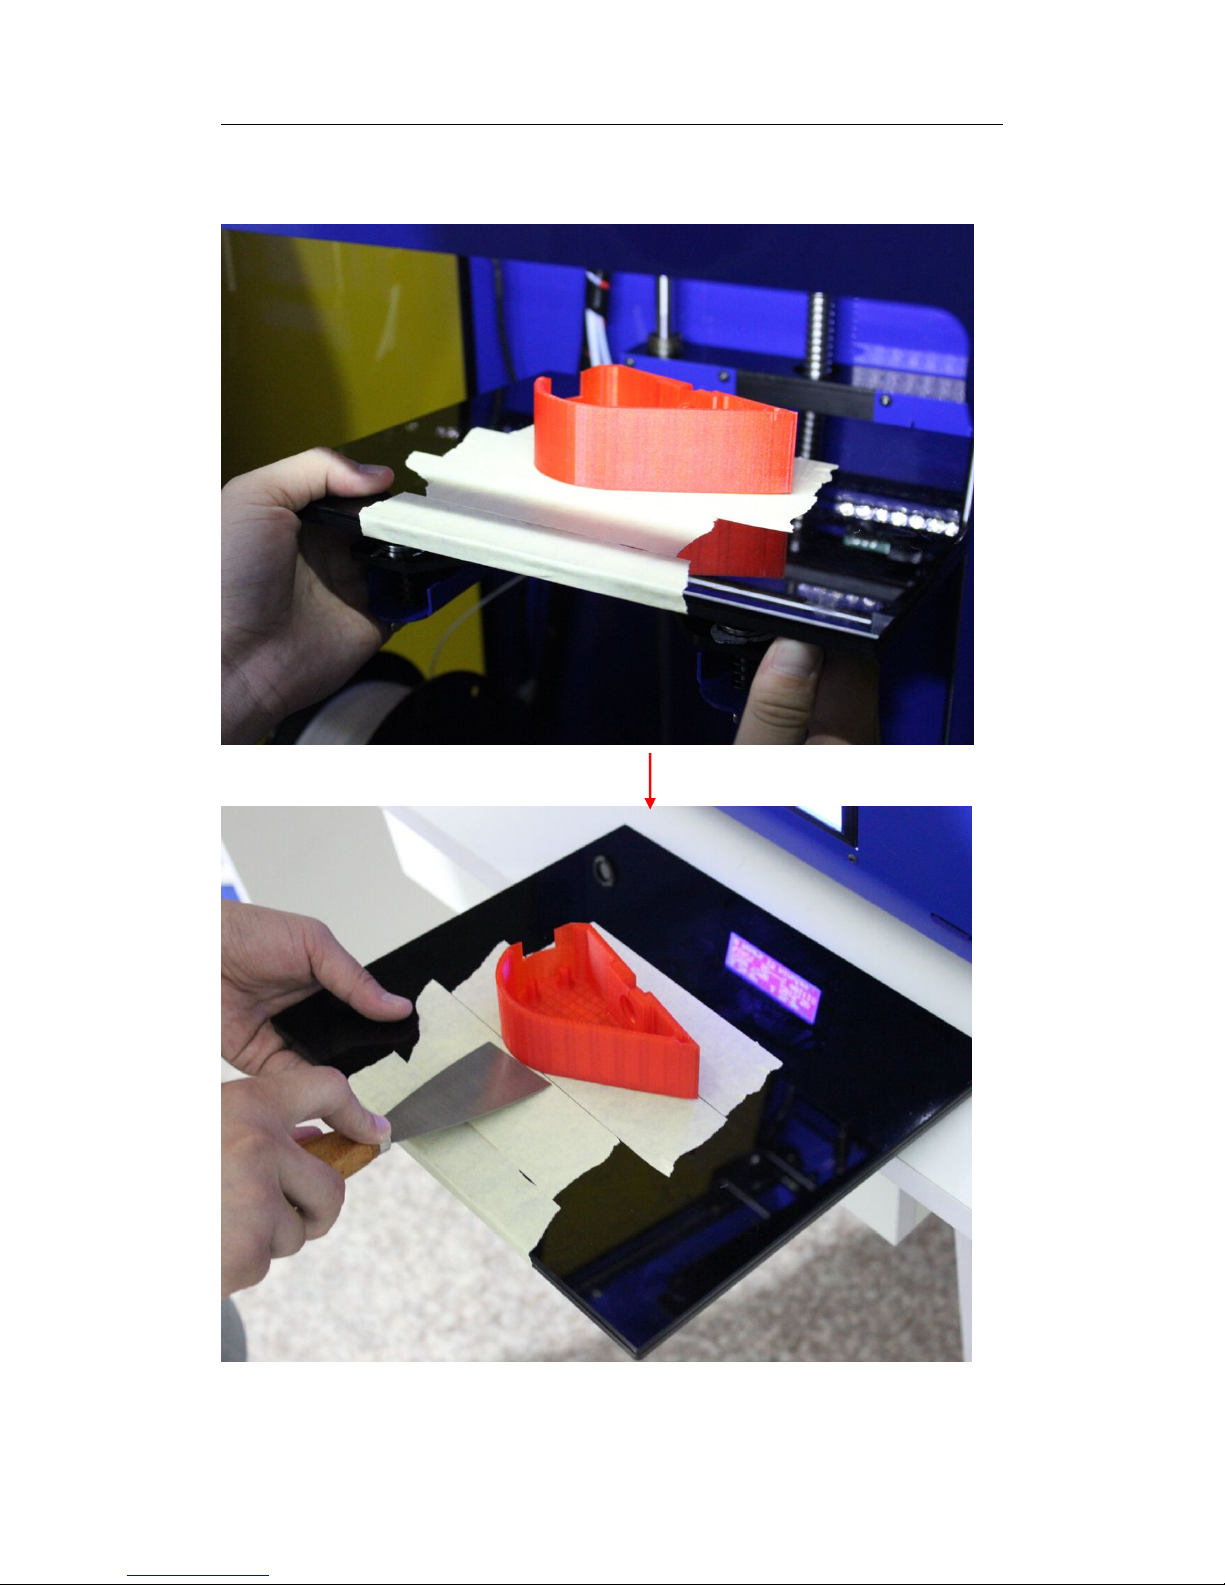
4. How to take model off the platform
Take out the platform with two hands
→
take the model off platform by the knife
 Loading...