

CreatBot DX User Manual
CreatBot 3D Printer
User manual
English V7.0
Henan Suwei Ele ctroni cs Technology Co., Ltd.
- 1 -

CONTENTS
Notice ················································3
Machine Diagram
Front and Back·························4
Hotend / Feeder ·····················5
Hardware Installation
Unpacking·································6
Install Build Platform ············· 7
Install Feeder ····························· 8
Printer Operation
LCD Screen································9
Keypad / Knob························9
LCD Menu Tree ·····················10
Leveling Platform ················ 11
Paving Crepe Paper ············· 11
Load Filament························12
Unload Filament···················13
Software Operation
CreatWare Setup·················· 14
Quick Print UI ······················· 15
Print Your First Model ········ 15
Full Setting UI ······················· 16
Mouse Operation ················ 17
Model Rotate/Scale············18
Model Mirror··························19
View Mode ······························ 19
Right Click on Model ············ 20
Toolpath Structure················20
Basic Setting ··························· 21
Advanced Setting·················22
Expert Setting ························ 23
Skirt/Brim/Raft ······················ 24
Plugins ····································· 24
Start/End GCode ·················· 25
Dual Head Printing ·············· 25
Align Dual Head Horizon ··· 26
Align Dual Head Vertical····27
Add Multi Type Printer······· 27
Frequently Asked Questions
Routine Maintenance·········28
Print PLA and ABS ··············· 28
Paving Kapton······················29
Change Fuse ·························· 30
Adjust Z Limit ························ 30
Hardware Troubleshoot·····31
Printing Troubleshoot ········ 32
Specifications ······························ 33
Icon conventions
Tip icon to remind users to have a good method or technique.
Note icon, to remind the user must be given adequate attention.
Prohibition icons, prevents users from unauthorized operation.
26 Jun 2015
- 2 -

Notice
Read First
Thank you for choosing CreatBot 3D printer!
This manual contains important information about the installation, use,
maintenance and common problems of CreatBot 3D printer. Please read this
manual carefully before using 3D printer. All losses caused by the breach of the
notes and the operation process of the operation process will be borne by the user.
Please use the filament provide by CreatBot, or high quality filament of third
manufacturers. Due to the use of third party inferior material caused by the failure
of the printer, the loss will be borne by the user.
Software running environment, 2G or above processors, at least 1G memory,
compatible with Windows, MAC, or Linux, please use memory as much as possible.
I wish you a fun with CreatBot!
Danger Warning
The nozzle's temperature will reach 300 degrees, don't touch.
The platform's temperature will reach 120 degrees, don't touch.
Please make sure that the printer connected to the ground.
Do not attempt to open the case, be careful of electric shock.
Working Environment
The 3D printer can work in the indoor environment of 5 ℃ to 30 ℃.
Long-term not use of the printer, be sure to dust, moisture.
Long-term not use of the filament, please be sealed to prevent deterioration.
- 3 -
Machine Diagram
Front and Back
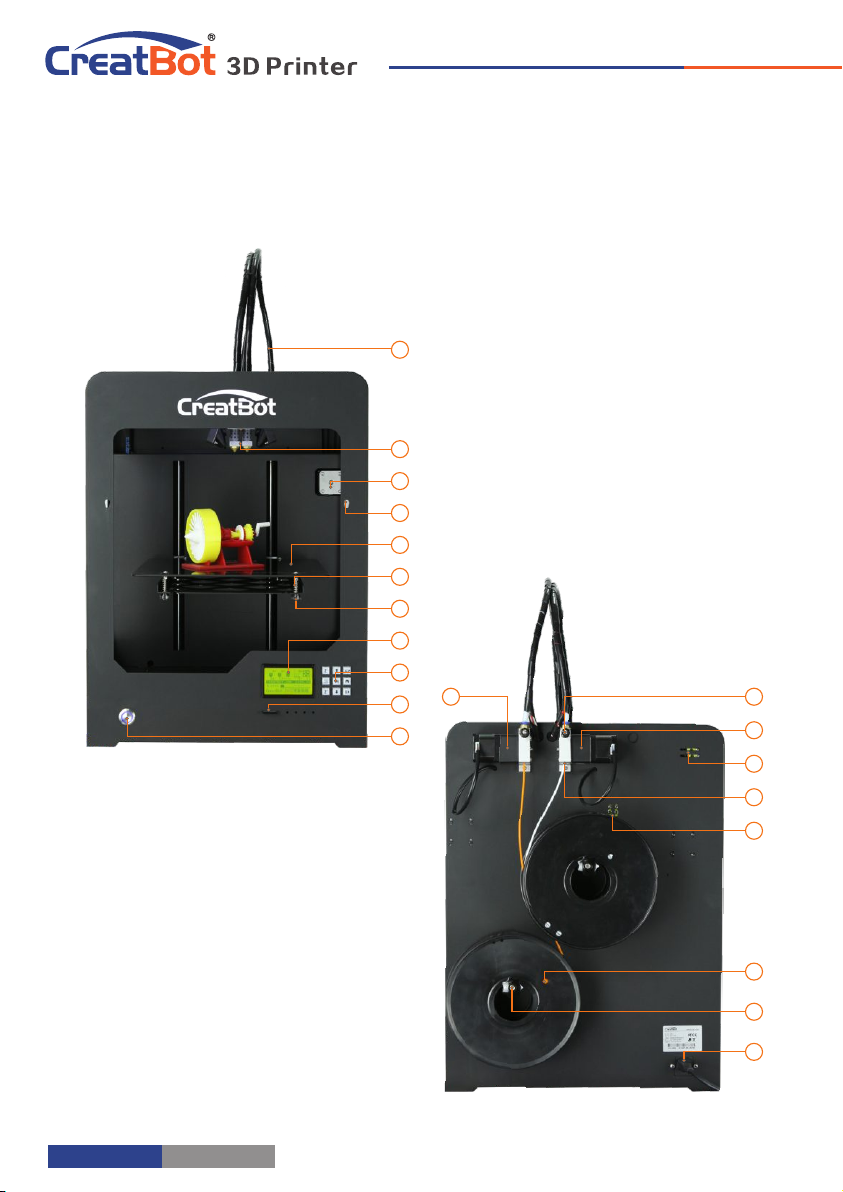
12. Power socket
13. Spool holder
14. Filament
15. Z stop limit
16. Filament inlet
17. X stop limit
18. Filament feeder 1
19. Compression nut
20. Filament feeder 2
1. Power switch
2. SD-card slot
11
3. Keypad
4. LCD display
5. Leveling nut
6. Leveling spring
10
9
8
7
6
5
4
3
2
1
7. Build platform
8. Baffle holes
9. X stepper motor
10. Printer head
11. Filament guide pipe
1920
18
17
16
15
14
13
- 4 -
12
Machine Diagram
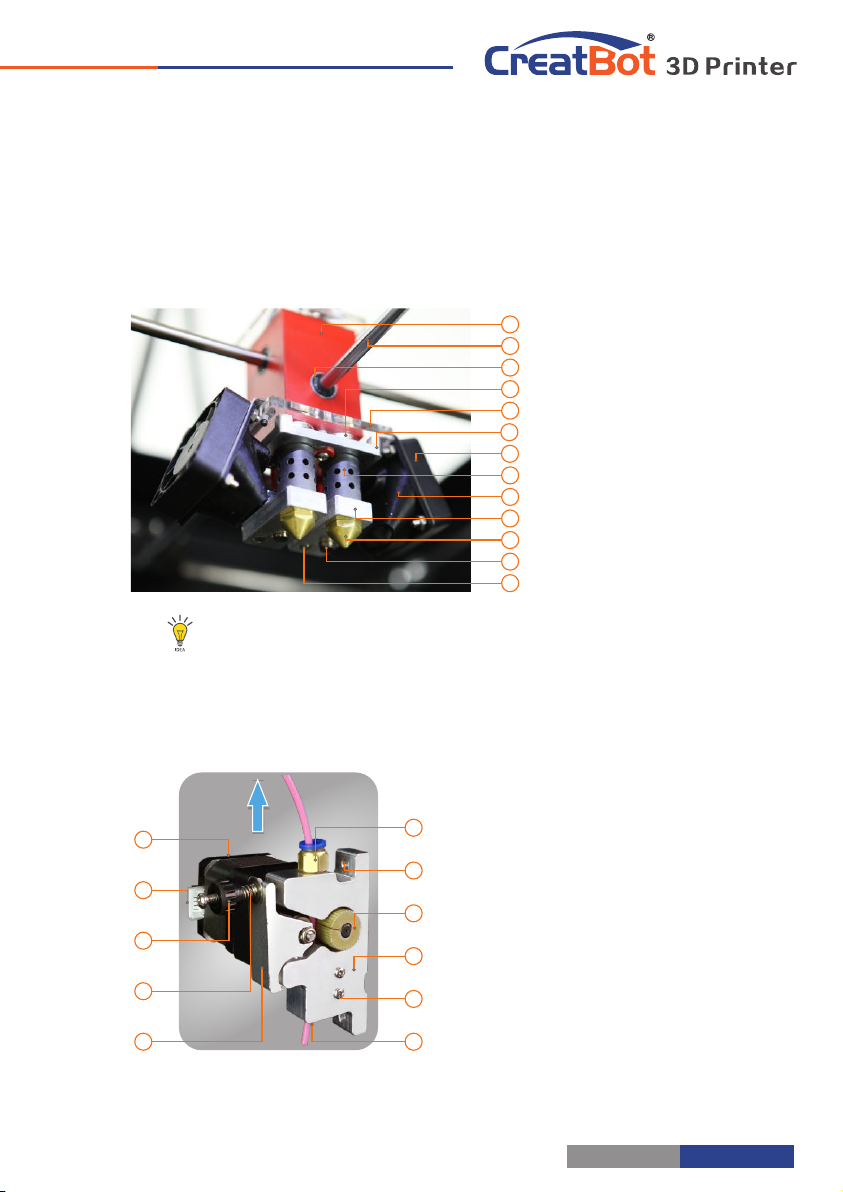
Printer Head
Hea d w il l b e up d at e a t an y t im e .
1. Thermostat tube
2. Heating tube
13
3. Nozzle
12
11
4. Heating block
10
5. Fan duct
9
6. Insulation tube
8
7. Cooling fan
7
8. Head Al. frame
6
9. Adapter plate
5
4
10. Head adjust
3
11. Linear bearing
2
12. Linear axis
1
13. Head main block
Filament Feeder
1. Pressure arm
5
4
3
2
1
11
10
9
8
7
6
- 5 -
2. Pressure spring
3. Pressure nut
4. Wire socket
5. Geared motor
6. Filament inlet
7. Filament sensor
8. Feeder body
9. Feeding wheel
10. Fixed hole
11. Pipe joint
Hardware Installation
Unpacking Install Build Platform
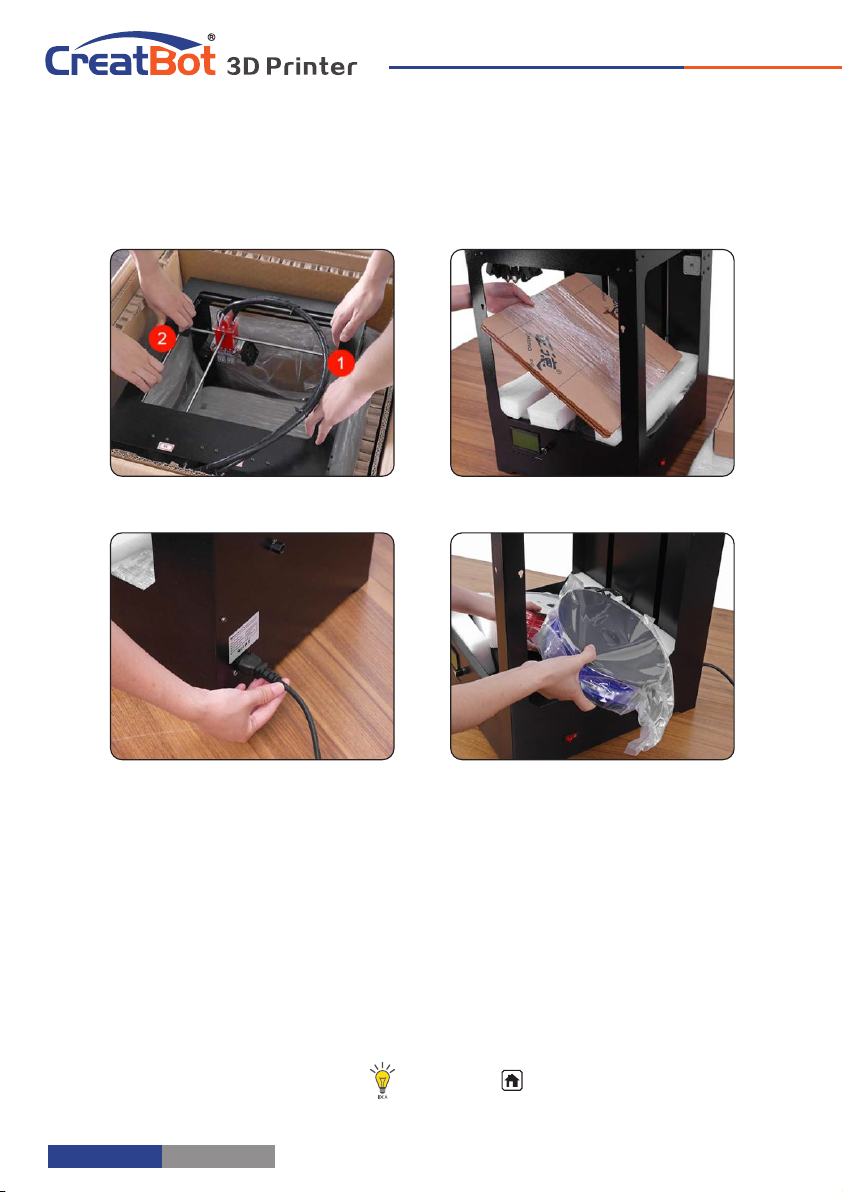
Unpacking
Turn on printer
1. Ensure the packing is not broken.
2. Need two people at the same time.
3. Lift it out by grasping the frame, not the belt or rails.
4. Takeout the accessories, will see the bracket and the filament.
5. Turn on the printer, enter "Move axis" menu, select "Auto home", the bracket
will rise, now you can takeout filament.
Takeout accessories
Takeout filament
same as "Auto home".Tips: Press
- 6 -
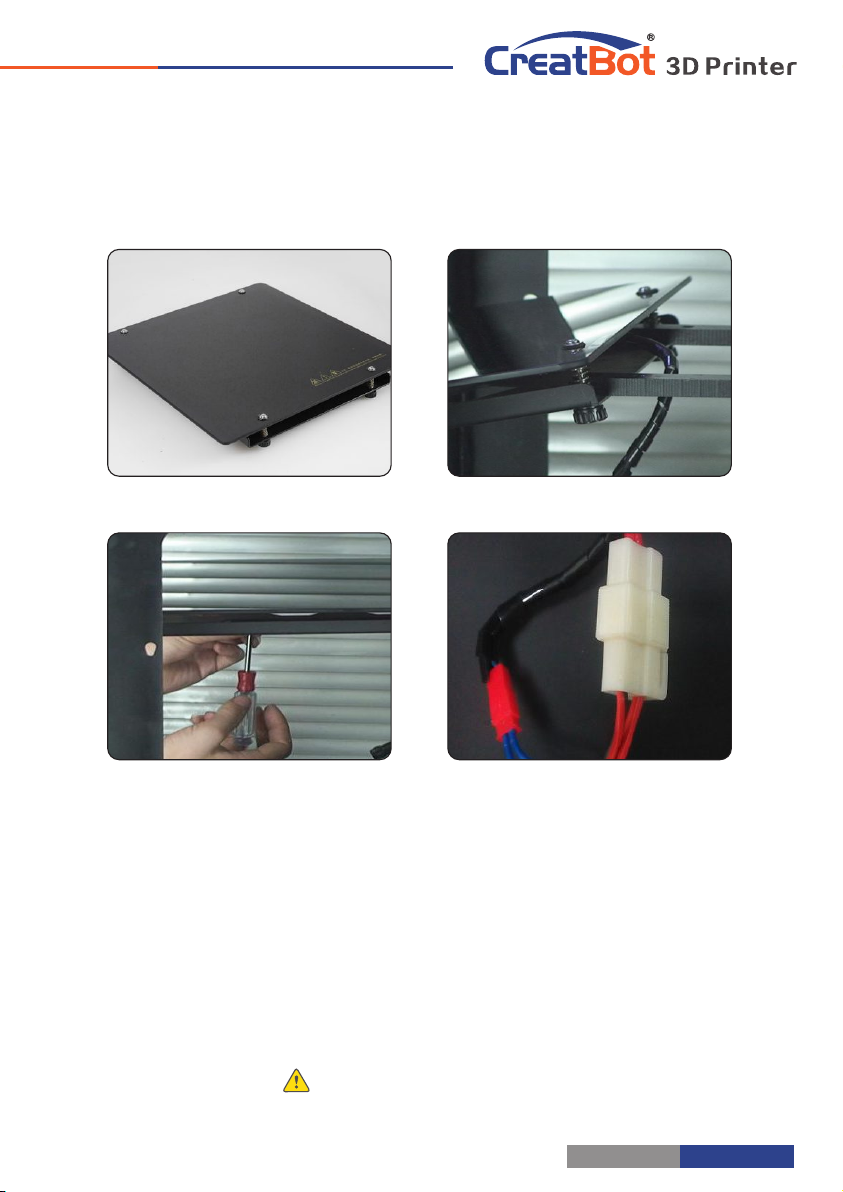
Hardware Installation
Takeout platform
Tighten the screws
1. Enter "Move axis" menu, move the platform a little down.
2. Fix the M5 screw to the hole of bracket, do not tighten.
3. Insert platform to the bracket, the bracket is between plate and tray.
4. Aim the tray fix hole to the M5 nut, then tighten the screws.
5. Connect the power plug and temperature sensor plug.
Notice: Ensure the plug is well contacted.
Insertplatform
Connect the cables
- 7 -

Hardware Installation
KEY
FUNCTION
KEY
FUNCTION
Up
Move Z up
Down
Move Z down
OK
Browse SD card
Status/Home
Pause/Resume
Preheat nozzle/bed, and switch between them
Install Feeder LCD Display
Fixed feeder
Plugin cable
1. Take out the feeder, pay attention to the order between left and right feeder.
2. Mount the feeder fixing hole on the back the chassis.
3. Tighten the screw nut firmly with a wrench.
4. Tighten the joint nut firmly on the feeder.
5. Plug in the motor cable to the socket.
6. Install spool's holders.
7. Install rack sleeve, you can download it from our website.
Connect joint
Install spool's holders
Notice: Feeder must same order to the nozzle.
- 8 -
Printer Operation
KEY
FUNCTION
KEY
FUNCTION
Up
Move Z up
Down
Move Z down
OK
Browse SD card
Status/Home
Pause/Resume
Preheat nozzle/bed, and switch between them
13 11 10
12
-
Z
OK
+
Z
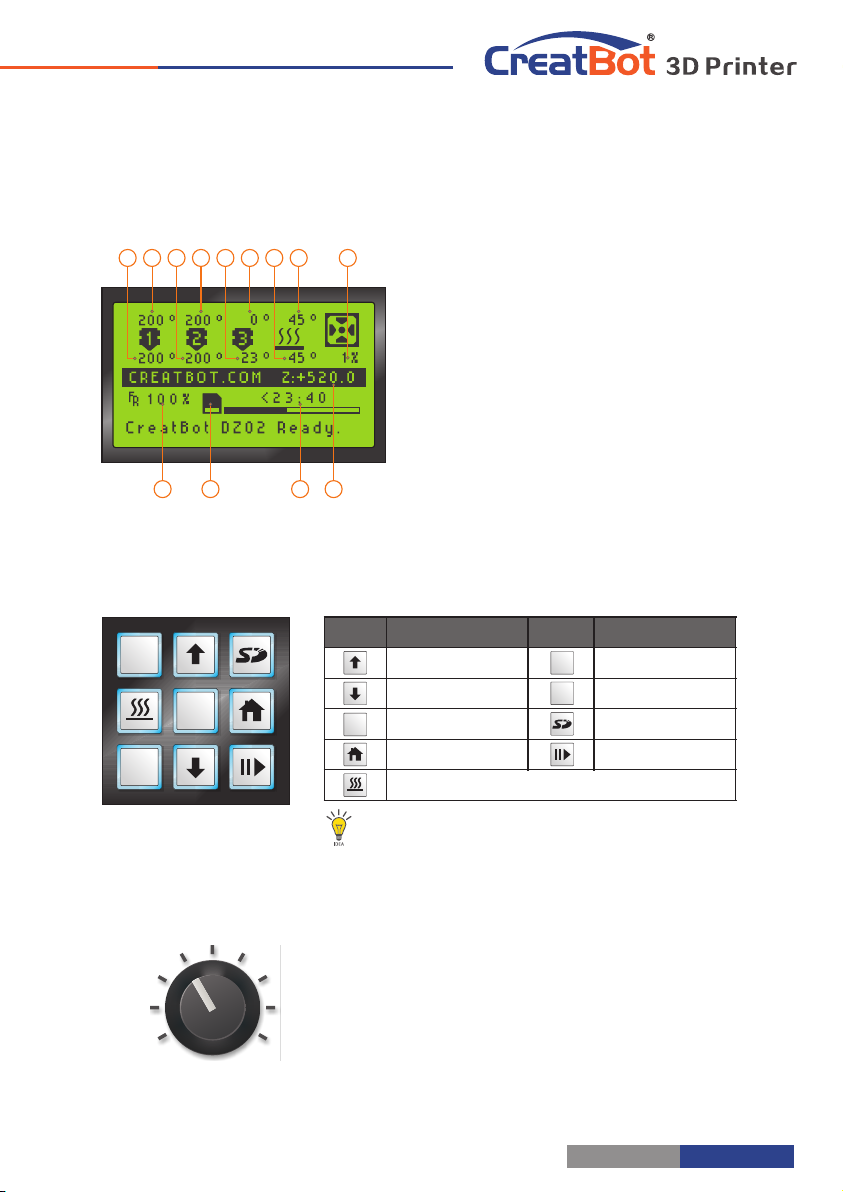
986421 3 5 7
1. Current temp. 1
2. Target temp. 1
3. Current temp. 2
4. Target temp. 2
5. Current temp. 3
6. Target temp. 3
7. Cur. hotbed temp.
8. Tar. hotbed temp.
9. Fan speed
10. Cur. Z position
11. Remaining time
12. SD card icon
13. printing speed
Keypad
-
Z
+
Z
OK
Notice : Up/ Dow n can c hange glo bal p rint spee d.
PUSH
Knob
1. Push knob to confirm, rotate to move up down.
2. Ratate knob can change global print speed.
- 9 -
Printer Operation
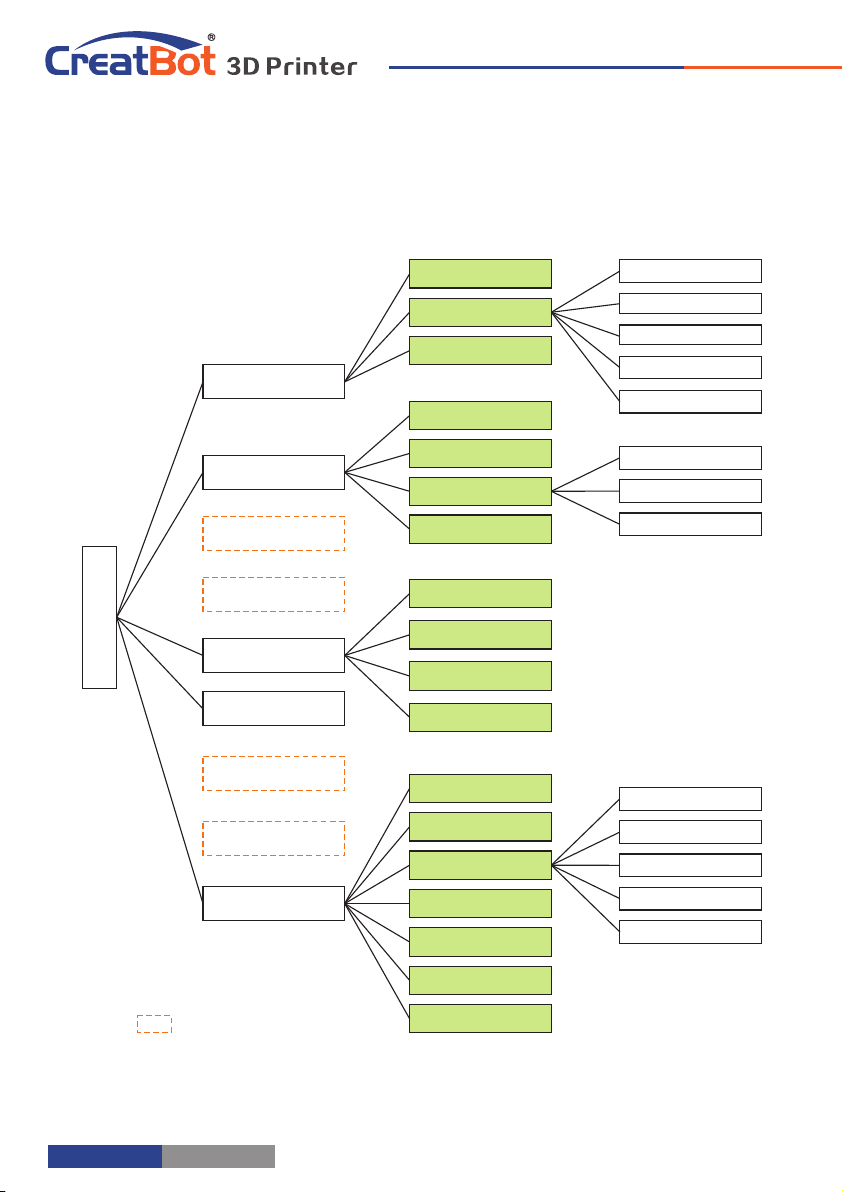
LCD Menu Leveling Platform
Preheat PLA
Preheat ABS
Cooldown
Preheat
Auto home
Move axis
Tune
Statu s
Change filam.
Filament
SD card
Pause print
Cancel print
Setting
10 mm
1 mm
0.1 mm
Extruder 1
Extruder 2
Unload 1
Unload 2
Temperature
Leveling bed
Motion
Save setting
Factory setting
Preheat nozzle 1
Preheat nozzle 2
Preheat nozzle 3
Preheat hotbed
Preheat All
X axis
Y axis
Z axis
Xsteps/mm
Ysteps/mm
Zsteps/mm
Esteps/mm
Reg. Number
Display while printing
Firmware Ver.
Time used
- 10 -
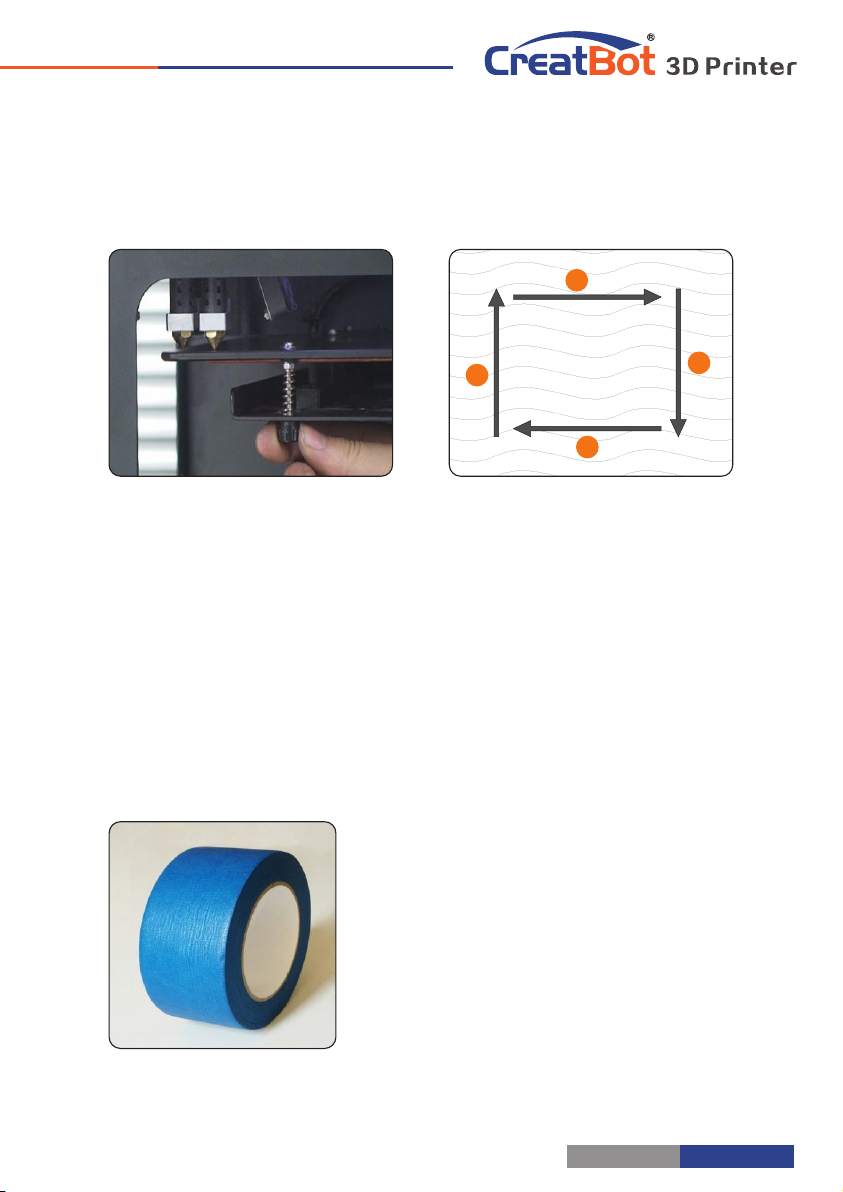
Printer Operation
2
1
3
4
1. Enter setting menu->leveling bed, waiting for the platform back to home.
2. Adjust first leveling nut, make nozzle close to the platform.
3. Press Up/Down button or rotating knob, adjust other three leveling nut.
4. To adjust repeatedly, eventually distance (0.2mm) to insert a name card is
advisable.
5. All the leveling nut should uniform, nozzle can't too close to the platform.
6. All will be subject to the actual effect of print, please make more little adjust at
the beginning of printing.
Paving Masking Paper
Platform need paste masking paper or
Kapton to achieve best viscosity, and the
model will be firmly fixed on the platform.
Kapton is double-sided tape, please tear
film on both sides.
- 11 -
 Loading...