

Page 1
Outsight Pty Ltd
6/888 Bourke St, Zetland, Sydney NSW 2017, AUSTRALIA
+61-2-9699 8688
User Guide
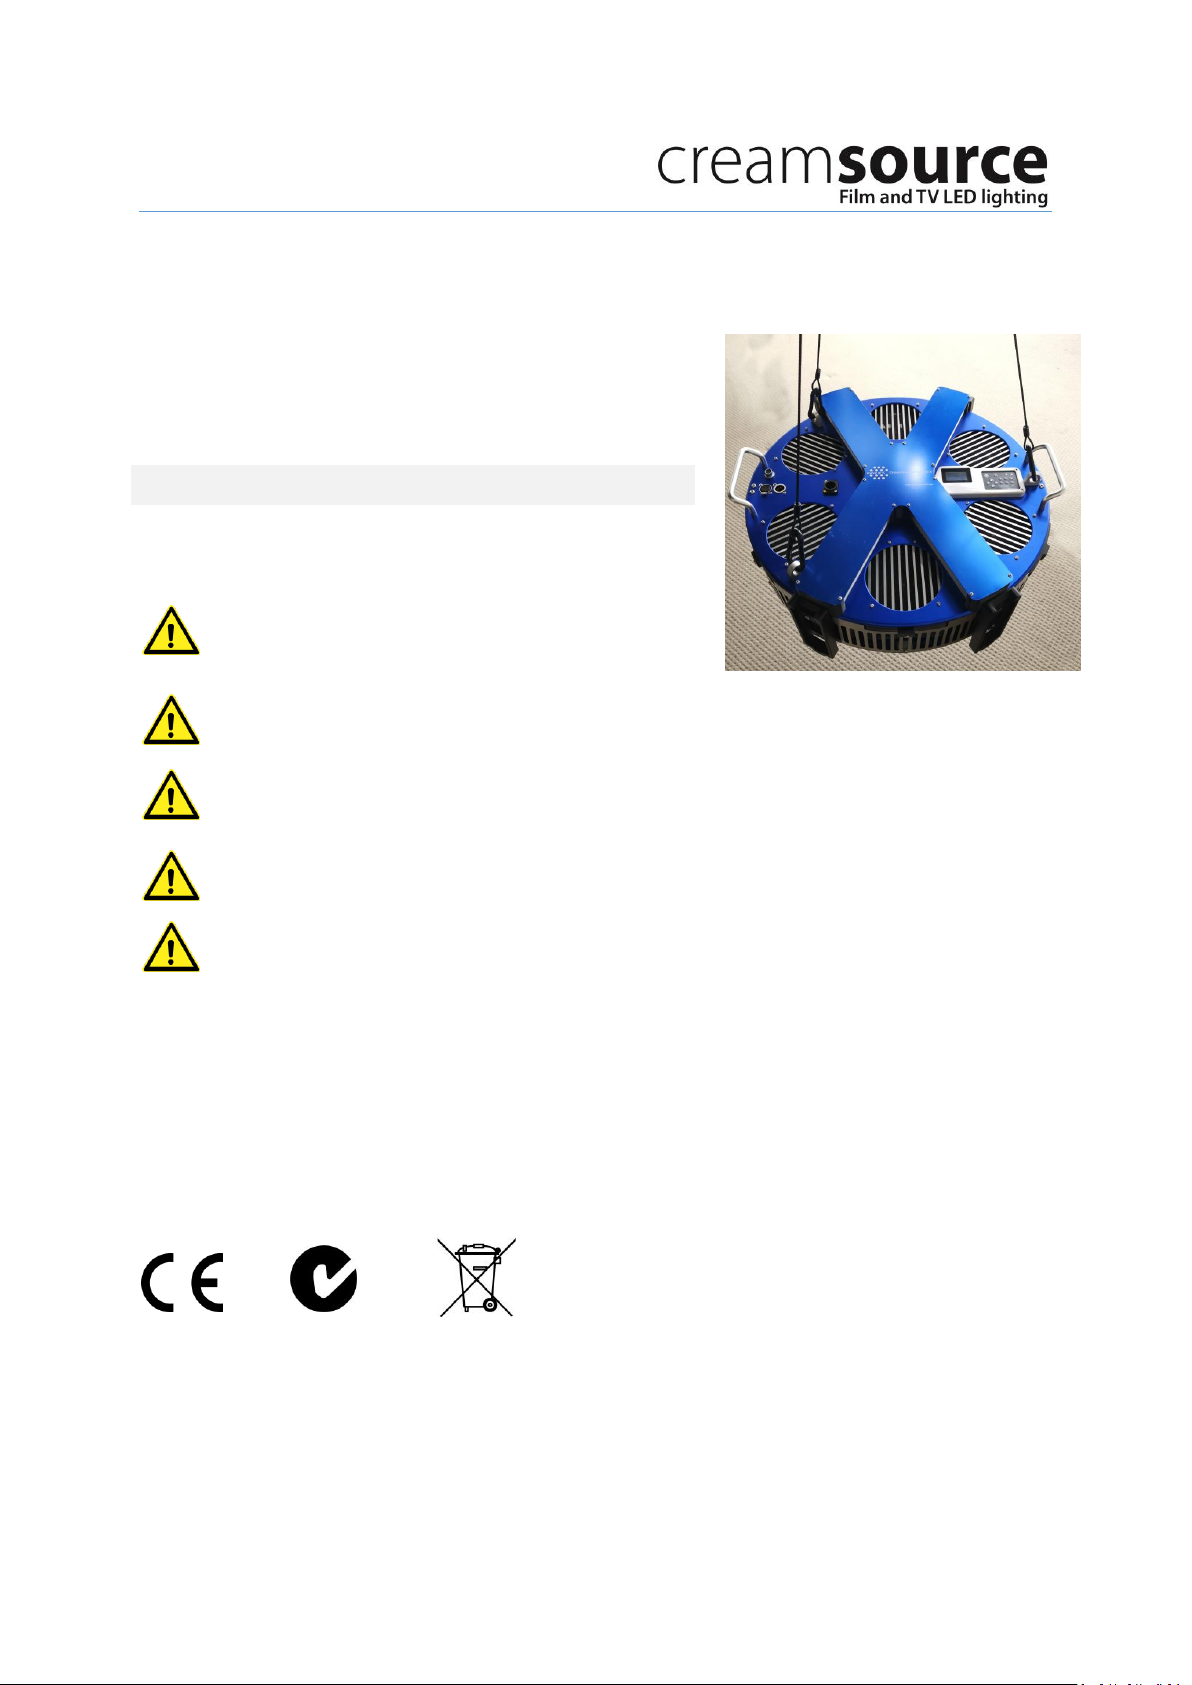
The Creamsource SpaceX is a 1200W, full colour (RGBWA) LED softlight fixture with continuous colour adjustment from 2200K up to 15000K,
including full control of Green/Magenta axis. Wireless DMX is built in using the LumenRadio system
Please take the time to read this manual before using your Creamsource Space X. This will give you a good understanding of the full
functionality and capabilities.
PART NUMBERS
The table below lists part numbers for the Creamsource Space X system
Part Number
Description
CSX-1200-C
Creamsource SpaceX Luminaire, 1200W with full colour
mixing. Power Supply is built into the unit
WARNINGS
High power LED light is emitted from this product. Do not stare directly into
the beam, permanent eye damage could result
Case can get hot during normal operation. Please take care when handling unit. Maximum Surface Temperature Tc = 70 deg C
Fixture has dangerous voltages inside. Do not open.
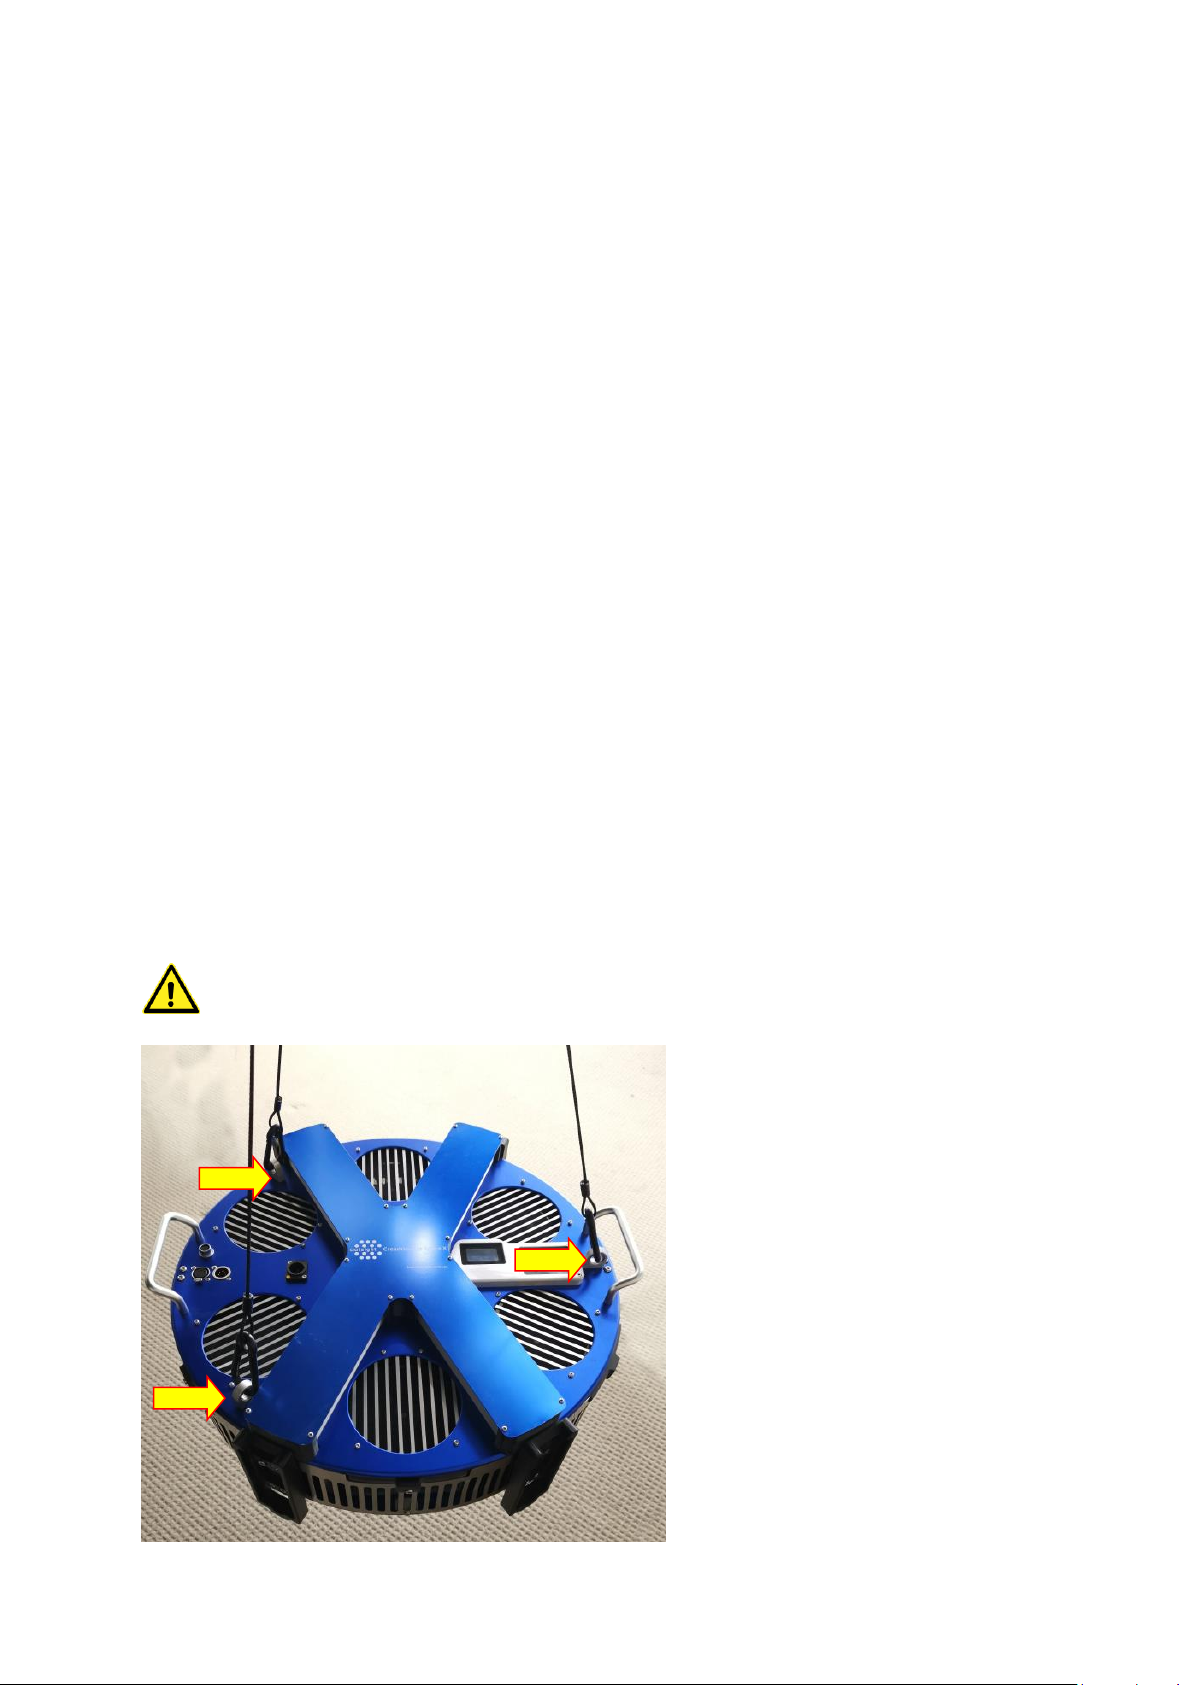
Falling hazard - make sure unit is properly secured and all three rigging chains are attached
If the external flexible cable of this luminaire is damaged, it must be replaced by an original cable from the manufacturer or
service agent.
COMPLIANCE NOTES
This device complies with Part 15 of the FCC Rules. Operation is subject to the following two conditions: (1) This device may not cause
harmful interference, and (2) This device must accept any interference received, including interference that may cause undesired operation.
N24018
Please make sure discarded electrical waste is properly recycled to reduce environmental impact. Please use a separate collection facility or
contact the supplier from which this fixture was purchased
SpaceX
Page 2
Outsight Pty Ltd
6/888 Bourke St, Zetland, Sydney NSW 2017, AUSTRALIA
+61-2-9699 8688
CONTROLLING THE SPACE X
There are four different ways of controlling the fixture, which are detailed below.
On-board keypad and display
Wired DMX
Wireless DMX using inbuilt Lumen Radio system
Wired remote dimmer control (sold separately)
ON-BOARD KEYPAD AND DISPLAY
All settings and configuration can be done using the on-board keypad and OLED display.
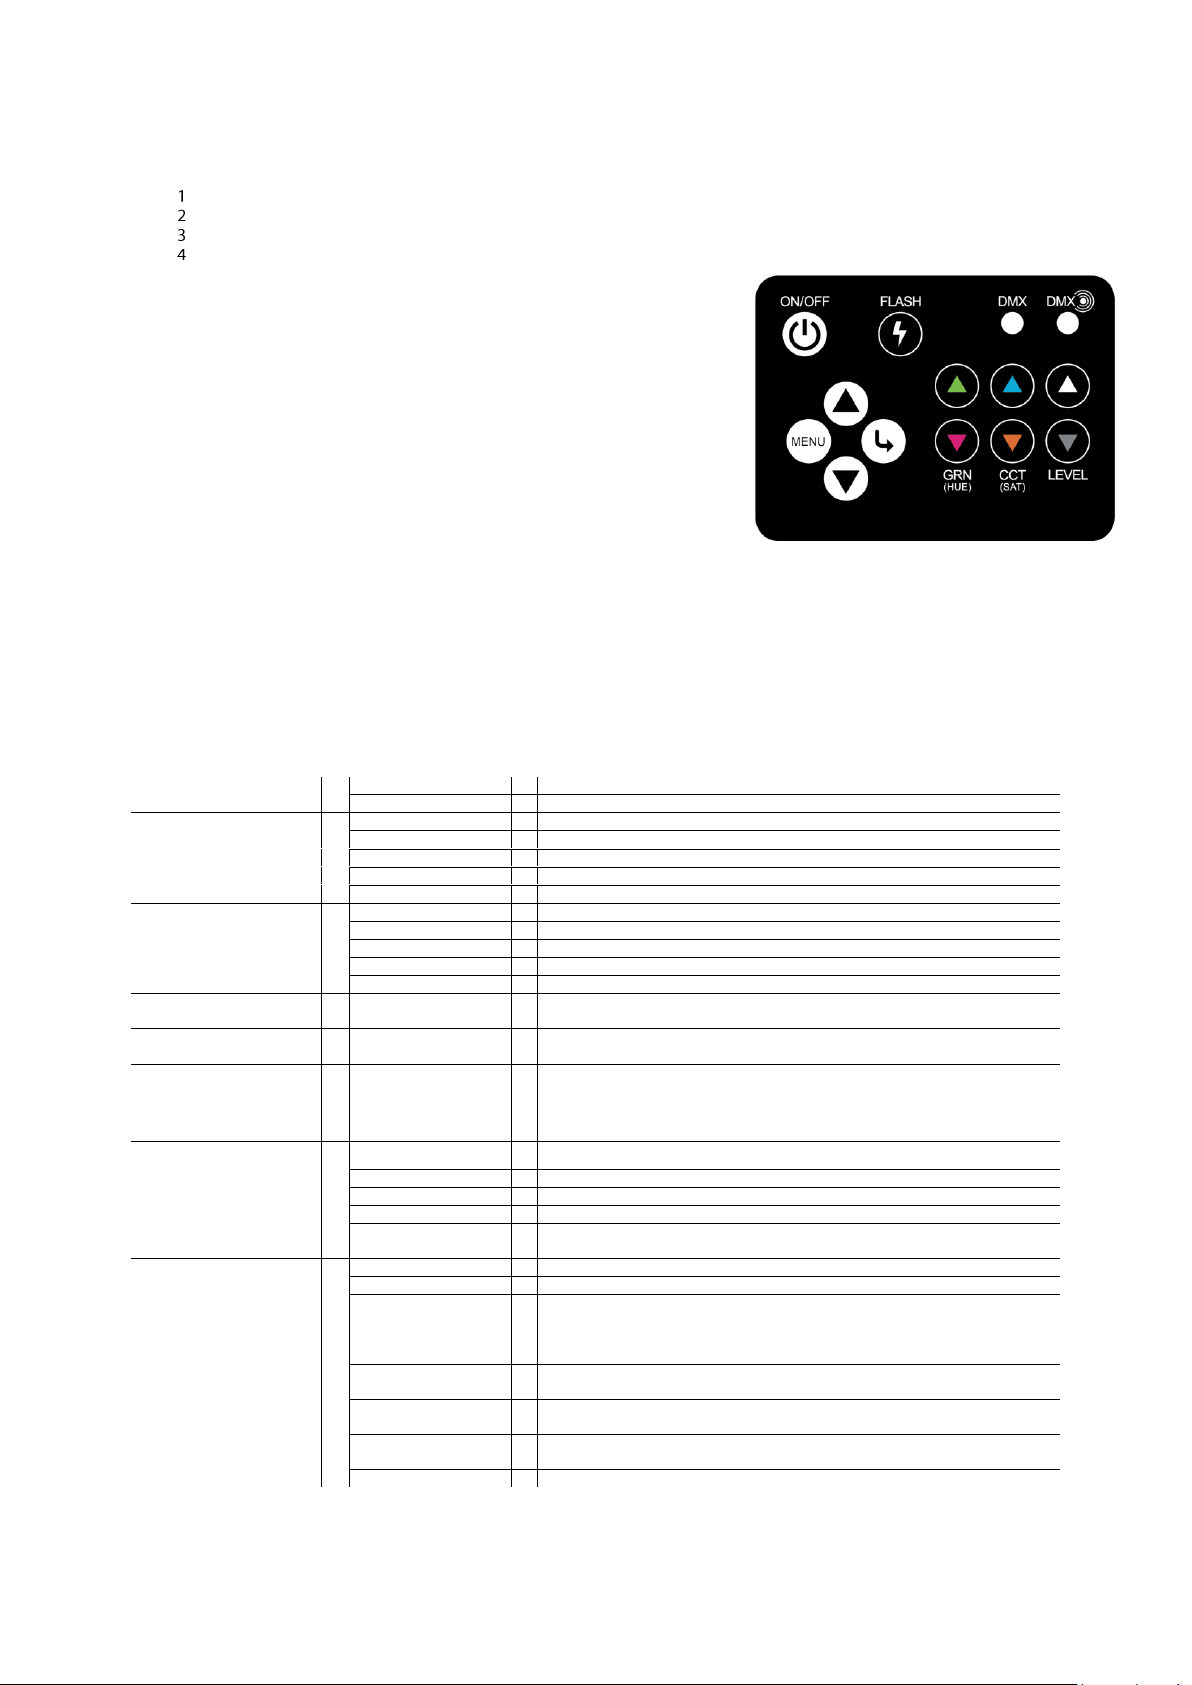
Dedicated buttons:
ON/OFF - Press to turn light on and off
FLASH - Flashes light on or off when held down
LEVEL - Adjusts intensity from 0 to 100%
CCT (SAT) - Adjusts CCT from 2200K to 15000K. Also controls
Saturation when in HSV mode
GRN (HUE) - Adjust Green/Magenta bias from Full Minus Green to Full Green
(-100 to 100 on display). Also controls Hue when in HSV mode
To access the menu system, press MENU button, then:
MENU - Press to go back a menu level.
Select - Press to accept current menu item or setting
Up - Press to scroll up, or increase setting value. Hold to scroll quickly
Down - Press to scroll down, or decrease setting value. Hold to scroll quickly
Indicator LEDs:
DMX - Flashes yellow rapidly when DMX signal is present
DMX ))) - Flashes blue rapidly when wireless DMX signal is present
MENU FUNCTIONS
The table below outlines all the menu items and a brief description of their function, for firmware V1.4.7 and above
COLOUR MODE
Normal - CCT
Switch to CCT mode to produce white light with CCT and GRN/MAG control
Colour - HSV
Switch to HSV mode to produce colours with Hue and Saturation control
EFFECTS MODE
NO EFFECT
Turn off effects
Strobe
Switch to strobe mode
Random
Switch to Random Flashing mode
Colour Cycle
Switch to Colour Cycle mode
Calibrate Sync
Switch to Calibrate Sync Mode
PRESET
2700K
Set colour temperature to 2700K, GRN/MAG to 0
3200K
Set colour temperature to 3200K, GRN/MAG to 0
4500K
Set colour temperature to 4500K, GRN/MAG to 0
5600K
Set colour temperature to 5600K, GRN/MAG to 0
6500K
Set colour temperature to 6500K, GRN/MAG to 0
DMX Address
Use UP/DOWN arrow keys to set DMX address from 1 to 494 (<512 to allow for all
channels to be patched)
DMX Scenario
Use UP/DOWN arrow keys to set DMX Scenario from 1 to 10 (see DMX implementation
tables for complete description of different scenarios)
Boost Brightness
Boost Brightness allows for increased light output when unit is running at low
temperatures. When Boost Brightness is NOT enabled, the output level of the light is
restricted to that of the normal ‘HOT’ running temperature of the light, even if the light
is running cooler than normal. This prevents ‘output droop’ as the unit heats up
FAN MODE
Auto
Fans speed is variable depending on temperature
Quiet
Fans will constantly run at lowest speed
Medium
Fans will constantly run a medium speed
High
Fans will constantly run at high speed
Pause
Fans will stop running, until maximum temperature is reached - then will run in Quiet
mode
Advanced
LumenRadio Unlink
Select this to unlink Lumen Radio from transmitter
LumenRadio Enabled
Lumen Radio Receiver can be enabled or disabled
High Speed
Enable High Speed Mode – this increases the PWM frequency of the unit to allow fast
frame rate shooting (up to 2,000fps). The drawback of using High Speed mode is that
the dimming and colour changing of the unit becomes less fluid and smooth. When
disabled, frame rates of up to 500fps are achievable.
DMX Terminated
Enable to terminate DMX line with 120R resistor internally. The last fixture in the DMX
chain should have this option selected
Display Always On
If this is not enabled, then the OLED display will switch off after a period of no keypresses, to lengthen it’s lifespan and prevent screen burn-in
Information
Displays information screen with serial number, temperatures, unit run-hours and other
vital statistics
Restore Defaults
Restores user defaults including DMX address,Scenario and other settings
Page 3
Outsight Pty Ltd
6/888 Bourke St, Zetland, Sydney NSW 2017, AUSTRALIA
+61-2-9699 8688
WIRED DMX CONTROL
Standard 5 pin XLR connectors are located on the back of the unit.
When a valid DMX signal is detected, the yellow DMX indicator LED will flash on the rear of the unit and the keypad controls for the light are
disabled. These are restored several seconds after loss of DMX signal. After around 15 seconds of valid DMX input the OLED Display will
power off automatically – press any key on the keypad to turn it back on again.
The desired DMX address can be selected from the main menu. Please see the DMX Implementation Tables for more information about the
channel mapping options.
As with all DMX installations, the last unit in the chain should be terminated. This can be done through the menu system, by selecting
MENU->Advanced->DMX Terminated.
WIRELESS DMX CONTROL
Every Space X unit has built in Wireless DMX control using the Lumen Radio system.
When a valid wireless DMX signal is present, the blue indicator LED will flash rapidly. The current signal level will also be displayed on the top
status area of the OLED screen
After around 15 seconds of valid DMX input the OLED Display will power off automatically – press any key on the keypad to turn it back on
again.
If wired DMX is connected at the same time as the Wireless DMX is receiving data, then the wired connection will take control.
The DMX address and scenario should be set in the same mannor as for wired DMX.
To unlink the Lumen Radio module, go to Menu->Advanced->Unlink Lumen
Please see Lumen Radio documentation for more information about the wireless DMX system.
WIRED REMOTE DIMMER
The wired remote dimmer plugs into the 7 pin Accessory connector on the back of the unit. This will allow limited access to the menu system
of the unit for setup and also control of levels, cct, green/mag, hue, saturation and DMX address/Scenario.
RIGGING
Three rigging points are provided for attachement of the correctly rated safety cables to hang the unit. Make sure to use cables rated to
withstand the full weight of the unit: 18kg
Ensure that mounting point is safe and secure and is rated to take the full unit weight
Page 4

Outsight Pty Ltd
6/888 Bourke St, Zetland, Sydney NSW 2017, AUSTRALIA
+61-2-9699 8688
SILK SKIRT ATTACHEMENT
Three spigots are provided for attachement a silk and/or black skirt to the underside of the unit.
SPECIFICATIONS FOR FIXTURE
Model Number
CSX-1200-C
Input
100-250V AC, 50-60Hz, Max 16A
Maximum Ambient Temperature
40°C
Cooling
Variable Speed Low Noise Fans
Weight
18kg
Protection Class
IP20
 Loading...