

Page 1

7x
User Guide
1
Page 2

2
Contents
1.Precautions ............................................................................................................................................. 3
1.1 Brief introduction ............................... 3
1.2 About this manual ................................. 3
1.3 Safety Tips ................................................ 4
1.4 Cautions .................................................... 4
1.5 Application notice for mobile phone 5
1.6 Application notice for battery............. 6
1.7 Application notice for charger ............ 7
1.8 Cleaning and maintenance ................. 8
2. Quick start guide ................................................................................................................................... 9
2.1 Power on/Off ........................................... 9
2.2 Key .............................................................. 9
2.3 Touch screen operations .................... 10
2.4 Setting screen lock/unlock ................ 11
2.5 Use notes panel .................................... 13
3. Function menu .................................................................................................................................... 14
3.1 Phone ....................................................... 14
3.2 Messaging ............................................... 17
3.3 E-mail ...................................................... 19
3.4 Contacts .................................................. 22
3.5 Settings ................................................... 24
3.6 Camera .................................................... 30
3.7 Gallery ..................................................... 33
3.8 Music ........................................................ 35
3.9 Radio ..................................................... 38
3.10 Sound recorder ................................ 39
3.11 Clock ................................................... 40
3.12 Calendar ............................................. 41
3.13 Calculator ............................................... 41
3.14 My files ............................................... 42
3.15 Browser .............................................. 43
4 .Troubleshooting .................................................................................................................................. 47
Page 3

3
1.Precautions
1.1 Brief introduction
Thank you for your choose to by 7x mobile phone。You can master how to use
I5288 mobile phone by reading the user manual and fully understand the function and
simple operation
1.2 About this manual
◇ Please read this manual before using the device to ensure safe and proper use.
◇ Descriptions are based on the device’s default settings.
◇ Images and screenshots may differ in appearance from the actual product.
◇ Content may differ from the final product, or from software provided by service
providers or carriers, and is subject to change without prior notice.
◇ Available features and additional services may vary by device, software, or service
provider.
◇ The format of this manual and consultants are based on Android operating system,
it may differ from what the user have.
◇ Applications and their functions may vary by country, region, or hardware
specifications. We are not liable for performance issues caused by applications
from any provider
◇ You may incur additional charges for data services, such as messaging, uploading
and downloading, auto-syncing, or using location services. To avoid additional
charges, select an appropriate data tariff plan. For details, contact your service
provider.
◇ Please keep this user manual properly for future reference
Page 4

4
1.3 Safety Tips
If your phone is lost or stolen, please notify the telecommunications sector or
outlets immediately to disable the SIM card. This will allow you to take a call from
someone else brought economic losses.
For a safer use of mobile phones, please take precautions, such as: set up mobile
phone SIM card PIN code, PIN code protects your SIM card from unauthorized use by
others. When leaving the car, please do not put the phone in visible place, best to carry
or locked in the trunk.
1.4 Cautions
◇ This phone has maneuverable mode function setting, when you take a plane when
the phone should be set to flight mode or turn it off, to confirm the mobile phone in
the plane fly process will not influence.
◇ Please strictly abide by relevant local drive you cell phone use of laws and
regulations. If your cell phone use while driving, please obey the following rules:
concentrate on driving, pay attention to the road condition; Please plug in advance
of the matching headset, use headphones call; If the driving conditions are bad,
please stop, then call or to answer the phone.
◇ In close to the storage of oil, chemicals or explosives and other places, please
comply with laws, regulations and the relevant sign.
◇ Turn your mobile phone battery and charger, placed on children is difficult to reach
place, so as not to be treated as a children's toys, cause injury.
◇ In order to avoid damage your phone and your mobile phone can only use the
company designated the battery, the battery charger and accessories. Use other
battery, charger may cause battery leakage, overheating, burst, fire failure.。
◇ Please do not in the weak signal or high precision electronic equipment nearby cell
phone use. Mobile wireless radio frequency interference may cause these
Page 5

5
electronic equipment adjustment and other problems. Especially in the following
near equipment special attention should: hearing AIDS, pacemakers and other
medical electronic equipment, fire detectors, automatic door and other automatic
control equipment, etc. The influence of the equipment to consult the equipment
manufacturer or local distributors.
◇ Please do not violent collisions, and vibration or throwing mobile phone, in order to
avoid the failure and the mobile phone.
◇ Don't take the battery, mobile phone, charger on the microwave oven or high
voltage equipment, otherwise may cause damage such as fire and circuit accident.
◇ Please do not have in flammable and explosive gas place use cell phones, or it may
cause cellular phone fault and cause a fire.
◇ Please do not the phones in high temperature, high humidity or amounts of dust
place, otherwise it may cause handset malfunction.
◇ Do not place the phone on uneven or unstable place, to prevent the drop caused by
the failure or damage.
1.5 Application notice for mobile phone
◇ Please do not use Mobile while charging. Disconnect Mobile from charger before
use.
◇ Do not use the mobile phone if the screen is cracked or broken. Cracked and / or
broken screens could cause injury to hands and /or face.
◇ Avoid potential damage to your mobile phones as under
-- Keep away from liquids.
-- Do not handle the mobile phone with wet hands
-- Avoid using and / or storing in dusty and / or dirty places / environments.
-- Do not drop, knock, throw or otherwise handle the mobile phone roughly.
--Avoid exposing your mobile phone and / or batteries to extreme temperatures.
Extreme temperatures reduce the charging capacity and life of batteries and
mobile phone
Page 6

6
-- Never use damaged chargers or batteries.
-- Do not use chemicals or other cleaning solutions to clean the mobile phone.
-- Use moist or anti-static cloth.
-- Avoid using mobile phone with camera flash or light close to the eyes.
-- Do not dismantle the mobile phone and / or accessories without permission.
1.6 Application notice for battery
◇
Do not disassemble or modify the battery, otherwise it will lead to battery leakage,
overheating, bursting and fire.
◇
Do not use old batteries thrown into the general garbage. Expressly provided for
disposal of batteries in accordance with the instructions.
◇
Do not put batteries in a fire, otherwise it will cause the battery to fire and burst.
◇
Install the battery, not the imposition of pressure, this may cause battery leakage,
overheating, bursting and fire.
◇
Do not short circuit batteries, wires, needles and other metal objects; not want to
batteries and necklaces and other metal objects together, otherwise it will lead to
battery leakage, overheating, bursting and fire.
◇
Do not solder the battery contacts, otherwise it will cause leakage, overheating,
bursting and fire.
◇
If the battery liquid from entering the eye will be blind dangerous, then please do
not rub eyes, wipe with a dry towel, then immediately to the hospital.
◇
Do not use in the fire or heater next to a hot place or leave the battery, otherwise
it will lead to battery leakage, overheating, bursting and fire.
◇
If the battery is in use, recharging or save the phenomenon of abnormal heating,
discoloration, deformation, please stop using and replace a new battery.
◇
If the battery leakage liquid is run into the skin, on clothing, which may cause skin
burns immediately with a dry towel to wipe a doctor immediately, if necessary.
Page 7

7
◇
If the battery leakage of liquid or emits a strange odor, immediately put it away
from open fire, avoid fire and burst.
◇
Do not expose the battery to moisture, otherwise it will cause the battery to
overheat, smoke, and corrosion.
◇
Do not use in direct sunlight, high temperature areas or leave the battery,
otherwise it will result in liquid leakage and overheating may degrade performance
and shorten life.
◇
Do not charge it continuously for more than 24 hours.
◇
Keep the battery out of the sun, cool well ventilated place.cell phone battery life is
limited.
◇
Gradually shorten the battery life time in the frequent charge. Many times the
charge is invalid, the battery life has done, should be replaced a new battery of the
specified models.
Removing the battery sure you want to phone off. Absolute prohibition in the boot
or other external power connector and remove the battery, otherwise it may
damage the SIM card and cell phone.
1.7 Application notice for charger
◇
Do not disassemble or modify the charger, otherwise it will lead to personal injury,
electric shock, fire and damage to the charger.
◇
Use 220V AC. Other voltages can cause leakage, fire and damage to mobile phones
and chargers.
◇
Chargers against short circuit, otherwise it would cause electric shock, smoke and
damage to the charger.
◇
Do not use the charger power cord is damaged, otherwise it will cause fire and
electric shock.
◇
Please cleaning product in an outlet on the dust.
◇
Please do not put water container on the charger next to avoid water spills caused
Page 8

8
by the charger short-circuit, leakage or other failure.
◇
If the charger is exposed to a water or other liquids, immediately cut off the power
to prevent short circuits, fire, electric shock and charger failure.
◇
Please do not place high humidity in the bathroom to use the charger, otherwise it
will cause an electric shock, fire and damage to the charger.
◇
Do not charger, wires and an electrical outlet with wet hands, otherwise it will
cause an electric shock.
◇
Do not place heavy objects on the power cord or modification wire, otherwise it will
cause electric shock and fire.
◇
Before cleaning and maintenance, please unplug the charger plug from the power
outlet.
◇
Seize the charger when you pull the plug, pull the power cord may damage the
wire, electric shock and fire.
◇
Please do not charge in the following areas: direct sunlight and high temperature
areas such as; wet, multi-place of the ashes or vibration (may cause a malfunction);
near the TV, radio and other electrical (will affect the image, sound effects).
1.8 Cleaning and maintenance
◇
Please do not use the mobile phone, battery and charger in the place with high
humidity meanwhile, pay attention to avoid getting wet
◇
Please use the soft dry cloth clean mobile phone, battery and charger
◇
Please do not clean your smart phone with alcohol, thinner or benzene chemical
reagents
◇
Dirty plug will cause poor contact, power failure so that unable to charge cell phone,
please clean it regularly
Page 9
9
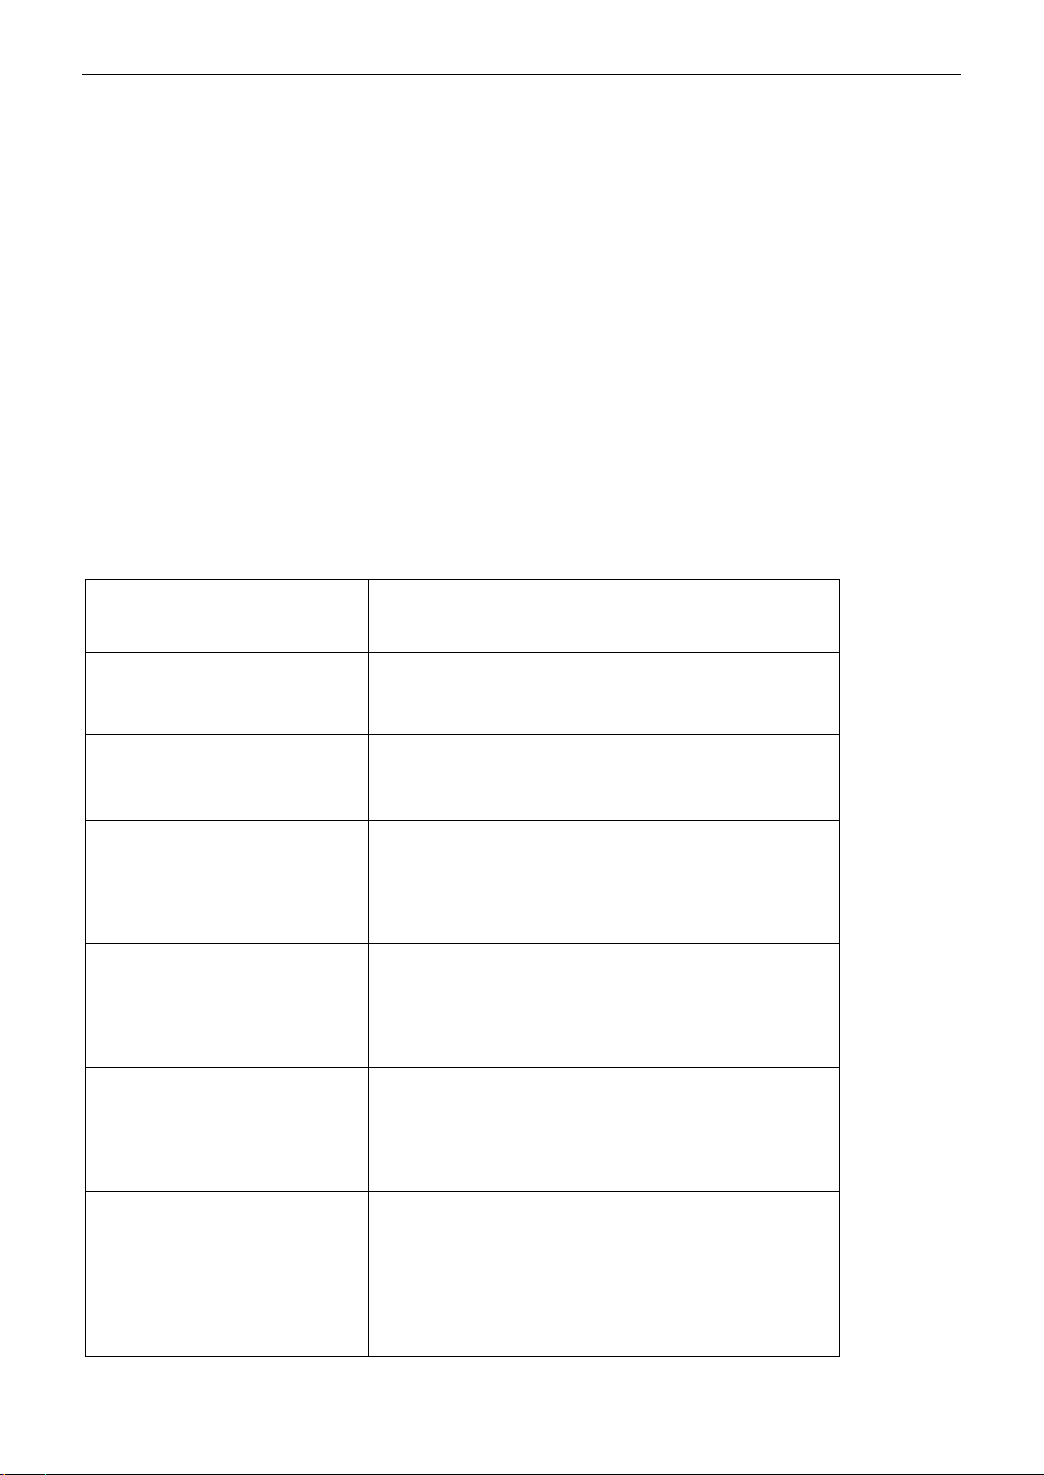
2. Quick start guide
Key
Functions
Tap “+”
to increase the volume
Tap “-”
to decrease the volume
“Power” button
Short Press to lock the screen, long press to
select the pop-pop box
“Home” button
Short press to return to the idle screen; long
press to eject Google search interface
“Menu” button
Short press to return to the previous screen
“Return” button
“Return” button- Return to the previous
interface or turn off the dialog based and
option menu. Note panel or screen
keyboard.
2.1 Power on/Off
To turn on your phone please press POWER button on the right side. If turn off the
device press POWER button more than 3 seconds then choose power off.
2.2 Key
Page 10

2.3 Touch screen operations
Use touch screen makes it easier to select items or perform functions. Learn to
use the basic operation of the touch screen.
◇ To avoid scratch screen, do not use sharp tool
◇ Forbidden touch screen touching other electronic device. The static discharge may
cause malfunction of touch screen.
◇ To make better use of touch screen please peel off protect film before use it.
◇ Touch screen has a layer that can detect weak electric charge emitted by the human
body. For best results, use your finger to tap the touch screen belly. If you use a stylus
or pen and other sharp instruments to operate the touch screen may be
unresponsive.
Carry out below operations also can control touch screen:
◇ Click:Click one time, confirm menu or run application.
◇ Long press:Long press an application last 2 seconds.
◇ Drag:Long press an application last 2 seconds move to the designated position. (If
need remove, drag the application to recycle bin)
◇ Double-click:Click twice on a application.
◇ Slide:Slide in four directions for navigating the screen and website.
◇ pinch-to-zoom: Two fingers on the screen will be stretched, and then carried them
through the switching finger zoom in or out.
Tips: 1. If you do not use the device for a specified length of time, the device turns off the
touch screen. To open the screen, press the power button.
2.Also adjust the backlight time. In standby mode, open the main menu, then select
Settings》Display》Screen Timeout
10
Page 11

2.4 Setting screen lock/unlock
Start screen lock feature can lock the touch screen, every time turn on the phone
or unlock the touch screen, the device will be asked to enter the unlock code.
Setting unlock pattern
① In standby mode, open the application list and select Settings / Security / screen lock
/ pattern.
② Pay attention to screen tips and examples pattern then choose next
③ Your figure dragged for connecting 4 point to draw up a pattern.
④ Select “Continue”
⑤ Draw again for the pattern and confirmation
⑥ When turn on the phone or unlock touch screen, drawing the pattern before enter the
desktop.
Face recognition
① In standby mode, open the application list and select settings/security/screen
lock/recognition face unlock
② Pay attention to screen tips and choose setting then move to next step
③ Make your face direct at the camera then framing and wait to remember it.
④ After remember your face also need input a pin code, if face to unlock failed you can
input a pin code for the screen unlock successfully.
Setting voice unlock apps
① In standby mode, open the application list and select settings/security/screen lock/
voice unlock
② Pay attention to screen tips and choose setting then move to next step
③ Recording your voice
11
Page 12

④ After keep your voice in memory storage you also need to input a pin code or pattern,
if voice unlock failed you can input a pin code or pattern for the screen unlock
successfully.
Setting unlock PIN code
① In standby mode, open the application list and select settings/security/screen
lock/PIN
② Input new PIN code (Number)and select “Continue”
③ Input new PIN code again then choose confirm.
④ When turn on the phone or unlock touch screen, input PIN code enter the desktop.
Setting PUK
① In standby mode, open the application list and select settings/security/screen
lock/password
② Setting new passwords(number, grapheme)then select “Continue”
③ Input new password again then choose confirm.
④ Input new PIN code again then choose confirm. Input password enter the desktop.
Lock SIM Card
Lock SIM card by PIN code
① In standby mode, open the application list and select settings/security/ lock the
phone/ SIM card locked.
② Input PIN code and choose confirm
③ If already started the lock of PIN code, please input PIN code every time when turn on
the device
Tips: 1. If input wrong PIN code several times SIM card will be locked automatically. You
have to input PUK so that SIM card could be unlocked.
12
Page 13

2. If input wrong PUK caused SIM card locked please take the SIM card to the service
provider to deal with this problem.
2.5 Use notes panel
Notification icons appear on the status bar at the top of the screen to report missed calls,
new messages, calendar events, device status, and more. Drag down from the status bar
to open the notifications panel. Scroll the list to see additional alerts. To close the
notifications panel, drag up the bar that is at the bottom of the screen.
Quick setting panel:
◇ Flight mode: Activate or deactivate flight mode.
◇ Power saving: Activate or deactivate power-saving mode.
◇ WLAN: Activate or deactivate the Wi-Fi feature
◇ Bluetooth: Activate or deactivate the Bluetooth feature.
◇ GPS: Activate or deactivate the GPS feature.
◇ Screen rotation: Allow or prevent the interface from rotating when you rotate the
device.
◇ Flashlight: Activate or deactivate the flashlight feature.
◇ Profiles:Can choose standard, mute, conferences and outdoor mode
◇ Brightness: It can adjust the screen brightness
◇ Sleep: Can adjust the screen timeout for 15 seconds, 30 seconds or a minute
13
Page 14

3. Function menu
3.1 Phone
Learn how to use call features such as make or receive calls, use the options available
during a call, or customize and use of call-related features.
Making a call or receiving calls
You can use buttons or touch screen while dial, answer or refuse a call. When open
proximity sensor, the device will close automatically and lock the touch screen, in order to
prevent the equipment clingy facial when unexpected input. During a call the static
electricity was caused by the body and the clothes will interfere the proximity sensor.
Making a call : (1) In standby mode, select the Dial.
14
Page 15
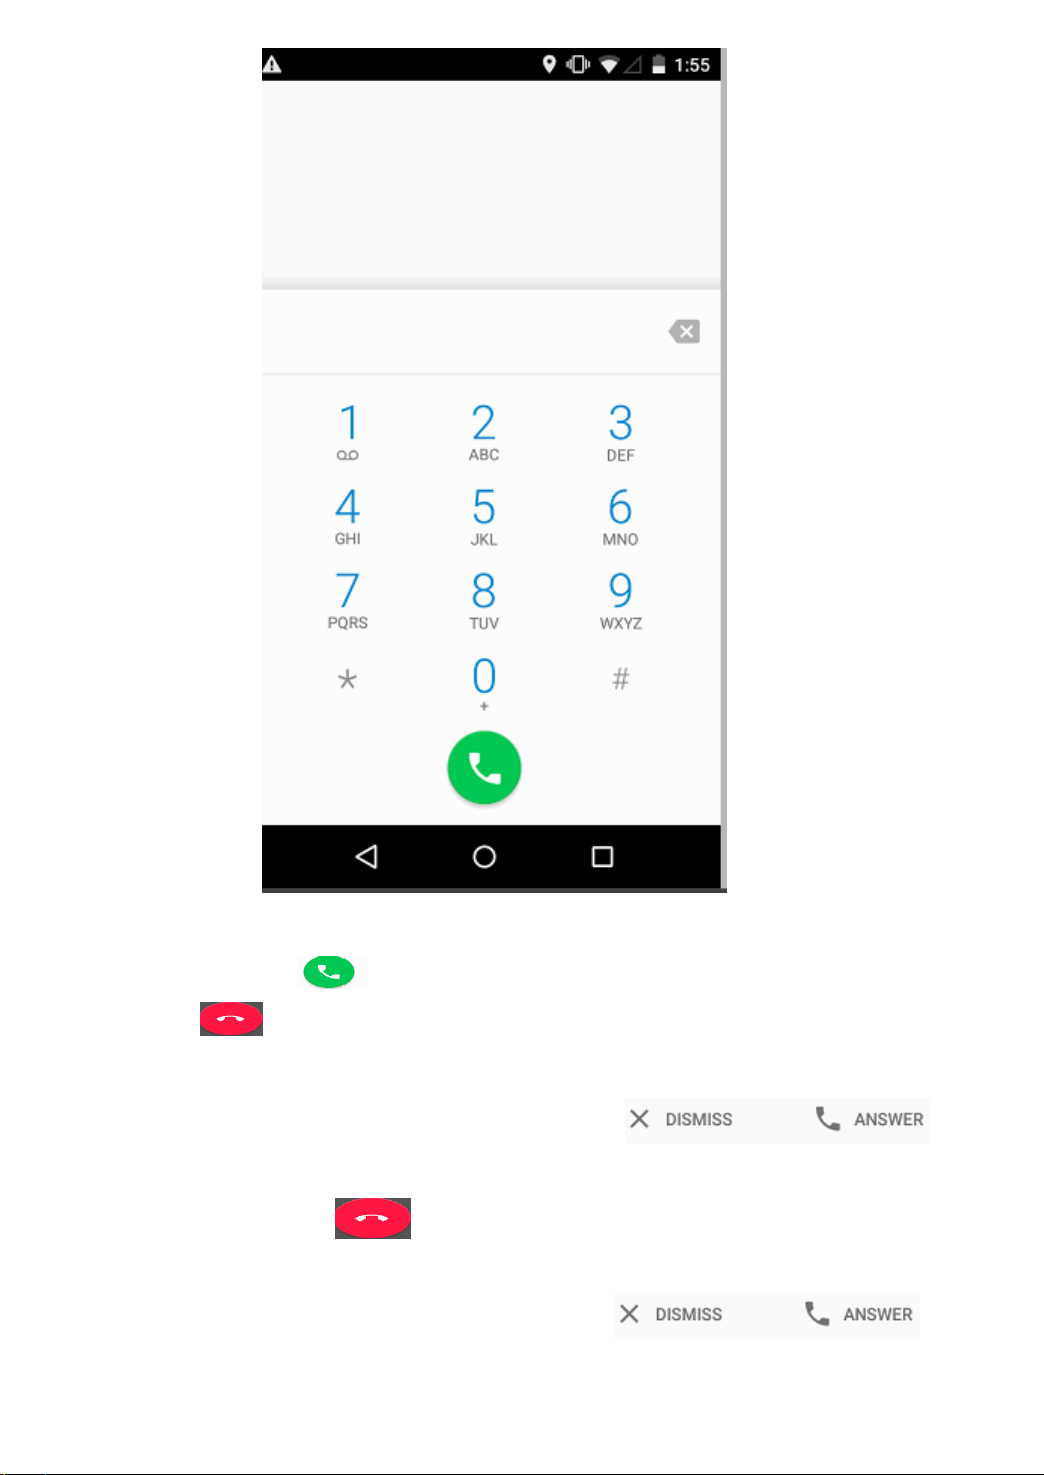
(2) Enter the country code, area code, and phone number,
(3) And then tap .
(4) Tap to end a call.
◇ Receiving calls:1. When a call comes in,tap for
answer,When the device is ringing, press the volume keys to mute the device.
2.To end the call, Tap 。
◇ Reject calls:When an incoming call, tap Ignore 。
15
Page 16
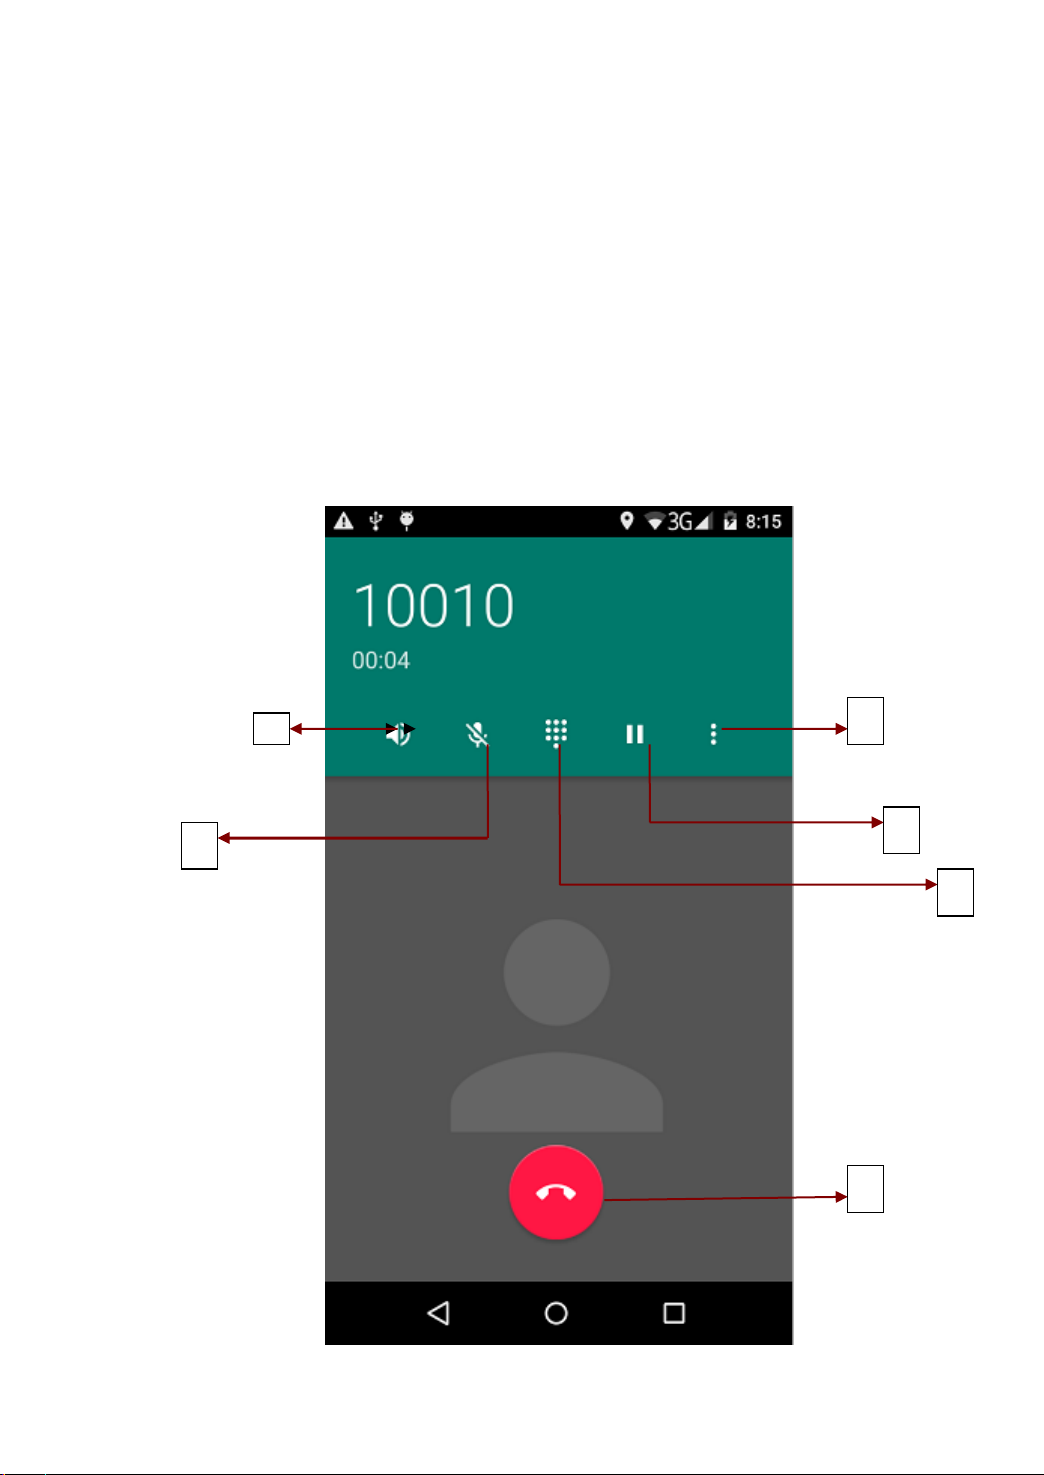
2
3 4 5
6
Use Headset
Connect the headset with smartphone, can answer and control the call:
◇ Tap headphone button you can receive the phone
◇ Long press the button of headphone a call will be refused.
During a video call
The following actions are available:
16
Page 17
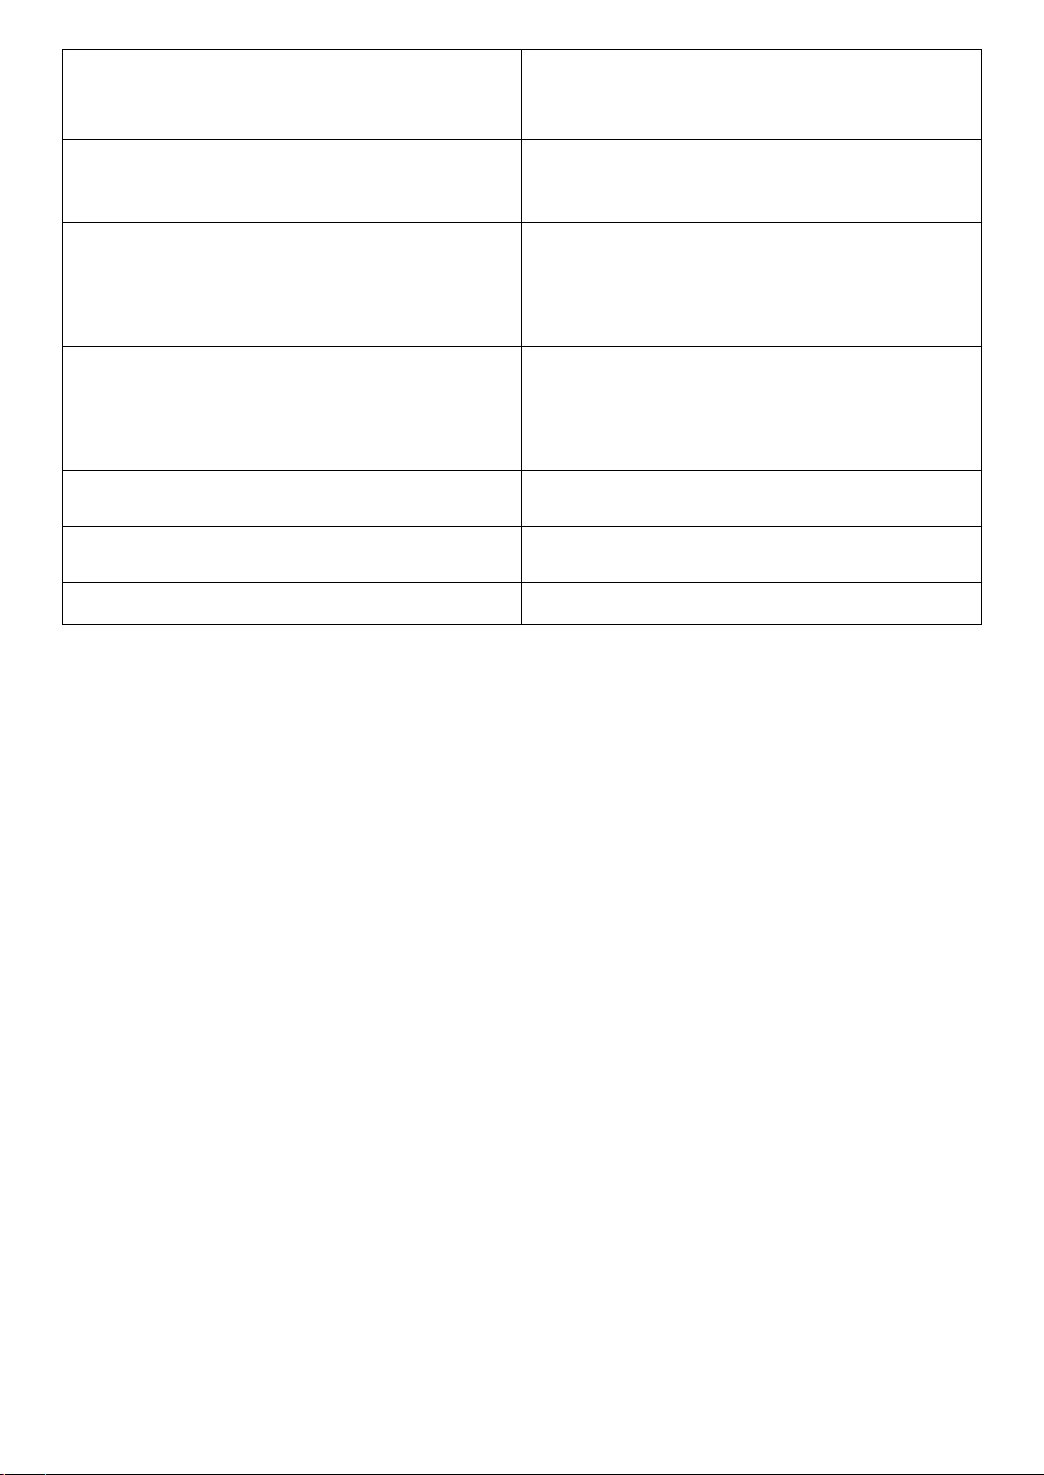
Number
Features
1
Open the loudspeaker, other people can
heard what you said
2
Speaker off, deactivate the speakerphone
feature.
3
Operators can open multi party calls, add
the second or more parties calls then
perform recording
4
Keeping a call with previous people
5
Open the keypad
6
Ending a call
Speed dial numbers
◇ For speed dial numbers, tap and hold the corresponding digit.
◇ Make a call from the contacts list.
3.2 Messaging
Use this application to send text messages (SMS) or multimedia messages (MMS) and
manage the messages what you received or sent out.
Sending messages
◇ Tap messaging on the Applications screen.
◇ Editing new message
17
Page 18
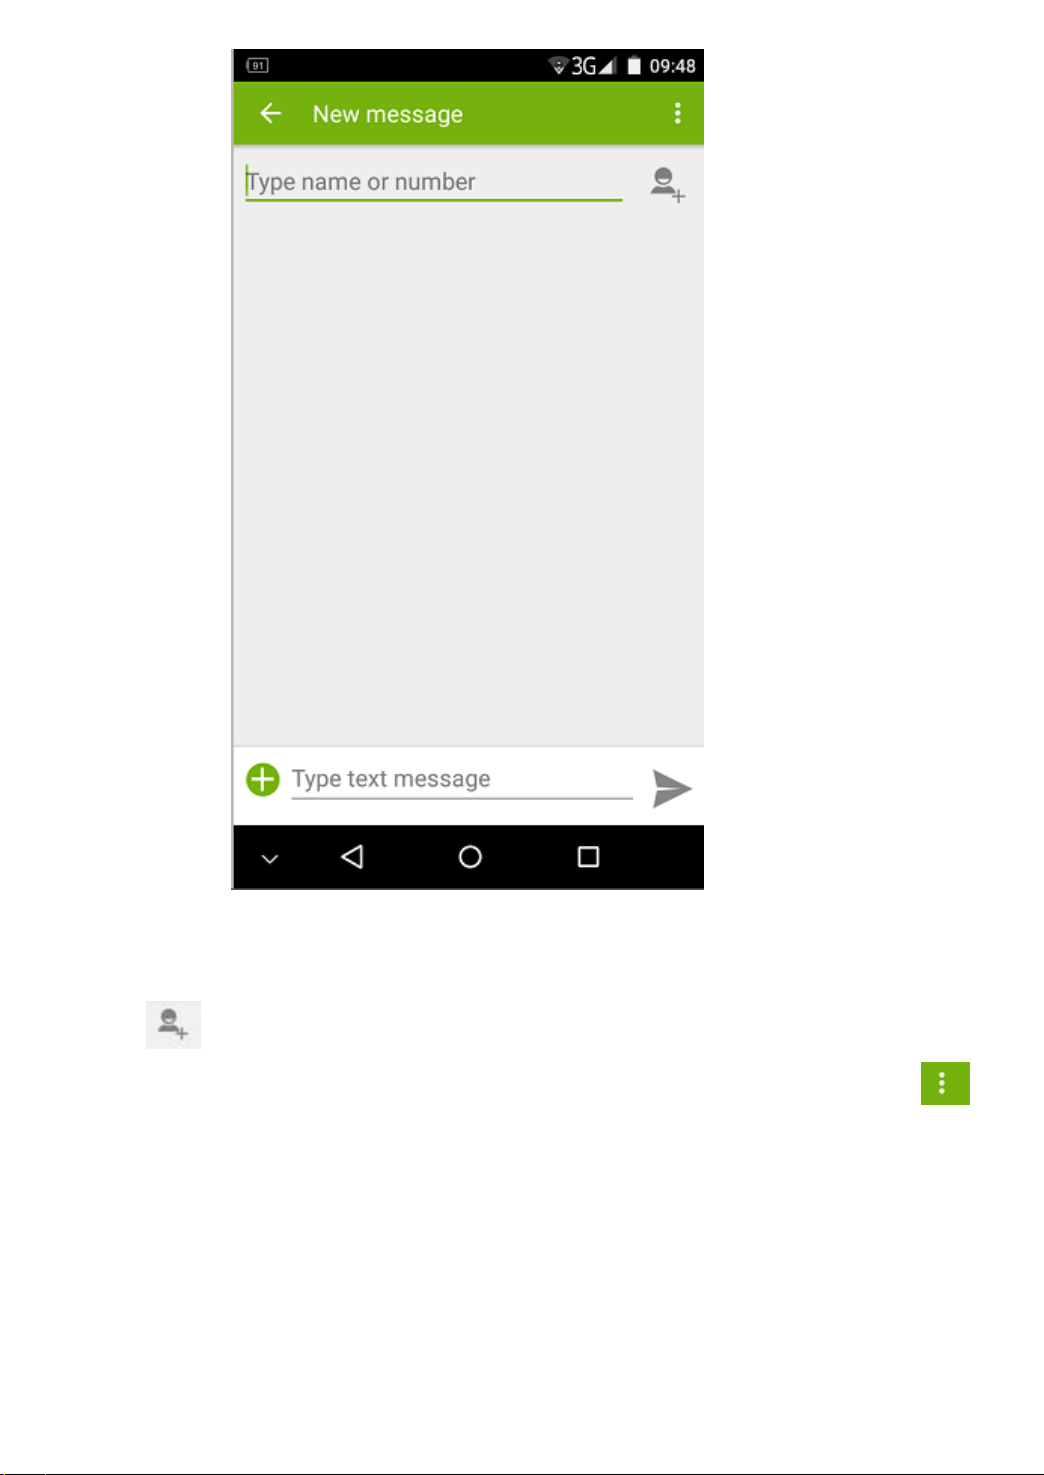
Add recipients
1. Enter a phone number if more than one phone number please separate them by“,”
2. Tap choose the phone number from contacts.
• Choose recipient, enter a message, if need insert text template please tap
insert common phrase, contacts and add subject
• Tap “send” for sending message
Sending a multimedia message
◇ Tap messaging on the Applications screen.
◇ Editing new message
18
Page 19

Add recipients.(1) Between a manually enter a phone number or email address,
multiple numbers or addresses with a semicolon or a comma.
(2) Select from the list, select the phone number or e-mail address.
(3) enter an email address, the device will convert the information for MMS.
◇ Tap add subject to enter a subject.
◇ Tap attach images, videos, contacts, memos, events, and others.
◇ Select sending a message.
View the SMS or MMS
◇
In standby mode, select the information. Using the mailbox information contact
group for information dialogue.
◇
Select contacts.
◇
MMS or SMS message, select a message to view details.
3.3 E-mail
Use this application to send or view email messages.
Setting up email accounts
◇ In standby mode, opening communication then choosing email for the first time
◇ Enter the email address and password then tap Next
19
Page 20
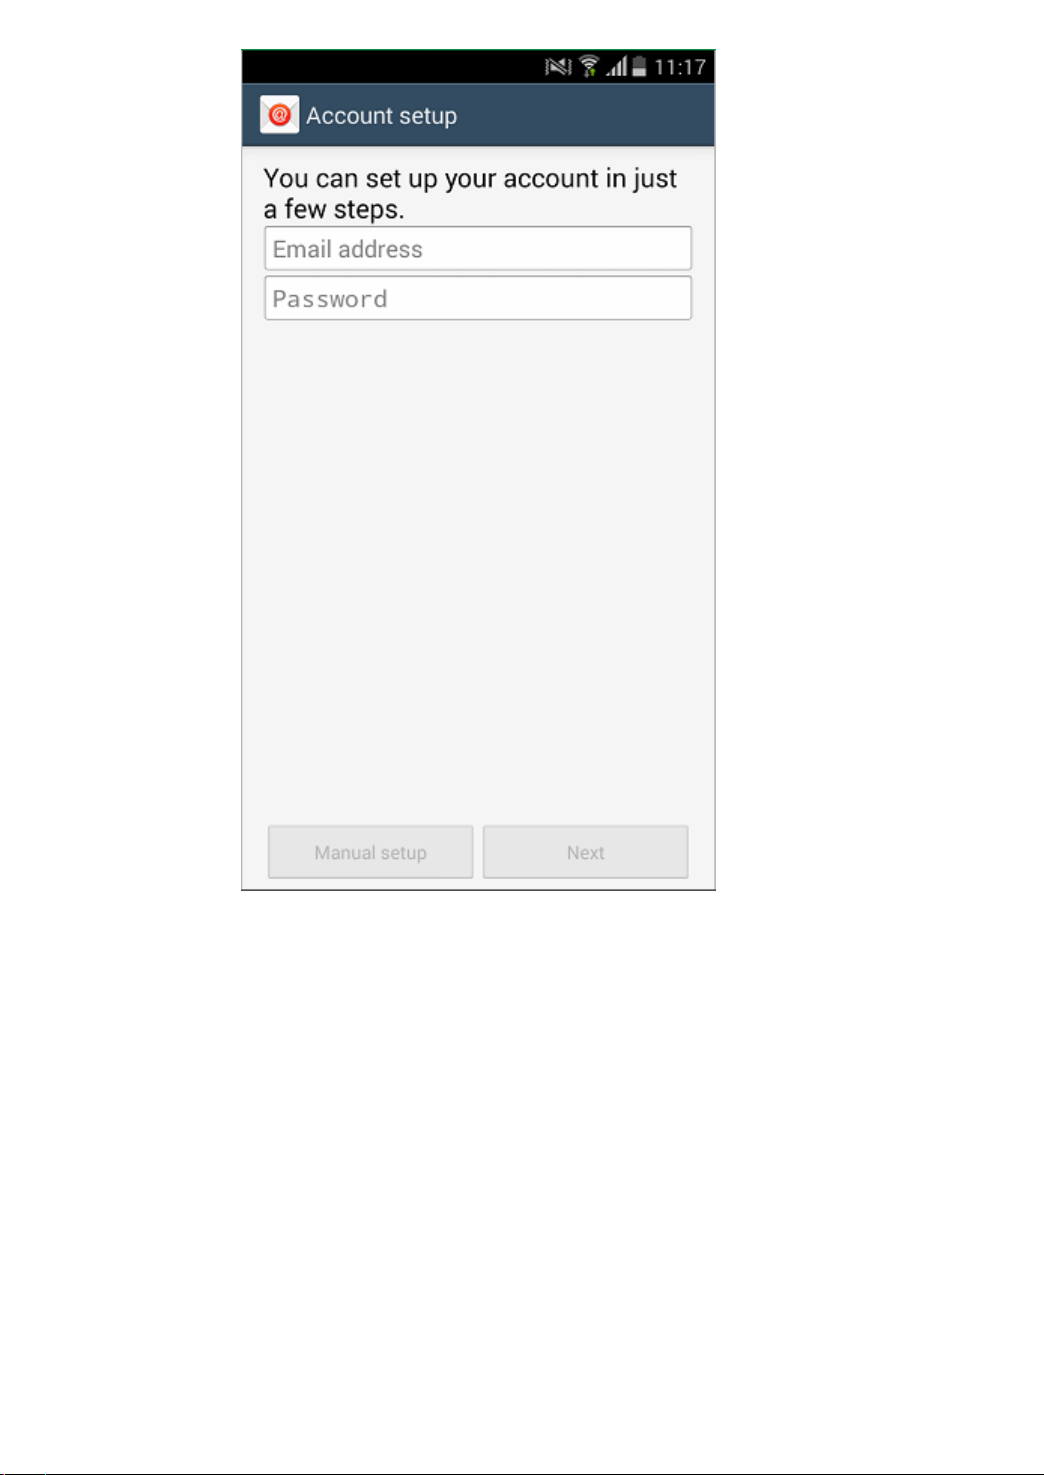
.
◇ Once completed the Email account setting the email information will be download to
the device. If have already set up 2 email accounts you can switch between two
accounts, choose the account name at the left bottom of your screen and tap a
pre-extracting email account.
Sending messages
20
Page 21
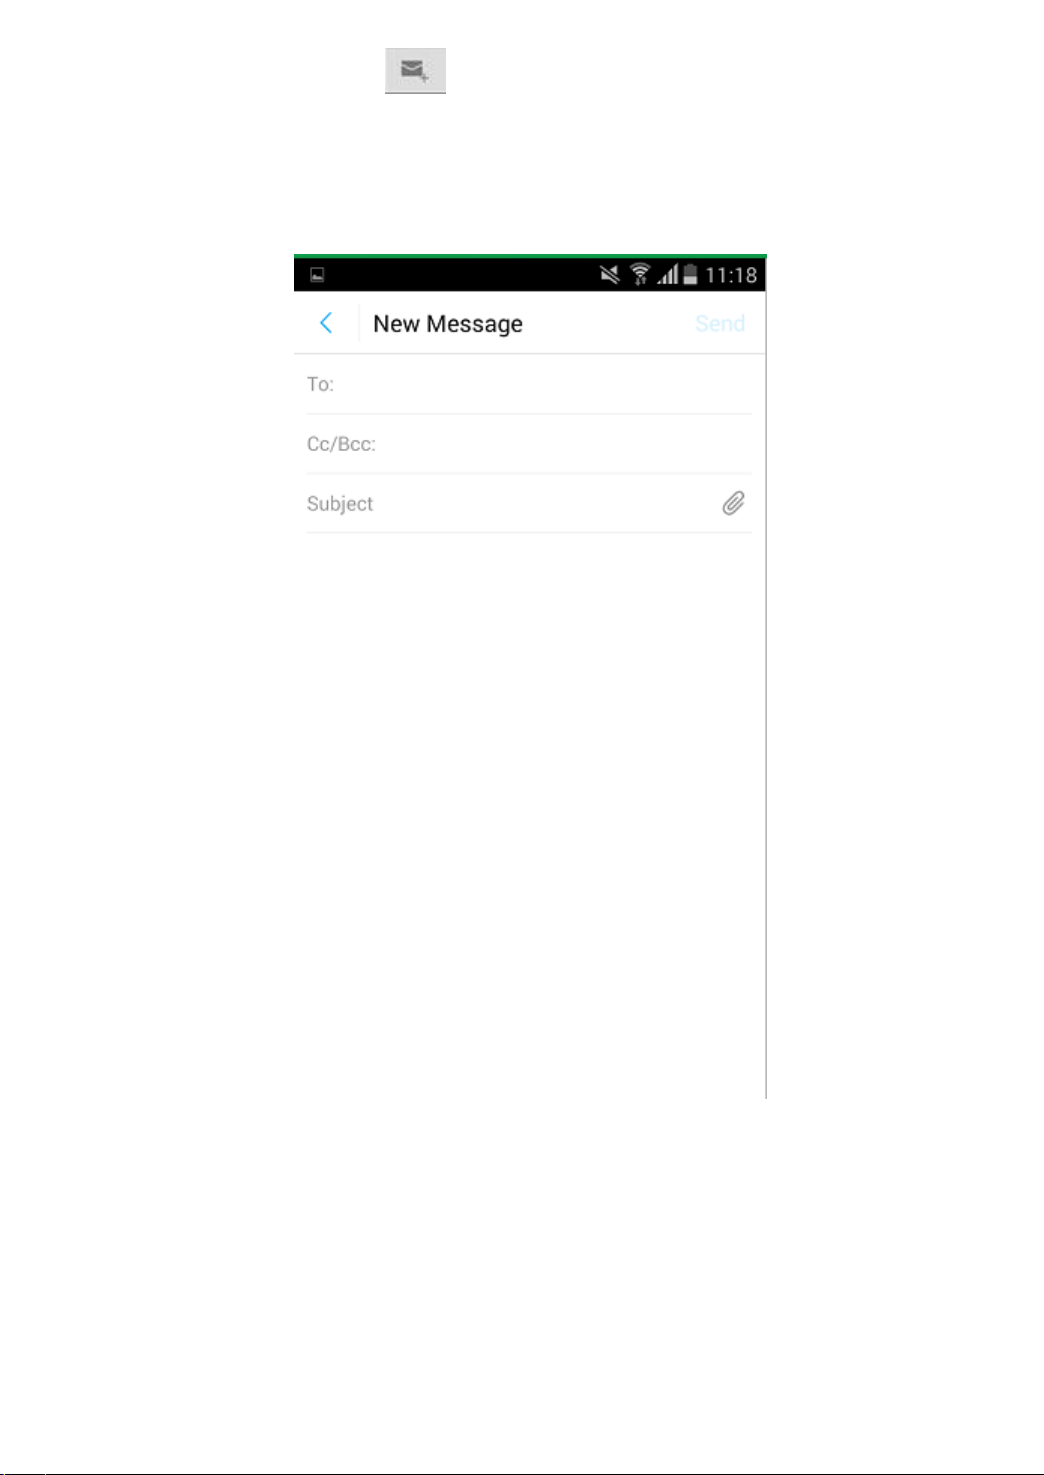
Enter the Email appliance tap for editing the content of email.
◇ Adding recipients (1).Input email address by hand, more than one email address
should be separated by”,” (2). If need to copy or blind copy tap MENU choose add CC
and BCC address
◇ The select a topic to the field to enter a subject.
◇ The select a text input field to enter the body of the email. To add an attachment,
press the MENU button to add attachments. You can choose from the list of files to
add contacts, and can also create a new photo, video or sound.
◇ The choose to send to send a message.
21
Page 22
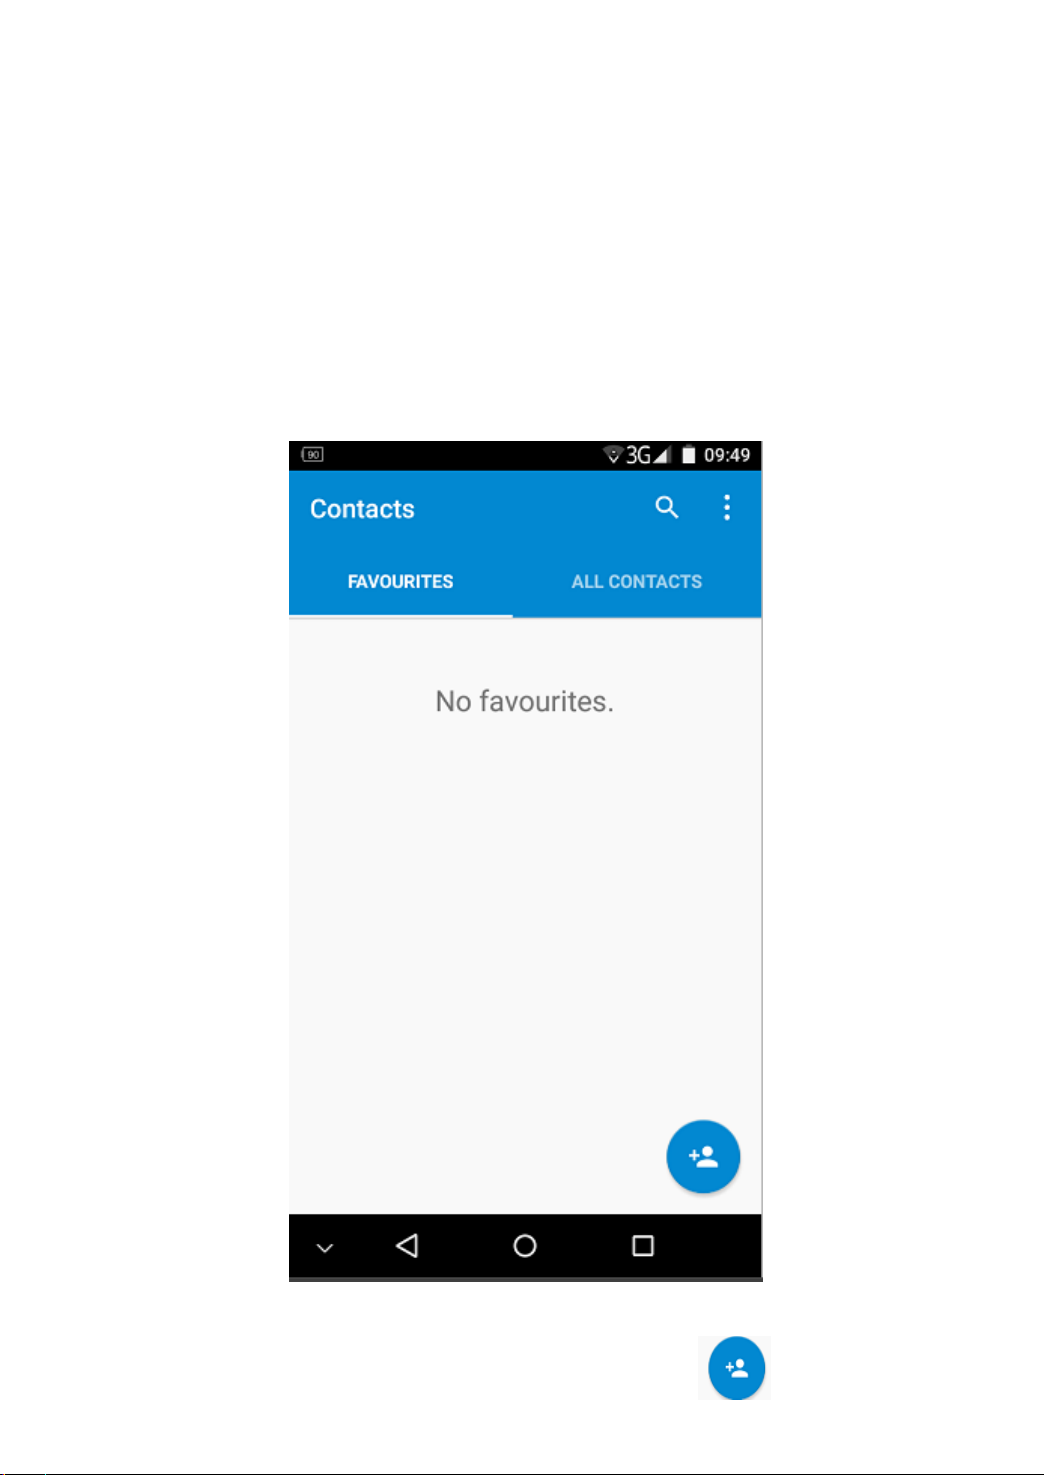
3.4 Contacts
Use this application to manage contacts, including phone numbers, email addresses, and
Others. Tap Contacts on the application screen.
Creating a contact
◇ In standby mode, select a contact.
◇ Add new contact at the bottom right corner of the screen
22
Page 23
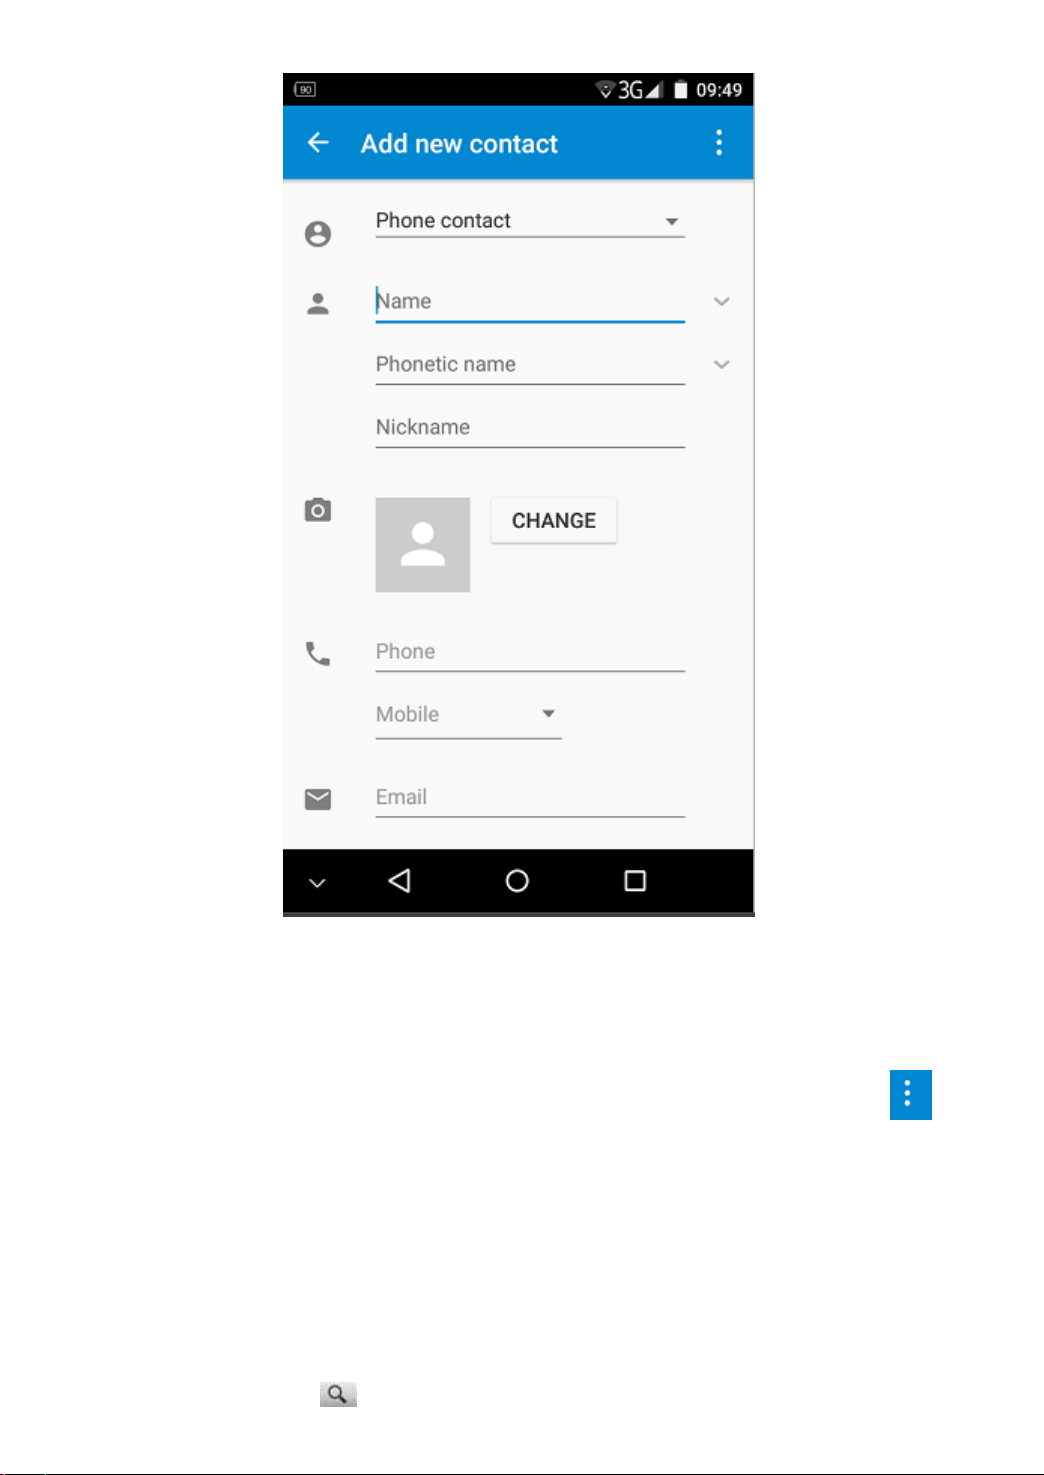
◇ Choose storage location smartphone or SIM card
◇ Input contact information and save.
◇ Create contact from phone interface. In standby mode tap phone and tap for
choose add new contact. Confirm the storage location before input contact
information and save.
Searching for contacts
◇ Tap the search field at the top of the contacts list and enter search criteria.
23
Page 24

◇ Use the index at the right side of the contacts list for quick scrolling, by dragging a
finger along it.
Moving contacts
◇ Tap at the contacts interface
◇ Click “delete contact”
◇ Choose the person which you want to move
Importing or Exporting contacts
For contacts on the memory card file into the device:
◇ Contact interface press the MENU button to import or export.
◇ Copy contacts from the selected source (phone, SIM card or SD card), click Next.
◇ Need to export your contacts file and select OK.
3.5 Settings
Connection
Manage SIM card
◇ SIM card information: the name of the current network operator.
◇ The default SIM card: You can set up for voice telephony, video telephony,
information, data connection.
◇ Other settings: You can set up international roaming, and contacts with the SIM card.
24
Page 25
WLAN
◇ WLAN: Tap to the right side of Wlan for open Wifi, select a network
from the list of detected Wi-Fi networks, enter a password if necessary, and then
tap Connect. Networks that require a password appear with a lock icon. After the
device connects to a Wi-Fi network, the device will automatically connect to it any
time it is available.
Tips: Open airplane mode based on Wifi opened, the system will turn off Wifi
automatically; Open airplane mode and connect to wifi again the wifi can work well.
Bluetooth
◇ Tap bluetooth for open.
◇ Enter the bluetooth inferface tap (1) Re-name smart phone (2)Inspect
setting timeouts (3) Display the received documents
Data usage
Keep track of your data usage amount, and customize the settings for the limitation.
More
◇ Airplane mode: Stop all the wireless connection, tap it for turn on/off.
◇ VPN: Before modify VPN network need to set lock screen PIN code or password.
◇ Network sharing and portable hotspots
◇ The default short message application
◇ Mobile network: 3G service, the name of the access points, network operators
25
Page 26

My device
Audio profiles
There are four models, including the standard for the meeting and outdoor, for each
model can sound Settings
Display
◇ Lock screen notifications:Open after missed calls or unread messages, showing the
lock screen
◇ Wallpaper::can change the wallpaper
◇ Auto-rotate screen::mobile phones can rotate mobile phone to change direction
setting
◇ Brightness::adjustment screen brightness
◇ Daydream:Into the dock, charge, or both either case, there will be display
screensaver clock, kaleidoscope, photos, tables and frames
◇ Font size:You can set the font size
◇ Sleep:Adjust the screen automatically locks the delay before
◇ Wireless display:Wireless devices
Accessibility
◇ TalkBack:"TalkBack" This device is turned on and enabled for the blind and visually
impaired users, to provide voice feedback.
26
Page 27

◇ Magnification gestures :When this feature is enabled, you can zoom in by clicking the
screen three times
◇ Power button ends call :Can choose to open or close
◇ Speak passwords :Can choose to open or close
◇ Touch & hold delay :Can choose short, medium and long
◇ Enhance web accessibility :You want to allow the application to install scripts from
Google so that you can browse the web content of these applications
Language keyboard
◇ Choose the language: select all of the application form and function display
language
◇ Android keyboard: some of the keyboard to Android Settings
◇ Input method: choose the default keyboard type text input
Account
Add account
Add the account and data synchronization
Backup and reset
◇ Back up my data: Set the device to back up settings and application data, wlan
password to the Google server.
◇ Reset DRM: delete all DRM licenses.
◇ Factory data reset: Reset settings to the factory default values and delete all data.
27
Page 28

Location Services
◇ Access to my location: Set the device to allow applications to use your current
location information
◇ GPUse GPS satellites: Set the device to use the GPS satellite for finding the current
location.
◇ Wlan & mobile network location: Set the device to allow google location data
collection and to determine the location of your lost or stolen device via Wi-Fi or
mobile network
Security
◇ Screen lock :You can use pattern, PIN, Face Unlock, voice unlock or password lock
screen
◇ Owner info:Input character display owner information on the lock screen
◇ Encrypt phone :Have to enter a PIN or password to decrypt the phone each time the
phone is switched on after the encryption
◇ Set up SIM card lock :Set up SIM card lock
◇ Make passwords visible :The Password screen display password
◇ Device administrators : Add or Remove Device Manager
◇ Unknown sources::allow installation is not from electronic market for application
◇ Verify apps :Prohibit the installation of applications that could be hazardous, or
warned before installing
◇ Install from SD card:: from the SD card installed encryption certificate
App
28
Page 29

View and manage the applications on your device.
Battery
View the amount of battery power consumed by your device.
Storage
◇ View memory information for your device and memory card, or format a memory
card.
◇ Uninstall SD card and format SD card
Date and time
◇ Automatic determine the date and time: can use network provide time or GPS
provides a time
◇ Automatic sure time zone: can open the use of the network time zone
◇ Set period: manual set the current time
◇ Set a time: manual set the current time
◇ Using 24 hour format: set to 24-hour system shows the time
◇ Choose the date format: choose duly format
Schedule power on/off
Touch can set the timer power on / off time can also choose to repeat or a week a day.
29
Page 30

About device
Access device information and update device software.
◇ Android version: Double-click twice on Android version will pop up the lollipop
interface
◇ Version code: Double-click four times on version code you can enter the
developer.
3.6 Camera
Take photo
◇ In standby mode, tap camera on the applications screen.
◇ Tap the image on the preview screen where the camera should focus. When the
subject is in
focus, the focus frame turns green. Tap to take the photo.
30
Page 31
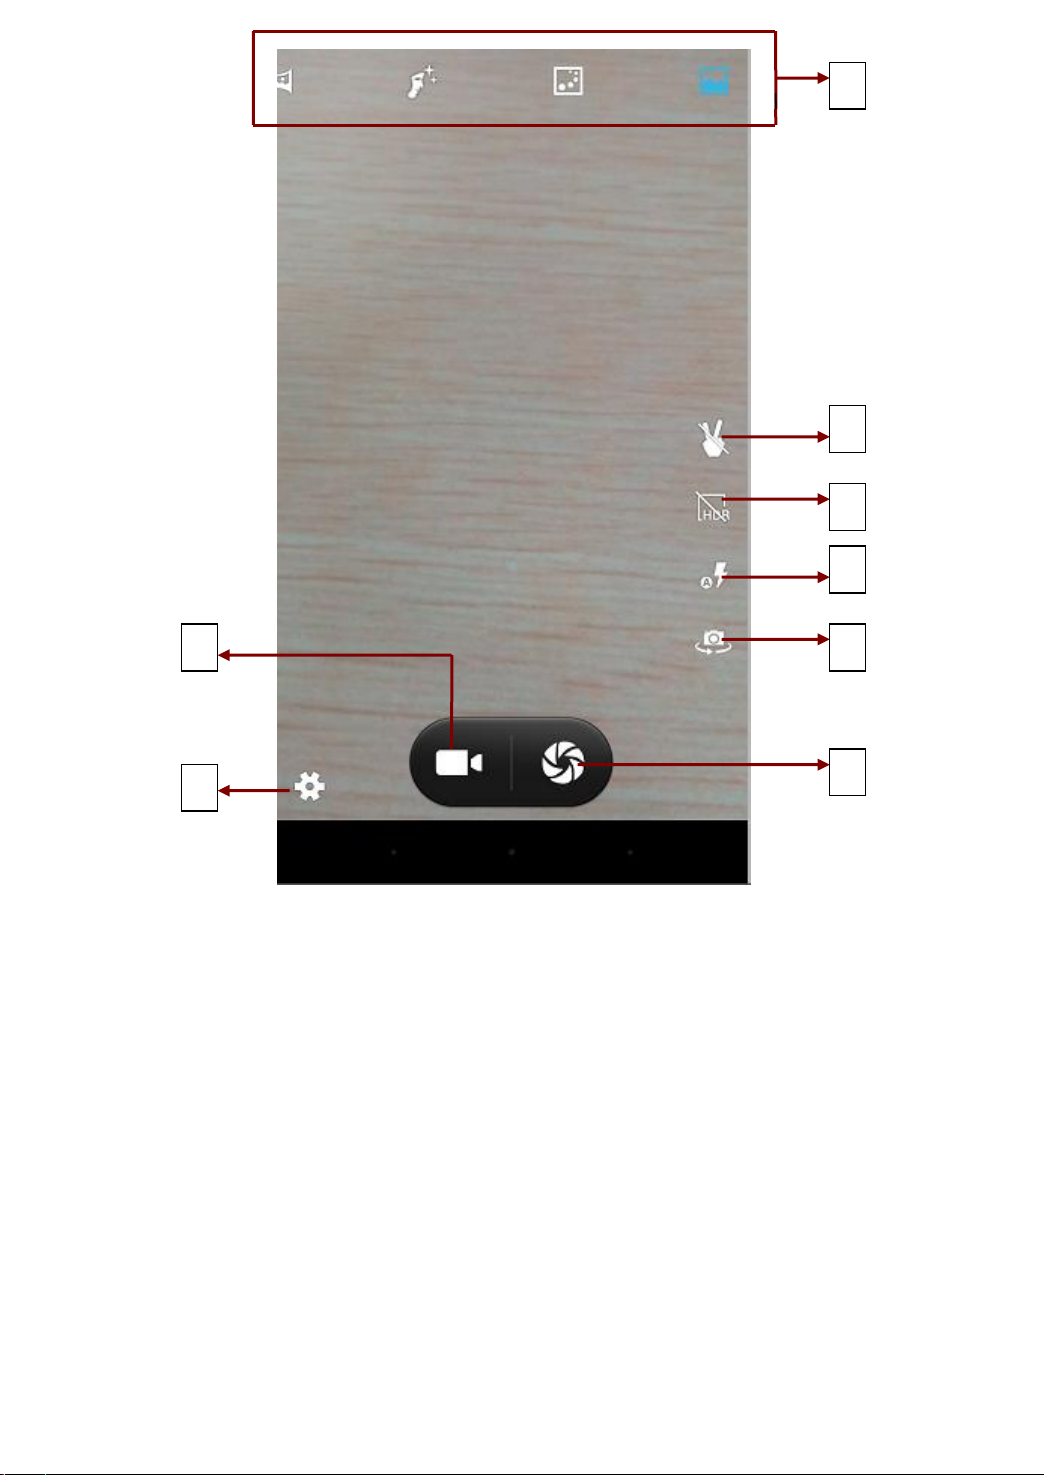
1 2 3 4 5 6 7
8
tips:
1. Set Menu
① GPS information: Open it you will know the current location.
② Exposure value: Change the exposure value. This determines how much light
the camera’s sensor receives. For low-light situations, use a higher exposure.
③ Color effect: for set color in mono,sepia, negative, posterize, aqua,
blackboard and whiteboard.
④ White balance: This settings are designed for specific lighting situations eg.
incandescent light, sunlight, fluorescent, cloudy day etc.
⑤ Anti-flicker: Should choose 50Hz or 60Hz automatically.
⑥ restore default settings: Restore camera default set.
31
Page 32

Set camera
① Face Detection :Capture focus on the face
② Self-timer setting: set 2 seconds or 10 seconds.
③ Picture size :Can choose a standard 4:3 QVGA, VGA, 1 million pixels, 1.3
million pixels, 2 megapixels, 3 megapixels, 5 megapixels and 8 megapixels.
Full-screen can be selected megapixels, 4 megapixels and 6 megapixels.
④ Preview size :Can select the full screen and standard (4:3)
⑤ ISO:Can be set to Auto, 100, 200, 400, 800 and 1600.
⑥ Facial beautification: Make facial more beautiful
Taking videos
① Anti-shake: Activate or deactivate anti-shake. Anti-shake helps focus when
the camera is moving.
② Sound recording
③ Recording mode: choose a standard or meeting
④ Delay interval: can choose delay video recording
⑤ Video image: you can set the image quality with low, normal, high quality and
high-solution image.
2. Video recording
3. Take photos
4. switch front and back shoot icon
5. Flashlight: select open/ shutoff and auto
6. HDR
7. Gestures: detect gestures after automatically take pictures
8. Sliding around in this area, from the left:
① :Long press to switch to multi-view mode
32
Page 33

② :Switch to panorama
③ :Long press to switch to the face beautification mode
④ :Click to switch to the trajectory mode
⑤ :Long Press to switch to photographed mode
◇ To view photos taken. To view more photos, scroll left or right. To enlarge or shrink,
the two fingers on the screen, and then separate the fingers (folded finger zoom out),
or double-click the screen. To send photos to others, choose to share. To delete a
photo, select Delete.
3.7 Gallery
Use this application to view images and videos
Viewing Images
◇ In standby mode, open media and tap gallery
33
Page 34
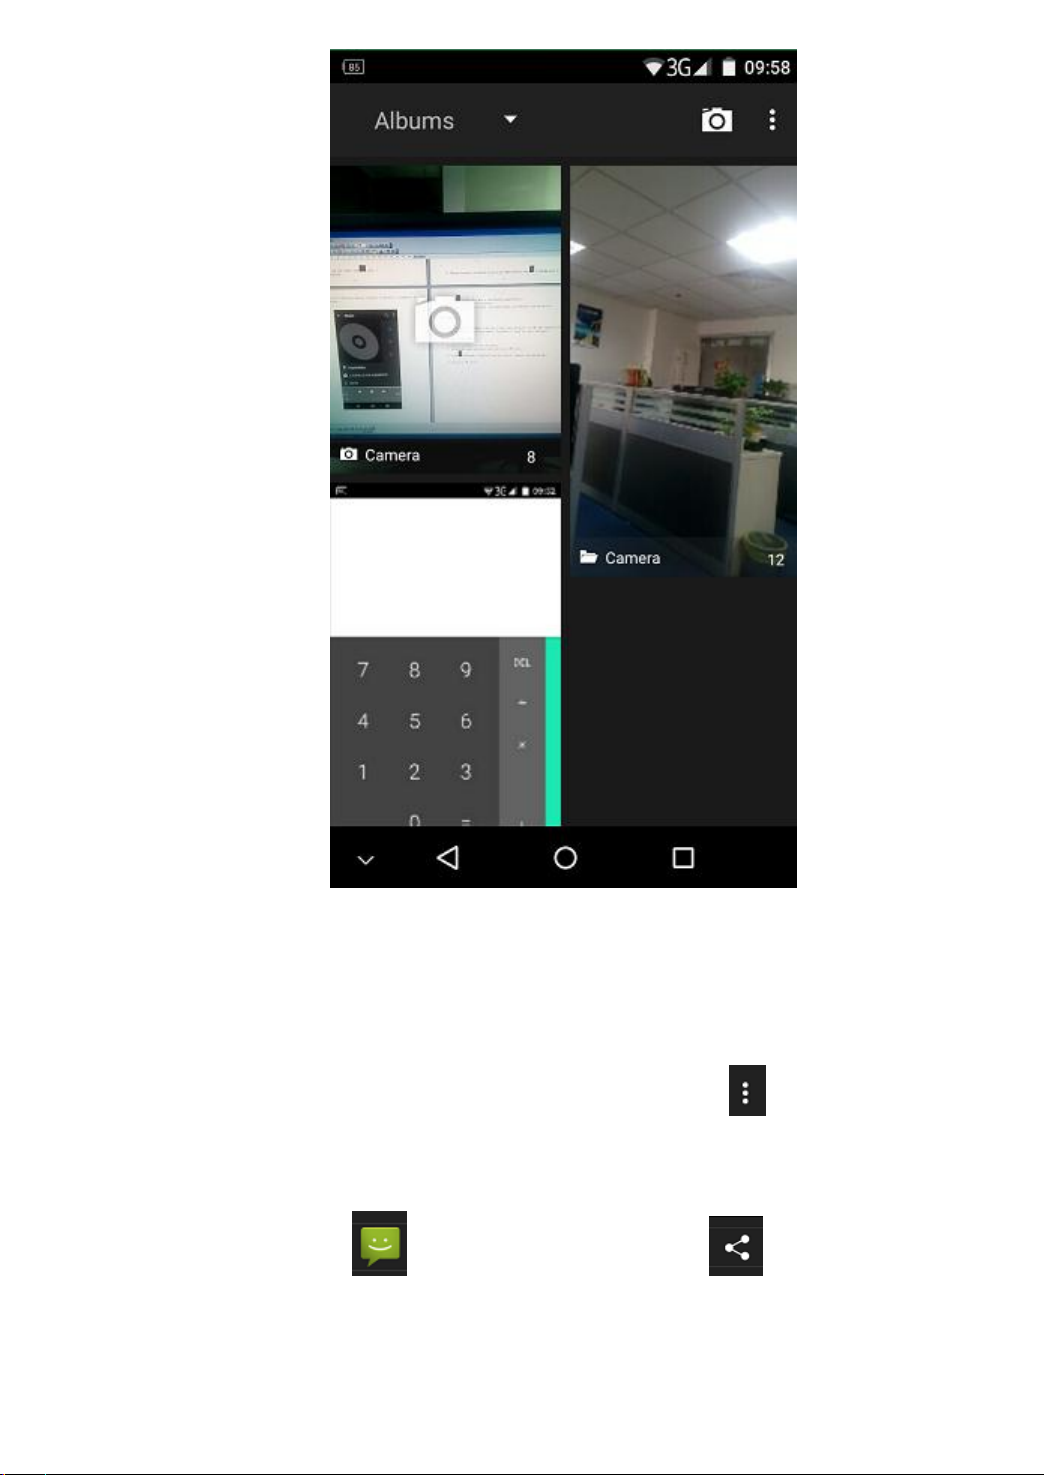
◇ Select a folder click to open it.
◇ Choose the picture for view. When check the picture tap then you can select
the following items:1. Delete 2. Slideshow 3. Edit 4. Rotate left 5. Rotate
right 6. Crop 7. Set picture as 8. Details 9. Print
◇ Share pictures: Click share to others by SMS. Click share to the nearby
people as well as contacts by bluetooth, picasa and gmail.
Playing videos
34
Page 35

◇ On gallery interface tap the videos with icon.
◇ Select a video for playing
◇ Rotate device used the landscape mode.
◇ Control playback video by virtual key
3.8 Music
Use this application to listen to music. Some file formats are not supported depending on
the device’s software version, some files may not play properly depending on the
encoding used.
Playing music
◇ In standby mode, open media and select music
35
Page 36
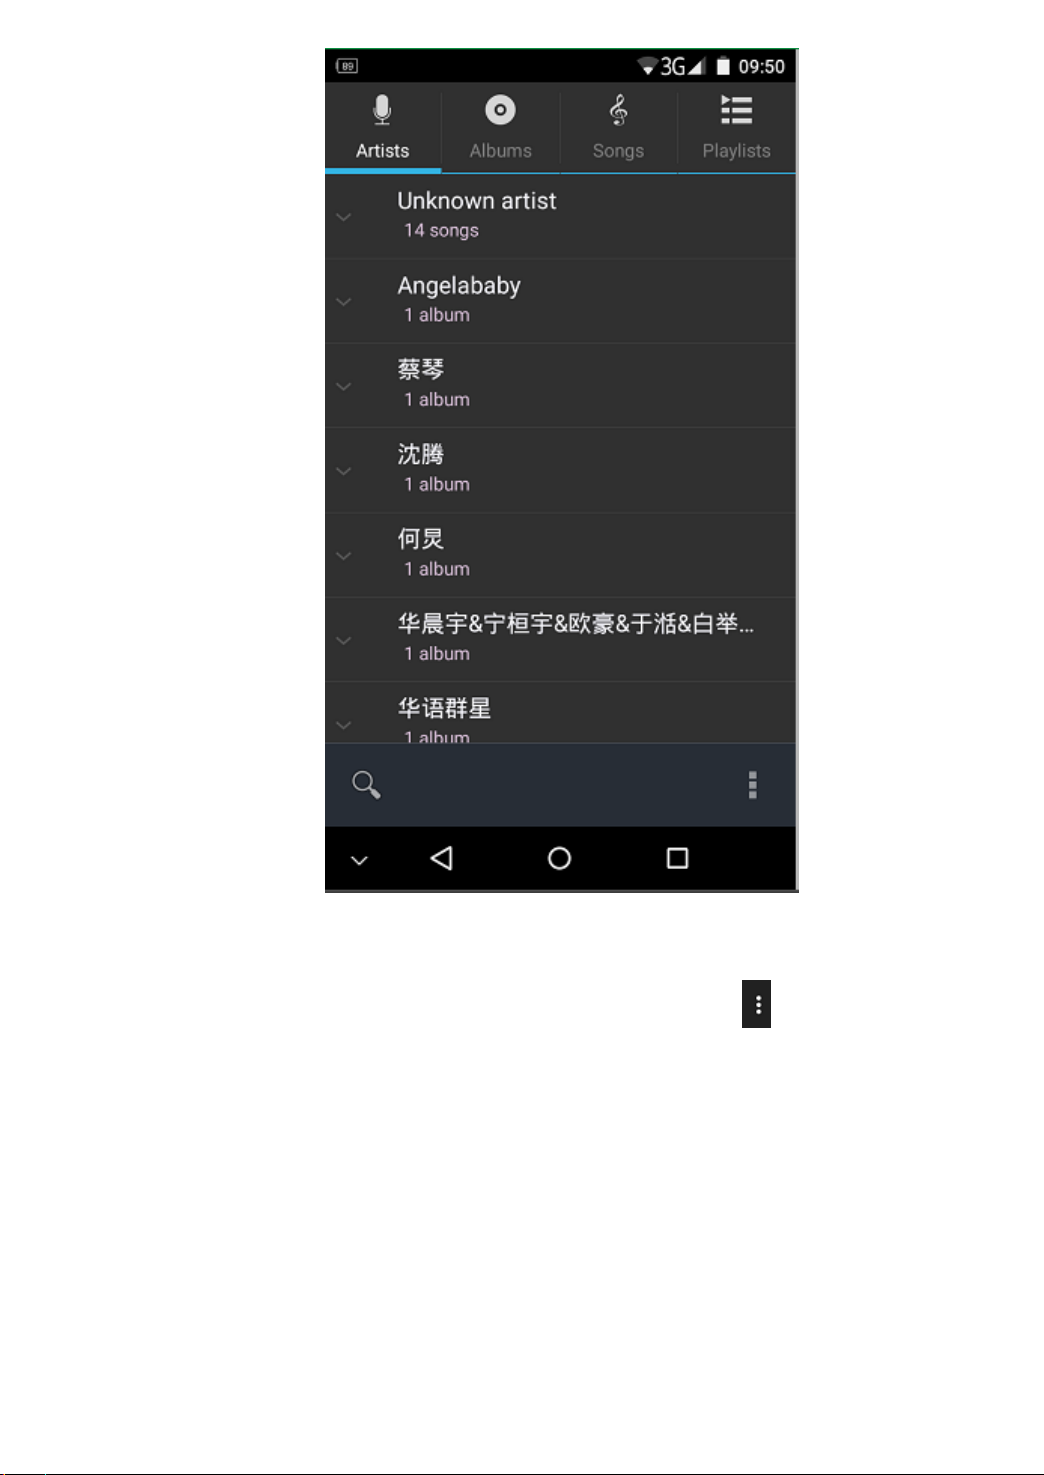
◇ Choose the music playback as you like. When playing tap 1. Random play 2.
Added to the music play list 3. Setting a song as ringtone 4. Delete 5. Sound
set 6. Can enter music library.
36
Page 37
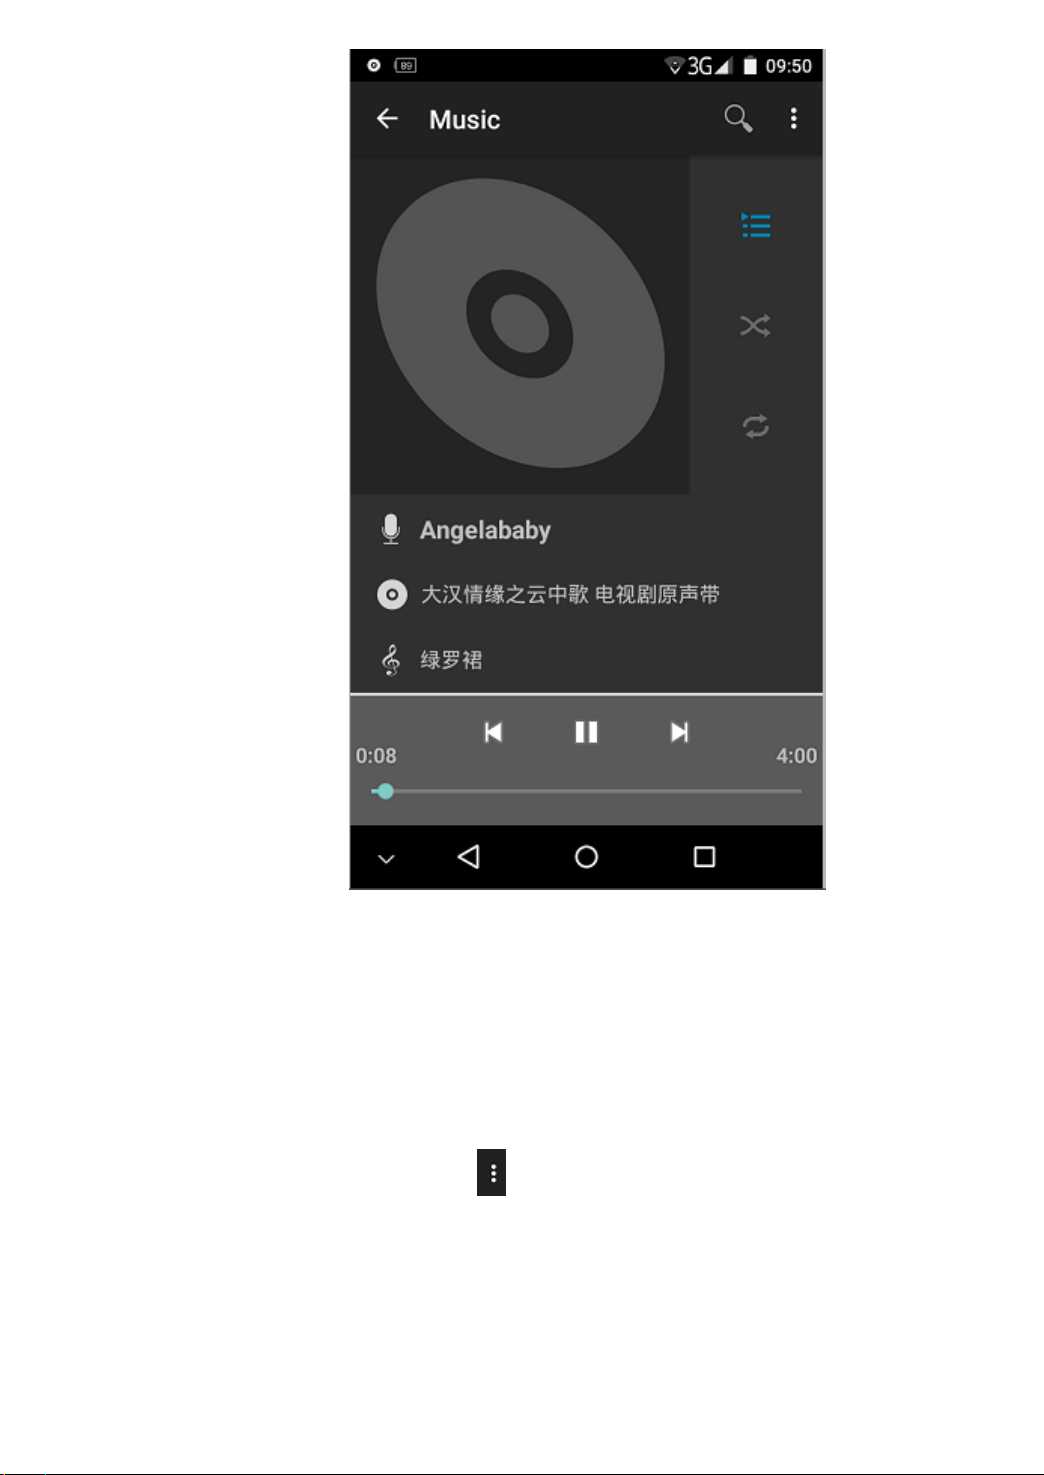
Music playback list
◇ On the music play interface tap 》add play list》create new play list
◇ Input the name of new created music play list then preserve it the current playing
music will be saved in the new created music play list.
37
Page 38

Setting sound effects
◇ Tap on the play music interface》sound effects
◇ Select sound effects started
◇ Choose a flat, bass boost, surround sound, the default reverberation
3.9 Radio
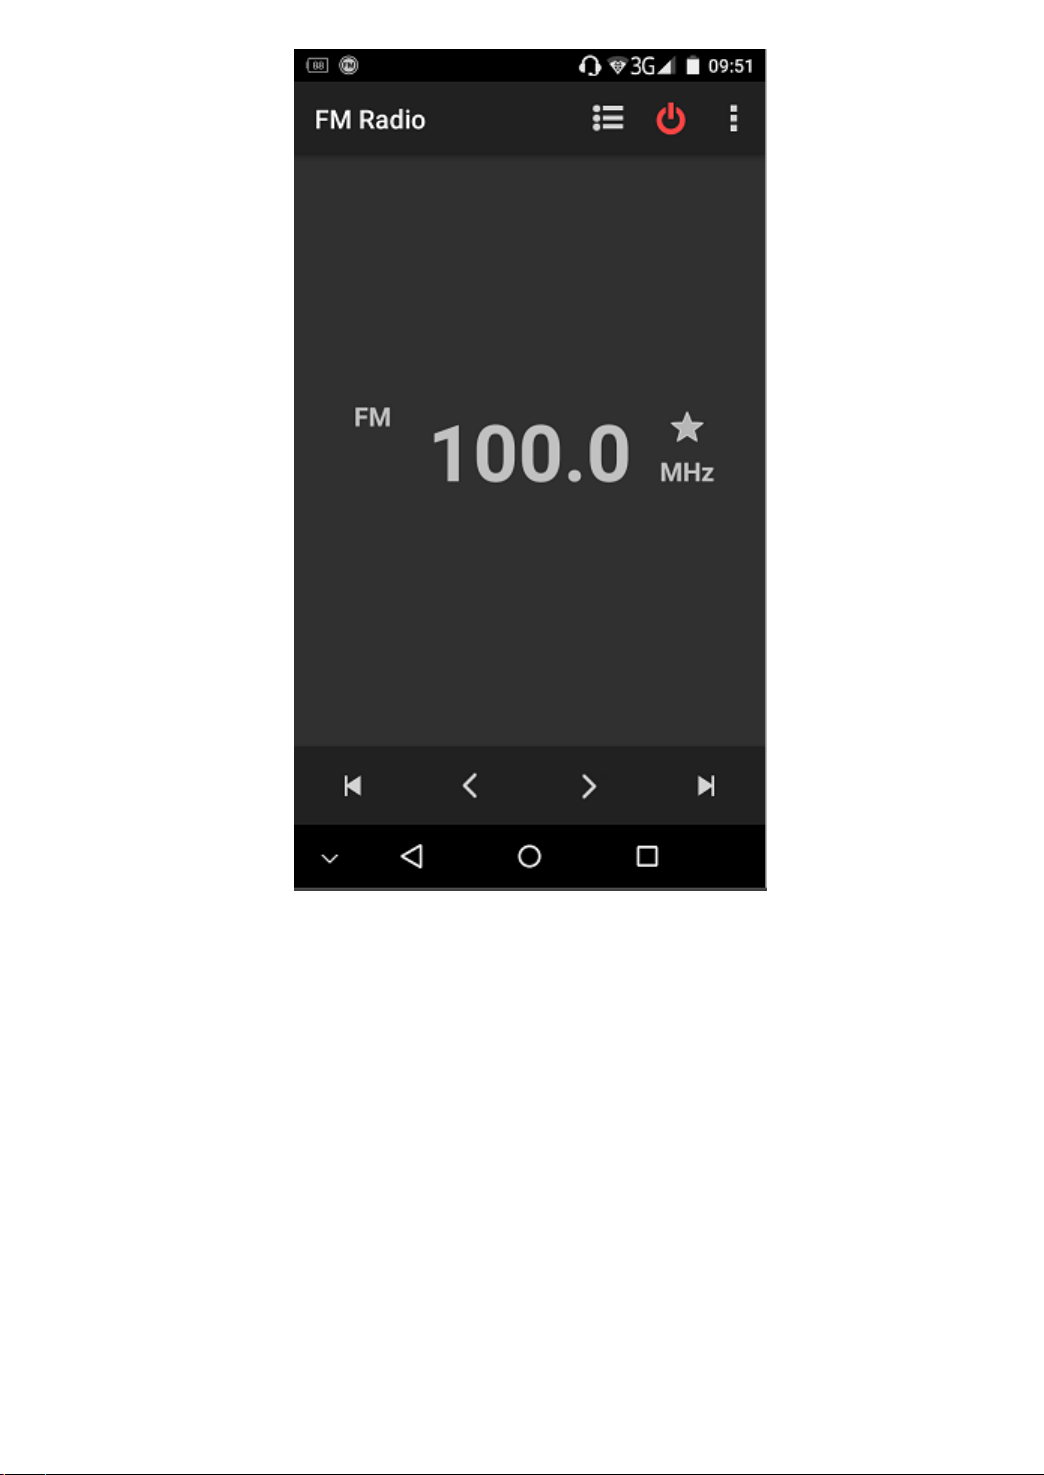
This device supports FM Radio. You can listen news and music on FM radio based on the
earphone is connected with smartphone. (earphone is used as radio antenna)
Listen to FM radio
◇ Plug in earphone to the smartphone.
◇ In standby mode open more apps and select FM radio.
◇ Click on FM Radio interface and set search, speaker and record FM.
◇ Listen to FM radio
38
Page 39
3.10 Sound recorder
Recording audio file
◇ In standby mode open HT tools then choose sound recorder
◇ Choose sound recorder started.
◇ Speak to the mike
◇ Once complete please tap pause
◇ Click play button on the save interface and playback the recording sound
39
Page 40

◇ Click save for storage
◇ If need record more sound, try previous steps again.
◇ If need delete sound file, tap the designated sound file for long time and click
delete.
3.11 Clock
Use this application to set alarms, check the time in any location in the world, measure
the
duration of an event, set a timer, or use as the desk clock.
Alarm
◇ Add alarm clock, set the alarm for more information, select Save.
◇ After a specified time, the alarm clock sounded.
◇ To stop select Cancel For later re-arming, choose to suspend the re-arming.
◇ To delete an alarm clock, long a set the alarm, select cancel the alarm.
Clock
◇ Add the clock of different locations
Timer
◇ Set the duration, and then tap Start.
Stopwatch
◇ Timing tool
40
Page 41

3.12 Calendar
New activities
◇ The click the MENU button, touch the new activities.
◇ In the Details box, enter the activity name.
Note: such as special occasions such as birthday or a full day of activities set up
throughout the day the options are. If the activity is at a certain time periods and select
the start time and end time.
◇ enter the venue, description, and to invite objects, repeat the reminder time.
◇ The click Done to return to the calendar.
Note: All-day events are displayed in the title of the calendar. Not calendar time.
To cancel the activity: in the time frame pop-up menu select Delete between activities by
activity.
3.13 Calculator
41
Page 42
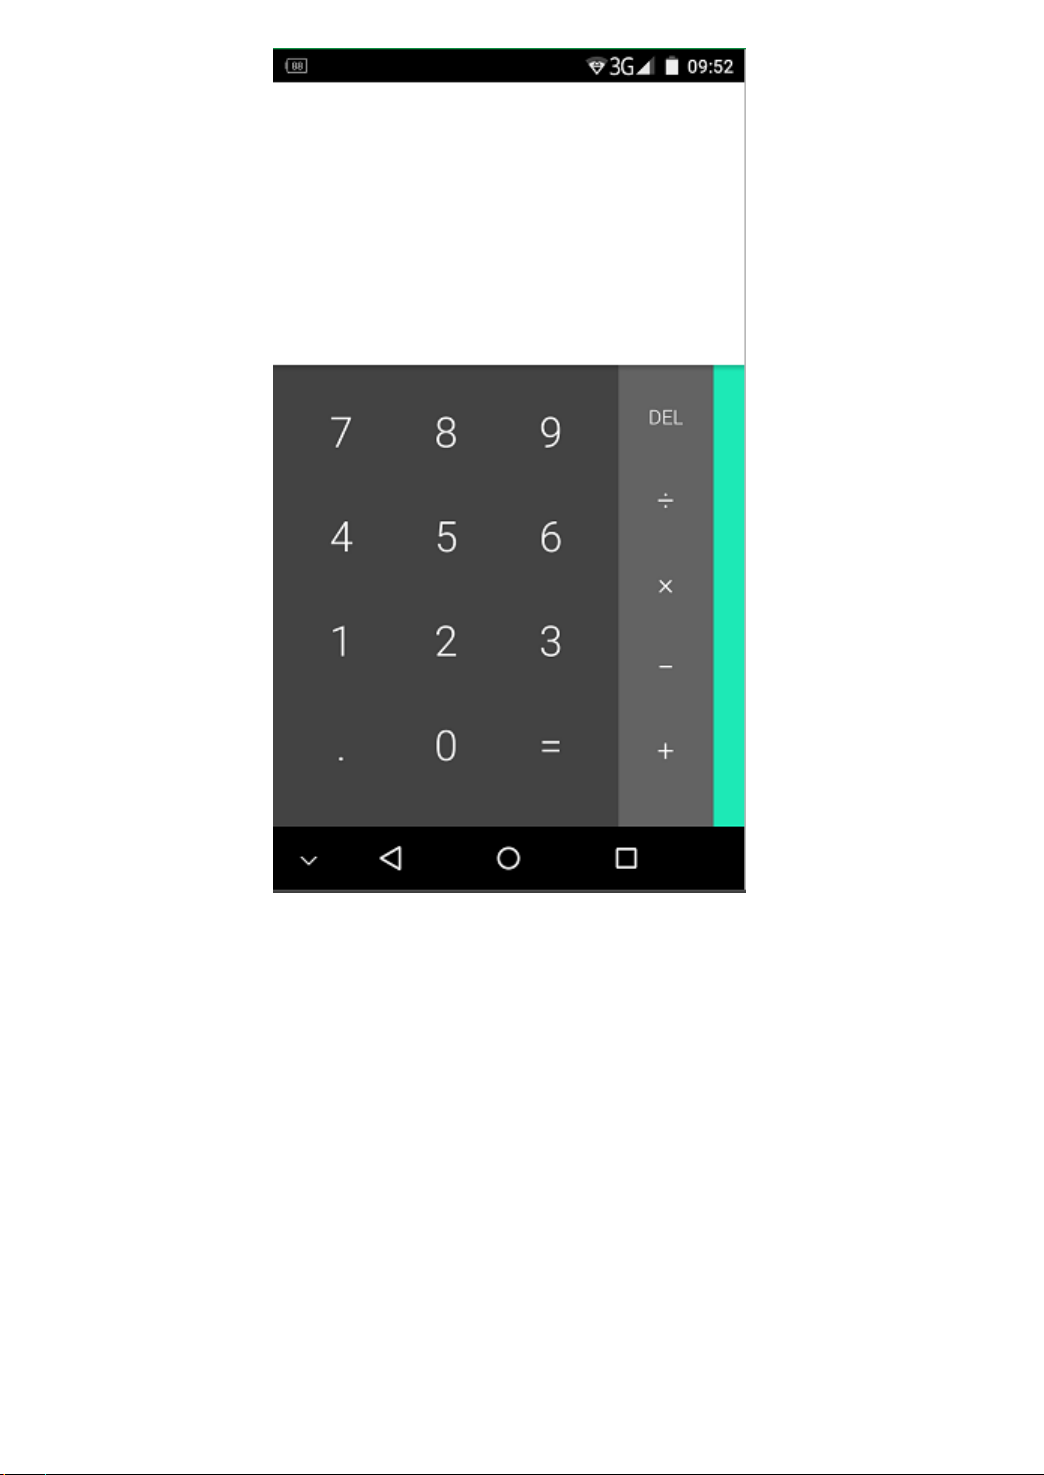
Use this application for simple or complex calculations. Tap number button will display at
white box, slip green scroll to left for simple calculations.
3.14 My files
Use this application to access all kinds of files stored in the device, including images,
videos,
42
Page 43
songs, and sound clips.
◇ Into the file management menu.
◇ The select folder. . If you want to move up in the file directory level, select up.
◇ To open the folder.
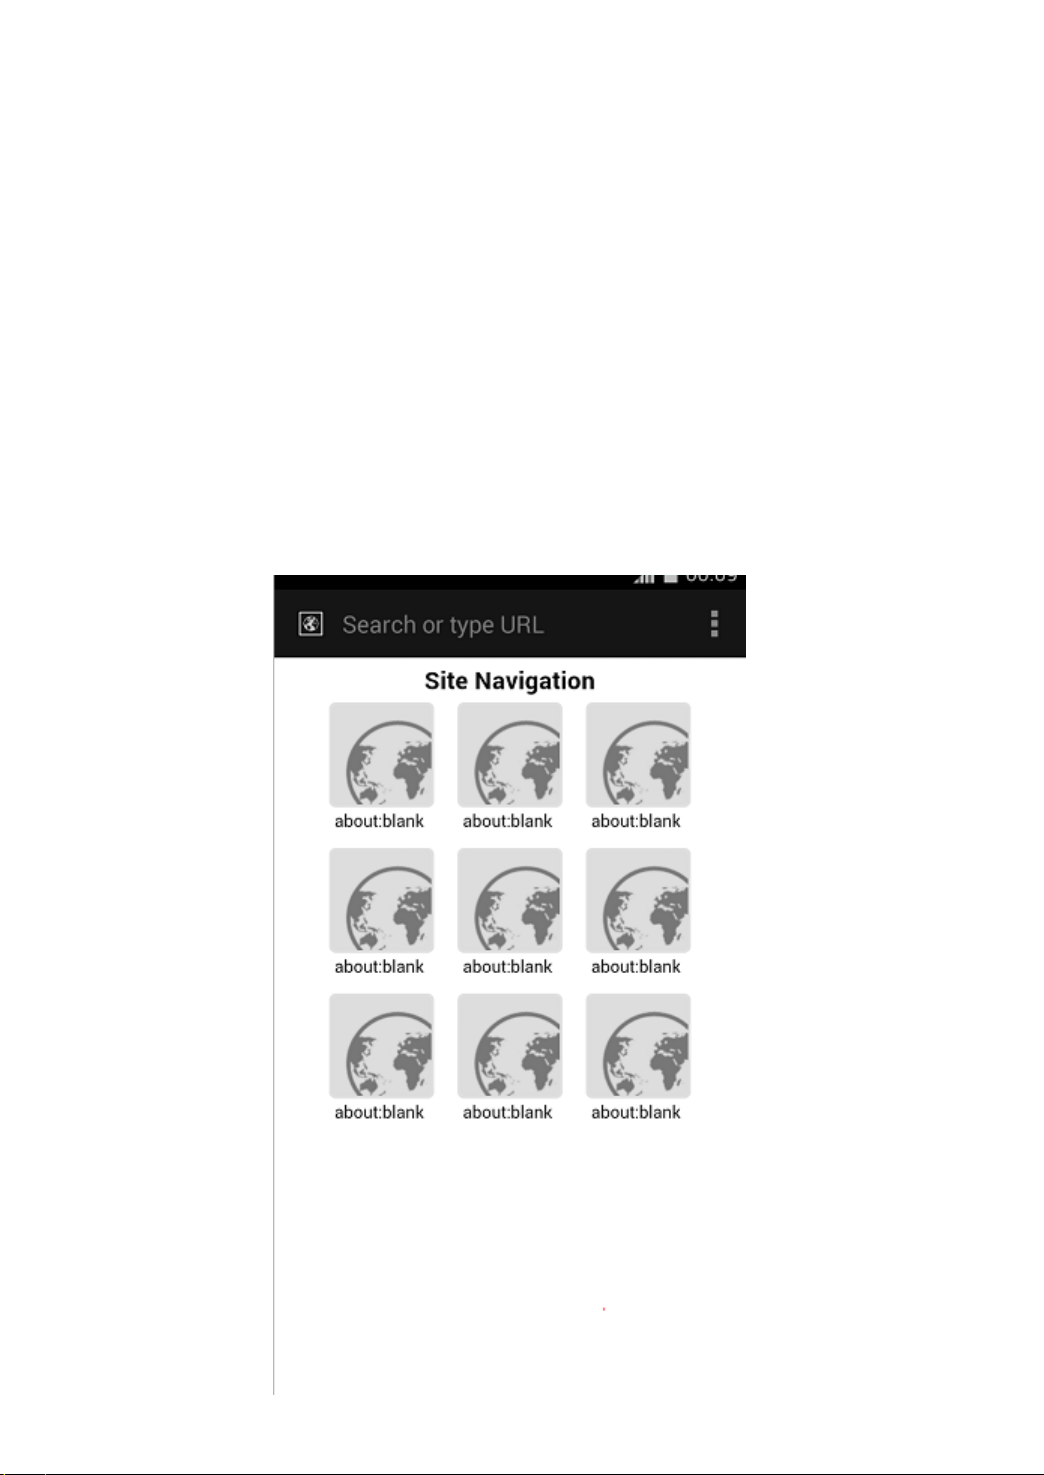
3.15 Browser
Browse internet
43
Page 44

◇ Click on the browser menu, go to the browser.
◇ Internet on the screen, and then touch the address bar enter the URL.
◇ Use the keyboard to enter a web address. You enter the address at the same time, in
line with the web address will appear on the screen. You can touch the URL to go
directly to that page or continue to enter the URL.
The click search, it will connect to the pages you want to browse.
Control browser
◇ Enter the inter face of browser
◇ Tap 》 book mark, save the website as book mark so that you can visit website
rapidly
◇ Tap 》 history, you can check the website that you browsed today and most
visited
◇ Tap 》 settings, can set the browser accordingly
3.16 Compass
This application for orientating the direction
◇ In home screen, open travel and click compass
◇ Please calibrate the compass before use it shake the cellphone follow the “8
shape”
◇ Click can share current location to the contacts by send SMS, Gmail,
bluetooth and QR code
3.17 Smart remote
44
Page 45

It can achieve control television, DVD, air-conditioner, DVB-S and other infrared device
by mobile phone.
◇ In home screen, open more application and select smart remote.
◇ Click add remote control》 select a device》confirm this controller
Tips: One smart phone can add more devices for remote control.
Introduction of E-ink screen
3.18 E-Manager
Manage some apps push on the E-ink screen
3.19 E- Reading
It will push ebooks and words on the E-ink screen.
◇ In standby interface open E- reading
◇ Open a ebook and click the middle area of screen, then tap the ebook / words
will display on the E-ink screen.
3.20 E-Photos
The picture in gallery and photos can be pushed on the e-ink screen
◇ In standby interface open E-ink apps and choose E-photo
45
Page 46
◇ Click , choose a picture then tap the on the top right corner of screen
the picture could be displayed on the e-ink screen.
◇ Click for take photos then click “cast as” the photo will be displayed on the
E-ink screen.
◇ You can cast the picture as standby picture or turn off picture.
3.21 E-Music
Push the local music to the E-ink screen
◇ In standby interface open E-ink apps and choose E-music
◇ Tap on the top right corner of screen then the local music could be displayed
on the e-ink screen.
◇ Tap Move Previous or Move Next or pause the e-ink screen will be switched
according to your operation
◇ Click on the top right corner of screen then choose settings for set
background and theme color.
3.22 E-Notes
Push the content of the E - Notes display on the e-ink screen is realized
◇ In standby interface open E-ink apps and choose E-Notes
◇ Tap on the top right corner of screen then the content of E-Notes will be
displayed on the e-ink screen
◇ Click on the top right corner of screen then choose settings for set new
reminder and details.
46
Page 47

3.23 E-Card
The business card could be displayed on the e-ink screen as standby picture.
◇ In standby interface open E-ink apps and choose E-Card
◇ Tap on the top right corner of screen for create name card, input contact
information by hand or import from contacts
◇ Once business card is completed tap on the top right corner of screen then
push the business card to e-ink screen.
◇ Click on the top right corner of screen choose settings for set the background
style for name card.
◇ You can cast the created business card as standby picture or turn off picture.
4 .Troubleshooting
4.1Device display an error message of the network or service
◇ When you are in a weak signal or accept bad place, you may lose reception
capabilities, please go elsewhere and try again.
◇ If you do not make a reservation, some of the option is not available, please contact
the ISP for more details.
47
Page 48

4.2Touch screen response is slow or incorrect
If the device has a touch screen and touch screen response is incorrect, please try to
operate.
◇ The remove any protective film touch screen. The protective film may be
organizational device recognition input, we do not recommend the touch screen
equipment, use of protective film.
◇ Click on the touch screen, make sure your fingers dry and clean.
◇ Restart the device to clear any temporary software errors.
◇ Ensure that the device software has been upgraded to the latest version.
4.3 Device is frozen or there is a serious error
If the device is frozen or suspended, may need to close the program to restart the device
to regain functionality. If the device is frozen or reflect the slow, press and hold the
switch button 10 seconds to restart. If the problem persists, restore the factory settings.
4.4 Dropped calls
When you are in the signal is weak or accept bad place, the network connection may be
disconnected. Go to other places and try again.
4.5 Call the other party can not hear you
◇ Ensure that does not cover the built-in microphone.
◇ Ensure that the built-in microphone near your mouth.
◇ If you use a headset, make sure the headset is connected correctly.
48
Page 49

4.6 Sound quality poor
◇ Ensure non-blocking devices built-in antenna.
◇ When you are in a weak signal or poor reception, you may lose reception. Go to other
places and try again.
4.7 when the call from the contacts can not be connected
◇ Ensure the correct number stored in the contact list.
◇ If necessary, please re-enter and save the number.
◇ Ensure that the contacts phone number to set the call restriction.
4.8 equipment feels hot
Large power applications or for a long time to use the application on the device, the
device feels will be very hot. This is normal, does not affect the useful life of equipment
and performance.
49
Page 50

FCC
FCC RF Exposure Information and Statement
The SAR limit of USA (FCC) is 1.6 W/kg averaged over on one gram of tissue.
Device types: 7x (FCCID: 2AGMGSIAM7X ) has also been tested against this SAR limit. The
highest SAR value reported under this standard during product certification for use at the ear
is 0.661 W/kg and when properly worn on the body is 1.308 W/kg. This device was tested for
typical body-worn operationswith the back of the handset kept 1.0 cm from the body. To
maintain compliance with FCC RF exposure requirements, use accessories that maintain a
1.0 cm separation distance between the user's body andthe back of the handset.
Third-party belt-clips, holsters and similar accessories used by this device should not
containany metallic components. Body-worn accessories that do not meet these
requirements maynot comply with FCC RF exposure requirementsand should be avoided.
Use only the supplied or an approved antenna.
This device complies with part 15 of the FCC rules. Operation is subject to the following
two conditions:
(1) this device may not cause harmful interference, and (2) this device must accept any
interferencereceived, including interference that may cause undesired operation.
NOTE: The manufacturer is not responsible for any radio orTV interference caused by
unauthorizedmodifications to this equipment. Such modifications could void the user’s
authority to operate theequipment .This equipment has been tested and found to comply
with the limits for a Class B digitaldevice, pursuant to part 15 of the FCC Rules. These
limits are designed to provide reasonable protectionagainst harmful interference in a
residential installation. This equipment generates uses and can radiate radio frequency
energy and, if not installed and used in accordance with the instructions, may
causeharmful interference to radio communications. However, there is no guarantee that
interference willnot occur in a particular installation. If this equipment does cause
harmful interference to radio ortelevision reception, which can be determined by turning
the equipment off and on, the user isencouraged to try to correct the interference by one
or more of the following measures:
-Reorient or relocate the receiving antenna.
- Increase the separation between the equipment and receiver.
-Connect the equipment into an outlet on a circuit different from that to which the
receiver isconnected.
50
Page 51

-Consult the dealer or an experienced radio/TV technician for help.
The user’s manual or instruction manual for an intentional or unintentional radiator shall
caution theuser that changes or modifications not expressly approved by the party
responsible for compliancecould void the user's authority to operate the equipment. In
cases where the manual is provided only in a form other than paper, such as on a
computer disk or over the Internet, the information required bythis section may be
included in the manual in that alternative form, provided the user can reasonably be
expected to have the capability to access information in that form.
51
 Loading...