

Page 1
Autofill System
Operator Manual
Grindmaster-Cecilware
4003 Collins Lane, Louisville, KY 40245 USA
Phone: 502.425.4776 Toll Free: 800.695.4500
Fax: 502.425.4664
Web: gmcw.com Email: info@gmcw.com
Safety Information...............................2
Specifications .......................................3
Installation ...........................................3
Operation .............................................4
Cleaning and Sanitizing ......................4
Troubleshooting Guide........................5
Parts List ...............................................6
Parts Diagram.......................................7
Flow Diagram.......................................8
Wiring Diagram ...................................8
Thank you for purchasing this quality autofill system. For your safety and the safety of others, read all warnings
and the operator manual before installing or using the product. Properly instruct all operators. Keep training
records. For future reference, record serial number here:
Table of Contents
Model 2001-000
Grindmaster-Cecilware provides the
industry’s BEST warranty. Visit gmcw.com
for warranty terms and conditions.
Model 2002-000
Notice: This system is not certified for
use with dairy products.
Bubbler Ratio 4:1 Ratio 5:1
Single 2001-001 2001-000
Double 2001-003 2001-002
Remote Single 2001-005
Remote Double 2001-004
Granita* Ratio 4:1 Ratio 5:1
Single 2002-001 2002-000
©2018 Grindmaster-Cecilware
Printed in USA
0118 Form # CC-387-04
Part # 390-00090
Activate your warranty now at
http://gmcw.com/warranty-registration
*for use with models NHV-2UL-AF, MT2ULAF,
MT2ULAFBL, MT3ULAFBL
Page 2

GB Series Cecilware
®
2
Use the product for its intended purpose only. Any other usage is inappropriate and may be dangerous. The
manufacturer assumes no responsibility for injury, loss, or damage resulting from improper machine use.
CAUTION
Do not alter or deform the power cord or plug in any way! Altering or deforming the plug may cause electrical
shock, damage unit and will void warranty.
The Bubbler Autofill must only be connected to a three wire 120 VAC, 60 Hz electrical circuit.
To prevent the possibility of electrocution, burns, or other injuries and to prevent damage, do not immerse in
water or any cleaning liquids.
Do not operate a damaged Autofill. Inspect the power supply cord, concentrate supply and water supply often.
If cord or plug is damaged or worn, do not use your Autofill. Turn off the water supply and disconnect the
electrical power.
Turn off and unplug the Autofill before cleaning or maintenance.
Disconnect power if the machine functions abnormally and notify qualified service personnel for repairs. Do
not permit non-qualified service personnel to attempt repairs. No user serviceable components inside. Do not
disassemble.
WARNING
Safety Information
2 Crathco
®
Autofill System
Important Safety Information
This is the safety alert symbol. It is used to alert you to potential personal injury hazards. Obey all safety messages
that follow this symbol to avoid possible injury or death.
For your safety and the safety of others, read all warnings and the operator manual before installing or using
the product.
DANGER: This term warns the user of imminent hazard that will result in serious injury or death.
WARNING: This term refers to a potential hazard or unsafe practice, which could result in serious injury or death.
CAUTION: This term refers to a potential hazard or unsafe practice, which could result in minor or moderate
injury.
NOTICE: This term refers to information that needs special attention or must be fully understood.
Observe machine voltage configuration. Do not apply improper voltage to machine or damage to machine may
occur.
Do not use extension cord (Bubbler Autofill units).
Do not allow water to be splashed or poured on front, sides, top, or back.
A qualified professional should perform installation, maintenance and repairs.
This equipment must be installed in accordance with the appropriate national and local codes of the country
and/or region in which the appliance is installed.
When turning the machine off for an extended period, be sure to evacuate the water and concentrate inside
the piping completely, otherwise the water and concentrate inside the machine could freeze and lead to damage
or cause mold to appear.
This unit is not certified for use with dairy products.
Highly acidic or caustic concentrates may not be compatible with the materials of this system. Thoroughly
evaluate chemical resistance and compatibility, especially at pH < 4 and pH > 10.
NOTICE
Page 3
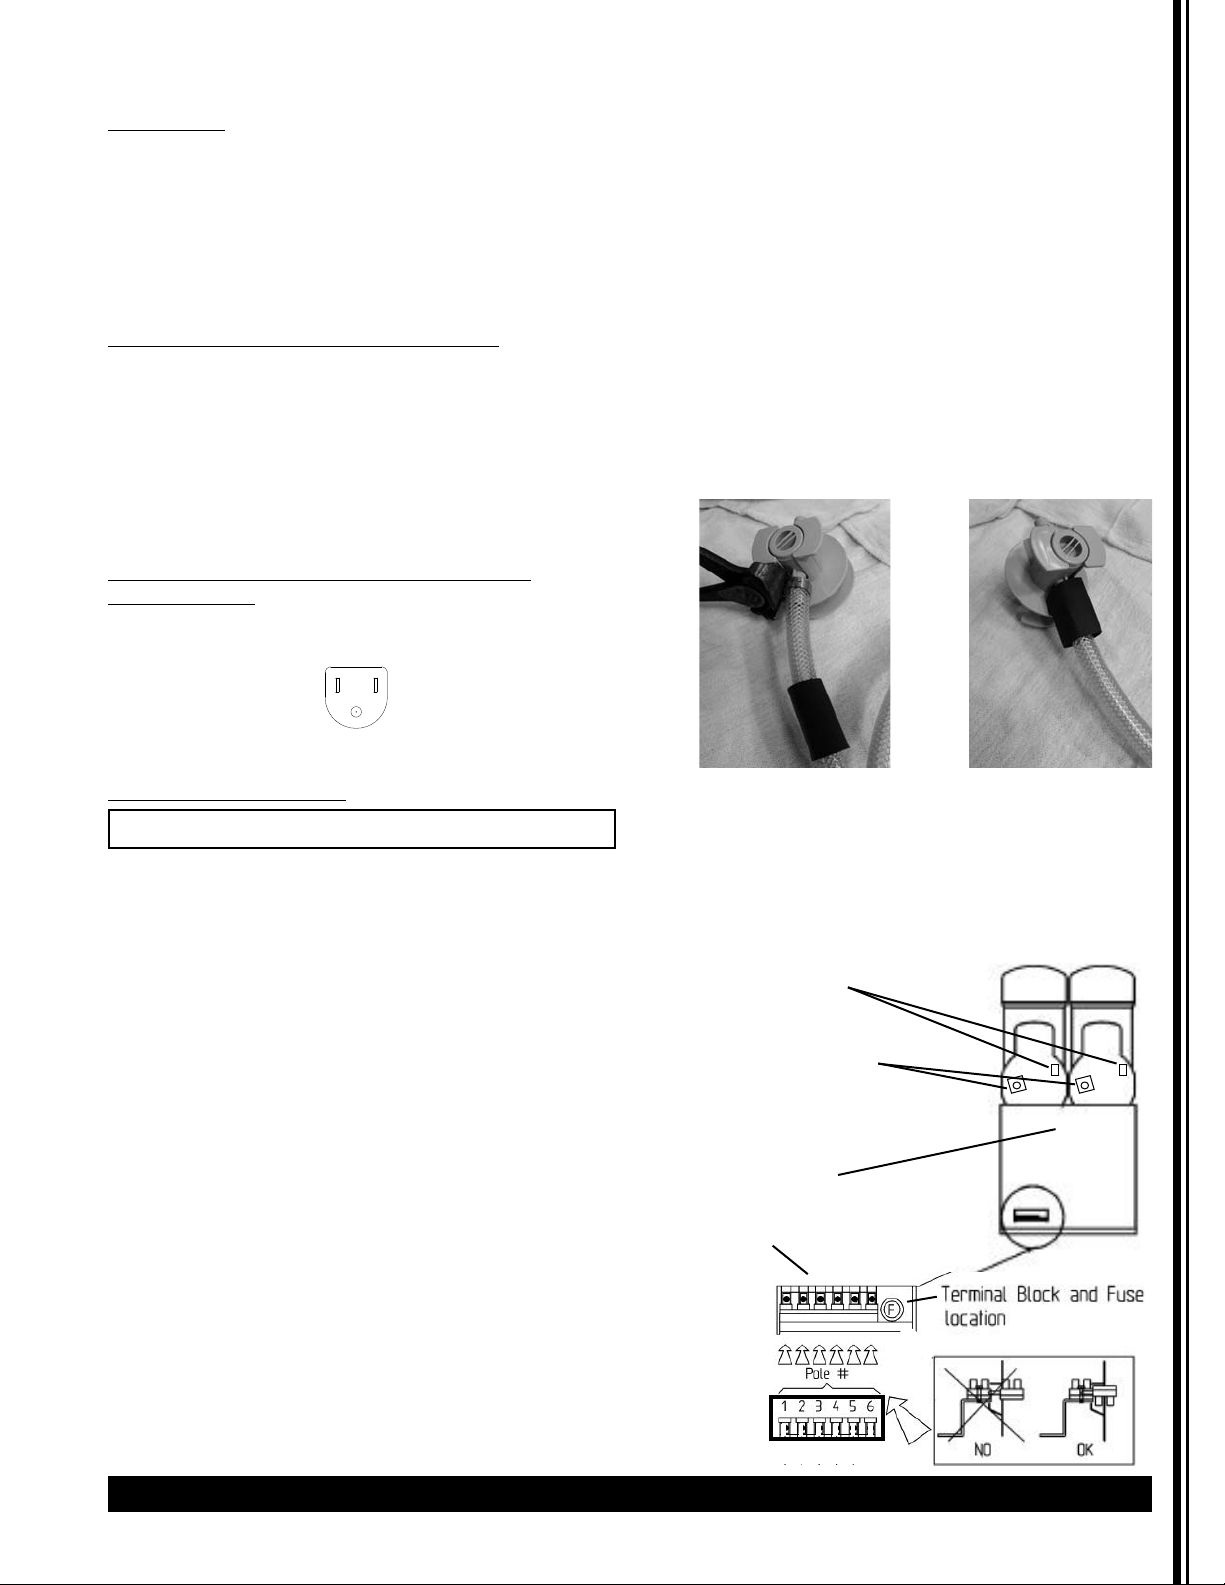
NEMA 5-15P
Mechanical
MIXING RATIO: 5:1, or 4:1
ELECTRICAL: 120 Volts, 60 Hz, 1 Phase, 2 Amps
PUMP DESIGN: Positive Displacement
PUMP POWER SOURCE: Potable Water
TEMPERATURE LIMITS: 34 - 120° F [2-45° C]
FLOW RATE: Typical 2-3 oz. [60-90 cc] per sec.
OPERATING PRESSURE: 50 PSI. [3.4 bar] MAX. / 25 PSI.
[1.7 bar] MIN.
Water Inlet Connection requirements:
The Autofill unit can use any standard municipal water
supply as well as any commercial-grade filtered,
distilled, de-ionized, or purified water. Do not connect
to reverse osmosis water supply. Recommended water
pressure should be 50 psig with a 3/4” standard GHT
fitting to the inlet valve of the unit. It is required to
install a manual shut-off valve between the main water
supply and the unit.
Electrical Connection requirements (only
Bubbler units)
A NEMA 5-15R receptacle is required on a 15 amp
circuit. (Granita Autofill units do not have an external
power cord.)
Installation
Unpacking Instructions
Carefully unpack the machine and immediately inspect
for shipping damage. The packaging may contain
unattached parts. Your machine was shipped in a carton
designed to give it maximum protection in normal
handling. It was thoroughly inspected before leaving
the factory. In case of damage, contact the shipper, not
Grindmaster-Cecilware.
This unit and any associated water supply lines must be
compliant and maintained in accordance with all local,
state and federal laws associated with commercial
beverage dispensing equipment and use of potable
water supply lines. Water pipe connections and fixtures
directly connected to potable water supply shall be
sized, installed, and maintained in accordance with
Federal, State, and Local codes. The equipment must be
installed with adequate backflow protection to comply
with applicable federal, state, and local codes. If
backflow protection built into the unit does not meet
local requirements, install protective device. If a check
valve type backflow preventer is used for water supply
protection, a screen of at least 100 mesh (100 strands
per 1.0 in [25 mm]) shall be installed immediately
upstream. The screen shall be accessible and removable
for cleaning or replacement. (Required for NSF
approved water hook-up)
Always ensure that the machine power switch is in the
OFF position and unplugged from power supply when
making or maintaining electrical connections.
Prime unit before using. See step 8.
1. Place Autofill unit on a stable surface.
2. Attach liquid concentrate (syrup) line to autofill and
concentrate supply. Accessory kit contains several
syrup supply connection ends. First slide heat shrink
tube over hose. Then attach appropriate connection
end to hose using provided clamp. Crimp in place
(see picture below). Position heat shrink tube over
clamp and end of hose (see picture below), and
then use hot water or heat gun to attach shrink
tube. (Heat shrink is used for sanitation purposes.)
Other end of hose attaches to the “SYRUP” port on
Autofill unit. Verify it is fully attached.
3. Connect water inlet line to potable water supply
125 PSI MAX/ 25 PSI MIN. Open water supply valve.
4. Granita: Attach digital electronic control line into
back of Granita (see diagram below). Ensure “UP”
label is on top of control plug. Attach other end to
Autofill unit by inserting, then twisting into
position (bayonet connection).
Autofill System Crathco
®
3
Specifications
NOTICE: Do not reuse old hose. Only use new hose.
back of Granita
“UP” label towards
top of unit
Switch
Outlet Hose Connection
Page 4

4 Crathco
®
Autofill System
5. Bubbler: Insert probe through larger grommet in
bowl. Attach digital control line to probe. Attach
other end of control line to Autofill unit by
inserting, then twisting into position (bayonet
connection).
6. Insert output hose to Autofill connection marked
“MIX” and verify fully seated.
7. Bubbler: Plug unit into a grounded 3 prong outlet.
Do not use extension cord.
Priming:
8. Place a container under the output hose. Granita:
On Granita beverage dispenser, hold power switch
to “II” position until proper mix of syrup and water
is flowing from the outlet hose. Bubbler: Turn
power switch to “ON” and allow the unit to
operate until proper mix of syrup and water is
flowing from the outlet hose. Turn power switch to
“OFF”.
9. Bubbler: Attach output hose fill nozzle through
larger grommet on back of Bubbler bowl. Install
grommets in bowl such that flat surface is inside
bowl and taper is located outside to ensure splash
shield will seat properly. Attach shields to inside of
bowl if using spray unit (see picture below).
10. Granita: Loosen elbow connection on back of
Granita machine with a Phillips screwdriver. Install
output hose to elbow attachment and tighten
screw.
11. Confirm that all tubing connections are properly
clamped, fittings are tight, and lines are not kinked.
12. Visually check for leaks at all connections.
13. Clean and sanitize the autofill (see Cleaning and
Sanitizing section).
Operation
Your new autofill system is easy to operate and
maintain. Before you place it in service, please have all
personnel familiarize themselves with these
instructions. Keep this manual in a convenient
place for ready reference.
If you need help, call Grindmaster-Cecilware Technical
Service Department for help, (502) 425-4776 or (800)
695-4500 (USA & Canada only) 8 AM - 6 PM EST.
Cleaning and Sanitizing
All equipment in the system requires periodic
sanitization. The frequency of this procedure is
dependent on the water condition, temperature, and
concentrate type.
Sanitize in accordance with local health department
regulations. Grindmaster-Cecilware recommends
cleaning and sanitizing at least every week.
Materials required:
• Non-sudsing liquid detergent (such as common
household automatic dishwasher liquid
detergent)
• Sanitizing agent. Recommended sanitizer bleach, Sodium Hypochlorite
• Clean five (5) US gallon [19 liter] bucket or
container
• Five (5) US gallon [19 liter] bucket or container
for used detergent/sanitizer
• Measuring cup
• An adapter fitting on the concentrate suction
line to allow sanitizing agent to enter the
autofill. A connector cut from an empty liquid
concentrate will work.
Cleaning
1. Turn power switch to “OFF” on Autofill unit and
empty bowl. For Bubbler, detach probe from control
line and clean and sanitize separately. For Granita,
turn off power to Granita.
2. Fill the bucket with four (4) gallons [15.14 L] of
liquid detergent mixed with warm water (120 180°F) [48-82°C]. Measure four (4) ounces (½ cup)
[118cc] of the liquid detergent and add to the
water.
3. Disconnect the outlet hose from the beverage
dispenser. Place an empty container under the
output hose.
4. Disconnect the concentrate line from the liquid
concentrate supply and install the adapter on the
quick disconnect so the line is open to the cleaning
solution. Place concentrate line into the bucket of
Installation (continued)
NOTICE: All sanitizing agents in the food zone must
comply with 21 CFR 178.1010.
NOTICE: Concentrates that contain pulp,
particulates, or solids will require more frequent
sanitation to prevent build-up. Concentrates with
especially “stringy” pulp will require even more
frequent sanitation.
WARNING: Do not alter or deform the plug in
any way! Altering or deforming the plug may cause
electrical shock, damage unit and will cause personal
injury.
Shields in place
for spray units
NOTICE: Granita Autofill unit is controlled from the
Granita dispenser.
Page 5

Autofill System Crathco
®
5
Cleaning and Sanitizing (continued)
cleaning solution. Be sure the inlet of the liquid
concentrate line stays at the bottom of the bucket.
5. Move lever on Autofill unit to "Sanitize" mode.
6. For Bubbler: Push and hold “Sanitize” button on
Autofill, turn on power switch, and then release
button. Allow unit to run until ALL the solution is
pulled through the concentrate inlet fitting into the
Autofill and out through the water outlet line.
When the bucket is about half empty, turn Sanitize
lever to “Dispense” position and allow to run for
one minute. Then turn Sanitize lever back to the
“Sanitize” position until bucket is empty and then
turn power switch to “OFF”
7. For Granita: Turn on Granita and dispense product
until level is below the autofill probe. Push and hold
switch in “II” position on Granita unit to run ALL
the solution through the concentrate inlet fitting
into the autofill and out the water outlet line.
8. Dispose of contents of the bucket and rinse bucket.
Sanitizing
9. Fill the bucket with four (4) gallons [15.14 L] of
water. Add sanitizing agent per instructions
provided with sanitizing agent. Note: Two (2)
ounces (¼ cup) [60 cc] of bleach, Sodium
Hypochlorite from an unopened container, may be
used as a sanitizing agent. Stir and mix the contents
of the bucket thoroughly.
10. Place concentrate line into the bucket of sanitizing
solution. Be sure the inlet of the liquid concentrate
line stays at the bottom of the bucket.
11. Move lever to "Sanitize" mode.
12. For Bubbler: Push and hold “Sanitize” button on
Autofill, turn on power switch, and then release
button. Allow unit to run until ALL the solution is
pulled through the concentrate inlet fitting into the
Autofill and out through the water outlet line.
When the bucket is about half empty, turn Sanitize
lever to “Dispense” position and allow to run for
one minute. Then turn Sanitize lever back to the
“Sanitize” position until bucket is empty.
13. For Granita: Push and hold switch in II position on
Granita unit to run ALL the solution through the
concentrate inlet fitting into the autofill and out
the water outlet line. When the bucket is about half
empty, turn Sanitize lever to “Dispense” position
and allow to run for one minute. Then turn Sanitize
lever back to the “Sanitize” position until bucket is
empty.
14. Reconnect the inlet line to the concentrate supply.
Product Purge
15. Push and release “Sanitize” button on Autofill, (for
Bubbler) or push and hold switch on Granita unit in
“II” position, allowing the pump to operate until all
sanitizing solution is purged from the system.
16. Reconnect the outlet hose to the beverage
dispenser.
17. Return the valve to the "Dispense" mode.
18. Dispose of contents of the bucket and rinse bucket.
Before you call for help, please read the following:
I. PUMP WILL NOT CYCLE:
• Verify there is adequate water pressure (30-50
psi.[2-3.4 bar]) at water inlet fitting.
• Verify that the dispenser valve operation
(switch/solenoid), passages, and lines are
unrestricted. Flush and sanitize pump and outlet
lines from pump fittings to the dispenser if
restricted.
• Check for liquid in the liquid concentrate supply. If
empty, replace with new box of concentrate.
• Check for plugged, kinked, or restricted inlet
tubing. Flush and sanitize pump and outlet lines
from pump fittings to the dispenser if restricted.
• Verify electrical connection, plug is properly seated,
and power switch is turned on.
II. NO CONCENTRATE (PUMP CYCLES) / IMPROPER
BRIX:
• Verify that the concentrate passage is opening
completely when installed on the B-I-B connector. If
concentrate is supplied from a tank, verify that the
vent is open.
• Inspect for vacuum leaks at the concentrate inlet
side. Carefully look for air bubbles at connections
and fittings while the pump is cycling.
• Determine if there was air packaged with the
concentrate when the bags where filled. Stand the
box up on end and pull the connector up, allowing
air to rise up to the bag connector. Install liquid
concentrate fitting and engage it on the bag
connector opening the passage. Slowly press the
bag down, expelling the air until concentrate
appears, release and remove the liquid concentrate
fitting.
• Inspect for debris or improper closing of the liquid
concentrate fitting that interferes with their
operation.
WARNING: To reduce the risk of electrical shock, unplug the power cord before repairing or replacing
any internal components of the unit. Before any attempt to replace a component, be sure to check all electrical
connections for proper contact. Only a qualified service technician should perform electrical and mechanical
adjustments or repairs.
Troubleshooting Guide
Page 6

6 Crathco
®
Autofill System
III. PUMP CYCLES INTERMITTENTLY/ WILL NOT
SHUT-OFF/ DRIPS:
• If the pump continues to cycle after liquid
concentrate supply has emptied, verify that there
are no vacuum leaks.
Determine if the concentrate bag has an excessive
(more than 1 cubic inch [16.4 cc]) amount of air.
NOTE: If the concentrate is moved above the pump,
head pressure from the liquid concentrate may be
substantial enough to cause the dispenser to drip.
Valve Inspection
Some concentrates, after prolonged periods of contact
without regular sanitizing, may cause the valves to
become stiff or clogged with pulp and/or particulates.
If a situation of this type is suspected, valve cartridges
(4 each) can be removed for inspection.
Turn off water supply valve and relieve pressure.
Remove each assembly by loosening the screw holding
the cartridge. Turn the cartridge and then pull it out of
the housing (use of tools may be required).
If you still need help, call Grindmaster-Cecilware
Technical Service Department, (502) 425-4776 or (800)
695-4500 (USA & Canada only) (Monday through Friday
8 AM - 6 PM EST). Please have the model and serial
number ready so that accurate information can be
given.
Prior authorization must be obtained from
Grindmaster-Cecilware for all warranty claims.
Grindmaster-Cecilware provides the industry’s
BEST warranty. Visit our website at gmcw.com for
warranty terms and conditions.
WARNING: To reduce the risk of electrical shock, unplug the power cord before repairing or replacing
any internal components of the unit. Before any attempt to replace a component, be sure to check all electrical
connections for proper contact. Only a qualified service technician should perform electrical and mechanical
adjustments or repairs.
Troubleshooting Guide (continued)
Parts List
# Part No. Bubbler Granita Description
1 349-00011 x Control Board_Level (Bubbler units)
2 99066 x On-Off Switch Rocker Switch (Bubbler units)
3 63195 x Switch, Sealed (Bubbler units)
4 280-00038 x x Reverse Flow Inhibitor - (2) for Single, (4) for Double
5 61153 x x Tubing_3/8 ID X 5/8 OD
6 310-00019 x x Brix Pump_5:1 Ratio
6 310-00018 x x Brix Pump_4:1 Ratio
7 280-00071 x Valve_120V Inlet 1.3 GPM (Single Bubbler units)
7 280-00080 x Valve Dual Inlet 0.8 GPM – 120V (Dual Bubbler units)
7 280-00056 x Valve_Water Inlet (Single Granita units)
8 310-00021 x x Water Pressurer Reducer 30 PSI
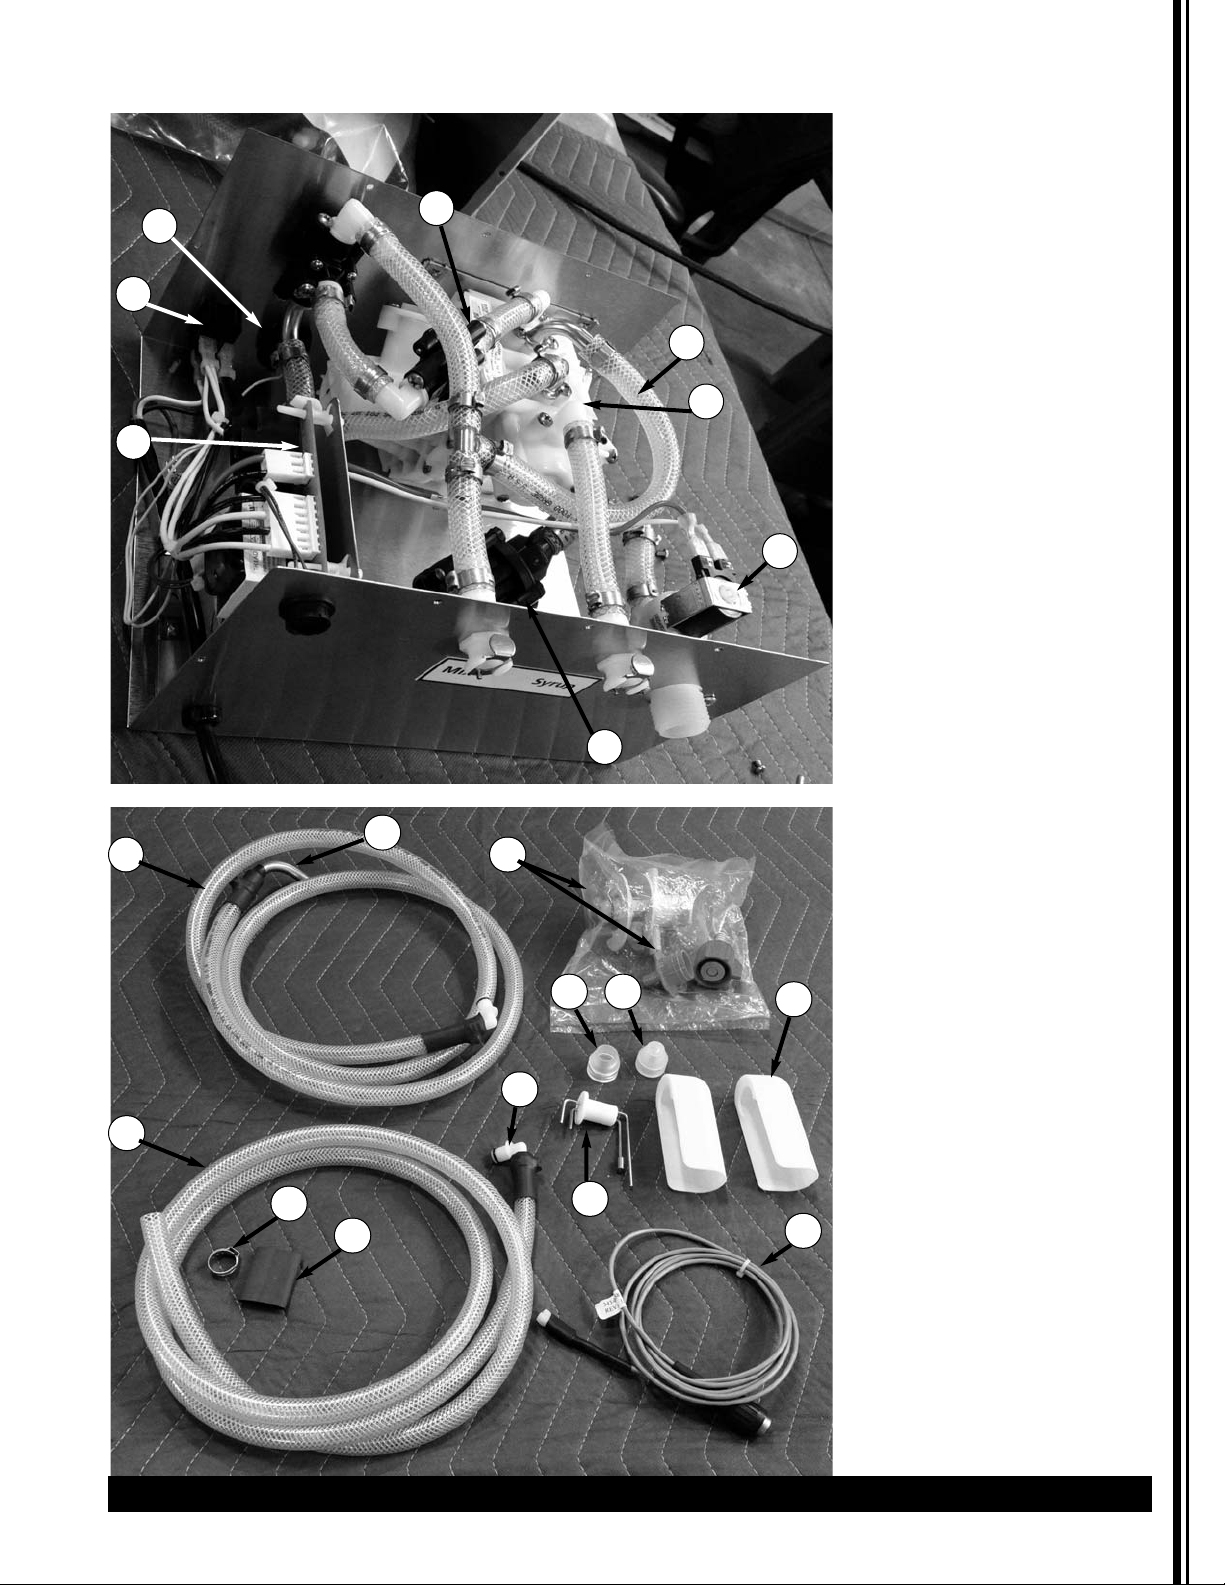
250-00175 x Bubbler Accessory Kit
9 Mix tubing with EL and SS fill nozzle_3/8 ID (72 IN.)
10 Syrup tubing with EL and open end_3/8 ID (72 IN.)
11 Clamp, 11/16" Uniform Seal (1)
12 3/4" ID_Heat Shrink (1.5 IN.)
14 Level Sensor (1)
15 Wire Harness_Level Sensor_72 IN. (1)
16 Shield_Splash (2)
17 Plug/Seal (Solid) (1)
18 Seal, Silicone 15MM (1)
19 Kit, Bib Adapter (1)
19 250-00171 x x Kit, Bib Adapter
Adapter_Bib_Coke (1)
Adapter_Bib_Coke_Generic (1)
Adapter_Bib_Liquibox Universal (1)
250-00177 x Remote Install Accessory Kit
11 Clamp, 11/16" Uniform Seal (4)
12 3/4" ID_Heat Shrink (6 IN.)
13 El_3/8_QC (2)
14 Level Sensor (1)
15 Wire Harness_Level Sensor_60 FT. (1)
17 Plug/Seal (Solid) (1)
18 Seal, Silicone 15MM (1)
19 Kit, Bib Adapter (1)
20 Nozzle_SS_Fill (1)
not shown
250-00183 x 100 ft Cable for Remote Install (1)
250-00176 x Frozen Accessory Kit
10 Syrup tubing with EL and open end_3/8 ID (72 IN.)
11 Clamp, 11/16" Uniform Seal (1)
12 3/4" ID_Heat Shrink (1.5 IN.)
13 El_3/8_QC (1)
19 Kit, Bib Adapter (1)
not shown Mix tubing with both ends attached_1/4" ID (72 IN.)
not shown Wire Harness_Level Senser_Frozen (1)
Page 7
Autofill System Crathco
®
7
Parts Diagram
9
10
19
16
1
3
2
18
17
11
12
15
14
7
8
6
4
5
13
20
(Single Autofill shown)
(Accessory kit shown)
Page 8

Grindmaster-Cecilware
4003 Collins Lane, Louisville, KY 40245 USA
Phone: 502.425.4776 Toll Free: 800.695.4500
Fax: 502.425.4664
Web: gmcw.com Email: info@gmcw.com
©2018 Grindmaster-Cecilware
Printed in USA
0118 Form # CC-387-04
Part # 390-00090
Wiring Diagram
Bubbler
Flow Diagram
NOTE: This is the wiring diagram for the
Bubbler Liquid Autofill System. No wiring
diagram is necessary for the Granita Autofill
System.
Sanitize knob
“Normal” position
Sanitize knob
“Sanitize” position
LIQUID AUTOFILL
HOSE CONNECTION DIAGRAM
 Loading...