

Page 1
Customer Service 800-967-6696 | http://www.crateandbarrel.com
WALKER MEDIA TOWER
Thank you for purchasing the Walker Tower. This page
all the contents included in the box. Please take the time to
identify the hardware as well as the individual components
this product. As you unpack and prepare for assembly, place
the contents on a carpeted or padded area to protect them
from damage.
Note: 2 people are required to safely assemble this product.
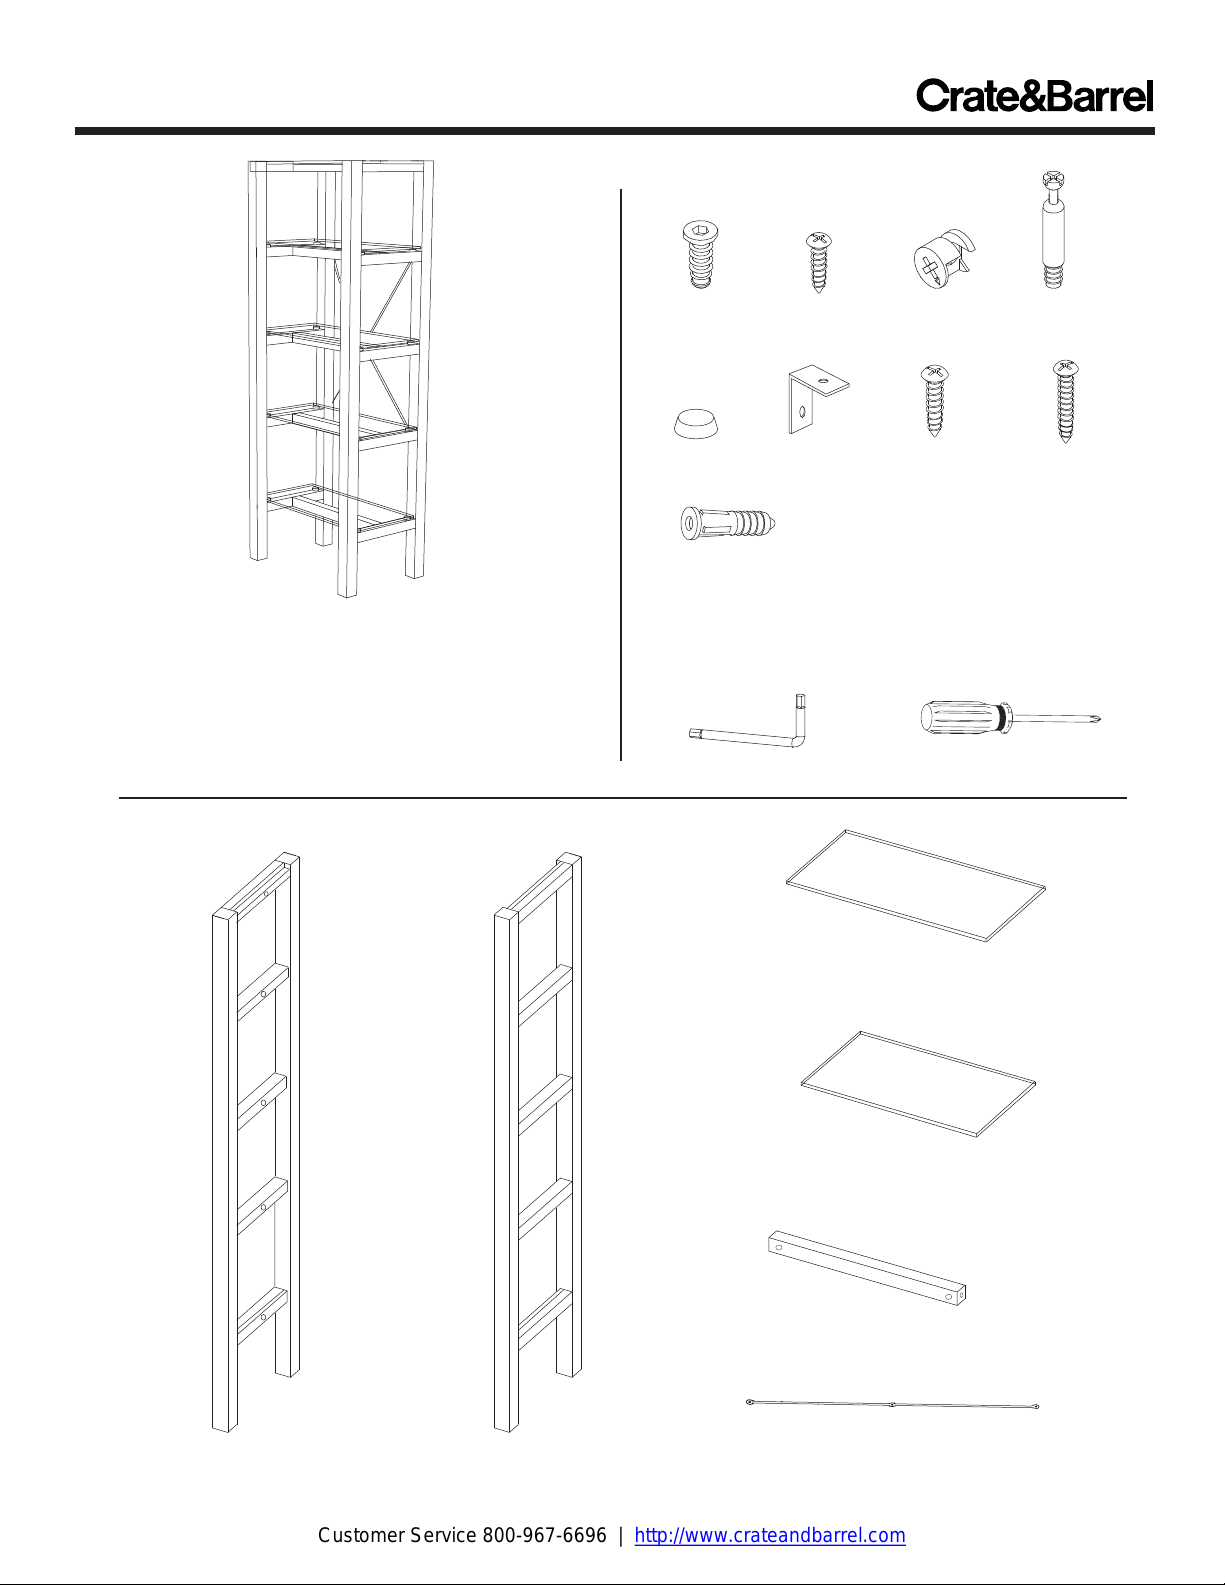
COMPONENTS
1 - left side frame 1 - right side frame
Made in China R05
lists
to
HARDWARE
1 - small
allen bolt
20 - rubber
pads
1 - drywall anchor
Missing hardware?
Please call 800.606.6387 for replacements.
4 - small
screws
1 - wall
bracket
10 -cams
1 - medium
screw
10 - cam
screws
1 - large
screw
TOOLS REQUIRED
Allen wrench (included) Phillips head screwdriver
3 - large glass panels
2 - small glass panels
5 - crossbars
2 - metal cross braces
Page 1 of 3
Page 2

Customer Service 800-967-6696 | http://www.crateandbarrel.com
WALKER MEDIA TOWER
1
Insert 10 cam screws into both side frames. Secure with
a phillips head screwdriver.
x10
A
3
A. Fit 5 crossbars onto the left side frame, aligning cam
screws with corresponding holes.
B. Turn cams clockwise using a Philip head screwdriver
to secure side frame to crossbars.
Made in China R05
A
Make sure
these holes
face up
x10
B
A
2
A. Insert 2 cams in the underside of each crossbar.
Make sure the arrow on each cam points towards the
closest short end of each crossbar.
B. Fit 5 crossbars onto the right side frame, aligning
cam screws with corresponding holes. Make sure holes
on the side frame face up.
Assemble the 2 metal cross braces, located in packing
4
foam with red ribbon. Using the allen wrench, tighten 1
small allen bolt to center of cross brace.
Page 2 of 3
Page 3

Customer Service 800-967-6696 | http://www.crateandbarrel.com
WALKER MEDIA TOWER
5
With assistance of another adult, turn assembly upright.
Attach assembled metal cross brace to back of the
bookshelf by fastening 4 small screws into predrilled
holes in the frame. Secure each with a screwdriver.
7
Carefully place 1 small glass panel on the top and
bottom shelves, and the remaining 3 large glass panels
on the middle shelves. Assembly is now complete.
Made in China R05
Small
Large
Large
Large
Small
6
Adhere 20 small rubber pads to the frames, as illustrated
above. Press each firmly to secure.
A
B
Optional Wall Attachment Hardware:
These instructions are for drywall mounting only. For
safe mounting it is essential to use the proper hardware
for your wall type. Be sure to consult your local hardware
store to determine the hardware needed for your wall
(plaster, drywall, concrete, etc.) This product is only
deterrent. It is not a substitute for proper adult supervision.
A) Drill a pilot hole in the wall slightly smaller in diameter
than the drywall anchor. Gently tap anchor with a
hammer if necessary until it is flush with the surface of the
drywall.
B) Screw the wall bracket to the wall using a large screw.
Place the tower in front of the wall bracket. Screw the wall
bracket to the top of the side frame using medium screw.
Note: Mount to wood studs whenever possible. If screw is
aligned with a wood stud, screw directly into the wood stud
and do not use the drywall anchor.
CLEANING AND CARE
Clean surfaces with a dry or damp soft cloth. Use glass
cleaner on shelves as necessary. Do not use abrasive cleaners.
Page 3 of 3
 Loading...