

Page 1
Customer Service 800-967-6696 | http://www.crateandbarrel.com
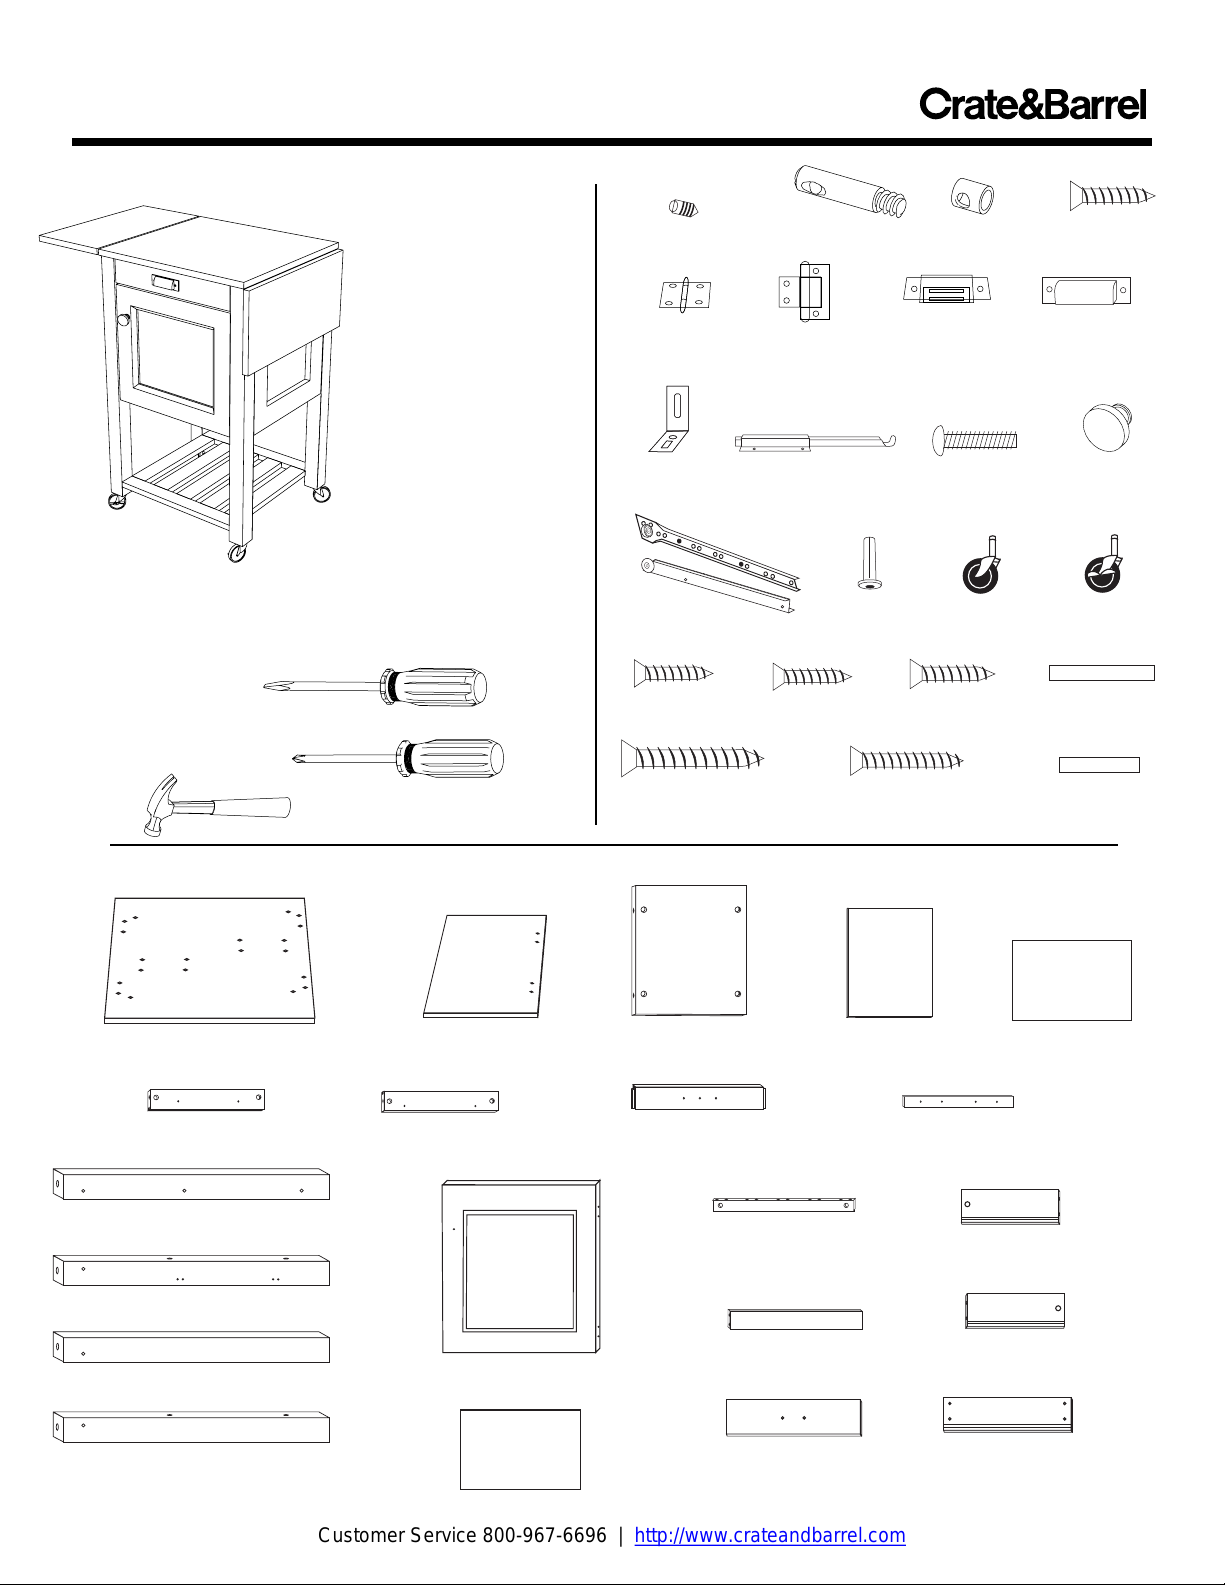
TOSCANA KITCHEN CART
Thank you for purchasing
the Toscana Kitchen
Cart. This page lists all
the contents included in
the box. Please take
time to identify the
hardware as well as the
individual components of
this product. As you
unpack and prepare for
assembly, place the
contents on a carpeted or
padded area to protect
them from damage.
Note: 2 people are
required to safely
assemble this product.
TOOLS REQUIRED
Flat Head Screwdriver
Phillips Head Screwdriver
Hammer
COMPONENTS
1 - table top
2 - drop leaves 1 - back panel
+
2 - top side braces
2 - bottom side braces 4 - vertical side braces
1 - right back leg
1 - right front leg
1 - left front leg
1 - door
1 - left back leg
Made in USA - r03
1 - drawer bottom
HARDWARE
18 - set
screws
4 - drop
leaf hinges
4 - L
brackets
1 set - drawer
glides
4 - 5/8" x #5
screws
8 - 1-1/4" x #8 screws 8 - 1/2" x #8 screws 20 - short steel pins
Missing hardware? Please call 800.606.6387 for replacements.
2 - shelf cross braces
5 - shelf slats
1 - drawer front
18 - post
screws
2 - door
hinges
2 - drop leaf
supports
4 - caster
inserts
12 - 5/8" x #6
screws
2 - side panels 2 - shelves
18 - barrel
nuts
1 - magnetic
door catch w/
plate & screws
(in a separate package)
3 - pull screws 1 - door
2 - casters
8 - 5/8" x #8
screws
2 - glide supports
1 - left drawer side
1 - right drawer side
1 - drawer back
24 - 1/2" x #9
bronze screws
1 - drawer
pull
8 - long
steel pins
pull
2 - locking
casters
Page 1 of 7
Page 2
Customer Service 800-967-6696 | http://www.crateandbarrel.com
TOSCANA KITCHEN CART
A
Right
Back Leg
B
Right
Front Leg
C
Left
Front Leg
D
Left
Back Leg
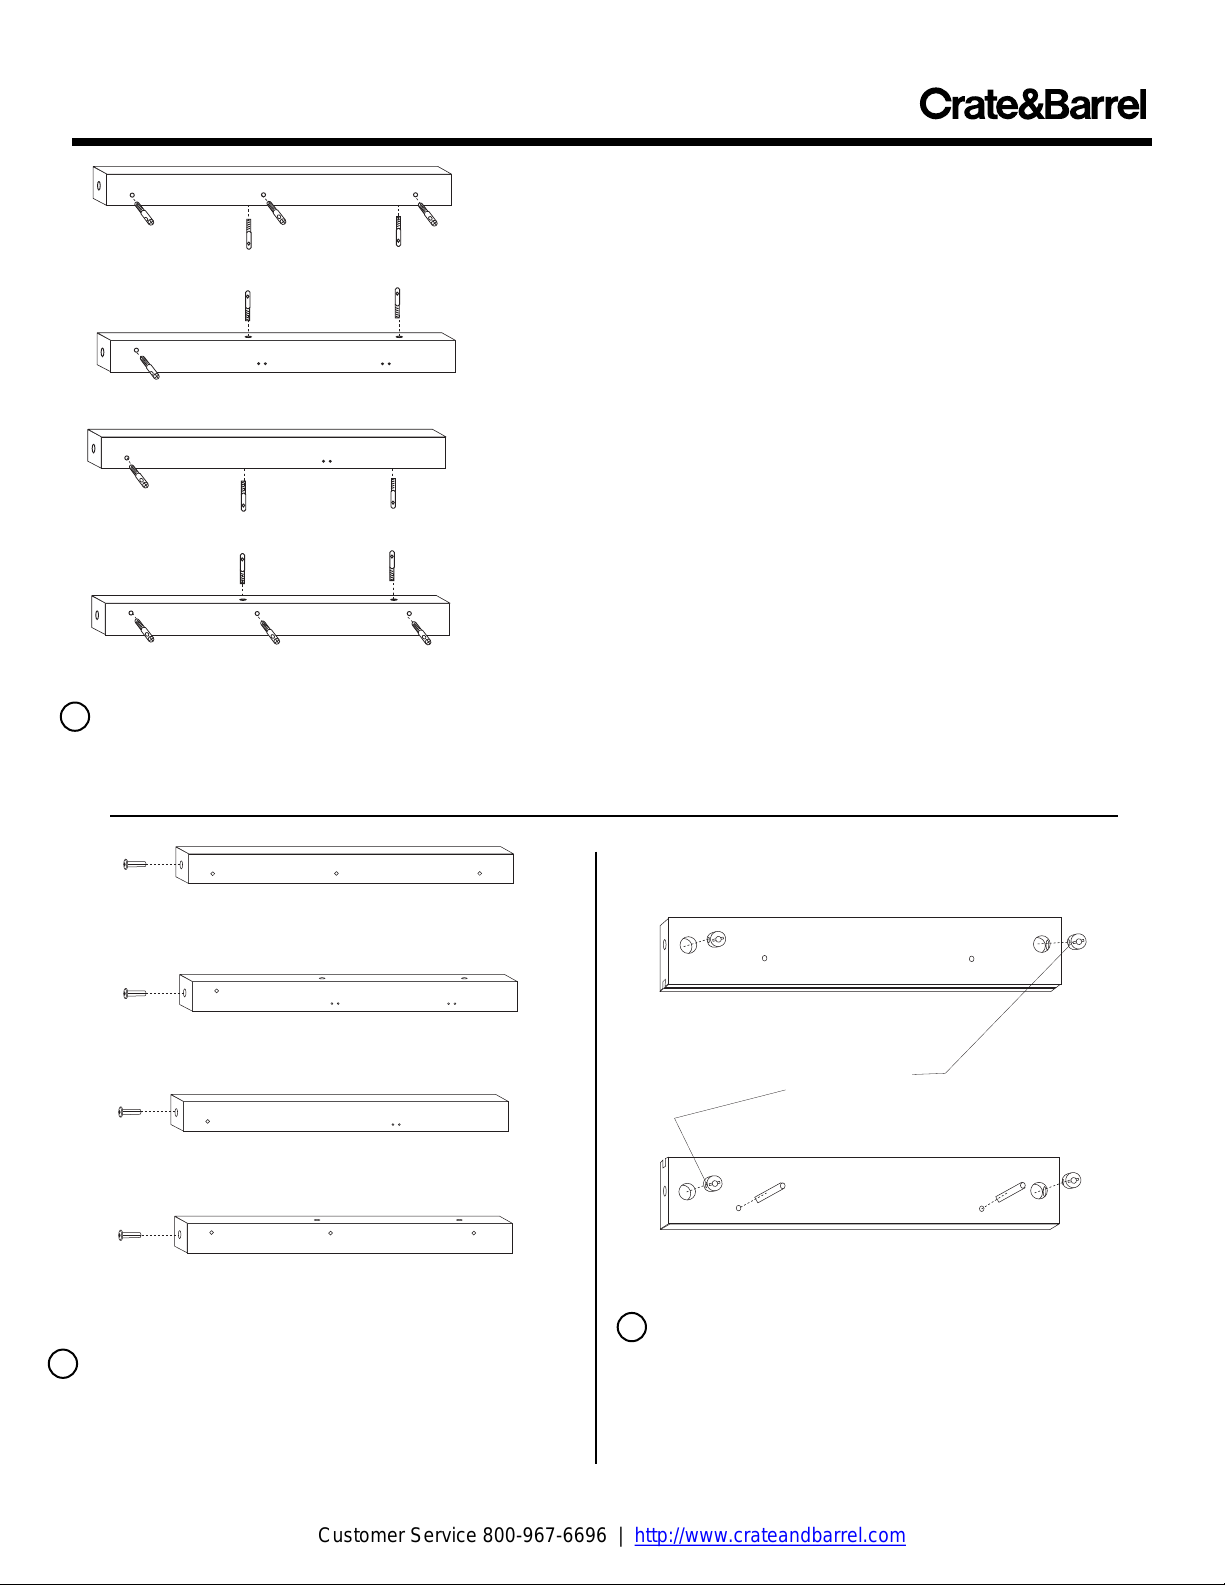
1 A. Insert 5 screw posts into the right back leg as shown. Secure each post with a flat head screwdriver.
B. Insert 3 screw posts in right front leg and secure with a screwdriver.
C. Insert 3 screw posts in left front leg and secure with a screwdriver.
D. Insert 5 screw posts into the left back leg and secure with a screwdriver.
2 Insert 1 caster insert into the bottom of each leg as
shown. Gently tap with a hammer if necessary.
Made in USA - r03
IMPORTANT INSTALLATION NOTE FOR
INSTALLING SCREW POSTS
a. Dip threads of the screw post in vegetable oil.
b. Align threaded end of post with the corresponding
hole in the wood. Tap on the slotted end with a
hammer until threads enter, then fully tighten using a
flat head screwdriver. DO NOT TRY TO HAMMER
THE POST ALL THE WAY IN AS IT WILL STRIP THE
POST HOLE AND NOT BE AN EFFECTIVE
CONNECTOR.
c. When solid shaft of post hits wood, back the post
out approximately 1/2 turn with the flat head
screwdriver.
A
Make sure holes
in barrel nuts align
with holes in edge
B
3 A. lnsert 2 barrel nuts into the top side brace as
shown. Make sure holes in each barrel nut are aligned with
holes on short edge of brace.
B. Insert 2 barrel nuts and 2 long steel pins into the
bottom side brace.
Page 2 of 7
Page 3
Customer Service 800-967-6696 | http://www.crateandbarrel.com
TOSCANA KITCHEN CART
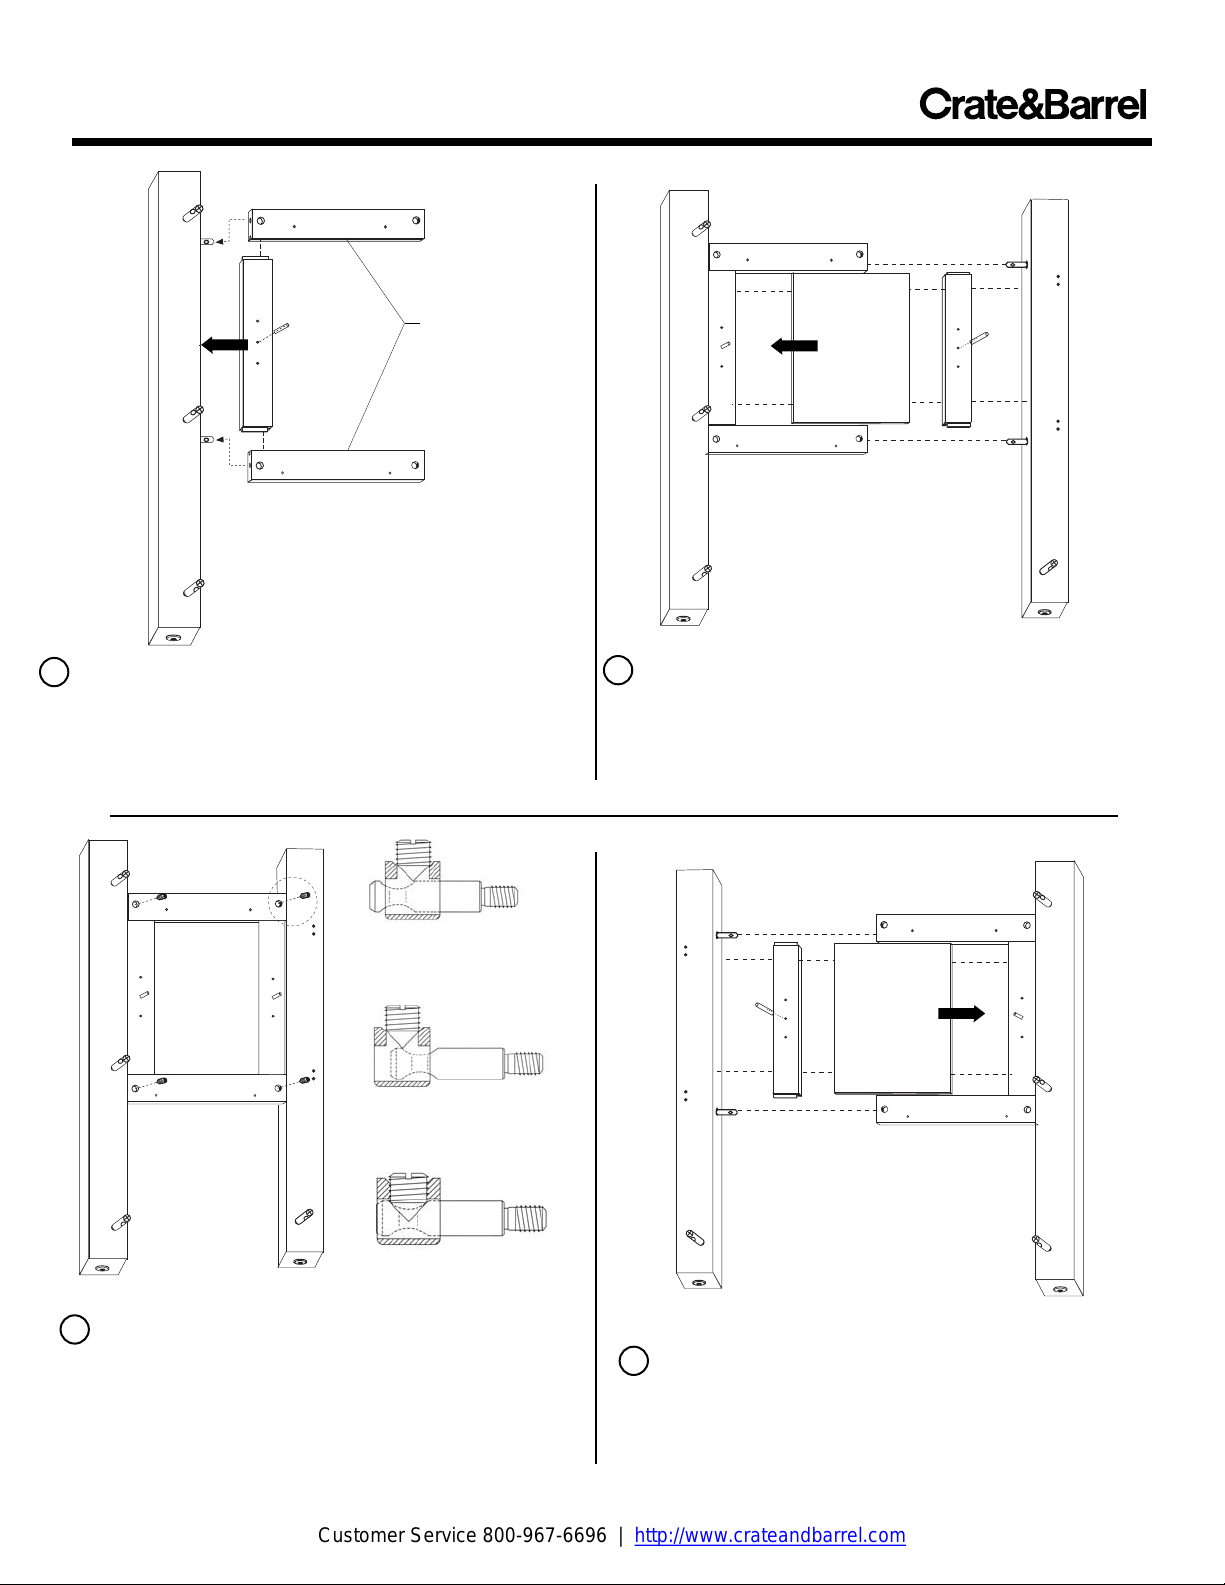
B
4 A. Fit top and bottom side braces onto screw posts of
right back leg, making sure slotted edges of braces face
each other.
B. Slide 1 vertical side brace into slot of top and bottom
braces so that it is flush with with leg. Insert 1 long steel pin
as shown.
INCORRECT
Post needs to be screwed deeper
INCORRECT
Post needs to be backed out
CORRECT
Set screw secures post properly
6 Secure side panel assembly by inserting 1 set
screw into each barrel nut. Tighten each set screw
with a phillips head screwdriver. The set screws are
self-centering and should be easy to tighten. If not,
adjust the position of the screw post by tightening or
loosening it. See the illustrations above for reference.
Made in USA - r03
A
Slots in
top & bottom braces
face one another
B
A
5 A. Slide 1 side panel into slot of top and bottom braces
until edge is flush to the vertical brace.
B. Fit 1 vertical side brace flush to exposed edge of side
panel. Insert 1 long steel pin into center hole.
C. Fit screw posts of right front leg into corresponding
holes in top and bottom braces.
7 Repeat Steps 3-6 for the left side panel assembly.
C
Page 3 of 7
Page 4

Customer Service 800-967-6696 | http://www.crateandbarrel.com
TOSCANA KITCHEN CART
A
B
8 A. Gently tap 2 short steel pins into the ends of each
shelf slat with a hammer.
B. Fit corresponding holes of front and back shelf
supports onto pins.
10 Fit left side panel assembly onto slat shelf and
back panel. Secure all cam posts with 4 set screws.
Made in USA - r03
B
A
9 A. Fit slat shelf assembly onto screw posts of right leg
frame. Secure with 2 set screws.
B. Fit back panel onto leg assembly and secure from
inside with 2 set screws.
Locking casters
at front
11 Fit 4 casters into caster inserts as shown, gently
tapping into place with a hammer if necessary. Make sure
the locking casters are inserted into the front legs, as
shown.
Page 4 of 7
Page 5

Customer Service 800-967-6696 | http://www.crateandbarrel.com
TOSCANA KITCHEN CART
12 With the assistance of another adult, place assembly
upright.
A. Attach 2 drawer glide supports to the inside of the
side panels with two 1-1/4"x#8 screws per support.
B. Attach the drawer glides to the drawer glide supports
with two 5/8" x #6 screws as shown.
14 A. Fasten the magnetic catch to the left front leg
using the screws from the magnetic catch packet.
B. Attach the door to the right front leg with four 1/2"
x #5 screws.
Made in USA - r03
IMPORTANT NOTE:
The knuckle of each
hinge must face out
and overlap the door
for proper fit. If the
hinge is not properly
oriented the door will
not close.
A
B
13 A. Attach 2 hinges to the door with two 1/2"x#5
screws per hinge. Make sure the knuckle of the hinge is
oriented as shown. Secure with a phillips head screwdriver.
B. Attach magnet plate to the door with the screw
included in the magnetic catch packet.
A
C
B
15 A. Attach the drawer back to left and right drawer
sides with four 1-1/4"x #8 screws. Make sure slots on the
bottom of each panel are aligned.
B. Slide drawer bottom into slot, finished side up.
C. Insert 1 barrel nut into each drawer side as shown,
making sure hole in barrel nut is aligned with hole in drawer
side.
Page 5 of 7
Page 6

Customer Service 800-967-6696 | http://www.crateandbarrel.com
TOSCANA KITCHEN CART
16 A. Insert 2 screw posts into the back side of the
drawer front as shown.
B. Fit screw posts of drawer front into the drawer sides
and secure each post with 1 set screw.
18 Place the table top and drop leaves upside down on a
padded surface as shown.
A. Fasten the L brackets to the underside of the table
top as shown with 5/8" x #6 screws.
B. Attach 1 drop leaf to either side of the table top with 2
hinges per side. Fasten each hinge with 1/2" x #5
screws.
C. Attach 2 drop leaf supports as shown with four 5/8" x
#8 screws as shown.
Made in USA - r03
Make sure wheels of
glides are at back of drawer
17 A. Attach drawer pull with 2 pull screws fastened
from the inside of the drawer front.
B. Attach 1 drawer glide to each drawer side and secure
with two 5/8" x #5 screws.
19 With the assistance of another adult, place table top
assembly into position, aligning holes in L brackets with
holes in legs. Secure each L bracket with a 5/8" x #6
screw.
Page 6 of 7
Page 7

Customer Service 800-967-6696 | http://www.crateandbarrel.com
TOSCANA KITCHEN CART
20 A. Fit 2 shelves into assembly, making sure middle
shelf is firmly supported by the steel pins.
B. Insert drawer assembly into case, fitting wheels on
drawer glides into rail of cabinet glides.
Assembly is now complete.
Made in USA - r03
CLEANING AND CARE
Clean spills on surfaces with a dry or damp soft cloth. Do
not use abrasive cleaners. The wood top is treated with
mineral oil. It is suggested to re-oil the base and top once
a month. After applying the mineral oil, make sure the
finish is fully dry before using.
Page 7 of 7
 Loading...