

Page 1
Customer Service 800-967-6696 | http://www.crateandbarrel.com
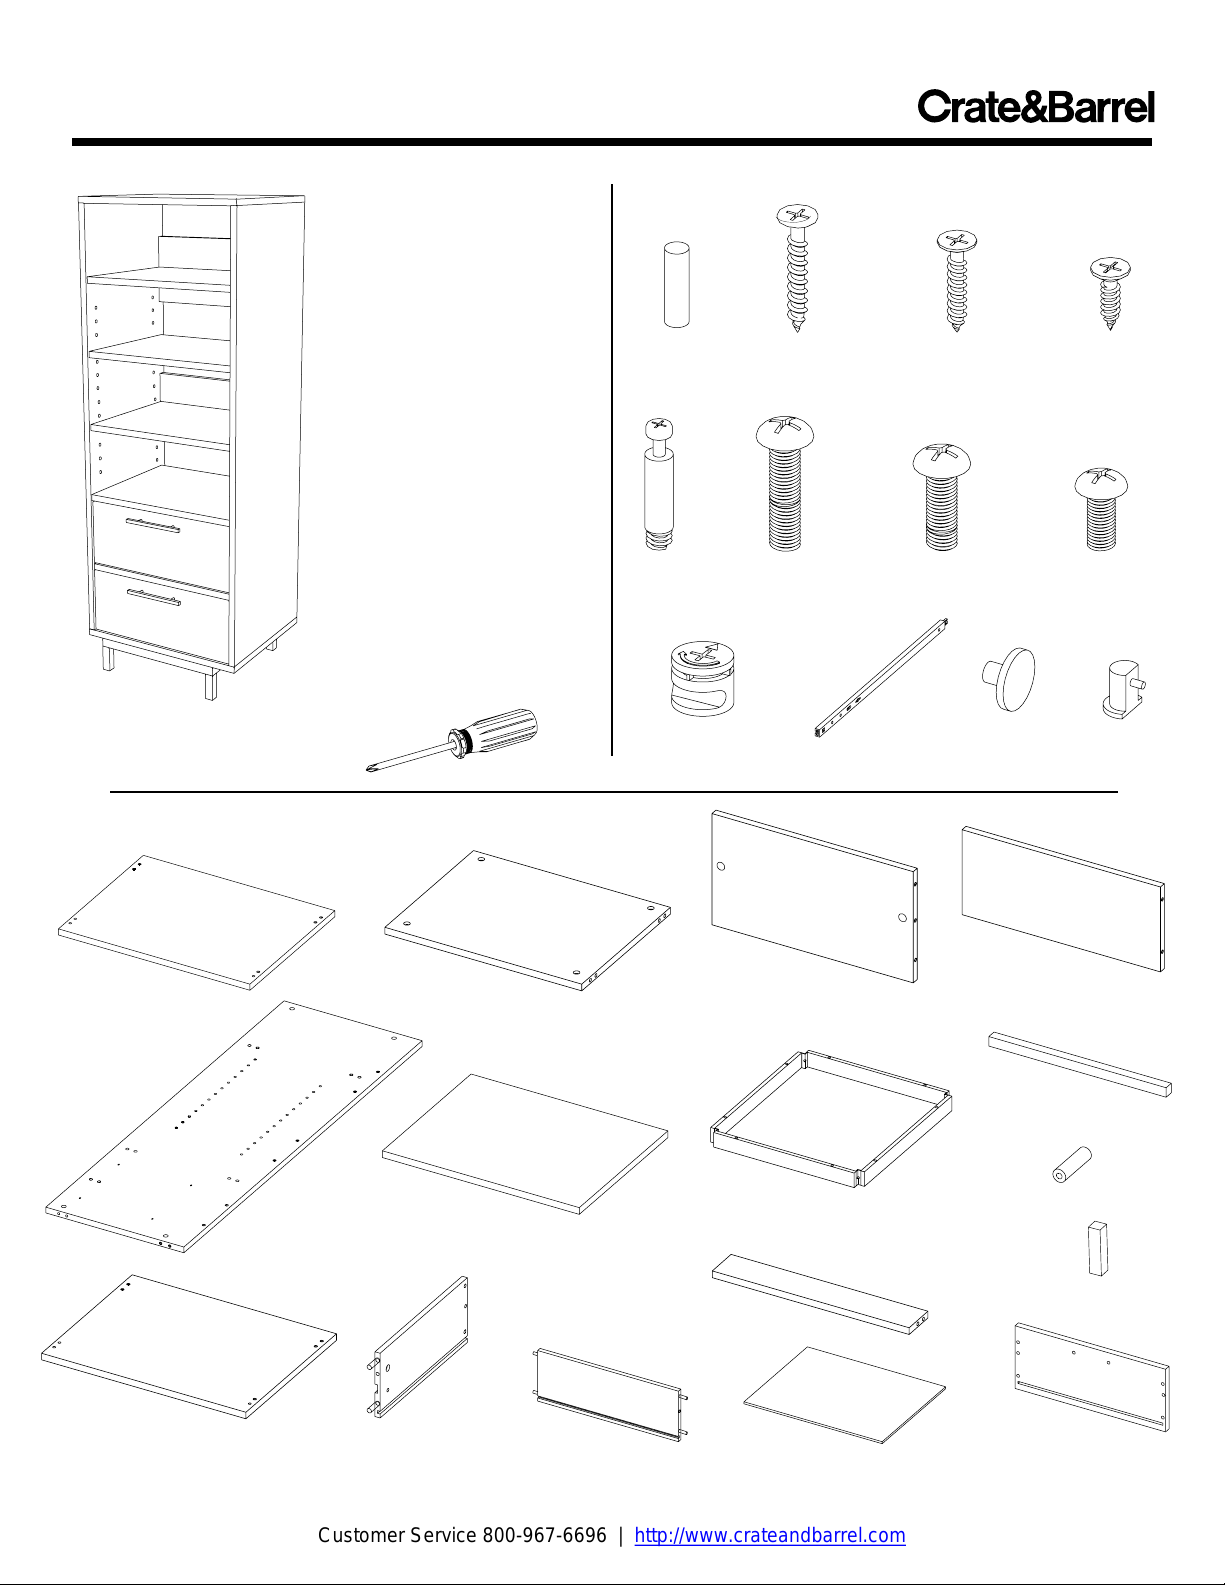
LATITUDE AUDIO TOWER
Thank you for purchasing
the Latitude Audio Tower.
This page lists all the contents
included in the box. Please
take time to identify the
hardware as well as the
individual components of
this product. As you unpack
and prepare for assembly,
place the contents on a
carpeted or padded area to
protect them from damage.
TOOLS REQUIRED
Phillips head screwdriver
COMPONENTS
1 - top panel
2 - fixed shelves
2 - side panels
(1 left, 1 right)
2 - adjustable shelves
1 - bottom panel
(has 8 pilot holes on underside)
Made in Denmark 2004
4 - drawer side
panels (2 left, 2 right)
2 - drawer backs
HARDWARE
32 - wood
dowels
22 - cam
screws
18 - large cams
4 - small cams
4 - long
machine screws
1 - large back panel
1 - metal
base frame
1 - stretcher
8 - long
wood screws
4 - medium
machine screws
4 - drawer
glides
2 - drawer bottoms
4 - medium
wood screws
18 - cam
covers
2 - small back panels
2 - metal pull handles
4 - metal pull standoffs
8 - short
wood screws
4 - short
machine screws
8 - shelf
pins
4 - metal legs
2 - drawer fronts
Page 1 of 6
Page 2
Customer Service 800-967-6696 | http://www.crateandbarrel.com
LATITUDE AUDIO TOWER
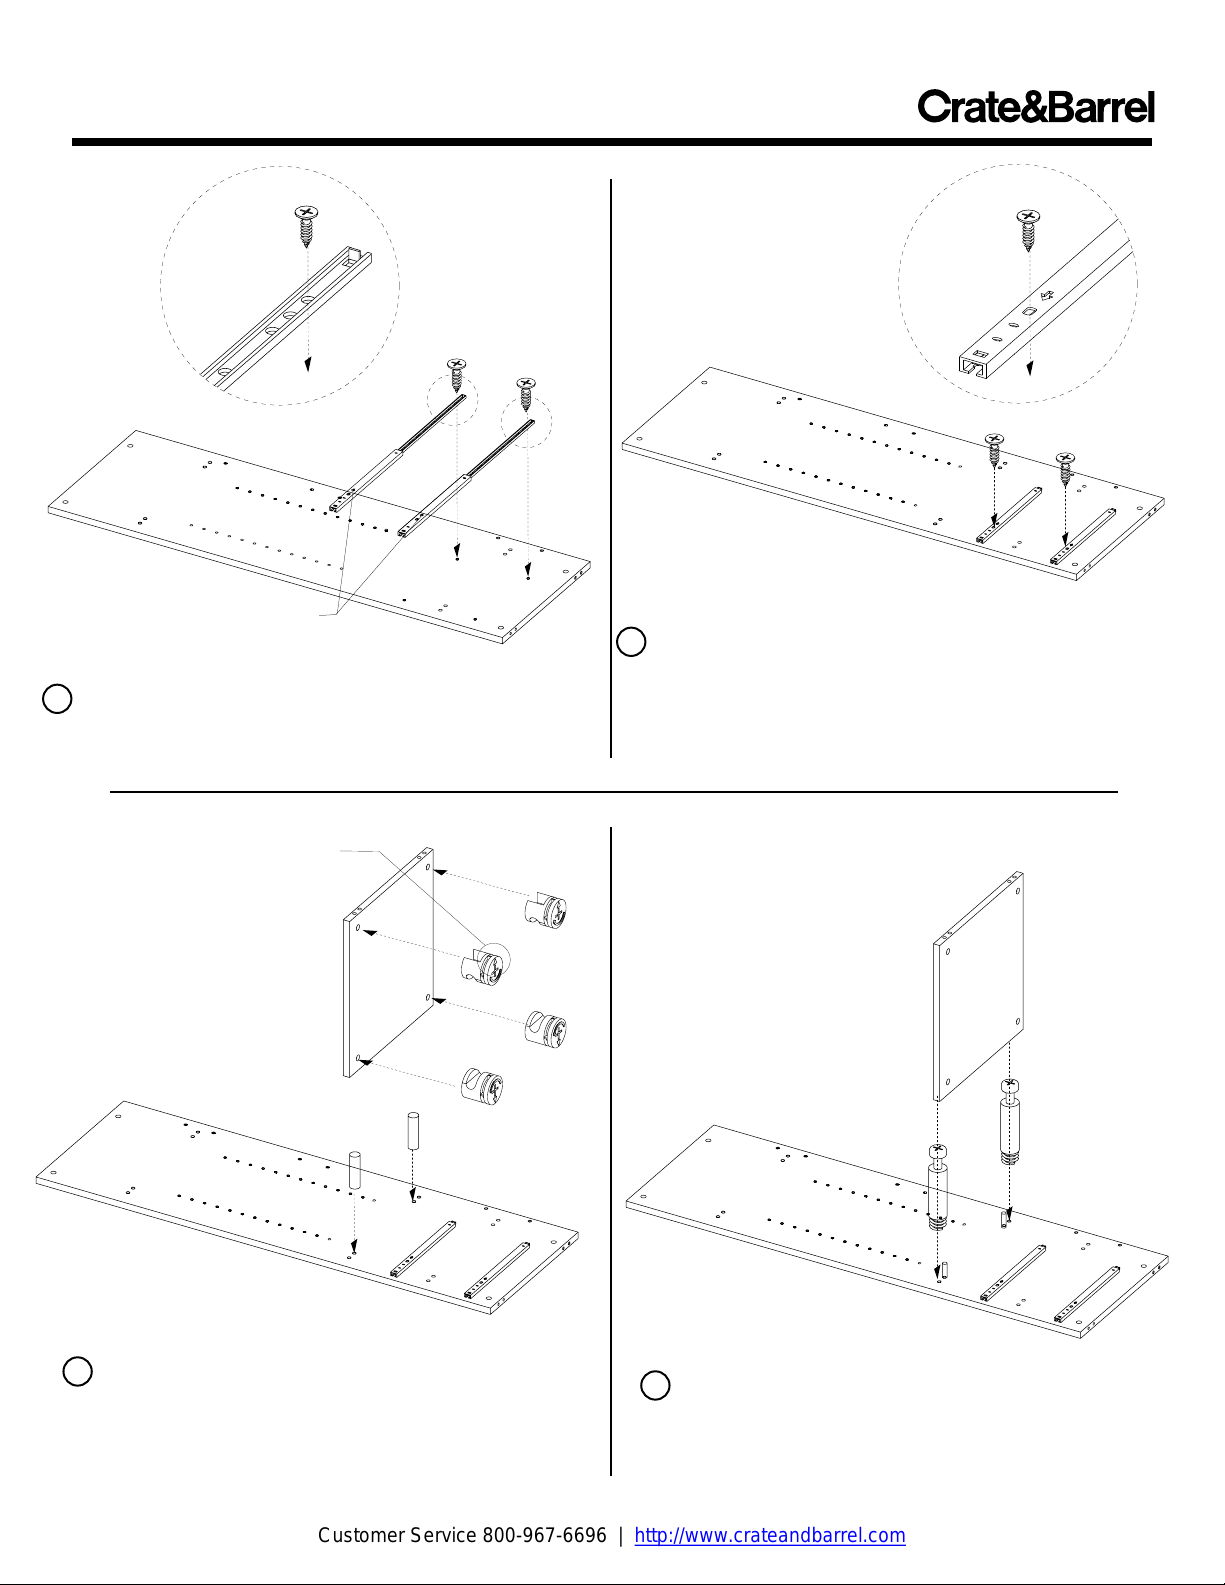
Left Side
Panel
Make sure arrows on
drawer glides point forward
1 Fully extend the drawer glide. Position the first hole at
the back end of the glide over the pre-drilled hole in the left
side panel. Attach back with 1 short wood screw.
Make sure this arrow points towards
the holes in the shelf edge
Left Side
Panel
3 A. Insert 4 large cams into underside of fixed shelf,
making sure arrows on each cam point towards the holes
on the shelf edge.
B. Insert 2 dowels into inner holes of left side panel.
Made in Denmark 2004
A
Fixed Shelf
(underside)
B
x 2
2 Retract the glide as shown. Position 1 short wood screw
over the oval hole on the external portion of the glide and
through the third hole on the inside portion of the glide.
Secure the front of the glide by fastening the short wood screw
into the pre-drilled hole.
Repeat these steps for the right side panel.
B
A
4 A. Using a screwdriver, fasten 2 cam screws into
the outer holes of the left side panel.
B. Slide shelf over cam screws and dowels.
Page 2 of 6
Page 3

Customer Service 800-967-6696 | http://www.crateandbarrel.com
LATITUDE AUDIO TOWER
5 Using a screwdriver, turn 2 cams 90 degrees clockwise
to secure the shelf panel to the left side panel.
A
Small
Back
Panel
B
Small
Back
Panel
7 A. Insert 4 dowels into sides of each small back panel.
Align dowels with holes in the side panel and fit into postion.
B. Insert 2 dowels into sides of each shelf and stretcher.
C. Insert 1 cam screw at the back of the left side panel.
Made in Denmark 2004
x 2
C
Fixed Shelf
Stretcher
6 Repeat steps 3-5 using 4 large cams, 2 cam screws &
4 wood dowels for the remaining fixed shelf and stretcher.
A
B
C
8 A. Insert 2 dowels into the side of the large back panel.
B. Insert 2 large cams into the large back panel.
C. Fit large back panel into positon. Fully tighten all cams
with a screwdriver.
Page 3 of 6
Page 4

Customer Service 800-967-6696 | http://www.crateandbarrel.com
LATITUDE AUDIO TOWER
Right
Side
Panel
9 Insert 5 cam screws into right side panel. Fit right
side panel into postion and secure the 5 cams on the
shelves and back panel with a screwdriver.
11 Fit each metal leg into the corner brackets of the
metal base frame. Align the holes in the legs with holes in
the brackets. Insert 1 medium machine screw through the
corner bracket into each leg and secure with a screwdriver.
Made in Denmark 2004
A
Top Panel
(underside)
B
10 A. Insert 8 large cams at top and bottom of side panels.
B. Insert cam screws and dowels into the top and bottom
panels. Place top and bottom panels into position as shown.
Secure by tightening cams completely.
12 Align the 8 holes in the base frame with the pilot holes
in the bottom panel and fasten with 8 long wood screws.
Bottom
Panel
Page 4 of 6
Page 5

Customer Service 800-967-6696 | http://www.crateandbarrel.com
LATITUDE AUDIO TOWER
DRAWER CONSTRUCTION
A
13 A. Attach drawer side panels to drawer back panel
using 2 medium wood screws.
B. Insert 1 small cam into the front of each side panel,
making sure the arrow on the cam faces towards the holes
on the edge of the side panel.
C
15 A. Insert 2 cam screws into the back side of the drawer
front.
B. Fit drawer front onto the drawer assembly and secure the
2 cams with a screwdriver.
C. Insert 2 long machine screws through the drawer front
and the 2 metal pull standoffs, then into the threaded holes
of the metal pull. Tighten with a screwdriver.
Made in Denmark 2004
B
x 2
B
A
x 2
x 2
14 Slide drawer bottom panel into the grooves at the
base of the drawer assembly.
A
B
16 A. With the assistance of another adult, lift case
assembly into an upright postion.
B. Fully extend drawer glides. Slide assembled drawers
onto drawer glides, fitting drawer glides into grooves on
drawer side panels.
Page 5 of 6
Page 6

Customer Service 800-967-6696 | http://www.crateandbarrel.com
LATITUDE AUDIO TOWER
17 Secure drawers to drawer glides by inserting short
machine screws through the drawer side panel into the
corresponding threaded first hole on the drawer glide.
19 Conceal all exposed cams by inserting
cam covers.
Made in Denmark 2004
A
B
18 A. Determine desired shelf location and insert
4 shelf pins per shelf into pre-drilled holes.
B. Place adjustable shelves into position, making sure
holes on underside of shelves engage the shelf pins.
20 Assembly is now complete.
CLEANING AND CARE
Clean wood surfaces with a dry or damp soft cloth. Do not
use abrasive cleaners. Do not use furniture wax or polish as
the wood is finished with a protective clear lacquer.
Page 6 of 6
 Loading...