

Page 1
Customer Service 800-967-6696 | http://www.crateandbarrel.com
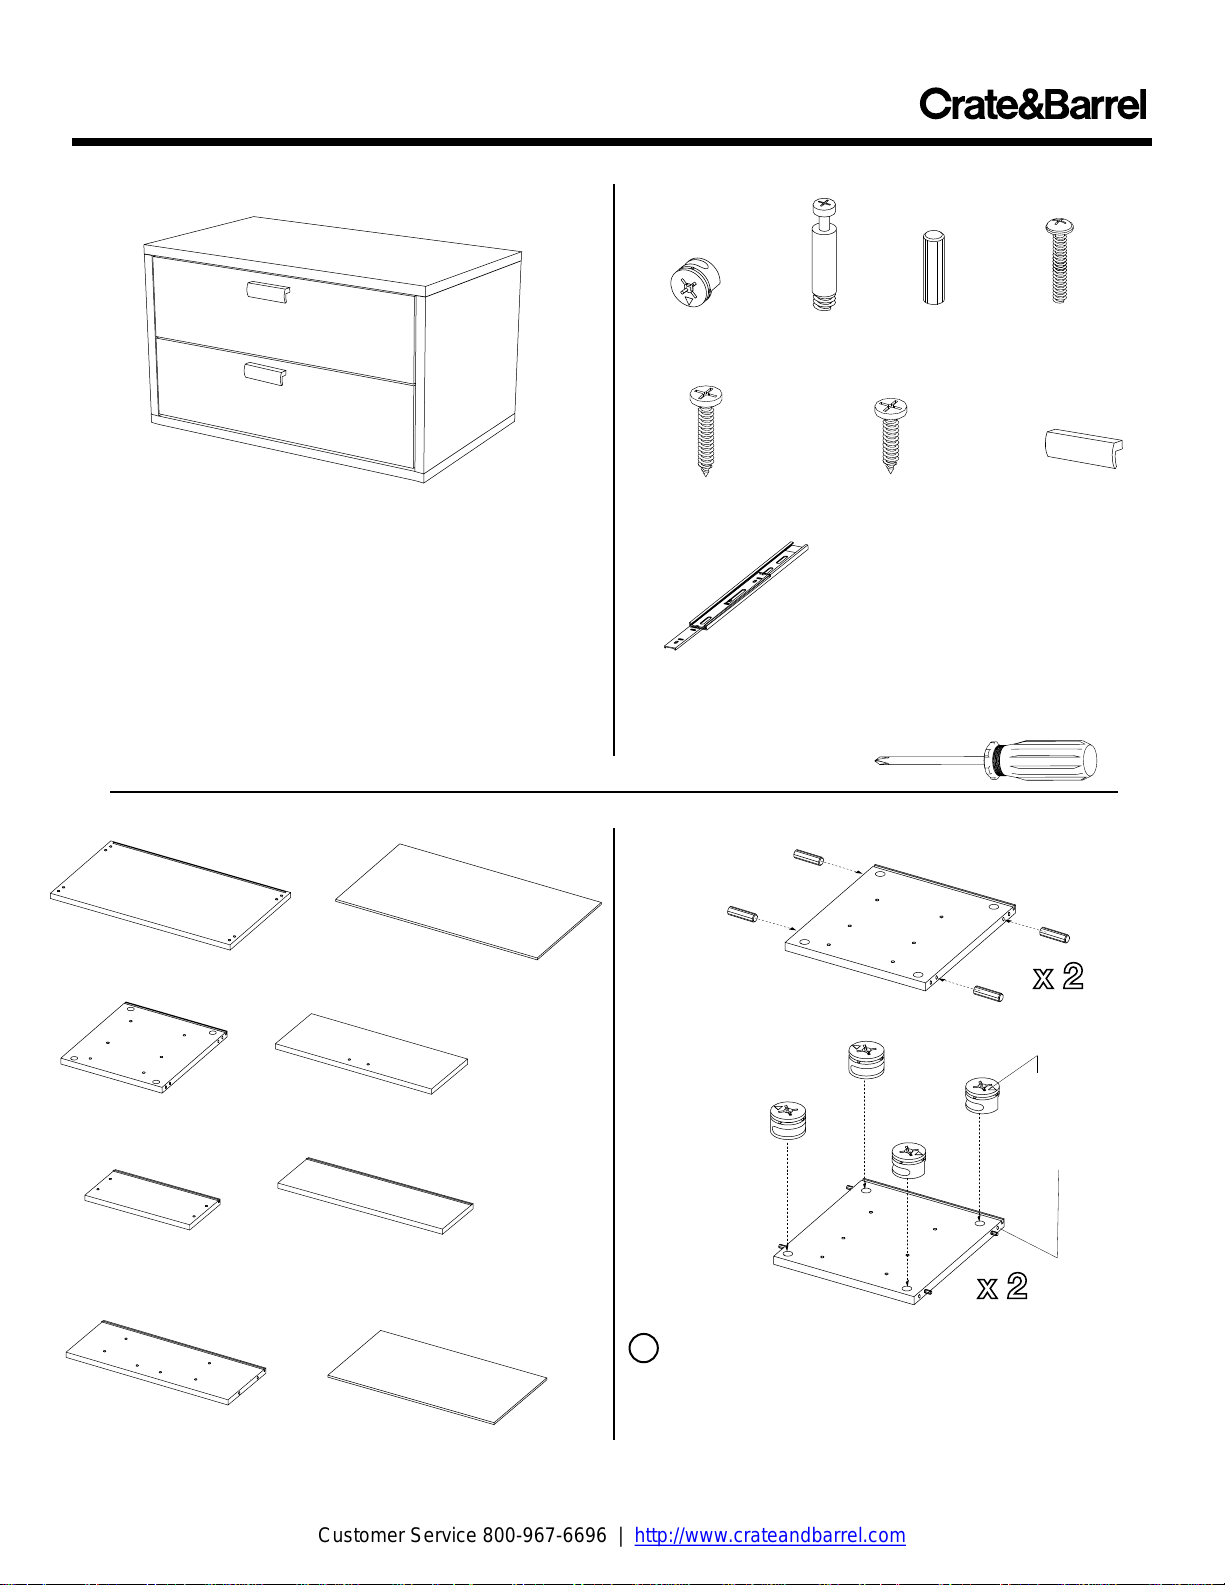
KENTON DOUBLE CUBE WITH 2 DRAWERS
Thank you for purchasing the Kenton
Double Cube with 2 Drawers. This page
lists all the contents included in the box.
Please take time to identify the hardware as
well as the individual components of this
product. As you unpack and prepare for
assembly, place the contents on a carpeted
or padded area to protect them from
damage.
COMPONENTS
2 - end panels
(1 labeled top, 1 labeled bottom)
1 - back panel
2 - side panels
(left labeled L, right
labeled R)
2 - drawer fronts
4 - drawer sides
(2 left, 2 right)
2 - drawer backs
2 - inner drawer
front panels
Made in China - r07
2 - drawer bottoms
HARDWARE
8 - cams
24 - large screws
Missing hardware? Please call 800.606.6387 for
replacements.
8 - cam
screws
24 - small screws
4 - glide assemblies
8 - wood
dowels
4 - pull screws
2 - drawer pulls
TOOLS REQUIRED
Phillips head screwdriver
A
Make sure
arrow on
each cam
points towards
edge with dowels
B
1 A. Insert 4 wood dowels into the inner holes on the
edges of the 2 side panels.
B. Insert 4 cams into the large holes in each side panel.
Make sure arrow on each cam points out towards edge
with dowels.
Page 1 of 3
Page 2
Customer Service 800-967-6696 | http://www.crateandbarrel.com
KENTON DOUBLE CUBE WITH 2 DRAWERS
NOTE:
Depress
plastic tab
to detach
small glide
from large
glide
assembly
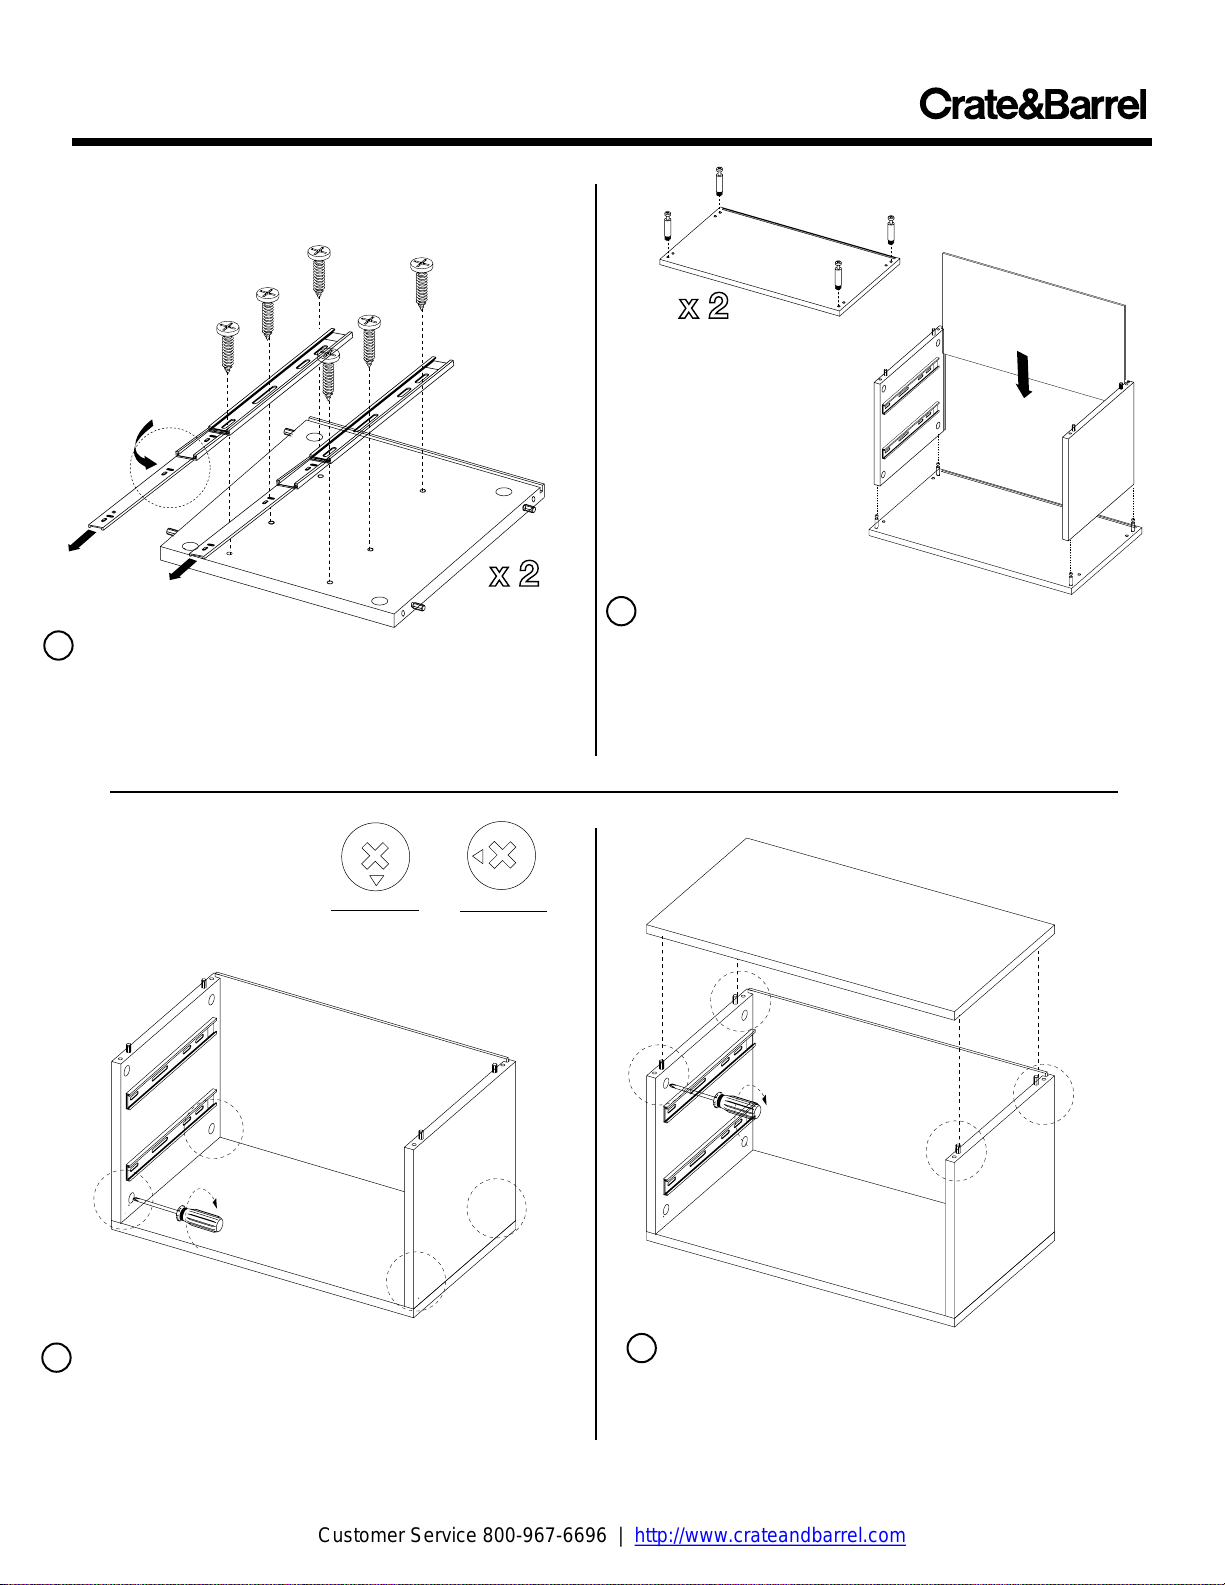
2 Remove the small component of each glide assembly.
Attach 2 of the large glides to the left and right side panels
with 3 small screws per glide, orienting each glide as
shown. The front of each glide should sit approximately
3/4" from the front edge of the panel. Secure, but do not
over tighten each screw with a phillips head screwdriver.
4 Using a phillips head screwdriver, turn each cam
at the base of the side panels clockwise until each
cam tightly engages the cam screw.
Made in China - r07
Do not over tighten
the screws.
Cam in
unlocked
position
Cam in
locked
position
A
C
B
3 A. Insert 4 cam screws in both end panels. Secure, but do
not over tighten with a phillips head screwdriver.
B. Place side panels into position over 1 bottom panel,
making sure slots on side panels line up with slot on bottom
panel. Align dowels and cam screws and firmly press into
position.
C. Slide back panel into the corresponding slot in the bottom
& side panels.
5 Repeat Steps 3 and 4 for attachment of the top panel.
Be sure that back panel is seated in the slot at the back
of the top panel before securing the 4 cams.
Page 2 of 3
Page 3

Customer Service 800-967-6696 | http://www.crateandbarrel.com
KENTON DOUBLE CUBE WITH 2 DRAWERS
A
IMPORTANT:
Make sure
unfinished
edge of
drawer
side faces
forward
B
6 A. Attach left drawer side to drawer back and inner
drawer front with 4 large screws. Make sure unfinished
edge faces forward. Secure, but do not over tighten each
screw with a phillips head screwdriver.
B. Slide drawer bottom into slot at bottom of assembly.
Repeat Steps A & B for the other drawer.
8 Using a phillips head screwdriver, fasten the
small glide from each glide assembly to each drawer
side with 3 small screws. Make sure the front of the
drawer glide fits snug to the back of the drawer front.
Do not over tighten the screws.
Made in China - r07
NOTE:
Make sure front of
the drawer glide
fits snug to the
back face of the
drawer front.
A
B
C
7 A. Attach right drawer side to drawer assembly with 4
large screws.
B. Attach drawer front to drawer assembly with 4 large
screws.
C. Attach drawer pull to drawer front with 2 pull screws.
Repeat Steps A-C for remaining drawer.
9 Fit small drawer glide hardware into corresponding large
glide hardware on the case interior. Applying even pressure
to each side of the drawer front, firmly push drawer glides into
the case glides.
If the drawer fronts appear uneven or misaligned, open each
drawer. Loosen each drawer slide screw enough to allow for
movement of the drawer. Make any necessary adjustments
to the drawers and re-tighten the drawer glide screws.
Assembly is now complete.
CLEANING AND CARE
Clean surfaces with a dry or damp soft cloth. Do not use
abrasive cleaners. Do not use furniture wax or polish as the
wood is finished with a protective clear lacquer.
Page 3 of 3
Page 4

Customer Service 800-967-6696 | http://www.crateandbarrel.com
KENTON SINGLE AND DOUBLE CUBE WITH 2 DRAWERS
ADJUSTING THE DRAWER FRONTS
If the drawer fronts appear uneven or misaligned, open each drawer.
Loosen each drawer slide screw enough to allow for movement of the
drawer. Make any necessary adjustments to the drawers and
re-tighten the drawer glide screws.
Made in China - r03
Page 1 of 1
Page 5

Customer Service 800-967-6696 | http://www.crateandbarrel.com
KENTON SINGLE & DOUBLE CUBE ATTACHMENT
MULTIPLE CUBE STACKING
FOR SINGLE & DOUBLE CUBES
TOOLS REQUIRED
Phillips head screwdriver
A
B
1 A. Stack cubes in desired configuration, making sure the rear edges of each cube are aligned and flush.
B. Place 1 mending plate into position as shown and attach with 2 wood screws per mending plate. Secure, but
do not over tighten each screw with a phillips head screwdriver.
C. Repeat Steps A & B for each additional stacked cube.
Made in China - r02
Single Cube - 2 wood screws
Double Cube - 4 wood screws
HARDWARE INCLUDED
Single Cube - 1 mending plate
Double Cube - 2 mending plates
NOTE:
Do not stack more than
5 cubes high
 Loading...