

Page 1
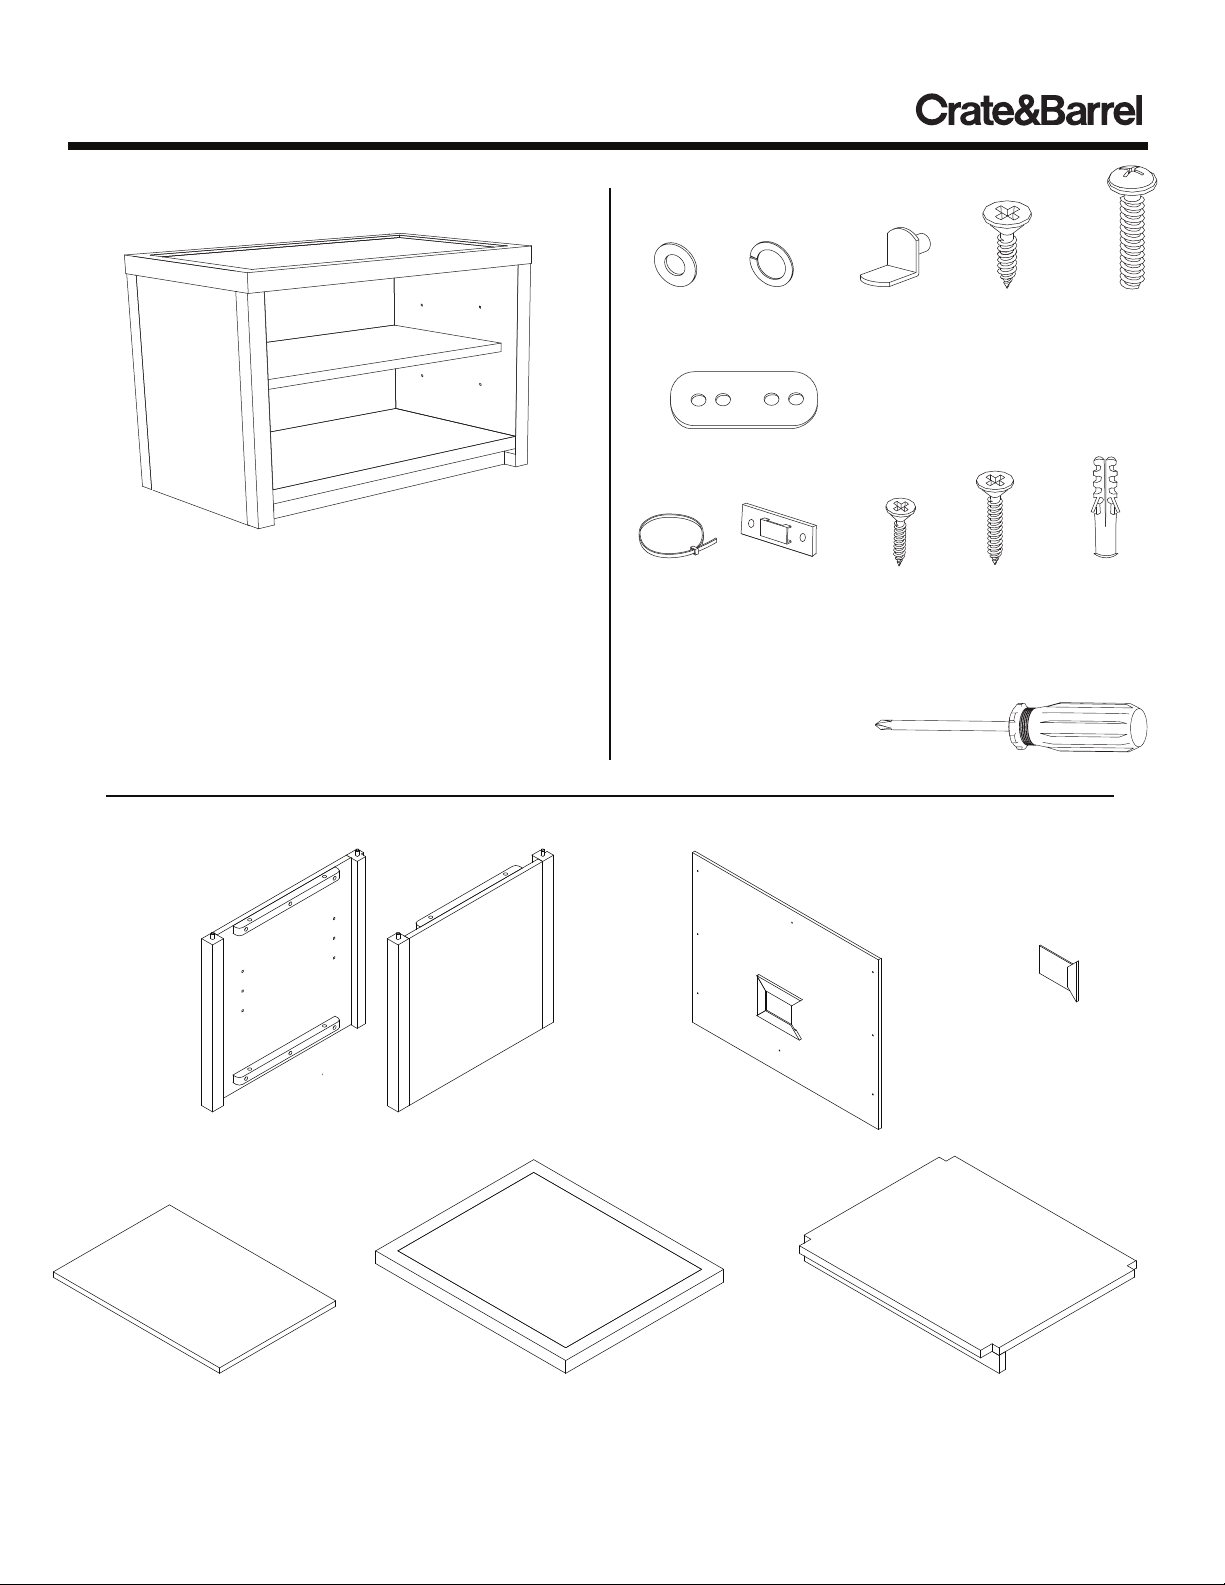
KENDEL 22” OPEN BOOKCASE
ASSEMBLY HARDWARE
Thank you for purchasing the Kendel 22” Open
Bookcase. This page lists all the contents included in
the box. Please take time to identify the hardware as
well as the individual components of this product. As
you unpack and prepare for assembly, place the
contents on a carpeted or padded area to protect them
from damage.
Note: 2 people are required to safely assemble this product.
COMPONENTS
8 - flat
washers
8 - spring
washers
pins
2 - connecting
brackets
18 - small
screws
8 - bolts4 - shelf
MOUNTING HARDWARE
1 - wall
straps
Missing hardware? Please call 800.606.6387 for replacements.
2 - brackets 2 - plastic
2 - medium
screws
2 - large
screws
anchors
TOOLS REQUIRED
phillips head screwdriver
(We recommend the use of hand tools instead of power tools)
1 - wire
management
cover
1 - back panel2 - side panels
(1- left, 1- right)
1 - bottom panel1 - top panel1 - adjustable shelf
Made in Vietnam - r06 Page 1 of 4
Customer Service 800.967.6696 | Latest instructions available at www.crateandbarrel.com
Page 2

KENDEL 22” OPEN BOOKCASE
NOTE: Make sure apron of
bottom panel is facing the
front as shown
right side
panel
bottom
panel
left side
panel
NOTE: Do not over
tighten the bolts
1 Attach left/right side panels to bottom panel with 2
bolts, 2 spring washers and 2 flat washers per side
panel as shown. Secure, but do not over tighten, bolts
with a phillips head screwdriver.
top
panel
2 Position unit upright as shown. Fit dowels of assembled
unit into corresponding holes of top panel. Secure top
panel with 4 bolts, 4 spring washers and 4 flat washers as
shown.
NOTE: Do not over
tighten the screws
B
B
A
3 A) Insert wire management cover into
corresponding window of back panel as shown.
B) Attach back panel with 10 small screws as shown.
Secure, but do not over tighten, screws with a
screwdriver as shown.
back
panel
wire
managment
cover
A
A
adjustable
B
shelf
4 A) Insert 4 shelf pins into holes at the desired shelf
height.
B) Tilt adjustable shelf and place into assembled unit.
Make sure shelf is securely supported by shelf pins.
Made in Vietnam - r06 Page 2 of 4
Customer Service 800.967.6696 | Latest instructions available at www.crateandbarrel.com
Page 3

KENDEL
22” OPEN BOOKCASE
MULTIPLY UNIT ASSEMBLY
22”
22”
22”
44”
22” 44”
5 If you purchased multiple Kendel Bookcases, it is suggested that
every 22” and 44” bookcase be secured together as shown,
connecting every 22” and 44” bookcase with 2 connecting plates.
Attach each plate with 4 small screws using a screwdriver. Repeat
steps for each additional bookcase.
44”
22”
bookcase
44”
bookcase
(sold
seperately)
22”
bookcase
(sold
seperately)
Made in Vietnam - r06
Customer Service 800.967.6696 | Latest instructions available at www.crateandbarrel.com
Page 3 of 4
Page 4

KENDEL
22” OPEN BOOKCASE
WALL MOUNTING ASSEMBLY FOR MULTIPLE UNITS
plastic
C
anchor
bracket
large
D
screw
medium
A
screw
6 Safety Mounting Instructions
F
wall
strap
bracket
NOTE:
If you are unsure about your wall type or what
mounting method you should use, consult a
qualified professional or your local hardware store.
For added safety and stability, it is recommended that the
wall mounting hardware be installed. For safe mounting, it is
essential to use wall anchors appropriate to your wall type
(i.e. plaster, drywall, concrete, etc.). Mount to wood studs
whenever possible.
A) Locate pilot holes on back of unit, and attach 1 bracket
using 2 medium screws as shown.
B) Determine the final location of unit. Mark position on the
wall, approximately 2" below the wall bracket mounted to the
back of the unit.
C) Drill a hole in the wall stud. If the wall stud is not
available, drill a hole in the wall that is slightly smaller in
diameter than the plastic anchor. Gently tap the plastic
anchor until the flange of the anchor is flush with the wall.
D) Attach 1 bracket to the wall by inserting 2 large screws
trough the bracket and into the plastic anchors in the wall.
E) Place the unit so the wall brackets on the back edge are
aligned with the wall brackets on the wall.
F) Lace one end of the wall strap through both brackets,
and into the other end of the strap.
G) Pull the strap tightly until secure.
H) Repeat steps A-G for remaining wall brackets and wall
straps.
CLEANING & CARE
Clean surfaces with a dry or damp soft cloth. Do not use abrasive cleaners. Do not use furniture wax or polish as
the unit is finished with a protective clear lacquer. It is recommended to use coasters to protect surface from heat
and water.
Made in Vietnam - r06 Page 4 of 4
Customer Service 800.967.6696 | Latest instructions available at www.crateandbarrel.com
 Loading...