

Page 1

The Art of Hasty-Baking
G
R
I
L
L
,
B
A
K
E
O
R
S
M
O
K
E
Owner’s Guide & Instruction Manual
Page 2
Safety
When using your Hasty-Bake oven, please observe the following cautions to ensure that your outdoor cooking
experiences are happy and safe.
Hasty-Bake ovens are designed for outdoor
use. If used in an enclosed area, proper
ventilation must be provided. Otherwise, toxic
fumes will accumulate and cause serious bodily
injury or death.
Do not add charcoal starter fluid or charcoal
impregnated with charcoal lighter fluid to hot
or warm coals. Cap starter fluid after using and
place a safe distance away from the oven.
Do not use gasoline, alcohol, or other highly
volatile fluids to ignite charcoal.
Do not leave infants, children, or pets
unattended near a hot oven.
Do not attempt to move a hot oven.
Do not use your Hasty-Bake oven within five
feet of any combustible material.
Do not remove ashes until all coals are
completely burned out and are fully
extinguished.
Do not wear clothing with loose flowing
sleeves while lighting or using the oven.
Do not use your Hasty-Bake oven in high
winds.
WA R R A N T Y
Do not store combustible materials (charcoal,
Firelighters, etc.) in the storage area under the
ash pan while using the oven.
Keep the oven in a level position at all times.
Open the lid of the oven while lighting and
getting the coals started.
Never touch the cooking or charcoal grates, or
the oven, to see if they are hot.
Barbecue mitts or hot pads should always be
used to protect hands while barbecuing,
opening the fire door, or adjusting the dual
draft vents.
Use proper barbecue tools with long, heatresistant handles.
To extinguish coals, close the hood, fire door,
and dual draft vents. Do not use water.
To control flare ups, close the hood and, if
necessary, the fire door and dual draft vents.
Do not use water.
Handle and store hot electric starters carefully.
Keep electrical cords away from the hot
surfaces of the oven.
Using sharp objects to clean the cooking grill
or remove ashes will damage the finish.
Using abrasive cleaners on the cooking grill or
the oven itself will damage the finish.
Powder-Coated Finish Models (131, 414)
1 year warranty on paint
5 year warranty on parts and workmanship
Dual Finish Models (256, 83)
1 year warranty on paint
5 year warranty on parts and workmanship
10 year warranty on stainless steel components
Stainless Steel Models
(132, 415, 257, 84, 270, 369)
10 year warranty on parts and workmanship
Hastings (290)
10 year warranty on parts and workmanship
Shipping and handling extra
Page 3

Table of Contents
Welcome. . . . . . . . . . . . . . . . . . . . . . . . . . . . . . . . . . . . 2
A Little History. . . . . . . . . . . . . . . . . . . . . . . . . . . . . . . 3
Unique Features & Benefits . . . . . . . . . . . . . . . . . . 4 - 5
Assembly Instructions
Suburban/Continental/Legacy/Gourmet
Fiesta/Hastings . . . . . . . . . . . . . . . . . . . . . . . . . . . 6 - 7
Parts Diagrams & Installation Instructions
Hastings . . . . . . . . . . . . . . . . . . . . . . . . . . . . . . . . . . . 8
Fiesta . . . . . . . . . . . . . . . . . . . . . . . . . . . . . . . . . . . . . 9
Portable . . . . . . . . . . . . . . . . . . . . . . . . . . . . . . . . . . 10
Caring for your Hasty-Bake . . . . . . . . . . . . . . . . . . . . 11
Getting Started . . . . . . . . . . . . . . . . . . . . . . . . . . . . . . 12
Cooking Tips. . . . . . . . . . . . . . . . . . . . . . . . . . . . . . . . 13
Cooking Methods . . . . . . . . . . . . . . . . . . . . . . . . 14 - 15
Installing a Rotisserie . . . . . . . . . . . . . . . . . . . . . . . . . 16
Trouble Shooting & Common Questions . . . . . . . . . 17
Recipes . . . . . . . . . . . . . . . . . . . . . . . . . . . . . . . . 18 - 26
What is Hardwood Charcoal? . . . . . . . . . . . . . . . . . . 27
Hasty-Bake Accessories . . . . . . . . . . . . . . . . . . . 28 - 29
O w ne r’ s G ui de & I ns tr uc ti on M an ua l
1
Page 4

G
R
I
L
L
,
B
A
K
E
O
R
S
M
O
K
E
Welcome
Dear Hasty-Bake owner,
Congratulations and welcome to the proud Hasty-Bake
family. I am confident that you will be pleased with
your decision to purchase the finest multipurpose
charcoal-burning grill available.
Whether you are a “seasoned” outdoor chef or just
getting “fired-up”, the following pages will provide you
with helpful tips, tricks, and techniques to make your
Hasty-Bake experiences more enjoyable. We have also
included a collection of our favorite recipes to get you
started (we hope you like them as much as we do!).
We sincerely appreciate your business and look forward
to serving all of your outdoor cooking needs. Please do
not hesitate to contact us if you have any questions or
comments about “The Art of Hasty-Baking”. We would
love to hear from you.
Best regards,
Richard Alexander
President
2
Page 5

A Little History
In 1948, Grant Hastings produced the first Hasty-Bake Charcoal Oven. As one of
the original manufacturers of the “backyard barbecue,” Hastings was a pioneer in
the industry. Specifically, Hasty-Bake introduced the first portable unit, the first
hooded unit, and a new method of cooking using indirect heat. Hastings’ design
controlled the intensity of heat by using vents, a heat deflector, a ventless hood and
an adjustable firebox, revolutionizing the method in which food was cooked.
In acknowledgment of Grant Hastings tremendous efforts, Hasty-Bake Charcoal
Ovens have attracted a lot of attention over the years. Hasty-Bake was selected by
the State Department to represent the United States at the Brussels World’s Fair in
1958. Our company won the Hess Award in 1962, and our ovens have been on
display in the Chicago Museum of Science and Industry. The patented Hasty-Bake
design receives continual praise from food and industry critics across the country.
In addition, our ovens have produced blue ribbon results in barbecue competitions
from coast to coast. For example, the Grand Champion of the 1994 American
Royal in Kansas City (known as the World Series of Barbecue Cookoffs), Doug
Steele and his Heat’s Neat team, used a Hasty-Bake to prepare most of their
award-winning recipes.
Though our company has undergone many changes in the last 60 years, the basic
design of Hasty-Bake Charcoal Ovens remains unchanged. Since 1993, HastyBake has been owned by Richard Alexander. They have continued the tradition of
producing the finest multipurpose charcoal-burning grill available on the market
today.
Built for the discriminating outdoor chef, Hasty-Bake ovens create a cooking
environment that produces meals which are superior in taste. No other product has
the versatility to grill, bake and smoke with such ease and perfection. Each HastyBake is constructed by hand from only the highest-quality materials. With proper
care and basic maintenance, you can expect our black powder finish, cold-rolled
steel ovens to last for 15 to 25 years (or longer). Our solid stainless steel models can
be expected to last virtually forever!
Even after 60 years, our charcoal ovens continue to grow in popularity, largely
thanks to proud owners who tell others about their Hasty-Baking experiences.
Since satisfied customers have always been our best advertising, we hope you will
carry on the Hasty-Bake tradition by sharing your enthusiasm with others.
O w ne r’ s G ui de & I ns tr uc ti on M an ua l
3
Page 6
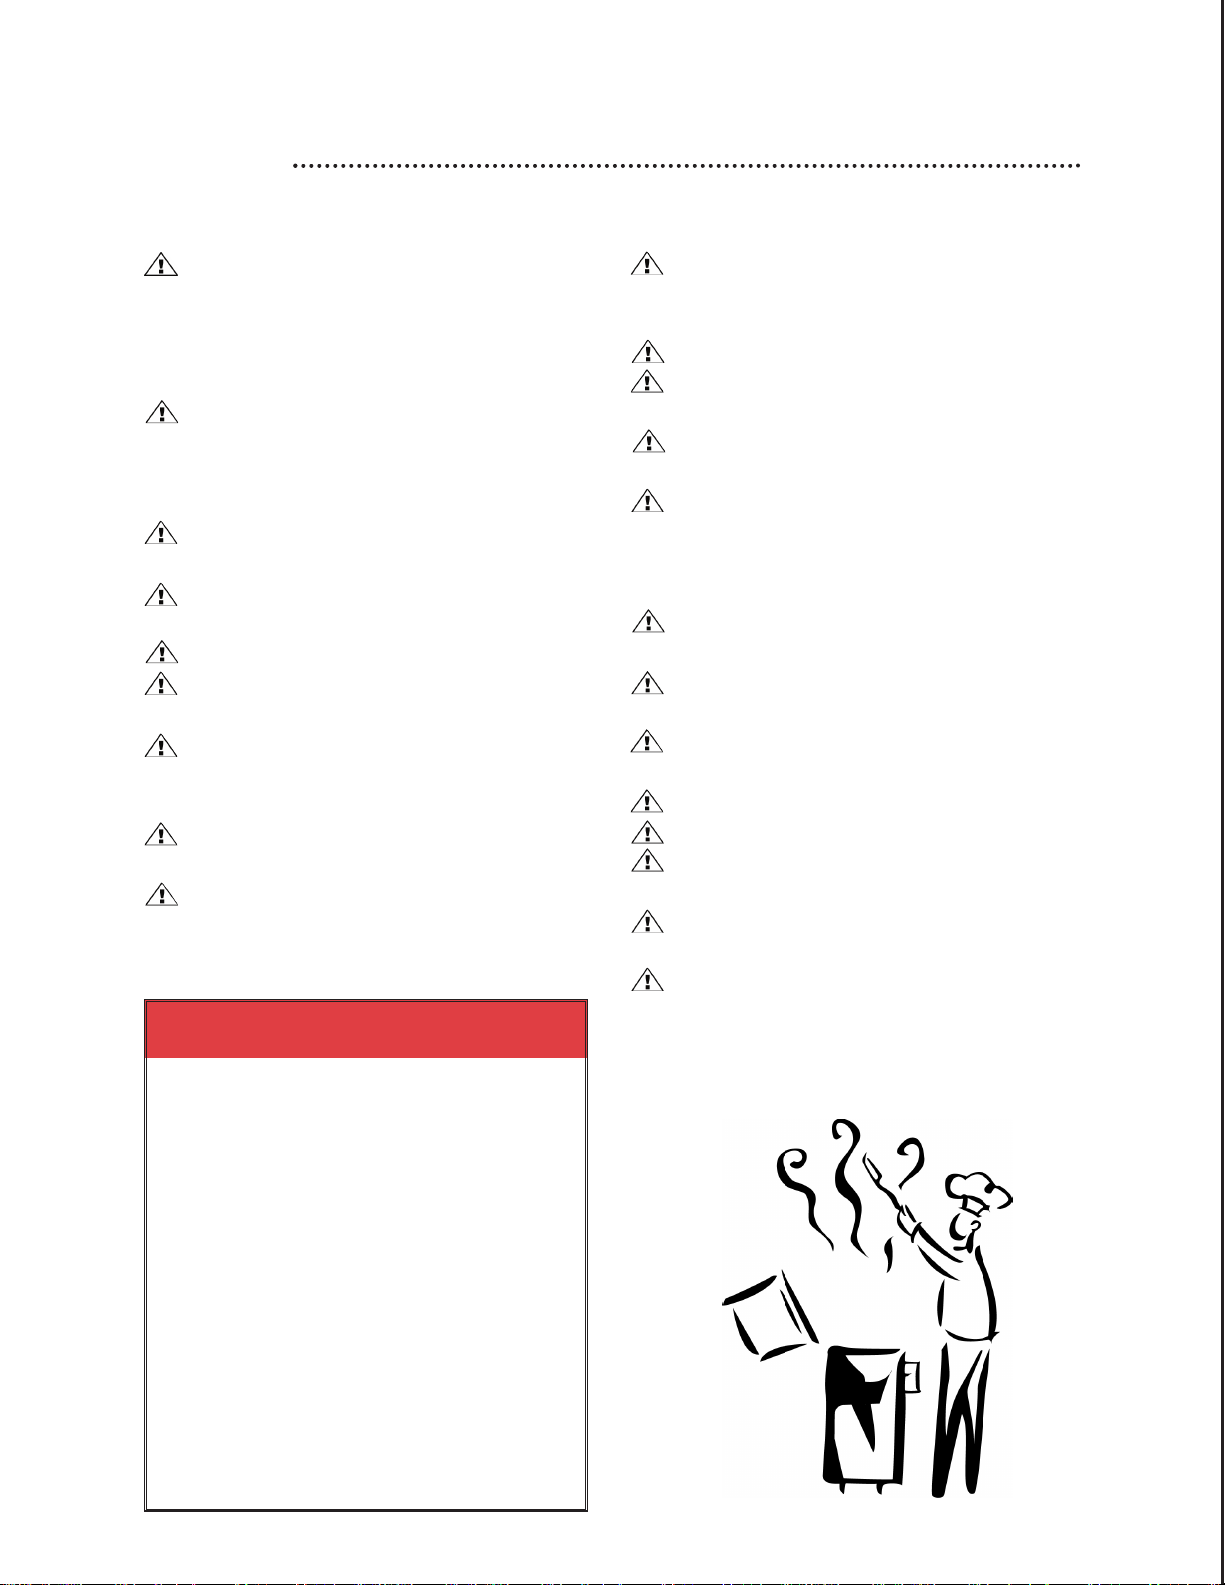
Unique Features & Benefits
6
7
8
1
2
3
4
5
9
ADJUSTABLE FIRE BOX & COOKING STYLE INDICATOR (1)
The position of your fire may be mechanically adjusted up or down. Different cooking methods require
varying placements of the fire. Turning the outside crank handle clockwise raises the fire box to the “sear”
position for quick cooking of steaks, burgers, etc. Turning the crank handle
counterclockwise lowers the fire box to a “bake” level for cooking chicken, ham,
bread, etc. Continue turning the crank handle counterclockwise and
the fire will be in the “smoke” position, for slow cooking or smoking
of turkeys, ribs, briskets, etc. Read the information on page 5 about
the heat deflector for proper use with the adjustable fire box. The
cooking style indicator on the front of the Hasty-Bake is linked to the
lift mechanism and eliminates any guess work about the
position of the fire.
Because the fire box (instead of the cooking grills) may be
moved up or down, the cooking space inside the
hood remains unchanged during fire box
adjustments. This is important when cooking
large turkeys, hams or both.
GREASE DRAIN SYSTEM (2)
The “V”-shaped cooking grills encourage most of the
grease and fat to drain off of the meat, follow the “V”
toward the center of the cooking grill, drip into the
grease drain rod and continue outside the unit to the
grease cup. Flare-ups are virtually eliminated. Typically,
when the hood is closed and the heat deflector is in place, grease
drippings will not cause flare-ups. If you are “searing” or “grilling” your
food with the hood open and the heat deflector removed, flare-ups
might occur. You can control them by simply closing the hood and draft vents for a few seconds.
FULL-WIDTH FIRE DOOR (3)
On all Hasty-Bake models, a full-width-fire door permits easy fueling and allows the fire box and ash pan to
be entirely removed for cleaning. The full-width fire door also makes it easy to slide the heat deflector into
place or remove it when necessary. In addition, the fire door makes it easy to access the fire box for refueling
during slow cooking or smoking so that foods never have to be removed from the grill. Use the space at the
bottom of the oven base (below the ash pan) as a warming area while cooking and a storage area when your
Hasty-Bake is not in use. We do not recommend storing your Hasty-Bake charcoal below the ash pan.
COOKING GRILLS (4)
Our cooking grills are constructed of heavy1⁄4” diameter nickel-plated cold rolled steel or stainless steel,
depending on the model. They provide a clean, durable cooking surface. The grills are also “V”-shaped,
allowing grease to flow to the center of the cooking grill and travel properly through the grease drain system.
4
Page 7

HEAT DEFLECTOR (5)
6
4
8
2
The heat deflector plate, which is placed on the fire box (when in use), combines with the ventless hood to
enable your Hasty-Bake to cook like an oven. The heat deflector’s function is to distribute heat evenly
throughout the cooking area without exposing any food to the direct fire and to control flare-ups. Thus, your
Hasty-Bake becomes a “convection” oven and your food can be placed across the entire cooking surface. For
the heat deflector to work properly, confine the coals to
one half of the fire box (usually the right hand side,
which is the side of the fire box closest to the fire door)
and slide the heat deflector in place on top of the fire box
above the coals. Remember to remove the heat deflector
when using your Hasty-Bake for cooking with direct heat
(searing).
THERMOMETER (6)
Accurate to within 2%, this stainless steel bi-metal
thermometer helps you maintain your desired cooking
temperature.
VENTLESS HOOD (7)
Your Hasty-Bake has a hinged hood so you can cook with the hood open or closed. The deep “ventless” hood
is just one of the unique features which enables you to prepare foods which are flavorful and juicy (draft vents
placed in the hood of a grill will dry out foods). The main function of your Hasty-Bake hood is to hold in the
heat and smoke so that it rotates around your food. Your Hasty-Bake cooks like an oven; it turns the heat
instead of you having to turn the meat.
DUAL DRAFTVENTS (8)
Dual draft vents, combined with the adjustable fire box and HastyBake’s totally enclosed design, provide you with the ability to
control the fire at all times. The intake draft vent is located on the
fire door, just below the fire level. The exhaust draft vent is located
above the fire level on the opposite side of the grill, by the push
handle. Hasty-Bake’s unique dual draft vent feature creates a cross
draft in the body of the oven, instead of in the hood, which allows
your foods to be cooked on all sides. Fully opened vents create an
intense heat. Conversely, vents that are barely open lower the heat
for baking and smoking.
ASH PAN (9)
All Hasty-Bake models feature a completely removable ash pan,
making clean up easy. When the fire box is pulled out for
refueling, remember to pull the ash pan out simultaneously to
catch the charcoal ashes and cinders that may fall through the fire
grate. To help reduce corrosion and to keep clean-up simple, we
recommend that you line the ash pan with heavy-duty aluminum
foil.
O w ne r’ s G ui de & I ns tr uc ti on M an ua l
5
Page 8
1
2
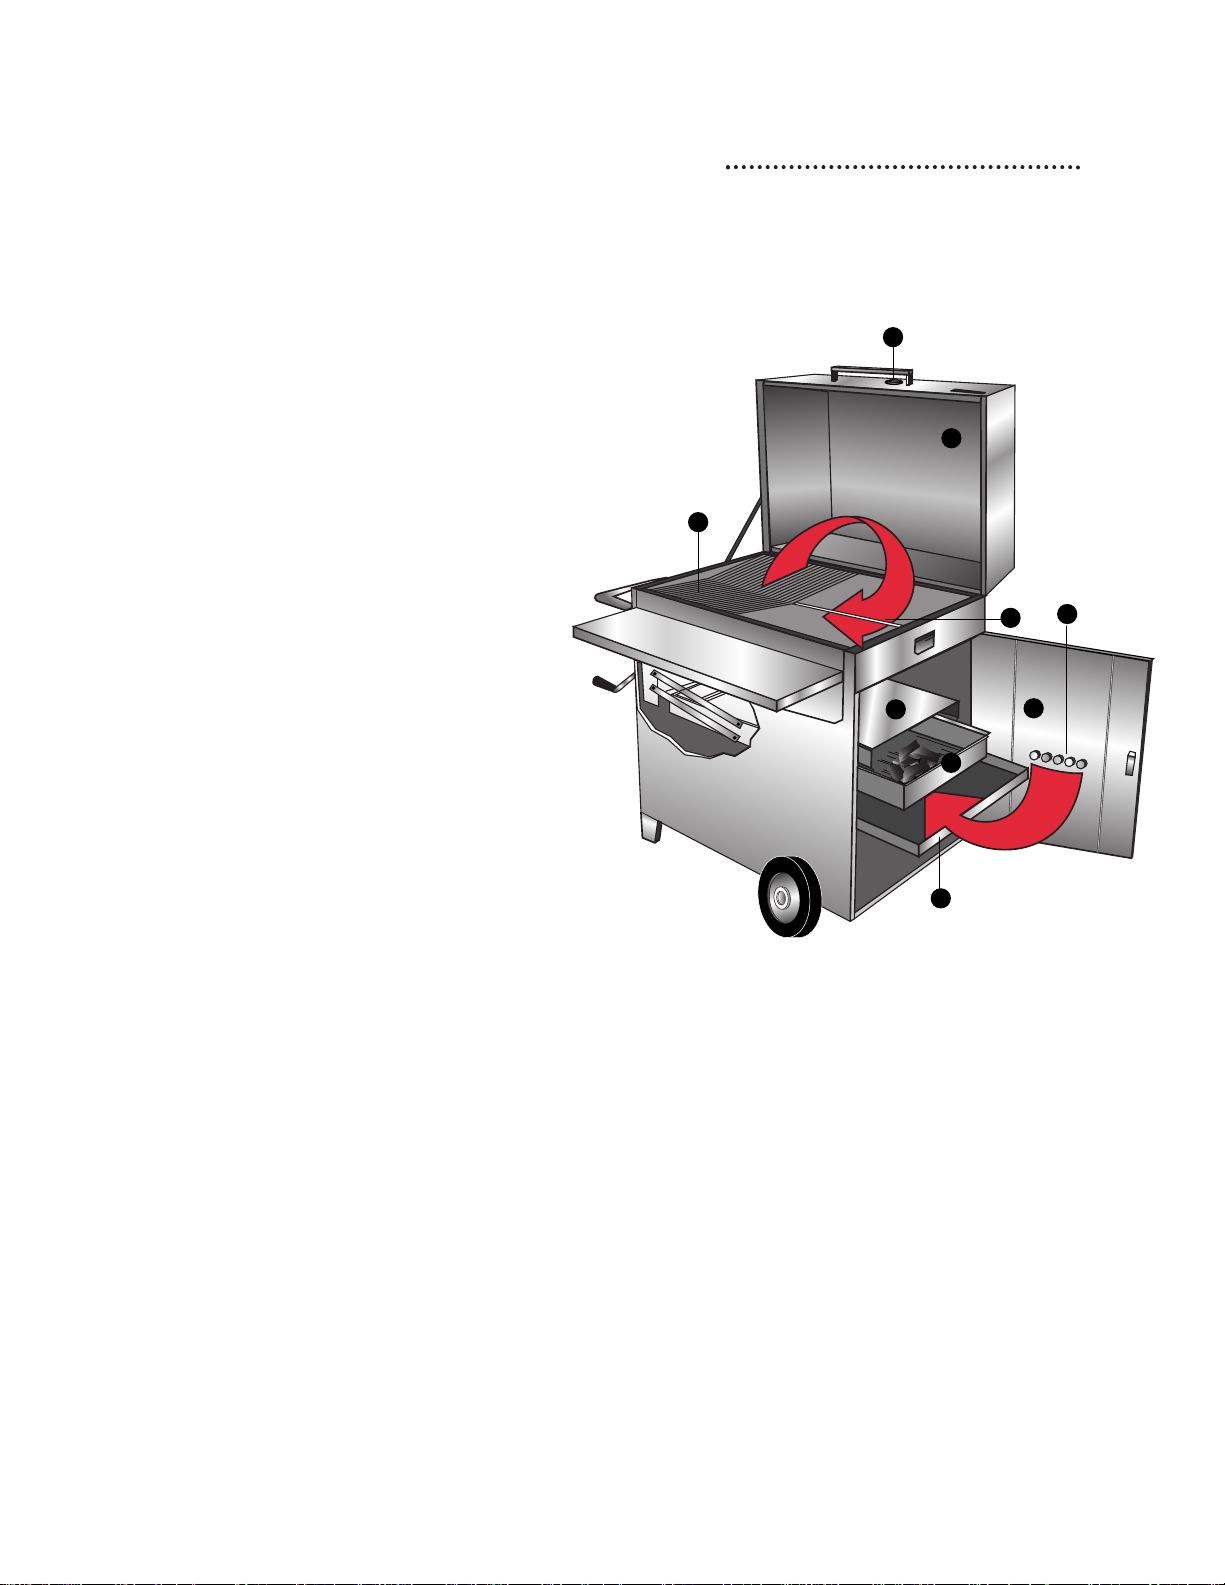
Assembly Instructions
Suburban/Continental/Legacy/Gourmet/Fiesta/Hastings
Your new Hasty-Bake oven should arrive almost fully assembled. However, a few items are left unassembled
for ease of shipping or loading into vehicles. The unit is not difficult to assemble and there are only two tools
needed for assembly: a Phillips screwdriver and a crescent wrench. If you have any problems assembling your
Hasty-Bake, please call 1-800-4AN-OVEN.
CRANK HANDLE
Screw the crank handle into threaded hole on the left side of
the oven opposite the full-width fire door) and continue to turn until the lift
mechanism is moving up and down.
GREASE CUP HOLDER
Attach the grease cup holder to the left side of the
cabinet base using either the top or bottom rotisserie
bracket mounting holes located at the center of the
oven, directly below the draft vents. The bolt, nut and
lockwasher should already be attached to the grill base.
Leave the remaining bolt in place to plug the unused
hole. (These same bolts are also used to mount the
Hastings/Fiesta Grease Cup
rotisserie should you purchase one for your grill.) Place
the grease cup on the holder and bend the arms to fit
around the foil cup.
the oven (the side of
3
4
5
GREASE DRAIN ROD
Insert the grease drain rod into the unit. The rod should be positioned with the
notched hole inserted into the retaining hole, which is located on the inside of the
oven, centered and directly above the fire door on the right side of the unit. For the
drainage system to operate properly, DO NOT
spit rod hole on the oven base. The end of the rod without the notched hole
extends through the center draft hole on the left side of the unit and hangs over the
foil cup, positioned on the outside of the grill.
PUSH HANDLE
The push handle fits into holes located on the left side of the unit. This is a
“friction fit”, so work on one side at a time, rotating the handle into the holes.
After you have worked the handle partially into both holes, push the handle in
completely. Attach with the four larger bolts, lockwashers, and nuts provided in
the bag. If your push handle is delivered with a side work table in place,
installation will be easier if the work table is removed first. Once the handle is
bolted in place, snap the table back on. NOTE: Lift and push your Hasty-Bake
with this handle, DO NOT pull the unit behind you.
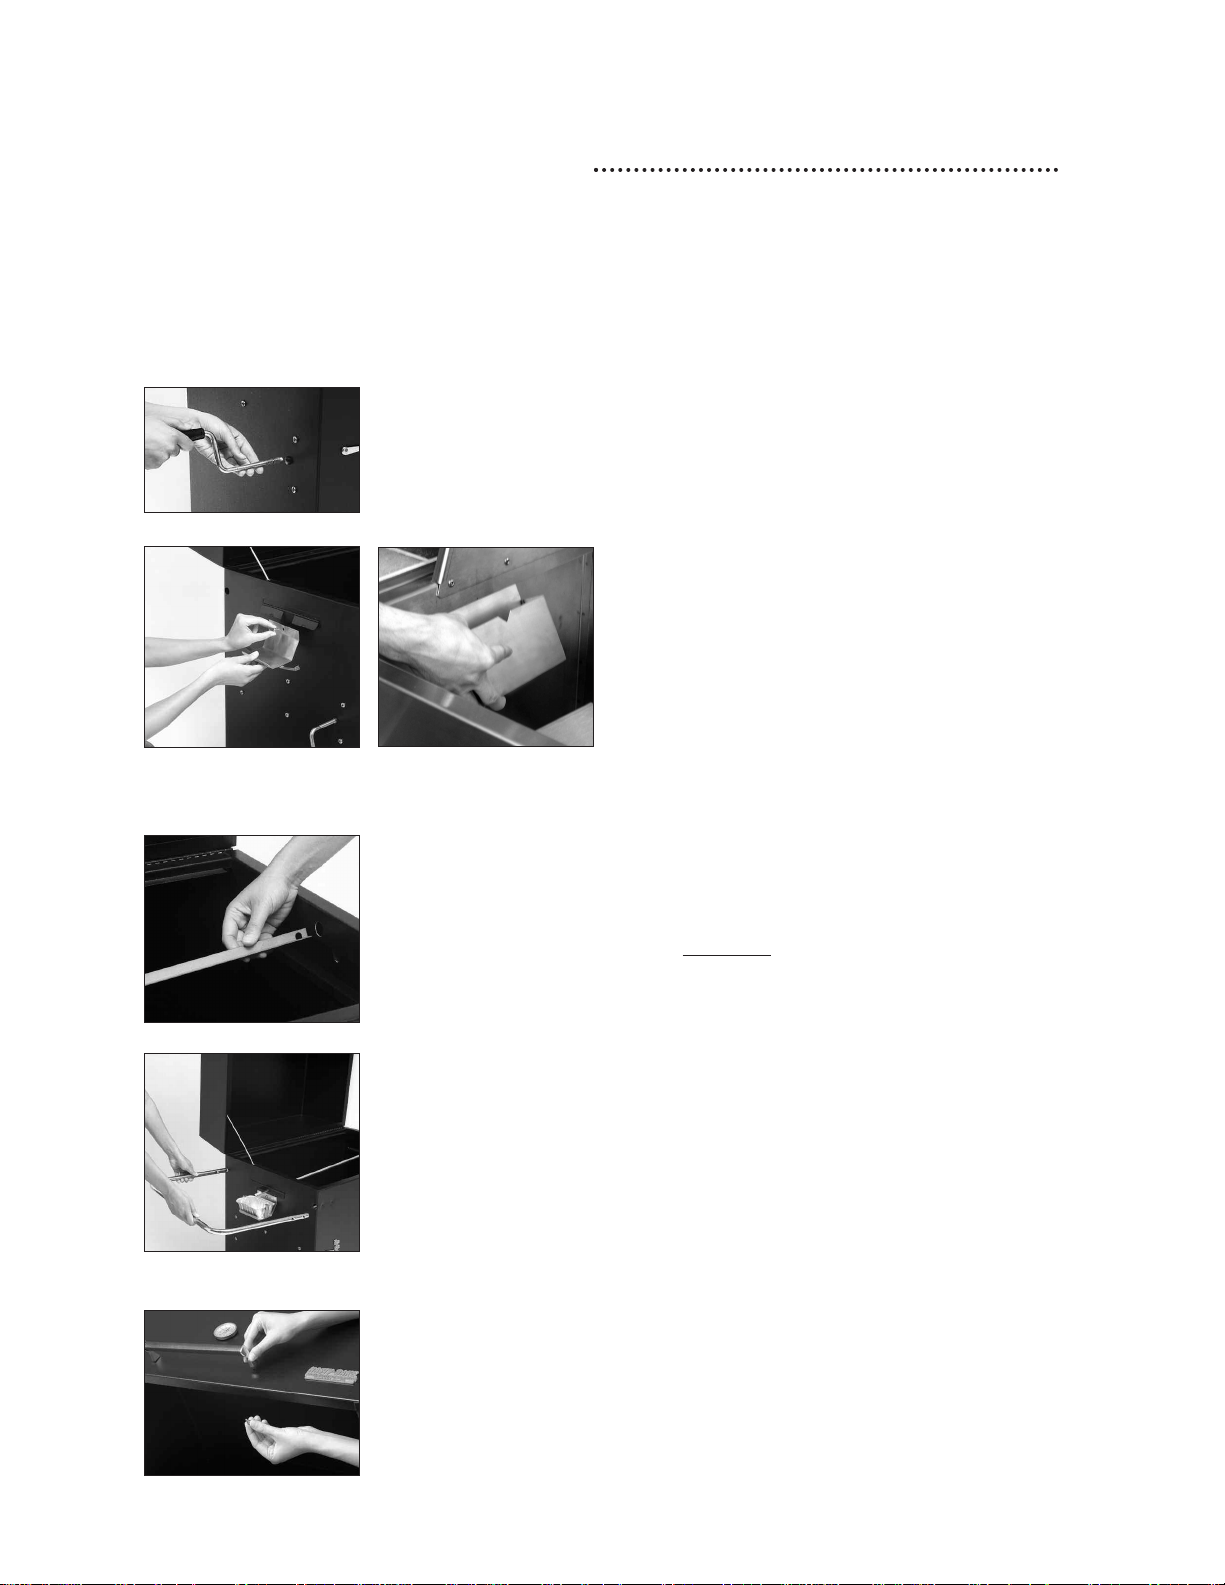
HOOD HANDLE
Attach the hood handle with the two small bolts and lockwashers provided in
the bag.
insert the rod into the rotisserie
6
Page 9

COOKING GRILLS
The two cooking grills sit on lips positioned near the top of the
base along the front and back sides. Set grills with the “V” facing
down in order for the grease to flow to the center of the unit.
FIRE GRATE
Place the fire grate into the bottom of the fire box.
Built-in Units
FIRE BOX
The fire box slides into the channels on the lift mechanism,
which is located inside the unit above the ash pan.
6
7
8
Correct Usage
ASH PAN
The ash pan slides into support runners on each side of the
cabinet base.
HEAT DEFLECTOR
The heat deflector slides over and rests on the lift mechanism
rails above the fire box. It can be moved along the length of the
fire box or removed and stored elsewhere, depending on your
chosen cooking method. NOTE: If the fire box is raised to the
highest position (“sear”) with the heat deflector in place, the
grease drain rod will bend.
FRONTWORKTABLE*
The stainless steel front work table simply rests on
the front of the oven base. The table must be removed and
stored, either in the grill or in the storage area under the ash pan,
for your Hasty-Bake grill cover to fit.
Incorrect Usage
9
10
11
*Remove plastic protective covering before use!!
O w ne r’ s G ui de & I ns tr uc ti on M an ua l
7
Page 10

Parts Diagrams
2
3
4
5
6
7
1
HASTINGS
1. Fire box
2. Storage area
3. Fire door
4. Cooking grills
5. Heat deflector
6.Thermometer
7.Ash pan
110/120V Electrical Outlet
for Rotisserie Motor (optional)
Front View on Cart
Side View on Cart
HASTING S INSTALLATIO N INSTRUCTIONS
AND RECOM MENDATIONS
LOCATION:
• Locate the Hastings grill only in a well-ventilated
area.
• Never locate the grill in a building, garage,
breezeway, shed or other such enclosed
area without an approved ventilation system.
• The grill is not to be located under any overhead
unprotected combustible construction.
• The grill may be placed adjacent to noncombustible construction.
BUILT-IN STRUCTURE DIMENSIONS:
ALL DIMENSIONS ARE TO FINISHED SURFACES.
• A minimum of 12” must be maintained from the
back and sides of the unit to any combustible
construction.
• Never install a Hastings where any parts of the grill
are adjacent to combustible materials. Any flammable
material close to or touching the grill should be
protected.
• We recommend that you research your options
carefully, and don’t forget to insulate behind the unit
as well.
CLEARANCES:
• A minimum of 6” clearance is required on the left
side of the lid to allow for rotisserie motor attachment.
A 110/120 V outlet is also recommended on the left
side of the grill to power the rotisserie motor.
• A minimum of 10
8
unit to open and close the lid.
1
/
2” is required above the top of
TOLERANCES:
1
/
+
4”, -0”. Any additional clearance must be
within these tolerances or fit of built-in
structure may be adversely affected.
AUTION:
C
Remember that wooden countertops are flammable! Even
if all other construction is masonry, be sure to protect the
edges of the counter opening.
RECOMMENDED ACCESSORIES:
• Hastings Rotisserie
• Hastings Cover (cart or built-in)
• Hasty-Bake Grilling Towel
• Hasty-Bake Cutting Board
• Hasty-Bake Hardwood
Charcoal
• Hasty-Bake Firestarter
• Firelighters
• Hasty-Bake Grill Lifter
Don’t Forget the Hasty-Bake Seasonings:
• Hasty-Bake BBQ Sauce
• Gourmet Greek
• Lemon Pepper and
• Award-winning Rub N’ Spice
Grill must be supported
from the bottom!
Front View Built In
Side View Built In
Page 11

Parts Diagrams
FIESTA
Front View
Side View
Top View
Trim Kit
standard
(
Built-in Units
10/120V Electrical Outlet for
1
Rotisserie Motor (optional)
1. Fire box
2. Grease drain system
3. Full-width fire door
4. Cooking grills
5. Heat deflector
6.Thermometer
7.Ash pan
)
BUILT-IN STRUCTURE DIMENSIONS
All dimensions are to finished surfaces.
1
Tolerances: +
within these tolerances or fit of built-in structure may be
adversely affected.
/4
”, -0”. Any additional clearance must be
1” Trim
Grill must be supported
from the bottom!
O w ne r’ s G ui de & I ns tr uc ti on M an ua l
9
Page 12

Parts Diagrams
PORTABLE
1. Fire box
2. Full-width fire door
3. Cooking grills
4. Heat deflector
5.Ash pan
6.Vent
NOTE: Since your new Portable grill is completely assembled, all you need to do is put the cooking grill in
the proper position.
The fire door can be adjusted to open easier or close tighter simply by slightly bending the fire door clips up
or down. Over time, heat from usage may require the clips to be adjusted periodically.
10
Page 13

Caring for your Hasty-Bake
TIPS FOR CLEANING
YOUR HASTY-BAKE
Constructed by hand, each Hasty-Bake unit contains only the highestquality materials to provide unequaled performance, convenience and
durability. With proper care and basic maintenance, you can expect our
black powder finish, cold-rolled steel ovens to last for 15 to 25 years (or
longer). Our solid stainless steel models can be expected to last virtually
forever!
LINEYOUR ASH PAN WITH ALUMINUM FOIL.
We recommend using a heavy-duty foil. This makes clean-up easy and
provides a barrier between the caustic ashes and your ash pan, increasing
the life of your ash pan.
AVOID EXCESSIVE HEAT.
Be aware that operating your Hasty-Bake at extremely high temperatures
can damage the paint and other components of your grill and may void
the warranty.
DON’T FORCE THE CRANK HANDLE IF IT IS TOO
TIGHT.
Keep the crank handle lubricated for smooth operation. If the handle
won’t turn, check for obstructions. If there are no visible problems and the
threads are lubricated, then call us.
Empty ashes frequently (if not before
every use) to avoid having them spill
over the sides of the ash pan. Also, be
sure to remove any ashes that may fall
below the ash pan into the storage
area. Ashes draw moisture, creating a
chemical reaction, which promotes
rust.
Scrape the grease drain rod (after
every cooking usage) to keep the
grease drain system functioning
efficiently and to control and virtually
eliminate flare-ups.
Scrape off excessive grease build up
on the interior of the oven
(periodically) with a putty knife to
avoid obstruction of moving parts.
Excessive grease build up can hinder
many of the movable parts (ash pan,
fire box, heat deflector) which can lead
to grease fires.
LOWERYOUR FIRE BOX AFTER EACH USE.
The heat build-up from cooking on your Hasty-Bake can cause the lift
mechanism to warp if left to cool in a raised position.
PROTECTYOUR INVESTMENT.
Excess moisture can shorten the life expectancy of your Hasty-Bake. So,
try to remember to keep your oven out of the elements by either storing it
in a covered area or by using one of our grill covers (a black cover silk-
™
screened with the Hasty-Bake logo, made of Sunbrella
Never cover your Hasty-Bake while the oven is still hot and do not use a
plastic cover.
On powder coated units, we recommend that you use a high
temperature touch up paint to touch up any parts beginning to show rust
and/or paint burn off. This should be done annually, and will significantly
extend the life of your unit. Sand down the rust and clean with acetone
before using the touch up paint.
material). NOTE:
Clean the outside of your HastyBake. Use a 3M Scotch-Brite
degreaser such as Simple Green
clean the outer surface of the powdercoated finished parts. For stainless
steel parts, use acetone for tough
grease and a stainless steel polish to
clean. We also carry a stainless steel
cleaning product which helps keep
stainless steel products looking shiny
and new.
Clean the window on Gourmet,
Continental and Fiesta models by
applying a degreasing cleaner. Allow
the window to soak for a minute or
two and scrape off any build-up with a
razorblade tool.
®
pad and
®
to
O w ne r’ s G ui de & I ns tr uc ti on M an ua l
11
Page 14

Getting Started
Open the hood and dual draft vents.
Hardwood Charcoal
Hasty-Bake Hardwood
Charcoal is 100% charred
1
2
3
4
Excess grease build up should be removed from the top of
the heat deflector and the grease drain to prevent grease
fires.
Open the fire door. Slide the ash pan and fire box
approximately half way out. Load the charcoal (we
recommend hardwood charcoal) into the fire box. The
charcoal should be loaded in the right side of the fire box
only, level with the top of the fire box. If you are planning
to sear over the entire cooking surface, still load the
charcoal in the right side only and spread it evenly across
the fire box after the charcoal has reached desired intensity.
Slide the fire box back into the unit. Place Firelighter
match on the ash pan and slide the ash pan back into the
unit. Using the crank handle, lower the fire box until it is
positioned approximately 1 inch above the ash pan. This
will allow the flames from the Firelighters to leap up
through the firegrate until the charcoal is well ignited. If
using hardwood charcoal, the fire should be fully ignited
in 10 to 15 minutes and is ready when bright red.
Should you prefer something other than Firelighters to
start your grill, we suggest using Firestarter. This alcoholbased gel does a wonderful job of lighting your grill
without the odor of petroleum-based lighter fluids. DO
NOT squirt gel on coals, but rather put an approximate 2”
diameter of gel on the ashpan, light the gel, and then
lower the firebox to allow the flame through the firegrate –
just as you would with the firelight or matches. Hasty-Bake
does not recommend using any type of petroleum-based
lighter fluids – they only ruin the taste of your foods!
hardwood made primarily
from oak and hickory. Easy to
light, this key ingredient for
Hasty-Bake cooking does not
contain any fillers or chemical
additives. Hardwood charcoal
burns hotter and gives food
great campfire flavor, and it
will have you cooking in 10 to
15 minutes without the use of
lighter fluid.
Firelighters
Firelighters are oversized
kitchen matches made of fine
wood particles coated with
paraffin which burn
completely in 6 to 8 minutes.
Firestarter
Firestarter is an odorless,
alcohol-based fire starting gel,
Firelighter match
that helps achieve quicker
ignition times.
Grill Brush
Our grill brush has an 18”
wood handle, brass bristles
and a stainless steel scraper
Firestarter
tool.
5
12
Once the thermometer indicates a temperature between
150 and 200ºF, excess grease build up on the cooking grills
should be removed (we recommend using a grill brush) to
clean the grills and help prevent grease fires.
NOTE: If a grease fire ever occurs, you should immediately close the
hood, dual draft vents and fire door (if it is open), to quickly suffocate
the fire.
Page 15

Cooking Tips
CONTROLLING THETEMPERATURE
There are basically three ways in which you can control the inside oven temperature of your Hasty-Bake. You
must take into consideration that outside factors such as humidity, wind and temperature are beyond your
control, but with continued use of your Hasty-Bake you will quickly become experienced in controlling the
inside oven temperature by using the following methods:
AMOUNT OF CHARCOAL – The more charcoal you use, the higher the temperature.
POSITION OF THE FIRE BOX – Lower the fire box to lower the temperature (slowing down the cooking
process) and raise the fire box to raise the temperature (speeding up the cooking process).
DUAL DRAFTVENTS – Charcoal requires oxygen to burn. Therefore, opening the draft vents will raise
the temperature inside the oven, and closing the draft vents will lower the temperature.
TEMPERATURE GUIDELINES
SMOKE
Smoking or slow cooking is done with the hood closed and the food
placed over indirect heat (coals are covered with the heat deflector).
Temperatures are usually kept in the 180 to 225ºF range.
BAKE
Baking is done with the hood closed and the food placed over
indirect heat (coals are covered with the heat deflector). Temperatures
are usually in the 225 to 325ºF range.
SEAR
Searing is done with the hood open and the food placed directly over the coals, (without the heat deflector
in place) for greater heat intensity. The cooking surface will reach temperatures as high as 600ºF. (Be aware
that the temperature will not be measured by the thermometer since the hood is usually left open when
searing.)
USE OF WOOD CHUNKS
You can enhance the flavor of any food with smoke by using either wood chips or chunks. Both do an
excellent job of adding smoke. However, wood chunks are more often preferred since they are bigger and
usually last longer than wood chips. To achieve an intensified flavor, we suggest soaking the wood chips or
chunks in water for a least an hour before use.
Wood chips or chunks can be added to the cooking process by two different methods:
1. Place water-soaked wood chips or chunks in a small aluminum foil pan and place the pan directly on the
coals or on top of the heat deflector. This creates a slow smoke release.
2. Place water-soaked wood chunks directly in the fire box, mixed in with the coals. This creates a quick burst
of smoke flavor.
Following are some guidelines for choosing the “right” woods for the foods you prepare. Of course, we
always recommend that you experiment to find a taste that you like. Remember, your Hasty-Bake oven holds
in the smoke and greatly intensifies the flavor, so be careful to avoid over-seasoning.
Alder – Good for salmon, turkey and chicken.
Apple – Tangy and clean-flavored, good for chichen, pork and fish. The greener the wood, the sweeter the smoke flavor.
Cherry – Sweet and fruity, best with duck and other poultry.
Grapevine – Good for steaks and other meats, poultry and seafood.
Hickory – Rich and smoky, hickory is the “basic” barbecue wood. It is especially good with pork.
Maple – Mellow, mild and sweet, maple is good with poultry, seafood and pork.
Mesquite – Robust and smoky, mesquite is best with beef.
Pecan – Similar to hickory but milder, use with beef, poultry and pork.
Persimmon – Use with beef and pork, also a great choice for wild game.
O w ne r’ s G ui de & I ns tr uc ti on M an ua l
13
Page 16

Cooking Methods
Hasty-Bake Charcoal Ovens are proven award-winning smokers, but are much more versatile than traditional
smokers, allowing you to grill, bake and smoke, all on the same unit!
DIRECT COOKING
Direct cooking is done by cooking foods
directly over hot coals with the hood either open
or closed. This method is also called searing,
grilling or even frying. The fire box is generally
raised to the highest position ("sear" on the
cooking style indicator), or 4 to 6 inches below
the cooking grills. The heat deflector should be
removed when using this cooking method.
Remember, that the meat must be turned since
it will cook faster on the side that is directly over
the fire. If you wish to cook utilizing the entire
cooking surface, light the coals as instructed and
then spread them across the entire fire box after
the coals are glowing red.
INDIRECT COOKING
Indirect cooking is done by cooking with
heat only, instead of using direct fire. This
method is used for smoking, roasting or
baking. The fire box is usually in one of the
lower positions ("bake" or "smoke" on the
cooking style indicator), with the heat
deflector in place over the coals. Food may
be placed on either side of the grill while
cooking with this method, or you can utilize
the entire cooking surface. Recipe times are
based on the fire box being positioned 8 to
14 inches below the cooking grills. Cooking
times will decrease as the fire box is raised.
Your fire will need to be refueled when using
indirect cooking, so remember to check your
fire about 1
cooking process.
1
⁄2 to 2 hours throughout the
Cooking style
indicator
14
CONCEPTS: Radiant Heat vs Convection Heat
When cooking by the direct method, the majority of heat transferred to the food is accomplished by radiant heat. Examples of
this type of heat include when you stand in the shade versus standing in the sunlight. Even though the temperature is essentially
the same, the radiant heat from the sun is much warmer. Another example is the broiler feature in your household oven. When
you brown toast, it is not due to the oven temperature, but rather the radiant heat emitting from the element at the top.
Convection cooking is heat transferred by air and is the primary source of heat when cooking by the indirect method using your
heat deflector. That is why you must keep all the coals directly covered in order to remove the radiant heat (direct) from the
process in order to slowly cook your foods without burning the outsides.
Page 17

COMBINATION COOKING
Combination cooking is done by cooking
some foods directly over the coals while
cooking other foods on the opposite end of
the fire. The fire box should be in the
highest position ("sear" on the cooking style
indicator), or 4 to 6 inches below the
cooking grills, with the heat deflector
removed. With the fire confined to one end
of the fire box, you may cook potatoes, corn,
bread, chicken parts, etc., at the end away
from the fire while searing steaks, chops,
etc., directly over the coals at the same time.
Remember that the hood must be closed for
combination cooking, and slower cooking
foods should be started earlier than the
"searing" foods.
ROTISSERIE COOKING
Rotisserie cooking is impressive and fun. However, you can easily and successfully cook anything on a Hasty-Bake
without using a rotisserie since our unique design allows the heat and smoke to rotate around your food. However,
should you desire to use the rotisserie cooking method, we do have rotisserie kits available for all Hasty-Bake models
(except the Portable).
Rotisserie cooking involves having the food rotate constantly throughout the cooking process. Always balance
your meat well on the spit rod and secure it with the spit forks. It is a good idea to double check to make sure
that the meat is secure. Tie or pin fowl wings flat
against the sides of the bird. Rotisserie cooking
times may be faster than those used for roasting or
baking by the indirect cooking method. To keep fat and
juices from falling directly into the fire, spread the coals
along the outer edges of the fire box and place
aluminum foil beneath the meat to catch the
drippings. The heat will rise along the back
of the unit, cooking the meat on all sides as
it rotates. Another option is to confine the
coals to one side of the fire box with the heat deflector in place.
This is a form of indirect cooking, using the spit rod for self-basting.
Foods which are rotated while cooking tend to be self-basting, and
therefore more moist and juicy.
O w ne r’ s G ui de & I ns tr uc ti on M an ua l
15
Page 18

Installing A Rotisserie
SUBURBAN AND LEGACY
When utilizing a rotisserie with a Suburban or Legacy model, please note
that you will need to remove the cooking grills, which will eliminate your
cooking surface. Therefore, you will not be able to cook additional food
items while using the rotisserie.
• Remove cooking grills and grease drain rod.
• Remove grease cup holder and position it on the next lower hole.
• Mount grease cup holder and rotisserie bracket together.
• Gently slide motor into bracket.
• Assemble spit rod and forks.
• Slide squared end of spit rod into the flap above the fire door.
• Place pointed end of spit rod into the square slot on the motor.
• Plug motor into electrical outlet and turn motor on when you
are ready to begin rotisserie cooking.
CONTINENTAL, GOURMET, FIESTA, AND HASTINGS
When utilizing a rotisserie on a Continental, Gourmet, Fiesta or Hastings
model, you have the ability to rotisserie cook without eliminating any
cooking surface. However, you also have the option to use two rotisseries at
once. Should you desire to operate two rotisseries at the same time, simply
combine the installation instructions above with the installation instructions
below.
• Remove warming grill (rack).
• Mount motor bracket in the two holes located on the left side of the
grill hood.
• Gently slide motor into bracket.
• Assemble spit rod and forks.
• Slide squared end of spit rod into the flap above
the fire door.
• Place pointed end of spit rod into the square slot
on the motor.
• Plug motor into electrical outlet and turn motor
on when you are ready to begin rotisserie cooking.
16
Hastings
Page 19

Troubleshooting & Common
Questions
What should I do if a grease fire occurs?
Immediately close the hood, the dual draft vents and fire door (if it is open), to
quickly suffocate the fire. Keeping your grease drain clean and cooking with the
heat deflector in place will help reduce the chance of grease fires.
What should I do if my fire is beginning to die down?
Charcoal requires oxygen to burn. By opening the draft vents and fire door, you
should be able to get your fire going again or you may simply need to add more
charcoal to the fire box. However, if the fire has died down almost completely,
and opening the vents and fire door does not reignite the fire, you will need to
simply relight the charcoal.
How much charcoal should I use?
We recommend filling half of the fire box with hardwood charcoal. If you are
planning to sear using the entire grill, you can spread the charcoal to the other
side after it has reached the desired heat intensity.
What if I have charcoal left when I’m done cooking?
Simply close your grill (lid, fire door, draft vents) to smother the fire. You will be
able to reuse the charcoal that is left in the fire box the next time you use your
Hasty-Bake.
How do I regulate the heat in my Hasty-Bake?
There are basically three ways to control the temperature of your Hasty-Bake
oven. Outside factors such as humidity, wind and temperature are beyond your
control, but you will quickly become experienced in controlling the inside
temperature by using these methods:
Amount of charcoal - The more charcoal you use, the higher the temperature.
Position of the fire box - Lower the fire box to lower the temperature and raise
the fire box to raise the temperature.
Dual draft vents - Fire requires oxygen to burn. Open the draft vents (and even
the fire door) to raise the temperature and close the grill to lower the
temperature.
O w ne r’ s G ui de & I ns tr uc ti on M an ua l
17
Page 20

Beef
Myers’ Hasty Brisket
8 to 12 pound brisket
1
1 bottle Hasty-Bake Rub
1 large bottle Italian dressing
2 cups beer/cola/juice
Hasty-Bake BBQ Sauce
Ingredients reserved for Baste
3-4 Tablespoons Hasty-Bake BBQ Sauce
1 cup Italian dressing
3-4 Hasty-Bake BBQ Sauce
2 cups Beer/cola/juice
Other
Heavy Duty Aluminum Foil
Basting brush
Basting bowl (any Stainless Steel bowl will work)
Smoking wood of your choice soaked in water, fist
sized chunks
Preparation
Remove “hard” fat from brisket. Soft fat will melt
making the meat juicy, while hard fat takes 12+ hours
to cook away. If it feels “hard”, cut it out. Flat brisket
will NOT require trimming as it has had “hard” fat
removed.
Perforate/poke holes in meat with a fork about 1inch apart to allow fat to escape and seasoning to
penetrate.
Heavily apply Italian dressing and massage it into
the meat.
Heavily apply Hasty Bake Rub and pat until entire
brisket is covered.
If cooking is to be done soon, allow brisket to set out
for 1 hour. This allows it to warm up to room
temperature and lessens the cooking time significantly.
If brisket is to be cooked later, put it in a large
plastic bag (trash bags work for larger cuts), remove
excess air, and seal the top. Place it in the refrigerator
to store overnight. One hour before cook time remove
from refrigerator and allow it to warm up before
cooking.
Start an indirect fire and heat the grill up to 200 to
225 degrees.
Cooking
Place brisket on grill FAT SIDE UP, to allow the juices
to run down the meat.
DO NOT OPEN THE LID FOR 1 HOUR–Use
the vents to regulate the temperature. Usually the
emperature will decrease when the food is first put on
t
the grill but it will gradually raise back up.
Add wood chunks (1 to 2 fist size pieces will smoke
for approximately 1 hour).
Baste
Use the first hour to mix up the BASTE! The baste
keeps the meat juicy on the outside as the inside slowly
cooks.
2 cups beer or cola or apple juice
1 cup Italian dressing
3-4 Tablespoons of Hasty-Bake rub
3-4 Tablespoons of Hasty-Bake BBQ Sauce that will
be served with the brisket when finished.
Anything else that sounds good, be creative!
Mix all basting ingredients in a stainless steel bowl and
allow to set until it reaches room temp or until needed.
Cold baste will cool the brisket adding more cooking
time.
After brisket has been on for 1 hour begin to baste
every 15 to 20 minutes with the basting brush. Keep
grill temperature between 200 and 225 degrees, add
charcoal and wood as needed.
Repeat basting for 2 to 3 hours, turning brisket is
OK and may be necessary to keep the bottom moist.
After 3-4 hours of TOTAL COOK TIME, use an
internal meat thermometer to test the internal
temperature. Place thermometer in the thickest part of the
center of the meat.
When an internal temperature of 160 –165 degrees
is reached (it may take longer), remove the brisket
from the grill and wrap it tightly in heavy duty
aluminum foil. At this point, lightly brush bbq sauce over
entire brisket, it ads flavor and stickiness!
After the brisket has been wrapped in foil the
temperature of the grill must not exceed 200 degrees.
The sugar in the rub, as well as bbq sauce, will burn at
temperatures over 200 degrees.
Place foil wrapped brisket back on the grill at 180200 degrees for 1 additional hour. Check internal
temperature with meat thermometer. At 185 degrees
the brisket can be pulled off, unwrapped, and sliced.
For softer brisket (for sandwiches) continue to cook until
internal temperature reaches 190+ degrees.
ENJOY!
18
Page 21

Beef
Ain’t Momma’s Meat Loaf
(Smoke & Spice)
MEAT LOAF
1 Tablespoon oil, preferably canola or corn
1
⁄2 cup minced onion
1
⁄2 green or red bell pepper, chopped fine
garlic cloves, minced
3
1 teaspoon freshly ground black pepper
1 teaspoon salt
1
⁄2 teaspoon cumin
1
⁄4 pounds ground beef
1
3
⁄4 pound ground pork
1
1
⁄2 cups dry bread crumbs
3 Tablespoons sour cream
2 Tablespoons Worcestershire sauce
1 egg
1
⁄4 cup stock, preferably beef
1 teaspoon Tabasco or other hot pepper sauce
to taste
BASIC BEER MOP (OPTIONAL)
12 ounces beer
1
⁄2 cup cider vinegar
1
⁄2 cup water
1
⁄4 cup oil, preferably canola or corn
1
⁄2 medium onion
2 garlic cloves, minced
1 Tablespoon Worcestershire sauce
1 Tablespoon Wild Willy’s Number One-derful Rub
(see Chicken on a Throne recipe) or other savory
seasoning blend
Prepare your Hasty-Bake to cook with indirect heat
(with the heat deflector in place over the coals),
bringing the temperature to 200 to 220ºF.
In a heavy skillet, warm the oil over medium heat.
Add the onion, bell pepper, garlic, pepper, salt and
cumin and sauté until the vegetables are softened.
Spoon the vegetable mixture into a large bowl.
Add the remaining meat loaf ingredients and mix
well with your hands. Mound the meat into a smokeproof loaf pan.
If you plan to baste the meat, stir the mop
ingredients together in a small saucepan and warm over
low heat.
Cook the loaf on your Hasty-Bake for 45 minutes,
or until the meat has shrunk away from the sides of the
pan. Gently ease the meat loaf out of the pan and place
directly onto the cooking grill of the Hasty-Bake.
Continue cooking the meat until the internal
emperature reaches 170ºF (approximately 1
t
1
⁄2 h
ours),
dabbing it every 30 minutes with the mop. When
about 30 minutes of cooking time remain, apply a
barbecue sauce of your choice to the top of the meat
loaf.
After removing the loaf from the grill, allow it to sit
at room temperature for 10 minutes before slicing and
serve warm or refrigerate for later use in sandwiches.
Hasty-BakeAward-Winning
Chili Surprise
6 slices of bacon, chopped
2 large yellow onions
10 cloves of garlic, chopped or minced
3 pounds coarse chopped beef chuck
1 7-ounces can green chilies
2 16-ounce can stewed tomatoes
6 dried pablanos, seeded and reconstituted in
warm water. Save
3 chipoltle peppers, mashed
1 Tablespoon ground dried oregano
1 Tablespoon ground cumin
2 16-ounce cans black beans
2 cups strong beef stock
1
⁄4 cup semi-sweet chocolate morsels
1 Tablespoon honey
1 cup red wine
1 teaspoon salt
1 Tablespoon balsamic vinegar
1
⁄2 teaspoon ground pepper
Once pablanos are reconstituted, place food in food
processor and blend. The mixture is thick and pasty in
appearance. In a large basting pan on top of your
Hasty-Bake, cook chopped bacon until crisp. Remove
and clean pan of excess bacon fat. Now add onion and
garlic and sauteé until onions start to brown. Next,
place beef in with the onion mixture and cook until
brown. Add remainder of ingredients except the
chocolate, stirring well. (A Hasty-Bake baster pan can
be used to sautee all of the above.) Close the hood on
your Hasty-Bake and allow to simmer for an hour at
225 degrees. During the last half hour of cooking time,
add the chocolate. Try adding mesquite wood to the
fire for extra smoked flavor. This recipe may also be
cooked indoors on a stove and then warmed on your
Hasty-Bake, or vice versa.
1
⁄2 cup of water
O w ne r’ s G ui de & I ns tr uc ti on M an ua l
19
Page 22

Poultry
Hasty-Bake Signature Recipe Chicken
Chicken breasts, with or without skin and bones
16 ounce bottle of Italian salad dressing
Hasty-Bake Gourmet Greek or Lemon Pepper
seasoning or equivalent
Soy sauce
Worcestershire sauce
Marinate chicken in Italian dressing for at least 1 hour
and overnight if possible. (You may substitute equal
parts olive oil and vinegar for Italian dressing, adding
salt to taste.)
Cook chicken breasts bone side down at 225 to
250ºF over indirect heat (the heat deflector should be
in place over the coals). Baste every 20 minutes with a
mixture of equal parts soy sauce and Worcestershire
sauce using a spray bottle or brush. Sprinkle chicken
with seasoning after last basting and again to taste
before serving. Boneless breasts will be done in 30 to
40 minutes. Bone-in breasts will take 45 to 55 minutes
to cook.
Chicken on a Throne
(Smoke & Spice)
Two 31⁄2 pound whole chickens
WILD WILLY’S NUMBER ONE-DERFUL RUB
6 Tablespoons paprika
2 Tablespoons ground black pepper
2 Tablespoons salt
2 Tablespoons sugar
1 Tablespoon chili powder
1 Tablespoon garlic powder
1 Tablespoon onion powder
1 teaspoon cayenne
INJECTION LIQUID
12 ounces beer
1
⁄4 cup oil, preferably canola or corn
1
⁄4 cup cider or white vinegar
2 teaspoons Wild Willy’s Number One-derful Rub
1 Tablespoon Wild Willy’s Number One-derful Rub
Two 12-ounce cans beer (no bottles please)
1
⁄2 medium onion, chopped
1
⁄4 cup cider or white vinegar
4 garlic cloves, minced
The night before you plan to barbecue, combine the
rub ingredients in a small bowl. In another bowl,
combine the ingredients for the injection liquid.
Remove the organs from the cavity of the chickens.
With a kitchen syringe, inject about1⁄2 cup of the
injection liquid deep into the breast and legs of each
chicken in several spots. Massage the chickens
thoroughly, inside and out, with the remaining
injection liquid, working it as far as possible under the
skin without tearing the skin. Cover the chickens well
with the dry rub, again massaging inside and out and
over and under the skin. Reserve at least 1 Tablespoon
of the rub if you are planning to baste the chickens.
Place the chickens in a plastic bag and refrigerate them.
Prepare your Hasty-Bake to cook with indirect heat
(with the heat deflector in place over the coals),
bringing the temperature to 200 to 220ºF.
Remove the chickens from the refrigerator and let
them sit at room temperature for about 30 minutes.
While you wait, open the 2 beer cans and drink
half–and only half–of each beer. With a can opener,
remove the tops of the half-empty beer cans. Place half
of the onion, vinegar, garlic and reserved rub in each
can. Insert the replenished beer cans into the cavities of
the chickens, balancing the birds so that they rest
upright with their legs bent forward. The cans should
sit flat on the grill or on a cooking tray, holding the
chickens at attention while their insides are steaming
and their outsides are smoking.
If you are going to use the mop, combine the
ingredients in a saucepan and keep the mixture warm
over low heat.
Transfer the chickens to the Hasty-Bake. Cook for
approximately 2 to 3 hours, mopping every 30 minutes
or so. When the chickens are done, the legs will move
freely and the internal temperature should be 165ºF.
Let the chickens sit for 5 to 10 minutes. Remove the
skins, carve the chickens, and serve.
20
THRONE MOP (OPTIONAL):
12 ounces beer
1 cup chicken stock
1
⁄2 cup water
1
⁄4 cup oil, preferably canola or corn
Page 23

Poultry
Quick Chick
(Smoke & Spice)
6 boneless, skinless, individual chicken breasts,
pounded lightly
SPLIT-SECOND DRY RUB
1 Tablespoon paprika
1 teaspoon salt
1 teaspoon sugar
1
⁄2 teaspoon freshly ground black pepper
1
⁄2 teaspoon onion powder
Pinch cayenne
SPLIT-SECOND MOP
1 cup orange juice
3 Tablespoons butter
1 Tablespoon Worcestershire sauce
Prepare your Hasty-Bake to cook with indirect heat
(with the heat deflector in place over the coals),
bringing the temperature to 225 to 250ºF.
Combine the rub ingredients in a small bowl. Rub
the breasts with the mixture and let them sit at room
temperature for about 20 minutes.
Combine the mop ingredients in a small saucepan,
placing the pan over low heat to melt the butter. Keep
the mop warm over low heat.
Drizzle the breasts with about1⁄3 of the mop.
Transfer the chicken to the Hasty-Bake and cook for
30 to 40 minutes, or until cooked through. Either mop
the breasts half-way through the cooking time, or
drizzle with mop as soon as you remove them from the
grill.
Hasty-Bake SmokedTurkey
(It’s not just for the holidays)
4 quartered onions
1 10 to 12 pound turkey (if you need more turkey, it
s best to smoke two small birds)
i
Hasty-Bake Gourmet Greek seasoning or poultry rub
6 to 8 cloves peeled garlic
Basting liquid of your choice: white wine, chicken
stock, flat champagne, apple juice, beer
Clean all internal parts from the turkey. Rub the
seasoning over the entire turkey, getting on and under
the skin and in the cavity. Stuff the cavity with the
onions and cloves of garlic.
Put the turkey in a large aluminum baking pan or
Hasty-Bake baster pan. Fill the pan with1⁄4” to1⁄2” of
the basting liquid of your choice. Make sure the heat
deflector is in place over the coals and bring your
Hasty-Bake to about 200ºF. Cover the breast of the
turkey with a flourcloth or cheesecloth soaked in olive
oil, butter or bacon grease. Baste the bird about every
30 minutes – it is important that you don’t let the
turkey dry out.
Smoke the turkey approximately1⁄2 hour per pound,
plus one additional half hour. You will need to refresh
the supply of hardwood charcoal about every 1 to 11⁄2
hours. Small amounts of fruit wood, such as apple or
cherry, may be added to the fire to give your turkey a
stronger smoke flavor. To test for doneness, use an
Insta-Read thermometer. The thickest part of the
breast should be 165ºF.
Note: To have a picture-perfect bird, you should
remove the flourcloth or cheesecloth to brown the
breast about 30 minutes prior to removing the turkey
from the grill.
O w ne r’ s G ui de & I ns tr uc ti on M an ua l
21
Page 24

Pork
Jerked Pork Tenderloin with Orange-
Red Onion Salsa
2 pork tenderloins, 10 to 12 ounces each
MARINADE
4 green onions, chopped fine
cloves garlic, minced
4
2 serrano chiles, chopped fine
1 teaspoon salt
2 Tablespoons jerk seasoning
2 teaspoon cider vinegar
1
⁄4 cup vegetable oil
To make marinade:
Combine all ingredients and mix well.
SALSA
1 orange, peeled, seeds removed, divided into
sections and cut into smaller pieces
1 red onion, diced small
1 teaspoon minced garlic
5 Tablespoons lime juice (about 3 limes)
1 teaspoon minced free red or green chile pepper of
your choice
1 teaspoon ground cumin
2 Tablespoons chopped fresh cilantro
1 teaspoon chili powder
Salt and freshly cracked black pepper to taste
To make salsa:
Combine all the salsa ingredients, mix well and set
aside. (This mixture will keep, covered and
refrigerated, for 3 or 4 days.)
Place whole pork tenderloins in zip-lock bag with
marinade and massage well. Refrigerate for 2 to 4
hours.
With the heat deflector in place over the coals, bring
the temperature of your Hasty-Bake to 225 to 250ºF.
Cook the tenderloins until the internal temperature
reaches 160ºF (approximately 1 hour). Remove and let
rest for 10 minutes before serving. To serve, slice into
1
⁄4” medallions and top with salsa.
Lone Star Spareribs
(Smoke & Spice)
3 full slabs of pork spareribs, St. Louis cut (trimmed
of the chine bone and brisket flap), preferably 3
ounds each or less
p
1
⁄3 cup ground black pepper
1
⁄4 cup paprika
2 Tablespoons sugar
1 Tablespoon salt
1 Tablespoon chili powder
1
1
⁄2 teaspoons garlic powder
1
1
⁄2 teaspoons onion powder
12 ounces beer
1
⁄2 cup cider vinegar
1
⁄2 cup water
1
⁄4 cup oil, preferably canola or corn
1
⁄2 medium onion
2 garlic cloves, minced
1 Tablespoon Worcestershire sauce
1 Tablespoon Barbecued Rib Rub
The night before you plan to barbecue, combine the
rub ingredients in a small bowl. Apply the rub evenly
to the ribs, reserving about half the spice mixture. Place
the slabs in a plastic bag and refrigerate overnight.
Remove ribs from the refrigerator. Pat them down
with remaining rub, reserving 1 Tablespoon if you plan
to use the mop. Let the ribs sit at room temperature for
30 to 40 minutes. Prepare your Hasty-Bake to cook
with indirect heat (with the heat deflector in place over
the coals), bringing the temperature to 200 to 220ºF.
If you are going to baste the ribs, mix together the
ingredients in a saucepan and warm over low heat.
Cook the ribs on your Hasty-Bake for 3 to 5 hours,
turning and basting them with the mop about once an
hour. When ready, the meat should be well-done and
pulling away from the bones. Allow to sit for 10
minutes before slicing into individual ribs.
BARBECUED RIB RUB
BASIC BEER MOP (OPTIONAL)
22
Page 25

Fish
Jalapeno-Lime Shrimp
(Smoke & Spice)
1 pound large shrimp, peeled and deveined
ALAPENO-LIME MARINADE
1
⁄3 cup pickled jalapeno slices
1
⁄4 cup pickling liquid from jar or can of pickled
Juice of 2 limes
4 Tablespoons corn oil, preferably unrefined
3 Tablespoons minced fresh cilantro
4 green onions, sliced
3 garlic cloves, minced
Remaining Jalapeno-Lime Marinade
1
⁄2 cup seafood or chicken stock
Juice of 1 lime
Slices of fresh red jalapeno or other red chile, for
garnish (optional).
Puree the marinade ingredients in a food processor
or blender.
Place the shrimp in a shallow, nonreactive dish or
plastic bag. Pour the marinade over the shrimp and let
the shrimp marinate at room temperature for 30 to 40
minutes.
Prepare your Hasty-Bake for barbecuing, bringing
the temperature to 180 to 200ºF.
Drain the shrimp from the marinade, pouring the
marinade into a saucepan. Add the stock and
additional lime juice to the remaining marinade for the
mop. Bring the liquid to a vigorous boil over high heat
and boil for several minutes. Keep the mop warm over
low heat.
Place the shrimp on a small grill rack and baste
liberally with the mop. Transfer the shrimp to the
smoker and place away from the fire (make sure to
have your heat deflector in place over the coals). The
shrimp should cook in approximately 25 minutes, but
watch them carefully. They are ready when opaque,
slightly firm, and lightly pink on the exterior. Remove
the shrimp from the grill and mop them heavily again.
Place the shrimp on a platter, scatter the red chiles over
them, if you wish, and serve.
J
jalapenos
JALAPENO-LIME MOP
T-Shirt Fish
Go fishing and get lucky enough to pull out a few 10
ounce/1 pound trout, salmon or other fish, or just go
buy some at a good fish store. Gut each fish and season
with salt, pepper and lemon.
Prepare a hot bed of coals (in your Hasty-Bake).
Decide to part with an old t-shirt, but save the
cleaned and bleached relic for its final sacrifice. Soak
the shirt in salt water to remove any impurities. Rinse
and machine dry.
Buy some dill or fennel grass, about1⁄2 to 11⁄2 pounds.
Spread it out onto the t-shirt and top with the fish. Put
a branch of celery, carrot and/or onion in the cavity for
seasoning. Roll the fish up in the herbs and t-shirt and
tie with a string. Brush the whole t-shirt with oil. Set it
to smoke directly on the live coals. The t-shirt will
catch fire. Close the lid of your grill and allow the
package to smolder.
Flip the fish once after 4-5 minutes. Remove after 10
minutes with the assistance of 2 spatulas. Allow the fish
to cool overnight.
The fish technically steams in the herb and cotton
jacket, but gains the smoke from the fire. It handles
best when cold.
Peel off the t-shirt and herb wrap and discard.
Separate the skin from the flesh. Pick out the bones
and fins.
Serve the fish with a light green salad with boiled
potatoes, lemon dressing and olive oil.
22
O w ne r’ s G ui de & I ns tr uc ti on M an ua l
23
Page 26

Veggies
Roasted Red Peppers
Cut each bell pepper in half and remove the core and
seeds. Place the pepper over a medium-hot direct fire
on the grill and roast, turning occasionally, until
completely charred (about 10 minutes). Place the
pepper in a paper bag and let it steam for about 10
minutes, until it’s cool enough to handle. Peel away
the skin and slice the pepper into strips.
Herb Butter-Basted Corn-on-the-Cob
(TheVegetarian Grill)
6 ears corn, unhusked
1 fresh herb sprig (such as basil, cilantro, oregano,
thyme, chives, etc.)
1 garlic clove
1
⁄2 teaspoon salt
1
1
⁄2 Tablespoons unsalted butter
Prepare a medium-hot direct fire in your Hasty-Bake.
Peel back the husks from the corn and remove the
silks. Place in water to soak for at least 10 minutes.
On a cutting board, or in a mortar, combine the
herb, garlic and salt. Mince finely or pulverize. Add the
butter to the mortar or combine in a bowl with the
herb mixture, and work until you have a smooth paste.
Lightly spread on the corn. Bring the husks back over
the cobs.
Grill the corn, turning frequently, until the husks are
dry and the kernels are beginning to brown, 15 to 20
minutes. Serve hot off the grill.
Soy-Grilled Green Beans
(TheVegetarian Grill)
1 pound green beans, trimmed
2 Tablespoons toasted sesame oil
1 Tablespoon soy sauce
1 Tablespoon dry sherry or Chinese rice wine
2 garlic cloves, minced
Lift the beans out of the marinade with a pair of tongs.
Grill the beans, tossing frequently, until tender and
rowned, 8 to 10 minutes.
b
Place the beans in a serving dish. Pour over any
remaining marinade. Serve hot.
Calico Pepper Salad
(Smoke & Spice)
3 large bell peppers, preferably 1 each of red, yellow
and green
1 small onion
1 fresh green chile, preferably New Mexican,
Anaheim or poblano (optional)
1 fresh jalapeno or 1 to 2 fresh serranos
3 garlic cloves
1 Tablespoon oil, preferably canola or corn
1 Tablespoon garlic-flavored oil
1 Tablespoon minced fresh cilantro
1
⁄2 teaspoon ground cumin
Dashes of red wine vinegar
Salt to taste
Prepare your Hasty-Bake to cook with indirect heat
(with the heat deflector in place over the coals),
bringing the temperature to 200 to 220ºF.
Rub the bell peppers, onion, green chile, jalapeno,
and garlic with enough canola or corn oil to coat their
surfaces lightly.
Transfer the vegetables to the smoker. Cook until
they are well softened, 25 to 30 minutes for the garlic
and 65 to 75 minutes for everything else. Remove each
of the vegetables as it is done.
Place the bell peppers, the green chile and the
jalapeno in a plastic bag to steam. Chop the garlic and
onion finely and transfer them to a bowl. Remove the
peppers from the bag and pull the skin off of each.
Slice the bell pepper and green chile into thin ribbons
and add them to the garlic and onion. Mince the
jalapeno and add about half of it to the bowl.
Stir in the garlic-flavored oil, cilantro, cumin and a
bit of vinegar and salt to taste. Add more jalapeno or
the other seasonings as desired. Serve warm or chilled.
24
Prepare a medium direct fire in your Hasty-Bake with
a lightly oiled vegetable grill rack or grill wok in place.
Place the beans in a shallow dish. Add the sesame
oil, soy sauce, sherry or rice wine and garlic. Toss to
coat.
Page 27

Bread
Garlic Bread
Make diagonal slices into a loaf of French bread about
11⁄2” apart, being careful not to cut all the way through
the bottom.
Mash one clove of garlic (or use about1⁄4 teaspoon of
garlic powder) and mix well with1⁄2 cup of butter.
Spread butter mixture on both sides of each slice.
Wrap the whole loaf in foil and heat at 180 to 200ºF
in your Hasty-Bake with the heat deflector in place
over the coals until the bread is heated through (about
20 minutes).
Hasty-Baked Pizza Dough
1 package dry active yeast
1
⁄4 cup tepid water
1 Tablespoon honey
4 cups unbleached flour
1 teaspoon salt
1 teaspoon dried oregano
1 teaspoon dried basil
2 teaspoons olive oil
1
1
⁄2 cup cold water
grill, then unfold so the crust is directly over the coals.
Close the lid and wait about 3 minutes. Lift lid to
heck. The dough should be puffing up. When it is
c
lightly browned, remove and invert it so the browned
side is up on a pizza peel or a sheet pan.
Now place the toppings of your choice (sauce,
chicken, veggies, cheese, etc.) on the cooked side. Slide
the pizza back onto the grill, this time not directly over
the coals. Close the lid and cook for another 10
minutes or until nicely done.
(Note: The best way to arrange the charcoal to make
pizza on your Hasty-Bake is to confine your fire to the
right side of your grill. Put the dough on the right side
to brown the first time. Then use the left side to finish
cooking the pizza with toppings.)
In the bottom of a food processor, mix tepid water,
yeast and honey. Process for a couple seconds.
Add flour, salt, oregano, basil and oil to the bowl of
the food processor and pulse to combine.
Add water to bowl and process until dough is
formed. Stop the machine and feel the dough. If it is
too moist, sprinkle a little flour over the dough and
process a couple more turns. Let the dough rest in the
food processor for 4 to 5 minutes.
Now start the processor again and let the dough
rotate in the bowl 25 to 30 times. This completes
machine kneading. Remove the dough from the bowl
and place on a lightly floured surface. Let dough rest
another 2 minutes.
Place dough in an oiled bowl and cover with plastic.
Put in a warm place until dough has doubled in size
(approximately 1 to 11⁄2 hours).
Remove dough from bowl and knead in order to
deflate and redistribute yeast. Divide for the number of
pizzas you will be making.
Prepare a medium direct fire in your Hasty-Bake.
Clean grill surface well with a brush. Roll out dough to
the appropriate size. Fold dough in half and lay on the
O w ne r’ s G ui de & I ns tr uc ti on M an ua l
25
Page 28

Dessert
BakedApples
Core a large cooking apple (the firmer and tarter the
better). Fill the whole with red cinnamon candies,
raisins and a bit of butter. Dot the rest of the apple
with butter.
Place the apple in the center of a sheet of foil. Bring
the corners together and twist, leaving the foil rather
loose around the apple.
Cook on your Hasty-Bake at about 200ºF with the
heat deflector in place over the coals until the apple is
soft, about 30 minutes.
Foil-WrappedApple Brown Betty
(TheVegetarian Grill)
4 apples, peeled and thinly sliced
1
⁄2 cup crushed graham cracker crumbs
1
⁄4 cup brown sugar
4 Tablespoons butter, melted
1 teaspoon ground cinnamon
Prepare a low fire on the grill (over a hot fire, the
apples will scorch and their flavor will be bitter).
Combine the apples, crumbs, brown sugar, butter and
cinnamon in a bowl and mix well. Divide the mixture
between 2 large pieces of heavy-duty foil and seal the
packets so no liquid or steam will escape. Grill the
packets, turning once, until apples are soft, about 20
minutes. Open the packets very carefully and serve
warm.
Honey-Nut Fruit Kabobs
(TheVegetarian Grill)
1 pineapple
2 large bananas, peeled and sliced 1
oranges, peeled and sectioned
2
3 Tablespoons butter
2 Tablespoons honey
1 Tablespoon Grand Marnier, Cointreau or other
orange-flavored liqueur
1 cup finely chopped nuts (such as almonds, walnuts
or pecans)
Prepare a medium-low direct fire in your Hasty-Bake.
On a cutting board, cut off the crown and bottom of
the pineapple so it can stand. Slice down the sides,
removing the peel and eyes. Cut into quarters and
remove the core. Slice each quarter into chunks 11⁄2
inches thick.
Arrange pineapple, bananas, and oranges on skewers.
Combine the butter and honey in a small pan or
microwave-save container and heat until butter is
melted. Stir in the liqueur. Brush the mixture onto the
fruit and sprinkle each kabob with nuts.
Grill, turning occasionally, until the nuts are golden
brown (5 to 10 minutes). Serve warm.
1
⁄2 inches thick
Caramelized Bananas
(TheVegetarian Grill)
2 Tablespoons butter, melted
2 Tablespoons brown sugar
4 bananas
26
Prepare a medium direct fire. Combine the butter and
brown sugar in a shallow dish. Peel the bananas, slice
in half lengthwise, then again crosswise. Add the
bananas to the butter mixture and toss very gently to
coat. Grill the bananas, turning ounce, until a crispy
brown coating of caramelized sugar forms on the
surface (about 5 minutes per side). Watch carefully;
don’t allow sugar to char. Remove from the grill and
serve hot.
Page 29

What is Hardwood Charcoal?
The Hasty-Bake
Philosophy
For over 60 years we
• 100% pure charred hardwood
• Chemical free
• Natural chunk form
• Good “old fashioned” campfire flavor
• Lights without charcoal lighter fluid
• Burns hotter
Hasty-Bake Hardwood Charcoal
10 lb. bag
(5 bags minimum order when shipping)
How is hardwood charcoal different than
charcoal briquettes?
Generally speaking, manufacturers grind small pieces of natural charcoal
(not necessarily hardwood) to face powder consistency. Then they mix it
with 60% fillers (i.e., sand, straw, etc.). It is bound together with a
petroleum coating to hold its form. It takes so long to turn a gray ash color
because you must first burn off the chemical coating. Using lighter fluid
adds one more chemical to your cooking process.
How is natural charcoal made?
Hasty-Bake Hardwood Charcoal is 100% charred hardwood made primarily
from oak and hickory. These low-resin hardwoods have long been
recognized for their superior charcoal. They produce a very dense charcoal
that burns cleanly and gives a high amount of energy for its weight. The
wood is stacked in large steel ovens where the temperature inside rises to
approximately 900ºF, which
cooks the liquors out of the
wood. The wood
becomes carbonized –
creating natural
hardwood charcoal.
have been leaders in the
barbecue industry. It is our
belief that superior flavor and
healthier meals are a result of
using pure, chemical-free
hardwood charcoal. Petroleum
products have their place. But,
given the choice, why taint the
flavor of your food? We prefer
to enjoy great campfire flavor
as it was intended!
Hasty-Bake Hardwood
Charcoal, used in conjunction
with our Hasty-Bake Charcoal
Ovens, is a winning
combination! You can grill,
bake or smoke a variety of
foods to perfection including
red meats, fish, vegetables,
fruits, stews, and even breads.
O w ne r’ s G ui de & I ns tr uc ti on M an ua l
27
Page 30

Accessories
SINCE 1948
FIRE
STARTER
W
ARNING!
F
LAMMABLE VAPOR
H
ARMFULIF SWALLOWED
See Other Cautions
on Back Panel
C
ONTENTS24 FL.OZ.
®
Hasty-Bake Apron
Black apron with embroidered
Hasty-Bake logo.
asty-Bake Grill
H
Brush
18” wood handle, brass
bristles with stainless steel
craper tool.
s
Hasty-Bake T-Shirt
Black or gray T-shirt silk-screened
with Hasty-Bake logo and design.
Please specify size M, L, XL, or
Hasty-Bake Grill Extender
Increase your cooking surface or use as a warming rack.
Small (for Suburban and Continental)
Large (for Legacy, Gourmet, Fiesta and Hastings)
XXL.
Hasty-Bake Baster Pan
Accessory used in place of a cooking grill for water, chili,
beans and smoking meats.
Small (for Suburban and
Hasty-Bake Baseball Cap
Black cap with black trim on bill and
embroidered Hasty-Bake logo.
Continental)
Large (for Legacy,
Gourmet, Fiesta and
Hastings)
Fire Starter
Odorless, alcohol-based firestarting gel.
Wok Topper/Grill Topper
Great stainless grill accessories! Use when cooking foods that
are small enough to fall through the grills. Wok topper has
bowl-like sides to allow
you to stir-cook
vegetables, shrimp, etc.
(You’ll never use kabobs
Firelighters
Oversized matches that burn for 6 to 8
minutes.
(8 matches per box)
again). Flat grill topper
1
has
⁄2” edges on three
sides – works best for
cooking fish.
12” Stainless Steel Wok Topper
Stainless Steel Grill Topper (16” x 12”)
Hasty-Bake Grill
Cover
Black cover silk-screened with
Hasty-Bake logo, made of
Sunbrella
™
material. Each
cover is designed to fit your
particular Hasty-Bake model.
Portable Cover
Suburban Cover
Continental Cover
Legacy Cover
Gourmet Cover
Fiesta Cover
Hastings Built-In Cover
Hastings Cart Cover
28
Stainless Poultry Roaster
Holds a chicken in the vertical position,
searing the cavity to hold in the juices
while draining fat.
Page 31

Cookbooks
Hasty-Bake is proud to offer Grilling
Grant’s Way, a collaboration of founder
Grant Hastings plus the best charcoal grill
ooks. Hasty-Bake also offers a selection
c
of popular cookbooks by Cheryl Alters
Jamison and Bill Jamison for all your
grilling needs:
Grilling Grant’s Way
Smoke & Spice (one of the best books
on cooking with smoke)
Sublime Smoke (another great resource
or low temp cooking)
f
Hasty-Bake Rub and Seasonings
Selection of seasonings made from blends of
herbs, spices and a few “secret” ingredients.
Rub n’ Spice - Won Best Rub on the Planet
at 2002 American Royal
Gourmet Greek
Honey Lemon Pepper
Disposable Grease Cups
These little jewels need to be replaced
every so often to keep your HastyBake grease drainage system in proper
condition. They can also be used for
soaking wood smoking chips.
Rib Rack
These are the best rib racks
money can buy! Ribs stand
vertically, allowing fat to
drain while the meat cooks evenly.
Racks will hold country ribs, baby
back ribs, even chicken quarters. Utilizes grilling space more
efficiently.
Small Rib Rack (4 slots) 11” x 11
Large Rib Rack (8 slots) 18” x 11” x 3
1
⁄2” x 3” (LxWxH)
1
⁄4” (LxWxH)
Hasty-Bake Barbecue Sauce
A mild and sweet sauce with a traditional taste.
Dale’s Marinade
Since 1946, gourmet chefs have been
marinating their steaks, ribs, chicken and
vegetables with this concentrated blend of herbs
and spices.
Wood Chunks
Put extra flavor into your outdoor
meals with our wood smoking
chunks. Hickory and pecan are
great with beef. Most fruit woods
such as apple and cherry compliment
poultry and pork. (Availability may vary.)
Hasty-Bake Front Storage Table
A stainless steel front work table with a storage compartment
to hold utensils, matches, etc.
Small (for Suburban and Continental)
Large (for Legacy and Gourmet)
Hasty-Bake Rotisserie
A rotisserie is not really necessary on a Hasty-Bake due to its
natural convection cooking effects. However, some people
simply prefer cooking with a rotisserie. So we offer the finest
motor, spit rod and forks that we can find (kit also includes
mounting bracket).
Small (for Suburban and Continental)
Large (for Legacy, Gourmet and Fiesta)
Hastings (for Hastings - comes with a larger motor)
Apple Pecan Peach
Cherry Pear Alder
O w ne r’ s G ui de & I ns tr uc ti on M an ua l
29
Page 32

P.O. Box 4609 Tulsa, Oklahoma 74159
Phone: (918) 665-8220 or 1-800-4AN OVEN (1-800-426-6836)
Fax: (918) 665-8225
www.hastybake.com
 Loading...