

Page 1
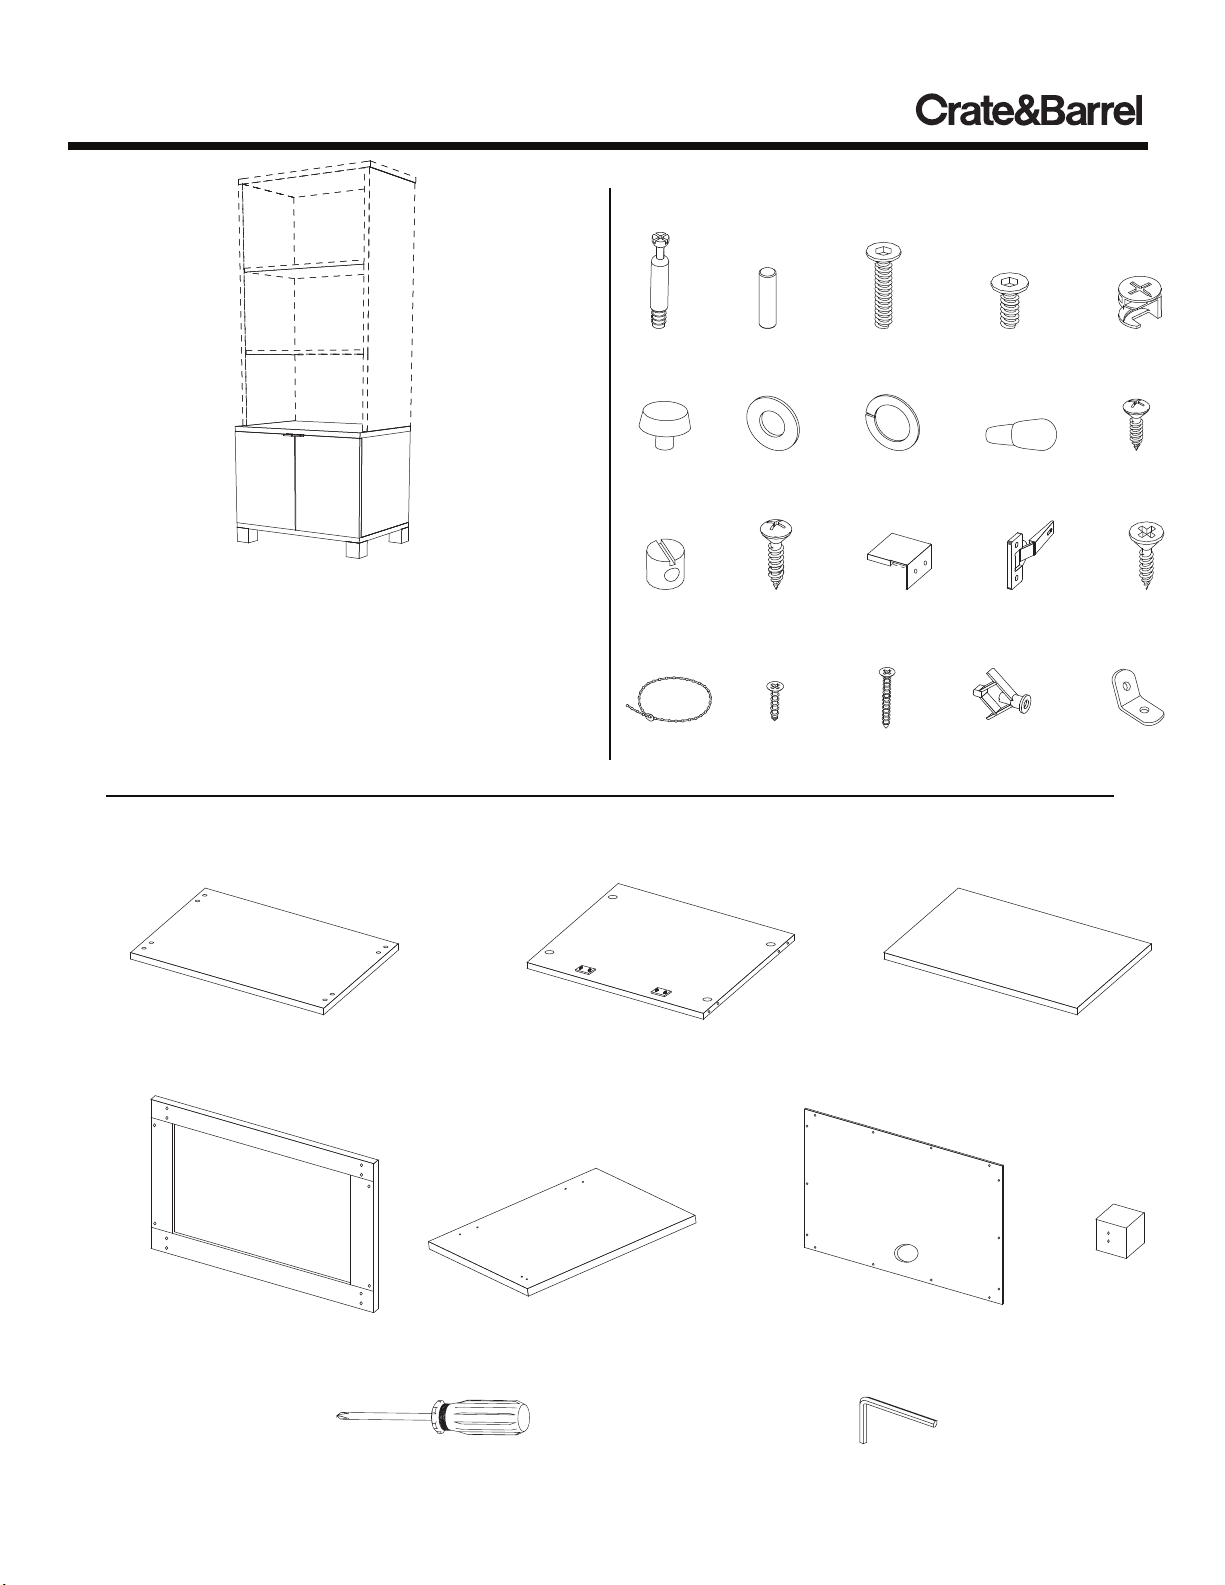
CONTOUR AUDIO TOWER
ASSEMBLY INSTRUCTIONS FOR
THE CONTOUR AUDIO BASE
This page lists all the contents included in the box.
Please take time to identify the hardware as well as the
individual components of this product. As you unpack
and prepare for assembly, place the contents on a
carpeted or padded area to protect them from damage.
Note: 2 people are required to safely assemble this product.
HARDWARE
4 - cam
screws
4 - adjustable
feet
4 - barrel
nuts
1 - wall
strap
Missing hardware?
Please call 800.606.6387 for replacements.
12 - wood
dowels
8 - flat
washers
4 - pull
screws
1 - short
screw
4 - long
bolts
8 - spring
washers
2 - pulls
1 - long
screw
4 - short
bolts
4 - shelf
pins
4 - door
hinges
1 - plastic
anchor
4 - cams
14 - wood
screws
8 - hinge
screws
2 - brackets
COMPONENTS
1 - top
panel
1 - bottom
panel
TOOLS REQUIRED
(1 left, 1 right)
2 - doors
(1 left, 1 right)
phillips head screwdriver
1 - back
panel
1 - shelf2 - side panels
4 - legs
allen wrench (included)
Made in China - r06 Page 1 of 8
Customer Service 800.967.6696 | www.crateandbarrel.com
Page 2
CONTOUR AUDIO TOWER
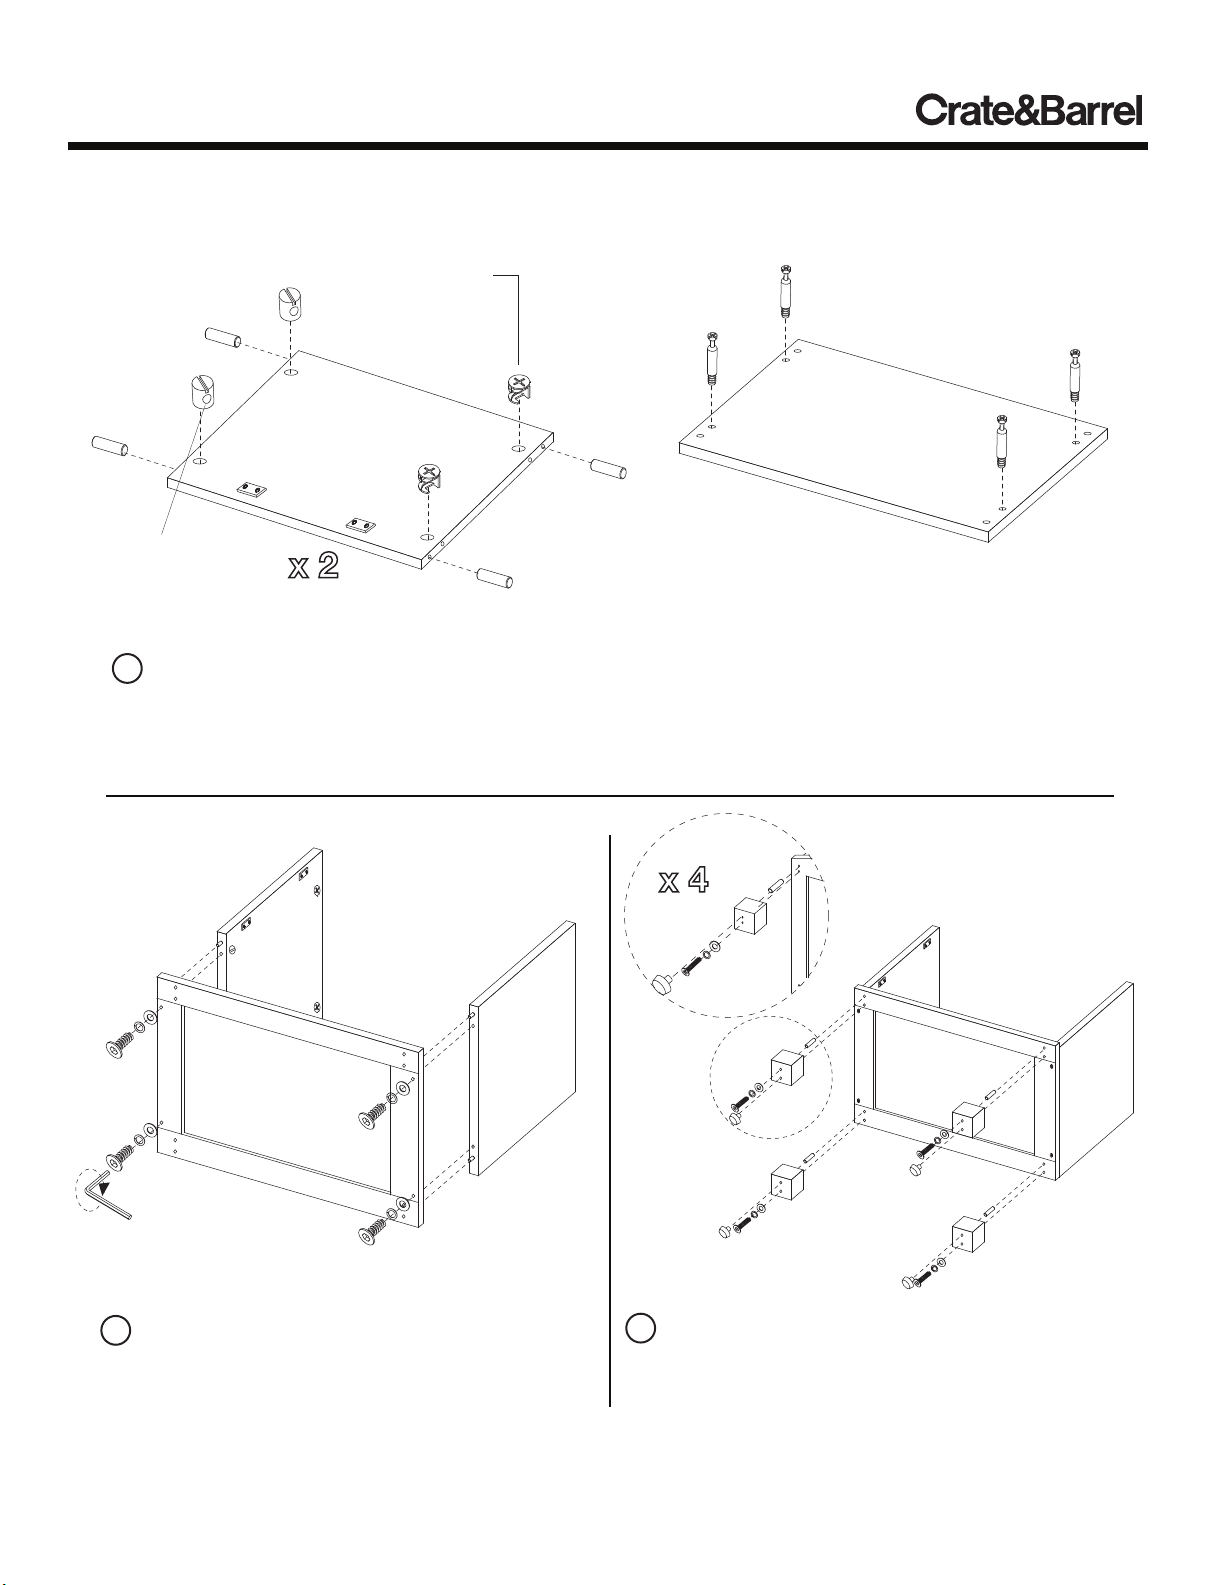
A B
side
panels
Make sure hole
of each barrel
nut is vertical
Make sure arrow on
each cam points
towards nearest
edge with holes
top
panel
1 A) Insert 2 barrel nuts, 2 cams, and 4 wood
dowels into left and right side panels as shown.
Make sure threaded hole of each barrel nut is vertically
aligned with holes of side panel. Make sure arrows on
each cam points towards the nearest edge with holes.
B) Insert 4 cam screws into top panel as shown.
Secure cam screws, but do not over tighten with a
phillips head screwdriver.
A
C
B
2 Fit dowels of side panels into holes of bottom
panel. Secure bottom panel with 4 short bolts, 4
spring washers, and 4 flat washers as shown.
Secure bolts with an allen wrench.
Made in China - r06 Page 2 of 8
Customer Service 800.967.6696 | www.crateandbarrel.com
3 A) Insert 4 wood dowels into bottom panel as
shown.
B) Attach 4 legs onto assembled unit as shown.
Secure each leg with 1 long bolt, 1 spring washer,
and 1 flat washer, using an allen wrench.
C) Insert 1 adjustable foot into each leg as shown.
Page 3
CONTOUR AUDIO TOWER
A
B
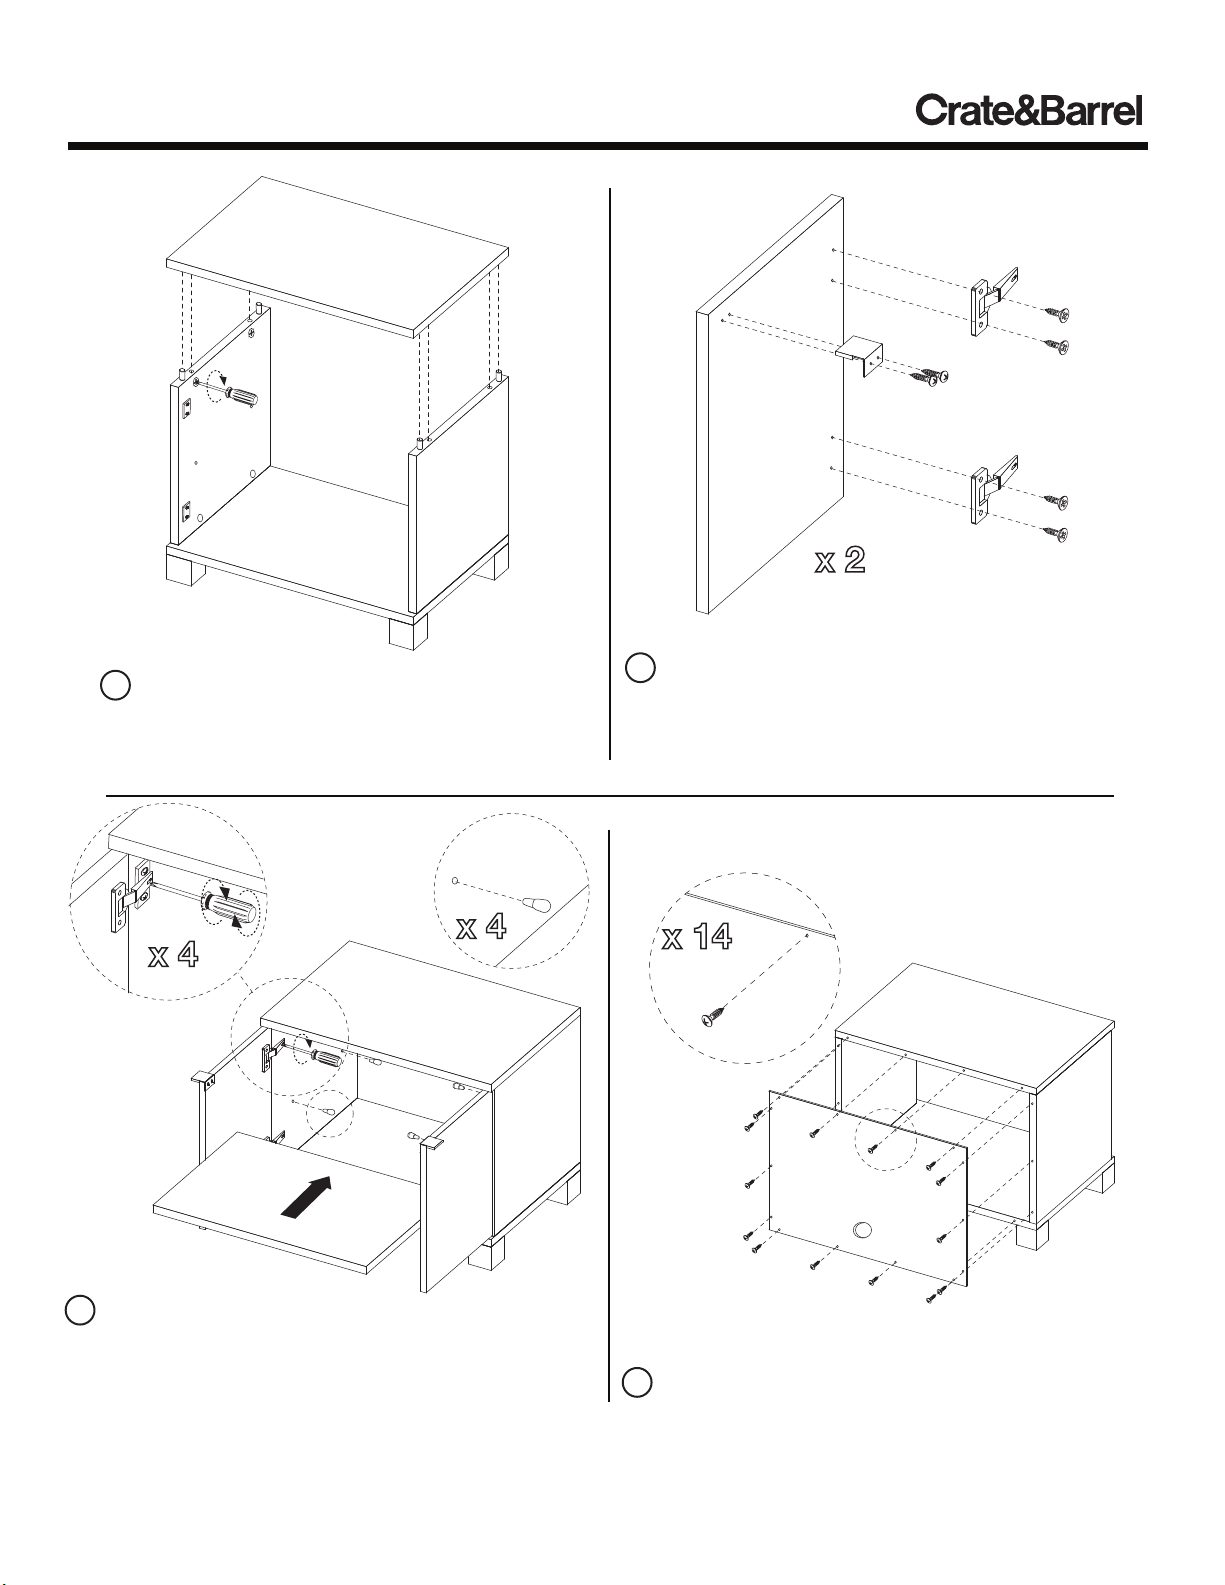
4 Fit dowels of assembled unit and cam screws of
top panel as shown. With a screwdriver, turn each
cam clockwise until it securely engages each cam
screw.
A
B
A
B
C
5 A) Attach 2 door hinges to each door as shown
with 2 hinge screws per hinge. Secure screws with a
screwdriver.
B) Attach 1 pull onto each door as shown with 2 pull
screws per pull. Secure screws with a screwdriver.
6 A) Attach hinges of left and right door to assembled
unit as shown. With a screwdriver, turn each preassembled screw clockwise to secure. If needed, adjust
doors by slightly loosening or tightening the screw.
B) Insert 4 shelf pins to assembled unit as shown.
C) Carefully place shelf to assembled unit as shown.
Make sure shelf is securely supported onto each shelf pin.
Made in China - r06 Page 3 of 8
Customer Service 800.967.6696 | www.crateandbarrel.com
7 Attach back panel onto assembled unit as shown
with 14 wood screws. Secure screws with a
screwdriver.
Page 4

CONTOUR AUDIO TOWER
8 Safety Mounting Instructions
For added safety and stability, it is recommended that the
wall mounting hardware be installed. For safe mounting, it
is essential to use wall anchors appropriate to your wall type
(i.e. plaster, drywall, concrete, etc.). Mount to wood studs
whenever possible.
A) Attach 1 bracket to top of audio base unit as shown,
using 1 small screw.
B) Determine the final location of audio base unit. Mark
position on the wall, approximately 2" below the bracket
mounted to the back of the cabinet.
C) Drill a hole in the wall stud. If the wall stud is not
available, drill a hole in the wall that is slightly smaller in
diameter than the anchor. Squeeze 2 flanges of plastic
anchor and fit into pre-drilled hole. Gently tap the plastic
anchor until the flange of the anchor is flush with the wall.
D) Attach the remaining bracket to the wall by inserting 1
large screw through the wall bracket and into the wall
anchor in the wall.
E) Place the unit so the bracket on the back edge is allowed
with the bracket on the wall.
F) Lace one end of the wall strap through both brackets,
and into the other end of the strap.
G) Pull the strap tightly until secure.
Audio base assembly is now complete.
short
A
screw
long
D
screw
wall
F
strap
NOTE:
If you are unsure about your wall type or what
mounting method you should use, consult a
qualified professional or your local hardware
store.
C
anchor
bracket
Made in China - r06 Page 4 of 8
Customer Service 800.967.6696 | www.crateandbarrel.com
Page 5
CONTOUR AUDIO TOWER
HARDWARE
ASSEMBLY INSTRUCTIONS FOR
THE CONTOUR AUDIO SHELVING
This page lists all the contents included in the box.
Please take time to identify the hardware as well as the
individual components of this product. As you unpack
and prepare for assembly, place the contents on a
carpeted or padded area to protect them from damage.
Note: 2 people are required to safely assemble this product.
COMPONENTS
8 - cam
screws
8 - cams
1 - wall
strap
12 - wood
dowels
4 - flat
washers
1 - short
screw
4 - long
bolts
4 - spring
washers
1 - long
screw
4 - short
bolts
8 - screws
1 - plastic
anchor
2 - connecting
pieces
2 - metal
plates
2 - brackets
Missing hardware? Please call 800.606.6387 for replacements.
TOOLS REQUIRED
phillips head screwdriver
allen wrench (included)
A
shelves
Make sure arrow on
each cam points
towards nearest
edge with holes
2 - side panels
(1 left, 1 right)
B
side
panels
1 - top
panel
9 A) Insert 4 cams and 4 wood dowels into shelves
as shown. Make sure arrow on each cam points
towards the nearest edge with holes.
B) Insert 4 cam screws and 2 wood dowels into left
2 - shelves
Made in China - r06 Page 5 of 8
Customer Service 800.967.6696 | www.crateandbarrel.com
and right side panels as shown. Secure cam screws,
but do not over tighten with a phillips head screw-
driver.
Page 6

CONTOUR AUDIO TOWER
10 Fit cam screws of side panels and dowels of
shelves as shown. Turn each cam clockwise until it
securely engages each cam screw, using a phillips
head screwdriver.
shelving
base
11 Fit holes of top panel and dowels of assembled
unit as shown. Secure top panel with 4 large bolts, 4
spring washers, and 4 flat washers as shown, using
an allen wrench.
CLEANING AND CARE
Clean surfaces with a dry or damp soft cloth. Do not use
abrasive cleaners. Do not use furniture wax or polish as the
wood is finished with a protective clear lacquer.
12 With the assistance of another adult, carefully position
unit upright. Attach 2 connecting pieces to back of audio
tower and stand as shown. Secure connecting pieces with
4 screws per piece, using a screwdriver.
Made in China - r06 Page 6 of 8
Customer Service 800.967.6696 | www.crateandbarrel.com
Page 7

CONTOUR AUDIO TOWER
13 Safety Mounting Instructions
For added safety and stability, it is recommended that the
wall mounting hardware be installed. For safe mounting, it
is essential to use wall anchors appropriate to your wall type
(i.e. plaster, drywall, concrete, etc.). Mount to wood studs
whenever possible.
A) Attach 1 bracket to top of audio shelving unit as shown,
using 1 small screw.
B) Determine the final location of audio shelving unit. Mark
position on the wall, approximately 2" below the bracket
mounted to the back of the cabinet.
C) Drill a hole in the wall stud. If the wall stud is not
available, drill a hole in the wall that is slightly smaller in
diameter than the anchor. Squeeze 2 flanges of plastic
anchor and fit into pre-drilled hole. Gently tap the plastic
anchor until the flange of the anchor is flush with the wall.
D) Attach the remaining bracket to the wall by inserting 1
large screw through the wall bracket and into the wall
anchor in the wall.
E) Place the unit so the bracket on the back edge is allowed
with the bracket on the wall.
F) Lace one end of the wall strap through both brackets,
and into the other end of the strap.
G) Pull the strap tightly until secure.
Audio shelving assembly is now complete.
short
A
screw
long
D
screw
wall
F
strap
NOTE:
If you are unsure about your wall type or what
mounting method you should use, consult a
qualified professional or your local hardware
store.
C
anchor
bracket
Made in China - r06 Page 7 of 8
Customer Service 800.967.6696 | www.crateandbarrel.com
Page 8

CONTOUR AUDIO TOWER
14 If you purchased the complete Contour collection (media
stand, hutch, and audio tower), please proceed with the
following instructions.
Attach 4 metal plates onto assembled unit as shown. Secure
plates with 2 short bolts as shown, using an allen wrench.
Audio tower assembly is now complete.
Made in China - r06 Page 8 of 8
Customer Service 800.967.6696 | www.crateandbarrel.com
Page 9

CONTOUR HUTCH
HARDWARE
Thank you for purchasing the Contour Hutch. This
page lists all the contents included in the box. Please
take time to identify the hardware as well as the
individual components of this product. As you unpack
and prepare for assembly, place the contents on a
carpeted or padded area to protect them from damage.
Note: 2 people are required to safely assemble this product.
COMPONENTS
4 - cam
screws
4 - cams
1 - wall
strap
8 - wood
dowels
4 - flat
washers
1 - short
screw
4 - spring
washers
1 - long
screw
4 - long
bolts
8 - large
screws
1 - plastic
anchor
2 - connecting
brackets
14 - short
screws
2 - brackets
Missing hardware? Please call 800.606.6387 for replacements.
TOOLS REQUIRED
phillips head screwdriver
allen wrench (included)
A
side panels
2 - side panels
(1 left, 1 right)
Make arrow on
1 - back
panel
each cam points
towards nearest
edge with holes
B
shelf
1 - shelf
1 A) Insert 2 cam screws and 2 wood dowels into left and
right side panels as shown. Secure cam screws, but do not
1 - top
panel
over tighten with a phillips head screwdriver.
B) Insert 4 cams and 4 wood dowels into shelf as shown.
Make sure arrow on each cam points towards the nearest
edge with holes.
Made in China - r04 Page 1 of 4
Customer Service 800.967.6696 | www.crateandbarrel.com
Page 10

CONTOUR HUTCH
2 Fit cam screws of side panels and dowels of shelf
together as shown. Turn each cam clockwise until it
securely engages each cam screw, using a phillips
head screwdriver.
3 Fit dowels of assembled unit as shown into
corresponding holes in top panel. Secure top panel
with 4 large bolts, 4 spring washers, and 4 flat
washers as shown, using the allen wrench.
hutch
media
stand
4 With the assistance of another adult, carefully place
assembled unit face down as shown. Attach back panel
to assembled unit with 14 short screws, using a
screwdriver.
Made in China - r04 Page 2 of 4
Customer Service 800.967.6696 | www.crateandbarrel.com
5 With the assistance of another adult, carefully position
hutch upright and place onto media stand as shown.
Attach assembly with 2 connecting brackets with 4 large
screws per bracket. Secure all screws with a screwdriver.
Page 11

CONTOUR HUTCH
6 Safety Mounting Instructions
For added safety and stability, it is recommended that the
wall mounting hardware be installed. For safe mounting, it
is essential to use wall anchors appropriate to your wall type
(i.e. plaster, drywall, concrete, etc.). Mount to wood studs
whenever possible.
A) Attach 1 bracket to top of hutch as shown, using 1
small screw.
B) Determine the final location of hutch. Mark position on
the wall, approximately 2" below the bracket mounted to the
back of the cabinet.
C) Drill a hole in the wall stud. If the wall stud is not
available, drill a hole in the wall that is slightly smaller in
diameter than the anchor. Squeeze 2 flanges of plastic
anchor and fit into pre-drilled hole. Gently tap the plastic
anchor until the flange of the anchor is flush with the wall.
D) Attach the remaining bracket to the wall by inserting 1
large screw through the wall bracket and into the wall
anchor in the wall.
E) Place the unit so the bracket on the back edge is allowed
with the bracket on the wall.
F) Lace one end of the wall strap through both brackets,
and into the other end of the strap.
G) Pull the strap tightly until secure.
short
A
screw
long
D
screw
wall
F
strap
NOTE:
If you are unsure about your wall type or what
mounting method you should use, consult a
qualified professional or your local hardware
store.
C
anchor
bracket
Made in China - r04 Page 3 of 4
Customer Service 800.967.6696 | www.crateandbarrel.com
Page 12

CONTOUR HUTCH
7 If you purchased the complete Contour collection (media
stand, hutch, audio stand, and audio tower), please proceed
with the following instructions.
Attach 4 metal plates onto assembled unit as shown. Secure
plates with 2 short bolts as shown, using an allen wrench.
Assembly is now complete.
CLEANING AND CARE
Clean surfaces with a dry or damp soft cloth. Do not use
abrasive cleaners. Do not use furniture wax or polish as the
wood is finished with a protective clear lacquer.
Made in China - r04 Page 4 of 4
Customer Service 800.967.6696 | www.crateandbarrel.com
Page 13

CONTOUR MEDIA STAND
HARDWARE
Thank you for purchasing the Contour Media Stand.
This page lists all the contents included in the box.
Please take time to identify the hardware as well as the
individual components of this product. As you unpack
and prepare for assembly, place the contents on a
carpeted or padded area to protect them from damage.
Note: 2 people are required to safely assemble this product.
COMPONENTS
8 - cam
screws
8 - flat
washers
1 - wall
strap
20 - wood
dowels
8 - spring
washers
1 - short
screw
4 - long
bolts
4 - shelf
pins
1 - long
screw
4 - short
bolts
18 - wood
screws
1 - plastic
anchor
8 - cams
Missing hardware? Please call 800.606.6387
for replacements.
4 - barrel
nuts
4 - adjustable
feet
2 - brackets
1 - top
panel
1 - back
4 - legs
panel
1 - bottom
panel
1 - glass
shelf
TOOLS REQUIRED
Made in China - r03 Page 1 of 4
Customer Service 800.967.6696 | www.crateandbarrel.com
phillips head screwdriver
2 - side panels
(1 left, 1 right)
2 - front panels
(1 left, 1 right)
allen wrench (included)
Page 14

CONTOUR MEDIA STAND
A
side
panels
Make sure hole
of each barrel
nut is vertical
front panels
B
1 A) Insert 2 barrel nuts and 2 cams into left and
right side panels as shown. Make sure threaded hole
of each barrel nut is vertically aligned with holes of
side panel. Make sure arrows on each cam points
towards the nearest edge with holes.
B) Insert 4 wood dowels and 2 cams into left and
Make arrow on
each cam points
towards nearest
edge with holes
C
bottom
panel
D
top
panel
right front panels.
C) Insert 2 cam screws and 4 wood dowels into
bottom panel as shown. Secure cam screws, but do
not over tighten with a phillips head screwdriver.
D) Insert 6 cam screws and 4 wood dowels into top
panel as shown.
2 Fit dowels of bottom panel into holes of side
panels. Secure bottom panel with 4 short bolts, 4
spring washers, and 4 flat washers as shown, using
an allen wrench.
A
C
B
3 A) Insert 4 wood dowels into bottom panel as
shown.
B) Attach 4 legs onto assembled unit as shown.
Secure each leg with 1 long bolt, 1 spring washer,
and 1 flat washer, using an allen wrench.
C) Insert 1 adjustable foot into each leg as shown.
Made in China - r03 Page 2 of 4
Customer Service 800.967.6696 | www.crateandbarrel.com
Page 15

CONTOUR MEDIA STAND
4 Fit dowels of left and right front panels and cam
screws of assembled unit as shown. With a
screwdriver, turn each cam clockwise until it securely
engages each cam screw.
5 Fit dowels of assembled unit and cam screws of
top panel as shown. Secure all cams.
B
A
7 Attach back panel onto assembled unit as shown
with 18 wood screws. Secure screws with a
screwdriver.
6 A) Insert 4 shelf pins into assembled unit as
shown.
B) Carefully place glass shelf into assembled unit as
shown.
Made in China - r03 Page 3 of 4
Customer Service 800.967.6696 | www.crateandbarrel.com
CLEANING AND CARE
Clean surfaces with a dry or damp soft cloth. Do not use
abrasive cleaners. Do not use furniture wax or polish as the
wood is finished with a protective clear lacquer.
Page 16

CONTOUR MEDIA STAND
8 Safety Mounting Instructions
For added safety and stability, it is recommended that the
wall mounting hardware be installed. For safe mounting, it
is essential to use wall anchors appropriate to your wall type
(i.e. plaster, drywall, concrete, etc.). Mount to wood studs
whenever possible.
A) Attach 1 bracket to top of media stand as shown, using
1 small screw.
B) Determine the final location of media stand. Mark
position on the wall, approximately 2" below the bracket
mounted to the back of the cabinet.
C) Drill a hole in the wall stud. If the wall stud is not
available, drill a hole in the wall that is slightly smaller in
diameter than the anchor. Squeeze 2 flanges of plastic
anchor and fit into pre-drilled hole. Gently tap the plastic
anchor until the flange of the anchor is flush with the wall.
D) Attach the remaining bracket to the wall by inserting 1
large screw through the wall bracket and into the wall
anchor in the wall.
E) Place the unit so the bracket on the back edge is allowed
with the bracket on the wall.
F) Lace one end of the wall strap through both brackets,
and into the other end of the strap.
G) Pull the strap tightly until secure.
Assembly is now complete.
short
A
screw
long
D
screw
wall
F
strap
NOTE:
If you are unsure about your wall type or what
mounting method you should use, consult a
qualified professional or your local hardware
store.
This unit can safely hold up to a 24" traditional
(CRT) TV without tipping. This unit can support
up to a 300 lb. TV. Please refer to TV
manufacturer’s recommendations for support
of a flat screen TV.
C
anchor
bracket
Made in China - r03 Page 4 of 4
Customer Service 800.967.6696 | www.crateandbarrel.com
 Loading...