

Crate & Barrel Checkers Black Three Cube, Checkers Black Five Cube, Checkers Single Metal Base, Checkers Black Two Cube, Checkers Triple Metal Base Assembly Instruction
...Page 1
Customer Service 800-967-6696 | http://www.crateandbarrel.com
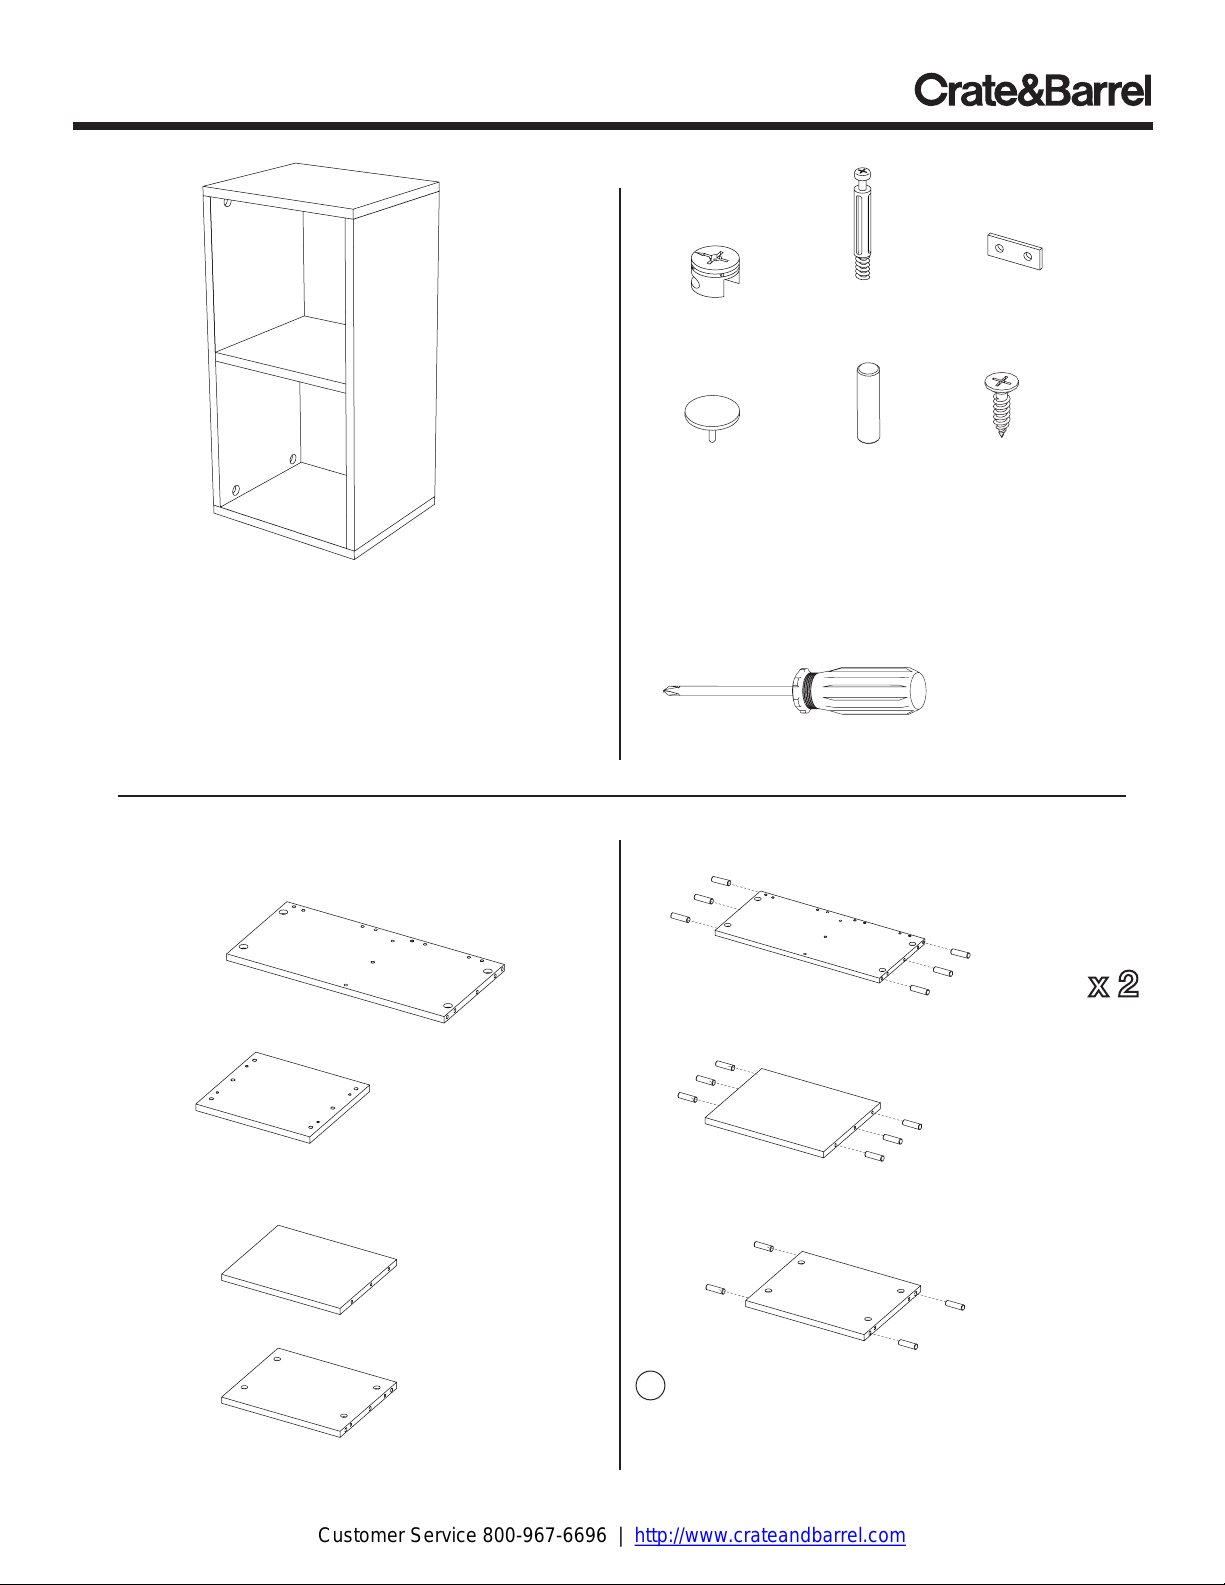
CHECKERS DOUBLE SHELVING
Thank you for purchasing the Checkers Double
Shelving. This page
box. Please take the time to identify the hardware as
well as the individual components
you unpack and prepare for assembly, place the
contents on a carpeted or padded area to protect them
from damage.
Note: 2 people are required to safely assemble this product.
lists all the contents included in the
to this product. As
COMPONENTS
2 - side panels
2 - end panels
(1 top, 1 bottom)
1 - shelf
1 - back panel
Made in Denmark r04
Customer Service 800.967.6696 | www.crateandbarrel.com
HARDWARE
12 - cams
12 - cam
covers
Missing hardware?
Please call 800.606.6387
for replacements.
12 - cam
screws
22 - wood
dowels
2 - mending
plates
4 - screws
TOOLS REQUIRED
Phillips head screwdriver
A
B
C
1 A) Insert 6 wood dowels into the ends of the 2 side panels.
B) Insert 6 wood dowels into the shelf.
C) Insert 4 wood dowels into the back panel.
Side Panels
Shelf
Back Panel
Page 1 of 3
Page 2
Customer Service 800-967-6696 | http://www.crateandbarrel.com
CHECKERS DOUBLE SHELVING
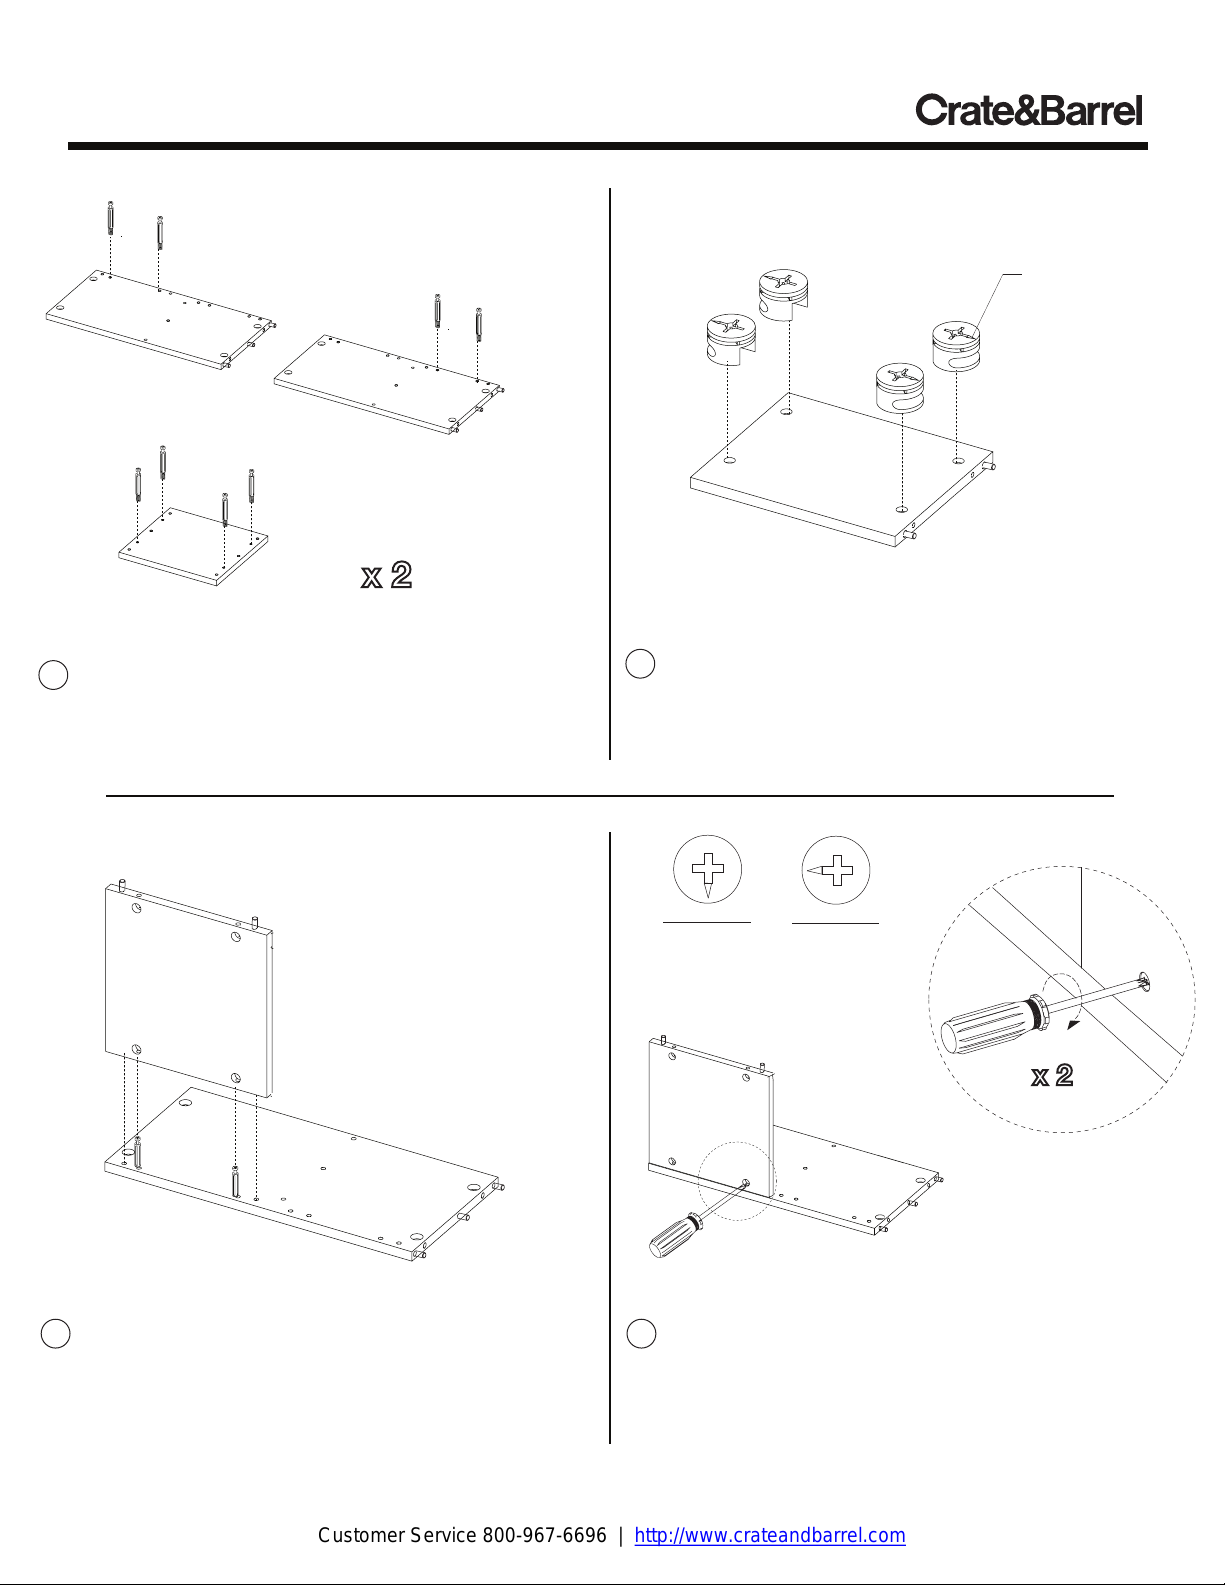
Side Panels
NOTE:
Do not over
tighten the
cam screws
A
End Panels
B
2 A) Insert 2 cam screws into each side panel as shown.
Secure, but do not over tighten each cam screw with a
phillips head screwdriver.
B) Fasten 4 cam screws to the 2 end panels with a phillips
head screwdriver.
4 Fit back panel onto cam screws of side panel as shown.
Make sure cams of back panel face “back” as illustrated.
Made in Denmark r04 Page 2 of 3
Customer Service 800.967.6696 | www.crateandbarrel.com
Arrow on
each cam
points towards
nearest edge
with holes
Back Panel
3 Insert 4 cams into the large holes of the back panel as
shown. Make sure the arrows on each cam point out towards
the nearest edge with holes.
Cam in
unlocked
position
5 Using a phillips head screwdriver, turn bottom 2 cams
of back panel clockwise until each cam fully engages each
cam screw.
Cam in
locked
position
Page 3
Customer Service 800-967-6696 | http://www.crateandbarrel.com
CHECKERS DOUBLE SHELVING
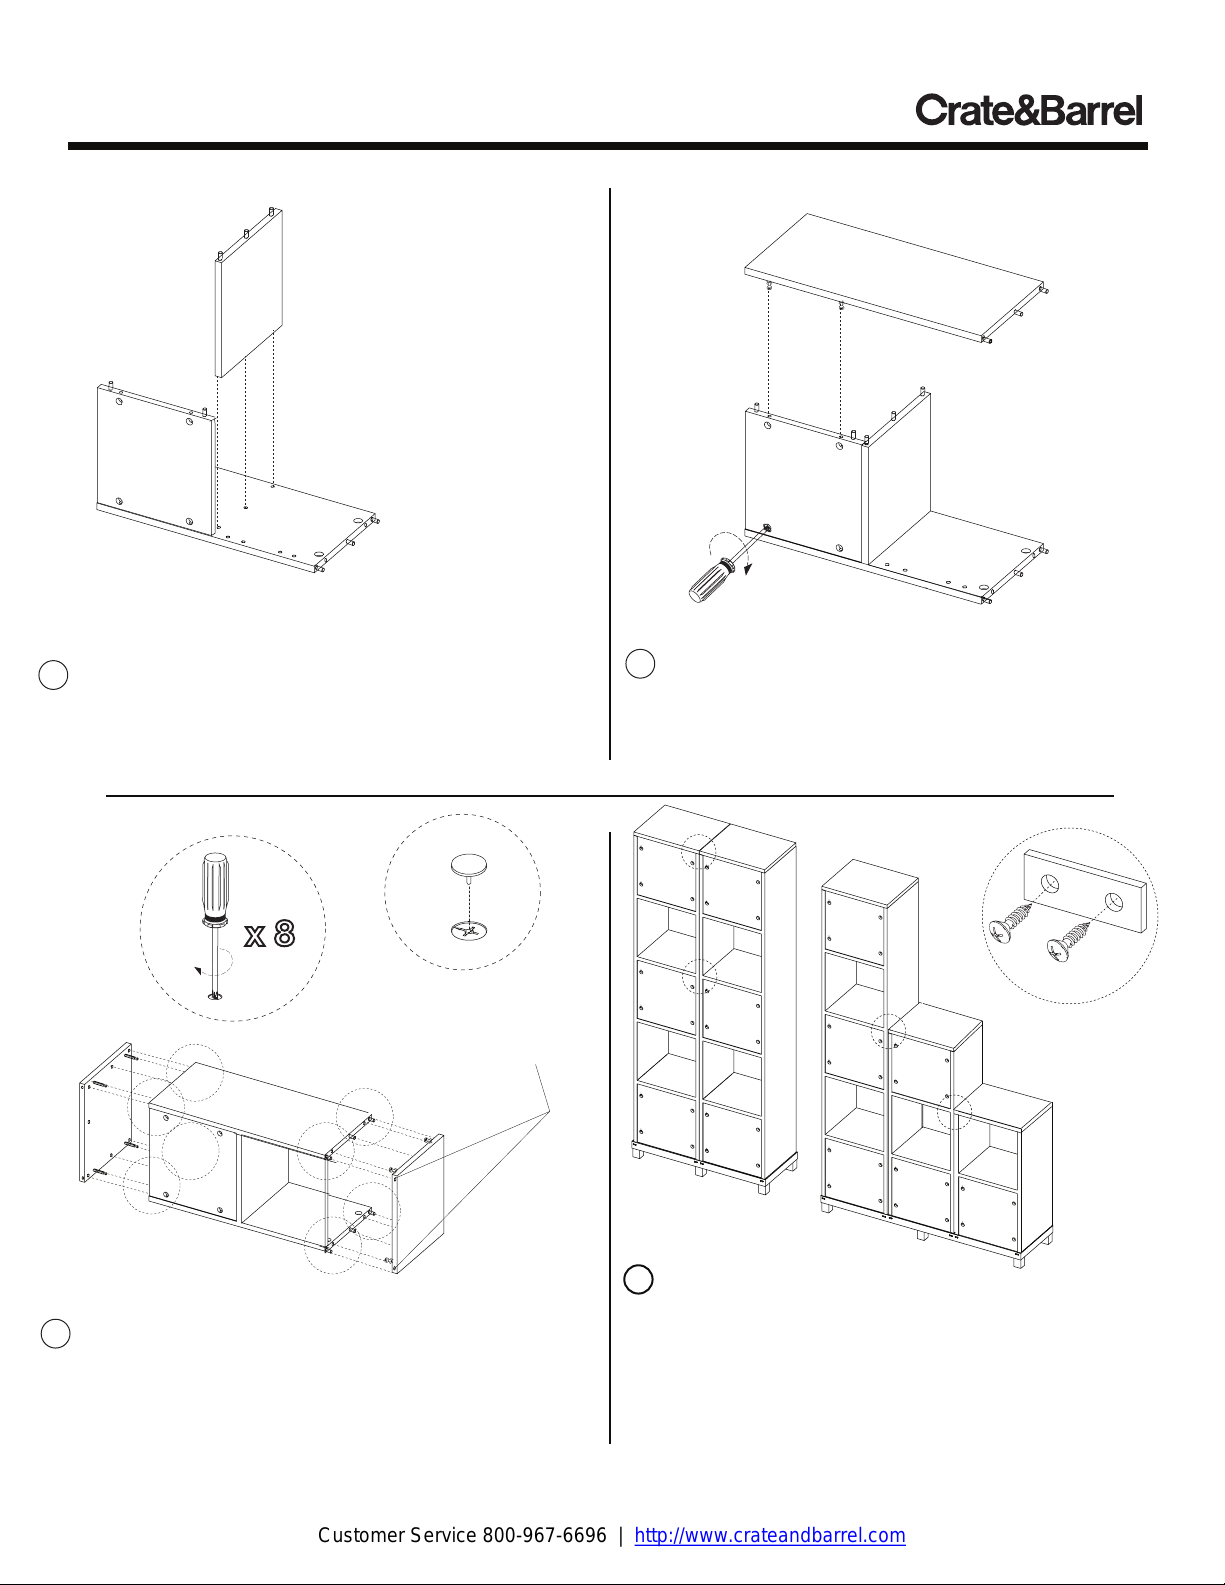
6 Align dowels of shelf with corresponding holes in side
panel and firmly fit into position.
A
8 A) Fit 2 end panels onto the assembly, aligning the cam
screws and dowels. Secure the 4 cams on each end panel
with a phillips head screwdriver.
B) Conceal all exposed cams with cam covers. Press firmly
to secure.
Made in Denmark r04 Page 3 of 3
B
IMPORTANT NOTE:
Make sure the holes
on the edge of the end panels
face “back” as shown
Customer Service 800.967.6696 | www.crateandbarrel.com
7 With the assistance of another adult, fit remaining side
panel onto assembly. Make sure pilot holes on panel edge
face back as shown. Lock top cams of each back panel by
turning each clockwise with a phillips head screwdriver.
Shown with
optional
Checkers
Metal
Bases
9 If combining multiple shelving units, be sure to connect the
units together with the mending plates at each set of
adjacent pilot holes. Fasten each mending plate with 2
screws. Assembly is now complete.
NOTE: UNITS ARE INTENDED TO STACK VERTICALLY AND
SHOULD NOT BE STACKED MORE THAN 5 CUBES HIGH.
CLEANING AND CARE
Clean surfaces with a dry or damp soft cloth. Do not use
abrasive cleaners.
Page 4

Customer Service 800-967-6696 | http://www.crateandbarrel.com
CHECKERS TRIPLE SHELVING
Thank you for purchasing the Checkers Triple
Shelving. This page
box. Please take the time to identify the hardware as
well as the individual components
you unpack and prepare for assembly, place the
contents on a carpeted or padded area to protect them
from damage.
Note: 2 people are required to safely assemble this product.
lists all the contents included in the
to this product. As
COMPONENTS
2 - side panels
2 - end panels
(1 top, 1 bottom)
2 - shelves
2 - back panels
Made in Denmark r03
Customer Service 800.967.6696 | www.crateandbarrel.com
HARDWARE
16 - cams
16 - cam
covers
Missing hardware?
Please call 800.606.6387
for replacements.
16 - cam
screws
32 - wood
dowels
2 - mending
plates
4 - screws
TOOLS REQUIRED
Phillips head screwdriver
Side Panels
A
B
C
1 A) Insert 6 wood dowels into the ends of the 2 side panels.
B) Insert 6 wood dowels into the 2 shelves.
C) Insert 4 wood dowels into the 2 back panels.
Shelves
Back Panels
Page 1 of 3
Page 5

Customer Service 800-967-6696 | http://www.crateandbarrel.com
CHECKERS TRIPLE SHELVING
Side Panels
A
NOTE:
Do not over
tighten the
cam screws
End Panels
B
2 A) Insert 4 cam screws into each side panel as shown.
Secure, but do not over tighten each cam screw with a
phillips head screwdriver.
B) Fasten 4 cam screws to the 2 end panels with a phillips
head screwdriver.
IMPORTANT NOTE:
Make sure the pilot hole
on the edge of the side panel
faces “back” as shown
4 Fit 2 back panels onto cam screws of side panel as
shown. Make sure cams of back panels and pilot hole on the
edge of the side panel face “back” as illustrated.
Made in Denmark r03 Page 2 of 3
Customer Service 800.967.6696 | www.crateandbarrel.com
Arrow on
each cam
points towards
nearest edge
with holes
Back Panels
3 Insert 4 cams into the large holes of each back panel as
shown. Make sure the arrows on each cam point out towards
the nearest edge with holes.
Cam in
unlocked
position
5 Using a phillips head screwdriver, turn bottom 4 cams
of back panels clockwise until each cam fully engages each
cam screw.
Cam in
locked
position
Page 6

Customer Service 800-967-6696 | http://www.crateandbarrel.com
CHECKERS TRIPLE SHELVING
6 Align dowels of shelves with corresponding holes in side
panel and firmly fit into position.
A
8 A) Fit 2 end panels onto the assembly, aligning the cam
screws and dowels. Secure the 4 cams on each end panel
with a phillips head screwdriver.
B) Conceal all exposed cams with cam covers. Press firmly
to secure.
Made in Denmark r03 Page 3 of 3
B
Make sure the pilot holes
on the edge of the end panels
face “back” as shown
Customer Service 800.967.6696 | www.crateandbarrel.com
7 With the assistance of another adult, fit remaining side
panel onto assembly. Make sure pilot holes on panel edge
face back as shown. Lock top cams of each back panel by
turning each clockwise with a phillips head screwdriver.
Shown with
optional
Checkers
Metal
Bases
9 If combining multiple shelving units, be sure to connect the
units together with the mending plates at each set of
adjacent pilot holes. Fasten each mending plate with 2
screws. Assembly is now complete.
NOTE: UNITS ARE INTENDED TO STACK VERTICALLY AND
SHOULD NOT BE STACKED MORE THAN 5 CUBES HIGH.
CLEANING AND CARE
Clean surfaces with a dry or damp soft cloth. Do not use
abrasive cleaners.
Page 7

Customer Service 800-967-6696 | http://www.crateandbarrel.com
CHECKERS QUINTUPLE SHELVING
Thank you for purchasing the Checkers Quintuple
Shelving. This page
box. Please take the time to identify the hardware as
well as the individual components
you unpack and prepare for assembly, place the
contents on a carpeted or padded area to protect them
from damage.
Note: 2 people are required to safely assemble this product.
lists all the contents included in the
to this product. As
COMPONENTS
2 - side panels
2 - end panels
(1 top, 1 bottom)
4 - shelves
3 - back panels
Made in Denmark r04
Customer Service 800.967.6696 | www.crateandbarrel.com
HARDWARE
20 - cams
20 - cam
covers
Missing hardware?
Please call 800.606.6387
for replacements.
20 - cam
screws
48 - wood
dowels
2 - mending
plates
4 - screws
TOOLS REQUIRED
Phillips head screwdriver
Side Panels
A
B
C
1 A) Insert 6 wood dowels into the ends of the 2 side panels.
B) Insert 6 wood dowels into the 4 shelves.
C) Insert 4 wood dowels into the 3 back panels.
Shelves
Back Panels
Page 1 of 3
Page 8

Customer Service 800-967-6696 | http://www.crateandbarrel.com
CHECKERS QUINTUPLE SHELVING
Side Panels
NOTE:
Do not over
tighten the
cam screws
A
End Panels
B
2 A) Insert 6 cam screws into each side panel as shown.
Secure, but do not over tighten each cam screw with a
phillips head screwdriver.
B) Fasten 4 cam screws to the 2 end panels with a phillips
head screwdriver.
IMPORTANT NOTE:
Make sure these 2 holes
on the edge of the side panel
face “back” as shown
4 Fit 3 back panels onto cam screws of side panel as
shown. Make sure cams of back panels and pilot holes on
the edge of the side panel face “back” as illustrated.
Made in Denmark r04 Page 2 of 3
Customer Service 800.967.6696 | www.crateandbarrel.com
Arrow on
each cam
points towards
nearest edge
with holes
Back Panels
3 Insert 4 cams into the large holes of each back panel as
shown. Make sure the arrows on each cam point out towards
the nearest edge with holes.
Cam in
unlocked
position
5 Using a phillips head screwdriver, turn bottom 6 cams
of back panels clockwise until each cam fully engages each
cam screw.
Cam in
locked
position
Page 9

Customer Service 800-967-6696 | http://www.crateandbarrel.com
CHECKERS QUINTUPLE SHELVING
6 Align dowels of shelves with corresponding holes in side
panel and firmly fit into position.
A
Pilot holes
face back
B
8 A) Fit 2 end panels onto the assembly, aligning the cam
screws and dowels. Secure the 4 cams on each end panel
with a phillips head screwdriver.
B) Conceal all exposed cams with cam covers. Press firmly
to secure.
Made in Denmark r04 Page 3 of 3
Customer Service 800.967.6696 | www.crateandbarrel.com
Pilot holes
face back
7 With the assistance of another adult, fit remaining side
panel onto assembly. Make sure pilot holes on panel edge
face back as shown. Lock top cams of each back panel by
turning each clockwise with a phillips head screwdriver.
Shown with
optional
Checkers
Metal
Bases
9 If combining multiple shelving units, be sure to connect the
units together with the mending plates at each set of
adjacent pilot holes. Fasten each mending plate with 2
screws. Assembly is now complete.
NOTE: UNITS ARE INTENDED TO STACK VERTICALLY AND
SHOULD NOT BE STACKED MORE THAN 5 CUBES HIGH.
CLEANING AND CARE
Clean surfaces with a dry or damp soft cloth. Do not use
abrasive cleaners.
Page 10

Customer Service 800-967-6696 | http://www.crateandbarrel.com
CHECKERS TRIPLE, DOUBLE & SINGLE BASE ASSEMBLY
Thank you for purchasing the Checkers Triple, Double or
Single Base. This page
box. Please take the time to identify the hardware as well as
the individual components
and prepare for assembly, place the contents on a carpeted
or padded area to protect them from damage.
Note: 2 people are required to safely assemble this product.
TOOLS REQUIRED
Phillips head screwdriver
NOTE: Units are intended to stack
vertically and should not be stacked
more than 5 cubes high.
2 If assembling multiple shelving units into a double or triple
base, be sure to connect the units together with the metal
mending plates (included with the shelving units) at each set
of adjacent pilot holes after attaching to the base.
Made in Taiwan - r04
lists all the contents included in the
to this product. As you unpack
HARDWARE
Single - 2 screws
Double - 4 screws
Triple - 6 screws
Customer Service 800.967.6696 | www.crateandbarrel.com
1 Fit assembled Checkers shelving unit into base as
shown. Align pilot holes on back edge of shelving unit with
holes in back of base.
Insert 1 screw through each base hole and into shelving unit.
Secure each screw with a phillips head screwdriver, but do
not over tighten.
CLEANING AND CARE
Clean surfaces with a dry or damp soft cloth. Do not
use abrasive cleaners.
Missing hardware? Please call 800.606.6387 for replacements.
Page 1 of 1
 Loading...