

Page 1
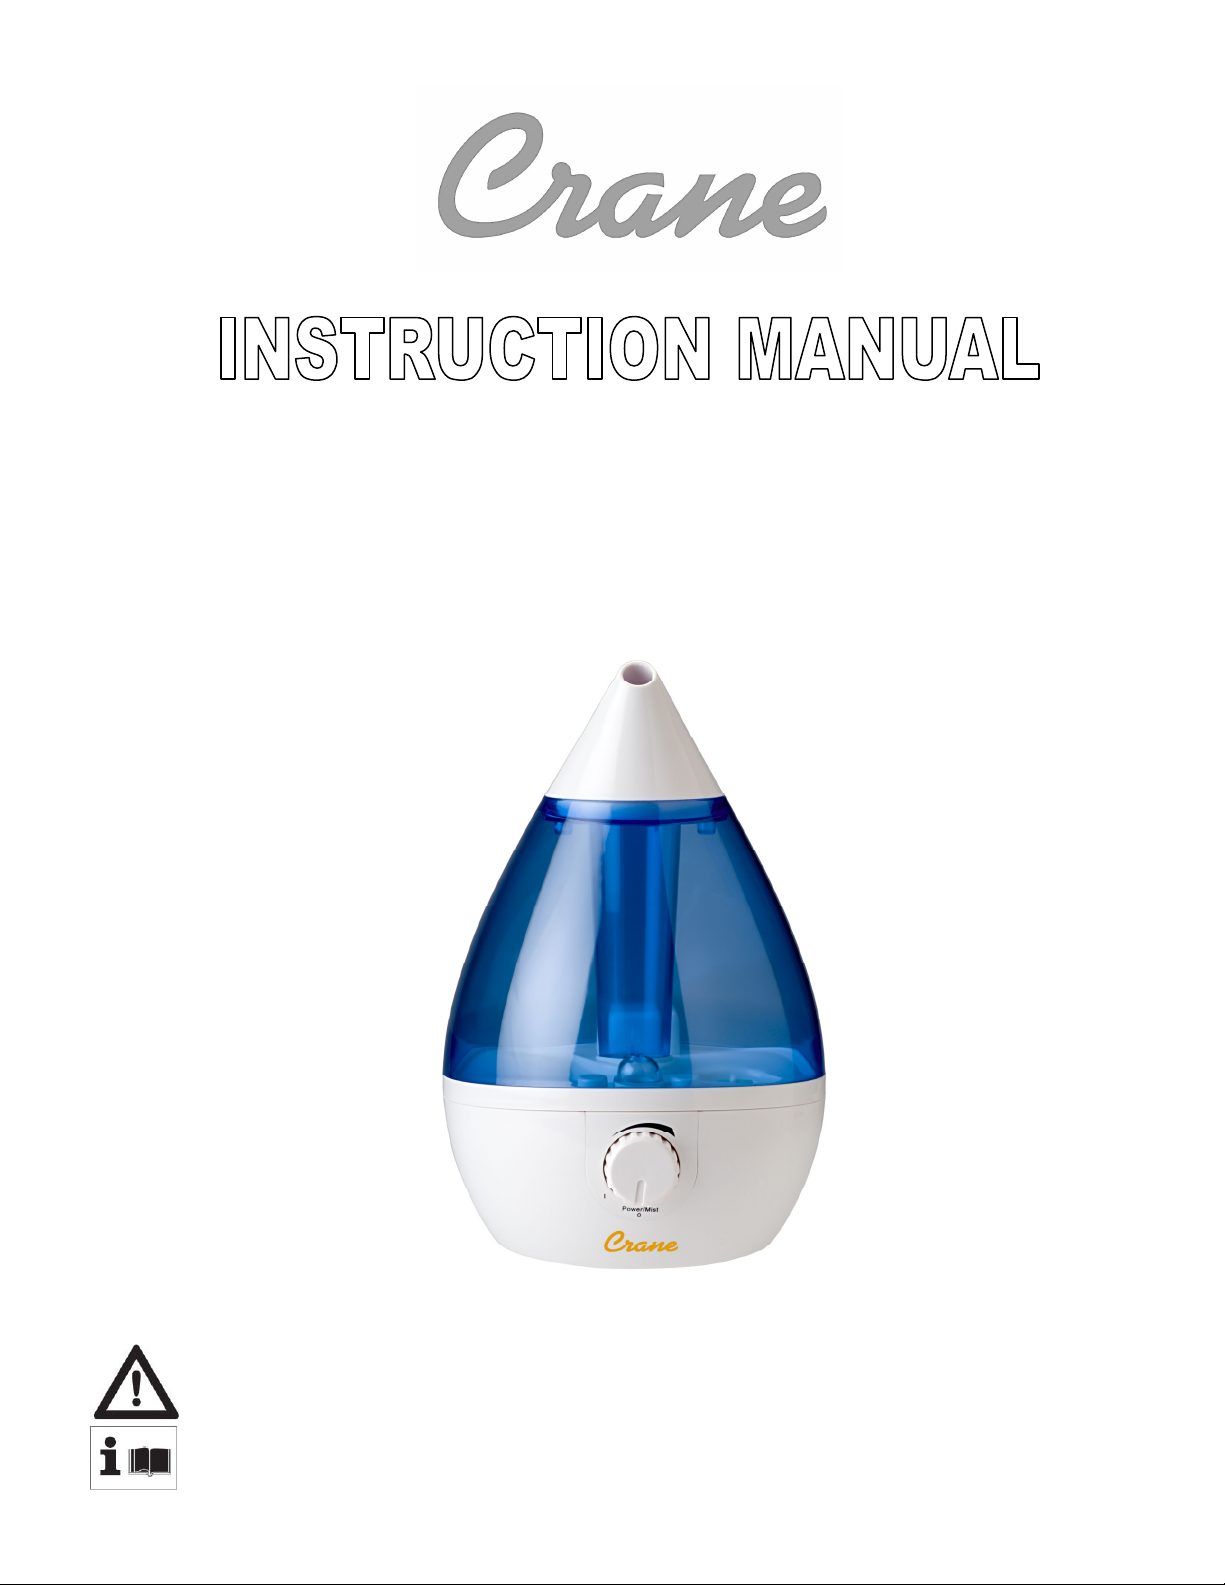
1 GALLON/ 3.78 LITER
ULTRASONIC HUMIDIFIER
MODEL# EE-5301,,,,EE-5301(G),,,,EE-5301(P)
PLEASE READ AND SAVE ALL INSTRUCTIONS TO ENSURE
THE SAFE AND EFFCTIVE USE OF THIS APPLIANCE.
Page 2

TABLE OF CONTENTS
Table of Contents P.1
Important Safety Instructions P. 2
General Safety Instructions P.3
List of Main Parts P.4
Tech. Specifications, Contents of Packaging
Operation and Use P.5-7
Maintenance P.8-9
Trouble Shooting P.10
Service Center Information P.10
Warranty Information P.12
Warranty Card P.13
1
P.5
Page 3

IMPORTANT SAFETY INSTRUCTIONS
INTRODUCTION
Thank you for purchasing our CRANE Ultrasonic Humidifier. Each unit has been
manufactured to ensure safety and reliability. Before using the humidifier for the first
time, please read the instructions carefully, and keep them for further reference
WARNING! READ AND SAVE THESE INSTRUCTIONS.
to follow all the instructions listed below may result in electric shock, fire and/or serious
personal injury.
1. This appliance in not intended for use by persons (including children) with
reduced physical, sensory or mental capabilities, or lack of experience and
knowledge, unless they have been given supervision or instruction
concerning use of the appliance by a person responsible for their safety.
2. DO NOT carry water tank by handle when it is filled with water. It is
advisable to carry filled water tank with two hands.
3. DO NOT operate outdoors; this humidifier is intended for indoor use only.
4. Always have water in the water tank when operating the unit.
5. Use only clean, cool tap water to fill the tank (filtered or distilled water is
recommended to avoid white dust if tap water is too hard). DO NOT use hot water.
6. Be sure that the filling cap of the tank is firmly tightened. Always have the mist
direction nozzle and the mist chamber in place while the unit is operating. Place the
mist so it aims away from children, walls, furniture, and electrical appliances.
7. Use only a 110-120VAC outlet. ALWAYS plug and unplug unit with dry hands.
8. Never operate the unit with a damaged cord or plug.
9. Always place the unit on a smooth, flat, lint free, non-metallic, level, waterproof
surface, and away from direct sunlight. Keep the cord away from heated surfaces
and areas where it could be walked on or tripped over. Unplug the unit when not in
use and whenever you clean or move the unit.
10. Do not add medication of any type into the nozzle, base or water tank. Do not
cover any openings on the unit or insert objects into any openings.
11. The unit should not be left unattended in a closed room as the air could become
saturated and leave condensation on walls or furniture. Leave room door partly
open.
12. When cleaning the inside of the unit keep water away from the air outlet / fan vent
(see FIG.3). The exterior may be wiped with a damp cloth, except the electrical
controls, only when the unit is off and unplugged. Humidifier requires regular
cleaning. Refer to cleaning instructions.
13. Do not tilt or tip the unit or attempt to empty or fill it while it is in operation.
14. Do not use a detergent to clean any parts of the unit that contain water. Always
use a few drops of bleach or white vinegar with water to clean humidifier.
Detergent film dissolved in the water supply can interfere with the unit output.
.
Failure
SAVE THESE INSTRUCTIONS!
2
Page 4
GENERAL SAFETY INSTRUCTIONS
WARNING!
listed below may result in electric shock, fire or serious personal injury. The warnings,
cautions, and instruction discussed in this instruction manual cannot cover all possible
conditions and situations that may occur. It must be understood by the operator that
common sense and caution are a factor which cannot be built into this product, but must
be supplied by the operator.
Read and understand all instructions. Failure to follow all instructions
THIS HUMIDIFIER IS NOT A TOY!
Do not let your child play with this appliance.
and electrocution might be possible. This appliance has to be operated by an adult only.
Children should be supervised to ensure that they do not play with the humidifier.
Serious injury
SAVE ALL INSTRUCTIONS!
CAUTION: A short power supply cord is provided to reduce the risk of personal injury
resulting from becoming entangled in or tripping over a longer cord. Extension cords are
available from local hardware stores and may be used if care is exercised in their use. If
an extension cord is required, special care and caution is necessary. Also the cord must
be: (1) marked with an electrical rating of 125 V and at least 13 A., 1625 W., and (2)
the cord must be arranged so that it will not drape over the countertop or tabletop
where it can be pulled on by children or tripped over accidentally.
ELECTRIC POWER
If electric circuit is overloaded with other appliances, your appliances may not operate
properly. The appliances should be operated on a separate electrical circuit from other
operating appliances.
POLARIZED PLUG
This appliance has a polarized plug (one blade is wider than the
other). As a safety feature to reduce the risk of electrical shock, this
plug is intended to fit in a polarized outlet only one way. If the plug
does not fit fully in the outlet, reverse the plug. If it still does not fit,
contact a qualified electrician. Do not attempt to defeat this safety
feature.
SAFETY WARNING
Although your appliance is easy to operate, for your safety, the below warnings must be
followed:
1. Do not place the appliance near a heat source.
2. Never leave the appliance unattended while connected to the electrical outlet.
3. To avoid any accidents, never put a hand over a vapor output slot and never cover it
when the appliance is in operation.
4. Use the appliance on a stable surface away from water.
5. Do not unplug from the wall socket by pulling on the supply cord.
6. The appliance must be unplugged:
A. Before either filling or emptying
B. Before any cleaning or maintenance
C. After use
D. If it appears to be faulty
THIS PRODUCT IS INTENDED FOR HOUSEHOLD USE ONLY.
3
Page 5
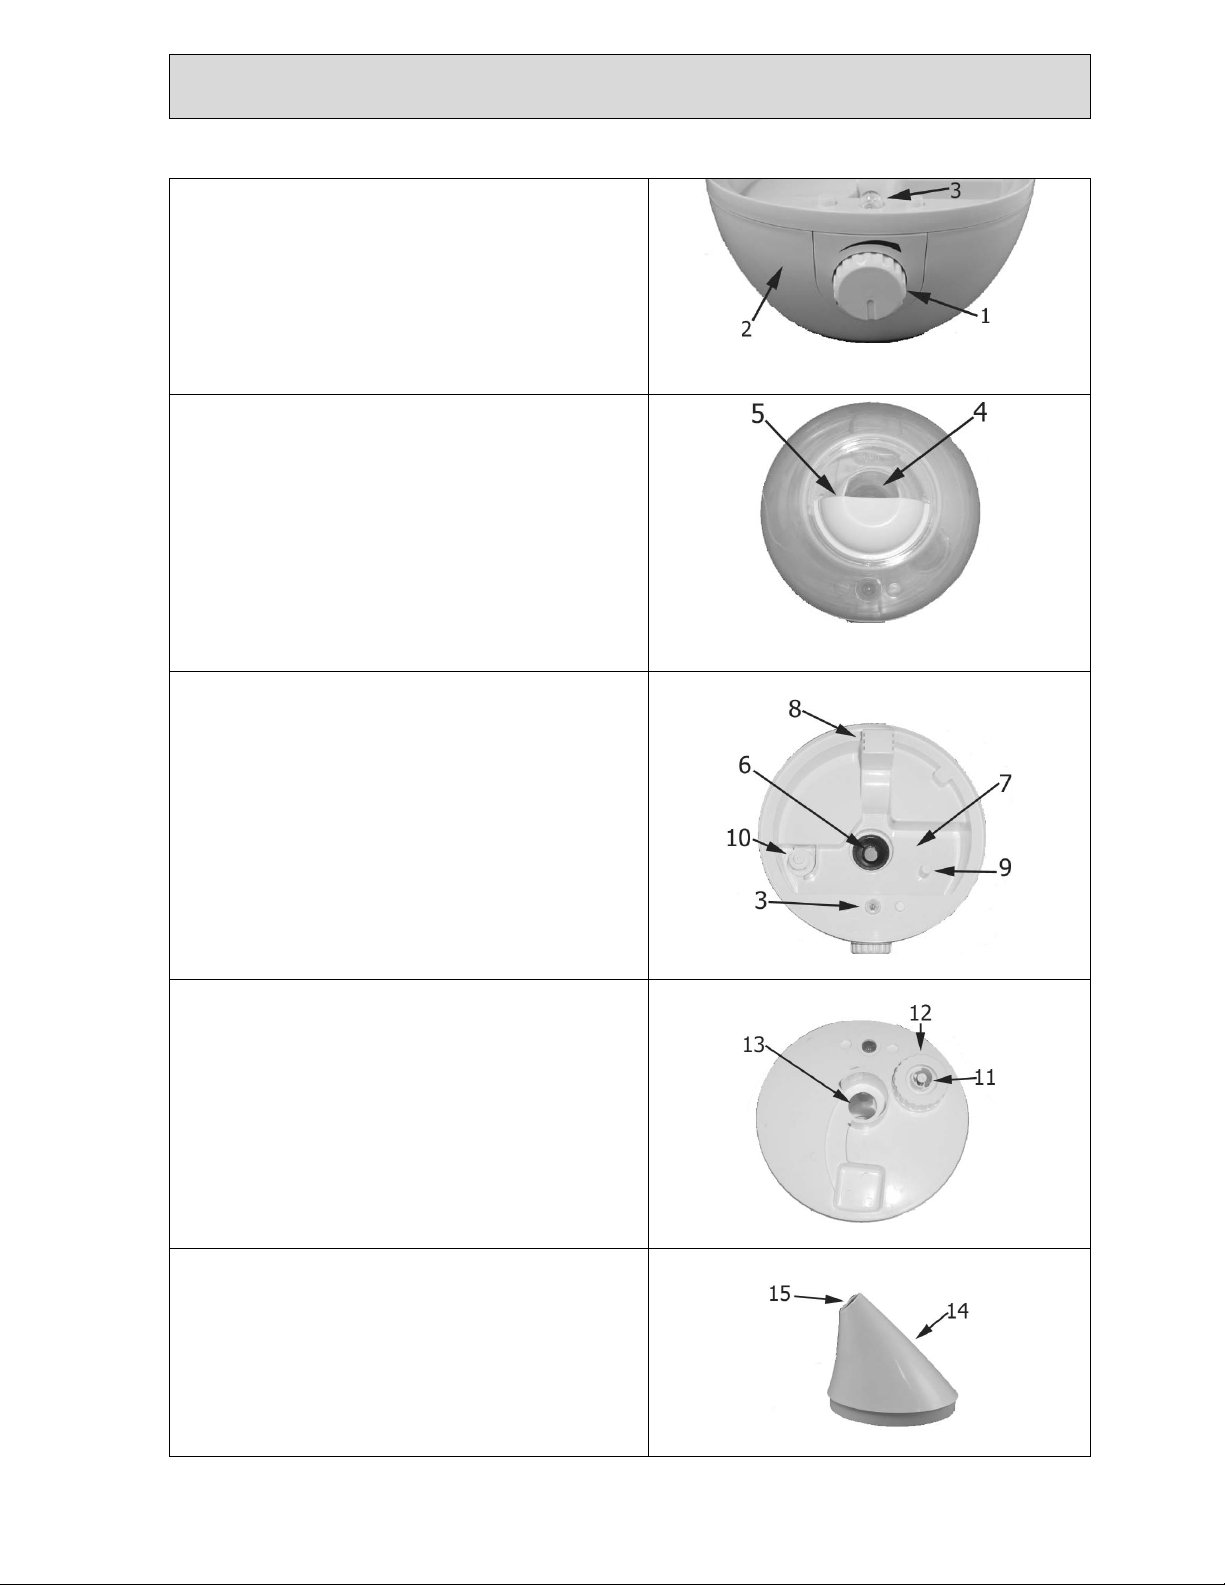
LIST OF MAIN PARTS
PARTS DESCRIPTION
Fig. 1 (Central Body)
1. On/Off Switch/Regulator Control Knob
2. Central body with water basin
3. Indicator light
Fig. 2 (Top of Water Tank)
4. Vapor Outlet Channel
5. Water Tank Handle
Fig. 3 (Water Basin)
6. Nebulizer
7. Vaporization Chamber
8. Fan Vent
9. Valve Opener
10. Water Level Sensor
Fig. 1
Fig. 2
Fig. 4 (Bottom of Water Tank)
11.Water Tank Valve
12. Water Tank Cap
13. Vapor Outlet channel
Fig. 5 (Water Tank Lid)
14. Water Tank Lid
15. Vapor Output Slot
4
Fig. 3
Fig. 4
Fig. 5
Page 6

TECHNICAL SPECIFICATIONS:
Rating Voltage 120V
Frequency 60Hz
Power 38W
Water Tank Capacity Approx. 0.9 Gallon / 3.3
Liter
Output Per 24 Hours Approx. 2.3 Gallon / 8.7
Liter
Run Time Per Tank Min. 10 Hours
Humidifying Capacity Up to 250 sq.ft. / 23 m2
Noise < 35 (dB) A
CONTENTS OF PACKAGING
a. Instruction Manual
b. Central Humidifier Body
c. Water Tank
d. Water Tank Lid with Vapor Output Slot
If any of the above items are missing, please contact our service department at 1-888599-0992 (http://www.crane-usa.com) for replacement. Business hours Mon-Fri 9:00am
- 4:00pm CT
OPERATION AND USE
BEFORE EACH USE
CHECK HUMIDIFIER PLACEMENT - Place the Humidifier on elevated non-metallic lint
free, waterproof, level surface for best performance. This is to help disperse the mist in
the air, and prevent it from being knocked over or cause moisture damage to surface.
DO NOT place Humidifier on top of a towel, or a carpeted surface. The air vent
on the bottom may become blocked, and overheat the humidifier.
CHECK WATER LEVEL SENSOR - Make sure that the water level sensor is secured
properly. Refer to GENERAL MAINTENANCE AND CLEANING.
CHECK FAN VENT - This fan vent is located on the bottom of the humidifier. The
purpose of the Fan Vent is to blow the cool mist through the vapor outlet slot. It is
important that this part is kept clean and free of obstructions. We recommend checking
the fan vent before using this item (i.e. lint, paper)
CAUTION:
DO NOT operate the humidifier without water in the water tank.
DO NOT plug in the cord with wet hands; electric shock could happen
5
Page 7
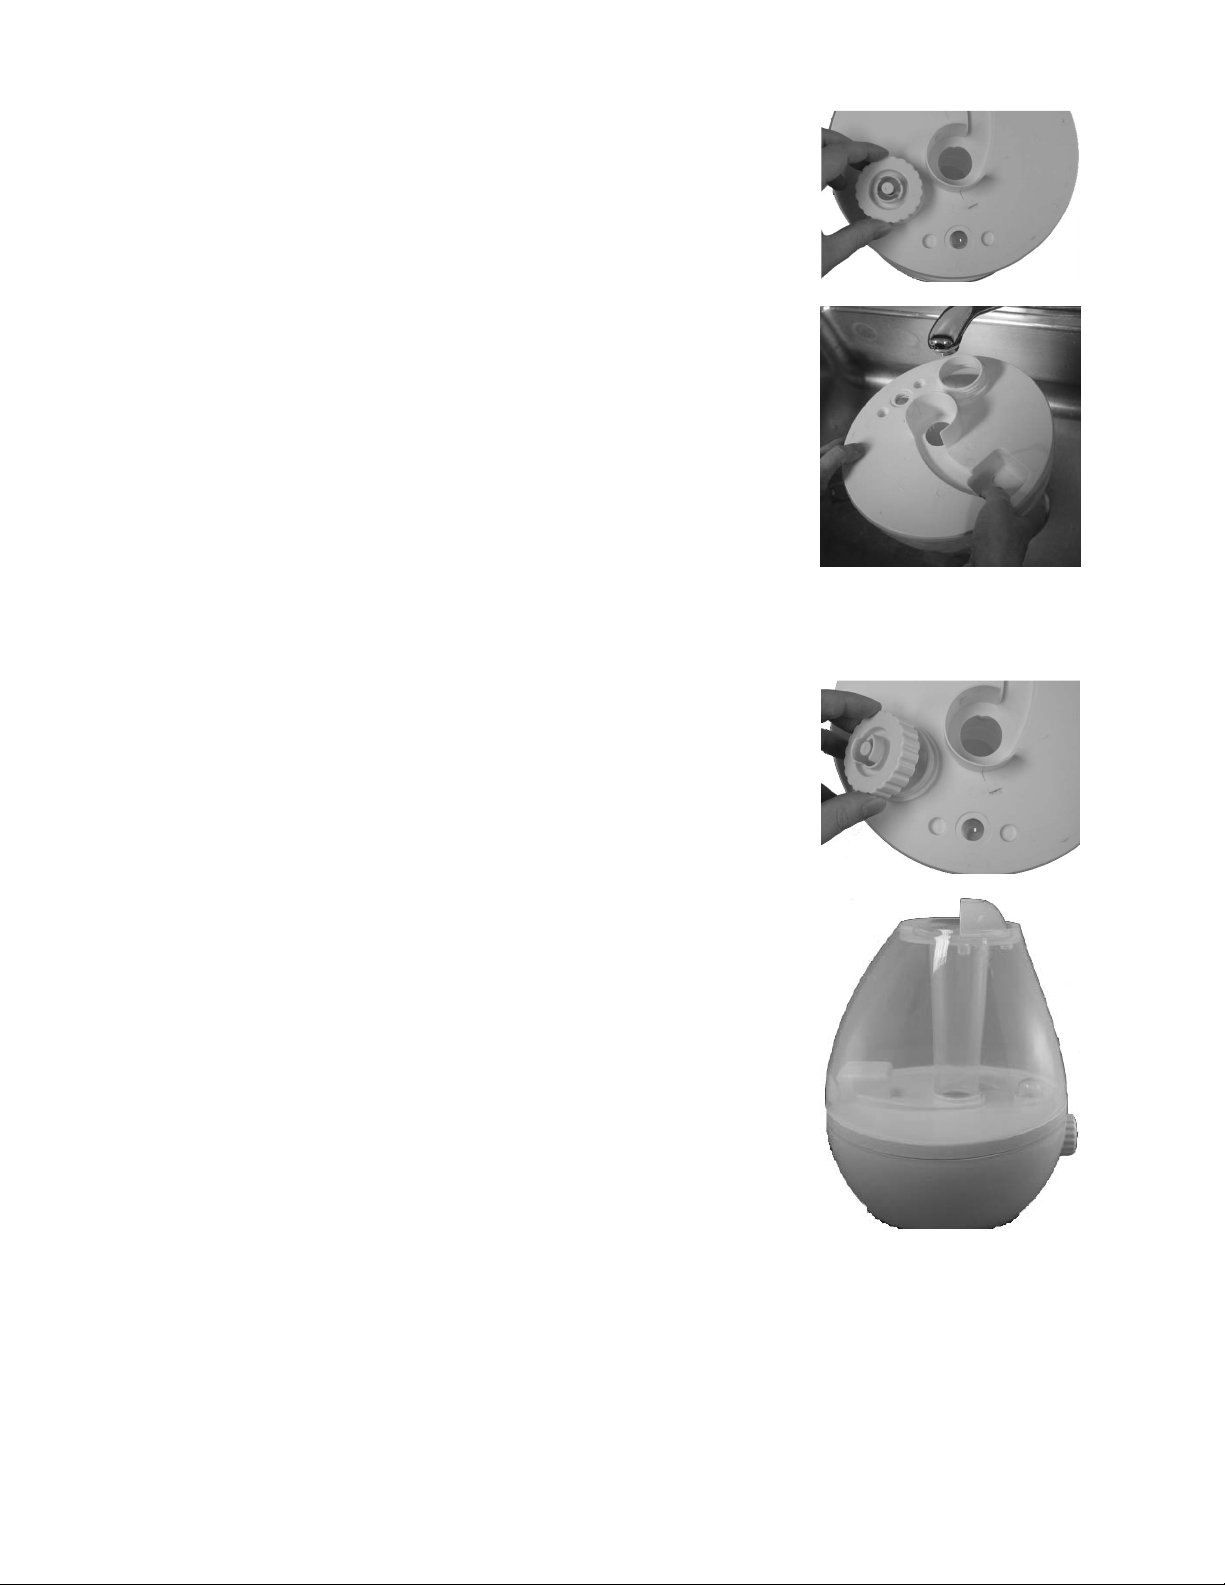
ASSEMBLY
1. Lift the water tank off the central body.
2. Turn over the water tank and unscrew the water tank cap
at the bottom of the tank by turning it counterclockwise.
(See Fig. 6)
3. Fill water tank with cold water; do not fill all the way to
the rim. DO NOT CARRY FULL WATER TANK BY
HANDLE. ALWAYS HOLD FULL WATER TANK WITH TWO
HANDS ON EITHER SIDE OF WATER TANK
(See Fig. 7).
Note: To avoid possible white dust due to hard water it
is recommended to use distilled water.
DO NOT use hot water. Use cool tap water.
DO NOT add any medication to other additives to the water
DO NOT pour water into Vapor Outlet Channel (part 13,
page 4)
4. Replace the water tank cap, aligning the threads on the
tank with the threads on the cap, and turn it clockwise.
(See Fig. 8)
Fig. 6
Fig. 7
Fig. 8
5. Turn the tank over, holding one hand by the top handle
and another hand under tank. Place full water tank on
the central body, making sure it fits perfectly. Place the
water tank lid with output slot on top of the water tank.
(see Fig. 9)
Fig. 9
6. Plug the power cord into a wall socket and turn on the unit. The On/Off switch is
located at the turning knob.
6
Page 8
7. The Indictor Light will turn on. In a few seconds mist will start emitting through the
openings at output slot.
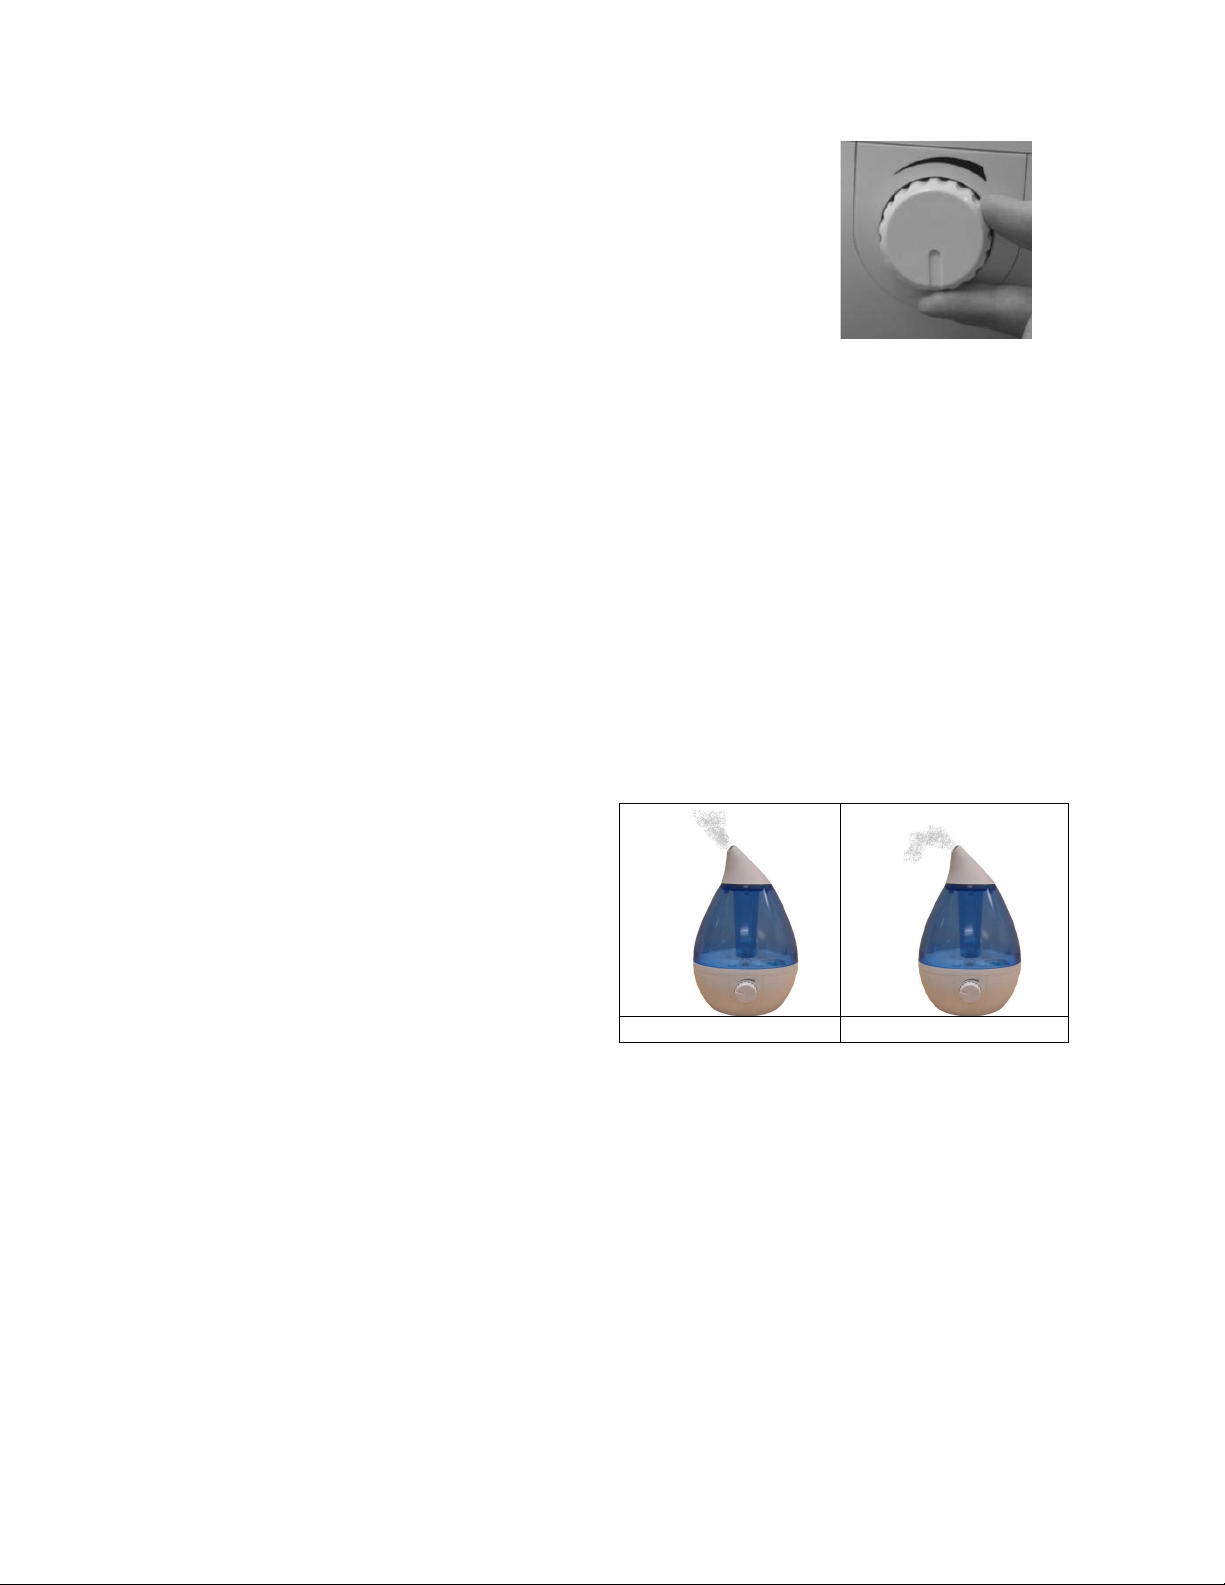
8. Use the control knob to adjust the intensity of the vapor
output. Turning the knob clockwise will increase the
moisture output, turning the knob counterclockwise will
reduce the moisture output (see Fig. 10).
Fig. 10
9. When the humidifier runs out of water the humidifier will automatically shut off and
the mist will stop. This is a safety feature to prevent the humidifier from possibly
over heating and damaging the nebulizer. This safety feature uses a water level
sensor to stop the nebulizer once the water level sinks below the required level in
the water basin. Turn the humidifier off and unplug before removing and refilling the
water tank. Please note that the Indicator Light will stay on. The light indicates
that the humidifier is turned on and needs to be refilled.
SET THE CORRECT HUMIDITY OUTPUT
ALWAYS PLACE THE HUMIDIFIER ON AN ELEVATED NON-METALLIC, LINT
FREE, WATERPROOF, LEVEL SURFACE FOR BEST PERFORMANCE.
Adjust the vapor control so that the
vapor rises up and gets absorbed by the
room air. Do not turn on too high output
as the vapor cannot be absorbed by the
air and accumulates on the surface
around the humidifier.
If the humidifier is placed near a fan or
air conditioning outlet the vapor may be
forced down by the foreign air stream.
Change the location of the humidifier or
reduce the output of the other room
conditioning appliances.
correct wrong
A NOTE ABOUT HUMIDITY
It is best to keep the humidity level at about 30-50 percent of relative humidity.
The comfort level of humidity will vary from room to room and with changing room
conditions.
In cold weather, windows and even some walls may fog or develop frost from
excessive indoor humidity. If this occurs, reduce the mist intensity setting to avoid
damage from condensed water dripping on windowsills.
Too much humidity in the room may allow moisture to accumulate on surfaces where
bacteria and fungi can grow. Moisture that gathers may also damage furniture and
walls, especially wallpaper.
To eliminate excessive humidity, especially in small rooms, leave the room door open
and adjust the mist intensity control setting.
7
Page 9

MAINTENANCE
CAUTION:
Always be sure that the appliance is unplugged and
switched OFF before cleaning or attempting to store the
item. NEVER PLUG OR UNPLUG UNIT WITH WET HANDS.
DO NOT leave water in water tank or water basin when
unit is not in use as it may result in the build up of
mineral deposits and bacteria that can inhibit the output
efficiency of the humidifier.
PLEASE NOTE that if water remains in the water tank for
more than a day or two, bacterial growth is possible.
ALWAYS use fresh cool water when using unit.
NOTE:
bottom of the water tank. It is recommended to have a dry cloth ready to dry wet
surfaces.
DISINFECTING THE WATER TANK AND WATER BASIN
GENERAL MAINTENANCE AND CLEANING
Before any cleaning operation, switch the humidifier off and unplug it.
1. Always unplug the unit before cleaning.
2. The humidifier must be drained and cleaned before storing.
3. Once unplugged the exterior of the unit may be cleaned by wiping with a dry cloth.
4. There may be some lime deposits in the nebulizer, particular in areas with hard
8
When removing water tank, water may accumulate under vapor lid and on the
1. Fill water tank with fresh cool water and place 1 teaspoon of household bleach or
white vinegar into full water tank. Let stand twenty minutes, shaking vigorously
with two hands every few minutes, drain and rinse with clean water until the
bleach or vinegar smell is gone. Dry with a clean cloth or paper towel.
2. Wipe the water basin with a soft cloth dampened in the bleach or white vinegar
and water solution. Rinse the water basin with cool water to remove any smell.
DO NOT IMMERSE WATER BASIN IN WATER.
3. Wipe all exteriors surfaces of the base with a soft, dry cloth. Do not immerse the
base in water or use water to clean the base. An electric shock may result or the
humidifier may be damaged.
Caution: The ON/OFF switch must be thoroughly dry before unit is again plugged
into power source.
water. Overcome this drawback by cleaning the nebulizer as follows:
A. Dampen a wet cloth with a few drops of white vinegar or bleach water
solution and wipe the nebulizer gently, until the lime deposits disappear
completely.
B. Rub down gently with a dry cloth and remove remains of humidity.
C. Do not rub the nebulizer with solid objects.
D.
Do not clean with chemical products.
Page 10
5. When cleaning the water basin do not place the nebulizer directly under the water
tap.
6. Never immerse the unit in water or let water enter the fan vent or any other
openings.
7. It is normal for water to be in the water basin. However water must not get inside
the central body. If this should happen, take the humidifier to an authorized service
center before using it again.
8. Clean the inside of the water tank at least once a week, as follows:
A. Fill the tank with clean water adding a few drops of bleach or white
vinegar (approx. 1 teaspoon) with water solution. Close the tank
completely with its cap and shake by holding the tank with both hands. Do
not hold by handle while shaking the tank.
B. Rinse thoroughly.
Note: Water accumulated over long periods may create bacteria and mildew (fungus).
It is important to remove the water in the humidifier if the humidifier is not being used.
Always use fresh clean water when filling the water basin.
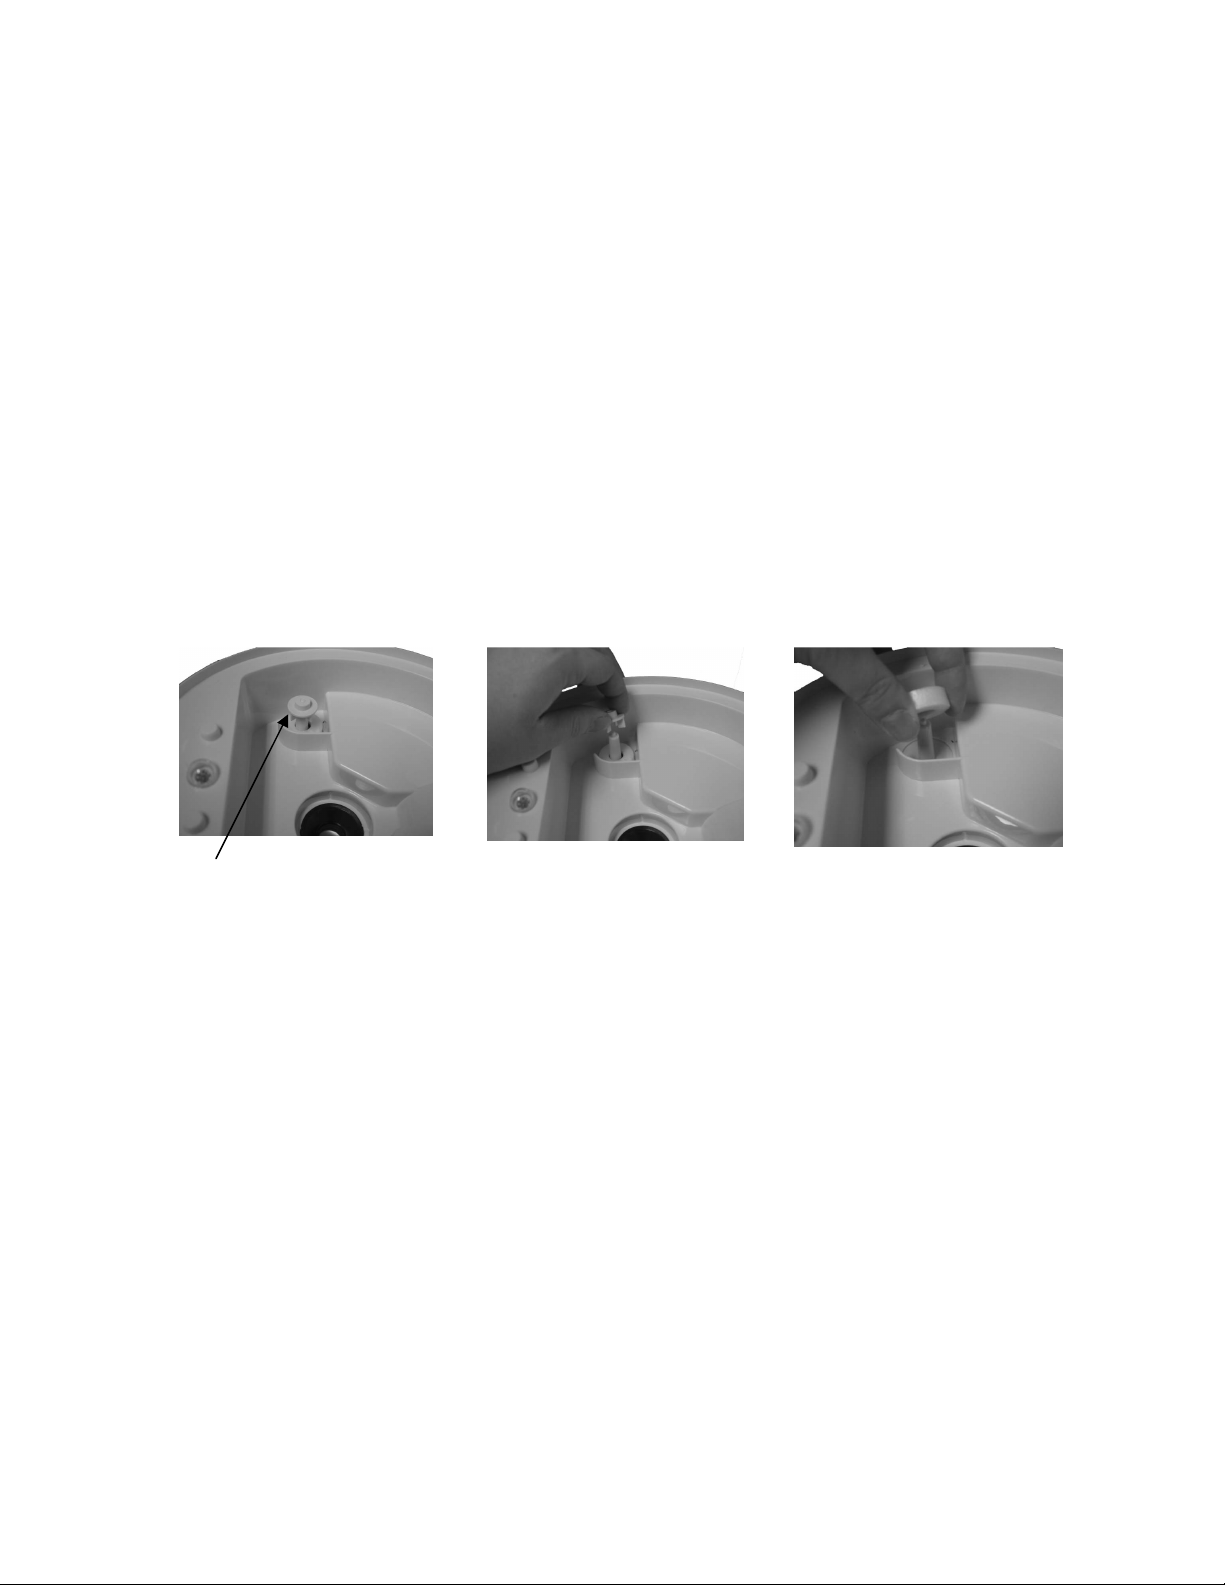
9. To clean the water float remove the plastic cap (see Fig. 11) on the pin by pulling it
up (see Fig.12). Remove the water float and cap and clean by wiping the parts with
a soft damp cloth. Replace the parts by first putting the water float onto the pin and
then pressing the plastic cap on the end of the pin to secure the float.(see Fig.13).
Do not use excessive force.
Plastic Cap
Fig. 11
Fig. 12
Fig. 13
STORING YOUR HUMIDIFIER
Allow the appliance to dry completely before storing. Store the appliance in a dry
location. Do not place any heavy items on top of appliance during storage as this may
result in possible damage of the appliance. Store the cord in a clean, dry location away
from metal objects. Always check the plug before use to assure metal items have not
become attached.
Save the box for off-season storage.
Make sure the tank, water basin and water tank cap are thoroughly dry before
storing.
If water is left in the unit during storage, it may evaporate completely and leave
deposits that can prevent the unit from operating properly.
Leave the water tank refill cap loose to prevent the water cap and gasket from
sticking together. NOTE: The gasket is the white rubber ring inside the water tank
cap. Keeping the cap loose will prolong the life of the gasket.
9
Page 11

TROUBLE SHOOTING
Problem
Solution
Check that the switch is in the ON
Leave the tank open for some time
The power light is
on but there is no mist
CAUTION: DO NOT attempt to repair the motor or nebulizer yourself. If the
humidifier continues to not operate please call our service center (see toll free
number below).
Humidifier is working than stops:
If humidifier does not work at all:
If there is a strange odor:
being emitted:
White dust appears and settles outside the
humidifier:
Ensure that water level float is
assembled properly.
Clean water float
Ensure it is properly plugged into a
power outlet.
position.
If Power On indicator light does not
come on, bring to authorized service
station.
Clean the tank with water and few
drops of white vinegar or bleach with
water solution and rinse with clean
water.
without the cap, in a cool place.
Check that there is water in the tank.
Check for possible lime deposits on the
water level float or the nebulizer.
Make sure that nothing blocks the
vapor output slot.
Check that the air vent on bottom of
humidifier is not blocked.
Empty the humidifier and rinse the
water basin with cool tap water and
allow to dry for 15 to 30 min.
Area tap water may have too many
minerals, change to filtered or distilled
water.
SERVICE CENTER
If you have any question in regards to the operation of this appliance or are in need of a
spare part please contact our service center at:
Crane USA Inc.
Tel: 1-888-599-0992 (Business Hours Mon-Fri 9:00am-4:00 pm Ct)
Website: http://www.crane-usa.com
1800 Nicholas Blvd
Elk Gove Village, Illinois 60007
ENVIRONMENTAL PROTECTION
If the appliance should no longer work at all, please make sure that it is disposed in an
environmentally friendly way, by handing it into a public collection point. Please do not
put it with your household waste.
10
Page 12

LIMITED WARRANTY
Thank you for purchasing a top quality Crane product. This Ultrasonic Humidifier
was tested and meets our stringent quality standards. This product is warranted
to be free from manufacturing defects under normal use and conditions for 1 year.
In case you find this product to have a manufacturing defect please proceed as
follows:
A. Within 90 days of purchase: return the product to your retailer for a
replacement or a refund.
B. After 90 days and within the warranty period: send the product and all of its
accessories to our service center. The consumer will be responsible for all
shipping costs to the Crane Service Center. Crane will not assume
responsibility for loss or damages to the product being returned to us. To
avoid transport damages carefully package the product and insure it with the
carrier. Be sure to fill out the warranty card and include it with a copy of the
dated sales receipt. In return you will receive your repaired item, or a new
product at the service center’s discretion.
WARRANTY IS ONLY VALID WITH A DATED PROOF OF PURCHASE.
The warranty is void if the defect is due to accidental damage, misuse, abuse,
neglect, improper repair or alteration by unauthorized persons or failure to follow
operation instructions provided with the product. This warranty does not apply to
normal wear and tear, as well as commercial use.
The warranty is non-transferable and applies only to the original purchase and
does not extend to subsequent owners of the product. Liability under this
warranty is limited to repair, or replacement. In no event shall liability exceed the
purchase price paid by the purchaser of the product. Under no circumstances shall
there be liability for any loss, direct, indirect, incidental, special or consequential
damage arising out of in connection with use of this product.
This warranty is only valid in the 48 contiguous states plus the District of
Columbia. Excluding Alaska, Hawaii, Puerto Rico, and the Virgin Islands. This
warranty is effective only if the product is purchase and operated in the United
States of America.
This Warranty gives you specific legal rights. However you may have other rights
that vary from state to state. Some states do not allow limitation on implied
warranties or exclusion of consequential damages therefore these restrictions may
not apply to you.
Any instruction or warranty included in this manual may be subject to change
without notice. For the most up to date set of instructions and warranty please
contact us or visit our web site.
Crane USA Inc.
Tel: 1-888-599-0992 (Business Hours Mon-Fri 9:00am-4:00 pm CT)
Website: http://www.crane-usa.com
1800 Nicholas Blvd
Elk Grove Village, Illinois 60007
11
WARRANTY INFORMATION
Page 13
WARRANTY CARD
Ultrasonic Humidifier
In case you find this product to be defective please proceed as follows:
A. Within 90 days of purchase: return the product to your retailer for a
replacement or a refund.
B. After 90 days and within the warranty period: send the product and
all of its accessories to our service center. The consumer will be
responsible for all shipping costs to the Crane Service Center. Crane
will not assume responsibility for loss or damages to the product
being returned to us. To avoid transport damages carefully package
the product and insure it with the carrier. Be sure to fill out the
warranty card and include it with a copy of the dated sales receipt. In
return you will receive your repaired item, or a new product at the
service center’s discretion.
This Ultrasonic Humidifier was tested and meets our stringent quality
standards. This product is warranted to be free from manufacturing
defects in original materials, including original parts, and workmanship
for 1 year with proof of purchase.
Please print clearly and fill in your details below. Send it together with
the product and purchase receipt. Please read the Limited Warranty
conditions mentioned in this instruction manual.
Customer Name
Street
City
State
WARRANTY CARD
ZIP Code
Phone #
Model #/Style
Purchase Date
PLEASE DETACH THIS SECTION AND RETURN IT WITH YOUR PRODUCT
Description of Defect :
Service Center Address:
Crane USA Inc.
1800 Nicholas Blvd Elk Grove Village, Illinois 60007
Tel: 1-888-599-0992 (Business Hours Mon-Fri 9:00am-4:00 pm CT)
Website: http://www.crane-usa.com
12
 Loading...