

Page 1
User Manual
Manual del usuario
POP-UP SUN SHELTER
RESGUARDO PARA EL SOL DESPLEGABLE
I
F
T
R
E
C
m
y
h
a
n
s
e
c
n
o
User-friendly
Manual
ID: #07177
English ........06
Español .......13
I
E
D
m
o
c
.
l
o
r
t
Page 2

QR codes take you where you want to go
quickly and easily
Whether you require product information, spare parts or accessories,
details on warranties or aftersales services, or if you want to watch a product
demonstration video or 360° product view, our QR codes will take you there
in no time at all.
What is a QR code?
A QR code (QR = Quick Response) is a type of matrix that can be read with a
smartphone camera and that contains a link to a website or contact details, for
example.
Advantage: You do not need to manually enter a website address or contact
details.
How it works
To scan the QR code, all you need is a smartphone with QR code reader software and an internet connection. This type of software can be downloaded for
free from your smartphone’s app store.
Try it out now
Just scan the QR code with your smartphone and find out
more about the ALDI product you have purchased.
Your ALDI Service Portal
All details mentioned above can also be found in the
ALDI Service Portal at www.aldi.us.
Depending on your smar tphone plan you may be charged for the connection.
Page 3

Contents
Overview .............................................................................4
Use ........................................................................................ 5
Package contents ................................................................6
General information ............................................................7
Reading and storing the user manual .................................. 7
Explanation of symbols ...........................................................7
Safety ................................................................................... 7
Proper use .................................................................................. 7
Safety instructions ................................................................... 8
Checking the sun shelter and package contents ..............9
Setting up the sun shelter ................................................ 10
Taking down the sun shelter ............................................ 10
Cleaning and storage ......................................................... 11
Technical data ....................................................................11
Disposal ...............................................................................12
Disposing of the packaging .................................................. 12
Disposing of the sun shelter .................................................. 12
Dok./Rev.-Nr. 194833_20170118_US
Page 4
4
A
1
234
B
Page 5
5
C
A
B
E
C
D
A+B
H
F G
I J
D
A
C
D
B
A+B
A+B
D
C
D
D
A+B
C
K
A
B
D
C
C
L
Page 6

6
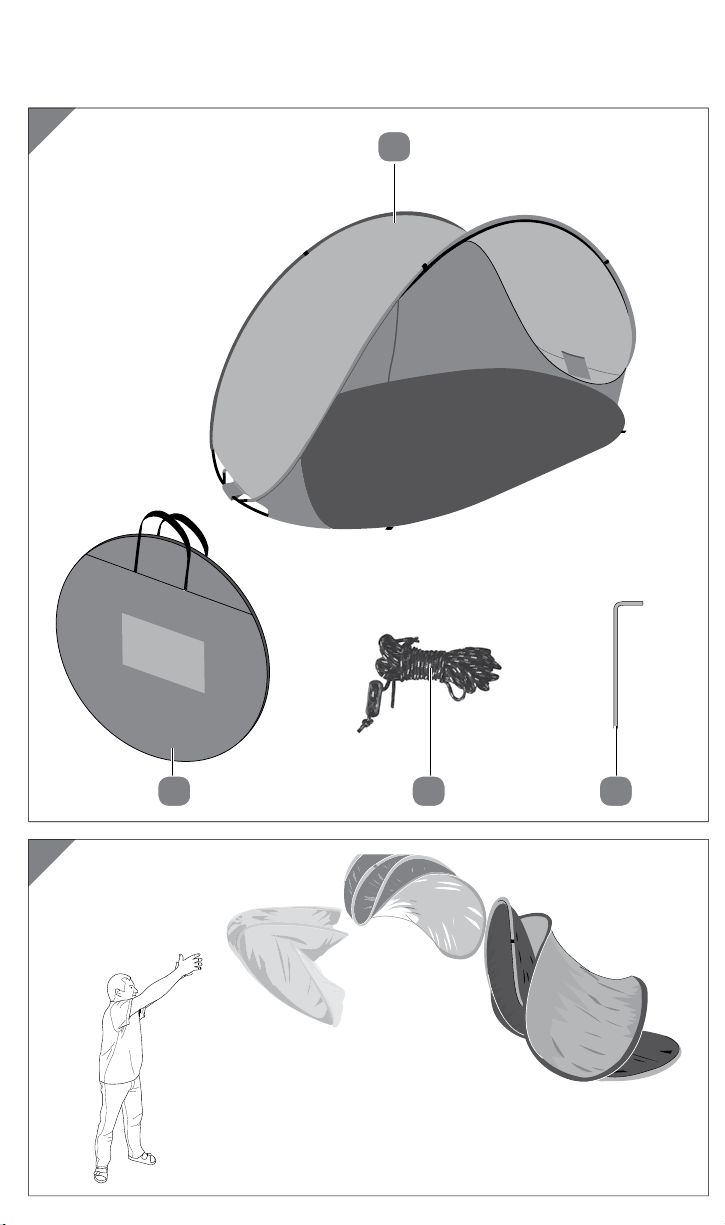
Package contents
1
Sun shelter
2
Peg, 9×
3
Tensioning rope, 4×
4
Storage bag
Page 7
General information
General information
Reading and storing the user manual
This user manual belongs to this pop-up sun shelter (referred to
below only as the “sun shelter”). It contains important information
about use and handling.
Before using the sun shelter, read the user manual carefully.
This particularly applies to the safety instructions. Failure to observe this user
manual may result in severe injury or damage to the sun shelter.
Store the user manual for future use. If you pass the sun shelter on to third
parties, please be absolutely sure to include this user manual.
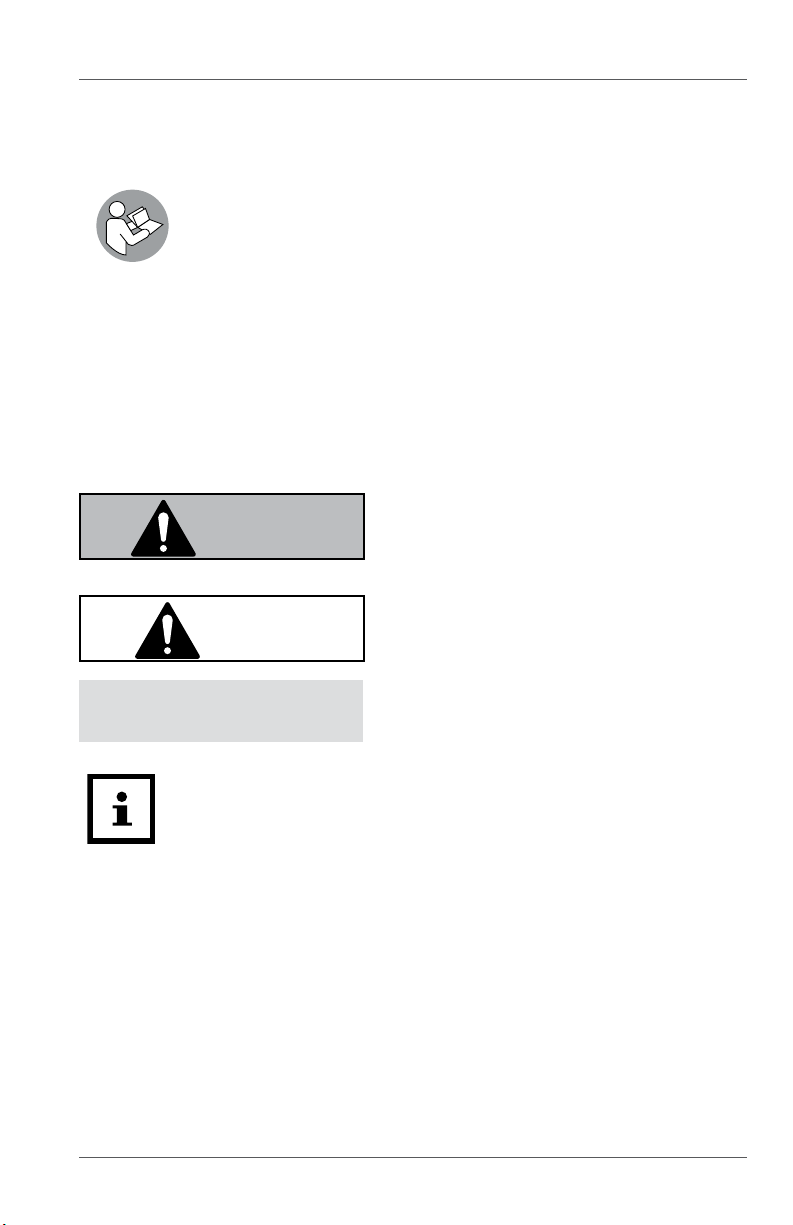
Explanation of symbols
The following symbols and signal words are used in this user manual, on the
sun shelter or on the packaging.
This signal symbol/word designates a
WARNING!
CAUTION!
hazard with moderate risk, which may
result in death or severe injury if not
avoided.
This signal symbol/word designates a
hazard with low risk that, if not avoided,
may result in minor or moderate injury.
This signal word warns against
NOTICE!
This symbol provides you with useful supplementary
information on use.
potential damages to property.
Safety
Proper use
The sun shelter is exclusively designed to provide protection against wind and the
sun. It is only intended for private use and is not suitable for commercial purposes.
Only use the sun shelter as described in this user manual. Any other use is
deemed improper and may result in damage to property or even personal
injury. The sun shelter is not a children’s toy.
The manufacturer or vendor accepts no liability for damage caused by
improper or incorrect use.
7
Page 8

Safety
Safety instructions
WARNING!
Burn and fire hazard!
The sun shelter is made of highly flammable material which
can cause a fire.
− Don’t place any electrical devices (e.g. heaters) that are
switched on near or in the sun shelter.
− ATTENTION! Do not start an open fire inside or near the sun
shelter.
− Keep the sun shelter away from open fire.
− Do not use any gas or other combustion devices in the sun
shelter.
− The sun shelter can protect your skin from direct UV
radiation but not from reflective UV rays.
− Inform yourself about facilities and precautions in the
event of a fire on the tent grounds and on the beach.
− Make sure you are aware of fire prevention precautions on
the premises.
− Do not set up any hot devices near the walls or roof.
− Keep the exits unobstructed.
WARNING!
Danger of suffocation!
When playing, children could catch themselves, be strangled
and suffocate in the storage bag or the tensioning ropes.
− Do not allow children to play with the storage bag and the
tensioning ropes.
8
Page 9

Checking the sun shelter and package content s
NOTICE!
Risk of damage!
Improper handling of the sun shelter may damage it.
− Don’t place the sun shelter with its opening against the
wind.
− Don’t set up the sun shelter during a storm or under
similar weather conditions.
− Take the sun shelter down in case of an emerging storm or
thunderstorm.
− Don’t set up the sun shelter on sloping ground.
− Only set up the sun shelter on suitable ground in which
you can securely fix the pegs.
− Select a location where there is enough space so that you
can also tighten the tensioning ropes.
Checking the sun shelter and package
contents
NOTICE!
Risk of damage!
If you are not cautious when opening the packaging with a
sharp knife or other pointed objects, you may quickly damage
the sun shelter.
− Be very careful when opening it.
1. Take the sun shelter out of the packaging.
2. Check to make sure that the delivery is complete (see Fig.A).
3. Check whether the sun shelter or the individual parts exhibit damages. If
this is the case, do not use the sun shelter. Contact the manufacturer at the
service address specified on the warranty card.
9
Page 10

Setting up the sun shelter
Setting up the sun shelter
CAUTION!
Risk of injury!
A sun shelter that is not adequately secured can cause injuries.
− Secure the sun shelter on the ground.
− Tighten the tensioning ropes and secure the pegs so that
no one can trip over them.
1
1. Take the sun shelter
2. Take the securing strap (rubber band) off of the sun shelter.
Caution! Once you have removed the securing strap, the sun shelter will
immediately pop open (see Fig.B).
3. Position the sun shelter in the desired location.
4. Secure the tensioning ropes
5. Insert the pegs
6. Tighten the tensioning ropes and secure the pegs in the ground.
Make sure that no other persons are in the vicinity of the sun shelter while it
springs open during setup.
2
out of the storage bag 4.
3
on the sun shelter.
in the loops on the end of the tensioning ropes.
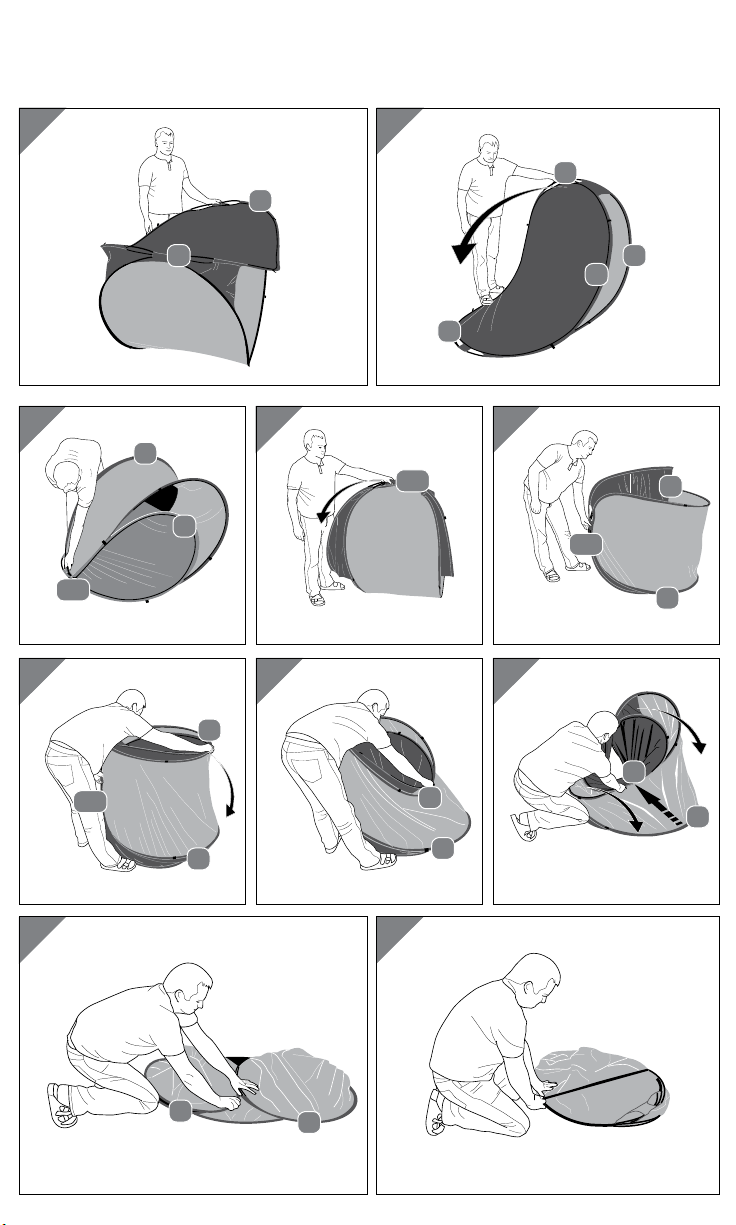
Taking down the sun shelter
1. Remove the pegs
2. Remove the tensioning ropes
3. Set the sun shelter up on its head so that the opening is facing forward (see Fig.C).
4. Bring the two ends
your left hand (see Fig.D and E).
5. Turn the sun shelter 90 degrees and set it upright in front of your body.
Make sure that the side
6. Use your right hand to take hold of the two rings
and bend them down and to the left up to the stop point (viewed from
where you are standing) (see Fig.H, I and J).
When bending, apply gentle pressure to the pole
with your left hand in order to then let go of the right hand.
Three rings should now have been formed.
10
from the ground.
2
from the sun shelter.
3
and B together and take hold of all 4 poles with
A
with the rubber band is down (see Fig.F and G).
C
that have been formed
D
A
and B
Page 11

Cleaning and storage
7. Let go of the rings
ring A with your right hand (see Fig.K).
8. Now push the ring
top of one another on the ground (see Fig.L).
9. Take hold of all poles and fix them in place with the rubber band (see Fig.L).
10. Stow the sun shelter
Also refer to the quick guide in the sun shelter.
, take hold of the ring B with your left hand and the
D
under the ring A so that all rings are positioned on
B
1
in the storage bag 4.
Cleaning and storage
NOTICE!
Risk of damage!
Improper handling of the sun shelter may result in damage.
− Do not use any aggressive cleaners, brushes with metal or
nylon bristles or sharp or metallic cleaning utensils such as
knives, scrapers and the like.
1
1. Clean the sun shelter
amount of a soapy solution.
2. Let all parts dry completely before storage.
− Never fold up the sun shelter if it is damp or dirty. This may result in the
formation of mold, odors or discoloration of the material.
− Do not use the sun shelter if it is damaged.
and the pegs 2 with a damp cloth and a small
Technical data
Model: MLHUS-16014
Dimensions (W × H × D)
without tensioning ropes: approx. 86.6 × 47.2 × 39.4" (220 × 120 × 100 cm)
with tensioning ropes: approx. 86.6 × 126 × 39.4" (220 × 320 × 100 cm)
UV protection: UPF 40 according to standard 801
Material: 100% polyester
Article number: 94823
11
Page 12

Disposal
Disposal
Disposing of the packaging
− Sort the packaging before you dispose of it. Dispose of paperboard
and cardboard with the recycled paper service and wrappings with the
appropriate collection service.
Disposing of the sun shelter
− Should the sun shelter no longer be capable of being used at some point
in time, dispose of it in accordance with the regulations in force in your
city or state.
− Please ensure your recycling information applies to local regulations and
the EPA recommendations (www.epa.gov).
12
Page 13

Contenido
Conjunto ................................................................................................4
Uso ........................................................................................................5
Volumen de suministro ....................................................................... 14
Códigos QR ........................................................................................... 15
Generalidades ..................................................................................... 16
Leer y guardar el manual de instrucciones ...................................... 16
Descripción de símbolos ...................................................................... 16
Seguridad ............................................................................................ 16
Uso apropiado ....................................................................................... 16
Indicaciones de seguridad ...................................................................17
Comprobar el resguardo para el sol y el volumen de suministro .... 19
Montaje del resguardo para el sol ..................................................... 19
Desmontaje del resguardo para el sol ...............................................20
Limpieza y almacenamiento ...............................................................20
Datos técnicos...................................................................................... 21
Eliminación .......................................................................................... 21
Eliminación del embalaje .....................................................................21
Eliminación del resguardo para el sol ................................................21
Contenido
13
Page 14

Volumen de suministro
Volumen de suministro
1
Resguardo para el sol
2
Piquete, 9×
3
Cable tensor, 4×
4
Bolsa de almacenamiento
14
Page 15

Códigos QR
Los códigos QR le ayudan a encontrar la información
que busca fácilmente y rápidamente
Si busca información sobre el producto, recambios o accesorios, datos sobre
garantías o soporte posventa, o si quiere ver un video de demostración del
producto o una vista 360° del producto, los códigos QR le ayudan a encontrar
lo que busca rápidamente.
¿Qué es un código QR?
Un código QR (QR = respuesta rápida) es un tipo de matriz que se puede leer con
la cámara de su smartphone y que contiene, por ejemplo, un enlace a una página web o información de contacto.
Ventaja: No es necesario introducir una dirección web o datos de contacto de
forma manual.
Cómo funciona
Para escanear el código QR solo necesita un smartphone con software que pueda leer códigos QR y una conexión a Internet.
Este tipo de software está disponible gratis en el app store de su smartphone.
Pruébelo ahora
Escanee el código QR con su smartphone para averiguar más sobre el producto
ALDI que ha comprado.
Su portal de servicio de ALDI
Todos los datos mencionados también se encuentran en
el portal de servicio de ALDI en www.aldi.us.
Según la tarifa contratada, se le puede cobrar por la conexión.
15
Page 16

Generalidades
Generalidades
Leer y guardar el manual de instrucciones
Este manual de instrucciones forma parte de este resguardo para
el sol desplegable (en lo sucesivo llamado únicamente “resguardo
para el sol”). Contiene información importante relacionada con el
uso y el manejo.
Antes de utilizar el resguardo para el sol, lea detenidamente el manual de
instrucciones, sobre todo las indicaciones de seguridad. La inobservancia de
este manual de instrucciones puede provocar lesiones graves o daños en el
resguardo para el sol.
Conserve el manual de instrucciones para su uso en el futuro. Si entrega el
resguardo para el sol a un tercero, entréguele necesariamente este manual de
instrucciones.
Descripción de símbolos
En este manual de instrucciones, en el resguardo para el sol y en el embalaje se
utilizan los siguientes símbolos y términos de advertencia.
Este término/símbolo de advertencia
¡ADVERTENCIA!
¡ATENCIÓN!
¡AVISO!
hace referencia a un grado de riesgo
medio que, si no se evita, puede provocar
la muerte o lesiones graves.
Este término/símbolo de advertencia
hace referencia a un nivel de riesgo bajo
que, si no se evita, puede resultar en una
lesión leve o moderada.
Este término de advertencia avisa de
posibles daños materiales.
Este símbolo le aporta información adicional práctica sobre el
uso.
Seguridad
Uso apropiado
El resguardo para el sol está ideado solo como protección frente al viento y
el sol. Está destinado exclusivamente para uso privado y no para el ámbito
comercial.
16
Page 17

Seguridad
Utilice el resguardo para el sol solo como está indicado en este manual de
instrucciones. Cualquier otro uso se considera inapropiado y puede provocar
daños materiales o incluso personales. El resguardo para el sol no es un
juguete.
El fabricante o distribuidor no se hacen responsables de daños producidos por
uso inapropiado o erróneo.
Indicaciones de seguridad
¡ADVERTENCIA!
¡Riesgo de quemaduras e incendio!
El resguardo para el sol es de material fácilmente inflamable
que puede provocar un incendio.
− No coloque equipos eléctricos encendidos (p. ej.
calefactores) cerca o dentro del resguardo para el sol.
− ¡PRECAUCIÓN! No utilice fuego abierto en el interior o
cerca del resguardo para el sol.
− Mantenga el resguardo para el sol alejado del fuego
abierto.
− No utilice equipos de gas ni otros dispositivos de
combustión en el resguardo para el sol.
− El resguardo para el sol puede proteger su piel de la
radiación UV directa, pero no de los rayos UV reflectantes.
− Infórmese de los sistemas y medidas contra incendios en
el camping y en la playa.
− Asegúrese de conocer las medidas contra incendios de la
zona.
− No coloque equipos calientes cerca de las paredes o del
techo.
− Mantenga despejadas las salidas.
17
Page 18

Comprobar el resguardo para el sol y el volumen de suministro
¡ADVERTENCIA!
¡Riesgo de asfixia!
Al jugar con la bolsa de almacenamiento o los cables tensores,
los niños pueden quedar atrapados, estrangularse y asfixiarse.
− No permita que los niños jueguen con la bolsa de
almacenamiento y los cables tensores.
¡AVISO!
¡Riesgo de daños!
El manejo inadecuado del resguardo para el sol puede provocar
daños en el mismo.
− No monte el resguardo para el sol con la abertura hacia
donde viene el viento.
− No instale el resguardo para el sol si hay borrasca o
condiciones climatológicas similares.
− Desmonte el resguardo para el sol si se aproxima una
tormenta o borrasca.
− No instale el resguardo para el sol en terrenos escarpados.
− Monte el resguardo para el sol únicamente sobre una
superficie adecuada donde se puedan fijar los piquetes.
− Escoja un lugar con suficiente espacio para poder tensar
también los cables tensores.
18
Page 19

Comprobar el resguardo para el sol y el volumen de suministro
Comprobar el resguardo para el sol y el
volumen de suministro
¡AVISO!
¡Riesgo de daños!
Si abre el embalaje con un cuchillo afilado o con otros objetos
puntiagudos sin tener cuidado, el resguardo para el sol puede
dañarse rápidamente.
− Al abrir el embalaje, proceda con sumo cuidado.
1. Saque el resguardo para el sol de su embalaje.
2. Compruebe si el suministro está completo (véase la fig.A).
3. Compruebe si el resguardo para el sol o las piezas individuales presentan
daños. Si presentara daños, no lo utilice. Contacte con el fabricante a través
de la dirección de servicio técnico indicada en la tarjeta de garantía.
Montaje del resguardo para el sol
¡ATENCIÓN!
¡Riesgo de lesiones!
Un resguardo para el sol fijado de manera indebida puede
provocar lesiones.
− Fije el resguardo para el sol de forma segura en el suelo.
− Tense los cables tensores y fije los piquetes de forma que
nadie pueda tropezar con ellos.
1
1. Saque el resguardo para el sol
2. Retire la brida de fijación (cinta de goma) del resguardo para el sol.
¡Atención! Tras retirar la brida de fijación, el resguardo para el sol se abre de
golpe (véase la fig. B).
3. Coloque el resguardo para el sol en el lugar deseado.
4. Fije los cables tensores
5. Meta los piquetes
3
en el resguardo para el sol.
en los lazos de los extremos de los cables tensores.
2
de la bolsa de almacenamiento 4.
19
Page 20

Desmontaje del resguardo para el sol
6. Tense los cables tensores y fije los piquetes en el suelo.
Asegúrese de que, durante el montaje, no haya nadie cerca del resguardo para
el sol cuando se abre.
Desmontaje del resguardo para el sol
1. Afloje los piquetes
2. Retire los cables tensores
3. Ponga boca abajo el resguardo para el sol de forma que la abertura mire
adelante (véase la fig. C).
4. Junte ambos extremos
(véase la fig. D y E).
5. Gire 90° el resguardo para el sol y póngalo de canto delante de usted.
Asegúrese de que el lado
fig. F y G).
6. Con la mano derecha, agarre los anillos formados
hacia la izquierda y abajo desde su perspectiva (véase la fig. H, I y J).
Al doblarlo, ejerza una ligera presión con la mano izquierda
sobre las varas
continuación.
Ahora deberían quedar tres anillos.
7. Suelte los anillos
anillo A con la derecha (véase la fig. K).
8. Mueva ahora el anillo
queden superpuestos en el suelo (véase la fig. L).
9. Agarre todas las varas y fíjelas con la cinta de goma (véase la fig. L).
10. Almacene el resguardo para el sol
del suelo.
2
del resguardo para el sol.
3
y B y tome las 4 varas con la mano izquierda
A
con la cinta de goma quede abajo (véase la
C
y dóblelos por completo
D
y B para poder soltar la mano derecha a
A
y agarre el anillo B con la mano izquierda, y el
D
bajo el anillo A de forma que todos los anillos
B
1
en la bolsa de almacenamiento 4.
Siga también la guía rápida del resguardo para el sol.
Limpieza y almacenamiento
¡AVISO!
¡Riesgo de daños!
La manipulación errónea del resguardo para el sol puede
provocar daños en el mismo.
20
Page 21

Datos técnicos
− No utilice productos de limpieza agresivos, cepillos con
cerdas de metal o nailon y objetos de limpieza afilados o
metálicos, como cuchillos, espátulas y similares.
1
1. Limpie el resguardo para el sol
y con algo de lejía jabonosa.
2. Antes de guardarlas, deje que todas las piezas se sequen por completo.
− Nunca pliegue el resguardo para el sol si está mojado o sucio. Pueden
aparecer olores, moho o decoloraciones en los materiales.
− No utilice el resguardo para el sol si está dañado.
y los piquetes 2 con un paño húmedo
Datos técnicos
Modelo: MLHUS-16014
Dimensiones
(ancho × alto × profundo)
sin cables tensores: aprox. 86.6 × 47.2 × 39.4" (220 × 120 × 100 cm)
con cables tensores: aprox. 86.6 × 126 × 39.4" (220 × 320 × 100 cm)
Protección UV: UPF 40 según norma 801
Material: 100% poliéster
Número de artículo: 94823
Eliminación
Eliminación del embalaje
− Elimine el embalaje por tipos de material. El cartón y las láminas han de
llevarse a un punto de recogida de papel usado y un punto de recogida de
materiales respectivamente.
Eliminación del resguardo para el sol
− Cuando el resguardo para el sol no se utiliza más, elimínelo de acuerdo conlas disposiciones de su estado o país en materia de desechos.
− Asegúrese de que la información sobre reciclaje corresponda a la normativa
local y las recomendaciones de la EPA (www.epa.gov).
21
Page 22

Page 23

USA
DISTRIBUTED BY • DISTRIBUIDO POR:
ALDI INC., BATAVIA, IL 60510
WWW.ALDI.US
AFTER SALES SUPPORT •
SERVICIO POSVENTA
USA
1 855 703 0292
hanson-service-us@teknihall.com
MODEL/NO DEL MODELO:
MLHUS-16014
94823
06/2017
 Loading...