

Page 1
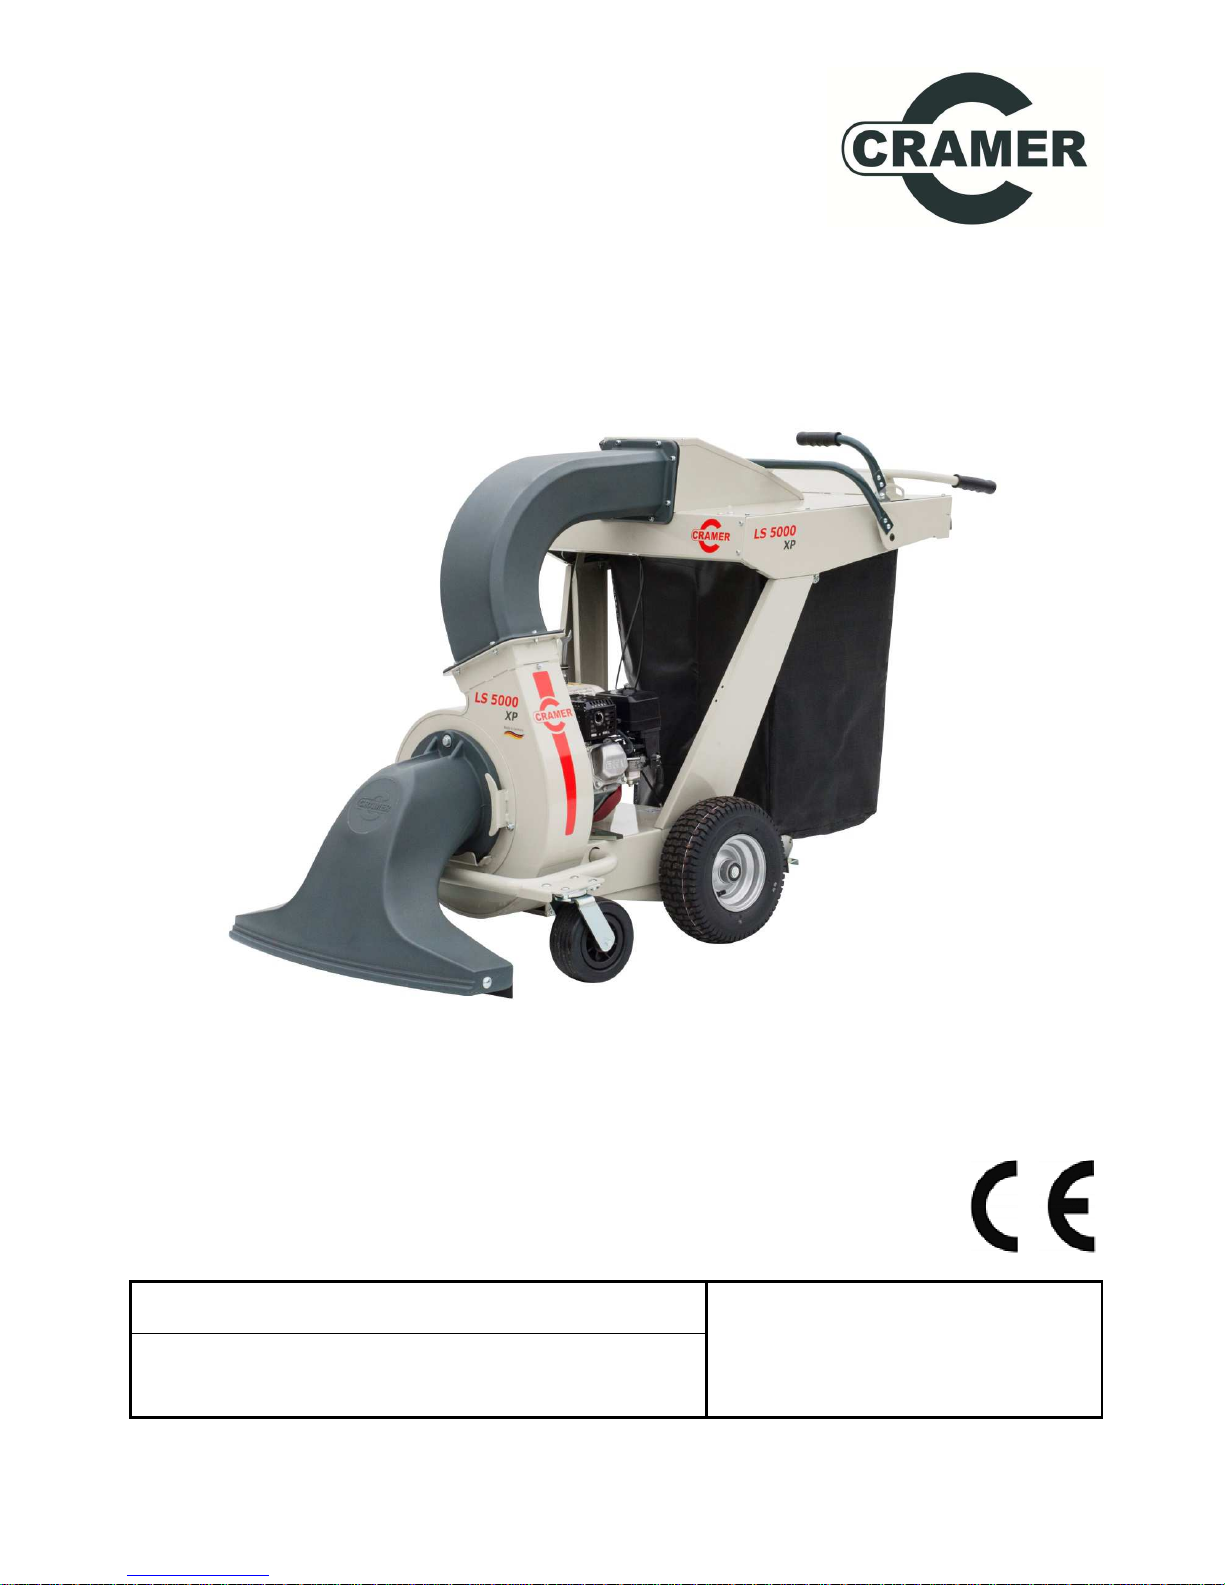
Leaf and litter vacuum 671.02-49 10.2014
Original Operation Manual English
Operation Manual
Model
LS 5000 XP
Machine no.
Page 2

Leaf and litter vacuum
Original Operation Manual
English -2
Contents
1 Important information ...................................................................................................................................................3
1.1 General ............................................................................................................................................................3
1.2 Symbols ...........................................................................................................................................................3
1.3 Limitation of liability ..........................................................................................................................................3
1.4 Copyright ..........................................................................................................................................................3
1.5 Warranty ...........................................................................................................................................................3
2 Safety ..........................................................................................................................................................................4
2.1 Use in compliance with intended purpose ........................................................................................................4
2.2 Possible misuse ...............................................................................................................................................4
2.3 General sources of risks ...................................................................................................................................4
2.3.1 Use and operation .................................................................................................................................4
2.3.2 Product-specific risks ............................................................................................................................4
2.3.3 Risks from motor operation ...................................................................................................................4
2.3.4 Risks for children, elderly persons and pets..........................................................................................4
2.4 Maintenance .....................................................................................................................................................4
2.5 Staff and operator qualification .........................................................................................................................4
2.6 Safety instructions ............................................................................................................................................4
2.7 Required protection equipment for operation ...................................................................................................4
2.8 Safety devices ..................................................................................................................................................5
2.9 Behaviour in case of danger .............................................................................................................................5
2.10 Environmental protection ..................................................................................................................................5
3 Technical data .............................................................................................................................................................5
4 Design and function .....................................................................................................................................................6
4.1 Brief description ...............................................................................................................................................6
4.2 Overview ..........................................................................................................................................................6
4.3 Operating elements and functions ....................................................................................................................6
4.4 Working position and areas of risk ...................................................................................................................9
4.5 Accessories and spare parts ............................................................................................................................9
5 Transport, storage .......................................................................................................................................................9
5.1 Information on transport ...................................................................................................................................9
5.2 Storage (short-term) .........................................................................................................................................9
5.3 Storage (long-term) ..........................................................................................................................................9
6 Operation ................................................................................................................................................................... 10
6.1 Safety ............................................................................................................................................................. 10
6.2 Activities prior to use ...................................................................................................................................... 10
6.3 Switching the machine on and off .................................................................................................................. 10
6.4 Normal operation ............................................................................................................................................ 10
6.5 Activities after use .......................................................................................................................................... 11
6.6 Emptying the collection bag ........................................................................................................................... 11
7 Start up (first machine inspection) ............................................................................................................................. 11
7.1 Safety ............................................................................................................................................................. 11
7.2 Start-up and functional test ............................................................................................................................ 11
8 Maintenance .............................................................................................................................................................. 12
8.1 Safety when performing maintenance work ................................................................................................... 12
8.2 Maintenance plan ........................................................................................................................................... 12
8.3 Maintenance work .......................................................................................................................................... 13
8.3.1 Check safety precautions .................................................................................................................... 13
8.3.2 Check vacuum nozzle and fan rotor for damage ................................................................................. 13
8.4 Cleaning work ................................................................................................................................................ 13
8.4.1 Machine cleaning ................................................................................................................................ 13
8.4.2 Cleaning the collection bag ................................................................................................................. 13
8.4.3 Cleaning the vacuum nozzle ............................................................................................................... 13
9 Troubleshooting ......................................................................................................................................................... 14
9.1 Safety ............................................................................................................................................................. 14
9.2 Service address ............................................................................................................................................. 14
9.3 First action for troubleshooting ....................................................................................................................... 14
10 Declaration of conformity ........................................................................................................................................... 14
11 Installation Manual ..................................................................................................................................................... 15
Page 3
Leaf and litter vacuum
Original Operation Manual
English -3
1 Important information
We are pleased that you have selected a machine from Cramer GmbH
in Germany.
Please read this Operation Manual before you use the machine
for the first time and observe the notes and safety instructions.
Imprint
Cramer GmbH
Reimersstr. 36
D-26789 Leer
Phone: +49491/60950
Fax: +49491/6095200
District court of Aurich HRB 110877
VAT ID: DE 814 305 398
1.1 General
Information on this Manual
• Observing the instructions in this manual allows for the safe and
efficient handling of the machine.
• The operator must have read this manual carefully and
understood it before starting working with the machine.
• Compliance with the safety instructions contained is a prerequisite
for using the machine without any risk.
Keeping the Operation Manual
• The Operation Manual is an integral part of the machine and shall
be kept in its immediate vicinity.
• The operator must have access to this Manual at any time.
Traffic regulations
• Any applicable traffic regulations have to be complied with in
regard to manoeuvring and transporting the machine on public
roads.
Accident prevention regulations
• General safety and local accident prevention regulations must also
be observed.
• National occupational safety regulations shall be complied with.
Other applicable documents
Assembly, Declaration of conformity
1.2 Symbols
DANGER !
This symbol cautions against an immediate
threat resulting in serious injuries or death if
not avoided.
WARNING !
This symbol cautions against a potentially
dangerous source of risk which may result in
death or serious injury if not avoided.
ATTENTION !
Indication of a potential risk which may result
in minor injuries if not avoided.
NOTE !
This symbol indicates a potential risk source which may
result in damage to property or minor personal injuries.
1.3 Limitation of liability
Liability on part of the manufacturer is excluded in the following cases:
• Non-compliance with the Operation Manual
• Use not in compliance with intended purpose.
• Assignment of untrained staff.
• Use of unauthorised spare parts. Only original components may
be used.
• Unauthorised modifications of the machine.
1.4 Copyright
© Cramer GmbH
Copying of the Operation Manual is only permissible for internal
training purposes.
1.5 Warranty
The General Terms and Conditions of Business as issued by us in
every country shall be applicable. Failures within the statutory
warranty period will be remedied by us free of charge if they are
caused by a material or manufacturing defect in our responsibility.
Please contact your authorised dealer in case of a failure and submit
the proof of purchase.
Page 4
Leaf and litter vacuum
Original Operation Manual
English -4
2 Safety
2.1 Use in compliance with intended purpose
The machine is suitable for use as a leaf and litter vacuum.
Any use exceeding this is considered not in compliance with the
intended purpose. The manufacturer shall not be liable for damage
resulting from use not in compliance with the intended purpose; the
risk for this shall be in the sole responsibility of the user.
Use in compliance with the intended purpose shall also include
compliance with the operation and maintenance provisions specified
by the manufacturer.
2.2 Possible misuse
• Do not vacuum any wires, cables or heavy stones. These could
damage the collection bag and cause injuries by flinging.
• Do not use your foot to push any objects beneath the vacuum
nozzle. This could cause injuries by flinging objects.
• Do not vacuum any materials which may block the fan.
2.3 General sources of risks
2.3.1 Use and operation
• Prior to starting the machine, the machine shall be checked for
proper condition and operational safety.
• The operator shall use the machine in compliance with its intended
purpose.
• Indoor machine operation is prohibited.
• The machine is only approved for floorings as indicated in the
Operation Manual.
• The machine may only be operated by staffs who have been
instructed in its use or have provided evidence of their operating
capability, and who have explicitly been instructed to operate the
machine.
• When starting the motor, no other persons may be in the vicinity of
the machine.
• Any protection equipment must be properly attached and in
functional order.
• Never leave the machine unattended.
• When leaving the machine, stop the motor and secure the machine
against unintended movement.
• The operator shall be responsible for accidents involving other
persons or their property.
2.3.2 Product-specific risks
• Do not vacuum any highly flammable materials or hot objects (e.g.
barbecue coal) - danger to life by burning.
2.3.3 Risks from motor operation
• Do not touch any parts of the motor during or after operation.
Significant risk of burning by hot surfaces.
• Stop the motor and let it cool down before working on the machine
as well as before performing maintenance, cleaning and repair
work.
2.3.4 Risks for children, elderly persons and pets
• The operator shall take account of surrounding conditions, e.g. the
effects of noise on persons and animals.
• The machine must never be left on a slope.
• Children, elderly persons and pets/livestock must not stay near the
machine.
• Children must not play with/on the machine.
2.4 Maintenance
• Servicing, maintenance and repair work as well as troubleshooting
shall only be carried out when the machine is switched off and the
motor is at a standstill. As required, the spark plug connectors shall
be disconnected.
• The machine must not be cleaned with spray water (risk of short
circuits or other damage).
• Safety checks pursuant to local regulations for non-stationary
commercially used machines shall be complied with.
• Always use appropriate tools when working on the machine.
• Only use the manufacturer's original spare parts.
2.5 Staff and operator qualification
• Persons with physical, sensory or mental handicaps or persons
with insufficient experience or knowledge must not operate the
machine unless a person in charge for their safety acts as
operation or instruction supervisor.
• People under the age of 16 must not operate the machine.
• The operator's responsiveness must not be affected, e.g. by drugs,
alcohol or medications.
• The operator shall have been instructed in the operation of the
machine.
• The operator shall be familiar with the Operation Manual.
2.6 Safety instructions
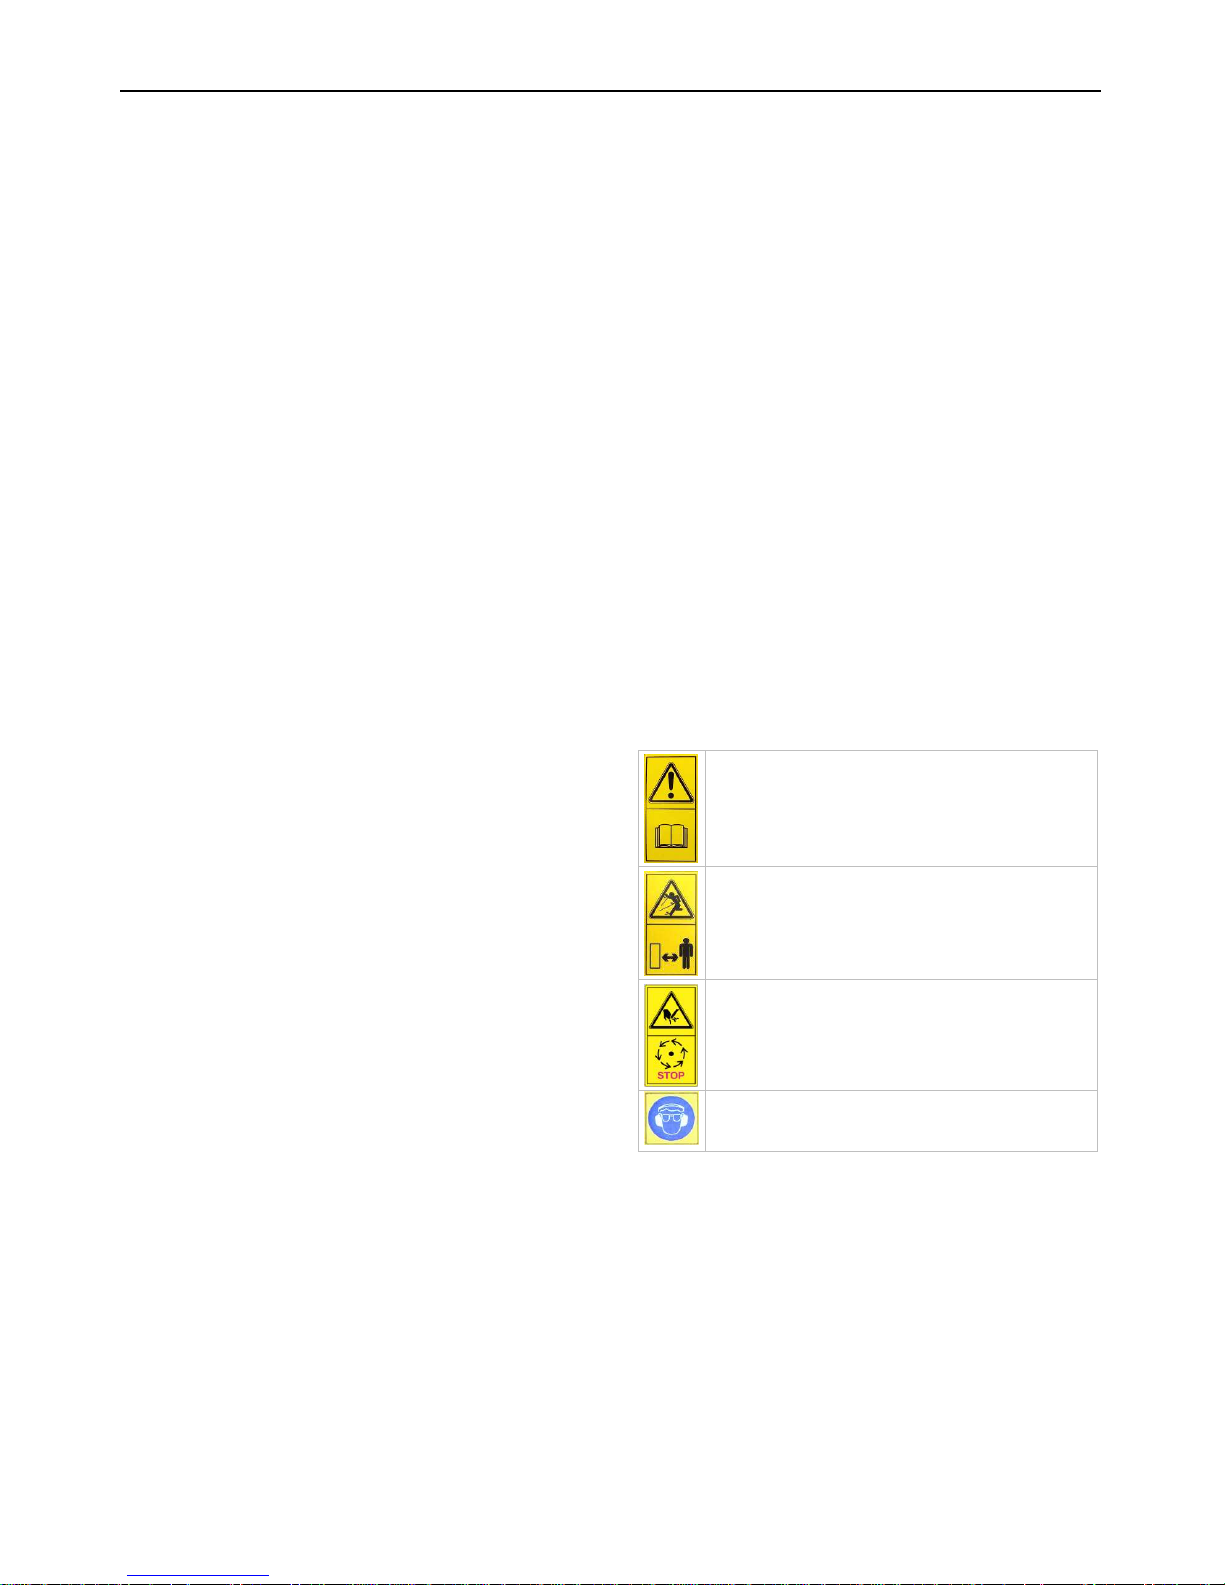
These warning labels on the machine warn you of possible dangers
and thus help you to avoid serious injuries and damage to property. If
labels have become detached or illegible, please contact your Cramer
dealer to have the labels replaced.
The operation manual and safety instructions must be
read and observed prior to starting the machine.
Risk by flinging parts with running motor. Keep a safety
distance of 3 m.
Risk of injury from rotating parts. Machine parts may only
be touched once they have come to a complete
standstill.
Always wear ear and face protection when working with
the machine.
2.7 Required protection equipment for operation
• Rugged footwear
• Close-fitting clothing
• Ear protection
• Safety gloves
• Face protection
The information on accident prevention regulations must also be
observed.
Page 5
Leaf and litter vacuum
Original Operation Manual
English -5
2.8 Safety devices
•
Do not remove any covers during operation.
•
Immediately remedy any damage to safety devices.
2.9 Behaviour in case of danger
1. Stop work immediately
2. Stop the motor
3. Disconnect power supply if necessary
4. Remedy the risk situation
2.10 Environmental protection
• Oils, fuels, greases and filters shall be disposed of properly and
separately in accordance with legal regulations. Please do not
dispose of any wastes in the environment.
• Packaging materials are recyclable. Please make sure that they
are collected for reuse.
• Legacy devices contain valuable recyclable materials which should
be collected for reuse. These devices may be disposed of through
appropriate collection systems.
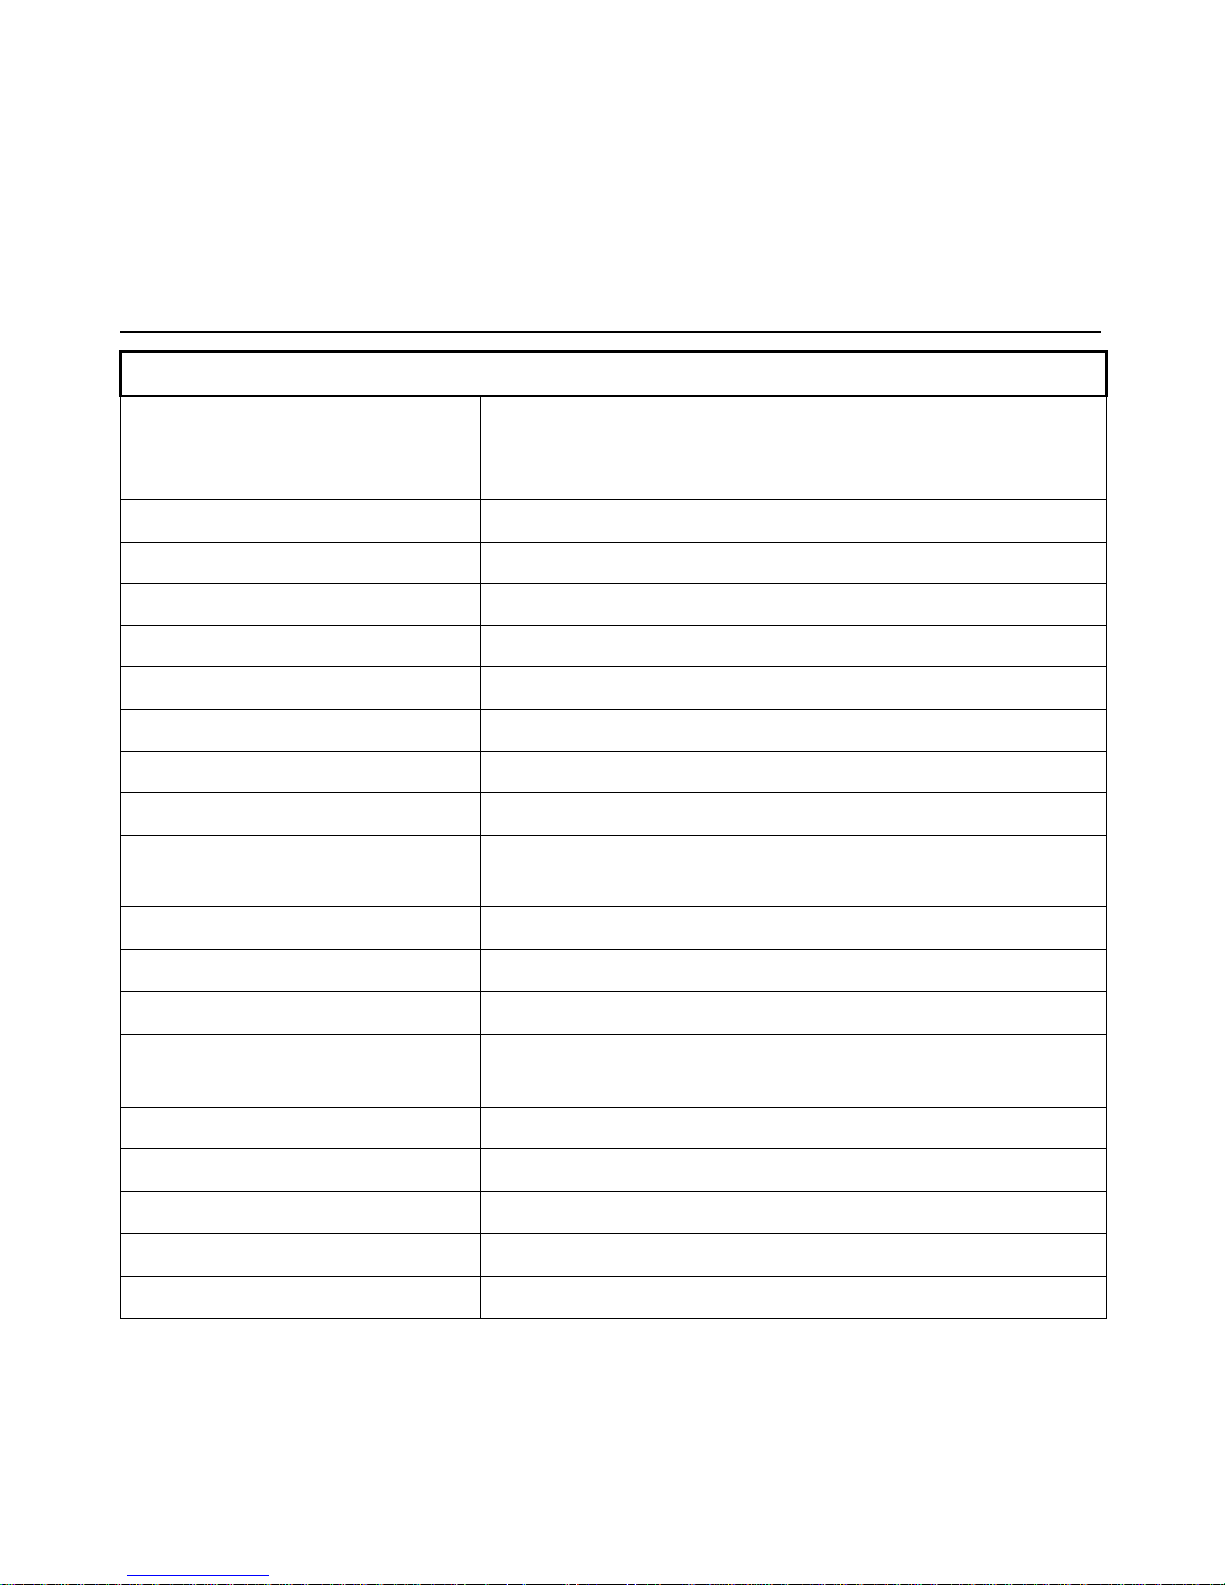
3 Technical data
LS 5000 XP model
Drive:
Petrol motor
Honda GX 160
4.8 HP/3.6 KW (net output)
Operating speed: 3000 rpm
Petrol consumption: 1.4 l/h
Speed: 0-4.8 km/h progressively
Weight: 118 kg
Dimensions (L x W x H): 185 x 86 x 111 cm
Collection bag volume: 180 litres
Working width: approx. 80 cm
Chassis 4 wheels
Sound pressure level:
Guaranteed acoustic power level:
86 dB(A)
99 dB
Hand / arm vibration: 3.6 m/s²
Application area: Conventional use in agriculture and forestry, park maintenance and landscape gardening
Connections / interfaces: Receiver point for collection bag
Front tyres:
Rear tyres:
Ø 180x80
Ø 330 (13x5.00-6)
Rear tyre pressure: 1.8 bar
Year of construction: Please refer to the machine's nameplate
Working ground: Plane surfaces on park areas, paving, tarmac, bitumen, concrete, lawns
Temperature, ºC See motor data from Honda
Responsibility limits for components: Motor (op. manual)
Page 6
Leaf and litter vacuum
Original Operation Manual
English -6
4 Design and function
4.1 Brief description
The universal vacuum is used for collecting leaves and litter. The machine is driven by a petrol motor. The collection bag can be removed and is
suitable for leaves and coarse waste.
4.2 Overview
4.3 Operating elements and functions
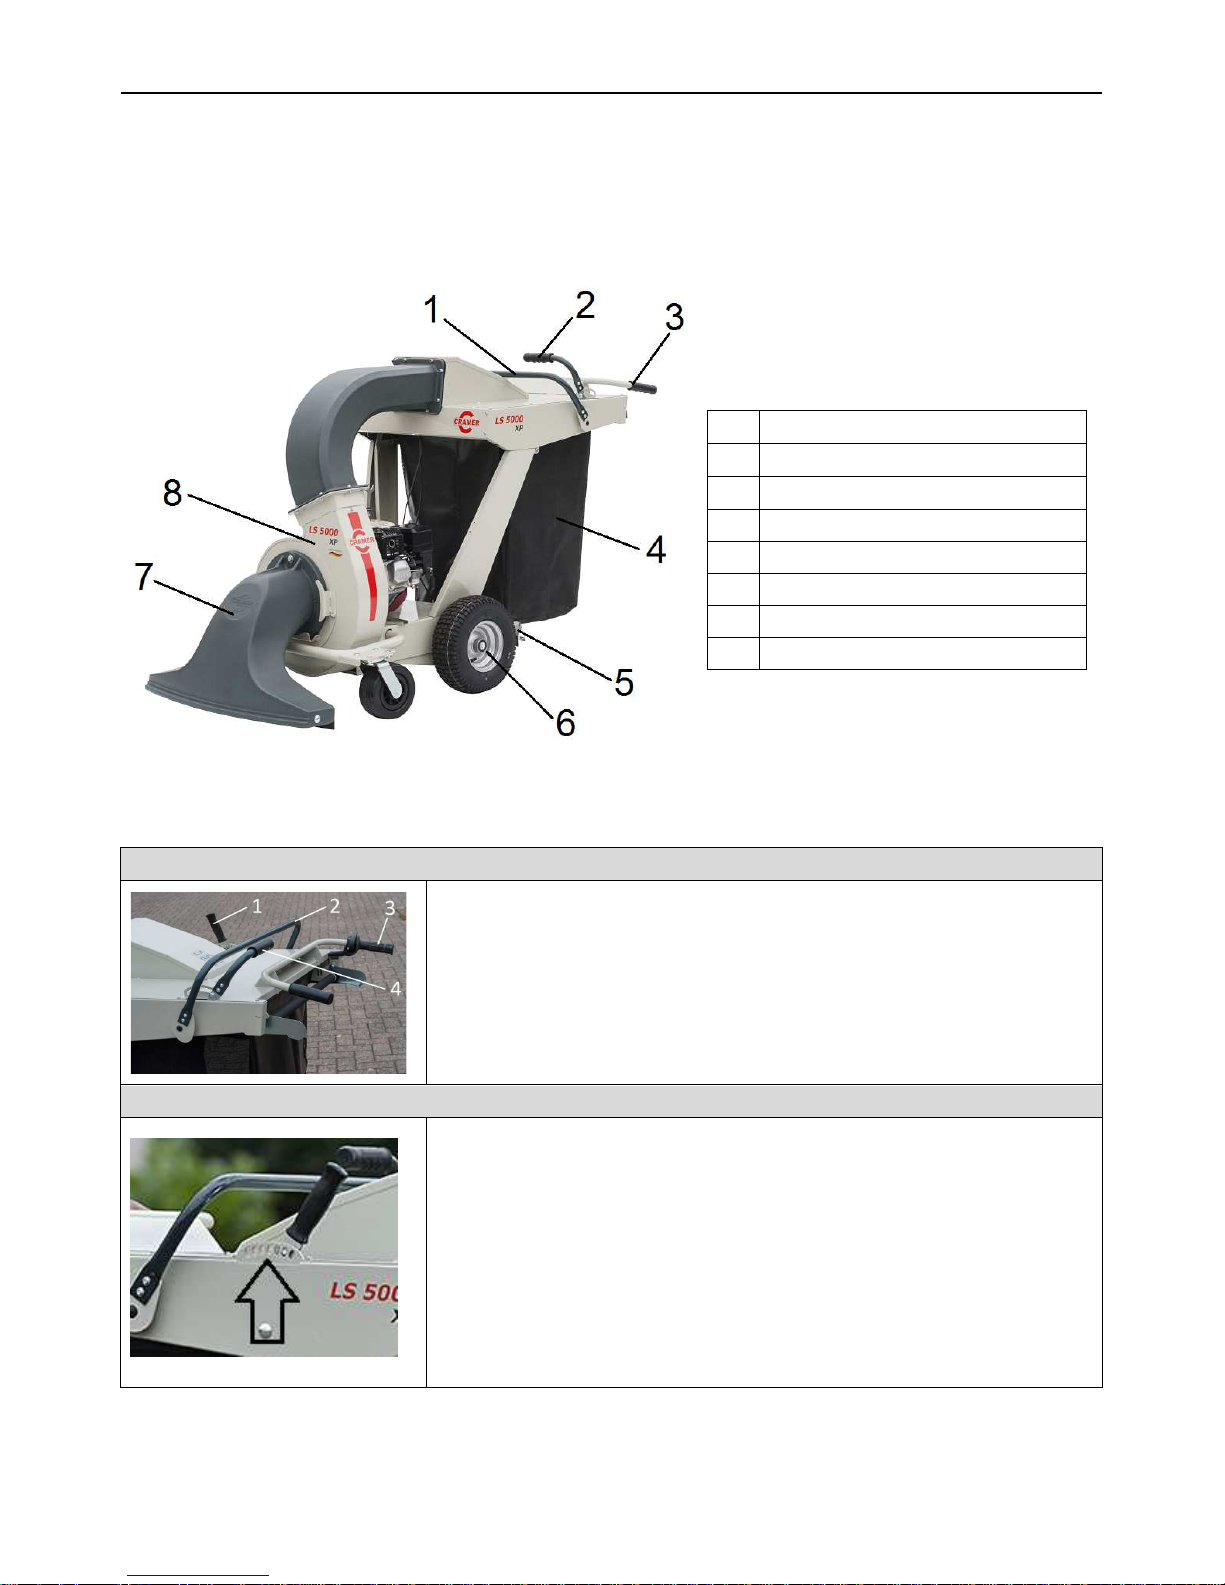
Overview
1 = Height adjustment of vacuum nozzle
2 = Collection bag release
3 = Drive lever
4 = Throttle for suction power
Height adjustment of vacuum nozzle
The height of the vacuum nozzle can be adjusted using this lever in order to adapt the vacuum
power to the weight and nature of the material to be collected.
Bend the lever slightly outward, to release it, and then move the lever to the desired height setting.
Pushing the lever away from you will lower the vacuum nozzle
Pulling the lever toward you will raise the vacuum nozzle
1 Collection bag release (parallelogram)
2 Throttle for suction power
3 Handle, drive lever on right
4 Collection bag
5 Parking brake
6 Drive wheel
7 Vacuum nozzle
8 Fan
Page 7
Leaf and litter vacuum
Original Operation Manual
English -7
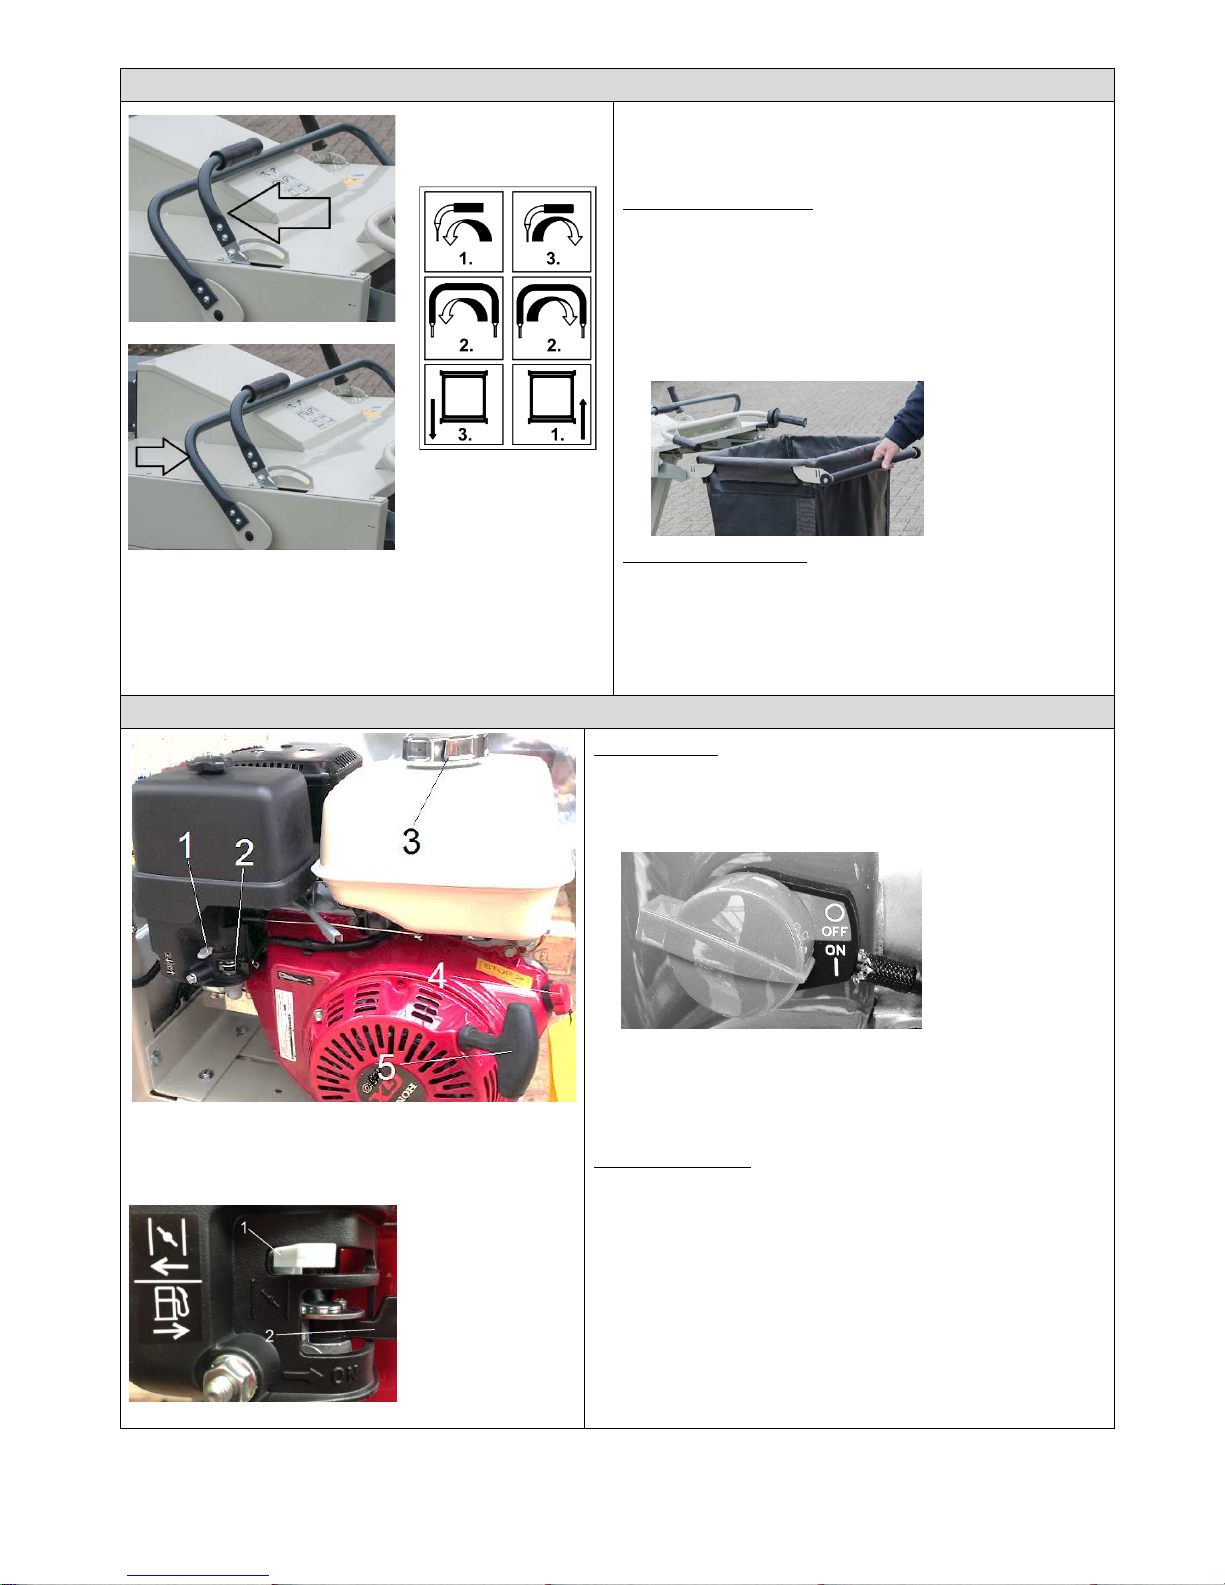
Collection bag release
The adjustment lever is used to unlock or lock the collection bag when
removing or attaching it. The collection bag is attached to a support
frame which is always detached together with the bag when the bag is
removed.
Removing the collection bag
1. To be able to remove the collection bag, you must first pull the
throttle lever toward you (to the idle position).
2. The collection bag release can then be pulled toward you. The roller
frame is lowered/unlocks and the frame with the collection bag can
be removed.
3. Detach the collection bag from the support and empty it.
Note! The collection bag cannot be removed until the throttle lever
has been moved.
Attaching the collection bag
1. To attach the collection bag, the support frame with the collection
bag is placed on the machine support and is then pushed
completely onto the holding fixture.
2. First push the release bar back in order to raise the collection bag
again and lock it.
3. Then push the throttle lever away from you.
Switching on the motor
1 Choke lever
2 Fuel tap
3 Tank opening
4 Starter handle
5 Ignition switch ON/OFF
1 = Choke
2 = Fuel tap
Starting the motor:
1. Move the choke lever to the left (CLOSED)
The choke is always needed for a cold-start.
2. Open the fuel tap (ON).
3. Move the ignition switch to ON
4. Pull the starter handle until you feel resistance, then pull it out quickly
and forcefully. Guide the starter handle back gently.
5. Using the throttle lever on the control console, set the motor power to
FULL or STOP (idle).
6. Move the choke lever to the right (OPEN).
Switching off the motor:
1. Move the motor switch to OFF
2. Close the fuel tap (OFF)
(turn the lever to the left)
Collection bag
removal
Collection bag
attachment
Page 8
Leaf and litter vacuum
Original Operation Manual
English -8
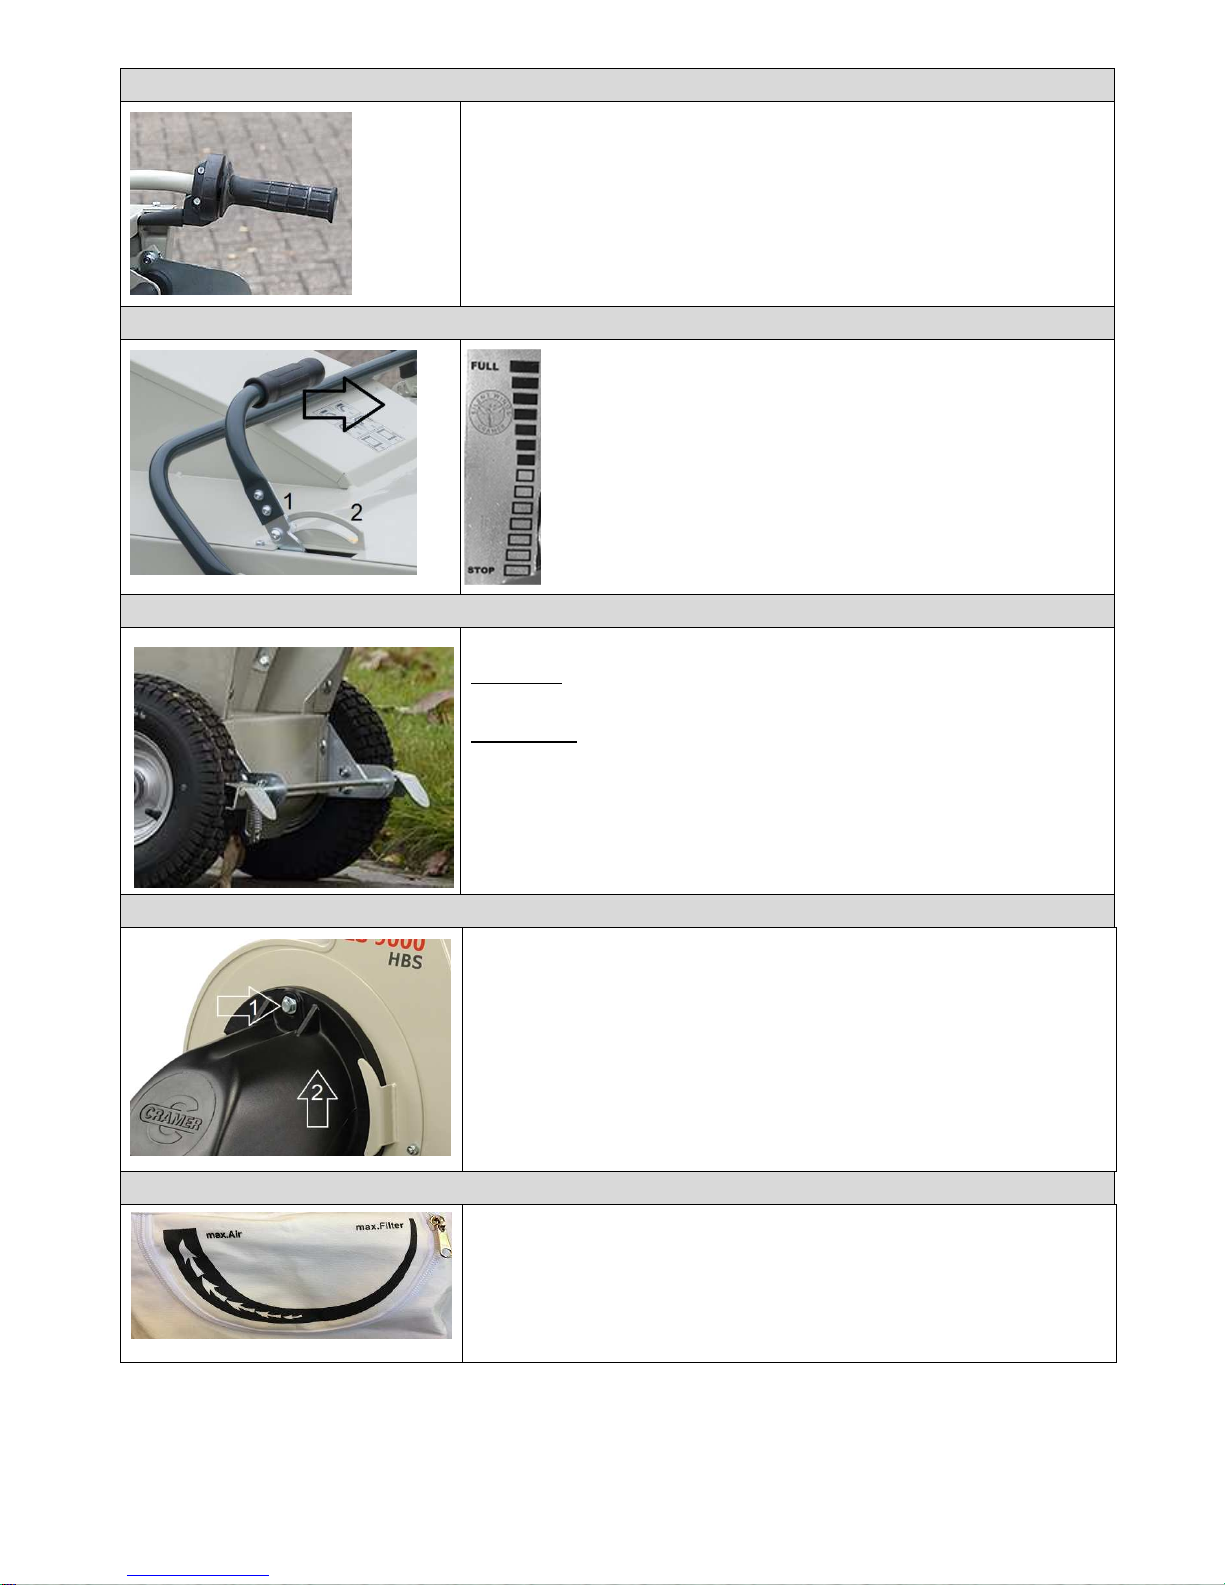
Drive
The drive handle for the machine is located on the right-hand side.
Turn the handle to the right and hold – the machine moves forward
Turn the handle to the left or release it – the machine comes to a standstill.
Throttle for suction power
The engine speed can be regulated between FULL and STOP. When collecting
material, the throttle must be set to FULL, otherwise the blower outlet will not be
fully open.
The engine speed can be changed by moving the throttle lever to the desired
position.
The following settings are possible:
1 = FULL (full throttle) - up
2 = STOP (idle) - down
Parking brake
The machine can be secured against unintended movement by applying the parking brake.
Apply brake:
• Press the brake lever down with your foot.
Release brake:
• Firmly push back the machine. The brake is released from the tyre tread.
Vacuum nozzle
To remove the vacuum nozzle for maintenance and repair work, use the wrench provided.
1. Unscrew the hexagon bolt using the wrench.
2. Pull the vacuum nozzle upwards and out of the retainer.
Airflow
The zip fasteners for regulating the air extraction volume, located on the sides of the collection
bag, can be opened if the airflow needs to be increased.
The zip fastener should be opened if the airflow needs to be increased in order to collect larger
objects such as tin cans.
Page 9
Leaf and litter vacuum
Original Operation Manual
English -9
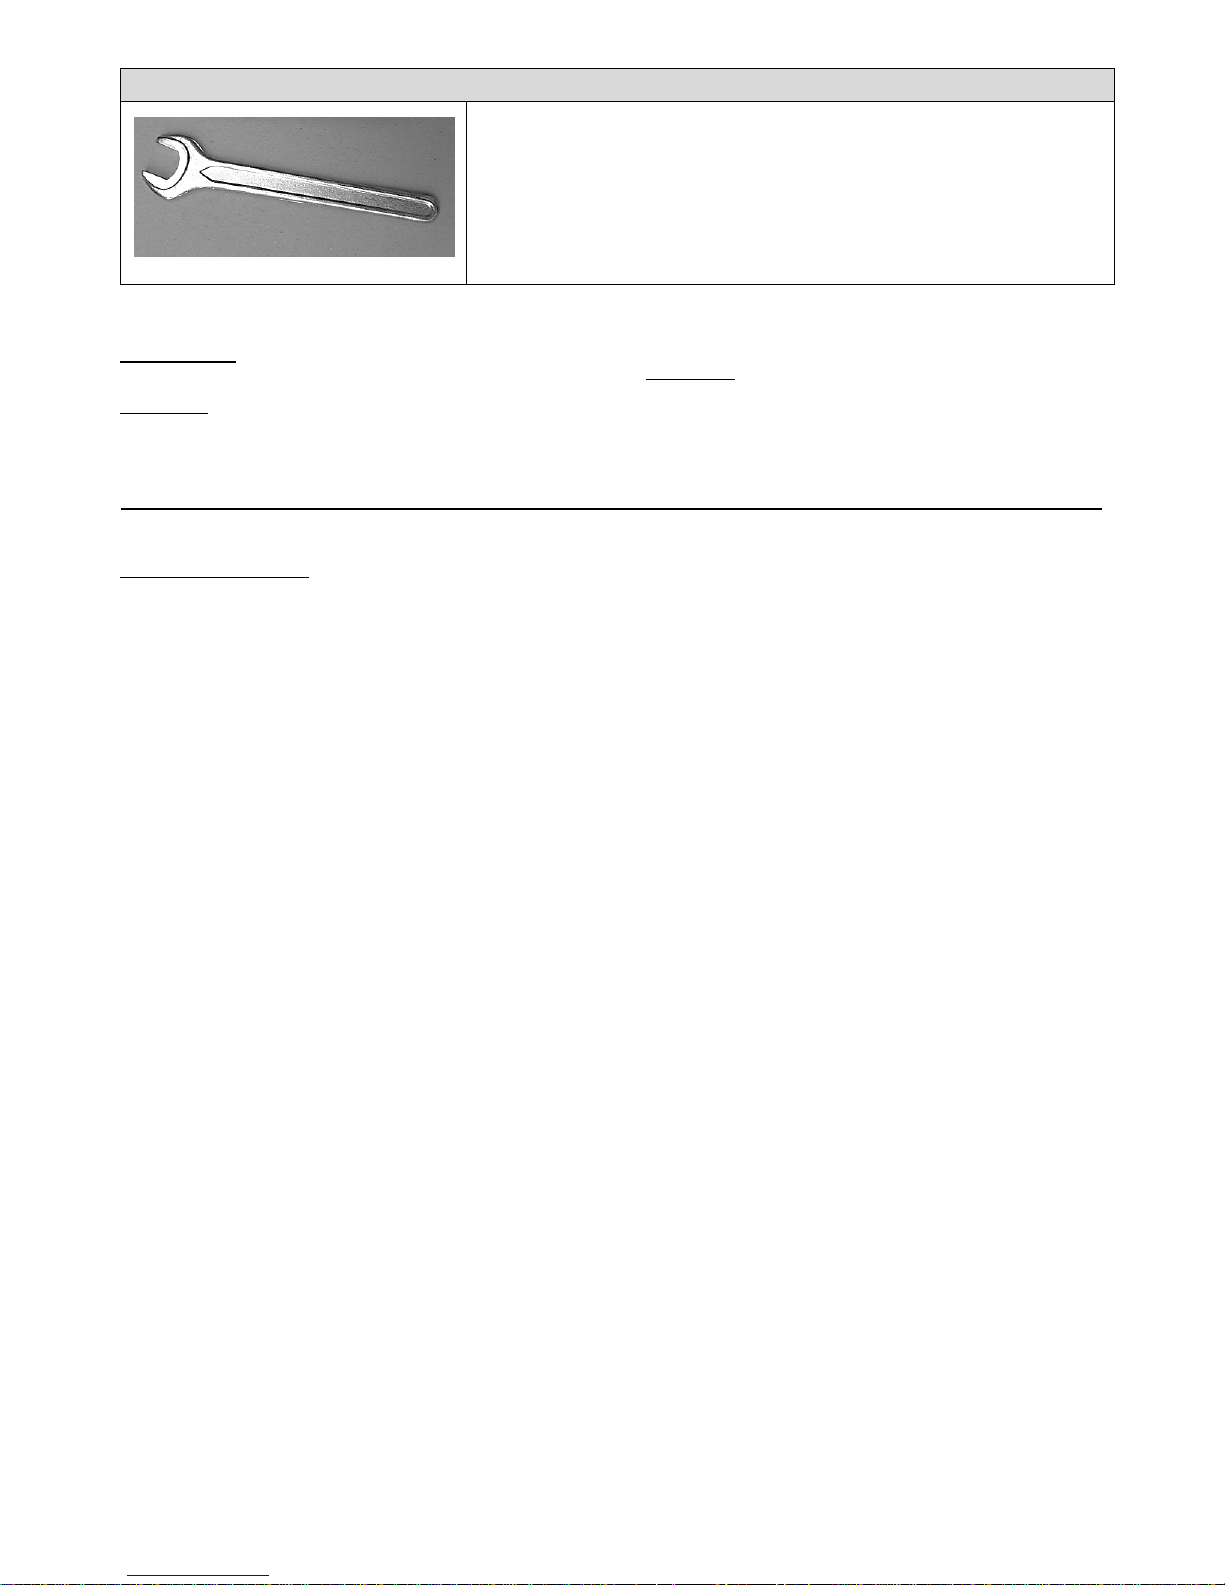
Tool supplied
The wrench illustrated is attached to a retainer on the steering bar.
4.4 Working position and areas of risk
Working position:
Next to the machine
Areas of risk:
• Catchment area of the machine's vacuum nozzle
• Discharge area of the blower outlet
4.5 Accessories and spare parts
Original parts
Only original spare parts and original accessories may be used.
5 Transport, storage
5.1 Information on transport
Transport without packaging
• Stop the machine
• Fix the machine by using lashing straps.
5.2 Storage (short-term)
The machine:
• must not be stored in the open air.
• Do not expose it to aggressive materials.
• Clean machine with a soft brush before storage.
5.3 Storage (long-term)
The following recommendations will help to ensure the long-standing
functionality of your Cramer machine:
1. Clean the machine - Important! The discharge area should also
be cleaned (see Maintenance, Cleaning)
2. Check machine for wear, repair paint damage.
3. Store the machine in a dry place.
Additional recommendations for machines with petrol motor:
1. Ensure that fuels are prepared for long-term storage (longer than
30 days), e.g. add fuel stabilizer
2. Renew motor oil
3. Treat spark plugs
Please refer to the attached motor operation manual for instructions
on how to care for the motor!
Page 10
Leaf and litter vacuum
Original Operation Manual
English -10
6 Operation
Before starting the machine, please read the safety information on
pages 4 and 5 as well as the "Activities prior to use" section on page
10.
6.1 Safety
Unauthorised restart
• It is prohibited to start the machine while another person is
working on it.
Risks of non-applied protection devices
WARNING !
Danger of injuries due to missing protective
covers!
Lack of covers may cause injuries by flinging materials.
Do not open or remove any covers during operation.
Risks of insufficient order and cleanliness
• Clean the machine regularly.
• Check the machine for blocking objects.
Requirements at location of use
• Only leave the machine on plane surfaces and solid ground.
6.2 Activities prior to use
To ensure your safety and the maximum service life of the machine,
please check the following before switching on the machine:
• Observe the safety information in this manual at all times.
• Ignition switch set to OFF
• Check the vacuum nozzle for any foreign objects
• Check the machine for damage and repair as required
• Check the fuel level
• Check the motor oil level
• Check the condition of the safety devices. The machine must not
be started if safety devices are missing or defective.
WARNING !
Exhaust gases contain toxic carbon
monoxide!
The machine must never be started or used indoors or in enclosed
spaces where other persons may be present.
Only operate the machine outdoors.
6.3 Switching the machine on and off
Basic prerequisites for switching on the machine
- Adjust the height of the vacuum nozzle
- Attach the collection bag
- Check the machine's fuel level and refill as required.
Switching on
1. Set the choke lever to CLOSED
2. Open the fuel tap
3. Set the ignition switch to ON
4. Set the throttle to FULL
5. Pull the starter handle and guide it back gently
6. Move the choke to OPEN
Switching off
1. Set the throttle to STOP
2. Set the ignition switch to OFF
3. Close the fuel tap
Switching off in an emergency
1. Immediately switch the machine to OFF
2. Leave the machine.
Switching on again after an overload or EMERGENCY-OFF
1. Move the engine switch to OFF
2. Wait until the machine has come to a standstill
3. Remove any blockage
4. Start the motor
6.4 Normal operation
1. Basic setting:
• Park machine on an even surface
• Refill consumables
2. Push the collection bag into the machine support.
3. Switch on the machine
3.1 Set the choke lever to CLOSED (only when engine is cold)
3.2 Open the fuel tap
3.3 Move the ignition switch to ON
3.4 Pull the starter handle
3.5 Move the choke to OPEN as required
3.6 Set the power output using the throttle
If no functional failures occur until then, the machine is ready for
use.
4. Push the machine over the material to be collected
• Set throttle to FULL
• Use the turning handle for the drive to move the machine
forward and back
5. Empty the collection bag when the machine begins to move down
• To empty the collection bag, switch off the machine first or set
to Idle. See Section 6.6.
6. The vacuum nozzle can be lowered for heavy materials to be
collected.
• Move the height adjustment lever to the desired position.
7. Switch off the machine before leaving it
• Place the machine in a dry area
• End drive operation
• Move the ignition switch to OFF
• Close the fuel tap.
In the event of faulty operation, please contact your Cramer dealer.
Page 11

Leaf and litter vacuum
Original Operation Manual
English -11
6.5 Activities after use
Please perform the following steps after using the machine:
1. Always empty the collection bag before storage.
2. The machine must be left in a clean and dry condition
3. Apply the parking brake and close the fuel tap.
6.6 Emptying the collection bag
The collection bag's filling limit is reached when the machine starts
to move down at the back and the vacuum nozzle rises up.
ATTENTION!
Risk of injury from the fan!
Working on the machine with the motor running can lead to
minor injuries.
Always switch off the motor when:
Carrying out any work on the collection bag
Carrying out any work on the vacuum nozzle and intake
canal
Empty the collection bag immediately when it is full. Do this as
follows:
1. Set the drive handle to Idle
2. Pull the throttle lever toward you
3. Pull the collection bag release toward you
4. Then detach the collection bag from the guide rail and empty it.
5. Insert the empty collection back into the guide rail and push it
into the holding fixture.
6. Push up the collection bag release
7. Use the throttle lever to set the motor power.
7 Start up (first machine inspection)
Assembly and start-up shall be performed by your authorised
Cramer dealer.
7.1 Safety
Before start-up, you must have read and understood the operation
manual and be familiar with the machine's functions.
7.2 Start-up and functional test
Before initial start-up, please check that all safety devices are
attached. Only then shall the following functional test be performed:
After an operating duration of approx. one hour, all fastening screws
of the blades as well as the fastening screw of the blade disc should
be re-tightened.
Functional test / starting the machine
1. Park machine safely on an even surface
2. Add fuel and check the oil level
3. Attach protective devices
4. Switch on the machine
If no functional failures occur until then, the machine is ready for use.
If functional failures do occur, please contact your Cramer dealer.
Page 12
Leaf and litter vacuum
Original Operation Manual
English -12
8 Maintenance
8.1 Safety when performing maintenance work
Regular and correctly performed maintenance work is essential for
the safe, economical and fault-free operation of the machine.
The information in the following sections helps you to ensure the
correct maintenance of your machine. You can perform routine
maintenance work yourself using basic hand tools. More complex
maintenance work requiring special tools should be performed by
qualified staff, e.g. at your Cramer dealer or by a qualified mechanic.
Some of the most important safety precautions and dangers are
listed in the box on the right. However, it is not possible here to list
all potential dangers that could arise during maintenance work and
describe the associated precautions. You are solely responsible for
deciding which maintenance work you wish to perform yourself.
8.2 Maintenance plan
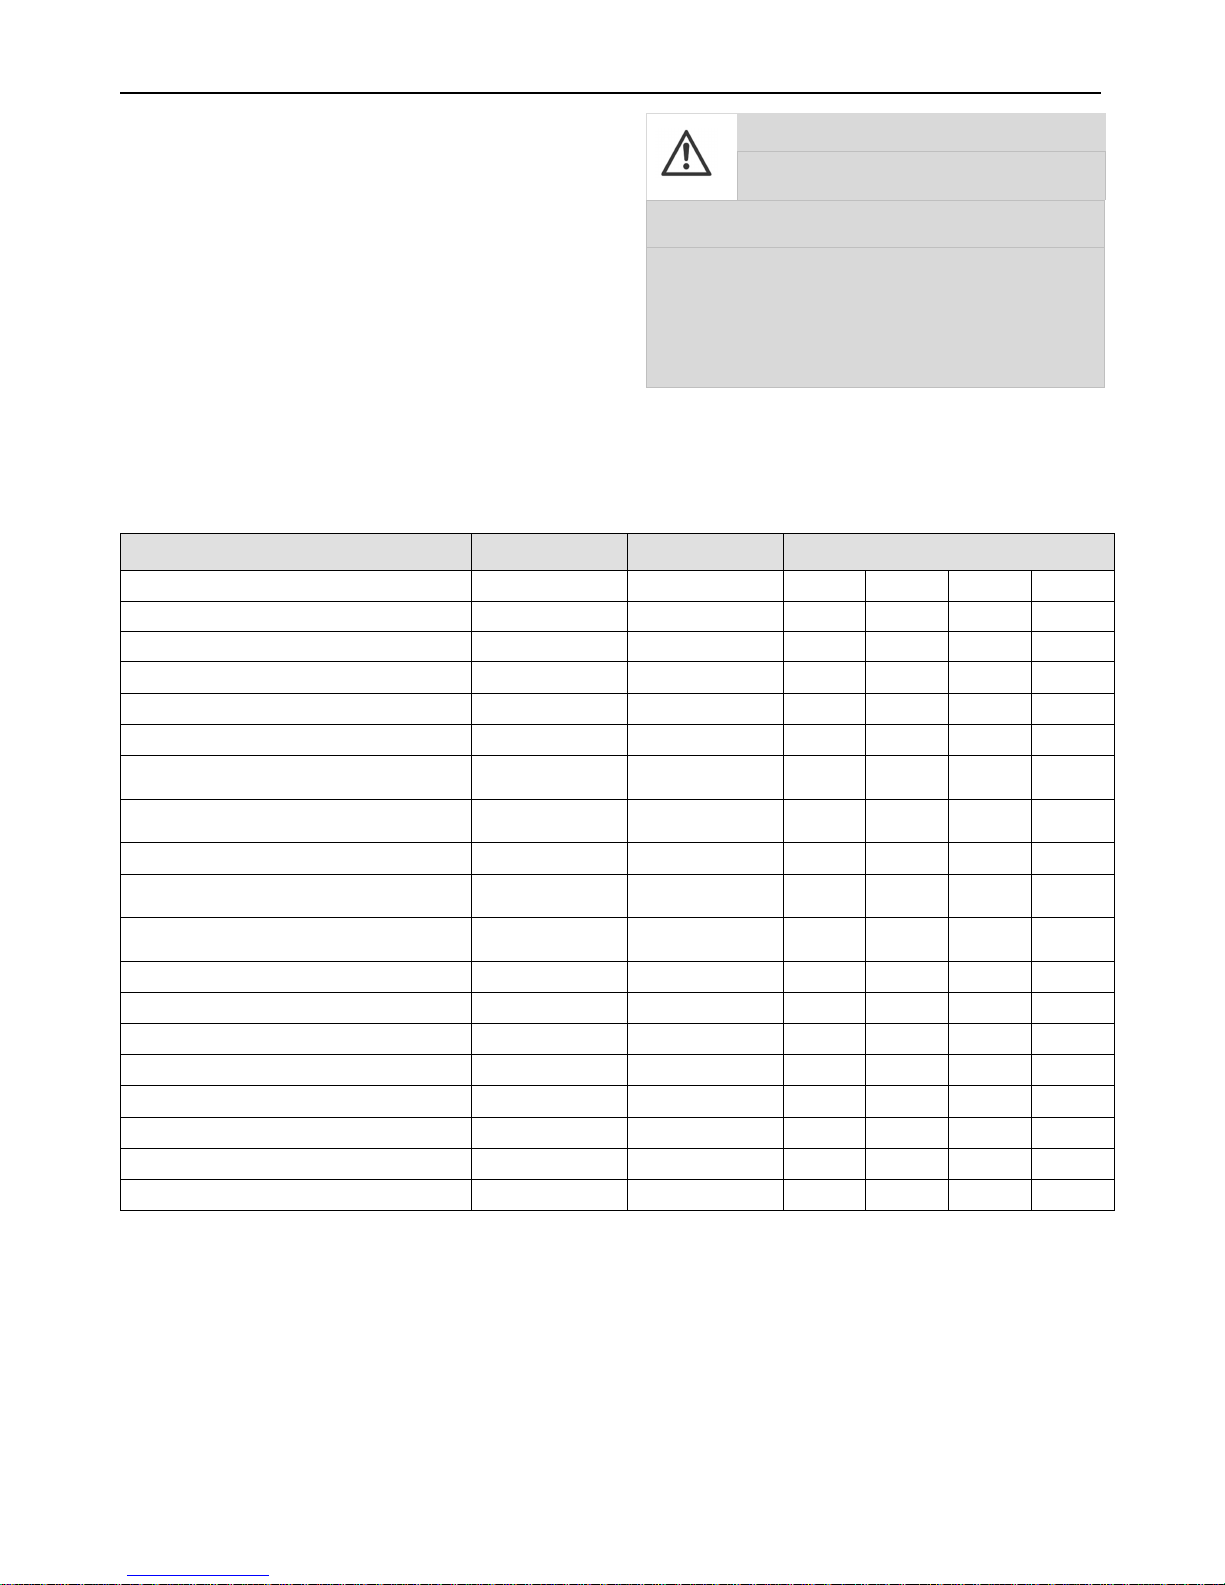
Maintenance Prior to each use Regularly Intervals in hours
25 50 100 200
Cleaning X (Item 8.4)
Check safety precautions X (Item 8.3.1)
Check all screws for tight fitting O
Check motor oil level B
Check air filter B
Clean or replace air filter (normal use) B
Clean or replace air filter (dusty conditions) B
Adjust tyre pressure O
Check machine for damage or corrosion on paint
coating and remedy as appropriate
O
Check machine for fuel or oil leaks O
Replace fuel filter B
Check vacuum nozzle for damage X (Item 8.3.2)
Check rotor fan for damage X (Item 8.3.2)
Check and adjust Bowden cables F
Grease rotating points and joints O
Grease Bowden cables O
Check battery B
Replace spark plugs B
X = Described in this Operation Manual in the indicated section
O = Not described in the present Operation Manual, inform specialist dealer as required
B = Description is enclosed in attached motor operation instructions
F = Work may only be performed by a qualified expert in this field
DANGER !
Risk of injury by inappropriately performed
maintenance work!
Defective work may result in serious bodily injuries and damage to
property.
Make sure that you have sufficient working space.
Disconnect the power plug from the mains supply when
working on the machine.
Place components separately.
Remount all components.
Remount all safety covers.
Keep the risk area clear of persons.
Page 13

Leaf and litter vacuum
Original Operation Manual
English -13
8.3 Maintenance work
ATTENTION!
Risk of injuries by combustion motors
Cleaning and repair work must never be carried out
during operation or when the machine runs idle, since
this may result in burns and cuts.
Stop machine and motor and let them cool down.
Disconnect the spark plug connector.
8.3.1 Check safety precautions
Safety precautions comprise:
- Discharge covers
- Vacuum nozzle
The machine must not be operated if the covers show any signs of
damage or are removed. They are to be replaced in case of damage
or loss. The machine must not be started without safety precautions.
8.3.2 Check vacuum nozzle and fan rotor for damage
1 Switch off the machine and leave it to cool down.
2 Use the wrench to unscrew the bolt on the vacuum nozzle (the
wrench is supplied with the machine)
3 Pull the vacuum nozzle upwards and out of the retainer
4 Remove any foreign objects from the vacuum nozzle
5 Check the fan rotor for foreign objects Remove all foreign
objects. If damaged, the rotor must be replaced.
6 Insert the vacuum nozzle into the retainer and secure using the
bolt.
8.4 Cleaning work
The machine should be cleaned regularly so that damage to the
paint coating or plastic components can be detected. Please
observe the notes listed for cleaning in order to avoid damage to the
electronics.
8.4.1 Machine cleaning
After every use, clean the outside of the machine and check it for
damage.
1. Park the machine on an even surface before cleaning it.
2. Clean the machine with a soft brush.
3. If necessary, then clean the machine with a damp cloth.
NOTE !
Machine damage!
Do not clean the machine with spray water.
8.4.2 Cleaning the collection bag
Remove the collection bag from the machine. When cleaning with
water, the collection bag must first be detached from the support
frame. Turn the collection bag inside out to wash it
The following cleaning methods may be used:
• Beat the dirt out of entire collection bag
• Clean in bath of water
• Clean under running water
• Clean at professional cleaners
Subsequently allow the collection bag to dry out completely.
Clean the zip with a soft brush and occasionally rub with talcum. Reattach the dry collection bag. See page 17 for attaching the
collection bag.
8.4.3 Cleaning the vacuum nozzle
The vacuum nozzle must always be dismantled for cleaning. Use the
tool (wrench) attached to the machine frame in order to dismantle
the vacuum nozzle.
1. Switch off the machine and leave it to cool down
2. Use the wrench to unscrew the bolt on the vacuum nozzle
3. Remove the vacuum nozzle from the retainer
4. Remove any foreign objects from the vacuum nozzle
Page 14
Leaf and litter vacuum
Original Operation Manual
English -14
9 Troubleshooting
9.1 Safety
Procedure for failures and accidents
1. Initiate emergency stop (leave working position).
2. Stop the machine.
3. Determine the failure cause.
4. Remedy failure or contact specialist dealer.
9.2 Service address
Please contact your sales consultant in case of failures, problems or
otherwise. Please always indicate the machine serial no. in inquiries.
(Please refer to nameplate on the machine or on the Operation
Manual cover).
9.3 First action for troubleshooting
Failure / Error message Possible cause(s) Remedy
Motor will not start Motor switch set to »OFF« Set switch to »ON«
No motor power Petrol tank empty
Spark plug defective
Fuel tap blocked or water in petrol
Air filter contaminated
Refill fuel
Replace spark plug
Take machine to authorised dealer
Clean (rinse) air filter
Motor becomes excessively hot Carburettor adjusted incorrectly
Not enough motor oil
Re-adjust carburettor
Refill motor oil
Machine has no suction power Collection bag too full
Filter surface of collection bag contaminated
Vacuum nozzle blocked
Empty collection bag
Clean filter surfaces (wash if necessary)
Clean vacuum nozzle
Wheel drive slips Gear coupling dragging Notify authorised dealer
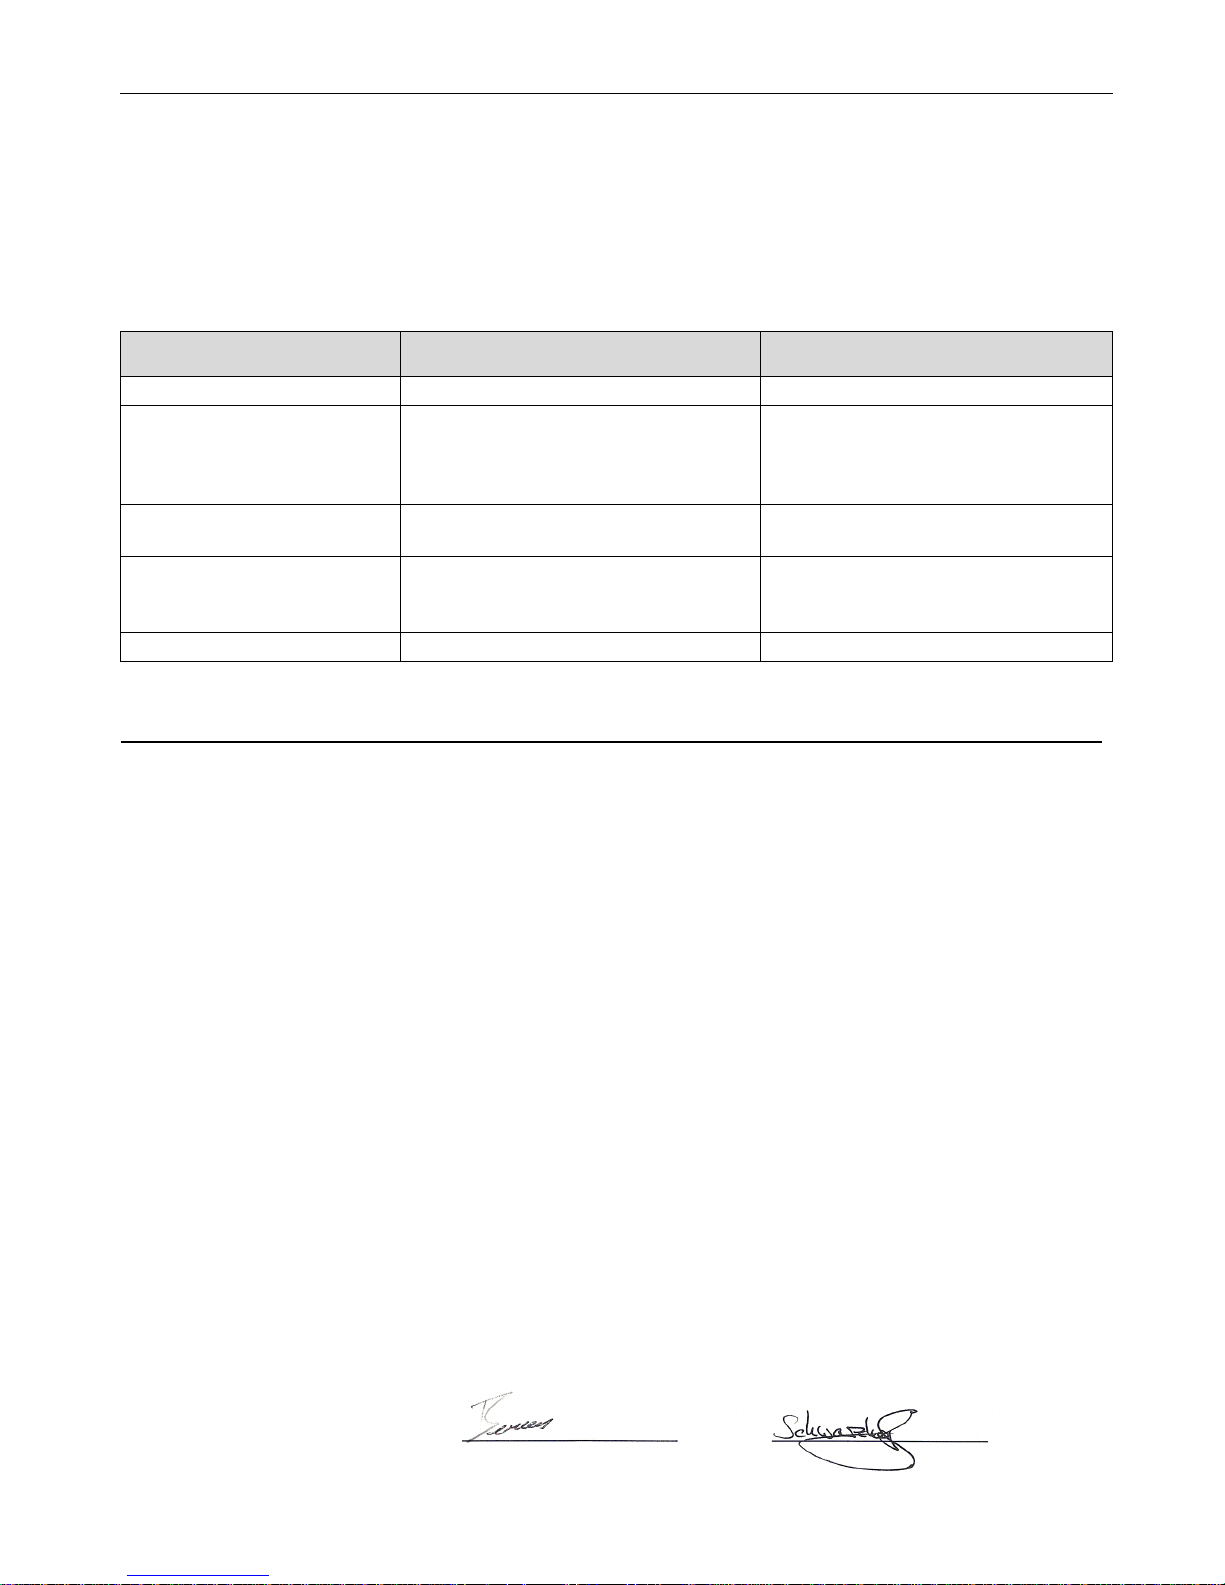
10 Declaration of conformity
EU Declaration of conformity pursuant to machine directive 2006/42/EC Annex II 1-A
The authorised party with residence in the EU,
Cramer GmbH
Reimersstr. 36
26789 Leer
herewith declares, that the following product
Manufacturer:
Cramer GmbH
Reimersstr. 36
26789 Leer
Product designation:
Leaf and litter vacuum
Make:
Cramer GmbH
Serial number:
see cover nameplate
Type(s):
LS 5000 XP
complies with all relevant regulations of the above-stated Directive as well as all other applicable Directives - including their amendments applicable
at the date of this declaration.
The following harmonized standards were applied:
EN 953:1997+A1:2009
EN ISO 12100:2010
EN ISO 3744:2010
DIN EN ISO 5349-2
Name and address of person authorised to compile the technical documentation:
Andre Schwarzkopf
Cramer GmbH
Reimersstraße 36
26789 Leer
Site:
Leer
Date:
20/10/2014
A. Bruns A. Schwarzkopf
Managing Director CE Officer
Page 15
Leaf and litter vacuum
Original Operation Manual
English -15
11 Installation Manual
Safety during assembly
Delivery, packaging, assembly
The individual parts for the screw connections are attached to
the mounting parts.
ATTENTION!
Squeezing hazard during assembly
Parts of the body may be squeezed when components
are assembled.
Risk of high dead weight
• Remove machine parts separately from packaging.
Perform transport inspection
• Check the machine for completeness and potential damage on
delivery.
• The front unit is supplied to the specialist dealer in a partially
assembled condition.
• Assembly and start-up have to be performed by a specialist dealer
and/or an expert in this field.
Packaging
• Please dispose of packaging materials separately.
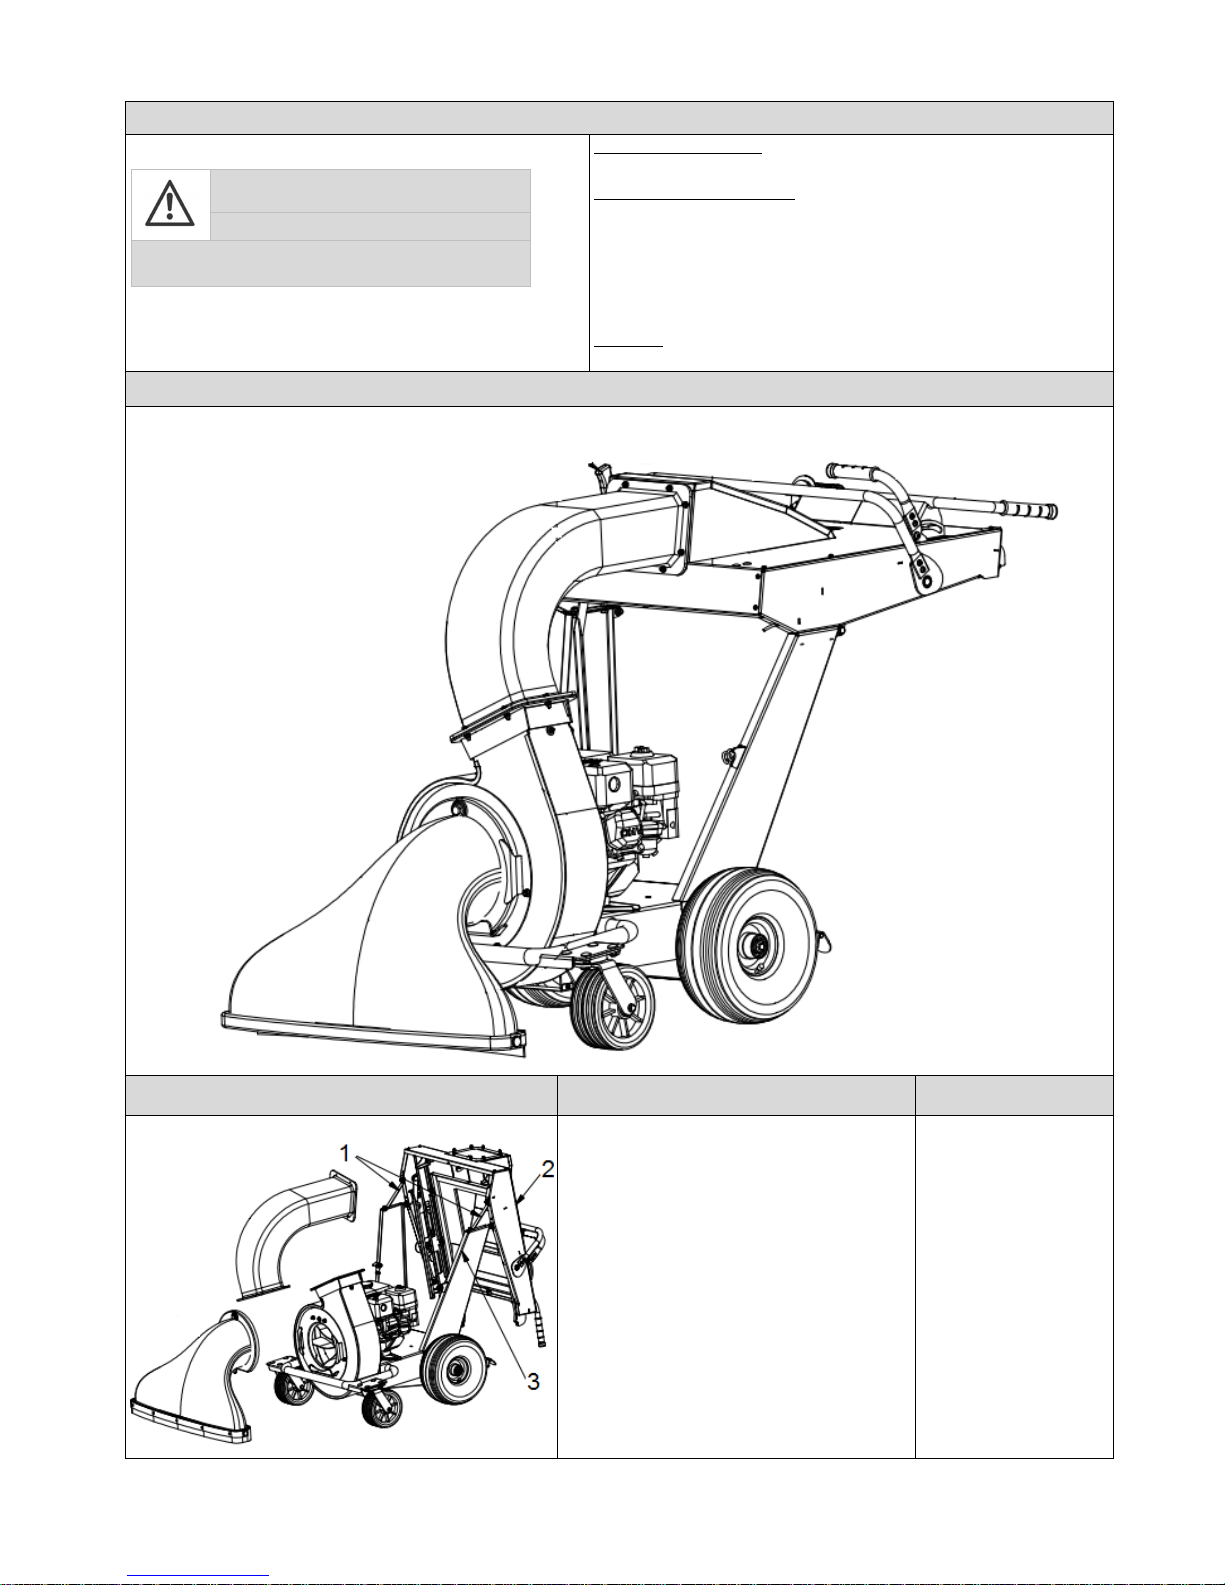
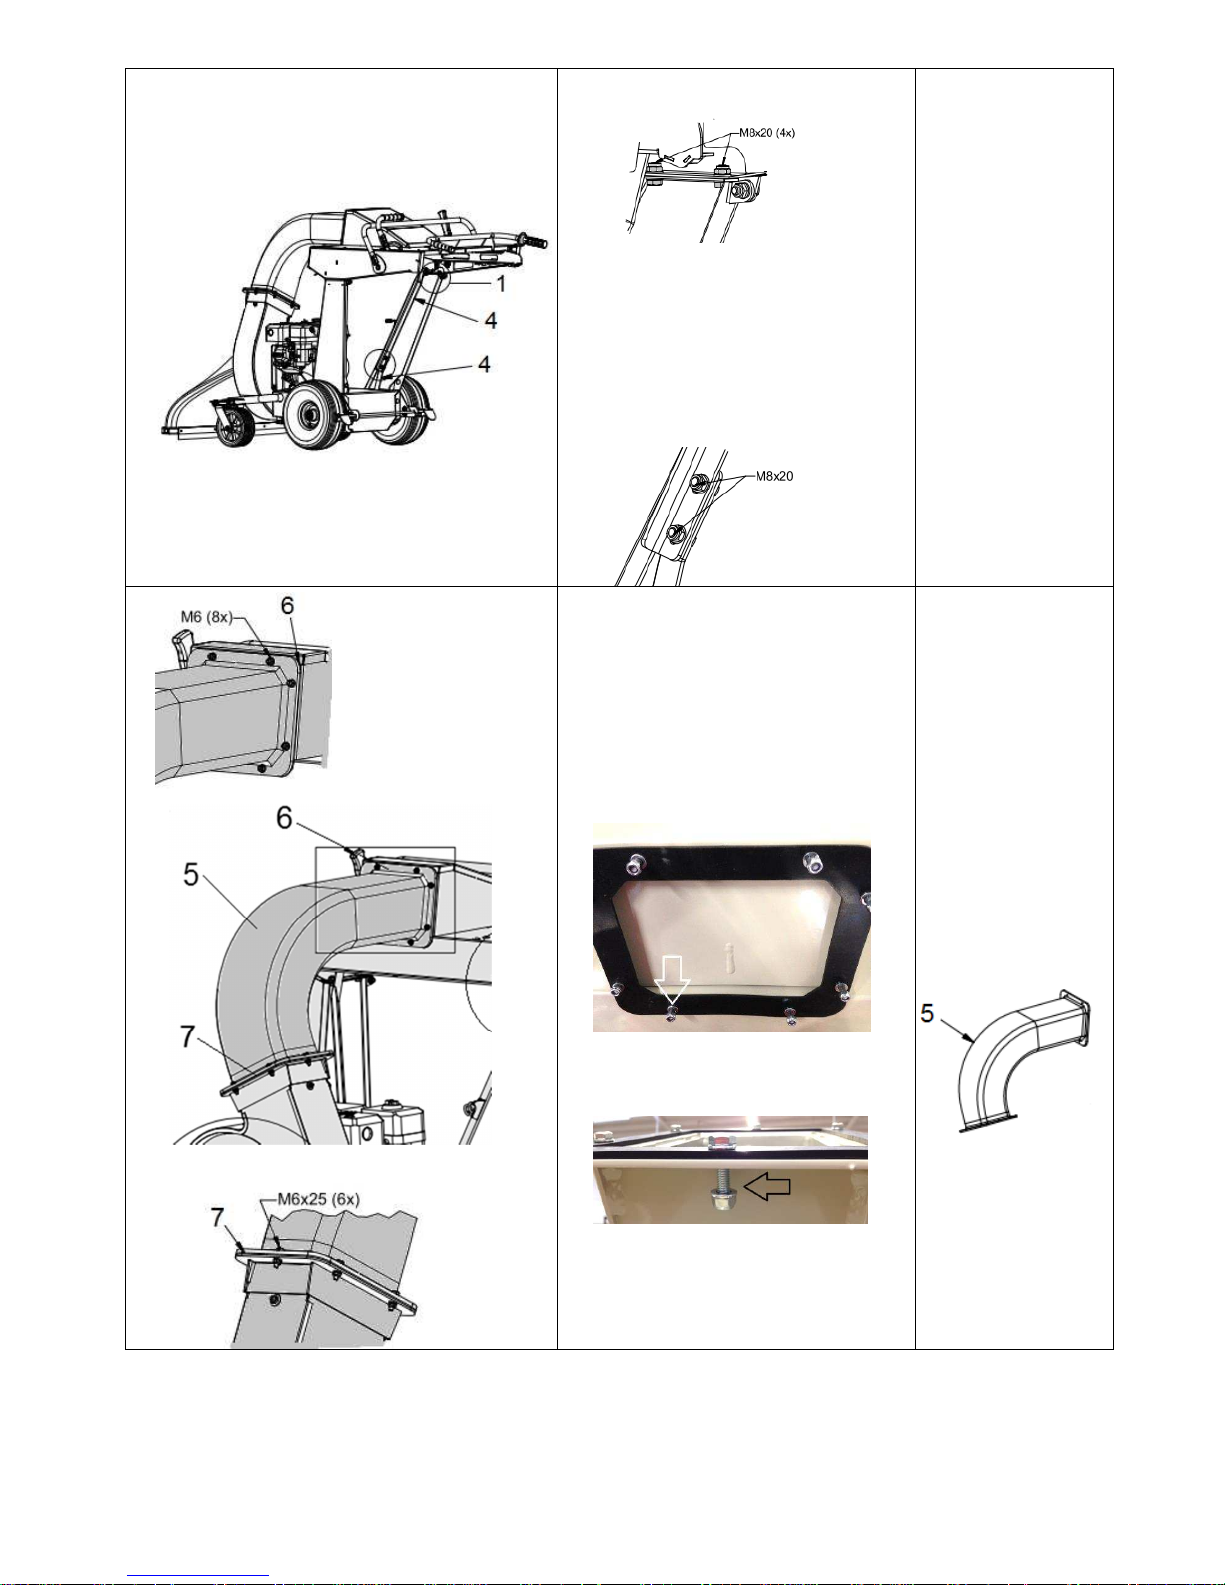
Assembly overview
Working steps Description Assembly parts
1. Unscrew the struts and fold up the control
console.
2. The bolts with the washers and nuts from
item 1 are required to secure the control
console and side wall.
1 Struts
2 Control console
3 Side wall
Page 16
Leaf and litter vacuum
Original Operation Manual
English -16
3. Use the bolts to fasten the control console
to the side wall.
4. For transport reasons, the bar of the height
adjustment lever has been divided into two
parts. The bolts required for these parts are
located at the bore holes of the bar.
5. Remove the bolts and nuts from the bar.
6. Hold the two ends of the bar together so
that the bore holes are aligned. Place a
washer on each of the two bolts and secure
using the washer and nut.
1 Bolt connection from
item 1
4 Height adjustment bar
7. The blower outlet must be secured between
the fan and the control console.
8. Remove the locking nut with the washer
from the flange on the control console.
9. Then remove the bolt connections (bolt,
washers and nut) on the flange of the fan
housing.
10. Hold the blower outlet against the control
console and secure with the washer and
locking nut (illustration).
11. Secure the blower outlet to the fan housing
using the bolts as shown in the illustration at
the bottom.
5 Blower outlet
6 Flange with rubber
seal
(M6x25)
7 Flange with rubber
seal
(Locking nut M6)
The required bolts,
washers and nuts are
attached to the respective
flange. Please secure the
bolts in the same way.
Page 17
Leaf and litter vacuum
Original Operation Manual
English -17
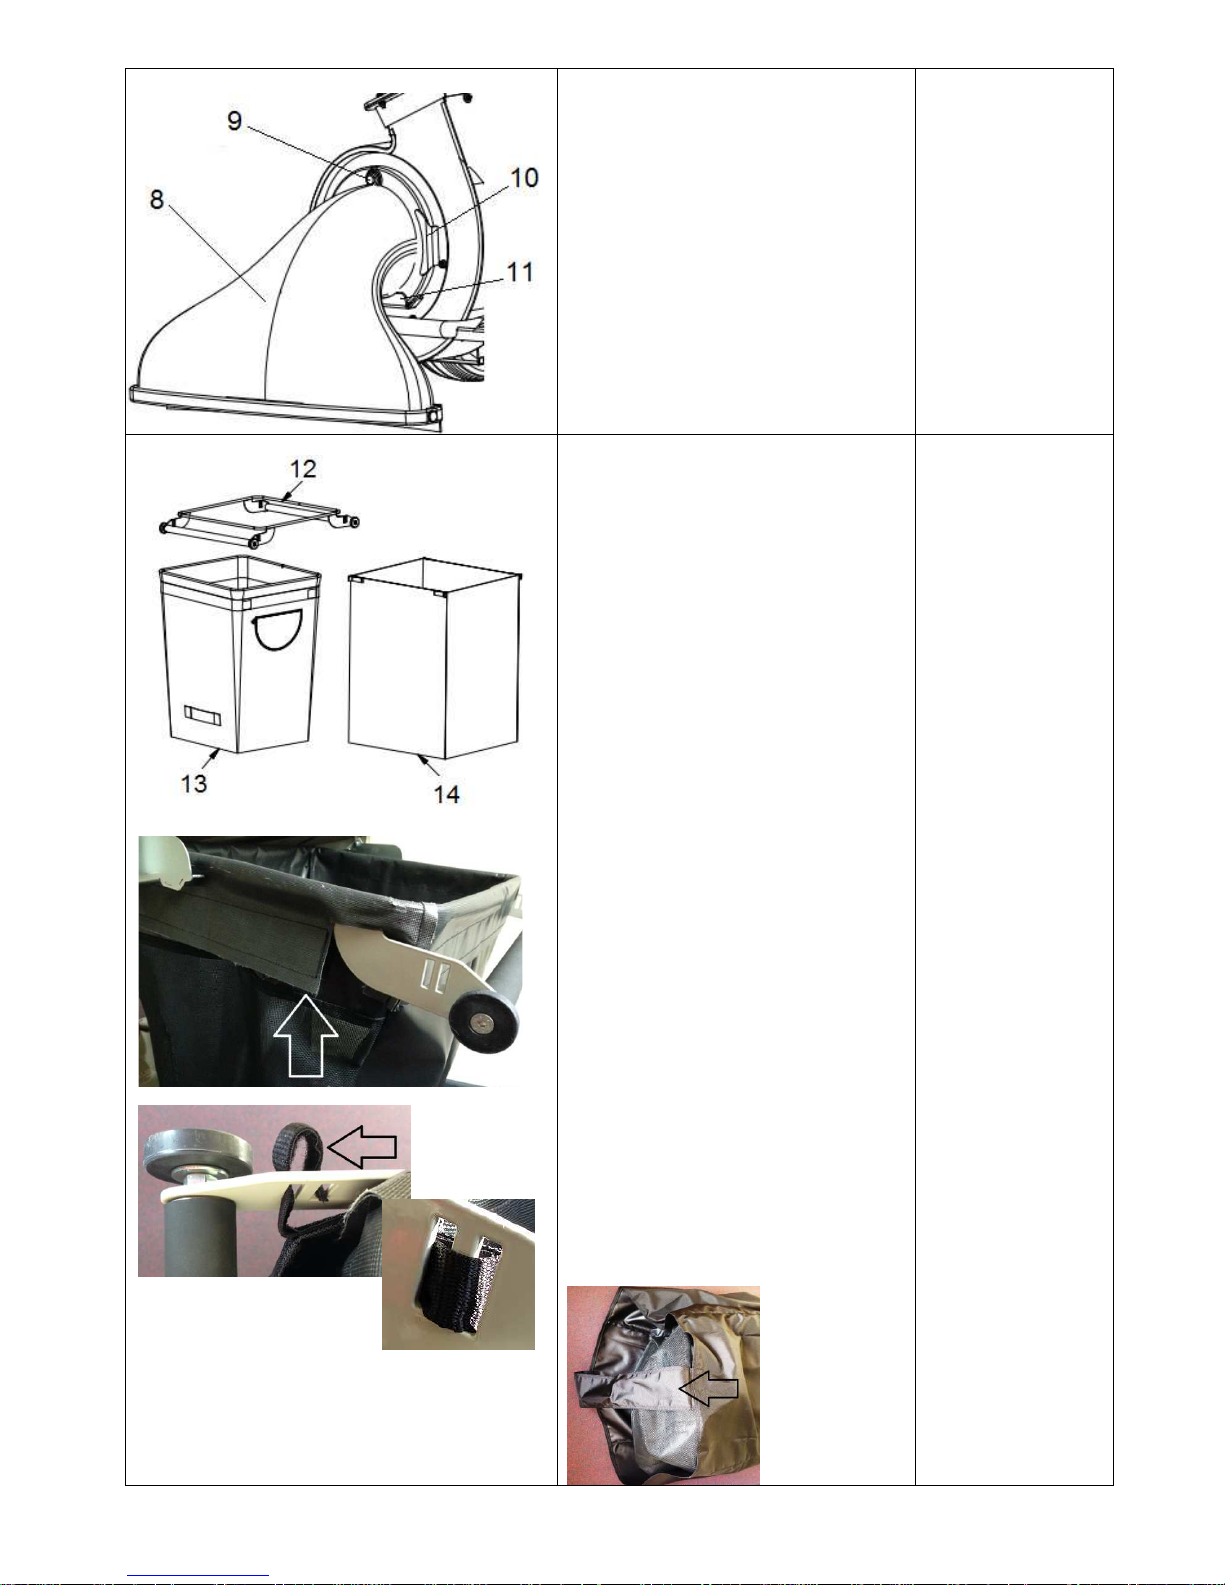
12. Guide the flange of the vacuum nozzle
between the side brackets.
13. Then push the vacuum nozzle further down
into the angle bracket.
Caution!
The nose of the flange must sit in the guide
slot of the angle bracket.
14. Secure the vacuum nozzle with the pre-
assembled hexagon bolt.
8 Vacuum nozzle
9 Hexagon bolt
10 Side bracket
11 Angle bracket
15. Secure the collection bag to the frame using
the Velcro strips. The side zip fasteners for
regulating the airflow must be parallel to the
wheels on the frame.
16. The collection bag and dust cover are
included in the scope of delivery.
Attach the collection bag using the Velcro
fasteners as shown in the picture. (Photo shows
the black wet waste bag)
12 Frame
13 Collection bag (white)
14 Dust cover (black)
17. The dust cover is open at the bottom and
can be attached to the frame over the
collection bag using the Velcro fasteners.
18. Pull the bottom of the dust cover over the
collection bag.
Note!
The strap on the bottom of the dust cover must
be lengthways in the direction of travel.
 Loading...