

Cramer KM 70 G Type 02, KM 80 G Type 02, KM 100 G Type 02, KM Domus Type 02, KM 70 G Operation Manual
...Page 1

Original Operation Manual 12-2014
Sweeper 689.04-40
Sweeper
Operation Manual
Models
KM 70 G Type 02 KM Domus Type 02
KM 80 G Type 02
KM 100 G Type 02
Machine no.
Page 2

Original Operation Manual
Sweeper 689.04-40 - 2
Contents
1 Important Information .......................................................................................................................... 3
1.1 General .................................................................................................................................. 3
1.2 Symbols ................................................................................................................................. 3
1.3 Limitation of liability ................................................................................................................ 3
1.4 Copyright ................................................................................................................................ 3
1.5 Warranty ................................................................................................................................ 3
2 Safety .................................................................................................................................................. 4
2.1 Use in compliance with intended purpose.............................................................................. 4
2.2 Possible misuse ..................................................................................................................... 4
2.3 General sources of risks ........................................................................................................ 4
2.3.1 Use and operation .................................................................................................. 4
2.3.2 Product-specific risks .............................................................................................. 4
2.3.3 Risks from motor operation .................................................................................... 4
2.3.4 Operating risks ....................................................................................................... 4
2.3.5 Risks for children, elderly persons and pets ........................................................... 4
2.4 Maintenance ........................................................................................................................... 4
2.5 Staff and operator qualification .............................................................................................. 4
2.6 Safety instructions .................................................................................................................. 5
2.7 Required protection equipment .............................................................................................. 5
2.8 Safety devices ........................................................................................................................ 5
2.9 Behaviour in case of fire......................................................................................................... 5
2.10 Environmental protection ....................................................................................................... 5
3 Design and function ............................................................................................................................ 5
3.1 Brief description ..................................................................................................................... 5
3.2 Overview ................................................................................................................................ 5
3.3 Operating elements for all models ......................................................................................... 6
3.4 Operating elements for KM Domus........................................................................................ 7
3.5 Operating elements for KM 70 G, KM 80 G, KM 100 G ......................................................... 7
3.6 Working position and areas of risk ......................................................................................... 8
3.7 Accessories and spare parts .................................................................................................. 8
4 Delivery, transport, storage ................................................................................................................. 8
4.1 Delivery .................................................................................................................................. 8
4.2 Transport ................................................................................................................................ 8
4.3 Storage ................................................................................................................................... 8
5 Start up (first machine inspection) ...................................................................................................... 8
5.1 Safety ..................................................................................................................................... 8
5.2 Requirements at location of use ............................................................................................ 8
5.3 Assembly ................................................................................................................................ 8
5.4 Start-up and functional test .................................................................................................... 8
6 Operation ............................................................................................................................................ 9
6.1 Activities prior to use .............................................................................................................. 9
6.2 Start and stop ......................................................................................................................... 9
6.3 Normal operation.................................................................................................................... 9
6.4 Brush setting .......................................................................................................................... 9
6.5 Brush inclination ..................................................................................................................... 9
6.6 Activities after use .................................................................................................................. 9
7 Maintenance ..................................................................................................................................... 10
7.1 Safety ................................................................................................................................... 10
7.2 Maintenance plan ................................................................................................................. 10
7.3 Maintenance work ................................................................................................................ 11
7.3.1 Machine cleaning .................................................................................................. 11
7.3.2 Check safety precautions ..................................................................................... 11
8 Troubleshooting ................................................................................................................................ 11
8.1 Safety ................................................................................................................................... 11
8.2 Service address ................................................................................................................... 11
8.3 First action for troubleshooting ............................................................................................. 11
9 Technical data ................................................................................................................................... 12
10 Declaration of conformity .................................................................................................................. 13
11 Sweeping brush installation, Side cover installation .................................................................... 14-16
Page 3
Original Operation Manual
Sweeper 689.04-40 - 3
1 Important Information
We are pleased that you have selected a machine from
Cramer GmbH in Germany.
Please read this Operation Manual before you use the
machine for the first time and observe the notes and
safety instructions.
Imprint
Cramer GmbH
Reimersstr. 36
D-26789 Leer
Phone: +49491/60950
Fax: +49491/6095200
District court of Aurich HRB 110877
VAT ID: DE 814 305 398
1.1 General
Information on this Manual
• Observing the instructions in this manual allows for the
safe and efficient handling of the machine.
• The operator must have read this manual carefully and
understood it before starting working with the machine.
• Compliance with the safety instructions contained is a
prerequisite for using the machine without any risk.
Keeping the Operation Manual
• The Operation Manual is an integral part of the machine
and shall be kept in its immediate vicinity.
• The operator must have access to this Manual at any
time.
Traffic regulations
• Any applicable traffic regulations have to be complied
with in regard to manoeuvring and transporting the
machine on public roads.
Accident prevention regulations
• General safety and local accident prevention regulations
must also be observed.
• National occupational safety regulations shall be
complied with.
Other
applicable documents
Assembly instructions, declaration of conformity
1.2 Symbols
DANGER !
This symbol cautions against an immediate
threat resulting in serious injuries or death if
not avoided.
WARNING !
This symbol cautions against a potentially
dangerous source of risk which may result in
death or serious injury if not avoided.
ATTENTION !
Indication of a potential risk which may result
in minor injuries if not avoided.
NOTE !
This symbol cautions against a potentially dangerous
source of risk which may result in damage to property or
minor injuries.
1.3 Limitation of liability
Liability on part of the manufacturer is excluded in the
following cases:
• Non-compliance with the Operation Manual
• Use of the machine and accessory equipment not in
compliance with intended purpose
• Assignment of untrained staff
• Use of unauthorized spare parts Only original
components may be used.
• Unauthorized modifications on the machine and the
accessory equipment.
1.4 Copyright
© Cramer GmbH
Copying of the Operation Manual is only permissible for
internal training purposes.
1.5 Warranty
The General Terms and Conditions of Business as issued by
us in every country shall be applicable. Failures within the
statutory warranty period will be remedied by us free of
charge if they are caused by a material or manufacturing
defect in our responsibility. Please contact your authorized
dealer in case of a failure and submit the proof of purchase.
Page 4

Original Operation Manual
Sweeper 689.04-40 - 4
2 Safety
2.1 Use in compliance with intended purpose
The machine is approved as a sweeper for sweeping
and collecting (with fitted sweepings container)
leaves and waste.
Any use exceeding this is considered not in
compliance with the intended purpose. The
manufacturer shall not be liable for damage resulting
from use not in compliance with the intended
purpose; the risk for this shall be in the sole
responsibility of the user.
Use in compliance with the intended purpose shall also
include compliance with the operation and maintenance
provisions specified by the manufacturer.
2.2 Possible misuse
• Do not sweep any wires, cables or heavy stones:
machine damage and injuries might be caused by
flinging.
• Do not use your foot to push any objects beneath the
sweeping brushes. (Risk of injuries!)
• Do not sweep any materials which may block the
sweeping brushes. (Machine damage!)
2.3 General sources of risks
2.3.1 Use and operation
• Prior to starting the machine, the machine including
accessories shall be checked for their proper condition
and operational safety.
• The operator shall use the machine in compliance with its
intended purpose.
• Indoor machine operation is prohibited.
• The machine is only approved for floorings as indicated in
the Operation Manual.
• The machine may only be operated by staffs who have
been instructed in its use or have provided evidence of
their operating capability, and who have explicitly been
instructed to operate the machine.
• When starting the motor, no other persons may be in the
vicinity of the machine.
• Any protective equipment must be properly attached and
in working order.
• Never leave the machine unattended.
• When leaving the machine, stop the motor and secure
the machine against unintended movement.
• The operator shall be responsible for accidents involving
other persons or their property.
2.3.2 Product-specific risks
• Do not sweep any highly flammable materials or hot
objects (e.g. barbecue coal) - danger of life by burning!
2.3.3 Risks from motor operation
• Do not touch any parts of the motor during or after
operation. Significant risk of burning by hot surfaces.
• Stop the motor and let it cool down before working on the
machine as well as before performing maintenance,
cleaning and repair work.
• Do not refill the tank when the motor is running - danger
of life by burning and explosion.
• Immediately remove spilled fuel with a cloth - danger of
life by burning and explosion.
• Keep fuel in designated containers.
• Exhaust gases are toxic and dangerous to health; they
must not be inhaled.
2.3.4 Operating risks
• Without any accessories mounted, only use the machine
on slopes of up to 12 %.
• With accessories mounted, only use the machine on
slopes of up to 2 %.
• When using the machine transverse to the direction of
travel, this is only possible on slopes up to 12 %.
• When operating the machines on slopes: be careful when
lifting off mounted accessories
2.3.5 Risks for children, elderly persons and pets
• The operator shall take account of surrounding
conditions, e.g. the effects of noise on persons and
animals.
• The machine must never be left on a slope.
• Children, elderly persons and pets/livestock must not stay
near the machine.
• Children must not play with/on the machine.
2.4 Maintenance
• Servicing, maintenance and repair work as well as
troubleshooting shall only be carried out when the
machine is switched off and the motor is at a standstill.
As required, the spark plug connectors shall be
disconnected.
• The machine must not be cleaned with spray water (risk
of short circuits or other damage).
• Safety checks pursuant to local regulations for nonstationary commercially used machines shall be complied
with.
• Wear suitable gloves and use appropriate tools for
working on the machine.
• Only use the manufacturer's original spare parts.
2.5 Staff and operator qualification
• Persons with physical, sensory or mental handicaps or
persons with insufficient experience or knowledge must
not operate the machine unless a person in charge for
their safety acts as operation or instruction supervisor.
• People under the age of 16 must not operate the
machine.
• The operator's responsiveness must not be affected, e.g.
by drugs, alcohol or medications.
• The operator shall have been instructed in the operation
of the machine.
• The operator shall be familiar with the Operation Manual.
Page 5
Original Operation Manual
Sweeper 689.04-40 - 5
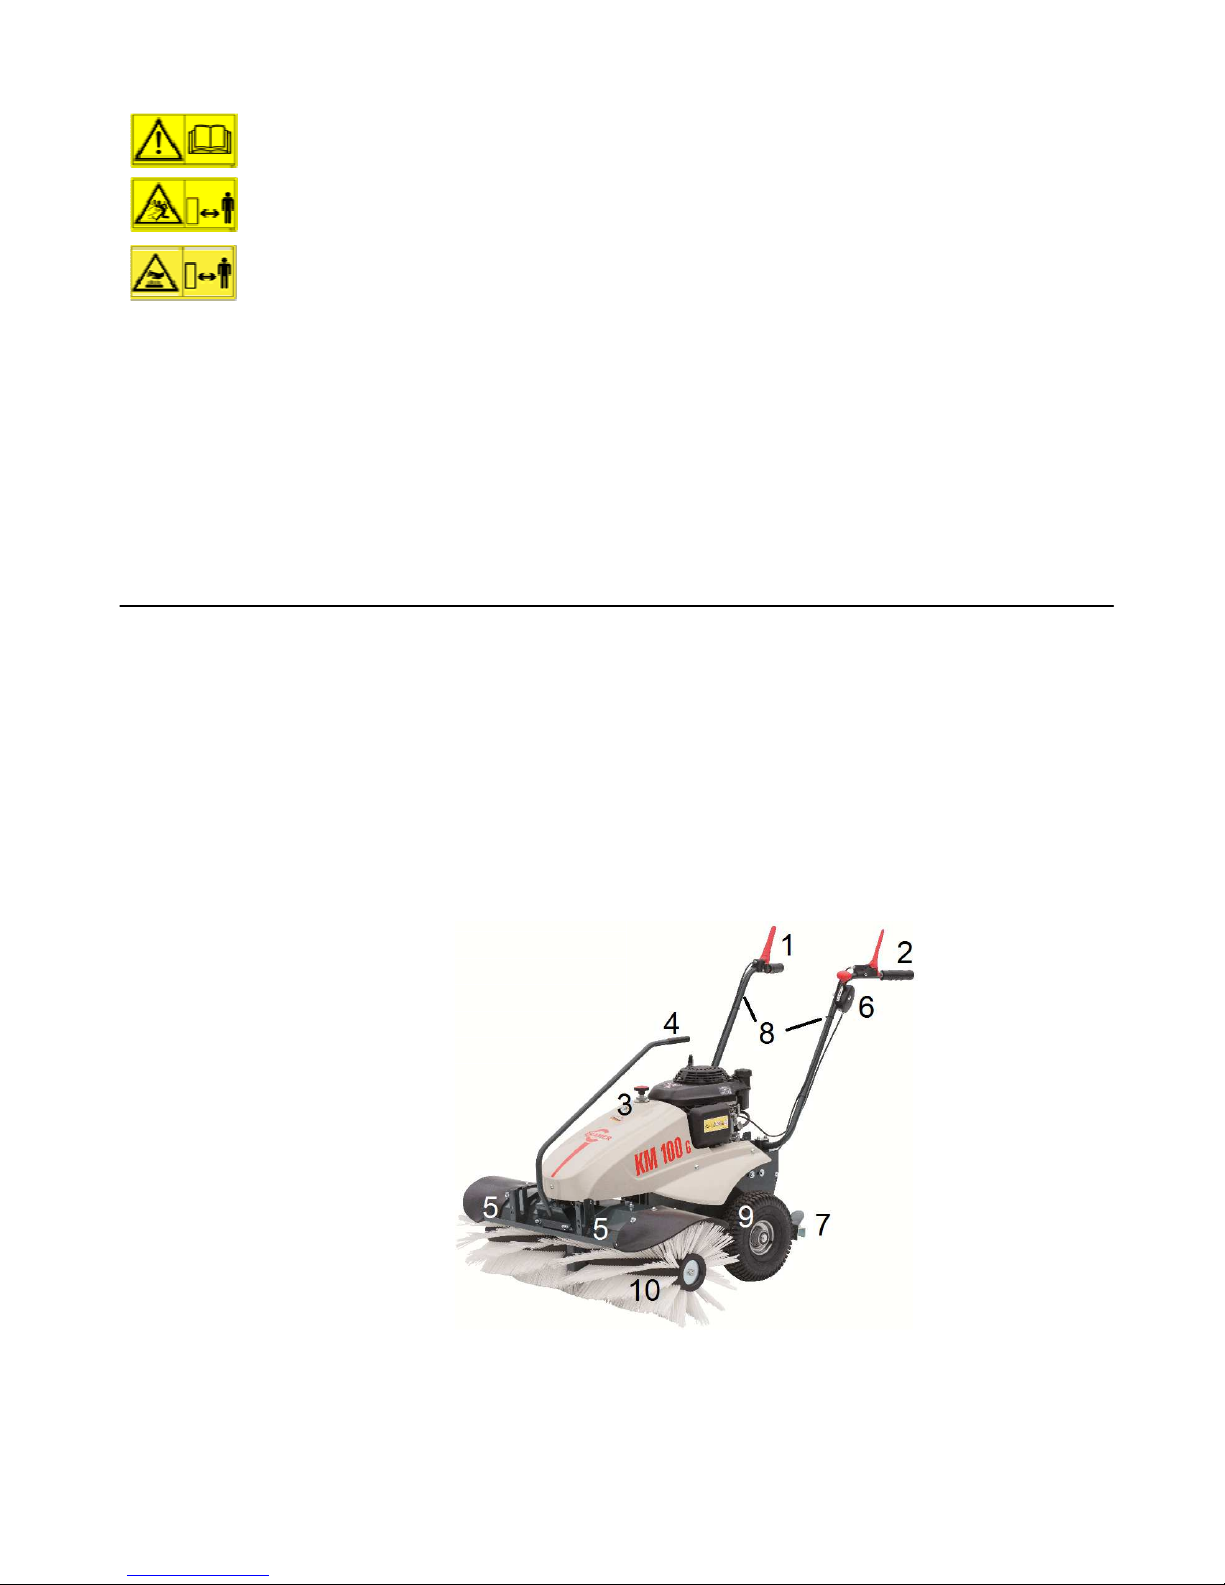
2.6 Safety instructions
The assembly and safety instructions
must be read and observed prior to
starting the machine.
Risk by flinging parts with running motor.
Keep a safety distance of 3 m.
Keep sufficient distance to hot surfaces.
2.7 Required protection equipment
• Rugged footwear
• Close-fitting clothing
• Ear protection
• Safety gloves
• Protection goggles
2.8 Safety devices
• Do not remove any covers during operation.
• Immediately remedy any damage to safety devices.
2.9 Behaviour in case of fire
1. Stop immediately.
2. Switch off the motor.
3. Leave the machine.
4. Remedy the risk situation.
2.10 Environmental protection
• Oils, fuels, greases and filters shall be disposed of
properly and separately in accordance with legal
regulations. Please do not dispose of any wastes in the
environment.
• Packaging materials are recyclable. Please make sure
that they are collected for reuse.
• Legacy devices contain valuable recyclable materials
which should be collected for reuse. These devices may
be disposed of through appropriate collection systems.
3 Design and function
3.1 Brief description
The sweeper is used to sweep up leaves and waste and is powered by a petrol motor. The sweeping brushes can be adjusted by
an angle of 45° in both directions.
3.2 Overview
1
Clutch lever for operation drive
2
Lever for sweeping brush drive (Bowden cable)
3
Height adjustment of sweeping brush
4
Swivel bracket to adjust sweeping brush
5
Attachment points for accessories
6
Hand throttle for motor capacity
7
Parking brake
8
Steering bracket
9
Drive wheel
10 Sweeping brushes
Page 6
Original Operation Manual
Sweeper 689.04-40 - 6
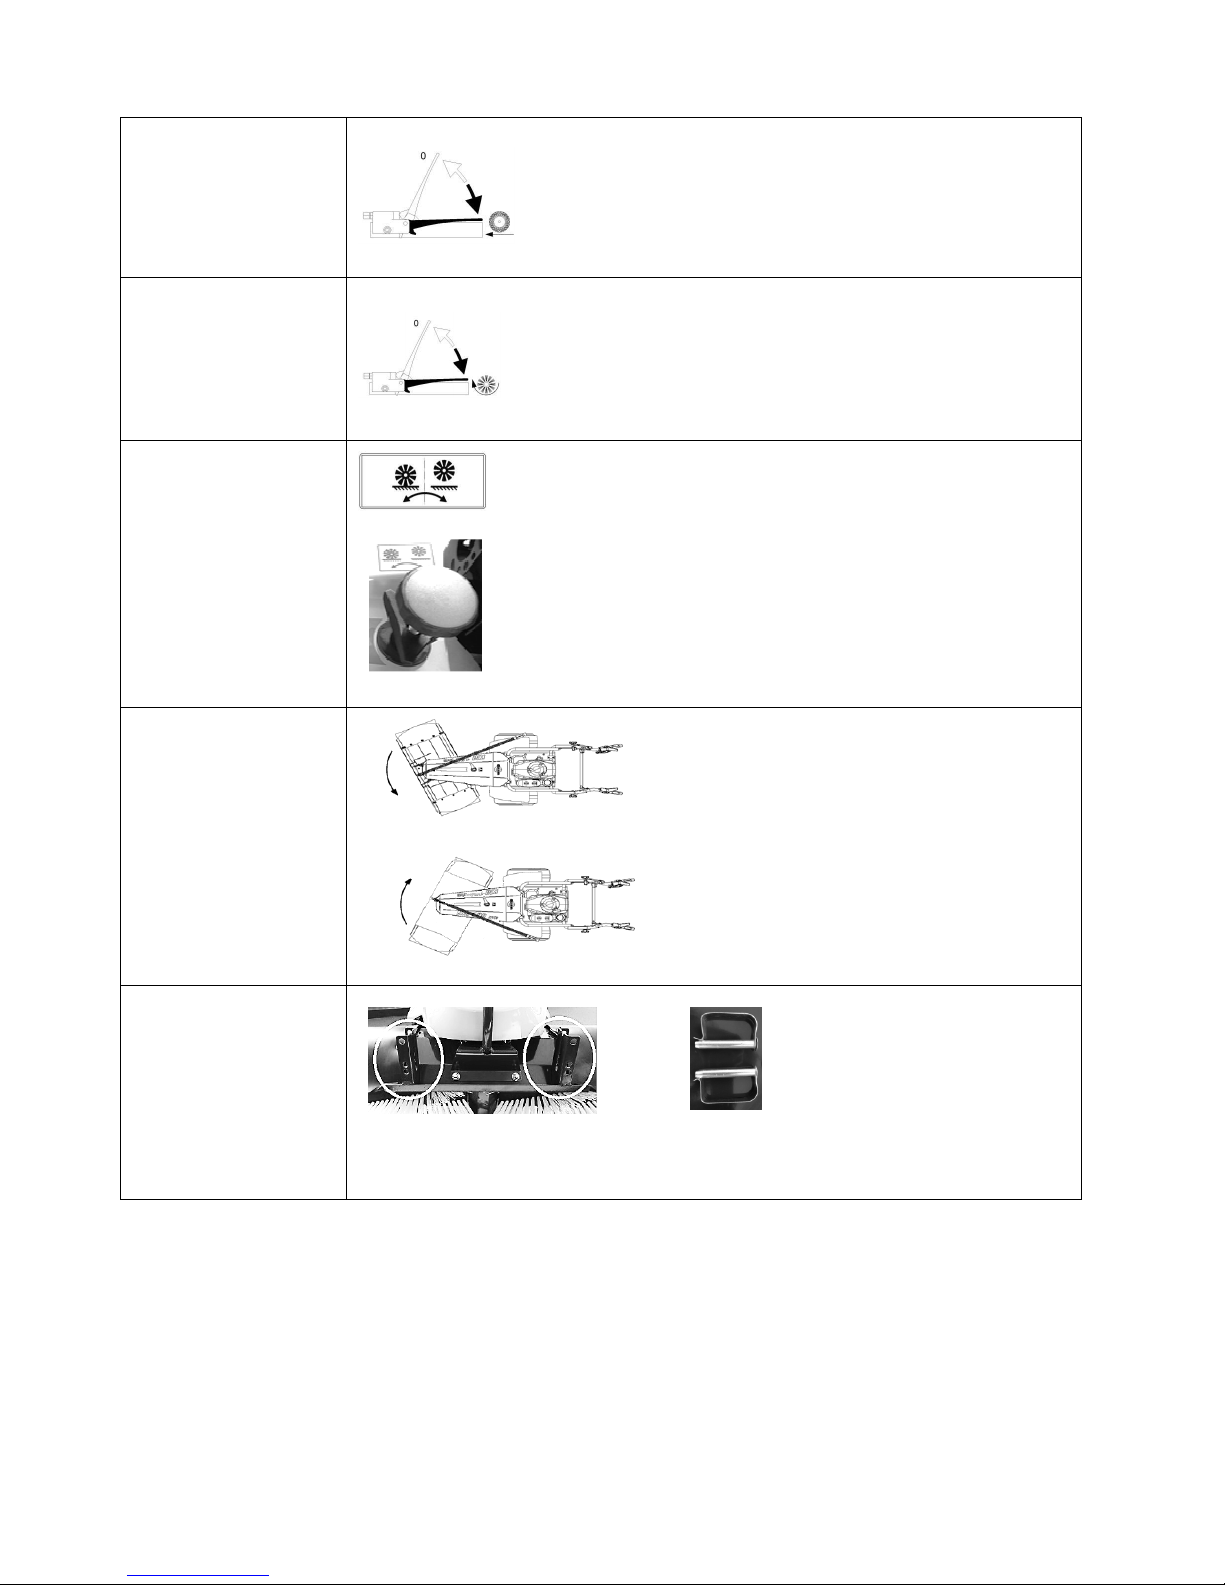
3.3 Operating elements for all models
1. Drive
Lever on the right for operation drive
Lever released: Machine is at standstill
Lever activated: Machine moving
2. Brush drive lever
Lever on the left for brush activation
Lever released: Brush is at standstill:
Lever activated: Brush turns
3. Brush height adjustment
Turn handle to the
required setting.
Use the star screw to secure the setting.
Turn right → Li$ brush
Turn left → Brush is lowered
4. Swivel bracket for brush
adjustment
1. Lift swivel bracket (disengage)
2. Select setting (centre, left, right)
3. Push back bracket (engage)
5. Attachment points for
accessories
Mount accessories in the provided elongated hole guide and secure them by R-clips
Page 7
Original Operation Manual
Sweeper 689.04-40 - 7
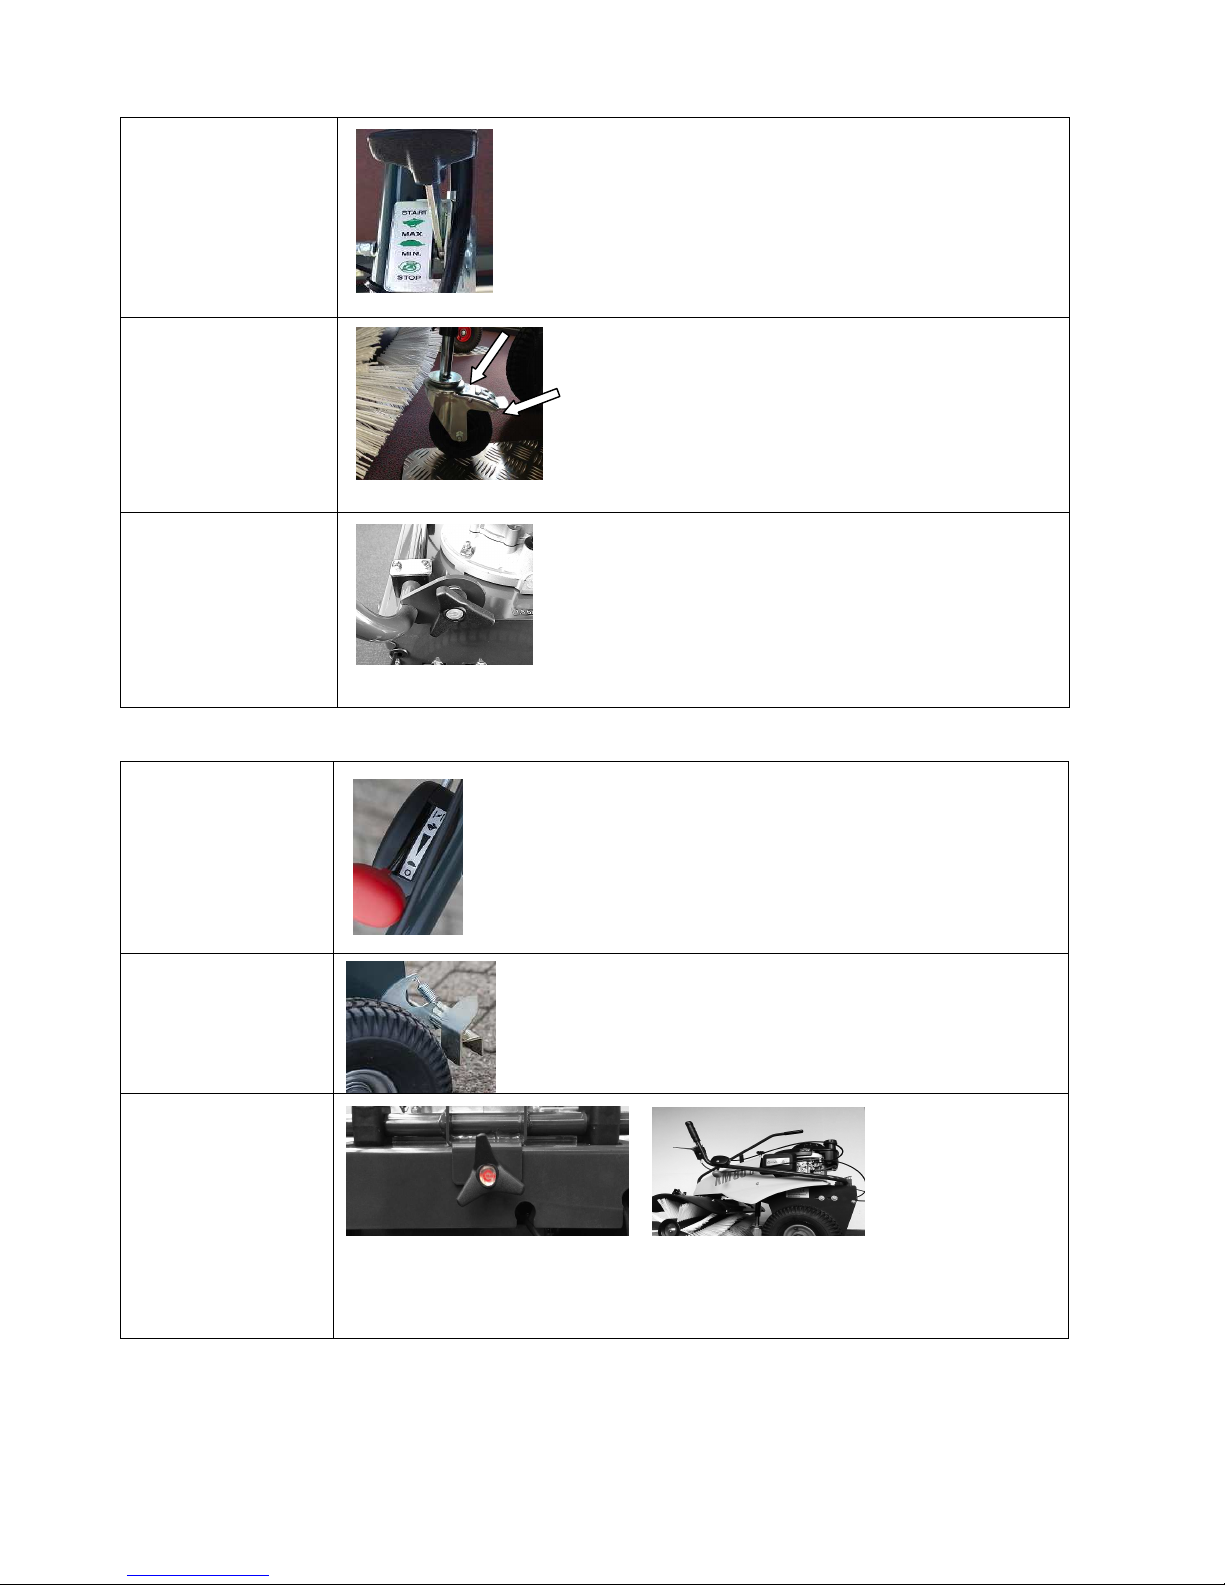
3.4 Operating elements for KM Domus
4. Hand throttle for motor
capacity
Parking brake on support
wheel
Brake on: Push the lower lever down
with your foot
Brake off: Push the upper lever down
with your foot
8. Release and tilt back
steering bracket
(for transport and storage)
1. Release cross-head screw
2. Hold Bowden cable at the right and left of the motor block
3. Carefully turn steering bracket to motor cover (observe cables!)
4. Position swivel bracket as shown in figure in item 3.5.8.
3.5 Operating elements for
KM 70 G, KM 80 G, KM 100 G
6. Hand throttle for motor
capacity
Choke
Full throttle
Idle
Off
7. Parking brake on rear
wheel
Brake on: Push the pedal on the brake down with your foot
Brake off: Pull the machine backwards; the brake is released
automatically.
8. Release and tilt back
steering bracket
(for transport and storage)
1. Release cross-head screw
2. Hold Bowden cable at the right and left of the motor block
3. Carefully turn steering bracket to motor cover (observe cables!)
4. Position the swivel bracket as shown in figure.
Page 8
Original Operation Manual
Sweeper 689.04-40 - 8
3.6 Working position and areas of risk
Working position:
Behind the machine on the handles
Areas of risk:
• Catchment area of sweeping brushes
• Ejection area of sweeping brushes
3.7 Accessories and spare parts
Original parts
Only original spare parts and original accessories may be used.
4 Delivery, transport, storage
4.1 Delivery
Risk of high dead weight
• The machine must not be lifted manually.
• Pull the machine off the transporter by the steering
bracket.
Transport inspection
• Check the machine for completeness and potential
damage upon delivery.
• Assembly and start-up are to be performed by the
specialist dealer.
4.2 Transport
Transport without packaging
• Shut down the machine.
• Apply the parking brake.
• Close the petrol tap.
• Fix the machine by using lashing straps.
4.3 Storage
• Do not store the machine in the open air.
• Do not expose it to aggressive materials.
• Clean machine with a soft brush before start up.
5 Start up (first machine inspection)
5.1 Safety
Unauthorized restart
• It is prohibited to start the machine while another person
is working on it.
Risks of insufficient order and cleanliness
• Clean the machine from dried dirt and sand regularly.
• Check the machine for blocking objects.
Risks of non-applied protection devices
WARNING !
Risk of injuries by rotating brushes!
Parts of the body may be seized if you reach into the
sweeping brushes.
Lack of covers may cause injuries by flinging materials.
Do not reach into the brushes during operation.
Do not open or remove any covers during operation.
5.2 Requirements at location of use
• Only leave the machine on plane surfaces and solid
ground.
• Only mount accessories on plane surfaces and solid
ground.
5.3 Assembly
Please observe the Assembly Instructions in the Annex of
this Operation Manual.
5.4 Start-up and functional test
Machine start
1. Fill the fuel tank
2. Put on protection equipment
3. Open fuel tap (except KM Domus)
4. Set throttle to Start/Choke
5. Slightly pull starter lever to resistance
6. Strongly pull starter lever
7. Carefully return starter lever
8. Set throttle to MAX/full throttle
Page 9
Original Operation Manual
Sweeper 689.04-40 - 9
6 Operation
6.1 Activities prior to use
Basic setting
Height of sweeping brush is set
Fuel tank is filled
Throttle is set to STOP/off.
6.2 Start and stop
KM Domus Start
1. Move throttle to Start
2. Pull starter rope
3. Motor is running
4. Move throttle to MAX
Stop
1. Move throttle to STOP
2. Motor is off
KM 70 G
KM 80 G
KM 100 G
Start
1. Open fuel tap
2. Set Choke
3. Pull starter rope
4. Motor is running
5. Move throttle to full throttle
Stop
1. Move throttle to off
2. Motor is off
3. Close fuel tap
Emergency stop
Immediately move throttle to STOP/off.
6.3 Normal operation
WARNING!
Risk of injuries by highly flammable
materials and heat!
Materials coming into contact with a hot surface may result
in serious burns on the body when they inflame; e.g. hot or
burning materials such as coal.
Keep highly flammable materials away from the
machine.
Do not sweep any spilled fuel or similar substances.
6.4 Brush setting
Height setting of sweeping brush by adjusting the support
wheel:
• The bristles of the sweeping brushes should just touch
the ground
• Turn crank to the left: Sweeping brush is lowered
• Turn crank to the right: Sweeping brush is lifted.
An excessively low setting results in an overload of the drive
and in inappropriate wear of the sweeping brushes.
6.5 Brush inclination
In order to sweep dirt to a specific side:
Set brush to the left or to the right.
6.6 Activities after use
1. Stop the motor.
2. Roughly remove dirt and sand by using a soft hand
brush.
3. Clear the brushes from tapes or wires wrapped around
them.
4. The machine must be left in a clean and dry condition.
5. Where applicable, close the petrol tap.
Start the machine.
• Activate operation drive lever.
• Activate brush drive.
• Move machine across the area to be swept.
• Adjust brush on the left or right in order to sweep dirt
aside.
Stop machine.
Page 10
Original Operation Manual
Sweeper 689.03-40 - 10
7 Maintenance
7.1 Safety
DANGER !
Risk of injury by inappropriately performed
maintenance work!
Defective work may result in serious bodily injuries and
damage to property.
Make sure that you have sufficient working space.
Place components separately.
Remount all components.
Remount all safety covers.
Keep the risk area clear of persons.
Disconnect spark plug connectors when working on
the machine.
7.2 Maintenance plan
Maintenance Prior to each use Annually Intervals in hours
25 50 100 200
Cleaning X (Item 7.3.1)
Check safety precautions X (Item 7.3.2)
Check all screws for tight fitting O
Check motor oil level B
Check air filter B
Clean or replace air filter (normal use) B
Clean or replace air filter (dusty conditions) B
Adjust tyre pressure O
Check sweeping brushes for tapes wrapped
around
O
Check sweeping brush height adjustment X (Item 6.4)
Check sweeping brush for wear O
Check and adjust Bowden cables F
Grease rotating points and joints O
Grease Bowden cables O
Check machine for fuel or oil leaks O
Replace fuel filter B
Replace spark plugs B
X = Described in this Operation Manual in the indicated section.
O = Not described in the present Operation Manual
B = Description is enclosed in attached motor operation manual.
F = Work may only be performed by a qualified expert in this field.
Page 11
Original Operation Manual
Sweeper 689.03-40 - 11
7.3 Maintenance work
ATTENTION!
Risk of injuries by combustion motors
Cleaning and repair work must never be carried out during
operation or when the machine runs idle, since this may
result in burns and cuts.
Stop machine and motor and let them cool down.
Disconnect the spark plug connectors.
Wear protection clothing and gloves for all work.
Avoid contact with parts.
7.3.1 Machine cleaning
NOTE !
Machine damage!
Do not clean the machine with spray water.
Wipe off machine with a soft brush or a damp cloth.
7.3.2 Check safety precautions
Safety precautions comprise:
- Covers of brushes (including rubber strips)
- Covers of drive wheels
- Motor cover
The covers must not show any damage or be removed. They
are to be replaced in case of damage or loss. The machine
must not be started without safety precautions.
8 Troubleshooting
8.1 Safety
Procedure for failures and accidents
1. Initiate emergency stop (leave working position).
2. Stop the machine.
3. Determine the failure cause.
4. Remedy failure or contact specialist dealer.
8.2 Service address
Please contact your sales consultant in case of failures,
problems or otherwise. Please always indicate the machine
serial no. in inquiries. (Please refer to nameplate on the
machine or on the Operation Manual cover).
Spare parts designations and spare parts lists are provided
for download on our website www.cramer.eu.
.
8.3 First action for troubleshooting
Failure / Error message Remedy Notes
Motor does not start
Low motor capacity
Check throttle position (START).
Refill tank.
Open fuel tap (Honda motor).
Drain spoiled or old fuel from tank and carburettor; add fresh fuel.
Check and clean spark plug; replace if required.
Check air filter; clean as required.
Check Bowden cable to motor.
Fuel line clogged or water in fuel - drain line and tank and refill fuel.
Notify Cramer specialist dealer.
Observe motor manufacturer's
Operation Manual!
Motor becomes excessively hot.
Carburettor needs readjustment.
Check and fill up motor oil.
Motor is running, but machine does not
move.
Adjust Bowden cable of operation drive.
Notify Cramer specialist dealer.
Notify authorized dealer if failure
persists.
Only use original spare parts!
Machine does not sweep properly
Heavy wear on brush
Check sweeping brush for wear; replace if required.
Lower and/or lift sweeping brush by height adjustment.
Re-adjust Bowden cable of sweeping drive.
Notify Cramer specialist dealer.
Low brush speed
V-belt slips → Tighten belt using adjustment screw on brush drive lever.
Brushes are rotating
Adjust Bowden cable at set screws.
Sweepings container performs
unsatisfactorily.
Correct rubber strip seat of sweepings container.
Re-adjust support wheel.
Snow is thrown under the machine
Use snow plow when snow is too high.
Set brushes to the very left or right.
Drive performance null or weak
Take machine to dealer.
Page 12

Original Operation Manual
Sweeper 689.03-40 - 12
9 Technical data
KM Domus KM 70 G KM 80 G KM 100 G
Type 02 Type 02 Type 02 Type 02
Machine data
Length x Width x Height, cm 86 x74x75 89x71x76 89x81x76 89x101x76
Deadweight (transport weight), kg 62 68 70 72
Drive speed Forward km/h
Backward km/h
2.4 2.4 2.4 2.4
Brush speed 280 280 280 280
Climbing power, max % 12
Climbing power with accessories, max % 2
Working width, cm 70 70 80 100
Support wheel 360° freely rotatable
Brush is adjustable Left Centre Right
Motor
Model
Briggs & Stratton
575 ex
Honda
GCV 140 / GCV 160
Honda
GCV 160
Engine size, cm³ 140 160 / 160 160
Max. motor speed, rpm 3600 3100 / 3100 3100
Min. motor speed, rpm 2800 1600 / 1600 1600
Net capacity KW(HP) at 3600 rpm 3.3(4.5) 3,1(4,2) / 3,3(4,4) 3.3(4,4)
Max. permanent capacity KW(HP) 2.4(3.3) 1,9(2,6) / 2,1(2,8) 2.1(2.8)
Fuel type Regular petrol, lead-free
Tank contents, litres 0.8 0,93 0,93 0,93
Spark plug EMC (Q) BPR 6 ES (NGK) BPR 6 ES (NGK) BPR 6 ES (NGK)
Motor oil type SAE 10W30
Motor oil filling quantity, litres 0.44 0.50 0.50 0.50
Tyres
Drive wheel Ø 300 (4.00-4)
Air pressure, bar 1.8
Support wheel Ø 125
Wheel drive Worm gear Tandem worm gear
Ambient conditions
Temperature, °C -5 to +40
Working ground Asphalt, industrial flooring, floor screed, concrete, pavement
Application area Normal use in facilities and landscaping maintenance
Noise emission
Guaranteed acoustic power level, dB 98 97 94 95
Sound pressure level at operator ear, dB 85 84 81 82
Hand-arm vibration, m/s² 4.2 <2.5 2.6 3.6
Responsibility limits for components: Motor
Motor
Motor
Motor
Year of construction See machine nameplate
Technical modifications reserved!
Page 13
Original Operation Manual
Sweeper 689.03-40 - 13
10 Declaration of conformity
EU Declaration of conformity pursuant to machine directive 2006/42/EC Annex II 1-A
The authorized party with residence in the EU,
Cramer GmbH
Reimersstr. 36
26789 Leer
herewith declares, that the following product
Manufacturer: Cramer GmbH
Reimersstr. 36
26789 Leer
Product designation: Sweeper
Make: Cramer GmbH
Serial number: see cover nameplate
Type(s): KM Domus, KM 70 G, KM 80 G, KM 100 G
complies with all relevant regulations of the above-stated Directive as well as all other applicable Directives - including their
amendments applicable at the date of this declaration.
The following other EU Directives were applied:
EMC Directive 2004/108/EC
EU Directive 2000/14/EC
The following harmonized standards were applied:
EN 12733:2001+A1:2009
EN 349:1993+A1:2008
EN 55012:2007/A1:2009
EN 953:1997+A1:2009
EN ISO 12100:2010
EN ISO 13857:2008
EN ISO 3744:2010
DIN EN ISO 5349-2
Name and address of person authorized to compile the technical documentation:
Andre Schwarzkopf
Cramer GmbH
Reimersstraße 36
26789 Leer
Place: Leer
Date: 05/12/2014
Page 14
Original Operation Manual
Sweeper 689.03-40 - 14
11 Sweeping brush installation, Side cover installation
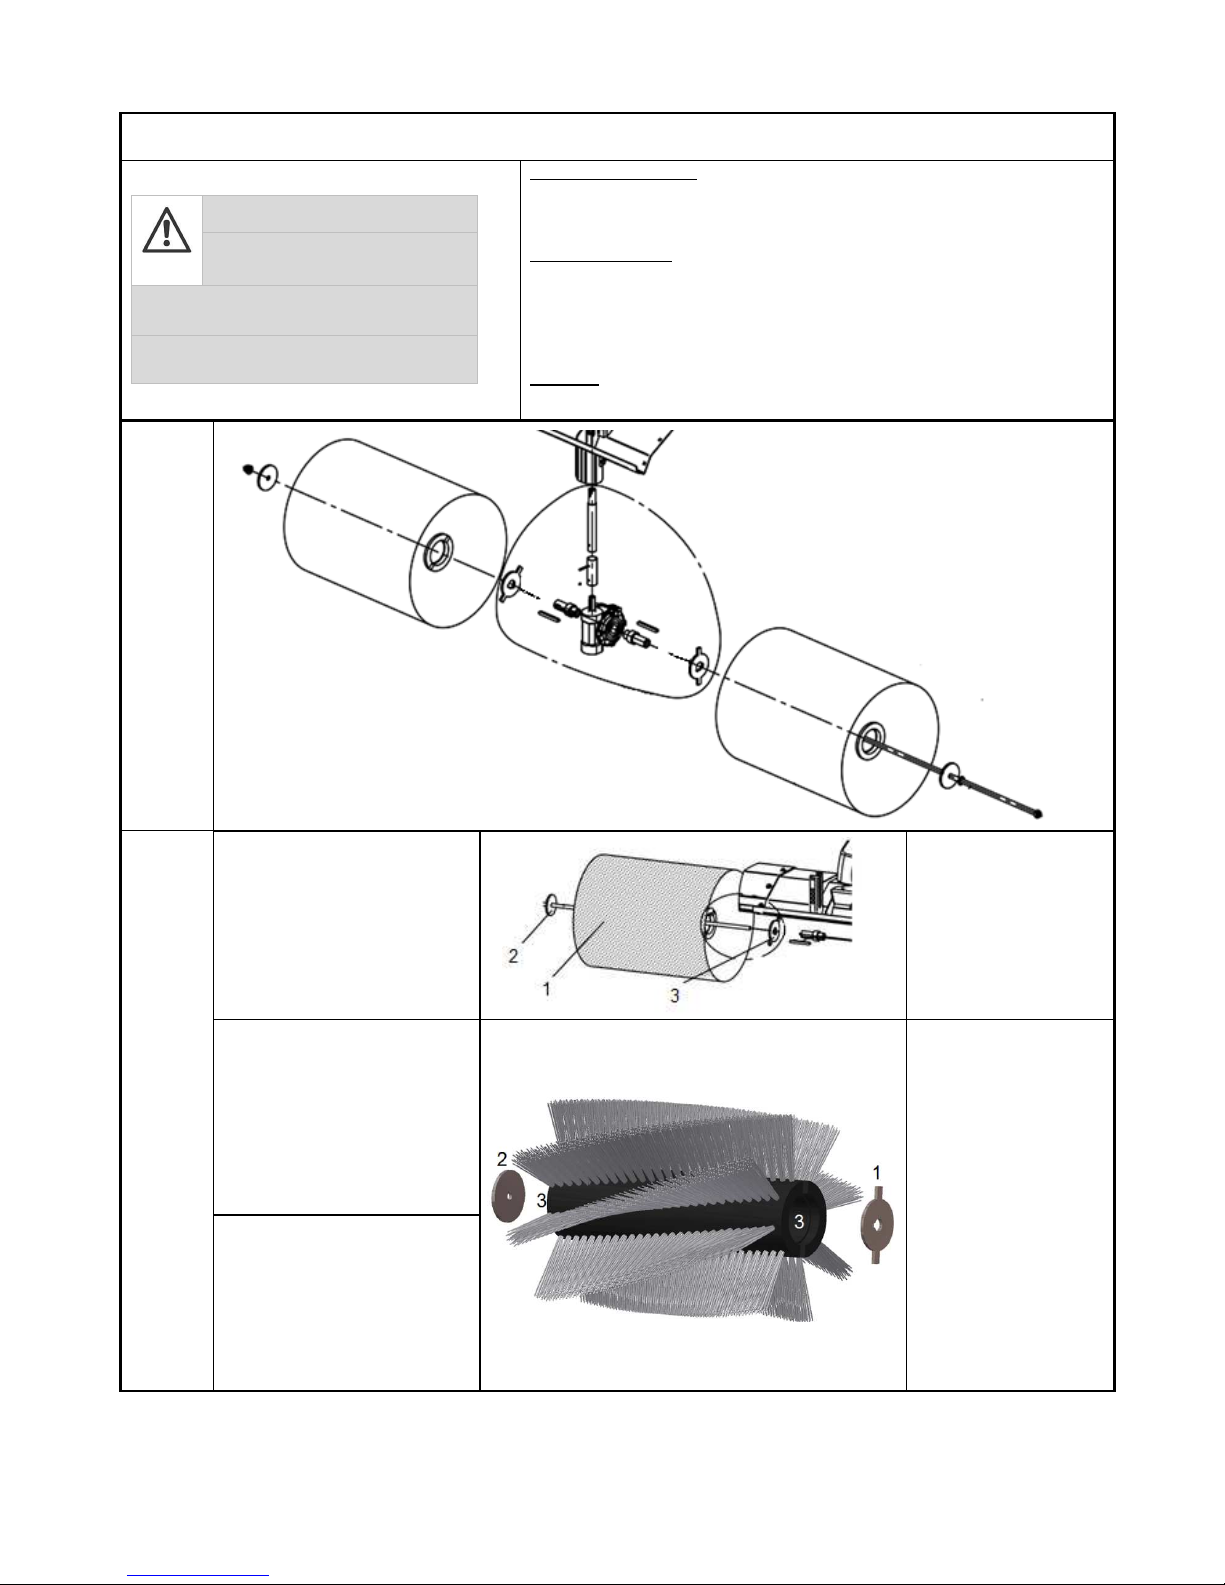
Sweeping brush installation for KM Domus, KM 100 G
Delivery, packaging, assembly
ATTENTION!
Squeezing hazard during
installation!
Parts of the body may be squeezed when
components are mounted.
Wear close-fitting clothing and
protection gloves during assembly.
Risk of high dead weight
• The machine must not be lifted manually.
• Pull the machine off the transporter by its handles.
• Remove machine parts separately from packaging.
Transport inspection
• Check the machine for completeness and potential damage upon delivery.
• The machine shall be supplied to the specialist dealer in a partially assembled
condition.
• Assembly and start-up have to be performed by a specialist dealer and/or an
expert in this field.
Packaging
• Please dispose of packaging materials separately.
Overview
1.
Right
brush
1. Right brush overview
1. Right brush
2. Washer
3. Washer with nibs
2. Press-fit the washer with
nibs (no. 1) into the hollow
body recess of the right
brush. Lightly hit on it as
needed.
1. Washer with nibs
2. Washer
3. Recess
3. Press-fit the washer (no. 2) in
the recess on the outside of
the right brush.
Page 15
Original Operation Manual
Sweeper 689.03-40 - 15
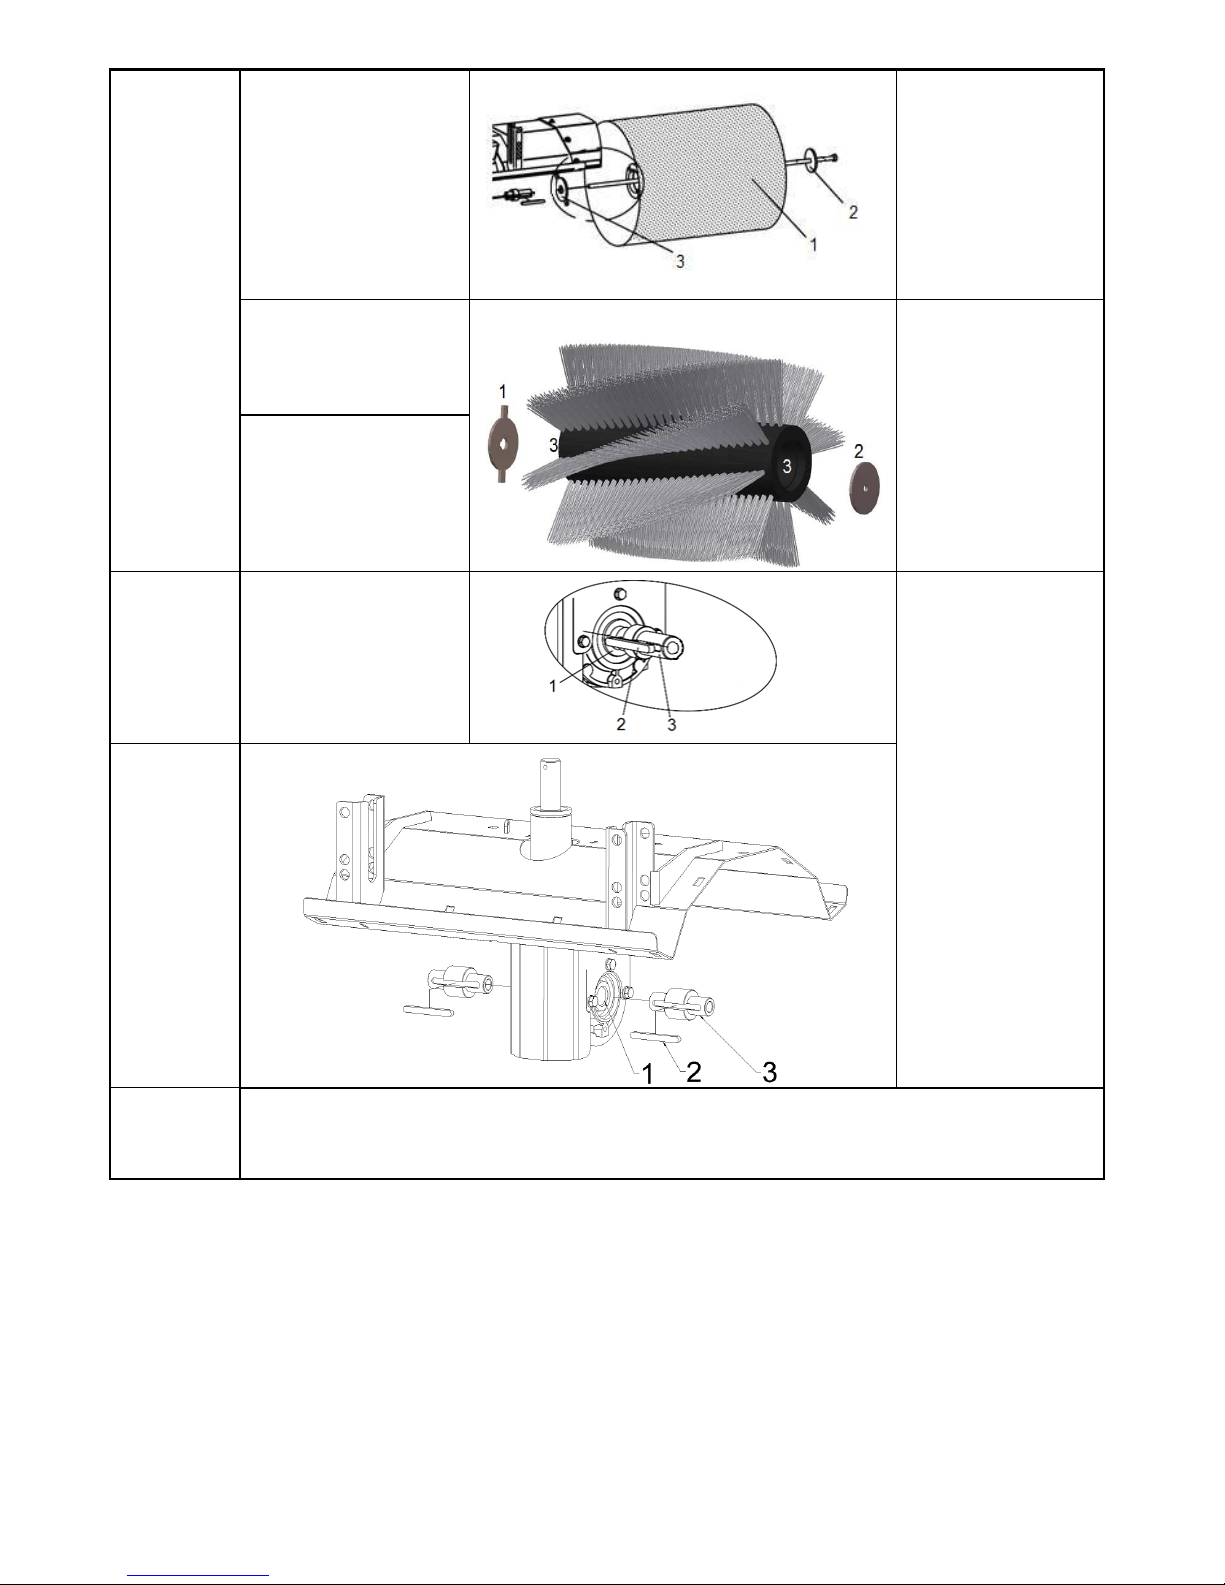
2.
Left brush
1. Left brush overview
1. Left brush
2. Washer
3. Washer with nibs
2. Press-fit the washer
with nibs (no. 1) into
the hollow body recess
of the left brush. Lightly
hit on it as needed.
1. Washer with nibs
2. Washer
3. Recess
3. Press-fit the washer (no.
2) in the recess on the
outside of the left
brush.
3.
Assemble left
and right
brush shaft!
1. Plug feather key into
brush shaft groove.
2. Plug brush shaft into
gear boring on the left
and right by using
feather keys.
1. Gear boring
2. Feather key
3. Brush shaft
Overview
4.
Brush
assembly
1. Push pre-assembled brushes on brush shafts
2. Push threaded rod through entire brush unit
3. Finally, place one washer and the locking nut onto the end of the threaded rod and tighten.
Page 16
Original Operation Manual
Sweeper 689.03-40 - 16
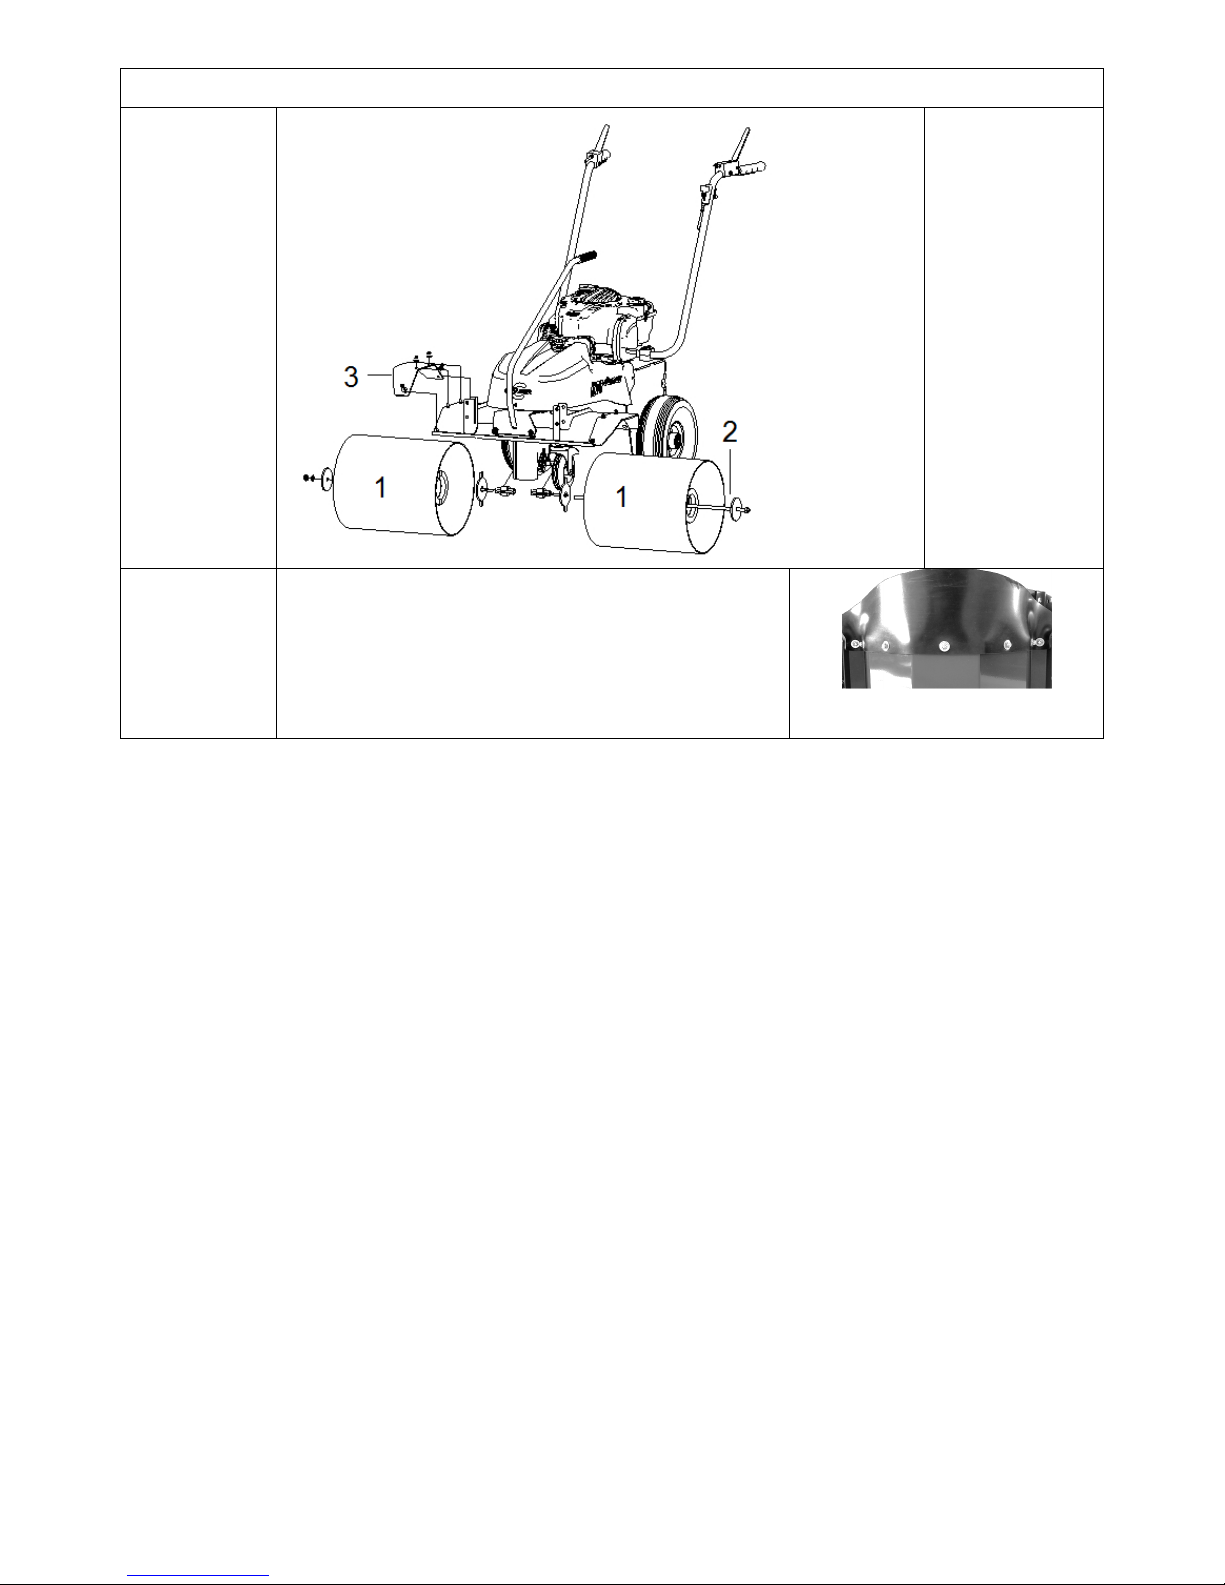
Side cover installation for KM Domus, KM 100 G
Overview
1. Brush
2. Threaded rod
3. Side cover, left and
right (rubber)
Assemble side
covers on the left
and right
As to item 3:
1. Position the rubber side covers over the cover plate holes as
indicated in the drawing.
2. Push screws through holes from below.
3. Place punched disc over screw end on the other side and secure it
by a locking nut.
 Loading...