

CRAIN 960 Instruction Manual
OPERATING INSTRUCTIONS:
This Heat Weld Gun is designed for welding seams in solid
vinyl or linoleum sheet goods only. It is not designed for stripping paint, or purposes not described in this manual.
SAFETY INSTRUCTIONS:
Wear safety glasses, ear plugs, and a dust mask when using
this heat weld gun.
Do not operate this heat weld gun near ammable materials,
liquids or gasses.
Do not operate this heat weld gun in wet areas. It is designed
for indoor use, and should be stored indoors.
Do not leave this heat weld gun unattended at any time.
Unplug when not in use.
When changing the pencil-tip nozzle or welding tip, allow the
gun to fully cool.
Use only with 120VAC electricity.
Do not use this heat gun for stripping paint. See the back
panel for additional warnings related to paint removal.
In use this gun becomes very hot. Keep out of contact with
your body. Keep away from your body, and always direct the
nozzle away from your body and other people.
Improper assembly may result in the nozzle or tip falling off
the gun while hot. Keep the nozzle and tip away from your
body at all times.
Use caution when setting the gun down after making a seam.
Hot air continues blowing out of the gun until turned off. The
tip is very hot long after the gun is turned off, and can burn
the oor or skin.
Follow the ooring manufacturer’s recommendations for the
type of groove and depth of groove to be made in the seam,
and use only manufacturer recommended welding rod. Absent recommendations, a good guideline for groove depth is
to at least 1/2 to 2/3 of the material thickness.
A test seam is always advisable before welding the actual
oor. Slower welding speeds on lower heat are advisable
for beginners.
This heat gun has a motor with two layers of electrical insulation. It does not need to be grounded. As a result, it has only
a two prong plug without a ground pole.
This heat gun is a high amperage device. Use only with
heavy gauge power cord. Be aware of the breaker capacity
of the plugs you are using.
JOBSITE PREPARATION:
Clean the seam area of all debris especially cuttings from
the groover prior to seaming. Check that the groove meets
manufacturer’s specications for proper depth and shape.
ASSEMBLY – NOZZLE:
Fully cool the heat gun. Place the pencil tip nozzle (No. 963)
on the nozzle of the heat gun. Tighten the screw securely.
Failure to tighten the screw may result in the hot nozzle falling off the gun during use. This can cause a severe burn or
damage the oor.
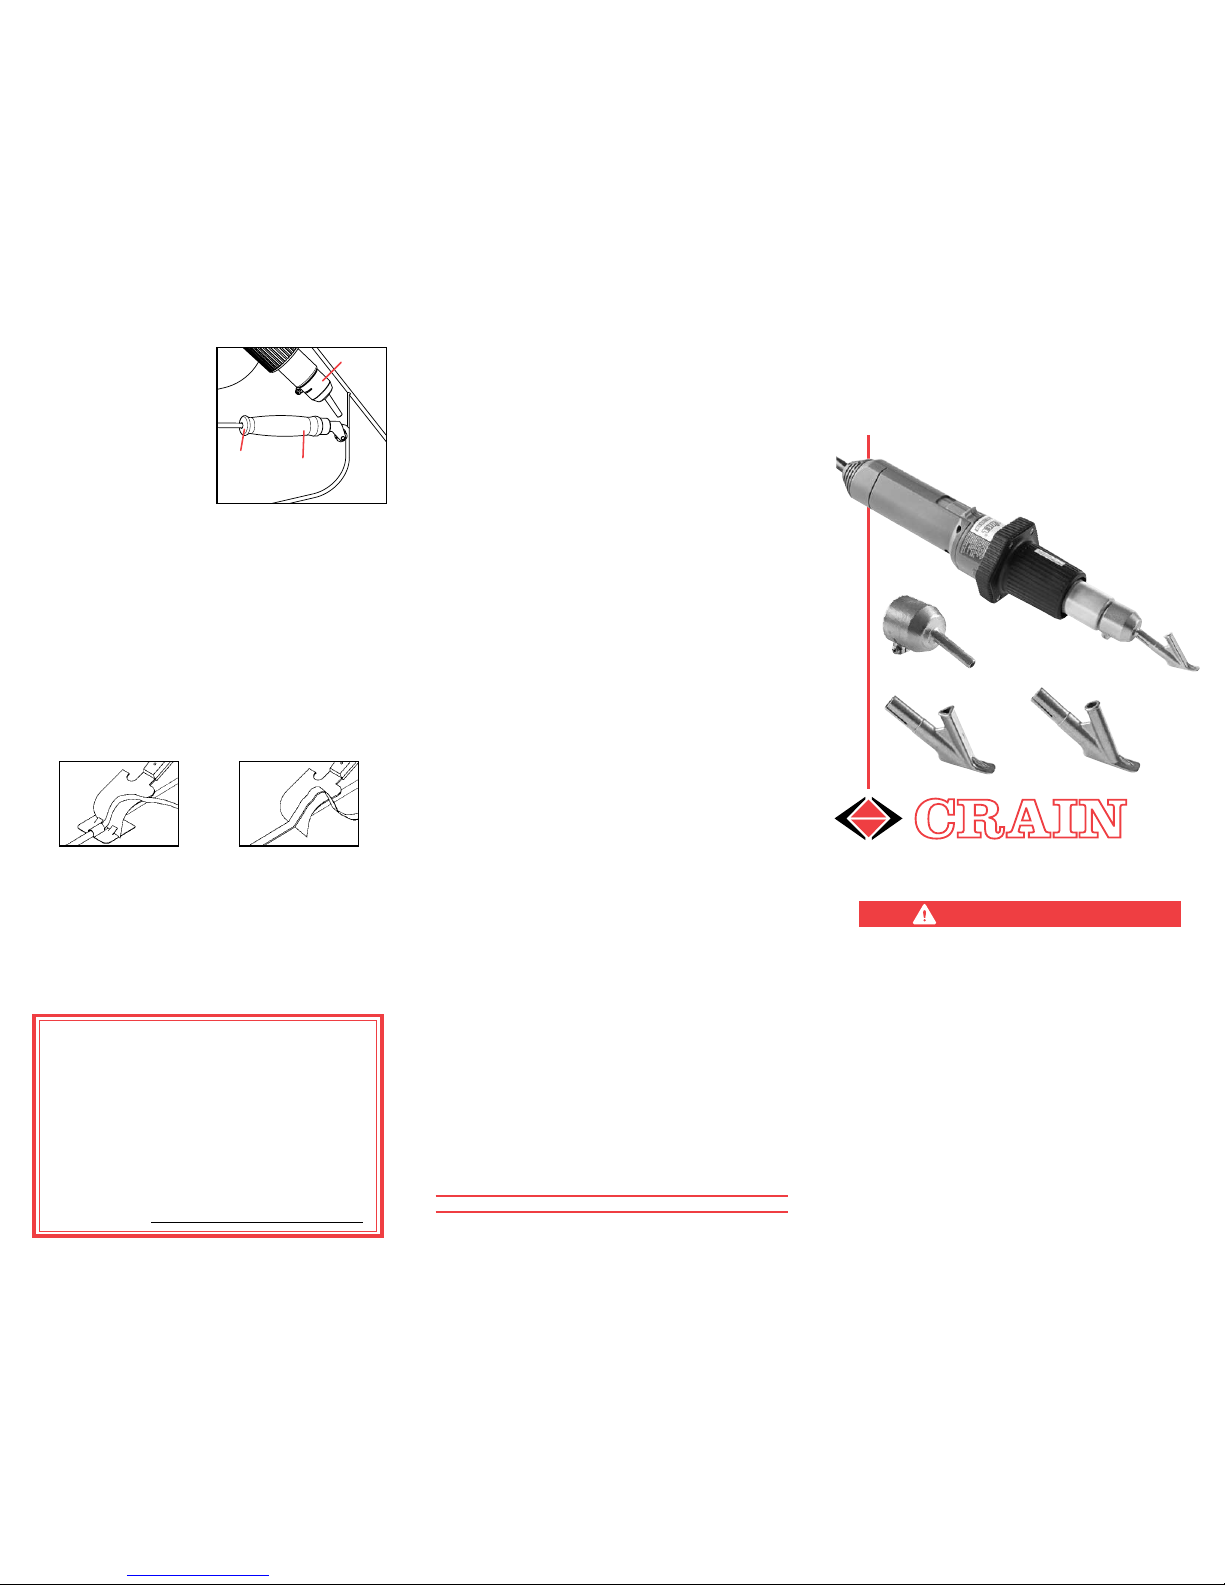
ASSEMBLY – TIPS:
Fully cool the heat gun. This
heat gun comes with two
tips. The triangular tip (No.
961) has a triangular-shaped
channel for feeding triangular
or “half moon” (“half round”)
welding rod. When welding
this type of rod, the triangular
point must go down into the
groove, and the flat must
face up.
The round tip (No. 962) has a
round channel round welding
rod. This tip should be used
on round welding rod only.
Insert the proper tip into the
end of the pencil tip nozzle and press rmly into the nozzle.
Failure to press into position may result in the hot tip falling
out of the nozzle during use. This can cause a severe burn
or damage the oor.
TEMPERATURE AND AIRFLOW CONTROLS:
The heat gun has two sliding
controls, one for adjusting heat
(red), and the other for adjust-
ing airow (blue). Each sliding
control has numbers from zero
to ve, with zero being lowest
and ve being highest.
TEST SEAM, SEAM SPEED, NOZZLE POSITION:
Many factors affect the performance of the heat gun, including
ambient air, ooring material, and suboor temperature, ooring material and welding rod characteristics, extension cord
length, wire gauge, and supply amperage. A test seam before
each job is the only way to ensure proper performance.
Before making a test seam,
proper temperature can be
estimated by putting the welding rod in front of the speed
tip and watching the results.
The rod should start to liquefy
but should not burn. Once
you adjust for proper melting, it is easier to adjust for other
factors with the test seam.
Under normal conditions, with ambient air about 70º F, for
beginners, a heat setting of about 2 and airow setting about
2 is good to start.
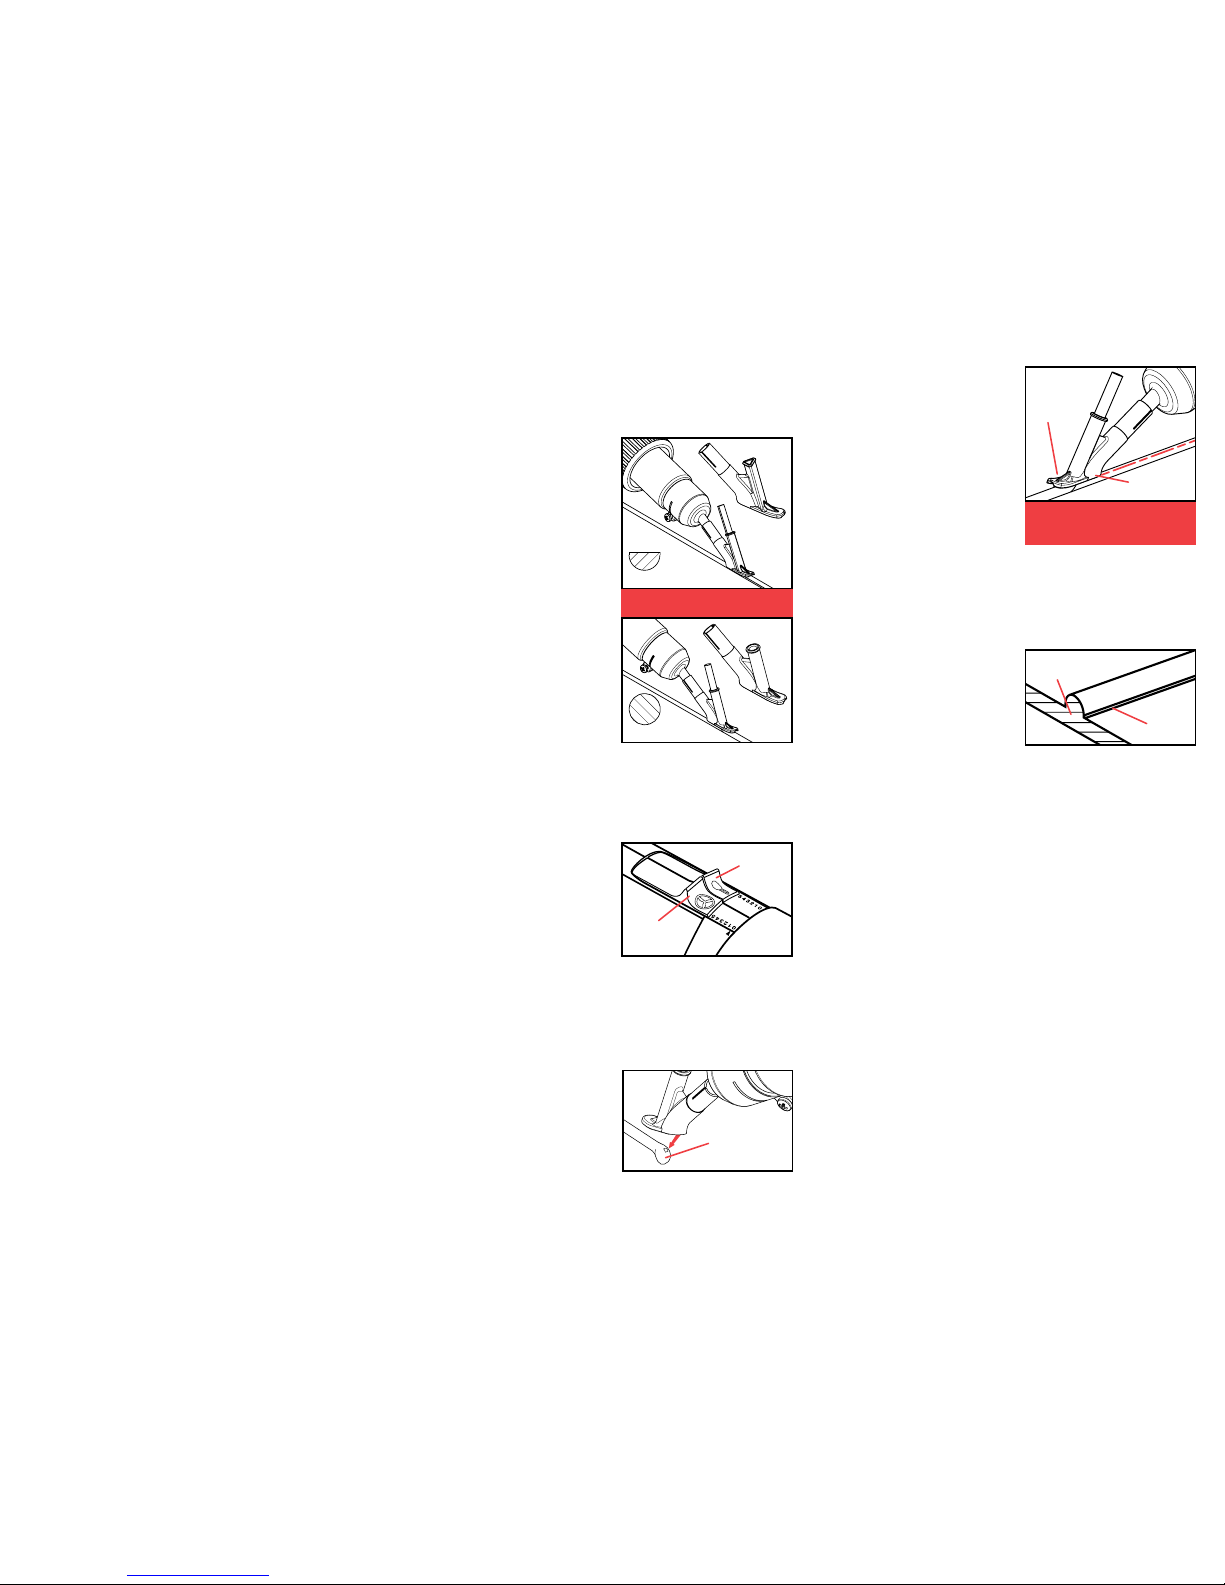
For a complete weld of the
seam area, the seam area must
be pre-heated by the opening
at the bottom of the tip, and the
welding rod must be pre-heated
while in the channel.
The hot air opening towards
the back of the tip should
be kept parallel with the
oor. This is pre-heating the
groove. If the opening is too close, it may burn. If it is too
far, it will not apply sufcient pre-heating to the groove. Keep
the opening centered over the groove to ensure both sides of
the groove are sufciently pre-heated. Use the trailing foot
to press the melting rod into the groove. Keep the trailing
foot constantly on the back of the welding rod.
The correct combination of
temperature, welding speed,
and pressure will create a
weld that forms a tiny ridge
or curl on both sides of the
seam, caused by slight rod
material ow. Look for this at all times while seaming.
Cut a cross section of the test seam with a knife. If the
section is welded into a homogeneous single piece, with no
cracks, will withstand bending, and will not easily pull apart,
the weld is successful.
SEAM WELDING PROCEDURE:
Pre-cut the welding rod to an adequate length for the length of
your seam including coves, then lay it out along the seamline.
Make certain there is plenty of extension cord, and there's
nothing in the way.
Start the weld as close to the wall as possible, but at least
one inch from any coved area. Coved areas must be done
separately AFTER the oor area is welded.
At the start of the weld, the seam must be quickly pre-heated
with the open-end of the speed tip. Quickly thereafter, insert
the welding rod into the channel such that extends out of the
at bottom of the tip. Follow the instructions above for seam
speed and nozzle position. Pull the heat gun down the seam
while constantly feeding the welding rod.
Stop the weld as close as possible to the wall, leaving at least
one inch of the oor unwelded at any cove area. Leave the
excess rod at the seam as you will need it to restart the weld
in the cove procedure (below).
COVE PROCEDURE:
To weld coves, a separate pressure roller (Crain No. 987)
is necessary. Allow the gun to fully cool, and then remove
the welding tip.
TIGHTEN PENCIL TIP SCREW
SECURELY AND SNUG FIT TIPS
kEEP OPENING PARALLEL WITH THE
GR OOV E BOTT OM AND TRAI LING
FOOT ON THE BACk OF THE ROD
HALF
MOON
OR TRIANGULAR
ROUND
AIR
FLOW
TRAILING
FOOT
HOT AIR
OPENING
HEAT
RIDGE
OR
CURL
HOMOGENEOUS
WELD AREA
HEAT
SHOULD
LIQUEFY BUT
NOT BURN!
INSTRUCTION
MANUAL FOR
No. 960 HEAT WELD GUN
Printed by: HF FORM F1960-07-2011
IMPORTANT SAFETY INSTRUCTIONS
READ THESE INSTRUCTIONS!
WARNING: Extreme care should be taken when stripping paint. The peel-
ing, residue and vapors of paint may contain lead, which is poisonous. Any
pre-1977 paint may contain lead and paint applied to homes prior to 1950 is
likely to contain lead. Once deposited on surfaces, hand to mouth contact
can result in the ingestion of lead. Exposure to even low levels of lead can
cause irreversible brain and nervous system damage; young and unborn
children are particularly vulnerable.
Before beginning any paint removal process you should determine whether the
paint you are removing contains lead. This can be done by your local health
department or by a professional who uses a paint analyzer to check the lead
content of the paint to be removed. LEAD-BASED PAINT SHOULD ONLY
BE REMOVED BY A PROFESSIONAL AND SHOULD NOT BE REMOVED
USING A HEAT GUN.
Persons removing paint should follow these guidelines:
1. Move the work outdoors. If this is not possible, keep the work area well
ventilated. Open the windows and put an exhaust fan in one of them. Be
sure the fan is moving the air from inside to outside.
2. Remove or cover any carpets, rugs, furniture, clothing, cooking utensils
and air ducts.
3. Place drop cloths in the work area to catch any paint chips or peelings.
Wear protective clothing such as extra work shirts, overalls and hats.
4. Work in one room at a time. Furnishings should be removed or placed in
the center of the room and covered. Work areas should be sealed off from
the rest of the dwelling by sealing doorways with drop cloths.
5. Children, pregnant or potentially pregnant women, and nursing mothers
should not be present in the work area until the work is done and all cleanup is complete.
6. Wear a dust respirator mask or a dual lter (dust and fume) respirator
mask which has been approved by the Occupational Safety and Health Administration (OSHA), the National Institute of Safety and Health (NIOSH), or
the United States Bureau of Mines. These masks and replaceable lters are
readily available at major hardware stores. Be sure the mask ts. Beards
and facial hair may keep masks from sealing properly. Change lter often.
DISPOSABLE PAPER MASkS ARE NOT ADEQUATE.
7. Use caution when operating the heat gun. Keep the heat gun moving, as
excessive heat will generate fumes which can be inhaled by the operator.
8. Keep food and drink out of the work area. Wash hands, arms and face
and rinse mouth before eating or drinking. Do not smoke, or chew gum or
tobacco in the work area.
9. Clean-up all removed paint and dust by wet-mopping the oors. Use wet
cloth to clean all walls, sills, and other surface where paint or dust is clinging.
DO NOT SWEEP, DRY DUST OR VACUUM. Use a high phosphate detergent
or trisodium phosphate (STP) to wash and mop areas.
10. At the end of each work session put the paint chips and debris in a double
plastic bag, close it with tape or twist ties, and dispose of properly.
11. Remove protective clothing and work shoes in the work area to avoid
carrying dust in to the rest of the dwelling. Wash work clothes separately.
Wipe shoes off with wet rag that is then washed with the work clothes; wash
hair and body thoroughly with soap and water.
SAVE THESE INSTRUCTIONS!
MODEL NO: 960 HEAT WELD GUN
VOLTAGE: 120 VOLTS AC 60 Hz
AMPERAGE: APPROX. 15 AMPS
WATTAGE: 1750 WATTS
TEMP. RANGE: variable 120 - 1250°F
AIRFLOW: variable
AIR PRESSURE: .438 psi / 300 Pa
SPECIFICATIONS:
No. 963
No. 961
No. 962
GUARANTEE
This Crain No. 960 Heat Weld Gun is guaranteed to be free
of defects in workmanship and quality of materials for a period of 1 year. Any parts of this Heat Weld Gun found defective subject to the guarantee will be replaced at no charge.
Credit in full or part cannot be extended by the distributor,
nor will a new Heat Weld Gun be given as a replacement
or loaner. Heat Weld Guns subject to this warranty must
be accompanied by same, returned freight PREPAID to
Milpitas, CA, and must be in assembled condition. Heat
gun elements are not covered by this guarantee.
DATE OF MFG.
Milpitas, CA 95035 TEL: (408) 946-6100
www.craintools.com
CRAIN CUTTER CO., INC.
Feed the excess end of the
welding rod into the hollow
center of the pressure roller.
Press the roller onto the back
of the welding rod. Use the
open end of the pencil tip
nozzle to heat the welding
rod and the groove. Proceed
with the roller all the way up
the coved area.
SkIVING AND FINISHING:
Wait for the weld to cool completely, generally at least 20
minutes. Skiving too soon results in a severely concave seam
area. Skiving is done with a Quarter Moon Knife. When using
the Quarter Moon Knife, only the bottom side of the knife is
sharpened and should always face down.
Use a trim guide (Crain No. 986) with a Quarter Moon Knife
(Crain No. 985) for the rst pass. See gure 7.
For the second pass, use only the Quarter Moon Knife. This
takes practice on a test seam. Too low an angle causes the
knife to climb out of the rod and too high an angle causes the
kife to dig into the oor. Use as smooth and continuous a motion
as possible. Interruptions, starts and stops will result in a rough
seam that will be more visible after the oor is polished.
No. 960
PENCIL
TIP
HOLLOW
CENTER
PRESSURE
ROLLER
FIRST PASS WITH QUARTER
MOON KNIFE AND A TRIM GUIDE
SECOND PASS WITH
QUARTER MOON KNIFE ONLY
Figure 7
Figure 8
•
THIS HEAT GUN CAN OPERATE UP TO
1250°F, WHICH CAN CAUSE SEVERE
BURNS. DO NOT TOUCH HOT NOZZLES
OR TIPS. NEVER POINT THE HOT AIR
FLOW AT YOURSELF OR OTHER PEOPLE.
•
ASSEMBLE NOZZLE TIGHTLY ON THE
GUN AND SNUG FIT THE TIPS. OTHERWISE PARTS MAY FALL OFF CAUSING
SEVERE BURNS.
•
TEST SEAMS ARE ALWAYS ADVISABLE.
•
WHEN DONE WELDING, TURN THE HEAT
TO ZERO AND RUN FAN ON COLD TO
PROPERLY COOL ELEMENT. FAILURE TO
DO SO CAUSES ELEMENT FAILURE.
WARNINGS:
 Loading...