

CRAIN 625 Instruction Manual
CRAIN CUTTER CO., INC.
1155 WRIGLEY WAY, MILPITAS, CA 95035-5426
TEL: 408-946-6100 FAX: 408-946-4268
Printed by:HF
FORM F1625-0910
Made in
INSTRUCTION
MANUAL
FOR
America
This Crain tool is guaranteed to be free of defects
due to faulty materials or workmanship for a period
of 6 months.
During this period, any parts of tools found defective
subject to the guarantee will be replaced at no charge.
Returns should be sent freight PREPAID, in assembled
condition and with a copy of the Bill of Sale (proof of
purchase) to CRAIN CUTTER COMPANY, Milpitas,
CA 95035. New tools or loaners will not be given for
those pending warranty repairs.
No claims shall exceed in amount the suggested sales
price of the product. No other guarantee, oral or written, is expressed or implied.
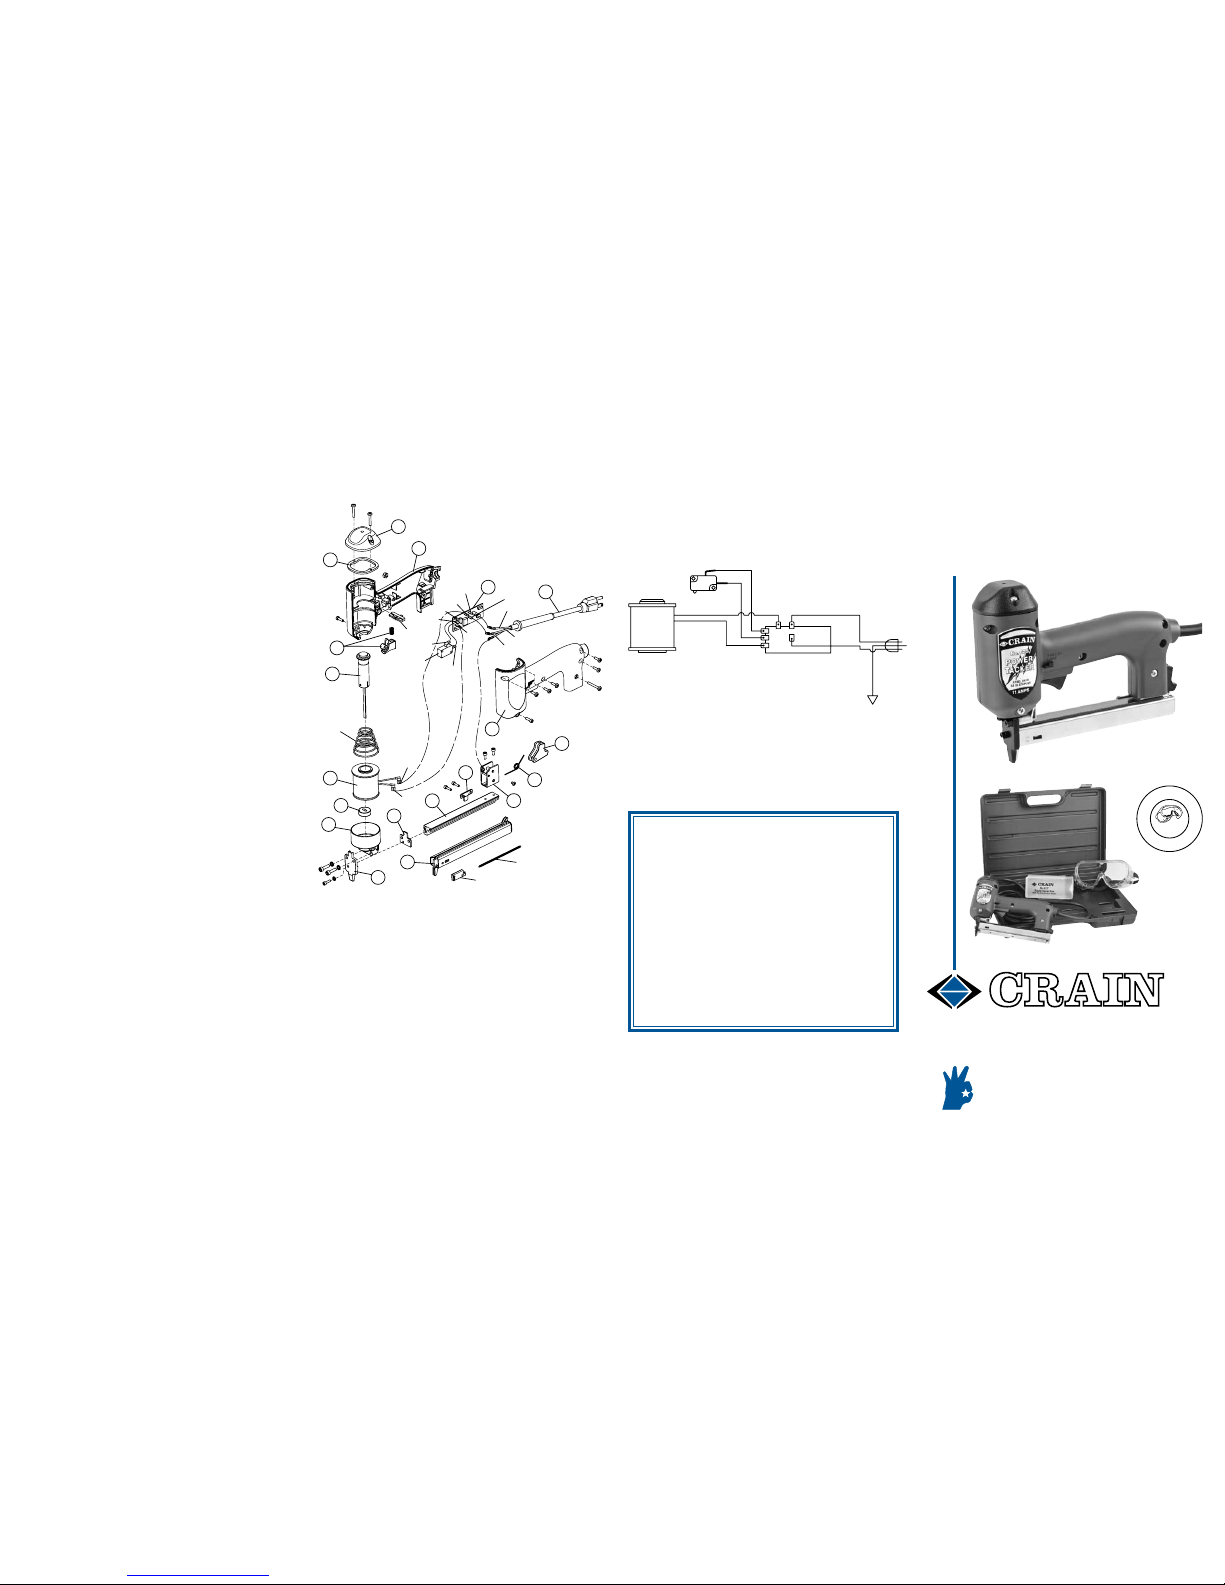
REPLACEMENT PARTS AND
ORDERING INFORMATION
•
T
h
i
n
k
S
a
f
e
t
y
•
W
e
a
r
E
y
e
P
r
o
t
e
c
t
i
o
n
CRAIN
No. 625 POWER TACKER
1625-01 Front Guide
& Screws
1625-02 Front Cover
1625-03 Aluminum Channel
& Screw
1625-04 Rear Bracket
& Screws
1625-05 Aluminum Cap
& Screws
1625-06 Torsion Spring
1625-07 Magazine
1625-08 Handle Set
& Screws
1625-10 Stop & Screws
1625-15 Retaining Ring
& Screws
1625-17 Trigger & Spring
1625-19 Coil Housing
& Screws
1625-20 Release Button
1625-22 Driver Assembly
1625-23 Control Board
1625-34 Bumper
1625-38 Staple Coil
1625-41 Carrying Case
1625-42 Power Cord
1615-C Driver Spring
1615-I Micro Switch
1615-J Trigger Lock
1615-S Staple Pusher
1615-T Pusher Spring
WIRING DIAGRAM
TO SW1
TO SW2
BLACK
COIL WIRE 1
WHITE
AC OUTLET
GREEN
GROUND
1625-23
CONTROL BOARD
1615-I
MIRCO SWITCH
1625-38
STAPLE COIL
COIL WIRE 2
01
02
03
04
05
06
07
08
08
10
15
17
19
34
20
1615-J
22
23
42
1615-I
ACH
ACG
L1
L2
SW1
To L1
To L2
1615-S
1615-T
SW2
BLK To ACH
WHT To ACG
GREEN To GRD
To SW1
TO SW2
38
1615-C
IMPORTANT SAFETY
INSTRUCTIONS
GENERAL SAFETY RULES
WARNING! Read and understand all instructions.
Failure to follow all instructions listed below may result
in electric shock, fire and/or serious personal injury.
SAVE THESE INSTRUCTIONS
Work Area
Keep your work area clean and well lit. Cluttered
benches and dark areas invite accidents.
Do not operate power tools in explosive atmospheres, such as in the presence of ammable
liquids, gases, or dust. Power tools create sparks
which may ignite the dust or fumes.
Keep bystanders, children, and visitors away while
operating a power tool. Distractions can cause you
to lose control.
Electrical Safety
Grounded tools must be plugged into an outlet
properly installed and grounded in accordance
with all codes and ordinances. Never remove the
grounding prong or modify the plug in any way.
Do not use any adaptor plugs. Check with a qualied electrician if you are in doubt as to whether
the outlet is properly grounded. If the tools should
electrically malfunction or break down, grounding
provides a l ow resistance path to carry electricity
away from the user.
Avoid body contact with grounded surfaces such
as pipes, radiators, ranges and refrigerators. There
is an increased risk of electric shock if your body is
grounded.
Don’t expose power tools to rain or wet conditions.
Water entering a power tool will increase the risk of
electric shock.
Do not abuse the cord. Never use the cord to carry
the tool or pull the plug from an outlet. Keep cord
away from heat, oil, sharp edges or moving parts.
Replace damaged cords immediately. Da maged
cords increase the risk of electric shock.
When operating a power tool outside, use an outdoor extension cord marked “W-A” or “W.” These
For proper operation, please take time to carefully
read all the instructions and rules for safe operation
in this booklet.
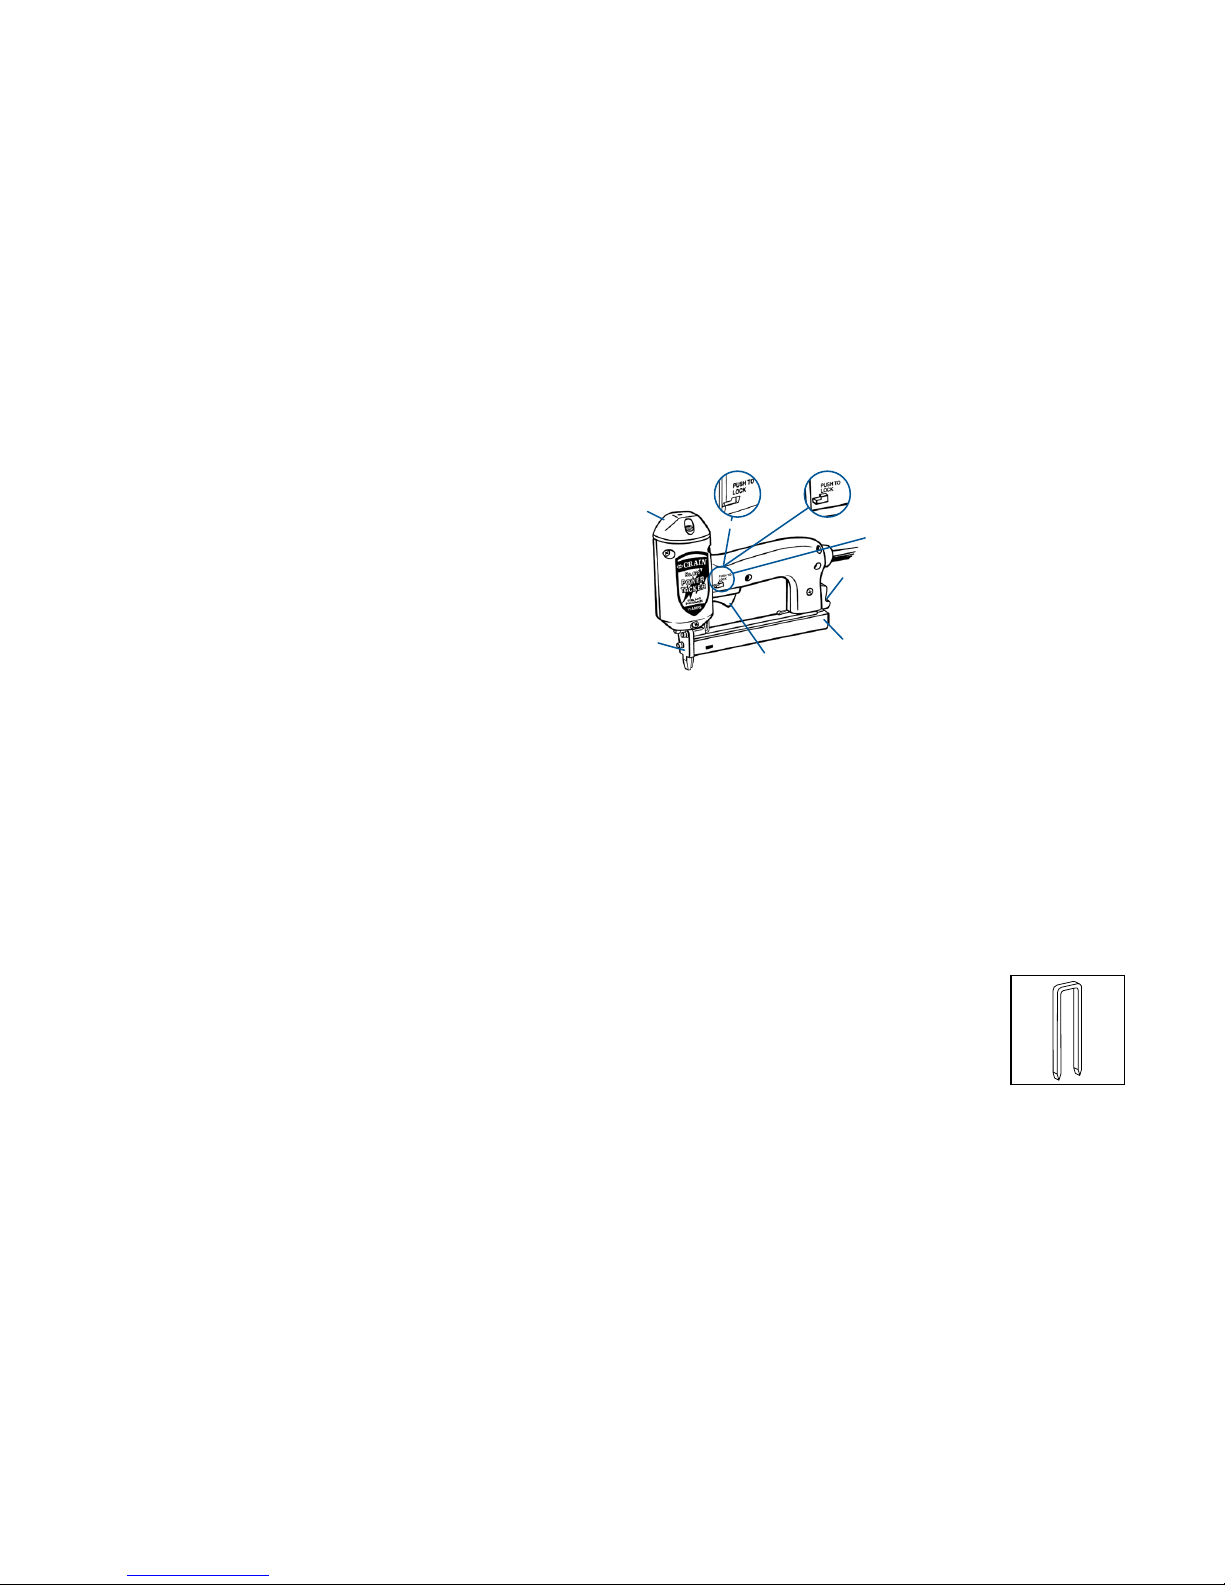
SAFETY GLASSES:
Always wear safety glasses when using this tool, especially when loading staples or clearing jams.
SAFETY SWITCH:
This tool is designed with a safety lock to prevent accidental firing. Depress the lock (Figure 1) whenever
you need to plug in the tacker, load staples, clear a
jam, or you need to leave the tacker unattended.
PREVENT ACCIDENTS:
NEVER point the tacker at another person. Unplug the
tool when you are walking from room to room.
TRIGGER:
See figure 1. With each pull of the trigger (located under
the handgrip), the tacker completes one cycle and fires
one staple. Make sure your finger is not on the trigger
when plugging in, or loading staples. Do NOT point the
nose of the tacker at anyone! Place the nose directly
onto the material being fastened.
ON/OFF TRIGGER SAFETY LOCK:
This tacker is equipped with a sliding on/off safety
lock, located above th e trigger at the front of the
hand grip, which is used to prevent accidental firing. Be sure the safety lock is depressed on the side
marked “PUSH TO LOCK” (figure 1) when plugging
the tacker in, loading staples, or whenever the tacker
is not in use.
TO LOAD STAPLES:
1. Make sure the tacker is unplugged and the safety
lock is depressed as shown in figure 1 above.
2. Turn the tacker upside-down, push the magazine
release button, and slide the magazine assembly
backward, fully open.
3. Insert a brick of staples into the channel, with the
staple points facing up.
4. Close magazine assembly until it locks in place.
TO OPERATE:
1. Use safety glasses!
2. Plug into a 115 volt/15 amp outlet.
3. Push the safety lock so that it is not depressed on
the side marked “PUSH TO LOCK” (figure 1).
4. Hold the nose of the tacker firmly against the mate-
MAINTENANCE INSTRUCTIONS
1. To clear a jam, depress the safety lock, and unplug the tacker. Turn the tacker upside-down and
depress the magazine release button to unlock.
Slide the magazine assembly back to expose the
channel in the nose. Remove the cause of the jam.
Close the magazine.
2. Use a clean cloth to remove dirt from the tacker.
Avoid using solvents when cleaning plastic parts.
3. DO NOT lubricate. The tacker does not require oil
or grease to operate.
4. In the event of a malfunction, DO NOT attempt to
repair the tacker yourself. Tool service must be
performed by qualified repair personnel.
5.
CAUTION: DO NOT alter, attach special fixtures
to, or “redesign” parts of the tacker. DO NOT fire
without staples, as this may cause damage to the
tacker.
STAPLE SELECTION:
The No. 625 Power Tacker uses standard Crain No.
619D Shur-Fast Staples, Duo Fast No. 5415 or No.
5418 electric tacker staples (or generics).
CRAIN NO. 619D 9/16"
LENGTH DIVERGENT
CAP
MAGAZINE
RELEASE
BUTTON
MAGAZINE
DEPRESSED NOT DEPRESSED
FIGURE 1
TRIGGER
NOSE
cords are rated for outdoor use and reduce the risk
of electric shock.
Personal Safety
Stay alert, watch what you are doing and use
common sense when operating a power tool. Do
not use tool while tired or under the inuence of
drugs, alcohol, or medication. A moment of inatten-
tion while operating power tools may result in serious
personal injury.
Dress properly. Do not wear loose clothing or
jewelry. Contain long hair. Keep your hair, clothing,
and gloves away from moving parts. Loose clothes,
jewelry, or long hair can be caught in moving parts.
Avoid accidental starting. Be sure switch is off
before plugging in. Carrying tools with your finger on
the switch or plugging in tools that have the switch on
invites accidents.
Remove adjusting keys or switches before turning
the tool on. A wrench or a key that is left attached to a
rotating part of the tool may result in personal injury.
Do not overreach. Keep proper footing and balance
at all times. Proper footing and balance enables better
control of the tool in unexpected situations.
Use safety equipment. Always wear eye protection.
Dust mask, non-skid safety shoes, hard hat, or hearing
protection must be used for appropriate conditions.
Tool Use and Care
Use clamps or other practical way to secure and
support the workpiece to a stable platform. Holding
the work by hand or against your body is unstable and
may lead to loss of control.
Do not force tool. Use the correct tool for your application. The correct tool will do the job better and
safer at the rate for which it is designed.
Do not use tool if switch does not turn it on or off.
Any tool that cannot be controlled with the switch is
dangerous and must be repaired.
Disconnect the plug from the power source before
making any adjustments, changing accessories,
or storing the tool. Such preventive safety measures
reduce the risk of starting the tool accidentally.
Store idle tools out of reach of children and other
untrained persons. Tools are dangerous in the hands
of untrained users.
Maintain tools with care. Keep cutting tools sharp
and clean. Properly maintained tools, with sharp
cutting edges are less likely to bind and are easier
to control.
Check for misalignment or binding of moving parts,
breakage of parts, and any other condition that
may affect the tool’s operation. If damaged, have
the tool serviced before using. Many accidents are
caused by poorly maintained tools.
Use only accessories that are recommended by
the manufacturer for your model. Accessories that
may be suitable for one tool, may become hazardous
when used on another tool.
SERVICE
Tool service must be performed only by qualied
repair personnel. Service or maintenance performed
by unqualified personnel could result in a risk of injury.
When servicing a tool, use only identical replacement parts. Follow instructions in the Maintenance
section of this manual. Use of unauthorized parts or
failure to follow Maintenance Instructions may create
a risk of electric shock or injury.
ADDITIONAL SAFETY RULES:
Hold tool by insulated gripping surfaces when performing an operation where the cutting tool may
contact hidden wiring or its own cord. Contact with
a “live” wire will make exposed metal parts of the tool
“live” and shock the operator.
OPERATING INSTRUCTIONS
rial to be fastened, and place the palm of your other
hand firmly on the cap, holding the tacker down.
5. Squeeze trigger to fire.
6. Avoid using long extensio n cords, as th ey will
noticeably reduce the tool’s drive strength. If you
must, use heavy- duty 3-wire cords with these
minimum wire sizes:
25' = 16 gauge wire
50' = 14 gauge wire
LOCKED UNLOCKED
SAFETY
LOCK
 Loading...