

CRAIN 575 Instruction Manual
REPLACEMENT PARTS:
LIMITED WARRANTY
INSTRUCTION
MANUAL
FOR
No. 575 MULTI-UNDERCUT SAW
Printed by: HF FORM F0575 01/2015
Milpitas, CA 95035 TEL: (408) 946-6100
CRAIN CUTTER CO., INC.
Crain warrants this saw to be free of defects in workmanship and quality of materials under normal use for
a period of six months from the date of purchase. Not
covered is the motor or motor brushes. Burnt motors
or worn-out brushes will be repaired at a charge.
Any parts of this saw found defective subject to the
guarantee will be replaced at no charge. Credit in full
or part can not be extended by the distributor, nor will
a new saw be given as a replacement or loaner.
Saws subject to this warranty must be accompanied
by the same, and returned freight PREPAID to Milpitas,
CA, and must be in assembled condition.
DATE OF MFG.
Plunge to appropriate depth. Always move the saw from
left to right only.
Do not force the saw; let blade cut at highest RPM possible.
Remove the saw from the cut, and release the switch to stop.
When the switch is released, the motor and the blade
coast to a stop. KEEP HANDS AWAY FROM THE BLADE.
THE BLADE CAN CUT YOU AS LONG AS IT IS TURNING.
Do not remove a hand from the handles to clear debris
until the saw is moved away and the blade is stopped.
If the saw is dropped, the blade guard may be bent or
otherwise damaged, restricting full return. Sawdust that accumulates behind the blade guard will cause it to become
clogged, especially drywall dust. Check operation of the
blade guard before each use. Do not use saw if the blade
guard does not operate properly. When not in use, store saw
in the custom carrying case. If the switch malfunctions, the
saw motor may continue running even after being switched
off. Turn off by unplugging. Repair the switch immediately!
Do not use the saw with a faulty switch.
MAINTENANCE:
Figure 9
SPECIFICATIONS:
POWER UNIT Model No. 575
Voltage: 120VAC, 60 HZ.
Amperes: 8.0 Amps
No Load Speed: 10,000 RPM
Max. Depth Adj: 1-1/4"
Max. Height Adj: 1"
Toe Space Specifications
Minimum Height: 3-1/2"
Maximum Depth: 3-1/2"
Gross Weight: 11.6 LBS.
Replacement Blade: #556 Carbide-Tipped Blade
Order No. Description Order No. Description
Figure 10 Figure 11
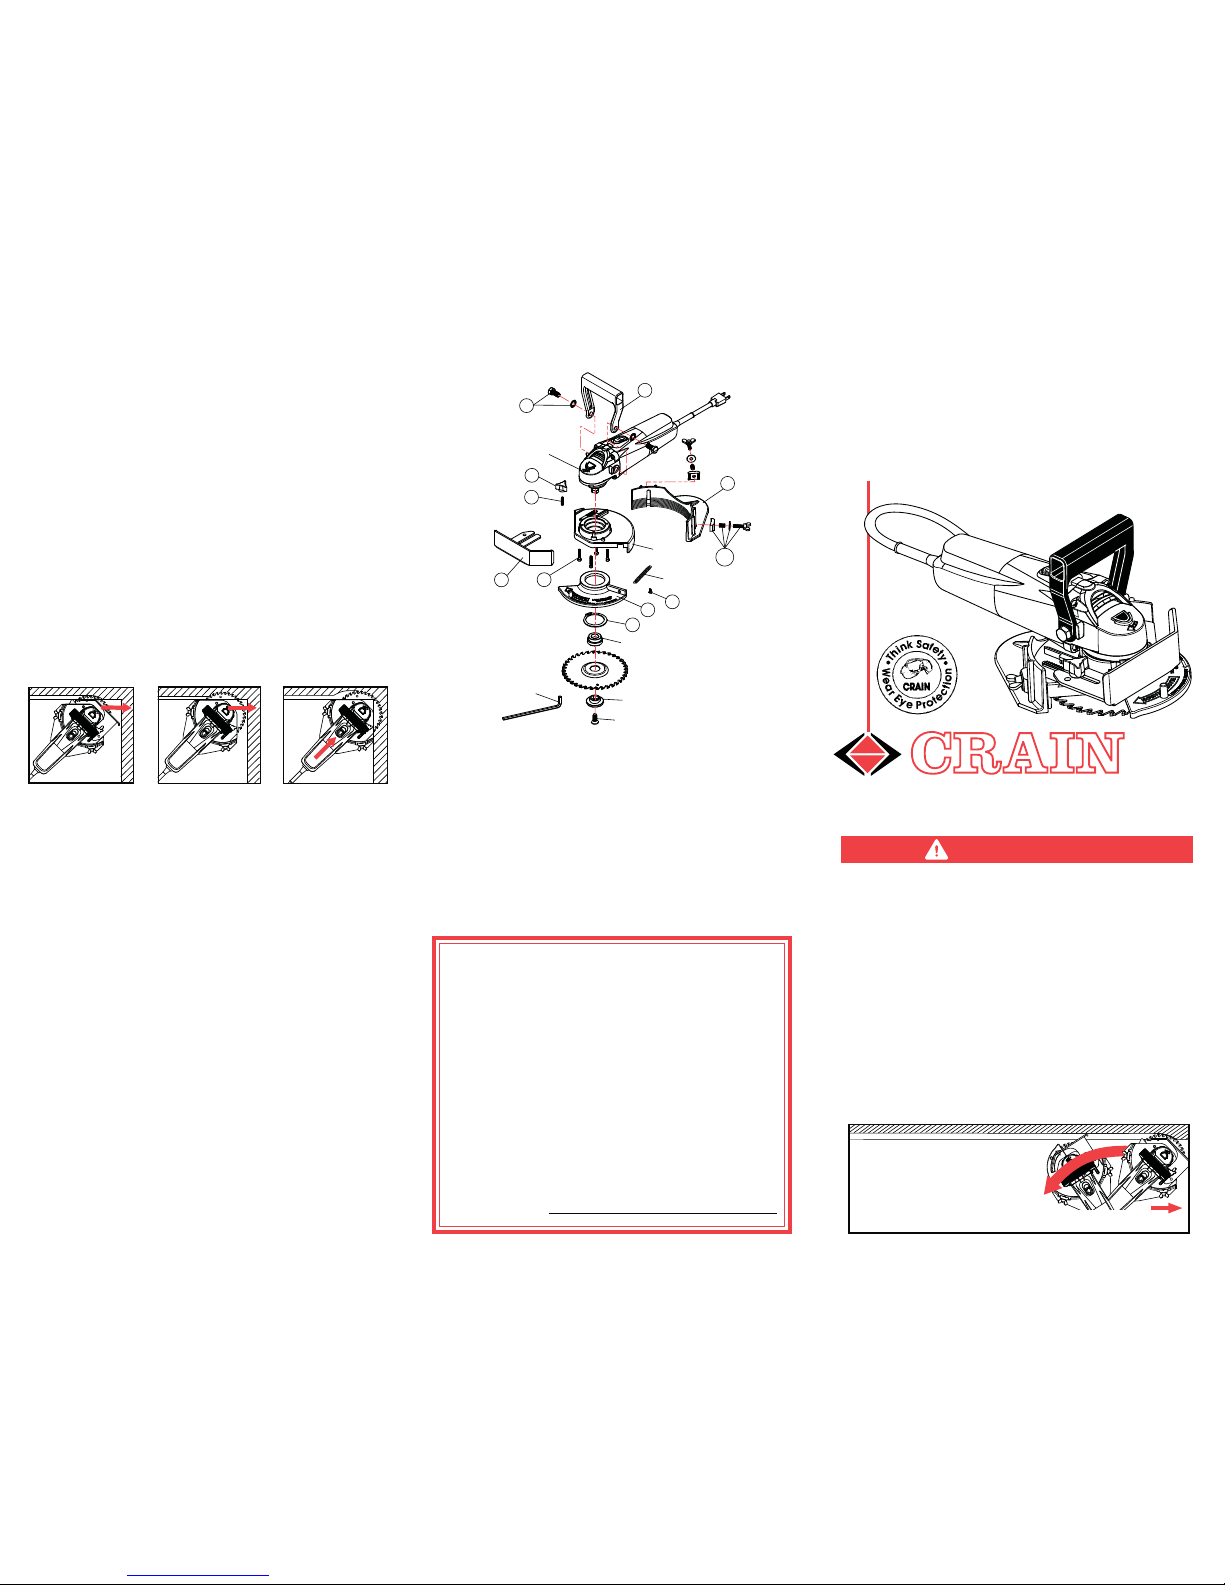
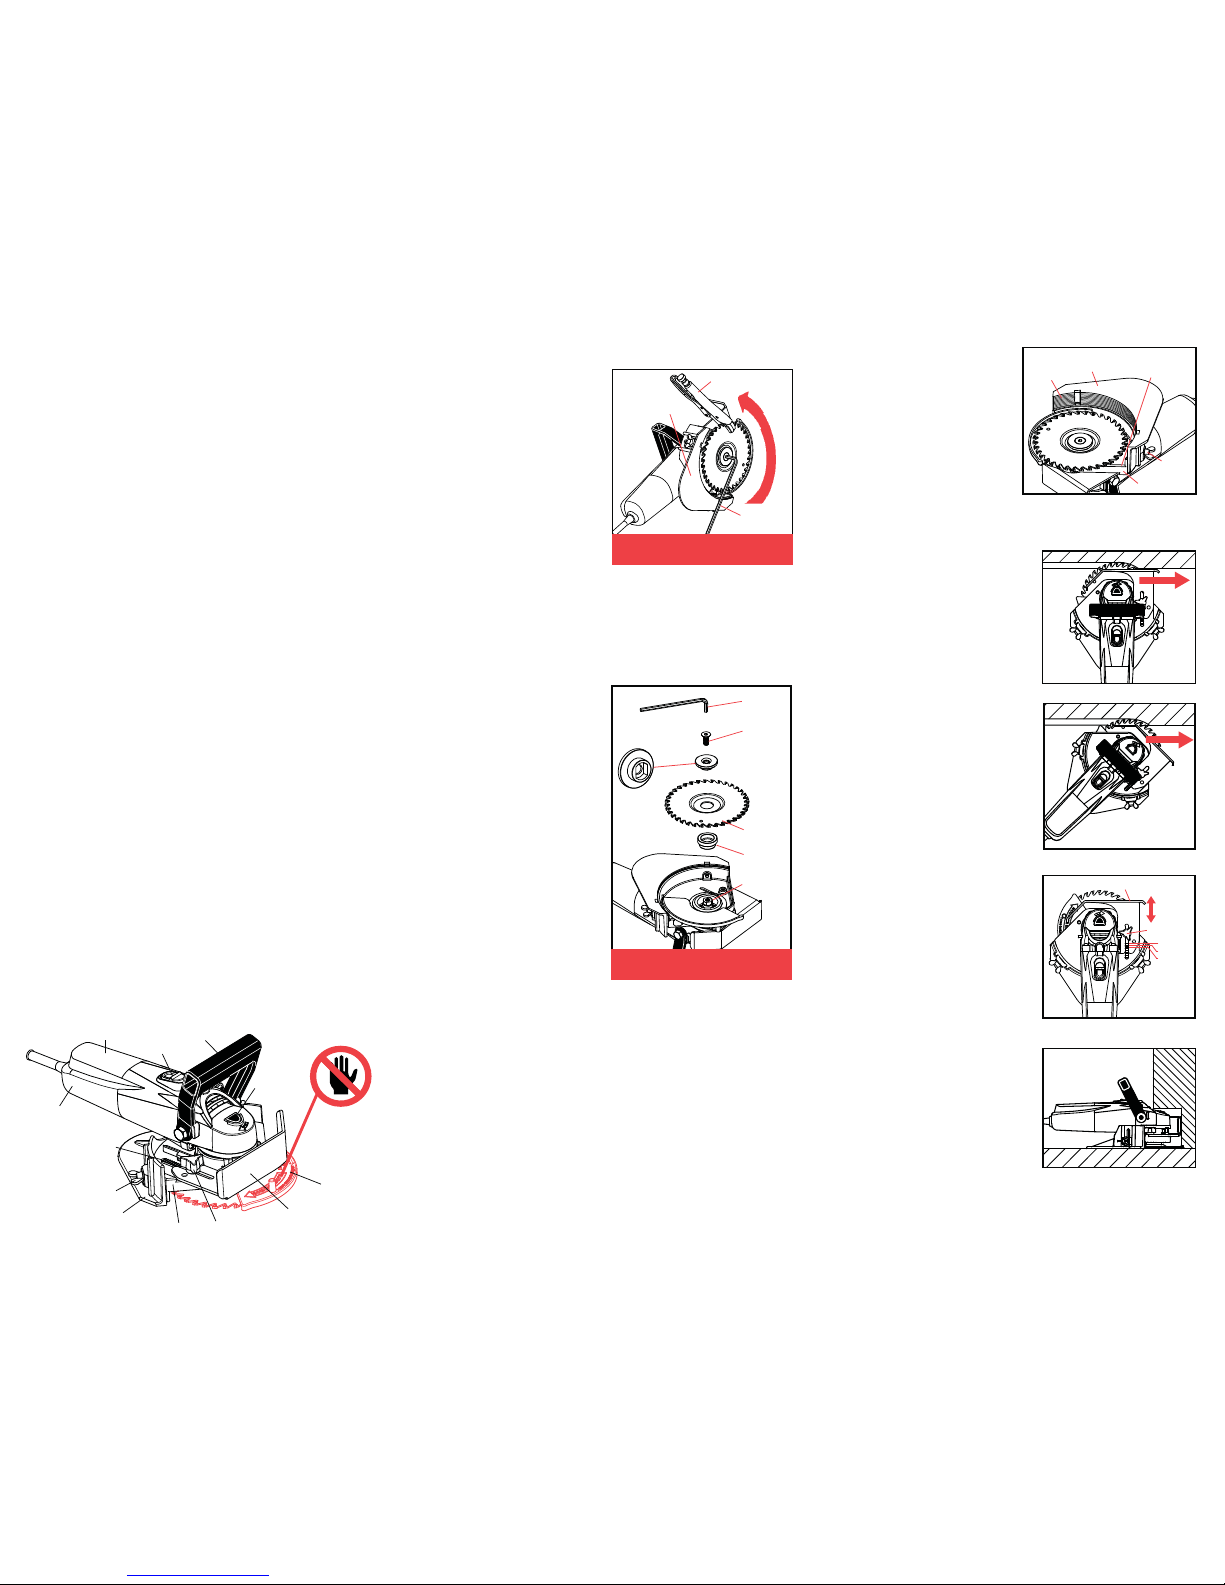
Cut towards the corner at 45˚ angle until the depth gauge
meets the right wall (see Figure 9). Switch off and unplug
saw. Wait for blade to stop. Remove depth gauge and continue the cut (see Figure 10). Push the saw into the corner
as shown until the housing meets both walls (see Figure 11).
WARNING: Depth gauge covers the blade and makes the
saw safer to use. Always unplug saw and re-install depth
gauge when you are done with the inside corner cutting.
INSIDE CORNER CUTTING:
1575-A Housing
1575-C Power Unit, 120 volts
1575-K Brush Set (2 - not shown)
1575-S Brush Holder Assembly (2)
(not shown)
1575-W Power Cord Strain Relief
(not shown)
1555-B Height Adjuster
1555-D Plastic Handle
1555-E Depth Gauge
1555-F Blade Guard
1555-G Three-Arm Knob
1555-L Handle Fastener Set (4)
1555-M1 Guide Washer &
Fastener Set (8)
1555-N Housing Fastener Set (4)
1555-O Set Screw
1555-P Snap Ring
1555-R Carrying Case (not shown)
1555-V1 Marquardt Switch (not shown)
1555-X Return Spring Screw Only
1555-Z Power Cord (not shown)
1810-J Blade Guard Spring
1812-O Blade Spacer
1812-P Blade Clamp
1812-Q Blade Screw
1812-R Hex Wrench
KICKBACK HAZARDS:
t
THIS SAW PLUNGE-STARTS. PLUNGE SLOWLY
BEFORE PUSHING FORWARD!
t
KEEP RPMs HIGH. DON’T FORCE THE SAW,
ESPECIALLY WHEN NAILS MAY BE PRESENT.
DO NOT OVERHEAT.
t
HEIGHT ADJUSTMENT: KEEP THE BLADE
HOUSING FLAT ON LEVEL FLOORS, AND
KEEP BLADE PARALLEL TO THE FLOOR AT
ALL TIMES.
t
ALWAYS PUSH SAW AGAINST BLADE ROTATION.
NEVER PULL TOWARDS YOU OR RUN IN REVERSE.
WARNINGS:
KEEP KNEES AND OTHER
BODY PARTS OUT OF KICK
BACK ARC.
KNEEL TO THE SIDE!
DO NOT USE STANDING UP!
SAFE OPERATING POSITION:
A
R
C
CUTTING DIRECTION
D
L
O
G
1575-C
M1
1575-A
B
E
N
F
X
P
1812-O
1812-P
1810-J
1812-Q
1812-R
SAFETY FIRST
This Multi-Undercut Saw is designed for undercutting afxed
wooden door jambs, moldings, or base, to allow new oor
coverings to be t underneath. Do not use this saw for sanding oors, cutting metal, or any other purpose not described
in this instruction manual. Please read all instructions.
WORKING TERMINOLOGY: see Figure 1
BLADE REMOVAL: see Figure 2
BLADE INSTALLATION: see Figure 3
Switch off and unplug
saw, with blade stopped.
Place the blade spacer
over the spindle.
Place the saw blade on
top of the blade spacer.
Place the blade clamp
through the arbor hole
of the blade with the
bottom slot of the blade
clamp properly aligned
with the spindle.
Screw in and re-tighten
the blade screw. Push in
the spindle lock button
to tighten. Be sure to
tighten rmly before use.
HEIGHT ADJUSTMENT: see Figure 4
Switch off and unplug the
saw. Blade must be stopped.
The depth adjuster accurately controls depth of cut from
either straight-on (Figure 5)
or a 45˚ angle (Figure 6).
To adjust, loosen the threearm knob on the depth
gauge and move the depth
gauge in and out as required
(Figure 7).
A depth gauge adjustment
scale is provided just behind
the three arm knob with nine
1/8" increments (Figure 7).
Re-tighten the three-arm
knob rmly before use.
We recommend that you set
the depth of cut to no more
than 1/2" to minimize the
chance of hitting wall studs
or nails, etc.
Remove the depth gauge
when cutting inside corners.
DEPTH ADJUSTMENT:
Switch off and unplug the saw. Blade must be stopped.
Loosen two wing screws on height adjuster about 1-1/2
to 2 turns. Do not back off the wing screws more than
necessary.
Adjust the height of your blade by moving the height adjuster up or down until desired height of cut is achieved.
The inside of the height adjuster has 10 reference lines, in
height increments of 3/32" (.093"- one blade thickness).
Use the reference lines as a guide (Fig. 4). The housing must be set parallel to the floor. Make certain that
the bottom edge of the housing is set parallel with a
Figure 4
reference line. This is
critical for safety and
straight undercutting.
The maximum height
adjustment is 1".
Re-tighten the wing
screws before use.
USING THE SAW:
Make sure the blade screw
and handle screws are tightened securely. Make sure
blade is parallel with the oor.
Keep handle in vertical position for general undercutting.
Turn the handle away from
the toe kick for undercutting
toe spaces (see Figure 8).
Plug-in the saw; hold rmly
and push the switch forward to turn the power unit ON.
Figure 3
Figure 7
Figure 6
Figure 5
Figure 1
CAUTION!
BLADE EXPOSED
WHILE CUTTING
KEEP HANDS
AWAY!
SWITCH
HANDLE HANDLE
MOTOR
HOUSING
DEPTH GAUGE
ADJUSTMENT
SCALE
WING SCREW
HEIGHT
ADJUSTER
HOUSING
THREE-ARM
KNOB
BLADE
GUARD
DEPTH
GAUGE
SPINDLE
LOCK
BUTTON
Figure 2
HEX
WRENCH
VISE GRIP
HEIGHT
ADJUSTER
Switch off and unplug
saw, with blade stopped.
Retract the height adjuster ush with the base
to allow clearance for
the
hex
wrench.
Push the lock button
down with one hand and
insert the hex wrench
into the blade screw with
other hand, then turn
until the spindle engages with the lock button
(blade stops rotating).
Hold onto the plastic housing; then, push hard on the
hex wrench counter-clockwise to open. If the blade is
very hard to remove, use a vise grip to hold the blade.
HOUSING
WING
SCREW
HEIGHT
ADJUSTER
BOTTOM EDGE OF
THE HOUSING
REFERENCE
LINES
BLADE
SPACER
HEX
WRENCH
BLADE
SCREW
BLADE
CLAMP
#556
MUST
ENGAGE
SPINDLE
SPINDLE
DEPTH GAUGE
THREE-ARM
KNOB
0
1/8" DEEP
1/4" DEEP
EACH LINE IS
1/8" DEEP
UNPLUG THE SAW. REMOVE ALL
WRENCHES BEFORE STARTING.
UNPLUG THE SAW. REMOVE ALL
WRENCHES BEFORE STARTING.
HANDLES:
Keep both hands on the handles until the blade stops.
KICKBACK HAZARDS: While cutting, do not force the saw.
Also, keep the housing at on the oor and the blade parallel
to the oor at all times. Angling may cause powerful, dangerous kickback. Keep the saw RPMs high. Using a dull blade
will place a heavy load on your saw and increase the danger of
kickback. Use only Crain replacement blades.
EYE & EAR PROTECTION: Always wear safety glasses when
using a power tool. Wear ear plugs when using this saw.
BLADE GUARD: The blade guard attached to your saw
is for your safety and protection. If it becomes damaged,
do not operate your saw until it has been repaired. Always
leave blade guard in operating position when using the saw.
DOUBLE-INSULATED: This tool is constructed with two
separate layers of electrical insulation. A tool built with this
insulation system does not need to be grounded.
DANGEROUS ENVIRONMENTS: Keep work area clean;
clutter invites accidents. Do not use the saw on damp or
wet oors. Be sure that there is good lighting. This saw
may throw sparks. Make certain that ammable materials,
especially explosive vapors, are not present. Use a face or
dust mask if the cutting operation creates dust.
ACCIDENTAL STARTS: Do not carry with ngers on switch
or while plugged in. When carrying, blade must be stopped.
CORD ABUSE: Never carry the saw by the cord or yank the
cord to disconnect from an outlet. Keep cords away from
heat, oil, and sharp edges.
EXTENSION CORD: To minimize power loss and prevent
overheating, use maximum of 25 feet long and 16 AWG.
HAIR & CLOTHING: Keep all loose hair and clothing away
from the spinning blade at all times.
Figure 8
To start a cut, use the wall to push the blade guard back
and expose blade. DO NOT USE YOUR HAND!
 Loading...