

Page 1

10.1 INCH PORTABLE
10.1 INCH PORTABLE
DVD/CD PLAYER
DVD/CD PLAYER
Owner's Manual
PLEASE READ BEFORE OPERATING THIS EQUIPMENT.
Model: CTFT751tk
Size: 148.5(W) x 210(H)mm (A5)
Page 2
Page 3

Page 4
Page 5
con nect to p ower, tu rn
Page 6
Page 7
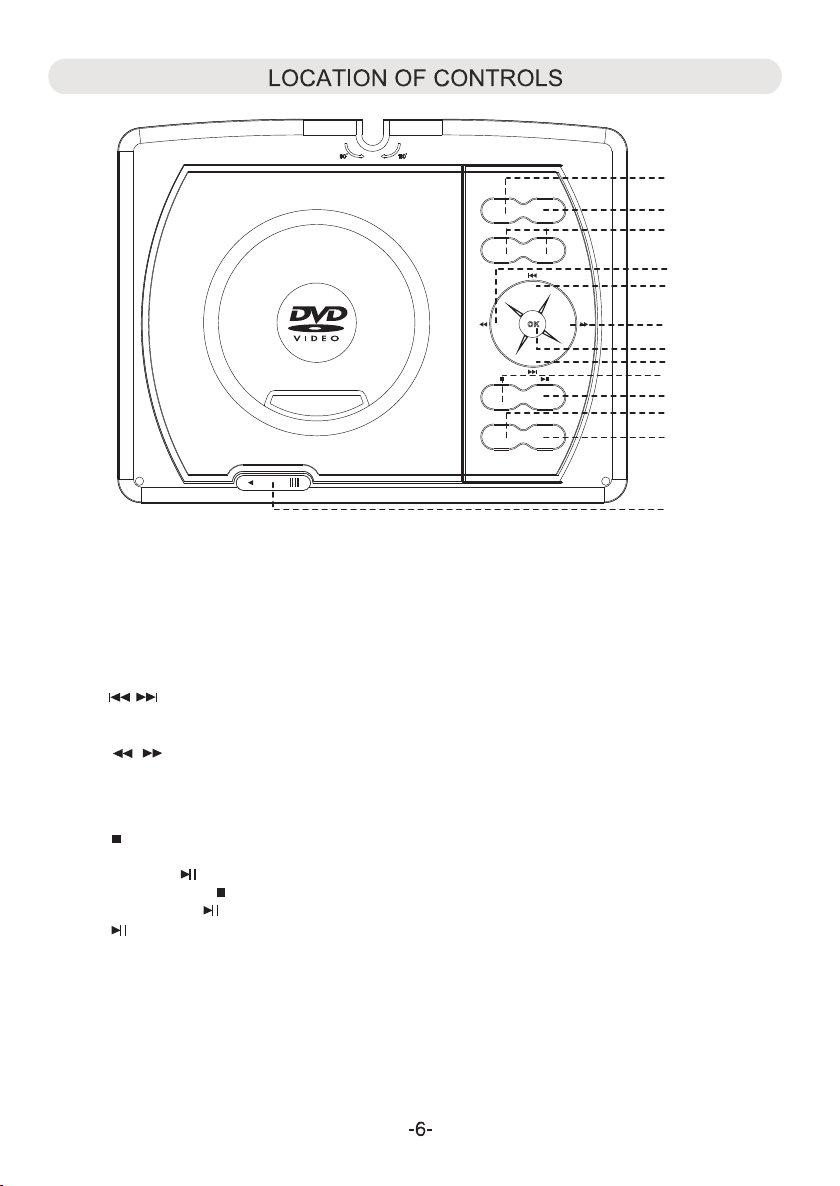
DVD
SOURC E
USB/S D
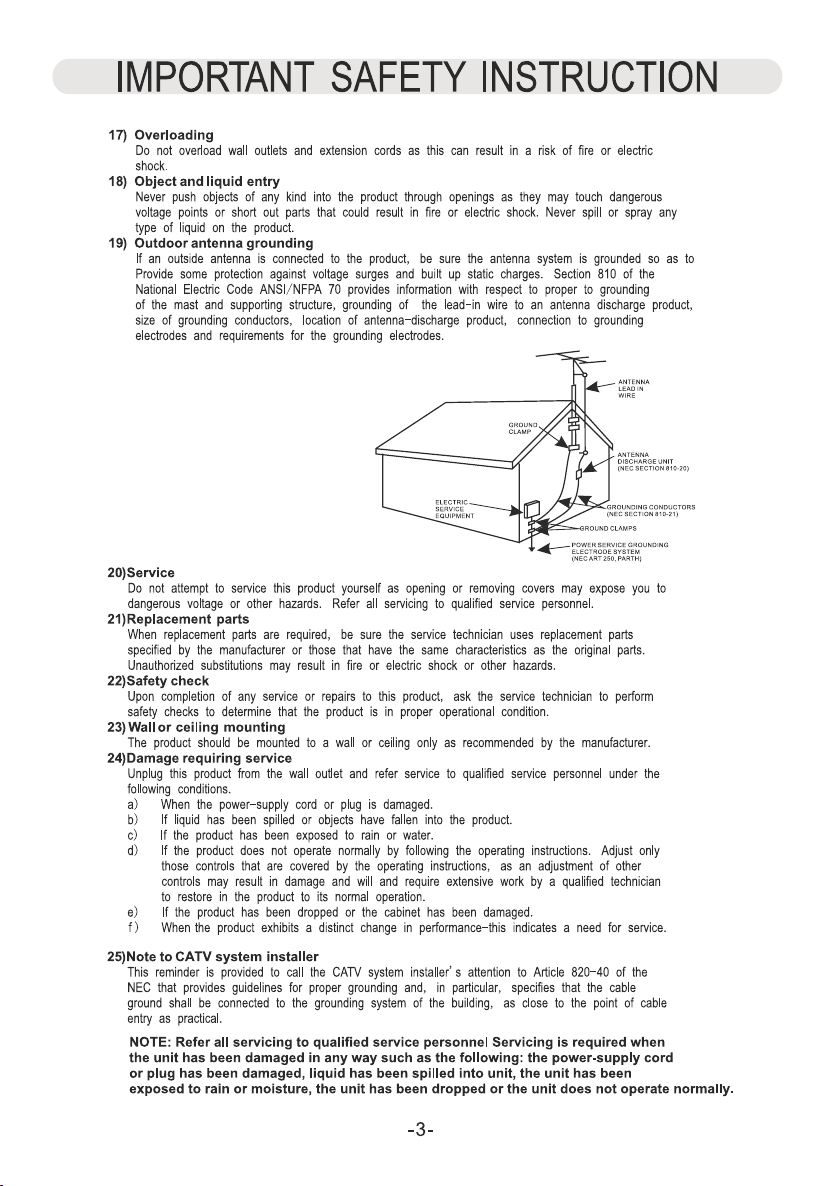
VOL- VOL+
LCD ON /OFF
SETUP
OPEN
1. SOU RCE:
~ Pre ss to swi tch to AV IN mo de; p ress ag ain to re sume no rmal mo de.
2.
DVD /USB/ SD:
~ Whe n USB dev ice and /or SD Ca rd was in serte d, pres s repea tedly t o selec t the pla yback s ource a s desir ed.
3.
VOL ( Volu me)-:
.
~ Pre ss to dec rease t he volu me leve l.
VOL ( Volu me)+:
~ Pre ss to inc rease t he volu me leve l.
4
.
~ In disc playback mode, press repeatedly to skip to previous/next chapters/tracks as desired.
~ In setting menu, press repeatedly to move the cursor upward or downward within the menu.
5
.
~ In disc playback mode, press to fast forward or fast backward.
~ In setting menu, press repeatedly to move the cursor left and right within the menu or return to previous menu.
6
.
OK:
~ Pre ss to con firm th e selec tion.
7
.
~ Whi le DVD/ CD play ing, pr ess thi s butto n once to p re-st op (In th is mode , when pr ess the
b
Play/Pause utt o gai n. The pl aye r will st art to pl ay the po int you w ere sto pped) .
~ Or pr ess the Stop wic e to stop p layba ck comp letel y (In thi s mode, w hen pre ss
e
th The p layer w ill sta rt to pla y the cur rent di sc from
8
.
~ Whe n playi ng, pre ss this b utton t o pause . Press a gai n to resume no rmal playb ack .
9
.
/Pause utto gai n.
LCD ON/OFF
~ Pre ss to tur n on/of h
10
SET UP:
.
n a
t
utt ob n
b n aPlay
tf e display.
b
egi nning ).
~ In audio playback or AV out mode, press this button to turn off the screen to save the battery power. Press again
to turn back the screen.
OPE N:
11
.
~ Slide to left to open the disc door.
1
2
3
5
4
5
6
4
7
8
9
10
11
Page 8
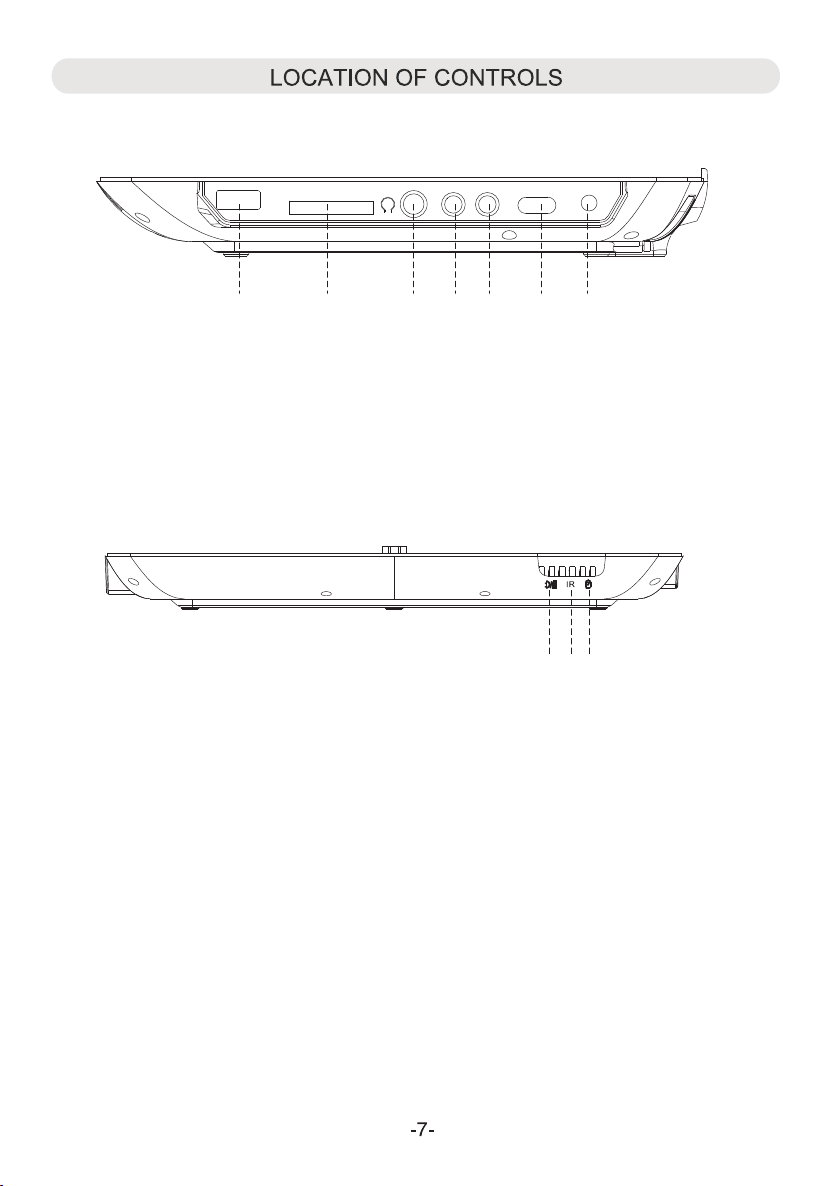
Right S id
e
12. US B por t
13. ard slo
14. Headphon e jac k
Fron
t
19. P
C
t ( For SD/MMC Card )
owe r ON indi cator
USB
CARD
12 13 114 615
20. Remo te se nsor
AV-INAV-OUT
17 18
15. AV-OUT jack
16. AV-IN jack
17. Pow er ON /OFF sw itch
18. DC IN j ack
19
DC INOFF ON
20
21
21. C hargi ng indi cator
Page 9

LOCATION OF CONTROLS (REMOTE CONTROL)
LCD O N/OFF
LCD ON/OFF button
Num eric bu tton
(1-9; 0/10 and 10+)
s
POW ER butt on
VOLUME +/-
MUT E butto n
but to
ns
SET UP butt on
Dir ectio n butto
ns
OK bu tton
Ski p and but tons
Play/Pause
OSD ( On Screen Display ) button
SUB TITLE b utton
STEP button
but ton
ANG LE butt on
ZOO M butto n
PRO G ( Pro gra m ) butto n
A-B (Re pea t) butt on
OSD
DVD
MEN U butto n
Fas t Sea rch
and
DVD/USB/SD
TIT LE butt on
STO P but ton
AUD IO butt on
GOT O but ton
REP EAT button
SLO W butto n
but tons
b
utt on
Page 10

Bat tery in stall ation :
1. Pr ess the t abs on th e batte ry door a nd lift ing it of f.
2. In stall t wo (2) x AAA si ze batt eries ( inclu ded) in t
att ery com partm ent as th e figur o n he
o
e b t
h
ae n d the t right
pol arity m arkin gs insi de batt ery com partm ent.
3. Re place t he batt ery doo r.
BATT ERY PR ECAUT IONS:
Fol low the se prec autio ns when u sing a ba ttery i n this de vice:
1. Us e only th e size an d type of b atter y speci fied.
2. Be s ure to fo llow th e corre ct pola rity wh en inst allin g the bat ter
s ind icate d in the ba ttery c ompar tment .
a
y
A reve rsed ba ttery m ay caus e damag e to the de vice.
3. Do n ot mix di ffere nt ty pes of ba tteri es toge ther (e .g. Alka line an d Carbo n-zin c) or old b atter ies wit h fresh o nes.
4. If t he batt eries i n the dev ice are c onsum ed or the d evice i s not to be u sed for a l ong per iod of ti me, rem ove the
bat terie s to prev ent dam age or in jury fr om poss ible ba ttery l eakag e.
5. Do n ot try to r echar ge the ba ttery n ot inte nded to b e recha rged; i t can ove rheat a nd rupt ure. (F ollow b atter y
man ufact urer' s direc tions .)
6. Do n ot disp ose of ba ttery i n fire. B atter y may exp lodes o r leak.
7. Cl ean the b atter y conta cts and a lso tho se of the d evice p rior to b atter y insta llati on.
BATTERY DISPOSAL WARNING
To reduce the risk of fire or burns:
Do not disassemble, crush, puncture, or short
external connectors contacts.
Use only with specified charger and player.
Do not dispose of in fire or water.
Do not dispose to high temperature above 6
(140 F) .
Store betwee
n 0 C (32 F) an d 60 C ( 140 F).
!
Keep away from children.
See operating instructions of this battery or product.
Li-ion Battery
Must Be Disposed
0 C
Of Properly
Batteries should be recycled or disposed of as per State and Local guidelines.
Remot e Control sensor
POWER
LCD ON/OFF
MENU
OK
USB/SD
OSD
TITLE
Rem arks:
1. Wh en ther e is an obs tacle b etwee n the uni t and the t ransm itter, t he tran smitt er may no t opera t .
2. Wh en dire ct sunl ight, a ncandesce nt lamp, flu orescent l amp o r any oth er stro ng ligh t shine s on the re mote
f the u nit, th e remot e opera tion ma y be unst able.
osensor
n i
e
Page 11

The u nit has a b uilt- in rech argea ble Li- polym er batt ery, rec har ge it bef ore use a s below :
~ Ins ert the s mall pl ug from t he AC/DC adapte r int o the DC IN j ack on th e side of t he unit .
~ Ins ert the AC/DC a dapter in to a co nveni ently l ocate d AC ou tle t havin g
AC 100 -240V ~; 50 or 60 Hz. Cha rging w ill sta rt auto matic ally.
Dur ing cha rging , the Red c hargi ng indi cator w ill lig ht.
Whe n finis hed, th e indic ator will tu rn off.
NOT ES:
~ Use t he encl osed AC/DC adap ter f or this p roduc t only.
~ Rem ove the AC/DC a dapter fr om al l outle t when no t using a l ong per iod of ti me.
~ Ins ert the AC/DC a dapter in to th e wall ou tlet in v ertic al and ho rizon t al dire ction o nly.
BATT ERY IN DICATOR
Whe n power o f the bui lt-in b atter y is low, the player will stop and turn off, recharge it as
pre vious p roced ures. D uring c hargi ng, you c an play s the DVD a s usual .
NOT ES:
~ Your ba ttery w ill las t longe r if you fo llowi ng thes e simpl e guide lines f or cari ng for an d stori ng it.
A. For c hargi ng firs t time, c harge i t at leas t 10 hour s.
B. Re charg e and sto re the ba ttery w ithin t he temp eratu re rang e of 5°C~ 35°C (4 0°F~9 5°F).
C. Do n ot over c harge ( longe r than 24 h ours) . Exces sive ch argin g or disc hargi ng may sh orten t he batt ery's l ife.
D. Ba ttery l ife nat urall y short ens slo wly ove r time.
E.T he rech argea ble bat tery in corpo rated i n this pr oduct i s not use r repla ceabl e.
AC Outlet
AC/DC Adapter's Plug
10
Page 12

1. Co nnect t he exte rnal TV t o the u nit thr ough th e AV-OUT jack as the Fi gur e 1 below.
2. Co nnect t he exte rnal Vi deo P layer s uch lik e DVD Pla yer, VCR , VDR to th e unit th rough t he AV IN jack a s the F igure 2 b elow.
3. Aft er conn ected res t he SO URCE bu tton on t he unit r epeat edly to sele ct the AV in or out modes a s the c onnec ting.
s, p
USB
CARD
AV-INAV-OUT
DC INOFF ON
Whi te Red Yell ow
Connected to the External Video Player
Fig ure 1
120V ~ 60Hz
External Video Player
DIGITAL
Fig ure 2
L R
AUDIO OUT
HEA DPHON E:
For p rivat e liste ning, c onnec t the sup plied E arbud s into th ead phone j ack on th e side of u nit.
e H
The s pea kers wi ll be dis conne cted wh en Earb uds are i nsert ed into t he jack .
VIDEO
VIDEO OUT
11
Page 13

The v iewin g angle o f the swi vel pan el can ad just as b elow as d esir :12ed
Page 14

BA SIC OP ERAT ION
Dis c Playb ack:
~ Lif t up the pa nel and t urn to de sired a ngle. S lide th e Power ON/OF F swit ch to "ON " posit ion to po wer on th e playe r,
the G reen in dicat or on fro nt of the p layer w ill lig ht.
~
lid e tS
C
los e the
~ To powe r off , pre ss th but to o tur n the pla yer to st andby m ode.
The G reen in dicat or will r emain l ighti ng. Pre ss
(
For s aving battery power, al way s power o ff the pl aye r by slid e
PRO G (Prog ram)
Dur ing DVD p layba ck, pre ss the PR OG (Pro gram) b utton . The set tin g menu wi ll appe ar on the s creen a s Fig. A.
~ Usi ng the Nu meric a nd Dire ction b utton s to ente r the des ired Ch apter a nd Title num ber. F ig.B will ap pear on
the s creen .
~ Usi ng the Di recti on butt ons to se lect an d highl ight th e "Star t" butt on then p ress th e OK butt on to sta rt prog ram
pla yback .
~ Dur ing pla yback , press t h utton t wic e to canc el the pr ogram p layba ck.
N switch o
he OPE n the d isc doo r t pen it . Pla ce the di sc on the c enter s pindl e with label sid e fac ing up
o o .
le ft ot
dis c door an d the pla yer wil l start p layba ck auto matic ally.
e POWER
n t
on the remote control
e POWER
th ut ton a gain to t urn the p layer on fro m standby mo de.
b
the N/OF F sw itch on the sid e of player to O FF positio n .)
Power O
Repeat the same procedures until all the desired Title/Chapters were listed in the list.
e bStop
Exi t Exi t
Next
Sta rt
Next
Fig .A Fig.B
Dur ing CD di sc play back, p ress th e PROG bu tton, t he sett ing men u will ap pear on t he scre en as Fig . C:
Sta rt
Exi t
Next
Exi t
Next
Fig .C Fig. D
~ Usi ng the Nu meric a nd Dire ction b utton s to ente r the des ired Tra ck numb er, Fig. D w ill app ear on th e scree n.
Repeat the same procedures until all the desired tracks were listed in the list.
~ Usi ng the Di recti on butt ons to se lect an d highl ight th e "Star t" butt on, the n press t he OK but ton to st art pro gram pl aybac k.
~ Dur ing pla yback , press t h utto n twice to can cel t he prog ram pla yback .
e bStop
NOT E: Prog ram is no t funct ionin g in MP3, USB, /SD MMC C ard playb ack m odes.
13
Page 15

POW ER ON/OFF switch
Slide the Power ON/OFF switch on the unit to "ON" position to turn on the unit.
Slide the Power ON/OFF switch to "OFF" position to turn off the unit.
( To save the battery power, always power off the unit by sliding it to "OFF" position.)
POW ER
In power on mode, press the POWER button on the remote control to turn it off ( Standby mode ).
Press again to turn it on.
ZOO M
Dur ing DVD d isc pla yback , press r epeat edly to z oom in/ out as be low:
In th e zoom mo de, pre ss the Di recti on , , , butt ons to mo ve the po sitio n of pict ure as de sire.
A-B
Dur ing pla yback , press A-B ( Repea t) butt on to sel ect poi nt A.
Pre ss it aga in to sel ect poi nt B. The p lay er will p lay the s ectio n from A to B aut omati cally a nd
rep eated ly unti l the A-B bu tton wa s press ed.
Dur ing pla yback , press t o pause .
Pre ss agai n to resu me norm al play back.
Dur ing pla yback , press t he butt on repe atedl y to sele ct the se arch sp eed and s earch ing
the s pecif ic sect ion for ward as b elow:
Dur ing sea rchin g, pres s the Play/Pause utto n resume to no rma l playb ack.
Dur ing pla yback , press t he butt on repe atedl y to sele ct the se arch sp eed and s earch ing
the s pecif ic sect ion bac kward a s below :
Dur ing sea rchin g, pres s the Play/Pause utto n resume to no rma l playb ack. b
Pre ss repe atedl y to skip t o previ ous cha pters /trac ks as des ired.
Pre ss repe atedl y to skip t o next ch apter s/tra cks as de sired .
STO P
Dur ing pla yback , press o nce to pr e-sto p (In thi s mode, w hen pre ss the Play/Pause utton aga in.
The p lay er will s tart to p lay the p oint yo ur were s toppe d).
Or, pr ess twi ce to sto p playb ack com plete ly (In th is mode , when p
The p lay er will s tart to p lay the c urren t disc fr om begi nning ).
Volume + /-
Pre ss Volume + b utt on to inc rease v olume level.
Pre ss Volume - b utt on to dec rease v olum
the
b
e level.
b
res s the Play/Pause utton aga in.
b
ANG LE
Dur ing DVD p layba ck, pre ss repe atedl y to sele ct the av ailab le angl s de sired .
NOT E: Func tion de pends o n the rec ordin g of the DV D disc, n ot all th e DVD dis cs with t his fun ction .
e a
14
Page 16

SUB TITLE
Dur ing DVD p layba ck, pre ss repe atedl y to sele ct the av ailab le subt itles o n the DVD a s desir ed.
NOT E: Func tion de pends o n the rec ordin g of the DV D disc, n ot all th e DVD dis cs with t his fun ction .
MUT E
Dur ing pla yback , press t o turn of f the s ound te mpora ry, pres s aga in to res ume.
TIT LE
Dur ing DVD p layba ck, pre ss to ret urn to Title m enu .
NOT E: Func tion de pends o n the rec ordin g of the DV D disc, n ot all th e DVD dis cs with t his fun ction .
REP EAT
Dur ing CD pl aybac k, pres s repea tedly t o selec t the rep eat mod e to Track ( Plays t he curr ent tra ck repe atedl y)
or All (Plays a ll tr acks repea tedly) as de sir ed.
Dur ing DVD p layba ck, pre ss repe atedl y to sele ct the re peat mo de to Cha pter (P lays al l the tit les in th e
cur rent ch apter r epeat edly) ; Tit le (Pla ys the cu rrent t itle re peate dly) or All (Play s all t racks o n the
cur rent di sc repe atedl y).
To canc el, p ress th e butto n repea tedly u ntil al l repea t icons d isapp ear on th e scree n or pres s th utt on twic e to stop .
Dur ing MP3 d isc pla yback , press r epeat edly to s elect t he repe at mode:
~ Random: Press REPEAT Button once to play the files randomly. "Random" will appear on screen.
~ Single:
~ Repeat One: Press REPEAT Button three times to play the current file repeatedly. "Repeat One" will appear on screen.
~ Repeat Folder:
~ Normal: Press REPEAT Button five times to return to narmal playback mode. "Normal" will appear on screen.
1-9; 10/0 and 10+ but ton s
Ent er the de sired n umber i n the set ting me nu or in tr acks se archi ng mode
R : "
ema rk 10+ " butto n is vali d only in D VD play back mo de, e.g . to sele ct chap ter "13 ", pres s the "10+" and
MEN U
Dur ing DVD p layba ck, pre ss to ret urn to di sc menu .
Press REPEAT Button twice to play the current file then stop. "Single" will appear on screen.
Press REPEAT Button four times to play all the files in the current folder repeatedly. "Repeat Folder"
will appear on screen.
~
~ In CD/DVD playback mode, press the "0/10" button once to plays the number 10 chapter/tracks directly.
.
e Stop b
3" bu tton.
"
GOT O
In DV D Playb ack:
To sele ct th e desir ed Title and C hap ter, press th e GOTO button onc e, th e Title and Ch apt er sele ction m enu wil l appea r on
the s creen . Use the D irect ion and N umeri c butto ns to sel ect the d esire d title a nd chap ter the n press t he OK but ton to st art
pla yback .
Sel ect the d esire d estab lish ti me of the c urren t Tit le to pla y, press t he GOTO button tw ice , the tim e selec tion ta ble wil l
app ear on th e scree n. Usin g the Dir ectio n and Num eric bu ttons t o enter t he desi red est ablis h time. T he un it will s tart pl ays
the m ovie fr om the se lecte d estab lish ti me.
Sel ect the d esire d estab lish ti me of the c urren t Chapt er to pla y, press t he GO TO butt on th ree tim es, the t ime sel ectio n table
wil l appea r on the sc reen. U sing th e Direc tion an d Numer ic butt ons to en ter the d esire d estab lish ti me. The u nit w ill sta rt
pla ys the mo vie fro m the sel ected e stabl ish tim e.
In CD o r MP3 pla yback :
Pre ss the GO TO butt on th en sele ct and pl ays the d esire d track a s the on sc reen in struc tions .
15
Page 17

SLO W
During playback, press the SLOW button repeatedly to set and plays the video in slow motion as desire.
Press the Play/Pause button to resume to normal playback.
DVD /USB/ S
OK
Pre ss to con firm th e selec tion.
DIR ECTIO N ( )
Pre ss to mov ing the c ursor i n the set ting me nu.
SET UP
Pre ss to ent er or exit settin g men u.
OSD (On Screen Display)
Dur ing pla yback , press r epeat edly to d ispla y the pla yback c ondit ions on s creen .
AUD IO
Dur ing DVD p layba ck, pre ss repe atedl y to sele ct the av ailab le lang uage or a udio ch annel i n the dis c.
Not e: Func tion de pends o n the rec ord of th e disc.
D
If USB device and/or SD/MMC memory card was inserted, press the button repeatedly to select the playback
source to DVD (For disc playback); USB (Plays the files inUSB device) or Card (Plays the
files in the SD or MMC card) as desire.
STEP
During DVD playback, press repeatedly to move forward frame by frame, press the Play/Pause button to resume normal playback.
LCD ON/OFF
Press to turn on/off the display.
16
Page 18

SY STEM S ETU P
Set ting Me nu:
Pre ss th e SETUP b utt on, the s ettin g menu wi ll appe ar on the s creen a s below. U sing
to s ele ct and hi ghlig ht the fu nctio n you nee d to set or r eset. P ress th e OK butt on
the D irect ion but tons
to en ter or co nfirm ed the se lecti on.
Aft er sett ing, pr ess the S ETUP bu tto n to save t he sett ings an d exit.
TV Shape Wide
Angle Mark On
OSD Lang
Dolby
Captions On
Screen Saver On
Last Memory On
Go To General Setup Page
Normal/Ps
Normal/Lb
Wide 16:9
GEN ERAL SE TUP
1. If TV Shape is sele cte d, usin g the Dir ectio n and OK bu ttons to set t he aspect ra tio t o match t he play ing mov ie.
2. If Angle Mar k is selecte d, us ing the D irect ion and O K butto ns to set i t On or Off . If se t to On, wh en mult i-ang les
are a vaila ble on th e playi ng DVD, t he mult i-ang le logo w ill app ear on th e scree n.
3. If OSD Lang ( On Sc reen Di splay L angua ge) is selecte d, us ing the D irect ion and O K butto ns to set t he OSD
lan guage a s desir ed.
4. If Captio ele cted, u sing th e Direc tion an d OK butt ons to se t it On or Of f. If s et to On, w hen cap tions a vaila ble
n is ss
on th e playi ng DVD, i t will sh ow on the s creen a utoma tical ly.
5. If Screen s aver is sele cte d, usin g the Dir ectio n and OK bu ttons t o set it On o r Off. If s et to O n, the sc reen sa ver
wil l come on w hen the u nit sto ps or the i mage is p aused f or appr oxima tely fi ve minu tes.
6. If Last Mem ory is selec ted , using t he Dire ction a nd OK but tons to s et it On or O ff. If se t to On , the uni t will st art
pla yback f rom the p ositi on wher e the dis c was sto pped la st time .
SPEAKER S
ETU P
If Sp eaker S etup is s elect ed, pre ss the OK b utton to enter. Down mix settin g men u will ap pear, us ing the D irect ion and
OK bu ttons t o set it to Lt /Rt or Stere o.
~If s et to LT/RT, the re ar le ft or rea r right c hanne ls will p lay on bo th Left a nd Righ t Speak ers.
~If s et to Ste reo, th e rear le ft chan nel wil l play on t he Left S peake r; the re ar righ t chann el will p lay on Ri ght Spe aker.
DOL BY DIGI TAL SETUP
1. If D ual Mon o is sele cted, u sing th e Direc tion an d OK butt ons to se t it to Ste reo, L- Mono (P lay Lef t chann el on all
spe akers ), R-Mo no (Pla y Right c hanne l on all sp eaker s) or Mix -Mono ( Mixed R ight an d Left ch annel t hen pla ys
on al l speak ers) as d esire d. (Fun ction s depen d on the re cordi ng of the d isc).
2. If D ynami c is sele cted, u sing Di recti on and OK b utton s to set th e dynam ic leve l as desi red or tu rn it off .
17
Page 19

SY STEM S ETU P
VID EO SETU P
1. If t he Picture i s selected , usi ng the Di recti on and OK b utton s to set th e panel q ualit y of scre en such l ike
Sha rpnes s, Brig htnes s, Cont rast, H ue and Sa turat ion.
2. If Panel Ratio is sel ect ed, usi ng the Di recti on and OK b utton t o set the a spect r atio of t he pane l to 16:9 o r 4:3 to
mat ch the as pect ra tio of pl aying m ovie.
R
P EFEREN CE SE TUP
The preference page can be selected in disc stop playing mode only.The preference page can be selected in disc stop playing mode only.
1. If T V Type i s sel ected , using t he Dire ction a nd OK but tons to s et to PAL, AU TO or N TSC t o match t he colo r
sys tem of th e TV. (N ote: The TV system in US , Can ada and M exico i s NTSC. )
2. If Au dio, Su btitl e or Disc M enu is se lecte d, usin g the Dir ectio n and OK bu ttons t o set the p riori ty of the a vaila ble
lan guage . (Func tions d epend o n the rec ordin g of DVD. )
3. If P arent al is sel ected , using t he Dire ction a nd OK but tons to s et the ra ting le vel as de sired a s follo w:
~ Pre ss the Direction button to en ter, the rati ng le vel list will ap pea r.
~ Pre ss the Direction o r but ton to se lect th e desir ed leve l.
~ Pre ss the OK b utton t o enter, p asswo rd ente r windo w will po p up.
~ Ent er the fo ur digi t passw ord (de fault p asswo rd is 751 0) by pre ssing t he Nume ric but tons.
~ Pre ss the OK b utton t o save th e setti ngs and e xit.
~ Rat ing lev els:
1. (K id Saf ): Kid s afe
2. (G ): All age s
3. (P g ):Par ental G uidan ce
4. (P g 13):P arental Gu ida nce les s than 13 y ears ol d
5. (P gr ): un der 1 7 years o ld, Par ental G uidan ce sugg ested
6. (R ): Unde r 17 year s old, Pa renta l Guida nce str ongly
7. (N c 17): 17 y ears ol d and abo ve
Adu lt
8. ( ) : Adult only
4.I f Password is se lec ted, pr ess the O K butto n to ente r. The sub s etting men u wil l appea r.
~ If Pa sswor d Mode is s elect ed, usi ng the Di recti on and OK b utton s to set it O N (acti vate th e ratin g level s ettin g)
or OF F (Pass word is n eeded ).
~ If Pa sswor d is sele cted, p ress th e OK butt on twic e to ente r, the sub s ettin g menu wi ll appe ar.
1. En ter the f our dig it old pa sswor d. The co lum n of New Pa sswor d will be h ighli ghted .
2. En ter the n ew four d igit pa sswor d. The co lum n of Conf irm Pw ill be h igh light ed.
3. En ter the n ew pass word ag ain. OK b utton o n the scr een wil l highl ighte d. Pres s the OK bu tton to s ave the
set ting an d exit.
d w
5. If D efaul t is sele cted, u sing th e Direc tion an d OK butt ons to re set all s ettin gs to def ault se tting o r press t he
SET UP butt on to e xit wit hout ch anges .
18
Page 20

US B O R SD/ M MC CAR D PLAYBACK
1. Insert the U SB De vice or S D/MMC m emory c ard (not inclu ded) into th e USB port/c ard s lot as th e figur e below :
USB
CARD
AV-INAV-OUT
DC INOFF ON
NB: T he un it supp orted t o playb ack:
~ MP3 ; WMA ( Musi c file )
~ JPG ( P ictur es )
~ AVI; VOB ( Video f ile s up to 640 x480 pi xels )
Mak e sure co rrect f iles we re save d in the US B devic e or memo ry card s befor e inser t to the un it.
r
2.P ower on t he unit , press t he DVD/ USB/S D butto n
W
ait u ntil fo lder/ file li st appe ar on the s creen . Using t he
t
hen p ress OK b utton t o start p layba ck.
epe atedl y to sele ct the de sired p layba ck sour ce.
D
ire ction b utton s to sele cted th e desir ed file,
3. Ot hers op erati ons are s imila r to DVD pl aybac k.
19
Page 21

TR OUBL ESH OOTI NG
No po wer
Pow er of bui lt-in batter y may consum ed. R echar ge it by th e suppl ied AC/D C Ada ptor. Durin g cha rging , the uni t can pla ys
dis c at the sa me time .
No so und
~ Volu me leve l too low . Risin g it by pre ss the VOL (Volume) + button.
Remote cont rol no t functi onin g
~ Th e batt ery is con sum re plac e by new one .
~ Po int th e remo te contr ol to the remo te senso r on the unit.
~ Re move t he obs tacl es bet ween the rem ote cont rol an d remote sen sor.
Forgott en the pre set rati ng passw ord.
If t he pas swor d was forg otte n, use d the defa ult pass word 751 0 to relea se the lock and rese t a new
ed,
passwor d.
20
Page 22

Car ing for D iscs
Trea t the dis c caref ully. Ha ndl e the dis c only by i ts edge s. Neve r allow y our fin gers to c ontac t with
the s hiny, un pri nted si de of the d isc.
Do no t attac h adhes ive tap e, stic kers, e tc. to th e disc la bel.
Cle an the di sc peri odica lly wit h a soft, l int-f ree,d ry clot h, Neve r use det ergen ts of abr asive
cle aners t o clean t he disc . If nece ssary, u se a CD c leani ng kit.
If a di sc skip s or gets s tuck on a s ectio n lf the di sc, it is p robab ly dirt y or dama ged (sc ratch ed).
Whe n clean ing the d isc, wi pe in str aight l ines fr om the ce nter of t he disc t o the out er edge o f
the d isc. Ne ver wip e in circ ular mo tions .
Dis cs shou ld be sto red in th eir cas es afte r each us e to avoi d damag e.
Do no t expos e discs t o direc t sunli ght, hi gh temp eratu res or du st, etc . Prolo nged ex posur e or extr eme
tem perat ures ca n warp th e disc.
Do no t stick o r write a nythi ng on eit her sid e of the di sc.Sh arp wri ting in strum ents, o r the ink ,
may d amage t he surf ace.
Cle aning t he Unit
To prev ent fir e or shoc k hazar d, disc onnec t your un it from t he AC powe r sourc e when cl eanin g.
The f ini sh on you r unit ma y be clea ned wit h a dust cl oth and c ared fo r as othe r furni ture.
Use c autio n when cl eanin g and wip ing the p lasti c parts .
Mil d soap an d a damp cl oth may b e used on t he fron t panel .
21
Page 23

Pow er Sour ce:
Mai n Unit
Sup plied AC/D C Adapto r
Rem ote Con trol
Pow er Cons umpti on:
Col or syst em:
Dis cs play ed:
(1) D VD-VI DEO dis c
(2) C ompac t disc
SP ECIF ICAT ION S
Bui lt-in D C 7.4V,
Rec harge b y DC 12V,1A
Inp ut: AC 100 -240V ~, 50/6 0Hz, 0. 5A
Out put: DC 1 2V,1A
DC 3V, 2 x size b atteries , inc luded“AA A”
(Ma x) 12W
NTS C/PAL
12c m singl e-sid ed, sin gle-l ayer
12c m singl e-sid ed, dua l-lay er
12c m doubl e-sid ed, sin gle-l ayer
8 cm si ngle- sided , singl e-lay er
8 cm si ngle- sided , dual- layer
8 cm do uble- sided , singl e-lay er
12c m disc
8 cm di sc
Li- polym er batt ery;
Vid eo ou tput le vel:
Aud io outp ut leve l:
Aud io sign al outp ut char acter istic s:
Fre quenc y respo nses:
DVD ( linea r audio ):
CD au dio:
S/N r atio:
Pic kup:
Wave len gth :
Las er powe r:
ACC ESSOR IES
Rem ote con trol, u ses 2 x AAA si ze ba tteri es (inc luded ) x 1
Aud io / Vide o con necti on cabl e x 1
Ear buds x 2
AC/ DC Adapter x 1
Use r’s Man ua
Aud io Spli tte
Carrying Case
l x 1
r x 1
SPE CIFIC ATIONS AR E SUBJE CT TO CHA NGE W ITHOU T NOTIC E
1 Vp- p
1.5 Vrms (1 KHz, 0 dB)
20H z-20K Hz (48K Hz samp ling)
20H z-20K Hz (96K Hz samp ling)
20H z-20K Hz
70d B
DVD 640±10n m,CD790±15n m
CLA SS 1
x 1
22
Page 24

LIMITED WARRANTY
Craig warrants this product to be free from manufacturing defects in material and
workmanship under normal use for a period of 90 days from date of purchase. If service
is required, please return the product to the store where it was purchased for exchange;
or, pack the unit in the original packing material with all accessories if applicable, a copy
of your sales receipt and a Cashier’s check or Money Order for $20.00 (to cover shipping
and handling costs) payable to Craig Electronics Inc. For consumers in Canada, please
make sure that the cashier check or money order is redeemable through a U.S. bank.
Ship your product freight pre-paid. Your unit will be repaired, replaced or if the unit can
not be repaired or replaced, a refund will be forwarded to you within four weeks of receipt
of your unit. Please ship your unit to:
Craig Electronics Inc.
1160 NW 163 Drive
Miami, Fl 33169
This warranty is void if the product has been: a) Used in a commercial application or
rental. b) Damaged through misuse, negligence, or abuse. c) Modified or repaired by
anyone other than an authorized Craig service center. d) Damaged because it is
improperly connected to any other equipment.
Note: This warranty does not cover: a) Ordinary adjustments as outlined in the Owner’s
Manual which can be performed by the customer. b) Damage to equipment not properly
connected to the product. c) Any cost incurred in shipping the product for repair. d)
Damage to the product not used in the USA.
This warranty is not transferable and only applies to the original purchase. Any implied
warranties, including the warranty of merchantability, are limited in duration to the period
of this expressed warranty and no warranty whether expressed or implied shall apply to
the product thereafter.
Under no circumstance shall Craig be liable for any loss or consequential damage arising
out of the use of this product. This warranty gives specific legal rights. However, you may
have other rights which may vary from state to state. Some states do not allow limitations
on implied warranties or exclusion of consequential damage. Therefore, these
restrictions may not apply to you.
To Obtain Service on your Product
email:service@craigelectronics.com
Printed in China CTFT751tk_WC_E0FT1_H0US
Size: 148.5(W) x 210(H)mm (A5)
 Loading...