

Page 1
Page 2

Page 3

Page 4
Page 5
Page 6
Page 7
Page 8

Battery Recharge
The player had a build-in DC 3.7V, 250mA Lithium battery. Recharging the battery as:
Power ON the player by slide the POWER switch to ON position.
Connect the player to the computer by the supplied USB connection cable.
The display on the unit will shows as below and will start to charging automatically:
NOTE:
1) For the first time to recharge the build-in battery, charge it at least 10 hours.
For normal recharge, it need approximate 4 hours.
2) When the POWER Switch is on the OFF position, the player can’t be charge.
TRANSFERRING FILES
Before you getting start to playback music, videos or photos, you should transfer those
files into the player as:
Download the normal music, videos and photos files into the player:
The player has two Online Device modes: MEDIA DEVICE and USB Disk, for normal
7
Page 9
files transferring, set the player in USB DISK mode as:
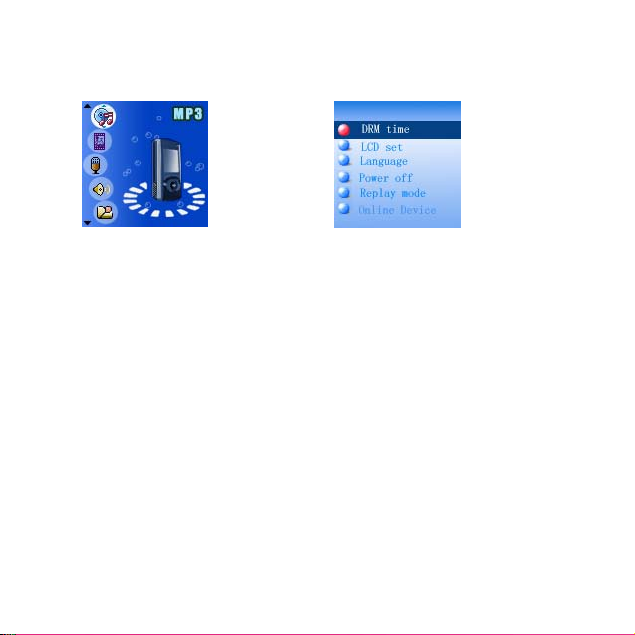
1. Power on the player by slide the POWER Switch to ON position, the setting manual
(FIG. 1) will appear on the display automatically.
FIG.1 FIG.2
2. Press the >>I or I<< button to select SETUP then press MENU button to enter.
3. Press >>I or I<< button to select Online Device (FIG. 2) then press MENU Button to
enter.
4. Press >>I or I<< button to select USB Disk, press MENU Button to confirmed the
selection then press and hold the MENU button to save the setting and exit.
5. After above setting, connect the player to the computer by the supplied USB
connection cable.
6. Download the specific files into the player as download the files to others portable
device.
7. After downloaded, disconnect the unit from computer.
NOTES:
~ All the downloaded files in this setting will stored in the Root Directory in the player.
~ For video files, only AMV video files (with .amv extension) can be playback by the
player. For details, please refer to the AMV converter section.
Download the DRM-WMA(Digital Rights Management-WMA, songs with copy
right protective in WMA format)files into the player:
1. Set the Online Device modes to MEDIA DEVICE as above procedures.
2. Connect the player to the computer with the supplied USB connection cable. The
8
Page 10

computer will detected the player and show:
3. Select and turn on the Windows Media Player in the computer and double click the
SYNC button on the menu ba r.
4. Drag the specific DRM songs into the sync list .
5. Double click the Start Sync button on the Windows Media Player to start synchronize
the DRM songs into the player.
6. When finished, disconnect the player from the computer. (The operation procedures
and the location of control buttons between Windows Media Player 10 and 11 are
difference. For details, please refer to the instruction manual of Windows Media
Player. )
7. In this setting, the DRM songs will stored in the Music Folder in the player.
IMPORTANT NOTE:
1. The DRM songs only can sync (synchronize) into the player through the Windows
Media Player 10 or 11.
9
SYNC button
Page 11

2. Only the Window XP and Vista or latest operation system of computer can installed
the Windows Media Player 10 or 11.
3. Do NOT disconnect the player during files transferring. Otherwise, the DRM
information in the unit may corrupt, you cannot playback the DRM songs again. In
this case, you should deleted all the DRM songs and information in the unit as:
3.1 Connect the player to the computer, delete all the files/folders in the player.
3.2 Disconnect the player from the computer.
3.3 Power on the unit, enter to the setting menu. Press >>I or I<< button to select
Remove MTPinfo then press menu button to delete all the internal information of
DRM in the player .
3.4 Connect the player to the c ompu ter an d sy nc th e D RM son gs i nto th e pl ay er ag ain.
Operation system of the computer:
1. Windows Vista and XP: The player can perform all functions.
2. Windows ME and 2000、Mac OS 10、Linux 2.4.2: T he n ormal m usic, v ideos or phot os
files can be download into the player.
3. Windows 98: Before download the normal music, videos or photos files into the
player, the drive in the enclosed CD disc should be installed to the computer.
Install drive-program at the system of WIN 98
1. Insert the supplied installation CD into the CD Drive in your computer; the List of
Folders in the CD will appear on the computer’s screen automatically.
2. Selected the “WIN 98 SE DRIVER” and enter.
3. Selected and double click “setup.exe” and follow the on-screen instructions to install
the software.
Install AMV Converter and Player in the computer
1. Insert the supplied installation CD into the CD Drive in your computer; the List of
Folders in the CD will appear on the computer’s screen automatically.
2. Selected the “MP3 set 4_16” and enter.
3. Selected and double click “setup.exe” and follow the on-screen instructions to install
the software.
10
Page 12

AMV Convert er
After the installation of the AMV Converter, click “START” on your
computer, click “All Programs”, selected and double click “MP3 Player
Utilities 4.16” to enter. Then selected and double click “AMV Converter”
to run the converter. The follows window will appear on the computer’s
screen:
HELP button
NOTE:
Before using this converter, press the HELP button on the AMV Converter to read the
detail Instruction Manual of the Converter.
Some video titles have built in protection software that, copying is prohibited. Only
unprotected video contents of the above formats are possible be converted by the AMV
converter.
There are some video files that may be s uing th e comp atib le forma t’ s name, but ac tually
are different formats, so that the AMV converter cannot handle.
11
Page 13

Locating the Controls
S/N Description S/N Description
>II Button
1
2 MENU Button
3
USB Jack
4 VOL Button
5 Phones Jack
6
Button
MIC (Microphone)
7
Button
8
LCD Display
9
Power ON/OFF Switch
10
12
Page 14

Display Overview
S/N Description S/N Description
EQ Mode
1
Repeat Mode
2
Volume Level
3
Battery Meter
4
Total Numbers of Tracks
5
Current Track Number
6
Real time Audio Spectrum
7
13
Current Song’s Name
8
Lyric Indicator
9
Bitrate of current Track
10
Total time of current Track
11
Elapsed Time of Current Track
12
Format of Current Track
13
Current Folder’s Name
14
Page 15

Battery Indicator
= Battery full power.
= Battery empty, connect the unit to the computer for recharging. It would take
about 4 hours to fully recha rge the battery. During charging, you can play back th e music,
videos or photos at the same time.
Basic Operation
1. Power On/Off:
1.1 Power On:
● Slide the Power ON/OFF Switch to ON position to power on the player.
1.2 Power OFF/Standby:
● In power on or playback modes, press and hold the >II Button to power off
(Standby mode) the player. To power on the player again from the standby mode,
press and hold the >II Button again, or
● Slide the Power ON/OFF Switch to OFF position to power off the player.
(NOTE: If long period of time will not use t he p layer, recommended to po wer off the
player by the Power ON/OFF switch.)
1.3 Volume Control:
● In the playba ck mode, press the VOL button then press the >>I or I<< button to
adjust the volume as desire.
1.4 Phones Jack:
●Insert the included Earphone to the Phones Jack on the bottom of the player.
14
Page 16

Main Menu
1. When power on the player, the setting menu will appear on the display
automatically.
2. In the others mode, press and hold the MENU button until the setting menu
appear on the display.
3. In the setting menu (or sub-menus), press the >>I or I<< Buttons repeatedly to
selected the specific functions, then press the MENU button to confirm the
selections. After setting, press and hold the MENU button to return to the main
menu or press the MENU button return to previously menu.
4. If MP3 is selected, press MENU button to enter Music Playback mode, press >II
button to start playback.
5. If AMV is selected, press MENU button to enter VIDEO Playback mode, press >II
button to start playback.
6. If RECORD is selected, press Menu button to enter Voice Recording Mode.
7. If VOICE is selected, press MENU button to enter Voice Recording Playback
mode.
8. If PHOTO is selected, press MENU button to enter Photo Playback mode, press
>II button to start playback the photos.
9. If SETUP is selected, press MENU button to enter setting menu mode. In setting
menu:
15
Page 17

9.1 If LCD set is selected, press MENU button to e nte r the setting menu. Press the
9.2 If Language is selected, press MENU button to enter, press the >>I or I<<
9.3 If Power off is selected, press MENU button to enter, press the >>I or I<< button
9.4 If Contrast is selected, press MENU button to enter the setting menu, press the
>>I or I<< button to select Black or Ex it. If Black is se lected, p ress MENU b utton
to enter, pres s the >>I or I<< but ton to s elect the displa y auto tu rn of f peri od to 0
(Display will not turn off); 6; 12; 18; 24; 30 (seconds), then press and hold the
MENU button to save the setting and exit. If Exit is selected, press MENU
button to return to the previous setting menu.
button to select the On Screen D ispl ay langu age a s de sire, t he n pre ss an d h old
the MENU button to save the setting and exit.
to select Off Time or Sleep time. If Off time is select, press MENU button to
enter, press the >>I or I<< button to set the auto power off time when the
player is idle to 0 (The player will not auto power off); 10; 20; 30; 40; 50;60
(seconds), then press and ho ld the MENU button to save the setting and exit. If
Sleep time is select, press the MENU butt on to enter to the setting menu, press
>>I or I<< button to set the sleep time from to 0 (Sleep timer w ill not f unctioni ng);
10 to 120 (minutes), press and hold the MENU button to save the setting and
exit.
NOTES:
1. If Sleep timer had been set, the player will be auto power off when time is
up.
2. If the sleep timer had not be reset to “0”, every time when you power on the
player, it will auto power off when sleep time is up.
>>I or I<< button to set the contrast level fr om 0-15 as desire, then pres s and
16
Page 18

hold the MENU button to save the setting and exit.
9.5 If Memory info. is selected, press MENU button to read the status of internal
memory. Press and hold the MENU button to exit.
9.6 If Firmware version is selected, press MENU button to read the information of
the software inside the player. Press and hold the MENU button to exit.
9.7 If Exit is selected, press the MENU button to exit.
Listening Music
1. When power on the player, the setting menu will appear on the display and the icon
of MP3 will be highlight automatically. (In the others mode, press the >>I or I<<
Buttons repeatedly until icon of MP3 is highlight.)
2. Press the MENU button to enter MP3 mode.
3. Press the MENU button to enter the songs list mode. Display shows:
4. Press the >>I or I<< button to select Local folder; Delete file or Delete all then press
the MENU button to enter:
4.1 If Local folder is sele cted, press the >>I or I<< button to searching the specific
4.2 If Deleted file is selected, the list of songs will appear on the display. Press the >>I
songs in the folders. If the specific files was found, press the MENU button to
confirmed, then press >II button to start playback the selected song.
or I<< button to select the song you want to delete, then press the MENU button.
Press the >>I or I<< button to select Y ES or NO . If Y ES is sele cted, th en pr ess th e
MENU button to deleted the selected song and return to the pervious menu.
Repeat the same procedures until all the specific songs were deleted. If No is
selected, then press the MENU button to return to previous menu.
17
Page 19

4.3 If Delete all is selected, press MENU button to enter, then press the >>I or I<<
button to Select YES or NO. If YES is selected, then press the MENU button to
delete all the songs in the player and exit. If NO is selected, press the MENU
button to return to pervious menu.
5. To plays all the songs in the player once, press >II button to start.
6. During playback, press >II button to pause, press agai n to res ume no rmal playback.
7. During playback, press the >>I or I<< button repeatedly to skip to the higher or lower
numbers track.
8. During playback, press and hold the >>I or I<< button to fast searching the specific
section.
9. During playback, press the MENU button to enter Music setting menu, press the >>I
or I<< Buttons repeatedly to select Repeat; Equalize r; SR S mode; Tempo rate; Reply;
Reply times; Replay gap or Exit as desire, then press MENU button again to
confirmed the selection.
9.1 If Repeat is selected, press the >>I or I<< Buttons to select the setting and press
the MENU button to save the setting and exit as:
Normal: Plays all the tracks in the player one by one.
Repeat One: Repeat to play the current track.
Folder: Play the tracks in the current folder one by one and then stop.
Folder All: Repeat playback the tracks in the current folder.
Repeat All: Repeat to play all the trac ks in th e player.
Random: Playback the tracks in the player randomly.
Intro: Play the first 10 seconds of each tracks.
9.2 If Equalizer is selected, press the >>I or I<< button to select the preset sound
mode to Natural; Rock; Pop; Classic Soft, Jazz; DBB (Super Bass) as desire then
18
Page 20

press the MENU button to save the setting and exit.
9.3 If SRS mode is selected, press the > >I or I<< butto n to select t he sett ing and pre ss
the MENU button to save the setting and exit as:
SRS WOW: To turn ON the SRS (Surround) effect.
User mode: To set the SRS effects as desire.
Disable SRS: To turn OFF the SRS effect.
9.4 If Tempo is selected, press the >>I or I<< button to select tempo rate from -8 to +8
then press the MENU button to save the setting and exit. (Note: Tempo rate only
operated in MP3 and Voice recording playback.)
9.5 If Replay is selected, press MENU button to activate A-B repeat mode. Press the
>>I button to set the beginning of the specific section, press agai n to set the end of
the specific section. The selected section will playback repeatedly until the >II
button is press. To resume normal playback, press the >II button again.
9.6 If Replay times is selected, press the >>I or I<< button to set the repeat times of
A-B repeat, press the MENU button to save the setting and exit.
9.7 If replay gap is selected, press the >>I or I<< button to set the pause time between
the A-B repeats.
Lyric Display
This player can supports “.LRC” lyric files. During playback, if the color of LYRIC
indicator from red turn to green as th e figure belo w, it means the lyric files is available .
Press and hold the MENU button to read the lyric on the display. Press the MENU
button again to return t o normal display.
19
Page 21

Watching Movies
1. Power on the player, the setting menu will appear on the display.
2. Press the >>I or I<< button to select AMV then press MENU button to enter, the
display will shows:
3. Press the >>I or I<< button repeatedly to searching the specific video tracks.
4. Press the >II button to start playback.
5. During playback, press >II button to pause, press again to resume normal
playback.
6. During playback, press the >>I or I<< but ton repeatedly to skip to the higher or
lower numbers track
7. During playback, press and hold th e >>I or I<< b utton t o fast searchi ng t he sp ecific
section.
8. To adjust volume, press and hold the MENU button to return to the menu. Press
the VOL button, volume level will appear on the display, press the >>I or I <<
button to adjust volume as desire. Press >II button again to resume playback.
9. Press and hold the >II button or slide the power switch to off position to power off
the player.
20
Page 22

Watching Photos
1. Power on the player, the setting menu will appear on the display.
2. Press the >>I or I<< button to select Photo, the display will show:
3.
Press MENU button to enter, the list of photos will appear on the display.
4. Press >>I or I<< button repeatedly to select the photos as desire. Press the >II
button to start playback.
Or, press the MENU button to enter photo setting manual, the display will show
as :
21
Page 23

4.1 Press the >>I or I<< button to select the functions then press MENU
button to enter:
4.2 If Local folder is selected, press the >>I or I<< button to searching the specific
files in difference the folders. If the specific files was found, press the MENU
button to confirmed, then press >II button to start play back the selected photos.
4.3 If Play set is selected, press the >>I or I<< button to select Manual play or Auto
play (plays the photos in slide show mode).
~ If Manual play is selected, press the MENU button to confirmed
the selection, the player will plays the photos one by one when the >>I or I<<
button is press.
~ If Auto play is selected, press the MENU button to enter the setting mode, press
the >>I or I<< button repeatedly to set the duration between photos. Press the
MENU button to save the setting and exit. After setting, the player will plays the
photos in slide show mode.
4.4 If the Deleted file is selected, the list of ph otos w ill app ear on the dis play. Press the
>>I or I<< button to select the picture you want to delete, then press the MENU
button. Press the >>I or I<< button to select YES or NO. If YES is selected, then
press the MENU button to deleted the selected photo and return to the pervious
menu. Repeat the same procedure until all the specific photos were deleted. If No
is selected, then press the MENU button to return to previous menu.
4.5 If Delete all is selected, press MENU button to enter, then press the >>I or I<<
button to Select YES or NO. If YES is selected, then press the MENU button to
delete all the photos in the player and exit. If NO is selected, press the MENU
button to return to pervious menu.
4.6 If Exit is selected, press the MENU button to return to previous menu.
22
Page 24

Voice Recording
1. Power on the player, the setting menu will appear on the display.
2. Press the >>I or I<< button t o sel ect RE CORD then press MEN U b utton to enter. The
display will show:
3. Press the menu button to enter the recording quality setting menu.
4. Press the >>I or I<< button to select REC type then press MENU button to enter.
5. Press the >>I or I<< button to select recording modes to Fine REC; Fine VOR as
desire then press the MENU button to save the setting and exit.
Fine REC: Fine quality recording in WAV format. (For find
quality for recording, recommended set the recording in this
setting)
Fine VOR: Fine quality recording in WAV format. (In this setting, when the built-in
microphone have not detected any input s ou nd s d uri ng recording, the player will turn
to pause mode automatically. When it dete cted t he so unds agai n, t he pla y er will star t
to recording again.)
6. Press the >II button to start recordi ng. S peak i nto th e microph one at a normal tone o f
voice.
7. During recording, press >II button to pause recording, press again to resume
recording.
8. Press and hold the MENU to save the recording and exit.
23
Page 25

Voice Recording Playback
1. Power on the player, the setting menu will appear on the display.
2. Press the >>I or I<< button to select VOICE then press MENU button to enter. The
display will show:
3. Press the >>I or I<< button to select the specific recording tracks.
4. Press the >II button to start playback the specific v ice recording track. o
5. The others operations is same as music playback.
24
Page 26

TROUBLESHOOTING GUIDE
If you experience a problem with this unit, check the chart below before calling for
service.
Player do not power on
Music, Video, Photos can’t be
play
No sound output
Sound quality is bad
Computer does not detect the
player/Download failure
Voice recording sound quality
is bad
Check the ON/OFF switch. Slide the switch to ON
position.
● Press and hold the II button until the LCD screen
light on .
Files not successfully transferred to the player.
Connect the player to the computer using the
provided USB cable, transfer files to the player
again
Files format not correct. Trans fe r
MP3,WMA,AMV,JPEG,W AV files to the player only .
Earphone not connected. Connects the earphone
plug completely into the player’s earphone jack.
● Earpho ne may damage. Check and replace the
earphone.
Volume too low, adjust volume to higher level.
Files may damaged or in wrong formats. Try other
files.
Music file is corrupted. Try other files.
● Battery level low, recharge the unit.
Earphone damaged, replace a new earphone.
Read the supported Operation System of computer
on page 10.
USB cable not secured, connects USB cable
properly.
● Point the built in mic to the sound source, no
barriers between the mic and the sound source.
25
Page 27

Specification
Dimension 2.2(W) x 2.8(H) x 0.4(D) inches
Weight 1.65 oz
PC connection USB 2.0 (Fast Speed)
Flash memory 2G(Due to some of memory was used for internal
Battery
Record
MP3、WMA、AMV、
Formats supported to
playback directly
Video formats can
converted to AMV format
through the included
converter
Working temperature 0 ℃-35 ℃
Operating System Windows98/SE/ME/2K/XP、Mac OS 10、Linux 2.4.2
The Specifications are subject to change without notice.
operation, only approx 1.87 GB memory are free for
download.)
3.7V 250mA
Max Play time: Up to 4 hours
Sample rate 32KHz
Recording format WAV
Recording time Approx 136h (2G Flash)
Sound output level 10mW/channel(32 ohm)
MP3 bit rate 8K bps – 320K bps and VBR
WMA bit rate 5K bps – 384K bps and VBR
Frequency response 200Hz to 20KHz
MP3、WMA、AMV、WAV
AVI、WMV、MPG、MPEG、ASF、MOV、3GP、SWF、
MP4、VOB、DAT
26
Page 28

27
Page 29

28
 Loading...