

Page 1

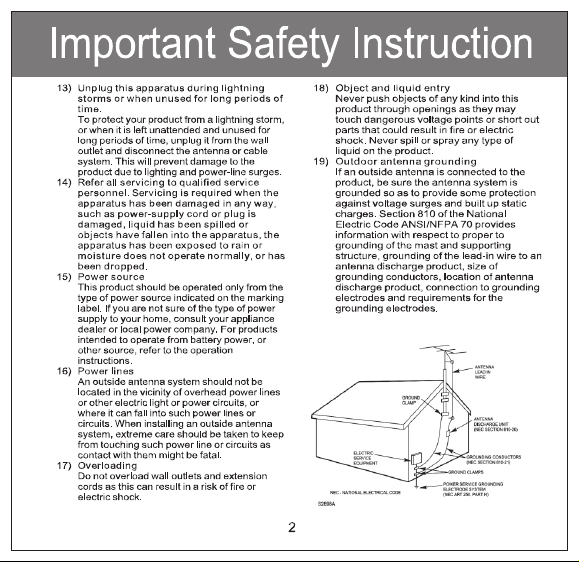
Page 2

Page 3
Page 4
Page 5
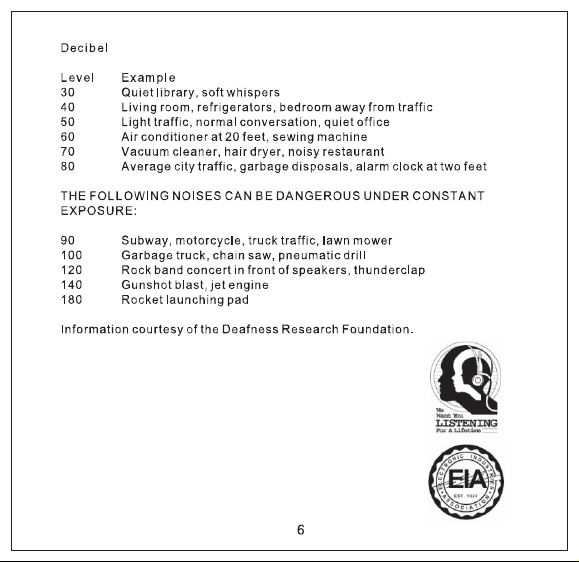
Page 6
Page 7
Page 8
Cha rging T he Ba ttery :
Cha rge As Fol lows:
NOT ES :
1) F or t he fi rs t ti me t o cha rg e th e bu ilt- in ba tt er y, ch ar ge it a t le as t 10 ho ur s.
s
on ing
with
e
7
Page 9

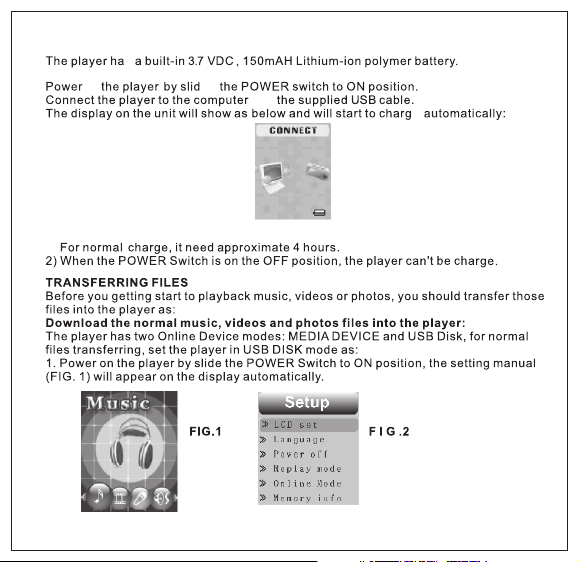
Onl ine Mod e
8
9
Page 10

Page 11

10
Page 12

Loc ation o f Contr ols
1
>ll but to n
2
but ton
3
USB p ort
4
VOL (Vo lume) b utton
Ear phone s jack
5
6
>>l but to n
Pow er ON/O FF Swit ch
7
8
l<< but to n
9
MIC ( Mi cr oph on e)
10
11
Page 13

14
13
12
l LCD W indow
1
2 3
11
photo s
4
S /N
Desc ripti on
5
1
EQ mod e
6
2
Rep eat mod e
3
7
8
9
10
Volu me leve l
4
Batt ery met er
Total numb er of tracks i n the
5
curre nt folder
Numbe r of current t racks
6
Audio Sp ectrum
7
S /N
Desc ripti on
8
Infor mation of cu rrent tra ck
9
Lyric In dicator
10
Bitra te of curren t Track
11
Total time of c urrent Trac k
12
Play/ Pause Indi cator
Forma t of current Tra ck
13
Elaps ed Time of Curre nt Track
14
12
13
Page 14

Page 15

9.1
If LCD set is selected, press MENU button to enter the setting menu. Press the >>I or I<<
button to select Contrast, Black or Exit.
If Contrast is selected, press MENU button to enter, press the >>l or l<< button to set
~
the contrast level to 0-15 as desire then press and hold the MENU button to save the
setting and exit.
If Black is selected, press MENU button to enter, press the >>I or I<< button to select the
~
display auto turn off to 0 (Display will not turn off); 6;12;18;24 or 30 (seconds), then
press and hold the MENU button to save the setting and exit.
~
If Exit is selected, press MENU button to return to the previous setting menu.
9.2 If Language is selected, press MENU button to enter, press the >>I or I<< button to select
the On Screen Display language as desire, then press and hold the MENU button to save the
setting and exit.
9.3 If Power off is selected, press MENU button to enter, press the >>I or I<< button to select
Off time or Sleep time. If Off time is select, press MENU button to enter, press the >>I or I<<
button to set the auto power off time when the player is idle to 0 (The player will not auto power
off); 10; 20; 30; 40; 50;60 (seconds), then press and hold the MENU button to save the setting
and exit. If Sleep time is select, press the MENU button to enter to the setting menu, press
>>I or I<< button to set the sleep time from to 0 (Sleep timer will not functioning); 10 to 120 (min
-utes), press and hold the MENU button to save the setting and exit.
NOTES:
1. If Sleep timer had been set, the player will be auto power off when time is up.
2. If the sleep timer had not turn off by reset it to "0", every time when you power on the
player, it will auto power off when sleep time is up.
If Replay mode is selected, press the MENU button to enter. Press >>l or l<< button to set the
9.4
replay mode to Manual replay or Auto replay then press and hold the MENU button to save the
settings and exit.
9.5 If Online Mode is sele ct, press MENU but ton to enter the settin g menu, press the >>I or I
<< button to select Media Device or USB Disk. Press and hold the MENU button to save the
setting and exit. (For details operations for Media Device and USB Disk, refer to the section of
TRANSFERRING FILES.)
9.6 If Memory info (Memory information). is selected, press MENU button to read the status of
internal memory. Press and hold the MENU button to exit.
9.7 If Firmware version is selected, press MENU button to read the information of the software
timer
14
Page 16

inside
9.8 If DRM Time is select ed, press ME NU button to rea d the DRM time insi de the player.
Press and hold the MENU butto n to exit.
Notes:
1. The DRM time is not the rea l time. It's for re ferenc e only.
2. The DRM time can' t reset by the user. It will be upd ated ever y times when you sync the
DRM tracks into the player vi a Windows Med ia Player.
9.9
Pre ss t he > ll bu tt on t o sta rt p layba ck .
15
Setting menu
to
searching the spec ific fold er/
In
song as desire then press the MENU button to confirmed your selecti on. The information
of the selec ted track will appear on the dis play. Press the >ll bu tton to start playback.
Page 17

5.
6.
7.
8.
8.
16
Page 18

Repea t Fo lde r:
tracks in the current folder randomly.
8.
button to save the setting and exit.
8.3 If SRS mode is selected, press the >>I or I<< button to select the setting and press the
MENU button to save the setting and exit as:
SRS WOW: To turn ON the SRS (Surrou nd ) effect.
User mode: To set the SRS effects as desire.
Disable SRS: To turn OFF the SRS effect.
8.4 If Tempo is selected, press the >>I or I<< button to select tempo rate from -8 to +8 then
Press the MENU button to save the setting and exit. (Note: Tempo rate only operated in
Mp3 and Voice recording playback.)
8.5 In Replay mode, if replay is selected, press MENU button to activate A-B repeat mode,
Press the >>Ibutton to set the beginning of the specific section, press again to set the end
of the specific section. To resume normalThe selected section will be playback repeatedly.
playback, press the >II button to pau se then pres s again to resume normal playback . If
Replay times is selected, press the >>I or I << button to set the repeat times of A-B repeat,
press the MENU button to save the setting and exit. If replay gap is selected, press the
>>I or I << button to set the pause time between the A-B repeats.
Lyric Display
This player can supports lyric files(a file with ".irc" extension). During playback, if the color of
LYRIC.
Indicator from red turn to green as the figure below, it means the lyric files is available.
Press and hold the MENU button to read the lyric on the display. Press the MENU button again
to return to normal display.
in the curre nt folder.
tracks in the unit.
tracks in the current folder.
Sound
17
Page 19

Lyri c Indic ator
2. Press the >>I or I<< button to select Movie then press MENU button to enter, the display
will shows:
8. To adjust volume. Press the VOL button once, then press the >>l or l<< button to adjust . When
finished, press the VOL button once to exit.
9. When finished watching, press and hole the MENU button to return to main menu. To turn off
the player, press and hold the >ll button two seconds or slide the POWER ON/OFF switch to
OFF position.
18
Page 20

~
19
the selection, the
Page 21

player will plays the photos one by one when the >>I or I<< button is press.
~If Auto play is selected, press the MENU button to enter the setting mode, press the
>>I or I<< button repeatedly to set the duration between of photos. Press the MENU
button to save the setting and exit.
~ After setting, the player will plays the photos in slide show mode.
4.4 If Delete is selected, the list of photos will appear on the display. Press the >>I or I <<
button to select the picture you want to delete, then press the MENU button. Press the
>>I or I<< button to select YES or NO. If YES is selected, then press the MENU button to
deleted the selected photo and return to the pervious menu. Repeat the same procedure
until all the specific photos were deleted. If No is selected, then press the MENU button to
return to previous menu.
4.5 If Delete all is selected, press MENU button to enter, then press the >>I or I<< button to
Select YES or NO. If YES is selected, then press the MENU button to delete all the photos
in the player and exit. If NO is selected, press the MENU button to return to pervious menu.
secon ds , the d is pl ay
Aft er 8 (e igh t)
20
Page 22

21
Page 23

Sli de the PO WER ON/ OFF Swi tch to ON p ositi on.
Page 24

Page 25

Page 26

 Loading...