

Page 1

Model: CD698
PLEASE READ BEFORE OPERATING THIS EQUIPMENT.
Owner's Manual
STEREO SUITCASE
TURNTABLE SYSTEM
with Bluetooth®
wireless technology
STEREO SUITCASE
TURNTABLE SYSTEM
with Bluetooth®
wireless technology
Size: 148.5(W) x 210(H)mm (A5)
2016.07.
13
17:39:53
+08'00'
2016.07.13
18:12:34 +08'00'
Page 2
WARNING:
TO REDUCE THE RISK O F FIRE OR ELECTRIC
SHOCK, DO NOT EXPOSE THIS PRODUCT TO RAIN
OR MOISTURE.
WARNING:
TO REDUCE THE RISK O F FIRE OR ELECTRIC
SHOCK, AND ANNOYING INTERFERENCE, USE THE
RECOMMENDED ACCESSORIES ONLY.
FCC
NOTICE:
This eq uipment has been t ested and f ound to comply
with the limits for a Clas s B digital device , pursuan t to
part 15 of the FCC Rules. These limits are design ed to
provide reasonable protection against harmful
inter ference in a residential installation. This equipment
generates, uses and can radiate radio frequency energy
and, if n o nstal led and use n accor dance with the
instructions, may cause harmful interferen ce to radio
communications.
Howev er, there is no guarantee that interference will not
occur i n a particular ins tallati on. If this equipm ent does
cause h armful interference t o radio or television
recep tion, which can be d etermin ed by turning the
equip ment off and on, t he user is en courage d to try to
correct the interference by one or more of the following
measures:
Reori ent or relocate th e receiving antenna.
Increase the separation between the equipment and
recei ver.
Connect the equipment into an outlet on a circuit
different from that t o which the r eceiver i s connected.
Consu lt the dealer or an ex perienc ed radio/TV
technician for help.
FCC WARNING:
To assure c ontinued compl iance, fo llow the attached
insta llation instru ctions an d use only shielde d cables
when co nnecting to other devi ces. Modifications n ot
authorized by the manufacturer may void user`s authority
to oper ate this device.
IMPORTANT SAFETY INSTRUCTIONS
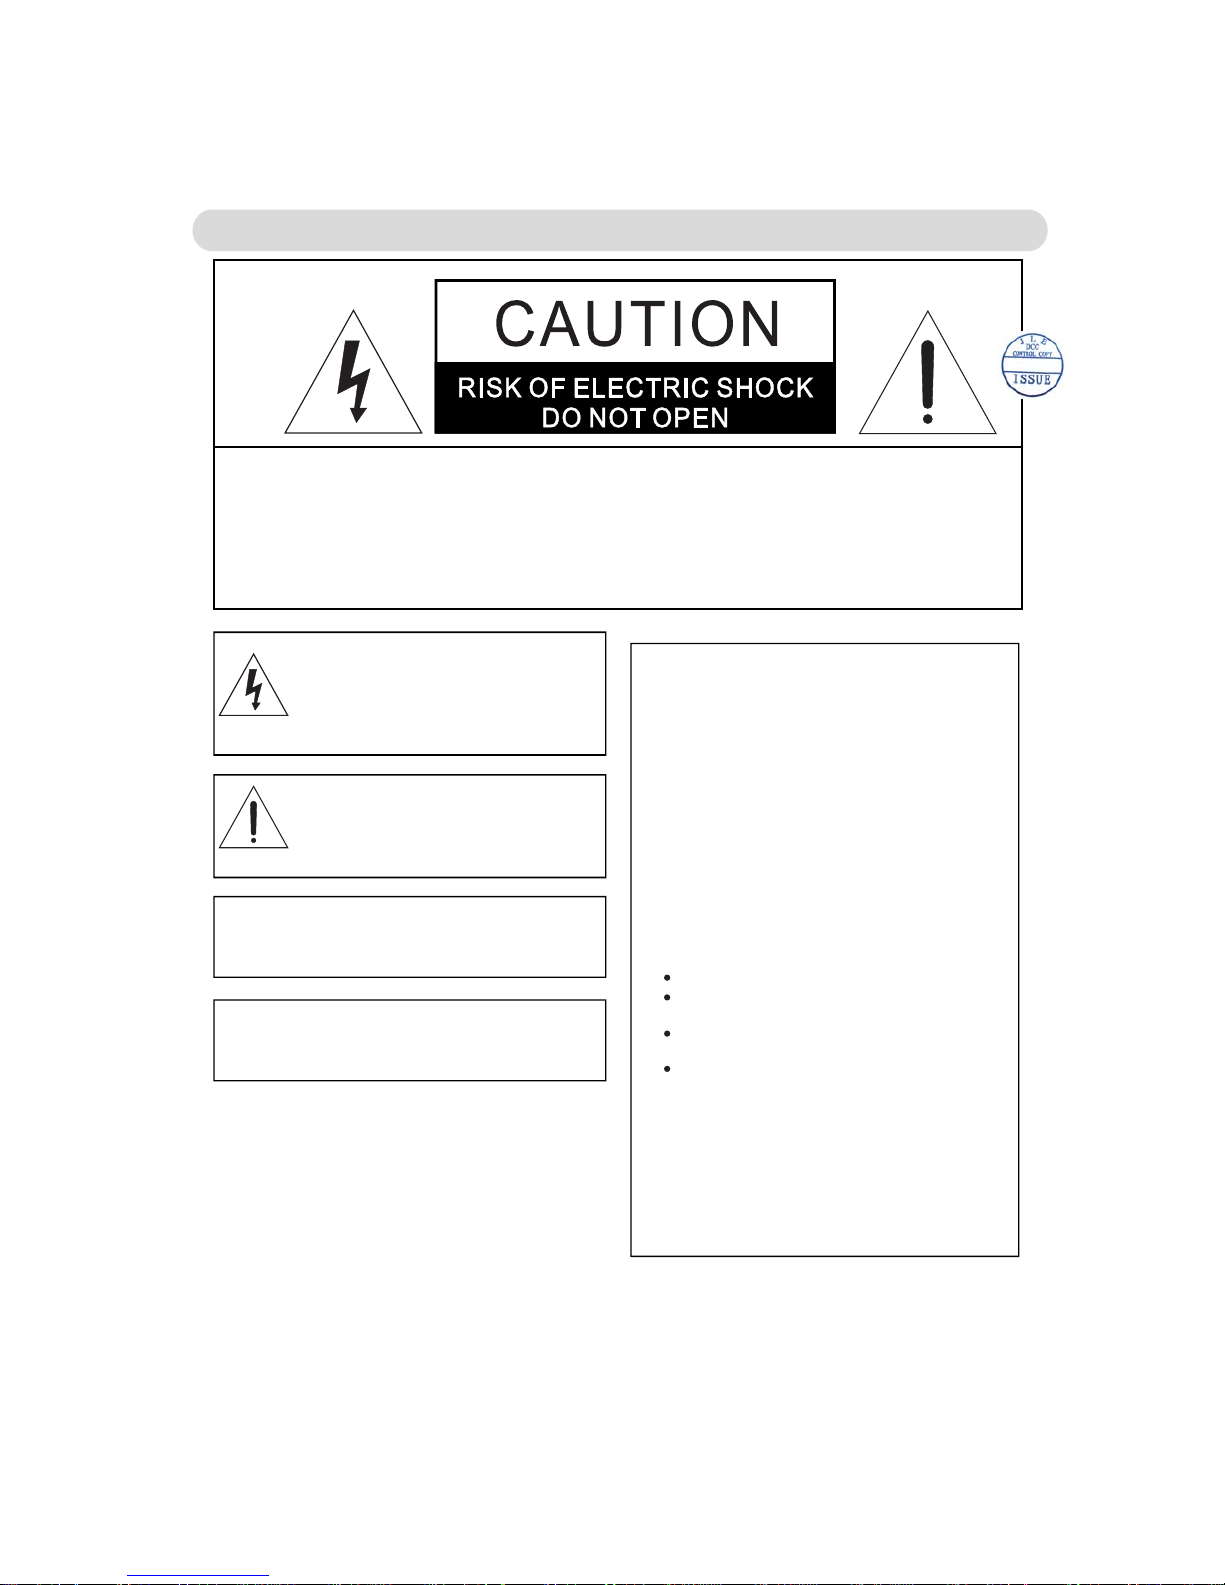
CAUTION: TO REDUCE THE RISK OF ELECTRIC SHOCK, DO NOT
EMOVE COVER (OR BACK). NO USER-SERVICEABLE
ART
NSIDE
EFER SERVICING T UALIFIED
ERVICE PERSONNEL.
The lig htning flash wit h arrowhe ad symbol
within an equilateral triangle is intended to alert
the use r to the presence of u ninsula ted
dangerous voltage within the product`s
enclosure that may be of sufficient magnitude to
const itute a risk of elec tric shoc k to persons.
The exclamation point within an equilateral
trian gle is intended to a lert the us er to the
presence of important operating and
maintenance(servicing) instructions in the
literature accompanying the appliance.
S
I
P
S
OQ.R
R
2
t d ii
2016.07.13
18:12:42
+08'00'
This device complies with part 15 of the FCC Rules.
Operation is subject to the following two conditions:
(1) This device may not cause harmful interference, and
(2) this device must accept any interference received,
including interference that may cause undesired operation.
This equipment complies with FCC radiation exposure
limits set forth for an uncontrolled environment.
This equipment should be installed and operated with
minimum distance 20cm between the radiator & your body.
Page 3

Before using the unit, be sure to read all operating instructions carefully. Please note that these
are general precautions and may not pertain to your unit.
For example, this unit may not have the capability to be connected to an outdoor antenna.
1) Read these instructions.
All the safety and operating instructions should be read before the product is operated.
2) Keep these instructions.
The safety and operating instructions should be retained for future reference.
3) Heed all warnings.
All warnings on the product and in the operating instructions should be adhered to.
4) Follow all instructions.
All operating and use instructions should be followed.
5) Do not use this apparatus near water.
Do not use this product near water and moisture, for example: near a bathtub, washbowl, kitchen
sink or laundry tub; in a wet basement; or near a swimming pool.
6) Clean only with dry cloth.
Unplug this product from the wall outlet before cleaning. Do not use liquid cleaners or
aerosol
cleaners. Use a dry cloth for cleaning.
7) Do not block any ventilation openings. Install in accordance with the manufacturer's
instructions.
Slots and openings in the cabinet and in the back or bottom are provided for ventilation, to ensure
reliable operation of the product and to protect it
from overheating. These openings must not be
blocked or covered. The openings should never be blocked by placing the product on a bed, sofa,
rug or other similar surface. This product should never be placed near or over a radiator or heat
source. This product should not be placed in
a built-in installation such as a bookcase or rack
unless proper ventilation is provided or the manufacturer's instructions have been adhered to.
8) Do not install near any heat sources such as radiators, heat registers, stoves, or other
apparatus(including amplifiers) that produce heat.
9) Do not defeat the
safety purpose of the polarized or grounding-type plug. A polarized plug
has two blades with one wider than the other. A grounding type plug has two blades and a
third grounding prong. The wide blade or the third prong are provided for your safety. If the
provided plug does
not fit into your outlet, consult an electrician for replacement of the
obsolete outlet.
10)Protect the power cord from being walked on or pinched particularly at plugs, convenience
receptacles, and the point where they exit from the apparatus.
11) Only use attachments/accessories specified by the manufacturer.
12)Use only
with the cart, stand, tripod, bracket, or table specified by the
manufacturer, or sold
with the apparatus. When a cart is used,
use caution when
moving the cart/apparatus
combination to
avoid injury from tip-over.
An appliance and cart combination should be moved with care.
Quick stop, excessive force
and uneven surfaces may cause the
appliance and cart combination to overturn.
13) Unplu g this apparatus during lightning storms or when unused for long periods of time.
To protect your product from a lightning storm, or when it is left unattended and unused for long
periods of time, unplug it from
the wall outlet and disconnect the antenna or cable system. This
will prevent damage to the product due to lightning and power-line surges.
14) Refer all servicing to qualified service personnel. Servicing is required when the apparatus
has been damaged in any way, such as power-supply cord or plug
is damaged, liquid has
been spilled or objects have fallen into the apparatus, the apparatus has been exposed to rain
or moisture does not operate normally, or has been dropped.
15) Power source
This product should be operated only from the type of power source indicated on the marking label.
If you
are not sure of the type of power supply to your home, consult your appliance dealer or local
power company. For products intended to operate from battery power, or other source, refer to the
operation instructions.
16) Power lines
An outside antenna system should not be located in the vicinity of
overhead power lines or other
electric light or power circuits, or where it can fall into such power lines or circuits. When
installing an outside antenna system, extreme care should be taken to keep from touching such
power lines or circuits as contact with them might be fatal.
IMPORTANT SAFETY INSTRUCTIONS
3
2016.07.13
18:12:48 +08'00'
Page 4

17) Overloading
Do not overload wall outlets and extension cords as this can result in a risk of fire or electric
shock.
18) Object and liquid entry
Never push objects of any kind into the product through openings as they may touch dangerous
voltage points or short out parts that could result in fire or electric shock. N
ever spill or spray any
type of liquid on the product.
19) Outdoor antenna grounding
If an outside antenna is connected to the product, be sure the antenna system is grounded so as to
Provide some protection against voltage surges and built up static charges. Section 810 of the
National Electric Code ANSI/NFP
A 70 provides information with respect to proper grounding
of the mast and supporting structure, grounding of the lead-in wire to an antenna discharge product,
size of grounding conductors, location of antenna-discharge product, connection to grounding
electrodes and requirements for the grounding electrodes.
20)Service
Do not attempt to service this product yourself as opening or removing covers may expose you to
dangerous voltage or other hazards. Refer all servicing to qualified service personnel.
21)Replacement parts
When replacement parts are required, be sure the service technician uses replacement parts
specified by the manufacturer or those that have the same characteristics as the original parts.
Unauthorized substitutions may result in fire or electric shock or other hazards.
22)Safety check
Upon completion of any service or repairs to this product, ask the service technician to perform
safety checks to determine that the product is in proper operating condition.
3
24)Damage requiring service
Unplug this product from the wall outlet and refer service to qualified service personnel under the
following conditions.
a) When the power-supply cord or plug is damaged.
b) If liquid has been spilled or objects have fallen into the product.
c) If the product has been exposed to rain or water.
d) If the product does not operate normally by following the operating instructions. Adjust only
those controls that are covered by the operating instructions, as an adjustment of other
controls may result in damage a
nd will require extensive work by a qualified technician
to restore the product to its normal operation.
e) If the product has been dropped or the cabinet has been damaged.
f)
When the product exhibits a distinct change in performance-this indicates a need for service.
2 )Note to CATV system installer
This reminder is provided to call the CATV system installer's attention to Article 820-40 of the
NEC that provides guidelines for proper grounding and, in particular, specifies that the cable
ground shall be connected to the grounding system of the building, as close to the point of cable
entr
y
as
p
ractical.
NOTE:
Refer all servicing to qualified service personnel. Servicing is required when
the unit has been damage
n any way such as the following: the power-supply cord
or plug has been damaged, liquid has bee
pilled into unit, the unit has been
exposed to rain or moisture, the unit has been droppe
r the unit doe
ot operate normally.
IMPORTANT SAFETY INSTRUCTIONS
d
i
n
s
d
o
s
n
This equipment should be installed and operated with minimum distance 20cm between the radiator & your body.
2016.07.13
18:12:54
+08'00'
Page 5
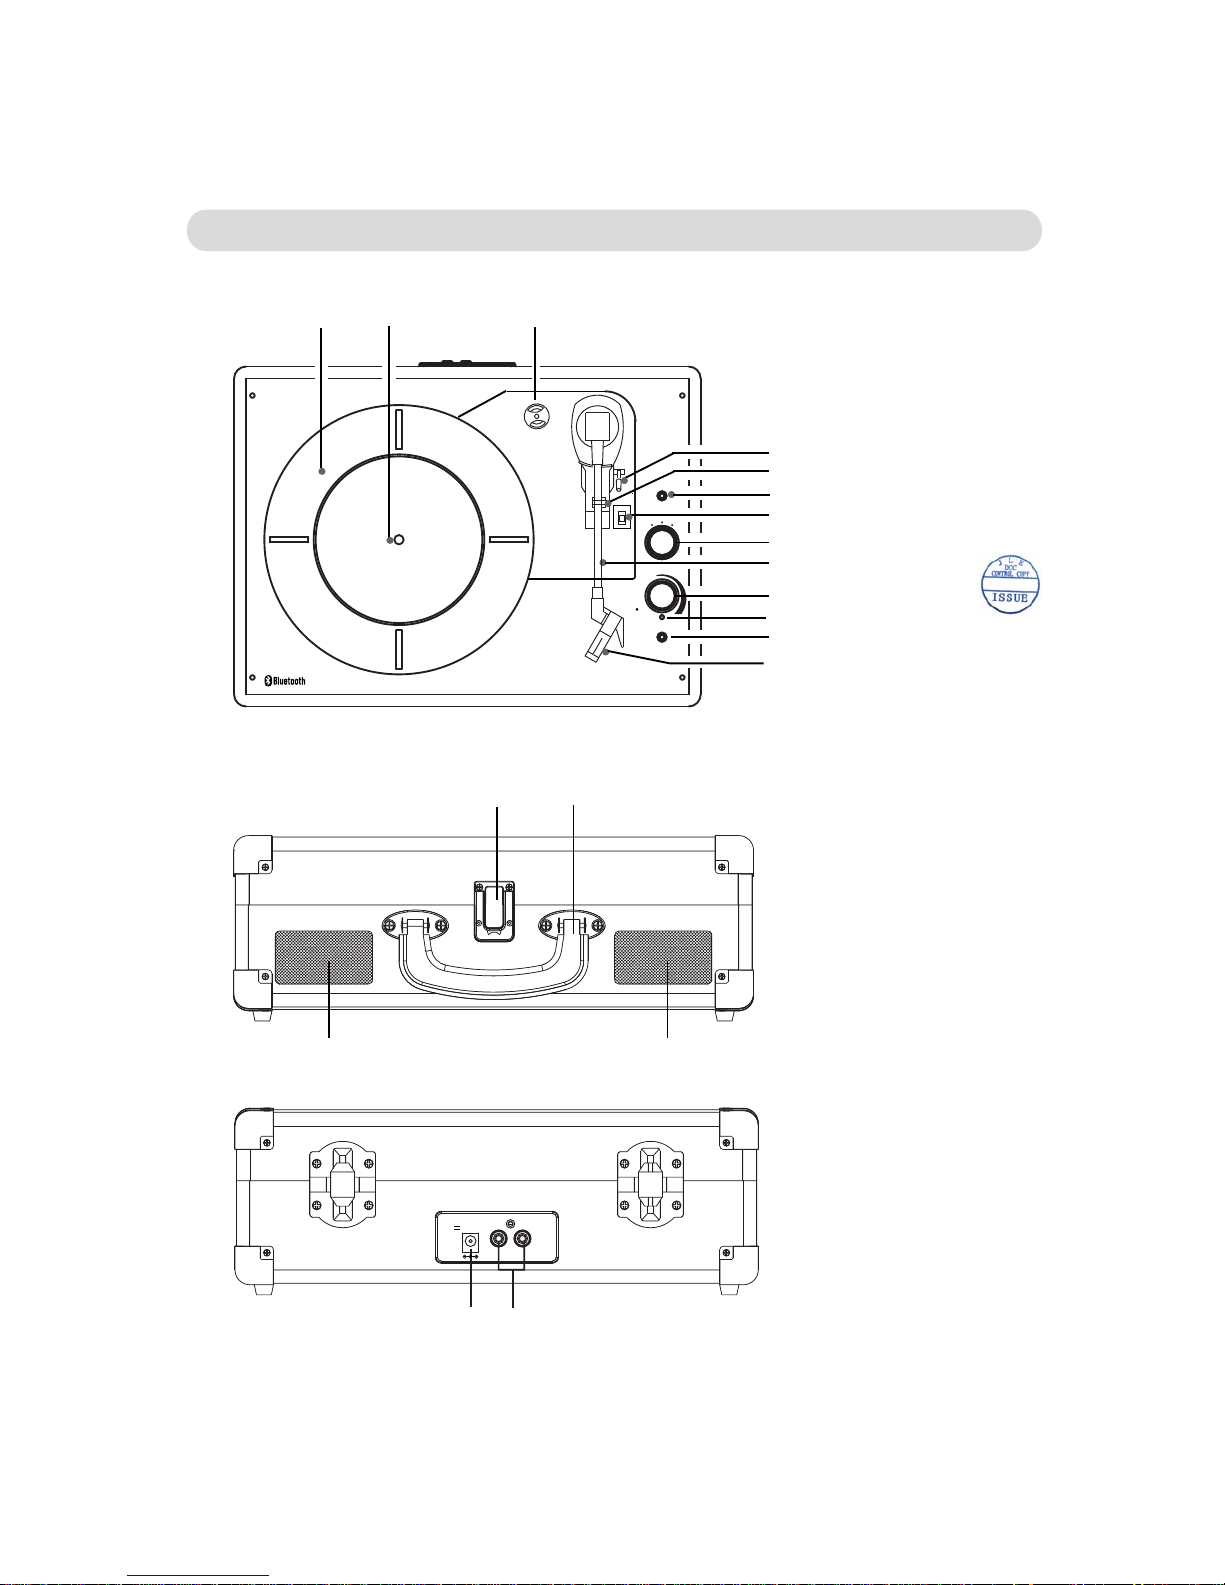
Front View and Rear View
Turntable and Function Panel
Location of Controls
E
N
I
I
N
L
B
O
T
N
O
H
P
LINE IN
HEADPHONE
ON
OFF
12 3
4
5
6
7
8
9
10
11
12
13
1. Turntable platter
2. Turntable center spindle
3. 45 RPM adapter
4. Lever
5. Tone arm holder
6. LINE IN jack
7. Speed selector
8. Function knob
9. Tone arm
11. Indicators
12. HEADPHONE jack
13. Stylus
14
15
16
17
16
LINE
OUT
R
L
18
17. DC IN jack
18. LINE OUT jacks
14. Metallic buckle
15. Handle
16. Speakers
10.Power ON-OFF/
Volume knob
5
INDICATOR
DC IN
DC 9V,1000mA
2016.07.
13
18:13:02
+08'00'
Page 6
Operation
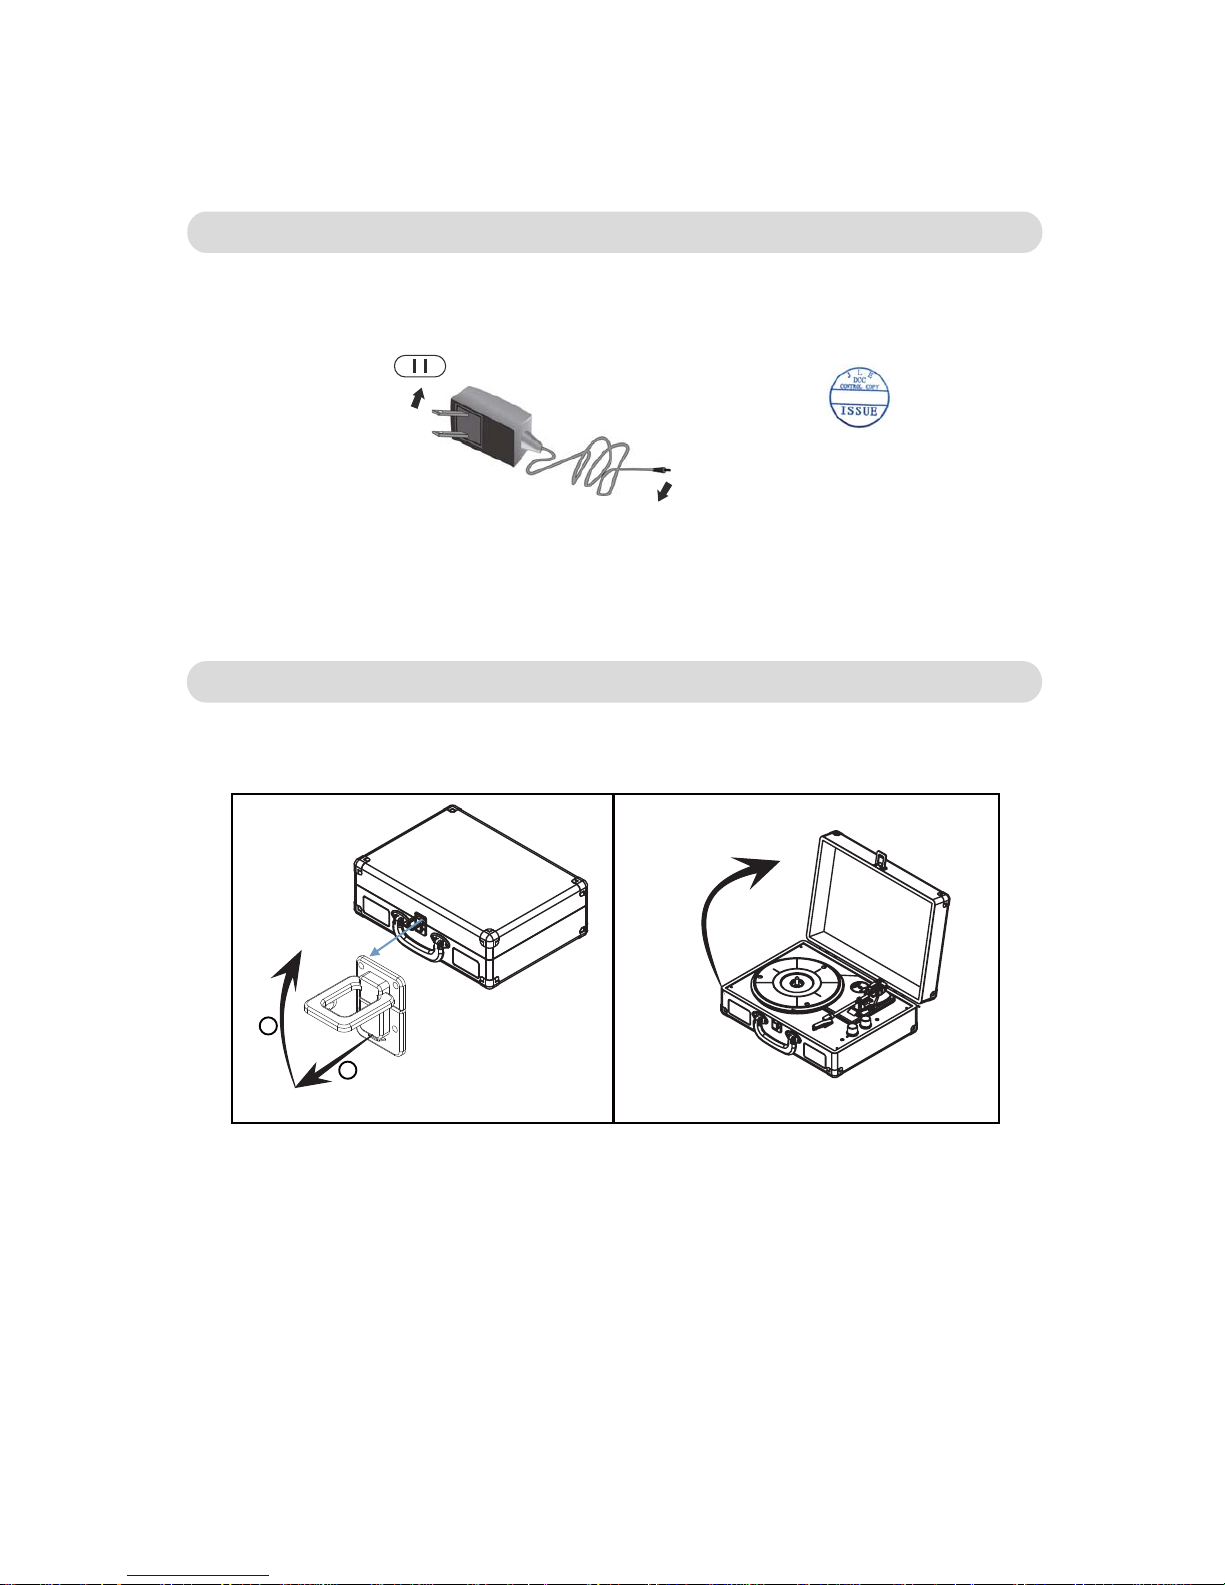
2. Plug the AC/DC Adapter into a conveniently located AC outlet having AC 100-240V~, 50/60Hz.
AC outlet
AC/DC Adapter
To the DC IN jack on the rear of the unit.
Power Source
1. Connect the small plug from the supplied AC/DC Adaptor to the DC IN jack on the rear of unit.
Notes:
~ This AC/DC Adaptor is intended to be correctly orientated in a vertical or floor mount position.
~ For saving energy, if long period of time will not use the unit.
Unplug the AC/DC Adaptor from wall outlet.
1. Open the top cover as the illustrated follows:
2. Connected the unit to AC power as instructed earlier.
3. Turn the Power ON/OFF--Volume knob clockwise to power on the unit and set the volume to the desired level.
The indicator will illuminate.
4. Turn the Function selector to the desired position.
5. When finished listening, turn the Power ON/OFF--Volume knob counterclockwise until “Click”
is heard to shut off the unit. The indicators will not light.
6. Close the cover then lock it.
6
General Operation:
1
2
2016.07.13
18:13:07 +08'00'
Page 7

Listening through Bluetooth
In first time use or re-pairing to a new BT Device, pairing it as below:
3. Plays the music in the paired BT Device as usual.
Notes:
Pairing code “0000” or “1234” may need to enter.
3. Plays the music in the paired BT Device as usual.
4. During playback, using the control buttons on the paired cell phone to skip the tracks; pause; play...etc.
1. Power on the unit and turn the Function selector to BT position as the instructed earlier. The color of indicator will turn
to Blue and blink.
2. Power on the external BT Device and enter to BT searching mode. Start pairing as the on screen instructions on the
external BT Device. After paired, the Blue indicator will stop blinking, the tone sound of connected will hear.
(For details pairing procedures, please refer to the user’s manual of your BT device.).
When the external BT player searched the unit, our model number “CD698” will appear on the display of external
BT Device.
1. Power on the unit and turn the Function selector to the BT position as the instructed earlier. The color of indicator will
turn to Blue and blink.
2. Wait a few seconds until the unit auto paired to the external BT Device. (The Blue indicator will stop blinking, the
tone sound of connected will be heard).
7
(BT) Bluetooth:
Normal operation after paired:
2016.07.13
18:13:15 +08'00'
Page 8

Listening a Record
1. In first time use, take off the protective cover from the stylus as the illustrated below:
2. Place the Record on the center spindle.
3. Slide the Speed selector to 33; 45 or 78 to match the play speed of the record.
4. Unlock the Tone Arm from the holder as the illustrated below:
clip
Note: If you are playing a 45 RPM Single (small size record), place the supplied 45 RPM
5. Power on the unit and turn the Function selector to the PHONO position as the instructed
6. Raise the Lever to raising the Tone Arm then move it to the top of the desired location
7. When finished playback, the unit will auto stop turning (or you wants to stop immediately);
adapter to the center spindle
then place the record on it.
earlier. The color of
indicator will turn to Red.
raise the Lever to rising
the Tone Arm then put it back to the Holder.
of the record. Release the
Lever to put the Tone Arm onto the record. Plays will auto start.
8
Plastic protective cover (White color)
Release the Lever then lock the Tone Arm on the Holder.
2016.07.13
18:13:20 +08'00'
Page 9
LINE
OUT
R
L
LINE IN:
Mobile Phone
To the Line In/AUX In
jacks on the external
Audio Amplifier
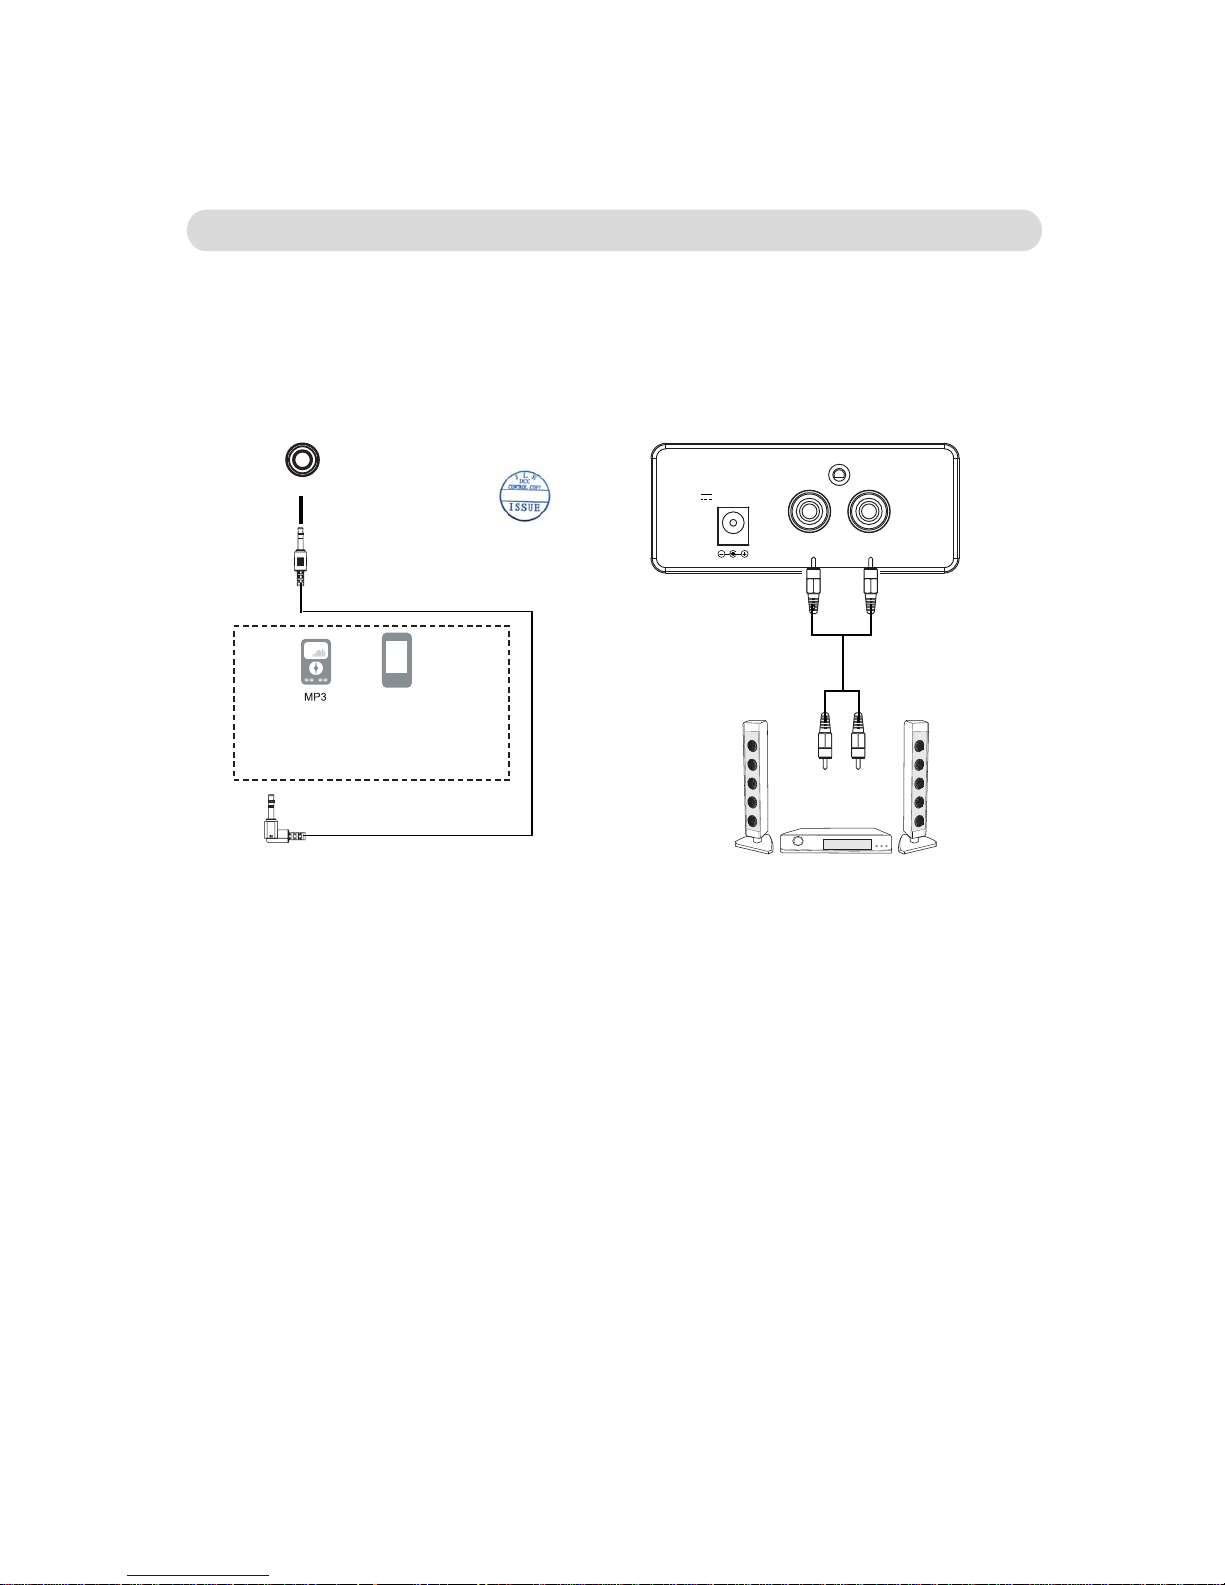
Other Connections
(Audio Connection Cable supplied)
(Connection Cable not included)
To LINE IN jack on the unit
Connect to the Phones; AUX Out;
Line Out Jack of the external devices
(Such like MP3 Player; cell phones;
iPod/iPad ... etc)
LINE OUT:
To the Line In/AUX In
jacks on the external
LI NE IN
Red
White
HEADPHONE:
For private listening, connect the 3.5mm plug from the
Earphone/Headphone (not supplied) into the HEADPHONE
jack on the top of unit. Sound from speakers will be auto cut.
To listening from external Audio Amplifier:
1. Connect one end of the RCA Audio Connection Cable
(not supplied) to the Line IN Jacks or AUX IN Jacks on
the external Audio Amplifier.
2. Connect the other end of the cable to the LINE OUT
jacks on the rear of unit as the illustrated below:
3. Power on the unit and plays music as usual as the
instructed earlier.
4. Power on the external Audio Amplifier and set it to
LINE IN mode to plays the music from this unit.
Listen music from the external Audio Player as follows:
1. Connect one end of the supplied Audio Connection
Cable to the Phones Jack; Line Out Jack or AUX Out
Jack on the external Audio Player.
2. Connect the other end to the LINE IN Jack on the top
of unit as the illustrated below:
3. Power on the unit and turn the Function selector to
the LINE IN position as the instructed earlier. The
color of indicator will turn to Purple.
4. Plays the music on the connected external Audio
Player as usual.
Note: Make sure the volume level of the external Audio
Player was set to high. Otherwise, sound from
this unit may weak.
9
Audio Amplifier
DC IN
DC 9V,1000mA
2016.0
7.13
18:13:2
6
+08'00'
Page 10

Records Handling
Replace the stylus
then pull it out as the illustrated below:
2. Install the new stylus as illustrated below:
1. Use a screwdriver (not supplied) to push the stylus off
Guide Pins (inside)
10
label
grooves
edge
Do not touch the record's grooves. Only handle records, by the edges or the label. Make sure your hands are clean. Skin
oils from even clean hands can leave a residue on the record surface that will gradually deteriorate the quality of your
record.
Keep your hands away from dust. Keep them in a cool, dry place.
To avoid dust and scratches, keep records in their sleeves and jackets when not in use.
Store records upright on their edges. Records stored horizontally will eventually bend and ward.
Do not expose records to direct sunlight or high humidity and temperature. Long exposure to high temperatures will will warp
the record.
Do not store your records in the trunk of your car. The temperature in a closed trunk can ruin your collection.
Store records in an area with a stable temperature an dlow humidity.
Should the record become dirty, gently wipe the surface in a circular motion, using a soft anti-static cloth.
If the stylus was abrased after long time use, replace it by the supplied extra style as follows:
2016.07.13
18:13:31
+08'00'
Page 11

Troubleshooting Guide
6\PSWRP 3RVVLEOH &DXVH 6ROXWLRQ
3RZHU
1R SRZHU
$&'& $GDSWRU KDG QRW
FRQQHFWHG WR XQLW RU ZDOO
RXWOHW
&RQQHFWHG WKH $&'&
$GDSWRU WR WKH XQLW
ZDOO RXWOHW
3RZHU 212))9ROXPH
NQRE LV RQ SRZHU RII SRVLWLRQ
7XUQ WKH 3RZHU
212))9ROXPH NQRE
FORFNZLVH WR SRZHU RQ
WKH XQLW DQG VHW WKH
YROXPH WR WKH GHVLUHG
OHYHO
7XUQ WD EO H
1RLVH RU VRXQG GLVWRUWHG
6SHHG VHOHFWRU ZURQJ
VHWWLQJ
6HW WKH 6SHHG VHOHFWRU
WR WKH FRUUHFW SRVLW
RU DV WKH
UHFRUG
7KH VW\OXV PD\ DEUDVLRQ
DIWHU ORQJ WLPH XVHG
5HSODFH LW E\ WKH
VXSSOLHG
%7
%7 QRW IXQFWLRQLQJ
7KH %7 'HYLFH KDG QRW
SDLUHG WR WKH XQLW
3DLUHG WKH %7 'HYLFH
WR WKH XQLW DV SDJH
6RXQG ZHDN RU GLVWRUWLRQ 7KH %7 'HYLFH
3ODFH WKH %7 'HYLFH
FORVH WR WKH XQLW
11
DGQ
RQL
SOD\LQJ
VSHHG RI
H[WUD VW\OXV
DV SDJH
IDU IURP WKH XQLW
WRR
2016.07.13
18:13:36
+08'00'
Page 12

SPECIFICATIONS AND ACCESSORIES ARE SUBJECT TO CHANGE
WITHOUT NOTICE
3RZHU 6RXUFH '&
9 P$
$XGLR 3RZHU : 506 [
,PSHQGHQFH RI 6SHDNHUV 2KP : [
%7 9HUVLRQ
%7 (IIHFWLYH 5DQJH IHHW LQ RSHQ DUHD
7XUQWDEOH
6SHHG USP VHOHFWDEOH
7\SH RI 6W\OXV &6&
[ 8VHU¶V 0DQXDO
[ $&'& $GDSWRU ,QSXW $& 9a +] $ 2XWSXW '&
9
P$
[ 6W\OXV RQH SUHPRXQWHG
[ 530 $GDSWRU
[ $XGLR FRQQHFW FDEOH ZLWK PP VWHUHR SOXJV
12
General Specifications
Accessories
2016.07.13
18:13:42 +08'00'
Page 13

Craig warrants this product to be free from manufacturing defects in material and
workmanship under normal use for a period of 90 days from date of purchase. If service
is required, please return the product to the store where it was purchased for exchange;
or, pack the unit in the original packing material with all accessories if applicable, a copy
of your sales receipt and a Cashier’s check or Money Order for $12 (to cover shipping
and handling costs) payable to Craig Electronics Inc. For consumers in Canada, please
make sure that the cashier check or money order is redeemable through a U.S. bank.
Ship your product freight pre-paid. Your unit will be repaired, replaced or if the unit can
not be repaired or replaced, a refund will be forwarded to you within four weeks of receipt
of your unit. Please ship your unit to:
Craig Electronics Inc.
1160 NW 163 Drive
Miami, Fl 33169
This warranty is void if the product has been: a) Used in a commercial application or
rental. b) Damaged through misuse, negligence, or abuse. c) Modified or repaired by
anyone other than an authorized Craig service center. d) Damaged because it is
improperly connected to any other equipment.
Note: This warranty does not cover: a) Ordinary adjustments as outlined in the Owner’s
Manual which can be performed by the customer. b) Damage to equipment not properly
connected to the product. c) Any cost incurred in shipping the product for repair. d)
Damage to the product not used in the USA.
This warranty is not transferable and only applies to the original purchase. Any implied
warranties, including the warranty of merchantability, are limited in duration to the period
of this expressed warranty and no warranty whether expressed or implied shall apply to
the product thereafter.
Under no circumstance shall Craig be liable for any loss or consequential damage arising
out of the use of this product. This warranty gives specific legal rights. However, you may
have other rights which may vary from state to state. Some states do not allow limitations
on implied warranties or exclusion of consequential damage. Therefore, these
restrictions may not apply to you.
To Obtain Service on your Product
email:[email protected]
Printed in China CD698_WC_E0CL1_B0WU
LIMITED WARRANTY
2016.07
.13
18:13:4
8
+08'00'
 Loading...