

Page 1
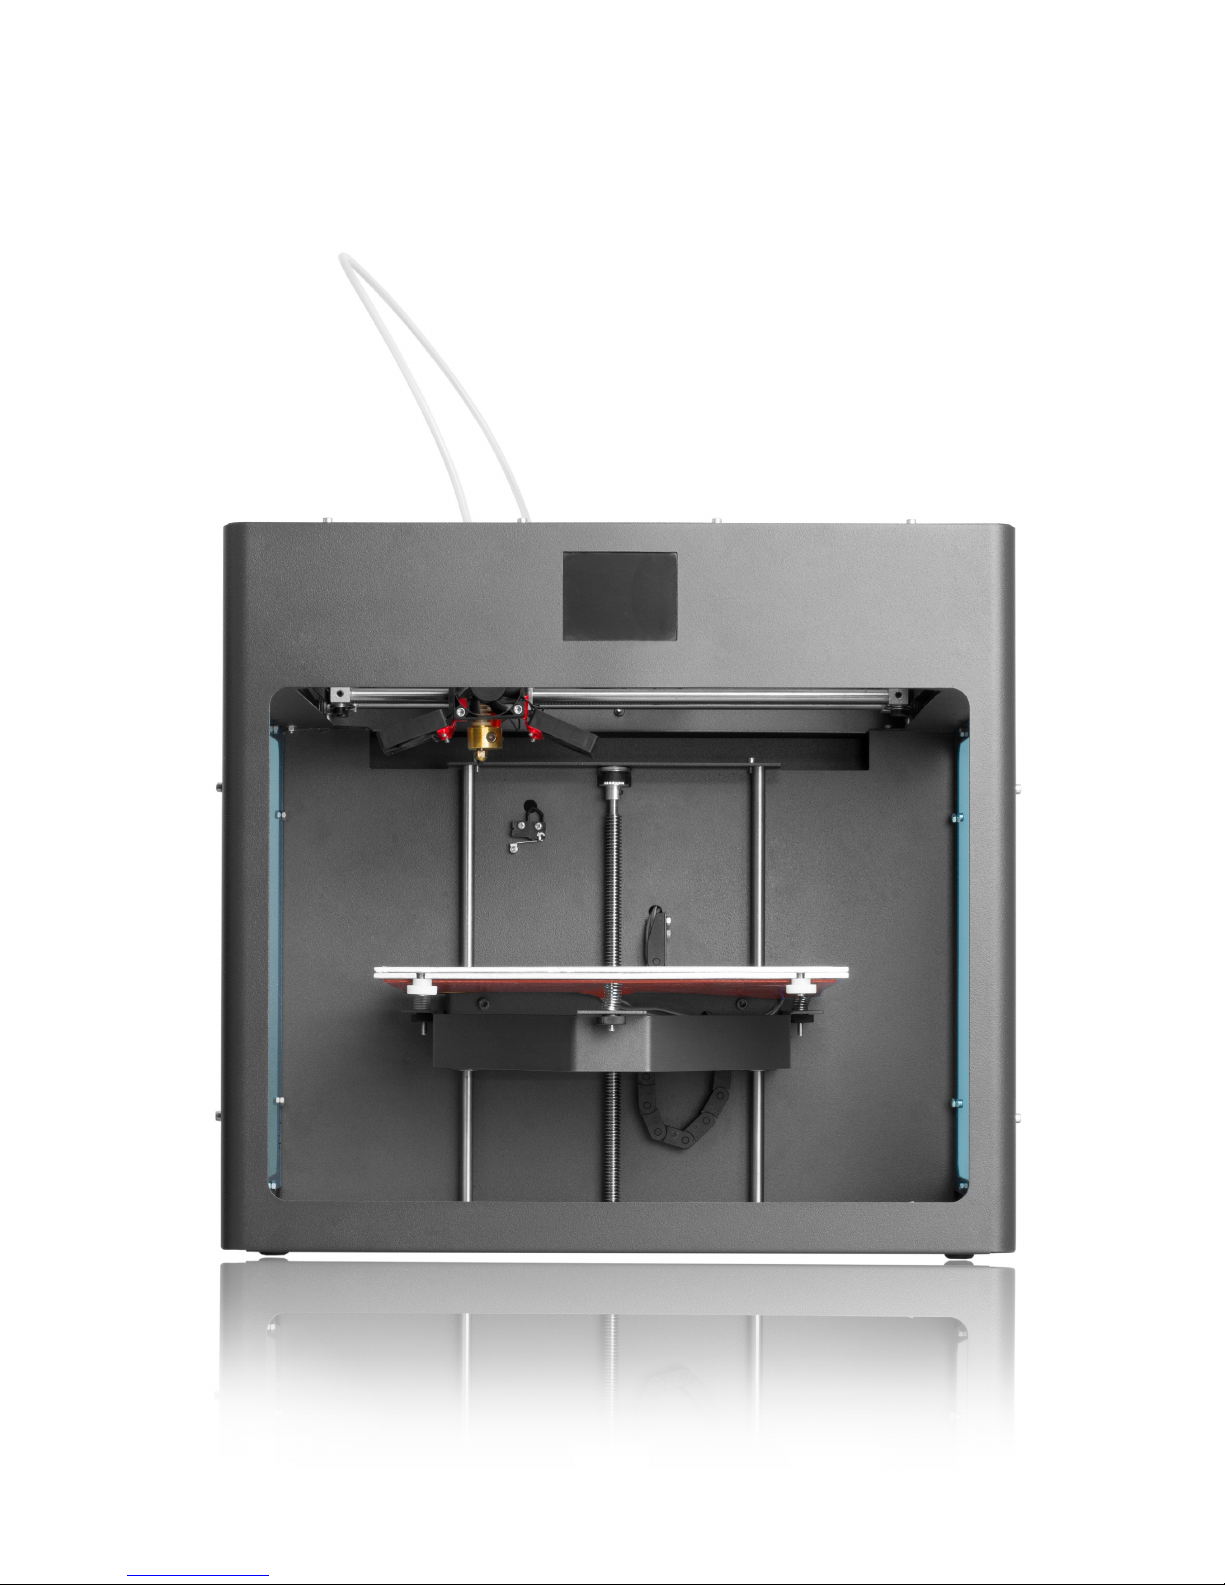
CraftBot Desktop
3D Printer
User Manual
Dec 15, 2014
Page 2

TABLE OF CONTENTS
2
Recommended use and warnings: READ FIRST BEFORE DOING ANYTHING ELSE!
01. WELCOME
01.01. Introduction
01.02. Specifications
02. SETTING UP YOUR CRAFTBOT DESKTOP 3D PRINTER
02.01. Contents of the box
02.02. CraBot diagram
02.03. Unpacking your CraBot
02.04. Freeing the extruder
02.05. Installing the filament guide tube
02.06. Installing the filament spool holder
02.07. Mounting the filament spool
02.08. Attaching the USB cable
02.09. Attaching the power chord and powering up
03. THE FIRST STEPS
03.01. Navigating through the touchscreen LCD menu
03.02. Leveling the build plate
03.03. Loading the filament
04. CRAFTING AN OBJECT WITH CRAFTWARE
04.01. Downloading CraWare
04.02. Download an object from http://www.yeggi.com
04.03. Open CraWare
04.04. Bring an .stl file onto the scene
04.05. Generate .gcode
04.06. Cra it!
05. MAINTENANCE
05.01. Lubricating the CraBot 3D printer
06. GUARANTEE AND CRAFTBOT 3D PRINTER WARRANTEE
Table of Contents
Page 3

*Always operate the CraBot 3D printer with the utmost care, for both the machine
and the user’s wellbeing. Respect the machine!
*Never force anything, whether it be during unpacking, setup, operation, service.
Never!
*Never reach inside the machine when turned on. Dierent parts of the machine
(mainly the
extruder and heated buildplate) operate at very high temperatures and can cause
severe burns. The moving parts can also cause pinching and crushing injuries.
There is also a risk of electric shock when reaching inside.
*Make sure that the power supply is o and that the power cord is disconnected
before servicing. Allow at least 5 minutes for the device to cool down aer unplugging it before reaching inside to service.
*Service and oil the suggested parts as oen as recommended. Never use a substance to do so that is not recommended by us personally.
*Never leave the CraBot unattended while it is plugged in, and especially when it
is operating.
*Always turn o the printer and disconnect from the computer when it is not being
used.
*Never, ever operate the CraBot if something is not running “as usual”
*In the case of an emergency, immediately disconnect the printer from power and
the computer.
*If you are working with material other than PLA, operate the machine in an open
space with the necessary ventilation which allows the fumes to dissipate. Breathing in unnecessary fumes can result in health hazards and sickness.
*an open area is also recommended for PLA use, even though PLA is a relatively
safe material.
RECOMMENDED USE AND WARNINGS
3 Recommended use and warnings
Page 4

*The CraBot should be operated on a flat and even surface parallel with the
ground.
*CraBot should never be used in high traic footpaths, or any footpath or walkway for that matter. It should not be used in any area were any outside interference to the unit could occur.
*Keep small children away from the CraBot printer, as moving parts could be attractive to them. Although, children can receive great educational benefits from
CraWare and the CraBot 3D printer, the mechanism itself is not a toy, but rather
it is a tool. Serious injuries can result if CraBot is not regarded in this way. Always
keep close watch around any child in the area of the printer, and provide the correct supervision to avoid any possible injuries. Children are encouraged to work
with the soware end of 3D printing, but when it comes to using the CraBot itself,
an adult should always be there.
*Take care of all pets in the area of the CraBot 3D printer. Especially with cats, as
the moving parts can be very enticing. The components have the ability to cause
serious harm, and just as a human should not reach inside the printer while in operation, neither should an animal.
*Do not place the CraBot 3D printer on top of any moving devices.
*Never place anything on top of the printer. There are many moving parts in the
printer and setting objects on top of it could lead to unnecessary dangers in the
environment, such as things falling o the top of the printer, or into the printer itself.
*Never place the printer near an open flame, water, heat sources, flammable materials, or anything else deemed “hazardous”.
*Always work with a smoke alarm in the same room as the CraBot 3D printer.
RECOMMENDED USE AND WARNINGS
4 Recommended use and warnings
Page 5

*Optimally the best mode for printing is directly with a USB card, which is unaected by the operations from a computer. If you are using the CraBot directly, make
sure that all systems that could possibly cause lag, such as screensavers, sleep or
hibernation mode, or videos/programs that could cause delays, have been disabled. An uninterrupted stream is best for making prints, as any lag can cause
flaws in the final printed object, even making it necessary to re-print.
*Always use a surge protector with a circuit breaker.
*Never, ever attempt to open or fix the power supply. If you come across any problem, turn the machine o.
*Only use the CraBot’s power supply.
*Plug the CraBot 3D printer and your computer into the same outlet to reduce the
possibility of interference.
*Do not plug the CraBot into the same outlet as high power devices such as A/C,
heaters, or climate control devices, or large appliances, even kitchen appliances or
anything else that sucks out a lot of power in a short time.
*Do not use non recommended materials and filaments with the CraBot.
*Keep the nozzle out of close contact with the build plate when not in use.
*Do not modify the CraBot.
RECOMMENDED USE AND WARNINGS
5 Recommended use and warnings
Page 6

*CONCERNING RADIO AND TELEVISION INTERFERENCE
The CraBot 3D printer has undergone testing in order to recognize it's satisfactory
compatibility with the standards set by the Federal Communications Commission
(FCC) and the CE mark European standard. The CraBot 3D printer complies with
the limits of a Class B digital device which can be found in part 15 of the FCC rules.
All electronic units emit radio waves. If used correctly, and only within the boundaries of the manner intended and suggested by the manufacturer, the CraBot
passes all of these necessary interference tests with flying colors. The CraBot is
also specifically tested to function when bombarded with interfering radio waves
within the guidelines of the FCC standard. Modification is not recommended by
CraUnique, and if the operator defers from these instructions, they take all the
responsibility into their own hands. Any alteration to the CraBot by the consumer will void the user the authority to operate the CraBot 3D printer under the FCC
guidelines.
Going back to the fact that "all electronic devices emit radio interference", if you
happen to experience interference in correlation with the operation of your CraBot 3D printer, maybe try these popular quick remedies: relocate either the CraBot or the other unit involved in the interference, reorient any antenna or transmission/reception fundamental, try using a separate power outlet, contact an expert
technician.
RECOMMENDED USE AND WARNINGS
6 Recommended use and warnings
Page 7

Chapter 1
Welcome
Page 8
8
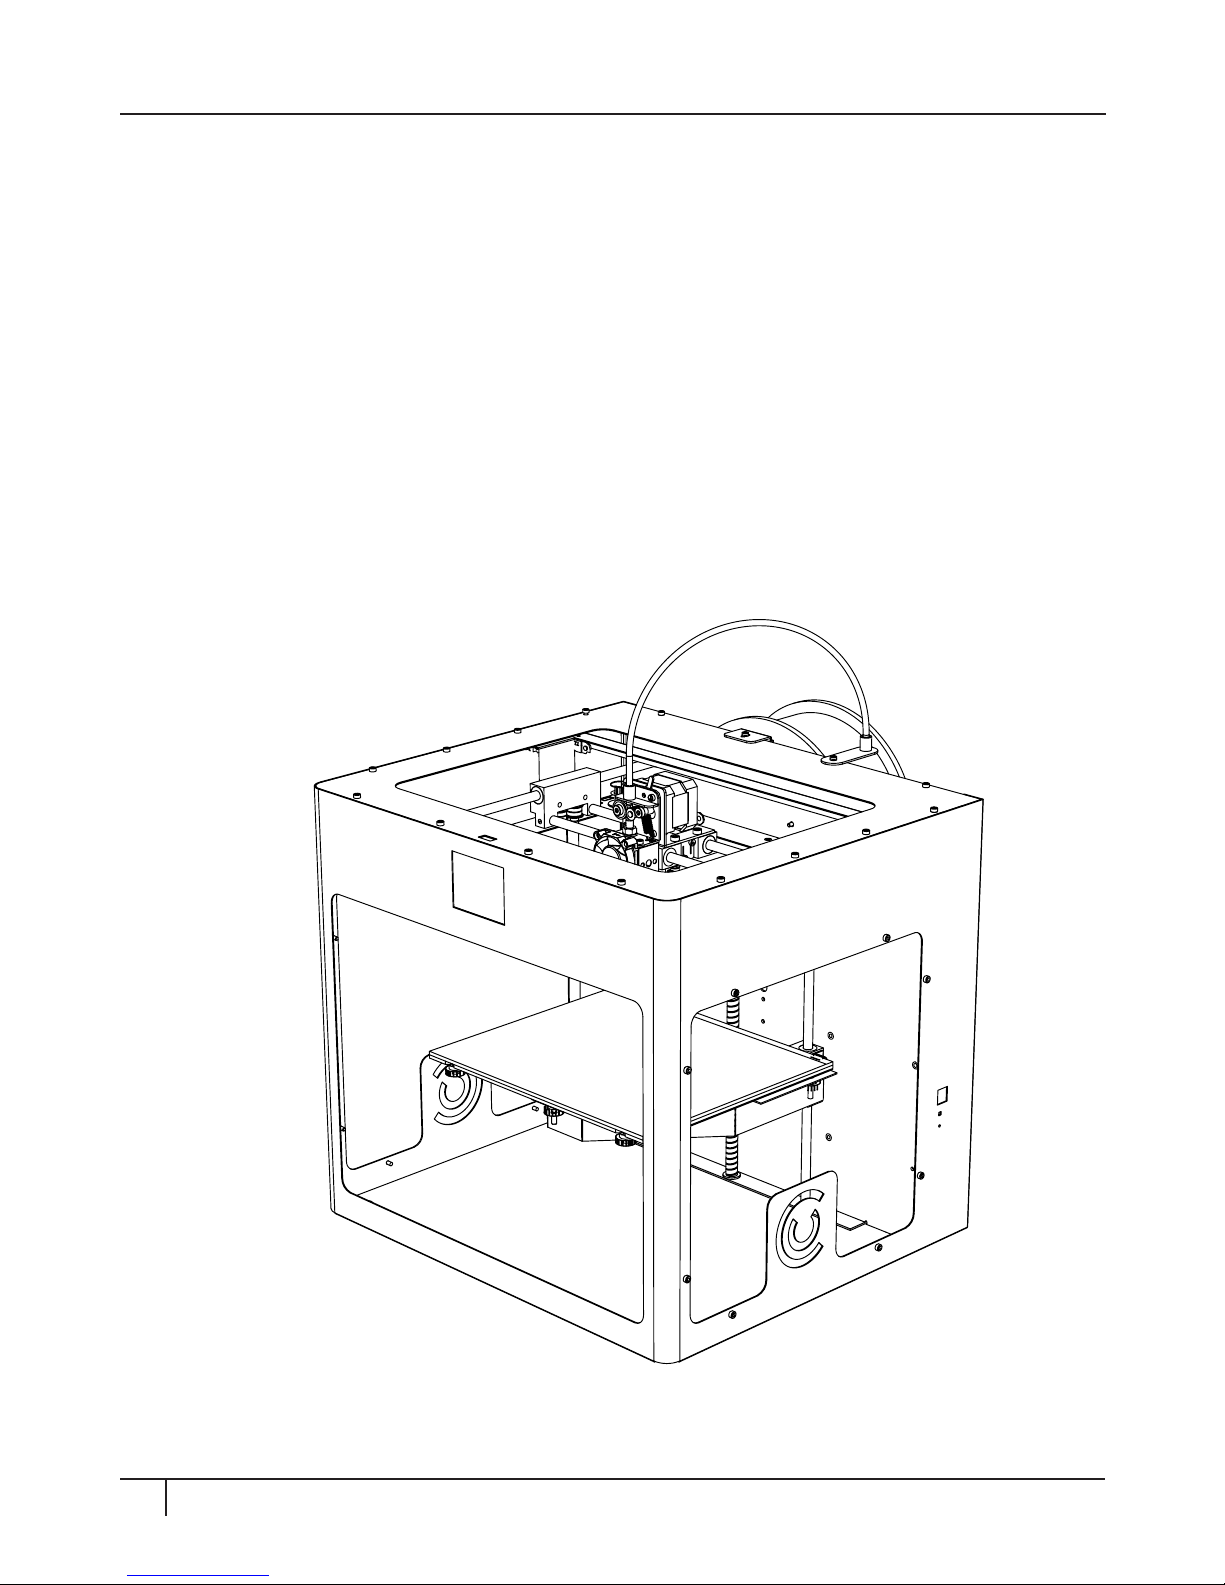
Thank you for purchasing the CraBot 3D printer! Now, “Just what is 3D printing?”,
you may ask. 3D printing encompasses a variety of dierent techniques to achieve
one similar end result: the construction of solid, three dimensional objects which
can be used in either practical, relative or artistic mediums. The CraBot itself does
this through a process known as “Fused Filament Fabrication” (FFF) in which you
can use a 3D design generated in a soware program to make a real life physical
print. These designs are translated into toolpath instructions for the CraBot
and are sent to the machine via USB cable or USB pendrive. The printer then
heats a filament material (such as PLA or ABS), and once the material reaches the
appropriate melting temperature, it is extruded through a nozzle to create these
3D prints layer by layer. The possibilities are almost limitless!
Welcome
INTRODUCTION
Page 9

9 Welcome
SPECIFICATIONS
PRINTING
Printing technology: Fused Filament
Fabrication (FFF)
Build volume: 25x20x20 cm
Layer resolution: 100 micron (high)
200 micron
(medium)
300 micron (low)
Position precision: X,Y: 4 micron
Z: 2 micron
Filament diameter: 1.75 mm
Nozzle diameter: 0.4 mm
Print speed: 50mm/s
SOFTWARE
Soware package: CraWare
File types: STL/OBJ/CWPRJ
Supports: Windows (XP
32bit/7+)
Mac OSX
PHYSICAL DIMENSIONS
Frame dimensions: X: 40 cm
Y: 36 cm
Z: 37 cm
With all parts
attached even
filament guide tube:
X: 40 cm
Y: 46 cm
Z: 55 cm
Shipping box: X: 46 cm
Y: 42 cm
Z: 43 cm
Weight: 14 kg
Total shipping weight: 17 kg
TEMPERATURE
Ambient temperature: 15-32 °C
Storage temperature: 0-32 °C
Operating nozzle
temperature:
180-260 °C
Operating heated
build plate
temperature:
50-100 °C
WARNING: The CraBot generates high temperatures which can cause burns and also has moving
parts that can cause pinching and crushing injuries. Never reach inside of the CraBot while it
is in operation. Always control the CraBot from the touchscreen on the front of the printer or
with the power-switch on the back. Always allow the CraBot to cool down for 5 minutes before
reaching inside or providing maintenance.
CAUTION: When opening the CraBot for service, always make sure that the power switch is
turned into the o position and the cord is disconnected completely from the printer.
Page 10

Chapter 2
Setting up your
CraftBot Desktop 3D printer
Page 11
11 Setting up your CraBot
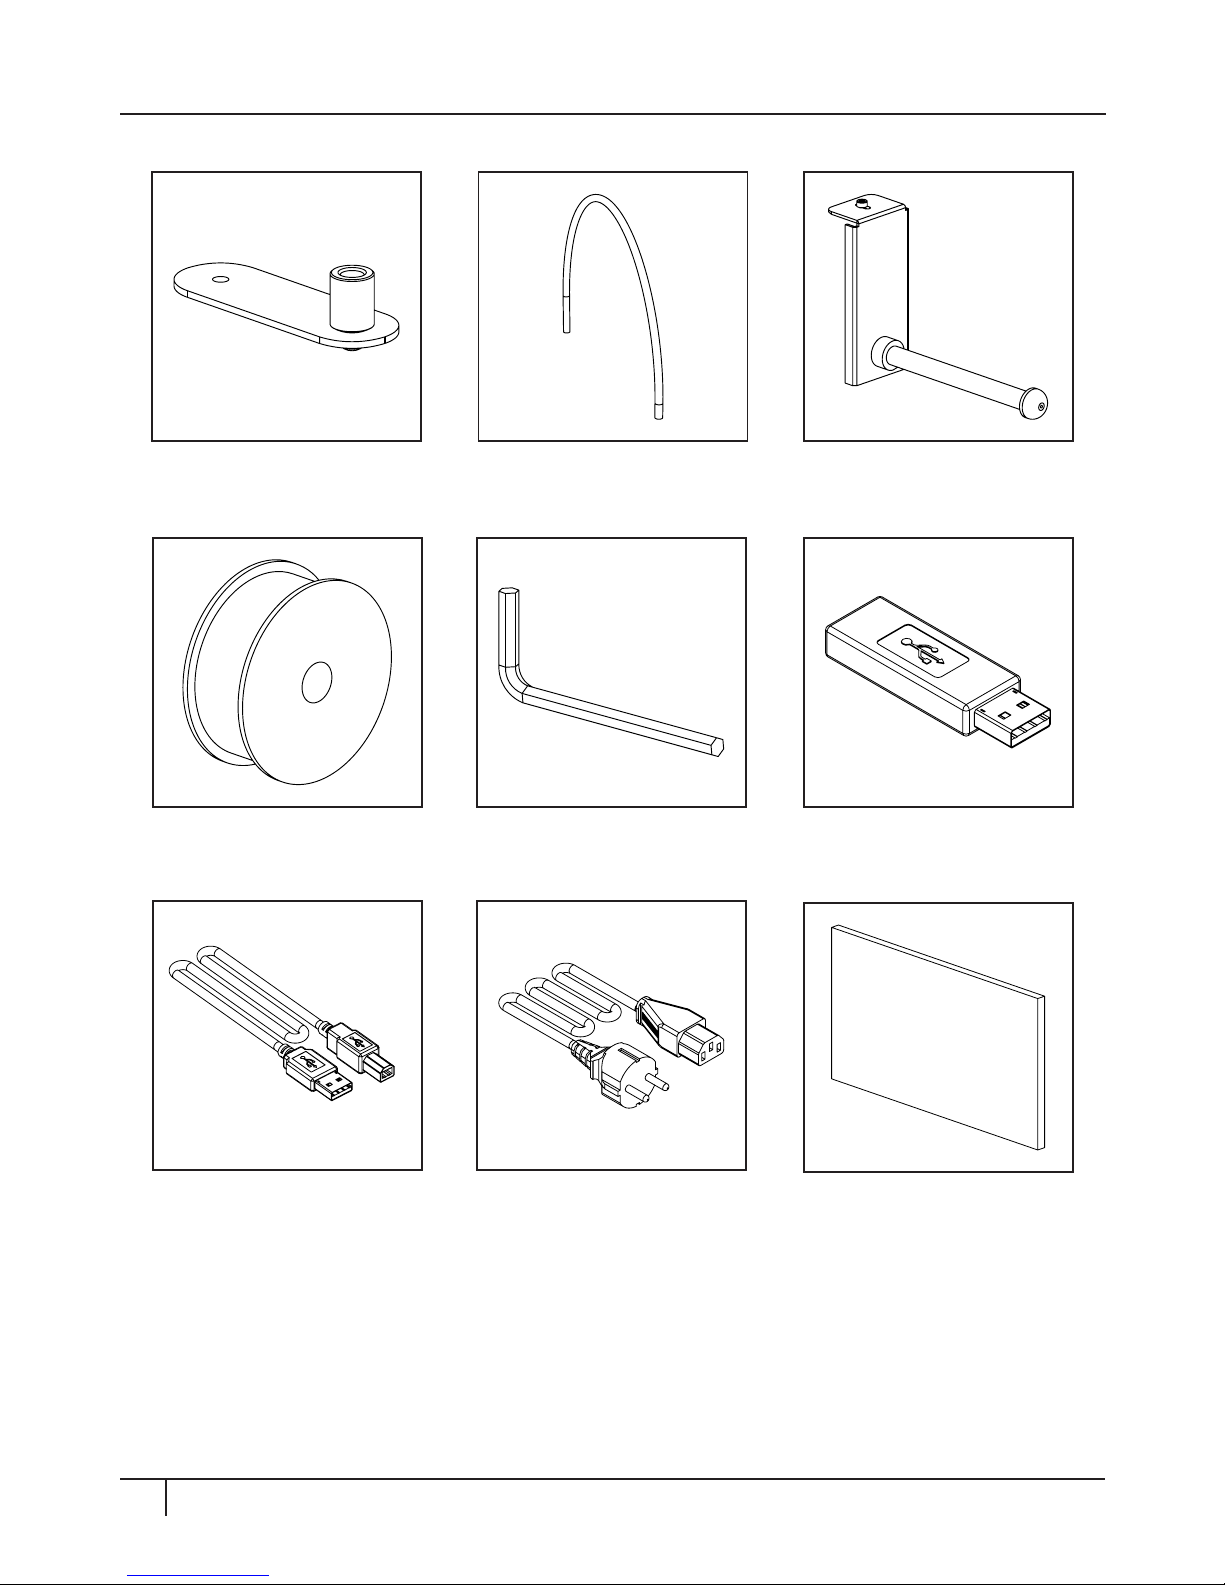
CONTENTS OF THE BOX
Filament guide tube
holder
Filament guide tube Filament spool
hoder
Filament spool Hex wrenches USB Flash storage
USB A-B cable AC power cable Spacer card
Page 12
12 Setting up your CraBot
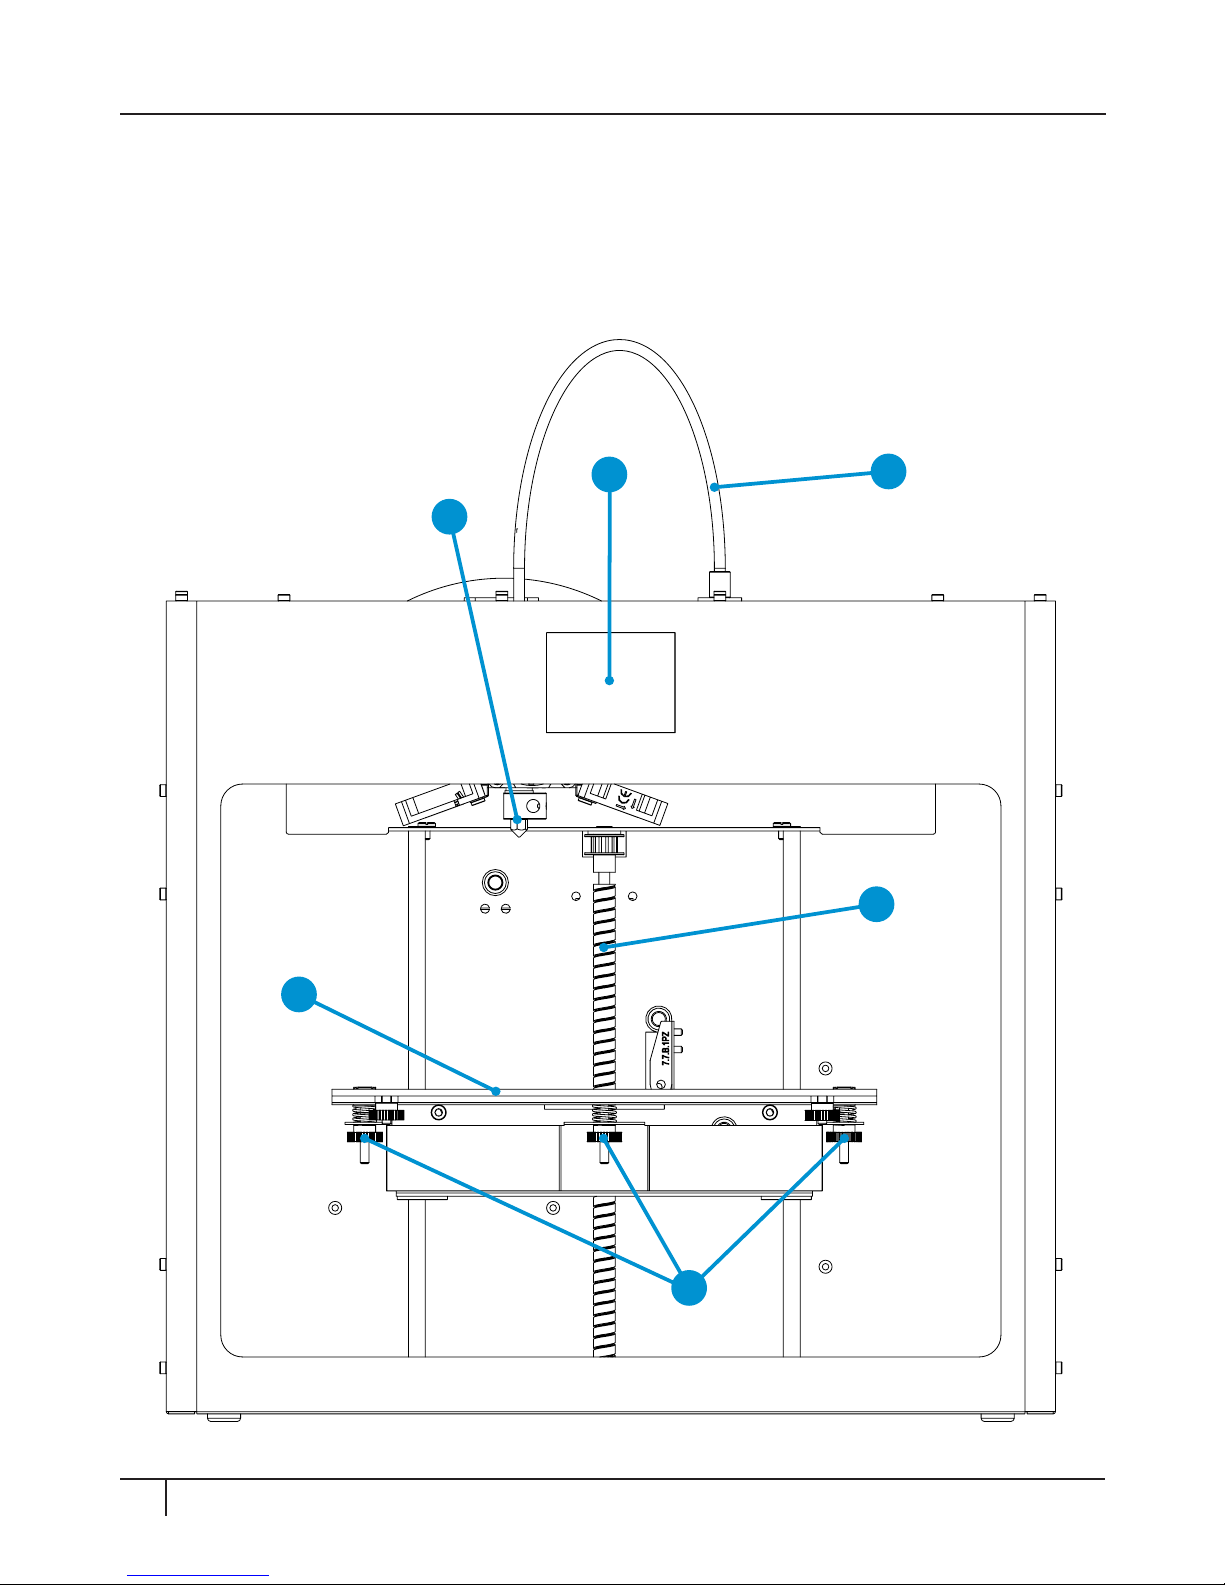
CRAFTBOT DIAGRAM
[1] - Touchscreen LCD display
[2] - Filament guide tube
[3] - Nozzle
[4] - Removable build plate
[5] - Leveling knobs
[6] - Z axis rod
3
1
2
4
6
5
Page 13
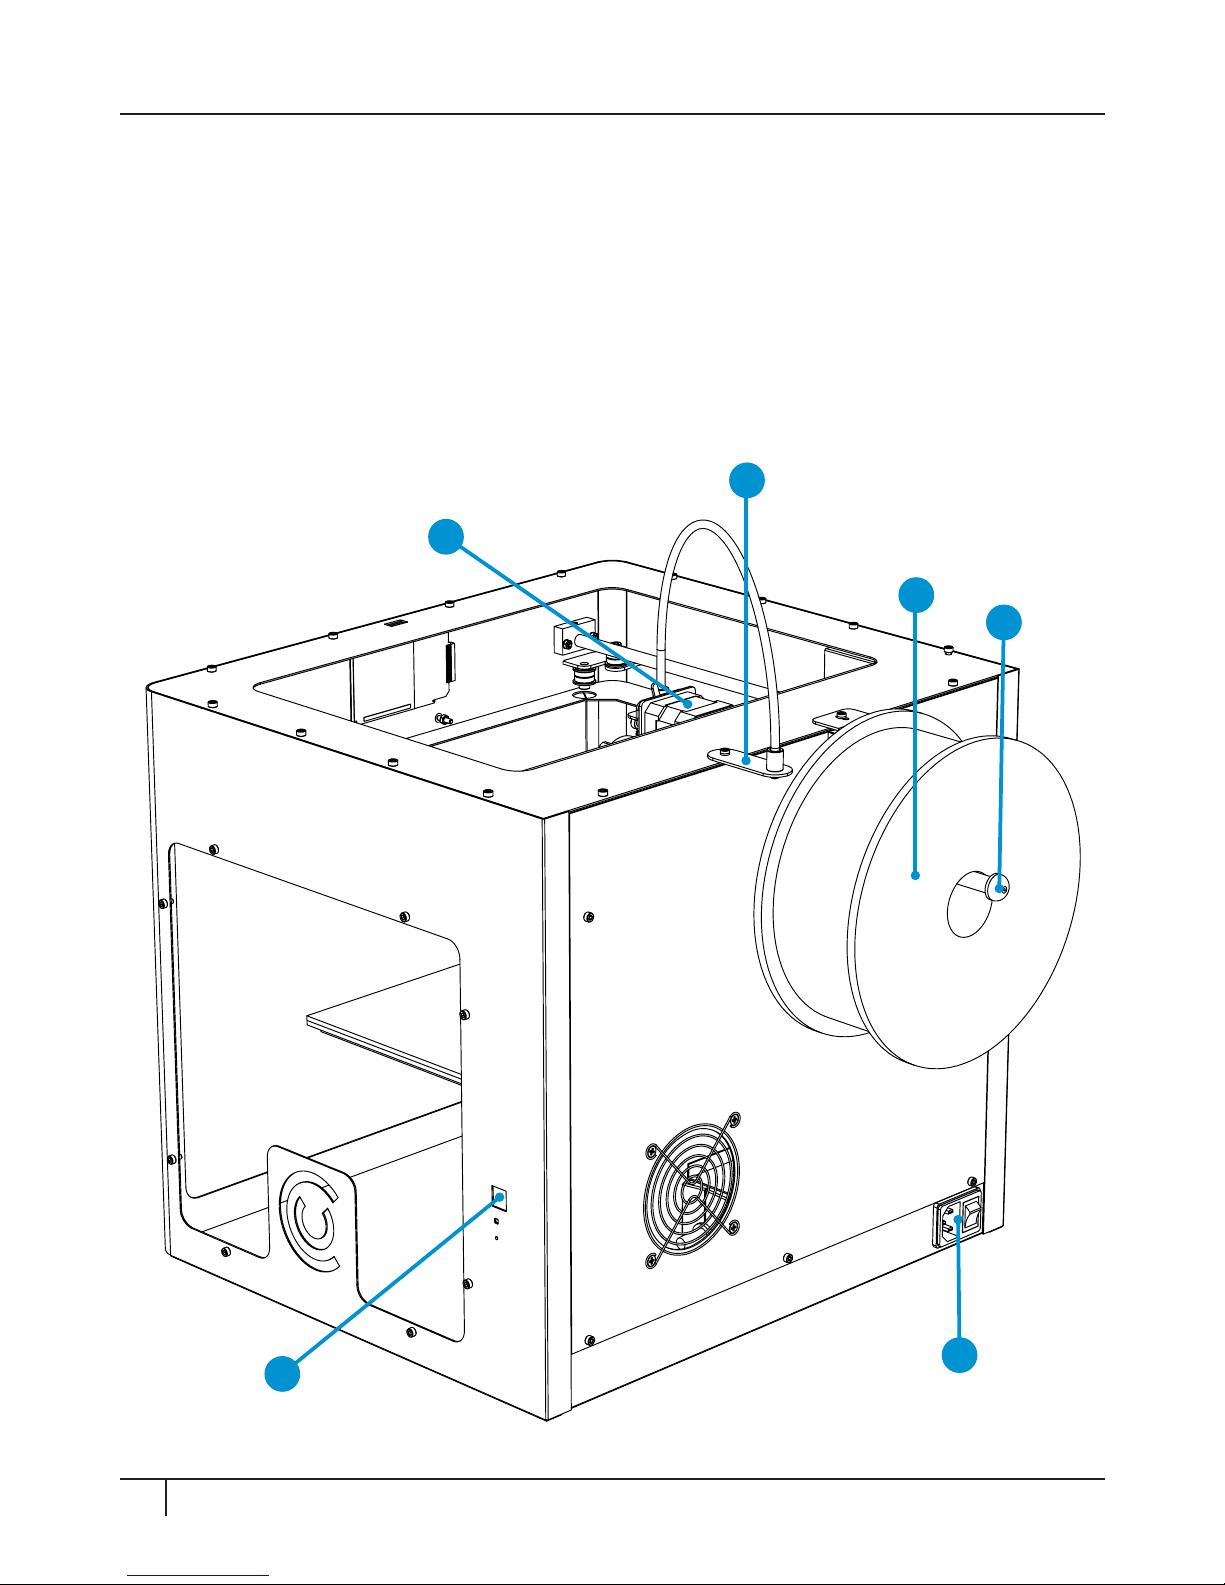
13 Setting up your CraBot
CRAFTBOT DIAGRAM
[7] - Filament spool holder
[8] - Filament spool
[9] - Filament guide tube holder
[10] - Extruder
[11] - USB socket
[12] - AC power socket
7
8
9
12
11
10
Page 14
9 Setting up your CraBot
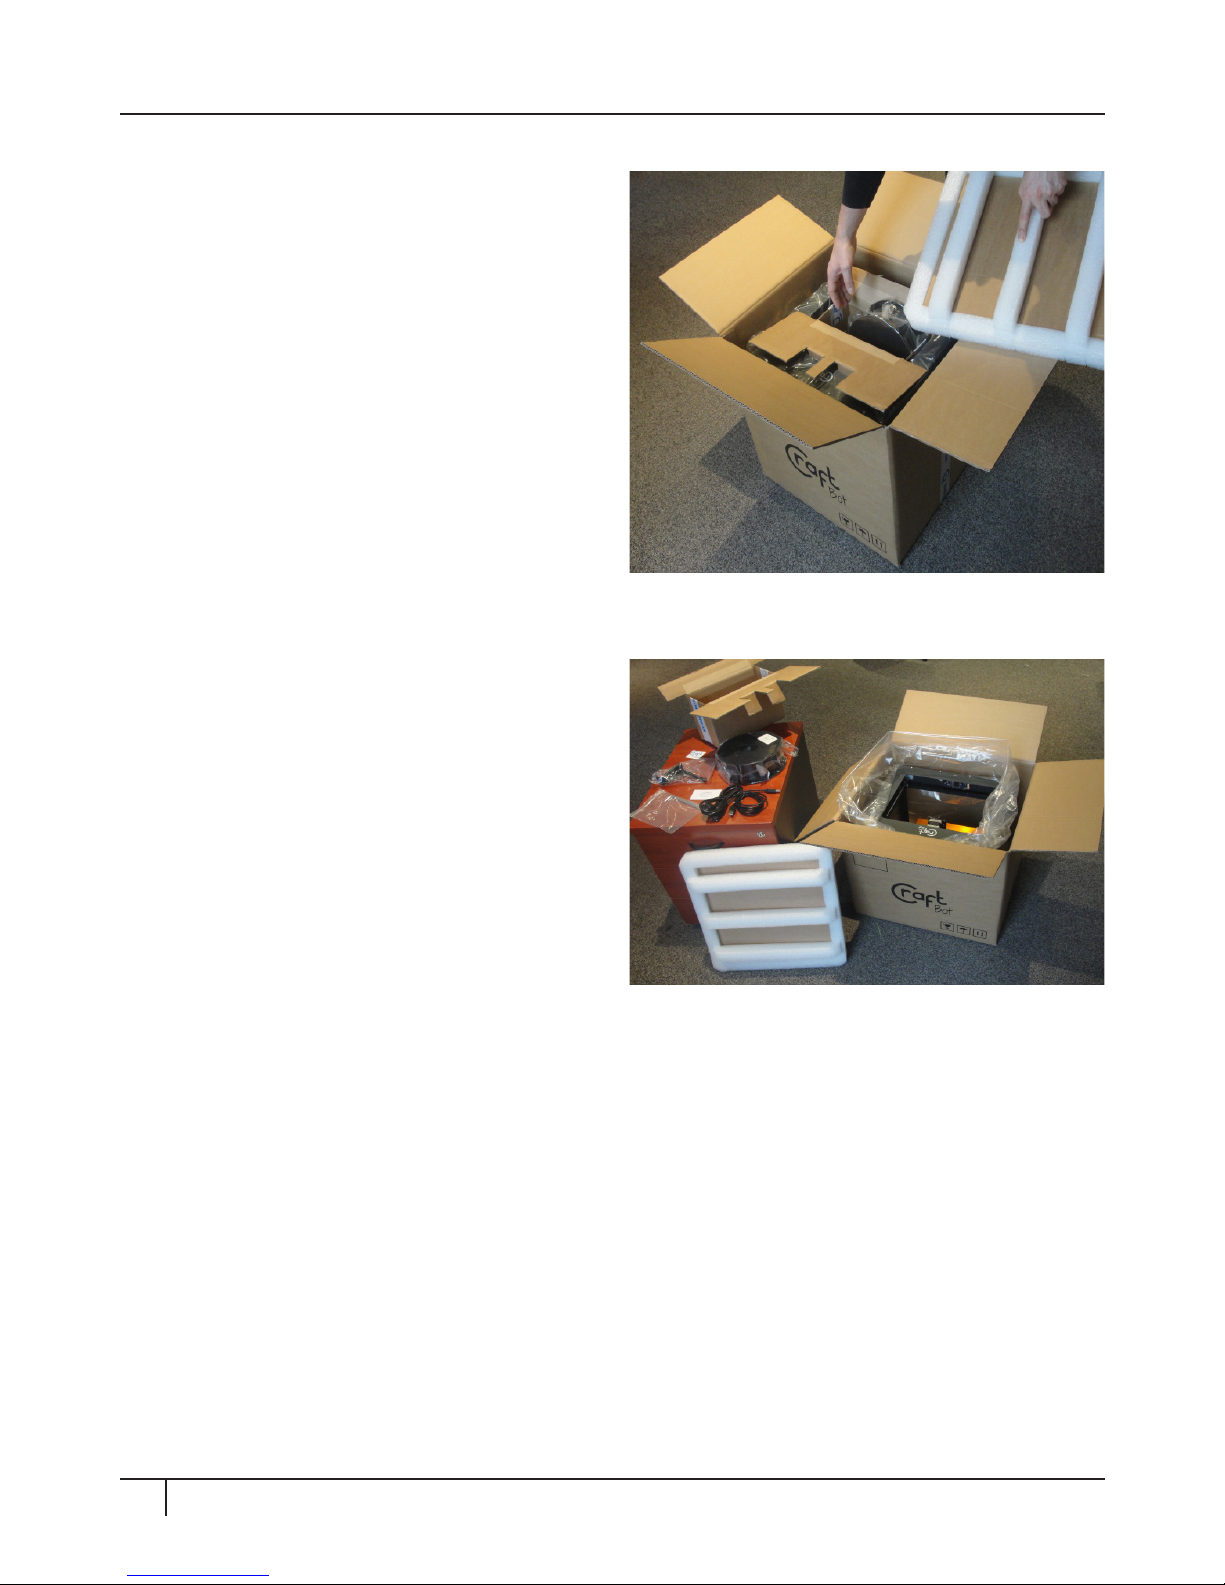
UNPACKING YOUR CRAFTBOT
1. Place the CraBot box on the ground
on a level surface. Make sure that there
is a lot of open space around you. Open
the box, make sure not to damage the
contents if using a blade. You will find
the quickstarter guide, along with the
invoice, located within the top protective
foam insert. Remove these.
2. You will then find the insert cradle which
contains the accessories and filament
spool. The cradle also acts as a support
for the extruder during shipping. The
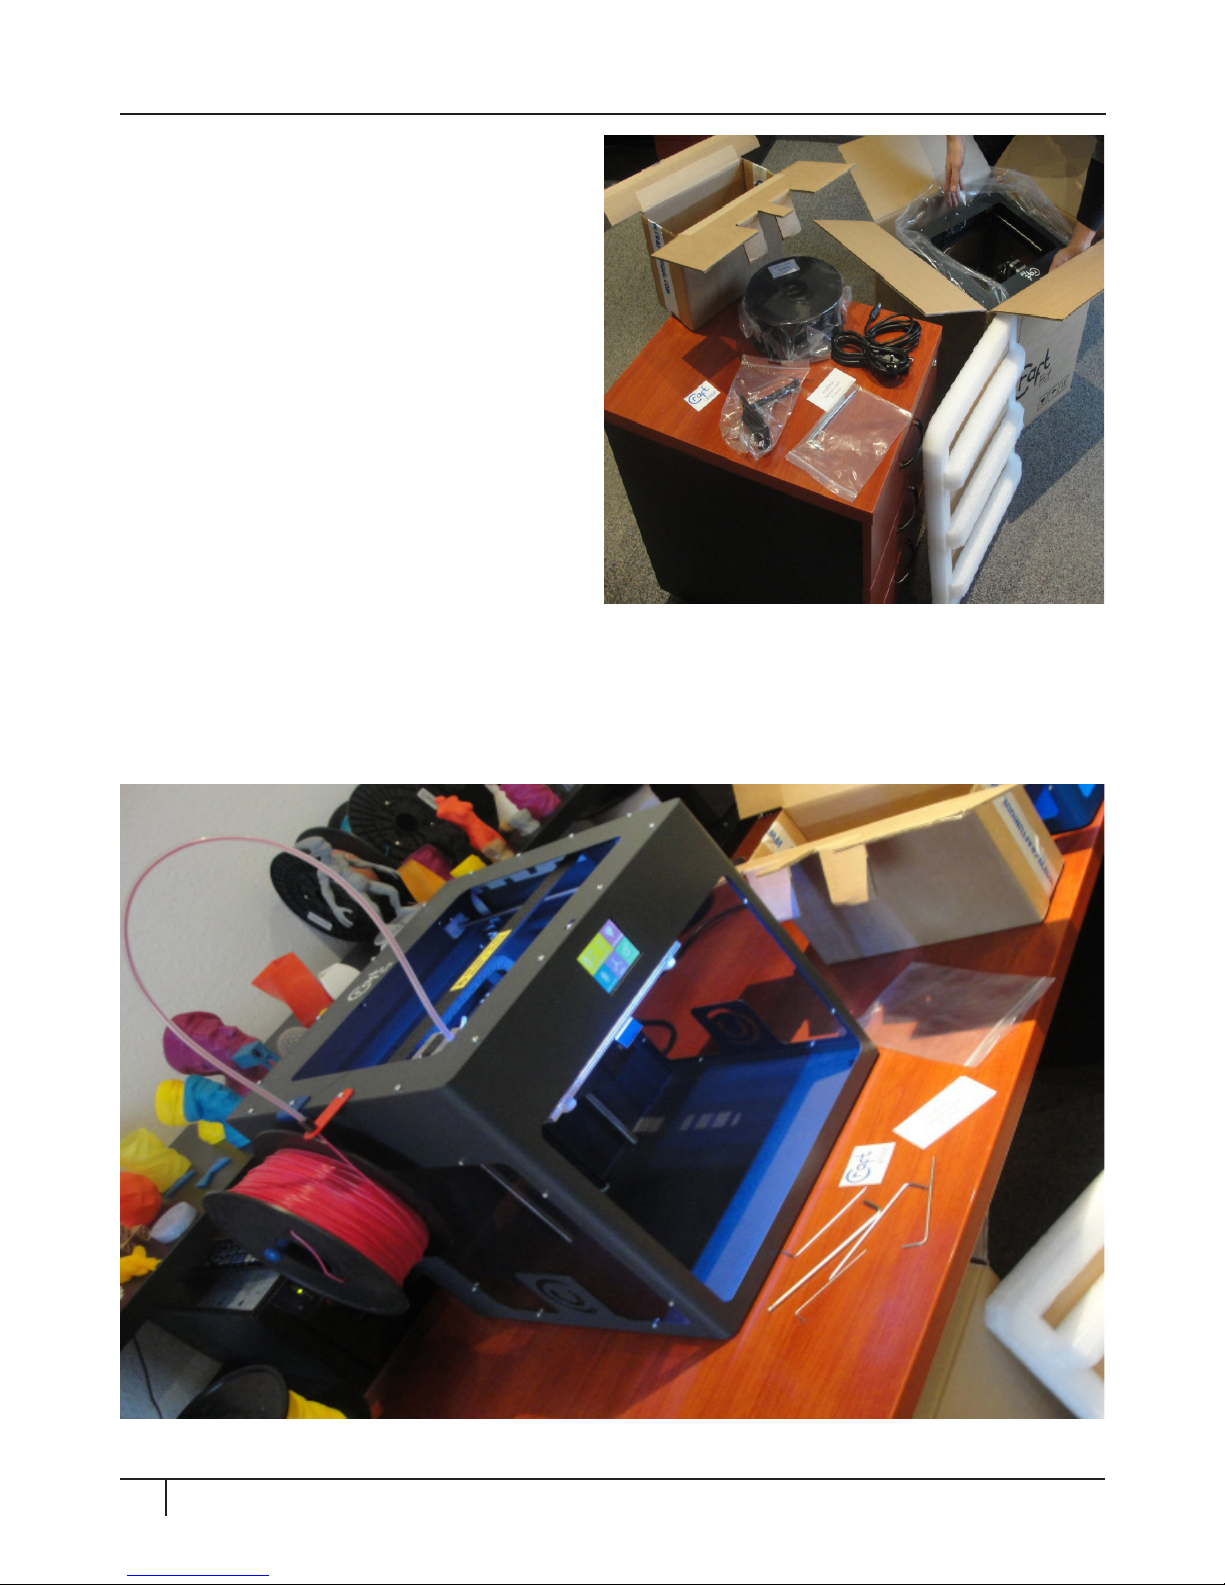
CraBot user manual can also be found
on the pendrive with the accessories.
We recommend that you use this users
manual to guide you through the setup
process. Keep it at hand as you unpack
the contentsof the box. If you feel that
anything is missing, feel free to contact
us by email at info@craunique.com.
Remove the accessory cradle from your
CraBot 3D printer.
Page 15
15 Setting up your CraBot
UNPACKING YOUR CRAFTBOT (continued)
NOTE: You can download a PDF copy of this manual at http://www.craunique.com/docs/
crabot-user-manual
3) Now you will find the CraBot 3D
printer itself completely enclosed in
a protective plastic bag. Open the
plastic covering and firmly grasp the
frame of the CraBot. Li it from the
plastic and out of the box, resting it
on a stable and level surface. Do not
stack it on top of other components, a
desktop is the best resting surface for
your printer. The CraBot has moving
parts, so do not set it near to the edge
of the table. Be careful! Don’t hurt
yourself, the CraBot 3D printer is
made of good stu, so it’s heavy!
Page 16
16 Setting up your CraBot
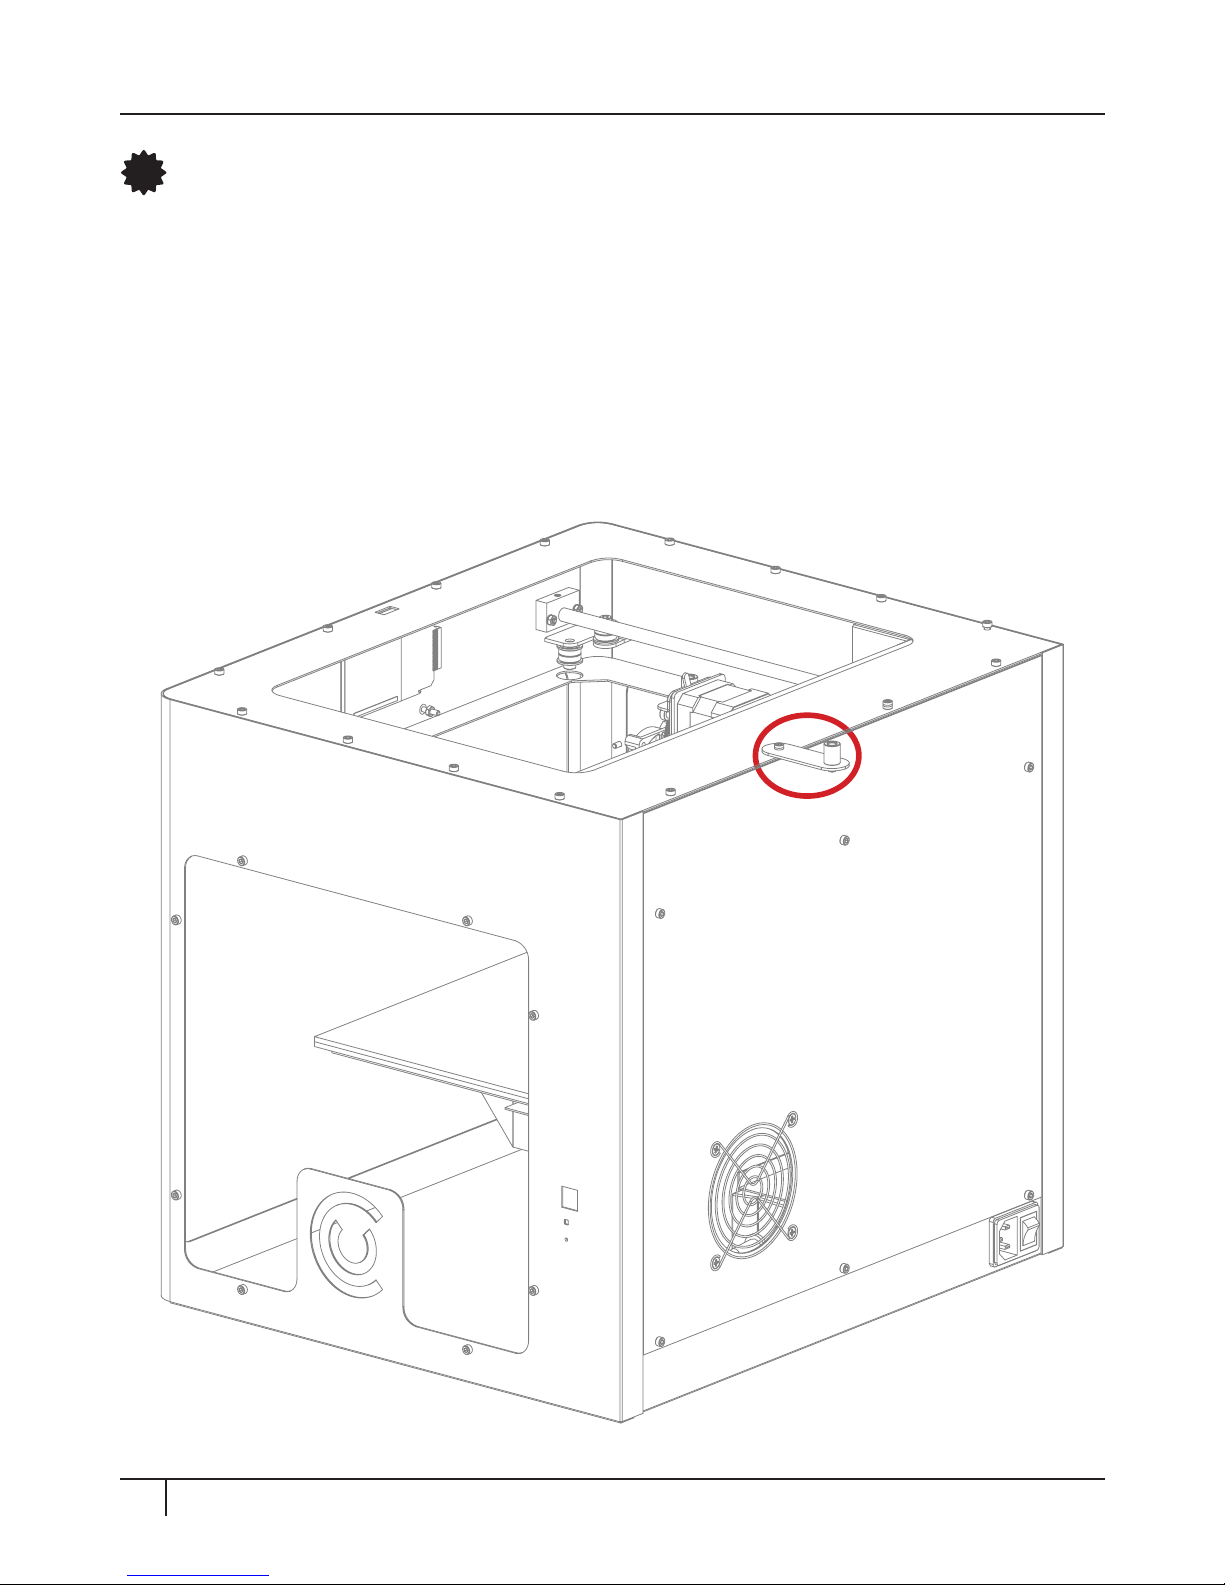
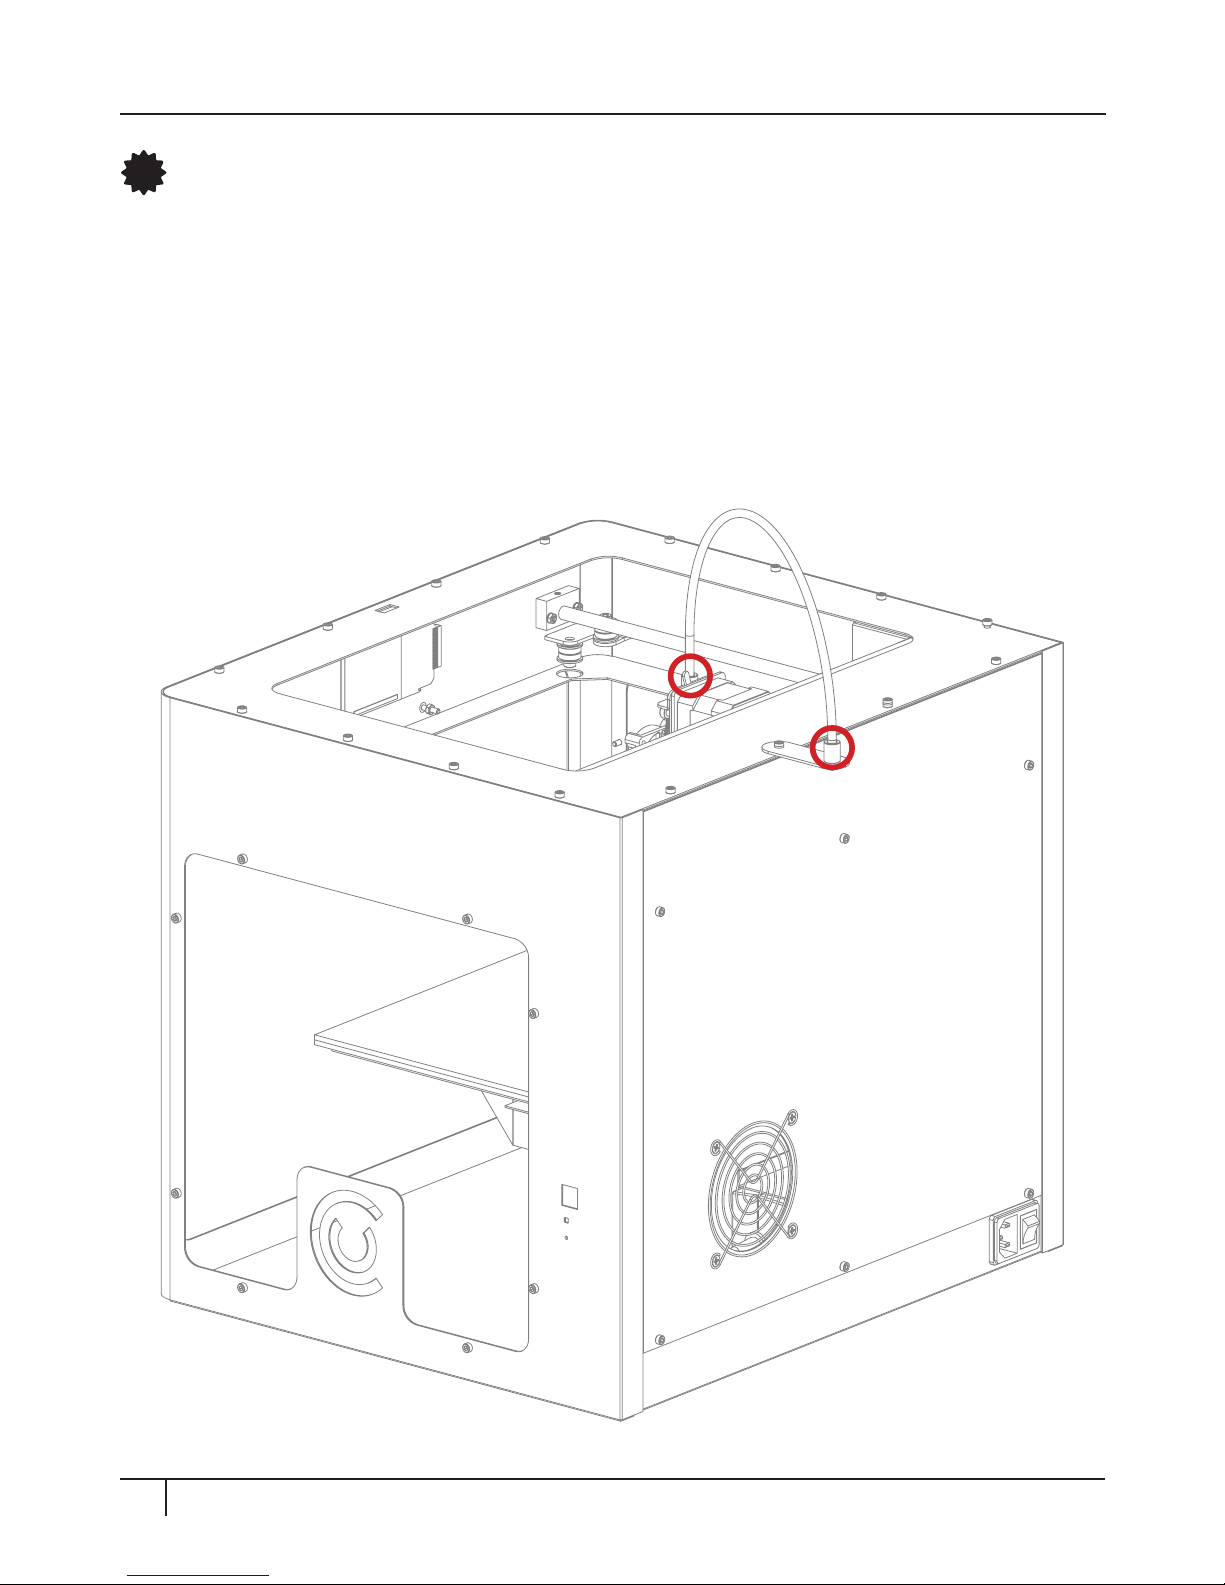
INSTALLING THE FILAMENT GUIDE TUBE
Locate the guide tube holder. Using a hex wrench, install the guide tube holder
onto the top of the CraBot at a desired position. Insert the other end of the
filament guide tube into the guide tube holder on CraBot. Any side will do for
installation because the extruder is made to cover the entire surface area of the
printer evenly. Keep in mind that the spool holder must be installed directly next
to the guide tube holder.
Install the filament guide tube holder.
1
Page 17
17 Setting up your CraBot
INSTALLING THE FILAMENT GUIDE TUBE (continued)
Locate the filament guide tube. Push the filament guide tube into the filament
guide tube holder and push the other end into the hole on the top of the extruder.
Install the filament guide tube.
2
Page 18
18 Setting up your CraBot
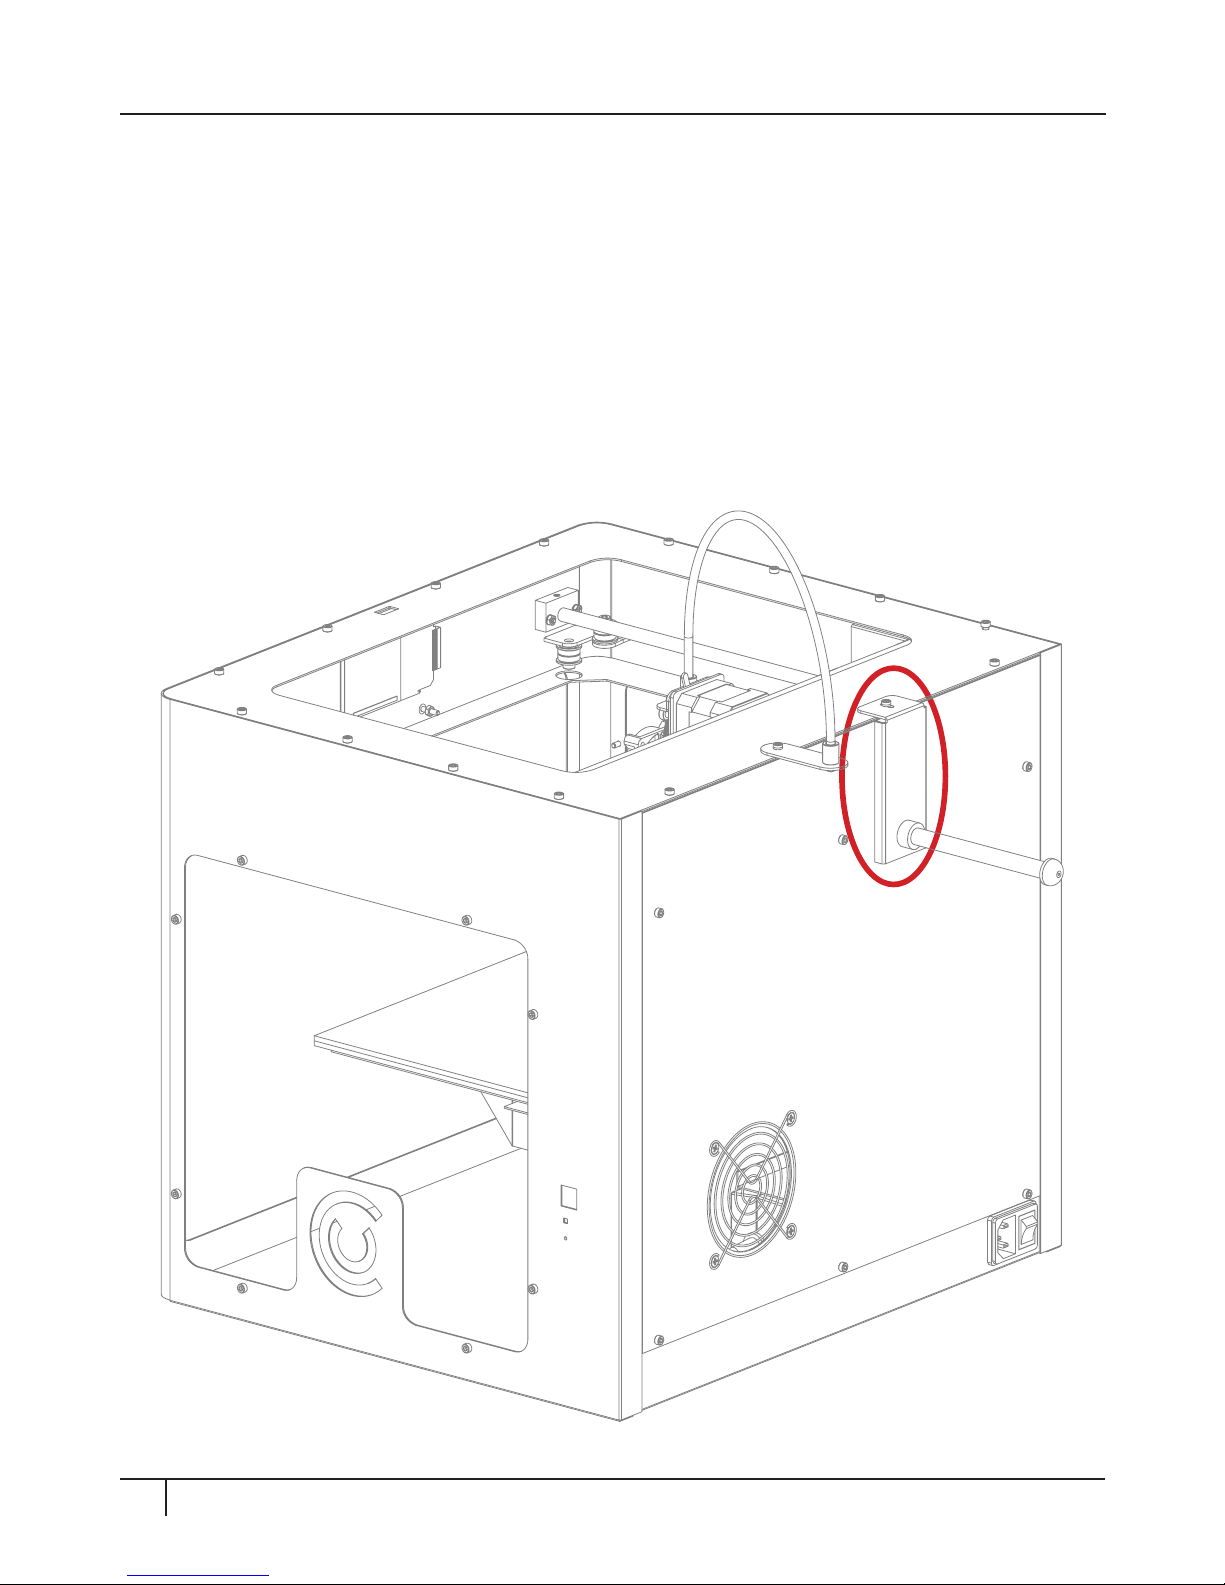
INSTALLING THE FILAMENT SPOOL HOLDER
Locate the filament spool holder. Using a hex wrench install the filament spool
holder next to the filament guide tube holder.
Note: The spool holder must be installed beside the guide tube holder.
Page 19
19 Setting up your CraBot
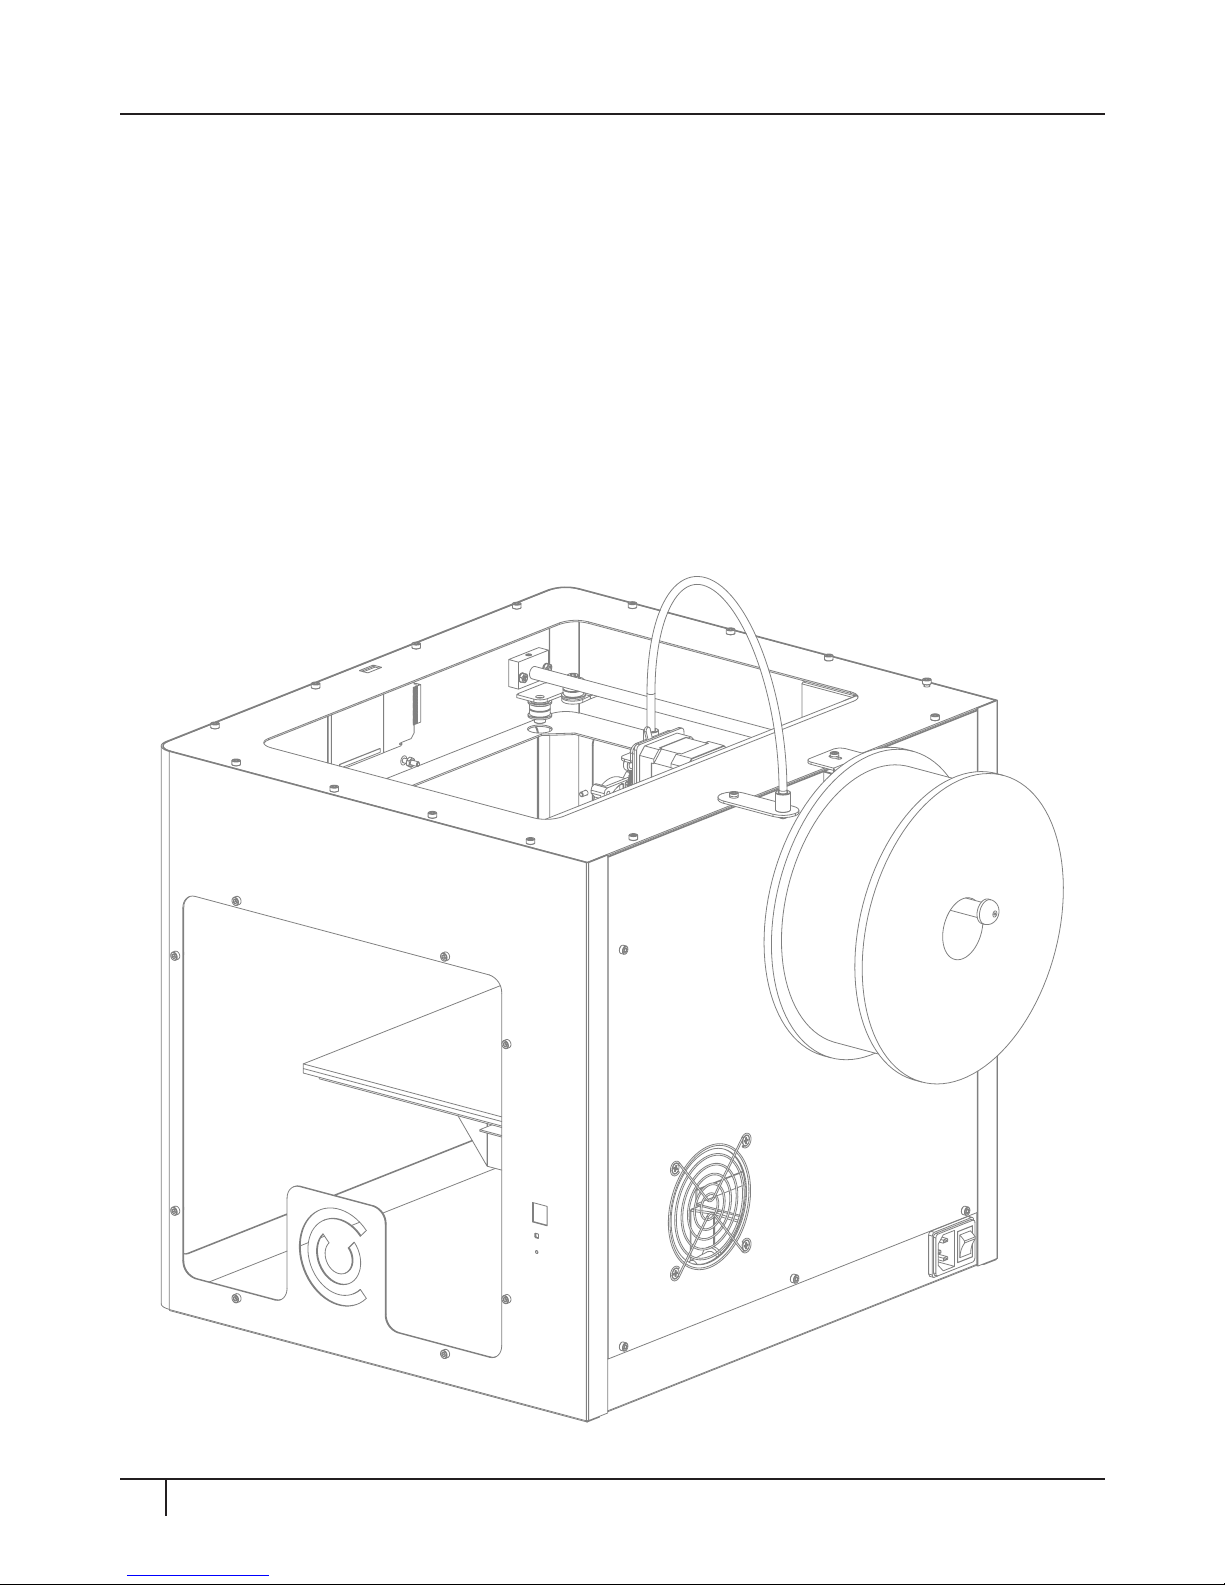
MOUNTING THE FILAMENT SPOOL
1. Open the box containing the PLA filament and take the filament spool out of
the bag.
2. Fit the filament spool onto the filament spool holder so that the lead end keeps
it’s course when the filament is fed into the guide tube holder.
Page 20
20 Setting up your CraBot
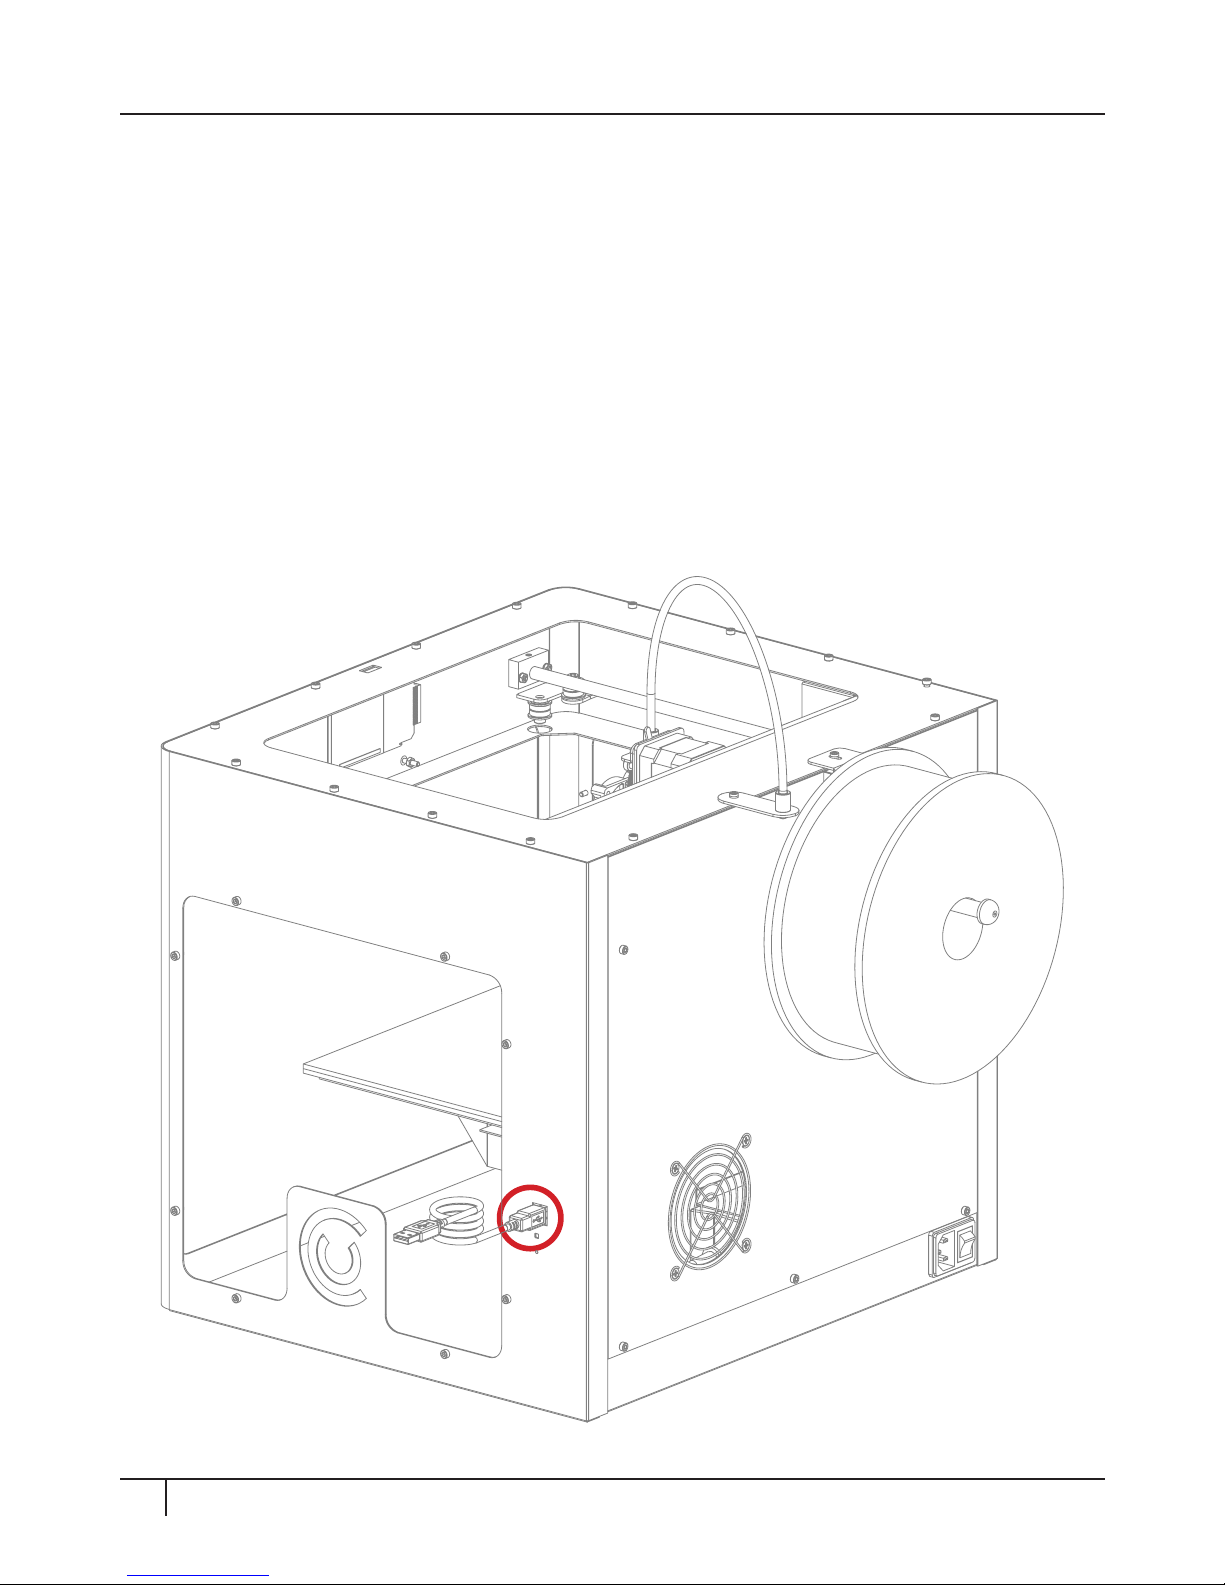
ATTACHING THE USB CABLE
1. Take the USB-A to USB-B cable from the accessories. Insert the USB cable into
the USB-B port on the right side of the CraBot. You can attach the other end of
the USB cable directly into your computer.
Page 21
21 Setting up your CraBot
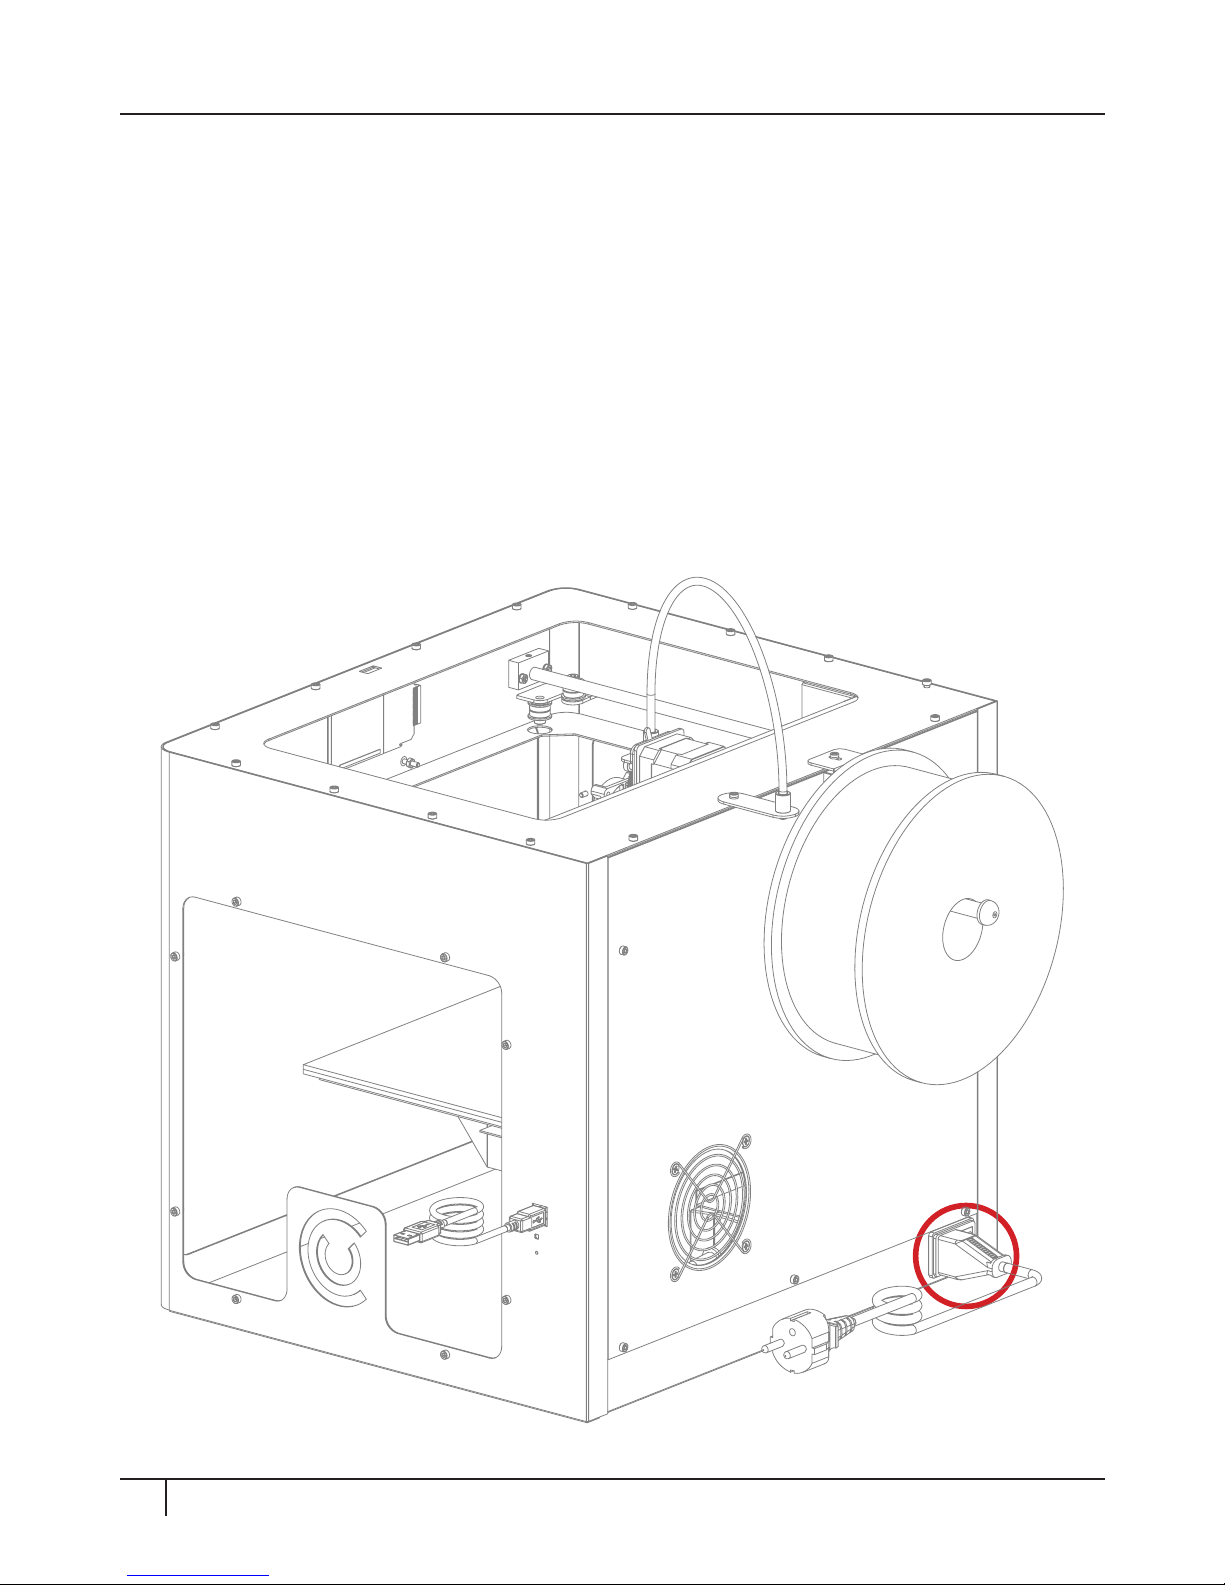
ATTACHING THE POWER CORD AND POWERING UP
1. Ensure that the power switch on the CraBot is set to the OFF position.
3. Plug the other end of the AC power cord into the correct electrical outlet.
2. FInd and then insert the AC power cord into the power input on the back of the
CraBot.
4. Turn the power switch to the ON position and then go to the next chapter.
Page 22

Chapter 3
The rst steps
Page 23
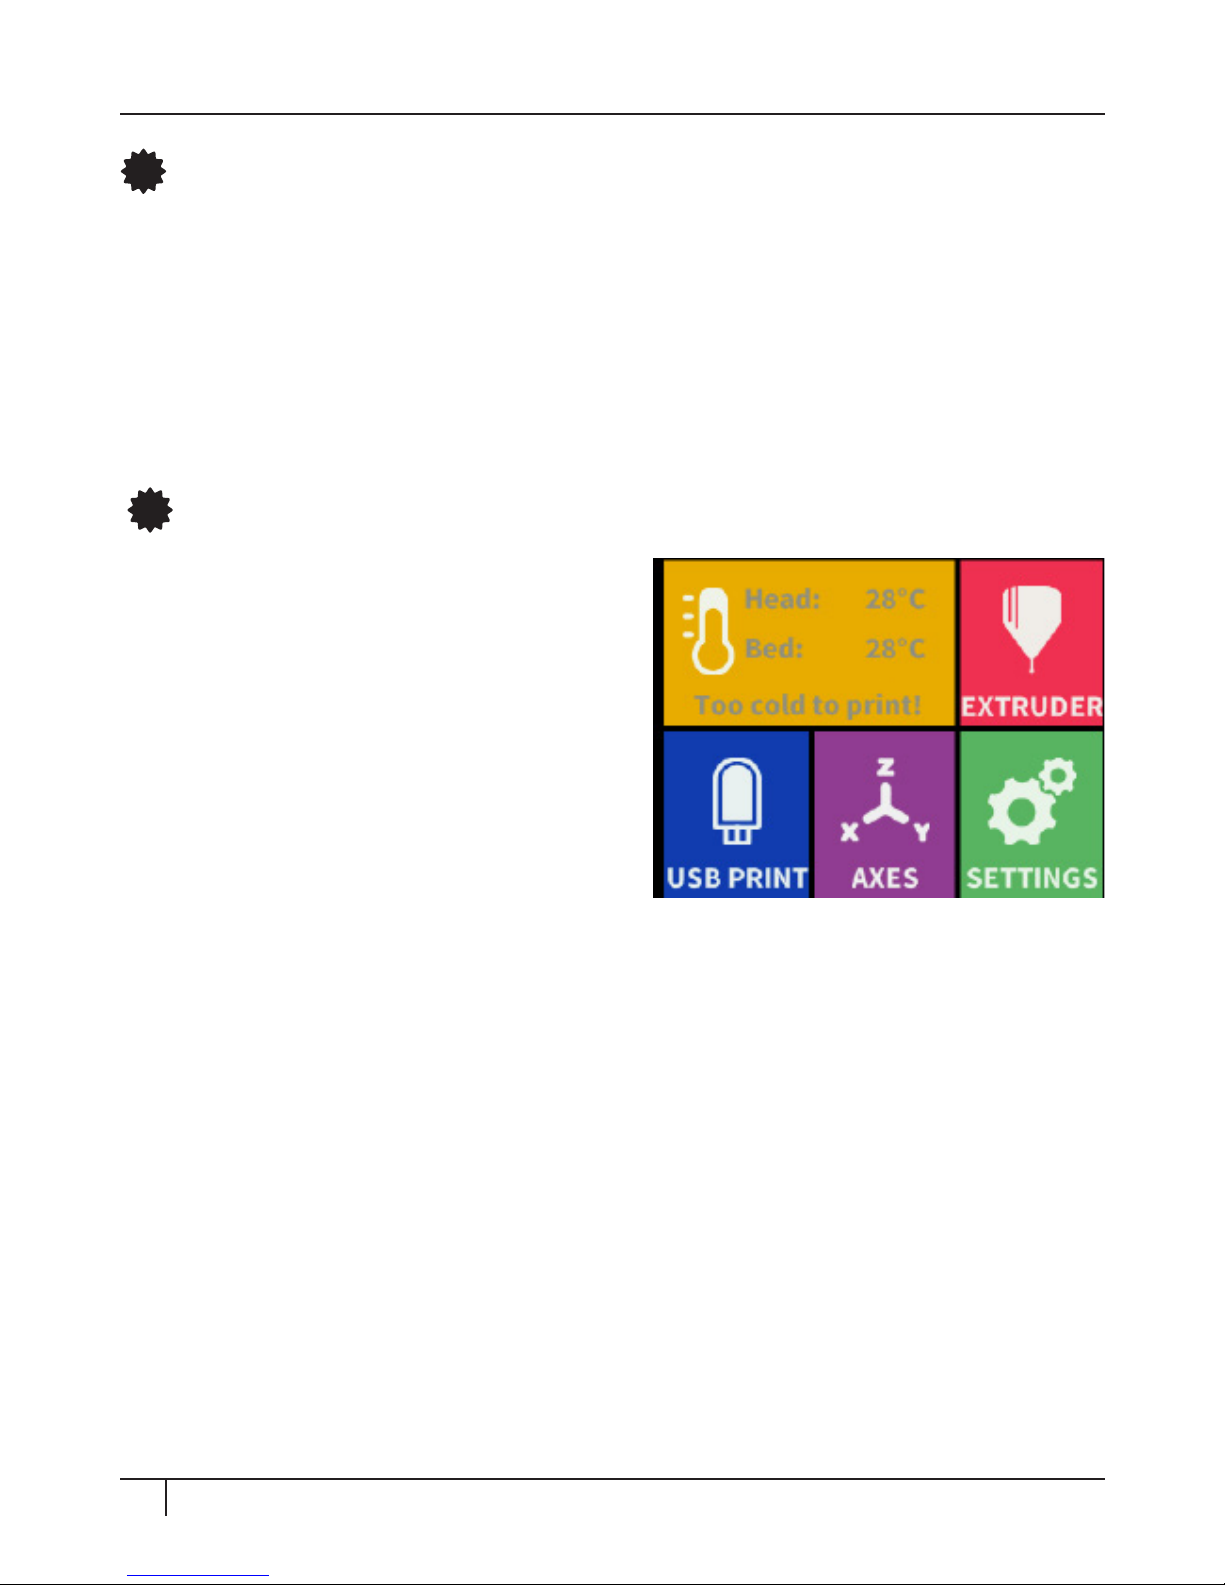
This is the menu that you will see appear
when you first power up the CraBot 3D
printer. By using the “back” button (or
in completion of a process) in any of the
following displays you can always return to
this one. From this display you can view the
current temperature of both the extruder
and the bed. It will also let you know if you
are ready to print or if the extruder is “too
cold”. Use this menu to navigate through
further options and commands: extruder control, looking up prints on your
pendrive for standalone printing, move the extruder or heat bed along the axes,
or navigate through a plethora of personal settings.
23 The first steps
NAVIGATING THROUGH THE LCD MENU
The following text is presented in a way in which every visual display of the
CraBot touchscreen is shown, and below each illustration is an introductory
text explaining just what you are seeing. You can find further examples of the LCD
touchscreen displays used in owner’s manual as their implications are relevant
to the operation (examples: leveling the bed, loading the filament). This tutorial
should give you a pretty solid understanding of the preliminary operations
though.
!
Introduction
1
Main menu
Page 24
24 The first steps
NAVIGATING THROUGH THE LCD MENU
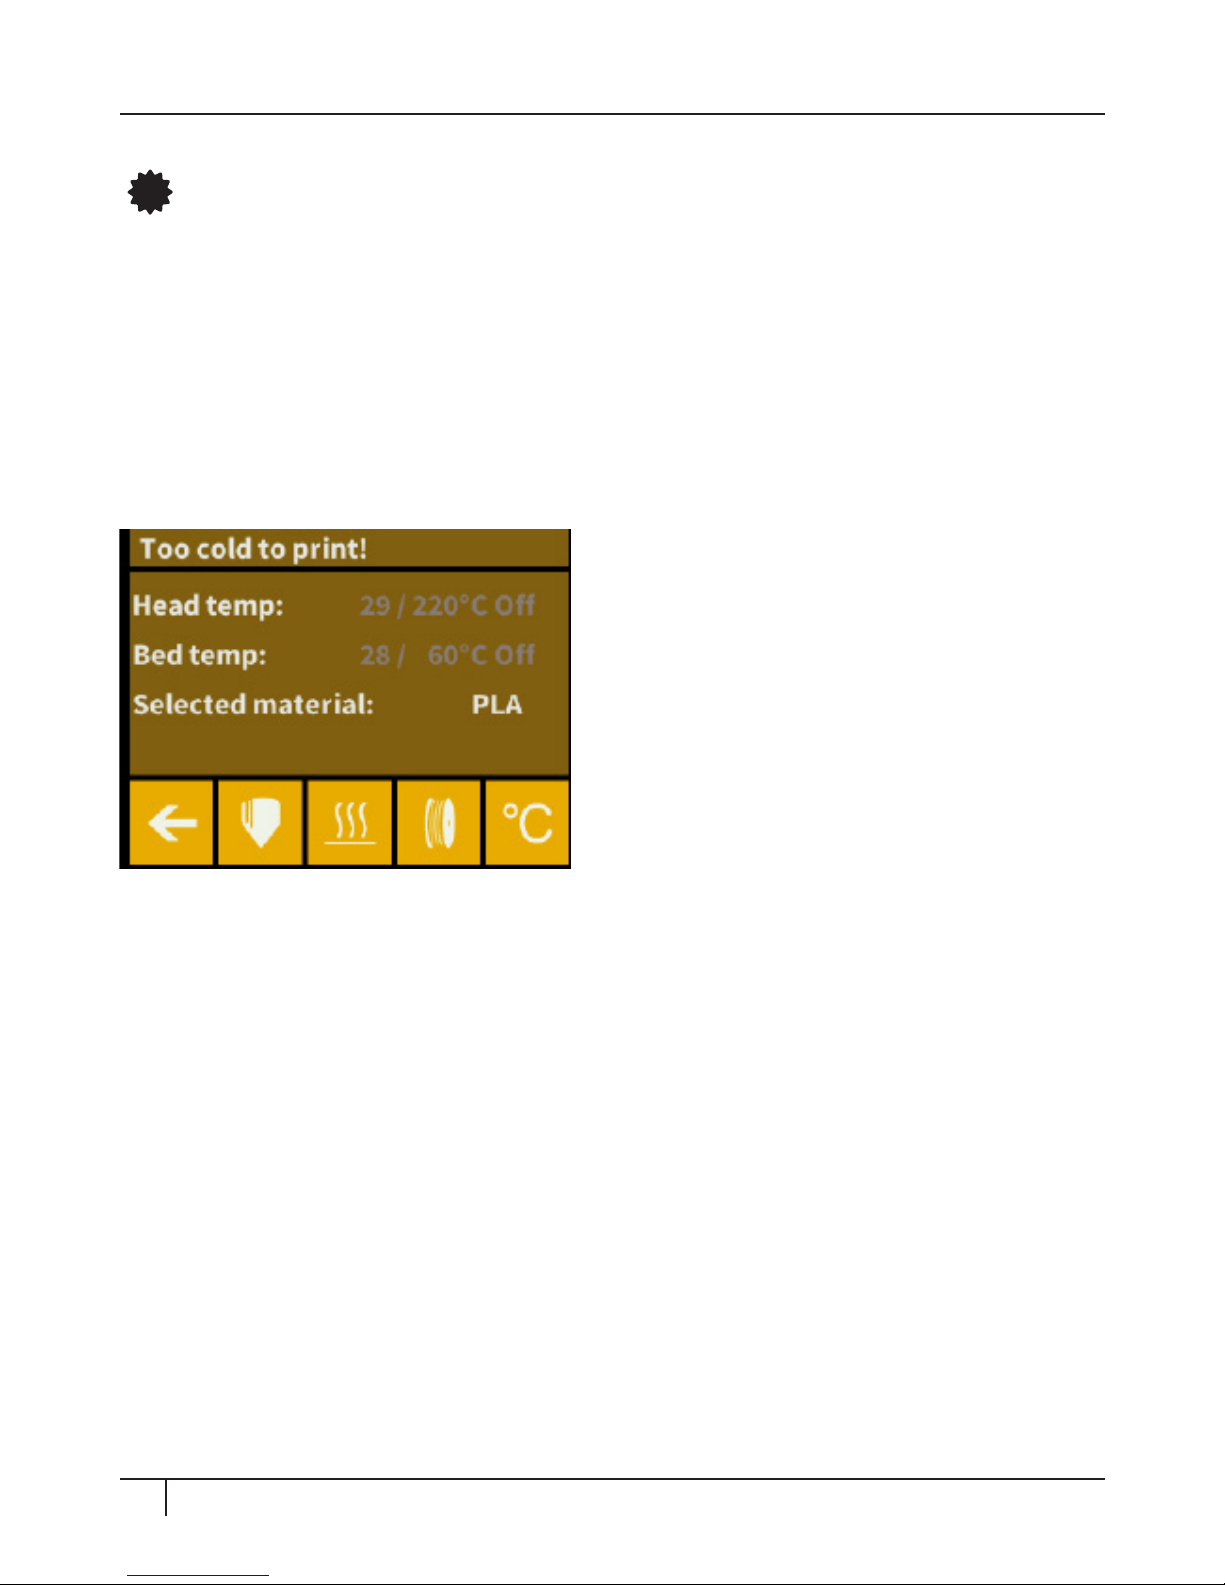
If you touch this option in the main menu display, you will be redirected to another
display in which, as in the main menu, both the “Head temp” and the “Bed temp”
can be readily seen. The first number represents the current temperature and
the second number, aer the slash (/), represents the target temperature that
the component, either the head or the bed, will heat up to once engaged. There
is also a display showing the “Selected material”, which can be chosen using
the filament icon explained in more detail below. If you look closely at the icons
on the bottom of the screen, you will
first see the “back” button to the far le,
which will return you to the main menu.
The next two options from the le, the
extruder “Head”/nozzle and the heated
“Bed”/build plate icons, will allow you
to engage or disengage heating for both
components. Once you touch either
one or both of these icons, you will see
the above grey numerical temperature
information, directly following the “Head
temp” and the “Bed temp” text, change to white. If the temperature is white, or
highlighted, then this means that the component is either heating up or is already
heated. If it is grey, then this means that it is disengaged. Use the two buttons
to change back and forth. The next option, moving down the line, looks like a
filament spool, and this option will adjust the temperature of the head and the
bed to the default settings of the dierent filament types (PLA, ABS, PET, customer
“User” selection). As an extra, useful information concerning the characteristics
of each filament type you can see running across the screen.
2
Heat menu
Page 25
25 The first steps
NAVIGATING THROUGH THE LCD MENU
To change the temperature of either the head or the bed, click on the Degrees icon
to the far right end of the options at the bottom. You will be redirected to a new
display in which these two values can be changed to the user’s personal printing
preferences by touching the arrows located to the right of each temperature.
Upon returning to the original temperature menu, aer changing to custom
temperature settings, you will see the modifications displayed as the new target
temperatures and the “Selection material” with read as “User”. If the material
selection is made again then the temperatures will return to the default, including
the default of the “User” selection.
Once the head and bed have been engaged using the two buttons at the bottom,
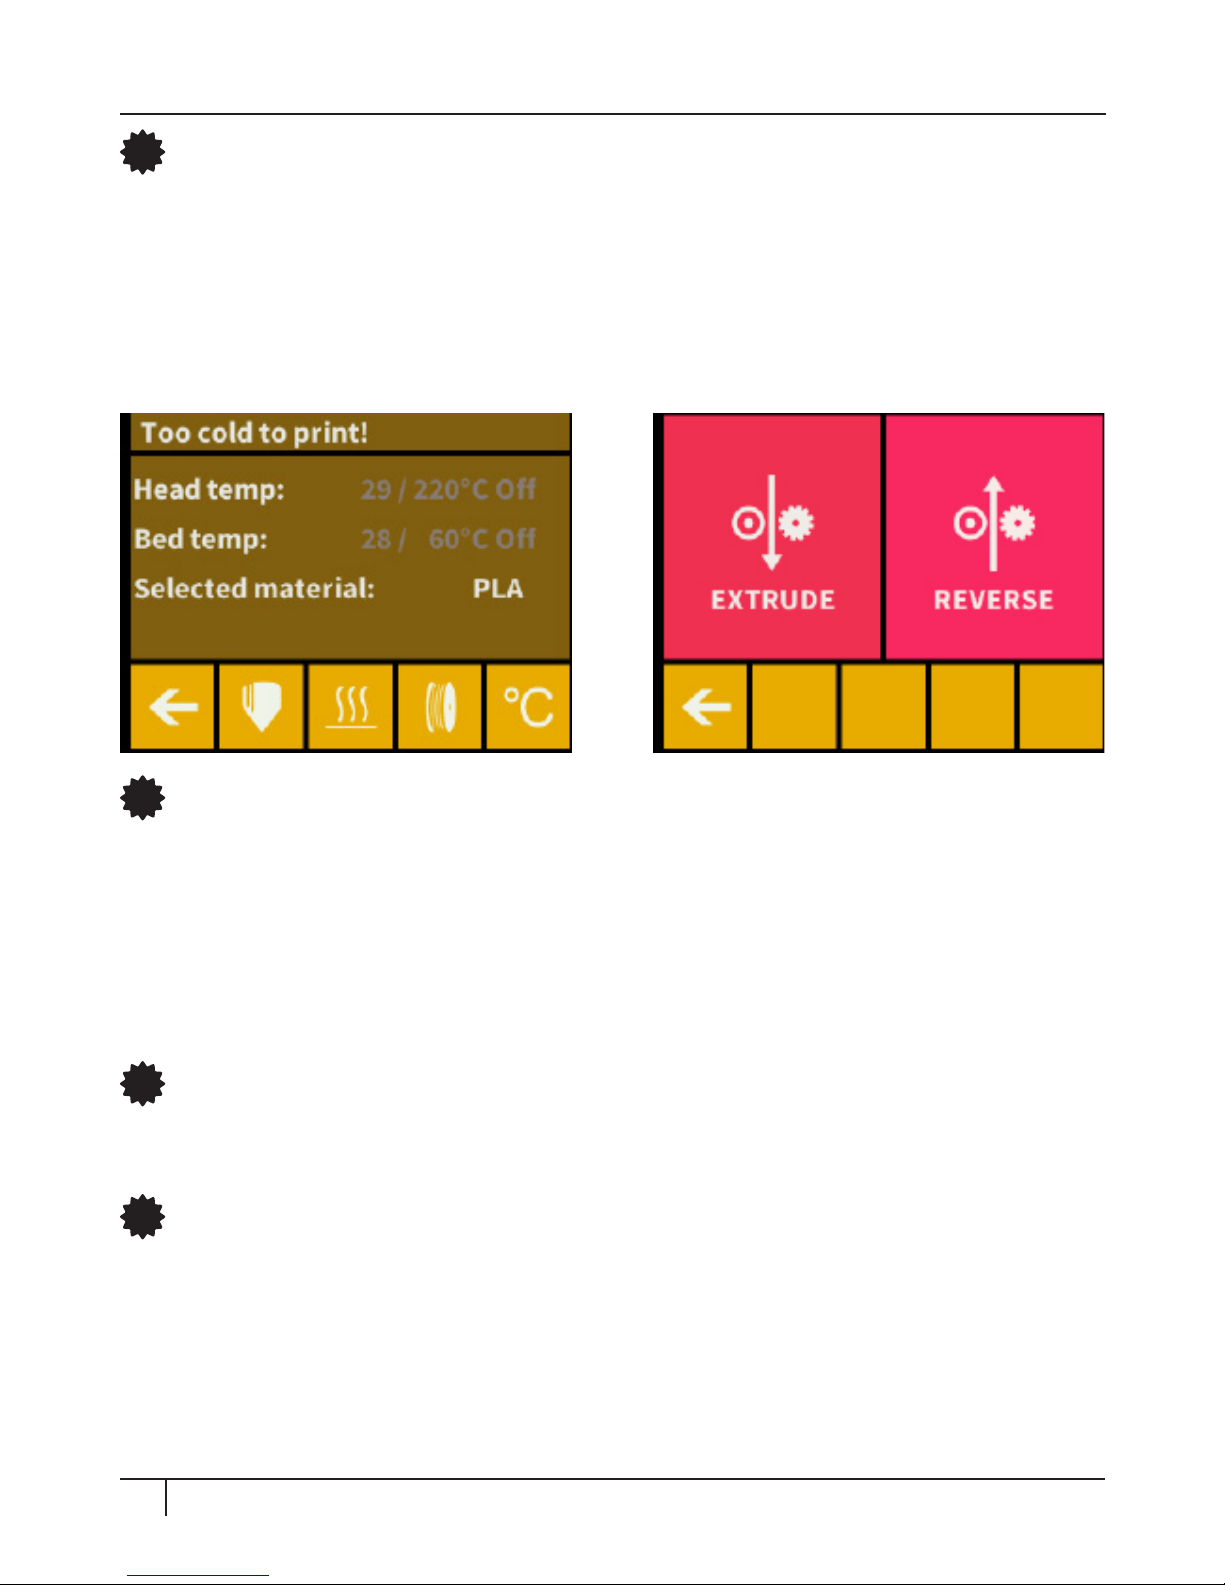
it will take a short while to heat up. Until then, the information at the top of the
screen will say “Too cold to print”
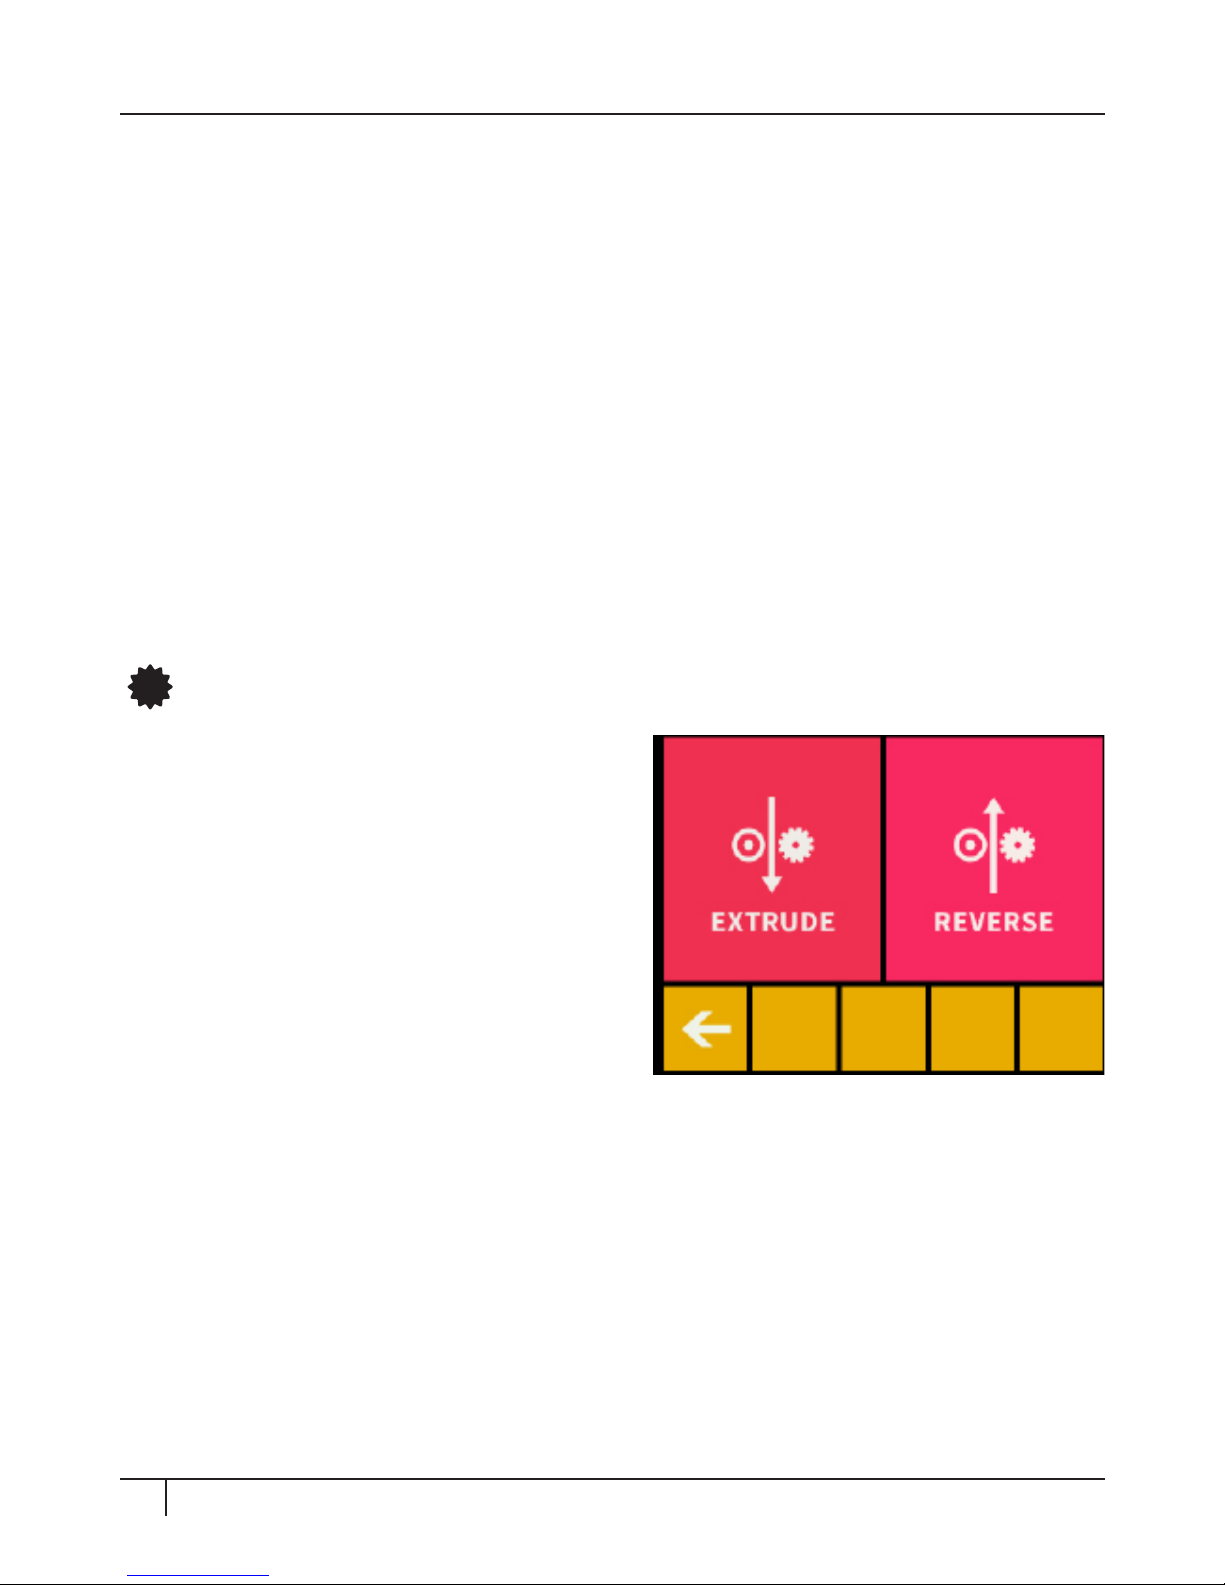
Touch the button that looks like an extruder
nozzle with a thin bit of filament dripping
from the bottom. You will be redirected
to another display. If the temperature is
not hot enough to extrude then you can
redirect to the heat menu by touching the
little thermometer icon at the bottom of
the screen, second from the le. To bypass
this push the forward button and you will
come to yet another display with two large
touch options, “Extrude” and “Reverse” with a visual depicting the drive gear on
the extruder itself. If you plan to extrude, which you should before starting every
print to make sure that the filament is not only in the extruder, but that it is also
working properly, choose the “extrude” option. To retract the filament using the
gear, select the “reverse” button. You can press the back button to return to a
previous menu.
2
Extruder menu
Page 26
26 The first steps
NAVIGATING THROUGH THE LCD MENU
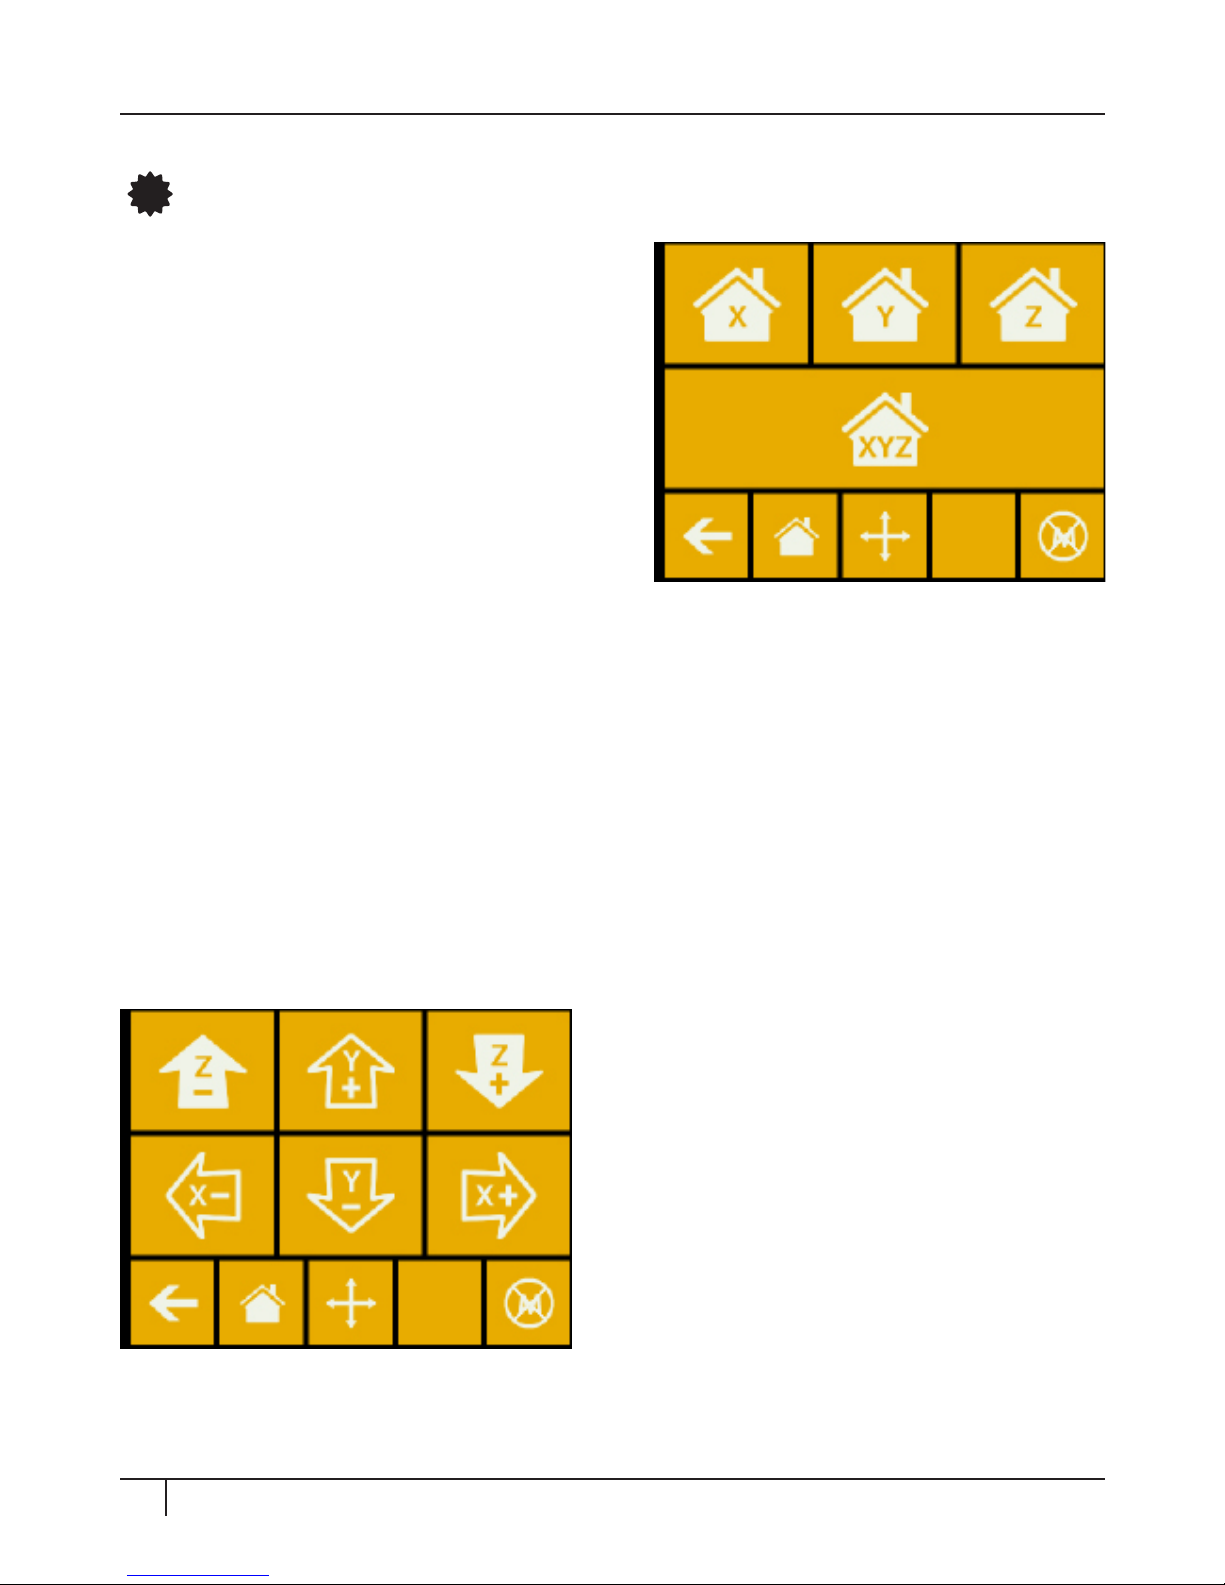
Click on the button in the main menu
display with the X, Y and Z meeting by
three lines in the center, and you will be
redirected to the Axis/Axis control menu.
The first “back” button will, of course, return
you to the main menu. Moving to the right,
the next button looks like a house, and is
the “home” icon. When clicking on the
“Axes” button in the main menu, you will
be automatically directed to this display.
From here you can reset the extruder and the bed, or heated build plate, to the
“home”, or “zero”, position. You can either set each axis one at a time (X, Y or Z), or
do all three of them at once by touching the appropriate button. If the individual
houses are white, then this means that the motors of each highlighted icon is
engaged. To disengage the motors click on the icon in the far right bottom corner
(M with an X through it), and you will see all of the houses turn black. The motors
have now been disengaged and you can freely move the extruder by hand if you
wish to do so. The directional button to the right of the “home” button can be
used to move along the X, Y or Z axis using the motors. Aer clicking on this button
you will be redirected to another display in which you will see six dierent arrow
buttons. Note that this option can only be used if all of the motors are already
activated and the houses are all white. If
the houses are black, then nothing will
happen. In this case, aer clicking on
the direction button, you will see all of
the arrows in the color grey. To activate
the motors, return to the “home” icon
and home in; the houses will now turn
white and you can go on to the direction
display and move the extruder and bed
as you see fit.
3
Axes menu
Page 27
27 The first steps
NAVIGATING THROUGH THE LCD MENU
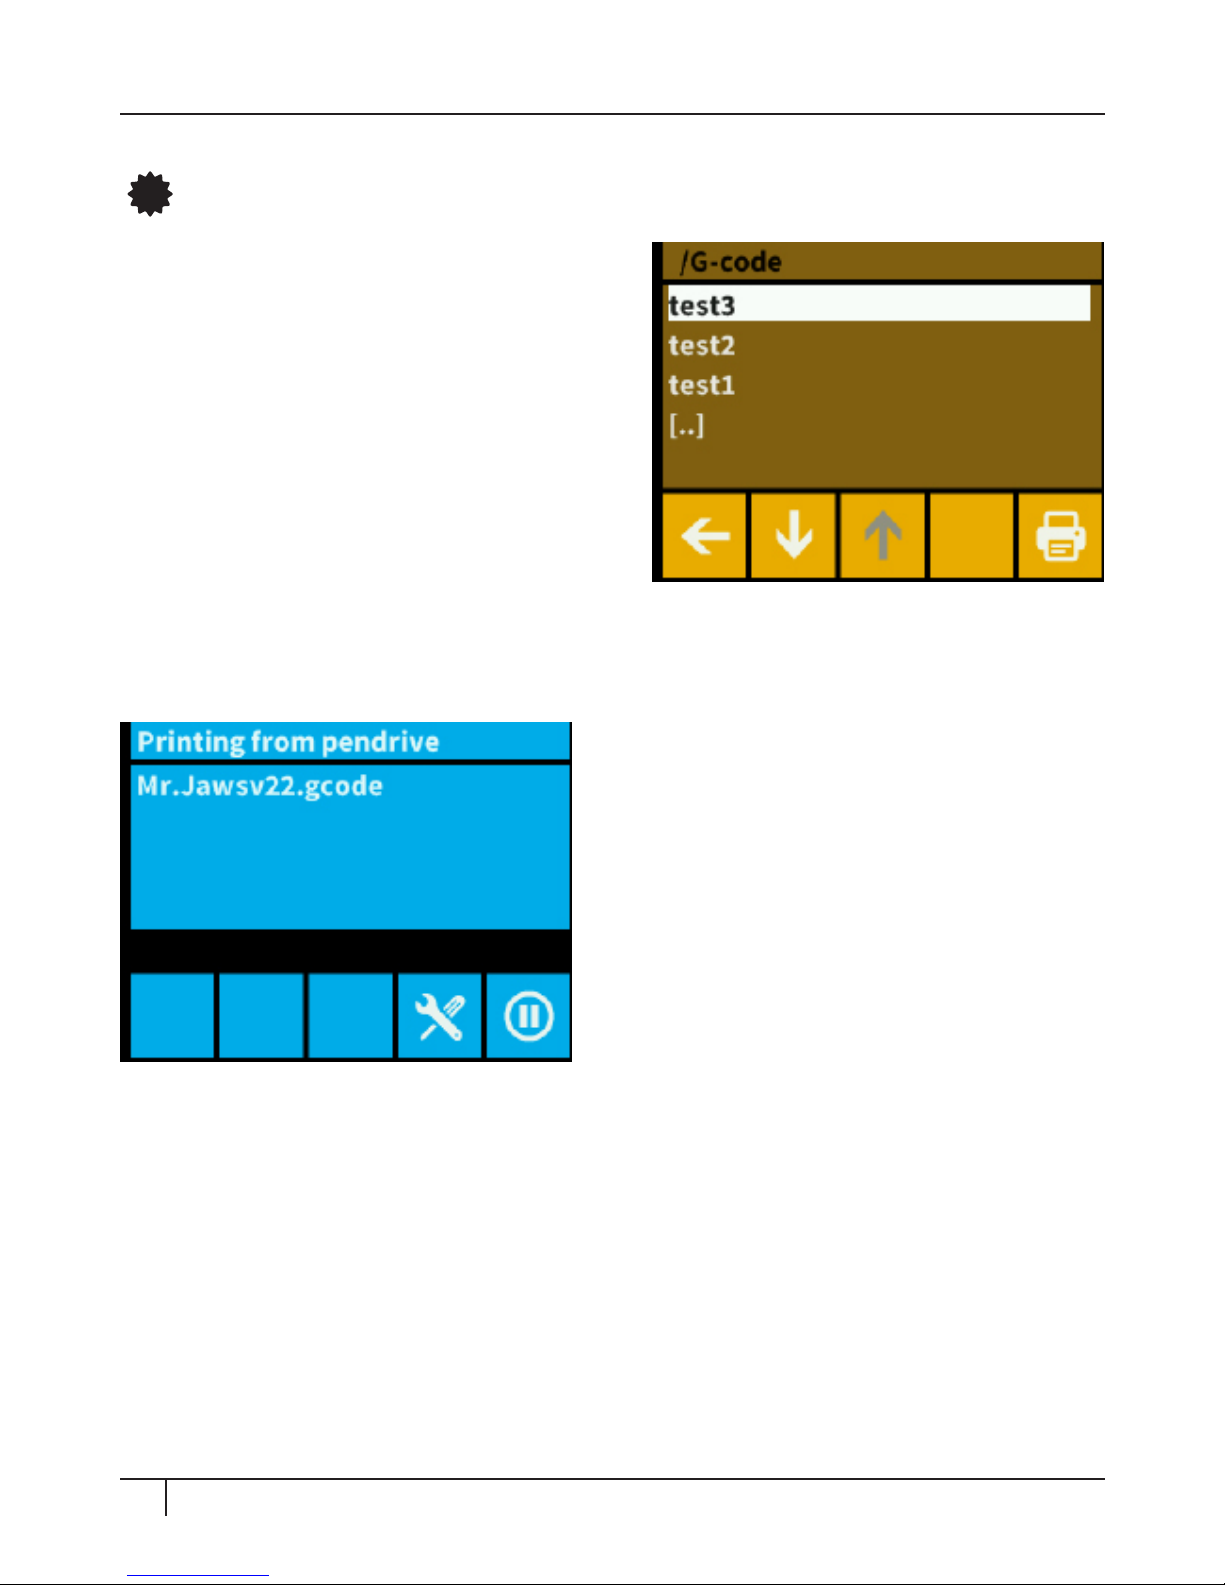
Touch the “USB Print” button with the
pendrive icon to precede to the next display.
At this point, if you have already inserted a
USB card into the top of the CraBot, you
will see a list of the contents. If the USB
pendrive is not inserted into the top of the
CraBot to begin with, the initial icon will
appear grey, and all further actions will be
disabled. In this case though, it is possible
to print using CraWare and a connection
to a host computer through the USB port located on the right hand side of your
CraBot. Use the up and down arrow buttons to scroll through the possible
prints. Once you find one that tickles your fancy, select it by touching the file.
It will be highlighted. At this point (aer
setting up everything that you would
like in the pre-printing process such as
temperature or setting the axes to the
home position), you can continue on to
the actual printing by pressing the “print”
button located in the lower right hand
corner. You will be directed to another
screen during printing in which you can
pause and alter the speed real-time.
4
USB PRINT menu
Page 28
28 The first steps
NAVIGATING THROUGH THE LCD MENU
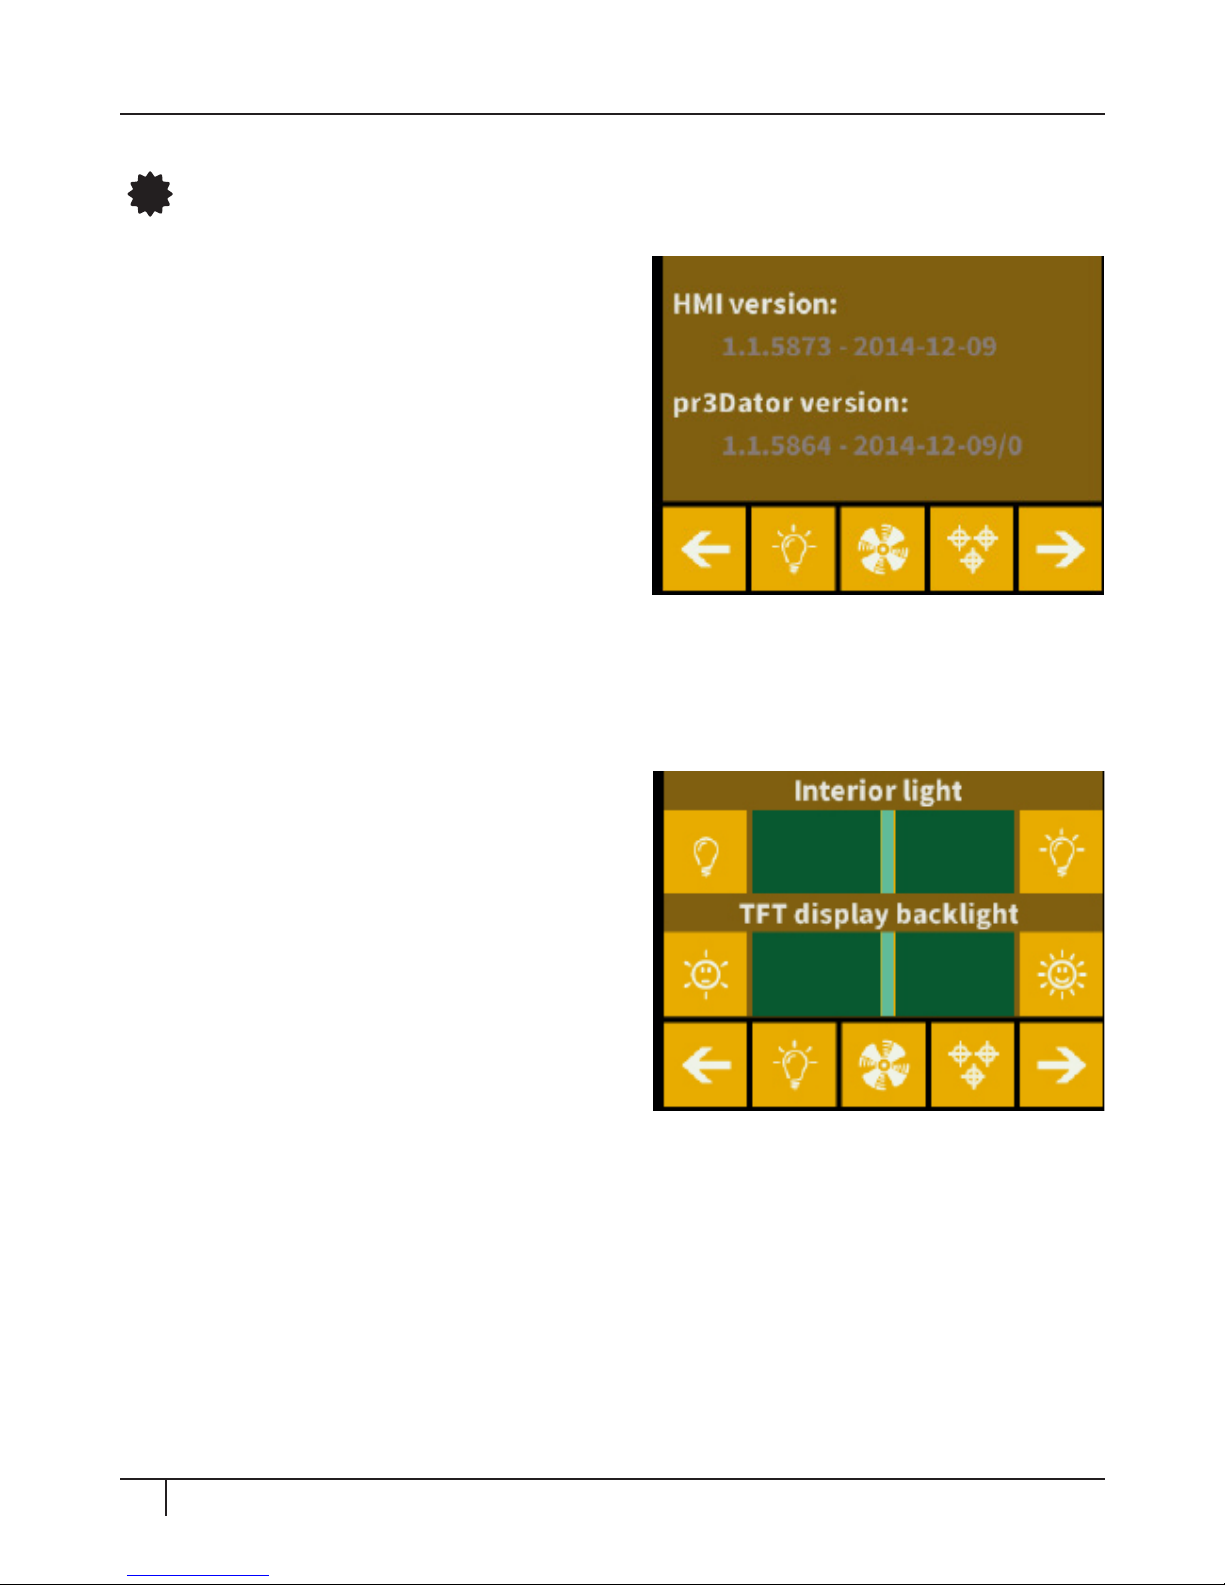
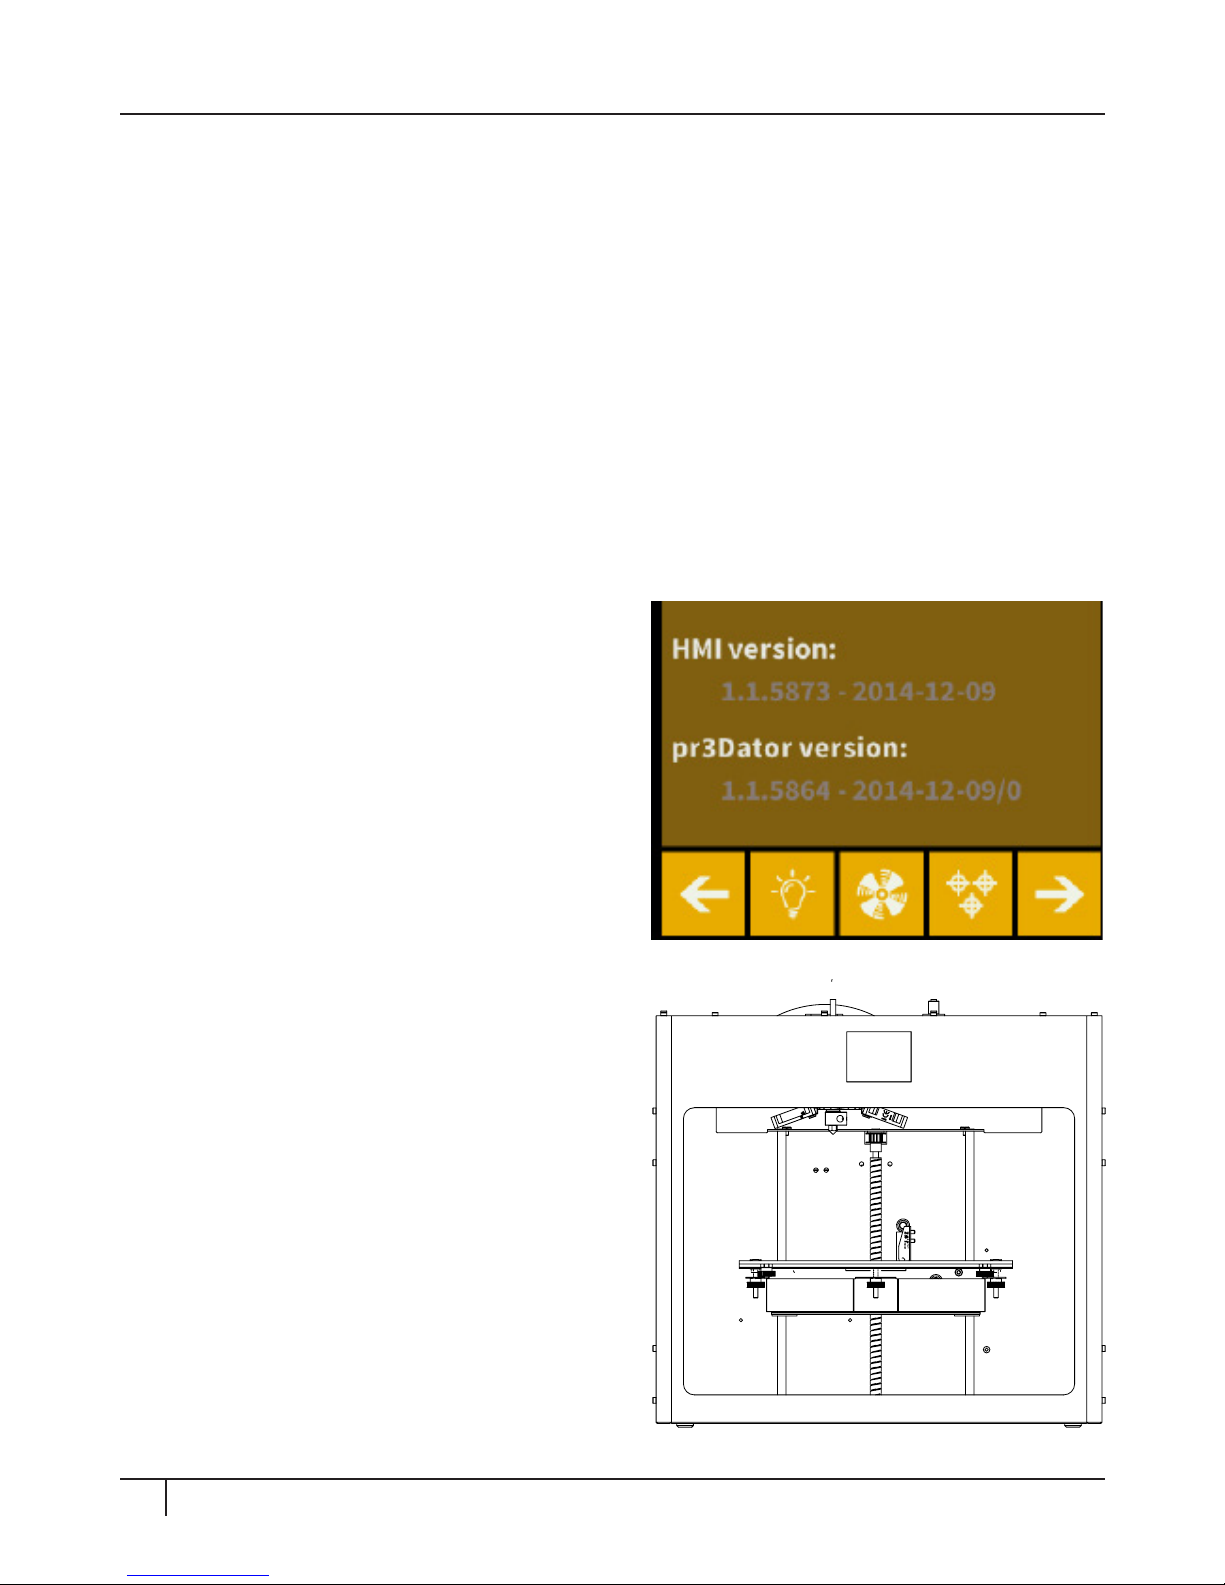
Find the icon with the gears, “Settings”,
found in the main menu and select it. Here
you will see the information containing the
current firmware version uploaded to the
CraBot (HMI version/pr3Dator version).
At the bottom of the screen you will find
a whole bunch of dierent options which
you can use to set up your CraBot in the
way that you see fit. You can find even
more options by using the forward button
located in the lower right hand corner. I’ll give you a run-down, item by item...
Lighting: By touching the light bulb button you will be see a variance pop up on
the screen: two dierent touchscreen sliders. Move the line from the le to the
right to vary the brightness of either the
interior LED lighting of the CraBot or the
LCD display backlighting.
Fan Control: Touch the button with the
fan. From here you will be able to activate
and deactivate the fans before or during
printing to match your preferences.
4
SETTINGS menu
Page 29
29 The first steps
NAVIGATING THROUGH THE LCD MENU
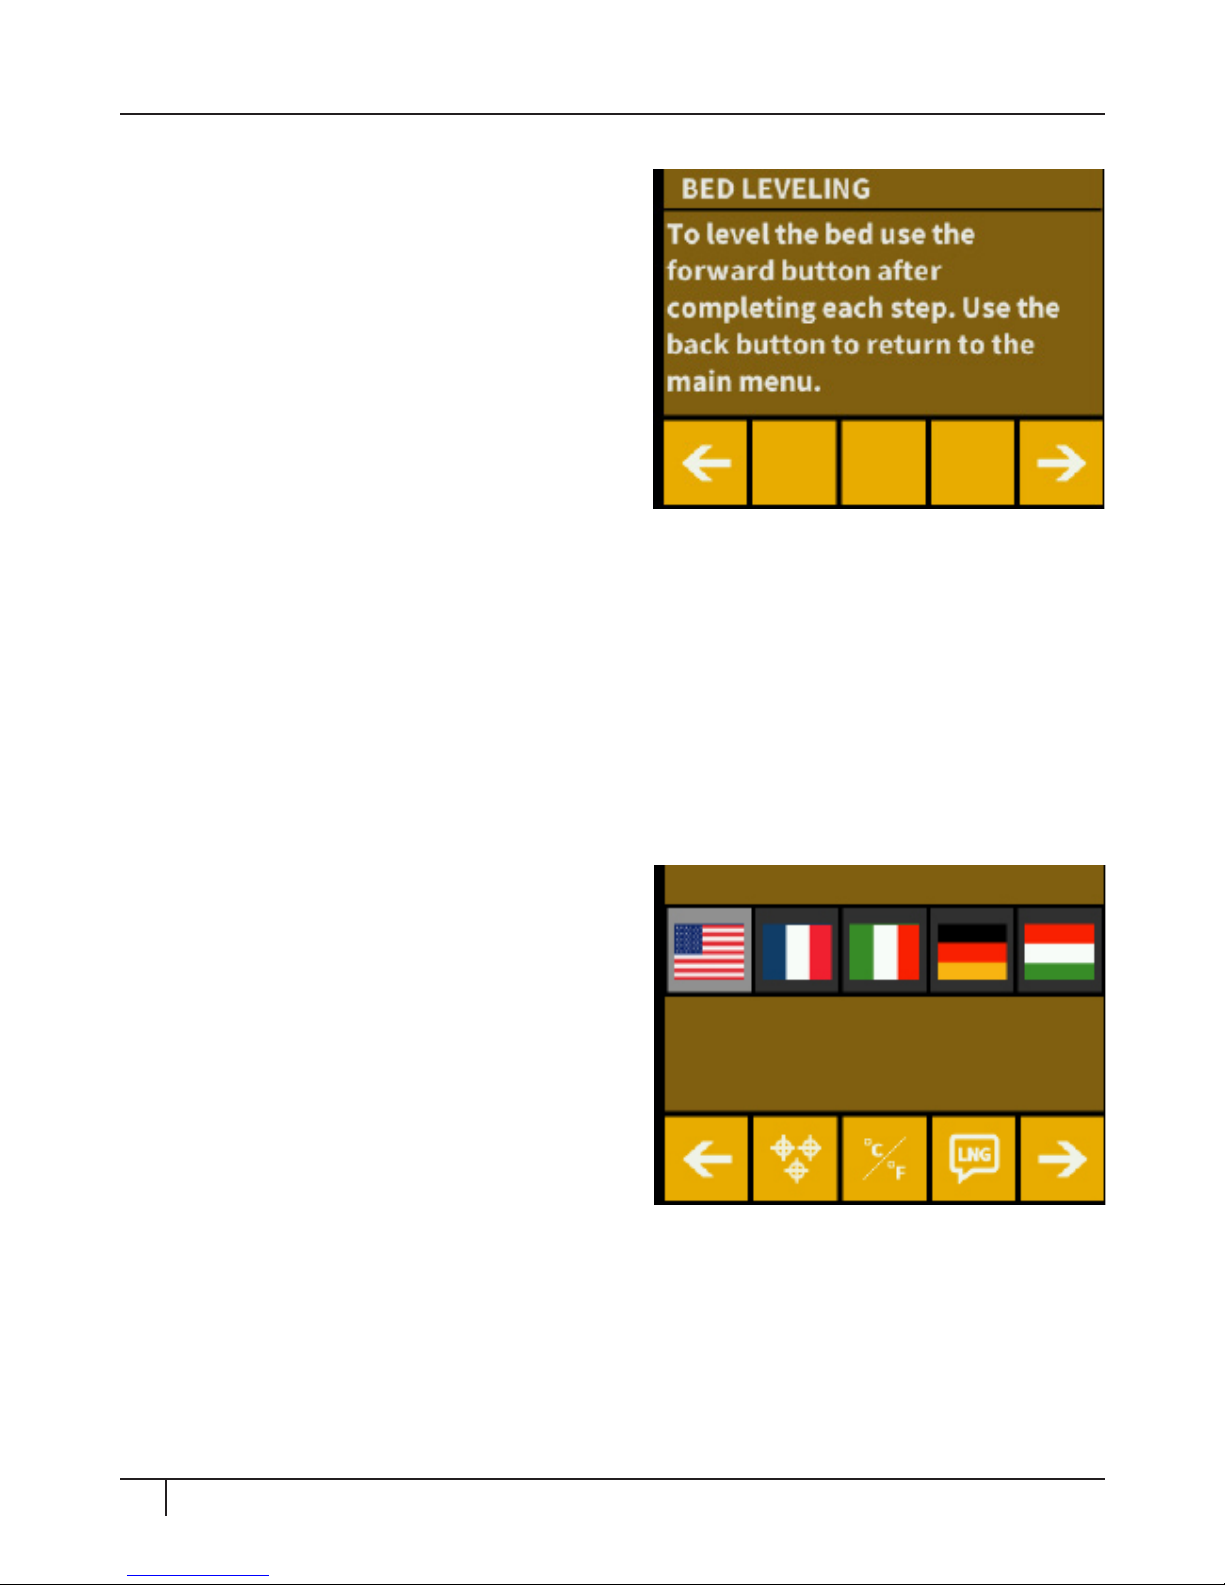
Bed Leveling: Find the button with the three
crossed circles (which represent the three
knobs and screws used to raise and lower
the heated build plate). Touch the button
and you will be directed to another display
in which you will be walked through the
process step-by-step. Aer completing the
steps, use the forward button to navigate
back to the CraBot settings. Use the back
button at any time to return all the way to
the main menu.
Scale of Temperature: Look for the button with the °C/°F symbol, and select it.
Every time that you touch the button, the scale will change from either Fahrenheit
to Celsius to Kelvin (yes, Kelvin too!). Once you have selected the scale that you
prefer, you can either go onto more settings options, or return to the main menu
by clicking through the back button a few times. Language Selection: Touch
the comic bubble with the “LNG” and you will see some flags pop up. Choose
the language which you would like to have the CraBot speak and then you can
either go onto adjusting dierent settings,
or you can use the back arrow a few times
to return to the main menu.
Sound settings: Touch the bell button to
mute or enable the sound. Once you have
adjusted the sound how you like, you
can either go onto more settings options,
or return to the main menu by clicking
through the back button a few times.
Page 30
30 The first steps
HOW TO LEVEL THE BED/HEATED BUILD PLATE
A level bed is essential for the optimal performance of the CraBot 3D printer. If
the extruder is too high o of the build plate then you will have a diicult time
getting the objects to stick. If the extruder nozzle is too low, then the nozzle and
plate can collide and either damage one another or the Kapton layer. This will
also cause the first layers of the print to be mashed into one another, thus creating
deformities and a poor foundation.
DO NOT REACH INTO THE CRAFTBOT IF THE EXTRUDER OR THE HEATED BED ARE
HOT. ALLOW AT LEAST FIVE MINUTES FOR THEM TO COOL AFTER USE. IF, IN THE
LEVELING PROCESS YOU ENCOUNTER A PROBLEM OR STRANGE NOISE, TURN
OFF THE CRAFTBOT BY THE SWITCH IN THE BACK AND UNPLUG IMMEDIATELY.
To level the bed first locate the “Settings”
button on the main menu of your CraBot’s
touchscreen display; it is the one with
the gears. Now touch it and you will be
redirected to a dierent display. You will
then select the button at the bottom of
the screen that is the second one from
the right. This icon has three crossed
circles which represent the three knobs
and screws used to adjust the height of
the heated build plate. Aer touching this, you will see a step-by-step process
that will take you through the bed leveling.
It is essential that you first turn all three
black knobs, located at the front center
and back le and right hand sides under
the heated build platform, all the way to
the right until the springs in between have
been compressed and the knobs begin to
feel tight. You will also need to locate your
.3mm spacer card that you received with
your CraBot (this is a normal business
card). Using this card in reference to the
nozzle and bed will give you an optimal inbetween space for printing.
Page 31

31 The first steps
HOW TO LEVEL THE BED/HEATED BUILD PLATE
By moving forward via the touchscreen, the extruder will first of all go to the
“home” or zero position as a reference. From here it will move directly above the
center knob and will ask you to “Adjust the front knob under the extruder until the
spacer card slides freely but with just a small amount of resistance between the
nozzle and the extruder”. To move the bed closer to the extruder, turn to the le
and decompress the spring. If the card does not slide through so easily, then it
is too tight and you will need to back it o a little by turning the knob back to the
right. Once you feel satisfied, precede to the next step by touching the forward
button. The extruder will then move directly above the rear right hand screw and
will ask you to do the same calibration with the spacer card. Then you will move
forward yet one more step, in turn sending the extruder to the rear le knob. You
will conduct the same measurement.
Once the three positions have been calibrated, then it will run through them
once more just to make sure. This is an important step because if there is any
discrepancy in the initial angle of the bed upon setup, due to the height dierence
of the knobs, the bed can be a little o and not yet accurately ready to print with.
So it is a smart decision to repeat the steps and make sure.
Once the bed leveling process has been completed you can use the forward arrow
button to move along to your next task, such as printing funky things.
Page 32
32 The first steps
LOADING THE FILAMENT
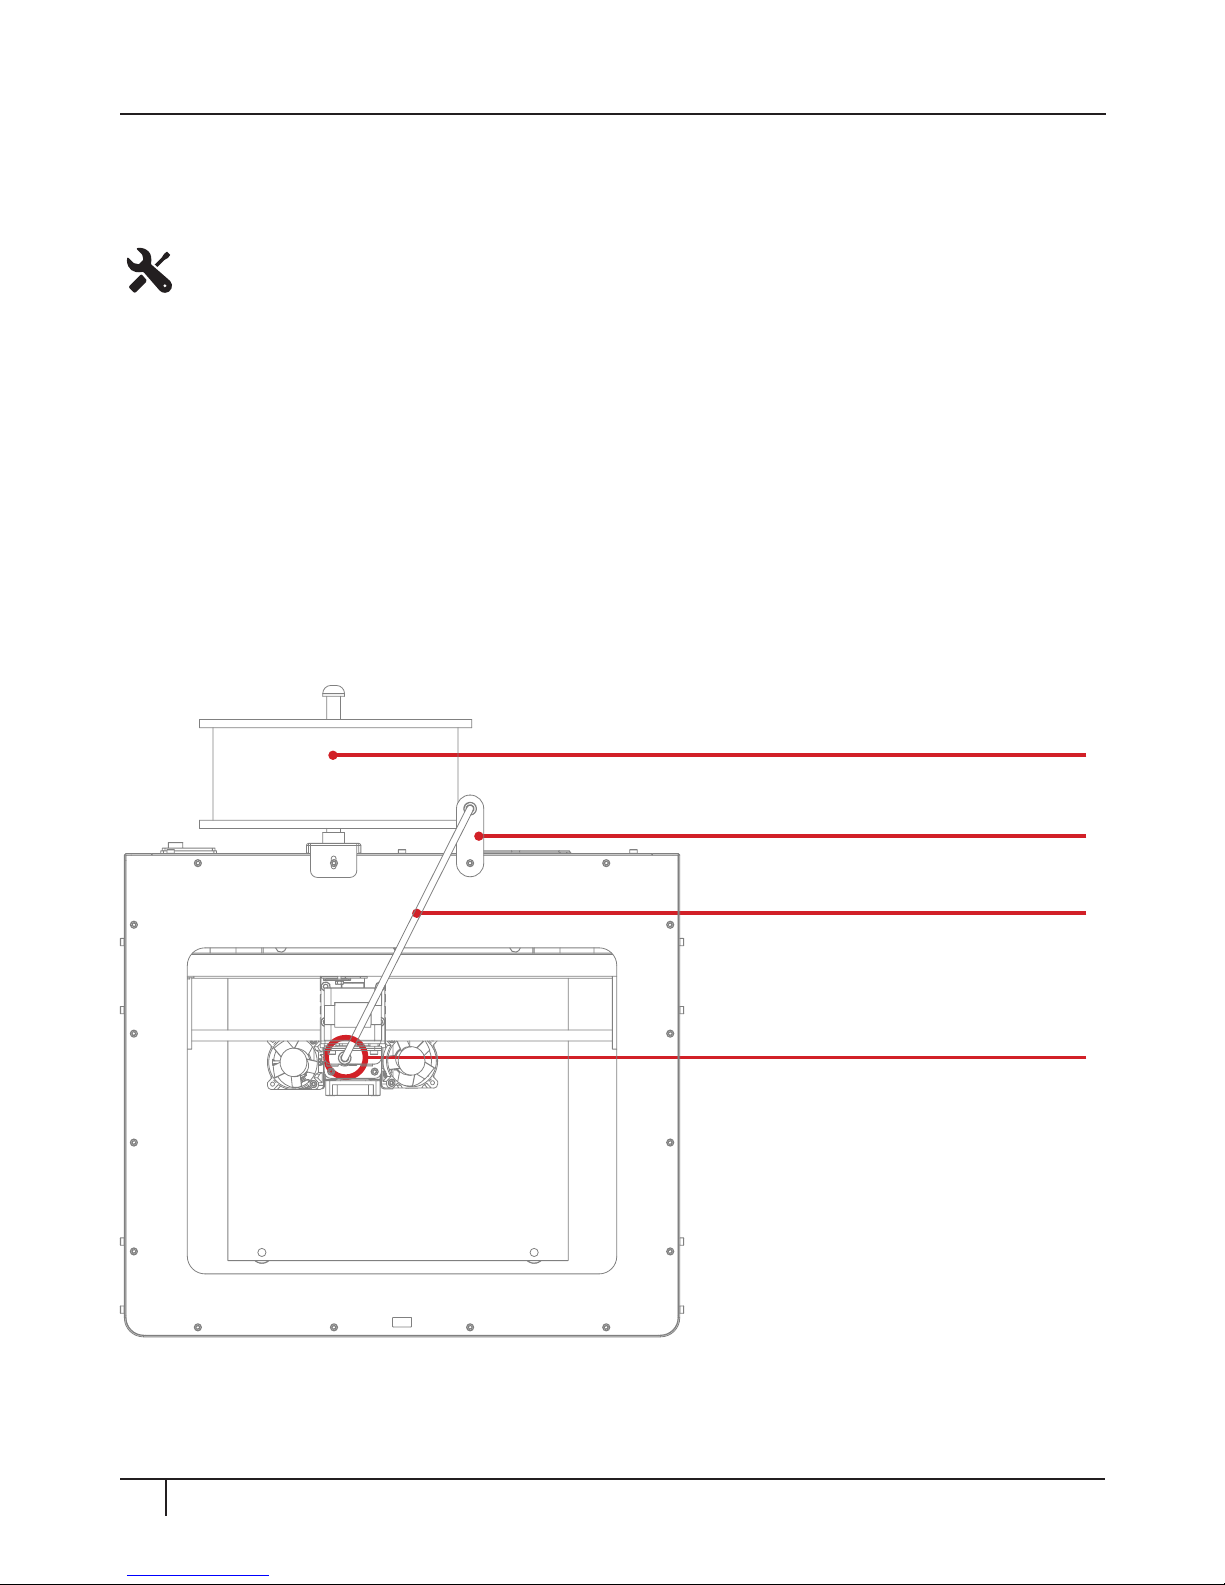
Loading the filament
• Remove the the filament guide tube from the insert hole in the top of the extruder.
• Insert the filament from the spool into the end of the filament guide tube where
it attaches to the filament guide tube holder.
• Push the filament all the way through the filament guide tube.
• Insert the end of the filament into the hole at the top of the extruder.
• Wait for the extruder to heat up the filament and extrude.
• Re-insert the filament guide tube back into the hole at the top of the extruder.
Please turn to the next page to view the process step-by-step.
Lets get the filament material loaded so that we can melt it down and create
your first print with CraBot!
Filament guide tube holder
Filament guide tube
Extruder
Filament spool
(Top view of CraBot)
Page 33
33 The first steps
LOADING THE FILAMENT (continued)
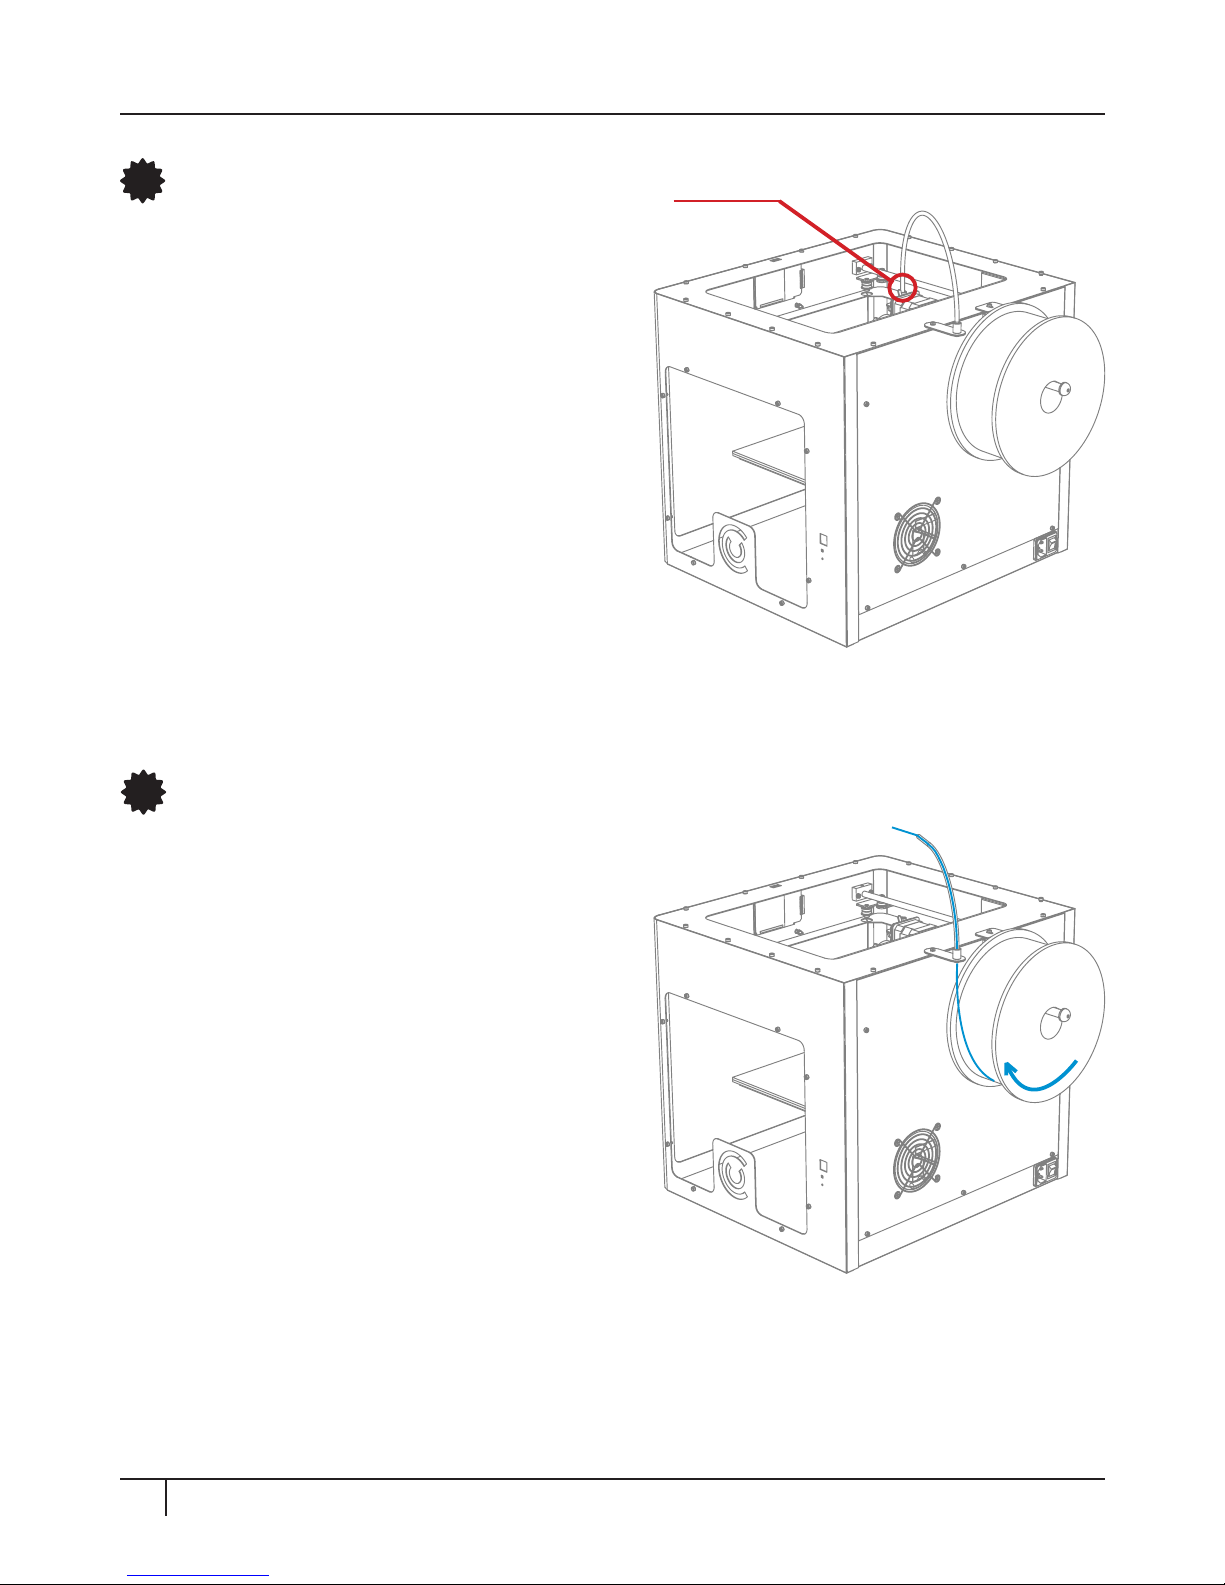
Detach the filament guide tube
Remove the the filament guide tube
from the insert hole in the top of the
extruder.
Feed the filament through the guide tube
Make sure that the filament spool feeds
toward the guide tube holder (from
the bottom up) so that the filament
keeps it’s course. This way you avoid
any unnecessary bending that would
occur if the filament was to be fed from
the top. Use a pair of scissors, make
sure that you cut a clean edge before
insering the filament into the guide
tube. Feed the Filament all the way
through the guide tube until it comes
out the other end.
NOTE: Make double-sure that you first cut a clean edge to the filament before pushing it through
the guide tube. This will avoid jams.
1
2
Pull here
Page 34
34 The first steps
LOADING THE FILAMENT (continued)
Begin heating the extruder
Aer you’ve finished feeding the filament all the way through the guide tube,
make sure that the extruder has time to heat up before loading the filament.
Heat up the extruder by selecting the thermostat or “extrude” option in the LCD
touchscreen menu.
WARNING: Never touch the extruder while it is heating — it heats up to 220° C.
Inserting the filament
Aer the extruder reaches the correct temperature, move the extruder switch to
the le into the “unlocked” position which will allow the filament to bypass the
gears. Insert the filament into the extruder hole as far as it will go. When you see
the filament begin to extrude, first return the extruder switch to the right side
into the “locked” position. At this point you can also use the “extrude” menu in
the touchscreen to push for filament out of the nozzle.
3
Re-insert the filament guide tube back into the hole at the top of the extruder.
Re-inserting the filament guide tube
5
Remove the excess extruded filament
Wait a few minutes for the excess extruded filament to cool down and then
remove it by hand (best with gloves) from the nozzle. Make extra sure not to
touch the nozzle, it will burn you. If you leave excess test-extruded filament on
the nozzle, it may redirect the later extruded filament, causing it to not stick to
the build plate, which could possibly ruin your print.
6
4
Page 35

35 The first steps
LOADING THE FILAMENT (continued)
Changing or removing the current filament already fed into your CraBot’s
extruder
If you intend to change the color or filament type first of all take warning
that forcefully pulling it from a cold extruder could potentially damage vital
components. To remove the filament correctly, the extruder must be heated.
Once the filament has cooled it will leave a thicker section of previously melted
material in the extruder itself, creating a certain “knot” that acts as an anchor
when trying to retrieve it cold. It simply won’t fit back out of the passage way. To
remove correctly, revert back to your LCD menu options and find the “extrude”
icon and touch it. You must heat the extruder in the same fashion as you did in
loading it. Once the extruder reaches the target temperature of your filament
(keeping in mind that direent materials such PLA, ABS, and PET have dierent
temperature characteristics), you can now press the “extrude” button, but only
briefly, and then touch the “reverse” button and hold a short while. Once the
gears have begun to retract the filament you will be free to pull it out from the
printer and then load a new filament.
7
Page 36

Chapter 4
Crafting an object with CraftWare
Page 37
37 Craing an object with CraWare
CRAFTWARE AND 3D MODELING
Downloading CraWare
1
1) Open a new browser session on the computer where you’d like to install
CraWare.
2) Enter the URL http://www.craunique.com/craware and download the
installer.
3) Open the installer and follow the directions to install the soware.
Download a 3D model from yeggi.com
2
Yeggi is a website in which the 3D printing community shares printable 3D objects.
You can also share your own 3D designs.
1) Open a browser session and go to www.yeggi.com. You can either browse for
3D objects that may tickle your fancy, or you can always use the “search” for
something more specific.
2) We like our CraBot robot model. You can find it by typing in “CraBot.stl”. If
you’d like to use this model as a test, then save it to your computer.
CraWare is a free soware. It is our own slicer soware that generates the
required toolpath information for your CraBot.
Open CraWare
Once CraWare has been opened up, you will see a virtual build platform which
represents your CraBot’s real build plate. You can add .stl files onto this virtual
build plate and print them.
3
Page 38
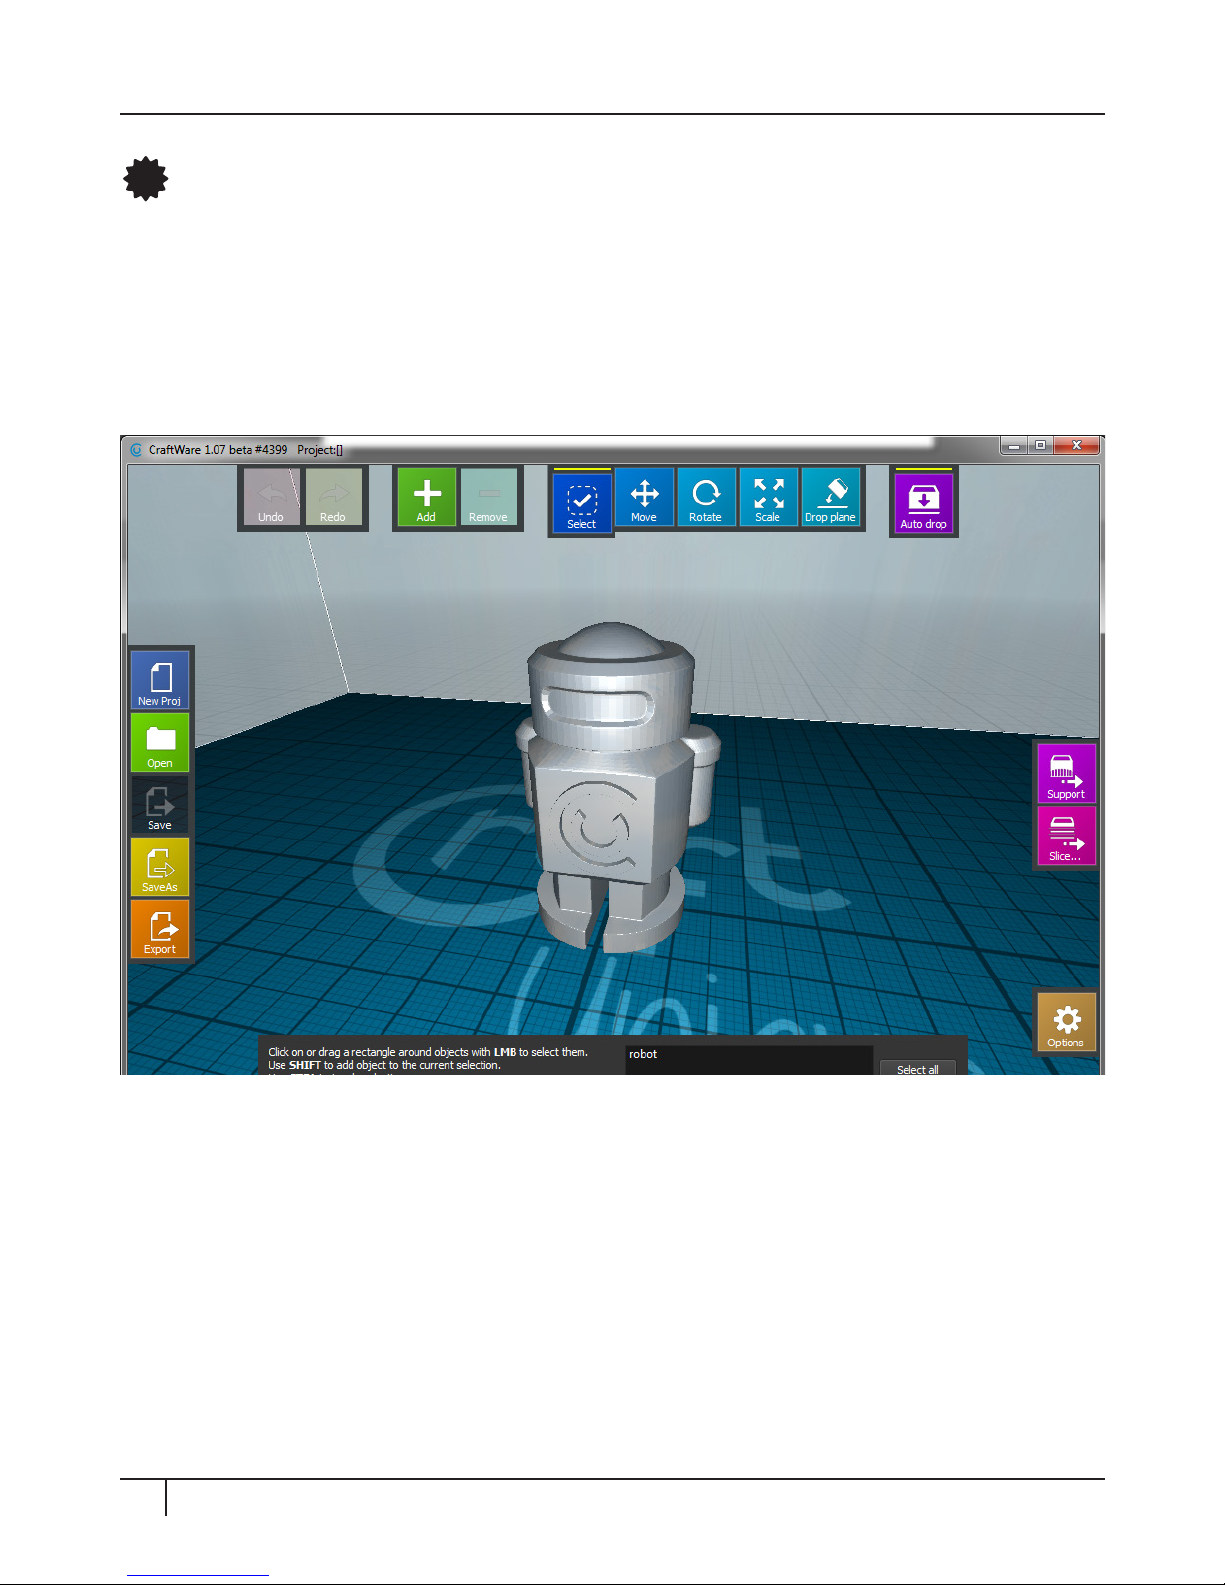
Bring an .stl file onto the scene
4
Find and then click on the “Add” button. Navigate to the location of the suggested
CraBot robot file “CraBot.stl” and select it. Once selected you will see this file
open up at the center of the virtual build plate.
CRAFTWARE AND 3D MODELING
38 Craing an object with CraWare
Page 39
Generate the necessary toolpath information needed to print
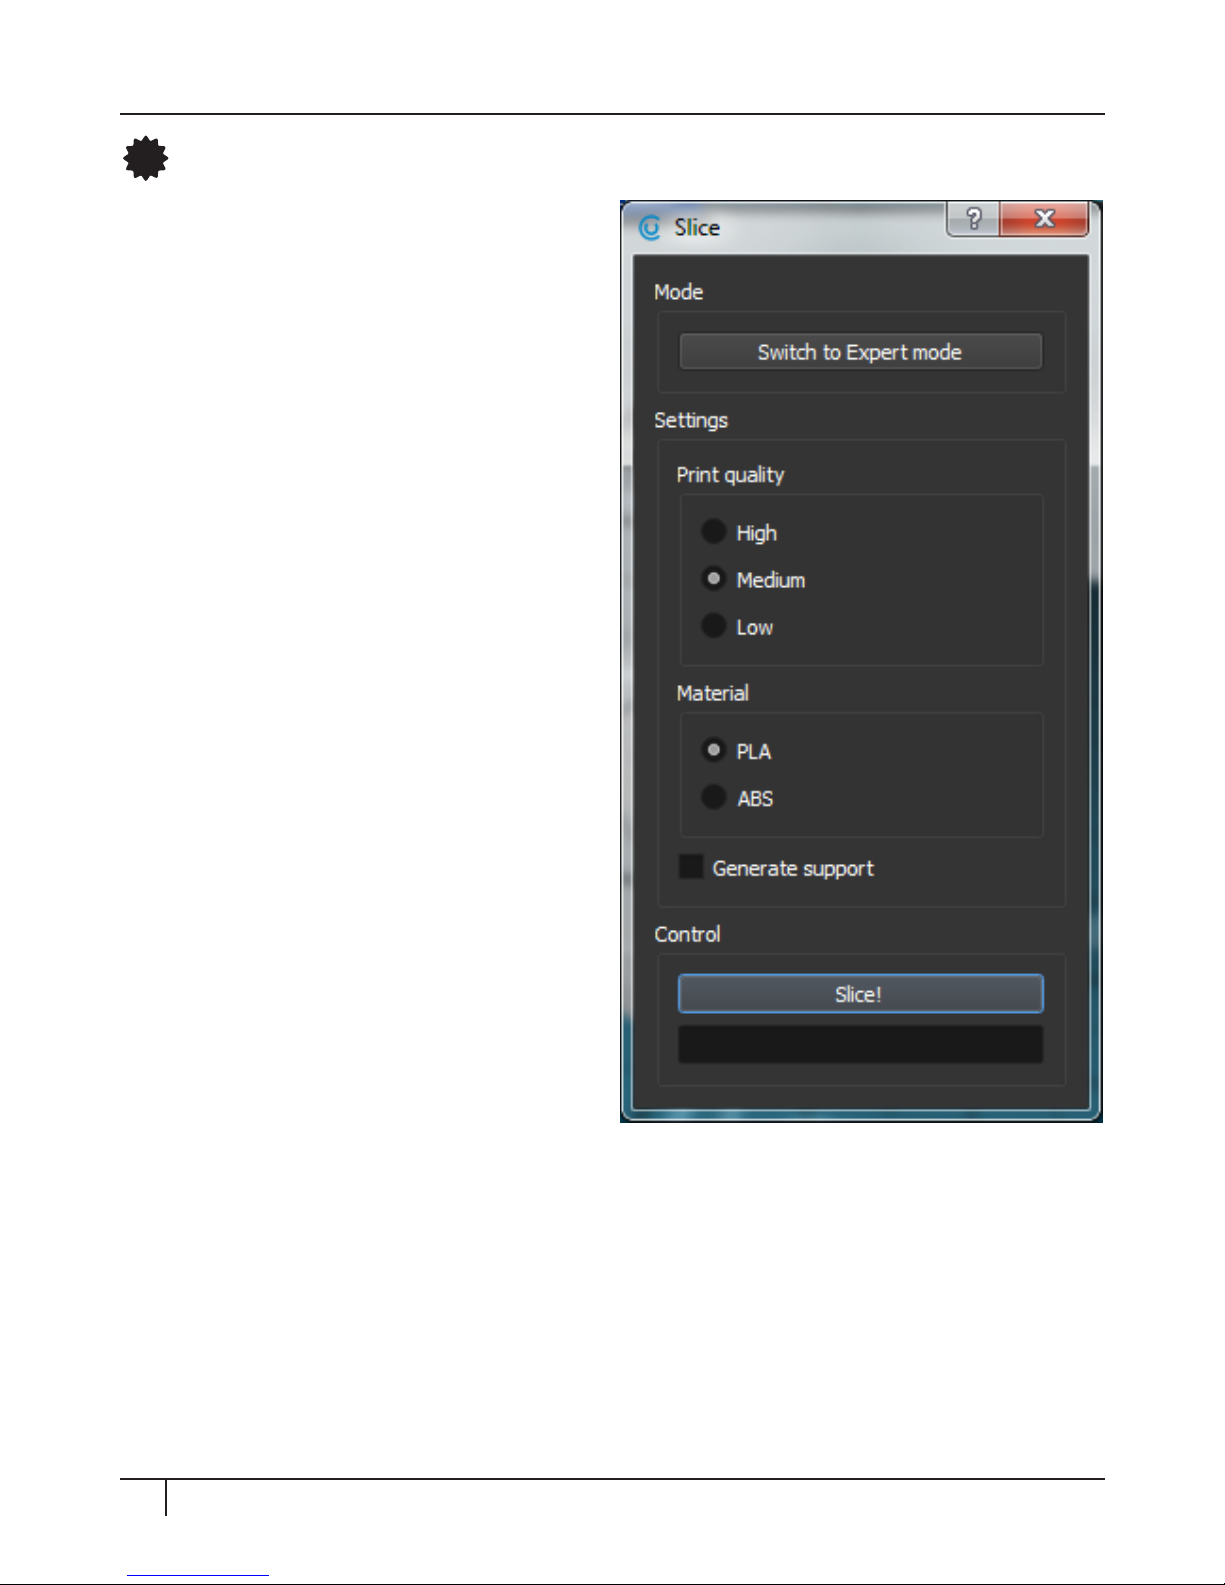
5
To print a 3D object CraBot needs
toolpath information generated from
3D object files like .obj or .stl. Toolpath
information is simply called gcode.
Before generate gcode, select the print
quality and the material you are using.
CRAFTWARE AND 3D MODELING
39 Craing an object with CraWare
Page 40
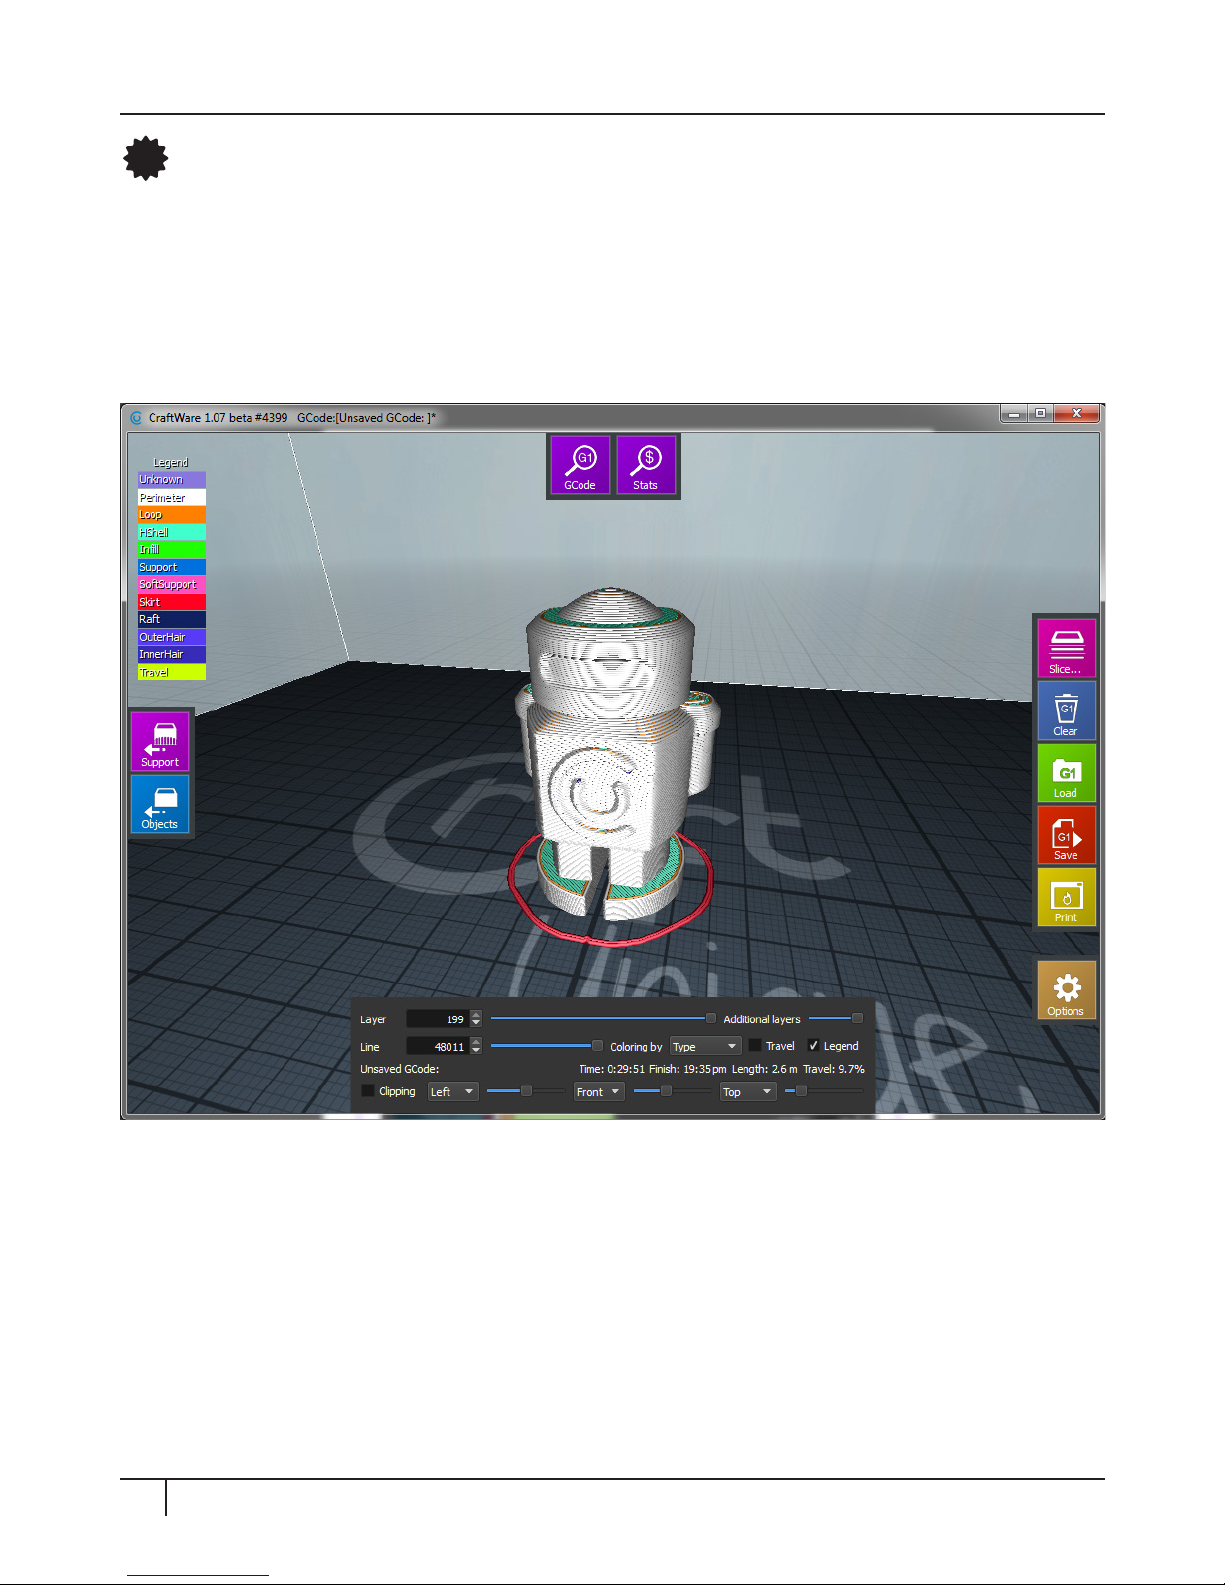
The GCODE visualizer
6
CRAFTWARE AND 3D MODELING
When the gcode is ready, you can overlook it in the 3D gcode viewer. With
the sliders you can go layer by layer and gcode by gcode and see how CraBot
will print your object in real life.
When you are satisfied and ready, press the “Print“ button.
40 Craing an object with CraWare
Page 41

Chapter 5
Maintenance
Page 42

42 Maintenance
LUBRICATING THE CRAFTBOT 3D PRINTER
Here are the correct and complete step-by-step lubrication instructions on how to
properly service your CraBot 3D printer. Follow the steps accordingly and don’t
cut any corners. The CraBot should be lubricated at least once aer every 50
hours of use. If you encounter any problems that exist outside of a maintenance
issue, do not attempt to operate your printer. If something sounds or appears to
be wrong then turn o your CraBot and unplug it from the power source and get
ahold of the professionals (us). We will gladly help you out.
info@craunique.com
So, lets get this thing oiled up and working like it should!
Some things that you will need before lubricating your CraBot 3D printer: A
PTFE based spray lubricant or grease, 2 separate lint-free rags or thicker stronger
paper towels, personal protection such as gloves and safety glasses/goggles, the
necessary lighting to see the interior of the CraBot correctly (lamp).
*Never, ever reach into your CraBot printer while it is turned on or plugged in,
if you do so you will run the risk of serious crushing and pinching injuries, and
also severe burns. Always turn o your printer and unplug it “just to be sure”.
Make sure that you are servicing a “cold” unit. That extruder and heated build
plate get very, very hot. Please allow the CraBot 3D printer at least 5 minutes to
cool down aer it has been turned o and disconnected before reaching into the
cavity to service.
Page 43
43 Maintenance
LUBRICATING THE CRAFTBOT 3D PRINTER
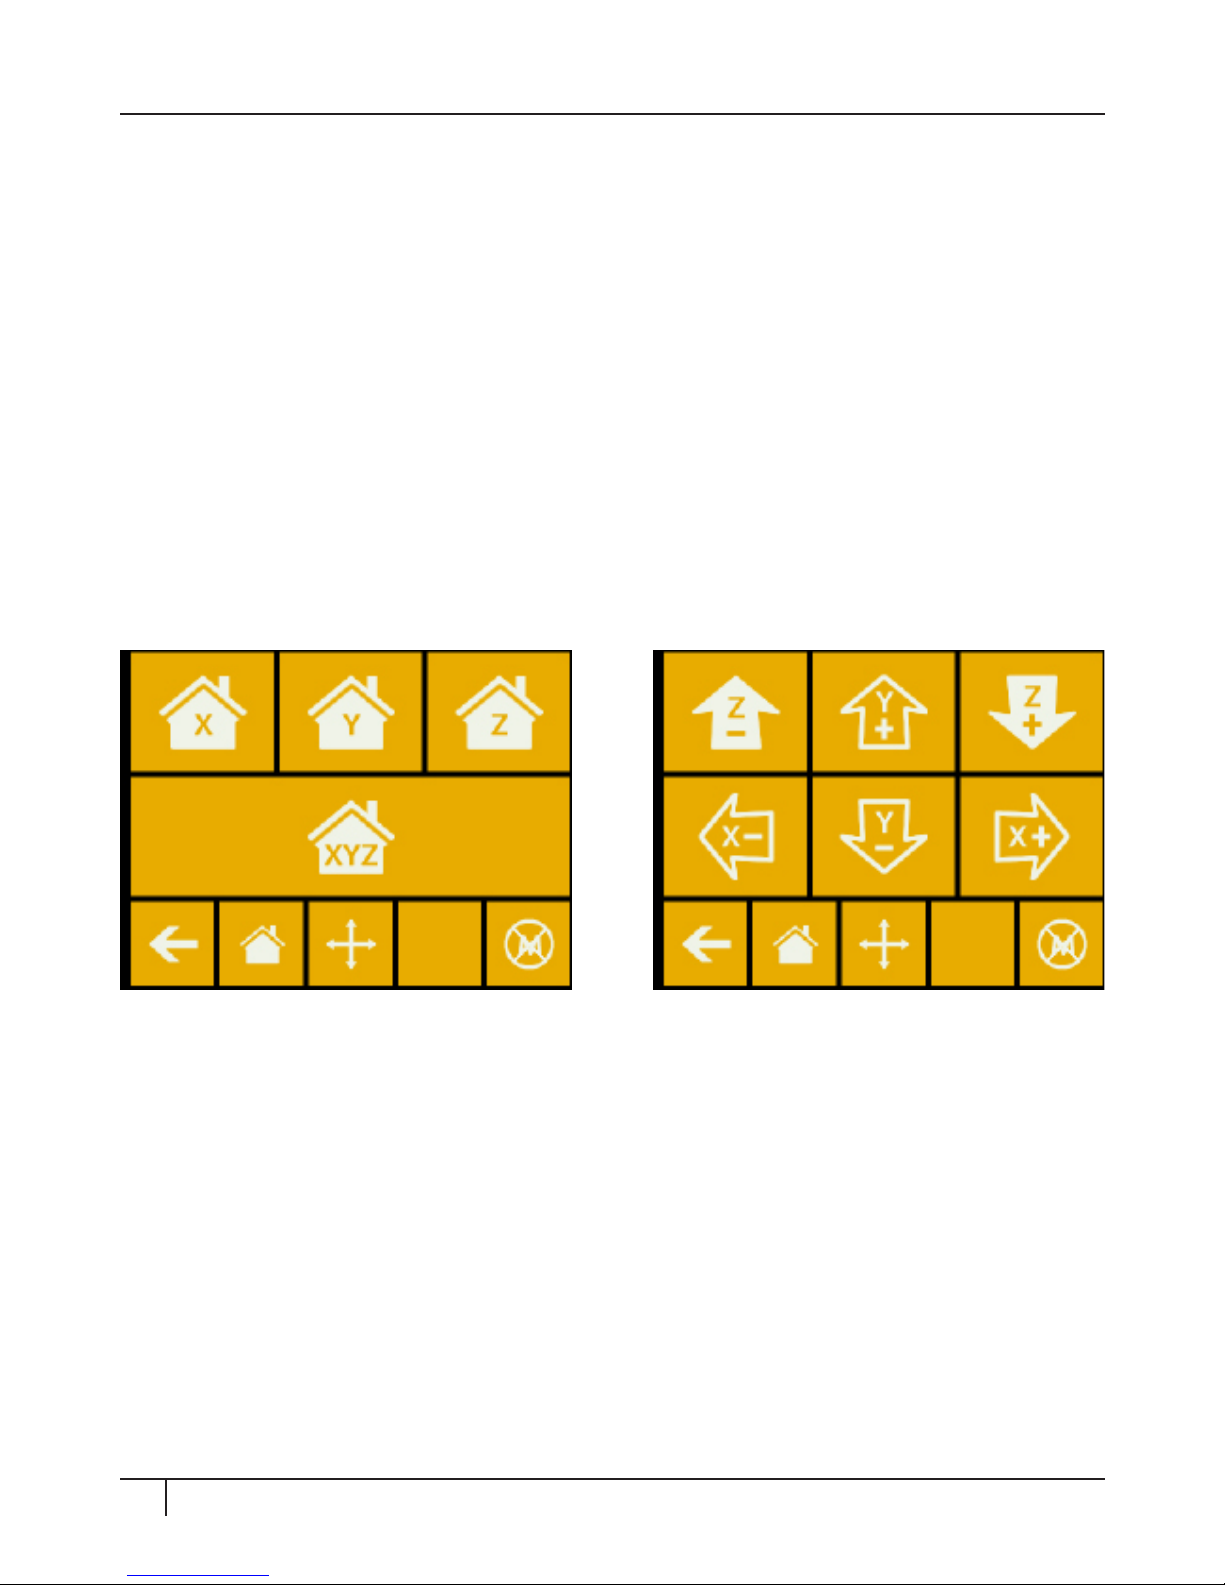
While the CraBot 3D printer is still on, set your build plate to the Ø, “Home”, or
reference position, by moving it up to the highest possible point. You can find all
your extruder and bed navigation commands in the “Axes” section of the CraBot
touchscreen’s main menu. Once you have selected the icon that looks like an X, Y
and Z with a line connecting all three in the center, you will be taken to a dierent
display. The first thing that you will need to do is to set the extruder to “home”
position. To do this, touch the “XYZ” house icon. If it is not white already, then
it soon will be. In the next steps you will need to touch the directional arrow
icon aer setting the bed and extruder to the home position. From here you can
precede to moving the bed manually. If the extruder is not in the home position
and the motors are not all engaged then the arrow buttons used to move the
extruder and bed will be grey, meaning that they are disabled.
Once the extruder and bed are in the home position, turn the CraBot printer o
and unplug it from the electrical outlet.
Page 44
44 Maintenance
LUBRICATING THE CRAFTBOT 3D PRINTER
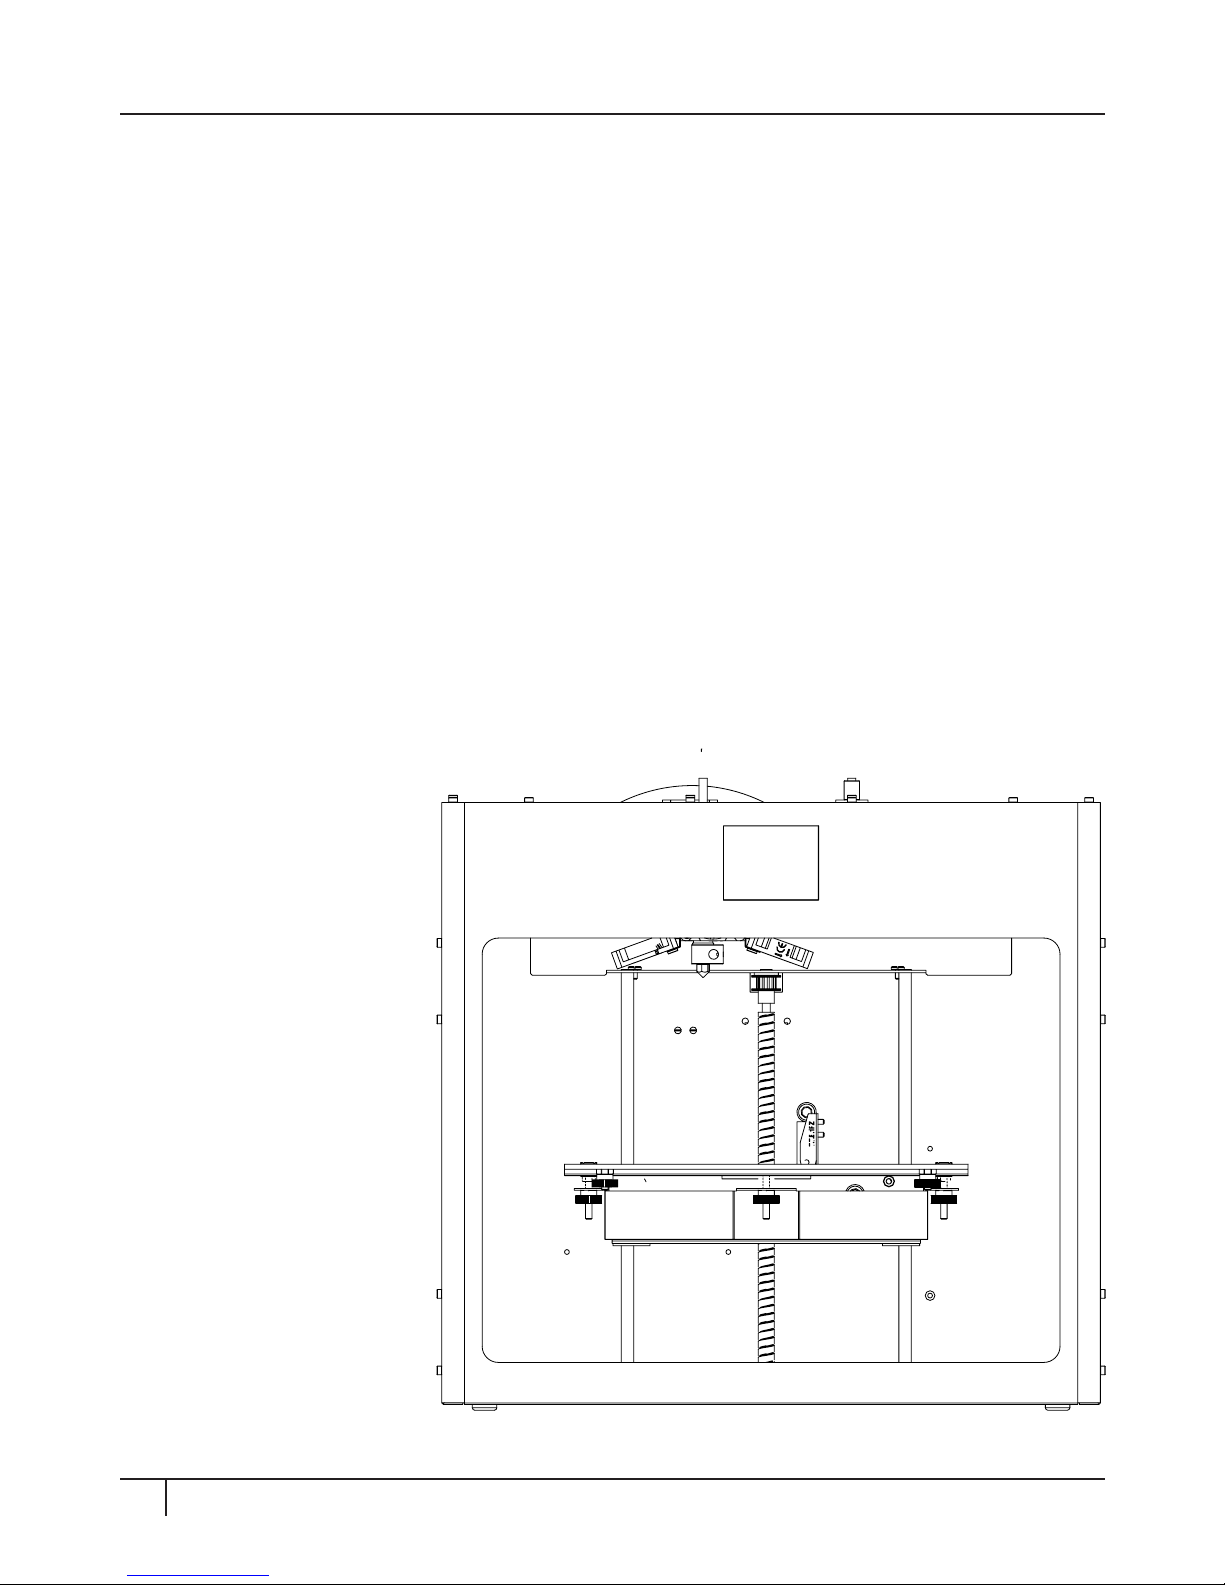
If you look beneath the build plate you will see three rods that run vertically
in which the build platform moves up and down on. The two outside rods are
smooth and the center rod is threaded. These three rods are known as the
“Z-axis rods”. Place a folded paper towel, or a lint-free rag, behind the center
threaded Z-axis rod. This rag is used to protect other areas of the printer from any
overspray that may occur. AREAS OR PARTS OF THE CRAFTBOT THAT ARE NOT
INTENDED TO BE LUBRICATED, OR ARE NOT RECOMMENDED SPECIFICALLY BY US
TO BE LUBRICATED SHOULD NEVER BE LUBRICATED. Once the protective rag
has been correctly inserted, begin spraying the threaded Z-axis rod at a relatively
close distance to reduce overspray. Make sure the lubricant reaches the inside
of every thread (especially if you decide to use a grease that you spread with
your hand). Spray and adequate amount, but do not “drench” it in lubricant as
this could make a real mess! Do not spray the other two smooth outside rods
directly, rather use the over spray on the rag and wipe it onto the rods aer you’ve
sprayed the threaded rod. Remove the rag from the CraBot interior.
Page 45

45 Maintenance
LUBRICATING THE CRAFTBOT 3D PRINTER
Power up your CraBot once again and move the build plate to the lowest point
(“Axes” menu, home position and then go to the directional menu and press the
Z down arrow until the bed reaches the lowest point).
Turn the CraBot printer o and unplug it from the electrical outlet.
Place a second clean rag on top of the heated build plate to protect the
components and Kapton from any overspray. Repeat the process for the top
side of the Z-axis rods the same as you performed on the bottom side: protective
rag behind threaded rod, spray, wipe excess lubricant on other two outside rods.
Power up the CraBot once again and raise the build plate back up to the highest
position (set the X, Y and Z to home position).
Turn the CraBot printer o and unplug it from the electrical outlet.
Wipe any excess lubricant o from the bottom side of the Z-axis rods.
Power up your CraBot once again and move the build plate back to the lowest
point.
Turn the CraBot printer o and unplug it from the electrical outlet.
Wipe any excess lubricant o from the top side of the Z-axis rods.
Power up the CraBot once again and raise the build plate back up to the highest
position.
Turn the CraBot printer o and unplug it from the electrical outlet. The motors
will now disengage so that you can move the extruder freely by hand.
Use an oiled rag to lubricate the X and Y axis rods. Do not spray from above, it
is very easy to mis-spray and make a real mess! Move the extruder back and
forth by hand to both extremes of the axes. When the extruder moves absolutely
smoothly you are finished.
Page 46

Chapter 6
Guarantee and Warranty
Page 47

We guarantee that you will receive our product tested, working, fully assembled
and ready to use. Every printer is covered under the Conditions of Carriage by FedEx, and can be read using this link...
http://www.fedex.com/hu_english/services/terms/
We will also personally insure every printer sent under a Declared Value Insurance,
also optioned by FedEx.
If, in the case there is a problem with the CraBot outside of the FedEx terms, it is
not the result of neglect of the purchaser and the incident occurs and is reported
within 3 months (90 days) of the purchase date, conforms to all the rules of the warranty hereby included and the customer provides the original proof of purchase/
serial number, then we will work out the problem on an individual basis as every
problem must be addressed this way. In the rare case of a specifically diagnosed
and proven DOA (dead on arrival) part (we want to see some video/photos and
want a detailed description of what is wrong), we will most likely send a replacement part to you. In the case that a customer has already been through all these
previous options stated and is still not satisfied with the results, they must then pay
themselves to have the printer sent back. Once a return is received (for example a
returned printer), CraUnique will then send back a new unit. CraUnique will pay
to send out the printer and parts to correct a problem, but will not be responsible
for return costs. Proper packaging is required in the rare case of a returned product or part, and the product itself must arrive back in the condition in which it was
originally received.
We are not in any way responsible for any consequential losses or downtime whatso-ever caused by a problem in the performance of our products. We are not responsible for additional customs fees and taris. We are not responsible for delivery delays or the inability to deliver from the carrier. We are not responsible
for damages resulting from improper handling during delivery. The warranty also
does not cover any damages brought about because of an accident. And all of
our products are not covered by warranty once they have been removed from the
original country of purchase.
GUARANTEE AND WARRANTY
47 Guarantee and warranty
Page 48

The guarantee and warranty does not cover any alterations or repairs made by a
second or third party. We are always eager to work with you personally to fix any
problem that may arise in the most eicient fashion meeting it’s specific case,
but we do not suggest you to “rig” up something outside of the recommended
guidelines in your user manual unless personally instructed by us to do so. We
provide no guaranties on the safety or performance of modified CraBot 3D printers. We are also not responsible for incorrect voltage being used, environmental
conditions (moisture, fire, water, flood, lightning, ext.), or any other form of gross
neglect on the customer’s part. If you are unsure about something, ask us about
it first. We are also not responsible for damages caused by the use of old information, as we are a forward looking company and information/manuals/users
guides and suggestions are continually being updated, as we plan to manufacture and to evolve our products into many future generations as the technology
develops.
The guarantee and warranty covers critical components only. For example we
will not replace a printer because of a perceived blemish in the paintjob. The critical components/replacement parts do not carry a warranty themselves and are
only covered in the initial 3 month warranty starting on the purchase date. Components not included in the warranty include: timing belts, linear ball bearings,
rods, and the build platform. Moving parts, although of the highest manufactured quality, must be properly maintained, serviced and/or oiled, and the failure
to do so will result in progressed wearing and tearing. The heated build platform
itself will be subjected to unavoidable scratching and wear upon use. If you wish
to order replacement parts, they are available in our online store, or by contacting us personally by telephone or email. There is no warranty issued when CraBot is used with exotic printing material not personally recommended by us at
CraUnique. Foreign materials can damage the extruder. The warranty also does
not cover operating the printer at unrecommended speeds and settings.
In the case that a repair is determined to be “outside of the warranty” in which
the buyer decides “must be looked at by the pros”, the buyer will pay the shipping
both ways plus the repair costs.
GUARANTEE AND WARRANTY
48 Guarantee and warranty
Page 49

Concerning “unauthorized returns”: returns not pre-authorized will not be eligible
for repair, replacement or refund. Do not send it back to us
unless you have contacted us first and we have pre-authorized you to do so.
Concerning “Refunds”: A refund is possible only with the CraBot 3D printer itself
and will not be oered for any filaments, or spare parts what-so-ever. If within two
weeks (14 days) aer recieving your CraBot 3D printer you are not completely satisfied, we oer you a refund option. You will pay to have it shipped back, and aer
we recieve it, we will deduct a 10% restocking fee from the total refund of the price
of the Crabot 3D printer (excluding the tax and other fees). There will also be a
thorough inspection of the printer, and upon finding any damages deemed on the
part of the buyer, other deductions from the refund will be made accordingly. Deductions will be made for any wear percieved to the printer, including scratches.
The 14 day period aer recieving the printer will be concretely determined in calculation with the FedEx tracking information.
Limitations
This guarantee and limited warranty are sole and final as they stand in reference to
CraBot, CraUnique and it’s products where permitted by law. Any implied warranty or fitness is limited to this 3 month (90 day) warranty starting from the date of
purchase. CraUnique waives all liability for any incidental, exemplary, punitive,
collateral, indirect, consequential, or special damages. We will determine on sole
descretion whether an issue is covered under our warranty or not.
Concerning any problems or enquiries, you can contact us at:
support@craunique.com
Returned parts/products can be sent to:
CraUnique LTD, c/o Service Department
Bem st. 28,
Budapest 1047,
Hungary.
GUARANTEE AND WARRANTY
49 Guarantee and warranty
Page 50

Click below to find more
Mipaper at www.lcis.com.tw
Mipaper at www.lcis.com.tw
 Loading...