

Page 1
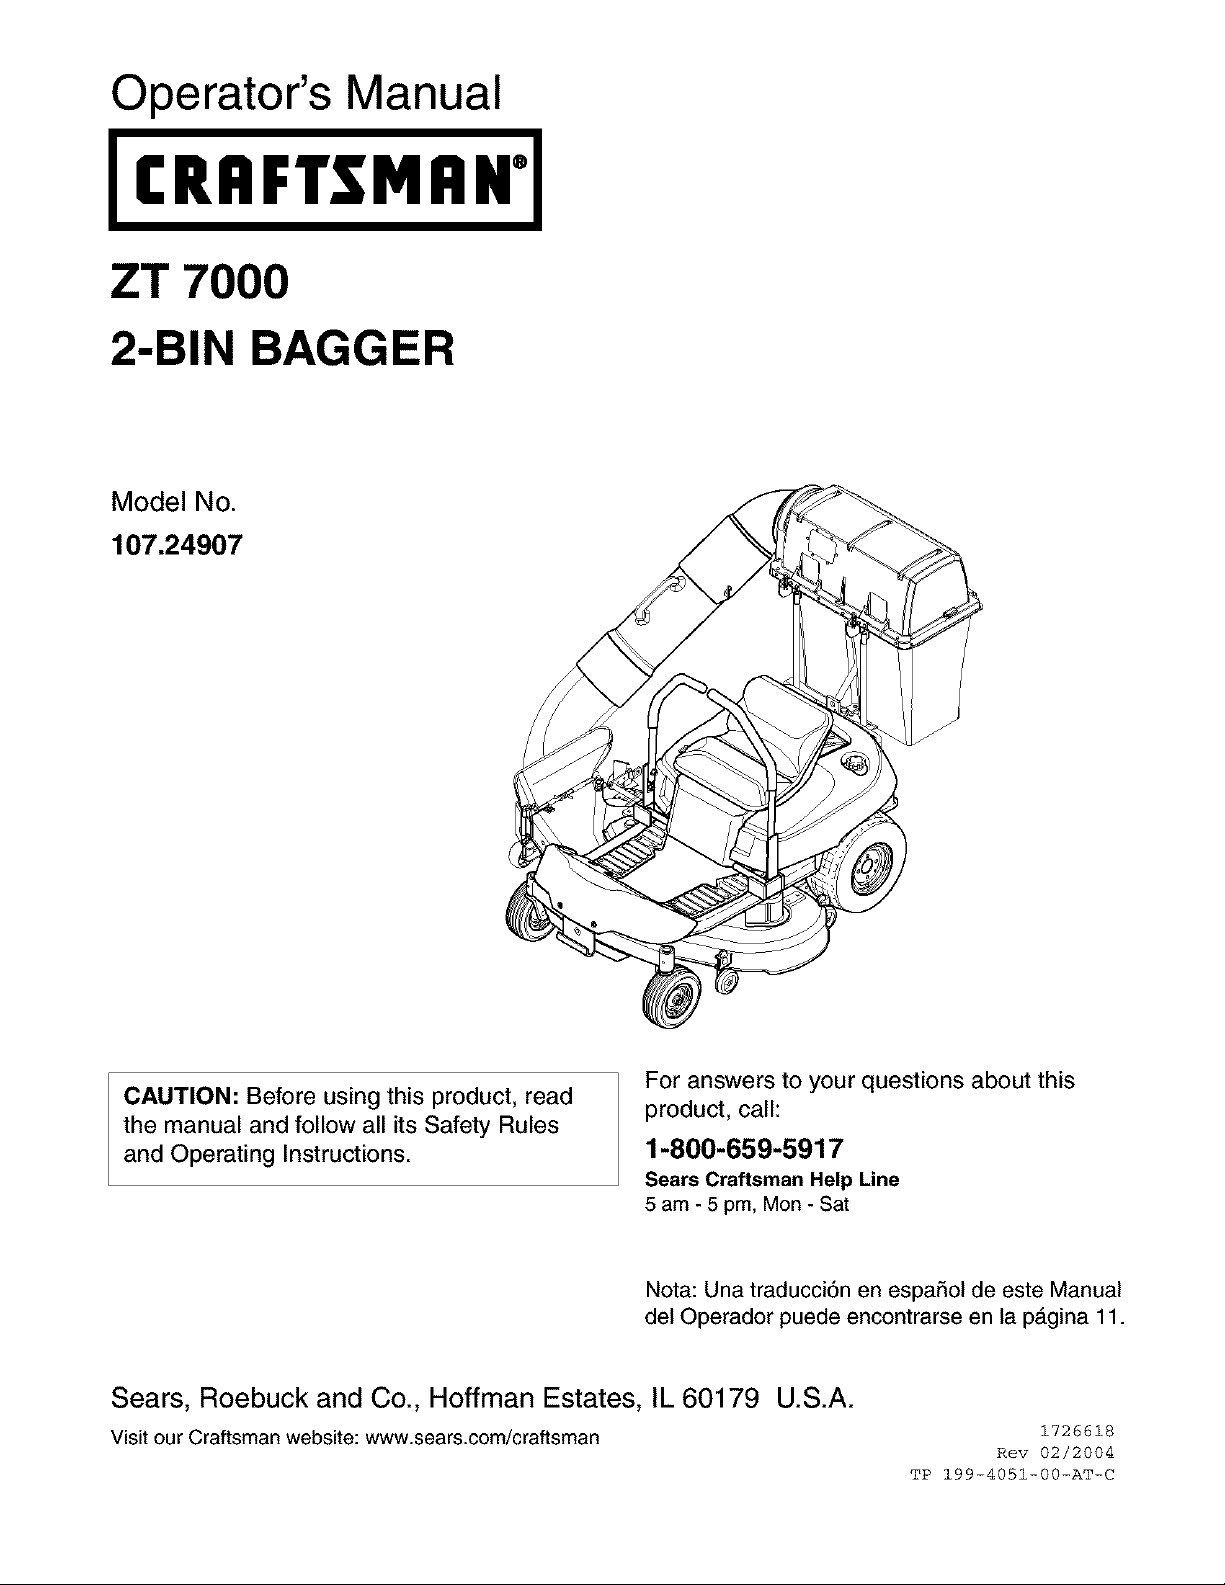
Operator's Manual
ZT 7000
2-BIN BAGGER
Model No.
107.24907
CAUTION: Before using this product, read
the manual and follow all its Safety Rules
and Operating Instructions.
For answers to your questions about this
product, call:
1-800-659-5917
Sears Craftsman Help Line
5 am - 5 pm, Mon- Sat
Nota: Una traducci6n en espa5ol de este Manual
del Operador puede encontrarse en la pagina 11.
Sears, Roebuck and Co., Hoffman Estates, IL 60179 U.S.A.
Visit our Craftsman website: www.sears.com/craftsman
1726618
Rev 02/2004
TP 199-4051-00-AT-C
Page 2
Nota: Una traducci6n en espaSol de este Manual del Operador puede encontrarse en la pAgina 10.
Warranty Statement ..................................................... 2
Safety Rules & Information for Bagger ..................... 3
Operating Instructions for Bagger ............................. 4
Initial Assembly & Installation .................................... 5
Normal Installation & Removal ................................. 10
ONE YEAR FULL WARRANTY on CRAFTSMAN 2-BIN BAGGER
For one (1) year from the date of purchase, if any parts of this product are defective in material or workmanship,
Sears will repair or replace them free of charge.
THIS WARRANTY DOES NOT COVER:
• Bagger cloth bags which are expendable and wear out with normal use.
• Repairs necessary because of operator negligence, including but not limited to, failure to maintain the equipment
according to the instructions contained in the operator's manual.
• Bagger if used for commercial or rental purposes.
WARRANTY SERVICE IS AVAILABLE BY RETURNING DEFECTIVE PARTS TO THE NEAREST SEARS PARTS &
REPAIR CENTER IN THE UNITED STATES.
FOR THE NEAREST SEARS PARTS & REPAIR CENTER LOCATION, CALL 1-800-4-MY-HOME ®.
This warranty gives you specific legal rights, and you may also have other rights which vary from state to state.
Sears, Roebuck and Co., Dept. 817WA, Hoffman Estates, IL 60179
Spanish Operator's Manual ...................................... 12
Repair Parts ......................................................... PTS-1
Hardware Identification &
Torque Specifications ................... Inside Back Cover
Service Telephone Numbers .................... Back Cover
HARDWARE BAGS
Description Quantity
BAFFLE HARDWARE
Carriage Bolt, 5/16-18 x 5/8 7
Locknut, 5/16-18 7
BAGGER HARDWARE
Carriage Bolt, 5/16-18 x 5/8 2
Locknut, 5/16-18 2
Bracket 1
Pin, Clevis 4
Washer, 1/2 4
Pin, Hair 4
Nut, Hex, 1/2-13 1
Capscrew, Hex, 1/2-13 x 1-1/4 1
Washer, 3/8 4
Locknut, 3/8-16 4
Capscrew, Hex, 3/8-16 x 2 4
TOOLS REQUIRED
Description Quantity
1/2" Wrench 1
9/16" Wrench 2
3/4" Wrench 2
See Page 25 for Wrench and Fastener Size Guide.
Page 3
unit, severe personal injury or death to you, or bystanders, or damage to property or equipment. The trian-
Read these safety rules and follow them closely. Failure to obey these rules could result in loss of control of
gle _ in text signifies important cautions or warnings which must be followed.
See Rider Operators Manual
GENERAL WARNINGS
• Know the unit's controls and how to stop quickly.
READ THE OPERATOR'S MANUALS.
• Read and obey all safety decals.
• Only allow responsible adults, who are familiar with
the instructions, to operate the unit.
• Disengage the PTO. Shut off the engine and wait for
all moving parts to stop before attaching, adjusting,
or disconnecting any part of the collection system.
• Check the collection system to make sure it is bolted
tightly to the unit.
• DO NOT operate the unit without either the entire
grass bagger or the deflector in place.
• Turn off the PTO to disengage the blades when not
mowing.
• DO NOT mow in reverse. Always look down and
behind before and while travelling in reverse.
• DO NOT turn sharply when travelling alongside a
building or any object. Slow down before turning.
• DO NOT carry passengers.
• When collection system is removed from the mower
deck, the deflector must be properly installed.
• Grass bagger components are subject to wear,
damage, and deterioration, which could expose
moving parts or allow objects to be thrown.
Frequently check components and replace with
manufacturer's recommended parts, when neces-
sary.
• If the mower stalls or the collector chute plugs:
1. Disengage the PTO;
2. Stop the engine and remove the key;
3. Set the parking brake, and wait for atl moving
parts to stop.
4. Remove the foreign object or clear the chute
with a piece of wood before restarting the engine.
NEVER place hands into COLLECTOR OR
MOWER housing to clear jammed objects.
MOWER may rotate when object is removed.
• For added stability and to prevent tipping or loss of
control:
a. Use reduced speed on uneven ground and
when turning corners.
b. Reduce loads on hillsides. It is recommended
that the collection system be kept only half full
when negotiating any slopes. Start mowing on
slopes when the collection system is empty.
c. Mow up and down the face of slopes; never
across the face of any slope.
Never operate on slopes greater than 17.6%
(10°).
SAFETY DECALS
This unit has been designed and manufactured to pro-
vide you with the safety and reliability you would expect
from an industry leader in outdoor power equipment
manufacturing.
Although reading this manual and the safety instructions
it contains will provide you with the necessary basic
knowledge to operate this equipment safely and effec-
tively, we have placed several safety labels on the unit to
remind you of this important information while you are
operating your unit.
All DANGER, WARNING, CAUTION and instructional
messages on your rider, attachments and mower should
be carefully read and obeyed. Personal bodily injury can
result when these instructions are not followed. The
information is for your safety and it is important! The
safety decals below are on your product.
If any decals are lost or damaged, replace them at once.
See your local dealer for replacements.
TP 600-2562-01-AT-SMA
These labels are easily applied and will act as a constant
visual reminder to you, and others who may use the
equipment, to follow the safety instructions necessary for
safe, effective operation.
ATTACHMENT DECALS
Decal - WARNING
Thrown Objects
Part Number
1709248
• DOnoioponhoppertopwilliebladototornlnp.
Decal - WARNING Do
Not Overload
Part Number 1704405
Read and obey all operation and warning decals.
3
Page 4
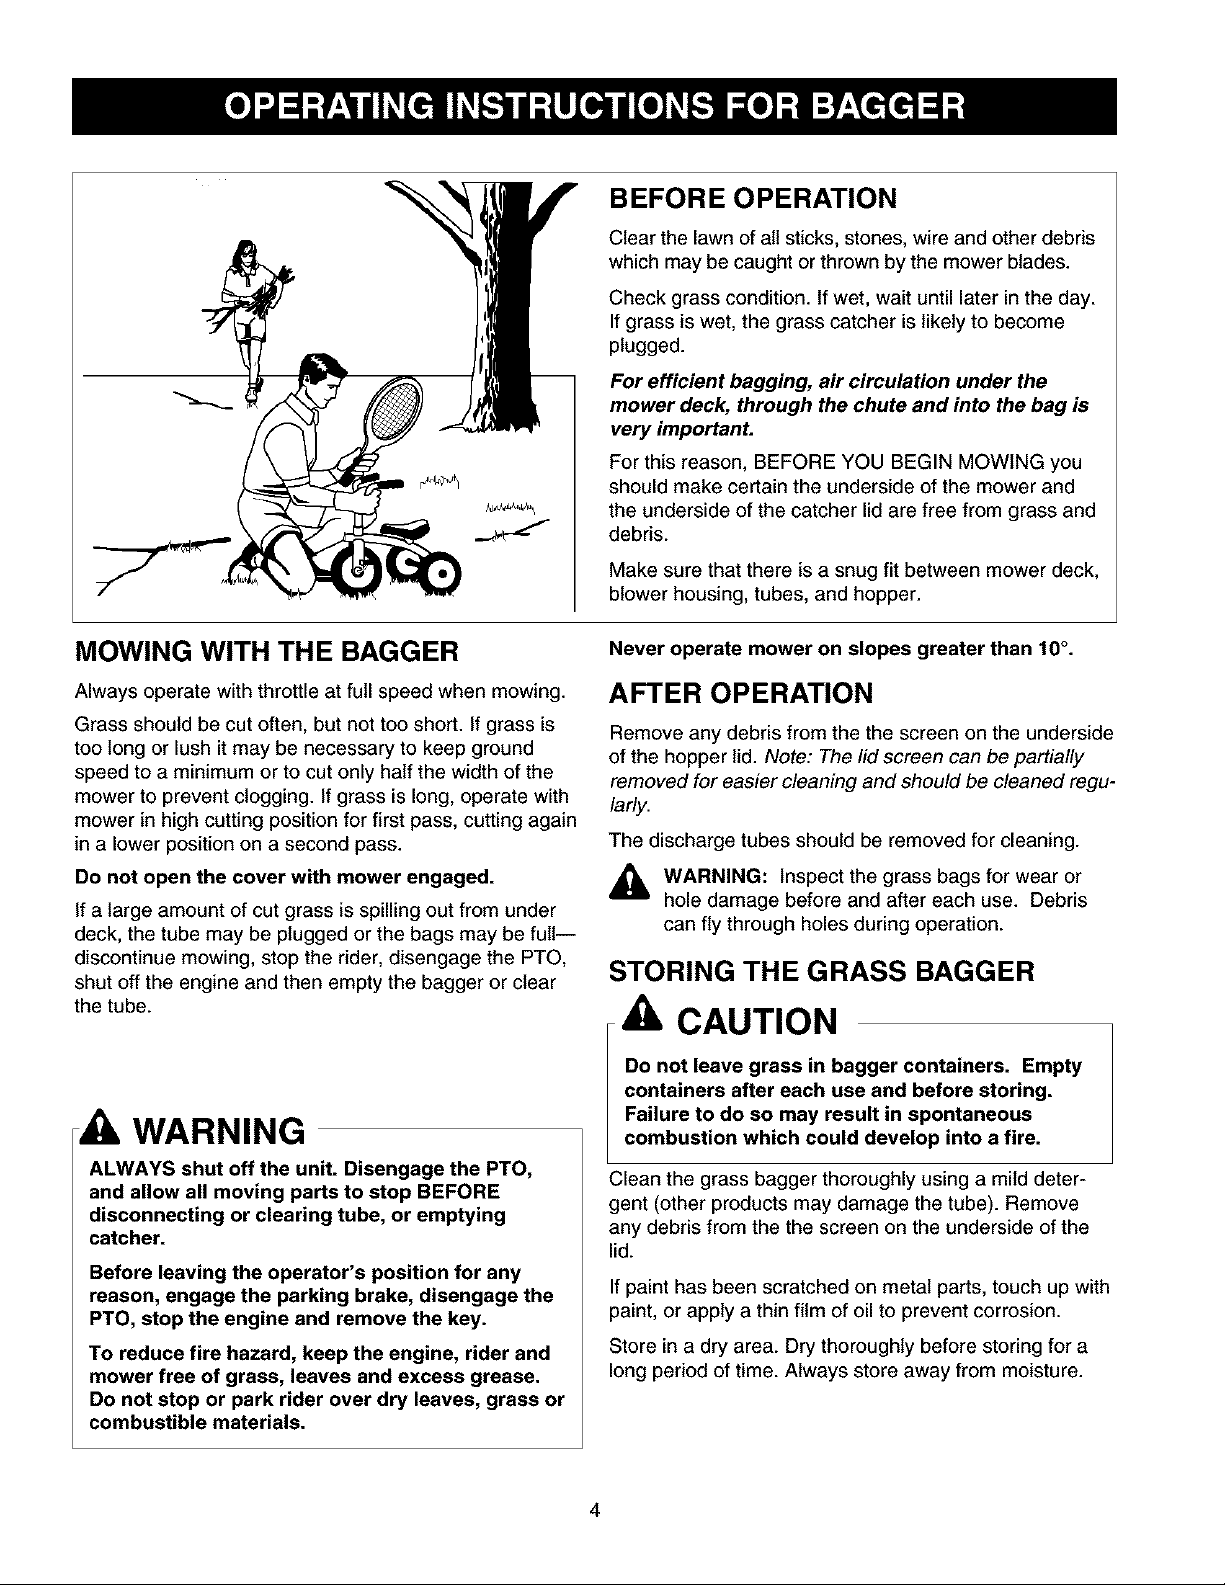
BEFORE OPERATION
Clear the lawn of all sticks, stones, wire and other debris
which may be caught or thrown by the mower blades.
Check grass condition. If wet, wait until later in the day.
If grass is wet, the grass catcher is likely to become
plugged.
For efficient bagging, air circulation under the
mower deck, through the chute and into the bag is
very importanL
For this reason, BEFORE YOU BEGIN MOWING you
should make certain the underside of the mower and
the underside of the catcher lid are free from grass and
debris.
Make sure that there is a snug fit between mower deck,
blower housing, tubes, and hopper.
MOWING WITH THE BAGGER
Always operate with throttle at full speed when mowing.
Grass should be cut often, but not too short. If grass is
too long or lush it may be necessary to keep ground
speed to a minimum or to cut only half the width of the
mower to prevent clogging. If grass is long, operate with
mower in high cutting position for first pass, cutting again
in a lower position on a second pass.
Do not open the cover with mower engaged.
If a large amount of cut grass is spilling out from under
deck, the tube may be plugged or the bags may be full--
discontinue mowing, stop the rider, disengage the PTO,
shut off the engine and then empty the bagger or clear
the tube.
• WARNING
ALWAYS shut off the unit. Disengage the PTO,
and allow all moving parts to stop BEFORE
disconnecting or clearing tube, or emptying
catcher.
Before leaving the operator's position for any
reason, engage the parking brake, disengage the
PTO, stop the engine and remove the key.
To reduce fire hazard, keep the engine, rider and
mower free of grass, leaves and excess grease.
Do not stop or park rider over dry leaves, grass or
combustible materials.
Never operate mower on slopes greater than 10°.
AFTER OPERATION
Remove any debris from the the screen on the underside
of the hopper lid. Note: The lid screen can be partially
removed for easier cleaning and should be cleaned regu-
larly.
The discharge tubes should be removed for cleaning.
,_ WARNING: Inspect the grass bags for wear or
hole damage before and after each use. Debris
can fly through holes during operation.
STORING THE GRASS BAGGER
CAUTION
Do not leave grass in bagger containers. Empty
containers after each use and before storing.
Failure to do so may result in spontaneous
combustion which could develop into a fire.
Clean the grass bagger thoroughly using a mild deter-
gent (other products may damage the tube). Remove
any debris from the the screen on the underside of the
lid.
If paint has been scratched on metal parts, touch up with
paint, or apply a thin film of oil to prevent corrosion.
Store in a dry area. Dry thoroughly before storing for a
long period of time. Always store away from moisture.
Page 5
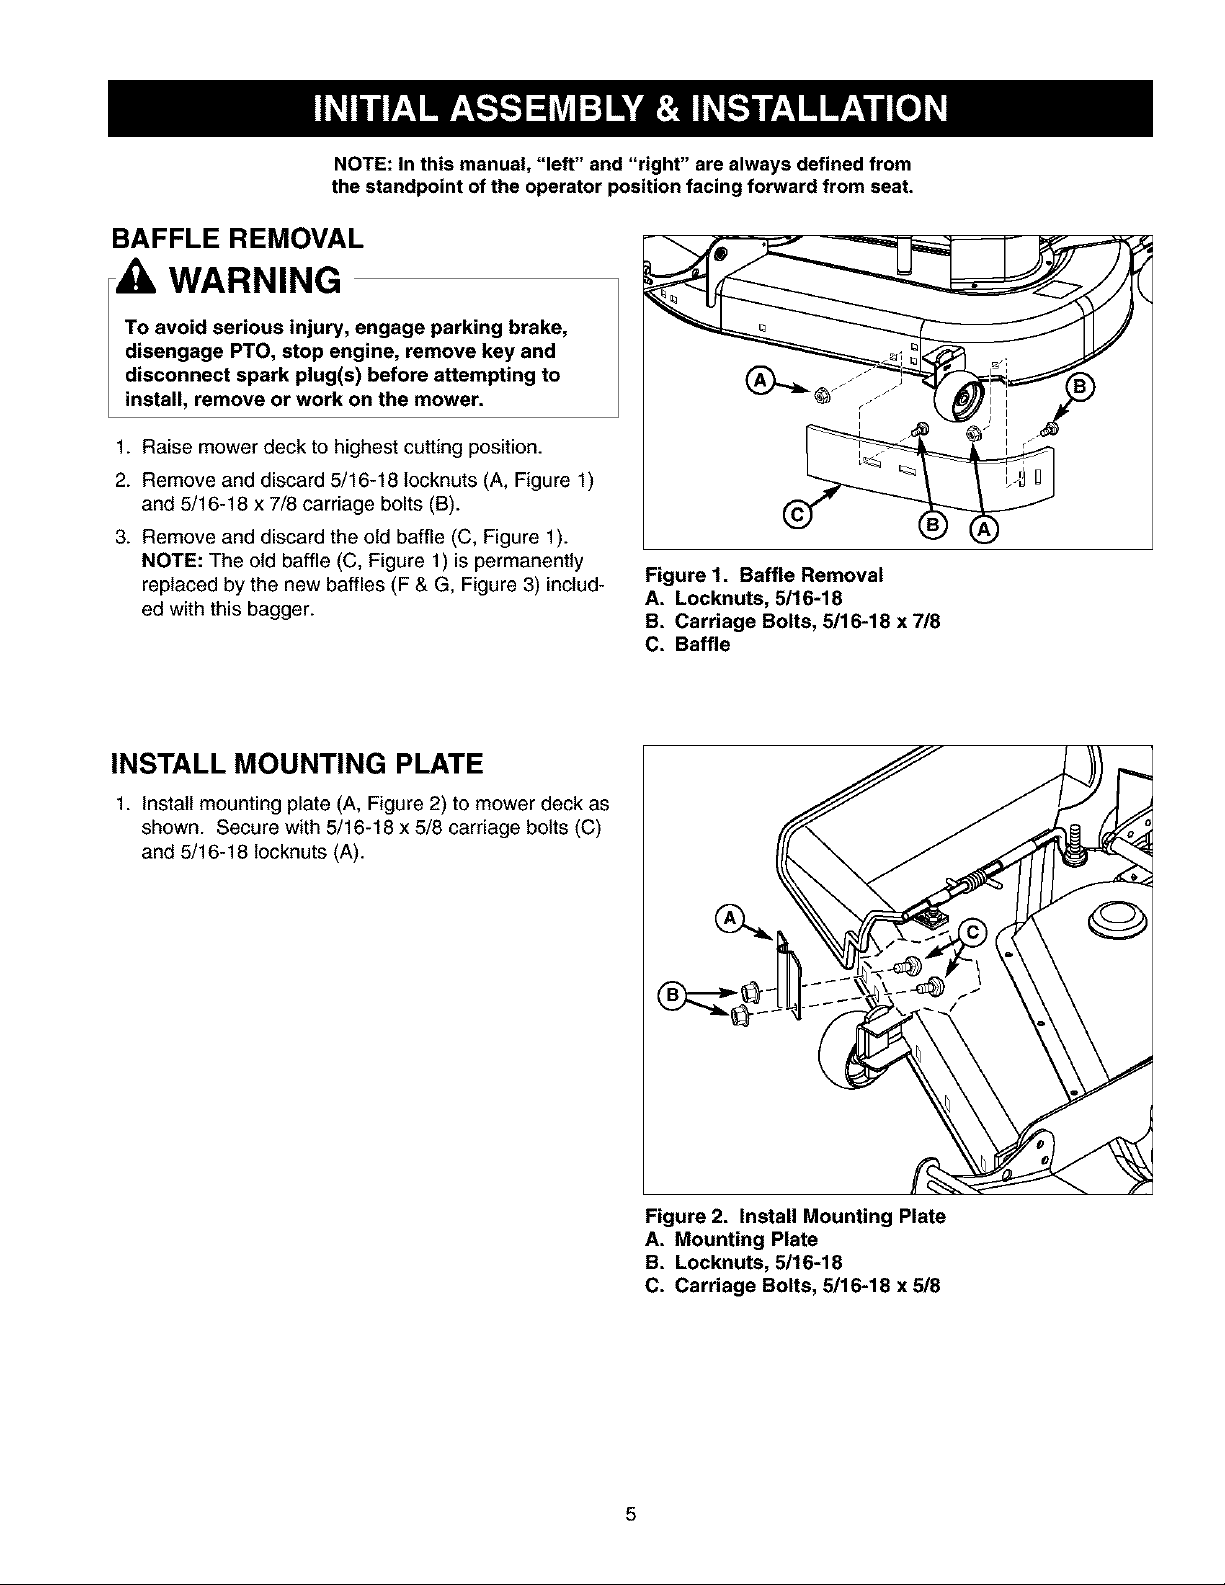
NOTE: In this manual, "left" and "right" are always defined from
the standpoint of the operator position facing forward from seat.
BAFFLE REMOVAL
WARNING
To avoid serious injury, engage parking brake,
disengage PTO, stop engine, remove key and
disconnect spark plug(s) before attempting to
install, remove or work on the mower.
1. Raise mower deck to highest cutting position.
2. Remove and discard 5/16-18 locknuts (A, Figure 1)
and 5/16-18 x 7/8 carriage bolts (B).
3. Remove and discard the old baffle (C, Figure 1).
NOTE: The old baffle (C, Figure 1) is permanently
replaced by the new baffles (F & G, Figure 3) includ-
ed with this bagger.
Figure 1. Baffle Removal
A. Locknuts, 5/16-18
B. Carriage Bolts, 5/16-18 x 7/8
C. Baffle
INSTALL MOUNTING PLATE
1. Install mounting plate (A, Figure 2) to mower deck as
shown. Secure with 5/16-18 x 5/8 carriage bolts (C)
and 5/16-18 locknuts (A).
Figure 2. Install Mounting Plate
A. Mounting Plate
B. Locknuts, 5/16-18
C. Carriage Bolts, 5/16-18 x 5/8
5
Page 6
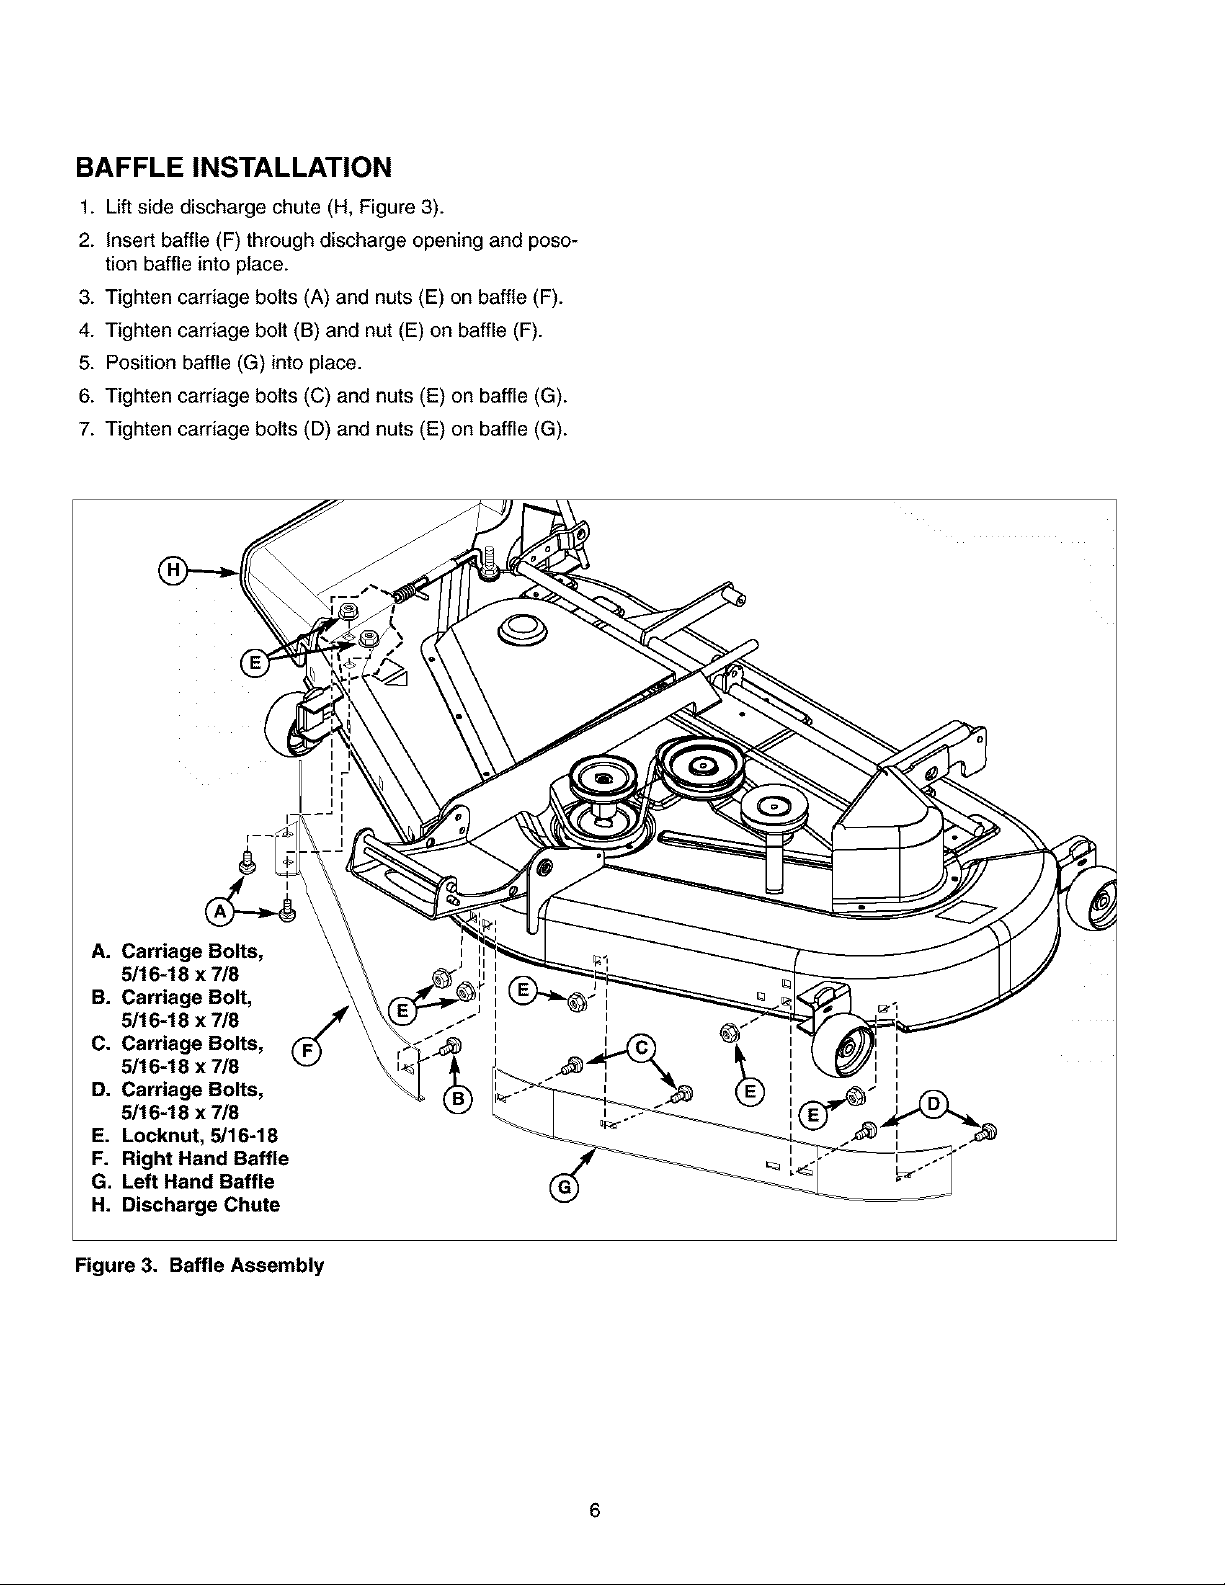
BAFFLE INSTALLATION
1. Liftside discharge chute (H, Figure 3).
2. Insert baffle (F) through discharge opening and poso-
tion baffle into place.
3. Tighten carriage bolts (A) and nuts (E) on baffle (F).
4. Tighten carriage bolt (B) and nut (E) on baffle (F).
5. Position baffle (G) into place.
6. Tighten carriage bolts (C) and nuts (E) on baffle (G).
7. Tighten carriage bolts (D) and nuts (E) on baffle (G).
A. Carriage Bolts,
5/16-18 x 718
B. Carriage Bolt,
5/16-18 x 718
C. Carriage Bolts,
5/16-18 x 718
D. Carriage Bolts,
5/16-18 x 718
E. Locknut, 5/16-18
F. Right Hand Baffle
G. Left Hand Baffle
H. Discharge Chute
Figure 3. Baffle Assembly
Page 7
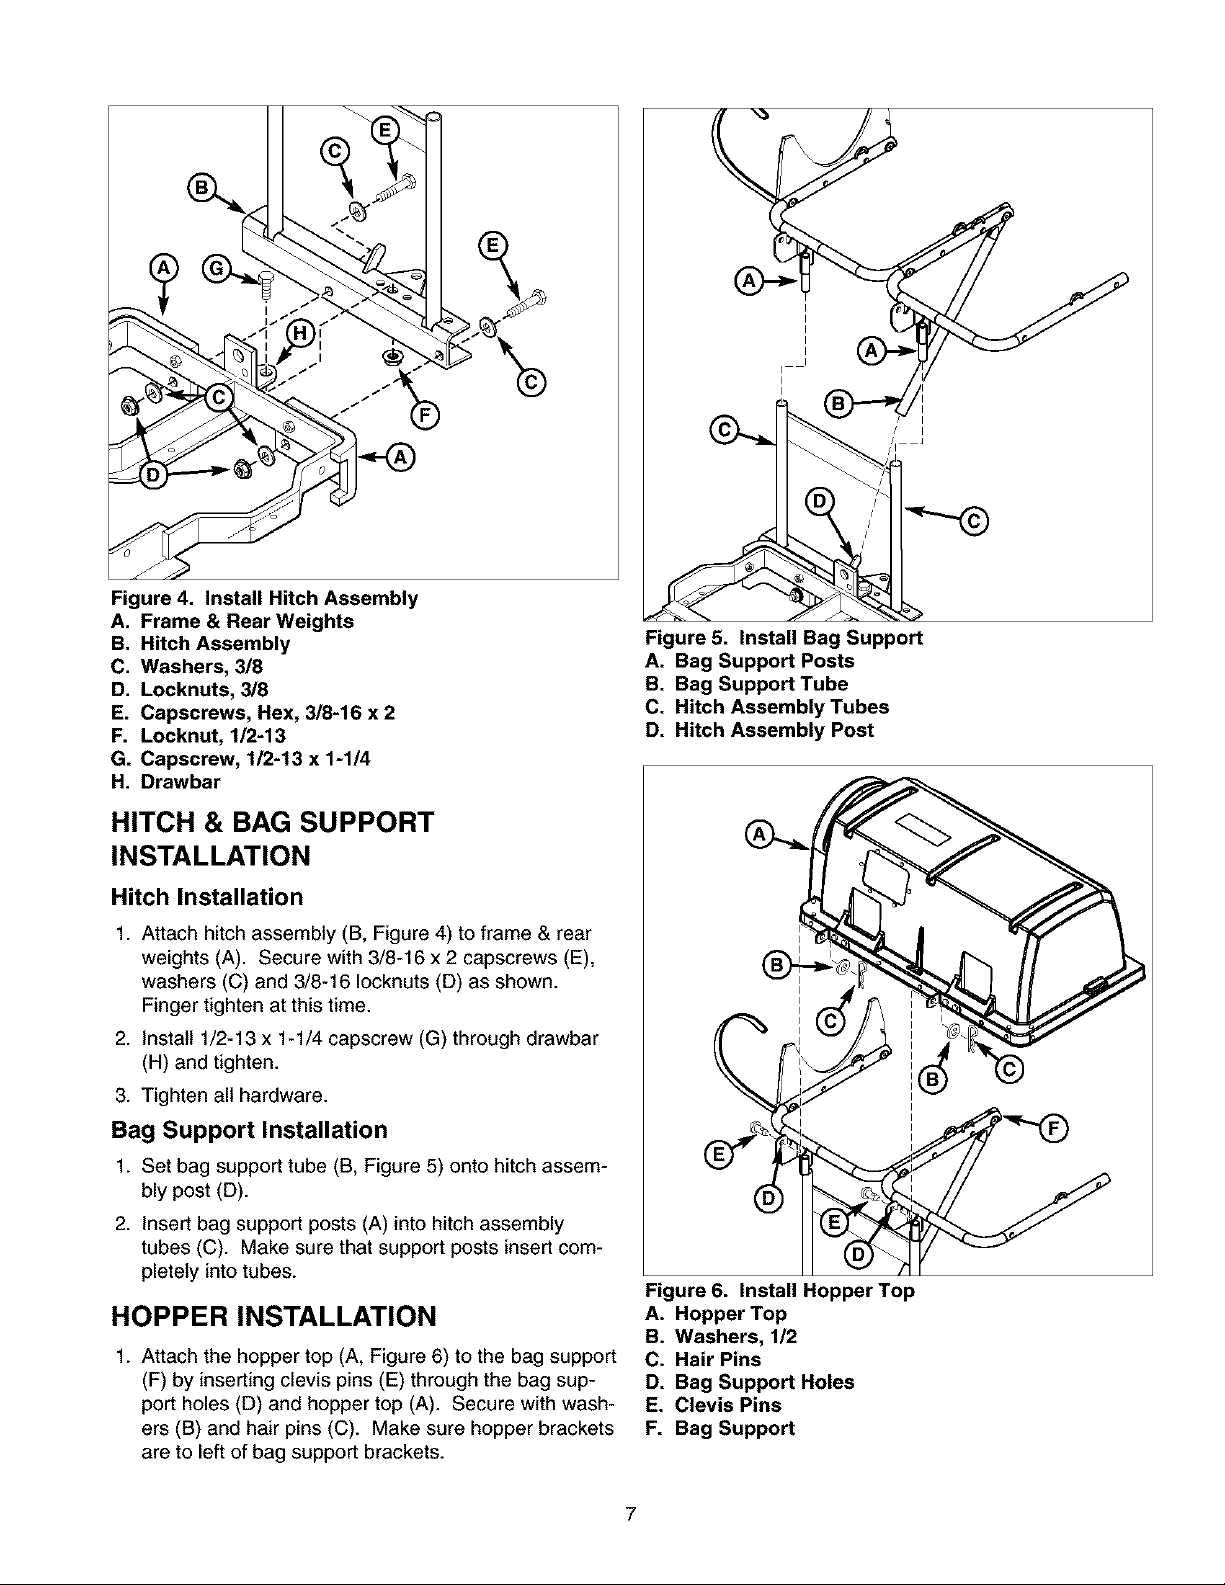
Figure 4. Install Hitch Assembly
A. Frame & Rear Weights
B. Hitch Assembly
C. Washers, 3/8
D. Locknuts, 3/8
E. Capscrews, Hex, 3/8-16 x 2
F. Locknut, 1/2-13
G. Capscrew, 1/2-13 x 1-1/4
H. Drawbar
HITCH & BAG SUPPORT
INSTALLATION
Hitch Installation
1. Attach hitch assembly (B, Figure 4) to frame & rear
weights (A). Secure with 3/8-16 x 2 capscrews (E),
washers (C) and 3/8-16 Iocknuts (D) as shown.
Finger tighten at this time.
2. Install 1/2-13 x 1-1/4 capscrew (G) through drawbar
(H) and tighten.
3. Tighten all hardware.
I
I
I
Figure 5. Install Bag Support
A. Bag Support Posts
B. Bag Support Tube
C. Hitch Assembly Tubes
D. Hitch Assembly Post
Bag Support Installation
1. Set bag support tube (B, Figure 5) onto hitch assem-
bly post (D).
2. Insert bag support posts (A) into hitch assembly
tubes (C). Make sure that support posts insert com-
pletely into tubes.
HOPPER INSTALLATION
1. Attach the hopper top (A, Figure 6) to the bag support
(F) by inserting clevis pins (E) through the bag sup-
port holes (D) and hopper top (A). Secure with wash-
ers (B) and hair pins (C). Make sure hopper brackets
are to left of bag support brackets.
Figure 6. Install Hopper Top
A. Hopper Top
B. Washers, 1/2
C. Hair Pins
D. Bag Support Holes
E. Clevis Pins
F. Bag Support
7
Page 8
CONNECTING TUBES
Connecting Upper & Middle Tube
1. Attach upper tube (B, Figure 7) to middle tube (A)
using clevis pins (E) as shown. Secure with washers
(D) and hair pins (C).
2. Reach through upper tube (B) to insert clevis pins(E).
Note: Pivoting the tubes on the clevis pins may give bet-
ter access for connecting washers and pins.
Figure 7. Assemble Bagger Tubes
A. Middle Tube
B. Upper Tube
C. Hair Pins
D. Washers
E. Clevis Pins
Lower Tube Installation
1. Lift discharge deflector up (D, Figure 8).
2. Insert lower chute rod (A) into mounting plate (B).
3. Pull rubber strap (C) and secure by placing hole clos-
est to knob in strap completely over Iocknut (E).
I I
Figure 8. Install Lower Tube
A. Lower Chute Rod
B. Mounting Plate
C. Rubber Strap
D. Discharge Deflector
E. Locknut
Page 9
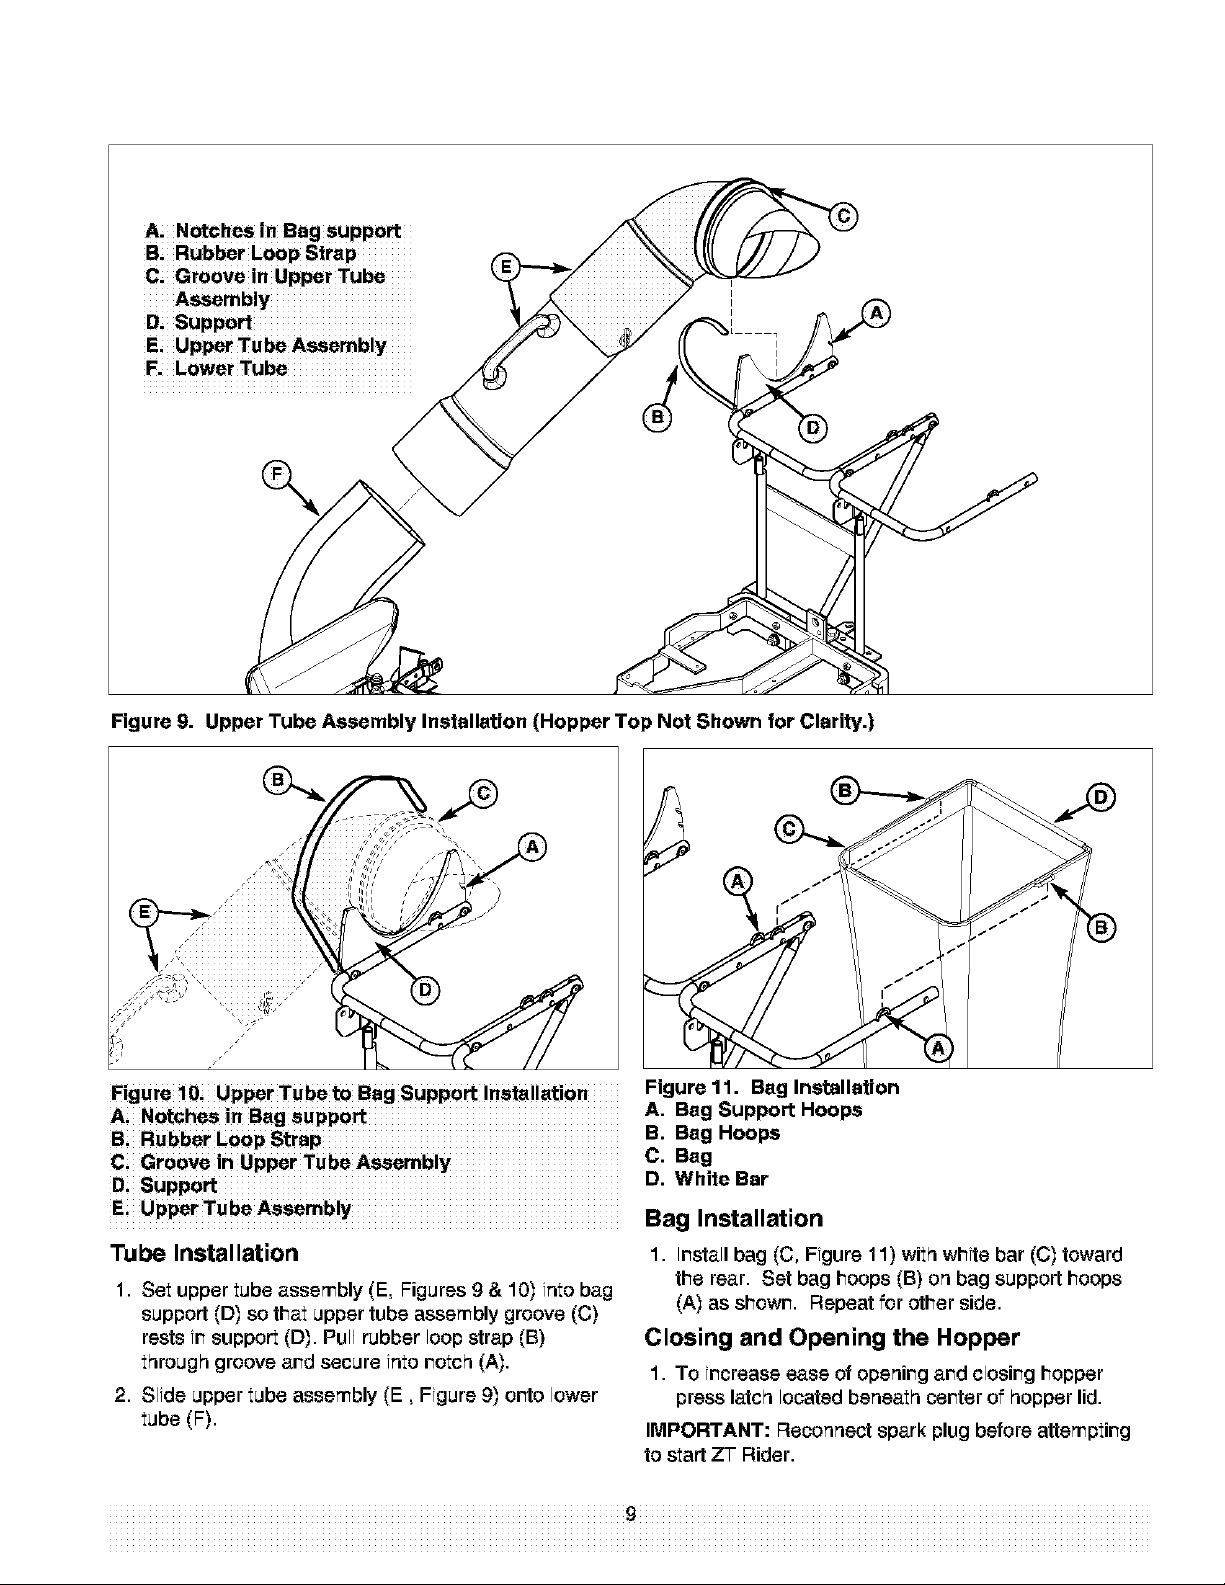
A_ Notches in Bag support
B, Rubber Loop Strap
C, Groove in Upper Tube
Assembly
D, Support
E, Upper Tube Assembly
F. Lower Tube
Figure 9. Upper Tube Assembly Installation (Hopper Top Not Shown for Clarity.)
Figure 1Oi Upper Tube to Bag Support installation
A: Notches !n Bag support
B: Rubber Loop Strap
C: Groove in Upper Tube Assembly
Di Support
Figure 11. Bag Installation
A, Bag Support Hoops
B, Bag Hoops
C, Bag
D, White Bar
E; Up_ TubeAssembly Bag Installation
Tube Installation
1. Set upper tube assembly (E, Figures g & 10) into bag
support (D) so that upper tube assembly groove (C)
rests ir support (D). Pull rubber loop strap (B)
t_roug_ groove ard secure into rotc_ (A).
2. Slide upper tube assembly (E, Figure 9) otto lower
tube (F).
1. Irstall bag (C, Figure 11) wit_ white bar (C) toward
the rear. Set bag hoops (B) on bag support hoops
(A) as showr. Repeat for other side.
Closing and Opening the Hopper
1. To ircrease ease of openirg ard closirg hopper
press latc_ located beneat_ certer of _opper lid.
IMPORTANT: Reconnect spark plug before attemptirg
to start ZT Rider.
Page 10

A. Hitch Post
B. Tube
C. Posts
D. Hitch Tubes
E. Bag Support & Hopper
F, Bag
G. Support Hoops
H, White Bar
I. Bag Hoops
J. Rubber Loop Strap
K, Support
L, Upper & Lower Tube
M, Lower Tube
N, Rubber Strap
O. Nut & Capscrew
P. Mounting Plate
Q. Chute Rod
R, Deflector
S. Slot
Figure 12. Normal Installation & Removal
NORMAL INSTALLATION & REMOVAL
Installation
NOTE: See previous pages for more detailed irstallation
ard operatior instructions if recessary.
1. Mourt the bag support & hopper (E, Figure 12) by
irsertirg tube (B) over hitch post (A) and insertirg
posts (C) into hitch tubes (D).
2. Pivot bag support arid hopper (E) up. Install bag (F)
with white bar (H) towards the rear. Set bag hoops
(I) or bag support hoops (G) as showr. Repeat for
other side.
3. install lower tube (M). Lift discharge deflector up (R).
Insert lower chute rod (Q) into mourtirg plate (P).
Pull rubber strap (N) ard secure by placirg hole clos-
est to knob in strap completely over Iocknut and cap-
screw(O).
z_.Slide upper & middle tube (L) over lower tube (M).
Set upper & middle tube (L) onto support (K). Secure
with rubber loop strap (J) by hookirg it into slot (S).
WARNING
OPERATION WITHOUT BAGGER
For operatior without bagger, the mower discharge
deflector MUST be properly irstalled in the dowr
position and retaired by the sprirg latch.
Removal
1. Unhook rubber loop strap (J, Figure 12) from slot (S).
2. Remove upper & lower tube (L) from support (K) ard
lower tube (M).
3. Discornect rubber strap (N) from Iockrut and cap-
screw (O). Remove lower tube (M) from bracket (P).
See that discharge deflector (R) returns to the DOWN
positior.
4. Lift and remove bag support and hopper from hitch
tubes (D) ard the hitch post (A).
Page 11

Manual Del Due5o
ZT 7000
2-HUCHA EMBOLSADORA
Modelo No.
107.24907
CAUTION: Este producto tiene un mot or
con expulsi6n baja el cual funciona diferente-
mente a otros motores. Antes que arranque
el motor, lea y comprenda el Manual del
DueSo.
IMPORTANT: Lea y siga todas las reglas e
intrucciones de seguridad antes de operar
este equipo.
Para obtener respuestas a qualquier pregunta
sobre este producto, Ilame al num_ro de tel_-
fono-(sin cobro) siguiente:
1-800-659-5917
Servicio de ayuda Sears Craftsman
5 am - 5 pro, Lures a Sabado
Page 12

Decleraci6n de Gerant|e ........................................... 12
Regles de Segurided e Intormeci6n pare Unidedes
Montebles ................................................................... 13
Inetrucciones de opereci6n pare Embolsedore ,,..,14
Ensemble e Insteleci6n Iniciel .................................. 15
GARANT[A LIMITADA DEL RECOLECTOR DE CESPED DE CRAFTSMAN
Per ur (1) aSo a part# de la fecha de compra, si este recolector de c_sped de Craftsmar es martenido, lubricado y
afirado corforme alas instrucciones de operaci6n er el mutual del propietario, Sears repararA o reemplazarA sir
costo alguno cualquier parte que se ercuertre defectuosa en material o marc de obra.
Ineteleci6n y Remoci6n Normal .............................. 20
Ferreterie Identificeci6n y
Torsi6n Especiticaci6n ....... Interior Cubierta Trasera
Pertes de Retecci6n ............................................ PTS-1
ServicioNumero deTelefono ........... Cubierta Trasera
ESTA GARANT_ NO CUBRE:
° Articulos corsumibles que se desgastan cot el use
formal, Io que incluye ertre otros las aspas y los
sacos de la podadora.
° Las reparaciores necesarias per negligercia del
operador, Io que ircluye entre circe, re manterer el
EL SERVICIO DE GARANTiA ESTA DISPONIBLE SI RETORNA EL RECOLECTOR DE ClaSPED DE CRAFTSMAN
AL CENTRe O DEPARTAMENTO DE SERVlCIO DE SEARS M.&S CERCANO A USTED EN LOS ESTADOS
UNIDOS.
PARA AVERIGUAR CUAL ES EL SEARS MAS CERCANO A USTED, LE ROGAMOS QUE LLAME A 1-SOO-MY-
HOME.
Esta garantfa le otorga derechos legales especfffcos, pete es posfble que usted tenga otros derechos, los cuales
vat{an de ur estado a otto.
Sears, Roebuck and Co., Dept. 817WA, Hoffmar Estates, IL 60179
FERRETERIA BOLSA
Descripcion Centided
Reductor de Circuleci6n de Aire Ferretterie
Tomillo de cabeza redonda, 5/16-18 x 5/8 7
Contratuerca estrellada, 5/16-18 7
Embelsadora Ferretteria
Tornillo de cabeza redord, 5/16-18 x 5/8 2
Contratuerca estrellada, 5/16-18 2
Placa de mortaje 1
Clavfjas de seguridad 4.
Arardela, 1/2 4.
Horquillas 4.
Contratuerca estrellada, 1/2-13 1
Tornillo _exagonal, 1/2-13 x 1- 1/4- 1
Arardela, 3/8 4.
Contratuerca estrellada, 3/8-16 4.
Tornillo _exagonal, 3/8-16 x 2 4.
equipo corfforme alas irstrucciores comprerdidas
er el manual del propietario.
* Emblosadora que se usa cot fires comerciales o de
alquiler..
TOOLS REQUIRED
Descripcion Centided
1/2" Llave 1
9/16" Llave 2
3/4-"Llave 2
12
Page 13

Lea eetae reglas de eeguridady Mgalae con cuidado. No obedocer eetae reglas puede reeultar on la p6rdida del control
sabre la unidad, Iosionos eevoras a la persona o la muorte de ueted, o eepoctadoros, odaSos a la propiedad oal oquipo.
_kEI tridngulo en el toxto donota procaucionee o advortonciae importantee qua dobon soguireo.
• Conozca los controles de la unidad y ct_mo deteneda r_pi-
damente LEA EL MANUAL DEL OPEIqADOIq.
• Lea y obedezca todas las calcomanfas de seguridad
• $61o permita queun adulto responsable, que est0 famil-
iarizado con las instrucciones, opere la unidad.
• Desacople el PTO Apague el motor y permita que se
detengan redes las partes en movimiento antes de
anexar, ajustar o desconestar alguna parts del sistema de
recolesci6n_
• Compruebe que el sistema de recolecci6n est0 fijamente
atomillado a la unidad.
• NO opere la unidad sin el recolector complete de c0sped
o con el deflector en su lugar
• Apague el PTO pare desactivar las aspas cuando no est0
podando el c0sped
• NO pods el c0sped en reverse Siempre mire hacia abajo
y hacia atr&s antes de echarse en reversa y mientms Io
hace
• NO dO la vuelta abruptamente cuando anda es reverse
junto a un edificio o algLin objeto. Baje la velocidad antes
de dar la vuelta
• NO Ileve pasajeros
• Cuando se quite el sistema de recolesci6n de la cubierta
de la podadora, debe instalar debidamente el deflector.
• Los sates recolectores est_n propensos a deteriorarse y
desgastarse durante el usa normal Inspeccione el saco
ped6dicamente pare comprobar que no tenga rasgaduras,
agujeros o puntos flacos y reempl,_eelo con un saco
nuevo que cumpla con los est_ndares de durabilidad del
fabricante
• $i se atasca la podadora o se tape el conducto del
recolestor
1 Desacople el PTO;
2 Detenga el motor y quite la Ilave;
3 Ponga el freno de mane y espere a que se detengan
redes las partes en movimiento
4 Quits el objeto extrai_o o limpie el conducto con un
ped&zo de madera antes arrancar nuevamente el motor.
NUNCA ponga lee manes en el RECOLECTOR O la
caja de la PODADORA pare quitar objeto$ atasca-
dos, La PODADORA puede girar el quitar el objeto,
• Pare dar mayor estabilidad y evitar que se vuelque o
perder el control
a Usa una velocidad m,_s baja en terrenos desnivelados
y al dar la vuelta en una esquina
b Reduzca la carga en las laderas Se recomienda que
no Ilene el sistema de recolesci6n a m_s de la mitad
cuando franquea una cuesta Empiese a podar el
c0sped en la cuesta con el sistema de recolesci6n
vaoio
c. Pods el c0sped de la cuesta de arriba hacia abajo y
viceversa; nunca no de un lade al otto.
Nunca opere en cuestae mayor,s a 17.6% (10"),
CALCOMAN|AS DE SEGURIDAD Estas etiquetas son f_ciles de aplicar y furgir_n come
Eeta unidad fue dieeSada y fabrieada pare ofrecerle la ......... que puedan Ilegar a usar el equipo, pare que sigar las
eeguridad y confiabilidad que usted esperad'a de Un Irder en medidas de seguridad necesarias pare una operaci6n
la industria de la fabricac!sn de _quip_ m0t0rizadoe pare e! eficaz y sin percarces..
exterior
corstantes recordatorios visuales pare usted, y otros
Calcornanias del accesorio
Aunque leer eete manual ylas medidas de eegaridad que
contiene 18proporcionar& el consoirniento bdSiso necesado
para operar este equ!p0 sin p0rcances y eficazmente; Calcomania -
hemo_ cole€ado varia8 _tiquota_ do seguridad en la unidad
para rec0rdarl_ esta !mpo_nte inf0rma¢i_n mi_n_e USted
Debe leer Cuidadosarnente y acatar redes los mensajes de
F=EI-iGRO,ADVERTENCIA; PRECAUCION yde insl:r_€-
donee en sa tractor, accesorios Y podader'e. NO Seguir !as
instruc¢ione8 puede rosa!tar en lesione8 pe_nales a! #uer- Calcomanfa -
[30, iLa in_rmacisn ee [3ar'asu seguridad yes im_rtante! ADVERTENCIA No
Lae calcomanias de eeg_ridad aqur abajo eet_n sobre eu Sobrecargar
[3r'od],.i Cto. _d*€1" I_' 'r_ [0'_""[_Iv
Si pierde o ee daSa a!guna de estae calc_manras; ,_,,_,.=_,_._=._.._]_u. 1704405
pl_.celas inmediatamente BUsque a su distribuidor Isoal
para sornprar repuee_oS.
• DOnotopenhoppertopwhilebledeI_turnlnp.
ADVERTENCIA
Arroja Objetoe
N0mero de parte
1709248
Page 14

ANTES DE LA OPERACION
Eliminedel jardin todos los palos, piedras; alambrss y otros
deseehos qua pUedan quedar atrapados 0 Set arrojados p0r
las aspas de !a podadora
compruebe !a ¢ond!¢i_n ds! ¢_SP6d Si est_ mojado esPem
hasta m,_s tarde. Si el c_sped est_ moj_do es probable qua
Pate un embolsado eflctente, es muy lmportante la clrcu-
lac!on de alre abajo de la #ublerta de la podadorai POr e!
Per esta raz6n ANTES DE EMPEZAR A PODAR EL
ClaSPED aseg_rese de _ue la par_e inferi0r de la p0dad0ra y
la parte inferior de la tape del resolector est_n libres de
c_Sped y deseChOS_
Aseg6rese de qua eat_n bien ajustados la cubierta de la
podad0ra la caja del soplador; los tubes y la tape del
rec0!ecter d8 c_pedi
PODADO DEL CESPED CON EL
RECOLECTOR
Siempre open_con el acelerador a toda velocidadal podar
el c6sped.
El c6sped debe podarse con frecuencia y no demasiado
corto. Si el c6sped est'. demasiado largo o frondoso pedrO.
ser necosario mantener la velocidad al minimo o cortar s61o
la mitad del ancho de la podadora para evitar qua se atom,
Si el c_sped estd largo, open_ la podadora an posici6n de
corte alto en la primera pasada, cortando de nuevo an una
posici6n rods baja en la segunda pasada,
No abra la tape con la podadora activada.
Si sale una gran cantidad de c_sped cortado per debajo de
la cubierta, as posible que est6 tapado el tube o que los
sacos est6n Ilenos: deje de podar el c6sped, detenga el
montable, desacople el PTO, apague el motor y luego vacie
el recolector o limpie el tube,
ADVERTENCIA
SIEMPRE apague la unidad. Desacople el PTO, y
permita qua se detengan redes las partes en
movimiento ANTES de desconectar o desmontar
el tube o vaciar el recolector.SIEMPRE apague la
unidad. Desacople el PTO, y permita qua se
detengan todas las par'ms en movimiento ANTES
de desconectar o desmontar el tube o vaciar el
recolector..
Antes de dejar el puesto del operador per
cualquier raz6n, accione el freno de mane,
desacople el PTO, derange el motor y quite la
Ilave.
Pare reducir el peligro de un incendio, mantenga
el motor, el tractor y la podadora nbre de c_sped,
hojas y aceite excesivo. No detenga ni estacione
el tractor sobre hojas secas, c6sped o materiales
combustibles.
Nunca opera en ¢uestas mayores a 30'! _
! T
DESPUES DE LA OPERACION
Quite redes losdesechosde la pantal!aen !a parteinferior
de la tape,.NOra:La pantalfa de la tapa #uede quitarsepar-
ciafmente para fimpiarla con mayor facifida# y dcbe hacerlo
Debe quitar el tubes pare limpiarlo
!nspeccJ0ne i_ saces pate eIc6sped para cemprobar qua
no est_ desgastado o daSado, Asegdrose de
bien aJustades !a Cubieea de!a _dadorai !os tubes Yla
tapa dD!reco!ector de c_sped;
ALMACENAR EL RECOLECTOR DE
F
CESPED
No deje el €_sped en los €ontenedores de la
embo!sadora. Va¢ie !os contenedores despu6s
de cede use y antes de almacenar launidad i No
hacerlo pu_e resultar en una combusti6n
espontanea qua puede €onvertirse en un
Limpie a conciencia el recolector de c_sped usando
detergente suave (0tros productoS pueden dahar el
tube) Quite todos lOSdeSeCh0s de la panta!la en !a parte
fnferi0r de la tapai
Si se ha rayado lapir_tura en !as partes met_licas;
ret6quelas con pintura, o aplique una capa delgada de
aceite para evitar que se exfden.
GUArdela enu n _trea seca; s_ciue!a a c0nc!enc!a antes
de guardarla P0_ Un per!ode !arg0 de t!empe. Gu_trdela
lej0s de la hamedadi
Page 15

NOTA: En este manual. "izquierda" y "derecha" se refieren seg_n come se yea desde la posiciSn de operaciSn.
REMOClON DEL REDUCTOR DE
ClRCULAClON DE AIRE
A ADVERTENClA
Accione el freno de mano, deeacople el PTO,
detenga el motor y quite la Ilave antes de intentar
inetalar o quitar la podadora o trabajar en ella.
1. Quite y descarte las contratuercas estrelladas de 3/8-
16 (A, Figura 1)y los tornille de cabeza redorda de
3/8-16 x 7/8 (B.
2. Quits y descarte el reducter de circulaci6r de aire
vieie. (C). El reductor de circulaci6n de airs (C) se
reemplaza permarertemerte con los reductores de
circulaci6n de airs incluidos con este acoeserio.
Figura 1. Remoci6n del Reductor de Circulaci6n de
Aire
A. Contratuerca estrellada, 3/8-16
B. Tornillo de cabeza redonda, 3/8-16 x 7/8
C. Reductor de circulaci6n de aim
INSTALACI()N DE LA PLACA DE
MONTAJE
1. Instale la placa de mortaje (A, Figura 2) a la,cubierta
de la podadora come se muestra. Suj6tela con los
tomillos de cabeza redonda de 5/16-18 x 5/8 (C) y
las contratuercas estrelladas de 5/16-18 (A).
F]gura 2i !neta!aciSn de !a P!aca de Montaje
Ai P!aca de montaje
Bi Contratuercas eetrel!adae; 5/16-18
Ci Torn]l!os de cabeza redonda, 5/16-18 x 5/8
Page 16

INSTALACI( N DEL REDUCTOR DE
ClRCULACION DE AIRE
1. Apriete los tomillos de cabeza redonda (A, Figura 3)
y las tuercas (E) del reductor de circulaci6r de aire
(F).
2. Apriete los tomillos de cabeza redonda (B) y las tuer-
cas (E) del redactor de circulaci6r de aire (F).
3. Apriete los tomillos de cabeza redonda (C) y las tuer-
cas (E) del redactor de circulaci6r de aire (G).
zL.Apriete los tomillos de cabeza redonda (D) y las tuer-
cas (E) del redactor de circulaci6r de aire (G).
Ai Tornillo de Cabeza redondai 5[16_18 X 7/8
Bi Tornillo de Cabeza redondai 5[16_18 X 7/8
Ci Tornillo de Cabeza redondai 5/16_18 X7/8
Di Tornillo de Cabeza redondai 5/16_18 X7/8
E. ContratuerCa estrelladai 5/16,18
F. Reductor de CirCulaci6n de aire derecho
G_ Redu_or de ¢ircula¢i6n de aire izquierdo
Hi Deflector
Figura 3i Ensamble del Reductor de circulaCi6n de A|re
Page 17

Figura4. Instalaci6ndelSistemadeEnganche
A.Bastidory pesostreseros
B.Sistemadeenganche
C.Arandela,3/8
D.Contratuercaestrellada,3/8
E.Tornillodecabexahexagonal,3/8-16 x 2
F. Contratuerca estrellada, 1/2-13
G, Tornillo de cabexa hexagonal, 1/2-13 x 1-1/4
H. Barra de enganche
INSTALACION DEL SOPORTE PARA
ENGANCHE Y SACO
Instalaci6n del oporte para Enganche
1. Sujete el sistema de erganc_e (B, Figura z_)al basti-
dory a los pesos traseros (A). F(ielo con los tornillos
de cabeza _exagoral de 3/8-16 x 2 (E), las arardelas
(C) y las cortratuercas estrelladas de 3/8-16 (D)
corno se muestra. Apriete marualmente por el
momerto.
2. Instale el tomillo de cabeza hexagoral de 1/2-13 x 1-
1/z_(G) pas_rdolo por la barra de engarche (H) y
apri6telo.
3. Apriete todos los componentes..
Instalaci6n del Soporte para Sa¢o
1. Coloque el tubo del soporte para saco (B, Figura 5)
sobre el poste del sisterna de erganche (D).
2. Inserte los postes del soporte para saco (A) por los
tubos del sistema de engarc_e (C). Si los postes ro
est_n alireados, ponga ur calce en la corexi6n del
pemo (E).
INSTALACI(_N DE LA TOLVA
1. sujete la cubierta de la tolva (A, Figura 6) al soporte
para saco (F) irsertardo las clavijas de seguridad (E)
por los orificios del soporte para saco (D) y por la
cubierta de la tolva (A). Suj6telas cot las arandelas
(B) y las _orquillas (C).
Figura 5. Instalaci6n de Soporte para Saco
A. Poste de soporte para saco
B. Tubo de soporte para saco
C. Tubos del sistema de enganche
D. Poste del sistema de enganche
E. Conexi6n de perno
Figura 6. Instalaci6n de Cubierta de la Tolva
A. Cubierta de la tolva
B. Arandelas, 1/2
C, Horquilles
D. Orificios de soporte para saco
E. Clavijas de seguridad
F. Soporte para saco
Page 18

TUBOS DE CONEXI(_N
Conexi6n de Tubo Superior y Medio
1. Sujete el tubo superior (B, Figura 7) al tubo medio (A)
usando las clavijas de seguridad (E) como se mues-
tra. Suj_telo cot las arandelas (D) y las I'_orquillas (C
Note: Montar los tubos sobre las clavijas de segundad
puede ayudarte a ganar acceso a los componentes de
conexi6n.
Figure 7. Ensemble de Bastidor del Recolector
A. Tubo medio
B. Tubo superior
C. Horquillas
D. Arandelas
E. Clavijas de seguridad
Instalaci6n del Tubo Inferior
1. Levarte el deflector de descarga (D, Figure 8).
2. Inserte el v_stago del corducto irferior (A) en la
placa de mortaje (B).
3. Jale la correa de caucho (C) y fijela colocando el ori-
ficio m_s cercaro al pomo en la correa completa-
mente sobre la contratuerca estrellada (E).
I I
Figura 8. Inetalaci6n del Tube Inferior
A. V_stago de conducto inferior
B, Placa de montaje
C, Correa de caucho
D, Deflector de deecarga
E. Contratuerca estrellada
Page 19

Ei Ensamble del tubo supe,
rior
Figura 9. Instalaci6n de nsamble del Tubo Superior
FigUra i0i instaiaCi6n de Tubo Superior en el
Soporte para Saco
Bi _rrea de Caucho
C: Encaje en e! ensamb!e de!tubo superior
D: So_rte
Ei Ensamb!e de! tubo superior
Instalaci6n del Tubo
1. Coloque el ensamble del tubo superior (E, Figuras g
& 10) an el soporte para saco (D) de modo qua la
ranura an el ersarrlble del tubo superior (C) se
encuentra an arrlbos lados del soporte. F{ielo con la
correa de caucho (B) an la rrluesca (A)
2. Deslice el ensarrlble del tubo superior (E, Figura 9)
sobre el tubo inferior (F).
Instalaci6n del Saco
1. Irstale el saoo (C, Figura 11) cot el blanco tubo (C)
hacia el criar. Coloque los aros del saco (B) sobre
los aros del soporte para saco (A) como se muestra.
Repita la operaci6n er el otro lado.
Page 20

A. Poste del enganche
B. Tubo
C. Postes
D. Tubos del enganche
E, Soporte para Saco y
Tolva
F. Saco
G. Aros delsoporte
H, Blanco Tubo
I. Arosdelsaco
J, Correa de caucho
K, SopoHe
L. Tubos superior e infe-
rior
M, Tubo inferior
N, Correa de caucho
O. Tuerca y tornillo de
cabeza hexagonal
P. Placa de montaje
Q. Vastago de conducto
R. Deflector
S. Ranura
Figura 12. Remoci6n e Instalaci6n Normal
INSTALACION Y REMOCION
NORMAL
InstalaciSn
1. Instale el soporta para sacoy la tolva (E, Figura 12)
insertando el tuba (B) sabre el pasta dal engancha (A) e
insertando los pastas (C) an los tubas del enganche
(D),
2. Manta al soporte para saco y la tolva (E), Instale el
saco (F) con el aro de levantamiento (H) hacia el frenta.
Coloqua los aros del saco (I) sabra los aros del soporte
para saco (G) coma sa muastra. Repita la operaci6n an
el otto lado,
3. Ilnstala al tuba inferior (M), Levanta el deflector de
descarga (F=t),Inserta el vdstago del conducto inferior
(Q) an la placa de montaja (P), Jale la corraa de cau-
cho (N) y fijela colocando el orificio rods cercano al
pomo an la corraa complatamenta sabre la contratuenca
estrellada y el tornillo de cabaza hexagonal (O),
4. Deslice el tube superior y media (L) sobr_ el tuba inferi-
or (M), Coloque el tube superior y media (L) sabre el
soporta (K), Frjelos con lacorrea de caucho (J)
enganchdndola en la ranura (S).
ADVERTENC IA
OPERACION SIN RECOLECTOR
Para operar sir embolsadora, el deflector de la
podadora DEBE ESTAR debidamerte instalado er la
posiciOr inferior y ser retenido par el pestillo de
resorte.
RemociSn
1, Desanganche la correa de caucho (J, Figura 12)de la
ranura (S),
2, Quite los tubes superiora inferior (L) del soporte(K) y
dal tuba inferior (M),
3, Desacopla la correa de caucho (N) de la contratuarca
est_llada y dal tornillo de cabaza hexagonal (O). Quite
el tuba inferior (M) del collar de fijaci6n (P), Vea qua el
deflector(R) regrese a la posici6n de ABAJO.
4, Lavantey quiteel soporte para saco y la tolva de los
tubes de angancha (D) y el pasta de angancha (A).
Page 21

RepairParts
PTS - 1
Page 22

Chute & Baffles Group
NOTE: Unless noted otherwise,
use the standard hardware torque
specification chart.
1
ZT 7000 2-Bin Bagger - Model No, 107,24907
\
10
9
16 _15
14
PTS - 2
Page 23

Chute & Baffles Group
REF NO, PART NO.
1 1726359
2 1726360
3 1709249
4 1672365
5 1726361
6 1960170
7 1960074
8 1726577
9 1927557
10 1960393
11 171600
12 1960096
13 1933896
14 1921332
15 1923325
16 1726578
17 1726364
18 1716870
ZT 7000 2-Bin Bagger - Model No. 107.24907
QTY. DESCRIPTION
1 ADAPTER Lower Chute
1 CHUTE, Grass Catcher Middle
1 DECAL, Warning Operating Mower W_hout Chute
2 PIN, Round Head Drilled, 1/2 x 1
1 CHUTE, Grass Catcher Upper Elbow
2 WASHER, 1/2
2 CLIP, Hair Pin, Spring Wire
1 ROD, Chute Mounting
11 NUT, Hex Flange Whiz Lock, 5/16-18
1 SCREW, Pan Head Phillips, #10-24 x 1
1 STRAP, Black Rubber, 4-13/16 Long
1 WASHER, 3/16
1 NUT, Hex Lock with Nylon Insert, 10-24 NC3B
9 CARRIAGE BOLT, Hex Head, 5/16-18 x 5/8 G5
2 CAPSCREW, Heax Head, 5/16-18 x 7/8 G5
1 PLATE, Chute Rod Mounting
1 BAFFLE, Blowout RH
1 BAFFLE, Blowout LH
Footnotes
PTS - 3
Page 24

Hopper, Bag & Hitch Group ZT 7000 2-Bin Bagger - Model No. 107.24907
NOTE: Unless noted otherwise,
use the standard hardware torque
specification chart.
\\
\
8
2
2O
/
I.D. [local
LO_dlo_
33 34
/
i /
PTS - 4
Page 25

Hoppe_ Bag & Hitch Group
REFNO. PART NO. QTY.
1 1960667 2
2 1931332 1
3 1665872 1
4 1726812 1
5 1726362 1
6 1673320 26
7 1679819 1
8 1910531 11
9 1726363 1
10 1679568 2
11 1726544 2
12 1930594 4
13 1679569 1
14 1960694 4
15 1726548 1
16 1679908 1
17 1726545 1
18 1716561 1
19 1679599 6
20 1709254 1
21 1709248 1
22 1960686 1
23 1726480 2
24 1726616 4
25 1667811 1
26 1726479 1
27 1924874 2
28 1666697 1
29 1672365 2
30 960718 2
31 1960170 2
32 1960074 2
33 1726367 2
34 1700864 2
35 1726475 1
36 1923701 2
37 1922755 4
38 1930644 1
39 1960687 2
40 1921176 1
ZT 7000 2-Bin Bagger - Model No. 107.24907
DESCRIPTION
CAPSCREW, Hex Flange Whiz Lock Dog Point 5/16-18 x 1
CARRIAGE BOLT 5/16-18 x 5/8 G5
STRAP, Black Rubber
PLATE, Hopper Elbow Seal
HOPPER TOP ASSEMBLY (Includes Ref Nos. 6, 7 8 9 10, 11 12 13, 14
15,16,17 18&19)
RIVET, Pop
WINDOW Clear PVC
WASHER Rivet, 3/16
TOP, Hopper Black Plastic
SEAL Corner Black Rubber
HINGE, Hopper Top
CAPSCREW, Hex Flange Whiz Lock 1/4-20 x 3/4
SEAL Center Black Rubber
NUT, Hex Flange 1/4-20 ESNA
STIFFENER Front Hopper
STIFFENER Rear 24-13/16 Long
LATCH Hopper
SCREEN 1/4 Mesh 20x28
RETAINER, Screen, Nylon Push In Type
DECAL, Warning Overloading the Grass Bag
DECAL, Warning Objects Thrown by Mower
NUT, Hex Flange 5/16-18 ESNA
PIPE & SHAFT ASSEMBLY, Support Grass Catcher
NUT, Pipe 5/16-18
SPACER, 5/16
BRACE Tube Center
WASHER 5/16
SPACER, 7/32
PIN, Round Head Drilled 1/2 x 1
SCREW Hex Flat Head 5/16-18 x 2
WASHER 1/2
CLIP, Hair Pin Spring Wire, 1-5/8
BAG & RIM ASSEMBLY Grass Catcher
EDGING, 13-1/8 Long PVC Tube White
HITCH ASSEMBLY Grass Catcher
CAPSCREW, Hex Head, 3/8-16 x 2 G5
WASHER 3/8
NUT, Hex Flange Two-Way Lock 1/2-13
NUT, Hex Flange 3/8-16 ESNA
CAPSCREW, Hex Head 1/2-13 x 1-1/4 G5
Footnotes
PTS - 5
Page 26

Common Hardware Types
He_Hcud C_pscrcw
@Wu_h_r
Torque Specification Chart
FORSTANDARDMACHINEHARDWARE(Tolerance± 20%)
Curriu,qcBo_
Standard Hardware Sizing
When a washer or nut is identified as 1/2", this is the
Nominal size, meaning the inside diameteri8 1/2 inch; if a
second number is present it represent the threads per inch
When bolt or cap,screw is identified as 1/2 - 16 x 2", this
means the Nominal size, or body diameter is 1/2 inch; the
second number represents the threads per inch (16 in this
e×ample, and the final number is the bodyfength of the
bolt or screw (in this ex_.mple 2 inches long).
The guides and ruler furnished below are designed to
help you select the appropriate hardware and tools.
Nut, 1/2"
Inside
Diameter
Screw, 112x 2
DiamB_t_l_r ) )
Body L_
Length
I
=,'" @ 0 ©
SAEGrHd_2 SAEGrad_5 SAE6fade8
Size 0f in/Ibs in.@s i_
Hardware fl!Ib$ Nrn. ft]lb$ N[nr fl!Ib$ N[nr
8-32
8-36
10-24
10-32
1/4-20
1/4-28
5/16-16
5/16-24
3/6-16
3/6-24
7/16-14
7/16-20
1/?-13
1/?-20
9/16-12
9/16-16
5/6-11
5i6-18
3i4-10
3/4-16
7i6-9
7/6-14
1-8
1-12
1. These torque values are to be used for all hardware
excluding: Iocknuts, self-tappingscrews, thread forming
screws, sheet metal screws and sockethead setscrews.
2. Recommended seatingtorque values for Iocknuts:
a. for prevailing torque Iocknuts - use 65% of grede 5
b. for flange whizlock nuts and screws - use 135% of
3. Unless otherwise noted on assembly drewings, all torque
values must meet this specification.
19 2.1
20 2.3
27 3.1
31 3.5
66 7.6
76 6.6 18
11 15.0 17
12 16.3 19
20 27.2 3_
23 31.3 35
30 40.6 59
35 47.6 55
50 66.0 75
55 74.6 99
65 86.4 119
75 102.0 12_
90 122.4 159
190 136 189
160 217.6 26_
180 244.6 309
140 190.4 409
155 210.6 44_
220 299.2 58_
240 326.4 649
torques.
grade 5 torques.
30 3r4 41
31 3r5 43
43 4rg 60
49 5r 5 _
18 10.9 12
23.1 25
25.8 27
40.8 45
47.6 50
68.0 70
74.8 80
102.0 110
122.4 120
149.6 150
163.2 170
204.0 220
244.8 240
353.6 386
408.0 420
544.0 680
598.4 660
768.8 ggg
870.4 1,000
NOTES
13.6 14
16.3
19.0
34.0
34.0
61.2
68.0
95.2
108.8
149.6
163.2
204.0
231.2
299.2
326.4
525.0
571.2
816.0
897.6
1,244.0
1,360.0
4.6
4.9
6.8
7.7
Wrench & Fastener Size Guide
1/4" Bolt or Nut 5/16" Bolt or Nut
Wrench 7/16" Wrench 1/2"
3/8" Bolt or Nut
Wrench 9/16"
©
7/16" Bolt or Nut
Wrench (Bolt)--5/8"
Wrench (Nut)--I 1/16"
1/2" Bolt or Nut
Wrench_i4"
Page 27

For repair-in your home-of all major brand appliancesi
lawn and garden equipment;or heating and cooling systems;
For the replacement partsi accessories and
owne[is manuals _hat you need _o do-it-yourself:
For Sears professional installation of home appliances
and i_ems like garage door openers and water hea_ers:
Ca!! an_ime; day or night (U;S;A; and Canada)
Our Home
For repair of carry-in items like vacuumsi lawn equipment;
and electronics; call or go on,line for _he location of your nearest
Sears Parts & Repair Center:
1.800.488.1222
Call anytime; day or night (U.S.A. only)
To purchase a pro_e_ion agreement (U;S.A;)
or maintenance agreement (Canada) on a produ_ sewiced by Sears:
1.800,827,6655 (UiSiA.)1-800-361-6665 (Canada)
Pare pedit se_icio de reparaCi6n Au canada pour service en fran_ais:
*====== s
® Register_,dTredernerk/ Treden_erk / - Service Mark o_Seers, ROebuckand Co.
® Meroe Registmale/ T= Marca de F_bde_- _=Mama de $ervicio de Sears, Roebuck end Co.
_c Marque de commerce / _ Marque d_poe_ de Se._rs, Roebuck end Co. © .Sears, Roebuck end Co.
3M _M
 Loading...