

Page 1

INSTRUCTION MANUAL | MANUAL DE INSTRUCCIONES
Battery Powered Lithium-Ion Tractor
Montable alimentado por batería de ión de litio
Model Name Number & Description
CMXGRAM1130049 33AA27JD793 Lawn Tractor
IF YOU HAVE QUESTIONS OR COMMENTS, CONTACT US.
SI TIENE DUDAS O COMENTARIOS, CONTÁCTENOS.
1-888-331-4569 WWW.CRAFTSMAN.COM
Form No. 769-18972
(November 26, 2018)
Page 2

TABLE OF CONTENTS
Safe Operation Practices ........................Page 3
Assembly .......................................Page 9
Operation ......................................Page 13
Service & Maintenance ..........................Pag e 17
Battery Type: 1500 Wh Li-Ion
Charger: 48V, 650w
Off-Season Storage ..............................Page 18
Troubleshooting ............................... Page 22
Español ........................................ Page 24
Warranty Statement ...............Separate Supplement
MODEL NUMBERPRODUCT SPECIFICATIONS
Model Number ________________________________
Serial Number _________________________________
Date of Purchase _______________________________
Record the model number, serial number,
and date of purchase above.
WARNING
Before using this equipment, read the manual and follow all safety rules and operating instructions.
NOTE: This Operator’s Manual covers sever al models. Featur es may vary by model. Not all features in this manual are applicable to all models and the model depicted may di ffer
from yours.
2
Page 3

SAFETY INSTRUCTIONS
WARNING
This symbol points out important safety instructions which, if not followed, could endanger the personal safety and/or property of yourself and others. Read
and follow all instructions in this manual before attempting to operate this machine. Failure to comply with these instructions may result in personal injury.
When you see this symbol, HEED ITS WARNING!
WARNING
CALIFORNIA PROPOSITION 65
Engine Exhaust, some of its constituents, and certain vehicle components contain or emit chemicals known to the State of California to cause cancer and birth
defects or other reproductive harm.
DANGER
This machine was built to be operated according to the safe operation practices in this manual. As with any type of power equipment, carelessness or error
on the part of the operator can result in serious injury. This machine is capable of amputating fingers, hands, toes and feet and throwing debris. Failure to
observe the following safety instructions could result in serious injury or death.
READ ALL INSTRUCTIONS
1500 Watt-Hours Lithium-Ion Battery System
Servicing requires extreme care and knowledge of the system and must be performed only by a qualified service technician. For repair or service take the
tractor to your nearest authorized ser vice dealer. Always use original equipment manufacturer’s (OEM) replacement parts when servicing.
General Operation
1. Read, understand, and follow all instructions on the tractor and in the
manual(s) before attempting to assemble and operate. Keep this manual in a
safe place for future and regular reference and for ordering replacement parts.
2. Be familiar with all controls and their prop er operation. Know how to stop the tractor
and disengage the blades quickly.
3. Never allow children under 14 years of age to operate t his tractor. Children 14 and over
should read and unders tand the instructions and s afe operation practices in t his manual
and on the tractor an d should be trained and supervis ed by an adult.
4. Never allow adults to operate this tractor without proper instruc tion.
5. Do not charge or operate the tractor in the rain or wet conditions.
6. In case of a system fault or a complete loss of bat tery power the tractor can
freewheel. Depress the brake pedal to maintain control and stop the trac tor.
Restart the tractor. If the problem per sists, contact your authorized service
dealer.
7. To help avoid blade contact or a thrown object injury, keep bystanders,
helpers, children and pets at least 75 feet from the tractor while it is in
operation. Stop tractor if anyone enters the area.
8. Thoro ughly inspect the area where the equip ment is to be used. Remove all stones,
sticks, wire, bo nes, toys, and other foreign objects whic h could be picked up and
thrown by the blade(s). Thrown objects can c ause serious personal injur y.
9. Plan your mowing pattern to avoid discharge of material toward roads,
sidewalks, bystanders and the like. Also, avoid discharging material against
a wall or obstruction which may cause discharged material to ricochet back
toward the operator.
10. Always wear safety glasses or safety goggles during operation and while
performing an adjustment or repair to protect your eyes. Thrown objects
which ricochet can cause serious injury to the eyes.
11. Wear sturdy, rough-soled work shoes and close-fitting slacks and shirts.
Loose fitting clothes and jewelr y can be caught in movable parts. Never
operate this tractor in bare feet or sandals.
12. Be aware of the cutting deck and attachment discharge direction and do not
point it at anyone. Do not operate the cutting deck without the discharge
cover or entire grass catcher in its proper place.
13. Do not put hands or feet near rotating parts or under the cutting deck.
Contact with the blade(s) can amputate hands and feet.
14. A missing or damaged discharge cover can cause blade contact or thrown
object injuries.
15. Stop the blade(s) when crossing gravel drives, walks, or roads and while not
cutting grass.
16. Watch for traff ic when operating near or crossing roadways. This tractor is not
intended for use on any public roadway.
17. Do not operate the tractor while under the inf luence of alcohol or drugs.
18. Mow only in daylight or good ar tificial light.
19. Never carry passengers.
20. Do not turn the key of f and coast downhill.
21. Do not tow this tractor.
22. Turn off blade(s) before traveling in reverse. Back up slowly. Always look
down and behind before and while backing to avoid a back-over accident.
23. Slow down before turning. Operate the tractor smoothly. Avoid erratic
operation and excessive speed.
24. Turn off blade(s), set parking brake, press Start/Stop button and wait
until the blade(s) come to a complete stop before removing grass catcher,
emptying grass, unclogging chute, removing any grass or debris, or making
any adjustments.
25. Never leave a running tractor unattended. Always turn of f blade(s), turn
power key to OFF position and remove before dismounting.
26. Use extra care when loading or unloading the tractor into a trailer or truck.
This tractor should not be driven up or down ramp(s), because the tractor
could tip over, causing serious personal injury. The tractor must be pushed
manually on ramp(s) to load or unload properly.
27. Motors may become hot and can cause a burn. Do not touch.
28. Check overhead clearances carefully before driving under low hanging tree
branches, wires, door openings etc., where the operator may be struck or
pulled from the tractor, which could result in serious injury.
3
Page 4

SAFETY INSTRUCTIONS
29. Your tractor is designed to cut normal residential grass of a height no more
than 10”. Do not attempt to mow through unusually tall, dry grass (e.g.,
pasture) or piles of dry leaves. Dry grass or leaves may contact hot surfaces
and/or build up on the tractor deck presenting a potential fire hazard.
30. Use only accessories and attachments approved for this tractor by the tractor
manufacturer. Read, understand and follow all instructions provided with
the approved accessory or attachment.
31. Data indicates that operators, age 60 years and above, are involved in a large
percentage of tractor-related injuries. These operators should evaluate their
ability to operate the tractor safely enough to protect themselves and others
from serious injury.
32. If situations occur which are not covered in this manual, use care and good
judgment. Contact your customer service representative for assistance.
Slope Operation
Slopes are a major factor related to loss of control and tip-over accidents which can
result in severe injury or death. All slopes require extra caution. If you cannot back
up the slope or if you feel uneasy on it, do not mow or drive on it.
For your safety, use the slope gauge included as part of this manual to measure
slopes before operating this tractor on a sloped or hilly area. If the slope is greater
than 12 degrees as shown on the slope gauge, do not operate this tractor on that
area or serious injury could result.
Do:
1. Set the parking brake when sitting on an incline with the power key off.
2. Mow up and down slopes, not across. Exercise extreme caution when changing
direction on slopes.
3. Watch for holes, ruts, bumps, rocks, or other hidden objects. Uneven terrain
could overturn the tractor. Tall grass can hide obstacles.
4. Use slow speed. Choose a low enough speed setting so that you will not have
to stop while on the slope. Tires may lose traction on slopes even though the
brakes are functioning properly. This tractor uses regenerative braking on
the drive motor to help slow it down.
5. Follow the manufac turer’s recommendation for wheel weight s or counterweights to
improve stability.
6. Use extra care with grass catchers or other attachments. These can change
the stability of the tractor.
7. Keep all movement on the slopes slow and gradual. Do not make sudden
changes in speed or direction. Rapid engagement or braking could cause the
front of the tractor to lift and rapidly flip over backwards which could cause
serious injury.
8. Avoid star ting or stopping on a slope. If tires lose trac tion, turn off the blade(s) and
proceed slowly straight down the slope.
Do Not:
1. Do not turn on slopes unless necessary; then, turn slowly and gradually
downhill, if possible.
2. Do not turn the power key off on an incline without setting the parking
brake.
3. Do not mow or drive near drop-offs, ditches or embankments. The tractor
could suddenly turn over if a wheel is over the edge of a cliff, ditch, or if an
edge caves in.
4. Do not try to stabilize the tractor by putting your foot on the ground.
5. Do not use a grass catcher on s teep slopes.
6. Do not mow or drive on wet grass. Reduced traction could cause sliding.
7. Do not press the Start/Stop button and coast downhill. Over-speeding may
cause the operator to lose control of the tractor resulting in serious injury or
death.
8. Do not tow heavy pull behind attachments (e.g. loaded dump cart, lawn
roller, etc.) on slopes greater than 5 degrees. When going down hill, the
extra weight tends to push the tractor and may cause you to loose control
(e.g. tractor may speed up, braking and steering ability are reduced,
attachment may jack-knife and cause tractor to overturn).
Children
1. Tragic accidents can occur if the operator is not alert to the presence of
children. Children are of ten attracted to the tractor and the mowing activity.
They do not understand the dangers. Never assume that children will remain
where you last saw them.
a. Keep children out of the mowing area and in watchful care of a
responsible adult other than the operator.
b. Be alert and turn tractor off if a child enters the area.
c. Before and while bac king, look behind and down for small children.
d. Never car ry children, even with the blade(s) shut off. They may fall of f and
be seriously injured o r interfere with safe trac tor operation.
e. Use extreme care when approaching blind corners, doorways,
shrubs, trees or other objects that may block your vision of a child
who may run into the path of the tractor.
f. To avoid back-over accidents, always turn off the cutting blade(s)
before traveling in Reverse. If equipped, the “Reverse Caution Mode”
should not be used when children or others are around.
g. Remove key when tractor is unattended to prevent unauthorized
operation.
2. Never allow children under 14 years of age to operate this tractor. Children
14 and over should read and understand the instructions and safe operation
practices in this manual and on the tractor and should be trained and
supervised by an adult.
Towing
1. Tow only with a tractor that has a hitch designed for towing. Do not at tach towed
equipment except at the hitch point.
2. Follow the manufacturers recommendation for weight limits for towed
equipment and towing on slopes.
3. Never allow children or others in or on towed equipment.
4. On slopes, the weight of the towed equipment may cause loss of traction and
loss of control.
5. The maximum tongue weight on the hitch is 50 lbs. and the maximum
towed weight is 250 lbs.
6. Always use extra caution when towing with a tractor capable of making
tight turns (e.g. “zero-turn” ride-on tractor). Make wide turns to avoid
jack-knifing.
7. Travel slowly and allow extra distance to stop.
8. Do not press the Start/Stop but ton and coast downhill.
Service
General Service
1. Remove key and store tractor indoors when not in use. Allow motors to cool
before storing in any enclosure. Tractor should be stored indoors in a dry
place, out of reach of children.
2. Recharge only with the charger specified by the manufacturer. A charger
that is suitable for one type of batter y may create a risk of fire when used
with another battery.
3. Do not use the charger in the rain.
4. Before cleaning, repairing, or inspecting, make certain the blade(s) and all
moving parts have stopped.
4
Page 5
SAFETY INSTRUCTIONS
5. Never douse or hose the tractor with water. Avoid getting any liquid in the
motors and electrical connections. Clean the tractor after each use. Refer to
cleaning and storage. Do not use solvents or strong detergents.
6. To reduce fire hazard, keep the motor(s) free of grass, leaves and debris
build-up.
7. Periodically check to make sure the blade(s) come(s) to complete stop within
(5) five seconds after operating the blade on/off button. If the blade(s) do not
stop within the this time frame, your tractor should be serviced professionally
by an authorized service dealer.
8. Check brake operation frequently as it is subjected to wear during normal
operation. Adjust and service as required.
9. Check the blade(s) and mounting bolts at frequent intervals for proper
tightness. Also, visually inspec t blade(s) for damage (e.g., excessive
wear, bent, cracked). Replace the blade(s) with the original equipment
manufacturer’s (O.E.M.) blade(s) only. “Use of parts which do not meet the
original equipment specifications may lead to improper performance and
compromise safety!”
10. Tractor blade(s) are sharp. Wrap the blade or wear gloves, and use extra
caution when servicing them.
11. Keep all nuts, bolts, and screws tight to be sure the equipment is in safe
working condition.
12. Never tamper with the safety interlock system or other safety devices. Check
their proper operation regularly.
13. After st riking a foreign object, stop the t ractor, remove the key and thoroughly
inspect the tr actor for any damage. Repair the damage before operating the
tractor.
14. Never attempt to make adjustments or repairs to the tractor while the power
key is ON.
15. Grass catcher components and the discharge cover are subject to wear and
damage which could expose moving parts or allow objects to be thrown. For
safety protection, frequently check components and replace immediately
with original equipment manufacturer’s (O.E.M.) parts only. “Use of parts
which do not meet the original equipment specifications may lead to
improper performance and compromise safety!”
16. Maintain or replace safety and instruction labels, as necessary.
17. This product has an Average Useful Life of seven (7) years, or 270 hours of
operation. At the end of the Average Useful Life have the tractor inspected
annually by an authorized service dealer to ensure that all mechanical and
safety systems are working properly and not worn excessively. Failure to do
so can result in accidents, injuries or death.
18. Do not dispose of the batter y(ies) in a fire. The cell may explode. Check with
local codes for proper disposal instructions.
19. Do not tou ch the motor(s). These parts c an get hot from operation, even after the
tractor is tur ned off.
20. Exercise care in handling batteries in order not to short the battery with
conductive materials such as rings, bracelets, and keys. The battery or
conductor may be hot and cause burns.
21. For continued protection against risk of injury or elec tric shock, do not
replace blown fuses. Please call authorized service personnel.
General Electric Safety
1. Do not expose the tractor to rain or wet conditions.
2. Do not handle the tractor with wet hands.
3. Do not operate the tractor in the rain, in wet conditions or on wet surfaces.
4. To reduce the risk of electric shock, avoid body contact with grounded
conductors, such as metal pipes or wire fences.
5. Do not operate the tractor in explosive atmospheres, such as in the presence
of flammable liquids, gases or dust.
Battery Charger Safety
WARNING
Only use a Delta-Q battery charger (model # IC650-048-CAN/part #
950-0004 or model # IC650-048-COMMD/part # 950-0007) (OEM part# 72507253 or part# 725-07253A) to charge batteries. DO NOT attempt to charge
any other batteries with a Delta-Q battery charger. Other types of batteries
may burst, causing fire, personal injury or property damage.
1. A nameplate on the charger ind icates the voltage used. Never connect t he charger to
an AC voltage that diff ers from this voltage.
2. An extension cord should not be used unless absolutely necessary. Use of
an improper extension cord could result in a risk of f ire, electric shock or
electrocution.
3. Do not use multiple extension cords
4. Make sure the extension cord is heavy enough to carry the current drawn by
the charger. An undersized extension cord will cause a drop in line voltage,
resulting in a loss of power and overheating. If in doubt, use the next heavier
gauge cord. The smaller the gauge number, the heavier the cord.
MINIMUM WIRE SIZE FOR EXTENSION CORDS FOR 120 VOLT APPLIANCES USING 0-6
AMPS
Cord Length (ft.) 25 50 100 150
Wire Size (AWG) 16 16 16 14
5. Make sure the cords are in good condition. Inspect the power cord and extension
cord periodically. Look closely for deterioration, cu ts or cracks in the insulation. If a
cord is damaged in any manner while plugge d in, disconnect the cord from both
the outlet and the charger. Do not use a damaged cord. Damaged cords should b e
repaired or replaced.
6. Do not abuse cords. Never pull or carry the charger by a cord. Keep cords
away from heat, oil, water, sharp edges, and moving objects. Always grasp
the plug when disconnecting a cord.
7. Never modify a plug, cord or outlet in any way.
8. Groun d Fault Circuit Interrupter (GFCI) protec tion should be provided on the
circuit(s) or outlet(s) to be used with this charger. For an ex tra measure of safety, use
receptacles with b uilt-in GFCI protection.
9. Do not place the battery charger where cords might be stepped on, tripped
over or subjected to damage.
10. Do not charge batteries in the rain or in wet conditions. Keep the battery
charger in a cool and dry area.
11. Keep the battery charger away from all liquids.
12. Do not allow small metal items or material such as steel wool, aluminum foil or
other foreign par ticles into the charger port.
13. Do not probe the charger with conductive material. There is a risk of electric
shock.
14. Do not cover the battery charger. The batter y charger may overheat.
15. Do not allow the battery or battery charger to overheat. If they are warm,
allow them to cool down. Only charge batteries in temperatures between
32° and 104° F (0° and 40° C).
16. Always unplug the battery charger when it is not in use.
Battery Safety
1. Do not expose the battery to fire or to temperatures over 176º F (80º C).
Doing so could cause an explosion.
5
Page 6

SAFETY INSTRUCTIONS
2. Handle batteries with care. Do not short the battery with conductive
materials, such as rings, bracelets, keys, etc. Shorting the battery may cause
personal injury, damage to the battery or a f ire.
3. Do not attempt to charge a cracked or damaged battery.
4. Do not use or charge a wet battery or a battery that shows any evidence of
corrosion.
5. Do not use a damaged or modified battery. Doing so could result in a fire,
explosion or personal injury.
WARNING
The battery may present a risk of fire or chemical burn if misused. Do not
disassemble, overheat or incinerate the battery.
WARNING
Leakage from the Power Cell may occur under extreme usage, charging
or temperature conditions or if the Power Cell is damaged, crushed or
punctured. This leakage indicates a failure of the Power Cell and the
Power Cell should be properly disposed of per local hazardous material
regulations.
If the Power Cell leakage gets on your skin or eyes, follow these steps:
• Immediately wash the area with soap and water.
• Immediately flush the eyes with clean water for a minimum of 20 minutes
and seek immediate medical attention.
If the leakage gets on your clothing or shoes, remove, isolate and wash the
contaminated clothing thoroughly.
FCC Statement (Bluetooth® Models only)
NOTE: This equipment has been tested and found to comply with the limits for a
Class B digital device, pursuant to part 15 of the FCC Rules. These limits are designed
to provide reasonable protection against harmful interference in a residential
installation. This equipment generates, uses and can radiate radio frequency
energy and, if not installed and used in accordance with the instructions, may cause
harmful interference to radio communications. However, there is no guarantee that
interference will not occur in a particular installation. If this equipment does cause
harmful interference to radio or television reception, which can be determined
by turning the equipment off and on, the user is encouraged to try to correct the
interference by one or more of the following measures:
• Reorient or relocate the receiving antenna.
• Increase the separation between the equipment and receiver.
• Connect the equipment into an outlet on a circuit different from that to
which the receiver is connected.
• Consult the dealer or an experienced radio/TV technician for help.
CAUTION
Changes or modifications not expressly approved by the party responsible
for compliance could void the user’s authority to operate the equipment.
6
Page 7
SAFETY INSTRUCTIONS
SAFETY SYMBOLS
This page depic ts and describes safety symbols that may appear on this product. Read, understand, and follow all instructions on the machine before
attempting to assemble and operate.
Symbol Description
READ THE OPERATOR’S MANUAL(S)
Read, understand, and follow all
instructions in the manual(s) before
attempting to assemble and operate.
WARNING — THROWN OBJECTS
This tractor may pick up and throw and
objects which can cause serious personal
injury. Stay clear. Keep bystanders, helpers,
children and pets at least 75 feet from the
tractor while it is in operation.
WARNING — BYSTANDERS
Keep bystanders, helpers, children and pets
at least 75 feet from the tractor while it is in
operation.
DANGER — ROTATING BLADE(S)
Never carry passengers. Never carry
children, even with the blade(s) OFF.
WARNING — ROTATING BLADE(S)
Do not put hands or feet near rotating
parts or under the cutting deck. Contact
with the blade(s) can amputate hands and
feet. Be sure blade(s) and power are off
before placing hands or feet near blade(s).
WARNING — ROTATING BLADE(S)
Do not put hands or feet near rotating parts
or under the cutting deck. Contact with
the blade(s) can amputate hands and feet.
Be sure blade(s) and power are off before
placing hands or feet near blade(s). Always
remove the power key when not in use.
WARNING — SLOPE OPERATION
Go up and down slopes, not across. Use extra
caution on slopes. Do not mow or drive on
lopes greater than 12°/21%. If tractor stops
going uphill, stop blade(s) back down slowly.
Symbol Description
WARNING — ELECTRIC SHOCK
Do not charge tractor in rain or wet
locations. Do not use battery operated
tractor in rain.
DANGER — SLOPE OPERATION
Do not operate this tractor where it could
tip or slip. Avoid sudden turns. Use low
speed.
DANGER — SERVICE
Many components on this tractor should
only be serviced by an authorized service
dealer. Read this Operator’s Manual before
attempting to service this tractor.
DANGER — ROTATING BLADE(S)
Always look down and behind before
and while backing to avoid a back-over
accident. To avoid a back-over accident,
keep children away from the tractor while
it is in operation. Mowing in reverse is not
recommended.
WARNING — THROWN OBJECTS
This tractor may pick up and throw and
objects which can cause serious personal
injury.
WARNING — ROTATING BLADES
Do not put hands or feet near rotating
parts or under the cutting deck. Contact
with the blade(s) can amputate hands and
feet.
DANGER — GUARDS, SHIELDS, SWITCHES,
ETC.
Keep safety devices (Guards, Shields,
Switches, Etc.) in place and working.
WARNING — ELECTRIC SHOCK
Do not charge tractor in rain or wet
locations. Do not use battery operated
tractor in rain.
WARNING
Your Responsibility—Restrict the use of this power machine to persons who read, understand and follow the warnings and instructions in this
manual and on the machine.
SAVE THESE INSTRUCTIONS!
7
Page 8
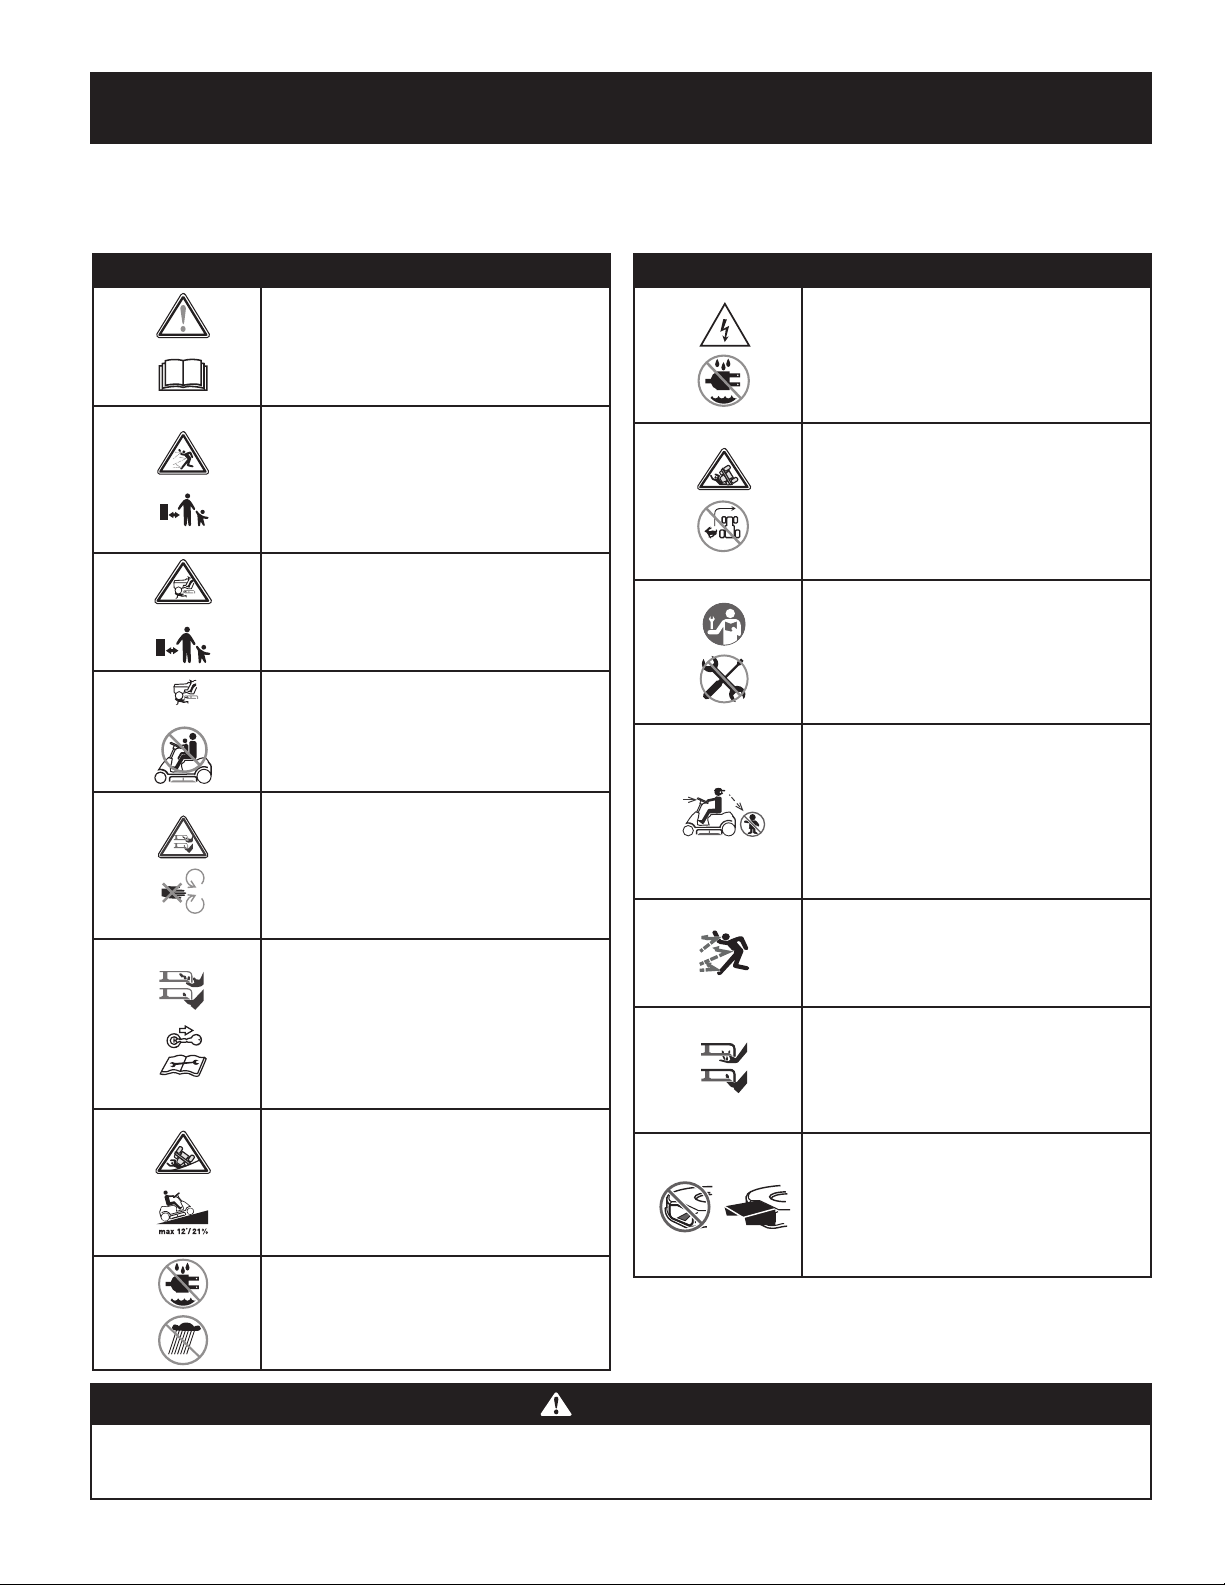
SLOPE GAUGE
12°/21% Slope
Figure 2Figure 1
Slope Gauge
12°/21% Slope
(OK) (TOO STEEP)
12°/21% dashed line
USE THIS SLOPE GAUGE TO DETERMINE
IF A SLOPE IS TOO STEEP FOR SAFE OPERATION!
Do not operate machine on slopes in excess of 12 degrees/21 percent. All slopes require extra caution. If you cannot back up the slope or if you
WARNING! Slopes are a major factor related to tip-over and roll-over accidents which can result in severe injury or death.
feel uneasy on it, do not mow or drive on it. Always mow up and down slopes, never across the face of slopes.
To check the slope, proceed as follows:
1. Remove this page and fold along the dashed line.
2. Locate a vertical object on or behind the slope (e.g. a pole, building, fence, tree, etc.)
3. Align either side of the slope gauge with the object (See Figure 1 and Figure 2 ).
4. Adjust gauge up or down until the left corner touches the slope (See Figure 1 and Figure 2).
5. If there is a gap below the gauge, the slope is too steep for safe operation (See Figure 2 above).
8
Page 9
ASSEMBLY
(b)
(a)
(a)
(b)
(d)
(c)
(a)
(b)
(d)
(c)
Note: This Operator’s Manual covers several models. Tractor features may vary by
model. Not all features in this manual are applicable to all tractor models and the
tractor depicted may differ from yours.
Note: All references in this manual to the left or right side and front or back of the
tractor are from the operating position only. Exceptions, if any, will be specified.
Note: Some components may come already assembled. If they are already
assembled, skip ahead to the next step.
Contents of Crate
• Tractor
• Steering Pedestal Cap
• Discharge Chute Assembly
• Hardware Pack
• Product Registration Card
• Operator’s Manual
• Rear Hitch Plate
• Mulch Plug
• Battery Charger
• Steering wheel/ Shaft Assembly
• Seat Assembly
• Seat Assembly
• Front Bumper
• Battery Charger Manual
Contents of Hardware Pack
Before beginning installation, remove all the contents from the crate and all the
hardware from the pack to make sure everything is present. Hardware is listed
below.
• Hitch Plate
• Seat Mounting Bracket (w/ two shoulder bolts & lock nuts installed)
Recommended Tools for Assembly
• 3/8” wrench and/or socket
• 7/16” wrench and/or socket
• 1/2” wrench and/or socket
• 9/16” wrench and/or socket
• Phillips screw driver
• 1/4” or 3/8”drive ratchet
Manually Moving the Tractor
The tractor can be moved as long as the parking brake is not set. Do not tow the
tractor. The tractor can be pushed slowly.
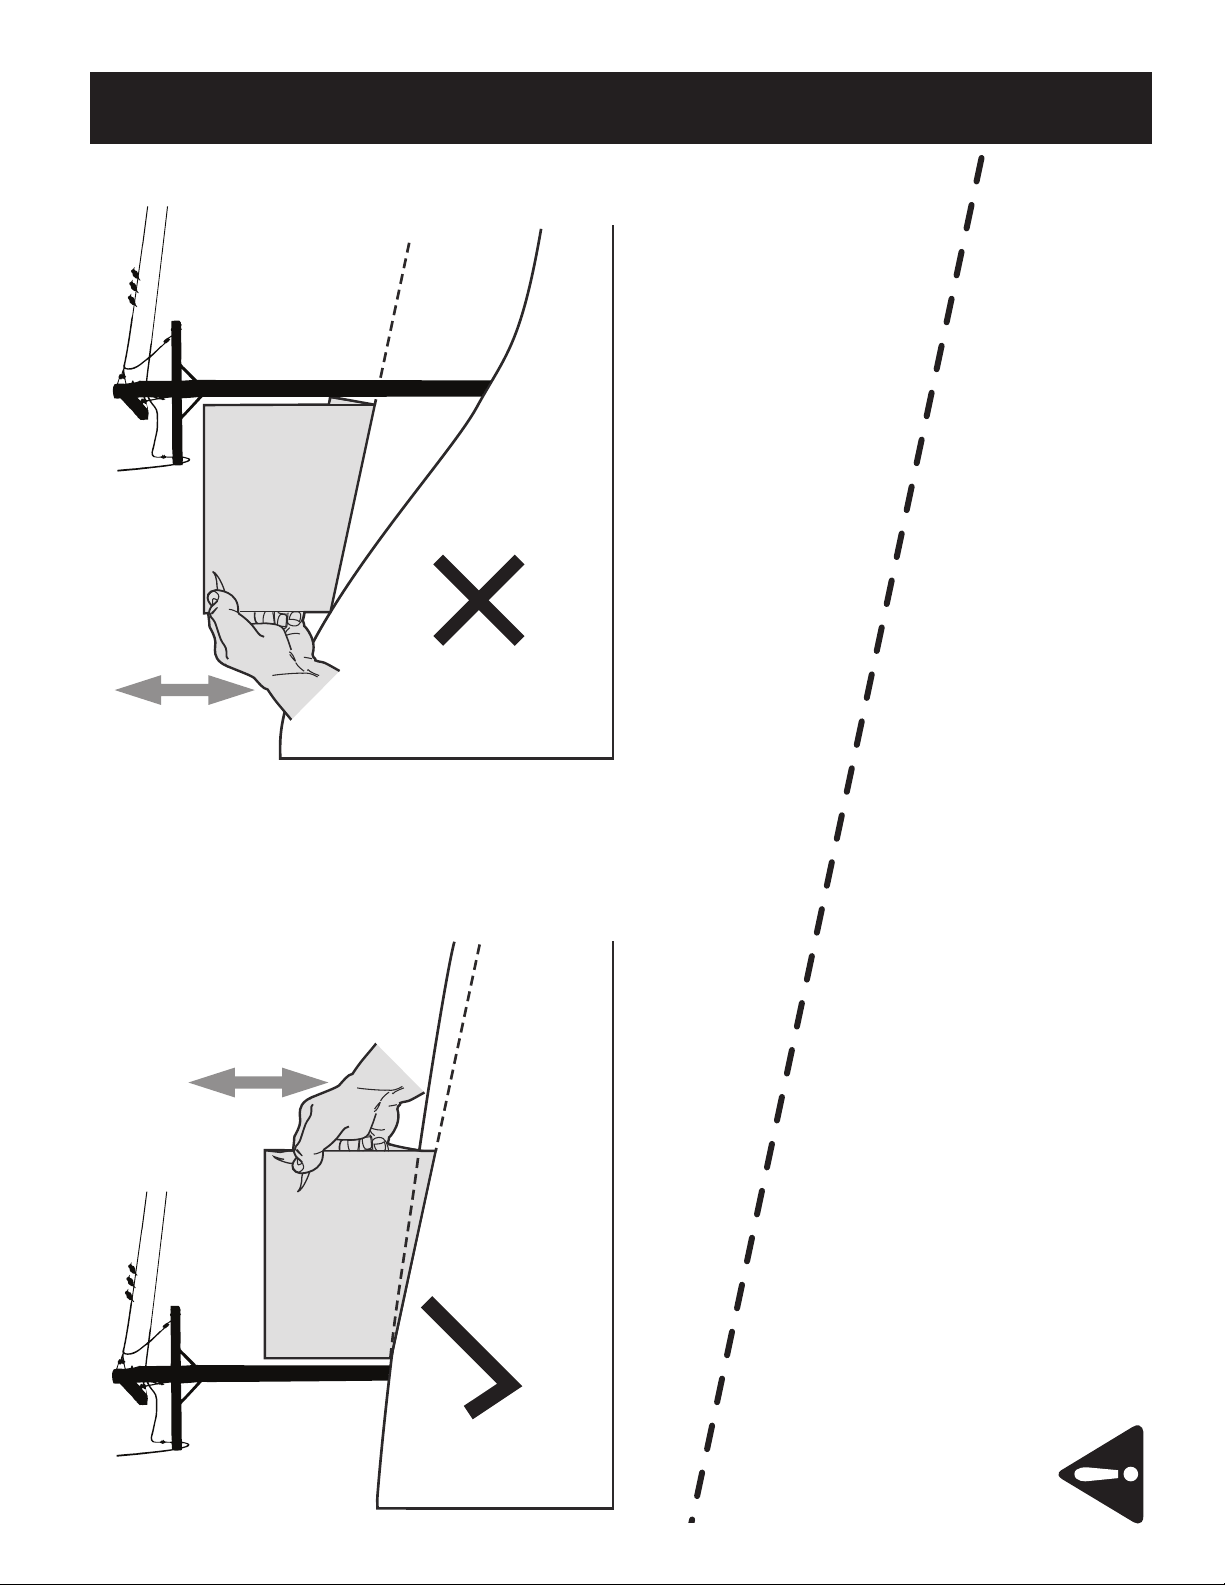
Installing the Steering Wheel Assembly
If the steering wheel assembly for your tractor did not come already installed,
follow the steps below:
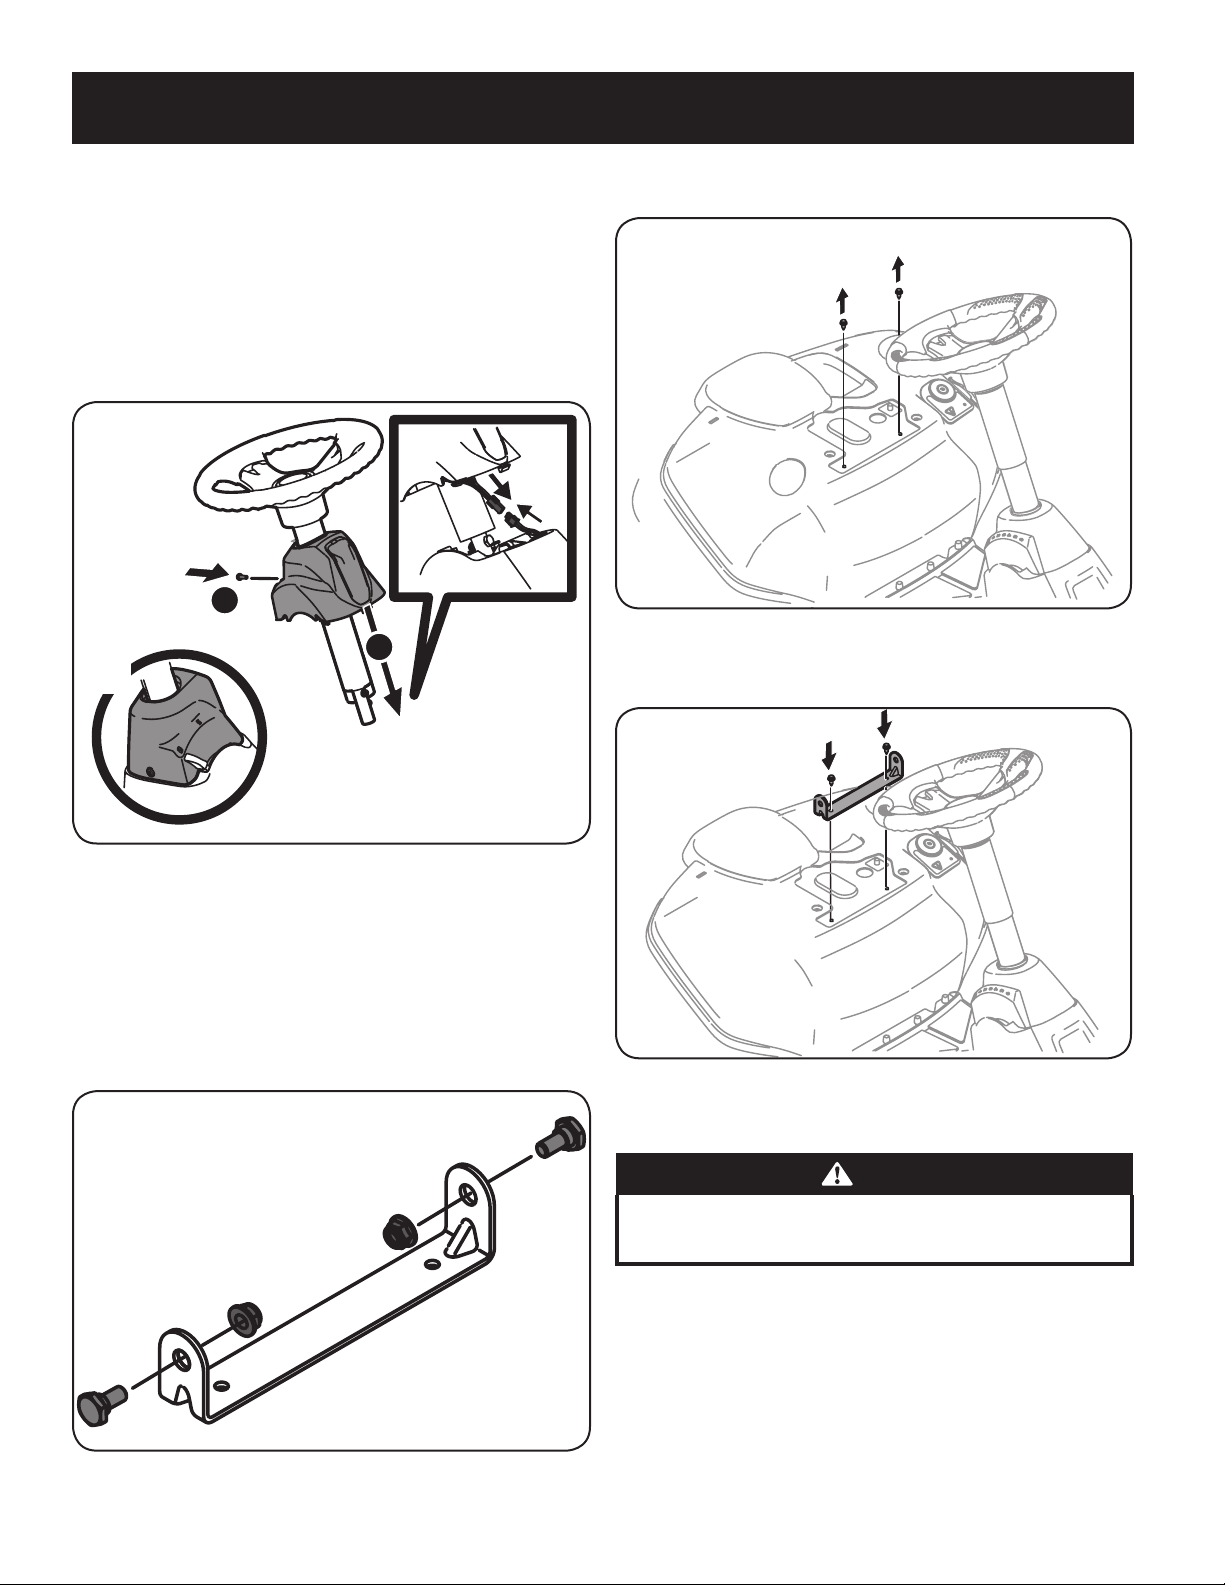
1. Slide the pedestal cap (a) onto the steering shaf t (b) so that when the
steering shaft (b) is installed on the tractor, the pedestal cap (a) will be
upright as shown in Figure 1.
Figure 1
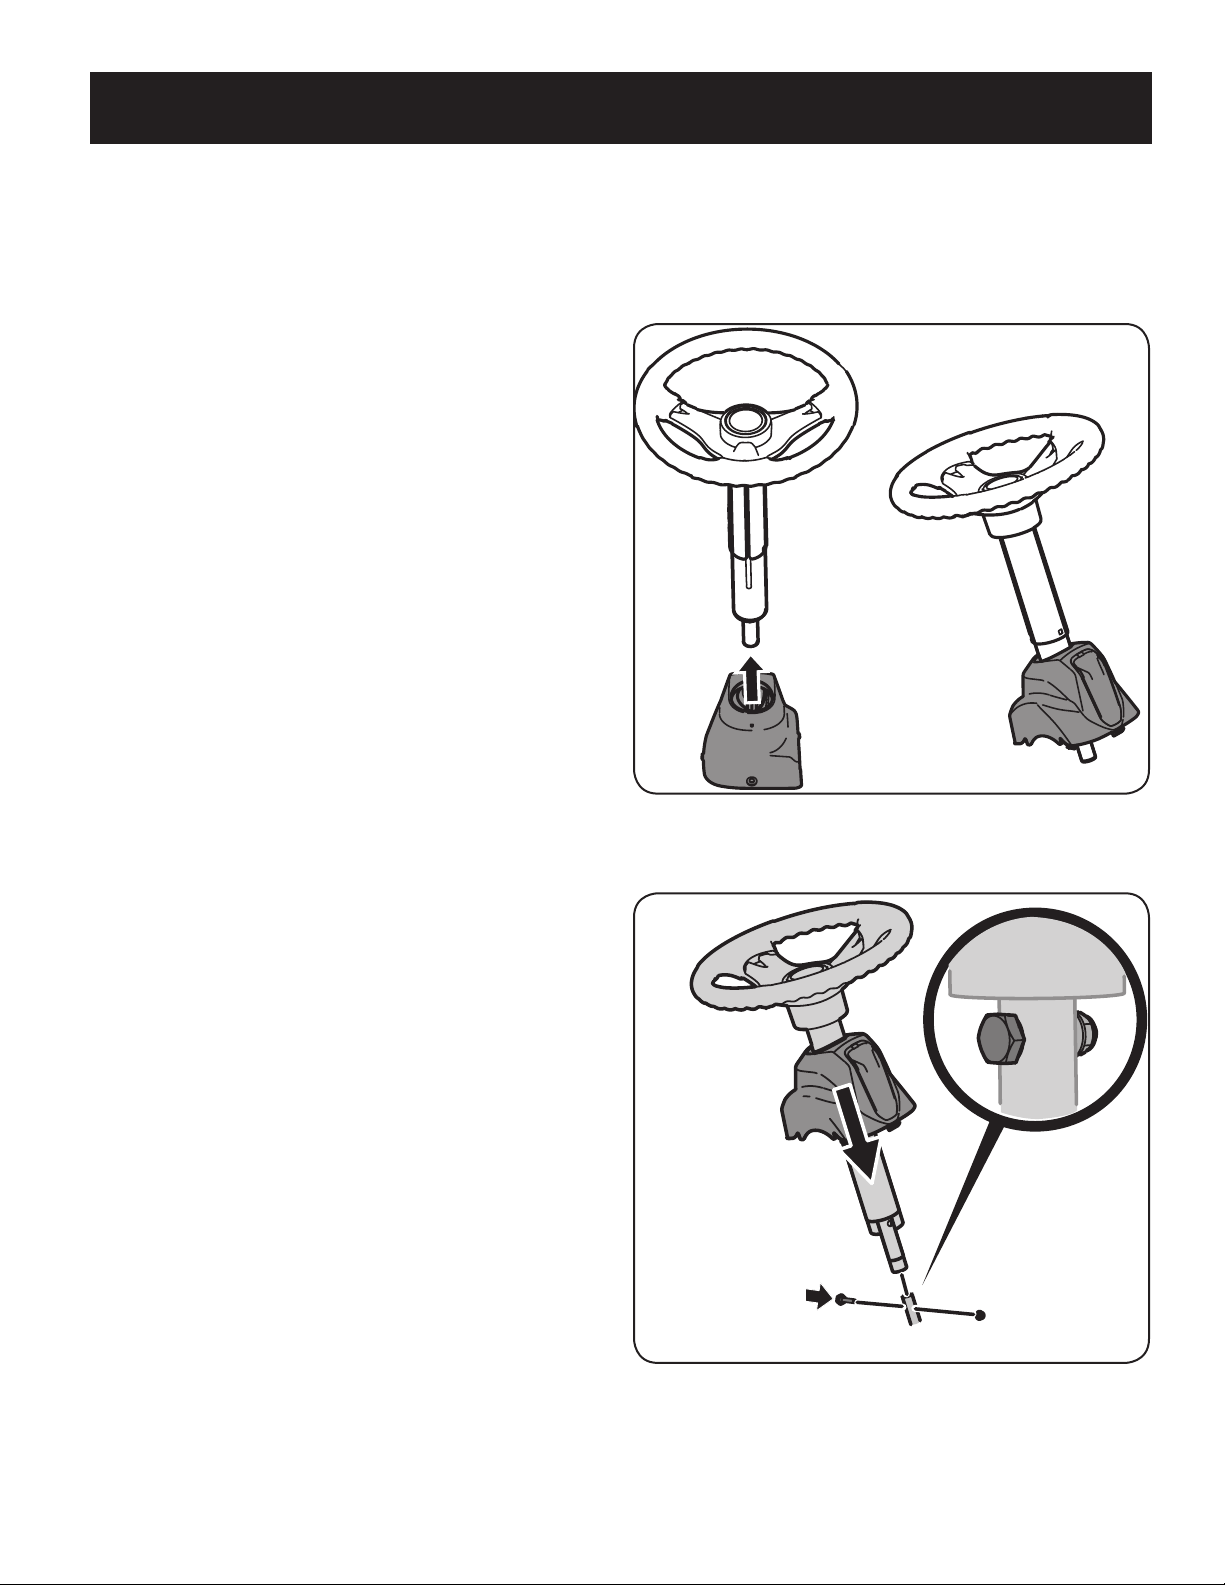
2. Remove the shoulder bolt (c) and lock nut (d) from the steering shaft and
retain for later steps. See Figure 2.
Figure 2
9
Page 10
ASSEMBLY
1
2
(a)
(b)
(b)
(c)
(c)
(a)
(b)
(a)
(b)
(a)
(a)
(a)
(b)
(b)
3. Position the steering wheel assembly over the lower steering shaft on the
tractor. Align the steering wheel so that its largest opening faces forward
when the tractor wheels are straight.
4. Lower the steering wheel assembly (a) onto the lower steering shaft (b) and
secure with the shoulder bolt (c) and lock nut (d)previously removed. See
Figure 2.
5. Tighten the shoulder bolt and lock nut using a 9/16” wrench or socket and
7/16”wrench or socket.
6. Remove the pedestal cap mount screw factory installed and located on the
tractor’s steering console. Retain the screw for later instruc tions. See Figure 3.
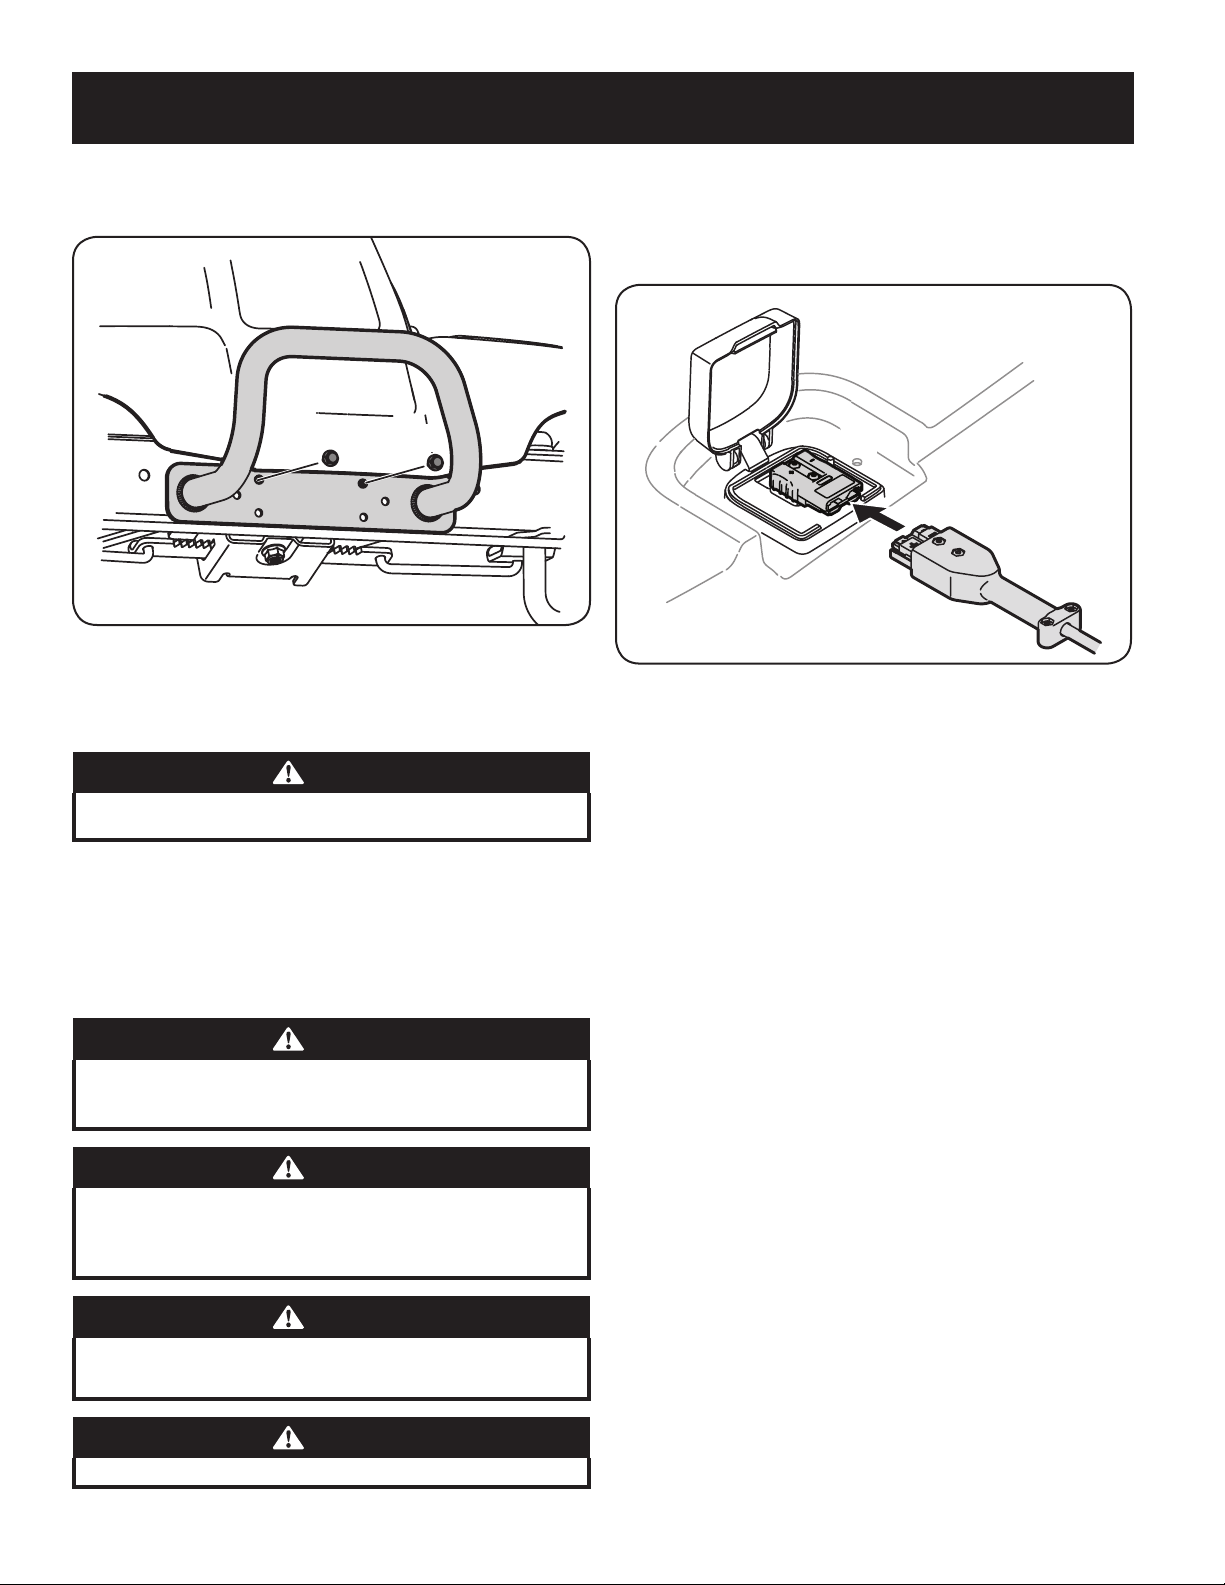
2. Remove the two self-tapping bolts (a) factory installed on the tractor. See
Figure 5.
Figure 5
3. Align the seat bracket (a) in place over the holes from where the self-tapping
bolts (b) were removed, as shown in Figure 6.
Figure 3
7. Connect the headlight wire terminals (a). Slide the pedestal cap (b) down
onto the tractor and slightly rotate to the right to clip into place. Secure the
pedestal cap (b) with the screw (c) previously removed. See Figure 3.
Attaching the Seat
If the seat for your tractor was not attached at the factory, follow the applicable
instructions below to attach it.
1. Remove the shoulder bolts (a) and lock nuts (b) from the seat mounting
bracket (c) included in your hardware pack. See Figure 4.
Figure 6
4. Using a 1/4” drive ratchet with a 3/8” socket, secure the seat bracket (a) with
the self-tapping bolts (b) removed in step 2. See Figure 6.
CAUTION
Do not use any type of power tool (e.g. impact gun or electric drill with nut
driver attached) when tightening the self-tapping bolts to attach the seat
bracket.
Figure 4
10
Page 11

ASSEMBLY
(a)
(a)
(b)
(b)
(c)
(a)
(b)
(c)
(d)
(a)
(a)
(b)
(c)
(c)
(d)
(e)
(f)
(g)
(a) (a)
(b)
(c)
(c)
(d)
(e)
(f)
(g)
5. Position the seat assembly over the seat mounting bracket, aligning the
holes provided. See Figure 7.
6. Install the two shoulder bolts (a) and lock nuts (b) removed from the seat
mounting bracket (c) in Step 1. See Figure 7.
Figure 7
Note: Make sure that the bolt’s shoulder is completely recessed into the seat
bracket when securing the lock nut.
7. To adjust the position of the seat, loosen the adjustment knob (d) on the
bottom of the seat. Slide the seat forward or backward as desired. Securely
retighten the adjustment knob. Refer to Figure 7.
Installing the Deck Chute
Important: Make certain that the upper-rear portion of deck chute (b) is
depressing the safety switch (e) located on the deck surface and under the
tab (f) on the rear deck bracket (g). The blade(s) will not start without the
deck chute (b) properly in place.
10. Secure the deck chute (b) by tightening the wing knobs (a) removed in step
1. See Figure 8.
Installing the Mulch Plug (If equipped)
WARNING
Never operate this tractor without either the mulch plug or deck chute
installed.
1. Remove the wing knobs (a) installed on the mowing deck and retain for later
installation. See Figure 9.
WARNING
Never operate this tractor without either the mulch plug or deck chute
installed.
8. Remove the wing knobs (a) installed on the mowing deck and retain for later
installation. See Figure 8.
9. Install the deck chute (b) into the deck discharge opening on the deck. The rear
of the chute should be under the tab (f) on the rear deck bracket (g). The studs
(c) on the deck surface will f it through the holes on the upper portion of the
deck chute. The small tab (d) on the deck lip area will fit through the square
cutout on the lower portion of the deck chute. See Figure 8.
Figure 8
Figure 9
2. Install the mulch plug (b) into the deck discharge opening on the deck.
The rear of the mulch plug (b) should be under the tab (f) on the rear deck
bracket (g). The studs (c) on the deck surface will fit through the holes on the
upper portion of the mulch plug (b). The small tab (d) on the deck lip area
will fit through the square cutout on the lower portion of the mulch plug (b).
See Figure 9.
Important: Make certain that the upper-rear portion of mulch plug (b) is
depressing the safety switch (e) located on the deck surface and under the
tab (f) on the rear deck bracket (g). The blade(s) will not start without the
mulch plug (b) properly in place.
3. Secure the mulch plug (b) by tightening the wing knobs (a) removed in step 1.
11
Page 12
ASSEMBLY
(a)
(a)
(b)
(c)
(a)
(b)
Installing the Bumper (If equipped)
1. Remove the two screws (a) as shown in Figure 10.
Figure 10
2. Position the bumper (b) over the mounting holes and secure using the
screws (a) removed in Step 1. See Figure 10.
Tire Pressure
WARNING
Equal tire pressure should be maintained at all times. Never exceed the
maximum inflation pressure shown on the sidewall of the tire.
The recommended operating tire pressure is:
• 10 psi for the rear tires
• 14 psi for the front tires
Important: Refer to the tire sidewall for exact rating of the tire or maximum psi. Do
not overinflate. Uneven tire pressure could cause the cutting deck to mow unevenly.
Charging the Batteries
WARNING
California Proposition 65
This product contains a chemical known to the State of California to cause
cancer and reproductive harm. Wash hands after handling.
WARNING
The batterie s contain corrosive fluid and toxic material — HANDLE WITH CARE.
Keep away from children. Do not puncture, disassemble, mutilate, or incinerate.
Explosive gases could be vented during charging or discharging. Charge in a
well ventilated area, away from sources of ignition.
WARNING
Recharge only with the charger provided with this tractor. A charger that is
not suitable for this machine may damage the batteries or create the risk of
fire.
Do not charge or operate the tractor in the rain or in wet conditions.
WARNING
Rechargeable batteries degrade with time and use. The batteries may eventually
need to be replaced. To have the batteries replaced, contact your authorized service
dealer.
1. Lif t the charge port door (a), located on the rear body panel of the tractor.
See Figure 11.
Figure 11
2. Insert the charging cord (b) into the charge port (c). Plug charger cord (b)
into wall outlet. See Figure 11.
Note: It will take approximately 4 hours to fully charge the batteries.
Note: The Vehicle Control Module (VCM) LED’s will blink continuously when
charging and the LCD display will display percentage of charge. The battery
is completely charged when all green lights are illuminated and the LCD
displays 100%. Refer to the Operator’s Manual for more charging tips.
Note: When the charging cord is plugged into the tractor and not yet plugged
into the wall, the LED’s will illuminate continuously until the cord is plugged
into the wall.
3. If at any time you get a charger fault when charging your battery, follow
these procedures:
a. Turn the power key off.
b. Unplug the charger from the tractor.
c. Unplug the charger from the power source.
d. Plug the charger back into the power source.
e. Plug the charger back into the tractor.
f. It the problem persists contact qualified service personnel.
Battery Charging Tips
• Use only the battery charger provided with this tractor.
• The batter ies should be fully charged before the ini tial use.
• Never charge a frozen battery.
• It is recommended that the tractor be charged once every month during
off-season storage.
• Always disconnect battery charger (or extension cord, if used) from the
electrical outlet first, then disconnect battery charger from the charging
port.
• It is recommended that the batteries be fully charged after each use. Storing
batteries in a discharged state could reduce future performance.
• It will take approximately 4 hours to fully charge the batteries. Leaving the
batteries connected to the charger for more than 4 hours will not damage
the batteries.
• The batteries do not develop a memory and do not need to be fully
discharged before recharging.
12
Page 13
OPERATION
RF
3
sec.
1
sec.
F
C
F
D
E
H
G
B
A
J
I
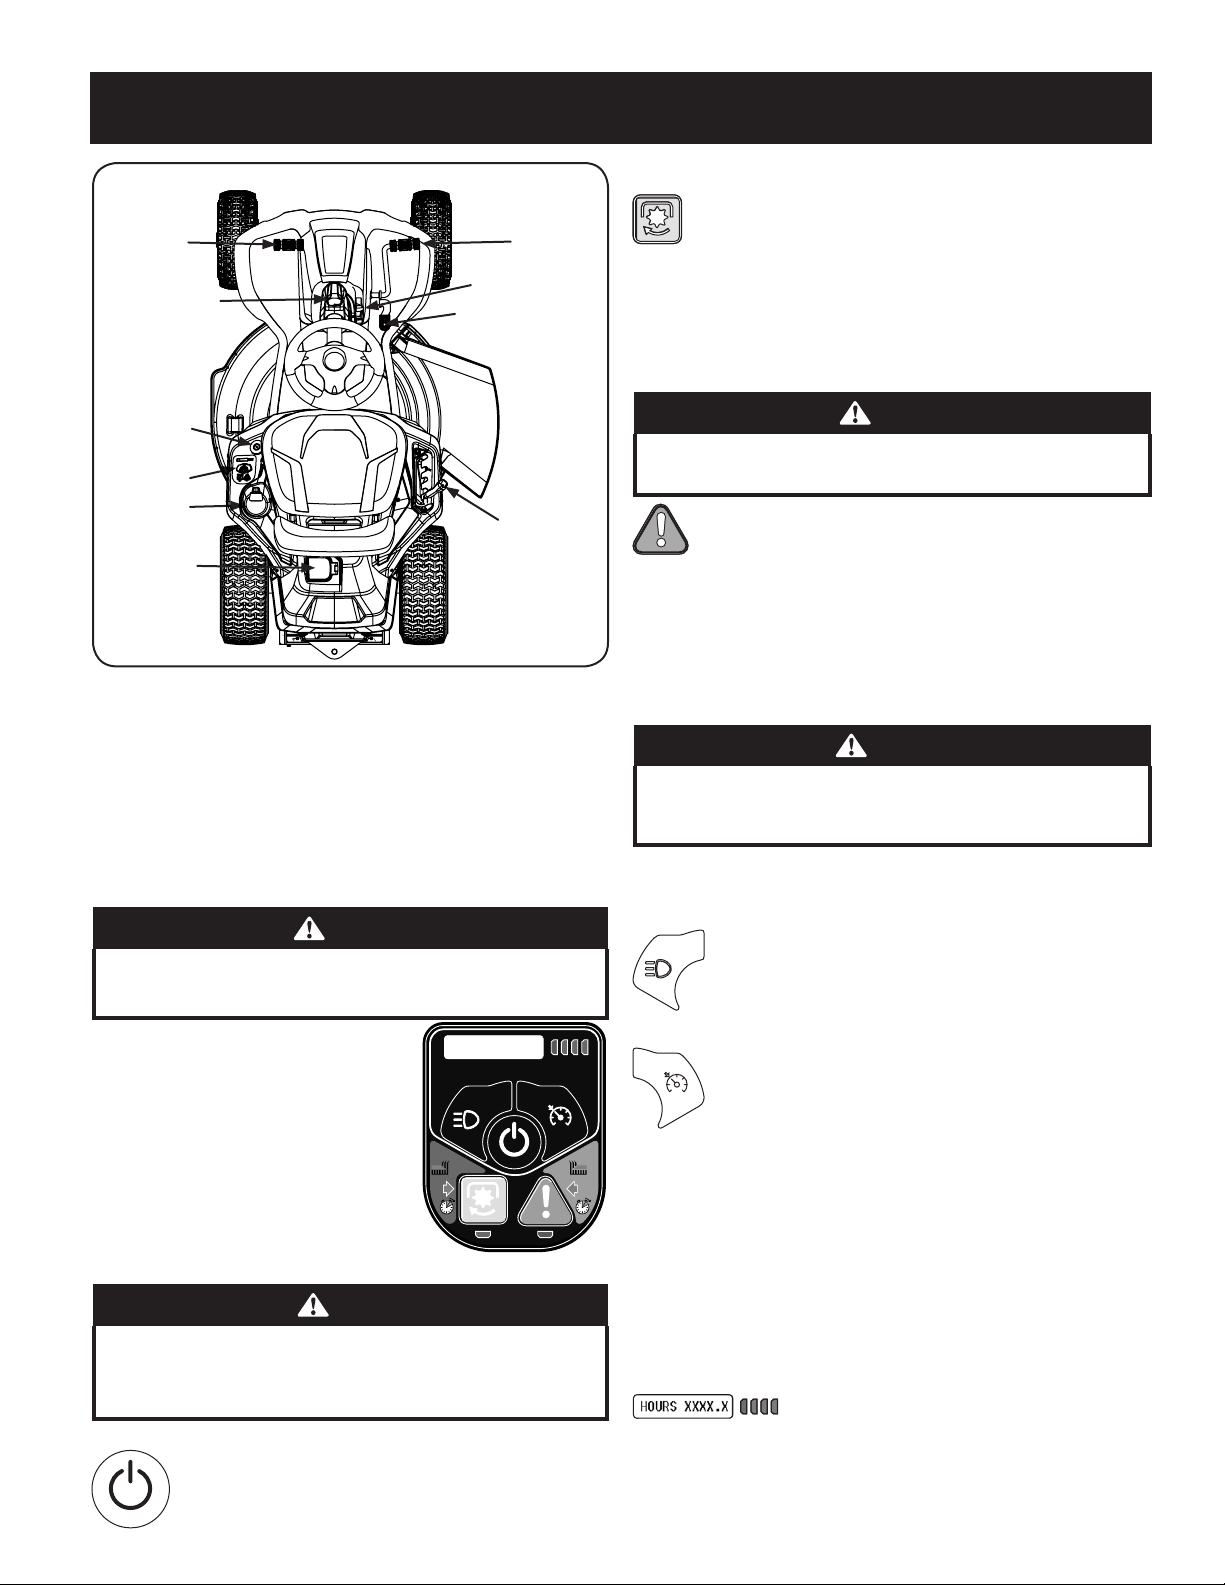
PTO (Blades ON/OFF) Button
Located on the VCM, the PTO button is used to engage
the blades. To operate, press the PTO button for one
second. The green indicator light below the PTO button
is illuminated when there is power to the cutting deck and the
LCD Screen displays “CUT DECK ON.” Pressing the PTO button
again will disengage power to the cutting deck. The green
indicator light is not illuminated when there is no power to
the cutting deck.
Reverse Caution Mode (RCM) Button
CAUTION
Prior to operating the tractor, refer to the Operation section of this
manual for detailed instructions regarding operating the tractor in
REVERSE CAUTION MODE.
Located on the VCM, the RCM button allows the
tractor to be operated in reverse with the blade(s)
engaged. To activate the RCM, press the RCM button
down for three seconds. When activated, the red indicator
light is illuminated. To de-activate the RCM, press the RCM
button again. When the RCM is not activated, the red indicator
light is not illuminated. Refer to the Operation section of this
manual for more information on operating the tractor in the
Figure 12
Note: This Operator’s Manual covers several models. Tractor
features may vary by model. Not all features in this manual are
applicable to all tractor models and the tractor depicted may
differ from yours.
Note: References to LEFT, RIGHT, FRONT, and REAR indicate that
position on the tractor when facing forward while seated in
the operator’s seat.
Vehicle Control Module (VCM) (A)
WARNING
Never leave a running mac hine unattended. Always disengage PTO, set
parking brake, stop tracto r and remove power key to prevent unintended
starting.
The vehicle control module (VCM)
is located on the left fender of the
tractor seated in the operator’s
position.
The VCM is the location of several
control buttons for your tractor.
The VCM inludes the START/STOP
O
PT
button, PTO (blades ON/OFF)
button , Reverse Caution Mode
(RCM) button, Headlight button,
Cruise Control button, LCD Screen
and the Battery Level Indicator.
CAUTION
Prior to operating the tractor, refer to both Safety Interlock Switches
and Starting The Tractor in the Operation section of this manual for
detailed instructions regarding the VCM and operating the tractor in
REVERSE CAUTION MODE.
Start/Stop Button
Located on the VCM, the start/stop button is used
to start and stop the tractor.
reverse caution mode.
Note: Mowing in reverse is not recommended.
WARNING
Use extreme caution while operating the tractor in the REVERSE
CAUTION MODE. Always look down and behind before and while
backing. Do not operate the trac tor when children or others are
around. Stop the tractor immediately if someone enters the area.
Headlight Button
Located on the VCM, the headlight button is used to
turn the headlights on or off.
Cruise Control Button
Located on the VCM, pressing the cruise control
button while the tractor is in motion allows the
tractor to remain at a constant ground speed
without applying pressure to the forward drive
pedal, the LCD Screen displays “CRUISE ON” when
RC
M
the cruise control is activated. The cruise control can be
disengaged by pressing either the cruise control button, the
brake pedal or the drive pedal. Refer to the Operation section
of this manual for detailed instructions regarding the cruise
control feature.
Note: Cruise control will not engage at the tractor’s fastest
ground speed. If the operator should attempt to do so, the
tractor will automatically decelerate to the fastest optimal
mowing ground speed.
Note: Cruise control will not engage in reverse.
LCD Screen & Battery Level Indicator
Located on the VCM, the LCD display & battery level indicator
are used to provide instructions, warnings and information
about your tractor systems and the battery level of your
trac tor.
13
Page 14

OPERATION
Key Switch (B)
Style B1 (If Equipped)
The key switch is located on the left fender and sends power
to the VCM when the switch is in the ON (I) position. The
tractor cannot be started unless the key switch is in the ON (I)
position. Turning the switch to the OFF (O) position turns the
tractor off and stops the flow of power to the VCM.
Do No t
Remove Labe l
While On Displa y
Supprimer l'étiquette
Pendant l'affichag e
S
u
R
p
p
e
m
r
i
o
m
v
e
r
l
'
é
Note: Before your tractor can be started, the safety
label covering the key switch must be removed.
Ne pa s
This label is in place to prevent unintended starting
r
e
I25799
r
t
r
r
a
a
t
m
S
e
é
o
L
T
a
l
d
b
e
r
u
when the tractor is on display. Peel off the label to
o
t
i
p
q
u
e
t
e
t
access the key switch.
Style B2 (If Equipped)
Forward Drive Pedal (C)
The forward drive pedal is located on the right side of the
steering column, along the running board. Press the forward
drive pedal forward to cause the tractor to travel forward.
Ground speed is also controlled with the forward drive pedal.
The further forward the pedal is pressed, the faster the tractor
will travel. The pedal will return to its original/neutral position
when it is released.
Reverse Drive Pedal (D)
The reverse drive pedal is located on the right side of the
steering column along the running board. Ground speed
is also controlled with the reverse drive pedal. The further
rearward the pedal is pressed, the faster the tractor will travel.
The pedal will return to its original/neutral position when it is
released.
Brake Pedal (E)
The brake pedal is located on the left side of the steering
column, along the running board. Depress the pedal all the
way down to engage the disc brake and bring the tractor to a
complete stop.
Note: The brake pedal must be completely depressed to
start the tractor. Refer to Safety Interlock Switches for more
information.
Parking Brake Lever (F)
To set the parking brake, fully depress the brake pedal. Move
the parking brake lever all the way back and into the parking
brake position. Release the brake pedal to allow the parking
brake to engage.
To release the parking brake, depress the brake pedal and
move the parking brake lever forward and out of the parking
brake position. Release the brake pedal.
Deck Lift Lever (G)
Located on your tractor’s right fender, the deck lift lever
is used to change the height of the cutting deck (5
positions). To use, move the lever to the left, then place in
the notch best suited for your application. The lowest
position is “1” and the highest position is “5”
Position “1” is approximately a 1” cutting height, Position
“5” is approximately a 4” cutting height and the change
in height is approximately 3/4” between each position.
Headlight (H)
The headlight is ON whenever the key switch is ON and the
headlight button is pressed. To turn the headlight OFF, press
the headlight button again.
Charging Port (I)
The charging port for the tractor is located on the rear of the
tractor. To access the charging port, lift up on the charging
port cover.
Cup Holder (J)
The cup holder is located to the left of the operator’s seat.
Operation
WARNING
Avoid Serious Injury or Death
Know location and function of all controls.
Remove objects which could be thrown by the blade(s).
Go up and down slopes, not across.
Use extra caution on slopes. Do not mow or drive on slopes greater
than 12°/21%. Avoid sudden turns. Use low speed.
Always engage the parking brake when turning the key switch off on
an incline.
Do not operate machine where it could tip or slip.
If machine stops going uphill, stop blade(s) and back down slowly.
Before leaving operator’s position, disengage blade(s), engage parking
brake, shut off and remove key.
Be sure blade(s) and power are off before placing hands or feet near
blade (s).
Keep safety devices (guards, shields, switches, etc.) in place and
working.
Keep bystanders away.
Allow machine to cool before storing.
Keep machine free of debris.
Read Operator’s Manual
Safety Interlock Switches
This tractor is equipped with a safety interlock system for
the protection of the operator. If the interlock system should
ever malfunction, do not operate the tractor. Contact an
authorized service dealer.
• The safety interlock system prevents the tractor from
operating the tractor unless the operator is in the seat
with the brake pedal fully depressed or the parking
brake set and the drive pedal in the NEUTRAL position..
• The tractor will not operate with the charger cord
plugged into the charging port and/or the charging port
cover open or removed.
• The tractor will not operate unless the discharge chute,
mulch plug or bagger chute is in place and properly
installed.
• The tractor will automatically shut off the blade(s) and
drive motors if the operator leaves the seat.
Note: To restart the tractor, follow the proper starting
procedures.
14
Page 15
OPERATION
WARNING
Do not operate the tractor if the safety interlock system is
malfunctioning. This system was designed for your safety and
protection.
Engaging the Parking Brake
1. Fully depress the brake pedal and hold it down with your
foot.
2. Move the parking brake lever back into the parking brake
position.
3. Release the brake pedal to allow the parking brake to
engage.
Releasing the Parking Brake
1. Depress the brake pedal and move the parking brake
lever forward out of the parking brake position.
Setting the Cutting Height
Select the height position of the cutting deck by placing the
deck lift lever in any of the five (5) different cutting height
notches on the right side of the fender.
WARNING
Keep hands and feet away from the discharge opening of the cutting
deck.
Refer to Leveling the Deck in the Service & Maintenance
section of this manual for more detailed instructions
regarding deck adjustment.
Starting the Tractor
WARNING
Do not operate the t ractor if the interloc k system is malfunc tioning. This
system was de signed for your safet y and protection.
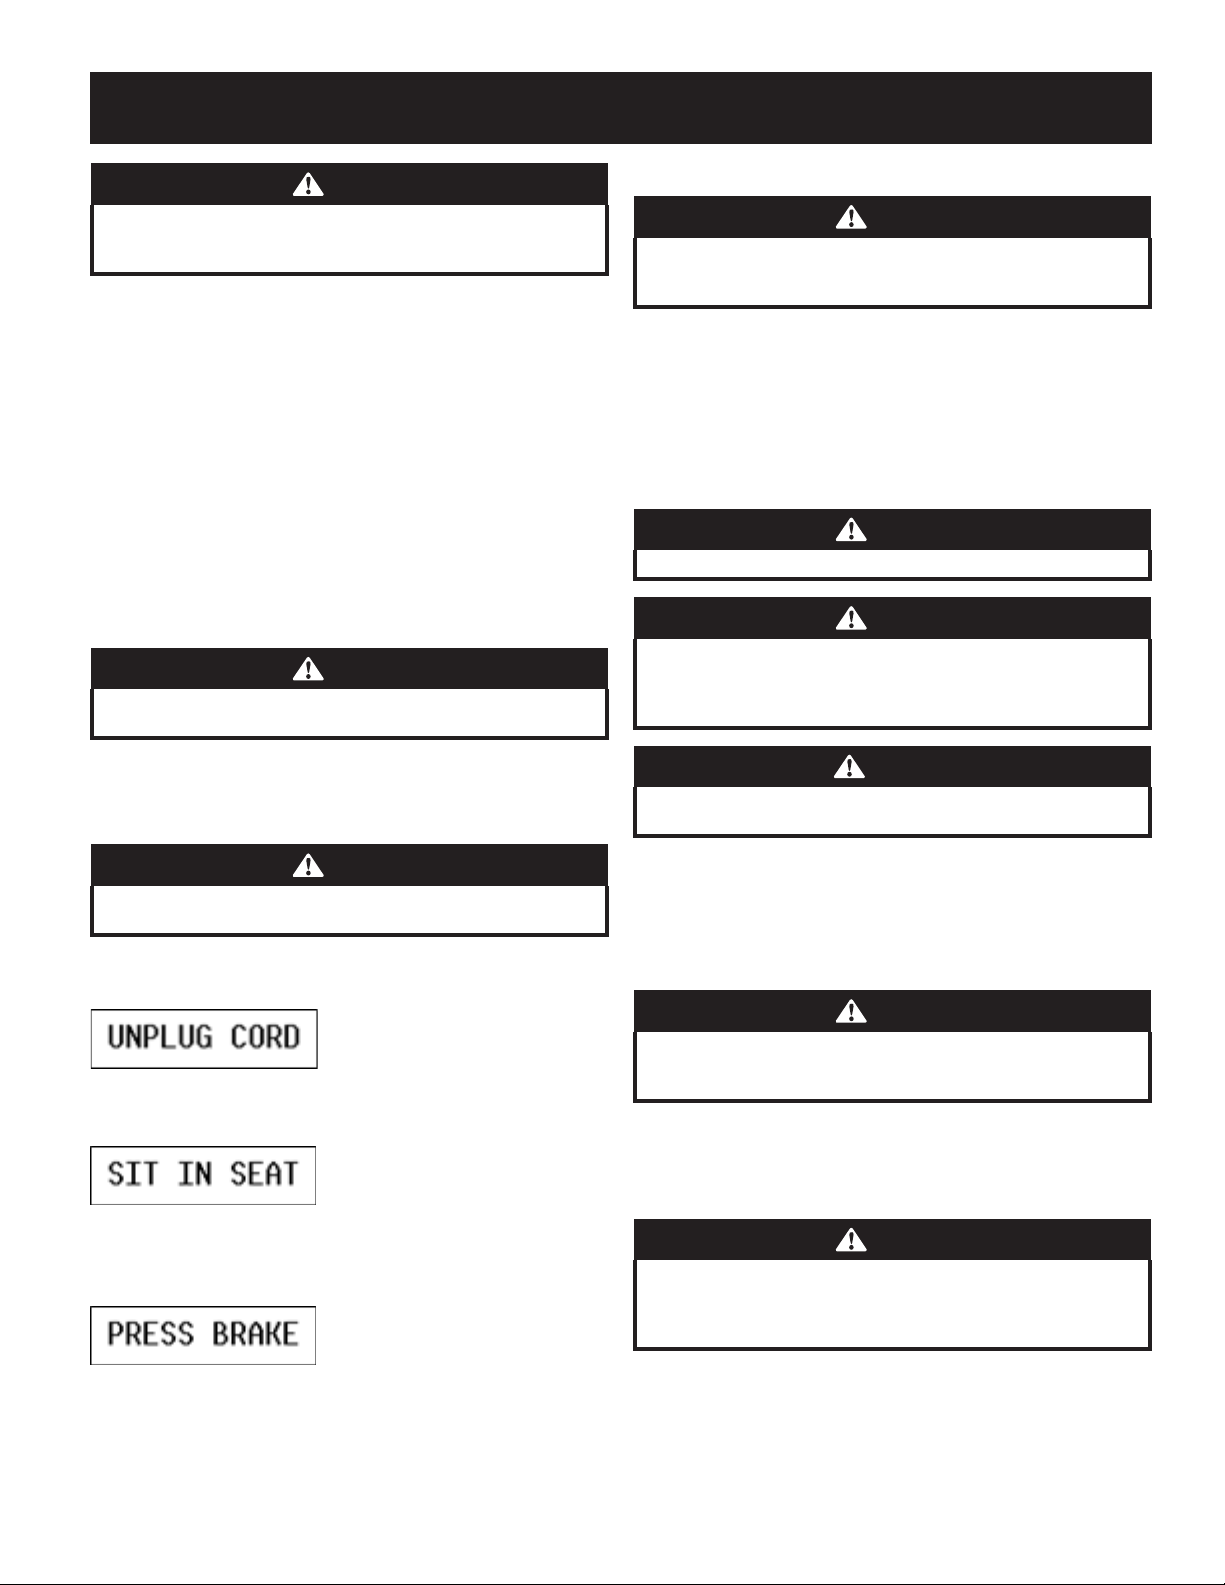
1. Unplug the charging cord (if necessary). If the cord is still
plugged in a reminder will display on the VCM when the
key switch is turned on.
2. Sit in the operator’s seat. A reminder will display on
the VCM if the operator is not in the seat when the key
switch is turned on.
3. Insert the power key into the key switch.
4. Fully depress the brake pedal or set the parking brake. If
the brake is not engaged a reminder will display on the
VCM when the key switch is turned on.
Stopping the Tractor
WARNING
If you strike a foreign object, stop the trac tor, turn the power key to OFF
and remove. Thoroughly inspect the machine for any damage. Repair the
damage before restarting and operating.
1. If the blade is engaged, press the PTO button to
disengage the PTO.
2. Press the start/stop button for one second (one beep)
or turn the power key counter-clockwise to the OFF (O)
position.
3. Remove the key from the key switch to prevent
unintended starting.
Driving the Tractor
WARNING
Avoid sudden starts, excessive speed and sudden stops.
WARNING
Do not leave the seat of the tractor without first pressing the PTO button
to turn off the blade(s), depressing the brake pedal and engaging the
parking brake. If leaving the trac tor unattended, also turn the power key
to the OFF position and remove the power key.
WARNING
Always look down and behind before and while backing up to avoid a
back-over accident.
1. To travel FORWARD, slowly press the forward drive pedal
to travel FORWARD until the desired speed is reached.
2. To travel in REVERSE, slowly press the reverse drive pedal
until the desired speed is reached.
3. The tractor is brought to a stop by releasing the forward
or reverse drive pedal and/or depressing the brake pedal.
WARNING
Before leaving the operator’s position for any reason, disengage the
blade(s), engage the parking brake, turn the key switch to OFF position
and remove the power key.
Reverse Caution Mode (RCM)
The REVERSE CAUTION MODE button allows the tractor to be
operated in reverse with the blade(s) (PTO) engaged.
Note: Mowing in reverse is not recommended.
WARNING
Use extreme caution while operating the tractor in the REVERSE
CAUTION MODE. Always look down and behind before and while
backing. Do not operate the trac tor when children or others are
around. Stop the tractor immediately if someone enters the area.
5. Turn the power key clockwise to the ON (I)position.
6. Press the start/stop button down for two seconds (two
beeps).
15
Page 16

OPERATION
To use the REVERSE CAUTION MODE:
Note: The operator MUST be seated in the tractor seat.
1. Start the tractor as previously instructed.
2. Press and hold the RCM button down for three seconds
until the red indicator light illuminates. The red indicator
will remain on as long as the REVERSE CAUTION MODE is
on.
3. Once activated (indicator light ON), the tractor can
be driven in reverse with the cutting blade(s) (PTO)
engaged.
4. Always look down and behind before and while backing
to make sure no children are around. After resuming
forward motion, press the RCM button to return to
normal mowing operation.
The REVERSE CAUTION MODE will remain activate until:
a. The RCM button is pressed or
b. The operator leaves the seat.
Driving on Slopes
Refer to the SLOPE GAUGE in the Important Safe Operation
Practices section to help determine slopes where you may
operate the tractor safely.
WARNING
Do not mow or drive on inclines with a slope in excess of 12°/21% (a rise
of approximately 2.1 feet for every 10 feet). The tractor could overturn
and cause serious injury.
1. Mow up and down slopes, NEVER across.
2. Exercise extreme caution when changing direction on
slopes.
3. Watch for holes, ruts, bumps, rocks, or other hidden
objects. Uneven terrain could overturn the tractor. Tall
grass can hide obstacles.
4. Avoid turns when driving on a slope. If a turn must be
made, turn down the slope. Turning up a slope increases
the chance of a roll-over.
5. Avoid stopping when driving up a slope. If it is necessary
to stop while driving up a slope, start up slowly and
carefully to reduce the possibility of flipping the tractor
over backward.
Engaging the PTO
Engaging the PTO transfers power to the cutting deck. To
engage the blade(s), proceed as follows:
Press the PTO button for one second. When activated the
green indicator light under the PTO button is illuminated.
Mulching (If equipped)
Mulching is a process of recirculating grass clippings
repeatedly beneath the cutting deck. The ultra-fine clippings
are then forced back into the lawn where they act as a
natural fertilizer. Refer to the Assembly & Set-up section of
this manual for instructions on how to install the mulch kit (if
equipped).
Using the Deck Lift Lever
To raise the cutting deck, move the deck lift lever to the left,
then place it in the notch best suited for your application.
Refer to Setting the Cutting Height in this section.
Mowing
WARNING
To help avoid blade contact or a thrown object injury, keep bystanders,
helpers, children and pets at least 75 feet from the machine while it is
in operation. Stop machine if anyone enters the area.
WARNING
Plan your mowing pattern to avoid discharge of materials toward
roads, sidewalks, bystanders and the like. Also, avoid discharging
material against a wall or obstruction which may cause discharged
material to ricochet back toward the operator.
The following information will be helpful when using the
cutting deck with your tractor:
1. Do not mow or drive at high ground speed, especially if a
mulch kit or grass collector is installed.
2. For best results it is recommended that the first two laps
be cut clockwise with the discharge facing towards the
center of your lawn. After the first two laps, reverse the
direction to discharge to the outside for the balance of
cutting. This will give a better appearance to the lawn.
3. Do not cut the grass too short. Short grass invites weed
growth and yellows quickly in dry weather.
4. Under heavier conditions it may be necessary to go back
over the cut area a second time to get a clean cut.
5. Do NOT attempt to mow heavy brush and weeds and
extremely tall grass. Your tractor is designed to mow
lawns, NOT clear brush.
6. Keep the blade sharp and replace the blade when worn.
Refer to Cutting Blade in the Service section of this
manual for proper blade sharpening instructions.
16
Page 17

SERVICE AND MAINTENANCE
MAINTENANCE SCHEDULE
WARNING
Before inspecting, cleaning or servicing the machine, power off the
tractor and remove the key from the key switch.
Interval Item Service Service Log
Prior to Use 1. Hardware
2. Battery
3. Blades
4. Tire Pressure
Every 10 Hours 1. Blades
2. Pedal Pivot Points
Every 25 Hours 1. Steering Rack Teeth
2. Pinion Gear
3. Front Axles and Rims
Prior to Off-Season Storage 1. Battery
2. Pedal Pivot Points
3. Front Axles and Rims
† Clean more often under dusty conditions or when airborne debris is present.
Note: This Operator’s Manual covers several models. Tractor features may vary by
model. Not all features in this manual are applicable to all tractor models and the
tractor depicted may differ from yours.
DANGER
The electrical components on this tractor are not serviceable. Please
contact an authorized service dealer for any service needs.
DANGER
Have your tractor serviced by qualified service personnel using only
identical replacement parts. This will ensure that the safety of the
tractor is maintained.
Post-Operation Tractor Care
After each operation of the tractor, the following procedures should be
implemented to extend the life of your tractor and ensure safe operating conditions.
DANGER
Failure to follow these recommendations may result in serious injury
to yourself or others and may cause damage to the tractor.
Cleaning the Underside of the Deck
WARNING
To prevent serious injury, do not use water to clean the tractor, battery
or battery charger. Do not use strong detergents. Household cleaners
that contain aromatic oils such as pine and lemon, and solvents such as
kerosene, can damage plastic.
The underside of tractor deck should be cleaned after each use as grass clippings,
leaves, dirt and other debris will accumulate. This accumulation of grass clippings,
etc., is undesirable as it will promote rust and corrosion.
Follow the maintenance schedule given below. This chart describes service
guidelines only. Use the Service Log column to keep track of completed
maintenance tasks. To schedule service from an authorized service center,
call 1-888-331-4569.
1. Check
2. Charge
3. Check
4. Check and inflate to sidewall specification
1. Check
2. Lubricate
1. Lubricate
2. Lubricate
3. Lubricate
1. Charge
2. Lubricate
3. Lubricate
1. Remove any buildup of grass and leaves on or around the motor (DO NOT USE
WATER). Wipe the tractor clean with a dry cloth.
2. If debris is allowed to build up on the underside of the machine, tilt the
tractor for ward or on its side and clean with a suitable tool.
Important: Do not use a pressure washer or garden hose to clean your tractor.
These may cause damage to elec tric components or the electric motor. The use of
water will result in shortened life and reduce ser viceability.
Cleaning the Tractor
WARNING
If the tractor has been recently run, metal surfaces will be hot and can
cause burns to the skin. Let the tractor cool for at least five minutes.
Exercise caution to avoid burns.
Your tractor should be cleaned af ter each use and under certain conditions, i.e. dry
conditions and/or mulching situations, additional cleaning may be necessary.
One of the best ways to keep your tractor running efficiently and to reduce fire risk
is to regularly remove debris buildup from the tractor. Follow the recommendations
below and contact your authorized dealer with any questions.
• Allow the machine to cool in an open area before cleaning.
• Do not use water on any part of the tractor. Doing so can cause damage to the
tractor’s electrical components and motor. The use of compressed air and/or
leaf blower or a brush, damp sponge or rag will help keep the tractor clean.
• Clean around fuses, all wiring and harnesses, etc.
17
Page 18

SERVICE AND MAINTENANCE
Rear Wheel Not
Shown for Clarity
(a)
• Clean the top of the tractor deck. See Figure 13.
Figure 13
• Clean around and near the transmission, axle and the fan area. See Figure 14.
2. Drive the tractor without a load to make certain all the tractor systems are
functioning properly.
Maintenance
WARNING
Before performing any maintenance or repairs,disengage blade(s) PTO, set
parking brake, turn key switch to OFF position and remove power key to
prevent unintended starting.
Lubrication
Pivot Points & Linkage:
Lubricate all the pivot points on the drive system, parking brake and lift linkage at
least once a season with light oil.
Rear Wheels:
The rear wheels should be removed from the axles once a season. Lubricate the
axles and the rims well with an all-purpose grease before re-installing them.
Front Axles:
Each end of the tractor’s front pivot bar may be equipped with a grease f itting.
Lubricate with a grease gun after every 25 hours of tractor operation.
Lubricate Rack & Pinion:
Once per season, or every 25 hours of operation, it will be necessary to lubricate the
steering rack teeth and pinion gear (a) located under the front of the tractor. Using
standard automotive grease, apply grease to the front side of the steering rack teeth
and pinion gear (a), as indicated in Figure 15.
Figure 14
• Debris can accumulate anywhere on the tractor, especially on horizontal
surfaces. Additional cleaning may be necessary when mowing in dr y
conditions or when mulching.
• Excess lubrication can become collection sites for debris. Immediate repair
and cleaning up excess lubrication can help reduce fire hazards.
• In addition to cleaning the tractor before operating and storing, do not
attempt to mow unusually tall grass (10” or higher), dry grass (e.g., pasture)
or piles of dry leaves. Dr y grass or leaves may build up on the tractor deck
presenting a potential f ire hazard.
Storing the Tractor
• Allow the machine to cool in an open area before storing.
• Do not park the tractor near any flammable materials (wood, cloth or
chemicals) or any open flames or other potential source of ignition (furnace,
water heater or any other type of heater).
• Remove all combustible materials from the tractor before storing. Empty
cargo boxes, grass catchers or containers.
• Fully charge the batteries and recharge the batteries every 30 days when in
storage.
Removing The Tractor From Storage
1. Fully charge the batteries and inf late the tires to the recommended
pressures.
Figure 15
Battery Storage
1. The batteries should be stored with a full charge. Discharged batteries can
freeze faster than charged batteries in cold temperatures.
2. The batteries should be fully charged once ever y month.
Note: It will take approximately 4 hours to fully charge the batteries.
Leaving the batteries connected to the charger for more than 4 hours will
not damage the batteries, but when the charging is complete the charger
should be disconnected.
3. Batteries should not be kept in a discharged state. Permanent damage to the
batteries can occur.
4. Fully recharge the batteries before returning to service.
18
Page 19

SERVICE AND MAINTENANCE
(c)
(a)
(b)
Charging the Batteries
WARNING
The batteries contain cor rosive fluid and toxic material — HANDLE WITH
CARE. Keep away from children. Do not puncture, disassemble, mutilate, or
incinerate. Explosive gases could be vented during charging or discharging.
Charge in a well ventilated area, away fr om sources of ignition.
WARNING
Recharge only with the charger provided with this tractor. A charger
that is not suitable for this machine may damage the batteries or
create the risk of fire.
WARNING
Do not charge o r operate the tractor in th e rain or in wet conditions.
Note: Rechargeable batteries degrade with time and use. The batteries may
eventually need to be replaced. To have the batteries replaced, contact your
authorized Service Dealer.
Note: Replace batteries if battery capacity drops below 50% of initial capacity
Note: Using old or faulty batteries could cause a system fault that results in loss of
power
1. Lif t the charge port door (a), located on the rear body panel of the tractor.
See Figure 16.
3. If at any time you get a charger fault when charging your battery, follow
these procedures:
a. Turn the power key off.
b. Unplug the charger from the tractor.
c. Unplug the charger from the power source.
d. Plug the charger back into the power source.
e. Plug the charger back into the tractor.
f. It the problem persists contact qualified service personnel.
Battery Charging Tips
• Use only the battery charger provided with this tractor.
• The batteries should be fully charged before the initial use.
• Never charge a frozen battery.
• It is recommended that the tractor be charged once every month during
off-season storage.
• Always disconnect battery charger (or extension cord, if used) from the
electrical outlet first, then disconnect battery charger from the charging
port.
• It is recommended that the batteries be fully charged after each use. Storing
batteries in a discharged state could reduce future performance.
• It will take approximately 4 hours to fully charge the batteries. Leaving the
batteries connected to the charger for more than 4 hours will not damage
the batteries.
• The batteries do not develop a memory and do not need to be fully
discharged before recharging.
Fuses
Figure 16
2. Insert the charging cord (b) into the charge port (c). Plug charger cord (b)
into wall outlet. See Figure 16.
Note: It will take approximately 4 hours to fully charge the batteries.
Note: The Vehicle Control Module (VCM) LED’s will blink continuously when
charging and the LCD display will display percentage of charge. The battery
is completely charged when all green lights are illuminated and the LCD
displays 100%. Refer to the Operator’s Manual for more charging tips.
Note: When the charging cord is plugged into the tractor and not yet
plugged into the wall, the LED’s will illuminate continuously until the cord is
plugged into the wall.
CAUTION
For continued protection against risk of injury or electric shock, do not
replace blown fuses please call qualified service personnel.
Adjustments
WARNING
Never attempt to make any adjustments while the key switch is ON,
except where specified in the Operator’s Manual.
Seat
Refer to the Set-Up & Assembly section of this manual for seat adjustment
instructions.
Parking Brake
WARNING
Never attempt to adjust the brakes w hile the tractor is runni ng. Always
disengage blade(s) PTO, set parking brake, turn key switch to OFF position
and remove power key to prevent unintended st arting.
If the tractor does not come to a complete stop when the brake pedal is completely
depressed, or if the tractor’s rear wheels can roll with the parking brake applied, the
brake is in need of adjustment. See an authorized service dealer to have your brakes
properly adjusted.
Deck
Note: Check the tractor’s tire pressure before performing any deck leveling
adjustments. Refer to Tires in the Assembly section for more information regarding
tire pressure.
19
Page 20

SERVICE AND MAINTENANCE
(a)
(b)
(a)
(b)
(a)
(b)
(a)
(b)
(a)
(a)
Front-to-Rear Levelling
It is possible to adjust the pitch of the cutting deck. The front of the deck should be
between 0” (level) and 1/4” lower than the rear of the deck. Adjus t if necessary as follows:
1. With the tractor parked on a firm, level surface, place the deck lift lever in
the middle position and rotate the blade so that it is aligned with the front
and rear of the tractor.
2. Measure the distance from the front of the blade tip to the ground and the
rear of the blade tip to the ground. The first measurement taken should be
between 0” (level) and 1/4” less than the second measurement. Determine
the approximate distance necessary for proper adjustment and proceed, if
necessary, to the next step.
3. Loc ate the flange lock nut (a) on the front end of the PTO lift rod (b). See Figure 17.
4. Disconnect the deck motor(s) from the adapters on the underside of the
tractor. Rotate the collar on the larger connector (a) counterclockwise and
carefully pull apar t. Repeat the procedure with the smaller connector (b).
Note: Your mower may have one of two different deck motor connector
setups. If your mower has horizontally positioned connectors, see Figure 19.
If your mower has vertically positioned connectors, see Figure 20.
Figure 19
Figure 17
a. Tighten the fla nge lock nut (a) to raise the front of the deck.
b. Loosen the flange lock nut (a) to lower the front of the deck.
Tires
Refer to the Assembly & Set-Up section for more information regarding tire pressure.
Service
Cutting Deck Removal
To remove the cutting deck, proceed as follows:
1. Remove power key and engage the parking brake.
2. Lower the deck by moving the deck lift lever into the lowest (#1) position on
the right fender.
3. Remove the bow-tie cotter pin (a) and flat washer (b) from the deck lift
assembly, and retain for reinstallation later. See Figure 18.
Figure 20
Note: Always disconnect the larger connector first.
5. Remove the remaining bow-tie cot ter pins (a)
securing the deck to the tractor, as shown in Figure 21.
Figure 21
Figure 18
20
Page 21

SERVICE AND MAINTENANCE
(a)
(b)
(d)
(c)
(a)
(b)
6. Unplug the wire connector (a) from the safety switch (b) at the rear of the
chute opening. See Figure 22.
Figure 22
7. Move the deck lift lever into the highest (#5) position on the right fender to
raise the deck lif t arms up and out of the way.
8. Gently slide the cutting deck (from the lef t side) out from underneath the
tractor.
Cutting Deck Installation
1. Raise the deck lift lever into the highest (#5) position on the right fender to
move the deck lift arms out of the way.
2. Gently slide the cutting deck (from the lef t side) back under the tractor.
3. Plug the wire connector (a) into the safety switch (b) at the rear of the chute
opening. See Figure 22.
Note: Be sure to securely reconnect the wire connector to the safety switch
in Figure 22, you tractor will not start or operate without the safety switch
properly connected.
4. Lower the deck lift lever to the lowest (#1) position.
5. Secure the deck to the deck lift arms using two bow-tie cotter pins. See
Figure 21.
Note: The bow-tie cotter pins (a) should be installed from the top down.
6. Reconnect the deck motors on the underside of the tractor. Always connect
the larger connector first and then the smaller connector. See Figure 19.
Note: When reconnecting the deck motors, you must be sure that the
connections are secure.
Blade(s)
CAUTION
If the cutting edge of the blade(s) has previously been sharpened, or if
any metal separation is present, replace the blade(s).
The blade(s) may be removed as follows.
Note: It may be easier to change the blade(s) by first removing the deck
from beneath the tractor, (refer to Cutting Deck Removal earlier in this
section) then gently f lip the deck over to expose its underside. It is possible
to change the blade(s), however, with the deck still attached to the tractor. If
attempting to change the blade(s) with the deck still installed on the tractor,
first move the deck lift lever to its highest (#5) position.
1. Remove the mulch plug, deck chute or bagging chute, if equipped, exposing
the deck chute opening.
2. Using a block of wood or 2 x 4, insert it into the deck opening and rotate the
blade around until it wedges the wood between the deck opening and the
cutting blade, as shown in Figure 23.
Figure 23
3. Remove the hex screw (a) and the blade bell support (b) which holds the
blade (c) and the blade adapter (d) to the deck motor. See Figure 24.
WARNING
Shut the tractor off, engage parking brake and remove power key before
removing the cutting blade(s) for sharpening or replacement. Protect
your hands by using heavy gloves when grasping the blade.
WARNING
Periodically inspect the blade(s) and/or spindle for cracks or damage,
especially after you’ve struck a foreign object. Do not operate the machine
until damaged components are replaced.
Figure 24
21
Page 22

SERVICE AND MAINTENANCE
4. Remove blade (c) and adapter (d) from the deck motor spindle See Figure 24.
5. To properly sharpen the cutting blade, remove equal amounts of metal
from both ends of the blade along the cutting edges, parallel to the trailing
edge, at a 25°- to 30° angle. Always grind each cutting blade edge equally to
maintain proper blade balance. See Figure 25.
Figure 25
6. Test the blade’s balance using a blade balancer. Grind metal from the heavy
side until it balances evenly.
WARNING
A poorly balanced blade will cause excessive vibration, may damage
the tractor and/or result in personal injury.
Note: When replacing the blade, be sure to install the blade with the side of
the blade marked ‘‘Bottom’’ (or with a part number stamped in it) facing the
ground when the tractor is in the operating position.
CAUTION
Use a torque wrench to tighten the hex bolt to between 450-600 in-lbs.
Battery Disposal
Disposing of Damaged or Worn-Out Batteries
WARNING
The following toxic and corrosive material is used in this battery:
LITHIUM-ION, a toxic material.
WARNING
To prevent contamination of the environment, contact your local
waste disposal agency for specific instructions before disposing of
damaged or worn-out lithium-ion batteries. Take batteries to a local
recycling and/or disposal center, certified for lithium-ion battery
disposal.
WARNING
Do not use broken or cracked batteries, even if there is no leakage.
Replace damaged or worn-out batteries with new batteries. DO NOT
ATTEMPT TO REPAIR BATTERIES! Repair attempts may result in severe
personal injury, due to explosion or electrical shock.
To avoid personal injury and damage to the environment:
• Do not attempt to remove or destroy any of the battery components. Do not
open or mutilate the battery. If a leak develops, released elec trolytes are
corrosive and toxic. Do not get the solution in your eyes or on your skin, and
do not swallow it.
• Do not dispose of the battery in the regular household trash.
• Do not dispose of the battery in a fire. The cell may explode.
• Do not dispose of the battery where it will become part of any waste landfill
or municipal solid waste stream.
• Cover the battery terminals with heavy-duty adhesive tape.
• Dispose of the battery according to local, state and federal regulations.
• Dispose of the battery promptly.
About Call2Recycle® Battery Seals
Call2Recycle®’s industry steward program helps battery and
product manufacturers fulfill recycling requirements in the
U.S. and Canada, including compliance with extensive state,
provincial and federal regulations, such as the Mercur y-
Containing and Rechargeable Battery Act (The Battery Act).
Call2Recycle® Licensees/Industry Stewards, participating battery and product
manufacturers and marketers, purchase the rights to imprint the Call2Recycle®
Battery Seals on their rechargeable batteries and products. When you see the
Call2Recycle® Battery Seal, you can feel confident knowing that your battery or
product can be safely and responsibly recycled.
About Call2Recycle®
Since 1994, Call2Recycle® has diverted more than 75 million pounds of rechargeable
batteries from local landfills and established a network of 30,000 rec ycling drop-off
locations. More than 200 battery and/or product manufacturers, Call2Recycle®
Industry Stewards, have united to ensure that batteries are responsibly recycled
when they reach their end of life and fund the program that is operated by
Call2Recycle®, Inc., a 501(c)4 nonprofit public service organization.
To locate the nearest recycling center, please call 1-800-822-8837.
Troubleshooting
Excessive Vibration
1. Blade loose or unbalanced
• Tighten cutting blade and deck spindle
2. Cutting blade damaged, unbalanced or bent.
• Replace the blade
Uneven Cut
1. Deck not properly leveled
• Perform front-to-rear deck adjustment
2. Cutting blade dull or damaged
• Sharpen or replace cutting blade
3. Uneven tire pressure
• Check and correct tire pressure in all four tires
Tractor will not mulch grass
1. Wet grass
a. Do not mulch when grass is wet
22
Page 23

SERVICE AND MAINTENANCE
2. Excessively high grass
a. Mow once at a high cutting height, then mow again at desired
height or make a narrower cutting swath
3. Dull blade
a. Sharpen or replace blade
Tractor stopped or will not start
1. Electrical system fault
a. Shut off and restart tractor
b. If problem persists, contact an authorized service dealer
The blades do not rotate /blades stopped
1. Overload
a. Allow deck motor(s) to cool/raise deck height
2. Low battery
a. Return home, plug into charger
The blade(s) stopped when traveling in reverse
1. Blade(s) stopped
a. Restart blade(s) (PTO)
b. Make sure Reverse Caution Mode is activated
Reduced Speed
1. Low battery
a. Charge battery as instructed in the battery charger manual
2. Overload
a. Raise deck
Drive Motor Control Fault: The deck and drive shut off. Power off and restart
tractor. If problem persists contact qualified service personnel.
Self Test Fault: The deck and drive shut off. Power off and restart trac tor. If
problem persists contact qualified service personnel.
Electrical Faults: The deck and drive shut off. Power off and restart tractor. If
problem persists contact qualified service personnel.
Battery Temperature Low: Move the tractor to a warm location and allow the
battery to warm. If problem persists contact qualified ser vice personnel.
LCD Screen Messages
Brake Switch Fault: The deck and drive shut off. Power off and restart tractor. If
problem persists contact qualified service personnel.
Accelerator Pedal Sensor Fault: The deck and drive shut off. Power off and
restart tractor. If problem persists contact qualified service personnel.
Seat Switch Fault: The deck and drive shut off. Power off tractor, sit in seat and
restart tractor. If problem persists contact qualified service personnel.
Cutting Deck Overload: The deck and drive shut of f. Power off the tractor, clean
under the deck as instructed in the Post-Operation Tractor Care section and restart
the tractor. Raise the deck and/or cut at a slower pace. If problem persists contact
qualified service personnel.
High Temperature Faults: Power off, let the tractor cool and restart tractor. If
problem persists contact qualified service personnel.
Charge Port Door is Open: The tractor will come to a stop and shut off. Close the
charge port door and restart tractor. If problem persists contact qualified service
personnel.
Low Battery Warning: The batter y is low and should be charged as soon as
possible.
Sharpen Blade Warning: When this warning is displayed, the blades should be
checked and sharpened.
Check Tire Pressure Warning: When this warning is displayed check and adjust
the tire pressure.
Drive Motor Over Current Fault: The deck and drive shut off. Power off, let
the tractor cool and restart tractor. If problem persists contact qualified service
personnel.
23
Page 24

ÍNDICE
Prácticas operación seguras ...................Página 25
Montaje ......................................Página 31
Funcionamiento ..............................Página 35
Servicio y Mantenimiento .....................Página 39
Almacenamiento fuera de temporada .........Página 40
Solución de problemas ........................Página 44
Garantía ......................... Suplemento separado
NÚMERO DE MODELOESPECIFICACIONES DEL PRODUCTO
Batería: 1500 Wh Li-Ion
Cargador: 48V, 650w
ADVERTENCIA
Antes de usar este equipo, lea el manual y siga todas las medidas de seguridad e instrucciones de funcionamiento.
Número de modelo _____________________________
Número de serie ________________________________
Fecha de compra _______________________________
Registre el número de modelo, número de serie y fecha
de compra más arriba.
NOTA : Este manual del operador cubre var ios modelos. Las característ icas pueden variar según el modelo. No todas las f unciones de este manual son aplicables a todos los
modelos y el modelo que se mues tra puede difer ir del suyo.
24
Page 25

INSTRUCCIONES DE SEGURIDAD
ADVERTENCIA
La presencia de este símbolo indica que se trata de instrucciones de seguridad importantes que se deben respetar para evitar poner en peligro su seguridad
personal y/o material y la de otras personas. Lea y cumpla todas las instrucciones de este manual antes de intentar operar esta máquina. Si no respeta estas
instrucciones puede provocar lesiones personales. Cuando vea este símbolo, ¡preste atención a la advertencia!
ADVERTENCIA
PROPOSICIÓN 65 DE CALIFORNIA
Cáncer y daño reproductivo.
PELIGRO
Esta máquina está diseñada para ser utilizada respetando las normas de seguridad contenidas en este manual. Al igual que con cualquier tipo de equipo
motorizado, un descuido o error por parte del operador puede producir lesiones graves. Esta máquina es capaz de amputar dedos, manos y pies y de arrojar
residuos. De no respetar las instrucciones de seguridad siguientes se pueden producir lesiones graves o la muerte.
Sistema de batería de ion de litio de 1500 W
El servic io requiere ser ext remadamente cuidadoso y co nocer el sistema, y sólo debe re alizarlo un técnico de ser vicio calific ado. Para las reparaciones o e m antenimiento, lleve
el tracto r al distribuidor de ser vicio autorizad o más cercano. Cuando realice el ser vicio, debe usar siempr e piezas de reemplazo del f abricante del equipo or iginal (OEM).
Funcionamiento general
1. Lea, entienda y cumpla todas las instrucciones incluidas en el montable y
en el(los) manual(es) antes de intentar realizar el montaje de la unidad y
utilizarla. Guarde este manual en un lugar seguro para consultas futuras y
periódicas, así como para solicitar repuestos.
2. Familiarícese con todos los controles y su correcto funcionamiento. Sepa
cómo detener el montable y desactivar los controles rápidamente.
3. No permita nunca que los niños menores de 14 años utilicen este montable.
Los niños de 14 años en adelante deben leer y entender las instrucciones y
las normas de seguridad contenidas en este manual y sobre el montable, y
deben ser entrenados y supervisados por un adulto.
4. Nunca permita que los adultos operen este montable sin recibir antes la
instrucción apropiada.
5. No cargue ni utilice el montable bajo la lluvia o en condiciones mojadas.
6. En caso de una falla del sistema o de que se pierda totalmente la
alimentación de la batería, el montable puede desplazarse con las ruedas
libres. Presione el pedal del freno para mantener el control y detener
el montable. Vuelva a encender el montable. Si el problema persiste,
comuníquese con su distribuidor de servicio autorizado.
7. Para ayudar a evitar el contacto con las cuchillas o una lesión por algún
objeto que sea arrojado, mantenga a las personas que lo observan, a los
ayudantes, niños y mascotas alejados al menos 25 metros del montable
mientras este está en funcionamiento. Pare el montable si alguien ingresa a
la zona.
8. Revise minuciosamente el área donde se va a usar el equipo. Saque todas
las piedras, palos, cables, huesos, juguetes y demás objetos extraños que
puedan ser recogidos y arrojados por las cuchilla(s). Los objetos arrojados por
la máquina pueden producir lesiones personales graves.
9. Planif ique el patrón de corte, para evitar que la descarga de material se
realice hacia los caminos, las veredas, los observadores, etc. Evite además
descargar material contra una pared u obstrucción, ya que esto podría hacer
que el material descargado rebotara contra el operador.
10. Utilice siempre anteojos o antiparras de seguridad durante la operación o
mientras realiza ajustes o reparaciones. Los objetos arrojados que rebotan
pueden producir lesiones graves en los ojos.
11. Utilice zapatos de trabajo resistentes, de suela fuerte, y pantalones y camisas
ajustados. Las prendas sueltas y las alhajas pueden quedar atrapadas en las
piezas móviles. Nunca haga funcionar el montable descalzo o con sandalias.
12. Esté atento a la plataforma de corte y a la dirección de descarga de la
cortadora y de sus accesorios, y no los apunte a nadie. Nunca opere la
plataforma de corte sin tener bien colocada la cubierta de descarga o el
colector de césped.
13. No ponga las manos ni los pies cerca de las piezas rotatorias ni debajo de la
plataforma de corte. El contacto con las cuchilla(s) puede amputar manos y
pies.
14. Una cubierta de descarga faltante o dañada puede provocar lesiones por
contacto con la cuchilla o por objetos arrojados.
15. Detenga la(s) cuchilla(s) cuando cruce caminos de gravilla, senderos o
caminos y cuando no esté cortando el césped.
16. Vigile el tránsito vehicular cuando esté operando cerca de caminos o en
cruces. Este montable no está diseñado para ser usado en la vía pública.
17. No haga funcionar el montable si se encuentra bajo los efectos del alcohol o
las drogas.
18. Úsela solamente con luz natural o con buena luz artif icial.
19. Nunca lleve pasajeros.
20. No gire la llave hasta la posición de apagado para desplazarse con ruedas
libres pendiente abajo.
21. Desconecte las cuchillas antes de desplazarse marcha atrás. Retroceda
lentamente. Siempre mire hacia abajo y hacia atrás antes y mientras
retrocede para evitar accidentes.
22. Reduzca la velocidad antes de girar. Haga funcionar el montable de manera
uniforme. Evite que funcione de manera errática y a excesiva velocidad.
23. Desenganche las cuchillas, coloque el freno de mano, pulse el botón de
encendido/detención y espere hasta que la(s) cuchilla(s) se detenga(n)
por completo antes de retirar el colector de recortes de césped, vaciar los
recortes, desbloquear la tolva, retirar cualquier residuo o desecho, o realizar
cualquier ajuste.
24. Nunca deje el montable en funcionamiento sin vigilancia. Desconecte
siempre las cuchillas, gire la llave de encendido hasta la posición APAGADO y
quítela antes de bajarse del montable.
25. Tenga mucho cuidado al cargar o descargar el montable en un remolque
o camión. Este montable no debe conducirse subiendo o bajando rampas,
ya que el montable podría volcar y provocar lesiones personales graves. El
montable se debe empujar a mano en rampas para cargarla o descargarla
correctamente.
25
Page 26

INSTRUCCIONES DE SEGURIDAD
26. Los motores pueden estar calientes y producir quemaduras. No los toque.
27. Revise la holgura superior antes de conducir debajo de ramas bajas, cables,
cerramientos de puertas, etc., donde el operador puede golpearse o ser
tirado del montable, lo que podría resultar en lesiones graves.
28. El montable fue diseñada para cortar césped residencial normal, con una
altura no mayor de 10 in. No intente cortar césped demasiado crecido,
seco (como un pastizal) ni pilas de hojas secas. El césped o las hojas secas
pueden entrar en contac to con las superficies calientes y/o acumularse en la
plataforma de corte presentando un potencial peligro de incendio.
29. Utilice solamente accesorios e implementos aprobados para este montable
por su fabricante. Lea, comprenda y siga todas las instrucciones incluidas con
el accesorio o implemento aprobado.
30. Los datos estadísticos muestran que los conductores mayores de 60 años se
ven implicados en un alto porcentaje de lesiones relacionadas con montable.
Estas personas deben evaluar su capacidad para operar el montable de
manera suficientemente segura para protegerse a sí mismos y a otros de
lesiones graves.
31. Si se presentan situaciones que no están previstas en este manual, tenga
cuidado y use el sentido común. Póngase en contacto con su representante
de atención al cliente para obtener ayuda.
Operación en pendientes
Las pendientes son un factor importante en los accidentes ocasionados por pérdida
de control y vuelcos que pueden causar lesiones graves e incluso la muerte. Todas
las pendientes requieren precaución extra. Si no puede retroceder por la pendiente
o si no se siente seguro, no realice ningún corte ni conduzca sobre esta.
Para su seguridad, use el indicador de pendientes que se incluye como parte de este
manual para medir la pendiente antes de operar el montable en una zona inclinada.
Si la pendiente es de más de 12º, como se muestra en el medidor, no haga funcionar
el montable en ese sector, o podría causar lesiones graves.
Si:
1. Accione el freno de mano cuando esté sentado en el montable en una
superficie inclinada y con la llave de encendido apagada.
2. Corte hacia arriba y abajo de las pendientes, no en forma transversal. Tenga
sumo cuidado al cambiar de dirección en una pendiente.
3. Esté atento a los hoyos, surcos, baches, rocas, u otros objetos ocultos. El
terreno desnivelado puede hacer que el montable se vuelque. El césped alto
puede ocultar obstáculos.
4. Conduzca a baja velocidad. Elija ajuste de velocidad lo suf icientemente bajo,
de modo que no tenga que detenerse mientras está en la pendiente. Los
neumáticos pueden perder tracción en las pendientes aún cuando los frenos
funcionen correctamente. Este montable utiliza un sistema de frenado
regenerativo en el motor de transmisión para ayudar a reducir la velocidad.
5. Siga las recomendaciones del fabricante sobre los pesos o contrapesos de las
ruedas para mejorar la estabilidad.
6. Tenga mucho cuidado con los colectores de césped y otros complementos.
Estos pueden modificar la estabilidad de la máquina.
7. Haga que todos los movimientos en las pendientes sean lentos y graduales.
No realice cambios bruscos de velocidad o dirección. Hacer un cambio o
frenar repentinamente puede hacer que el frente del montable se levante y
vuelque rápidamente hacia atrás dando lugar a lesiones graves.
8. Evite arrancar o detenerse en una pendiente. Si las ruedas pierden tracción,
desactive las cuchillas y descienda la pendiente lentamente.
No:
1. No gire en pendiente a menos que sea necesario; si lo hace, gire lenta y
gradualmente cuesta abajo, si es posible.
2. No gire la llave hasta la posición de apagado en una pendiente sin accionar el
freno de mano.
3. No corte el césped ni conduzca cerca de barrancos, zanjas o terraplenes. El
montable puede volcarse repentinamente si una de las ruedas pasa el borde
de un acantilado o zanja o si se desmorona un borde.
4. No intente estabilizar el montable poniendo el pie en el suelo.
5. No utilice colector de césped en pendientes empinadas.
6. No corte el césped ni conduzca sobre césped húmedo. La falta de tracción
puede hacer que patine.
7. No pulse el botón de encendido/detención para desplazarse pendiente abajo
con ruedas libres. El exceso de velocidad puede hacer que el operador pierda
el control del montable y se produzcan lesiones graves o la muerte.
8. No arrastre cargas pesadas detrás de los accesorios (volquete cargado, rodillo
de césped, etc.) en pendientes mayores de 5 grados. Cuando se desplaza
pendiente abajo, el peso adicional tiende a empujar el montable y puede
hacer que se pierda el control del mismo (por ejemplo, el montable se puede
acelerar; se reduce la capacidad para frenar y maniobrar o el accesorio puede
plegarse como un cortaplumas y hacer que el montable vuelque).
Niños
1. Se pueden producir accidentes trágicos si el operador no está alerta por
la presencia de niños. Por lo general, los niños se sienten atraídos por el
montable y su actividad. Los niños no son conscientes de los peligros. Nunca
asuma que los niños permanecerán donde los vio por última vez.
a. Mantenga a los niños fuera del área de trabajo y bajo estricta
vigilancia de un adulto responsable además del propio operador.
b. Esté alerta y apague el montable si un niño ingresa al área.
c. Antes de moverse hacia atrás y mientras lo hace, mire hacia atrás y
abajo para ver que no haya niños pequeños.
d. Nunca transporte niños, ni siquiera con las cuchillas desactivadas.
Podrían caerse y resultar gravemente heridos o inter ferir con la
operación segura del montable.
e. Tenga mucho cuidado al aproximarse a las esquinas ciegas, puertas,
arbustos, árboles u otros objetos que puedan obstaculizarle la vista
de un niño que pudiese correr al encuentro del montable.
f. Para evitar accidentes retrocediendo, siempre desacople las cuchillas
antes de cambiar a marcha atrás. Si está equipado, el “Modo de
marcha atrás con precaución” no se debe usar cuando haya niños y
otras personas alrededor.
g. Retire la llave cuando el montable quede sin vigilancia para evitar el
funcionamiento no autorizado.
2. No permita nunca que los niños menores de 14 años utilicen este montable.
Los niños de 14 años en adelante deben leer y entender las instrucciones y
las normas de seguridad contenidas en este manual y sobre el montable, y
deben ser entrenados y supervisados por un adulto.
Remolque
1. Remolque únicamente utilizando un montable que cuente con un dispositivo
de enganche diseñado para tal fin. No acople equipo remolcado excepto en
el punto de enganche.
2. Siga las recomendaciones del fabricante en lo que respecta a los límites de
peso de los equipos a remolcar y al remolque en pendientes.
3. Nunca permita que los niños y otras personas se suban a equipos
remolcados.
4. En las pendientes, el peso del equipo remolcado puede causar pérdida de
tracción y pérdida de control.
5. El peso máximo en punto de enganche es de 22,7 kg (50 lb) y el peso máximo
remolcable es de 122,5 kg (250 lb).
6. Siempre tenga mucho cuidado al remolcar con un montable capaz de hacer
giros cerrados (por ejemplo, un montable con radio de giro cero). Realice
giros amplios para el acodillamiento.
7. Desplácese lentamente y deje distancia adicional para detenerse.
8. No pulse el botón de encendido/detención para desplazarse pendiente abajo
con ruedas libres.
Servicio
Servicio general
1. Cuando no la use, saque la llave y almacene el montable en el interior.
Permita que los motores se enfríen antes de almacenarlo en cualquier
recinto. La cortadora de césped se debe almacenar en interiores, en un lugar
26
seco y fuera del alcance de los niños.
Page 27

INSTRUCCIONES DE SEGURIDAD
2. Recargue las baterías solamente con el cargador especificado por el
fabricante. Un cargador que es adecuado para un tipo de batería puede crear
un riesgo de incendio si se usa con otra batería.
3. No utilice el cargador en la lluvia.
4. Antes de limpiar, reparar o inspeccionar la máquina, compruebe que la(s)
cuchilla(s) y todas las piezas móviles se hayan detenido.
5. Nunca remoje o limpie el montable con una manguera con agua. Evite el
ingreso de cualquier líquido en el motor y las conexiones eléctricas. Limpie el
montable después del uso. Consulte Limpieza y almacenamiento. No utilice
solventes o detergentes fuertes.
6. Para reducir la posibilidad de incendio mantenga el motor sin pasto, hojas y
otros desechos acumulados.
7. Revise periódicamente, para asegurarse de que las cuchillas se detengan por
completo en un espacio de aproximadamente cinco (5) segundos después de
accionar botón de activación/desactivación de las cuchillas. Si las cuchillas no
se detienen en este lapso, su montable necesita un ser vicio profesional de un
distribuidor autorizado.
8. Controle el funcionamiento de los frenos con frecuencia, ya que está sujeto
a desgaste durante el funcionamiento normal. Realice los ajustes y el
mantenimiento necesarios.
9. Inspeccione las cuchillas y los pernos de montaje a intervalos frecuentes,
para verificar que estén bien ajustados. Además, inspeccione visualmente
las cuchillas para detectar la presencia de daños (por ejemplo: desgaste
excesivo, abolladuras, rajaduras). Reemplace las cuchillas únicamente por
cuchillas de los fabricantes del equipo original (OEM). “El uso de piezas que
no cumplen con las especificaciones del equipo original podría producir un
rendimiento inadecuado y además puede comprometer la seguridad”.
10. Las cuchillas del montable son filosas. Envuelva la cuchilla o utilice guantes y
extreme las precauciones cuando les haga mantenimiento.
11. Mantenga todas las tuercas, pernos y tornillos bien ajustados para
asegurarse de que el equipo está en condiciones de funcionamiento seguras.
12. Nunca altere el sistema de interbloqueo de seguridad u otros dispositivos
de seguridad. Compruebe regularmente que estos elementos funcionen
correctamente.
13. Después de golpear un objeto extraño, detenga el montable, saque la llave
e inspeccione detenidamente el montable para verificar si se produjo algún
daño. Repare el daño antes de hacer funcionar el montable.
14. Nunca intente hacer ajustes o arreglos en el montable si la llave de
encendido está en la posición ENCENDIDO.
15. Los componentes del colector de césped y la cubierta de descarga están
sujetos a desgaste y daños que podrían dejar expuestas piezas que se
mueven o permitir que se arrojen objetos. Para proteger su seguridad,
verifique frecuentemente los componentes y reemplácelos inmediatamente
por piezas del fabricante del equipo original (O.E.M.) únicamente. “El uso de
piezas que no cumplen con las especificaciones del equipo original podría
producir un rendimiento inadecuado y además puede comprometer la
seguridad”.
16. Mantenga o reemplace las etiquetas de seguridad e instrucciones según sea
necesario.
17. Este producto tiene una vida útil media de siete (7) años o 270 horas
de funcionamiento. Al finalizar la vida útil media, haga inspeccionar
anualmente esta unidad por un distribuidor de servicio autorizado para
cerciorarse de que todos los sistemas mecánicos y de seguridad funcionan
correctamente y no tienen excesivo desgaste. Si no lo hace, puede ocasionar
accidentes, lesiones o la muerte.
18. No arroje las baterías al fuego. El elemento de la batería puede explotar.
Consulte los códigos locales para obtener instrucciones sobre la eliminación
adecuada.
19. No toque los motores. Estas partes se ponen calientes por el funcionamiento,
incluso después de que se apaga el montable.
20. Tenga cuidado al manejar las baterías para no ponerlas en cortocircuito
con materiales conductores, como anillos, pulseras y llaves. La batería o el
material conductor pueden estar calientes y producir quemaduras.
21. Para brindar protección continuada contra el riesgo de lesiones o de choques
eléctricos, no reemplace los fusibles quemados. Llame al personal de servicio
calificado.
Seguridad eléctrica en general
1. No exponga el montable a la lluvia o a condiciones húmedas.
2. No utilice el montable con las manos mojadas.
3. No utilice el montable bajo la lluvia, en condiciones húmedas ni en
superficies mojadas.
4. Para reducir el riesgo de descarga eléctrica, evite el contacto del cuerpo con
elementos conductores con puesta a tierra, por ejemplo, caños metálicos o
cercos de alambre.
5. No utilice el montable en atmósferas explosivas, por ejemplo, en presencia
de líquidos, gases o polvo inf lamables.
Seguridad del cargador de baterías
ADVERTENCIA
Utilice un cargador de baterías Delta-Q (modelo n.º IC650-048-CAN/pieza
n.º 950-0004 o modelo n.º IC650-048-COMMD/pieza n.º 950-0007) (OEM n.º de
parte 725-07253 or n.º de parte 725-07253A) para cargar las baterías. NO intente
cargar otras baterías con un cargador Delta-Q. Otros tipos de baterías
pueden hacer que las baterías estallen, lo que a su vez puede producir
incendios, lesiones personales o daños en la propiedad.
6. La placa de identificación del cargador indica el voltaje utilizado. Nunca
conecte el cargador con un voltaje de CA que difiera de este voltaje.
7. No utilice un alargador salvo que sea absolutamente necesario. El uso de un
cable prolongador inadecuado puede generar riesgo de incendio, descarga
eléctrica o electrocución.
8. No utilice cables prolongadores múltiples.
9. Asegúrese de que el cable prolongador sea suf icientemente pesado como
para transportar la corriente que toma el cargador. Si el cable prolongador
es de calibre inferior al requerido se producirá una caída del voltaje de línea
y esto dará lugar a la pérdida de potencia y el sobrecalentamiento. Si está
en duda, utilice cable del calibre más grueso siguiente. A menor número de
calibre, mayor grosor de cable.
TAMAÑO MÍNIMO DEL CABLE PARA PROLONGADORES DE ARTEFACTOS DE 120
VOLTIOS QUE USAN 0-6 AMPERIOS
Longitud del cable (pies) 25 50 100 150
Calibre (AWG) 16 16 16 14
10. Asegúrese de que los cables estén en buenas condiciones. Inspeccione el
cable de alimentación y el cable prolongador periódicamente. Observe
detenidamente para ver si hay deterioro, cortes o grietas en el aislamiento.
Si el cable se daña de algún modo cuando está enchufado, desconecte el
cable del tomacorriente y el cargador. No utilice un cable dañado. Los cables
dañados se deben reparar o cambiar.
11. No use los cables en forma inadecuada. Nunca arrastre ni lleve el cargador
tirando del cable. Mantenga los cables lejos de fuentes de calor, aceite, agua,
bordes filosos y objetos en movimiento. Para desconectar un cable agarre
siempre el enchufe.
12. No modif ique nunca un enchufe, un cable ni un tomacorriente de ninguna
manera.
13. Siempre se debe suministrar protección con un interruptor de detección
de falla a tierra (GFCI) en los circuitos a ser usados con este cargador. Para
proporcionar una medida adicional de seguridad, utilice receptáculos con
protección GFCI incorporada.
27
Page 28

INSTRUCCIONES DE SEGURIDAD
14. No coloque el cargador de baterías en lugares donde se lo pueda pisar, donde
alguien pueda tropezar o que se pueda dañar.
15. No cargue las baterías bajo la lluvia ni en condiciones mojadas. Guarde el
cargador de baterías en un área fresca y seca.
16. Guarde el cargador de baterías lejos de cualquier líquido.
17. No permita que se introduzcan objetos metálicos pequeños ni materiales, por
ejemplo, lana de acero, lámina de aluminio ni otras partículas extrañas en el
orificio del cargador.
18. No pruebe el cargador con material conductor. Existe el riesgo de descarga
eléctrica.
19. No cubra el cargador de baterías. El cargador de baterías se puede
sobrecalentar.
20. No permita que la batería o el cargador de baterías se sobrecalienten. Si se
calientan, deje que los mismos se enfríen. Cargue las baterías únicamente en
temperaturas que se encuentren entre 32º y 104ºF (0º y 40ºC).
21. Desenchufe siempre el cargador de baterías cuando no esté en uso.
Seguridad de las baterías
1. No exponga la batería al fuego o a temperaturas superiores a 80 °C (176 °F). Si
lo hace, se puede producir una explosión.
2. Manipule las baterías con cuidado. No cor tocircuite la batería con materiales
conductores, por ejemplo, anillos, pulseras, llaves, etc. Si se cortocircuita la
batería se puede dañar la misma o se pueden producir lesiones personales.
3. No intente cargar una batería que esté rota o dañada.
4. No utilice ni cargue una batería que esté húmeda o que muestre indicios de
corrosión.
5. No utilice una batería dañada o modificada. Si lo hace, se puede producir un
incendio, una explosión o lesiones personales.
ADVERTENCIA
La batería puede generar riesgo de incendio o quemaduras químicas si se
utiliza inadecuadamente. No desarme, sobrecaliente ni incinere la batería.
Si la fuga entra en contacto con su vestimenta o calzado, quítese los mismos, aísle y
lave la vestimenta contaminada a fondo.
ADVERTENCIA
Utilice un cargador de baterías Delta-Q (modelo n.º IC650-048-CAN/pieza
n.º 950-0004 o modelo n.º IC650-048-COMMD/pieza n.º 950-0007) (OEM n.º de
parte 725-07253 or n.º de parte 725-07253A) para cargar las baterías. NO intente
cargar otras baterías con un cargador Delta-Q. Otros tipos de baterías
pueden hacer que las baterías estallen, lo que a su vez puede producir
incendios, lesiones personales o daños en la propiedad.
Declaración de la FCC (solo modelos con Bluetooth®)
¡PRECAUCIÓN!
Si se realizan cambios o modificaciones que no estén específicamente
aprobadas por el responsable de cumplimiento se podría anular la
autoridad del usuario para utilizar el equipo.
NO TA: Este equipo se ha probado y se ha determinado que cumple con los límites
para dispositivos digitales Clase B de acuerdo con la parte 15 de las Reglas de la
FCC. Estos límites tienen por finalidad suministrar protección razonable contra la
interferencia perjudicial en una instalación residencial. Este equipo genera, utiliza
y puede irradiar energía de radiofrecuencia y si no se lo instala y utiliza de acuerdo
con las instrucciones puede causar interferencia perjudicial en las comunicaciones
de radio. Sin embargo, no hay garantía de que no se produzca interferencia en
alguna instalación en par ticular. Si este equipo en efec to causa interferencia
perjudicial para la recepción de radio o televisión, lo cual se puede determinar
apagando y encendiendo el equipo, se recomienda que el usuario trate de corregir la
interferencia a través de una o más de las siguientes medidas:
• Reoriente o reubique la antena de recepción.
• Aumente la separación entre el equipo y el receptor.
• Conecte el equipo a un tomacorriente o circuito diferente aquél al cual está
conectado el receptor.
• Consulte con el distribuidor o con un técnico de radio/TV experimentado
para solicitar ayuda.
ADVERTENCIA
Se pueden producir fugas de la batería en condiciones extremas de uso,
carga o temperatura o si la batería se daña, tritura o perfora. Esta fuga
indica una falla de la batería y la batería se debe eliminar adecuadamente
de conformidad con las regulaciones locales para materiales peligrosos.
Si la fuga entra en contacto con su piel o sus ojos realice los siguientes pasos:
• Lave inmediatamente el área con jabón y agua.
• Lávese los ojos inmediatamente con agua limpia como mínimo durante 20
minutos y procure atención médica inmediata.
28
Page 29

INSTRUCCIONES DE SEGURIDAD
Símbolos de seguridad
En esta página, se presentan y describen los símbolos de seguridad que pueden aparecer en este producto. Lea, comprenda y siga todas las instrucciones incluidas en el
montable antes de intentar armarla y hacerla funcionar.
Símbolo Descripción
LEA LOS MANUALES DEL OPERADOR
Lea, entienda y siga todas las instrucciones incluidas en
los manuales antes de intentar armar y hacer funcionar.
ADVERTENCIA— OBJETOS LANZADOS
Este montable puede recoger y lanzar objetos que
pueden causar lesiones personales graves. Manténgase
alejado. Mantenga a los observadores, ayudantes,
niños y mascotas por lo menos a 75 pies del montable
mientras la misma está en funcionamiento.
ADVERTENCIA — OBSERVADORES
Mantenga a los observadores, ayudantes, niños y
mascotas por lo menos a 75 pies del montable mientras
la misma está en funcionamiento.
PELIGRO — CUCHILLAS GIRATORIAS
Nunca lleve pasajeros. Nunca transporte niños, ni
siquiera después de haber DESCONECTADO las cuchillas.
Símbolo Descripción
ADVERTENCIA — DESCARGA ELÉCTRICA
No cargue el montable bajo la lluvia o en lugares
húmedos. No utilice el montable a baterías en la lluvia.
ADVERTENCIA — DESCARGA ELÉCTRICA
No cargue el montable bajo la lluvia o en lugares
húmedos. No utilice el montable a baterías en la lluvia.
PELIGRO — FUNCIONAMIENTO EN PENDIENTES
No utilice el montable en lugares donde podría resbalar
o volcar. Evite realizar giros abruptos. Corte a baja
velocidad.
PELIGRO — MANTENIMIENTO
El mantenimiento de muchos componentes de este
montable debe ser realizado por un distribuidor de
servicio autorizado. Lea este manual del operador
antes de intentar realizar el mantenimiento de este
montable.
PELIGRO — CUCHILLAS GIRATORIAS
No coloque las manos ni los pies cerca de piezas que
giran ni debajo de la plataforma de corte El contacto
con las cuchilla(s) puede amputar manos y pies.
Asegúrese que las cuchillas estén desconectadas antes
de colocar las manos o los pies cerca de las cuchillas.
PELIGRO — CUCHILLAS GIRATORIAS
No coloque las manos ni los pies cerca de piezas que
giran ni debajo de la plataforma de corte El contacto
con las cuchilla(s) puede amputar manos y pies.
Asegúrese que las cuchillas estén desconectadas antes
de colocar las manos o los pies cerca de las cuchillas.
Retire siempre la llave cuando no use la unidad.
ADVERTENCIA - OPERACIÓN EN PENDIENTES
Recorra las pendientes hacia arriba y hacia abajo, no
de manera transversal Tenga más precaución en las
pendientes. No corte el césped en pendientes que
superen los 12°/21 %. Si el montable se para mientras
sube la pendiente, pare las cuchillas y retroceda
lentamente para abajo.
PELIGRO — CUCHILLAS GIRATORIAS
Siempre mire hacia abajo y hacia atrás antes y mientras
se desplaza marcha atrás, para evitar un accidente.
Para evitar un accidente al retroceder, mantenga a
los niños alejados del montable mientras este esté en
funcionamiento. No se recomienda cortar el césped en
marcha atrás.
ADVERTENCIA— OBJETOS LANZADOS
Este montable puede recoger y lanzar objetos que
pueden causar lesiones personales graves.
PELIGRO — CUCHILLAS GIRATORIAS
No coloque las manos ni los pies cerca de piezas que
giran ni debajo de la plataforma de corte. El contacto
con las cuchilla(s) puede amputar manos y pies.
PELIGRO — PROTECCIONES Y ESCUDOS DE SEGURIDAD,
INTERRUPTORES, ETC.
Mantenga los dispositivos de seguridad (defensas,
protecciones, interruptores, etc.) en su lugar y en
funcionamiento.
ADVERTENCIA
Su responsabilidad—Limite el uso de esta máquina motorizada a las personas que lean, comprendan y cumplan las advertencias e instrucciones que
aparecen en este manual y en la máquina.
¡GUARDE ESTAS INSTRUCCIONES!
29
Page 30

PENDIENTE DE CALIBRE
12°/21% Pendiente
Figura 2Figura 1
Pendiente
de Calibre
(DEMASIADO ESCARPADO)
línea discontinua
12°/21% Pendiente
12°/21%
(ACEPTAR)
30
USO DE ESTE PENDIENTE DE CALIBRE PARA DETERMINAR
SI UNA PENDIENTE ES DEMASIADO ESCARPADO PARA UNA OPERACIÓN SEGURA!
Para comprobar la pendiente, haga lo siguiente:
1. Borrar esta página y doble a lo largo de la línea discontinua.
No utilice la máquina en pendientes de más de 12 grados/21 por ciento. Todas las pendientes requieren precaución extra. Si no puede retroceder por la pendiente o si no
se siente seguro, no realice ningún corte ni conduzca sobre esta. Siempre corte hacia arriba y hacia abajo de las pendientes, nunca de manera transversal.
ADVERTENCIA!: Las pendientes son un factor importante relacionado con accidentes por tumbos y vuelcos que pueden producir lesiones graves o la muerte.
(consultar Figura 1 and Figura 2).
operación segura (consultar Figura 2 above).
2. Localizar un objeto vertical sobre o detrás de la pendiente (un poste, un edicio, una valla, un árbol, etc.)
3. Alinee cada lado de pendiente de calibre con el objeto vertical (consultar Figura 1 and Figura 2 ).
4. Ajuste el pendiente de calibre arriba o hacia abajo hasta los toques esquina izquierda el pendiente
5. Si hay un espacio por debajo de la pendiente de calibre, el pendiente es demasiado escarpa por
Page 31

MONTAJE
(b)
(a)
(a)
(b)
(d)
(c)
(a)
(b)
(d)
(c)
Nota: Este manual de operación corresponde a numerosos modelos. Las
características del montable pueden variar según los modelos. No todas las
características que se incluyen en este manual se aplican a todos los modelos de
montable y la máquina que se ilustra aquí puede diferir de la suya.
Nota: Las referencias que contiene este manual sobre los lados derecho o izquierdo
y trasero o delantero del montable se hacen siempre desde la posición de operación.
Las excepciones, si las hubiere, serán especificadas.
Nota: Algunos componentes pueden venir previamente ensamblados. Si ya están
ensamblados, continúe con el siguiente paso.
Contenido del carton
• Montable
• Tapa de pedestal de dirrección
• Conjunto de canal de descarga
• Paqueta de elementos de ferretería
• Tarjeta para registrar el producto
• Manual del operador
• Placa de enganche trasera
• Asadptor para abono
• Cargador de batería
• Conjunto de volante/eje de dirrección
• Conjunto de asiento
• Paragolpes de delantero
• Manual del cargador de la batería
Contenido del paquete de elementos de ferretería
Antes de comenzar la instalación, extraiga todo el contenido de la caja y todos
los elementos de ferretería del paquete para comprobar que no falte nada. Los
elementos de ferretería se detallan a continuación.
• Placa de enganche
• Soporte de montaje del asiento (con dos pernos con reborde y tuercas de
sujeción instalados)
Herramientas recomendadas para el montaje
• Llave de 3/8 in y/o de cubo
• Llave de 7/16 in y/o de cubo
• Llave de 1/2 in y/o de cubo
• Llave de 9/16 in y/o de cubo
• Destornillador Phillips
• Llave de trinquete de 1/4 in o de 3/8 in
Movimiento manual del tractor
El montable se puede mover siempre que el freno de mano no esté accionado. No
remolque ni empuje el montable por encima de las 10 mph.
Instalación del conjunto del volante
Si el conjunto del volante del montable no vino ya instalado, siga los pasos a
continuación:
1. Deslice la tapa del pedestal (a) sobre el eje de la dirección (b) de manera
que dicho eje (b) se instale en el montable, la tapa del pedestal (a) quedará
vertical como se indica en la Figura 1.
Figura 1
2. Extraiga el perno con reborde (c) y la tuerca de seguridad (d) del eje de la
dirección y guárdelos para los pasos posteriores. Consulte la Figura 2.
Figura 2
3. Con el conjunto del volante vertical y ubicado de manera que quede sobre
el árbol inferior de la dirección del montable, se debe alinear el volante de
manera que con las ruedas del montable derechas, la abertura grande del
volante esté orientada hacia adelante.
31
Page 32

MONTAJE
1
2
(a)
(b)
(b)
(c)
(c)
(a)
(b)
(a)
(b)
(a)
(a)
(a)
(b)
(b)
4. Baje el conjunto del volante (a) sobre el eje inferior de la dirección (b) y
sujételo mediante el perno con reborde (c) y la tuerca de seguridad (d) que
extrajo previamente. Consulte la Figura 2.
5. Ajuste el perno con reborde y la tuerca de seguridad usando la llave de 9/16
in o de cubo y la llave de7/16 in o de cubo.
6. Extraiga el tornillo de montaje de la tapa del pedestal instalado en fábrica y
ubicado en la consola de dirección del montable. Guarde el tornillo para uso
posterior. Consulte la Figura 3
2. Extraiga los dos pernos autorroscantes (a) instalados en fábrica en el
montable. Consulte la Figura 5.
Figura 5
3. Alinee el soporte del asiento (a) en su lugar sobre los orificios de los pernos
autorroscantes (b) que extrajo, como se indica en la Figura 6.
Figura 3
7. Conecte los terminales del cable del faro (a). Deslice la tapa del pedestal
(a) sobre el (montable) y rótela ligeramente a la derecha para calzarla en
su lugar. Sujete la tapa del pedestal (b) con el tornillo (c) que extrajo antes.
Consulte la Figura 3.
Colocación del asiento
Si su montable no traía el asiento instalado de fábrica, siga las instrucciones
correspondientes que se incluyen a continuación para instalarlo.
1. Extraiga los pernos con reborde (a) y las tuercas de seguridad (b) del
soporte de montaje del asiento (c) incluidos en el paquete de elementos de
ferretería. Consulte la Figura 4.
Figura 6
4. Con una llave de trinquete de 1/4 in y una llave de cubo de 3/8 in, sujete el
soporte del asiento con los pernos autorroscantes que extrajo en el Paso 2.
Consulte la Figura 6.
¡PRECAUCIÓN!
No use ninguna herramienta eléctrica (por ejemplo, pistola de impacto
o taladro eléc trico con el extractor de tuercas colocado) para apretar los
pernos autorroscantes para sujetar el soporte del asiento.
5. Ubique el conjunto del asiento sobre el soporte de montaje del asiento,
alineando los orificios suministrados. Vea la Figura 7.
Figura 4
32
Page 33

MONTAJE
(a)
(a)
(b)
(b)
(c)
(a)
(b)
(c)
(d)
(a)
(a)
(b)
(c)
(c)
(d)
(e)
(f)
(g)
(a) (a)
(b)
(c)
(c)
(d)
(e)
(f)
(g)
6. Instale los dos pernos con reborde (a) y las tuercas de seguridad (b) que
extrajo del soporte de montaje (c) del asiento en el Paso 1. Consulte la Figura
7.
Figura 7
Nota: Compruebe que el reborde del pernos quede completamente
embutido en el sopor te del asiento cuando sujete la tuerca de seguridad.
7. Para ajustar la posición del asiento, afloje la perilla de ajuste (d) que están
ubicadas en la parte inferior del asiento. Deslice el asiento hacia adelante o
hacia atrás, según lo desee. Vuelva a ajustar la perilla de ajuste (d). Consulte
la Figura 7.
Instalación del canal de la plataforma
2. Coloque el canal de la plataforma (b) en la abertura de descarga de la
plataforma. La par te trasera del canal de la plataforma debe estar debajo
de la lengüeta (f) del soporte trasero de la plataforma (g). Los pernos
prisioneros (c) de la superficie de la plataforma calzarán a través de los
orificios de la parte superior del canal de la plataforma. La pequeña lengüeta
(d) del borde de la plataforma calzará a través del recorte cuadrado de la
parte inferior del canal de la plataforma. Consulte la Figura 8.
Importante: Compruebe que la porción superior trasera del canal de la
plataforma (b) esté oprimiendo el interruptor de seguridad (e) ubicado en la
superficie de la plataforma y debajo de la lengüeta (f) del soporte de la parte
trasera de la plataforma (g). Las cuchillas no se accionarán si el canal de la
plataforma no está (b) correctamente ubicado.
3. Sujete el canal de la plataforma (b) ajustando las perillas de aleta (a) que
extrajo en el Paso 1. Consulte la Figura 8.
Instalación del adaptador para abono
(si forma parte del equipo)
ADVERTENCIA
Nunca opere este montable si no tiene colocados el adaptador para abono
o el canal de la plataforma.
1. Extraiga las perillas de aleta (a) que instaló en la plataforma de corte y
consérvelas para colocarlas posteriormente. Consulte la Figura 9.
ADVERTENCIA
Nunca opere este montable si no tiene colocados el adaptador para abono
o el canal de la plataforma.
1. Extraiga las perillas de aleta (a) que instaló en la plataforma de corte y
consérvelas para colocarlas posteriormente. Consulte la Figura 8.
Figura 8
Figura 9
2. Coloque el adaptador para abono (b)en la abertura de descarga de la
plataforma. La par te trasera del adaptador para abono de la plataforma (b)
debe estar debajo de la lengüeta (f) del soporte trasero de la plataforma (g).
Los pernos prisioneros (c) de la superficie de la plataforma calzarán a través
de los orificios de la parte superior del adaptador para abono (b). La pequeña
lengüeta (d) del borde de la plataforma calzará a través del recorte cuadrado
de la parte inferior del adaptador para abono (b). Consulte la Figura 9.
Importante: Compruebe que la porción superior trasera del Adaptador
para abono (b) esté oprimiendo el interruptor de seguridad (e) ubicado en la
superficie de la plataforma y debajo de la lengüeta (f) del soporte de la parte
trasera de la plataforma (g). Las cuchillas no se accionarán si el adaptador
para abono (b) no está correctamente ubicado.
3. Sujeta el adaptador para abono (b) ajustando las perillas de aleta (a) que
extrajo en el Paso 1.
33
Page 34

MONTAJE
(a)
(a)
(b)
(c)
(a)
(b)
Instalación del parachoques
(si está equipado)
1. Extraiga los dos tornillos (a), como se indica en la Figura 10.
Figura 10
2. Ubique el paragolpes (b) sobre los orificios de montaje y sujete con los
tornillos (a) que extrajo en el Paso 1. Consulte la Figura 10.
Presión de los neumáticos
ADVERTENCIA
Se debe mantener una presión uniforme para todos los neumáticos en todo
momento. Nunca exceda la presión máxima de inflado que se indica en los
laterales de los neumáticos.
La presión operativa recomendada para los neumáticos es:
• 10 psi para los neumáticos traseros
• 14 psi para los neumáticos delanteros
Importante: Consulte los laterales de las ruedas para conocer con exactitud la
clasificación recomendada por el fabricante del neumático. No los infle en exceso.
Una presión de neumáticos despareja podría hacer que la plataforma no corte el
césped parejo.
Carga de las baterías
ADVERTENCIA
Proposición 65 de California
Este producto contiene una sustancia química que según el Estado de
California puede producir cáncer y problemas reproductivos. Lávese las
manos después de estar en contacto con estos componentes.
ADVERTENCIA
ADVERTENCIA
Las baterías contienen fluido corrosivo y material tóxico: TENGA
MUCHO CUIDADO. Mantener fuera del alcance de los niños. No perfore,
desensamble, mutile o prenda fuego. Durante la carga o descarga se
podrían emitir gases explosivos. Realice la carga en un área bien ventilada,
lejos de fuentes de combustión.
Recargue las baterías solamente con el cargador que se proporciona con
este montable. Un cargador que no sea adecuado para esta máquina puede
dañar las baterías o crear riesgos de incendios.
ADVERTENCIA
No cargue las baterías bajo la lluvia ni utilice el montable condiciones
húmedas.
Las baterías recargables se degradan con el tiempo y el uso. Las baterías pueden
eventualmente necesitar ser reemplazadas. Para reemplazar las baterías, contacte a
su distribuidor autorizado de servicio.
1. Levante la puerta del puerto de carga (a), que se encuentra en el panel
posterior del cuerpo de la podadora. Ver Figura 11.
Figura 11
2. Inserte el cable de carga (b) en el puerto de carga (c). Enchufe el cable del
cargador (b) en el tomacorriente de la pared. Ver la Figura 2-11.
Nota: tomará aproximadamente 4 horas cargar completamente las baterías.
Nota: Los LED del Módulo de control del vehículo (VCM) parpadearán
continuamente durante la carga y la pantalla LCD mostrará el porcentaje de
carga. La batería está completamente cargada cuando todas las luces verdes
están iluminadas y la pantalla LCD muestra 100%. Consulte el Manual del
operador para obtener más consejos de carga.
Nota: Cuando el cable de carga está enchufado al conduc tor y aún no está
enchufado a la pared, los LED se iluminarán continuamente hasta que el
cable esté enchufado a la pared.
3. Si en algún momento obtienes un error del cargador al cargar tu batería,
sigue estos procedimientos:
a. Desactiva la llave de encendido.
b. Desconecte el cargador del jinete.
c. Desenchufe el cargador de la fuente de alimentación.
d. Vuelva a conectar el cargador a la fuente de alimentación.
e. Enchufe el cargador de nuevo en el jinete.
f. Si el problema persiste, póngase en contac to con el personal de
servicio calificado.
Consejos para cargar la batería
• Use solo el cargador de batería provisto con este rider.
• Las baterías deben estar completamente cargadas antes del uso inicial.
• Nunca cargue una batería congelada.
• Se recomienda que el conductor cargue una vez por mes durante el
almacenamiento fuera de temporada.
• Desconec te siempre el cargador de la batería (o el cable de extensión, si se usa) de
la toma eléctric a, luego desconec te el cargador de la batería del puerto de carga.
• Se recomi enda que las baterías estén completamente car gadas después de cada uso.
Almacenar las baterías en un esta do descargado podría reducir el r endimiento futuro.
• Tomará aproximadamente 4 horas cargar completamente las baterías. Dejar las
baterías conectadas al cargador por más de 4 horas no dañará las baterías.
• Las baterías no desarrollan memoria y no necesitan descargarse
completamente antes de recargarlas.
34
Page 35

FUNCIONAMIENTO
C
F
D
E
H
G
B
A
J
I
RF
3
sec.
1
sec.
F
Botón de la toma de fuerza (PTO) (ENCENDIDO/APAGADO de
cuchillas)
Situado en el VCM, el botón de la toma de fuerza (PTO) se utiliza para
accionar las cuchillas. Para accionarlas, pulse el botón de la toma de fuerza
(PTO) durante un segundo. La luz indicadora verde ubicada debajo del
botón de la PTO se enciende cuando la plataforma de corte está energizada y la
pantalla LCD muestra el mensaje CUT DECK ON (plataforma de cor te activada). Al
pulsar nuevamente el botón de la PTO, se desactivará el suministro de energía a la
plataforma de corte. El indicador verde no se ilumina cuando no hay suministro de
energía hacia la plataforma de corte.
Botón del modo de precaución marcha atrás (RCM)
¡PRECAUCIÓN!
Antes de utilizar el montable, consulte la sección Funcionamiento de
este manual para obtener instrucciones detalladas relacionadas con el
uso del montable en el MODO DE PRECAUCIÓN MARCHA ATRÁS.
Situado en el VCM, el botón de RCM está ubicado en el VCM y permite
operar el montable marcha atrás con las cuchillas acopladas. Para ac tivar
el RCM, mantenga pulsado el botón de RCM durante 3 segundos. Cuando
el modo RCM está activado, se ilumina la luz indicadora roja. Para desactivar el RCM,
vuelva a pulsar el botón de RCM. Cuando el modo RCM no está activado, no se
ilumina la luz indicadora roja. Consulte la sección Funcionamiento de este manual
Figura 37
Nota: Este manual de operación corresponde a numerosos modelos. Las
características del montable pueden variar según los modelos. No todas las
características que se incluyen en este manual se aplican a todos los modelos de
montable y la máquina que se ilustra aquí puede diferir de la suya.
Nota: Las referencias a IZQUIERDA, DERECHA, ADELANTE Y ATRÁS indican esa
posición desde el asiento del operador en montable, mirando hacia adelante.
Módulo de control del vehículo (VCM) (A)
ADVERTENCIA
Nunca deje la máquina en funcionamiento sin vigilancia. Siempre
desconecte la toma de fuerza (PTO), ponga el freno de mano, pare
el montable y retire la llave de encendido, para evitar que el motor
arranque accidentalmente.
El módulo de control del vehículo (VCM) está
ubicado en el guardabarros izquierdo del
tractor si se sienta en la posición del operador.
En el VCM, se ubican varios botones de
control del montable. El VCM incluye el
botón de ENCENDIDO/DETENCIÓN, el botón
de la toma de fuerza (PTO) (ENCENDIDO/
O
PT
APAGADO de cuchillas), el botón del modo de
precaución marcha atrás (RCM), el botón del
faro delantero, el botón de control de crucero,
la pantalla LCD y el indicador de nivel de la
batería.
¡PRECAUCIÓN!
Antes de operar el montable, consulte Interruptores de
interbloqueo de seguridad y Arranque del montable en
la sección Funcionamiento de este manual para ver instrucciones
detalladas del Módulo del VCM y del funcionamiento del tractor en el
MODO DE PRECAUCIÓN MARCHA ATRÁS.
Botón de encendido/detención
segundo (un pitido).
Situado en el VCM, el botón de encendido/detención se utiliza para
encender y detener el montable cuando el interruptor de llave está en la
posición ENCENDIDO. Para encender el montable, pulse el botón de
encendido/detención durante dos segundos (dos pitidos). Para detener
el montable, pulse el botón de encendido/detención durante un
para obtener instrucciones detalladas relacionadas con el uso del montable en el
modo de precaución marcha atrás.
Nota: No se recomienda cortar el césped en marcha atrás.
ADVERTENCIA
Tenga mucho cuidado cuando opere el montable en MODO DE
PRECAUCIÓN MARCHA ATRÁS. Mire siempre hacia abajo y detrás de
usted antes y durante la marcha atrás. No haga funcionar el montable
cuando haya niños u otras personas cerca. Detenga el montable
inmediatamente si alguien se acerca.
Botón de faros delanteros
Situado en el VCM, este botón se utiliza para encender o apagar los
faros delanteros.
Palanca de control de crucero
Situado en el VCM, si se pulsa el botón de control de crucero cuando el
RC
M
montable está en movimiento, el montable se mantiene a velocidad
absoluta constante sin que sea necesario presionar el pedal de
transmisión. La pantalla LCD muestra “CRUISE ON” (Crucero activado)
cuando el control de crucero está activado. El control de crucero se
puede desactivar pulsando el botón de control de crucero o presionando el pedal de
freno o el pedal de marcha adelante. Consulte la sección Funcionamiento de este
manual para ver instrucciones detalladas sobre la función de control de crucero.
Nota: El control de crucero no se accionará a la velocidad absoluta más rápida
del montable. Si el operador intentara hacerlo, el montable se desacelerará
automáticamente a la velocidad de corte absoluta óptima y más rápida.
Nota: El control de crucero no se accionará durante la conducción marcha atrás.
Pantalla LCD e indicador de nivel de la batería
Situado en el VCM, la pantalla LCD y el indicador de nivel de la batería se utilizan
para brindar instrucciones, advertencias e información acerca de los sistemas y el
nivel de la batería del montable.
35
Page 36

FUNCIONAMIENTO
Interruptor de llave (B)
Tipo B1 (Si está equipado)
Tipo B2 (Si está equipado)
El interruptor de llave está ubicado en el guardabarros izquierdo y suministra
energía al VCM cuando el interruptor está en la posición ENCENDIDO (I): El montable
no se puede encender, a menos que el interruptor de llave no esté en la posición
ENCENDIDO (I). Si se gira el interruptor hasta la posición OFF (O), se apaga el
montable y se detiene el f lujo de energía al VCM.
Do No t
Remove Labe l
While On Displa y
Supprimer l'étiquette
Pendant l'affichag e
S
u
R
p
p
e
m
r
i
o
m
v
e
r
l
'
é
Nota: Antes de que se pueda encender el montable, se debe quitar la
Ne pa s
etiqueta de seguridad que cubre el interruptor de llave. Esta etiqueta
r
e
I25799
r
t
r
r
a
a
t
m
S
e
é
o
L
T
a
l
d
b
e
r
está colocada para evitar el arranque accidental cuando el montable
u
o
t
i
p
q
u
e
t
e
t
está en exhibición. Quítela para acceder al interruptor de llave.
Pedal de marcha adelante (C)
El pedal de marcha adelante está ubicado a la derecha de la columna de dirección,
sobre el estribo. Presione el pedal de marcha adelante hacia adelante para que el
montable se mueva en esa dirección. La velocidad absoluta también se controla
con el pedal de marcha adelante. Cuanto más se presione el pedal, más rápido se
moverá el montable. El pedal volverá a su posición original/neutral cuando se libere.
Pedal de marcha atrás (D)
El pedal de marcha atrás está ubicado a la derecha de la columna de dirección
sobre el estribo. La velocidad absoluta también se controla con el pedal de marcha
atrás. Cuanto más se presione el pedal, más rápido se moverá el montable. El pedal
volverá a su posición original/neutral cuando se libere.
Pedal del freno (E)
El pedal del freno está ubicado del lado izquierdo de la columna de la dirección,
sobre el estribo. Presione el pedal totalmente hacia abajo para colocar el freno de
disco y hacer que el montable se detenga por completo.
Nota: Se debe oprimir completamente el pedal del freno para poner en marcha el
montable. Consulte Interruptores de enclavamiento de seguridad para obtener más
información.
Palanca del freno de mano (F)
Para colocar el freno de mano, presione totalmente el pedal de freno. Mueva la
palanca del freno de mano totalmente hacia abajo hasta la posición de freno de
mano. Suelte el pedal del freno para permitir que el freno de mano quede puesto.
Para soltar el freno de mano, presione el pedal de freno y mueva la palanca del
freno de mano hacia adelante y hacia afuera de la posición del freno de mano.
Suelte el pedal de freno.
Palanca de elevación de la plataforma (G)
Ubicada en el guardabarros derecho del montable, la palanca de elevación de
la plataforma se utiliza para cambiar la altura de la plataforma de corte (5
posiciones). Para utilizarla, mueva la palanca hacia la izquierda, luego
colóquela en la muesca que mejor se adapte a la aplicación deseada. La
posición más baja es “1”, y la posición más alta es la posición “5”
La posición “1” tiene una altura de corte de aproximadamente 1 in (2,5 cm);
la posición “5” tiene una altura de corte de aproximadamente 4 in (10 cm), y
el cambio de altura es de aproximadamente 3/4 entre cada posición.
Faro delantero (H)
El faro se ENCIENDE siempre que el interruptor esté en la posición ON (Encendido)
y el botón del faro esté presionado. Para APAGAR el faro, pulse el botón del faro
nuevamente.
Orificio de carga (I)
El orificio de carga está ubicado en la parte trasera del montable. Para acceder al
orificio de carga, eleve la tapa del orif icio de carga.
Portavasos (K)
El portavasos está ubicado a la izquierda del asiento del operador.
Funcionamiento
ADVERTENCIA
Evite lesiones graves o la muerte
Conozca la ubicación y función de todos los controles.
Extraiga los objetos que podrían ser arrojados por las cuchillas.
Recorra las pendientes hacia arriba y hacia abajo, no de manera
transversal.
Tenga más precaución en las pendientes. No corte el césped en
pendientes que superen los 12°/21%. Evite realizar giros abruptos.
Corte a baja velocidad.
Aplicación del freno de mano cuando gire el interruptor de llave en una
pendiente.
No utilice la unidad en lugares donde podría resbalar o volcar.
Si la máquina se para mientras sube la pendiente, pare las cuchillas y
retroceda lentamente para abajo.
Antes de abandonar la posición del operador, desconecte las cuchillas,
accione el freno de mano, apague y retire la llave.
Asegúrese que las cuchillas estén desconectadas antes de colocar las
manos o los pies cerca de las cuchillas.
Mantenga los dispositivos de seguridad (defensas, protecciones,
interruptores, etc.) en su lugar y en funcionamiento.
Mantenga alejados a los observadores.
Deje que la máquina se enfríe antes de almacenarla.
Mantenga la máquina libre de residuos.
Lea el Manual del operador
Interruptores de interbloqueo de seguridad
Este montable está equipado con un sistema de bloqueo de seguridad para
protección del operador. Si el sistema de interbloqueo funciona mal, no se
debe hacer funcionar el montable. Comuníquese con un distribuidor de servicio
autorizado.
• El sistema de bloqueo de seguridad impide que el operador utilice el
montable, a menos que el operador esté en el asiento con el pedal
completamente presionado o el freno de mano accionado y el pedal de
marcha en la posición NEUTRAL.
• El montable no funciona con el cable de carga conec tado en el orificio de
carga y/o la cubierta del orif icio de carga abierta o extraída.
• El montable no funcionará, a menos que el canal de descarga, el adaptador
para abono o el canal de embolsadora estén instalados correctamente en su
lugar.
• Si el operador abandona el asiento, el montable desconectará
automáticamente las cuchillas y los motores.
Nota: Para volver a encender el montable, siga los procedimientos de
arranque adecuados.
36
Page 37

FUNCIONAMIENTO
ADVERTENCIA
No opere el montable si el sistema de enclavamiento de seguridad
funciona mal. El sistema fue diseñado para brindarle seguridad y
protección.
Aplicación del freno de mano
1. Presione totalmente el pedal del freno y manténgalo hacia abajo con el pie.
2. Mueva la palanca del freno de mano hacia atrás, hasta la posición de freno
de mano.
3. Suelte el pedal del freno para permitir que el freno de mano quede puesto.
Para sacar el freno de mano
1. Presione el pedal del freno y mueva la palanca del freno de mano hacia
adelante para sacarla de la posición del freno de mano.
Fijación de la altura de corte
Seleccione la altura de cor te de la cubierta de corte colocando la palanca de
elevación de la cubierta en cualquiera de las cinco (5) muescas de altura de corte, en
el lado derecho del guardabarros.
ADVERTENCIA
Mantenga las manos y los pies alejados de la abertura de descarga de
la plataforma de corte.
Consulte la sección Nivelación de la plataforma en la sección Cuidado del producto
de este manual para obtener instrucciones detalladas sobre el ajuste de la
plataforma.
Encendido del montable
ADVERTENCIA
No opere el montable si el sistema de enclavamiento funciona mal. El
sistema fue diseñado para brindarle seguridad y protección.
1. Desconecta el cable de carga (si es necesario). Si el cable todavía está
conectado, se mostrará un recordatorio en el VCM cuando el interruptor de
llave se mueva a la posición de encendido.
2. Siéntese en el asiento del operador. Se mostrará un recordatorio en el VCM si
el operador no está en el asiento cuando el interruptor de llave se mueva a la
posición de encendido.
3. Inserte la llave de encendido en el del interruptor de llave.
4. Presione completamente el pedal del freno para liberar el freno de mano. Si
el freno no está accionado, se mostrará un recordatorio en el VCM cuando el
interruptor de llave se mueva a la posición de encendido.
Detención del montable
ADVERTENCIA
Si golpea un objeto extraño, detenga el montable, gire la llave
de encendido a la posición APAGADO y quiítela. Inspeccione
minuciosamente la máquina para ver si está dañada. Repare el daño
antes de volver a arrancar y hacer funcionar.
1. Si las cuchillas están conectadas, pulse el botón de la PTO para desconectar
la PTO.
2. Presione el botón de encendido/detención por un segundo (un pitido) o
gire la tecla de encendido en sentido contrario a las agujas del reloj hasta la
posición APAGADO (O).
3. Retire la llave del interruptor de llave para evitar encendidos accidentales.
Conducción del montable
ADVERTENCIA
Evite arrancar súbitamente, desarrollar excesiva velocidad y parar
inesperadamente.
ADVERTENCIA
No abandone el asiento del montable sin pulsar primero el botón de
la PTO para desconectar las cuchillas, presionando el pedal del freno
y colocando el freno de mano. Si va a dejar el montable sin vigilancia,
gire también la tecla de encendido hasta la posición APAGADO.
ADVERTENCIA
Siempre mire hacia abajo y hacia atrás antes y mientras se desplaza
marcha atrás, para evitar un accidente.
1. Para conducir hacia ADELANTE, presione lentamente el pedal de marcha
adelante para desplazarse hacia ADELANTE hasta alcanzar la velocidad
deseada.
2. Para conducir MARCHA ATRÁS, aplique lentamente el pedal de marcha
adelante hasta alcanzar la velocidad deseada.
3. El montable se detiene soltando el pedal de marcha y luego presionando el
pedal de marcha de avance o de retroceso y o presionando el pedal de freno.
ADVERTENCIA
Antes de abandonar la posición del operador por cualquier motivo,
desconecte las cuchillas, accione el freno de mano, gire el interruptor
de llave hasta la posición OFF y extraiga la llave de encendido.
Modo de precaución en marcha atrás (RCM)
La posición MODO DE PRECAUCIÓN EN MARCHA ATRÁS permite operar el tractor
marcha atrás con las cuchillas (PTO) activada.
Nota: No se recomienda cortar el césped en marcha atrás.
5. Gire la llave de encendido en el sentido de las agujas del reloj hasta la
posición ENCENDIDO (I).
6. Pulse el botón de encendido/detención durante dos segundos (dos pitidos).
ADVERTENCIA
Tenga mucho cuidado cuando opere el tractor en MODO DE PRECAUCIÓN
EN MARCHA ATRÁS. Mire siempre hacia abajo y detrás de usted antes
y durante la marcha atrás. No haga funcionar el tractor cuando haya
niños u otras personas cerca. Detenga el tractor inmediatamente si
alguien se acerca.
37
Page 38

FUNCIONAMIENTO
Para utilizar el MODO PRECAUCIÓN MARCHA ATRÁS:
Nota: El operador DEBE estar sentado en el asiento del tractor.
1. Ponga en marcha el montable como se indicó previamente.
2. Mantenga presionado el botón RCM durante tres segundos hasta que se
ilumine la luz indicadora roja. La luz indicadora roja permanecerá encendida
siempre que el MODO PRECAUCIÓN MARCHA ATRÁS esté encendido.
3. Una vez activada (luz indicadora ENCENDIDA), se puede operar el montable
en marcha atrás con las cuchillas de corte (PTO) activadas.
4. Siempre mire hacia abajo y hacia atrás antes y mientras opera en marcha
atrás, para asegurarse de que no haya niños en el área. Una vez retomado el
movimiento hacia adelante, presione el botón RCM para volver al modo de
corte normal.
El MODO PRECAUCIÓN MARCHA ATRÁS permanece activado hasta que:
a. Se presiona el botón RCM o
b. El operador abandona el asiento.
Conducción en pendientes
Consulte el INDICADOR DE PENDIENTES en la sección Importantes medidas de
seguridad para contribuir a determinar en qué pendientes puede operar el
montable de manera segura.
ADVERTENCIA
No corte en pendientes con una inclinación de más de 12°/21% (una
elevación aproximada de 2.1 pies por cada 10 pies). El montable podría
voltearse y causar lesiones graves.
1. En las pendientes, corte hacia arriba y hacia abajo, NUNCA en forma
transversal.
2. Tenga sumo cuidado al cambiar de dirección en una pendiente.
3. Esté atento a los hoyos, surcos, baches, rocas, u otros objetos ocultos. El
terreno desnivelado puede hacer que el montable se vuelque.
El césped alto puede ocultar obstáculos.
4. Evite realizar giros cuando opere en una pendiente. Si debe realizar un giro,
hágalo pendiente abajo. Subir una pendiente aumenta las posibilidades de
que el vehículo dé una vuelta de campana.
5. Evite detenerse cuando suba una pendiente. Si fuese necesario detenerse
mientras sube una pendiente; arranque lenta y cuidadosamente para reducir
la posibilidad de que el montable se dé vuelta hacia atrás.
Conexión de la toma de fuerza (PTO)
Al conectar la PTO, se suministra alimentación a la plataforma de corte. Para activar
las cuchillas, haga lo siguiente:
Pulse el botón de la toma de fuerza (PTO) durante un segundo. Cuando la PTO está
activada, se enciende la luz indicadora verde debajo del botón PTO.
Abono (si esta función está incluida)
El abono es un proceso por el cual se recirculan los recortes de césped de manera
repetida debajo de la plataforma de corte. Los recortes muy finos luego son
despedidos de vuelta para que se depositen en el césped donde actúan como
fertilizante natural. Consulte la sección Configuración y Montaje de este manual
para ver instrucciones sobre cómo se instala el kit de abono (si es parte del equipo).
Uso de la palanca de elevación de la plataforma
Para levantar la plataforma de corte, mueva la palanca de elevación de la
plataforma hacia la izquierda, luego colóquela en la muesca más conveniente para
su aplicación. Consulte Ajuste de la altura de corte en esta sección.
Corte de césped
ADVERTENCIA
Para ayudar a evitar el contacto con las cuchillas o una lesión por algún
objeto que sea arrojado, mantenga a las personas que lo observan,
a los ayudantes, niños y mascotas alejados al menos 25 metros de la
máquina mientras está en funcionamiento. Pare la máquina si alguien
ingresa a la zona.
ADVERTENCIA
Planifique el patrón de corte, para evitar que la descarga de materiales
se realice hacia los caminos, las aceras, los observadores, etc. Evite
además descargar material contra una pared u obstrucción, ya que esto
podría hacer que el material descargado rebotara contra el operador.
La siguiente información será de utilidad cuando use la plataforma de corte con su
montable:
1. No corte ni conduzca a alta velocidad absoluta, especialmente si tiene
instalado un kit de abono
o un colector de césped.
2. Para obtener los mejores resultados, se recomienda realizar las dos primeras
vueltas en el sentido de las agujas del reloj de corte con la descarga hacia
el centro. Después de las dos primeras pasadas, invier ta la dirección para
arrojar la descarga hacia afuera, para equilibrar el corte. Esto otorgará un
mejor aspecto al césped.
3. No corte el césped demasiado corto. El césped corto es propicio para el
crecimiento de malezas y se pone amarillo rápidamente cuando escasea la
lluvia.
4. En terrenos difíciles, puede resultar necesario pasar por segunda vez el
tractor cortacésped sobre el área ya cortada, para obtener un corte más
prolijo.
5. NO intente cortar malezas frondosas o césped extremadamente alto. La
cortadora fue diseñada para cortar el césped, NO para podar malezas.
6. Mantenga las cuchillas afiladas y cámbielas cuando se gasten. Consulte
Cuchillas de corte en la sección Servicio de este manual para obtener
instrucciones sobre cómo afilar correctamente las cuchillas.
38
Page 39

SERVICIO Y MANTENIMIENTO
PROGRAMA DE MANTENIMIENTO
ADVERTENCIA
Antes de realizar cualquier tipo del mantenimiento/servicio, suelte todos
los mandos y pare la maquina.
Intervalo Artículo Servicio Registro de servicio
Siga el cronograma de mantenimiento que se presenta a continuación. Esta tabla
sólo describe pautas de servicio. Utilice la columna Registro de Servicio para hacer
el seguimiento de las tareas de mantenimiento completadas. Para ubicar el centro
de servicio más cercano o para programar un servicio, comuníquese al teléfono con
1-88 8-331-4569.
Cada Uso 1. Las herramientas
2. La batería
3. Cuchillas
4. Presión de los neumáticos
Cada 10 horas 1. Cuchillas
2. Puntos de pivote de los pedales
Cada 25 horas 1. Cremallera y
2. Piñon
3. Eje delantero y llantas
Antes de Almanacenaje 1. Batería
2. Puntos de pivote de los pedales
3. Eje delantero y llantas
† Limpie más a menudo en condiciones polvorientas o cuando los escombros aerotransportados están presentes.
Nota: Este manual de operación corresponde a numerosos modelos. Las
características del montable pueden variar según los modelos. No todas las
características que se incluyen en este manual se aplican a todos los modelos de
montable y la máquina que se ilustra aquí puede diferir de la suya.
1. Compruebe
2. Cargue
3. Compruebe
4. Compruebe e infle a la especificación
del neumático
1. Compruebe
2. Lubrique
1. Lubrique
2. Lubrique
3. Lubrique
1. Cargue
2. Lubrique
3. Lubrique
Importante: No utilice una lavadora a presión o manguera de jardín para limpiar su
montable. Estas pueden ocasionar daño a los comp onentes eléctricos o al motor eléc trico.
El uso de agua acortar á la vida útil de la máquina y reducirá su capacidad de servicio.
Limpieza del montable
PELIGRO
Los componentes eléctricos de este montable no se pueden reparar. Consulte
al distribuidor de servicio autorizado ante cualquier necesidad de servicio.
PELIGRO
Haga reparar el m ontable por un técnico cal ificado que use únic amente piezas de
repuesto idé nticas. Esto asegurar á que se mantenga la seguridad de l montable.
Cuidado del montable posterior al funcionamiento
Después de cada vez que s e utilice el montable, se deben implementar los siguientes
procedimientos para e xtender su vida útil y garantizar condiciones de operación seguras.
PELIGRO
Si no se siguen estas recomendaciones, usted u otras personas pueden
sufrir lesiones graves, o pueden producirse daños en el montable.
Si el montable ha estado en funcionamiento recientemente, las superficies metálicas
estarán c alientes y pueden causar q uemaduras en la piel. Deje que e l montable se
enfríe durante al menos cinco minutos. Tenga precaución para evitar quemaduras.
El montable se debe limpiar de spués de cada uso y bajo cierta s condiciones; es decir, en
condiciones sec as o cuando se haga abono, puede ser necesario reali zar limpiezas adicionales.
Una de las mejores maneras de mantener el funcionamiento eficiente de su
montable y reducir el riesgo de incendio es eliminar regularmente la acumulación
de desechos del montable. Siga las recomendaciones a continuación y contacte a su
distribuidor autorizado si tiene alguna pregunta.
• Deje que la máquina se enfríe en un área abierta antes de limpiarla.
• No use agua en ninguna parte del montable. Sí lo hace, puede producir
daños en los componentes eléc tricos y en el motor del montable. El uso de
aire comprimido y/o de un soplador de hojas o de un cepillo, de una esponja
húmeda o de un trapo ayudará a mantener limpio el montable.
• Limpie alrededor de los fusibles, de todo s los cables y de los mazos de cables, etc.
• Limpie la parte superior de la plataforma del montable. Consulte la Figura 38.
Limpieza de la parte inferior de la plataforma
ADVERTENCIA
ADVERTENCIA
Para evitar lesiones graves, no use agua para limpiar el montable, las baterías
o el cargador de baterías. No utilice detergentes fuertes. Los productos de
limpieza para el hogar que contienen aceites aromáticos como pino y limón, y
los disolventes como el queroseno, pueden dañar el plástico.
Debe limpiar la parte inferior de la plataforma del montable después de cada uso ya
que se acumulan recortes de pasto, hojas, suciedad y otros desechos. Esta acumulación
de recortes de pasto, etc. no es aconsejable porque produce óxido y corrosión.
1. Quite el pasto y las hojas acumulados alrededor del motor (NO USE AGUA).
Limpie el montable con un paño seco.
2. Si se han acumulado desechos en la parte inferior de la máquina, incline la
cortadora y limpie con una herramienta adecuada.
39
Figura 38
Page 40

SERVICIO Y MANTENIMIENTO
No se muest ra la rueda trasera
para mayor claridad.
(a)
• Limpie alre dedor y cerca de la transmisión, el eje y el área del ventilador. Vea la Figura 39.
Figura 39
• Se pueden acumular residuos en cualquier parte del montable,
especialmente en superficies horizontales. Puede ser necesario cuando corte
césped en condiciones secas o cuando haga abono.
• El exceso de lubricación puede hacer que ciertos sectores se transformen en
depósitos de suciedad. La reparación del exceso de lubricación puede ayudar
a reducir los riesgos de incendio.
• Además de limpiar el montab le antes de utilizarlo y antes de guardarlo, no intente
cortar césped demasiado crecido (de 25 cm [10 in] o más de altura), seco (como
un pastizal) ni pilas de hojas secas. Se pueden acumular césped u hojas sec as en la
plataforma de cor te, y esto puede repre sentar un potencial peligro de incendio.
Almacenamiento del montable
• Deje que la máquina se enfríe en un área abierta antes de almacenarla.
• No estacione el montable cerca de cualquier material inflamable (madera,
ropa o productos químicos) o de llamas abiertas o cualquier otra fuente de
ignición (hornos, calentadores de agua u otros tipos de calefactores).
• Quite todos los materiales combustibles del montable antes de guardarlo.
Vacíe las cajas de carga y los colectores o contenedores de césped.
• Cargue totalmente las baterías y recárguelas cada 30 días durante el período
de almacenamiento.
Retiro del montable del lugar de guarda
1. Cargue totalmente las baterías e infle los neumáticos a la presión
recomendada.
2. Conduzca el montable sin carga para estar seguro de que todos los sistemas
del montable funcionan correctamente.
Mantenimiento
Antes de realizar tareas de mantenimiento o reparaciones, desconecte
la toma de fuerza (PTO) de las cuchillas, ponga el freno de mano, gire el
interruptor de llave hasta la posición de APAGADO y retire la llave, para
evitar encendidos accidentales.
Lubricación
Puntos de pivote y varillaje
Lubrique todos los puntos de pivote del sistema de transmisión, el freno de mano y
el varillaje de elevación al menos una vez por temporada con aceite ligero.
ADVERTENCIA
Ruedas traseras
Las ruedas traseras se deben retirar de los ejes una vez por temporada. Lubrique
bien los ejes y las llantas con una grasa multiusos antes de reinstalarlos.
Ejes delanteros
Cada extremo de la barra de pivote delantera del montable puede est ar equipado con un
engrasador. Lubrique con pistola de grasa cada 25 horas de funcionamiento montable.
Lubricación de cremallera y piñón
Una vez por temporada, o cada 25 horas de funcionamiento, será necesario lubricar el
mecanismo de cremallera y piñón de dirección que está ubicado debajo del frente de la
montable. Mediante el uso de grasa para automóviles estándar, engrase el frente y la
parte posterior de la cremallera de dirección, como se indica en la Figura 4 0.
Figura 40
Almacenamiento de la batería
1. Las baterías deben guardarse con carga completa. Las baterías descargadas se
pueden congelar más rápido que las baterías cargadas en temperaturas frías.
2. Las baterías se deben cargar totalmente una vez por mes.
Nota: Llevará aproximadamente 4 horas para cargar totalmente las baterías.
Si se dejan conectadas las baterías al cargador durante más de 4 horas, esto
no les producirá ningún daño, pero cuando se completa la carga, se debe
desconectar el cargador.
3. Las baterías no se deben mantener descargadas. Se puede producir un daño
permanente a las baterías.
4. Recar gue totalmente las baterías antes de volver a poner el montable en ser vicio.
Carga de las baterías
Nota: Si en algún momento el cargador falla durante la carga de la batería, siga
estos procedimientos:
1. Gire la llave hasta la posición de APAGADO.
2. Desconecte el cargador del montable.
3. Desconecte el cargador de la fuente de alimentación.
4. Vuelva a conectar el cargador a la fuente de alimentación.
5. Vuelva a conectar el cargador al montable.
6. Si el problema persiste comuníquese con el personal de servicio autorizado.
40
Page 41

SERVICIO Y MANTENIMIENTO
(c)
(a)
(b)
ADVERTENCIA
Las baterías contienen fluido corrosivo y material tóxico: TENGA
MUCHO CUIDADO. Mantener fuera del alcance de los niños. No perfore,
desensamble, mutile o prenda fuego. Durante la carga o descarga se
podrían emitir gases explosivos. Realice la carga en un área bien ventilada,
lejos de fuentes de combustión.
ADVERTENCIA
Recargue las baterías solamente con el cargador que se proporciona con
este montable. Un cargador que no sea adecuado para esta máquina puede
dañar las baterías o crear riesgos de incendios.
ADVERTENCIA
No cargue las baterías bajo la lluvia ni utilice el montable condiciones
húmedas.
Nota: Las baterías recarga bles se degradan con el tiempo y el uso. Eventualmente,
puede ser necesario reemplazar las baterías. Para hacer reemplazar las baterías
póngase en contacto con su distribuidor de servicio autorizado.
Nota: Reemplace las baterías si la capacidad de la batería cae por debajo del 50 %
de la capacidad inicial.
Nota: El uso de baterías viejas o falladas podrían producir una falla del sistema, y
esto puede resultar en una pérdida de alimentación.
Las baterías recargables se degradan con el tiempo y el uso. Las baterías pueden
eventualmente necesitar ser reemplazadas. Para reemplazar las baterías, contacte a
su distribuidor autorizado de servicio.
1. Levante la puerta del puerto de carga (a), que se encuentra en el panel
posterior del cuerpo de la podadora. Ver Figura 41.
3. Si en algún momento obtienes un error del cargador al cargar tu batería,
sigue estos procedimientos:
a. Desactiva la llave de encendido.
b. Desconecte el cargador del jinete.
c. Desenchufe el cargador de la fuente de alimentación.
d. Vuelva a conectar el cargador a la fuente de alimentación.
e. Enchufe el cargador de nuevo en el jinete.
f. Si el problema persiste, póngase en contac to con el personal de
servicio calificado.
Consejos para la carga de las baterías
• Use solo el cargador de batería provisto con este rider.
• Las baterías deben estar completamente cargadas antes del uso inicial.
• Nunca cargue una batería congelada.
• Se recomienda que el conductor cargue una vez por mes durante el
almacenamiento fuera de temporada.
• Desconecte siempre el cargador de la batería (o el cable de extensión, si
se usa) de la toma eléctrica, luego desconecte el cargador de la batería del
puerto de carga.
• Se recomienda que las baterías estén completamente cargadas después de
cada uso. Almacenar las baterías en un estado descargado podría reducir el
rendimiento futuro.
• Tomará aproximadamente 4 horas cargar completamente las baterías. Dejar
las baterías conectadas al cargador por más de 4 horas no dañará las baterías.
• Las baterías no desarrollan memoria y no necesitan descargarse
completamente antes de recargarlas.
Fusibles
iPRECAUCIÓN!
Para brindar protección continuada contra el riesgo de lesiones o de
choques eléctricos, no reemplace los fusibles quemados; llame al personal
de servicio calificado.
Ajustes
2. Inserte el cable de carga (b) en el puerto de carga (c). Enchufe el cable del
cargador (b) en el tomacorriente de la pared. Ver la Figura 2-11.
Nota: tomará aproximadamente 4 horas cargar completamente las baterías.
Nota: Los LED del Módulo de control del vehículo (VCM) parpadearán
continuamente durante la carga y la pantalla LCD mostrará el porcentaje de
carga. La batería está completamente cargada cuando todas las luces verdes
están iluminadas y la pantalla LCD muestra 100%. Consulte el Manual del
operador para obtener más consejos de carga.
Nota: Cuando el cable de carga está enchufado al conduc tor y aún no está
enchufado a la pared, los LED se iluminarán continuamente hasta que el
cable esté enchufado a la pared.
Figura 41
ADVERTENCIA
Nunca intente realizar ningún ajuste mientras el interruptor de llave
esté ACTIVADO, excepto cuando esto esté especificado en el Manual del
Operador.
Asiento
Consulte la sección Configuración y Montaje de este manual para ver instrucciones
para el ajuste del asiento.
Freno de mano
ADVERTENCIA
Nunca intente ajustar los frenos cuando el montable esté en marcha.
Desconecte la toma de fuerza (PTO) de las cuchillas, accione el freno de
mano, gire el interruptor de llave hasta la posición de APAGADO y retire la
llave, para evitar encendidos accidentales.
Si el montable no se detiene por completo cuando se presiona totalmente el
pedal de freno, o si las ruedas traseras del montable pueden rodar con el freno de
mano colocado, el freno necesita ajustes. Consulte con su distribuidor de ser vicio
autorizado para realizar un ajuste correcto de los frenos.
Plataforma
Nota: Controle la presión de neumáticos del montable antes de realizar cualquier
nivelación de la plataforma. Consulte Neumáticos en la sección Montaje y
configuración para obtener más información sobre la presión de los neumáticos.
41
Page 42

SERVICIO Y MANTENIMIENTO
(a)
(b)
(a)
(b)
(a)
(b)
(a)
(b)
(a)
(a)
Nivelación delantero-posterior
Es posible ajustar la inclinación de la plataforma de corte. El frente de la plataforma
debe estar entre 0” (a nivel) y 1/4 in más bajo que la parte posterior de la
plataforma. De ser necesario, realice un ajuste de la siguiente manera:
1. Con el montable estacionado sobre una superficie f irme y nivelada, ubique la
palanca de elevación de la plataforma en la posición media y rote la cuchilla, de
manera que quede alineada con el frente y la parte posterior del montable.
2. Mida la distancia desde la parte delantera de la punta de la cuchilla hasta
el suelo, y desde la parte posterior de la punta de la cuchilla hasta el suelo.
La primera medición debe ser de entre 0” (a nivel) y 1/4 in menor que la
segunda. Determine la distancia aproximada necesaria para un ajuste
adecuado y, de ser necesario, siga con el paso siguiente.
3. Ubique la tuerca de seguridad con brida en el extremo frontal de la varilla de
elevación de la PTO (b). Consulte la Figura 42.
4. Desconecte el motor de la plataforma de los adaptadores de la parte derecha
o inferior del montable. Gire el conector más grande (a) 1/4 de vuelta en
sentido contrario a las agujas del reloj y empuje hacia abajo. Repita el
procedimiento con el conector más pequeño (b).
Nota: Su cortacésped puede tener una de dos configuraciones diferentes
de conectores de motor de plataforma. Si su cortacésped tiene conectores
posicionados horizontalmente, consulte la Figura 44. Si su cortacésped tiene
conectores posicionados verticalmente, consulte la Figura 45.
Figura 44
Figura 42
a. Apriete la tuerca de seguridad con brida para levantar la parte
frontal de la plataforma.
b. Afloje la tuerca de seguridad con brida para bajar la parte frontal de
la plataforma.
Neumáticos
Consulte la sección Montaje y configuración para obtener más información sobre la
presión de los neumáticos.
Servicio
Extracción de la plataforma de corte
Para extraer la plataforma de corte, proceda de la siguiente manera:
1. Extraiga la llave de encendido y accione el freno de mano.
2. Baje la plataforma colocando la palanca de elevación de la plataforma hasta
la posición más baja (N.º 1) en el guardabarros derecho.
3. Extraiga el pasador de chaveta (a) con unión curva y la arandela plana (b)
del conjunto de elevación de la plataforma y guárdelo para volver a colocarlo
posteriormente. Consulte la Figura 43.
Figura 45
Nota: Desconecte siempre el conector más grande primero.
5. Extraiga los pasadores de chaveta con unión curva (a) que aún están
sujetando la plataforma al montable, como se indica en la Figura 46.
Figura 43
Figura 46
42
Page 43

SERVICIO Y MANTENIMIENTO
(a)
(b)
(d)
(c)
(a)
(b)
6. Desconecte el conector del cable (a) del interruptor de seguridad (b) de la
parte trasera del canal de descarga. Consulte la Figura 47.
Figura 47
7. Mueva la palanca de elevación de la plataforma hasta la posición más alta
(N.º 5) en el guardabarros derecho para levantar los brazos de elevación de la
plataforma y sacarlos del paso.
8. Deslice suavemente la plataforma de corte (desde el lado izquierdo) hacia
afuera desde la par te inferior del montable.
Instalación de la plataforma de corte
1. Eleve la palanca de elevación de la plataforma hasta la posición más alta
(N.º 5) en el guardabarros derecho para mover los brazos de elevación de la
plataforma y sacarlos del paso.
2. Deslice suavemente la plataforma de corte (desde el lado izquierdo)
nuevamente hacia la parte inferior del montable.
3. Conecte el conector del cable (a) en el interruptor de seguridad (b) de la
parte trasera del canal de descarga. Consulte la Figura 47.
Nota: Asegúrese de reconectar el conector del cable al interruptor de
seguridad en la Figura 47; el montable no funcionará si el interruptor de
seguridad no está correctamente conectado.
4. Coloque la manija de elevación de la plataforma en la posición más baja (N.º 1).
5. Asegure la plataforma a los brazo de elevación de la plataforma utilizando
dos pasadores de chaveta con unión curva. Consulte la Figura 46.
Nota: Los pasadores de chaveta con unión curva (a) se deben volver a colocar
de arriba hacia abajo.
6. Desconecte los motores de la plataforma a los adaptadores de la parte
derecha o inferior del montable. Conecte siempre el conector más grande
primero y, luego, el conector más pequeño. Consulte la Figura 45.
Nota: Cuando reconecte los motores de la plataforma, debe asegurarse de que
las conexiones sean seguras. Empuje hacia arriba en los manguitos ubicados
alrededor de los conec tores y gírelos en el sentido de las agujas del reloj hasta
que sienta que la posición de detención indique una conexión segura.
Cuchillas
ADVERTENCIA
Inspeccione periódicamente las cuchillas y/o el husillo en busca de rajaduras
o daños, especialmente después de golpear un objeto extraño No opere la
máquina hasta después de haber reemplazado los componentes dañados.
iPRECAUCIÓN!
Si el borde cortante de la cuchilla ha sido afilado previamente o si existe
una separación de metal, reemplace las cuchillas.
Las cuchillas se pueden sacar de la siguiente manera.
Nota: Puede resultar más fácil cambiar la cuchilla empezando primero por
extraer la plataforma de la parte inferior del montable, (consulte la sección
Extracción de la plataforma de corte en partes anteriores de esta sección);
luego voltee con delicadeza la plataforma para dejar al descubierto su parte
inferior. Sin embargo, es posible cambiar la cuchilla sin sacar la plataforma
del montable. Si se intenta cambiar la cuchilla sin sacar la plataforma del
montable, primero se debe mover la palanca de elevación de la plataforma
hasta su posición de cor te más elevada (N.º 5).
1. Ex traiga el adaptador de abono, el canal de la platafo rma o el canal de la embolsadora,
si viene equipado, dejando a la vist a la abertura del canal de la platafor ma.
2. Use un bloque de madera o un 2 x 4, insértelo dentro de la abertura de la
plataforma y haga girar la cuchilla hasta que la madera haga cuña entre la
abertura de la plataforma y la cuchilla de cor te, como se indica en la Figura 48.
Figura 48
3. Saque el perno (a) y el soporte de campana de la cuchilla (b) que sostienen la
cuchilla (c) y el adaptador (d) al motor de la plataforma. Consulte la Figura 49.
ADVERTENCIA
Apague el motor, accione el freno de mano y extraiga la llave antes de
retirar las cuchillas de corte para afilarlas o reemplazarlas. Proteja sus
manos utilizando guantes reforzados cuando sujete las cuchillas.
43
Figura 49
Page 44

SERVICIO Y MANTENIMIENTO
4. Extraiga la cuchilla (c) y el adaptador (d) del husillo del motor de la
plataforma. Consulte la Figura 49.
5. Para afilar la cuchilla de corte correctamente, extraiga cantidades iguales de
metal de ambos extremos de las cuchillas a lo largo de los bordes cortantes,
paralelo al borde de caída, a un ángulo de 25° a 30°. Afile siempre cada
borde de las cuchillas de corte de forma pareja para mantener un equilibrio
adecuado entre las mismas. Consulte la Figura 50.
Figura 50
6. Pruebe el equilibrio de la cuchilla usando un compensador de cuchillas. Afile
el metal del lado pesado hasta que quede bien equilibrada.
ADVERTENCIA
Una cuchilla mal equilibrada causará exceso de vibración y puede dañar el
montable y/o causar lesiones.
Nota: Cuando reemplace la cuchilla, asegúrese de instalarla con el lado marcado
“Bottom” (inferior) (o con el lado que posee un número de pieza es tampado)
mirando al piso cuando la cor tadora de césped está en posición de operación.
iPRECAUCIÓN!
Utilice una llave de torsión para ajustar el perno hexagonal entre
450 y 600 pies-libras.
Eliminación de las baterías
Eliminación de baterías dañadas o agotadas
ADVERTENCIA
En esta batería, se utiliza el siguiente material tóxico y corrosivo: IÓN DE
LITIO, un material tóxico.
ADVERTENCIA
Para evitar la contaminación ambiental, póngase en contacto con su
agencia local de eliminación de residuos para solicitar instrucciones antes
de eliminar baterías de ion de litio dañadas o agotadas. Lleve las baterías
a un centro local de reciclaje y/o eliminación que cuente con certificación
para la eliminación de baterías de ion de litio.
ADVERTENCIA
No use baterías rotas o con grietas, aun cuando no tengan pérdidas.
Cambie las baterías dañadas o agotadas por baterías nuevas. ¡NO INTENTE
REPARAR LAS BATERÍAS! Los intentos de reparación pueden producir
lesiones personales graves debido a explosión o descarga eléctrica.
Para evitar lesiones personales y daños ambientales:
• No intente retirar ni destruir ningún componente de la batería. No abra ni
mutile la batería. Si se produce una pérdida, los electrolitos emitidos son
corrosivos y tóxicos. No deje que la solución entre en contacto con sus ojos o
su piel y no trague solución.
• No arroje la batería junto con la basura domiciliaria normal.
• No arroje la batería al fuego. El elemento de la batería puede explotar.
• No elimine la batería en un lugar donde pase a ser parte de algún relleno
sanitario o de los desechos sólidos municipales.
• Cubra los bornes de la batería con cinta adhesiva reforzada.
• Deseche la batería de acuerdo con las regulaciones federales, estatales y
locales.
• Elimine la batería sin demora.
Acerca de los sellos de batería Call2Recycle®
El programa de auxiliares de la industria Call2Recycle® ayuda a
los fabricantes de baterías y productos a cumplir los requisitos
de reciclaje en los Estados Unidos y Canadá, incluido el
cumplimiento de amplias regulaciones estatales, provinciales
y federales, por ejemplo, la Ley de Baterías Recargables y con
Contenido de Mercurio (la Ley de las Baterías. Los licenciatarios/auxiliares de la
industria y los fabricantes y comerciantes de productos y baterías que participan en
el programa Call2Recycle® adquieren los derechos de imprimir los sellos de batería
Call2Recycle® en sus baterías y productos recargables. Cuando usted ve el sello de
batería Call2Recycle®, puede estar seguro de que su batería o su producto se pueden
reciclar en forma segura y responsable.
Acerca de Call2Recycle®
Desde 1994 Call2Recycle® ha desviado más de 75 millones de libras de baterías
recargables de los rellenos sanitarios locales y ha establecido una red de 30.000
lugares donde dejar unidades para reciclaje. Más de 200 fabricantes de productos
y/o baterías, auxiliares de la industria Call2Recycle®, se han reunido para asegurarse
de que se realice el reciclaje responsable de las baterías cuando llegan al fin de su
vida útil y solventan el programa que funciona a través de Call2Recycle®, Inc., una
organización de ser vicios públicos sin fines de lucro 501(c)4.
Para ubicar el centro de reciclaje más cercano, por favor, comuníquese al 1-800-822-
8837.
Solución de Problemas
Demasiada vibración
1. La cuchilla está floja o desequilibrada
• Apriete la cuchilla de corte y el husillo.
2. Cuchilla de corte dañada, desbalanceada o doblada.
• Reemplace la cuchilla
Corte irregular
1. Plataforma nivelada incorrectamente
• Haga un ajuste de la plataforma de adelante hacia atrás
2. Cuchilla de corte floja o descentrada.
• Afile o cambie la cuchilla de corte.
3. Presión de neumáticos desigual.
• Verifique y corrija la presión de los cuatro neumáticos.
El montable no procesa los recortes como abono
1. Césped húmedo
a. No procese abono cuando el pasto está mojado.
2. Césped excesivamente alto
a. Corte una vez a una altura de corte elevada y luego vuelva a realizar
el corte a la altura deseada, o siga una ruta de corte más estrecha.
44
Page 45

SERVICIO Y MANTENIMIENTO
3. La hoja de la cortadora está desafilada.
a. Afile o cambie la cuchilla
El montable se detuvo o no arranca
1. Falla en el sistema eléctrico
a. Apague el montable y vuelva a encenderlo
b. Si el problema persiste, comuníquese con un distribuidor de servicio
autorizado.
Las cuchillas no giran/se detuvieron
1. Sobrecarga
a. Permita que el motor de la plataforma se enfríe/eleve la altura de la
plataforma
2. Batería baja
a. Regrese al hogar; conéctela al cargador
Las cuchillas se detuvieron durante el desplazamiento marcha
atrás
1. Las cuchillas se detuvieron
a. Vuelva a activar la PTO de las cuchillas
b. Asegúrese de que esté activado el modo marcha atrás con precaución
Velocidad reducida
1. Batería baja
a. Cargue la batería se gún las instrucciones del manual del carga dor de la batería
2. Sobrecarga
a. Eleve la plataforma
Mensajes de la pantalla LCD
Falla del control del motor de transmisión: La plataforma y la transmisión
se apagaron. Apague y vuelva a encender el montable. Si el problema persiste,
póngase en contacto con el personal de ser vicio autorizado.
Falla de autoprueba: La plataforma y la transmisión se apagaron. Apague y
vuelva a encender el montable. Si el problema persiste, póngase en contacto con el
personal de servicio autorizado.
Fallas eléctricas: La plataforma y la transmisión se apagaron. Apague y vuelva a
encender el montable. Si el problema persiste, póngase en contacto con el personal
de servicio autorizado.
Temperatura de batería baja: Mueva el montable a una ubicación más cálida y
permita que la batería se caliente. Si el problema persiste, póngase en contacto con
el personal de servicio autorizado.
Falla del interruptor del freno: La plataforma y la transmisión se apagaron.
Apague y vuelva a encender el montable. Si el problema persiste, póngase en
contacto con el personal de servicio autorizado.
Falla del sensor del pedal del acelerador: La plataforma y la transmisión
se apagaron. Apague y vuelva a encender el montable. Si el problema persiste,
póngase en contacto con el personal de ser vicio autorizado.
Falla del interruptor del asiento: La plataforma y la transmisión se apagaron.
Apague el montable, siéntese en el asiento y vuelva a encenderlo. Si el problema
persiste, póngase en contacto con el personal de servicio autorizado.
Sobrecarga de la plataforma de corte: La plataforma y la transmisión se
apagaron. Apague el montable, limpie debajo de la plataforma, según lo indicado
en la sección Cuidado del montable posterior al funcionamiento y vuelva a encender
el montable. Levante la plataforma y / o corte a un ritmo más lento Si el problema
persiste, póngase en contacto con el personal de servicio autorizado.
Falla de sobrecarga de corrie nte del motor de transmisión: La plataforma y la
transmisión se apagaron. Apague el montable, deje que se enf ríe y vuelva a encender
el montable. Si el problema per siste, póngase en contacto con el personal de servicio
autorizado.
Fallas por alta temperatura: Apague el montable, deje que se enfríe y vuelva a
encender el montable. Si el problema persiste, póngase en contacto con el personal
de servicio autorizado.
La puerta del orificio de carga está abierta: El montable se detendrá y se
apagará. Cierre la puerta del orificio de carga y vuelva a encender el montable. Si el
problema persiste, póngase en contacto con el personal de servicio autorizado.
Advertencia de batería baja: La carga de la batería está baja y se debe cargar tan
pronto como sea posible.
Advertencia de afilado de cuchilla: Cuando se muestra esta advertencia, es
necesario revisar y afilar las cuchillas.
Advertencia de revisión de presión de los neumáticos: Cuando se muestre esta
advertencia, revise y ajuste la presión de los neumáticos.
45
Page 46

NOTES
46
Page 47

NOTES
47
Page 48

CRAF TSMAN® is a registered trademark of Stanley Black & Decker, Inc., used under license.
CRAFT SMAN® es una marca regis trada de Stanley Black & Decker, Inc., utilizada bajo licencia.
© 2018 CRAFTSMAN U.S. & Canada Only
CRAF TSMAN.com
Product Manufactured by (Producto fabricado por): MTD LLC, P.O. BOX 361131 CLE VELAND, OHIO 4 4136-0019
 Loading...