

Page 1

INSTRUCTION MANUAL | GUIDE D’UTILISATION | MANUAL DE INSTRUCTIONES
V60 Mower
Tondeuse V60
Podadora V60
CMCMW260
IF YOU HAVE QUESTIONS OR COMMENTS, CONTACT US.
POUR TOUTE QUESTION OU TOUT COMMENTAIRE, NOUS CONTACTER.
SI TIENE DUDAS O COMENTARIOS, CONTÁCTENOS.
1–888–331–4569 WWW.CRAFTSMAN.COM
final page size: 8.5 x 5.5 in CRAFTSMANfinal page size: 8.5 x 5.5 in CRAFTSMAN
Page 2

English (original instructions) 1
Français (traduction de la notice d’instructions originale) 14
Español (traducido de las instrucciones originales) 28
Page 3
ENGLISH
Definitions: Safety Alert Symbols and Words
This instruction manual uses the following safety alert symbols and words to alert you to hazardous situations and your risk
of personal injury or property damage.
DANGER: Indicates an imminently hazardous situation which, if not avoided, will result in death or seriousinjury.
WARNING: Indicates a potentially hazardous situation which, if not avoided, could result in death or seriousinjury.
CAUTION: Indicates a potentially hazardous situation which, if not avoided, may result in minor or moderateinjury.
(Used without word) Indicates a safety related message.
NOTICE: Indicates a practice not related to personal injury which, if not avoided, may result in propertydamage.
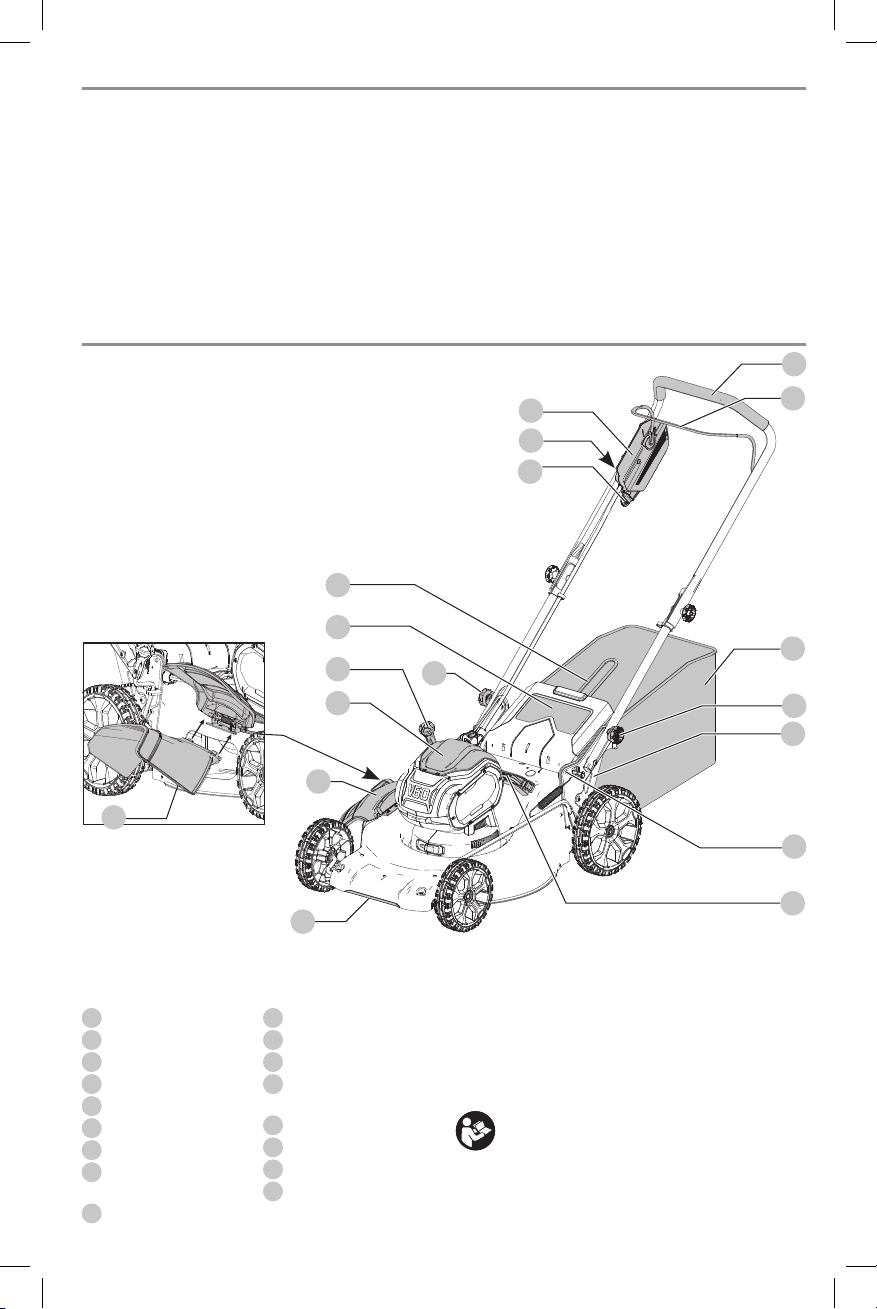
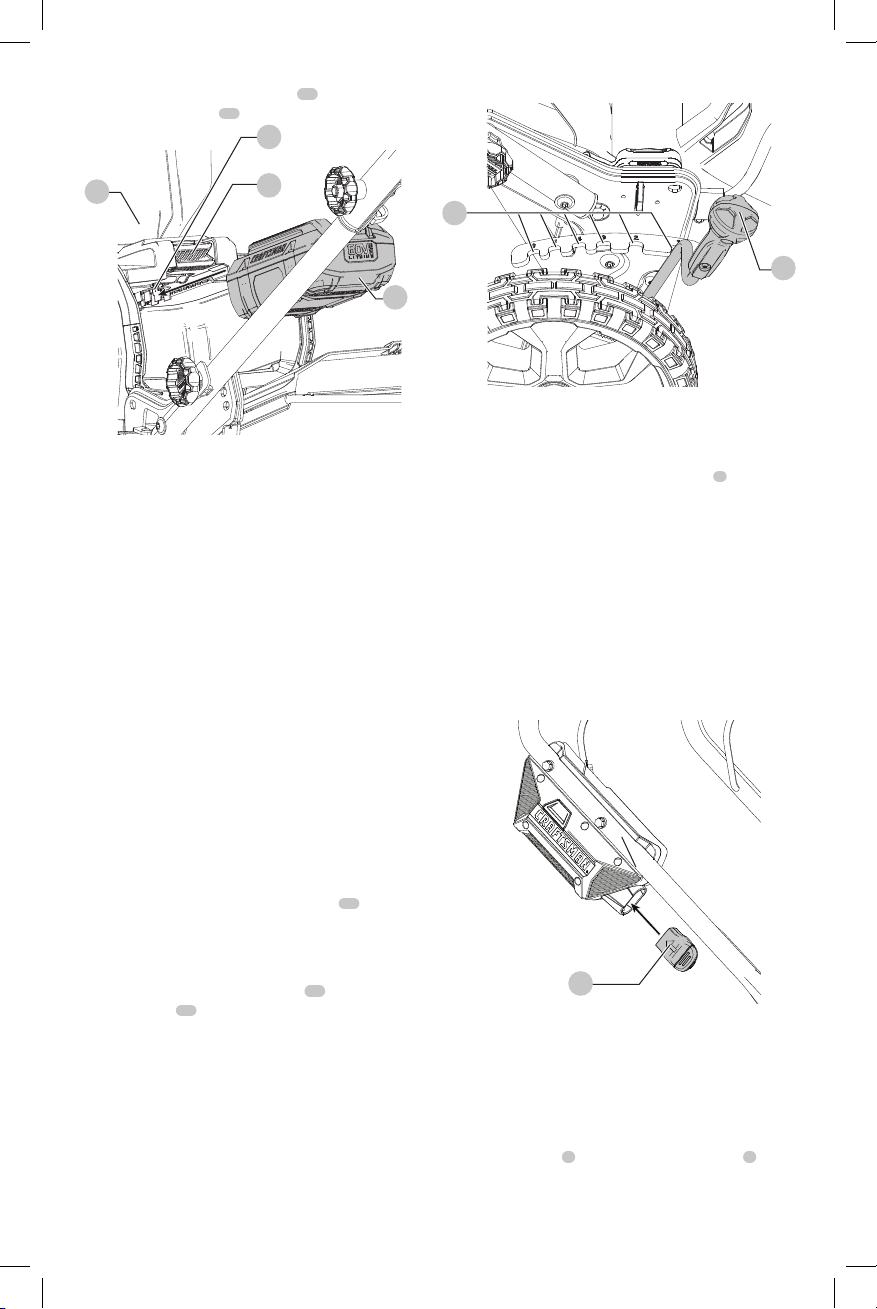
Fig. A
4
1
2
3
13
11
10
9
16
17
15
6
5
12
6
7
8
14
1
ON-OFF switch box
2
ON-OFF button
3
Safety key
4
Handle
5
Bail handle
6
Handle locks
7
Handle brackets
8
Handle storage detent
holes
9
Battery port cover
COMPONENTS
10
Cut height adjust lever
11
Rear door cover
12
Grass collection bag
13
Grass collection bag
handle
14
Upper carrying handle
15
Lower carrying handle
16
Side flap
17
Side discharge
attachment
WARNING: Read all safety warnings and all
instructions. Failure to follow the warnings and
instructions may result in electric shock, fire and/or
seriousinjury.
WARNING: Never modify the power tool or any part
of it. Damage or personal injury couldresult.
WARNING: To reduce the risk of injury, read the
instructionmanual.
If you have any questions or comments about this or
any product, call CRAFTSMAN toll free at:
1-888-331-4569.
1
Page 4

ENGLISH
V60 Mower
CMCMW260
IMPORTANT SAFETY WARNINGS AND
INSTRUCTIONS
WARNING: To reduce risk of injury:
• Before any use, be sure everyone using this tool
reads and understands all safety instructions and
other information contained in this manual.
• Save these instructions and review frequently prior
to use and in instructing others.
WARNING: When using battery powered lawn
mowers, basic safety precautions should always be
followed to reduce the risk of fire, electric shock, and
personal injury, including thefollowing.
READ ALL INSTRUCTIONS
GENERAL SAFETY WARNINGS AND
INSTRUCTIONS FOR ALL TOOLS
• This tool can be dangerous. Follow all warnings
and Safety Instructions in this manual. The operator is
responsible for following warnings and instructions in
this manual and on unit. Restrict use of this mower to
persons who read, understand and follow warnings and
instructions in this manual and onunit.
• Avoid dangerous environment – don’t use lawn
mowers in damp or wetlocations.
• Don’t Use InRain.
• Keep Children Away – All visitors should be kept a safe
distance from workarea.
• Dress Properly – Do not wear loose clothing or jewelry.
They can be caught in moving parts. Use of rubber gloves
and footwear is recommended when workingoutdoors.
• Use Safety Glasses – Always use face or dust mask if
operation isdusty.
• Use Right Appliance – Do not use lawn mower for any
job except that for which it isintended.
• Check for damaged parts. Before further use of the
mower, a guard or other part that is damaged should be
carefully checked to determine that it will operate properly
and perform its intended function. Check for alignment
of moving parts, binding of moving parts, breakage of
parts, mounting, and any other conditions that may affect
their operation. A guard or other part that is damaged
should be properly repaired or replaced by an authorized
service center unless otherwise indicated elsewhere in
thismanual.
• Repairs and service. Repairs, maintenance and
any adjustments not specified in this manual should
be performed by authorized service centers or other
qualified service organizations, always using identical
replacementparts.
• Don’t Force Lawn Mower – It will do the job better and
safer at the rate for which it wasdesigned.
• Don’t Overreach – Keep proper footing and balance at
alltimes.
• Stay Alert – Watch what you are doing. Use common
sense. Do not operate lawn mower when you aretired.
• Disconnect Lawn Mower – Remove the safety key and
battery pack from the mower when not in use, before
servicing, when changing accessories such as blades, and
the like.
• Store Idle Lawn Mower Indoors – When not in use,
lawn mower should be stored in an indoor dry and lockedup place – out of reach of children. Remove safety key and
batterypack.
• Maintain Lawn Mower With Care – Keep cutting edges
sharp and clean for best and safestperformance.
Follow instructions for lubricating and changing
accessories. Keep handles dry, clean, and free from oil
andgrease.
• Keep guards in place and in workingorder.
• Keep bladessharp.
• Keep hands and feet away from cuttingarea.
• Objects struck by the lawn mower blade can cause
severe injuries to persons. The lawn should always
be carefully examined and cleared of all objects prior to
eachmowing.
• If lawn mower strikes a foreign object, follow
thesesteps:
1. Stop lawn mower. Release the bailhandle.
2. Remove battery pack and safetykey.
3. Inspect fordamage.
4. Repair any damage before restarting and
operating the lawnmower.
• Use identical replacement bladesonly.
SAVE THESE INSTRUCTIONS
Important
Safe Practices for PedestrianControlled Mowers
This machine is capable of amputating hands and feet and
throwing objects. Failure to observe the following safety
instructions could result in serious injury or death.
General Information
1 . Read, understand, and follow instructions and
warnings in this manual and on the machine, engine
andattachments.
2 . Only allow operators, who are responsible, trained,
familiar with the instructions, and physically capable to
operate the machine.
3 . Do not operate the machine while under the influence of
alcohol or drugs.
2
Page 5
Preparation Before Operating
1 . Clear the operating area of any objects which could be
thrown by or interfere with operation of the machine.
2 . Keep the area of operation clear of all bystanders,
particularly small children. Stop the machine and
attachment(s) if anyone enters the area.
3 . Do not operate the machine without the entire grass
catcher, discharge chute, or other safety devices in place
and functioning properly. Check frequently for signs of
wear or deterioration and replace as needed.
4 . Wear appropriate personal protective equipment such as
safety glasses, hearing protection, and footwear.
Operating
1 . Only operate the machine in daylight or good
artificiallight.
2 . Avoid holes, ruts, bumps, rocks, or other hidden hazards.
Uneven terrain could overturn the machine, or cause
operator to lose their balance or footing.
3 . Do not put hands or feet near rotating parts or under the
machine. Keep clear of the discharge opening at all times.
4 . Do not direct discharge material toward anyone. Avoid
discharging material against a wall or obstruction.
Material may ricochet back toward the operator. Stop the
blade(s) when crossing gravel surfaces.
Children Specific
1 . Tragic accidents can occur if the operator is not alert to
the presence of children. Children are often attracted to
the machine and the mowing activity. Never assume that
children will remain where you last saw them.
2 . Keep children out of the operating area and under
the watchful care of a responsible adult other than
theoperator.
Slope Specific
1 . Slopes are a major factor related to accidents. Operation
on slopes requires extra caution.
2 . Travel in the manufacturer recommended direction on
slopes. Use caution while operating near dropoffs.
3 . Avoid mowing wet grass. (Poor footing could cause a slip
and fall accident.)
4 . Do not operate machine under any condition where
traction, steering, or stability is in question. Mower could
slide even if the wheels are stopped.
5 . Avoid starting and stopping on slopes. Avoid making
sudden changes in speed or direction. Make turns slowly
and gradually.
6 . Use extra care while operating machine with a grass
catcher or other attachment(s). They can affect the
stability of the machine.
Service
1 . Keep machine in good working order. Replace worn or
damaged parts.
2 . Use caution when servicing blades. Wrap the blade(s) or
wear gloves. Replace damaged blades. Do not repair or
alter blade(s).
ENGLISH
The following are explanations of important safety
hazard pictorials on themower.
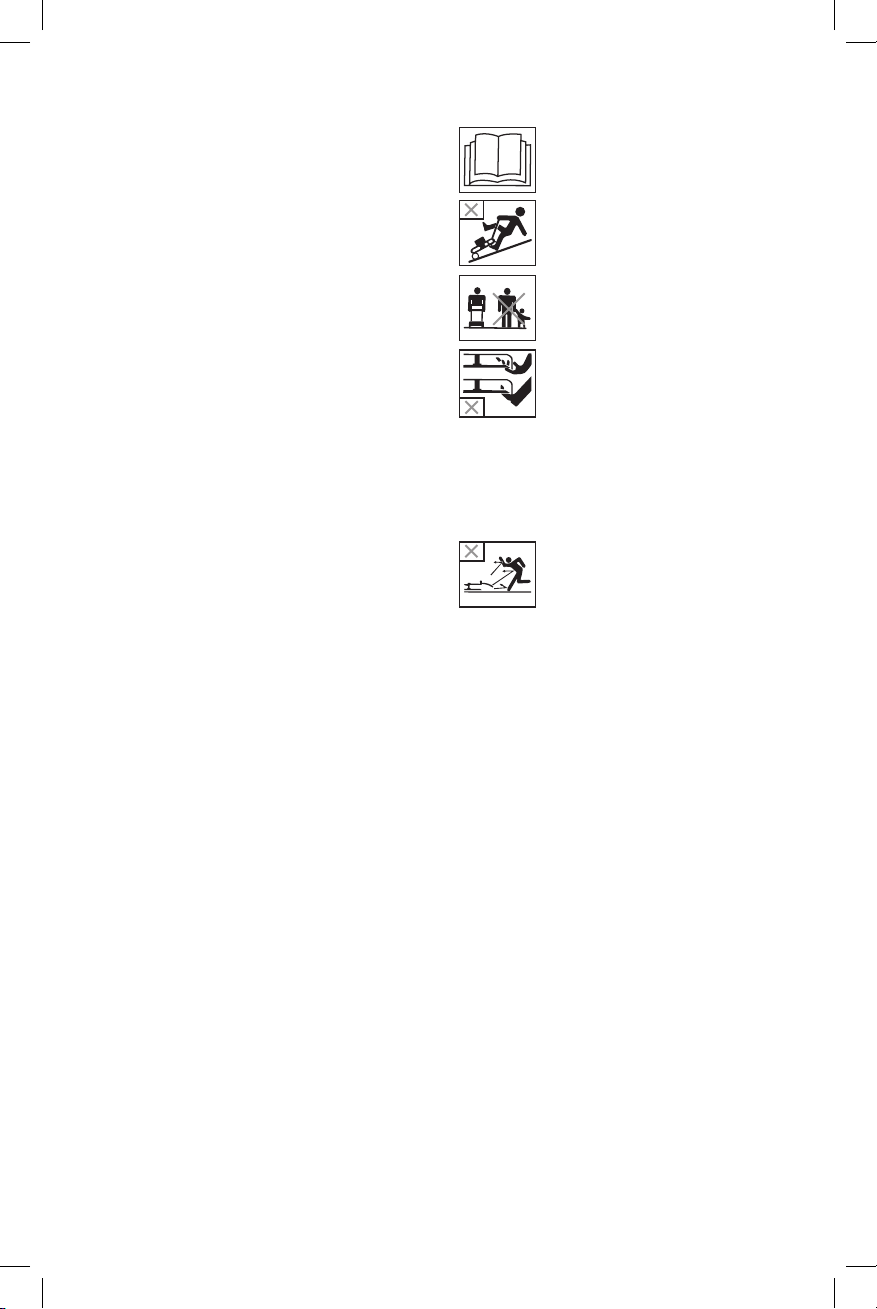
User must read and understand the
instructionmanual.
To avoid the risk of serious injury do not
mow up and down slopes. Always mow
acrossslopes.
To avoid the risk of injury to bystanders keep
all persons and pets at a safe distance from the
mower whileoperating.
Rotating blades can cause serious injury.
Keep hands and feet clear of mower deck and
discharge opening at all times. Always be
sure blade has stopped. Release bail handle
to turn mower off and wait for the blade
to stop rotating (approximately 3 seconds)
and remove the safety key and battey pack
before removing and replacing grass catcher,
cleaning, servicing, transporting or lifting
themower.
Objects struck by mower blade can cause
serious injury. Stay behind the handle when the
motor is running. Always ensure persons and
pets are clear of the discharge from the mower
while operating. Always inspect mowing area
before mowing and remove objects that could
be thrown by blade. Release bail handle to
turn mower off and wait for the blade to stop
rotating (approximately 3 seconds) before
crossing walk, roads, patio and graveldrives.
Additional Safety Information
WARNING: ALWAYS use safety glasses. Everyday
eyeglasses are NOT safety glasses. Also use face or
dust mask if cutting operation is dusty. ALWAYS WEAR
CERTIFIED SAFETYEQUIPMENT:
• ANSI Z87.1 eye protection (CAN/CSA Z94.3),
• ANSI S12.6 (S3.19) hearing protection,
• NIOSH/OSHA/MSHA respiratoryprotection.
WARNING: Some dust created by this product
contains chemicals known to the State of California to
cause cancer, birth defects or other reproductive harm.
Some examples of these chemicals are:
• compounds in fertilizers
• compounds in insecticides, herbicides
andpesticides
• arsenic and chromium from chemically
treatedlumber
To reduce your exposure to these chemicals, wear approved
safety equipment such as dust masks that are specially
designed to filter out microscopic particles.
3
Page 6
ENGLISH
The label on your tool may include the following symbols. The
symbols and their definitions are asfollows:
V ......................... volts
Hz ....................... hertz
min ..................... minutes
or DC ......direct current
...................... Class I Construction
(grounded)
…/min .............. per minute
BPM .................... beats per minute
IPM ..................... impacts per minute
RPM .................... revolutions per
minute
sfpm ................... surface feet per
minute
SPM .................... strokes per minute
OPM .................... oscillations per
minute
A ......................... amperes
W ........................ watts
or AC ........... alternating current
or AC/DC .... alternating or
direct current
...................... Class II
Construction
(double insulated)
no ....................... no load speed
n ......................... rated speed
...................... earthing terminal
..................... safety alert symbol
..................... visible radiation
..................... avoid staring at
light
..................... wear respiratory
protection
..................... wear eye
protection
..................... wear hearing
protection
..................... read all
documentation
IPXX .................... IP symbol
BATTERIES AND CHARGERS
The battery pack is not fully charged out of the carton.
Before using the battery pack and charger, read the
safety instructions below and then follow charging
proceduresoutlined. When ordering replacement battery
packs, be sure to include the catalog number andvoltage.
READ ALL INSTRUCTIONS
Important Safety Instructions for All
Battery Packs
WARNING: Read all safety warnings, instructions,
and cautionary markings for the battery pack,
charger and product. Failure to follow the
warnings and instructions may result in electric
shock, fire and/or serious injury.
• Do not charge or use the battery pack in explosive
atmospheres, such as in the presence of flammable
liquids, gases or dust. Inserting or removing the battery
pack from the charger may ignite the dust orfumes.
• When battery pack is not in use, keep it away from
other metal objects, like paper clips, coins, keys,
nails, screws, or other small metal objects, that can
make a connection from one terminal to another.
Shorting the battery terminals together may cause burns
or a fire.
• NEVER force the battery pack into the charger. DO
NOT modify the battery pack in any way to fit into
a non-compatible charger as battery pack may
rupture causing serious personal injury. Consult
the chart at the end of this manual for compatibility of
batteries andchargers.
• Charge the battery packs only in CRAFTSMAN chargers.
4
• DO NOT splash or immerse in water or otherliquids.
• Do not store or use the tool and battery pack in
locations where the temperature may reach or
exceed 104°F (40°C) (such as outside sheds or metal
buildings in summer). For best life store battery packs in
a cool, drylocation.
NOTE: Do not store the battery packs in a tool with
the trigger switch locked on. Never tape the trigger
switch in the ONposition.
• Do not incinerate the battery pack even if it is
severely damaged or is completely worn out. The
battery pack can explode in a fire. Toxic fumes and
materials are created when lithium-ion battery packs
areburned.
• If battery contents come into contact with the skin,
immediately wash area with mild soap and water. If
battery liquid gets into the eye, rinse water over the open
eye for 15 minutes or until irritation ceases. If medical
attention is needed, the battery electrolyte is composed of
a mixture of liquid organic carbonates and lithiumsalts.
• Contents of opened battery cells may cause
respiratory irritation. Provide fresh air. If symptoms
persist, seek medicalattention.
WARNING: Burn hazard. Battery liquid may be
flammable if exposed to spark orflame.
WARNING: Fire hazard. Never attempt to open the
battery pack for any reason. If the battery pack case
is cracked or damaged, do not insert into the charger.
Do not crush, drop or damage the battery pack. Do
not use a battery pack or charger that has received a
sharp blow, been dropped, run over or damaged in
any way (e.g., pierced with a nail, hit with a hammer,
stepped on). Damaged battery packs should be
returned to the service center forrecycling.
Storage Recommendations
1. The best storage place is one that is cool and dry, away
from direct sunlight and excess heat or cold.
2. For long storage, it is recommended to store a fully
charged battery pack in a cool dry place out of the
charger for optimal results.
NOTE: Battery packs should not be stored completely
depleted of charge. The battery pack will need to be
recharged before use.
Battery Pack Cleaning Instructions
Dirt and grease may be removed from the exterior of the
battery using a cloth or soft non-metallic brush. Do not use
water or any cleaningsolutions.
The RBRC® Seal
The RBRC® (Rechargeable Battery Recycling
Corporation) Seal on the nickel cadmium,
nickel metal hydride or lithium-ion batteries
(or battery packs) indicates that the costs
to recycle these batteries (or battery
packs) at the end of their useful life have already been
paid by CRAFTSMAN. In some areas, it is illegal to place
Page 7

spent nickel cadmium, nickel metal hydride or lithium-ion
batteries in the trash or municipal solid waste stream and
the Call2Recycle® program provides an environmentally
consciousalternative.
Call 2 Recycle, Inc., in cooperation with CRAFTSMAN and
other battery users, has established the program in the
United States and Canada to facilitate the collection of
spent nickel cadmium, nickel metal hydride or lithium-ion
batteries. Help protect our environment and conserve
natural resources by returning the spent nickel cadmium,
nickel metal hydride or lithium-ion batteries to an
authorized CRAFTSMAN service center or to your local
retailer for recycling. You may also contact your local
recycling center for information on where to drop off the
spent battery. RBRC® is a registered trademark of Call 2
Recycle,Inc.
Transportation
WARNING: Fire hazard. Do not store or carry the
battery pack so that metal objects can contact
exposed battery terminals. For example, do
not place the battery pack in aprons, pockets, tool
boxes, product kit boxes, drawers, etc., with loose
nails, screws, keys, etc. Transporting batteries
can possibly cause fires if the battery terminals
inadvertently come in contact with conductive
materials such as keys, coins, hand tools and the
like. The US Department of Transportation Hazardous
Material Regulations (HMR) actually prohibit
transporting batteries in commerce or on airplanes
in carry-on baggage UNLESS they are properly
protected from short circuits. So when transporting
individual battery packs, make sure that the battery
terminals are protected and well insulated from
materials that could contact them and cause a short
circuit. NOTE:Li-ion batteries should not be put in
checkedbaggage.
Important Safety Instructions for All
Battery Chargers
WARNING: Read all safety warnings, instructions,
and cautionary markings for the battery pack,
charger and product. Failure to follow the
warnings and instructions may result in electric
shock, fire and/or seriousinjury.
• DO NOT attempt to charge the battery pack with
any chargers other than a CRAFTSMAN charger.
CRAFTSMAN chargers and battery packs are specifically
designed to worktogether.
• These chargers are not intended for any uses other
than charging CRAFTSMAN rechargeable batteries.
Any other uses may result in risk of fire, electric shock
orelectrocution.
• Do not expose the charger to rain orsnow.
• Pull by the plug rather than the cord when
disconnecting the charger. This will reduce the risk of
damage to the electric plug andcord.
ENGLISH
• Make sure that the cord is located so that it will not
be stepped on, tripped over or otherwise subjected
to damage orstress.
• Do not use an extension cord unless it is absolutely
necessary. Use of improper extension cord could result in
risk of fire, electric shock orelectrocution.
• When operating a charger outdoors, always provide
a dry location and use an extension cord suitable
for outdoor use. Use of a cord suitable for outdoor use
reduces the risk of electricshock.
• An extension cord must have adequate wire size
(AWG or American Wire Gauge) for safety. The
smaller the gauge number of the wire, the greater the
capacity of the cable, that is, 16 gauge has more capacity
than 18gauge. An undersized cord will cause a drop in
line voltage resulting in loss of power and overheating.
When using more than one extension to make up the
total length, be sure each individual extension contains at
least the minimum wire size. The following table shows
the correct size to use depending on cord length and
nameplate ampere rating. If in doubt, use the next heavier
gauge. The lower the gauge number, the heavier thecord.
Minimum Gauge for Cord Sets
Volts
120 V 25 (7.6) 50 (15.2) 100 (30.5) 150 (45.7)
240 V 50 (15.2) 100 (30.5) 200 (61.0) 300 (91.4)
Ampere Rating
More
Not
Than
More
Than
0 6 18 16 16 14
6 10 18 16 14 12
10 12 16 16 14 12
12 16 14 12 Not Recommended
• Do not place any object on top of the charger or
place the charger on a soft surface that might block
the ventilation slots and result in excessive internal
heat. Place the charger in a position away from any heat
source. The charger is ventilated through slots in the top
and the bottom of thehousing.
• Do not operate the charger with a damaged cord
orplug–have them replaced immediately.
• Do not operate the charger if it has received a sharp
blow, been dropped or otherwise damaged in any
way. Take it to an authorized servicecenter.
• Do not disassemble the charger; take it to an
authorized service center when service or repair is
required. Incorrect reassembly may result in a risk of
electric shock, electrocution orfire.
• Disconnect the charger from the outlet before
attempting any cleaning. This will reduce the risk
of electric shock. Removing the battery pack will not
reduce thisrisk.
• NEVER attempt to connect 2 chargerstogether.
• The charger is designed to operate on standard
120V household electrical power. Do not attempt to
Total Length of Cord in Feet
(meters)
American Wire Gauge
5
Page 8

ENGLISH
use it on any other voltage. This does not apply to the
vehicularcharger.
WARNING: Shock hazard. Do not allow any liquid to
get inside the charger. Electric shock mayresult.
WARNING: Burn hazard. Do not submerge the
battery pack in any liquid or allow any liquid to
enter the battery pack. Never attempt to open the
battery pack for any reason. If the plastic housing of
the battery pack breaks or cracks, return to a service
center for recycling.
CAUTION: Burn hazard. To reduce the risk of injury,
charge only CRAFTSMAN rechargeable battery packs.
Other types of batteries may overheat and burst
resulting in personal injury and propertydamage.
CAUTION: Under certain conditions, with the charger
plugged into the power supply, the charger can
be shorted by foreign material. Foreign materials
of a conductive nature, such as, but not limited to,
grinding dust, metal chips, steel wool, aluminum
foil or any buildup of metallic particles should be
kept away from the charger cavities. Always unplug
the charger from the power supply when there is no
battery pack in the cavity. Unplug the charger before
attempting toclean.
Charging a Battery
NOTE: To ensure maximum performance and life of
lithium-ion battery packs, charge the battery pack fully
before firstuse.
1. Plug the charger into an appropriate outlet before
inserting batterypack.
2. Connect the charger and battery pack, making sure
the battery is fully seated. The (charging) light will
blink continuously indicating that the charging process
hasstarted.
3. The completion of charge will be indicated by the light
remaining ON continuously. The battery pack is fully
charged and may be removed and used at this time or
left in the charger.
NOTE: To remove the battery pack, some chargers require
the battery pack release button to bepressed.
Indicators
Charging
Fully Charged
Hot/Cold Pack Delay
A charger will not charge a faulty battery pack. The charger
refusing to light could indicate a problem with the charger
NOTE: If the charger refuses to light, take the charger and
battery pack to be tested at an authorized servicecenter.
Hot/Cold Pack Delay
When the charger detects a battery pack that is too hot
or too cold, it automatically starts a Hot/Cold Pack Delay,
suspending charging until the battery pack has reached an
appropriate temperature. The charger then automatically
switches to the pack charging mode. This feature ensures
maximum battery packlife.
A cold battery pack may charge at a slower rate than a
warm batterypack.
Important Charging Notes
1. Longest life and best performance can be obtained if
the battery pack is charged when the air temperature
is between 65°F – 75°F (18° C– 24°C). DO NOT charge
when the battery pack is below +40°F (+4.5°C), or
above +104°F (+40°C). This is important and will
prevent serious damage to the batterypack.
2. The charger and battery pack may become warm to the
touch while charging. This is a normal condition, and
does not indicate a problem. To facilitate the cooling of
the battery pack after use, avoid placing the charger or
battery pack in a warm environment such as in a metal
shed or an uninsulatedtrailer.
3. If the battery pack does not charge properly:
a. Check operation of receptacle by plugging in a lamp
or other appliance;
b. Check to see if receptacle is connected to a light
switch which turns power off when you turn out
the lights;
c. Move the charger and battery pack to a location
where the surrounding air temperature is
approximately 65°F – 75°F (18°C – 24°C);
d. If charging problems persist, take the tool, battery
pack and charger to your local servicecenter.
4. The battery pack should be recharged when it fails to
produce sufficient power on jobs which were easily
done previously. DO NOT CONTINUE to use under these
conditions. Follow the charging procedure. You may
also charge a partially used pack whenever you desire
with no adverse effect on the batterypack.
5. Foreign materials of a conductive nature such as, but
not limited to, grinding dust, metal chips, steel wool,
aluminum foil, or any buildup of metallic particles
should be kept away from charger cavities. Always
unplug the charger from the power supply when there
is no battery pack in the cavity. Unplug the charger
before attempting toclean.
6. Do not freeze or immerse the charger in water or any
otherliquid.
Charger Cleaning Instructions
WARNING: Shock hazard. Disconnect the charger
from the AC outlet before cleaning. Dirt and grease
may be removed from the exterior of the charger
using a cloth or soft non-metallic brush. Do not use
water or any cleaningsolutions.
SAVE THESE INSTRUCTIONS FOR
FUTURE USE
COMPONENTS (FIG. A)
Intended Use
This mower is designed for residential use.
6
Page 9
DO NOT use under wet conditions or in presence of
flammable liquids orgases.
DO NOT let children come into contact with the tool.
Supervision is required when inexperienced operators use
thistool.
ASSEMBLY
DANGER: To reduce the risk of serious personal
injury, turn unit off, remove safety key, and
remove battery pack before assembly, making
any adjustments or removing/installing
attachments or accessories. An accidental start-up
can causeinjury.
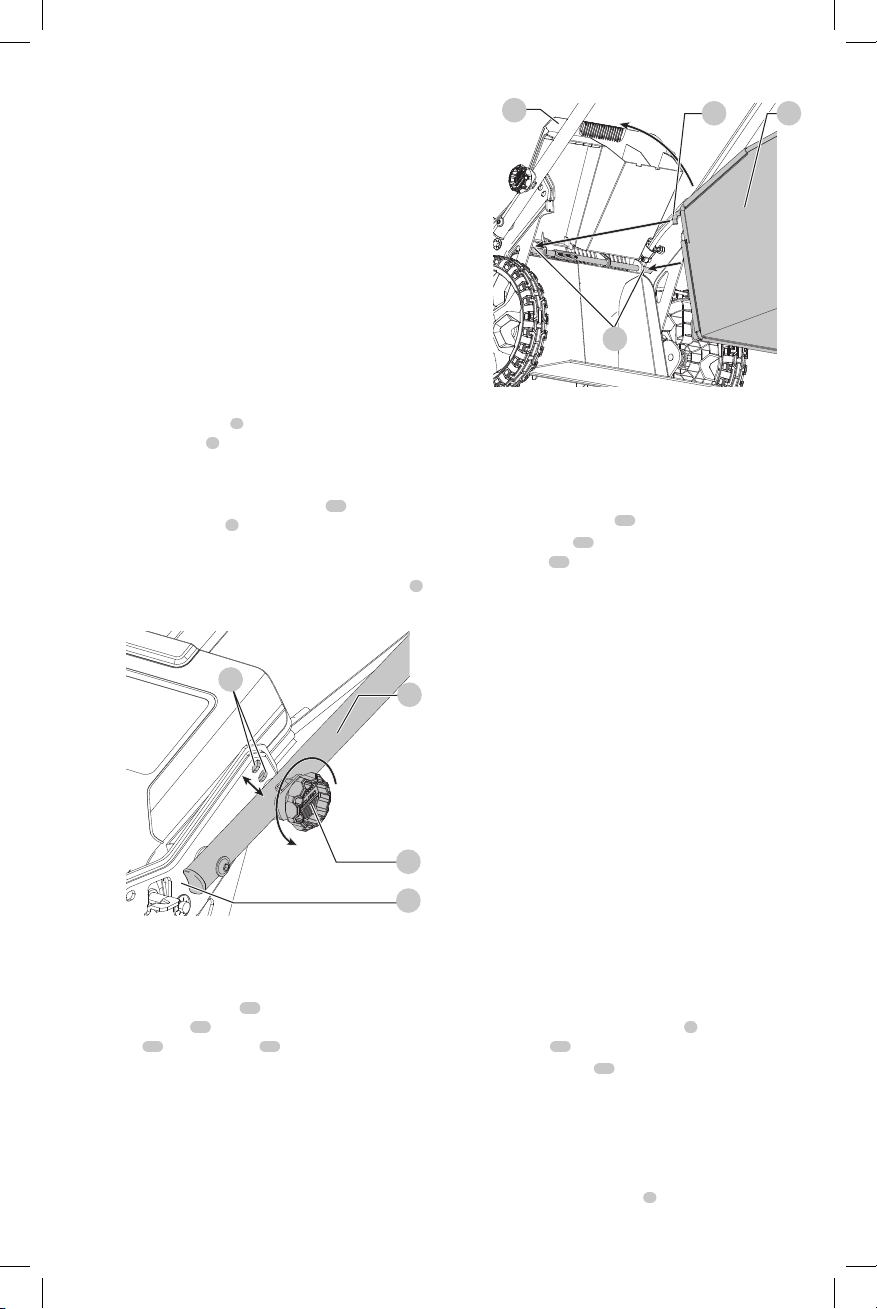
Adjusting Handle Height (Fig. B)
The mower is shipped in storage mode. You will need to
adjust the handle to operating position beforecontinuing.
1. To unlock the handle
two handle locks
both sides of the handle
2. R
aise the handle to operatingposition.
3. Locate the three handle detent holes
the handle brackets
4. Adjust the handle to the position that best fits the
operator and lock the handle in place by twisting the
handle locks back 90° and allowing the handle locks
to snap into the desired detentholes.
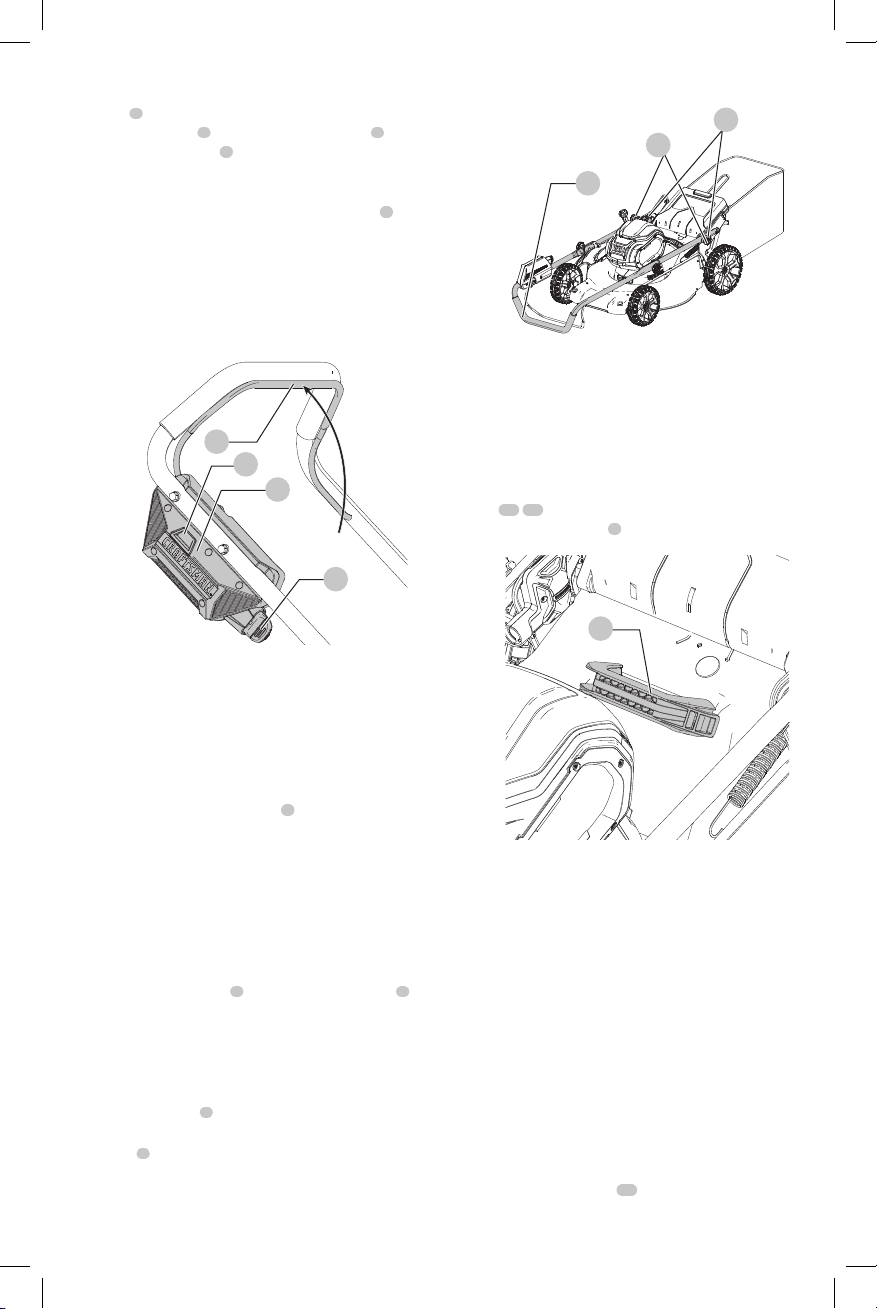
Fig.B
4
from storage position, twist the
6
90°. The handle locks are located on
as shown in Fig.B
7
as shown in Fig. B.
34
.
34
located on
4
Fig.C
11
18
Side Discharge (Fig. A)
DANGER: Remove safety key and battery pack before
removing collection bag.
1. To operate mower in side discharge mode remove the
grass collection bag.
2. Be sure rear door cover
3. Lift the side flap
attachment
4. Release the side flap and ensure the attachment holds
6
in place before turning mower on.
NOTE: The rear door cover is shaped in such a way that
the opening (at the bottom) cannot be completely
closedoff.
17
11
is down for sidedischarge.
16
and hook side discharge
onto the mower.
OPERATION
DANGER: To reduce the risk of serious personal
injury, turn unit off, remove safety key, and
remove battery pack before making any
adjustments or removing/installing attachments
or accessories. An accidental start-up can
causeinjury.
ENGLISH
1235
Grass Collection Bag (Fig. C)
DANGER: Remove safety key and battery pack, when
opening rear door cover and installingbag.
1. Lift the rear door cover
collection bag
35
rest on the lugs
hooks
lower the rear doorcover.
11
12
and place the grass
onto the mower so the bag
18
as shown in Fig. C. Then
Installing and Removing the Battery Pack
6
(Fig. A, D)
7
DANGER: MAKE CERTAIN THE SAFETY KEY IS
REMOVED TO PREVENT ACTUATION BEFORE
REMOVING OR INSTALLINGBATTERY.
NOTE: For best results, make sure the battery pack is
fullycharged.
To Install Battery Pack
1. Lift and hold the battery port cover
battery port
2. Slide a battery pack
audible click is heard (Fig. D). Make sure the battery pack
is fully seated and fully latched intoposition.
3. Close the battery port cover. Ensure the cover is fully
closed before startingmower.
To Remove Battery Pack
1. Open the battery port cover
19
.
20
into the battery port until an
9
9
as describedabove.
up to expose the
7
Page 10
ENGLISH
2. Depress the battery release button
and pull battery pack
Fig.D
9
20
out oftool.
19
21
21
on the mower
20
READ THIS INSTRUCTION MANUAL BEFORE
OPERATING YOUR MOWER
Refer to Figure A at the beginning of this manual for a complete
list ofcomponents. Save this manual for futurereference.
DANGER: Sharp moving blade. Do not operate the
mower in mulching mode if the rear door and side
discharge door are not closed under spring tension
as serious injury could result. Take your mower to the
nearest service center forrepair.
DANGER: Do not operate mower unless handle is
locked intoposition.
DANGER:
Sharp moving blade. Never operate the
mower in bagging mode unless the bag hooks on the
grass collection bag are seated properly on the mower
and the rear discharge door rests firmly against the top
of the grass collection bag as serious injury couldresult.
WARNING: Let the mower work at its own pace. Do
notoverload.
Adjusting Mower Height (Fig. E)
The height of cut is adjusted by the cut height adjustlever.
NOTE: If you are not sure which height to cut, begin
mowing with the cut height adjustment lever
positioned towards the rear of the appliance and adjust the
height down as needed, as shown in Fig.E.
To Set the Height of Cut
1. Pull the cut height adjustment lever
locking notch
2. Move the lever towards the rear of the appliance to raise
the height ofcut.
3. Move the lever towards the front of the appliance to
lower the height ofcut.
4. Push the height adjustment lever into one of the
lockingnotches.
22
.
10
out of the
10
Fig.E
22
Safety Key (Fig. F)
DANGER: Sharp moving blade. In order to prevent
accidental start-up or unauthorized use of your
cordless mower, a removable safety key
incorporated into the design of your mower. The
mower will be completely disabled when the safety
key has been removed from themower.
NOTE: The safety key has a tether rope to allow for storage
on a nail, out of the reach of children. Do not tether safety
key tomower.
DANGER: Rotating blades can cause serious
injury. To prevent serious injury, remove safety
key and battery pack when unattended, or when
charging, cleaning, servicing, transporting, lifting, or
storingmower.
Fig.F
3
3
has been
Starting Mower (Fig. G)
DANGER: Sharp moving blade. Never attempt
to override the operation of this switch box and
safety key system as serious injury couldresult.
NOTE: Mower is operational when battery and safety key
areinstalled.
1. Insert safety key
it is fully seated inside housing as shown in Fig. G. The
mower is nowoperational.
3
into the ON-OFF switch box
1
until
10
8
Page 11
2. Your mower is equipped with a special ON-OFF switch
1
box
. To operate the mower, push and hold the
ON-OFF button
pull the bail handle
in Fig.G. Once the mower starts you can release
theON-OFFbutton.
3. To turn the mower OFF, release the bailhandle
WARNING: Never attempt to lock a switch or bail
handle in the ONposition.
NOTE: Once the bail handle has returned to the original
position it will activate the “Automatic Braking Mechanism”.
The motor is mechanically braked and the mower blade will
stop rotating in three seconds orless.
2
on the ON-OFF switch box
5
to the handlebar as shown
1
, then
5
.
Fig.H
ENGLISH
7
6
4
Fig.G
5
2
1
3
Mower Overload
To prevent damage due to overload conditions, do not try
to remove too much grass at one time. Slow down your
cutting pace, or raise the cutheight.
Storage (Fig. A, H)
DANGER: Rotating blade can cause serious
injury. Release bail handle
remove safety key, and remove battery before
lifting, transporting, or storing the mower. Store in a
dryplace.
CAUTION: Pinch point. To avoid being pinched, keep
fingers away from area around handle brackets when
folding downhandles.
The handle of the mower can be easily folded down for
quick and convenientstorage.
1. To unlock the handle
located on both sides of the handle, and twist a
quarterturn.
2. Fold the handle to the front of the mower as shown in
Fig.H.
3. Locate the handle storage detent holes located on the
handle brackets
4. Lock the handle in place by untwisting the handle
6
locks
holes and ensure the handle is firmlylatched as shown
in Fig.H.
7
as shown in Fig.H.
allowing them to snap into the storage detent
5
to turn mower off,
4
pull the two handle locks
6
Carrying the Mower (Fig. A, I)
DANGER: Rotating blades can cause serious
injury. To prevent serious injury, remove safety
key and battery pack when unattended, or when
charging, cleaning, servicing, transporting,
lifting, or storingmower.
The mower can be carried using the convenient carry
14 15
handle
grasping the main handle
Fig.I
. DO NOT attempt to lift the mower by
4
.
14
Mowing Tips (Fig. A)
WARNING: ALWAYS INSPECT AREA WHERE
MOWER IS TO BE USED AND REMOVE ALL
STONES, STICKS, WIRE, BONES, AND OTHER
DEBRIS WHICH MIGHT BE THROWN BY THE
ROTATINGBLADE.
,
WARNING: Mow across the face of slopes, never
up-and-down. Exercise extreme caution when
changing direction on slopes. Do not mow excessively
steep slopes. Always maintain goodfooting.
• Release bail handle to turn mower “OFF” when crossing
any gravel area (stones can be thrown by theblade).
• Set mower at highest cutting height when mowing
in rough ground or in tall weeds. Removing too much
grass at one time can cause the motor to be overloaded
and to stop.
• If a grass collection bag
growing season, the grass may tend to clog up at the
12
is used during the fast
9
Page 12
ENGLISH
discharge opening. Release bail handle to turn mower
off, remove the safety key and battery pack. Remove the
catcher and shake the grass down to the back end of
the bag. Also clean out any grass or debris which may
be packed around the discharge opening. Replace the
grasscatcher.
• If mower should start to vibrate abnormally, release bail
handle to turn mower off, remove the safety key and
battery pack. Check immediately for cause. Vibration
is a warning of trouble. Do not operate mower until a
service check has been made. Refer to Troubleshooting
Guide inthismanual.
• For best cutting results, keep blade sharpened
andbalanced.
• Inspect and thoroughly clean mower after each use as a
deck with caked grass will degradeperformance.
• Always release bail handle to turn mower off, remove
safety key and battery pack when leaving it unattended
even for a short period oftime.
The following suggestions will help you
to obtain optimum run time from your
cordless mower:
• Slow down in areas where the grass is especially
long orthick.
• Avoid mowing when the grass is wet from rain or
dew-soaked.
• Cut your lawn frequently, especially during high
growthperiods.
NOTE: It is recommended that your mower be recharged
after use to prolong the battery life. Frequent charging will
not harm your battery, and will ensure that the battery is
fully charged and ready for its next use. Storing battery not
fully charged will shorten batterylife.
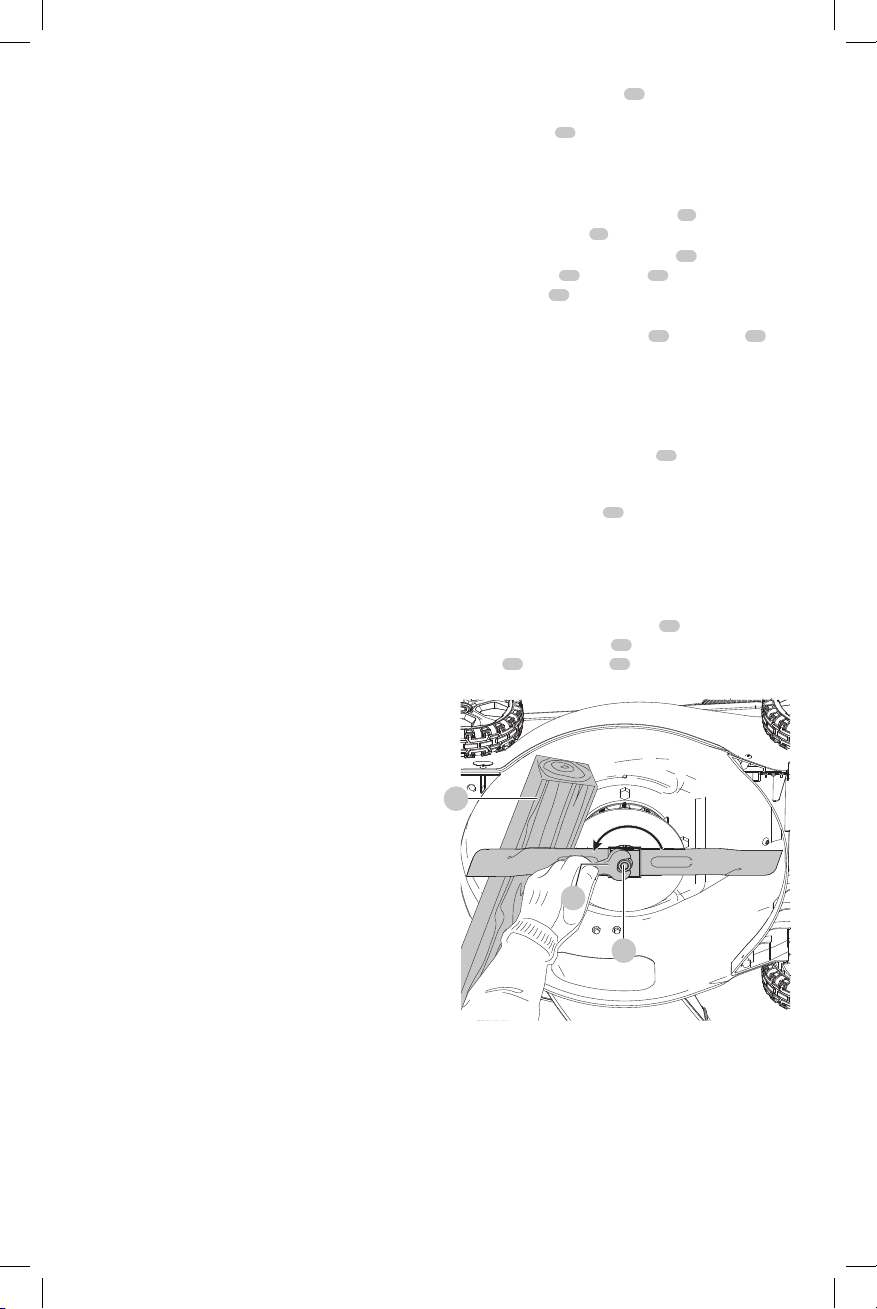
1. Cut a piece of 2" x 4' wood
(610mm) to keep blade from turning when removing
the flange nut
WARNING: Use gloves and proper eye protection.
Turn the mower on its side. Be careful of sharp edges
of blade.
2. Position wood and unscrew flange nut
with a 18 mm wrench
3. Remove square metal blade spacer
blade insulator
The blade fan
pieces for damage and replace ifnecessary.
4. Install sharpened or new blade
the blade fan as shown in Fig.K.
NOTE: When replacing sharpened or new blade on
shoulderof blade fan, make sure the “GRASS SIDE” on
the blade will be facing the ground when the mower is
returned to its normal uprightposition.
5. Install the plastic blade insulator
that the raised lips on one side engage the edges of
theblade.
6. Install the blade spacer
raised lips on the other side of the blade insulator. Be
sure to align the flats in the hole of the blade spacer
with the flats of the shaft, rotating the blade and blade
insulator together as necessary.
7. Position piece of wood to keep blade from turning as
shown in Fig. L. Install flange nut
against the blade spacer
blade
Fig. J
29
28
with a wrench
24
27
23
(about 2 feet long)
.
24
25
as shown in Fig.J.
and blade
should not be removed. Examine all
26
so that it sits inside the
26
and securely tighten the
25
.
counterclockwise
26
, square plastic
28
as shown in Fig. K.
28
on shoulder
27
on the blade such
24
with the flange
30
of
MAINTENANCE
DANGER: To reduce the risk of serious personal
injury, turn unit off, remove safety key, and
remove battery pack before making any
adjustments or removing/installing attachments
or accessories. An accidental start-up can
causeinjury.
Removing and Installing Blade (Fig. J–L)
DANGER: RISK OF INJURY. WHEN REASSEMBLING
THE BLADE SYSTEM, ENSURE EACH PART IS
REINSTALLED CORRECTLY, AS DESCRIBED BELOW.
IMPROPER ASSEMBLY OF THE BLADE OR OTHER PARTS
OF THE BLADE SYSTEM MAY CAUSE SERIOUSINJURY.
DANGER: To reduce the risk of serious personal
injury, turn unit off, remove safety key, and
remove battery pack before making any
adjustments or removing/installing attachments
or accessories. An accidental start-up can
causeinjury.
10
23
25
24
Page 13
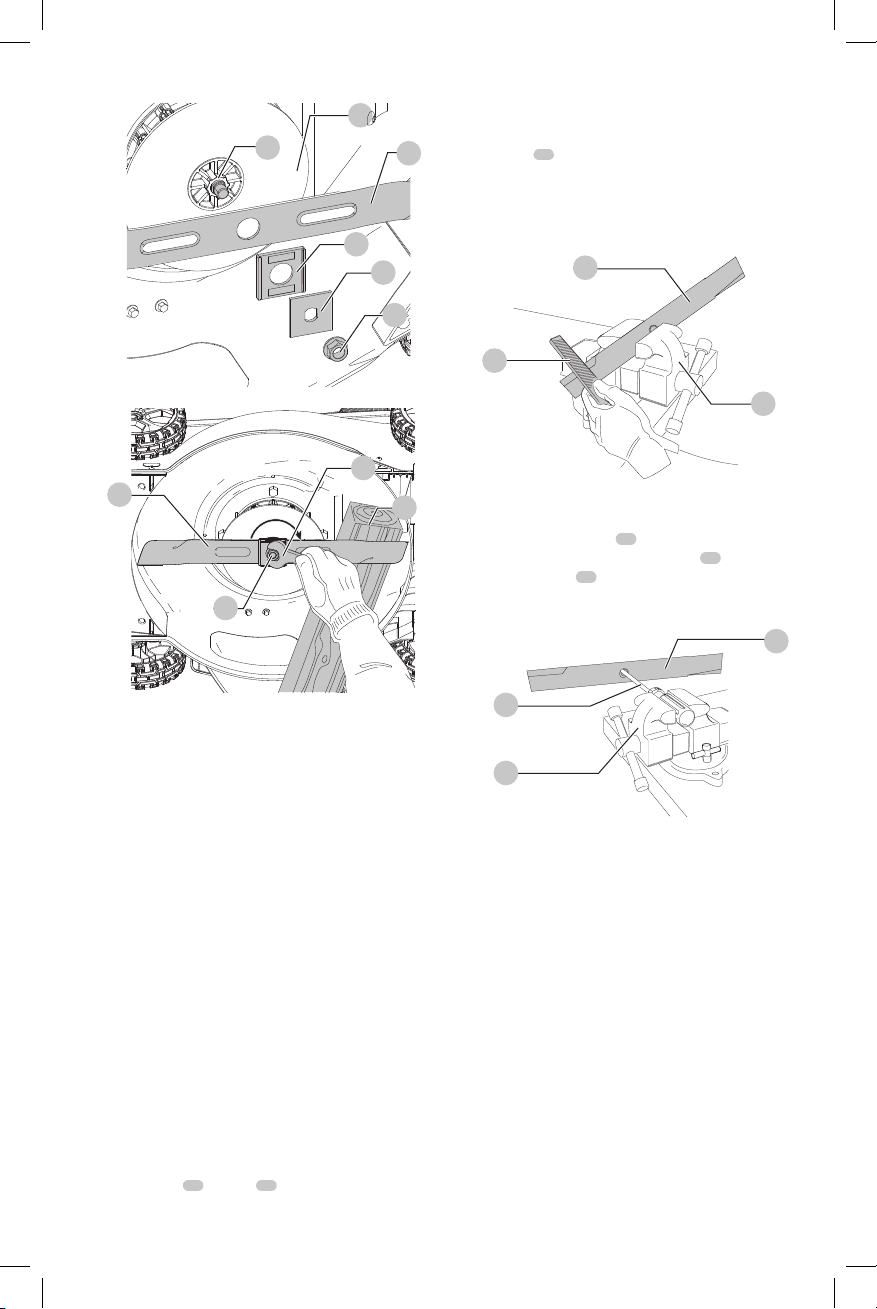
Fig.K
ENGLISH
4. Wear proper eye protection and gloves and be careful
29
30
28
27
26
24
not to cutyourself.
5. Carefully file the cutting edges of the blade with a fine
6. Check balance of blade. See instructions for
7. Replace blade on mower and tightensecurely.
Fig. M
32
tooth file
angle of the original cuttingedge.
BladeBalancing.
32
or sharpening stone, maintaining the
28
Fig.L
25
28
24
23
Blade Sharpening
KEEP BLADE SHARP FOR BEST MOWER PERFORMANCE. A
DULL BLADE DOES NOT CUT GRASSCLEANLY.
WARNING: Use gloves and proper eye protection
while removing, sharpening, and installing blade.
Ensure that safety key and battery pack are removed.
Sharpening the blade twice during a mowing season is
usually sufficient under normal circumstances. Sand causes
the blade to dull quickly. If your lawn has sandy soil, more
frequent sharpening may berequired. REPLACE BENT OR
DAMAGED BLADEIMMEDIATELY.
When Sharpening the Blade
• Make sure blade remainsbalanced.
• Sharpen blade at the original cuttingangle.
• Sharpen cutting edges on both ends of blade, removing
equal amounts of material from bothends.
To Sharpen Blade in a Vise (Fig. M)
1. Be sure the bail handle is released, the blade has
stopped and safety key and battery pack are removed
before removing theblade.
2. Remove blade from mower. See instructions for
Removing and InstallingBlade.
3. Secure blade
28
in a vise
31
.
31
Blade Balancing (Fig. N)
Check balance of the blade
the blade over a nail or round screwdriver
horizontally in a vise
downward, file along the sharp edge of that dropping end.
Blade is properly balanced when neither enddrops.
Fig. N
33
31
28
by placing center hole in
31
. If either end of the blade rotates
33
, clamped
28
Lubrication
No lubrication is necessary. Do not oil the wheels. They have
plastic bearing surfaces which require nolubrication.
Cleaning (Fig. A)
WARNING: Blow dirt and dust out of all air vents
with clean, dry air at least once a week. To minimize
the risk of eye injury, always use ANSI Z87.1 (CAN/
CSA Z94.3) approved eye protection and NIOSH/
OSHA/MSHA approved respiratory protection when
performingthisprocedure.
WARNING: Never use solvents or other harsh
chemicals for cleaning the non-metallic parts of
the tool. These chemicals may weaken the plastic
materials used in these parts. Use a cloth dampened
only with water and mild soap. Never let any liquid
get inside the tool; never immerse any part of the tool
into aliquid.
11
Page 14

ENGLISH
Release bail handle
to a stop and then remove battery and safety key. Clean
out any clippings which may have accumulated on the
underside of the deck. After several uses, check all exposed
fasteners fortightness.
5
to turn mower off, let the blade come
Corrosion
Fertilizers and other garden chemicals contain agents which
greatly accelerate the corrosion of metals. If you mow in
areas where fertilizers or chemicals have been used, the
mower should be cleaned immediately afterward as follows:
Release bail handle
battery and safety key. Wipe all exposed parts with a
dampcloth.
CAUTION: Do not pour or spray water on the mower
in an attempt to clean IT. Do not store the tool on or
adjacent to fertilizers or chemicals. Such storage can
cause rapidcorrosion.
5
to turn mower off and remove
Meets CPSC Safety Requirements
CRAFTSMAN Mowers conform to the safety standards of
the American National Standards Institute, and the U.S.
Consumer Product Safety Commission. The Blade turns
when the motor isrunning.
Accessories
WARNING: Since accessories, other than those
offered by CRAFTSMAN, have not been tested with
this product, use of such accessories with this tool
could be hazardous. To reduce the risk of injury, only
CRAFTSMAN recommended accessories should be
used with thisproduct.
Recommended accessories for use with your tool are
available at extra cost from your local dealer or authorized
service center. If you need assistance in locating any
accessory, please contact CRAFTSMAN, call 1-888-331-4569.
Repairs
The charger and battery pack are notserviceable. There are
no serviceable parts inside the charger or battery pack.
WARNING: To assure product SAFETY and
RELIABILITY, repairs, maintenance and adjustment
(including brush inspection and replacement, when
applicable) should be performed by a CRAFTSMAN
factory service center or a CRAFTSMAN authorized
service center. Always use identical replacementparts.
notification is required under the Federal Consumer
SafetyAct.
Register online at ..www.craftsman.com/
Four Year Limited Warranty
CRAFTSMAN will repair or replace, without charge, any
defects due to faulty materials or workmanship for four
years from the date of purchase. This warranty does
not cover part failure due to normal wear or tool abuse.
For further detail of warranty coverage and warranty
repair information, visit www.craftsman.com or call
1-888-331-4569. This warranty does not apply to
accessories or damage caused where repairs have been
made or attempted by others. THIS LIMITED WARRANTY
IS GIVEN IN LIEU OF ALL OTHERS, INCLUDING THE IMPLIED
WARRANTY OF MERCHANTABILITY AND FITNESS FOR A
PARTICULAR PURPOSE, AND EXCLUDES ALL INCIDENTAL
OR CONSEQUENTIAL DAMAGES. Some states do not allow
limitations on how long an implied warranty lasts or the
exclusion or limitation of incidental or consequential
damages, so these limitations may not apply to you. This
warranty gives you specific legal rights and you may have
other rights which vary in certain states orprovinces.
NOTE: Battery warranty voided if the battery pack is
tampered with in any way. CRAFTSMAN is not responsible
for any injury caused by tampering and may prosecute
warranty fraud to the fullest extent permitted bylaw.
90 DAY MONEY BACK GUARANTEE
If you are not completely satisfied with the performance of
your CRAFTSMAN Power Tool or Nailer for any reason, you
can return it within 90 days from the date of purchase with
a receipt for a full refund – no questionsasked.
LATIN AMERICA: This warranty does not apply to products
sold in Latin America. For products sold in Latin America,
see country specific warranty information contained in
the packaging, call the local company or see website for
warrantyinformation.
FREE WARNING LABEL REPLACEMENT: If your warning
labels become illegible or are missing, call 1-888-331-4569
for a freereplacement.
Register Online
Thank you for your purchase. Register your product nowfor:
• WARRANTY SERVICE: Registering your product will
help you obtain more efficient warranty service in case
there is a problem with yourproduct.
• CONFIRMATION OF OWNERSHIP: In case of
an insurance loss, such as fire, flood or theft, your
registration of ownership will serve as your proof
ofpurchase.
• FOR YOUR SAFETY: Registering your product will
allow us to contact you in the unlikely event a safety
12
Page 15

ENGLISH
TROUBLESHOOTING GUIDE
DANGER: To reduce the risk of serious personal injury, turn unit off, remove safety key, and remove battery
pack before making any adjustments or removing/installing attachments or accessories. An accidental start-up
can causeinjury.
For assistance with your product call CRAFTSMAN at 1-888-331-4569.
PROBLEM SOLUTION
Mower doesn’t run when bail handle
is activated
Motor stops while mowing Release bail handle to turn mower off. Remove safety key and battery pack. Turn mower over and check
Mower runs but cutting performance is
unsatisfactory, or does not cut entire lawn
Mower is too hard to push Release bail handle to turn mower off. Remove safety key and battery pack. Raise cutting height to reduce
Mower is abnormally noisy and vibrates Release bail handle to turn mower off. Remove safety key and battery pack. Turn mower on side and
Mower not picking up clippings with bag Chute clogged. Release bail handle to turn mower off. Remove safety key and battery pack. Clear chute of
Check to make sure safety key has been installed and is fully seated and that button on switch housing is
being completely depressed before pulling bail handle.
Release bail handle to turn mower off. Remove safety key and battery pack, turn mower over and check
that blade is free to turn.
Check that the battery cavity is free of debris and is connected properly.
Has battery been fully charged? Press state of charge button.
that blade is free to turn.
Raise cutting height of wheels to highest position and start mower.
Check that the battery cavity is free of debris and is connected properly.
Has battery been fully charged? Press state of charge button.
Avoid overloading the mower. Slow down the cutting pace, or raise the cut height.
Has battery been fully charged? Press state of charge button.
Release bail handle to turn mower off. Remove safety key and battery pack. Turn mower over and check:
• Blade for sharpness - Keep blade sharp.
• Deck and discharge chute for clogging.
Wheel height adjustment may be set too low for grass condition. Raise cutting height.
deck drag on grass. Check each wheel for free rotation.
check blade to ensure it has not been bent or damaged. If blade is damaged, replace with a CRAFTSMAN
replacement blade. If the underside of the deck is damaged, return mower to a CRAFTSMAN Authorized
service center.
If there is no visible damage to the blade and the mower still vibrates: Release bail handle to turn
mower off. Remove safety key and battery pack. Disassemble entire blade assembly as described in the
Removing and Installing Blade section. Remove any debris and clean each piece. Replace each piece
as described in the Removing and Installing Blade section. If mower still vibrates, return the mower to
an authorized CRAFTSMAN authorized service center.
grass clippings.
Raise cutting height of wheels to shorten length of the cut.
Bag full. Empty bag more often.
13
Page 16

FRANÇAIS
Définitions : symboles et termes d'alarmes sécurité
Ces guides d'utilisation utilisent les symboles et termes d'alarmes sécurité suivants pour vous prévenir de situations
dangereuses et de risques de dommages corporels ou matériels.
DANGER : indique une situation dangereuse imminente qui, si elle n’est pas évitée, entraînera la mort ou des
blessuresgraves.
AVERTISSEMENT : indique une situation potentiellement dangereuse qui, si elle n’est pas évitée, pourrait entraîner la
mort ou des blessuresgraves.
ATTENTION : indique une situation potentiellement dangereuse qui, si elle n’est pas évitée, pourrait entraîner des
blessures légères oumodérées.
(Si utilisé sans aucun terme) Indique un message propre à la sécurité.
AVIS : indique une pratique ne posant aucun risque de dommages corporels mais qui par contre, si rien n’est fait
pour l’éviter, pourrait poser des risques de dommages matériels.
Fig. A
17
1
Boîtier de commande
marche/arrêt
2
Bouton marche/arrêt
3
Clé de sûreté
4
Poignée
5
Anse
6
Verrous de la poignée
7
Supports de la poignée
8
Trous des crans de
rangement de la
poignée
9
Capot du logement des
blocs-piles
14
15
DESCRIPTION
10
Levier de réglage de la
hauteur de coupe
11
Capot de la porte arrière
12
Sac de collecte du gazon
13
Poignée du sac de
collecte du gazon
14
Poignée de transport
supérieure
15
Poignée de transport
inférieure
16
Volet latéral
17
Module d’éjection
latérale
4
1
2
3
13
11
10
9
16
6
AVERTISSEMENT : lire tous les avertissements
de sécurité et toutes les directives. Le non-respect
des avertissements et des directives pourrait se
solder par un choc électrique, un incendie et/ou une
blessuregrave.
AVERTISSEMENT : ne jamais modifier l’outil
électrique ni aucun de ses composants, car il y a
risques de dommages corporels oumatériels.
AVERTISSEMENT : afin de réduire le risque de
blessures, lire le mode d’emploi del’outil.
Pour toute question ou remarque au sujet de cet outil
ou de tout autre outil CRAFTSMAN composez le
numéro sans frais : 1–888–331–4569.
5
12
6
7
8
14
Page 17

Tondeuse V60
CMCMW260
AVERTISSEMENTS DE SÉCURITÉ
IMPORTANTS ET INSTRUCTIONS
AVERTISSEMENT: afin de réduire le risque
deblessure :
• Avant toute utilisation, assurez-vous que toutes
les personnes qui utiliseront cet outil lisent et
comprennent toutes les consignes de sécurité
et les autres renseignements compris dans le
présentmanuel.
• Conservez ces instructions et passez-les en revue
fréquemment avant l’utilisation et la formation
d’autres personnes.
AVERTISSEMENT: lors de l’utilisation de tondeuses à
gazon alimentées par piles, les mesures de précaution
de base devraient toujours être prises pour réduire le
risque d’incendie, de choc électrique et de blessures,
incluant ce quisuit.
LISEZ TOUTES LES INSTRUCTIONS
INSTRUCTIONS ET AVERTISSEMENTS
DE SÉCURITÉ GÉNÉRAUX POUR TOUS
LES OUTILS
• Cet outil peut être dangereux. Suivez tous les
avertissements et toutes les instructions de sécurité
dans ce manuel. L’utilisateur est responsable de suivre
les avertissements et instructions de ce manuel et
sur l’appareil. Limitez l’utilisation de cette tondeuse
aux personnes qui lisent, comprennent et suivent les
avertissements et les instructions de ce manuel et
surl’appareil.
• Évitez les environnements dangereux. Ne pas utiliser
des tondeuses dans des endroits humides ou mouillés.
• Ne pas utiliser sous la pluie.
• Gardez les enfants éloignés. Tous les visiteurs devraient
être gardés à une distance sécuritaire de l’aire de travail.
• Portez des vêtements appropriés. Ne pas porter des
vêtements amples ou des bijoux. Il peuvent se coincer
dans les pièces qui se déplacent. L’utilisation de gants en
caoutchouc et de chaussures est recommandée lors du
travail extérieur.
• Utilisez des lunettes de sécurité. Utilisez un
masque facial ou antipoussières s’il y a de la poussière
durantl’utilisation.
• Utilisez le bon outil.Ne pas utiliser la tondeuse à gazon
pour toute tâche autre que celles pour lesquelles elle
estconçue.
• Vérifiez s’il y a des pièces endommagées. Avant toute
utilisation ultérieure de la tondeuse, un protecteur ou une
autre pièce qui est endommagé doit être soigneusement
vérifié afin de déterminer s’il fonctionnera correctement
et s’il effectuera la fonction prévue. Vérifiez l’alignement
des pièces qui se déplacent, les fixations des pièces qui se
FRANÇAIS
déplacent, le bris des pièces, le montage et tout autre état
qui peut affecter leur utilisation. Un protecteur ou une
autre pièce qui est endommagé doit être convenablement
réparé ou remplacé par un centre de services autorisé sauf
indication contraire dans ce manuel.
• Réparations et service. Les réparations, l’entretien et
les ajustements non énumérés dans ce guide doivent être
effectués dans des centres de services autorisés ou des
entreprises de service qualifiées, toujours en utilisant des
pièces de remplacement identiques.
• Ne pas forcer la tondeuse. Elle travaillera mieux et sera
plus sécuritaire à la vitesse pour laquelle elle a été conçue.
• Ne pas s’étirer. Maintenez vos pieds bien d’aplomb sur le
sol et un bon équilibre en tout temps.
• Demeurez vigilant. Regardez ce que vous faites. Faites
preuve de bon sens. Ne pas utiliser la tondeuse lorsque
vous êtes fatigué.
• Débranchez la tondeuse. Retirez la clé de sûreté et le
bloc-piles de la tondeuse lorsque vous ne l’utilisez pas,
avant de réparer, lorsque vous changez les accessoires
comme les lames et autres.
• Entreposez la tondeuse à gazon arrêtée à l’intérieur.
Lorsqu’elle n’est pas utilisée, la tondeuse à gazon doit être
entreposée à l’intérieur dans un endroit sec et verrouillé
hors de portée des enfants. Retirez la clé de sûreté et
lebloc-piles.
• Entretenez soigneusement la tondeuse à gazon.
Gardez bords coupants aiguisés et propre pour la meilleure
performance et la plus sécuritaire. Pour lubrifier l’outil
et remplacer les accessoires, suivez les directives du
manuel.Gardez vos mains sèches, propres et exemptes de
graisse et de poussière.
• Maintenez les protecteurs en place en bon état
defonctionnement.
• Gardez les lames aiguisées.
• Gardez vos mains et vos pieds à distance de la zone
de coupe.
• Les objets frappés par la lame de la tondeuse à
gazon peuvent causer des blessures graves à des
personnes. Le gazon doit toujours être soigneusement
examiné et libre de tout objet avant chaque tonte.
• Si la tondeuse à gazon frappe un objet étranger,
suivez ces étapes:
1. Arrêtez la tondeuse à gazon. Relâchez l’anse.
2. Retirez le bloc-piles et la clé desûreté.
3. Inspectez pour tout dommage.
4. Réparez tout dommage avant de redémarrer et
d’utiliser la tondeuse à gazon.
• Utilisez seulement des lames de
remplacementidentiques.
CONSERVEZ CES INSTRUCTIONS
15
Page 18

FRANÇAIS
Important
Pratiques sécuritaires pour les
tondeuses à pousser
Cette machine peut amputer les mains et les pieds et
projeter des objets. Ne pas respecter les instructions de
sécurité suivantes pourrait entraîner une blessure grave ou
la mort.
Renseignements généraux
1 . Lisez, comprenez et suivez les instructions et les
avertissements dans ce guide et sur la machine, le moteur
et les accessoires.
2 . Permettez seulement aux utilisateurs, qui sont
responsables, formés, qui connaissent bien les instructions
et ayant les capacités physiques nécessaires d’utiliser
lamachine.
3 . Ne pas utiliser la machine lorsque vous êtes sous
l’influence de l’alcool ou de la drogue.
Préparation avant l’utilisation
1 . Retirez tout objet de la zone d’utilisation qui pourrait être
projeté ou nuire à l’utilisation de la machine.
2 . Gardez tous les passants à l’écart de la zone d’utilisation,
particulièrement les jeunes enfants. Arrêtez la machine et
les accessoires si quelqu’un entre dans la zone.
3 . Ne pas faire fonctionner la machine sans tout le sac
à herbe, le conduit d’éjection ou autres dispositifs de
sécurité en place et fonctionnant correctement. Vérifiez
régulièrement les signes d’usure ou de détérioration et
remplacer s’il y a lieu.
4 . Portez un équipement de protection individuel approprié
comme des lunettes de sécurité, une protection auditive et
des chaussures.
Utilisation
1 . Utilisez seulement la machine en plein jour ou avec une
bonne lumière artificielle.
2 . Évitez les trous, les ornières, les bosses, les roches ou
d’autres dangers cachés. Un terrain inégal faire renverser
la machine ou faire sorte que l’utilisateur perde son
équilibre ou son aplomb.
3 . Ne pas mettre les mains ou les pieds près des pièces en
rotation ou sous la machine. Tenez-vous éloigné de
l’ouverture d'éjection en tout temps.
4 . Ne pas diriger la matière rejetée vers quiconque. Évitez de
rejeter la matière contre un mur ou une obstruction. La
matière peut ricocher vers l’utilisateur. Arrêtez les lames
lorsque vous traversez des surfaces en gravier.
Concernant les enfants
1 . Des accidents tragiques peuvent se produire si l’utilisateur
ne fait pas attention à la présence des enfants. Les enfants
sont souvent attirés par la machine et l’activité de tonte.
Ne jamais présumer que les enfants demeureront à
l’endroit où vous les avez vus la dernière fois.
2 . Gardez les enfants hors de la zone d’utilisation et sous la
vigilance d’un adulte responsable autre que l’utilisateur.
Concernant les pentes
1 . Les pentes sont un facteur important lié aux accidents.
L’utilisation sur les pentes nécessite une prudence accrue.
2 . Déplacez-vous dans la direction recommandée par le
fabricant sur les pentes. Soyez prudent lorsque vous
utilisez la tondeuse près de ruptures de pente.
3 . Évitez de tondre le gazon mouillé. (Si vos pieds ne sont pas
d’aplomb, cela pourrait entraîner un glissement et une
chute accidentelle.)
4 . Ne pas utiliser la machine dans le cas où la traction, la
direction ou la stabilité remise en question. La tondeuse
pourrait glisser même si les roues sont arrêtées.
5 . Évitez les démarrages ou les arrêts sur les pentes. Évitez de
changer soudainement de vitesse ou de direction. Tournez
lentement et graduellement.
6 . Soyez très prudent lorsque vous utilisez la machine avec
un sac à herbe ou un (des) autre(s) accessoire(s). Ils
peuvent affecter la stabilité de la machine.
Réparer
1 . Gardez la machine en bon état de fonctionnement.
Remplacez les pièces usées ou endommagées.
2 . Soyez prudent lorsque vous entretenez les lames.
Enveloppez la (les) lame(s) ou portez des gants. Remplacez
les lames endommagées. Ne pas réparer ou altérer la
(les)lame(s).
Les éléments suivants sont des explications des
symboles de danger et sécurité importants sur
latondeuse.
L’utilisateur doit litre et comprendre le manuel
d'instructions.
Afin d’éviter le risque de blessure grave, ne pas
tondre les pentes vers le haut et vers le bas.
Tondez toujours en travers depentes.
Afin d’éviter le risque de blesser les passants,
gardez toutes les personnes et tous les animaux
à une distance sécuritaire de la tondeuse
durant l’utilisation.
Les lames en rotation peuvent causer de graves
blessures. Gardez les mains et les pieds loin
du châssis de la tondeuse et de l’ouverture
d’éjection en tout temps. Relâchez l’anse pour
éteindre la tondeuse et attendez que la lame
cesse de tourner (environ 3 secondes) et retirez
la clé de sûreté et retirez le blocs-pile avant
de retirer et de replacer le collecteur d’herbe,
de nettoyer, d’entretenir, de transporter ou de
soulever la tondeuse.
16
Page 19

Les objets frappés par la lame de la tondeuse
peuvent causer une blessure grave. Restez
derrière la poignée lorsque le moteur
fonctionne. Assurez-vous toujours que les
personnes et les animaux sont éloignés de
l’éjection provenant de la tondeuse durant
l’utilisation. Inspectez toujours la zone de
tonte avant de tondre et retirez les objets qui
pourraient être projetés par la lame. Relâchez
l’anse pour éteindre la tondeuse et attendez
que la lame cesse de tourner (environ 3
secondes) avant de traverser le trottoir, les
routes, le patio et les entrées engravier.
Consigne de sécurité supplémentaire
AVERTISSEMENT: porter SYSTEMATIQUEMENT
des lunettes de protection. Les lunettes courantes NE
sont PAS des lunettes de protection. Utiliser aussi un
masque antipoussières si l'opération est poussiéreuse.
PORTER SYSTÉMATIQUEMENT UN ÉQUIPEMENT DE
SÉCURITÉ HOMOLOGUÉ:
• Protection oculaire ANSI Z87.1 (CAN/CSA Z94.3);
• Protection auditive ANSI S12.6 (S3.19);
• Protection des voies respiratoires
NIOSH/OSHA/MSHA.
AVERTISSEMENT : certaines poussières produites
par ce produit contiennent des produits chimiques
reconnus par l’État de la Californie comme pouvant
causer le cancer, les anomalies congénitales et
d’autres dangers pour la reproduction. Voici quelques
exemples de ces produits chimiques :
• composés présents dans les engrais
• composés présents dans les insecticides,
herbicides et pesticides
• arsenic et chrome provenant de bois traité
chimiquement
Pour réduire votre exposition à ces produits chimiques, porter
un équipement de sécurité approuvé comme un masque
antipoussières conçu pour filtrer les particulesmicroscopiques.
L’étiquette apposée sur votre outil peut inclure les symboles
suivants. Les symboles et leur définition sont indiqués ci-après:
V ......................... volts
Hz ....................... hertz
min ..................... minutes
or DC ...... courant continu
...................... fabrication classe I
(mis à la terre)
…/min .............. par minute
BPM .................... battements par
minute
IPM ..................... impacts par minute
RPM .................... révolutions par
minute
sfpm (plpm) ....... pieds linéaires par
minute
SPM (FPM) ......... fréquence par
minute
OPM .................... oscillations por
minuto
A ......................... ampères
W ........................ watts
or AC ........... courant alternatif
or AC/DC .... courant alternatif
ou continu
...................... fabrication classe II
(double isolation)
no ....................... vitesse à vide
n ......................... vitesse nominale
...................... borne de terre
FRANÇAIS
...................... symbole
d’avertissement
..................... radiation visible
..................... protection
respiratoire
IPXX .................... symbole IP
..................... protection oculaire
..................... protection auditive
..................... lire toute la
documentation
BLOCSPILES ET CHARGEURS
Le bloc-piles n’est pas totalement chargé d’usine. Avant
d’utiliser le bloc-piles et le chargeur, lire les consignes de
sécurité ci-après puis suivre la procédure de chargement
indiquée. Pour commander un bloc-piles de rechange,
s’assurer d’en inclure le numéro de catalogue et la tension.
LIRE TOUTES LES CONSIGNES
Consignes importantes de sécurité
les blocs-piles
AVERTISSEMENT : lisez toutes les consignes
de sécurité, les instructions et les symboles
d’avertissements du bloc-piles, du chargeur et du
produit. Tout manquement aux avertissements
et instructions pose des risques de décharges
électriques, d’incendie et/ou de blessures graves.
• Ne pas recharger ou utiliser un bloc-piles en milieu
déflagrant, en présence, par exemple, de poussières,
gaz ou liquides inflammables. Le fait d’insérer ou
retirer un bloc-piles de son chargeur pourrait causer
l’inflammation de poussières ou d’émanations.
• Lorsque non utilisé, garder le bloc-piles éloigné de
petits objets métalliques comme des trombones
attache-feuilles, des pièces de monnaie, des clés, des
clous et vis ou autres pièces qui pourraient courtcircuiter les bornes. Un court-circuit pourrait causer des
brûlures ou un incendie.
• NE JAMAIS forcer l’insertion d’un bloc-piles dans un
chargeur. NE modifier un bloc-piles d’AUCUNE façon
pour le faire rentrer dans un chargeur incompatible,
car il pourrait se briser et causer des dommages
corporels graves. Consulter le tableau en dernière page
de ce manuel pour connaître les compatibilités entre
chargeurs et blocs-piles.
• Recharger les blocs-piles exclusivement dans des
chargeursCRAFTSMAN.
• NE PAS éclabousser le bloc-piles ou l’immerger dans l’eau
ou dans tout autreliquide.
• Ne pas entreposer ou utiliser l’appareil et le bloc-
piles en présence de températures ambiantes
pouvant excéder 40°C (104°F) (comme dans des
hangars ou des bâtiments métalliques l’été). Pour
préserver leur durée de vie, entreposer les blocs-piles dans
un endroit frais etsec.
REMARQUE: ne pas mettre un bloc-piles dans un
outil dont la gâchette est verrouillée en position de
marche. Ne jamais bloquer l’interrupteur en position
deMARCHE.
17
Page 20

FRANÇAIS
• Ne pas incinérer le bloc-piles même s’il est
sévèrement endommagé ou complètement usagé,
car il pourrait exploser et causer un incendie.
Pendant l’incinération des blocs-piles au lithium-ion, des
vapeurs et matières toxiques sontdégagées.
• En cas de contact du liquide de la pile avec la peau,
rincer immédiatement au savon doux et à l’eau. En
cas de contact oculaire, rincer l’œil ouvert à l’eau claire
une quinzaine de minutes ou jusqu’à ce que l’irritation
cesse. Si des soins médicaux s’avéraient nécessaires, noter
que l’électrolyte de la pile est composé d’un mélange de
carbonates organiques liquides et de sels delithium.
• Le contenu des cellules d’une pile ouverte peut
causer une irritation respiratoire. En cas d’inhalation,
exposer l’individu à l’air libre. Si les symptômes persistent,
consulter unmédecin.
AVERTISSEMENT : risques de brûlure. Le liquide de la
pile peut s’enflammer s’il est exposé à des étincelles ou
à uneflamme.
AVERTISSEMENT : risques d’incendie. Ne jamais
tenter d’ouvrir le bloc-piles pour quelque raison
que ce soit. Si le boîtier du bloc-piles est fissuré ou
endommagé, ne pas l’insérer dans un chargeur. Ne
pas écraser, laisser tomber, ou endommager les blocspiles. Ne pas utiliser un bloc-piles ou un chargeur
qui a reçu un choc violent, ou si l’appareil est tombé,
a été écrasé ou endommagé de quelque façon que
ce soit (p. ex. percé par un clou, frappé d’un coup
de marteau, piétiné). Les blocs-piles endommagés
doivent être renvoyés à un centre de réparation pour
y êtrerecyclés.
Recommandations de stockage
1. Le lieu idéal de rangement est un lieu frais et sec,
à l’abri de toute lumière solaire directe et de toute
températureexcessive.
2. Pour un stockage prolongé, il est recommandé
d’entreposer le bloc-piles pleinement chargé dans
un lieu frais et sec, hors du chargeur pour optimiser
lesrésultats.
REMARQUE: les blocs-piles ne devraient pas être
entreposés complètement déchargés. Il sera nécessaire de
recharger le bloc-piles avant réutilisation.
Instructions d’entretien du blocs-pile
Éliminer toute saleté ou graisse de la surface externe
du blocs-pile à l’aide d’un chiffon ou d’une brosse
non métallique douce. N’utiliser ni eau ni aucun
nettoyantliquide.
Le sceau SRPRC®
Le sceau SRPRC® (Société de recyclage des piles
rechargeables du Canada) apposé sur une
pile au nickel-cadmium, à hydrure métallique
de nickel ou au lithium-ion (ou un blocpiles) indique que les coûts de recyclage
de ces derniers en fin d’utilisation ont déjà été réglés par
CRAFTSMAN. Dans certaines régions, la mise au rebut ou
aux ordures municipales des piles au nickel-cadmium, à
l’hydrure métallique de nickel ou au lithium-ion, est illégale;
le programme de l’Appel à Recycler® constitue donc une
solution pratique etécologique.
Appel à Recycler Canada, Inc., en collaboration avec
CRAFTSMAN et d’autres utilisateurs de piles, a mis sur
pied de programme aux États-Unis et au Canada pour
faciliter la collecte des piles au nickel-cadmium, à l’hydrure
métallique de nickel ou au lithium-ion usagées. Aidez-nous
à protéger l’environnement et à conserver nos ressources
naturelles en renvoyant les piles au nickel-cadmium, à
l’hydrure métallique de nickel ou au lithium-ion usagées
à un centre de réparation autorisé CRAFTSMAN ou chez
votre détaillant afin qu’elles y soient recyclées. On peut en
outre se renseigner auprès d’un centre de recyclage local
pour connaître d’autres sites lesacceptant. SRPRC® est une
marque déposée de l’Appel à Recycler Canada,Inc.
Transport
AVERTISSEMENT : risques d’incendie. Au moment
de ranger ou transporter le bloc-piles, veiller à
protéger ses bornes à découvert de tout objet
métallique. Par exemple, éviter de placer le bloc-
piles dans un tablier, une poche, une boîte à outils
ou un tiroir, etc. contenant des objets tels que clous,
vis, clés, etc. Le fait de transporter des blocs-piles
comporte des risques d’incendie, car les bornes
des piles pourraient entrer, par inadvertance,
en contact avec des objets conducteurs, tels
que: clés, pièces de monnaie, outils ou autres.
La réglementation sur les produits dangereux
(Hazardous Material Regulations) du département
américain des transports interdit, en fait, le transport
des blocs-piles dans les commerces ou dans les avions
dans les bagages de cabine, À MOINS qu’ils ne soient
correctement protégés de tout court-circuit. Aussi
lors du transport individuel de blocs-piles, s’assurer
que leurs bornes sont bien protégées et isolées de
tout matériau pouvant entrer en contact avec elles
et provoquer un court-circuit. REMARQUE: il
ne faut pas laisser de piles au li-ion dans les
bagagesenregistrés.
Directives de sécurité importantes
propres à tous les chargeurs de piles
AVERTISSEMENT : lisez toutes les consignes
de sécurité, les instructions et les symboles
d’avertissements du bloc-piles, du chargeur et du
produit. Tout manquement aux avertissements
et instructions pose des risques de décharges
électriques, d’incendie et/ou de blessures graves.
• NE PAS tenter de recharger le bloc-piles avec tout
autre chargeur qu’une unité CRAFTSMAN. Le
chargeur CRAFTSMAN et son bloc-piles sont conçus
spécialement pour fonctionner conjointement.
• Ces chargeurs n’ont pas été conçus pour une
utilisation autre que recharger les blocs-piles
rechargeables CRAFTSMAN. Toute autre utilisation
18
Page 21

comporte des risques d’incendie, de chocs électriques
oud’électrocution.
• Protéger le chargeur de la pluie ou de laneige.
• Tirer sur la fiche plutôt que sur le cordon
pour débrancher le chargeur. Cela permet de
réduire les risques d’endommager la fiche ou le
cordond’alimentation.
• S’assurer que le cordon est protégé de manière à
ce que personne ne marche ni ne trébuche dessus,
ou à ce qu’il ne soit ni endommagé ni soumis à
aucunetension.
• N’utiliser une rallonge qu’en cas de nécessité
absolue. L’utilisation d’une rallonge inadéquate
comporte des risques d’incendie, de chocs électriques
oud’électrocution.
• Pour utiliser un chargeur à l’extérieur, le placer dans
un endroit sec et utiliser une rallonge conçue pour
l’extérieur. L’utilisation d’une rallonge conçue pour
l’extérieur réduit les risques de chocsélectriques.
• Pour la sécurité de l’utilisateur, utiliser une rallonge
de calibre adéquat (AWG, American Wire Gauge
[calibrage américain normalisé des fils électriques]).
Plus le calibre est petit, et plus sa capacité est grande. Un
calibre16, par exemple, a une capacité supérieure à un
calibre18. L’usage d’une rallonge de calibre insuffisant
causera une chute de tension qui entraînera perte de
puissance et surchauffe. Si plus d’une rallonge est utilisée
pour obtenir une certaine longueur, s’assurer que chaque
rallonge présente au moins le calibre de fil minimum. Le
tableau ci-dessous illustre les calibres à utiliser selon la
longueur de rallonge et l’intensité nominale indiquée sur
la plaque signalétique. En cas de doute, utiliser le calibre
suivant. Plus le calibre est petit, plus la rallonge peut
supporter decourant.
Calibre minimum pour les cordons d'alimentation
Volts
120 V 7,6 (25) 15,2 (50) 30,5 (100) 45,7 (150)
240 V 15,2 (50) 30,5 (100) 61,0 (200) 91,4 (300)
Ampères
Plus que Pas plus
que
0 6 18 16 16 14
6 10 18 16 14 12
10 12 16 16 14 12
12 16 14 12 Non recommandé
• Ne poser aucun objet sur le chargeur. Ne pas mettre
le chargeur sur une surface molle qui pourrait en
bloquer la ventilation et provoquer une surchauffe
interne. Éloigner le chargeur de toute source de chaleur.
Le chargeur dispose d’orifices d’aération sur le dessus et le
dessous duboîtier.
• Ne pas le faire fonctionner avec un cordon
d’alimentation ou une ficheendommagée–les
remplacer immédiatement.
• Ne pas utiliser le chargeur s’il a reçu un coup,
fait une chute ou a été endommagé de quelque
façon que ce soit. Le ramener dans un centre de
réparationagréé.
Longueur totale du cordon
d'alimentation en mètre (pieds)
AWG
FRANÇAIS
• Ne pas démonter le chargeur. Pour tout service
ou réparation, le rapporter dans un centre de
réparation agréé. Le fait de le réassembler de façon
incorrecte comporte des risques de chocs électriques,
d’électrocution et d’incendie.
• Débrancher le chargeur du secteur avant tout
entretien. Cela réduira tout risque de chocs
électriques. Le fait de retirer le bloc-piles ne réduira pas
cesrisques.
• NE JAMAIS tenter de connecter 2 chargeursensemble.
• Le chargeur a été conçu pour être alimenté en
courant électrique domestique standard de
120volts. Ne pas tenter de l’utiliser avec toute
autre tension. Cela ne s’applique pas aux chargeurs de
postesmobiles.
AVERTISSEMENT : risques de chocs électriques. Ne
laisser aucun liquide pénétrer dans le chargeur, des
chocs électriques pourraient enrésulter.
AVERTISSEMENT : risques de brûlure. Ne submerger
le bloc-piles dans aucun liquide et le protéger de toute
infiltration de liquide. Ne jamais tenter d’ouvrir le
bloc-piles pour quelque raison que ce soit. Si le boîtier
plastique du bloc-piles est brisé ou fissuré, le retourner
dans un centre de réparation pour y être recyclé.
ATTENTION : risques de brûlure. Pour réduire tout
risque de dommages corporels, ne recharger que des
blocs-piles rechargeables CRAFTSMAN.Tout autre type
de piles pourrait exploser et causer des dommages
corporels etmatériels.
ATTENTION : sous certaines conditions, lorsque le
chargeur est connecté au bloc d’alimentation, des
matériaux étrangers pourraient court-circuiter le
chargeur. Les corps étrangers conducteurs tels que
(mais pas limité à) poussières de rectification, débris
métalliques, laine d’acier, feuilles d’aluminium,
ou toute accumulation de particules métalliques
doivent être maintenus à distance des orifices du
chargeur. Débrancher systématiquement le chargeur
lorsque le bloc-piles n’y est pas inséré. Débrancher
systématiquement le chargeur avant toutentretien.
Chargement du bloc-piles
REMARQUE: afin d’assurer la performance et la vie
maximales des blocs-piles au lithium-ion, chargez
complètement le bloc-pile avant la première utilisation.
1. Branchez le chargeur dans une prise appropriée avant
d’insérer le bloc-piles.
2. Branchez le chargeur et le bloc-piles en vous assurant
que le bloc-piles est bien mis en place. Le voyant rouge
(chargement) clignotera sans cesse indiquant que le
processus de chargement est commencé.
3. La fin de la recharge sera indiquée par le voyant qui
demeurera allumé de façon continue. Le bloc-piles est
complètement chargé et peut être retiré utilisé à ce
moment ou laissé dans le chargeur.
REMARQUE: pour retirer le bloc-piles, on doit appuyer sur
le bouton de libération du bloc-piles sur certains chargeurs.
19
Page 22

FRANÇAIS
Indicators
Bloc-piles en Cours
de Chargement
Bloc-piles Chargé
Suspension de Charge Contre
le Chaud/Froid
Le chargeur ne pourront recharger des blocs-piles
défectueux. Le chargeur qui refuse de s'allumer peut
indiquer un problème avec le chargeure bloc-piles.
REMARQUE : si le chargeur ne se met pas en fonction,
faites tester le chargeur et le bloc-piles à un centre de
service autorisé.
Fonction de suspension de charge contre le
chaud/froid
Lorsque le chargeur détecte un bloc-piles trop chaud
ou trop froid, il démarre automatiquement la fonction
de suspension de charge contre le chaud, suspendant
le chargement jusqu’à ce que le bloc-piles ait repris
une température appropriée. Le chargeur ensuite se
remettra automatiquement en mode de chargement.
Cette caractéristique assure aux blocs-piles une durée de
viemaximale.
Un bloc-piles froid peut recharger moins vite qu’un
bloc-piles chaud.
Remarques importantes concernant
le chargement
1. Pour augmenter la durée de vie du bloc-piles
et optimiser son rendement, le recharger à une
température ambiante de 18°C à 24°C (65°F à 75°F).
NE PAS charger lorsque le bloc-piles est en dessous
de +4,5°C (+40°F) ou au-dessus de +40°C (+104°F).
C’est important pour prévenir tout dommage sérieux
au bloc-piles.
2. Le chargeur et son bloc-piles peuvent devenir chauds
au toucher pendant la charge. C’est normal et ne
représente en aucun cas une défaillance du produit.
Pour faciliter le refroidissement du bloc-piles après
utilisation, éviter de laisser le chargeur ou le bloc-piles
dans un local où la température ambiante est élevée
comme dans un hangar métallique ou une remorque
non isolée.
3. Si le bloc-piles ne se recharge pas correctement:
a. Vérifier le bon fonctionnement de la prise
en y branchant une lampe ou tout autre
appareilélectrique.
b. Vérifier que la prise n’est pas contrôlée par un
interrupteur qui coupe le courant lorsqu’on éteint
leslumières.
c. Déplacer le chargeur et le bloc-piles dans un local
où la température ambiante se trouve entre environ
18°C et 24°C (65°F et 75°F).
d. Si le problème persiste, amener l’outil, le bloc-piles et
son chargeur dans un centre de réparation local.
4. Recharger le bloc-piles lorsqu’il ne produit plus assez
de puissance pour effectuer un travail qu’il faisait
facilement auparavant. NE PAS CONTINUER à l’utiliser
dans ces conditions. Suivre la procédure de charge. Si
nécessaire, il est aussi possible de recharger
un bloc-piles partiellement déchargé sans effet nuisible
sur le bloc-piles.
5. Les corps étrangers conducteurs tels que (mais
pas limité à) poussières de rectification, débris
métalliques, laine d’acier, feuilles d’aluminium,
ou toute accumulation de particules métalliques
doivent être maintenus à distance des orifices du
chargeur. Débrancher systématiquement le chargeur
lorsque le bloc-piles n’y est pas inséré. Débrancher
systématiquement le chargeur avant tout entretien.
6. Ne pas congeler ou immerger le chargeur dans l’eau ou
tout autre liquide.
Instructions d’entretien du chargeur
AVERTISSEMENT : risques de chocs électriques.
Débrancher le chargeur de la prise de courant
alternatif avant tout entretien. Éliminer toute saleté
ou graisse de la surface externe du chargeur à l’aide
d’un chiffon ou d’une brosse non métallique douce.
N’utiliser ni eau ni aucun nettoyantliquide.
CONSERVER CES CONSIGNES POUR
UTILISATION ULTÉRIEURE
DESCRIPTION (FIG. A)
Usage prévu
Cette tondeuse est conçue pour applicationsdomestique.
NE PAS les utiliser en milieu ambiant humide ou en
présence de liquides ou de gazinflammables.
NE PAS le laisser à la portée des enfants. Une supervision
est nécessaire auprès de tout utilisateur nonexpérimenté.
ASSEMBLAGE ET AJUSTEMENTS
DANGER: afin de réduire le risque de blessure
corporelle, éteignez l’outil, retirez la clé de
sûreté et retirez le blocs-pile avant d’assembler,
d’effectuer tout ajustement ou de retirer/installer
des pièces ou des accessoires. Un démarrage
accidentel peut causer desblessures.
Ajuster la hauteur de la poignée (Fig. B)
Cette tondeuse est expédiée en mode d’entreposage. Vous
devrez ajuster la poignée en position de fonctionnement
avant decontinuer.
1. Pour déverrouiller la poignée
d’entreposage, tournez les deux verrous de la
6
poignée
des deux côtés de la poignée comme illustré dans la
Fig. B.
2. Montez la poignée en position de fonctionnement.
3. Localisez les trous des crans de la poignée
sur les supports de la poignée
la Fig. B.
à 90°. Les verrous de la poignée sont situés
4
de la position
7
16
comme illustré dans
situés
20
Page 23

4. Ajustez la poignée à la position qui convient la mieux
à l’utilisateur et verrouillez la poignée en place en
tournant les verrous de la poignée
permettant de s’enclencher dans les trous désirés.
Fig.B
34
6
à 90° en leur
Sac de collecte du gazon (Fig. C)
DANGER: retirez la clé de sûreté et le blocs-pile avant
lorsque vous ouvrez le capot de la porte arrière et
installez lesac.
1. Levez le capot de la porte arrière
de collecte du gazon
crochets du sac
comme illustré dans la Fig. C. Baissez ensuite le capot de
la portearrière.
Fig.C
11
12
35
s’appuient sur les languettes
11
sur la tondeuse afin que les
et placez le sac
18
FONCTIONNEMENT
DANGER: afin de réduire le risque de blessure
corporelle, éteignez l’outil, retirez la clé de
sûreté et retirez le blocs-pile avant d’assembler,
d’effectuer tout ajustement ou de retirer/installer
des pièces ou des accessoires. Un démarrage
accidentel peut causer desblessures.
4
Installer et retirer le bloc-piles (Fig. A, D)
DANGER: ASSUREZ-VOUS QUE LA CLÉ DE SÛRETÉ
EST RETIRÉE AFIN D’ÉVITER L’ACTIVATION AVANT
D’INSTALLER OU DE RETIRER LESPILES.
REMARQUE : pour une meilleure performance, assurezvous que chaque bloc-piles est entièrementchargé.
Pour installer le blocs-pile
1. Levez et maintenez le capot du logement du bloc-
6
7
1235
9
piles
pour exposer le logement du bloc-piles
2. Glissez un bloc-piles
jusqu’à ce que vous entendiez un clic (Fig. D). Assurezvous que le bloc-piles est complètement inséré et
verrouillé enplace.
3. Fermez le capot du logement des blocs-piles. Assurezvous que le capot est complètement fermé avant de
démarrer latondeuse.
Pour retirer le bloc-piles
1. Ouvrez le capot du logement des blocs-piles
décrit ci-dessus.
2. Appuyez sur le bouton de libération des piles
tondeuse, puis sortez le bloc-piles
Fig.D
9
20
dans le logement du bloc-piles
19
21
20
de l’outil.
FRANÇAIS
19
.
9
comme
21
sur la
18
Éjection latérale (Fig. A)
DANGER: retirez la clé de sûreté et le bloc-piles avant
de retirer le sac de collecte.
1. Pour utiliser la tondeuse en mode d’éjection latérale,
retirez le sac de collecte du gazon.
2. Assurez-vous que le capot de la porte arrière
baissé pour l’éjection latérale.
3. Soulever le volet latéral
d’éjection latérale
4. Libérer le volet latéral et s’assurer que le module tient en
place avant d’allumer la tondeuse.
REMARQUE: le capot de la porte arrière est formé de
façon à ce que l’ouverture (en bas) ne puisse pas être
complètement fermée
16
et accrocher le module
17
sur la tondeuse.
11
est
20
LISEZ LE MANUEL D’INSTRUCTION AVANT
D’UTILISER VOTRE TONDEUSE
Consultez la Figure A au début de ce guide pour une liste
complète des composantes. Conservez ce manuel pour
référenceultérieure.
DANGER: lame tranchante en mouvement. Ne
pas utiliser la tondeuse en mode déchiquetage si la
porte arrière et l’éjection latérale ne sont pas fermées
sous la tension du ressort puisque cela pourrait
21
Page 24

FRANÇAIS
entraîner une blessure grave. Apportez votre tondeuse
au centre de services le plus près pour des réparations.
DANGER: ne pas utiliser la tondeuse tant que la
poignée est verrouillée enplace.
DANGER: lame tranchante en mouvement.
Ne jamais utiliser la tondeuse en mode sac à moins
que les crochets du sac sur le sac à herbe soient bien
placés sur la tondeuse et que la porte d’éjection arrière
demeure bien sur le dessus du sac à herbe puisque cela
pourrait entraîner une blessuregrave.
AVERTISSEMENT: laissez la tondeuse fonctionner à
son propre rythme. Ne passurcharger.
Ajuster la hauteur de la tondeuse (Fig. E)
La hauteur de coupe est ajustée par le levier de réglage de
la hauteur decoupe.
REMARQUE : Si vous n’êtes pas certain à quelle hauteur
couper, commencer la tonte avec le levier de réglage de
la hauteur de coupe
ajuster la hauteur vers le bas au besoin comme illustré dans
la Fig.E.
Pour régler la hauteur de la coupe
1. Sortez sur le levier de réglage de la hauteur de coupe
10
du cran de verrouillage
2. Déplacez le levier vers l’arrière de l’appareil pour monter
la hauteur de lacoupe.
3. Déplacez le levier vers l’arrière de l’appareil pour baisser
la hauteur de lacoupe.
4. Pousser le levier de réglage de la hauteur de coupe dans
le cran deverrouillage.
Fig.E
22
10
placé vers l’arrière de l’appareil et
22
.
10
Clé de sûreté (Fig. F)
DANGER: lame tranchante en mouvement. Afin
de prévenir le démarrage accidentel ou l’utilisation
non autorisée de votre tondeuse sans fil, une clé de
sûreté amovible
de votre tondeuse. La tondeuse sera complètement
désactivée lorsque la clé de sûreté a été retirée de
latondeuse.
3
a été intégrée dans la conception
REMARQUE : la clé de sûreté a une corde pour accrocher
afin de permettre l’entreposage sur un clou, hors de portée
des enfants. Ne pas accrocher la clé de sûreté à latondeuse.
DANGER: les lames en rotation peuvent causer
de graves blessures. Afin de prévenir une blessure
grave, retirez la clé de sûreté et le bloc-piles lorsque la
tondeuse est laissée sans surveillance ou pendant le
chargement, le nettoyage, l’entretien, le transport, la
levée ou l’entreposage de latondeuse.
Fig.F
3
Démarrer la tondeuse (Fig. G)
DANGER: lame tranchante en mouvement.
Ne jamais tenter de forcer le fonctionnement
du boîtier de commande et le système de clé
de sûreté puisque cela pourrait entraîner une
blessuregrave.
REMARQUE : la tondeuse est opérationnelle lorsque le
bloc-piles et la clé de sûreté sontinstallés.
1. Insérez la clé de sûreté
commande
placée à l’intérieur du boîtier comme illustré dans la
Fig.G. La tondeuse est maintenantopérationnelle.
2. Votre tondeuse est munie d’un BOÎTIER de commande
spécial
maintenez le bouton marche-arrêt
de commande
la poignée comme illustré dans la Fig.G. Une fois que
la tondeuse démarre, vous pouvez relâcher le bouton
marche-arrêt.
3. Pour éteindre la tondeuse, relâchez l’anse
REMARQUE : Une que la poignée aura retournée à
position originale, cela activera le «Mécanisme de freinage
automatique». Le moteur est freiné mécaniquement et la
lame de la tondeuse s’arrêtera de tourner en trois secondes
oumoins.
1
1
. Pour utiliser la tondeuse, appuyez et
AVERTISSEMENT: ne jamais tenter de verrouiller
le boîtier de commande ou l’anse lorsque l’outil est
enmarche.
3
jusqu’à ce qu’elle soit complètement
dans le BOÎTIER de
1
, puis tirez l’anse
2
sur le BOÎTIER
5
vers la barre de
5
.
22
Page 25

FRANÇAIS
Fig.G
5
2
1
3
Surcharge de la tondeuse
Afin de prévenir les dommages dus à des conditions de
surcharge, ne pas tenter de retirer trop d’herbe à la fois.
Ralentissez le rythme de votre coupe ou augmentez la
hauteur de lacoupe.
Entreposage (Fig. A, H)
DANGER: la lame en rotation peuvent causer de
graves blessures. Relâchez l’anse
tondeuse, retirez la clé de sûreté et retirez le bloc-piles
avant de lever, transporter ou entreposer la tondeuse.
Entreposez dans un endroitsec.
ATTENTION: point de pincement. Pour éviter
d’être pincé, gardez vos doigts loin de la zone autour
des supports de poignées lorsque vous rabattez
lespoignées.
La poignée de la tondeuse peut être facilement rabattue
pour un entreposage rapide etpratique.
1. Pour déverrouiller la poignée
de la poignée
tournez d’un quart de tour.
2. Rabattez la poignée vers l’avant de la tondeuse comme
illustré dans la Fig.H.
3. Localisez les deux trous des crans de rangement de la
poignée situés sur les supports de la poignée
illustré dans la Fig.H.
4. Verrouillez la poignée en place en défaisant les verrous
de la poignée
les trous des crans de rangement de la poignée et
assurez-vous que la poignée est bienverrouillée comme
illustré dans la Fig.H.
6
situés des deux côtés de la poignée et
6
leur permettant de s’enclencher dans
5
pour éteindre la
4
, tirez les deux verrous
7
comme
Fig.H
6
4
7
Transporter la tondeuse (Fig. A, I)
DANGER: les lames en rotation peuvent
causer de graves blessures. Afin de prévenir
une blessure grave, retirez la clé de sûreté et
le bloc-piles lorsque la tondeuse est laissée
sans surveillance ou pendant le chargement, le
nettoyage, l’entretien, le transport, la levée ou
l’entreposage de latondeuse.
La tondeuse peut être transportée à l’aide de poignées
de transport pratiques
tondeuse en saisissant la poignée principale
Fig.I
14 15
. NE PAS tenter de lever la
14
4
.
Conseils de tonte (Fig. A)
AVERTISSEMENT: INSPECTEZ TOUJOURS LA
ZONE OÙ LA TONDEUSE DOIT ÊTRE UTILISÉE ET
RETIREZ TOUTES LES PIERRES, TOUS LES BÂTONS,
FILS, OS ET AUTRES DÉBRIS QUI PEUVENT ÊTRE
PROJETÉS PAR LA LAME ENROTATION.
AVERTISSEMENT: tondez en vous déplaçant en
travers des pentes, jamais vers le haut ou vers le bas.
Soyez très prudent lorsque vous changez de direction
sur les pentes. Ne pas tondre sur des pentes très raides.
Maintenez toujours un bonaplomb.
23
Page 26

FRANÇAIS
• Relâchez l’anse pour éteindre la tondeuse lorsque vous
croisez toute zone en gravier (les pierres peuvent être
projetées par lalame).
• Réglez la tondeuse à la hauteur la plus haute lorsque
vous tondez sur un sol accidenté ou des herbes hautes.
Retirer trop d’herbes à la fois peut entraîner une
surcharge et un arrêt du moteur.
• Si un sac de collecte du gazon
la saison de croissance rapide, le gazon peut avoir
tendance à obstruer l’ouverture d’éjection. Relâchez
l’anse pour éteindre la tondeuse, retirez la clé de sûreté
et le bloc-piles. Retirez le sac et secouez l’herbe vers
l’extrémité arrière du sac. Nettoyez aussi l’herbe ou
tout débris qui peut être entassé autour de l’ouverture
d’éjection. Replacez le sac àherbe.
• Si la tondeuse devait démarrer en vibrant de
façon anormale, relâchez l’anse pour éteindre la
tondeuse, retirez la clé de sûreté et le bloc-piles.
Vérifiez immédiatement la cause. La vibration est un
avertissement de problème. Ne pas utiliser la tondeuse
jusqu’à ce qu’une vérification de services ait été
effectuée. Consultez la section Gui de Dépannage.
• Pour de meilleurs résultats de coupe, gardez la lame
aiguisée et équilibrée.
• Inspectez et nettoyez la tondeuse en profondeur après
chaque utilisation puisqu’un châssis avec de l’herbe
durcie réduira laperformance.
• Retirez toujours l’anse pour éteindre la tondeuse, retirez
la clé de sûreté et le bloc-piles lorsque vous la laissez
sans surveillance même pour une courtepériode.
12
est utilisé durant
Les suggestions suivantes vous aideront
à obtenir une durée de fonctionnement
optimale de votre tondeuse sans fil :
• Ralentissez dans les zones où l’herbe est
particulièrement longue ouépaisse.
• Évitez de tondre si l’herbe est mouillée en raison de la
pluie ou mouillée par larosée.
• Coupez souvent votre gazon, particulièrement durant
les périodes de fortecroissance.
REMARQUE : Il est recommandé que votre tondeuse soit
rechargée après l’utilisation afin de prolonger la durée des
piles. Les chargements fréquents ne nuira pas vos piles et
assurez-vous que les piles sont entièrement chargées et
prêtes pour leur utilisation suivante. Entreposer des piles
non chargées entièrement réduira la durée de vie despiles.
MAINTENANCE
DANGER: afin de réduire le risque de blessure
corporelle, éteignez l’outil, retirez la clé de
sûreté et retirez le blocs-pile avant d’assembler,
d’effectuer tout ajustement ou de retirer/installer
des pièces ou des accessoires. Un démarrage
accidentel peut causer desblessures.
Retirer et installer la lame (Fig. J–L)
DANGER: RISQUE DE BLESSURE. LORSQUE VOUS
RÉASSEMBLEZ LE SYSTÈME DE LAME, ASSUREZ-
VOUS QUE CHAQUE PIÈCE EST RÉINSTALLÉE
CORRECTEMENT, COMME DÉCRIT CI-DESSOUS. UN
ASSEMBLAGE INAPPROPRIÉ DE LA LAME OU D’AUTRES
PIÈCES DU SYSTÈME DE LAME PEUT CAUSER UNE
BLESSUREGRAVE.
DANGER: afin de réduire le risque de blessure
corporelle, éteignez l’outil, retirez la clé de sûreté
et retirez le bloc-piles avant d’effectuer tout
ajustement ou de retirer/installer des pièces
ou des accessoires. Un démarrage accidentel peut
causer desblessures.
1. Coupez une pièce de bois 2" x 4'
de long) (610mm) pour empêcher la lame de tourner
lorsque vous retirez l’écrou de la bride
AVERTISSEMENT: utilisez des gants et une
protection oculaire appropriée. Tournez la tondeuse
sur le côté. Faites attention aux bords aiguisés de
lalame.
2. Placez le bois et dévissez l’écrou de la bride
sens contraire des aiguilles d’une montre avec une clé
de 18mm
3. Retirez l’entretoise en métal carrée en métal
en plastique carré de la lame
illustré dans la Fig. K. Le ventilateur à pales
pas être retiré. Examinez toutes les pièces pour tout
dommage et remplacez-les aubesoin.
4. Installez la nouvelle lame ou la lame aiguisée
l’épaulement
dans la Fig.K.
REMARQUE : lorsque vous remplacez une nouvelle lame ou
une lame aiguisée sur l’épaulement du ventilateur à pales,,
assurez-vous que le «CÔTÉ HERBE» sur la lame sera face
au sol lorsque la tondeuse est retournée dans sa position
verticalenormale.
5. Installez l’isolant en plastique carré de la lame
la lame de manière à ce que les bords surélevés sur un
côté s’engagent dans les bords de lalame.
6. Installez l’entretoise de la lame
qu’elle se place à l’intérieur des bords surélevés de l’autre
côté de l’isolant de la lame. Assurez-vous d’aligner les
embouts plats dans le trou de l’entretoise de la lame
avec les embouts plats de la tige, en tournant la lame et
l’isolant de la lame ensemble au besoin.
7. Placez la pièce de bois pour empêcher la lame de
tourner comme illustré dans la Fig. L. Installez l’écrou de
la bride
26
clé
25
comme illustré dans la Fig.J.
30
du ventilateur à pales) comme illustré
24
avec la tige contre l’entretoise de la lame
et vissez la lame
25
.
28
23
(environ 2 pieds
24
.
24
dans le
26
27
et la lame
26
de manière à ce
de façon sécuritaire avec une
28
29
, l’isolant
comme
ne doit
28
sur
27
sur
24
Page 27

Fig. J
23
Fig.K
FRANÇAIS
Aiguiser la lame deux fois par saison de tonte est
habituellement suffisant en circonstances normales. Le sable
cause l’émoussement rapide de la lame. Si le gazon a un
sol sablonneux, aiguiser plus souvent peut être nécessaire.
REMPLACEZ IMMÉDIATEMENT UNE LAME PLIÉE
OUENDOMMAGÉE.
Lorsque vous aiguisez la lame
• Assurez-vous que la lame resteéquilibrée.
• Aiguiser la lame dans l’angle de coupeoriginal.
• Aiguisez les bords coupants aux deux extrémités de
25
24
29
30
28
27
26
24
la lame, retirez une quantité égale de matière aux
deuxextrémités.
Pour aiguiser la lame dans un étau
(Fig. M)
1. Assurez-vous que l’anse est relâchée, que la lame est
arrêtée et que la clé de sûreté et le bloc-piles sont retirés
avant de retirer lalame.
2. Retirez la lame de la tondeuse. Consultez les instructions
pour Retirer et installer lalame.
3. Sécurisez la lame
4. Portez une protection oculaireet des gants appropriés
et faites attention de ne pas vouscouper.
5. Limez soigneusement les bords coupants de la lame
avec une lime à dents fines
en maintenant l’angle du bord de coupeoriginal.
6. Vérifiez l’équilibre de la lame. Consultez les instructions
pour Équilibrer lalame.
7. Replacez la lame sur la tondeuse et vissezsolidement.
Fig. M
28
dans un étau
28
31
.
32
ou une pierre à aiguiser,
Fig.L
25
28
24
23
Aiguiser la lame
GARDEZ LA LAME AIGUISÉE POUR UNE MEILLEURE
PERFORMANCE DE LA TONDEUSE. UNE LAME ÉMOUSSÉE NE
COUPE PAS L’HERBENETTEMENT.
AVERTISSEMENT: utilisez des gants et une
protection oculaire appropriée pendant que vous
retirez, aiguisez et installez la lame. Assurez-vous que
la clé de sûreté et le bloc-piles sont retirés.
32
31
Équilibrer la lame (Fig. N)
Vérifiez l’équilibre de la lame
de la lame sur un clou ou un tournevis rond
horizontalement dans un étau
extrémités de la lame tourne vers le bas, limez le long du
bord aiguisé de cette extrémité en baisse. La lame est bien
équilibrée lorsqu’aucune des extrémités nebaisse.
Fig. N
33
31
28
en plaçant le trou central
31
33
. Si l’une ou l’autre des
, fixé
28
25
Page 28

FRANÇAIS
Nettoyage (Fig. A)
AVERTISSEMENT: soufflez la saleté et la poussière
de tous les évents avec de l’air sec et propre au moins
une fois par semaine. Afin de réduire le risque de
blessure aux yeux, utilisez toujours une protection
oculaireapprouvée ANSI Z87.1 (CAN/CSA Z94.3) et
une protection respiratoire approuvée NIOSH/OSHA/
MSHA lorsque vous effectuezceci.
AVERTISSEMENT: ne jamais utiliser de solvant ou
d’autres produits chimiques forts pour le nettoyage
des pièces non métalliques de l’outil. Ces produits
chimiques peuvent affaiblir les matériaux plastiques
des pièces. Utilisez un linge trempé seulement dans
de l’eau et du savon doux. Ne jamais laisser de liquide
entrer à l’intérieur de l’outil, ne jamais immerger toute
partie de l’outil dans unliquide.
Relâchez l’anse
s’arrêter et retirez le bloc-piles et la clé de sûreté. Nettoyez
tout gazon coupé qui peut s’être accumulé sur le dessous
du châssis. Après plusieurs utilisations, vérifiez toutes les
fixations exposées sont bienserrées.
5
pour éteindre la tondeuse, laissez la lame
Corrosion
Les fertilisants et d’autres produits chimiques pour le jardin
contiennent des agents qui accélèrent grandement la
corrosion des métaux. Si vous tondez dans des zones où
des fertilisants et des produits chimiques ont été utilisés, la
tondeuse doit être immédiatement nettoyée après comme
ce qui suit:
Relâchez l’anse
le bloc-piles et la clé de sûreté. Essuyez toutes les pièces
exposées avec un lingehumide.
5
pour éteindre la tondeuse et retirez
ATTENTION: ne pas verser ou vaporiser de l’eau
sur la tondeuse pour tenter de la nettoyer. Ne pas
entreposer l’outil sur ou près de fertilisants ou de
produits chimiques. Un tel entreposage peut causer de
lacorrosion.
Respecte les exigences de sécurité de la
CPSC
Les tondeuses CRAFTSMAN sont conformes aux normes
de sécurité de l’American National Standards Institute et de
la Consumer Product Safety Commission aux États-Unis. La
lame tourne lorsque le moteur est enmarche.
Accessoires
AVERTISSEMENT : puisque les accessoires autres
que ceux offerts par CRAFTSMAN n’ont pas été testés
avec ce produit, leur utilisation pourrait s’avérer
dangereuse. Pour réduire le risque de blessures,
utiliser exclusivement les accessoires CRAFTSMAN
recommandés avec le présentproduit.
Les accessoires recommandés pour cet outil sont vendus
séparément au centre de service de votre région. Pour
obtenir de l’aide concernant l’achat d’un accessoire,
communiquer avec CRAFTSMAN, composer le
1-888-331-4569.
26
Réparations
Le chargeur et le bloc-piles ne sont pasréparables.
Le chargeur ou le bloc-piles ne comportent aucune
pièceréparable.
AVERTISSEMENT : pour assurer la SÉCURITÉ et la
FIABILITÉ du produit, les réparations, l’entretien et
les réglages doivent être réalisés (cela comprend
l’inspection et le remplacement du balai, le cas
échéant) par un centre de réparation en usine
CRAFTSMAN ou un centre de réparation agréé
CRAFTSMAN. Toujours utiliser des pièces de
rechangeidentiques.
Registre en ligne
Merci pour votre achat. Enregistrez dès maintenant
votreprodui:
• RÉPARATIONS SOUS GARANTIE: cette carte remplie
vous permettra de vous prévaloir du service de
réparations sous garantie de façon plus efficace dans le
cas d’un probléme avec leproduit.
• CONFIRMATION DE PROPRIÉTÉ: en cas de perte
provoquée par un incendie, une inondation ou un vol,
cette preuve de propriété vous servira de preuve auprès
de votre compagnie d’assurances.
• SÉCURITÉ: l’enregistrement de votre produit
nous permettra de communiquer avec vous dans
l’éventualité peu probable de l’envoi d’un avis de
sécurité régi par la loi fédérale américaine de la
protection desconsommateurs.
Registre en ligne à www.craftsman.com/registration
Garantie limitée de quatre ans
CRAFTSMAN réparera ou remplacera sans frais tout appareil
défectueux en raison d’un défaut de matériau ou de maind›œuvre sur une période de quatre ans à partir de la date
d›achat de l›outil. Cette garantie ne couvre pas les pièces en
panne pour cause d'abus ou d'usure normale de l'outil. Pour
plus de détails au sujet de la couverture de la garantie et
l'information de réparation sous garantie, visitez
www.craftsman.com ou composez le 1-888-331-4569.
Cette garantie ne s’applique pas aux accessoires ou
dommages causés par des réparations effectuées ou
tentées par d’autres. CETTE GARANTIE REMPLACE TOUTES
LES AUTRES, INCLUANT LES GARANTIES IMPLICITES DE
LA QUALITÉ MARCHANDE ET L'APTITUDE POUR UN
BUT PARTICULIER, ET EXCLUT TOUS LES DOMMAGES
ACCIDENTELS OU CONSÉCUTIFS. Certaines provinces ne
permettent pas de limitation sur la durée de la garantie
implicite ou l'exclusion ou la limitation de dommages
indirects, alors ces limitations peuvent ne pas s'appliquer
à vous. Cette garantie vous donne des droits légaux
particuliers et vous pouvez avoir d’autres droits qui varient
selon les états ou les provinces.
REMARQUE : La garantie du bloc-piles est annulée si
le bloc-piles est altéré de quelque façon que ce soit.
CRAFTSMAN n’est pas responsable de toute blessure causée
par une altération peut intenter des poursuites pour fraude
de garantie dans les limites des lois en vigueur.
Page 29

FRANÇAIS
GARANTIE DE RETOUR DE 90JOURS SANS CONDITION
Si vous n'êtes pas entièrement satisfait de la performance
de votre outil électrique ou de votre cloueuse CRAFTSMAN,
vous pouvez le retourner en moins de 90jours de la date
d'achat avec une preuve d'achat pour un remboursement
complet, sans aucune raison à fournir.
AMÉRIQUE LATINE: La présente garantie ne s’applique pas
aux produits vendus en Amérique latine. Pour les produits
vendus en Amérique latine, consultez les renseignements
sur la garantie particulière au pays comprise dans
l’emballage, appelez l’entreprise locale ou consultez le site
Web pour les renseignements complets sur la garantie.
REMPLACEMENT GRATUIT DES ÉTIQUETTES
D’AVERTISSEMENT : si les étiquettes d’avertissement
deviennent illisibles ou sont manquantes, composer le
1-888-331-4569 pour en obtenir le remplacementgratuit.
GUIDE DE DÉPANNAGE
DANGER: afin de réduire le risque de blessure corporelle, éteignez l’outil, retirez la clé de sûreté et retirez
les blocs-piles avant d’effectuer tout ajustement ou de retirer/installer des pièces ou des accessoires. Un
démarrage accidentel peut causer desblessures.
Pour toute question ou commentaire à propos de n'importe quel outil CRAFTSMAN, appelez-nous au numéro sans frais:
1-888-331-4569.
PROBLÈME SOLUTION
La tondeuse ne fonctionne pas lorsque l’anse
est activée
Le moteur s’arrête durant la tonte Relâchez l’anse pour éteindre la tondeuse. Retirez la clé de sûreté et les blocs-piles. Retournez la tondeuse
La tondeuse fonctionne, mais la performance
de la coupe n’est pas satisfaisante ou elle ne
coupe pas tout le gazon
La tondeuse est trop difficile à pousser Relâchez l’anse pour éteindre la tondeuse. Retirez la clé de sûreté et les blocs-piles. Montez la hauteur
La tondeuse est anormalement bruyante
et vibre
La tondeuse ne ramasse pas le gazon coupé
avec le sac
Assurez-vous que la clé de sûreté est installée et est entièrement placée et que le bouton du boîtier de
commande est complètement appuyé avant de tirer l’anse.
Relâchez l’anse pour éteindre la tondeuse. Retirez la clé de sûreté et les blocs-piles, retournez la tondeuse
et vérifiez sir la lame tourne librement.
Vérifiez si le logement des piles est libre de débris et bien connecté.
Est-ce que les blocs-piles sont entièrement chargés? Appuyez sur le bouton de l’état de chargement.
et vérifiez si la lame tourne librement.
Montez la hauteur de coupe des roues à la position la plus élevée et démarrez la tondeuse.
Vérifiez si le logement des piles est libre de débris et bien connecté.
Est-ce que les blocs-piles sont entièrement chargés? Appuyez sur le bouton de l’état de chargement.
Évitez de surcharger la tondeuse. Ralentissez le rythme de la coupe ou augmentez la hauteur de la coupe.
Est-ce que les blocs-piles sont entièrement chargés? Appuyez sur le bouton de l’état de chargement.
Relâchez l’anse pour éteindre la tondeuse. Retirez la clé de sûreté et les blocs-piles. Retournez la tondeuse
et vérifiez :
• L’aiguisage de la lame. Gardez la lame aiguisée.
• Le châssis et le conduit d’éjection pour toute obstruction.
L’ajustement de la hauteur des roues peut être réglé trop bas pour l’état du gazon. Montez la hauteur de
la coupe.
de la coupe afin de réduire la résistance du châssis sur le gazon. Vérifiez chaque roue pour voir si elle
tourne librement.
Relâchez l’anse pour éteindre la tondeuse. Retirez la clé de sûreté et les blocs-piles. Tournez la tondeuse
sur le côté et vérifiez la lame afin d’assurer qu’elle n’est pas pliée ou endommagée. Si la lame est
endommagée, remplacez-la par une lame de remplacement CRAFTSMAN. Si le dessous du châssis est
endommagé, retournez la tondeuse dans un centre de services autorisé CRAFTSMAN.
S’il n’y a pas de dommage visible sur la lame et que la tondeuse vibre encore : Relâchez l’anse pour
éteindre la tondeuse. Retirez la clé de sûreté et les blocs-piles. Désassemblez tout l’assemblage de la lame
comme illustré dans la section Retirer et installer la lame. Retirez tout débris et nettoyez chaque pièce.
Replacez chaque pièce comme illustré dans la section Retirer et installer la lame. Si la tondeuse vibre
encore, retournez-la dans un centre de services autorisé CRAFTSMAN.
Conduit d’éjection obstrué. Relâchez l’anse pour éteindre la tondeuse. Retirez la clé de sûreté et les blocspiles. Dégagez le conduit de tout gazon coupé.
Montez la hauteur de coupe des roues à la longueur la plus courte de la coupe.
Sac plein. Videz le sac plus souvent.
27
Page 30

ESPAÑOL
Definiciones: Símbolos y Palabras de Alerta de Seguridad
Este manual de instrucciones utiliza los siguientes símbolos y palabras de alerta de seguridad para alertarle de situaciones
peligrosas y del riesgo de lesiones corporales o daños materiales.
PELIGRO: Indica una situación de peligro inminente que, si no se evita, provocará la muerte o lesionesgraves.
ADVERTENCIA: Indica una situación de peligro potencial que, si no se evita, podría provocar la muerte o
lesionesgraves.
ATENCIÓN: Indica una situación de peligro potencial que, si no se evita, posiblemente provocaría lesiones leves
omoderadas.
(Utilizado sin palabras) indica un mensaje de seguridad relacionado.
AVISO: Se refiere a una práctica no relacionada a lesiones corporales que de no evitarse puede resultar en daños a
la propiedad.
Fig. A
17
1
Caja de interruptor
ON-OFF (ENCENDIDOAPAGADO)
2
Botón de ENCENDIDOAPAGADO
3
Llave de seguridad
4
Manija
5
Manija de travesaño
6
Seguros de manija
7
Soportes de manija
8
Orificios de tope de
almacenamiento de
manija
9
Cubierta de puerto de
batería
28
15
COMPONENTES
10
Palanca de ajuste de
altura de corte
11
Cubierta de puerta
trasera
12
Bolsa de recolección de
césped
13
Manija de bolsa de
recolección de césped
14
Manija de transporte
superior
15
Manija de transporte
inferior
16
Aleta lateral
17
Aditamento de descarga
lateral
4
1
2
3
5
13
11
12
10
9
16
6
ADVERTENCIA: Lea todas las advertencias de
seguridad e instrucciones. El incumplimiento
de las advertencias e instrucciones puede provocar
descargas eléctricas, incendios o lesionesgraves.
ADVERTENCIA: Nunca modifique la herramienta
eléctrica, ni tampoco ninguna de sus piezas. Podría
producir lesiones corporales odaños.
ADVERTENCIA: Para reducir el riesgo de lesiones, lea
el manual deinstrucciones.
Si tiene alguna duda o algún comentario sobre ésta u
otra herramienta CRAFTSMAN llámenos al
número gratuito: 1–888–331–4569.
6
7
8
14
Page 31

Podadora V60
CMCMW260
ESPAÑOL
ADVERTENCIAS E INSTRUCCIONES DE
SEGURIDAD IMPORTANTES
ADVERTENCIA: Para reducir el riesgo de lesiones:
• Antes de cualquier uso, asegúrese que cualquiera
que use esta herramienta lea y entienda todas
las instrucciones de seguridad y otra información
contenida en este manual.
• Conserve estas instrucciones y revíselas con
frecuencia antes del uso y al instruir a otros.
ADVERTENCIA: Cuando use podadoras eléctricas,
siempre se deben seguir las precauciones de
seguridad básica para reducir el riesgo de incendio,
descarga eléctrica, y lesiones personales, incluyendo
lassiguientes.
LEA TODAS LAS INSTRUCCIONES
ADVERTENCIAS GENERALES DE SEGURIDAD
E INSTRUCCIONES PARA TODAS
LAS HERRAMIENTAS
• Esta herramienta puede ser peligrosa. Siga todas las
advertencias e instrucciones de seguridad de este manual.
El operador es responsable de seguir las advertencias e
instrucciones en este manual y en la unidad. Restrinja el
uso de esta podadora a las personas que lean, entiendan
y sigan las advertencias e instrucciones de este manual y
de la unidad.
• Evite ambientes peligrosos – no use podadoras en
ubicaciones mojadas o húmedas.
• No use en lluvia.
• Mantenga a los niños alejados – Todos los visitantes
deben mantener una distancia segura del área de trabajo.
• Use vestimenta apropiada – No use ropa holgada o
joyería. Pueden quedar atrapados en las partes móviles. Se
recomienda el uso de guantes de hule y calzado cuando
trabaje en exteriores.
• Use gafas de seguridad – También use una careta o
máscara de polvo si la operación produce polvo.
• Utilice el aparato correcto - No utilice la podadora para
ningún trabajo excepto para el que está diseñada.
• Revise respecto a partes dañadas. Antes de utilizar la
podadora, se debe revisar cuidadosamente un protector u
otra parte que esté dañada para determinar si funcionará
correctamente y cumplirá su función. Revise la alineación
de las partes móviles, la unión de las partes móviles, la
ruptura de partes, el montaje y cualquier otra condición
que pueda afectar su operación. Una protección u otra
parte que esté dañada se debe reparar o reemplazar
apropiadamente por un centro de servicio autorizado,
a menos que se indique lo contrario en otra parte de
estemanual.
• Reparaciones y servicio. Las reparaciones, el
mantenimiento y los ajustes no especificados en este
manual deben ser realizados por los centros de servicio
autorizados u otras organizaciones de servicio calificadas,
siempre utilizando partes de repuesto idénticas.
• No fuerce la podadora – Hará el trabajo mejor y con
más seguridad en la velocidad para la que está diseñada.
• No se estire en exceso – Mantenga la pisada y equilibrio
adecuados en todo momento.
• Permanezca alerta - Observe lo que está haciendo.
Utilice el sentido común. No opere la podadora de césped
cuando esté cansado.
• Desconecte la podadora – Retire la llave de seguridad
y el paquete de batería de la podadora cuando no esté
en uso, antes de realizar el mantenimiento, al cambiar
accesorios tales como cuchillas, y similares.
• Guarde la podadora sin uso en interiores – Cuando
no se usan, los aparatos deben almacenarse en un lugar
seco y cerrado, fuera del alcance de los niños. Retire la
llave de seguridad y el paquete de batería.
• Mantenga la podadora con cuidado – Mantenga
los bordes de corte afilados y limpios para un mejor
desempeño y más seguro. Siga las instrucciones para
lubricar y cambiar los accesorios. Revise el cable de la
podadora periódicamente y, si está dañado, pida que
lo reparen en instalaciones de servicio autorizadas.
Mantenga las manijas secas, limpias y libres de aceite
ygrasa.
• Mantenga las protecciones en su lugar y en buen
estado de operación.
• Mantenga las cuchillas afiladas.
• Mantenga las manos y los pies lejos del área
decorte.
• Los objetos golpeados por la cuchilla de la podadora
pueden causar lesiones graves a las personas.
El césped siempre debe revisarse cuidadosamente y
despejarse de todos los objetos antes de cada corte.
• Si la podadora golpea un objeto extraño, siga
estospasos:
1. Detenga la podadora. Libere la manija
detravesaño.
2. Retire el paquete de batería y la llave
deseguridad.
3. Revise respecto a daño.
4. Repare cualquier daño antes de reiniciar y operar
la podadora.
• Use cuchillas de repuesto idénticas solamente.
GUARDE ESTAS INSTRUCCIONES
29
Page 32

ESPAÑOL
levantar lapodadora.
Importante
Prácticas Seguras para Podadoras
Controladas por Peatones
Esta máquina es capaz de amputar manos y pies y arrojar
objetos. La falla en observar las siguientes instrucciones de
seguridad puede provocar lesiones graves o la muerte.
Información General
1 . Lea, comprenda y siga las instrucciones y advertencias de
este manual y de la máquina, el motor y los accesorios.
2 . Sólo permita operadores, responsables, entrenados,
familiarizados con las instrucciones y físicamente capaces
de operar la máquina.
3 . No opere la máquina bajo la influencia de alcohol
odrogas.
Preparación Antes de Operación
1 . Despeje el área de operación de cualquier objeto que
pueda ser arrojado o interferir con la operación de
lamáquina.
2 . Mantenga el área de operación libre de transeúntes,
particularmente niños pequeños. Detenga la máquina y
los accesorios si alguien entra al área.
3 . No opere la máquina sin el recolector de césped completo,
el conducto de descarga u otros dispositivos de seguridad
en su lugar y funcionando correctamente. Verifique
frecuentemente si hay señales de desgaste o deterioro y
reemplace según sea necesario.
4 . Use el equipo de protección personal adecuado, como
gafas de seguridad, protección auditiva y calzado.
Operación
1 . Sólo use la máquina durante el día o con buena
iluminación artificial.
2 . Evite agujeros, surcos, baches, rocas u otros peligros
ocultos. Un terreno irregular podría volcar la máquina o
hacer que el operador pierda el equilibrio o la posición de
los pies.
3 . No coloque las manos o los pies cerca de partes giratorias
o debajo de la máquina. Manténgase alejado de la
abertura de descarga en todo momento.
4 . Nunca descargue el material directamente hacia nadie.
Evite descargar material contra una pared u obstrucción.
El material puede rebotar hacia el operador. Detenga las
cuchillas al cruzar superficies de grava.
Específico para Niños
1 . Pueden ocurrir accidentes trágicos si el operador no está
alerta a la presencia de niños. Los niños a menudo se
sienten atraídos por la máquina y la actividad de poda.
Nunca asuma que los niños permanecerán donde los vio
por última vez.
2 . Mantenga a los niños fuera del área de operación y bajo
la atenta supervisión de un adulto responsable que no sea
el operador.
Específico para Pendientes
1 . Las pendientes son un factor importante relacionado
con los accidentes. La operación en pendientes requiere
precaución adicional.
2 . Viaje en la dirección recomendada por el fabricante en las
pendientes. Tenga cuidado al operar cerca de las bajadas.
3 . Evite cortar el césped mojado. (Un equilibrio descuidado
podría causar un accidente de resbalón y caída.)
4 . No opere la máquina bajo ninguna condición donde
la tracción, la dirección o la estabilidad estén en duda.
La podadora podría deslizarse incluso si las ruedas
estándetenidas.
5 . Evite comenzar y detenerse en pendientes. Evite hacer
cambios repentinos en la velocidad o dirección. Haga
giros lenta y gradualmente.
6 . Tenga mucho cuidado al operar la máquina con un
recolector de césped u otros accesorios. Pueden afectar la
estabilidad de la máquina.
Servicio
1 . Mantenga la máquina en buen estado de operación.
Reemplace las partes desgastadas o dañadas.
2 . Tenga cuidado al reparar las cuchillas. Envuelva las
cuchillas o use guantes. Reemplace las cuchillas dañadas.
No repare ni altere las cuchillas.
Las siguientes son explicaciones de ilustraciones de
peligros de seguridad importantes en la podadora.
El usuario debe leer y comprender el manual de
instrucciones.
Para evitar el riesgo de lesiones graves, no corte
de arriba a abajo las pendientes. Siempre corte
a través de laspendientes.
Para evitar el riesgo de lesiones a los
transeúntes, mantenga a todas las personas
y mascotas a una distancia segura de la
podadora mientras esté enfuncionamiento.
Las cuchillas giratorias pueden causar lesiones
serias. Mantenga las manos y los pies alejados
de la plataforma de poda y la abertura de
descarga en todo momento. Siempre suelte
la manija de travesaño para apagar la
podadora y espere a que la hoja deje de girar
(aproximadamente 3 segundos) y retire el
paquete de batería y la llave deseguridad
antes de retirar y reemplazar el recolector de
césped, limpiar, dar servicio, transportar o
levantar lapodadora.
30
Page 33

Los objetos golpeados por la cuchilla de la
podadora pueden causar lesiones graves.
Manténgase detrás de la manija cuando el
motor esté funcionando. Siempre asegúrese
que las personas y las mascotas estén lejos
de la descarga de la podadora durante el
funcionamiento. Siempre revise el área de siega
antes de cortar y quite los objetos que puedan
ser arrojados por la cuchilla. Suelte la manija
de travesaño para apagar la podadora y espere
a que la hoja deje de girar (aproximadamente
3 segundos) antes de cruzar aceras, caminos,
patio y caminos degrava.
Instrucción Adicional de Seguridad
ADVERTENCIA: Use SIEMPRE lentes de seguridad.
Los anteojos de diario NO SON lentes de seguridad.
Utilice además una cubrebocas o mascarilla antipolvo
si la operación de corte genera demasiado polvo.
SIEMPRE LLEVE EQUIPO DE SEGURIDADCERTIFICADO:
• protección ocular ANSI Z87.1 (CAN/CSA Z94.3),
• protección auditiva ANSI S12.6 (S3.19),
• protección respiratoria NIOSH/OSHA/MSHA.
ADVERTENCIA: Parte del polvo generado por este
producto contiene producto químicos reconocidos
por el Estado de California como causantes de
cáncer, defectos de nacimiento u otros problemas
reproductivos. Algunos ejemplos de estos productos
químicos son:
• compuestos en fertilizantes
• compuestos en insecticidas, herbicidas y
pesticidas
• arsénico y cromo de madera con tratamiento
químico
Para reducir su exposición a estos productos químicos,
use equipo de seguridad aprobado, como máscaras para
polvo que están diseñadas especialmente para filtrar las
partículasmicroscópicas.
La etiqueta de su herramienta puede incluir los siguientes
símbolos. A continuación se indican los símbolos y
susdefiniciones:
V ......................... voltios
Hz ....................... hertz
min ..................... minutos
or DC ...... direct current
...................... Construcción de
Clase I (tierra)
…/min .............. por minuto
BPM .................... golpes por minuto
IPM ..................... impactos por
minuto
RPM .................... revoluciones por
minuto
sfpm ................... pies de superficie
por minuto
SPM .................... pasadas por
minuto
OPM .................... oscilaciones por
minuto
A ......................... amperios
W ........................ vatios
or AC ........... corriente alterna
or AC/DC .... corriente alterna
o directa
...................... Construcción de
Clase II (doble
aislamiento)
no ....................... velocidad sin carga
IPXX .................... s ímbolo IP
n ......................... velocidad nominal
ESPAÑOL
...................... terminal de
conexión a tierra
...................... símbolo de
advertencia de
seguridad
..................... radiación visible
..................... protección
respiratoria
..................... protección ocular
..................... protección auditiva
..................... lea toda la
documentación
BATERÍAS Y CARGADORES
La batería no viene completamente cargada de fábrica.
Antes de utilizar la batería y el cargador, lea las siguientes
instrucciones de seguridad y luego siga los procedimientos
de carga indicados. Cuando pida baterías de repuesto, no
olvide indicar el número de catálogo y el voltaje.
LEA TODAS LAS INSTRUCCIONES
Instrucciones de Seguridad Importantes
Para Todas las Unidades de Batería
ADVERTENCIA: Lea todas las advertencias de
seguridad, instrucciones y marcas de precaución
para el paquete de la batería, el cargador y
el producto. No seguir las advertencias y las
instrucciones puede provocar una descarga
eléctrica, un incendio y/o lesionesgraves.
• No cargue o use la unidad de batería en atmósferas
explosivas, como en presencia de líquidos, gases
o polvos inflamables. Puede que al insertar o sacar la
unidad de batería del cargador se inflamen el polvo o
losgases.
• Cuando el paquete de batería no esté en uso,
manténgalo alejado de otros objetos metálicos,
como sujetadores de papel, monedas, llaves, clavos,
tornillos, u otros objetos pequeños de metal que
puedan hacer una conexión de una terminal a otra.
Conectar en corto circuito las terminales de la batería
puede causar quemaduras o unincendio.
• NUNCA fuerce la unidad de batería para que
entre en el cargador. NO modifique la unidad de
batería en ninguna forma para que entre en un
cargador no compatible, pues puede producir una
ruptura en la unidad de batería y causar lesiones
corporalesgraves. Consulte la tabla al final de este
manual para ver la compatibilidad entre baterías
ycargadores.
• Cargue las unidades de batería sólo en los cargadores
designados porCRAFTSMAN.
• NO salpique con ni sumerja en agua u otroslíquidos.
• No guarde ni use la herramienta y unidad de batería
en lugares donde la temperatura pueda alcanzar
o superar los 40°C (104 °F), tales como cobertizos
o construcciones de metal durante el verano).
Almacene las unidades de batería en lugares frescos y
secos para maximizar su vidaútil.
NOTA: No almacene las unidades de batería en
la herramienta con el interruptor de gatillo en
posición encendida fija. Nunca use cinta adhesiva
31
Page 34

ESPAÑOL
para mantener el interruptor de gatillo en
posiciónENCENDIDA.
• No incinere la unidad de batería, aunque esté
completamente dañada o descargada. La unidad
de batería puede explotar si se quema. Cuando se
queman unidades de batería de iones de litio, se producen
gases y materialestóxicos.
• Si el contenido de la batería entra en contacto con la
piel, lave el área de inmediato con agua y un jabón
suave. Si el líquido de la batería entra en contacto con
sus ojos, enjuáguelos con agua y los ojos abiertos por
15 minutos o hasta que cese la irritación. Si se requiere
de asistencia médica, el electrolito de la batería está
compuesto por una mezcla de carbonatos orgánicos
líquidos y sales delitio.
• El contenido de los elementos abiertos de la batería
puede causar irritación en el tracto respiratorio.
Salga al aire fresco. Si los síntomas persisten, busque
asistenciamédica.
ADVERTENCIA: Peligro de quemaduras. El líquido de
la batería puede ser inflamable si se expone a chispas
ollamas.
ADVERTENCIA: Peligro de incendio. Nunca intente
abrir la unidad de batería por ningún motivo. Si
la caja exterior de la unidad de batería se triza o
daña, no la introduzca en el cargador. No triture,
deje caer o dañe la unidad de batería. No use una
unidad de batería o un cargador que haya sido
golpeado, dejado caer, atropellado o dañado en
cualquier forma (por ejemplo, perforado por un clavo,
golpeado con un martillo, pisado). Lleve sus unidades
de batería dañadas al centro de servicio para que
seanrecicladas.
Recomendaciones de Almacenamiento
1. El mejor lugar de almacenamiento es uno que sea fresco
y seco, lejos de la luz solar directa y del exceso de calor
ofrío.
2. Para resultados óptimos durante tiempos prolongados
de almacenamiento, se recomienda almacenar la
unidad de batería completamente cargada en un lugar
fresco y seco fuera delcargador.
NOTA: Las unidades de batería no deberían almacenarse
completamente descargadas. La unidad de batería deberá
recargarse antes de serusada.
Instrucciones de Limpieza del Batería
Para limpiar la suciedad y grasa del exterior del cargador
puede usarse un paño o cepillo suave no metálico. No use
agua ni solucioneslimpiadoras.
El sello RBRC®
El sello RBRC® (Rechargeable Battery
Recycling Corporation) en las baterías
(ounidades de batería) de níquel cadmio,
níquel e hidruro metálico o de iones de litio indica que el
costo de reciclaje de estas baterías (o unidades de batería)
al llegar al final de su vida de servicio ya ha sido pagado por
CRAFTSMAN. En algunas áreas, es ilegal depositar baterías
de níquel cadmio, níquel e hidruro metálico o de iones de
litio gastadas en la basura o la corriente de residuos sólidos
urbanos; el programa Call 2 Recycle® proporciona una
alternativaecológica.
Call 2 Recycle, Inc., en cooperación con CRAFTSMAN y
otros usuarios de baterías, han establecido programas en
los Estados Unidos y Canadá para facilitar la recolección
de baterías de níquel cadmio, níquel e hidruro metálico
o de iones de litio gastadas. Al llevar sus baterías de
níquel cadmio, níquel e hidruro metálico y de iones de
litio gastadas a un centro de servicio autorizado por
CRAFTSMAN o al minorista local para que sean recicladas,
ayuda a proteger el medio ambiente y a conservar recursos
naturales. También puede comunicarse con el centro de
reciclaje de su localidad para mayor información sobre
dónde llevar sus bateríasgastadas.
RBRC® es una marca comercial registrada de Call 2
Recycle,Inc.
Transporte
ADVERTENCIA: Peligro de incendio. No guarde
o transporte la batería de forma que los
terminarles expuestos de la misma puedan estar
en contacto con objetos metálicos. Por ejemplo,
no ponga la batería en delantales, bolsillos, cajas de
herramientas, estuches de productos, cajones, etc.,
junto con clavos, tornillos, y llaves, etc. sueltos. El
transporte de baterías puede causar incendios
si sus terminales inadvertidamente entran en
contacto con materiales conductores como
llaves, monedas, herramientas manuales y
otros por el estilo. El Reglamento sobre Materiales
Peligrosos (HMR) del Departamento de Transporte de
EE.UU. prohíbe transportar baterías comercialmente
o en aviones en el equipaje de mano A MENOS que
estén debidamente protegidas contra cortocircuitos.
Por lo tanto, cuando transporte baterías individuales,
asegúrese de que sus terminales estén protegidos
y debidamente aislados de los materiales que
pudieran entrar en contacto con ellos y provocar
uncortocircuito. NOTA: Las baterías de iones de LI-ion
no deben colocarse dentro del equipajeregistrado.
Instrucciones Importantes de Seguridad
Para Todos los Cargadores de Baterías
ADVERTENCIA: Lea todas las advertencias de
seguridad, instrucciones y marcas de precaución
para el paquete de la batería, el cargador y
el producto. No seguir las advertencias y las
instrucciones puede provocar una descarga
eléctrica, un incendio y/o lesionesgraves.
• NO intente cargar el paquete de batería con ningún
cargador diferente a un cargador CRAFTSMAN. El
cargador y el paquete de batería CRAFTSMAN están
diseñados específicamente para funcionar juntos.
• Estos cargadores no fueron diseñados para ser
utilizados para más que cargar las baterías
recargables CRAFTSMAN. Cualquier otro uso puede
32
Page 35

producir riesgo de incendios, descargas eléctricas
oelectrocución.
• No exponga el cargador a la lluvia o a lanieve.
• Tire del enchufe y no del cable cuando desconecte el
cargador. De esta forma se reduce el riesgo de daño al
enchufe ycable.
• Asegúrese de que el cable no sea ubicado de
manera que podría ser pisado, causar que alguien
tropiece con él o ser expuesto a otro tipo de daños
ydesgastes.
• No use un alargador a menos que sea
absolutamente necesario. El uso de un alargador
incorrecto podría producir riesgo de incendios, descargas
eléctricas oelectrocución.
• Cuando opere un cargador al exterior, hágalo
siempre en un lugar seco y use un alargador
apropiado para uso al exterior. El uso de un alargador
apropiado para uso al exterior reduce el riesgo de
descargaeléctrica.
• Los hilos del alargador deben ser de un calibre
apropiado (AWG o American Wire Gauge) para
su seguridad. Mientras menor sea el calibre del hilo,
mayor la capacidad del cable. Es decir, un hilo calibre
16 tiene mayor capacidad que uno de 18. Un cable de
un calibre insuficiente causará una caída en la tensión
de la línea dando por resultado una pérdida de energía
y sobrecalentamiento. Cuando se utilice más de un
alargador para completar el largo total, asegúrese que
los hilos de cada alargador tengan el calibre mínimo.
La tabla siguiente muestra el tamaño correcto a utilizar,
dependiendo de la longitud del cable y del amperaje
nominal de la placa de identificación. Si tiene dudas sobre
cuál calibre usar, use un calibre mayor. Cuanto menor sea
el número del calibre, más resistente será elcable.
Calibre mínimo de conjuntos de cables
Voltios
120 V 25 (7,6) 50 (15,2) 100 (30,5) 150 (45,7)
240 V 50 (15,2) 100 (30,5) 200 (61,0) 300 (91,4)
Amperaje
nominal
Más de No
Más de
0 6 18 16 16 14
6 10 18 16 14 12
10 12 16 16 14 12
12 16 14 12 No recomendado
• No coloque ningún objeto encima del cargador
ni coloque a este sobre una superficie blanda
que pudiera bloquear las ranuras de ventilación
y resultar en un calor interno excesivo. Coloque
el cargador en un lugar alejado de cualquier fuente
de calor. El cargador se ventila a través de las ranuras
que se encuentran en la parte superior e inferior de la
cajaprotectora.
• No opere el cargador si su cable o enchufe
estándañados–reemplácelos de inmediato.
Longitud total del cable en pies
(metros)
AWG
ESPAÑOL
• No opere el cargador si ha recibido un golpe agudo,
si se ha caído o si ha sido dañado de alguna otra
forma. Llévelo a un centro de servicioautorizado.
• No desarme el cargador; llévelo a un centro de
servicio autorizado cuando deba ser reparado. Si es
reensamblado incorrectamente, puede causar descargas
eléctricas, electrocución oincendios.
• Desenchufe el cargador antes de intentar limpiarlo.
Esto reducirá el riesgo de descargas eléctricas. El
retirar el paquete de baterías no reducirá esteriesgo.
• NUNCA intente conectar 2 cargadores entresí.
• El cargador está diseñado para operar con una
corriente eléctrica estándar residencial de 120 V. No
intente usarlo con ningún otro voltaje. Esto no aplica
al cargadorvehicular.
ADVERTENCIA: Peligro de descarga eléctrica. No
permita que ningún líquido se introduzca en el
cargador. Puede producir descargas eléctricas.
ADVERTENCIA: Peligro de quemaduras. No sumerja
la unidad de batería en líquido de ningún tipo ni
permita que se introduzca ningún tipo de líquido a
la unidad de batería. Nunca intente abrir la unidad
de batería por ningún motivo. Si la caja plástica de la
unidad de batería se triza o rompe, llévela a un centro
de servicio para su reciclaje.
ATENCIÓN: Peligro de quemaduras. Para reducir el
riesgo de lesiones, sólo cargue unidades de batería
recargables CRAFTSMAN marca. Otros tipos de
batería podrían sobrecalentarse y reventar lo que
podría resultar en lesiones corporales y daños a
supropiedad.
ATENCIÓN: Bajo ciertas condiciones, cuando el
cargador está enchufado a una toma de corriente,
el cargador puede hacer cortocircuito si entra en
contacto con algún material ajeno. Los materiales
ajenos de naturaleza conductora, como el polvo de
esmerilado, las placas de metal, la lana de acero, el
papel de aluminio y otros, o cualquier acumulación
de partículas metálicas deberían mantenerse alejados
de las cavidades del cargador. Desenchufe siempre
el cargador cuando no haya una unidad de batería
en su cavidad. Desenchufe el cargador antes de
intentarlimpiarlo.
Carga de la Batería
NOTA: Para garantizar el máximo desempeño y la vida
útil de los paquetes de baterías de iones de litio, cargue la
batería por completo antes del primer uso.
1. Conecte el cargador en un tomacorriente apropiado
antes de insertar el paquete de batería.
2. Conecte el cargador y el paquete de baterías,
asegurándose que la batería esté completamente
asentada. La luz (carga) parpadeará continuamente
indicando que el proceso de carga ha comenzado.
3. La terminación de la carga se indicará por la luz que
permanece encendida continuamente. El paquete de
33
Page 36

ESPAÑOL
batería está completamente cargado y se puede retirar y
usar en este momento o dejarse en el cargador.
NOTA: Para retirar el paquete de la batería, algunos
cargadores requieren que se presione el botón de liberación
del paquete de batería.
Indicators
Unidad en Proceso de Carga
Unidad Cargada
Restraso por Unidad Caliente/
Fría
Un cargador no cargará una batería defectuosa. El cargador
que se niega a encenderse podría indicar un problema con
el cargador.
NOTA: Si el cargador no quiere encender, lleve el cargador y
el paquete de batería para que los prueben en un centro de
servicio autorizado.
Retraso por Batería Caliente/Fría
Cuando el cargador detecta que una batería está demasiado
caliente o demasiado fría, inicia automáticamente un
Retraso por batería caliente/fría y suspende la carga hasta
que la batería alcanza una temperatura adecuada. En ese
momento, el cargador inicia automáticamente el modo
de carga de la batería. Esta función garantiza la máxima
duración de la batería.
Una batería fría puede cargar más lentamente que una
batería caliente.
Notas Importantes Sobre la Carga
1. Se puede obtener una mayor duración y un mejor
rendimiento si la unidad de batería se carga a una
temperatura ambiente de 18 °C– 24 °C (65 °F– 75 °F).
NO cargue cuando el paquete de batería esté debajo de
+4,5 °C (+40 °F), o arriba de +40 °C (+104 °F). Esto es
importante y evitará causar daños graves a la batería.
2. Puede que el cargador y la unidad de batería se
calienten ligeramente durante el proceso de carga.
Esto es normal y no representa ningún problema. Para
facilitar el enfriamiento de la unidad de batería después
del uso, evite colocar el cargador o la unidad de batería
en un lugar cálido, como un cobertizo metálico o un
remolque sin aislamiento térmico.
3. Si la unidad de batería no se carga correctamente:
a. Verifique el funcionamiento de la toma enchufando
una lámpara u otro aparato;
b. Revise que la toma de corriente no esté conectada a
un interruptor de luz que corte la corriente cuando
se corte la luz;
c. Mueva el cargador y la unidad de batería a
un lugar donde la temperatura ambiental sea
aproximadamente 18 °C– 24 °C (65 °F– 75 °F);
d. Si el problema de carga continúa, lleve la
herramienta, unidad de batería y el cargador a su
centro de servicio local.
4. La unidad de batería debería ser recargada cuando
no sea capaz de producir suficiente potencia para
34
trabajos que eran fácilmente realizados antes. NO
CONTINÚE usándola bajo estas circunstancias. Siga el
procedimiento de carga. También puede cargar una
unidad de batería que haya sido usada parcialmente
cuando lo desee, sin dañarla.
5. Los materiales ajenos conductores por naturaleza, tales
como, pero sin limitarse a, el polvo del esmerilado, las
virutas metálicas, la lana de acero, el papel de aluminio o
cualquier acumulación de partículas metálicas deberían
mantenerse alejados de las cavidades del cargador.
Desenchufe siempre el cargador de la toma de corriente
cuando no haya una unidad de batería en su cavidad.
Desenchufe el cargador antes de intentar limpiarlo.
6. No congele ni sumerja el cargador en agua o cualquier
otro líquido.
Instrucciones de Limpieza del Cargador
ADVERTENCIA: Riesgo de descarga eléctrica.
Desconecte el cargador del tomacorriente de CA
antes de limpiarlo. Para limpiar la suciedad y
grasa del exterior del cargador puede usarse un
paño o cepillo suave no metálico. No use agua ni
solucioneslimpiadoras.
GUARDE ESTAS INSTRUCCIONES PARA
VOLVER A CONSULTAR EN EL FUTURO
COMPONENTES (FIG. A)
Uso Debido
Esta podadora está diseñada para uso residencial.
NO utilice la herramienta en condiciones de humedad o en
presencia de líquidos o gasesinflamables.
NO permita que los niños toquen la herramienta. Si el
operador no tiene experiencia operando esta herramienta,
su uso deberá sersupervisado.
MONTAJE Y AJUSTES
PELIGRO: Para reducir el riesgo de lesiones
personales serias, apague la unidad, retire la
llave de seguridad y retire el paquete de batería
antes del ensamble, realizar cualquier ajuste
o retirar/instalar conexiones o accesorios. Un
arranque accidental puede causarlesiones.
Ajuste de la Altura de la Manija (Fig. B)
La podadora se envía en modo de almacenamiento.
Deberá ajustar la manija a la posición de operación antes
decontinuar.
1. Para desbloquear la manija
almacenamiento, gire los dos seguros de la manija
90°. Los seguros de la manija están ubicados en ambos
lados de la manija, como se muestra en la Fig. B.
2. Levante la manija a la posición de operación.
3. Ubique los tres orificios de retención de la manija
ubicados en los soportes de la manija
muestra en la Fig. B.
4. Ajuste la manija a la posición que mejor se adapte al
operador y asegure la manija en su lugar enroscando los
4
de la posición de
7
6
16
como se
Page 37

seguros de la manija hacia atrás 90° y permitiendo que
los seguros de la manija
de retención deseados
6
se conecten en los orificios
ESPAÑOL
NOTA: La cubierta de la puerta trasera está configurada
de tal manera que la abertura (en la parte inferior) no se
puede cerrar por completo.
Fig.B
34
Bolsa de Recolección de Césped (Fig. C)
PELIGRO: Retire la llave de seguridad y el paquete de
batería antes del abrir la tapa de la puerta trasera e
instalar labolsa.
1. Levante la cubierta de la puerta trasera
bolsa de recolección de césped
forma que los ganchos de la bolsa
18
las orejas
baje la cubierta de la puertatrasera.
Fig.C
como se muestra en la Fig. C. Después
11
18
11
12
y coloque la
en la podadora de
35
se apoyen sobre
OPERACIÓN
PELIGRO: Para reducir el riesgo de lesiones
personales serias, apague la unidad, retire la
4
llave de seguridad y retire el paquete de batería
antes del ensamble, realizar cualquier ajuste
o retirar/instalar conexiones o accesorios. Un
arranque accidental puede causarlesiones.
Instalación y Desinstalación de Paquete
de Batería (Fig. A, D)
PELIGRO: ASEGÚRESE QUE LA LLAVE DE
6
7
1235
SEGURIDAD SE EXTRAIGA PARA IMPEDIR LA
ACTIVACIÓN ANTES DE RETIRAR O INSTALAR
LABATERÍA.
NOTA: Para mejores resultados, asegúrese que el paquete
de batería esté completamentecargado.
Para Instalar el Paquete de Batería
1. Levante y sostenga la tapa del puerto de la batería
hacia arriba para exponer los puertos de la batería
2. Deslice el paquete de batería
de la batería hasta que escuche un clic audible
(Fig. D). Asegúrese que el paquete de batería esté
completamente asentado y completamente asegurado
en suposición.
3. Cierre la tapa del puerto de la batería. Asegúrese que la
tapa esté completamente cerrada antes de encender
lapodadora.
Para Retirar el Paquete de Batería
1. Abra la tapa del puerto de la batería
describeanteriormente.
2. Presione el botón de liberación de la batería
podadora y retire la batería
Fig.D
9
20
en el puerto
20
de la herramienta.
19
21
9
como se
21
9
19
en la
.
Descarga Lateral (Fig. A)
PELIGRO: Retire la llave de seguridad y el paquete de
batería antes de retirar la bolsa de recolección.
1. Para operar la podadora en el modo de descarga lateral,
retire la bolsa de recolección de césped.
2. Asegúrese que la cubierta de la puerta trasera
abajo para la descarga lateral.
3. Levante la aleta lateral
descarga lateral
4. Suelte la aleta lateral y asegúrese de que el aditamento
se mantenga en su lugar antes de encender la cortadora
de césped.
16
17
y enganche el aditamento de
en la cortadora de césped.
11
esté
20
35
Page 38

ESPAÑOL
LEA ESTE MANUAL DE INSTRUCCIONES
ANTES DE OPERAR SU PODADORA
Consulte la Figura A al inicio de este manual respecto a una
lista completa de componentes. Conserve este manual para
referenciafutura.
PELIGRO: Cuchilla móvil filosa. No opere la
podadora en modo de cobertura si la puerta trasera y
la puerta de descarga lateral no están cerradas bajo
la tensión del resorte, ya que podría ocasionar lesiones
graves. Lleve su podadora al centro de servicio más
cercano para repararla.
PELIGRO: No opere la podadora a menos que la
manija esté bloqueada en suposición.
PELIGRO: Cuchilla móvil filosa. Nunca opere la
podadora en el modo de embolsado a menos que los
ganchos de la bolsa en el recogedor de césped estén
asentados correctamente en la podadora y la puerta
de descarga trasera descanse firmemente contra la
parte superior del recogedor de césped, ya que podría
ocasionar lesionesgraves.
ADVERTENCIA: Deje que la podadora funcione a su
propio ritmo. Nosobrecargue.
Ajuste de Altura de la Podadora (Fig. E)
La altura de corte se ajusta mediante la palanca de ajuste de
altura decorte.
NOTA: Si no está seguro de qué altura cortar, comience
a cortar con la palanca de ajuste de altura de corte
colocada hacia la parte posterior del aparato y ajuste la
altura según sea necesario, como se muestra en la Fig.E.
Para Ajustar la Altura del Corte
1. Jale la palanca de ajuste de altura de corte
la muesca de bloqueo
2. Mueva la palanca hacia la parte posterior del aparato
para elevar la altura decorte.
3. Mueva la palanca hacia la parte delantera del aparato
para bajar la altura decorte.
4. Empuje la palanca de ajuste de altura hacia una de las
muescas debloqueo.
Fig.E
22
22
.
10
10
fuera de
10
Llave de Seguridad (Fig. F)
PELIGRO: Cuchilla móvil filosa. Para evitar un
arranque accidental o el uso no autorizado de su
podadora sin cable, se ha incorporado una llave de
seguridad extraíble
La podadora estará completamente deshabilitada
cuando la llave de seguridad se retire de lapodadora.
NOTA: La llave de seguridad tiene una cuerda de anclaje
para permitir el almacenamiento en un clavo, fuera
del alcance de los niños. No ate la llave de seguridad a
lapodadora.
PELIGRO: Las cuchillas giratorias pueden causar
lesiones serias. Para evitar lesiones graves, retire
la llave de seguridad y el paquete de batería cuando
estén desatendidos, o cuando cargue, limpie, dé
servicio, transporte, levante o guarde lapodadora.
Fig.F
3
en el diseño de su podadora.
3
Arranque de Podadora (Fig. G)
PELIGRO: Cuchilla móvil filosa. Nunca intente
anular la operación de esta caja de interruptores
y sistema de llave de seguridad, ya que podría
ocasionar lesionesgraves.
NOTA: La podadora es operativa cuando la batería y la llave
de seguridad estáninstaladas.
1. Inserte la llave de seguridad
interruptor de ENCENDIDO-APAGADO
esté completamente asentada dentro de la caja
como se muestra en la Fig. G. La podadora ahora se
puedeoperar.
2. Su podadora está equipada con una caja especial de
interruptor de ENCENDIDO-APAGADO
la podadora, presione y mantenga presionado el botón
de ENCENDIDO-APAGADO
de ENCENDIDO-APAGADO
travesaño
Una vez que la podadora lo inicie puede soltar el botón
de ENCENDIDO-APAGADO.
3. Para APAGAR la podadora, libere la manija de
travesaño
5
al manillar como se muestra en la Fig. G.
5
.
ADVERTENCIA: Nunca intente bloquear un
interruptor o manija de travesaño en la posiciónON.
3
en la caja del
1
hasta que
1
. Para operar
2
en la caja de interruptor
1
, luego jale la manija de
36
Page 39

NOTA: Una vez que la manija de travesaño haya regresado
a la posición original, activará el "Mecanismo de frenado
automático". El motor se frena mecánicamente y la cuchilla
de la podadora dejará de girar en tres segundos omenos.
Fig.G
5
2
1
3
Sobrecarga de la Podadora
Para evitar daños debido a condiciones de sobrecarga, no
intente eliminar demasiada hierba a la vez. Disminuya la
velocidad de corte o aumente la altura decorte.
Almacenamiento (Fig. A, H)
PELIGRO: La cuchilla giratoria puede causar lesiones
serias. Suelte la manija de travesaño
la podadora, retire la llave de seguridad y retire la
batería antes de levantar, transportar o almacenar la
podadora. Almacene en un lugarseco.
ATENCIÓN: Punto de atrapamiento. Para evitar
que queden atrapados, mantenga los dedos alejados
del área alrededor de los soportes de la manija al
doblar lasmanijas.
La manija de la podadora se puede plegar fácilmente para
un almacenamiento rápido yconveniente.
1. Para desbloquear la manija
6
, ubicados a ambos lados de la manija y gire
manija
un cuarto de vuelta.
2. Doble la manija a la parte delantera de la podadora
como se muestra en la Fig.H.
3. Ubique los orificios de retención del almacenamiento de
la manija ubicados en los soportes de la manija
se muestra en la Fig.H.
4. Asegure la manija en su lugar desenroscando los
seguros de la manija
en los orificios de retención de almacenamiento y
asegúrese que la manija esté firmemente asegurada,
como se muestra en la Fig.H.
4
6
, permitiendo que se conecten
5
para apagar
, jale los dos seguros de la
7
como
ESPAÑOL
Fig.H
6
4
7
Transporte de la Podadora (Fig. A, I)
PELIGRO: Las cuchillas giratorias pueden causar
lesiones serias. Para evitar lesiones graves, retire
la llave de seguridad y el paquete de batería
cuando estén desatendidos, o cuando cargue,
limpie, dé servicio, transporte, levante o guarde
lapodadora.
La podadora puede transportarse utilizando las prácticas
manijas de transporte
NO intente levantar la podadora sujetando la manija
4
principal
.
Fig.I
14 15
, como se muestra en la Fig. N.
14
Consejos de Poda (Fig. A)
ADVERTENCIA: SIEMPRE REVISE EL ÁREA DONDE
SE DEBE UTILIZAR LA PODADORA Y RETIRE
TODAS LAS PIEDRAS, PALOS, ALAMBRES,
HUESOS Y OTROS ESCOMBROS QUE PUEDAN SER
ARROJADOS POR LA CUCHILLAGIRATORIA.
ADVERTENCIA: Pode a través de la pendiente,
nunca de arriba a abajo. Tenga extrema precaución
cuando cambie de dirección en pendientes. No corte
pendientes excesivamente empinadas. Siempre
mantenga un buenequilibrio.
• Suelte la manija de travesaño para apagar la podadora
cuando cruce cualquier área de grava (las piedras
pueden ser arrojadas por lacuchilla).
• Coloque la podadora a la altura de corte más alta
cuando corte en terreno irregular o en malezas altas.
37
Page 40

ESPAÑOL
Retirar demasiada hierba a la vez puede causar que el
motor se sobrecargue y se detenga.
• Si se usa una bolsa de recolección de hierba
la temporada de crecimiento rápido, la hierba puede
tender a obstruirse en la abertura de descarga. Suelte
la manija de travesaño para apagar la podadora, retire
la llave de seguridad y el paquete de la batería. Retire
el recogedor y agite el césped hasta el final de la bolsa.
Limpie también cualquier hierba o escombros que
pueda acumularse alrededor de la abertura de descarga.
Vuelva a colocar el recogedor decésped.
• Si la podadora comienza a vibrar anormalmente,
suelte la manija de travesaño para apagar la podadora,
retire la llave de seguridad y el paquete de la batería.
Verifique inmediatamente la causa. La vibración es una
advertencia de problemas. No opere la podadora hasta
que se haya realizado una revisión de servicio. Consulte
la Solución deProblemas en este manual.
• Para obtener los mejores resultados de corte, mantenga
la cuchilla afilada y equilibrada.
• Revise y limpie minuciosamente la podadora después
de cada uso, ya que una plataforma con césped atorado
reducirá elrendimiento.
• Siempre suelte la manija de travesaño para apagar la
podadora, retire la llave de seguridad y el paquete de
batería cuando la deje desatendida incluso por un corto
período detiempo.
12
durante
Las siguientes sugerencias lo ayudarán
a obtener un tiempo de operación
óptimo de su podadora inalámbrica:
• Reduzca la velocidad en áreas donde la hierba es
especialmente larga ogruesa.
• Evite cortar cuando la hierba está mojada por la lluvia o
por elrocío.
• Corte su césped con frecuencia, especialmente durante
períodos de grancrecimiento.
NOTA: Se recomienda que su cortacésped se recargue
después de su uso para prolongar la vida útil de la batería.
La carga frecuente no dañará su batería y garantizará que la
batería esté completamente cargada y lista para su próximo
uso. El almacenamiento de una batería no cargada por
completo acortará la vida útil de labatería.
MANTENIMIENTO
PELIGRO: Para reducir el riesgo de lesiones
personales serias, apague la unidad, retire la
llave de seguridad y retire el paquete de batería
antes del ensamble, realizar cualquier ajuste
o retirar/instalar conexiones o accesorios. Un
arranque accidental puede causarlesiones.
Desinstalación e Instalación de Cuchilla
(Fig. J–L)
PELIGRO: RIESGO DE LESIONES. AL REENSAMBLAR
EL SISTEMA DE LA CUCHILLA, ASEGÚRESE QUE CADA
PARTES SE REINSTALA CORRECTAMENTE, COMO
SE DESCRIBE A CONTINUACIÓN. UN ENSAMBLE
INCORRECTO DE LA CUCHILLA U OTRAS PARTES
DEL SISTEMA DE LA CUCHILLA PUEDE CAUSAR
LESIONESGRAVES.
PELIGRO: Para reducir el riesgo de lesiones
personales serias, apague la unidad, retire la
llave de seguridad y retire el paquete de batería
antes de realizar cualquier ajuste o retirar/
instalar conexiones o accesorios. Un arranque
accidental puede causarlesiones.
1. Corte una pieza de madera de 2" x 4'
2pies de largo) (610 mm) para evitar que la cuchilla gire
al quitar la tuerca de brida
ADVERTENCIA: Use guantes y protección adecuada
para los ojos. Ponga la podadora de lado. Tenga
cuidado con los bordes afilados de la cuchilla.
2. Coloque la madera y desatornille la tuerca de brida
en sentido contrario a las manecillas del reloj con una
llave de 18mm
3. Retire el espaciador cuadrado de la cuchilla
metálica
plástico
Fig. K. No se debe quitar el ventilador de la cuchilla
Revise todas las partes respecto a daños y reemplace si
esnecesario.
4. Instale la cuchilla afilada o nueva
ventilador de la cuchilla como se muestra en la Fig.K.
NOTA: Cuando reemplace la cuchilla afilada o nueva en el
borde del ventilador de la cuchilla), asegúrese que el "LADO
DE HIERBA" en la cuchilla quede de cara al suelo cuando la
cortadora vuelva a su posición verticalnormal.
5. Instale el aislador de cuchilla de plástico
cuchilla de modo que los labios levantados de un lado
se conecten con los bordes de lacuchilla.
6. Instale el espaciador de la cuchilla
quede dentro de los labios levantados en el otro lado
del aislador de la cuchilla. Asegúrese de alinear los
planos en el orificio del espaciador de la cuchilla con
los planos del eje, girando la cuchilla y el aislador de la
cuchilla juntos conforme sea necesario.
7. Coloque la pieza de madera para evitar que la hoja gire
como se muestra en la Fig. L. Instale la tuerca de
24
brida
cuchilla
una llave
25
26
, el aislador cuadrado de la lámina de
27
y la cuchilla
con la brida contra el espaciador de la
26
y apriete firmemente la cuchilla
25
.
25
como se muestra en la Fig.J.
28
23
(alrededor de
.
como se muestra en la
28
en el borde
27
en la
26
de manera que
28
con
30
24
29
del
.
38
Page 41

Fig. J
23
Fig.K
ESPAÑOL
Afilar la cuchilla dos veces durante la temporada de poda
suele ser suficiente en circunstancias normales. La arena
hace que la cuchilla pierda filo rápidamente. Si su césped
tiene tierra arenosa, es posible que se requiera un afilado
más frecuente. REEMPLACE INMEDIATAMENTE UNA
CUCHILLA DOBLADA ODAÑADA.
Al Afilar la Cuchilla
• Asegúrese que la cuchilla permanezcabalanceada.
• Afile la cuchilla en el ángulo de corteoriginal.
• Afile los bordes de corte en ambos extremos de la
25
24
29
30
28
27
26
24
cuchilla, eliminando cantidades iguales de material de
ambosextremos.
Para Afilar la Cuchilla en una Prensa de
Banco (Fig. M)
1. Asegúrese de liberar la manija de travesaño, de que la
cuchilla se haya detenido y de que se hayan retirado
la llave de seguridad y el paquete de batería antes de
retirar lacuchilla.
2. Retire la cuchilla de la podadora. Vea las instrucciones
para Desinstalación e Instalación decuchilla.
3. Asegure la cuchilla
4. Use guantes y protección adecuada para los ojos y
tenga cuidado de nocortarse.
5. Con cuidado, limpie los bordes de corte de la cuchilla
con una lima de dientes finos
manteniendo el ángulo del borde de corteoriginal.
6. Verifique el balance de la cuchilla. Vea las instrucciones
para Balanceo de lacuchilla.
7. Reemplace la cuchilla en la podadora y
aprietefirmemente.
Fig. M
28
en una prensa
28
31
.
32
o piedra para afilar,
Fig.L
25
28
24
23
Afilado de Cuchillas
MANTENGA LA HOJA AFILADA PARA OBTENER EL MEJOR
RENDIMIENTO DE LA PODADORA. UNA CUCHILLA SIN FILO
NO CORTA LA HIERBA DE FORMALIMPIA.
ADVERTENCIA: Use guantes y protección adecuada
para los ojos mientras saca, afila e instala la cuchilla.
Asegúrese de quitar la llave de seguridad y el paquete
de batería.
32
31
Balanceo de la Cuchilla (Fig. N)
Verifique el equilibrio de la cuchilla
orificio central en la cuchilla sobre un clavo o destornillador
33
redondo
cualquiera de los extremos de la cuchilla gira hacia abajo,
lime a lo largo del borde afilado de ese extremo de caída. La
cuchilla está correctamente equilibrada cuando ninguno de
los extremoscae.
, sujeto horizontalmente en una prensa
28
colocando el
31
. Si
39
Page 42

ESPAÑOL
Fig. N
Comisión de Seguridad de los Productos del Consumidor de
28
EUA. La cuchilla gira cuando el motor está enoperación.
33
31
Lubricación
No es necesaria la lubricación. No engrase las ruedas. Tienen
superficies de plástico que no requierenlubricación.
Limpieza
ADVERTENCIA: Sople la suciedad y polvo de todas
las ventilas de aire con aire limpio y seco por lo
menos una vez a la semana. Para minimizar el riesgo
de lesiones oculares, siempre use protección para
los ojos ANSI Z87.1 (CAN/CSA Z94.3) y protección
respiratoria aprobada por NIOSH/OSHA/MSHA
cuando realiceesto.
ADVERTENCIA: Nunca use solventes u otros químicos
fuertes para limpiar las partes no metálicas de la
herramienta. Estos químicos pueden debilitar los
materiales plásticos usados en estas partes. Use una
tela humedecida únicamente con agua y jabón suave.
Nunca permita que entre líquido a la herramienta;
nunca sumerja ninguna parte de la herramienta
enlíquido.
Suelte la manija de travesaño
deje que la cuchilla se detenga y luego retire la batería y la
llave de seguridad. Limpie los recortes que puedan haberse
acumulado en la parte inferior de la plataforma. Después de
varios usos, verifique que todos los sujetadores expuestos
esténapretados.
5
para apagar la podadora,
Corrosión
Los fertilizantes y otros productos químicos para el jardín
contienen agentes que aceleran en gran medida la
corrosión de los metales. Si corta en áreas donde se han
usado fertilizantes o productos químicos, la podadora se
debe limpiar inmediatamente después de la siguiente
manera:
Suelte la manija de travesaño
y retire la batería y la llave de seguridad. Limpie todas las
partes expuestas con un pañohúmedo.
ATENCIÓN: No vierta ni rocíe agua sobre la podadora
para intentar limpiarla. No guarde la herramienta
en o junto a fertilizantes o productos químicos. Tal
almacenamiento puede causar una corrosiónrápida.
5
para apagar la podadora
Cumple con los requisitos de seguridad de
CPSC
Las podadoras CRAFTSMAN cumplen con las normas de
seguridad del American National Standards Institute y la
Accesorios
ADVERTENCIA: Debido a que no se han probado con
este producto otros accesorios que no sean los que
ofrece CRAFTSMAN, el uso de dichos accesorios con
esta herramienta podría ser peligroso. Para reducir
el riesgo de lesiones, con este producto deben usarse
sólo los accesorios recomendados porCRAFTSMAN.
Los accesorios que se recomiendan para utilizar con la
herramienta están disponibles a un costo adicional en
su distribuidor local o en un centro de mantenimiento
autorizado. Si necesita ayuda para localizar algún accesorio,
póngase en contacto con CRAFTSMAN , o visite nuestro sitio
web: 1-888-331-4569.
Reparaciones
El Cargador y las unidades de batería no pueden
serreparados. El cargador y la unidad de batería no
contienen piezas reparables.
ADVERTENCIA: Para asegurar la SEGURIDAD y la
CONFIABILIDAD del producto, las reparaciones, el
mantenimiento y los ajustes (inclusive la inspección
y el cambio de las escobillas, cuando proceda) deben
ser realizados en un centro de mantenimiento en la
fábrica CRAFTSMAN u en un centro de mantenimiento
autorizado CRAFTSMAN. Utilice siempre piezas de
repuestoidénticas.
Para reparación y servicio de sus herramientas
eléctricas, favor de dirigirse al
Centro de Servicio más cercano
CULIACAN, SIN
Blvd. Emiliano Zapata 5400-1 Poniente Col.
San Rafael
GUADALAJARA, JAL
Av. La Paz #1779 - Col. Americana Sector
Juárez
MEXICO, D.F.
Eje Central Lázaro Cárdenas No. 18 - Local
D, Col. Obrera
MERIDA, YUC
Calle 63 #459-A - Col. Centro (999) 928 5038
MONTERREY, N.L.
Av. Francisco I. Madero 831 Poniente - Col.
Centro
PUEBLA, PUE
17 Norte #205 - Col. Centro (222) 246 3714
QUERETARO, QRO
Av. San Roque 274 - Col. San Gregorio (442) 2 17 63 14
SAN LUIS POTOSI, SLP
Av. Universidad 1525 - Col. San Luis (444) 814 2383
TORREON, COAH
Blvd. Independencia, 96 Pte. - Col. Centro (871) 716 5265
(667) 717 89 99
(33) 3825 6978
(55) 5588 9377
(818) 375 23 13
40
Page 43

VERACRUZ, VER
Prolongación Díaz Mirón #4280 - Col.
Remes
VILLAHERMOSA, TAB
Constitución 516-A - Col. Centro (993) 312 5111
PARA OTRASLOCALIDADES:
Si se encuentra en México, por favor llame al
(55) 5326 7100
Si se encuentra en U.S., por favor llame al
1-888-331-4569
(229) 921 7016
Póliza de Garantía
IDENTIFICACIÓN DELPRODUCTO:
Sello o firma delDistribuidor.
Nombre delproducto: __________________________
Mod./Cat.: ___________________________________
Marca: _____________________________________
Núm. deserie: ________________________________
(Datos para ser llenados por el distribuidor)
Fecha de compra y/o entrega delproducto:
___________________________________________
Nombre y domicilio del distribuidor donde se adquirió
elproducto:
___________________________________________
Este producto está garantizado por un año a partir de
la fecha de entrega, contra cualquier defecto en su
funcionamiento, así como en materiales y mano de obra
empleados para su fabricación. Nuestra garantía incluye
la reparación o reposición del producto y/o componentes
sin cargo alguno para el cliente, incluyendo mano de obra,
así como los gastos de transportación razonablemente
erogados derivados del cumplimiento de estecertificado.
Para hacer efectiva esta garantía deberá presentar su
herramienta y esta póliza sellada por el establecimiento
comercial donde se adquirió el producto, de no contar con
ésta, bastará la factura decompra.
Excepciones
Esta garantía no será válida en los siguientescasos:
• Cuando el producto se hubiese utilizado en condiciones
distintas a las normales;
• Cuando el producto no hubiese sido operado de acuerdo
con el instructivo de uso que se acompaña;
• Cuando el producto hubiese sido alterado o reparado
por personas distintas a las enlistadas al final de
estecertificado.
Anexo encontrará una relación de sucursales de servicio de
fábrica, centros de servicio autorizados y franquiciados en la
República Mexicana, donde podrá hacer efectiva su garantía
y adquirir partes, refacciones y accesoriosoriginales.
ESPAÑOL
Solamente para propósito deMéxico:
Importado por: Craftsman. Tool Co. S.A. de C.V.
Avenida Antonio Dovali Jaime, # 70 Torre B Piso 9
Colonia La Fe, Santa Fé
Código Postal : 01210
Delegación Alvaro Obregón
México D.F.
Tel. (52) 555-326-7100
R.F.C.: BDE810626-1W7
Registro en Línea
Gracias por su compra. Registre su producto ahorapara:
• SERVICIO EN GARANTÍA: Si completa esta tarjeta,
podrá obtener un servicio en garantía más eficiente, en
caso de que exista un problema con suproducto.
• CONFIRMATCIÓN DE PROPIEDAD: En caso de una
pérdida que cubra el seguro, como un incendio, una
inundacíon o un robo, el registro de propiedad servirá
como comprobante decompra.
• PARA SU SEGURIDAD: Si registra el producto,
podremos comunicarnos con usted en el caso
improbable que se deba enviar una notificación de
seguridad conforme a la Federal Consumer Safety
Act (Ley Federal de Seguridad de Productos para
elConsumidor).
Registro en línea en www.craftsman.com/registration.
Garantía Limitada de Cuatro Años
CRAFTSMAN reparará o reemplazará, sin cargo, cualquier
defecto debido a materiales o mano de obra defectuosos
por cuatro años desde la fecha de compra. Esta garantía
no cubre falla de partes debido al desgaste normal o
abuso de la herramienta. Para detalles adicionales de
la cobertura de la garantía e información de reparación
de garantía, visite www.craftsman.com o llame al
1-888-331-4569. Esta garantía no se aplica a accesorios o
daño causado cuando otros hayan realizado o intentado
reparaciones. ESTA GARANTÍA LIMITADA SE OTORGA EN
LUGAR DE TODAS LAS DEMÁS, INCLUIDA LA GARANTÍA
IMPLÍCITA DE COMERCIABILIDAD E IDONEIDAD PARA UN
PROPÓSITO EN PARTICULAR, Y EXCLUYE TODOS LOS DAÑOS
INCIDENTALES O EN CONSECUENCIA. Algunos estados no
permiten limitaciones sobre la duración de una garantía
implícita o la exclusión o limitación de daños incidentales
o en consecuencia, por lo que estas limitaciones pueden
no aplicarse en su caso. Esta garantía le da derechos legales
específicos y puede tener otros derechos que varían en
ciertos estados o provincias.
NOTA: La garantía del producto quedará nula si la
unidad de batería ha sido alterada de cualquier manera.
CRAFTSMAN no es responsable de ninguna lesión causada
por alteraciones y podría iniciar un procedimiento judicial
por fraude de garantía hasta el máximo grado permisible
por laley.
41
Page 44

ESPAÑOL
GARANTÍA DE REEMBOLSO DE SU DINERO
POR 90 DÍAS
Si no está completamente satisfecho con el desempeño
de su máquina herramienta o clavadora CRAFTSMAN,
cualquiera sea el motivo, podrá devolverlo hasta 90 días de
la fecha de compra con su recibo y obtener el reembolso
completo de su dinero – sin necesidad de responder a
ningunapregunta.
AMÉRICA LATINA: Esta garantía no se aplica a los
productos que se venden en América Latina. Para los
productos que se venden en América Latina, debe consultar
la información de la garantía específica del país que viene
en el empaque, llamar a la compañía local o visitar el sitio
Web a fin de obtener esainformación.
REEMPLAZO GRATUITO DE LAS ETIQUETAS DE
ADVERTENCIAS: Si sus etiquetas de advertencia se vuelven
ilegibles o faltan, llame al 1-888-331-4569 para que se le
reemplacengratuitamente.
SOLUCIÓN DE PROBLEMAS
PELIGRO: Para reducir el riesgo de lesiones personales serias, apague la unidad, retire la llave de seguridad y
retire los paquetes de batería antes de realizar cualquier ajuste o retirar/instalar conexiones o accesorios. Un
arranque accidental puede causarlesiones.
Si tiene alguna pregunta o comentario sobre esta o cualquier herramienta CRAFTSMAN, llámenos sin cargo al:
1-888-331-4569.
PROBLEMA SOLUCIÓN
La podadora no funciona cuando se
activa la manija de travesaño
El motor se detiene al cortar Libere la manija de travesaño para apagar la podadora. Retire la llave de seguridad y los paquetes de baterías.
La podadora funciona, pero
el desempeño de corte no es
satisfactorio, o no corta todo el césped
La podadora es muy difícil de empujar Libere la manija de travesaño para apagar la podadora. Retire la llave de seguridad y los paquetes de baterías.
La podadora es anormalmente ruidosa
y vibra
La podadora no recoge recortes con
la bolsa
Verifique que la llave de seguridad esté instalada y completamente asentada y que el botón del alojamiento del
interruptor esté completamente presionado antes de jalar de la manija de travesaño.
Libere la manija de travesaño para apagar la podadora. Retire la llave de seguridad y los paquetes de baterías,
voltee la podadora y verifique que la cuchilla pueda girar libremente.
Verifique que la cavidad de la batería no tenga residuos y que esté conectada correctamente.
¿Las baterías se cargaron por completo? Presione el botón de estado de carga.
Voltee la podadora y verifique que la cuchilla pueda girar libremente.
Eleve la altura de corte de las ruedas a la posición más alta y arranque la podadora.
Verifique que la cavidad de la batería no tenga residuos y que esté conectada correctamente.
¿Las baterías se cargaron por completo? Presione el botón de estado de carga.
Evite sobrecargar la podadora. Reduzca la velocidad de corte o aumente la altura de corte.
¿Las baterías se cargaron por completo? Presione el botón de estado de carga.
Libere la manija de travesaño para apagar la podadora. Retire la llave de seguridad y los paquetes de baterías.
• Voltee la cortadora y verifique:
• Filo de la cuchilla: mantenga la hoja afilada.
Cubierta y plataforma de descarga respecto a obstrucción.
El ajuste de la altura de la rueda puede ser demasiado bajo para la condición de la hierba. Eleve la altura de corte.
Aumente la altura de corte para reducir la resistencia de la plataforma en el césped. Verifique que cada rueda
tenga rotación libre.
Libere la manija de travesaño para apagar la podadora. Retire la llave de seguridad y los paquetes de baterías.
Voltee la podadora a un lado y revise la cuchilla para asegurarse de que no esté doblada ni dañada. Si la cuchilla
está dañada, reemplácela con una cuchilla de reemplazo CRAFTSMAN. Si la parte inferior de la plataforma está
dañada, devuelva la podadora a un centro de servicio autorizado CRAFTSMAN.
Si no hay daños visibles en la cuchilla y la cortadora aún vibra: Libere la manija de travesaño para apagar la
podadora. Retire la llave de seguridad y los paquetes de baterías. Desmonte todo el ensamble de la cuchilla como
se describe en la sección Desinstalación e instalación de la cuchilla. Retire cualquier suciedad y limpie cada
pieza. Reemplace cada pieza como se describe en la sección Desinstalación e instalación de la cuchilla. Si la
podadora aún vibra, devuelva la podadora a un centro de servicio autorizado por CRAFTSMAN.
Conducto obstruido. Libere la manija de travesaño para apagar la podadora. Retire la llave de seguridad y los
paquetes de baterías. Limpie el conducto de recortes de césped.
Aumente la altura de corte de las ruedas para acortar la longitud del corte.
Bolsa llena. Vacíe la bolsa más a menudo.
42
Page 45

Page 46

Page 47

Page 48

CRAFTSMAN BATTERY AND CHARGER SYSTEMS
Charger . Chargeur .
Cargadore de baterías
Battery
Output
Cat #
Voltage
CMCB6025 60 C
CMCB6050 60 C
CMCB6075 60 C
“C” Indicates that the battery pack is compatible with that specific charger. Read the instruction manual for more
specificinformation.
“C” indique que le bloc-piles est compatible avec ce chargeur. Lire le manuel d’utilisation pour obtenir des renseignements
plus précis.
Una “C” indica que el paquete de baterías es compatible con ese determinado cargador. Lea el manual de instrucciones para
obtener información más precisa.
* Maximum initial battery voltage (measured without a workload) is 60 volts. Nominal voltage is 54.
* La tension initiale maximum du bloc-piles (mesurée à vide) est de 60 volts. La tension nominale est de 54.
* El máximo voltaje inicial de la batería (medido sin carga de trabajo) es 60 voltios. El voltaje nominal es de 54.
Charger
CMCB602
CRAFTSMAN , 701 East Joppa Road, Towson, MD 21286
Copyright © 2018
10/18 Part No. N619431
 Loading...