

Page 1
OPERATOR′S MANUAL
MANUAL DEL USUARIO
60V MAX* LITHIUM-ION CORDLESS MOWER
PODADORA INALÁMBRICA DE
60 V MAX* Y BATERÍA DE LITIO
Model No. 151.98834
Modelo no 151.98834
CAUTION:
operator's manual before using this product.
PRECAUCIÓN:
comprender el manual antes de utilizar este producto.
Sears Brands Management Corporation, Hoffman Estates, IL 60179 USA
Visit the Craftsman web page: www.craftsman.com
Visite el sitio Web de Craftsman: www.craftsman.com
Used under license Usado bajo licencia
To reduce the risk of injury, the user must read and understand the
Para reducir el riesgo de lesiones, el usuario debe leer y
Save this manual for future reference
Conserve este manual para futura referencia.
* Maximum initial battery voltage (measured without workload) is 60 volts.
Nominal working voltage is 54 volts.
* La tensión inicial máxima de la batería (medida sin carga) es 60 voltios.
La tensión de trabajo nominal es 54 volts.
3084514
Page 2

TABLE OF CONTENTS / ÍNDICE DE CONTENIDO
ENGLISH
■ Warranty ...................................................................2
■ General Safety Rules ............................................3-6
■ Symbols .................................................................7-8
■ Features ...................................................................9
■ Assembly............................................................10-14
■ Battery Pack And Charger..................................14-16
■ Operation ...........................................................17-18
■ Care And Maintenance ......................................18-21
■ Environmentally Safe Battery Disposal...................22
■ Troubleshooting ......................................................23
■ Illustrated Parts List ...........................................24-26
■ Figure Numbers (Illustrations)................................i-vii
SPANISH
■ Garantía.................................Sección de Inglés pág2
■ Reglas generales de seguridad .............................3-6
■ Símbolos ...............................................................7-8
■ Características .........................................................9
■ Armado...............................................................10-14
■ Batería y cargador..............................................14-16
■ Funcionamiento .................................................17-18
■ Cuidado y mantenimiento ..................................18-21
■ Eliminación ambientalmente segura de la batería...22
■ Resolución de problemas .......................................23
■ Lista de piezas, ilustrada ...................................24-26
■ Números de las guras (ilustraciones)...................i-vii
WARRANTY /GARANTÍA
CRAFTSMAN LIMITED WARRANTY
FOR FOUR YEARS from the date of sale, this power tool is warranted against defects in
material or workmanship.
FOR TWO YEARS from the sale date a supplied battery pack or charger is warranted against
material or workmanship defects.
WITH PROOF OF SALE, a defective product will be replaced free of charge.
For warranty coverage details to obtain free replacement, visit the web page:
www.craftsman.com/warranty
This warranty does not cover the mower blade or collection bag, which are expendable parts
that can wear out from normal use within the warranty period.
This warranty is void if this product is ever used while providing commercial services or if
rented to another person.
This warranty gives you specic legal rights, and you may also have other rights which vary
from state to state.
Sears Brands Management Corporation, Hoffman Estates, IL 60179
GARANTÍA LIMITADA CRAFTSMAN
DURANTE CUATRO AÑOS a contar de la fecha de venta, esta herramienta está garantizada
contra defectos en sus materiales o fabricación.
DURANTE DOS AÑOS a contar de la fecha de venta, la batería o cargador incluido están
garantizados contra defectos en sus materiales o fabricación.
Un producto defectuoso puede reemplazarse por uno nuevo, de manera gratuita,
considerando que se presente una PRUEBA DE VENTA.
Para conocer la cobertura de la garantía y obtener un reemplazo gratuito, visite el sitio Web
www.craftsman.com/warranty
Esta garantía no cubre el aspa de la podadora ni la bolsa de recolección de polvo, las cuales
son piezas desechables que pueden desgastarse debido al uso normal dentro del periodo
de garantía.
La garantía se anula si el producto se usa para proporcionar servicios comerciales o si se le
arrienda a otra persona.
Esta garantía le entrega derechos legales especícos que pueden variar
(podría tener otros derechos adicionales).
Sears Brands Management Corporation, Hoffman Estates, IL 60179
* * *
según su estado
2 ― English
Page 3

GENERAL SAFETY RULES
WARNING!
This symbol indicates important safety
instructions. If these instructions are not
followed, it could endanger the personal
safety and/or property of the operator and
others. Read and understand all instructions
in this manual before attempting to operate
the mower. Failure to comply with these
instructions may result in personal injury.
DANGER
This mower was built to be operated
according to the rules for safe operation that
are contained in this manual. As with any
types of power equipments, carelessness or
errors on the part of the operator can result
in serious injury. This mower is capable of
amputating body parts and throwing objects.
Failure to observe the following safety rules
could result in serious injury or death.
WARNING!
Use of this mower should be restricted to
individuals who have read and understood
and will follow the warnings and instructions
that are printed in this manual and on the
mower.
■ Remove or disconnect the battery before
servicing, cleaning, or removing material from
the lawn mower.
■ Carefully read all instructions of the mower
in the manual before attempting to assemble
and operate the mower. Keep this manual in
a safe place for future reference, and consult
it regularly.
■ Do not use the lawn mower in damp or wet
conditions or in the rain.
■ Become familiar with all controls and their
proper operations. Know how to stop the
mower and how to disengage the power in an
emergency.
■ In order to avoid contact with the blade or
injury caused by a thrown object, stay in the
operating zone behind the handles, and keep
children and bystanders at least 50 ft. (15 m)
away from the mower while it is in operation.
!
Stop the motor immediately if someone
enters the mowing area.
■ Thoroughly inspect the area where the
mower is to be used. Remove all stones,
sticks, wire, bones, toys, and other objects
that could be tripped over or thrown by the
blade. Thrown objects can cause serious
personal injury.
■ Plan your mowing pattern in such a
way as to avoid discharging the material
toward roads, sidewalks, bystanders, etc.
Do not discharge material against a wall
or obstruction otherwise it may cause the
discharged material to ricochet back toward
the operator.
■ Always wear proper eye protection in
order to protect your eyes while operating or
performing any adjustments or repair. Thrown
objects that ricochet can cause serious eye
injury.
■ Always wear safety glasses with side
shields. Marked to comply with ANSI Z87.1,
along with hearing protection marked to
comply with ANSI Z87.1,along with hearing
protection. Daily glasses have only impact
resistant lenses. They are NOT safety
glasses. Following this rule will reduce
the risk of eye injury. Use a face mask if
operation is dusty.
■ Wear safety glasses or goggles that are
marked to comply with ANSI Z87.1 standard
when operating this product.
■ Always wear a face mask or a dust mask
when operating the mower in a dusty
environment.
■ Dress properly. Do not wear loose clothing
or jewelry that can get caught in moving
parts. The wearing of protective gloves and
safety footwear is recommended.
■ Many injuries occur as a result of the
mower being pulled over the operator’s foot
during a fall caused by slipping or tripping. Do
not operate this mower in bare feet, or while
wearing sandals or lightweight (e.g., canvas)
shoes. Do not hold on to the mower if you are
falling. Release the handle immediately.
3 ― English
Page 4

GENERAL SAFETY RULES
■ Never pull the mower back toward you
while you are walking. If you must back the
mower away from a wall or an obstruction,
rst look down and behind in order to avoid
tripping, and then follow these steps:
• Step back from the mower in order to fully
extend your arms.
• Be sure that you are well balanced.
• Pull the mower back slowly.
■ Do not use the mower for any jobs except
that for which it is intended. Do not force the
mower.
■ Do not operate the mower while under the
inuence of alcohol or drugs.
■ Stay Alert: Do not operate the mower when
you are tired. Pay attention to what you are
doing.
■ Do not put hands or feet near rotating parts
or under the cutting deck. Contact with the
blade can amputate hands and feet.
■ Keep hands and feet away from the cutting
area.
■ Do not attempt to adjust the wheels or the
cutting height while the motor is running.
■ Avoid dangerous environments. Do not
operate the mower in the rain or in wet or
damp grass.
■ Mow only in daylight or in good articial
light. Do not rush a mowing job.
■ Stop the blade when crossing gravel
driveways, walkways, or roads.
■ If the mower starts to vibrate excessively,
stop the motor and check for the cause
immediately. Vibration is generally a warning
of trouble.
■ Stop the motor and wait until the blade
comes to a complete stop before the
collection bag or unclogging the chute. The
cutting blade will continue to rotate for a few
seconds after the motor is shut off. Do not
place any parts of your body in the blade area
until you are sure that the blade has stopped
rotating.
■ Never operate mower without a proper trail
shield, discharge cover, collection bag, switch
control, or other safety device in place and in
working order. Do not operate the mower with
damaged safety devices otherwise it can
result in injury.
CHILD SAFETY
■ Tragic accidents can occur if the operator is
not aware of the presence of children.
■ Keep children out of the mowing area and
under the watchful care of a responsible
adult.
■ Do not allow children under the age of
14 to operate this mower. Children who are
14 years of age and older must read and
understand the operating instructions and
safety rules in this manual, and must be
trained and supervised by a parent.
■ Stay alert, and turn the mower off if a child
or any other person enters the mowing area.
■ Use extreme care when approaching blind
corners, doorways, shrubs, trees, or other
objects that may obscure your view of a child
who may run into the path of the mower.
CAUTION
USE ONLY Craftsman APPROVED
REPLACEMENT BATTERIES, OTHER
BATTERIES MAY CAUSE INJURY OR
DAMAGE TO THE MOWER.
Use with Craftsman 60V Lithium-lon battery.
BATTERY SAFETY RULES
■ The battery tools do not have to be plugged
into an electrical outlet; therefore, they are
always in operating condition. Be aware of
possible hazards when not using your battery
tool or when changing accessories. Following
this rule will reduce the risk of electric shock,
re, or serious personal injury.
■ Do not place battery tools or their batteries
near re or heat. This will reduce the risk of
explosion and possible injury.
■ Do not crush, drop or damage battery pack.
Do not use a battery pack or charger that has
4 ― English
Page 5

GENERAL SAFETY RULES
been dropped or received a sharp blow. A
damaged battery is subject to explosion.
Properly dispose of a dropped or damaged
battery immediately.
■ Batteries can explode in the presence of
a source of ignition, such as a pilot light. To
reduce the risk of serious personal injury,
never use any cordless products in the
presence of open ame. An exploded battery
can propel debris and chemicals. If exposed,
ush with water immediately.
■ Do not charge battery tool in a damp or wet
location. Following this rule will reduce the
risk of electric shock.
■ For best results, your battery tool should be
charged in a location where the temperature
is more than 35.6°F but less than 109.4°F. To
reduce the risk of serious personal injury, do
not store outside or in vehicles.
■ Under extreme use or temperature
conditions, battery leakage may occur. If
liquid comes in contact with your skin, wash
immediately with soap and water. If liquid
gets into your eyes, ush them with clean
water for at least 10 minutes, then seek
immediate medical attention. Following this
rule will reduce the risk of serious personal
injury.
■ When the battery pack is not in use,
keep it away from other metal objects like:
paper clips, coins, keys, nails, screws, or
other small metal objects that can make a
connection from one terminal to another.
Shorting the battery terminals together may
cause sparks, burns, or a re.
■ Always remove the battery pack from
your tools when you are assembling parts,
making adjustments, cleaning, or when not in
use. Removing the battery pack will prevent
accidental starting that could cause serious
personal injury.
■ Always remove the battery pack before
storing the device. When battery becomes
fully charged, unplug the charger from the
power supply and remove the battery pack
from the charger.
■ Keep battery pack dry, clean, and free
from oil and grease. Always use a clean
cloth when cleaning. Never use brake uids,
gasoline, petroleum-based products, or any
solvents to clean the battery pack.
BATTERY & CHARGER
CAUTION
USE ONLY Craftsman APPROVED
REPLACEMENT BATTERIES, OTHER
BATTERIES MAY CAUSE INJURY OR
DAMAGE TO THE MOWER. Use only with
Craftsman model 71.9883 or 71.98838 60V
Lithium-ion battery packs.
Ensure that the device is switched off before
inserting the battery. Inserting a battery into a
power tool that is switched on may result in
accidents.
Recharge the batteries indoors only because
the battery charger is designed for indoor use
only.
To reduce the electric shock hazard, unplug
the battery charger from the outlet before
cleaning the charger.
Do not subject the battery to strong sunlight
over long periods and do not leave it on a
heater.
Heat damages the battery and there is a risk
of explosion.
Allow a hot battery to cool before charging.
Do not open up the battery and avoid
mechanical damage to the battery. Risk of
short circuit and fumes may be emitted that
irritate the respiratory tract. Ensure fresh air
and seek medical assistance in the event of
discomfort.
Do not use non-rechargeable batteries!
The device must not be used by people
(including children) with limited physical,
sensory or mental faculties, or who lack the
necessary experience and/or knowledge, or
they are supervised by a person responsible
for safety or are being instructed to operate
the appliance by such a person.
5 ― English
Page 6

GENERAL SAFETY RULES
Children must be supervised in order
to ensure that they do not play with the
equipment.
To charge the battery, use only the charger
supplied. This ensures that the safety of the
device is maintained.
Before each use, check the charger, cable
and plug and have them repaired by qualied
professionals and only with original parts. Do
not use a defective charger and do not open
it up by yourself. This ensures that the safety
of the device is maintained.
Connect the charger only to a socket that
is grounded. Ensure that the outlet voltage
matches specications on the charger rating
plate.
Disconnect the charger from the outlet before
closing or opening connection to the battery /
power tool /device.
Keep the charger clean and away from wet
and rain. Do not use the charger outdoors.
Dirt and the entry of water increase the risk of
electric shock.
Operate the charger only with the appropriate
original batteries. Charging other batteries
may result in injuries and risk of re.
Avoid mechanical damage to the charger.
This can result in internal short circuits.
Do not operate the charger on a combustible
surface (e.g. paper, textiles). The risk of re
may occur due to heating.
If the power cord for this equipment is
damaged, it must be replaced by the
manufacturer, a customer service agent
of the same or qualied person in order to
prevent hazards.
The battery of the appliance is not fully
charged at the time of delivery. It therefore
needs to be fully recharged before you use it
for the rst time. For the rst recharge cycle,
charge the battery pack fully. Slot the battery
into the base and plug the battery charger
into an outlet. When the battery is fully
charged, unplug the charger from the outlet
of the appliance.
Charging time is approx. 85 min. Do not
charge the battery continuously since this
may damage the battery cells.
NOTE: Repeatedly charging small capacities
may damage the battery cells. Recharge
the battery only if the appliance is becoming
slow. Do not use the charger to charge nonrechargeable batteries.
WARNING!
Changes or modications to this unit not
expressly approved by the party responsible
for compliance could void the user’s authority
to operate the equipment.
This equipment has been tested and
NOTE:
found to comply with the limits for a Class B
digital device, pursuant to Part 15 of the FCC
Rules. These limits are designed to provide
reasonable protection against harmful
interference in a residential installation.
This equipment generates, uses and can
radiate radio frequency energy and, if not
installed and used in accordance with the
instructions, may cause harmful interference
to radio communications. However, there is
no guarantee that interference will not occur
in a particular installation. If this equipment
does cause harmful interference to radio or
television reception, which can be determined
by turning the equipment off and on, the
user is encouraged to try to correct the
interference by one or more of the following
measures:
■ Reorient or relocate the receiving antenna.
■ Increase the separation between the
equipment and receiver.
■ Connect the equipment into an outlet on a
circuit different from that to which the receiver
is connected.
■ Consult the dealer or an experienced radio/
TV technician for help.
6 ― English
Page 7
SYMBOLS
Some of the following symbols may be used on this product. Please study them and
learn their meaning. Proper interpretations of these symbols will allow you to operate the
product better and safer.
NOITANALPXE/NOITANGISEDEMANLOBMYS
V
Volts
Voltage
Type or a characteristic of currentDirect Current
A
zH
W
srh
Amperes
Hertz Frequency (cycles per second)
Watt
Hours
Class II Construction
Safety Alert
Read The Operator’s Manual
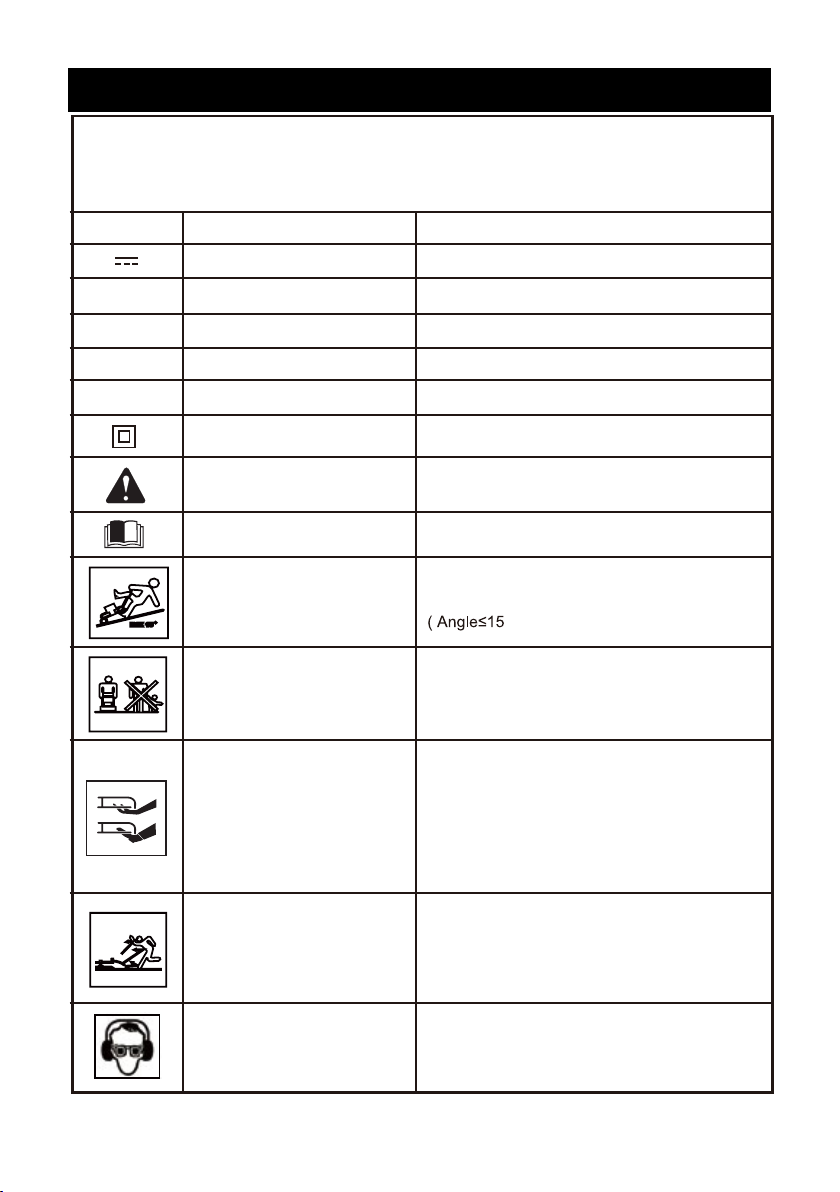
Do not mow up and down
slopes!
Keep all persons and pets
at a safe distance from the
mower while operating!
Keep hands and feet clear of
mower deck and discharge
opening at all times!
Stay behind the handle when
the motor is running!
Current
Power
Time
Double-insulated construction
Precaution that involves your safety.
You must read the operating instructions carefully.
To avoid the risk of injury, do not mow up and
down slopes. Always mow across slopes.
)
°
To avoid the risk of injury to bystanders, keep
all persons and pets at a safe distance from
the mower while operating.
Rotating blades can cause serious injury.
Keep hands and feet clear of mower deck and
discharge opening at all times. Always be sure
blade has stopped after releasing switch lever
and unplugging before removing and replacing
collection bag, cleaning, servicing, transporting
or lifting the mower.
Objects struck by mower blade can cause serious
injury. Stay behind the handle when the moto
is running. Always ensure persons and pets
are clear of the discharge from the mower while
operating.
Wear hearing and eye
protection when operating this
equipment.
7 ― English
Safety Alert Precautions that involve your safety.
Page 8
SYMBOLS
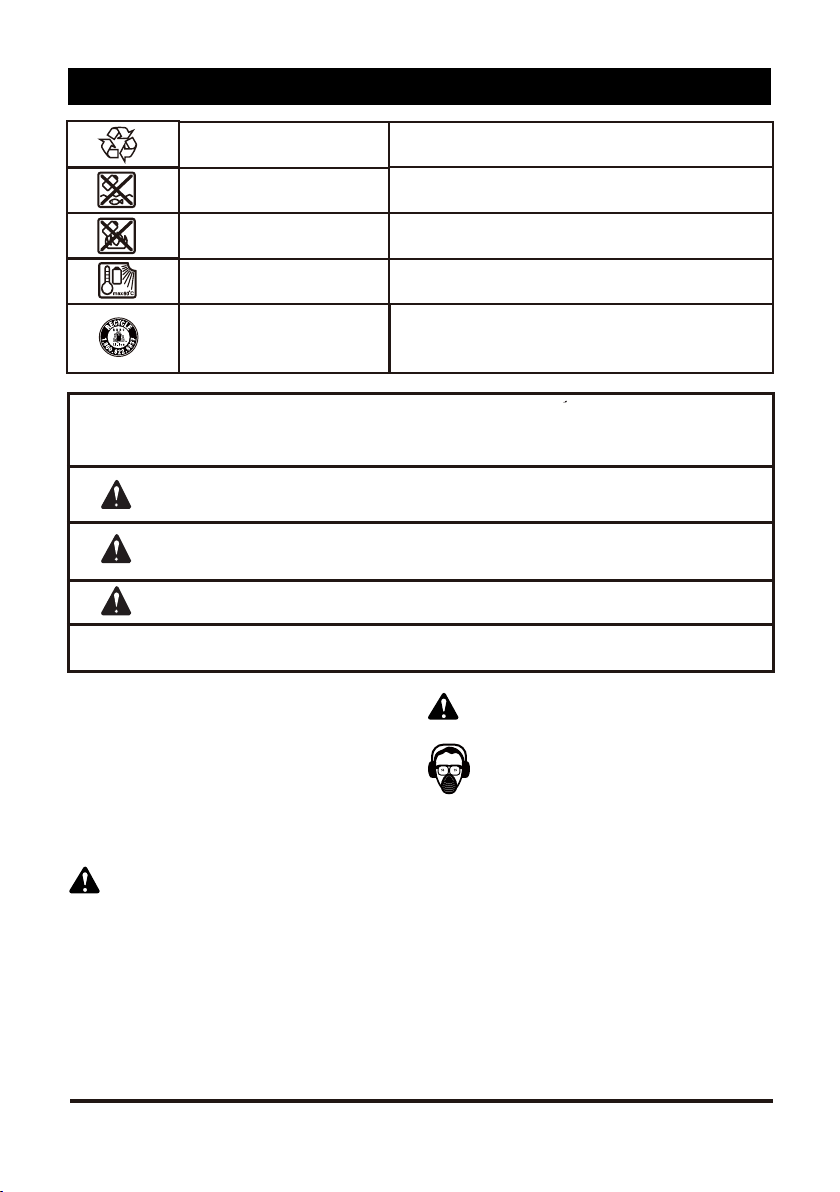
Lithium-Ion Battery
Recycling
Keep Away From Water
Keep Away From Fire
Heat Alert
Recycle Symbol
The following signal words and meanings are intended to explain the levels of risk associated with this
product.
SYMBOL SIGNAL MEANING
DANGER:
WARNING:
CAUTION:
CAUTION:
SERVICE
Servicing requires extreme care and
knowledge and should be performed only
by a qualied service technician. For service
we suggest you return the product to your
nearest SERVICE CENTER for repair. When
servicing, use only identical replacement
parts.
WARNING!
To avoid serious personal injury, do not
attempt to use this product until you read
thoroughly and understand completely the
operator’s manual. If you do not understand
the warnings and instructions in the
operator’s manual, do not use this product.
Call customer service for assistance.
Indicates an imminently hazardous situation, which, if not avoided,
will result in death or serious injury.
Indicates a potentially hazardous situation, which, if not avoided,
could result in death or serious injury.
Indicates a potentially hazardous situation, which, if not avoided, may
resulti n minor or moderate injury.
(Without Safety Alert Symbol) Indicates a situation that may result in
property damage.
Designates that this tool is in compliance with
Lithium-Ion battery recycling program requirements
Do not dispose of battery packs in rivers or
immerse in water
Do not dispose of battery packs in fire.
They will explode or leak and cause injury.
Do not expose battery packs to heat in excess
of 60ºC (140ºF).
This product uses lithium-ion batteries. Local, state, or
federal laws may prohibit disposal of batteries in ordinary
trash. Consult your local waste authority for information
regarding available recycling and/or disposal options.
WARNING!
The operation of any power tools can
result in foreign objects being thrown
into your eyes, which can result in severe
eye damage. Before beginning power tools
operation, always wear safety goggles or
safety glasses with side shields and, when
needed, a full face shield. We recommend
Wide Vision Safety Mask for use over
eyeglasses or standard safety glasses with
side shields. Always use eye protection which
is marked to comply with ANSI Z87.1.
8 ― English
Page 9

FEATURES
PRODUCT SPECIFICATIONS
Type .…………………....................................................................................................... Cordless, battery-powered
No-load Speed ……………….....................Auto level-3200rpm / 1level-3200rpm / 2level3300rpm / 3level 3400rpm
Deck Width ………………....................................................................................................................19 inch (48cm)
Cutting Width ……………….................................................................................................................18 Inch (46cm)
Cutting Height Adjustments………………................................................................. 6 Positions (1"-3.4") (35-85mm)
Functions ………………............................................................................. 3-in-1: Mulch, Rear Bag, Side Discharge
Wheel Size ………………......................................................................................... 6.70" (170mm) / 9.25" (235mm)
Unit Weight (With 5.0Ah Battery) ……………….............................................................................. 42.8 Lbs (19.4kg)
BATTERY
Model No .....................................................................................................................71.98838
Type ............................................................................................60V MAX* Lithium-Ion, 5.0Ah
CHARGER
Model No............................................................................................................................................. 60LFC02-ETL
Rated Input Voltage .............................................................................................................................. 120V ~ 60Hz
Rated Output ................................................................................................................................................. 60V DC
Rated Output Current ............................................................................................................................................ 4A
Charging Time ......................................................................................................................... 85min (For 71.98838)
* Maximum initial battery workload voltage (measured without a workload) is 60 volts. Nominal voltage is 54
volts. This product could use the 60V MAX Lithium-Ion, 2.0Ah battery. Model No. 71.98833.
Ah = Amp hours
KNOW YOUR LAWN MOWER
See Figure 1, page i
The safe use of this product requires an
understanding of the information on the
product and in this operator’s manual as
well as a knowledge of the project you
are attempting. Before use of this product,
familiarize yourself with all operating features
and safety rules.
1. Start/stop Bale Switch
2. Safety Switch Button
3. Upper Handle Bar
4. Handle Locking Clips X2
5. Lower Handle Bar
6. Locking Levers X2
7. Mower Carry Handle
8. Battery Compartment Cover
9. Side Discharge Door
9a. Side Discharge Chute
10. Front Wheels
11. Front Bumper Guard/Handle
12. Deck
13. Cutting Height Adjustment Lever
14. Rear Wheels
15. Collection Bag
9 ― English
16. Safety Flap
17. Mulching Plug
18. Foam Grip
19. Safety Key
(Inside the Battery Pack Compartment)
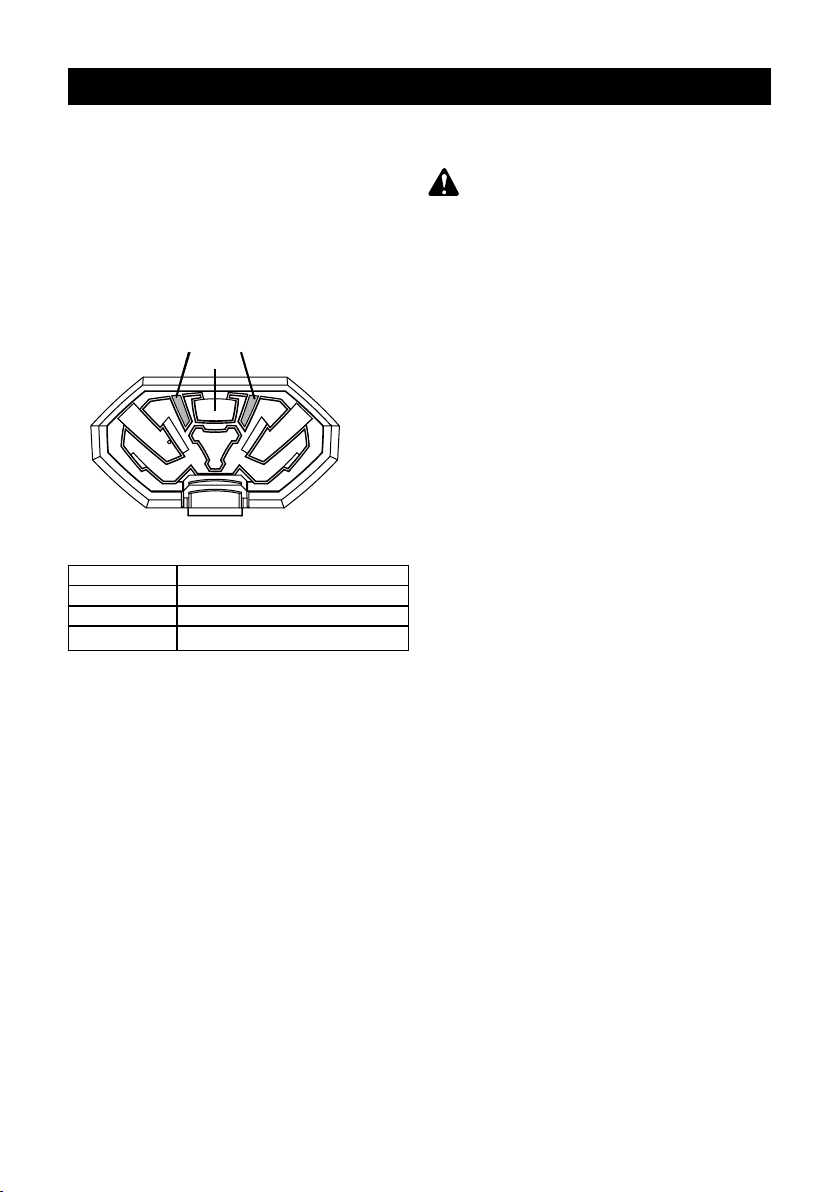
20. iPower Control Panel
20a. iPower Mower Mode Indicator
20b. iPower Battery Meter Indicator
21. Battery Pack
22. Battery Charger
NOTE: the above parts and their associated
number/letters will be used throughout this
manual to identify parts.
BRUSHLESS MOTOR
This lawn mower features a brushless motor,
which may improve run time. Also, there are
no brushes in the motor that may wear down
over time and require replacement.
Page 10

ASSEMBLY
UNPACK
This product requires assembly.
■ Carefully remove the product and any
accessories from the box. Make sure that all
items listed in the packing list are included.
■ Inspect the product carefully to make sure
no breakage or damage occurred during
shipping.
■ Do not discard the packing material until
you have carefully inspected and satisfactorily
operated the product.
YOU WILL NEED (ITEMS NOT SUPPLIED)
■ Screwdriver, at head
■ Suitable personal protective equipments.
PACKING LIST
Mower
Safety Key (Attached inside the Battery Pack
Compartment of Mower)
Mulching Plug - Comes installed from factory
at rear of mower
Grass Collection Bag Assembly (Bag & Metal
Frame)
Side Discharge Chute
Battery Charger
60V Lithium-Ion Battery
Operator’s Manual
NOTE: The safety key must be installed for
mower to operate. The safety key only ts
into the switch in one direction. DO NOT
FORCE IT!
WARNING!
If any parts are damaged or missing, do
not operate this product until the parts are
replaced. Failure to heed this warning so
could result in serious personal injury.
Do not attempt to modify this product or
create accessories not recommended for use
with this product.
Any such alterations or modications of this
product are misused and could result in a
hazardous condition leading to possible
serious personal injury.
Do not connect power supply until assembly
is complete. Failure to comply could result
in accidental starting and possible serious
personal injury.
Never operate the mower without the proper
safety devices in place and working. Never
operate the mower with damaged safety
devices. Failure to heed this warning can
result in serious personal injury.
ASSEMBLING THE COLLECTION BAG
See Figures 2-3, page ii
Your Craftsman comes with a Dust Blocker
collection bag. The Dust Blocker fabric
prevents dust from blowing through it during
mower operation.
To assemble:
■ Check the collection bag before assembling
to make sure there is no damage.
■ Pull the collection bag over the steel frame
as shown. Be sure to insert the frame handle
through the slot in the top of the bag so that
the handle is on the outside.
■ With your ngers or a at blade screwdriver,
pry open the plastic clamping sleeves. Clamp
the sleeves over the top, bottom and side
rods of the steel frame as shown.
NOTE: If you use screwdriver to assist in
prying, be careful not to tear bag fabric
10 ― English
Page 11

ASSEMBLY
INSTALLING THE COLLECTION BAG
See Figure 4, page ii
NOTE: When using the collection bag, do
not install the mulching plug (17). The
mulching plug MUST be removed prior to
installing the collection bag. See Attaching/
Removing Mulching Plug section.
■ Use one hand to raise and hold the rear
safety ap (16) all the way up.
■ Lift the collection bag by its handle, and
hook the connection tips into the bag frame
holder slots.
■ Release the rear safety ap.
■ Make sure that both connection tips are
rmly seated in the holder slots and that the
rear safety ap rests rmly against the top of
the collection bag.
CAUTION: During normal use, the bag
material is subject to wear. To reduce the risk
of injury, frequently inspect the bag assembly
and replace if there are any signs of wear or
deterioration.
INTENDED USE
This cordless lawnmower is designated for
use with Craftsman 60V Lithium-Ion batteries.
The product is intended for mowing and
mulching grass in domestic yards only. It
must not be used for mowing unusually high,
dry or wet grass, e.g. pasture grass, or for
shredding leaves. This product is intended
for private domestic use only, not for any
commercial trade use. It must not be used for
any purposes other than those described.
HANDLE TILT ADJUSTMENT
See Figures 5-7, page ii
After installing battery pack, adjust handle to
working position to operate mower.
The parking position is an intermediate
position, which is used to empty the collection
bag. Stop the machine before switching to
this position.
The storage position is used to store the
product in a space-saving manner when not
in use. Stop the machine and remove the
battery pack before switching to this position.
■ When the mower is removed from the
shipping box the handle bar is in the storage
position.
■ Simultaneously press and hold the Quick
Adjust Levers at the base of both handle
bars to release handle from storage position.
Raise the handle and rotate all the way back
into working position.
■ To pivot handle to parking position, press
the levers and push the handle forward until
it is caught by and rests against the detention
points on the handle brackets.
HANDLE BAR HEIGHT ADJUSTMENT
See Figures 8-9, page iii
To adjust the height for working:
■ Rotate handle bar into working position.
■ The mower has 2 operation height
working positions. Choose the position most
comfortable to you. To adjust the height,
grasp the handle by the top bar and pull all
the way up. You may lock the handle at this
height by closing the locking clips (4).
■ When you pull the handle all the way up,
you will notice a set of holes for the lower
height position. Lower the handle for this hole
set to be aligned with the locking clip pins.
Lock into position by closing the clips.
11 ― English
Page 12

ASSEMBLY
locking clips and adjust the handle bar to
the middle designed position, then close the
locking clips.
To adjust height for storage:
■ Stop the mower and remove the battery
pack.
■ Unlock both locking clips, and push the
handle down as far as it will go.
■ Simultaneously press and hold both Quick
Adjust Levers and rotate the handle all the
way forward until it stops. Release levers to
secure handle in storage position.
SETTING CUTTING HEIGHT
See Figure 10, page iii
WARNING
Do not at any time make any adjustments to
the lawn mower without rst stopping the
motor and removing the safety key. Keep
your feet away from the deck when adjusting
its height.
When shipped, the rear wheels (14) on the
mower are set to a low-cutting position.
Before using the mower for the rst time,
adjust the cutting position to the height best
suited for your lawn.The mower can be set to
6 cutting heights between 1.4” (35mm) and
3.4” (85mm). 6 is the highest setting,
1 is the lowest. Choose the proper cutting
height according to the types and conditions
of the grass.
To set the cutting height:
■ To raise the cutting height, grasp the
cutting height adjustment lever (13), shift it
to the side out of its position slot, and move
it toward the back of the the mower. Engage
the lever shaft into the new position slot.
■ To lower the cutting height, grasp the
cutting height adjustment lever (13), shift it
to the side out of its position slot, and move
it toward the front of the the mower. Engage
the lever shaft into the new position slot.
12 ― English
Page 13

ASSEMBLY
COLLECTION BAG VIEW WINDOW
See Figure 11, page iii
■ The collection bag (15) is equipped with a
clear view window through which you can
observe the lling condition during the
mowing process.
■ Empty the collection bag when through the
window you observe that the bag is nearly
full.
EMPTYING
■ Grasp the collection bag by its handle and
lift to remove from mower.
■ Empty grass clippings.
■ Lift the safety ap (16) and reinstall the
collection bag as described earlier in this
manual.
ATTACHING/REMOVING THE
MULCHING PLUG
See Figures 12-14, page iv
WARNING
Do not at any time make any adjustments to
the lawn mower without rst stopping the
motor and removing the safety key (19). Do
not attach the collection bag (15) and the
mulching plug (17) at the same time.
The mulching plug allows the grass clippings
to be deposited back on the lawn during
cutting. To install plug:
■ Lift the safety ap (16) and detach the
grass collection bag.
■ Lift and hold the safety ap up with one
hand.
■ With other hand grasp plug by its upright
handle and insert the plug into the rear
discharge chute. Ensure that the locking latch
snaps into place as shown in Fig. 13.
The mulching plug MUST be removed if
collection bag is used. To remove plug:
■ Lift and hold the safety ap up with one
hand.
■ With other hand squeeze the plug upright
handle to release the locking latch. Pull the
plug up and out of the discharge chute.
INSTALLING THE SIDE DISCHARGE
CHUTE
See Figure 15, page iv
WARNING
Do not at any time make any adjustments to
the lawn mower without rst stopping the
motor and removing the safety key (19).
The mower is designed to dispense clippings
back to the lawn (mulching plate installed)
or to gather clippings in the collection bag
(mulching plate removed). However, you may
choose to discharge the clippings to the side
of the mower as you mow, which requires
the installation of the side discharge chute
and removal of the collection bag. Also, to
improve side discharge, install the mulching
plug.
To install the side discharge chute:
■ Pull up and hold the side discharge door in
fully raised position.
■ Hook the slots in the tabs on the top of the
chute onto the hinge bar on the underside of
the discharge door.
■ Lower the side discharge door. The tension
of the hinge spring will keep the chute in
place.
13 ― English
Page 14

ASSEMBLY
INSTALLING / REMOVING THE
BATTERY PACK
See Figures 16-17, page iv
WARNING
If any parts are broken or missing, do not
attempt to attach the battery pack to the
mower or operate the mower until the broken
or missing parts are replaced. Failure to do so
could result in serious injury. Do not connect
the battery and/or the safety key before the
product is completely assembled.
To install battery pack:
■ Align the groove on each side of the battery
with the edges of the terminal plate in the
compartment.
■ Slide the battery pack onto the terminal
plate until it secures into place.
■ Do not use force when inserting the battery
pack. It should slide into position and "click."
BATTERY PACK AND CHARGER
BATTERY CHARGING
■ Use only with 60V Craftsman battery
chargers. The battery charger supplied is
specically designed for the Lithium-Ion
battery used in this tool.
■ Check the power voltage! Battery chargers
operate on 120 V.
■ Charge the battery between 35.6°F and
109.4°F. This ensures an optimum battery
service life.
■ Close the battery compartment cover (8).
Make sure that the safety key is inserted into
the front corner of the compartment before
closing cover.
NOTE: Make sure that battery pack rmly
snaps into place and is secured to the mower
before starting operation.
To remove battery pack:
■ Stop the machine. Lift the battery
compartment cover (8) and remove the safety
key (19).
■ Press the release button on the battery
pack (21), grasp the battery pack rmly and
pull out of the battery compartment (Fig. 16).
■ Close the battery compartment cover (8)
(Fig. 17).
■ Protect the battery from heat, from
continuous exposure to sun and keep away
from radiation or other heat sources. Do not
leave the battery in the tool in direct sunlight
over long periods.
■ The battery is supplied uncharged. Fully
charge the battery before using the tool for
the rst time. The Lithium-Ion battery can
be charged at any time without reducing
its service life. Interrupting the charging
procedure does not affect the battery.
14 ― English
Page 15
BATTERY PACK AND CHARGER
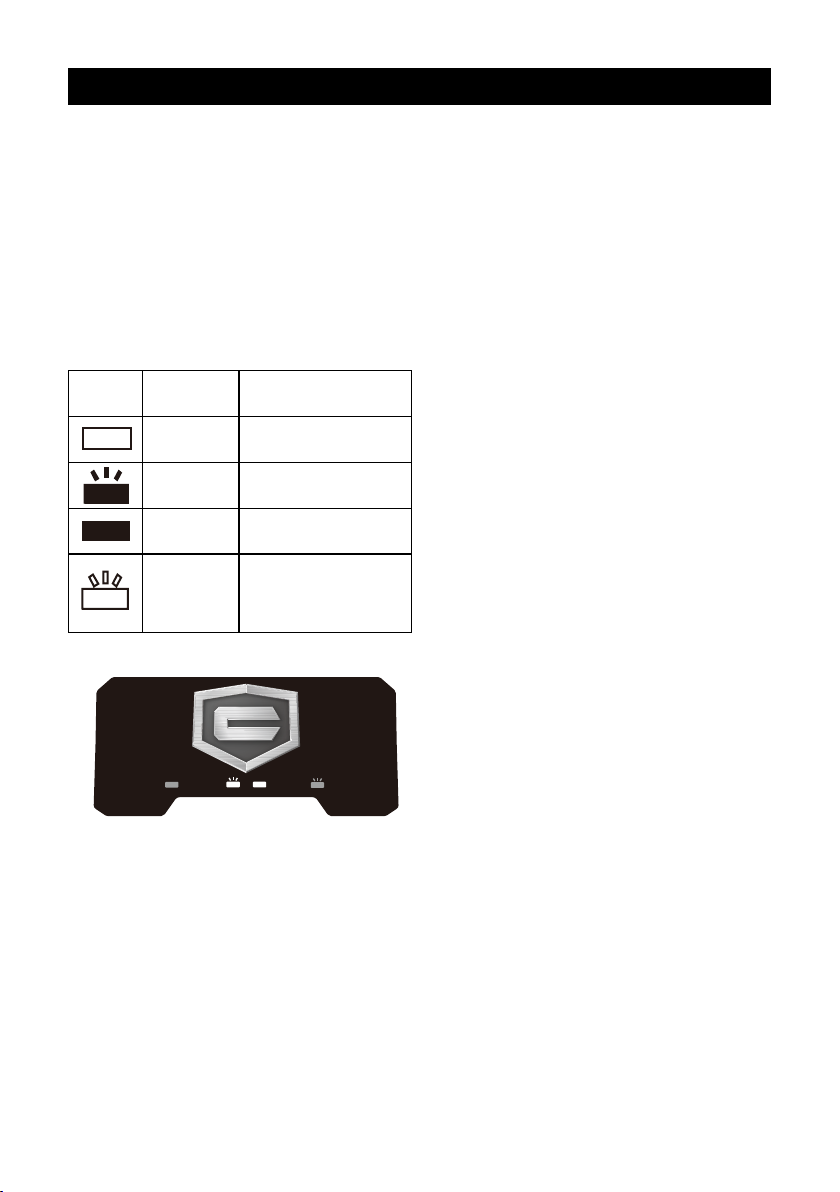
CHARGER LEDS
■ If the battery is not inserted into the
charger, a continuous red LED light indicates
that the plug is plugged into an outlet socket
and the battery charger is ready for operation.
■ Charging: a ashing green LED on the
charger indicates that the battery is charging
normally.
■ Charged: continuous green LED on the
charger indicates that the battery is ready for
use.
SYMBOL
INDICATOR
LIGHTS
Red,
Continuous
Green,
blinking
Green,
continuous
Red,
blinking
STATUS
Connected to power
supply
Charging
Fully charged
Charging problem:
See Technical Issue
in CHARGER LEDS
Charger Indicator Panel
■ Technical Issue: a ashing red LED light on
the charger indicates that battery pack has a
charging problem or might be defective.
- One possible condition is the battery
temperature is not within the charging
temperature range of 35.6°F - 109.4°F or
the charging current is too high. As soon as
the permitted temperature and the charging
current ranges are reached, the battery
charger will automatically switch to charging.
- If the temperature range and charging
current are correct and ashing red LED
light continues, then remove and reinstall
the battery pack. If the LED status repeats a
second time, try to charge another identical
battery. If the battery charges normally,
dispose of the defective battery pack (see
Environmental Safe Battery Disposal section).
- If the ashing red light continues after
installing the second battery, the charger may
be defective. Replace with a new one.
■ After continuous or repeated charging
cycles without interruption, the charger
may warm up. This is normal and does not
indicate a technical defect of the battery
charger.
Connected
To Power
Charging
Fully
Charged
Technical Issue
(see manual)
15 ― English
Page 16
BATTERY PACK AND CHARGER
BATTERY LED PANEL
■ The panel consists of 2 LEDs on the face
of the battery. Press the panel button for the
LEDs to show you the charge level of the
battery.
■ The battery charge level can be checked
when the battery is attached or removed from
the mower.
Power Indicator LEDs
Button
BATTERY LEDS
COLOR BATTERY CAPACITY
Green 50%~100 %
Orange 25%~ 50%
Red 0-25% (Recharge required)
CHARGING BATTERY PACK
See Figure 19, page iv
WARNING!
■ If any part of the charger is missing or
damaged, do not operate it! Replace the
charger with a new one. Failure to heed this
warning could result in possible serious injury.
■ Check the voltage! The voltage must
comply with the information on the rating
label.
BATTERY CHARGING PROCEDURE
■ Align the two slots on the underside of
the battery pack with the two edges of the
terminal plate on the side of the charger
body. Slide battery pack down until it locks
into place.
■ Connect the charger to the power supply.
■ Allow sufcient charging time (see Product
Specications), and then disconnect the
charger from the power supply.
■ Press the release button on the battery
pack and remove it from the charger.
It is normal for the battery pack and
NOTE:
charger to become warm (but not hot) during
charging process. If the battery does not
charge properly, check to make sure the
electrical outlet is operational. Always charge
the battery before storage!
16 ― English
Page 17

OPERATION
STARTING / STOPPING
See Figures 20-22, page v
■ To start motor, insert the safety key (19)
in the battery compartment and close
compartment cover.
■ Press in the safety button (2) with one
hand, and with other hand pull back the start/
stop bale switch (1). The safety button will
remain depressed.
■ To stop the mower motor, release the start/
stop bale switch (1). Remove the safety key
from the battery compartment if the mower is
not going to be used immediately.
iPOWER SPEED INDICATOR
See Figure 18, page iv
Located on upper mower handle
■ By default the motor power is set to AUTO
to automatically adjust to variations in lawn
texture as you mow. However, you may
set the motor power to one of three xed
settings.
■ Press the Speed button to cycle through
the different motor power levels.
• Set the motor power to 1, if your lawn
needs only light mowing.
• Set it to 2, if you are going to mow taller
and thicker grass.
• Set it to 3 to utilize the maximum motor
power for mowing the most stubborn grass.
iPOWER CHARGE INDICATOR
See Figure 18, page iv
■ Press the Charge button to check on the
battery status.
■ The number of lights lit will indicate
the remaining charge left in the battery.
CAUTION
A ashing LED on the cutting mode control
panel indicates that the current is too high.
A ashing LED on the battery indicates that
the voltage is too low. In either case the
motor will be shut down automatically. Do not
continue to activate the On/Off switch if the
motor has been shut down automatically. The
battery may be damaged.
GENERAL OPERATION
Check the mower before each use to make
sure that no components are damaged
and that all power connections are secure.
If damage is present, replace damaged
components before further use.
■ Double check that the blade is properly
installed.
■ Always operate the mower with both hands
on the handle. Keep the handles dry so that
hands do not slip off.
■ Switch the product off immediately if you
are disturbed while working by other people
entering the working area. Always let the
product come to complete stop before
removing the grass collection bag.
■ Do not overwork yourself. Take regular
breaks to ensure you can concentrate on the
work and have full control over the mower.
17 ― English
Page 18

OPERATION
MOWING
See Figure 23, page v
■ Make sure the lawn is clear of stones,
sticks, wires, and other objects that could
damage the lawn mower blades or motor.
Such objects could be accidentally thrown by
the mower in any direction and cause serious
personal injury to the operator and others.
■ For a healthy plot of grass, always cut off
one-third or less of the total length of the
grass blades.
■ When cutting heavy grass, reduce walking
speed to allow for more effective cutting and
a proper mulching or discharge of the
clippings.
■ Do not cut wet grass. It will stick to the
underside of the deck (12) and prevent
proper mulching or discharge of grass
clippings.
CARE AND MAINTENANCE
WARNING
When servicing, use only identical
replacement parts. Use of any other parts
may create a hazard or cause the product
damage.
WARNING
Always wear safety goggles or safety glasses
with side shields during the operation of this
mower. If the operation is dusty, also wear a
dust mask.
GENERAL MAINTENANCE
Avoid using solvents when cleaning plastic
parts. Most plastics are susceptible to
damage from various types of commercial
solvents and may be damaged by their use.
Use clean cloths to remove dirt, dust, oil,
grease, etc.
■ New or thick grass may require a narrower
cutting swath.
■ Clean the underside of the mower deck (12)
after each use to remove grass clippings,
leaves, dirt, and any other accumulated
debris. Mow in slight overlapping rows. The
most effective pattern for mowing lawns is
straight lines parallel to one of the sides.
This will keep the rows even and ensure that
all the lawn is cut without missing any spots
(Fig.23).
AFTER USE
■ Switch the product off, remove the battery
pack (21) and let it cool down.
■ Check, clean and store the mower as
described in Storing The Mower in the Care
And Maintenance section of this manual.
WARNING
Do not use any attachment or accessories not
listed in this manual. The use of attachments
or accessories not listed in this manual can
result in serious personal injury.
■ Do not at any time make any maintenance
to the lawn mower without rst stopping
the motor and removing the safety key
and battery pack.
■ Adjust the handle bar or make other
adjustments as illustrated in the manual.
■ Periodically check all screws, nuts and
bolts for proper tightness to insure the safe
operation of the mower.
■ Remove any buildup of grass and leaves
on or around the motor cover and battery
compartment. Wipe the mower clean with a
dry cloth occasionally. Do not use water.
18 ― English
Page 19

CARE AND MAINTENANCE
LUBRICATION
All of the bearings in this product are
lubricated with a sufcient amount of high
grade lubricant for the life of the unit under
normal operating conditions. Therefore, no
further bearing lubrication is required. At the
beginning and end of each mowing season:
■ Lubricate the springs on the rear safety ap
with light oil.
■ Lubricate the cutting height adjustment
lever (13) and related hardware with light oil.
■ Turn the mower on its side and lubricate the
front and rear wheel axles and axle insertion
points into the wheels with light oil.
■ Remove the blade and blade hub assembly
and lubricate the motor shaft with light oil or
engine oil. See Replacing the Mower Blade
for instructions on removing the blade.
WARNING
Always protect hands by wearing heavy
gloves and/or wrapping the cutting edges of
the blade with rags and other materials when
performing blade maintenance. Failure to
heed this warning could result in serious
personal injury.
WARNING
Before performing any maintenance, make
sure the mower is unplugged from the power
supply and the battery has been removed.
Failure to heed this warning could result in
serious personal injury.
REPLACING THE MOWER BLADE
See Figures 24-25, page v
NOTE: Remove safety key and battery before
performing any maintenance!
NOTE: Only use identical replacement
blades. Craftsman mower blade replacement
part# 71.98831.
■ Stop the motor and allow the blade to come
to a complete stop.
■ With blade stopped, remove SAFETY KEY
and BATTERY from mower and store in safe
location.
■ Wedge a block of wood between the blade
and the mower deck in order to prevent the
blade from turning when the nut is being
removed.
■ Loosen the blade nuts using a 14mm
wrench.
■ Remove the blade nuts and blade.
■ Place the new blade on the shaft .
■ Thread the blade nuts on the shaft and
nger tighten.
■ Torque the blade nuts down using a torque
wrench (not provided) to 25 N•m (221.5
pound-inches)to ensure the bolt is properly
tightened.
NOTE: Make certain all parts are replaced in
the exact order in which they were removed.
19 ― English
Page 20

CARE AND MAINTENANCE
SHARPENING THE BLADE
See Figure 26, page vi
For best mowing performance, the mower
blade must be kept sharp. A dull blade does
not cut grass evenly and overloads the motor.
Under normal circumstances, sharpening
the blade twice during the mowing season is
usually sufcient. However, if your lawn has
sandy soil, more frequent sharpening may be
required.
■ Following the instructions in the Replacing
Mower Blade section, remove the mower
blade. DO NOT attempt to sharpen the blade
while it is attached to the mower.
■ Using a ne-tooth le or sharpening stone,
sharpen cutting edges on both ends of the
blade, removing equal amounts of material
from both ends.
WARNING
When removing, inspect the blade carefully.
If blade is bent or damaged, replace
immediately with a new blade. Failure to
replace a bent or damaged blade could cause
an accident resulting in possible serious
injury.
BALANCING THE BLADE
See Figure 27, page vi
When sharpening, care should be taken to
keep the blade balanced. An unbalanced
blade will cause excessive vibration when
the mower is running. This vibration will
eventually cause damage to the mower,
especially the motor.
To check the blade balance:
■ Clamp a screwdriver horizontally in a vise
as shown.
NOTE: If a vise is not available, a straight nail
can also be used.
■ Place the center hole of blade on the
screwdriver (or nail) shank.
■ If blade is balanced, it will remain in a
horizontal position.
REPLACING WHEELS
See Figure 28, page vi
To replace a wheel (10 or 14):
NOTE: Before replacing a rear wheel (14),
set the mower cutting height at the highest
position.
■ Remove safety key (19) and battery (21) at
rst before replacing the wheel.
■ Fold the mower into the storage position.
Turn the mower upside down.
■ Push the inner hubcap tabs from inner side
of the wheel, by using a at head screwdriver
or other adequate tool.
■ When all inner hubcap tabs have been
depressed, the hubcap should become free
allowing access to the axle.
■ Remove the cotter pin using a pair of pliers,
and slide the washer off the axle.
■ Remove the wheel, replace with a new
identical replacement wheel.
■ Reinstall the washer and press cotter pin
back into place. Reinstall the inner hubcap.
Make sure all tabs are locked into place.
NOTE: Servicing or replacing requires
extreme care, knowledge and skills, and we
suggest it be performed by a qualied service
technician.
20 ― English
Page 21

CARE AND MAINTENANCE
STORING THE MOWER
See Figures 29-34, page vi-vii
■ Remove mower safety key (19) and battery.
■ Turn mower on its side and clean grass
clippings that have accumulated on the
underside of the mower deck (12).
■ Wipe the mower clean with a dry cloth.
■ Check all nuts, bolts, knobs, screws,
fasteners, etc., for tightness.
■ Inspect moving parts for damage,
breakage, and wear. Have repairs made on
any damaged or missing parts.
■ Store mower indoors in a clean, dry place
out of the reach of children.
■ Do not store near corrosive materials such
as fertilizer or rock salt.
To lower the handle before storing:
■ Unlock the locking clips on both sides of
the handle bar, then push the handle down
as far as it will go.
■ Simultaneously press and hold both Quick
Adjust Levers and rotate the handle all the
way forward until it stops. Release levers to
secure handle in storage position.
■ Store the mower at, upright, or upright
with collection bag hanging from mower (Figs.
33-35)
CHARGER MAINTENANCE
■ Keep the charger clean and clear of
debris. Do not allow foreign material into the
recessed cavity or on the contacts. Wipe with
a dry cloth. Do not use solvents, water, or
place in wet conditions.
■ Always unplug the charger when there is no
battery pack in it.
■ Check that the charger contacts have not
been shorted by debris or foreign material.
REPLACING THE BATTERY
■ The mower battery is designed for
maximum life. However, like all batteries it will
eventually need to be replaced. Always fully
charge the new battery before use.
■ To install, see Installing/Removing Battery
Pack instructions in Assembly section of this
manual.
■ Take the old battery pack to a recycling
center that accepts lithium-ion batteries.
Never dispose of battery in re or regular
household trash.
CLEAN THE MOWER
WARNING
To reduce the risk of electric shock, do not
expose the mower to water.
WARNING
Do not at any time make any maintenance
to the lawn mower without rst stopping
the motor and removing the safety key and
battery pack.
The underside of mower deck (12) should be
cleaned after each use as grass clippings,
leaves, dirt and other debris will accumulate
causing rust and corrosion.
■ Remove any buildup of grass and leaves
on or around the motor cover and battery
compartment (do not use water). Wipe the
mower clean with a dry cloth
occasionally.
■ If debris build up on the underside of the
unit while in use, stop the motor and remove
the battery pack. Tilt the mower forward, or
on its side, and clean.
21 ― English
Page 22

ENVIRONMENTAL SAFE BATTERY DISPOSAL
The following toxic and corrosive materials
are in the batteries used in this battery pack:
Lithium-Ion, a toxic material.
WARNING
All toxic materials must be disposed of in a
specied manner to prevent contamination
of the environment. Before disposing of
damaged or worn out Lithium-Ion battery
packs, contact your local waste disposal
agency, or the local Environmental Protection
Agency for information and
specic instructions.
WARNING
If the battery pack cracks or breaks, with or
without leaks, do not recharge it and do not
use. Dispose of it and replace with a new
battery pack. DO NOT ATTEMPT TO REPAIR
IT! To avoid injury and risk of re, explosion,
or electric shock, and to avoid damage to the
environment:
■ Cover the battery terminals with heavy-duty
adhesive tape.
■ DO NOT attempt to remove or destroy any
of the battery pack components.
■ DO NOT attempt to open the battery pack.
■ If a leak develops, the released electrolytes
are corrosive and toxic.
■ DO NOT get the solution in the eyes or on
skin, and do not swallow it.
■ DO NOT place these batteries in your
regular household trash.
■ DO NOT incinerate.
■ DO NOT place batteries where they will
become part of any waste landll or municipal
solid waste stream.
■ Take batteries to a certied recycling or
disposal center.
22 ― English
Page 23

TROUBLESHOOTING
PROBLEM POSSIBLE CAUSE SOLUTION
Key not installed.
Check the key installation.
Mower fails to start.
Mower cuts
unevenly.
Mower does not
mulch properly
Mower is hard to
push
Battery not attached or not
attached securely.
No power or power is too low.
Defective switch.
Jammed blade.
Battery depleted.
Rough or uneven lawn.
Cutting height not set properly.
Dull blade.
Wet grass clippings sticking to
the underside of the deck.
Missing mulching plug.
High grass and low cutting height.
Rear of mower housing and blade
dragging in heavy grass.
Cutting blade not assembled
securely.
Check connection of battery to mower .
Charge the battery .
If within warranty period return product
to retailer of purchase.
Stop mower and remove battery; check
for grass and debris under the deck,
clean to make blade free to move.
.
Replace the battery (call the toll free
helpline, at 1-888-331-4569).
Check the mowing area.
Set the mower at a higher position
Sharpen or replace the blade.
Wait until the grass dries before mowing.
Install the mulching plug.
Raise the cutting height .
Tighten the blade bolts .
.
Mower vibrates
overly and makes
excessive noise.
Unbalanced blade.
Bent motor shaft.
23 ― English
Sharpen and balance the blade following
the directions in this manual, or replace
the blade with a new one.
Stop mower and remove battery. Have
the mower inspected and repaired by
an authorized service center before
restarting.
Page 24

CRAFTSMAN 60V MAX* LITHIUM-ION CORDLESS MOWER –
MODEL NUMBER 151.98834
The model number will be found on a label attached to the motor housing.
TO PURCHASE REPLACEMENT PARTS, CALL 1-888-331-4569
24 ― English
Page 25

CRAFTSMAN 60V MAX* LITHIUM-ION CORDLESS MOWER –
MODEL NUMBER 151.98834
The model number will be found on a label attached to the motor housing.
TO PURCHASE REPLACEMENT PARTS, CALL 1-888-331-4569
Key Number Drawing Number Description Quantity
1 211032101 Upper Motor Housing Assembly 1
1a 211032102 Battery Cover 1
2 211032103 Transport Handle Assembly 1
3 211032104 Lower Motor Cover 1
4 211032105 Battery Compartment 1
5 211032106 Safety Key 1
6 111198106 Motor Assembly 1
7 111198107 Circuit Board Assembly 1
8 111198140 Telecontroller Assembly 1
9 211032107 Right Handle Bracket 1
10 111198109 Rear Wheel Assembly (235mm) 1
10a 111198133 Rear Wheel 2
10b 211032109 Wheel Cover 2
11 111198110 Side Discharge Door Assembly 1
12 111198111 Side Discharge Chute 1
13 211032110 Mower Deck 1
14 111198113 Front Wheel Assembly (170mm) 1
14a 111198135 Front Wheel 2
10b 211032109 Wheel Cover 2
15 111198115 Front Axle 1
16 111198116 Front Transport Handle 1
17 211032113 Blade Assembly 1
17a 71.98831** Blade (71.98831) 1
17b 111198137 Blade Stud 2
17c 111198138 Blade Bracket Assembly 1
18 111088115 Front Axle Bracket Assembly 1
19 111198141 Spring 1
20 111198118 Height Adjustment Connection Rod 1
21 111198119 Rear Axle Bracket Assembly 1
22 111198120 Height Adjustment Handle Assembly 1
23 111198121 Front Skid Plate 1
24 111198122 Rear Skid Plate 1
NOTE: Only the parts highlighted in gray are available for purchase.
Call 1-888-331-4569 to order.
**Part available at your nearest Sears location and www.Sears.com.
25 ― English
Page 26

CRAFTSMAN 60V MAX* LITHIUM-ION CORDLESS MOWER –
MODEL NUMBER 151.98834
The model number will be found on a label attached to the motor housing.
TO PURCHASE REPLACEMENT PARTS, CALL 1-888-331-4569
Key Number Drawing Number Description Quantity
25 211032114 Height Adjustment Knob Assembly 1
26 111198124 Rear Axle Assembly 1
27 211032115 Left Handle Bracket 1
28 111008129 Cable Clamp Assembly 1
29 111198126 Rear Safety Flap 1
30 211032116 Rear Discharge Door 1
31 111193126 Spring 1
32 211032117 Complete REDI-BAG Assembly 1
33 211032118 Handle Assembly 1
33a 211032119 Handle Cover Left Assembly 1
33b 211032120 Handle cover Right Assembly 1
33c 211032121 Handle Assembly 2
34 111198130 Mulch Plug 1
35 60LFC02-ETL 60V HPP Charger 1
36 151.98838 60V 5.0Ah Battery 1
NOTE: Only the parts highlighted in gray are available for purchase.
Call 1-888-331-4569 to order.
**Part available at your nearest Sears location and www.Sears.com.
26 ― English
Page 27

See this section for all of the gures referenced in the
operator’s manual.
Consulte esta sección para ver todas las guras a las que se hace
referencia en el manual del operador.
1
2
3
4
18
20a 20b
1
2
3
AUTO
CHARGESPEED
20
17
5
6
9a
16
7
8
9
15
14
10
11
19
13
12
22
21
i
Page 28

Fig. 2 Fig. 3
Sleeve
Manga
(
)
Steel Frame
Marco de acero
(
Fig. 4
)
Bag Frame Holder Slot
Ranura retén del
(
bastidor de la bolsa
)
Connection Tip
Punta de conexión
(
Mulching plug must be removed
prior to installing collection bag.
El conector de mantillo se debe
(
sacar antes de instalar la bolsa
recolectora.
)
)
Fig. 5
Working Position
Posición de trabajo
(
Fig. 6
)
Press the Quick Adjust Lever
Presione la palanca de ajuste rápido
(
Parking Position
Posición de
(
estacionamiento
)
Storage Position
Posición de
(
almacenamiento
)
Fig. 7
)
ii
Page 29

Fig. 8 Fig. 9
Fig. 11
13
View Window
Ventanilla de visualización
Fig. 10
(
)
iii
Page 30

Battery Cover
(Tapa de la batería)
1
2
3
AUTO
Battery-release Button
(Botón de liberación de la batería)
CHARGESPEED
Fig.16
Fig.17
Fig. 18
iPower Control Panel
Panel de control de energía
(
Fig.19
)
iv
Page 31

Fig:22Fig:20 Fig:21
TROZO
(
DE MADERA
Fig.25
)
v
BLADE
ASPA
(
)
Page 32

(Lengüeta)
(Chaveta)
(Lengüeta)
(RUEDA)
(Arandela)
(RUEDA)
vi
Page 33

locking clips
(Pinzas de
bloqueo)
vii
Page 34

REGLAS GENERALES DE SEGURIDAD
¡ADVERTENCIA!
Este símbolo indica importantes instrucciones
de seguridad. Si no se obedecen estas
instrucciones, se puede poner en peligro la
seguridad personal o la propiedad del usuario
o de otras personas. Lea las instrucciones
de este manual y compréndalas bien
antes de intentar utilizar la podadora. El
incumplimiento de estas instrucciones puede
derivar en lesiones personales.
¡PELIGRO!
Esta podadora ha sido fabricada para ser
utilizada según dictan las normas para un
uso seguro del producto contenidas en este
manual. Como ocurre con cualquier tipo
de equipo eléctrico, la falta de cuidado o
errores por parte del usuario pueden producir
lesiones graves. Esta podadora es capaz
de amputar partes del cuerpo y de lanzar
objetos despedidos. El incumplimiento de
las siguientes normas de seguridad puede
producir lesiones graves o fallecimiento.
¡ADVERTENCIA!
El uso de esta podadora debería estar
restringido a aquellos individuos que hayan
leído y comprendido las advertencias e
instrucciones impresas en este manual y
sobre la podadora, y que vayan a seguirlas.
■ Extraiga o desconecte la batería antes de
realizar reparaciones, limpiezas o extraer
materiales de la podadora.
■ Lea atentamente todas las instrucciones
de la podadora antes de intentar ensamblarla
y usarla. Conserve este manual en un lugar
seguro como futura referencia y consúltelo
con regularidad.
■ No utilice la podadora de césped en
condiciones mojadas, húmedas ni tampoco
bajo la lluvia.
■ Familiarícese con todos los controles y con
su correcto funcionamiento. Aprenda cómo
detener la podadora y cómo desconectar la
corriente eléctrica en caso de emergencia.
■ A n de evitar el contacto con la hoja o
daños provocados por objetos arrojados,
3 ― Español
permanezca en el lugar del usuario, detrás
del asidero, y mantenga a niños y personas
próximas a un mínimo de 50’ (15 m) de
distancia de la podadora cuando esta se
encuentre en funcionamiento. Detenga el
motor inmediatamente si alguien entra en la
zona por donde va a pasar la podadora.
■ Inspeccione meticulosamente la zona en la
que va a utilizar la podadora. Quite todas las
piedras, palos, alambres, huesos, juguetes y
otros objetos con los que se pueda tropezar o
que la hoja pueda arrojar. Los objetos, al salir
despedidos, pueden producir lesiones graves.
■ Planique su patrón de corte de manera
tal que evite descargar el material hacia
caminos, aceras, personas, etc. No descargue
material contra un muro u obstrucción, ya que
podría causar que tal material rebote hacia el
usuario.
■ Use siempre protección ocular adecuada,
para proteger sus ojos mientras usa el
aparato o realiza ajustes y reparaciones.
Los objetos que salen despedidos y rebotan
pueden producir graves lesiones en los ojos.
■ Use siempre antiparras de seguridad con
protección lateral. Cumple con la norma ANSI
Z87.1 de protección auditiva. Las gafas de
uso cotidiano sólo tienen cristales resistentes
a impactos. NO son gafas de seguridad.
Siga esta regla y reducirá el riesgo de sufrir
lesiones oculares. Utilice una máscara facial
si el uso del equipo genera polvo.
■ Al operar este producto, utilice gafas de
seguridad o antiparras que cumplan con el
estándar ANSI Z87.1.
■ Lleve siempre una máscara que le proteja la
cara, o una máscara contra el polvo, cuando
utilice la podadora en ambientes donde haya
mucho polvo.
■ Lleve ropa adecuada. No se ponga prendas
anchas o joyas que puedan quedar atrapadas
en las piezas móviles. Se recomienda llevar
guantes protectores y calzado de seguridad.
■ Se producen muchas lesiones como
resultado de empujar la podadora sobre el
pie accidentalmente al caer por tropezarse o
resbalar. No utilice esta podadora descalzo o
Page 35

REGLAS GENERALES DE SEGURIDAD
con sandalias o con calzado ligero (por ej. de
lona). No se agarre a la podadora si es está
cayendo. Suelte el asidero inmediatamente.
■ Nunca tire de la podadora hacia detrás
mientras está caminando. Si tiene que alejar
la podadora de una pared o cualquier otro tipo
de obstrucción, mire primero al suelo detrás
para no tropezar y luego siga los pasos a
continuación:
• Dé algún paso atrás, alejándose de la
podadora, de manera que pueda estirar los
brazos del todo.
• Asegúrese de que está en buen equilibrio.
• Tire de la podadora hacia atrás lentamente.
■ No utilice la podadora para ningún otro
trabajo que no sea para el que ha sido
diseñada. No fuerce la podadora.
■ No utilice la podadora si se encuentra bajo
la inuencia de alcohol o drogas.
■ Esté alerta: No utilice la podadora cuando
esté cansado. Preste atención a lo que hace.
■ No ponga sus manos ni sus pies cerca de
partes giratorias ni bajo la cubierta de corte. El
contacto con las hojas puede amputar manos
y pies.
■ Mantenga sus manos y pies lejos de la zona
de corte.
■ No trate de ajustar las ruedas o la altura de
corte cuando el motor esté en funcionamiento.
■ Evite ambientes peligrosos. No utilice
la podadora bajo la lluvia o sobre césped
húmedo o mojado.
■ Corte el césped durante el día o con buena
luz articial. No corte el césped con prisa.
■ Detenga la hoja cuando atraviese caminos,
senderos o carreteras de grava.
■ Si la podadora empieza a vibrar demasiado,
detenga el motor e intente averiguar la causa
inmediatamente. La vibración suele ser una
advertencia de problemas.
■ Antes de extraer la bolsa recolectora o quitar
las acumulaciones de pasto del escape,
detenga el motor y espere hasta que
las aspas paren por completo. La hoja de
corte seguirá girando durante unos segundos
después de que el motor se apague. Nunca
4 ― Español
acerque ninguna parte del cuerpo a la zona
de la hoja hasta que esté seguro de que la
hoja ha cesado de girar.
■ Jamás use la podadora sin su protección
para senderos, cubierta de descarga, bolsa
recolectora, control de encendido u otro
dispositivo de seguridad, y tampoco si éstos
no se encuentran operativos. No use la
podadora si sus dispositivos de seguridad
están dañados; podría provocarse lesiones.
SEGURIDAD INFANTIL
■ Pueden ocurrir accidentes trágicos si el
operador no está atento a la presencia de
niños.
■ Mantenga a los niños alejados de la
zona donde corta el césped y vigilados
atentamente por un adulto responsable.
■ No permita que niños menores de 14
años utilicen esta podadora. Los niños de
14 años o más deben leer y comprender las
instrucciones de uso además de las reglas de
seguridad de este manual; además, deben
estar capacitados en el uso de la herramienta
y estar bajo la supervisión de uno de sus
padres.
■ Manténgase alerta y apague la podadora si
un niño o cualquier otra persona entra en la
zona por donde va a pasar la podadora.
■ Tenga sumo cuidado al acercarse a
esquinas ciegas, puertas, arbustos, árboles
u otros objetos que puedan obstruir su visión
de un niño que pueda correr hacia la ruta de
la podadora.
CUIDADO
USE SÓLO BATERÍAS DE REPUESTO
APROBADAS POR Craftsman; OTRAS
BATERÍAS PUEDEN PROVOCAR
LESIONES O DAÑOS A LA PODADORA.
Use sólo la batería de litio de 60 V Craftsman.
NORMAS DE SEGURIDAD DE LA BATERÍA
■ Las herramientas con batería pueden
operar sin estar enchufadas a una toma
de corriente, por lo que siempre están en
condiciones operativas. Tenga en cuenta
posibles riesgos mientras no utiliza
Page 36

REGLAS GENERALES DE SEGURIDAD
su herramienta o cuando cambia sus
accesorios. Siga esta regla y reducirá el
riesgo de descargas eléctricas, incendios o
lesiones severas.
■ No coloque las herramientas ni sus
baterías cerca del fuego o fuentes de calor.
Esto reducirá el riesgo de explosión y
posibles lesiones.
■ No triture, deje caer o dañe la batería.
No utilice una batería o cargador que se
haya caído o recibido un golpe duro. Una
batería dañada puede explotar. De manera
adecuada, elimine inmediatamente una
batería dañada o que se haya caído.
■ Las baterías pueden explotar en presencia
de una fuente de ignición como, por ejemplo,
una luz piloto. Para reducir el riesgo de
lesiones severas, jamás utilice un producto
inalámbrico en presencia de llamas abiertas.
Una batería explotada puede expulsar
materiales y químicos. Si se expone, lávese
con agua inmediatamente.
■ No cargue la herramienta con batería en
un emplazamiento húmedo o mojado. Siga
esta regla y reducirá el riesgo de descargas
eléctricas.
■ Para obtener mejores resultados, la
herramienta debe cargarse en un lugar donde
la temperatura sea mayor a 10 °C (35,6 °F)
y menor a 20 °C (109,4 °F). Para reducir el
riesgo de lesiones severas, no almacene
la herramienta en el exterior o dentro de
vehículos.
■ Pueden ocurrir fugas de la batería bajo
uso o temperaturas extremas. Si el líquido
entra en contacto con su piel, lávela
inmediatamente con agua y jabón. Si el
líquido entra en sus ojos, enjuáguelos con
agua limpia por al menos 10 minutos y luego
busque atención médica. Siga esta regla y
reducirá el riesgo de sufrir lesiones severas.
■ Cuando no utilice la batería, manténgala
alejada de otros objetos metálicos como:
clips, monedas, llaves, clavos, tornillos u
otros objetos pequeños de metal que
puedan hacer conexión de una terminal
a otra. Que se provoque un cortocircuito
5 ― Español
en las terminales puede provocar chispas,
quemaduras o incendios.
■ Extraiga siempre la batería de sus
herramientas cuando ensamble piezas, realice
ajustes, limpie o cuando no estén en uso.
Extraiga la batería para evitar encendidos
por accidente, los cuales podrían provocar
lesiones personales graves.
■ Extraiga siempre la batería antes de
almacenar el dispositivo. Cuando la batería
esté completamente cargada, desenchufe el
cargador de la toma de corriente y extraiga el
paquete de baterías del cargador.
■ Mantenga el paquete de baterías seco,
limpio y sin aceite ni grasa. Al limpiar, utilice
siempre un trapo que esté limpio. Para limpiar
el producto, jamás use líquido de freno,
gasolina, productos en base a petróleo o
cualquier solvente.
BATERÍA Y CARGADOR
CUIDADO
USE SÓLO BATERÍAS DE REPUESTO
APROBADAS POR Craftsman; OTRAS
BATERÍAS PUEDEN PROVOCAR LESIONES
O DAÑOS A LA PODADORA.
Use sólo con las baterías Craftsman modelo
71.9883 o 71.98838 60 V.
Asegúrese de que el dispositivo esté apagado
antes de insertar la batería. Insertar una
batería en una herramienta encendida puede
provocar accidentes.
Recargue las baterías en interiores, ya que el
cargador está diseñado sólo para este tipo de
uso.
Para reducir el riesgo de descarga eléctrica,
desconecte el cargador de la batería de la
toma de corriente antes de limpiarlo.
No someta la batería a luz solar intensa
durante periodos de tiempo extensos ni la deje
sobre un calefactor.
El calor daña las baterías y podrían explotar.
Antes de cargar una batería caliente, déjela
enfriar.
No abra la batería y evite daños mecánicos a
ella. Riesgo de cortocircuito y emisión de
gases que irritan el tracto respiratorio. Salga
donde haya aire fresco y busque atención
Page 37

REGLAS GENERALES DE SEGURIDAD
médica en caso de incomodidad.
¡No use baterías no recargables!
El dispositivo no debe ser usado por personas
(incluidos niños) con capacidades físicas,
sensoriales o mentales limitadas, o que no
posean la experiencia y/o conocimiento,
a menos que sean supervisadas por una
persona responsable de su seguridad o que
se les instruya sobre el uso del aparato por
parte de tal persona.
Los niños deben ser supervisados para
asegurarse de que no jueguen con el equipo.
Para cargar la batería, use sólo el cargador
incluido. Esto garantiza que se mantenga la
seguridad del dispositivo.
Antes de cada uso, revise el cargador, el
cable y el enchufe. Realice sus reparaciones
únicamente mediante profesionales, usando
piezas originales. No use un cargador
defectuoso y no lo abra usted mismo. Esto
garantiza que se mantenga la seguridad del
dispositivo.
Conecte el cargador sólo a una toma de
corriente con conexión a tierra. Asegúrese de
que el voltaje de la toma concuerde con las
especicaciones de la placa de clasicación
del cargador.
Desconecte el cargador de la toma de
corriente antes de cerrar o abrir la conexión a
la batería / herramienta / dispositivo.
Mantenga el cargador limpio y lejos de la
humedad y lluvia. No use el cargador en
exteriores. La suciedad y el ingreso de agua
aumentan el riesgo de descarga eléctrica.
Use el cargador sólo con las baterías
originales adecuadas. Cargar otras baterías
puede provocar lesiones e incendios.
Evite daños mecánicos al cargador. Esto
puede provocar cortocircuitos internos.
No use el cargador sobre una supercie
combustible (papel, telas, etc.). Puede ocurrir
un riesgo de incendio debido al calentamiento.
Si el cable de alimentación de este equipo
está dañado, debe ser reemplazado por el
fabricante, por su agente de servicio o por una
persona similarmente calicada para así evitar
peligros.
Al comprar el aparato, su batería no viene
completamente cargada de fábrica. Se
necesita, entonces, cargar por completo la
batería antes de usarla por primera vez. Para
el primer ciclo de carga, cargue la batería por
completo. Coloque la batería en la base y
enchufe el cargador en una toma de corriente.
Cuando la batería esté completamente
cargada, desconecte el cargador de la toma de
corriente.
El tiempo de carga aproximado es 85 minutos.
No cargue la batería de forma continua, ya que
podría dañar sus celdas.
NOTA: Cargar la batería en cantidades
pequeñas reiteradamente puede dañar las
celdas. Recargue la batería sólo si el aparato
se vuelve lento. No use el cargador para cargar
baterías no recargables.
¡ADVERTENCIA!
Los cambios o modicaciones a esta unidad no
aprobados expresamente por el responsable
del cumplimiento anularían la autoridad del
usuario para operar el equipo.
NOTA: Este equipo ha sido probado por
cuanto a su cumplimiento con los límites de un
dispositivo digital Clase B, según la Parte 15 de
las Reglas FCC. Estos límites están diseñados
para proporcionar una protección razonable
contra interferencias dañinas en instalaciones
residenciales. Este equipo genera, usa y puede
irradiar energía de radiofrecuencias y, de no
instalarse y usarse según las instrucciones,
puede provocar interferencia dañina sobre las
comunicaciones por radio. Sin embargo, no
hay garantía alguna de que no pueda ocurrir
interferencia en una instalación en particular. Si
este equipo provoca una interferencia dañina a
la recepción de radio o televisión, lo cual puede
determinar con tan solo apagar y encender el
equipo, se recomienda corregir tal interferencia
mediante uno o más de los siguientes métodos:
■ Reoriente o reinstale la antena receptora.
■ Aumente la separación entre el equipo y el
receptor.
■ Conecte el equipo a una toma de corriente
de un circuito distinto al que está conectado el
receptor.
■ Consulte al representante de ventas o a
un técnico de radio/TV experimentado para
obtener ayuda.
6 ― Español
Page 38

SÍMBOLOS
Algunos de los siguientes símbolos podrían aparecer en este producto. Estúdielos y
aprenda su signicado. Las interpretaciones adecuadas de estos símbolos le permitirán
utilizar el producto de mejor manera y con más seguridad.
SÍMBOLO NOMBRE NOMBRE/EXPLICACIÓN
V
Volts
Corriente continua
Voltaje
Tipo o característica de la corriente
A
zH
W
srh
Amperes
Hertz Frecuencia (ciclos por segundo)
Vatio
Horas
Construcción clase II Doble aislación
Alerta de seguridad
Lea el manual de uso
¡No pode lomas en dirección
ascendente y descendente!
Mientras use la podadora,
mantenga a todas las
personas y mascotas a una
distancia segura.
Mantenga las manos y pies
lejos de la podadora y apertura
de descarga en todo momento.
Corriente
Energía
Tiempo
Precaución que involucra su seguridad.
Debe leer cuidadosamente las instrucciones de
uso.
Para evitar el riesgo de padecer lesiones, no pode
lomas en dirección ascendente o descendente.
Pode siempre a través de las lomas. (Ángulo ≤
15º)
Para evitar el riesgo de que las personas y
mascotas cercanas sufran lesiones, mantenga
una distancia segura de ellas al usar la podadora.
Las aspas giratorias pueden causar lesiones
severas. Mantenga las manos y pies lejos de
la podadora y apertura de descarga en todo
momento. Asegúrese siempre de que el aspa se
detenga antes de soltar la palanca interruptora y
de desconectar y reinstalar la bolsa recolectora,
de realizar limpiezas, reparaciones, transportar o
levantar la podadora.
Mientras el motor esté
andando, permanezca detrás
de la manija.
Utilice protección ocular
y auditiva al utilizar este
equipo.
7 ― Español
Los objetos golpeados por la podadora pueden
causar lesiones severas. Mientras el motor
esté andando, permanezca detrás de la manija.
Asegúrese siempre de que no haya personas o
mascotas cerca de la descarga de la podadora.
Precauciones de alerta de seguridad que
involucran a su seguridad.
Page 39

SYMBOLS
Reciclaje de la batería de
iones de litio
Mantener alejado del agua
Mantener alejado del fuego
Alerta de calor
Símbolo de reciclaje
Las siguientes palabras y signicados están diseñados para explicar los niveles de riesgo asociados
a este producto.
Indica que esta herramienta cumple con los requisitos
del programa de reciclaje de baterías de iones de litio
No elimine las baterías lanzándolas a ríos ni las
sumerja en agua
No elimine las baterías utilizando fuego. Explotarán o
tendrán fugas y provocarán lesiones.
No exponga la batería a un calor mayor a 60 ºC (140
ºF).
Este producto utiliza baterías de iones de litio. Las
leyes locales, estatales o federales podrían prohibir
la eliminación de baterías junto con la basura común.
Consulte a su autoridad de eliminación local para
obtener información sobre la disponibilidad de opciones
de reciclaje o eliminación.
SÍMBOLO SEÑAL SIGNIFICADO
PELIGRO:
ADVERTENCIA:
CUIDADO:
CUIDADO:
Indica una situación peligrosa inminente, la cual, de no evitarse, causará
una muerte o lesiones severas.
Indica una situación peligrosa potencial, la cual, de no evitarse,
podría causar una muerte o lesiones severas.
Indica una situación peligrosa potencial, la cual, de no evitarse, podría
causar una lesión menor o moderada.
(Sin símbolo de alerta de seguridad) Indica una situación que podría
causar daños a la propiedad.
SERVICIO
El mantenimiento requiere extremo cuidado
y conocimientos, por lo que debe realizarlo
solo un técnico de servicio calicado.
Para reparaciones, sugerimos que lleve la
herramienta a su CENTRO DE SERVICIO
AUTORIZADO más cercano. Al realizar
mantenimiento, utilice solo piezas de
repuesto idénticas.
¡ADVERTENCIA!
Para evitar lesiones severas, no intente
utilizar este producto hasta que haya leído y
comprendido exhaustivamente el manual del
usuario. Si no comprende las advertencias
e instrucciones del manual del usuario, no
utilice este producto Llame a atención al
cliente para obtener asistencia.
8 ― Español
¡ADVERTENCIA!
El uso de herramientas eléctricas
puede causar que objetos extraños entren
en sus ojos, lo cual puede provocar lesiones
severas. Antes de utilizar una herramienta
eléctrica, póngase antiparras o gafas de
seguridad con protección lateral y, de ser
necesario, use escudo facial. Recomendamos
una máscara de seguridad que permita
una visión amplia para usarse encima de
las gafas o bien gafas de seguridad con
protección lateral. Use siempre protección
ocular que cumpla con la normativa ANSI
Z87.1.
Page 40

CARACTERÍSTICAS
PRODUCT SPECIFICATIONS
Tipo.…………………............................................................................................................ Inalámbrico, con batería
Sin velocidad de carga………………................Selección automática de nivel: 3200 rpm / 1nivel-3200 rpm / 2nivel
3300 rpm / 3nivel 3400 rpm
Ancho de la cubierta………........................................................................................................19 pulgadas (48 cm)
Ancho de corte……....................................................................................................................18 pulgadas (46 cm)
Ajustes de la altura de corte……………................................................................6 Posiciones (1”-3,4”) (35-85 mm)
Funciones…………….......................................................................3-en-1: Mantillo, bolsa trasera, descarga lateral
Tamaño de la rueda………......................................................................................6,70” (170 mm) / 9,25” (235 mm)
Peso de la unidad (con batería de 5,0 Ah)……………....................................................................19,4 kg (42,8 lbs)
BATERÍA
N° de modelo...............................................................................................................................................71.98838
Tipo.........................................................................................................................60 V MAX* Iones de Litio, 5,0 Ah
CARGADOR
N° de modelo........................................................................................................................................60LFC02-ETL
Voltaje de entrada nominal...................................................................................................................120 V ~ 60 Hz
Potencia de salida........................................................................................................................................60 V DC
Corriente de salida nominal................................................................................................................................... 4A
Tiempo de carga................................................................................................................... 85min (Para 71.98838)
* El voltaje máximo inicial carga de trabajo batería (medida sin carga de trabajo) es de 60 voltios. Voltaje nominal
es 54 volts. Este producto puede usar la batería de 60 V MAX de Litio, de 2,0 Ah. Modelo nº 71.98833.Ah =
Amperes por hora
CONOZCA SU PODADORA DE CÉSPED
Consulte la Figura 1, página i
El uso seguro de este producto requiere que
conozca la información de la herramienta
y la que aparece en este manual así
como también el proyecto en el que está
trabajando. Antes de usar este producto,
familiarícese con todas las funciones
operativas y reglas de seguridad.
1. Interruptor de arranque/detención
2. Botón interruptor de seguridad
3. Manillar superior
4. Pinzas de bloqueo de la manilla X2
5. Manillar inferior
6. Palancas de bloqueo x2
7. Manilla de transporte de la podadora
8. Tapa del compartimiento de la batería
9. Puerta descarga lateral
9a. Escape de descarga lateral
10. Ruedas frontales
11. Manilla/Protección frontal contra golpes
12. Cubierta
13. Palanca de ajuste de la altura de corte
14. Ruedas traseras
15. Bolsa recolectora
16. Solapa de seguridad
17. Conector de mantillo
18. Zona de agarre de espuma
19. Llave de seguridad (dentro de
compartimiento de la batería)
20. Panel de control de energía
20a. Indicador del modo de energía de la
podadora
20b. Indicador de energía de la batería
21. Batería
22. Cargador de la batería
NOTA: las partes mencionadas y sus
números/letras asociados se usarán en este
manual para identicarlas.
MOTOR SIN CEPILLO
Esta podadora posee un motor sin cepillo,
el cual puede mejorar el tiempo de
funcionamiento. Además, no hay cepillos
en el motor que puedan desgastarse con el
tiempo y requerir cambios.
9 ― Español
Page 41

ARMADO
DESEMBALAJE
Este producto requiere armado.
■ Con cuidado, extraiga el producto y sus
accesorios de la caja. Asegúrese de que
todos los elementos mencionados en la
lista de componentes del empaque estén
incluidos.
■ Inspeccione el producto cuidadosamente
para asegurarse de que no se haya roto o
dañado durante el transporte.
■ No bote el material del empaque hasta
que haya inspeccionado completamente y
utilizado satisfactoriamente el producto.
NECESITARÁ (ARTÍCULOS NO
INCLUIDOS)
■ Destornillador de cabeza plana
■ Equipos de protección personal adecuados.
LISTA DE EMPAQUE
Podadora de césped
Llave de seguridad (jado al interior del
compartimiento de la batería de la podadora)
Conector de mantillo: instalado de fábrica en
la parte posterior de la podadora
Conjunto de piezas de la bolsa recolectora
de pasto (bolsa y bastidor metálico)
Escape de descarga lateral
Cargador de la batería
Batería de Iones de Litio de 60 V
Manual del usuario
NOTA: La llave de seguridad debe estar
instalada para que la podadora pueda
funcionar. La llave de seguridad entra en el
interruptor en una sola dirección. ¡NO LA
FUERCE!
¡ADVERTENCIA!
Si alguna pieza está dañada o falta, no
utilice este producto hasta reemplazarla. No
hacer caso a esta advertencia puede causar
lesiones severas.
No intente modicar este producto o crear
accesorios no recomendados para su uso con
este producto.
Cualquier alteración o modicación de este
producto se considera un uso indebido que
podría causar potenciales lesiones severas.
No conectar a la alimentación hasta que el
armado esté completo. El no cumplir con
esto podría causar un funcionamiento inicial
erróneo y posibles lesiones severas.
Jamás utilice la podadora de césped sin los
dispositivos de seguridad adecuados puestos
y operativos. Jamás utilice la podadora
con dispositivos de seguridad dañados. No
hacer caso a esta advertencia puede causar
lesiones severas.
ARMADO DE LA BOLSA RECOLECTORA
Consulte las Figuras 2-3, página ii
Su podadora Craftsman posee una bolsa
recolectora con bloqueo antipolvo. La tela
bloqueadora de polvo evita que el polvo sople
a través de la podadora mientras se está
usando.
Ensamblaje:
■ Revise la bolsa recolectora antes de
ensamblar, para asegurarse de que no tenga
daños.
■ Jale la bolsa recolectora sobre el bastidor de
acero, como se indica. Asegúrese de insertar
la manilla del bastidor a través de la ranura
de la parte superior de la bolsa, para que la
manilla quede en la parte exterior.
■ Con sus dedos o un destornillador de
cabeza plana, abra las mangas de las pinzas
plásticas haciendo palanca. Pince las mangas
sobre la parte superior, inferior y varillas
laterales del bastidor de acero, como se
indica.
NOTA: Si usa un destornillador para ayudarse
al hacer palanca, tenga cuidado de no
destrozar la tela de la bolsa.
10 ― Español
Page 42

ARMADO
CÓMO INSTALAR LA BOLSA
RECOLECTORA
Consulte la Figura 4, página ii
NOTA: Al usar la bolsa recolectora de pasto,
no instale el conector de mantillo (17). El
conector de mantillo se DEBE sacar antes
de instalar la bolsa recolectora. Consulte la
sección Fijar/extraer el conector de mantillo.
■ Use una mano para levantar y sostener la
solapa de seguridad (16) hasta llegar arriba.
■ Eleve la bolsa recolectora desde su manilla
y enganche las puntas de conexión en las
ranuras del bastidor de la bolsa.
■ Suelte la lengüeta de seguridad posterior.
■ Asegúrese de que ambas puntas de
conexión se asienten rmemente en las
ranuras y que la lengüeta de seguridad
posterior se asiente rmemente contra la
parte superior de la bolsa recolectora.
CUIDADO: Durante el uso normal, el material
de la bolsa está sujeto a desgaste. Para
reducir el riesgo de lesiones, inspeccione
frecuentemente el conjunto de piezas de la
bolsa y reemplácela ante cualquier señal de
desgaste o deterioro.
TIPO DE USO
Esta podadora inalámbrica está diseñada
para usarse con baterías de iones de Litio de
60 V Craftsman.
El producto está hecho para podar césped
y crear mantillo, sólo en aplicaciones
domésticas. No se debe usar para cortar
pasto inusualmente grande, seco o mojado
(por ejemplo, llanuras de pasto de gran altura
o para destrozar hojas). Este producto está
diseñado solo para uso doméstico y no para
algún otro uso comercial. No se debe utilizar
para otros propósitos que no sean los aquí
descritos.
AJUSTE DE INCLINACIÓN DE LA
MANILLA
Consulte las Figuras 5-7, página ii
Tras instalar la batería, ajuste la manilla en la
posición de trabajo deseada.
La posición de estacionamiento es intermedia
y se usa para vaciar la bolsa recolectora.
Detenga la máquina antes de seleccionar
esta posición.
La posición de almacenamiento se usa para
almacenar el producto ahorrando espacio.
Detenga la máquina y extraiga la batería
antes de cambiar a esta posición.
■ Cuando la podadora se saca de la
caja, la barra manillar está en posición de
almacenamiento.
■ Presione simultáneamente y mantenga
presionada las palancas de ajuste rápido
en la base de ambas barras para liberar la
manilla de la posición de almacenamiento.
Levante la manilla y gírela hacia la posición
de trabajo.
■ Para mover la manilla hacia la posición
de estacionamiento, presione las palancas
y empuje la manilla hacia adelante hasta
que quede ja y repose contra los puntos de
detención de las abrazaderas de la manilla.
11 ― Español
Page 43

ARMADO
AJUSTE DE ALTURA DE LA BARRA DEL
MANILLAR
Consulte las Figuras 8-9, página iii
Para ajustar la altura de trabajo:
■ Gire la barra del manillar hacia la posición
de trabajo.
■ La podadora tiene 2 alturas de trabajo.
Seleccione la posición que le sea más
cómoda. Para ajustar la altura, tome la
manilla desde la barra superior y tírela por
completo. Puede bloquear la manilla en su
altura al cerrar las pinzas de bloqueo (4).
■ Cuando tira de la manilla por completo,
observará un conjunto de oricios de la
posición de altura inferior. Baje la manilla de
este conjunto de oricios para que se alineen
con las clavijas de la pinza de bloqueo. Fije
en posición cerrando las pinzas.
Abra las pinzas de bloqueo, ajuste la barra
del manillar en la posición media y ciérrelas.
Para ajustar la altura y almacenar:
■ Detenga la podadora y extraiga la batería.
■ Desbloquee ambas pinzas y empuje la
manilla hasta el tope.
■ Simultáneamente, mantenga presionadas
ambas palancas de ajuste rápido y gire
la manilla hacia adelante por completo,
hasta que se detenga. Suelte las palancas
para asegurar la manilla en su posición de
almacenamiento.
AJUSTE DE LA ALTURA DE CORTE
Consulte la Figura 10, página iii
ADVERTENCIA
En ningún momento realice ajustes a la
podadora sin antes detener el motor y extraer
la llave de seguridad. Mantenga sus pies
lejos de la cubierta al ajustar su altura.
De fábrica, las ruedas traseras de la
podadora (14) están en posición de corte
bajo. Antes de usar la podadora de césped
por primera vez, ajuste la posición de corte a
la altura que mejor se ajuste a su pasto. La
podadora se puede ajustar en 6 posiciones
de altura, entre 1,4” (35 mm) y 3,4” (85
mm). El ajuste mayor es 6 y el menor es 1.
Seleccione la altura de corte adecuada según
los tipos y condiciones del pasto.
Para establecer la altura de corte:
■ Para aumentar la altura de corte, tome la
palanca de ajuste de altura (13) y muévala de
forma lateral fuera de su ranura de posición;
luego, muévala hacia la parte posterior de la
podadora. Fije el eje de la palanca en una
nueva ranura de posición.
■ Para reducir la altura de corte, tome la
palanca de ajuste de altura (13) y muévala de
forma lateral fuera de su ranura de posición;
luego, muévala hacia la parte frontal de la
podadora. Fije el eje de la palanca en una
nueva ranura de posición.
12 ― Español
Page 44

ARMADO
VENTANILLA DE VISUALIZACIÓN DE LA
BOLSA RECOLECTORA
Consulte la Figura 11, página iii
■ La bolsa recolectora (15) posee una
ventanilla de visualización que le permite
observar qué tan llena está durante el
proceso de corte.
■ Vacíe la bolsa recolectora cuando, a través
de la ventanilla, vea que está casi llena.
VACIADO
■ Tome la bolsa recolectora desde su manilla
y sáquela de la podadora.
■ Saque los trozos de pasto.
■ Levante la lengüeta de seguridad (16) y
reinstale la bolsa recolectora de pasto según
se indica anteriormente en este manual.
FIJAR/EXTRAER EL CONECTOR DE
MANTILLO
Consulte las Figuras 12-14, página iv
ADVERTENCIA
En ningún momento realice ajustes a la
podadora sin antes detener el motor y extraer
la llave de seguridad (19). No je la bolsa
recolectora (15) y el conector de mantillo (17)
al mismo tiempo.
El conector de mantillo permite que los
trozos de pasto se depositen en la podadora
durante el corte. Para instalar el conector:
■ Levante la lengüeta de seguridad (16) y
saque la bolsa recolectora de pasto.
■ Levante y sostenga la lengüeta de
seguridad con una mano.
■ Con la otra mano, tome el conector desde
su manilla superior e inserte el conector en el
escape de descarga trasero. Asegúrese de
que la lengüeta de bloqueo calce en posición,
como se indica en la Fig. 13.
El conector de mantillo DEBE retirarse si se
usa la bolsa recolectora de pasto. Para retirar
el conector:
■ Levante y sostenga la lengüeta de
seguridad con una mano.
■ Con la otra mano, apriete la manilla
recta del conector para liberar la lengüeta
de bloqueo. Tire el conector hacia arriba y
sáquelo del escape de descarga.
INSTALACIÓN DEL ESCAPE DE
DESCARGA LATERAL
Consulte la Figura 15, página iv
ADVERTENCIA
En ningún momento realice ajustes a la
podadora sin antes detener el motor y extraer
la llave de seguridad (19).
La podadora está diseñada para enviar los
trozos de pasto hacia la podadora (con la
placa de mantillo instalada) o para recolectar
los trozos de pasto en la bolsa recolectora (sin
la placa de mantillo instalada). Sin embargo,
puede descargar los trozos de pasto hacia
el costado de la podadora mientras corta,
lo cual requiere la instalación del escape
de descarga lateral y la extracción de la
bolsa recolectora. Además, para mejorar
la descarga lateral, instale el conector de
mantillo.
Instalación del escape de descarga lateral:
■ Tire y sostenga la puerta de descarga
lateral en posición completamente elevada.
■ Enganche las ranuras de
las lengüetas de la parte superior del escape
en la barra bisagra de la parte inferior de la
puerta de descarga.
■ Baje la puerta de descarga lateral. La
tensión del resorte de la bisagra mantendrá
al escape en posición.
13 ― Español
Page 45

ARMADO
INSTALACIÓN/EXTRACCIÓN DE LA
BATERÍA
Consulte las Figuras 16-17, página iv
ADVERTENCIA
Si alguna pieza está rota o ausente, no
intente instalar la batería en la podadora
ni operarla sino hasta haber reemplazado
la pieza rota o faltante. El no seguir estas
indicaciones puede provocar lesiones
severas. No conecte la batería y/o llave
de seguridad antes de haber ensamblado
completamente el producto.
Instalación de la batería:
■ Alinee las ranuras de cada lado de la
batería con los bordes de la placa terminal
del compartimiento.
■ Deslice la batería hacia la placa terminal
hasta que quede asegurada.
BATERÍA Y CARGADOR
CARGA DE LA BATERÍA
■ Use únicamente cargadores de batería
Craftsman de 60 V. El cargador de la batería
incluido está diseñado especícamente para
la batería de litio usada en esta herramienta.
■ ¡Revise el voltaje! Los cargadores de
baterías operan en 120 V.
■ Cargue la batería a entre 35,6 °F y 109,4
°F (2 y 43 °C). Esto garantiza una vida útil
óptima de la batería.
■ No utilice fuerza al insertar la batería.
Debiese calzar en su posición y hacer "clic".
■ Cierre la tapa del compartimiento de la
batería (8). Asegúrese de que la llave de
seguridad se inserte en la esquina frontal del
compartimiento antes de cerrar la tapa.
NOTA: Asegúrese de que la batería calce
rmemente en posición y quede asegurada
en la podadora antes de usarla.
Extracción de la batería:
■ Detenga la máquina. Levante la tapa del
compartimiento de la batería (8) y extraiga la
llave de seguridad (19).
■ Presione el botón de liberación de la
batería (21), tome la batería rmemente y
extráigala del compartimiento de la batería
(Fig. 16).
■ Cierre la tapa del compartimiento de la
batería (8) (Fig. 17).
■ Proteja la batería del calor y de la
exposición continua al sol, y manténgala
alejada de radiaciones u otras fuentes de
calor. No deje la batería en la herramienta
bajo luz solar directa durante largos periodos
de tiempo.
■ La batería incluida no viene cargada.
Cargue la batería por completo antes de usar
la herramienta por primera vez. La batería de
iones de litio se puede cargar en cualquier
momento sin reducir su vida útil. Interrumpir
el proceso de carga no afecta a la batería.
14 ― Español
Page 46

BATERÍA Y CARGADOR
LED DE CARGA
■ Si la batería no está insertada en el
cargador, una luz LED roja continua indica
que el enchufe está conectado en una toma
de corriente y que el cargador está listo para
funcionar.
■ Carga: un indicador LED verde
parpadeante en el cargador indica que la
batería está cargando con normalidad.
■ Cargada: un indicador LED verde continuo
en el cargador indica que la batería está lista
para usarse.
SÍMBOLO
LUCES
INDICADORAS
Rojo,
Continuo
Verde,
parpadeo
Verde,
continuo
ESTADO
Conectado a la
toma de energía
Cargando
Totalmente
cargado
Problema de
Rojo,
parpadeo
carga: Consulte
Problema técnico
en LEDS DEL
CARGADOR
Panel indicador del cargador
■ Problema técnico: una luz LED roja
parpadeante en el cargador indica que la
batería tiene un problema de carga o que
podría estar defectuosa.
- Un posible problema es que la temperatura
de la batería no esté dentro del rango de
temperatura de 35,6 °F - 109,4 °F (2 y 43 °C),
o que la corriente de carga sea demasiado
alta. Apenas se alcance la temperatura
permitida y se logren los rangos de corriente
de carga, el cargador comenzará a cargar la
batería automáticamente.
- Si el rango de temperatura y la corriente
de carga son correctas y la luz LED
continúa parpadeando de color rojo,
extraiga y reinserte la batería. Si el estado
del LED se repite una segunda vez, intente
cargar otra batería idéntica. Si la batería
carga normalmente, deseche la batería
defectuosa (consulte la sección Eliminación
ambientalmente segura de la batería).
- Si la luz roja parpadeante continúa tras
instalar una segunda batería, el cargador
podría estar defectuoso. Cámbielo por otro
nuevo.
■ Después de ciclos de carga continuos o
repetidos sin interrupción, el cargador puede
que se caliente. Esto es normal y no indica
defecto técnico alguno de la batería.
Conectado a la
toma de energía
Cargando
Totalmente
cargado
Problema técnico
(consulte el manual)
15 ― Español
Page 47

BATERÍA Y CARGADOR
PANEL LED DE LA BATERÍA
■ El panel consta de 2 LED en la parte frontal
de la batería. Presione el botón del panel
para que el LED le indique el nivel de carga
de la batería.
■ El nivel de carga de la batería se puede
revisar cuando la batería está dentro o fuera
de la podadora.
LEDS indicadores de potencia
Botón
LEDS DE LA BATERÍA
COLOR CAPACIDAD DE LA BATERÍA
Verde 50%~100 %
Naranja 25%~ 50%
Rojo 0-25% (se debe recargar)
CÓMO CARGAR LA BATERÍA
Consulte la Figura 19, página iv
¡ADVERTENCIA!
■ Si alguna parte del cargador falta o está
dañada, ¡no lo utilice! Cambie el cargador por
uno nuevo. No hacer caso a esta advertencia
puede causar lesiones severas.
■ ¡Revise el voltaje! El voltaje y la corriente
deben cumplir con la información indicada en
la etiqueta de clasicación eléctrica.
PROCEDIMIENTO PARA CARGAR LA
BATERÍA
■ Alinee las dos ranuras de la parte inferior
de la batería con los dos bordes de la
placa terminal en el costado del cuerpo del
cargador. Deslice la batería hacia abajo hasta
que quede ja en posición.
■ Conecte el cargador a la toma de energía.
■ Deje que la batería se cargue por un tiempo
suciente (consulte las especicaciones del
producto) y desconecte el cargador de la
toma de energía.
■ Presione el botón de liberación de la
batería y sáquela del cargador.
NOTA: Es normal que la batería y el cargador
se calienten (pero no demasiado) durante
el proceso de carga. Si la batería no carga
adecuadamente, revise que la toma eléctrica
esté operativa. Siempre cargue la batería
antes de almacenarla.
16 ― Español
Page 48

FUNCIONAMIENTO
ARRANQUE / DETENCIÓN
Consulte las Figuras 20-22, página v
■ Para encender el motor, inserte la llave de
seguridad (19) en el compartimiento de la
batería y cierre la tapa del compartimiento.
■ Presione el botón de seguridad (2) con
una mano y, con la otra, tire el interruptor de
arranque/detención (1) hacia atrás. El botón
de seguridad permanecerá hundido.
■ Para detener el motor de la podadora,
suelte el interruptor de arranque/detención
(1). Extraiga la llave de seguridad del
compartimiento de la batería si la podadora
no se usará inmediatamente.
INDICADOR DE VELOCIDAD
Consulte la Figura 18, página iv
Se encuentra en la manilla superior de la
podadora.
■ De manera predeterminada, la potencia
del motor está congurada en el ajuste
AUTO, el cual automáticamente se ajusta
a las variaciones de la textura del pasto a
medida que usted corta. Sin embargo, puede
congurar la potencia del motor en uno de
tres ajustes.
■ Presione el botón de velocidad para
alternar entre los distintos niveles de potencia
del motor.
• Elija el nivel 1 si su césped sólo necesita un
recorte ligero.
• Elija el nivel 2 si va a cortar césped más
alto y tupido.
• Elija el nivel 3 para utilizar el máximo de
potencia motora y cortar el césped más
rebelde.
CUIDADO
Un LED intermitente en el panel de control
del modo de corte indica que la corriente es
demasiado alta. Un LED intermitente en la
batería indica que el voltaje es demasiado
bajo. En cualquier caso el motor se apagará
automáticamente. No siga activando el
interruptor de apagado y encendido si el
motor se ha apagado automáticamente.
Puede que la batería esté dañada.
USO GENERAL
Revise la podadora antes de cada uso para
asegurarse de que no haya componentes
dañados y de que todas las conexiones
sean seguras. Si hay daño, reemplace los
componentes dañados antes de seguir
usando la podadora.
■ Revise dos veces que el aspa esté
instalada correctamente.
■ Use siempre la podadora con ambas
manos en la manilla. Mantenga las manillas
secas para que sus manos no se resbalen.
■ Apague el producto inmediatamente si
se le interrumpe mientras trabaja o si otras
personas entran al área de trabajo. Antes de
extraer la bolsa recolectora de pasto, deje
que el producto se detenga por completo.
■ No se exija más de la cuenta. Tome
descansos regulares para garantizar su
concentración en el trabajo y que tenga total
control sobre la podadora.
INDICADOR DE CARGA DE LA BATERÍA
Consulte la Figura 18, página iv
■ Presione el botón de carga para revisar el
estado de la batería.
■ El número de luces indicará la cantidad de
carga restante en la batería.
17 ― Español
Page 49

FUNCIONAMIENTO
CORTE
Consulte la Figura 23, página v
■ Asegúrese de que la podadora esté libre
de piedras, varas, alambres y otros objetos
que puedan dañar sus aspas o motor.
Tales objetos podrían salir accidentalmente
expelidos en cualquier dirección y provocar
graves lesiones personales al operador u
otras personas.
■ Para tener un pasto saludable, corte
siempre un tercio o menos del largo total del
pasto.
■ Al cortar en pasto denso, reduzca la
velocidad para obtener un corte más efectivo,
un mantillo adecuado y una mejor descarga
de los residuos.
■ No corte pasto mojado. Se pegará a la
parte inferior de la podadora de césped
(12) y evitará que el mantillo se genere
adecuadamente o que el pasto se descargue
correctamente.
CUIDADO Y MANTENIMIENTO
■ El pasto nuevo o espeso podría requerir un
corte más estrecho.
■ Limpie la parte inferior de la podadora de
césped (12) después de cada uso a n de
extraer pasto, residuos, tierra o cualquier
otro sedimento acumulado. Corte en las
que se superpongan. El patrón de corte
más efectivo para podar el césped es líneas
paralelas rectas hacia uno de los costados.
Esto mantendrá las las iguales y garantizará
que todo el césped se corte sin dejar ningún
espacio sin cortar (Fig. 23).
DESPUÉS DE UTILIZARLA
■ Apague el producto, extraiga la batería (21)
y déjela enfriar.
■ Revise, limpie y almacene la podadora
como se indica en Almacenamiento de
la podadora en la sección Cuidado y
mantenimiento de este manual.
ADVERTENCIA
Al realizar mantenimiento, utilice solo piezas
de repuesto idénticas. El uso de otras
piezas podría generar un peligro o dañar al
producto.
ADVERTENCIA
Cuando utilice esta podadora, use siempre
antiparras o lentes de seguridad con
protección lateral. Si la operación levanta
polvo, utilice también una mascarilla.
MANTENIMIENTO GENERAL
Evite el uso de solventes al limpiar piezas
plásticas. La mayoría de los plásticos son
susceptibles a daños causados por varios
tipos de solventes comerciales. Utilice paños
limpios para retirar la suciedad, polvo, aceite,
grasa, etc.
18 ― Español
ADVERTENCIA
No utilice accesorios o elementos no
recomendados en este manual. El uso de
accesorios o elementos no mencionados en
este manual puede causar lesiones severas.
■ En ningún momento realice mantenimiento
a la podadora sin antes detener el motor y
extraer la llave de seguridad y la batería.
■ Ajuste la barra del manillar o realice otros
ajustes como se indica en el manual.
■ Revise periódicamente el apriete de
todas las tuercas y pernos para asegurar el
funcionamiento seguro de la podadora de
césped.
■ Extraiga cualquier acumulación de pasto
y hojas que esté sobre o alrededor de la
cubierta del motor y compartimiento de la
batería. Ocasionalmente, limpie la podadora
de césped con un paño seco. No usar agua.
Page 50

CUIDADO Y MANTENIMIENTO
LUBRICACIÓN
Todos los cojinetes de este producto están
lubricados con una cantidad suciente de
lubricante de alto rendimiento que debiera
ser suciente para toda la vida útil de este
producto, bajo condiciones operativas
normales. Por lo tanto, no hay necesidad de
lubricar los cojinetes. Antes y después de
cada uso:
■ Lubrique los resortes de la lengüeta de
seguridad posterior con aceite ligero.
■ Lubrique la palanca de ajuste de la altura
de corte (13) y demás piezas relacionadas
con aceite ligero.
■ Voltee la podadora de césped y lubrique los
ejes frontal y posterior de las ruedas, además
de los puntos de inserción hacia las ruedas,
usando aceite ligero.
■ Extraiga el aspa y su maza; lubrique el
eje del motor con aceite ligero o aceite
para motor. Para obtener instrucciones
sobre cómo extraer el aspa consulte Cómo
reemplazar el aspa de la podadora.
ADVERTENCIA
Al realizar mantenimiento en el producto,
proteja siempre sus manos utilizando guantes
gruesos y/o envolviendo los bordes cortantes
del aspa con trapos y otros materiales. No
hacer caso a esta advertencia podría causar
lesiones severas.
ADVERTENCIA
Antes de realizar actividades de
mantenimiento, asegúrese de que la
podadora de césped esté desconectada de
la fuente de alimentación y de que la batería
se haya extraído. No hacer caso a esta
advertencia podría causar lesiones severas.
CÓMO REEMPLAZAR EL ASPA DE LA
PODADORA
Consulte las Figuras 24-25, página v
NOTA: ¡Extraiga la llave de seguridad
y la batería antes de realizar tareas de
mantenimiento!
NOTA: Utilice solo aspas de repuesto
idénticas. Utilice sólo el aspa de corte
Craftsman de repuesto pieza N° 71.98831.
■ Pare el motor y deje que la hoja se detenga
por completo.
■ Con el aspa detenida, extraiga la LLAVE
DE SEGURIDAD y la BATERÍA de la
podadora y almacénela en un lugar seguro.
■ Coloque un bloque de madera entre el
aspa y el cuerpo de la podadora de césped
para evitar que el aspa gire al extraer la
tuerca.
■ Suelte las tuercas del aspa utilizando una
llave de 14 mm.
■ Extraiga las tuercas del aspa y el aspa.
■ Instale la nueva aspa en el eje.
■ Gire las tuercas del aspa en el eje y apriete
con los dedos.
■ Mueva las tuercas del aspa con una llave
de torque (no incluida) a 25 N•m (221.5
libras-pulgadas) para asegurarse de que
estén bien apretadas.
NOTA: Asegúrese de volver a colocar todas
las piezas en el mismo orden en que las
sacó.
19 ― Español
Page 51

CUIDADO Y MANTENIMIENTO
AFILADO DE LA HOJA
Consulte la Figura 26, página vi
Para un mejor desempeño de la podadora,
el aspa debe permanecer alada. Un aspa
sin lo no corta el pasto de manera pareja
y sobrecarga el motor. Bajo circunstancias
normales, alar el aspa dos veces durante la
temporada de corte suele ser suciente. Sin
embargo, si el suelo de su pasto es arenoso,
podrían requerirse secuencias de alado más
frecuentes.
■ Siguiendo las instrucciones de la sección
Cómo reemplazar el aspa de la podadora,
extraiga el aspa. NO INTENTE alar el aspa
mientras está jada a la podadora de césped.
■ Utilizando una piedra de alar o lija na,
ale los bordes del aspa en ambos extremos,
extrayendo la misma cantidad de material en
ambos.
ADVERTENCIA
Al extraer el aspa, inspecciónela
cuidadosamente. Si está doblada o dañada,
reemplácela inmediatamente con una nueva.
El no reemplazar un aspa dañada o doblada
podría causar un accidente y posibles
lesiones severas.
BALANCEO DE LA HOJA
Consulte la Figura 27, página vi
Al alar el aspa se debe tener cuidado
para mantenerla equilibrada. Un aspa no
equilibrada causará vibración excesiva
cuando la podadora de césped esté
en funcionamiento. Esta vibración
eventualmente causará daño a la podadora
de césped, especialmente al motor.
Para vericar el equilibro del aspa:
■ Coloque un destornillador horizontalmente
en un tornillo de banco, tal como se indica.
NOTA: Si no tiene disponible un tornillo de
banco, puede utilizar un clavo recto.
■ Coloque el clavo o destornillador a través
del agujero del centro del aspa.
■ Si el aspa está equilibrada, se mantendrá
en posición horizontal.
REEMPLAZO DE LAS RUEDAS
Consulte la Figura 28, página vi
Para reemplazar una rueda (10 o 14):
NOTA: Antes de reemplazar una rueda
trasera (14), congure la altura de corte de la
podadora en la posición más alta.
■ Extraiga la llave de seguridad (19) y batería
(21) antes de reemplazar la rueda.
■ Pliegue la podadora en su posición de
almacenamiento. Voltee la podadora.
■ Empuje las pestañas del tapacubos interior
desde el costado interno de la rueda, usando
un destornillador de cabeza plana u otra
herramienta adecuada.
■ Cuando todas las pestañas del tapacubos
interno se hayan presionado, el tapacubos
quedará libre y permitirá el acceso al eje.
■ Extraiga la chaveta usando un par de
pinzas; luego, deslice la arandela para
sacarla del eje.
■ Extraiga la rueda y coloque una nueva de
repuesto que sea idéntica a la anterior.
■ Reinstale la arandela y presione la chaveta
de regreso a su posición. Reinstale el
tapacubos interno. Asegúrese de que todas
las pestañas estén jas en posición.
NOTA: Las reparaciones o el reemplazo
de piezas requieren un extremo cuidado,
conocimiento y habilidades, por lo que
sugerimos que tales tareas las realice un
técnico de servicio calicado.
20 ― Español
Page 52

CUIDADO Y MANTENIMIENTO
ALMACENAMIENTO DE LA PODADORA
Consulte las Figuras 29-34, página vi-vii
■ Extraiga la llave de seguridad de la
podadora (19) y la batería.
■ Ponga la podadora de césped de lado
y saque los restos de pasto que se hayan
acumulado en la parte inferior (12).
■ Limpie la podadora de césped con un paño
seco.
■ Compruebe que todas las tuercas,
pernos, botones, tornillos, cierres, etc. estén
apretados.
■ Inspeccione las piezas móviles en
búsqueda de daños, roturas y desgaste.
Lleve a reparación cualquier pieza dañada o
faltante.
■ Almacene la podadora en interiores en un
lugar limpio, seco y alejado del alcance de
los niños.
■ No almacene materiales corrosivos tales
como fertilizantes o sal de roca cerca de la
podadora de césped.
Para bajar la manilla antes de guardar la
podadora de césped:
■ Desbloquee las pinzas de ambos costados
y empuje la barra del manillar hasta el tope.
■ Simultáneamente, mantenga presionadas
ambas palancas de ajuste rápido y gire
la manilla hacia adelante por completo,
hasta que se detenga. Suelte las palancas
para asegurar la manilla en su posición de
almacenamiento.
■ Almacene la podadora en posición plana,
derecha, o derecha con la bolsa recolectora
colgando de ella (Figs. 33-35)
MANTENIMIENTO DEL CARGADOR
■ Mantenga el cargador limpio y libre de
sedimentos. No deje que materiales extraños
entren en la cavidad o en los contactos.
Limpie con un paño seco. No use solventes,
agua o exponga el dispositivo a condiciones
húmedas.
■ Siempre desconecte el cargador cuando no
tenga una batería conectada a él.
■ Asegúrese de que los contactos de
cargador no están en cortocircuito por culpa
de residuos o de material extraño.
RECAMBIO DE LA BATERÍA
■ La batería de la podadora está diseñada
para rendir el máximo de vida útil. Sin
embargo, al igual que todas las baterías,
eventualmente deberá cambiarse. Cargue
siempre las baterías nuevas antes de
usarlas.
■ Para instalarla, consulte las instrucciones
Instalación/extracción de la batería de la
sección Armado de este manual.
■ Lleve la batería antigua a un centro de
reciclaje que acepte baterías de iones de
litio. Nunca deseche baterías arrojándolas
al fuego o junto con los desperdicios
domésticos normales.
LIMPIEZA DE LA PODADORA
ADVERTENCIA
Para reducir el riesgo de descarga eléctrica,
no exponga la podadora al agua.
ADVERTENCIA
En ningún momento realice mantenimiento
a la podadora sin antes detener el motor y
extraer la llave de seguridad y la batería.
La parte inferior de la cubierta de la podadora
(12) debería limpiarse después de cada uso,
ya que se pueden acumular restos de hierba,
hojas, barro y otros residuos y causar óxido y
corrosión.
■ Extraiga cualquier acumulación de pasto
y hojas que esté sobre o alrededor de la
cubierta del motor y compartimiento de la
batería (no use agua). Ocasionalmente,
limpie la podadora de césped con un paño
seco.
■ Si se acumulan sedimentos en la parte
inferior de la unidad durante el uso, detenga
el motor y extraiga la batería. Incline la
podadora hacia adelante, o de costado, y
límpiela.
21 ― Español
Page 53

ELIMINACIÓN DE LA PILA DE FORMA
RESPETUOSA CON EL MEDIOAMBIENTE
Los siguientes materiales tóxicos y corrosivos
están presentes en esta batería: Iones de
litio, un material tóxico.
ADVERTENCIA
Todos los materiales tóxicos deben eliminarse
de la manera especicada a n de evitar
contaminación al ambiente. Antes de eliminar
una batería de litio dañada o gastada,
contacte a su agencia local de eliminación de
desechos o a la agencia local de protección
ambiental para obtener información sobre las
instrucciones especícas.
ADVERTENCIA
Si la batería se rompe o parte, con o sin
fugas, no la recargue ni tampoco la use.
Elimínela y reemplácela con una batería
nueva. ¡NO INTENTE REPARARLA! Para
evitar el riesgo de incendio, explosión,
descarga eléctrica y daños al medioambiente:
■ Cubra las terminales de la batería con cinta
adhesiva aislante.
■ NO intente extraer ni destruir alguno de los
componentes de la batería.
■ NO intente abrir la batería.
■ Si ocurre una fuga, los electrolitos liberados
son corrosivos y tóxicos.
■ NO deje que la solución entre en contacto
con sus ojos o piel ni tampoco la trague.
■ NO coloque estas baterías junto con su
basura doméstica regular.
■ NO incinerar.
■ NO deje las baterías en un lugar donde
se recojan para ser llevadas a algún relleno
sanitario o sistema municipal para desechos
sólidos.
■ Llévelas a un centro de reciclaje o
eliminación certicado.
22 ― Español
Page 54

RESOLUCIÓN DE PROBLEMAS
PROBLEMA POSSIBLE CAUSE SOLUCIÓN
La podadora no
enciende.
La podadora corta
de forma dispareja.
La podadora no
genera mantillo
adecuadamente
La llave no está instalada.
La batería no se puede jar o no
queda ja de manera segura.
No hay potencia o la potencia es
demasiado baja.
Interruptor defectuoso.
Aspa atascada.
Batería agotada.
Césped duro o disparejo.
La altura de corte no está bien
congurada.
El aspa está desalada.
Hay restos de pasto que se pegan
en la parte inferior de la podadora.
Falta el conector de mantillo.
Revise que la llave esté instalada.
Revise la conexión de la batería con la
podadora.
Cargue la batería.
Si aún está dentro del periodo de garantía,
devuelva el producto al vendedor minorista
donde lo adquirió.
Detenga la podadora y extraiga la batería;
revise que no haya pasto ni sedimentos en
la parte inferior de la carcasa. Limpie el aspa
para que pueda moverse libremente.
Reemplace la batería (llame
gratuita, al 1-888-331-4569).
Revise la zona que va a ser cortada.
Ajuste la podadora hacia una posición más
alta.
Ale o cambie el aspa.
Antes de cortar el pasto, espere hasta que
se seque.
Instale el conector de mantillo.
a la línea
Cuesta mucho
empujar la podadora
La podadora
vibra demasiado
y hace mucho
ruido.
El pasto está muy alto y el ajuste
de corte demasiado bajo. La
parte posterior de la carcasa
de la podadora y el aspa se
arrastran en el pasto denso.
El aspa de corte no está
ensamblada correctamente.
El aspa no está equilibrada.
El eje del motor está doblado. Detenga la podadora y extraiga la batería.
23 ― Español
Eleve la altura de corte.
Apriete los pernos del aspa.
Ale y equilibre el aspa siguiendo las
indicaciones de este manual, o bien
cámbiela por una nueva.
Haga que un centro de servicio autorizado
inspeccione y repare la podadora antes de
volver a encenderla.
Page 55

PODADORA INALÁMBRICA CRAFTSMAN DE 60 V MAX* CON BATERÍA DE
LITIO – NÚMERO DE MODELO 151.98834
El número de modelo se encuentra en la etiqueta adjunta a la carcasa del motor.
PARA ADQUIRIR PIEZAS DE REPUESTO, LLAME AL 1-888-331-4569
24
Page 56

PODADORA INALÁMBRICA CRAFTSMAN DE 60 V MAX* CON BATERÍA DE
LITIO – NÚMERO DE MODELO 151.98834
El número de modelo se encuentra en la etiqueta adjunta a la carcasa del motor.
PARA ADQUIRIR PIEZAS DE REPUESTO, LLAME AL 1-888-331-4569
Número clave Número de dibujo Descripción Cantidad
1 211032101 Conjunto de piezas de la carcasa superior del motor 1
1a 211032102 Tapa de la batería 1
2 211032103 Conjunto de piezas de la manilla de transporte 1
3 211032104 Tapa inferior del motor 1
4 211032105 Compartimiento de la batería 1
5 211032106 Llave de seguridad 1
6 111198106 Conjunto de piezas de la placa de circuitos 1
7 111198107 Conjunto de piezas del telecontrol 1
8 111198140 Abrazadera de la manilla derecha 1
9 211032107 Conjunto de piezas de la rueda trasera (235 mm) 1
10 111198109 Rear Wheel Assembly (235mm) 1
10a 111198133 Rueda trasera 2
10b 211032109 Cubierta de la rueda 2
11 111198110 Conjunto de piezas de la puerta de descarga lateral 1
12 111198111 Escape de descarga lateral 1
13 211032110 Cubierta de la podadora de césped 1
14 111198113 Conjunto de piezas de la rueda delantera (170 mm) 1
14a 111198135 Rueda frontal 2
10b 211032109 Cubierta de la rueda 2
15 111198115 Eje frontal 1
16 111198116 Manilla de transporte frontal 1
17 211032113 Conjunto de piezas del aspa 1
17a 71.98831** Aspa (71.98831) 1
17b 111198137 Broche del aspa 2
17c 111198138 Conjunto de piezas del aspa 1
18 111088115 Conjunto de piezas de la abrazadera del eje frontal 1
19 111198141 Resorte 1
20 111198118 Varilla conectora del ajuste de altura 1
21 111198119
22 111198120 Conjunto de piezas de la manilla de ajustes de altura 1
23 111198121 Placa protectora frontal 1
24 111198122 Placa protectora posterior 1
Conjunto de piezas de la abrazadera del eje
posterior
1
NOTA:
Sólo las partes resaltadas en gris están disponibles para
comprar. Llame al 1-888-331-4569 para ordenarlas.
**Parte disponible en su Sears más cercano, y en www.Sears.com.
25
Page 57

PODADORA INALÁMBRICA CRAFTSMAN DE 60 V MAX* CON BATERÍA DE
LITIO – NÚMERO DE MODELO 151.98834
El número de modelo se encuentra en la etiqueta adjunta a la carcasa del motor.
PARA ADQUIRIR PIEZAS DE REPUESTO, LLAME AL 1-888-331-4569
Número clave Número de dibujo Descripción Cantidad
25 211032114
26 111198124 Eje posterior 1
27 211032115 Abrazadera de la manilla izquierda 1
28 111008129 Conjunto de piezas de la pinza del cable 1
29 111198126 Lengüeta de seguridad posterior 1
30 211032116 Puerta de descarga posterior 1
31 111193126 Resorte 1
32 211032117 Conjunto de piezas REDI-BAG completa 1
33 211032118 Conjunto de piezas de la manilla 1
33a 211032119
33b 211032120
33c 211032121 Conjunto de piezas de la manilla 2
34 111198130 Conector de mantillo 1
35 60LFC02-ETL Cargador HPP de 60 V 1
36 151.98838 Batería de 60 V y 5,0 Ah 1
Conjunto de piezas de la perilla de ajuste
de altura
Conjunto de piezas izquierdo de la
cubierta de la manilla
Conjunto de piezas derecho de la cubierta
de la manilla
1
1
1
NOTA:
Sólo las partes resaltadas en gris están disponibles para
comprar. Llame al 1-888-331-4569 para ordenarlas.
**Parte disponible en su Sears más cercano, y en www.Sears.com.
26
Page 58

Product questions or problems?
1-888-331-4569
Customer Care Hot Line
Get answers to questions, troubleshoot problems,
order parts, or schedule repair service.
Para respuestas a preguntas o problemas, y ordenar
piezas o pedir servicio para la reparación de su equipo.
To help us help you, register your product at www.craftsman.com/registration
Para poderte ayudar mejor, registra tu producto en www.craftsman.com/registration
Join the Craftsman Club today!
Receive exclusive member benefits including special pricing and offers,
project sharing, expert advice, and SHOP YOUR WAY REWARDS!
Como miembro exclusivo, recibe diversos beneficios como ofertas, precios especiales, proyectos
nuevos, consejos de expertos y nuestro programa de puntos SHOP YOUR WAY REWARDS!
® Registered Trademark / TM Trademark of KCD IP, LLC in the United States, or Sears Brands, LLC in other countries
® Marca Registrada /
TM
Marca de Fábrica de KCD IP, LLC en Estados Unidos, o Sears Brands, LLC in otros países
 Loading...