

Page 1
Operator’s Manual
Model No. C950.672150
Part No. 317557GS Draft - (3/07/2012)
• Safety
• Assembly
• Operation
• Maintenance
• Parts
• Français, p. 34
HOURS: Mon. - Fri. 8 a.m. to 5 p.m. (CT)
PRESSURE WASHER
CUSTOMER HELPLINE
1-800-222-3136
WARNING
Before using this product, read this
manual and follow all Safety Rules
and Operating Instructions.
* This pressure washer is rated in accordance to the Pressure Washer Manufacturers Association
(PWMA) standard PW101-2010 (Testing and Rating Performance of Pressure Washers).
* Les caractéristiques nominales de ce nettoyeur à haute pression sont conformes à la norme PW101-2010 de la Pressure Washer Manufacturers Association
(PWMA) (Tests et performance nominale des nettoyeurs à haute pression).
Sears Canada, Inc.
Visit our Craftsman website: www.sears.ca
2600 PSI @ 2.1 GPM MAX*
2050 PSI @ 2.3 GPM MAX*
PRESSURE WASHER
AVERTISSEMENT
Avant d’utiliser ce produit, veuillez lire le
manuel et suivre toutes les directives
relatives à la sécurité et à l’utilisation.
Page 2

2
© 2012
WARRANTY
TABLE OF CONTENTS
CRAFTSMAN LIMITED WARRANTY
General: Craftsman products are warranted to be free from defects in materials or workmanship for a specific time period as
set-out below (the “Warranty Period”). Warranties extend to the original purchaser of a Craftsman product only. Purchases
made through an online auction or through any website other than www.sears.ca are excluded. The relevant Warranty Period
commences on the original date of purchase. Within this period, Sears Canada, Inc. will, at its sole option, repair or replace
any products or components which fail in normal use. Such repairs or replacement will be made at no charge to the customer
for parts or labor, provided that the customer shall be responsible for any transportation cost.
Exclusions: This warranty does not cover failures due to normal wear, abuse, misuse, neglect (including but not limited to the
use of stale fuel, dirt, abrasives, moisture, rust, corrosion, or any adverse reaction due to improper storage or use habits),
improper maintenance or failure to follow maintenance guidelines and/or instructions, failure to operate the product in
accordance with the owner’s manual or any additional instructions or information provided at the time of purchase or in
subsequent communications with the original purchaser, accident or unauthorized alterations or repairs made or attempted by
others. Also excluded from warranty coverage – except as provided below - are the following: maintenance, adjustments,
components subject to wear including but not limited to: cosmetic components, belts, blades, blade adapters, bulbs, tires,
filters, guide bars, lubricants, seats, grips, recoil assembly’s, saw chains and bars, trimmer lines and spools, spark plugs,
starter ropers and tines, and discoloration resulting from ultraviolet light. Any product missing the model and/or serial
number identification label will be disqualified from coverage under this warranty.
Repairs: Repairs conducted within the Warranty Period will be warranted until the end of the original Warranty Period.
Disclaimers: THE WARRANTIES AND REMEDIES CONTAINED HEREIN ARE EXCLUSIVE AND IN LIEU OF ALL OTHER
WARRANTIES, WHETHER ORAL OR WRITTEN (OTHER THAN AS STATED HEREIN), AND WHETHER EXPRESS, IMPLIED OR
STATUTORY, INCLUDING BUT NOT LIMITED TO ANY. THIS WARRANTY GIVES YOU SPECIFIC LEGAL RIGHTS, WHICH MAY
VARY FROM PROVINCE TO PROVINCE.
IN NO EVENT SHALL SEARS BE LIABLE FOR ANY INCIDENTAL, SPECIAL, INDIRECT OR CONSEQUENTIAL DAMAGES,
WHETHER RESULTING FROM THE USE, MISUSE OR INABILITY TO USE THE PRODUCT OR FROM DEFECTS IN THE
PRODUCT. THE EXCLUSIONS IN THIS PARAGRAPH SHALL NOT APPLY IN JURISDICTIONS WHERE APPLICABLE LAW DOES
NOT ALLOW FOR THE EXCLUSION OF INCIDENTAL OR CONSEQUENTIAL DAMAGES. IN SUCH JURISDICTIONS, THIS
PARAGRAPH SHALL NOT APPLY, BUT THE REMAINING PROVISIONS OF THIS DOCUMENT SHALL REMAIN VALID.
Sears retains the exclusive right to repair or replace the product or offer a full refund of the purchase price at its sole
discretion. SUCH REMEDY SHALL BE YOUR SOLE AND EXCLUSIVE REMEDY FOR ANY BREACH OF WARRANTY.
WARRANTY. . . . . . . . . . . . . . . . . . . . . . . . . . . . . . . . . . . . . . . . . 2-3
SAFETY RULES . . . . . . . . . . . . . . . . . . . . . . . . . . . . . . . . . . . . . . 4-6
FEATURES AND CONTROLS. . . . . . . . . . . . . . . . . . . . . . . . . . . . . . 7
ASSEMBLY . . . . . . . . . . . . . . . . . . . . . . . . . . . . . . . . . . . . . . . . 8-11
OPERATION. . . . . . . . . . . . . . . . . . . . . . . . . . . . . . . . . . . . . . . 12-15
SPECIFICATIONS . . . . . . . . . . . . . . . . . . . . . . . . . . . . . . . . . . . . . 16
MAINTENANCE . . . . . . . . . . . . . . . . . . . . . . . . . . . . . . . . . . . . 17-21
STORAGE . . . . . . . . . . . . . . . . . . . . . . . . . . . . . . . . . . . . . . . . . . . 22
TROUBLESHOOTING . . . . . . . . . . . . . . . . . . . . . . . . . . . . . . . . . . 24
NOTES . . . . . . . . . . . . . . . . . . . . . . . . . . . . . . . . . . . . . . . . . . . . . 25
REPLACEMENT PARTS . . . . . . . . . . . . . . . . . . . . . . . . . . . . . . 26-31
EMISSION CONTROL WARRANTY . . . . . . . . . . . . . . . . . . . . . 32-33
FRANÇAIS . . . . . . . . . . . . . . . . . . . . . . . . . . . . . . . . . . . . . . . . 34-63
HOW TO ORDER PARTS . . . . . . . . . . . . . . . . . . . . . . . . BACK PAGE
Page 3

3
Customer Responsibilities: In additional to complying with all suggested maintenance guidelines and instructions, customers’
obligations shall include but shall not be limited to: operating the product in accordance with the owner’s manual or any
additional instructions or information provided at the time of purchase or in subsequent communications to the purchaser
from time to time, exhibit reasonable care in the use, operation, maintenance, general upkeep and storage of the product.
Failure to comply with these requirements will void any applicable warranty.
List of Applicable Warranty Periods: The following list contains the applicable Warranty Period for your Craftsman product
and is based on a combination of the type of product or component and the intended and actual use of the product or
component:
1. 90 days: Craftsman products intended for use or actually used for commercial, institutional, professional or income-
producing purposes
2. 2 years: Craftsman riding lawn mowers, yard and garden tractors, walk behind mowers, tillers, brush cutters, snow
blowers, handheld blowers, backpack blowers, hedge trimmers and electrical products for noncommercial,
nonprofessional, non-institutional, or non-income-producing use, except for those components which are part of engine
systems manufactured by third party engine manufacturers for which the purchase has received an separate warranty with
product information supplied at the time of purchase.
3. 1 year: Craftsman pressure washers, power cutters, stump grinders, pole pruners, gas chain saws, electric chain saws,
trimmer attachments, baggers and pole saws for noncommercial, nonprofessional, non-institutional, or non-incomeproducing use.
4. 90 days: All defective batteries, which will be replaced during this 90-day Warranty Period.
5. 60 days: Additional Warranty Period of 60 days will apply to adjustments and worn products or components BUT DOES
NOT INCLUDE WEAR OR ADJUSTMENTS for products used for commercial, institutional, professional or incomeproducing purposes. Wear items include but are not limited to: belts, blades, tires, spark plugs, air filters, chains, shear
bolts, skid plates, scraper bars, drift cutters, ropes, tines, collection bags and pulleys.
Service Type: Craftsman product is either Carry-in/Shop service or At Home service. The following list identifies the service
by product type.
Shop Service:
Craftsman walk behind mowers, tillers, brush cutters, handheld blowers, backpack blowers, hedge trimmers, power cutters,
stump grinders, pole pruners, gas chain saws, electric chain saws, trimmer attachments, baggers and pole saws
At Home Service:
Craftsman riding lawn mowers, yard and garden tractors and snow blowers
As the Warranty Period runs from the date of purchase and NOT from the date that a product is delivered, opened, assembled
or first used, please ensure during this time period that your product or component has been assembled and tested for
correction operation regardless of when you intend to actually use it. Claims made after the Warranty Period has expired will
not be honored.
Proof of Purchase/Documentation: Warranty coverage is conditioned upon the original purchaser furnishing Sears Canada or
its authorized third party service provider if applicable, with the original sales receipt or other adequate written proof of the
original purchase date and identification of the product. In the event that the original purchaser is unable to provide a
company of the original sales receipt, Sears Canada Inc. reserves the right to determine in its sole discretion what other
written proof of the original purchase date and identification of the product is acceptable.
SEARS CANADA INC., TORONTO, ONTARIO, CANADA M5B 2C3
Page 4
4
Read this manual carefully and become familiar
with your pressure washer. Know its applications,
its limitations, and any hazards involved.
Important Safety Information
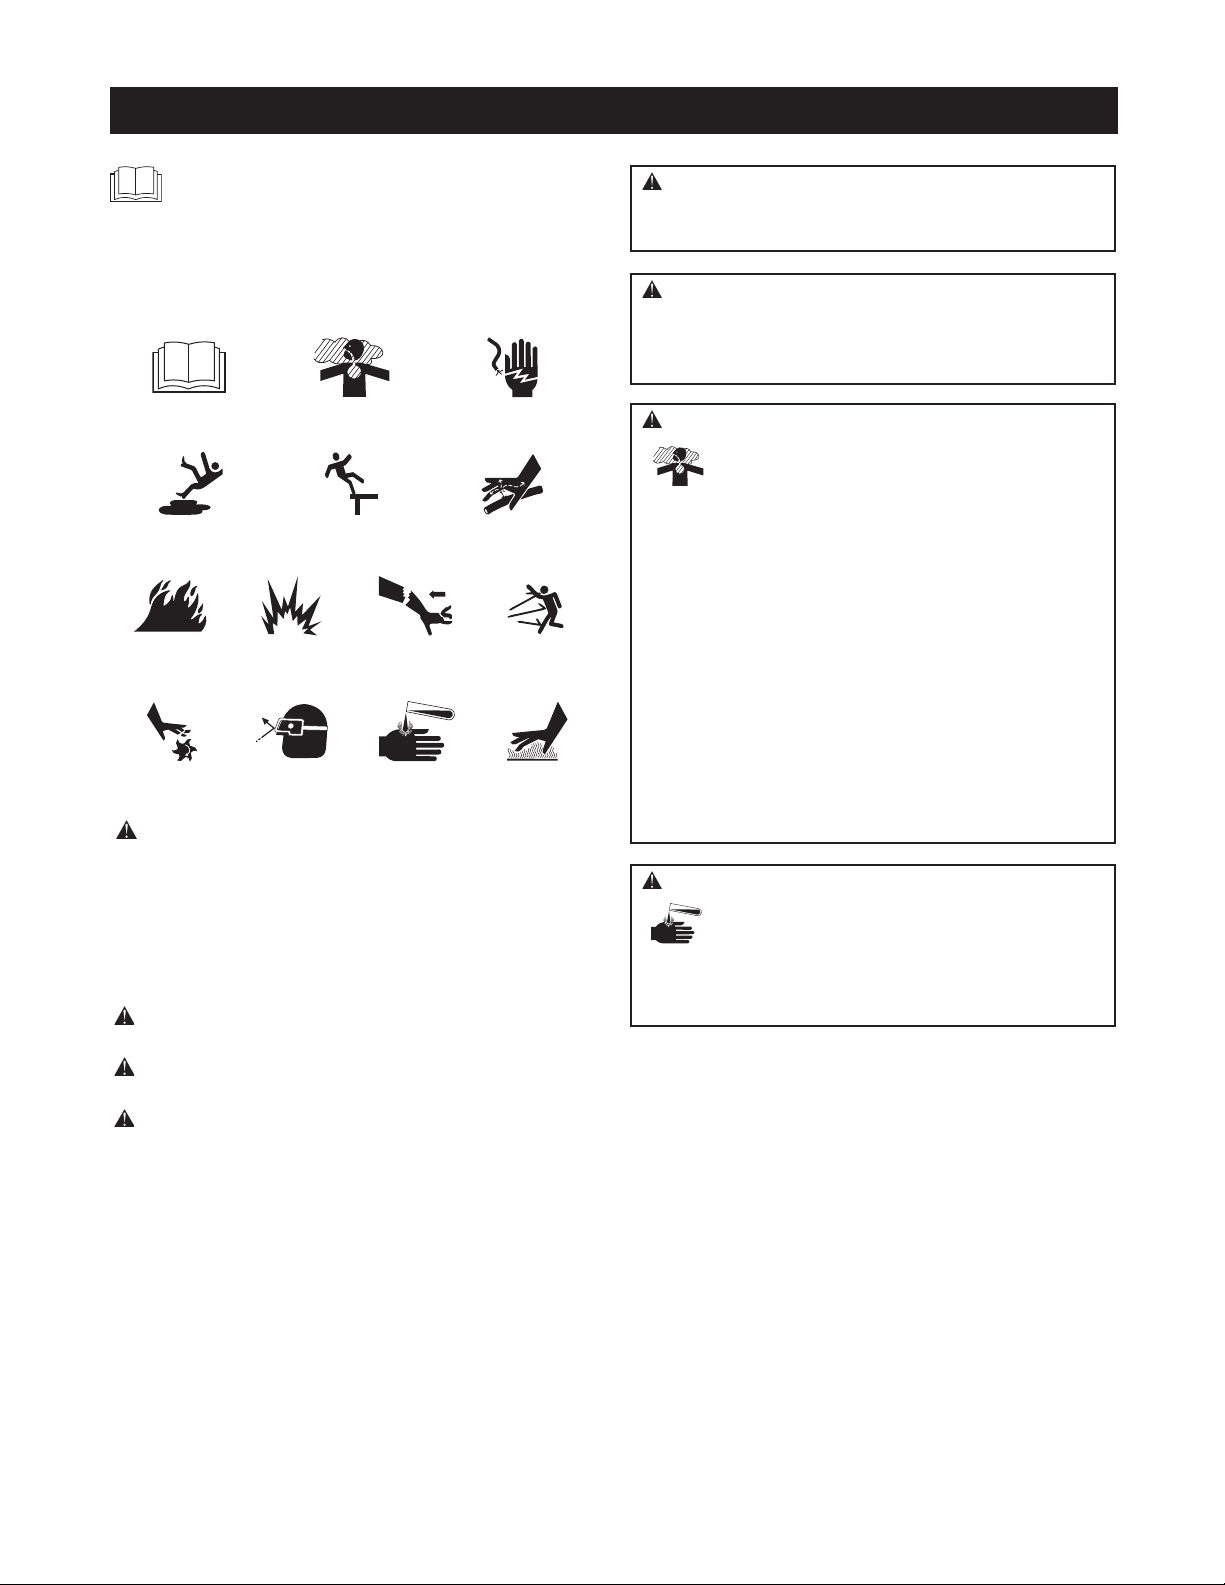
Safety Symbols and Meanings
The safety alert symbol indicates a potential personal
injury hazard. A signal word (DANGER, WARNING, or
CAUTION) is used with the alert symbol to designate a
degree or level of hazard seriousness. A safety symbol may
be used to represent the type of hazard. The signal word
NOTICE is used to address practices not related to personal
injury.
DANGER indicates a hazard which, if not avoided, will
result in death or serious injury.
WARNING indicates a hazard which, if not avoided, could
result in death or serious injury.
CAUTION indicates a hazard which, if not avoided, could
result in minor or moderate injury.
NOTICE address practices not related to personal injury.
SAFETY RULES
Fire
Explosion
Toxic Fumes
Hot Surface
Moving Parts
Electrical Shock
Slippery Surface
Fall
Kickback
Flying Objects
Fluid Injection
Operator’s Manual
Chemical Burn
Projectile
WARNING The engine exhaust from this product
contains chemicals known to the State of California to
cause cancer, birth defects, or other reproductive harm.
WARNING This product contains lead and lead
compounds, known to the State of California to cause
birth defects or other reproductive harm. Wash your
hands after handling this product.
WARNING Running engine gives off carbon
monoxide, an odorless, colorless, poison gas.
Breathing carbon monoxide could result in death,
serious injury, headache, fatigue, dizziness,
vomiting, confusion, seizures, nausea or fainting.
Some chemicals or detergents could be harmful if inhaled
or ingested, resulting in death, serious injury, nausea,
fainting or poisoning.
• Operate this product ONLY outdoors.
• Keep exhaust gas from entering a confined area through
windows, doors, ventilation intakes, or other openings.
• DO NOT operate this product inside any building, carport,
porch, mobile equipment, marine applications, or enclosure,
even if windows and doors are open.
• Use a respirator or mask whenever there is a chance that
vapors may be inhaled when using chemicals.
• Read all instructions with mask so you are certain the mask will
provide the necessary protection against inhaling harmful
vapors when using chemicals.
WARNING Chemical Burn Hazard.
Chemicals could cause burns resulting in death,
serious injury, and/or property damage.
• DO NOT use caustic liquid with pressure washer.
• Use ONLY pressure washer safe detergents /soaps. Follow all
manufacturers instructions.
Page 5
5
WARNING Fuel and its vapors are extremely flammable
and explosive which could cause burns,
fire or explosion resulting in death,
serious injury and/or property damage.
WHEN ADDING OR DRAINING FUEL
• Turn pressure washer engine OFF and let it cool at least 2
minutes before removing fuel cap. Loosen cap slowly to relieve
pressure in tank.
• Fill or drain fuel tank outdoors.
• DO NOT overfill tank. Allow space for fuel expansion.
• If fuel spills, wait until it evaporates before starting engine.
• Keep fuel away from sparks, open flames, pilot lights, heat, and
other ignition sources.
• Check fuel lines, tank, cap and fittings frequently for cracks or
leaks. Replace if necessary.
• DO NOT light a cigarette or smoke.
WHEN STARTING EQUIPMENT
• Ensure spark plug, muffler, fuel cap, and air cleaner are in place.
• DO NOT crank engine with spark plug removed.
WHEN OPERATING EQUIPMENT
• DO NOT operate this product inside any building, carport,
porch, mobile equipment, marine applications, or enclosure.
• DO NOT tip engine or equipment at angle which causes fuel to
spill.
• DO NOT spray flammable liquids.
WHEN TRANSPORTING, MOVING OR REPAIRING EQUIPMENT
• Transport/move/repair with fuel tank EMPTY or with fuel shutoff
valve OFF.
• DO NOT tip engine or equipment at angle which causes fuel to
spill.
• Disconnect spark plug wire.
WHEN STORING FUEL OR EQUIPMENT WITH FUEL IN TANK
• Store away from furnaces, stoves, water heaters, clothes
dryers, or other appliances that have pilot light or other ignition
source because they could ignite fuel vapors.
WARNING Risk of electrocution.
Contact with power source could cause electric
shock or burn resulting in death or serious injury.
• NEVER spray near power source.
WARNING Starter cord kickback (rapid retraction) will
pull hand and arm toward engine faster than you
can let go which could cause broken bones,
fractures, bruises, or sprains resulting in serious
injury.
• NEVER pull starter cord without first relieving spray gun
pressure.
• When starting engine, pull cord slowly until resistance is felt
and then pull rapidly to avoid kickback.
• After each starting attempt, where engine fails to run, always
point spray gun in safe direction, press red button and squeeze
spray gun trigger to release high pressure.
• Firmly grasp spray gun with both hands when using high
pressure spray to avoid injury when spray gun kicks back.
WARNING Exhaust heat/gases could ignite
combustibles, structures or damage fuel
tank causing a fire, resulting in death,
serious injury and/or property damage.
Contact with muffler area could cause burns resulting in
serious injury.
• DO NOT touch hot parts and AVOID hot exhaust gases.
• Allow equipment to cool before touching.
• Keep at least 5 feet (1.5 m) of clearance on all sides of pressure
washer including overhead.
• It is a violation of California Public Resource Code, Section
4442, to use or operate the engine on any forest-covered,
brush-covered, or grass-covered land unless the exhaust
system is equipped with a spark arrester, as defined in Section
4442, maintained in effective working order. Other states or
federal jurisdictions may have similar laws.
Contact the original equipment manufacturer, retailer, or dealer
to obtain a spark arrester designed for the exhaust system
installed on this engine.
• Replacement parts must be the same and installed in the same
position as the original parts.
WARNING The high pressure stream of water that
this equipment produces could cut through skin
and its underlying tissues, resulting in serious
injury and possible amputation.
Spray gun traps high water pressure, even when engine is
stopped and water is disconnected, which could result in
serious injury.
• If cut by fluid, call physician immediately. DO NOT treat as a
simple cut.
• DO NOT allow CHILDREN to operate pressure washer.
• NEVER repair high pressure hose. Replace it.
• NEVER repair leaking connections with sealant of any kind.
Replace o-ring or seal.
• NEVER connect high pressure hose to nozzle extension.
• Keep high pressure hose connected to pump and spray gun
while system is pressurized.
• DO NOT lift or tilt surface cleaner from horizontal surface while
connected to spray gun. Release spray gun trigger prior to
lifting or tilting.
• ALWAYS point spray gun in safe direction, press red button
and squeeze spray gun trigger to release high pressure, every
time you stop engine.
• NEVER aim spray gun at people, animals, or plants.
• DO NOT secure spray gun in open position.
• DO NOT leave spray gun unattended while machine is running.
• NEVER use a spray gun which does not have a trigger lock or
trigger guard in place and in working order.
• Always be certain spray gun, nozzles and accessories are
correctly attached.
Page 6
6
NOTICE High pressure spray could damage fragile items
including glass.
• DO NOT point spray gun at glass when using red (0°) spray tip.
• NEVER aim spray gun at plants.
NOTICE Improper treatment of pressure washer could
damage it and shorten its life.
• If you have questions about intended use, ask dealer or contact
qualified service center.
• NEVER operate units with broken or missing parts, or without
protective housing or covers.
• DO NOT by-pass any safety device on this machine.
• DO NOT tamper with governed speed.
• DO NOT operate pressure washer above rated pressure.
• DO NOT modify pressure washer in any way.
• Before starting pressure washer in cold weather, check all parts of
the equipment to be sure ice has not formed there.
• NEVER move machine by pulling on hoses. Use handle provided
on unit.
• This equipment is designed to be used with Sears authorized parts
ONLY. If equipment is used with parts that DO NOT comply with
minimum specifications, user assumes all risks and liabilities.
WARNING Use of pressure washer could create
puddles and slippery surfaces causing
you to fall resulting in death or serious
injury.
Kickback from spray gun could cause you to fall resulting
in death or serious injury.
• Operate pressure washer from a stable surface.
• The cleaning area should have adequate slopes and drainage to
reduce the possibility of a fall due to slippery surfaces.
• Be extremely careful if you must use the pressure washer from
a ladder, scaffolding, or any other similar location.
• Firmly grasp spray gun with both hands when using high
pressure spray to avoid injury when spray gun kicks back.
WARNING Unintentional sparking could cause fire or
electric shock resulting in death or
serious injury.
WHEN ADJUSTING OR MAKING REPAIRS TO YOUR PRESSURE
WASHER
• Disconnect the spark plug wire from the spark plug and place
the wire where it cannot contact spark plug.
WHEN TESTING FOR ENGINE SPARK
• Use approved spark plug tester.
• DO NOT check for spark with spark plug removed.
WARNING Starter and other rotating parts could
entangle hands, hair, clothing, or accessories
resulting in serious injury.
• NEVER operate pressure washer without protective housing or
covers.
• DO NOT wear loose clothing, jewelry or anything that could be
caught in the starter or other rotating parts.
• Tie up long hair and remove jewelry.
CAUTION
Excessively high operating speeds could
result in minor injury and/or pressure washer damage.
Excessively low speeds impose a heavy load.
• DO NOT tamper with governor spring, links or other parts to
increase engine speed. Pressure washer supplies correct rated
pressure and flow when running at governed speed.
• DO NOT modify pressure washer in any way.
WARNING Risk of eye or bodily injury.
Spray could splash back or propel
objects resulting in serious injury.
• Always wear indirect vented (chemical splash) safety goggles
marked to comply with ANSI Z87.1 when using or in vicinity of
this equipment.
• NEVER substitute safety glasses or dry-condition goggles for
indirect vented safety goggles.
• Always wear protective clothing such as a long-sleeved shirt,
long pants and close-toed shoes.
• NEVER operate pressure washer when barefoot or wearing
sandals or shorts.
Page 7

7
KNOW YOUR PRESSURE WASHER
Read the Operator’s Manual and safety rules before operating your pressure washer.
Compare the illustrations with your pressure washer to familiarize yourself with the locations of various controls and
adjustments. Save this manual for future reference.
FEATURES AND CONTROLS
A - Spray Gun — Controls the application of water onto cleaning
surface with trigger device. Includes trigger lock.
B - Accessory Tray — Provides convenient storage for accessories,
such as gun, nozzle extension, etc.
C - Spray Tips — Detergent, 0°, 15° and 40°: for various high
pressure cleaning applications.
D - Fold Down Handle — Handle and accessory tray fold flat atop
cold engine for space-saving storage.
E - Water Inlet — Connection for garden hose.
F - High Pressure Outlet — Connection for high pressure hose.
G - Air Filter — Protects engine by filtering dust and debris out of
intake air.
H - Bottle Bracket — Cleaning solution bottle fits in wire form
bracket here. Concentrate bottle not included.
J - Fuel Valve — Used to turn fuel supply on and off to engine.
K - Choke Rod — Prepares a cold engine for starting.
M - Engine Switch — Sets engine in starting mode for recoil starter
and stops a running engine.
N - PerfectMix™ Siphon — Mixes concentrate with pressure
washer spray.
P - Warning/Operating Instructions Tag — Identifies hazards and
proper procedure to start/stop pressure washer.
Q - Recoil Starter — Used for starting the engine manually.
R - Fuel Tank — Fill tank with regular unleaded fuel. Always leave
room for fuel expansion.
S - High Pressure Hose — Connect one end to water pump and
the other end to spray gun.
T - Nozzle Extension with Quick Connect — Allows you to switch
between four different spray tips.
Items Not Shown:
Oil Fill/Dipstick — Check, add and drain engine oil here.
Pump — Develops high pressure.
Automatic Cool Down System — Cycles water through pump when
water reaches 125°-155°F. Warm water will discharge from pump
onto ground. This system prevents internal pump damage.
Identification Label — Provides model and serial number of
pressure washer. Please have these readily available if calling for
assistance.
B
A
C
D
R
N
F
Q
H
S
P
T
G
M
K
J
E
Page 8
8
Your pressure washer requires some assembly and is ready
for use only after it has been properly serviced with the
recommended oil and fuel.
If you have any problems with the assembly of your
pressure washer, please call the pressure washer helpline
at 1-800-222-3136.
UNPACK THE PRESSURE WASHER
1. Remove everything from carton except pressure washer.
2. Open carton completely by cutting each corner from top
to bottom.
3. Remove pressure washer from carton.
CARTON CONTENTS
Check all contents. If any parts are missing or damaged, call
the pressure washer helpline at 1-800-222-3136.
• Main Unit
• Handle
• Accessory Tray with Hose Wrap
• Rubber Straps (2)
• High Pressure Hose
• Spray Gun
• Nozzle Extension with Quick Connect Fitting
• Oil Bottle
• Bottle Bracket Wireform
• PerfectMix™ Siphoning Unit/Hose
• Parts Bag (which includes the following):
• Operator’s Manual
• Bag containing 4 Multi–Colored Quick Connect Spray
Tips
• Handle Fastening Hardware Kit (which includes):
• Handle Bolts (2)
• Carriage Bolt (1)
• Plastic Knobs for Handle (2)
• Plastic Knob (1)
• Tree Clips (4)
Become familiar with each piece before assembling the
pressure washer. Identify all contents with the illustration on
page 6. If any parts are missing or damaged, call the
pressure washer helpline at 1-800-222-3136.
ASSEMBLING PRESSURE WASHER
Your Craftsman pressure washer will need assembly before
operation:
1. Attach handle and accessory tray.
2. Connect detergent siphon hose to pump.
3. Add oil to engine crankcase.
4. Add fuel to fuel tank.
5. Connect pressure hose to spray gun and pump.
6. Connect water supply to pump.
7. Attach nozzle extension to spray gun.
8. Select/attach quick connect spray tip to nozzle extension.
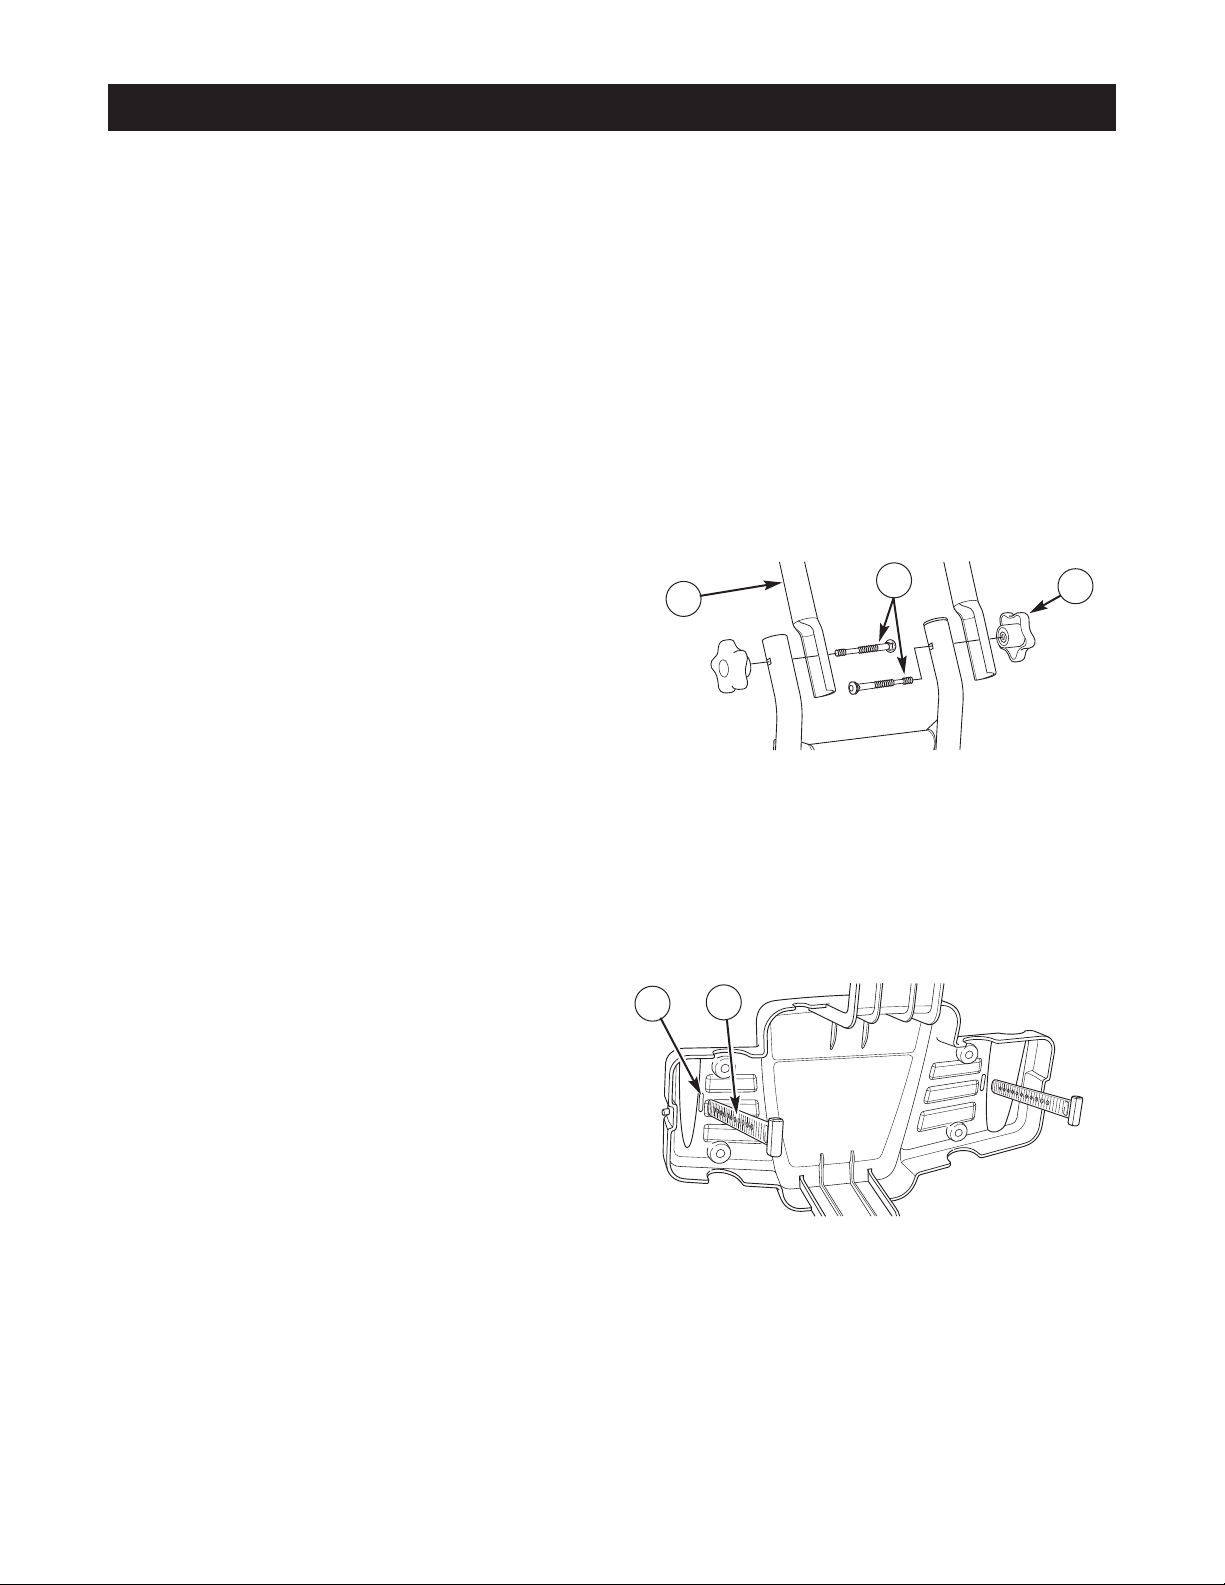
Attach Handle and Accessory Tray
1. Place handle (A) onto handle supports connected to
main unit. Make sure holes in handle align with holes on
handle supports.
2. Insert handle carriage bolts (B) through holes from
inside of unit and attach a plastic knob (C) from outside
of unit. Tighten by hand.
NOTICE By loosening both knobs to the middle section of
the attachment bolt, the upper handle can fold forward to
store flat atop the cold engine. DO NOT fold the handle down
while the engine is hot.
3. Insert rubber straps (D) through slots (E) in back of
accessory tray and pull tight from front.
ASSEMBLY
B
A
E
D
C
Page 9
9
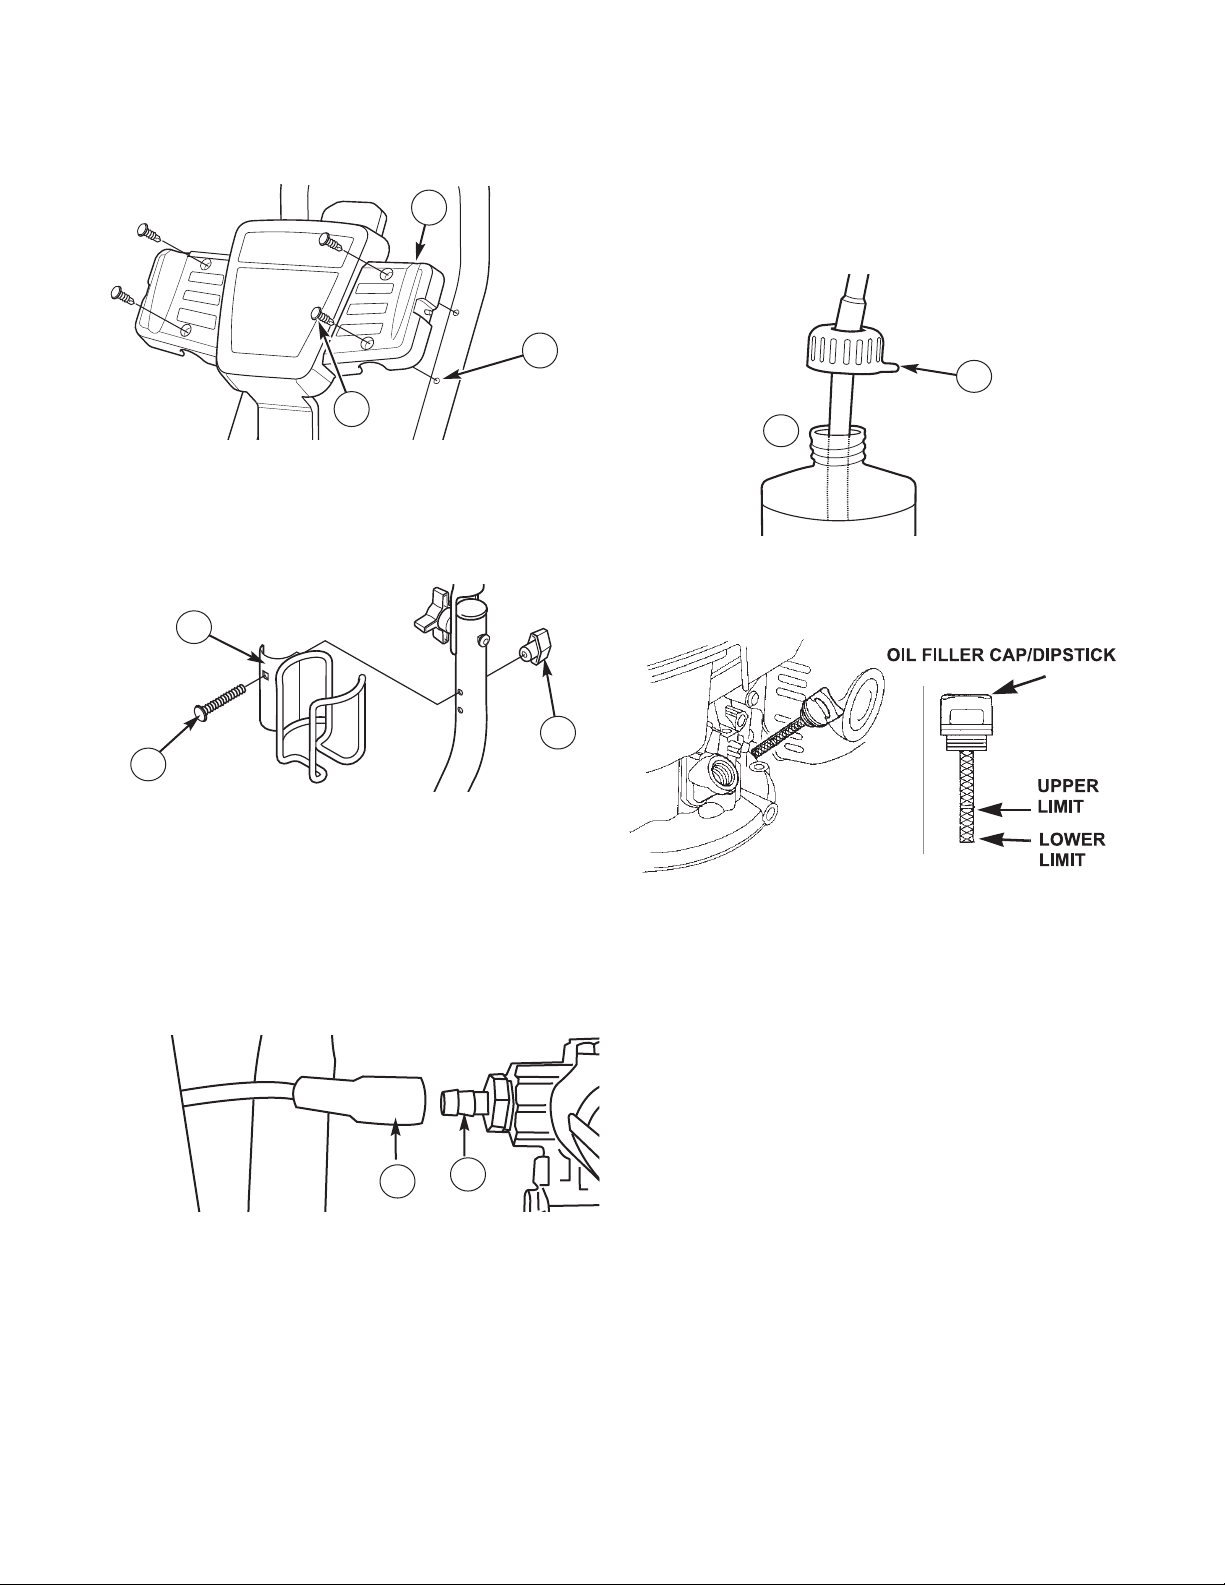
4. Place accessory tray (A) over holes (B) on handle
(viewing from front of unit). Push the tree clips (C) into
the holes until they sit flat against the accessory tray.
5. Insert multi–colored quick connect spray tips and other
supplied accessories in spaces provided in accessory
tray. See How to Use Accessory Tray.
6. Attach bottle bracket (D) to handle with carriage bolt (E)
and black plastic knob (F). Tighten by hand.
PerfectMix™ Soap System
The pressure washer is equipped with a detergent siphoning
hose.
Attach PerfectMix™ Siphon to Pump
Attach the tube end of the blue PerfectMix™ Siphon (G) to
the barbed tube fitting (H) on the pump.
Attach PerfectMix™ Detergent Siphon to
Concentrate Bottle
Place PerfectMix™ bottle (not included) in the wire-form
bracket on the handle. Remove cap from bottle and insert the
PerfectMix™ Siphon (J). Screw the siphon unit to the top of
the bottle (K). Use the clip on the cap (J) to snap siphon to
wire form bracket when siphon is not in a concentrate bottle.
Add Engine Oil
1. Place pressure washer on a flat, level surface.
2. Clean area around oil fill and remove oil fill cap/dipstick.
3. Using oil funnel (optional), slowly pour contents of
supplied oil into oil fill opening, frequently checking oil
level. DO NOT OVERFILL.
NOTICE Improper treatment of pressure washer could
damage it and shorten its life.
• DO NOT attempt to crank or start the engine before it has been
properly serviced with the recommended oil. This could result in
an engine failure.
4. Replace oil fill cap/dipstick and fully tighten.
G
H
K
J
E
D
F
A
B
C
Page 10
10
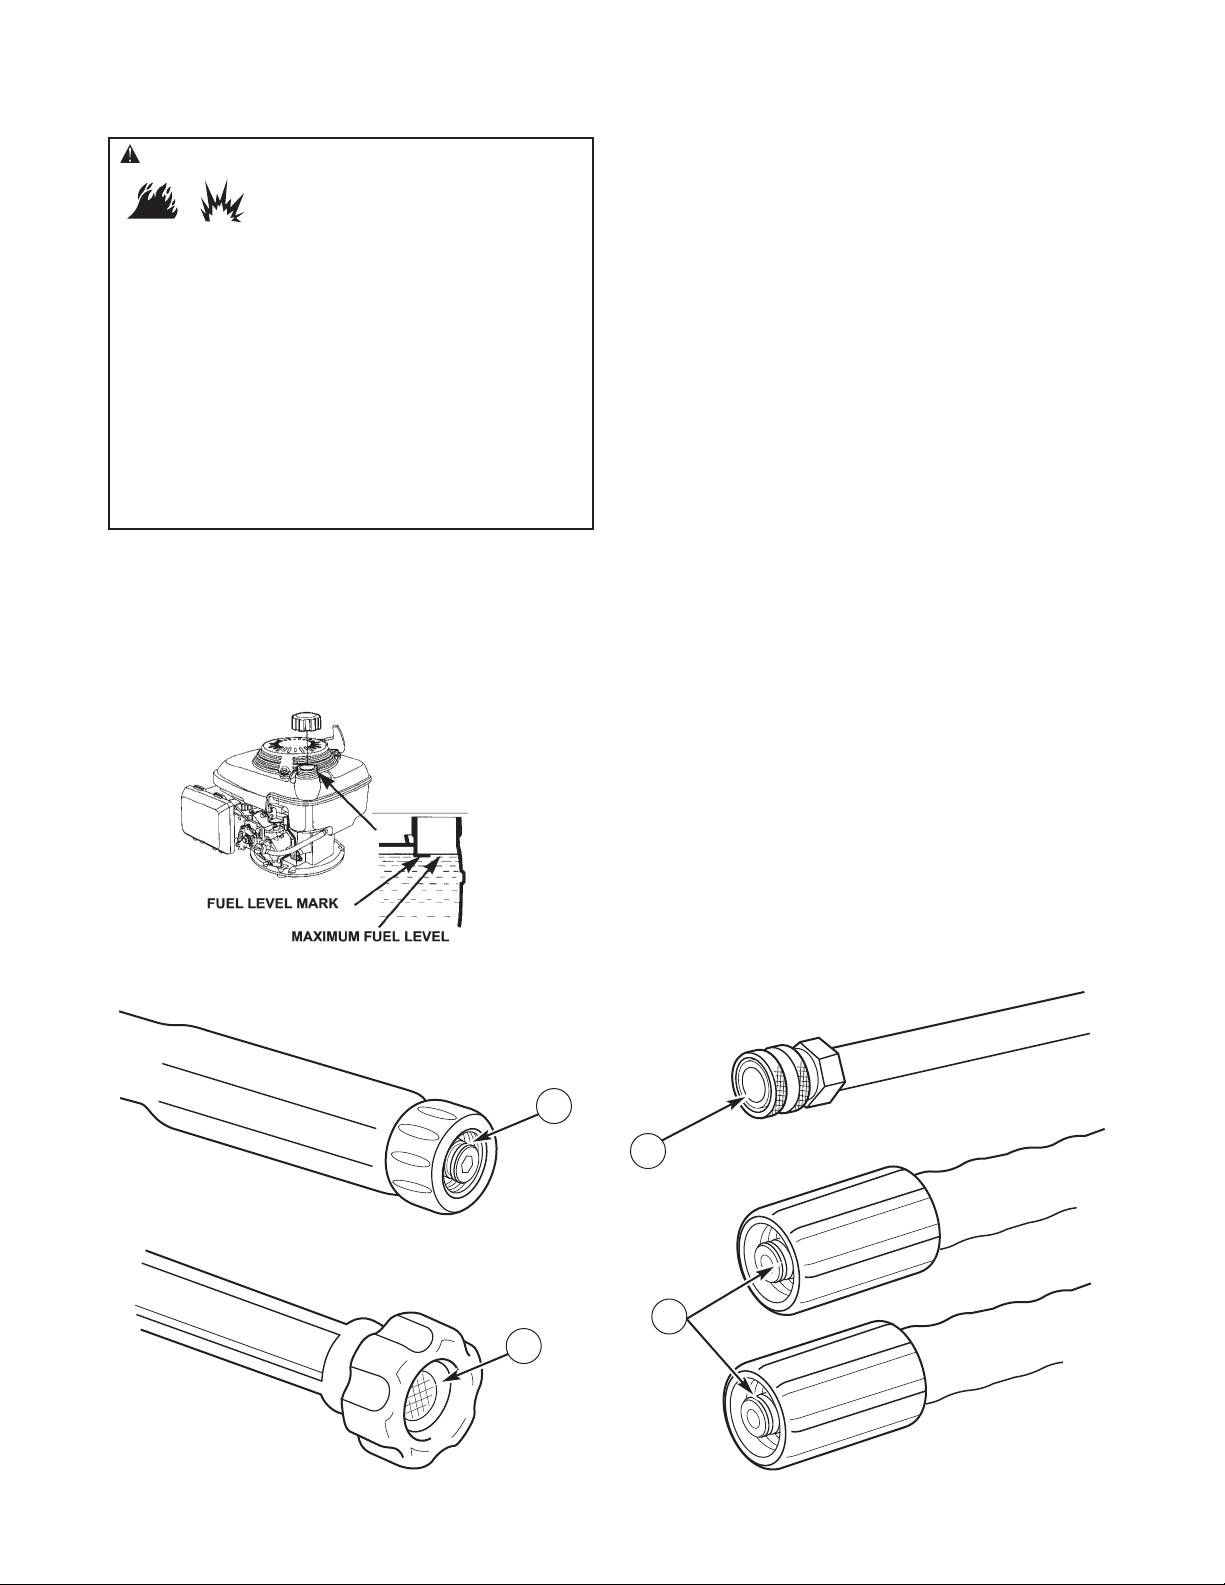
Add Fuel
1. Use clean, fresh, regular unleaded fuel with a minimum
of 86 octane with equipment. DO NOT mix oil with fuel.
2. Place pressure washer on a level surface. Clean area
around fuel fill cap, remove cap.
3. Slowly add regular unleaded fuel to bottom of fuel level
limit in neck of fuel tank. Be careful not to overfill.
4. Install fuel cap and allow any spilled fuel to evaporate
before starting engine.
CAUTION! Alcohol-blended fuels (called gasohol, ethanol or
methanol) can attract moisture, which leads to separation and
formation of acids during storage. Acidic gas can damage the
fuel system of an engine while in storage.
To avoid engine problems, the fuel system should be emptied
before storage of 30 days or longer. Drain the fuel tank, start
the engine and let it run until the fuel lines and carburetor are
empty. Use fresh fuel next season. See Storage for additional
information.
NEVER use engine or carburetor cleaner products in the fuel
tank as permanent damage may occur.
Lubricate O-Rings
Lubrication of o-rings is extremely important for installation
and operation. The use of a lubricant (petroleum or synthetic
grease) during assembly helps seat o-rings properly and
provides an improved seal. It also helps protect the o-ring
from damage by abrasion, pinching or cutting and extends
the life of the o-ring.
NOTICE ALWAYS apply a small amount of lubricant on
o-rings prior to assembling the garden hose to the pump (A),
high pressure hose (B), spray gun (C), and nozzle
extension (D).
Lubricate all connections shown below, following these
instructions:
1. Inspect and clean connecting surfaces prior to
lubrication and assembly.
2. Use lubricants sparingly during assembly; a light film is
all that is required.
3. Use a small brush or cotton swab to apply grease
directly to o-rings where they are not accessible (QC
fitting, M22 fitting).
WARNING Fuel and its vapors are extremely flammable
and explosive which could cause burns,
fire or explosion resulting in death,
serious injury and/or property damage.
WHEN ADDING FUEL
• Turn pressure washer engine OFF and let it cool at least 2
minutes before removing fuel cap. Loosen cap slowly to relieve
pressure in tank.
• Fill fuel tank outdoors.
• DO NOT overfill tank. Allow space for fuel expansion.
• If fuel spills, wait until it evaporates before starting engine.
• Keep fuel away from sparks, open flames, pilot lights, heat, and
other ignition sources.
• Check fuel lines, tank, cap and fittings frequently for cracks or
leaks. Replace if necessary.
• DO NOT light a cigarette or smoke.
D
C
A
B
Page 11
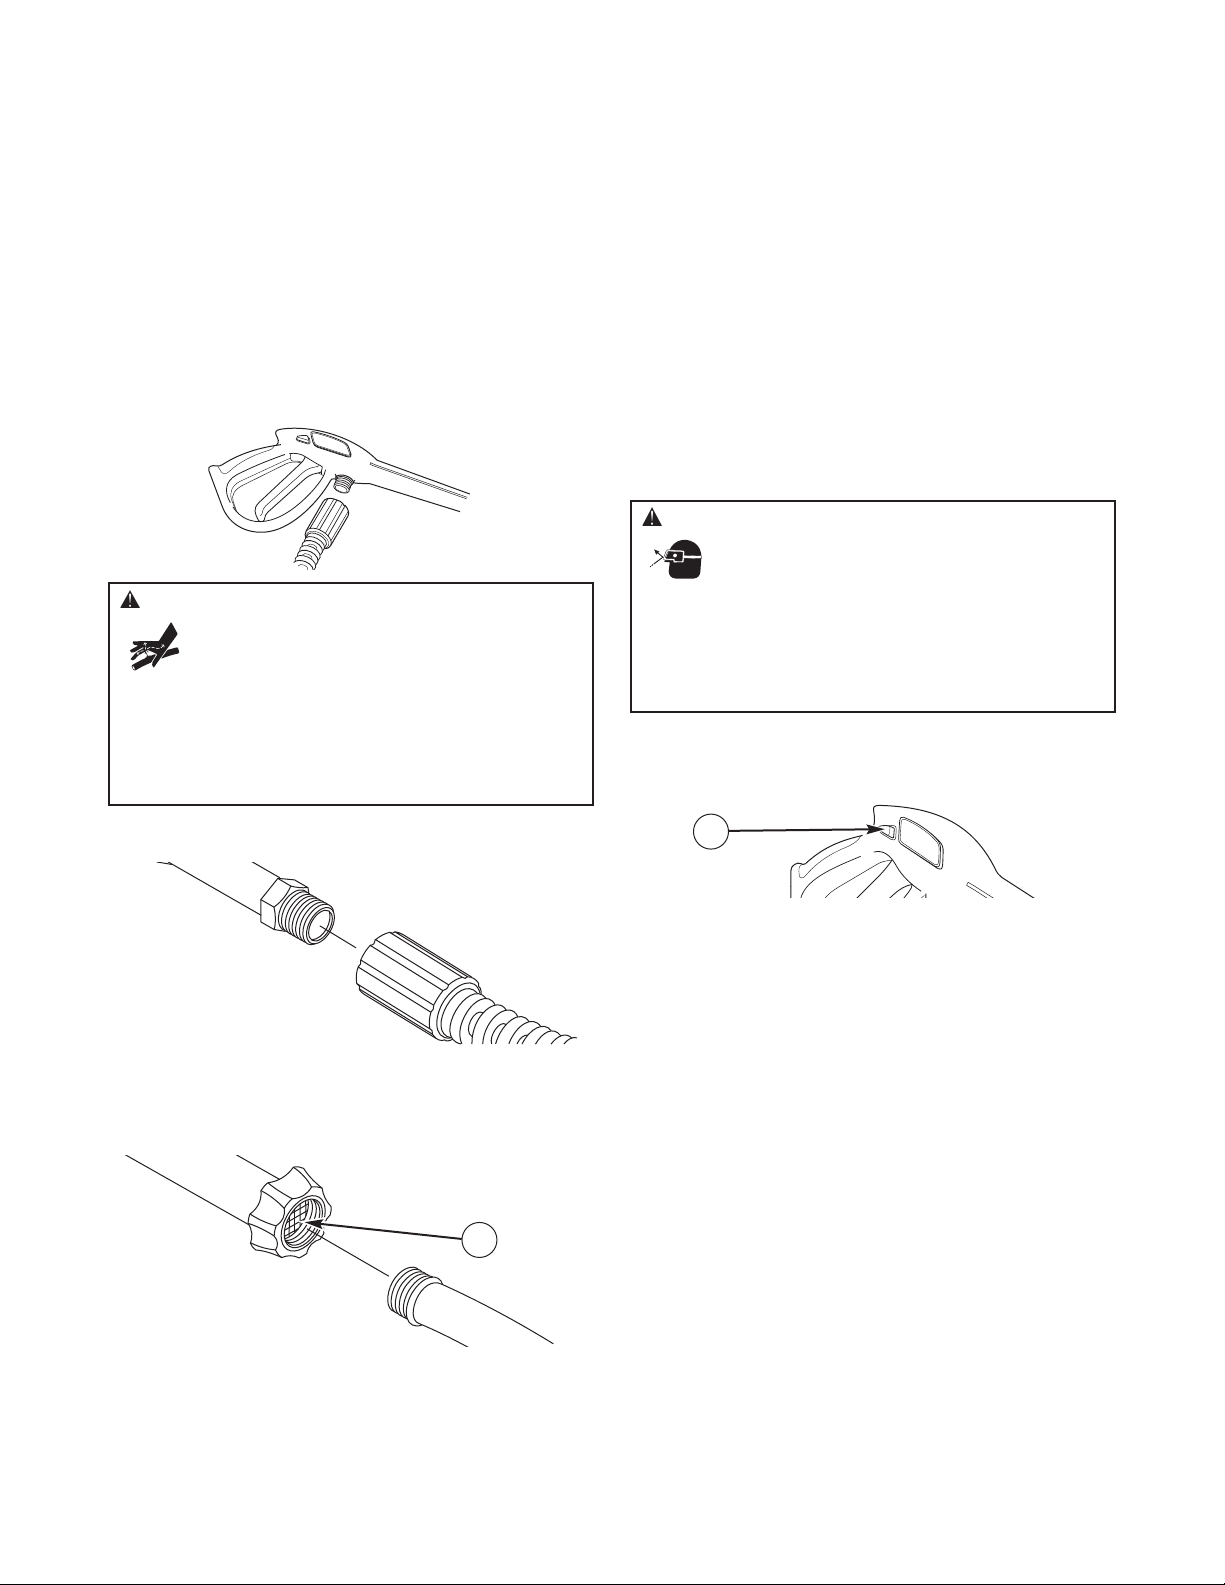
Connect Hose and Water Supply to Pump
NOTICE DO NOT run the pump without the water supply
connected and turned on.
• Damage to equipment resulting from failure to follow this
instruction will void warranty.
NOTICE Remove and discard the shipping caps from the
pump’s high pressure outlet and water inlet before attaching
hoses.
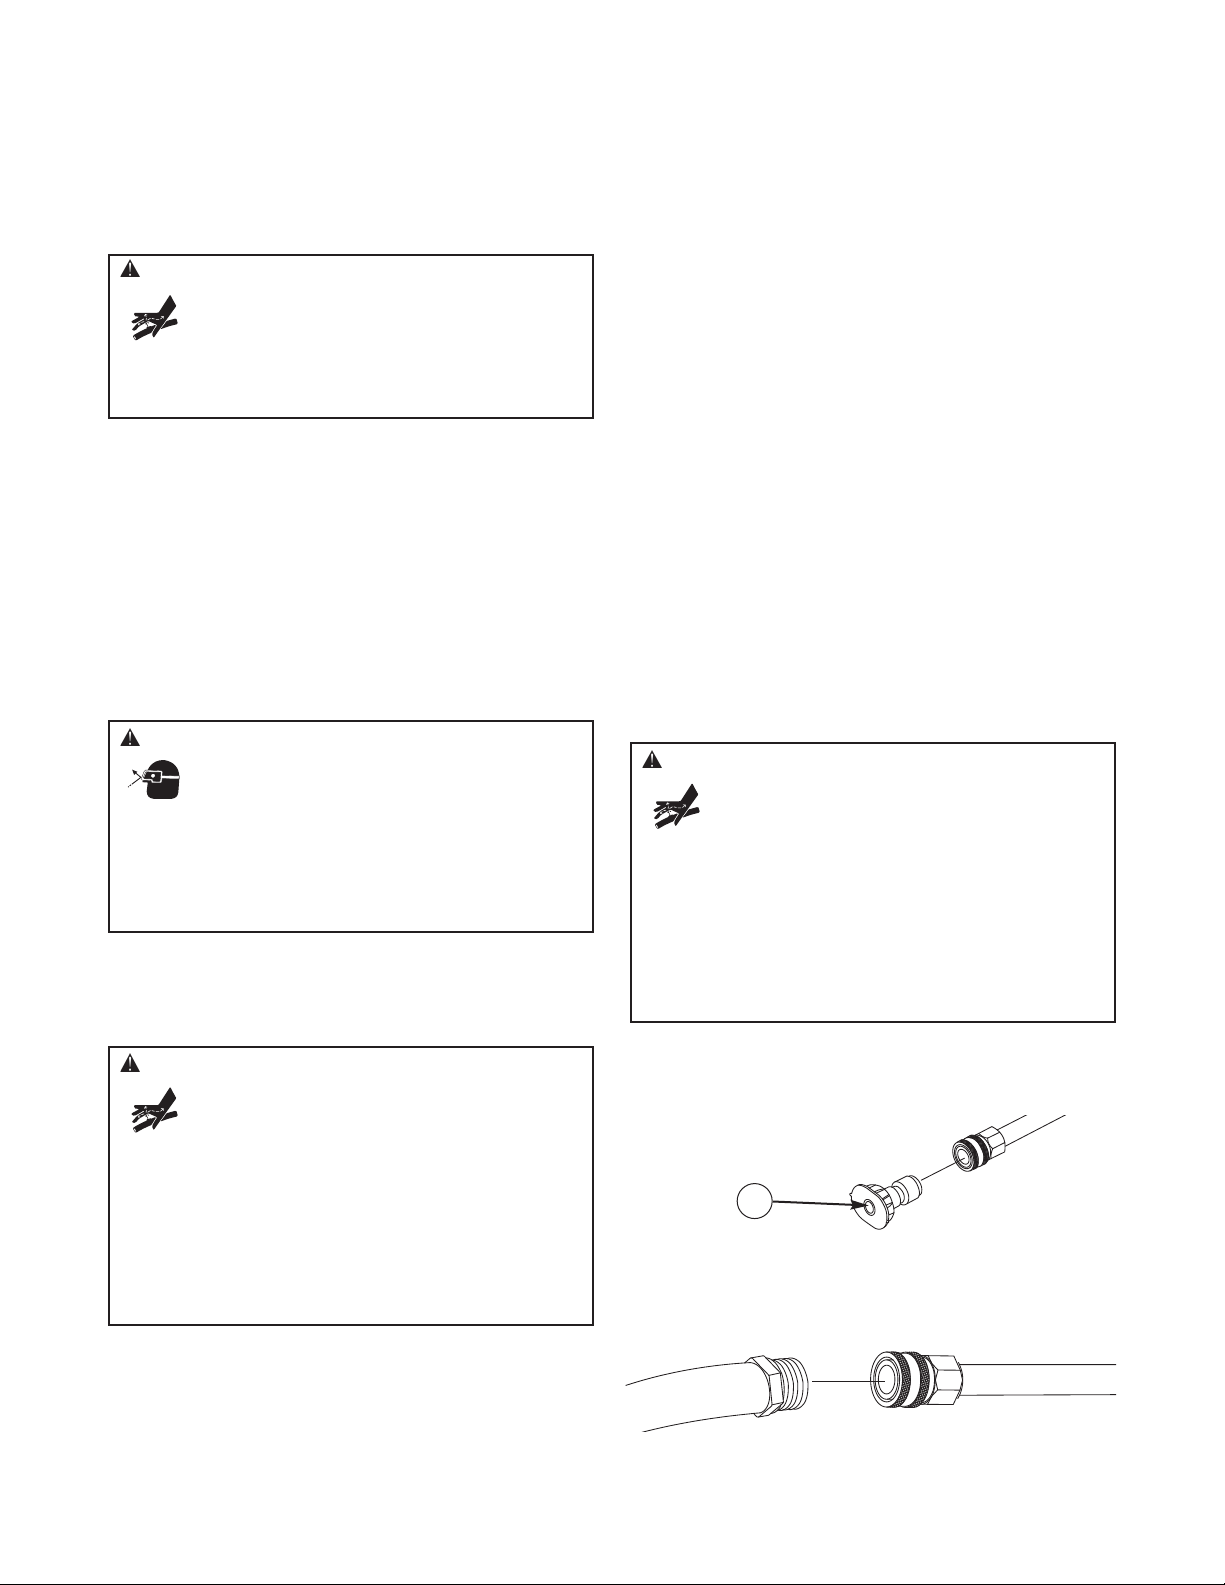
1. Uncoil high pressure hose and attach one end of hose to
base of spray gun. Tighten by hand.
2. Attach other end of high pressure hose to high pressure
outlet on pump. Tighten by hand.
3. Before connecting garden hose to water inlet, inspect
inlet screen (A). Clean screen if it contains debris or have
it replaced if damaged. DO NOT run pressure washer if
inlet screen is damaged or missing.
4. Run water through garden hose for 30 seconds to flush
it of debris. Turn off water.
NOTICE DO NOT siphon standing water for the water
supply. Use ONLY cold water (less than 100°F).
NOTICE Using a One Way Valve (vacuum breaker or check
valve) at pump inlet could cause pump or inlet connector
damage.
• There MUST be at least ten feet of unrestricted garden hose
between the pressure washer inlet and any device, such as a
vacuum breaker or check valve.
• Damage to equipment resulting from failure to follow this
instruction will void warranty.
5. Connect garden hose (not to exceed 50 feet in length) to
water inlet. Tighten by hand.
6. Turn ON the water, press red button (B) on the gun and
squeeze the trigger to purge the pump system of air and
impurities.
Checklist Before Starting Engine
Review the unit to ensure you have performed all of the
following:
1. Be sure to read Safety Rules and Operation sections
before using the pressure washer.
2. Make sure handle is in place and secure.
3. Check that oil has been added to proper level in engine
crankcase.
4. Add proper fuel to fuel tank.
5. Check for proper hose connections (high pressure and
water supply) and that there are no kinks, cuts, or
damage to the high pressure hose.
6. Provide proper water supply (not to exceed 100°F).
11
B
A
WARNING The high pressure stream of water that
this equipment produces could cut through skin
and its underlying tissues, resulting in serious
injury and possible amputation.
• NEVER connect high pressure hose to nozzle extension.
• Keep high pressure hose connected to pump and spray gun
while system is pressurized.
• Always be certain spray gun, nozzles and accessories are
correctly attached.
WARNING Risk of eye injury.
Spray could splash back or propel objects
resulting in serious injury.
• Always wear indirect vented (chemical splash) safety goggles
marked to comply with ANSI Z87.1 when using or in vicinity of
this equipment.
• NEVER substitute safety glasses or dry-condition goggles for
indirect vented safety goggles.
Page 12
HOW TO USE YOUR PRESSURE WASHER
If you have any problems operating your pressure washer,
please call the pressure washer helpline at 1-800-222-3136.
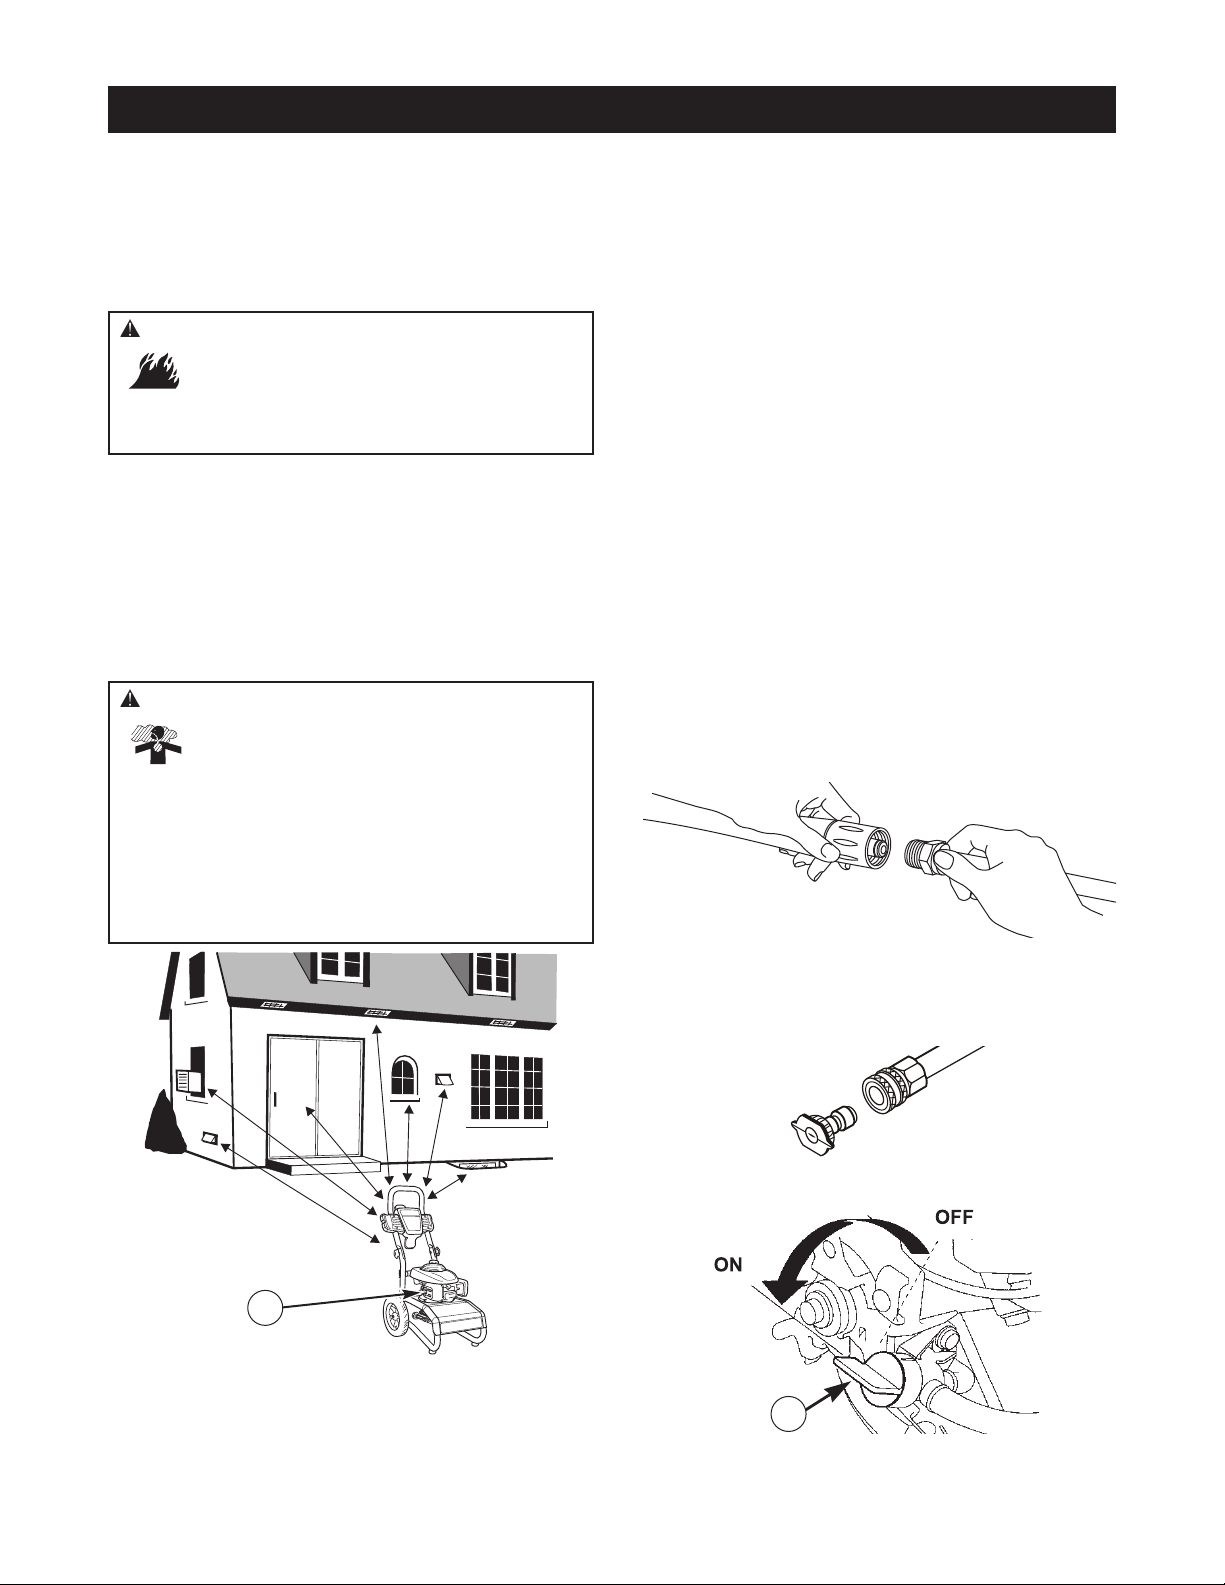
Pressure Washer Location
Pressure Washer Clearance
Place pressure washer outdoors in an area that will not
accumulate deadly exhaust gas. DO NOT place pressure
washer where exhaust gas (A) could accumulate and enter
inside or be drawn into a potentially occupied building.
Ensure exhaust gas is kept away from any windows, doors,
ventilation intakes, or other openings that can allow exhaust
gas to collect in a confined area. Prevailing winds and air
currents should be taken into consideration when positioning
pressure washer.
To Start Your Pressure Washer
To start your engine-powered pressure washer for the first
time, follow these instructions step-by-step. This information
also applies whenever you start the engine after you have let
the pressure washer sit idle for at least a day.
1. Place pressure washer outside near an water source
capable of supplying water at a flow rate greater than
3.3 gallons per minute and no less than 20 PSI at
pressure washer end of garden hose.
2. Check that high pressure hose is tightly connected to
spray gun and pump. See Assembly for illustrations.
3. Make sure unit is in a level position.
4. Connect garden hose to water inlet on pressure washer
pump.
NOTICE DO NOT run the pump without the water supply
connected and turned on.
• Damage to equipment resulting from failure to follow this
instruction will void warranty.
5. Turn ON the water, press red button on the gun and
squeeze the trigger to purge the pump system of air and
impurities.
6. Attach nozzle extension to spray gun. Tighten by hand.
7. Choose spray tip you want to use, pull back on collar of
nozzle extension, insert spray tip and release collar. Tug
on spray tip to make sure it is securely in place. See
How to Use Spray Tips.
8. Turn fuel valve (B) to “On” position.
12
OPERATION
A
B
WARNING Exhaust heat/gases could ignite
combustibles, structures or damage fuel tank
causing a fire, resulting in death, serious injury
and/or property damage.
• Keep at least 5 ft. (1.5 m) clearance on all sides of pressure
washer including overhead.
WARNING Running engine gives off carbon
monoxide, an odorless, colorless, poison gas.
Breathing carbon monoxide could result in death,
serious injury, headache, fatigue, dizziness,
vomiting, confusion, seizures, nausea or fainting.
• Operate this product ONLY outdoors.
• Keep exhaust gas from entering a confined area through
windows, doors, ventilation intakes, or other openings.
• DO NOT operate this product inside any building, carport,
porch, mobile equipment, marine applications, or enclosure,
even if windows and doors are open.
Page 13
13
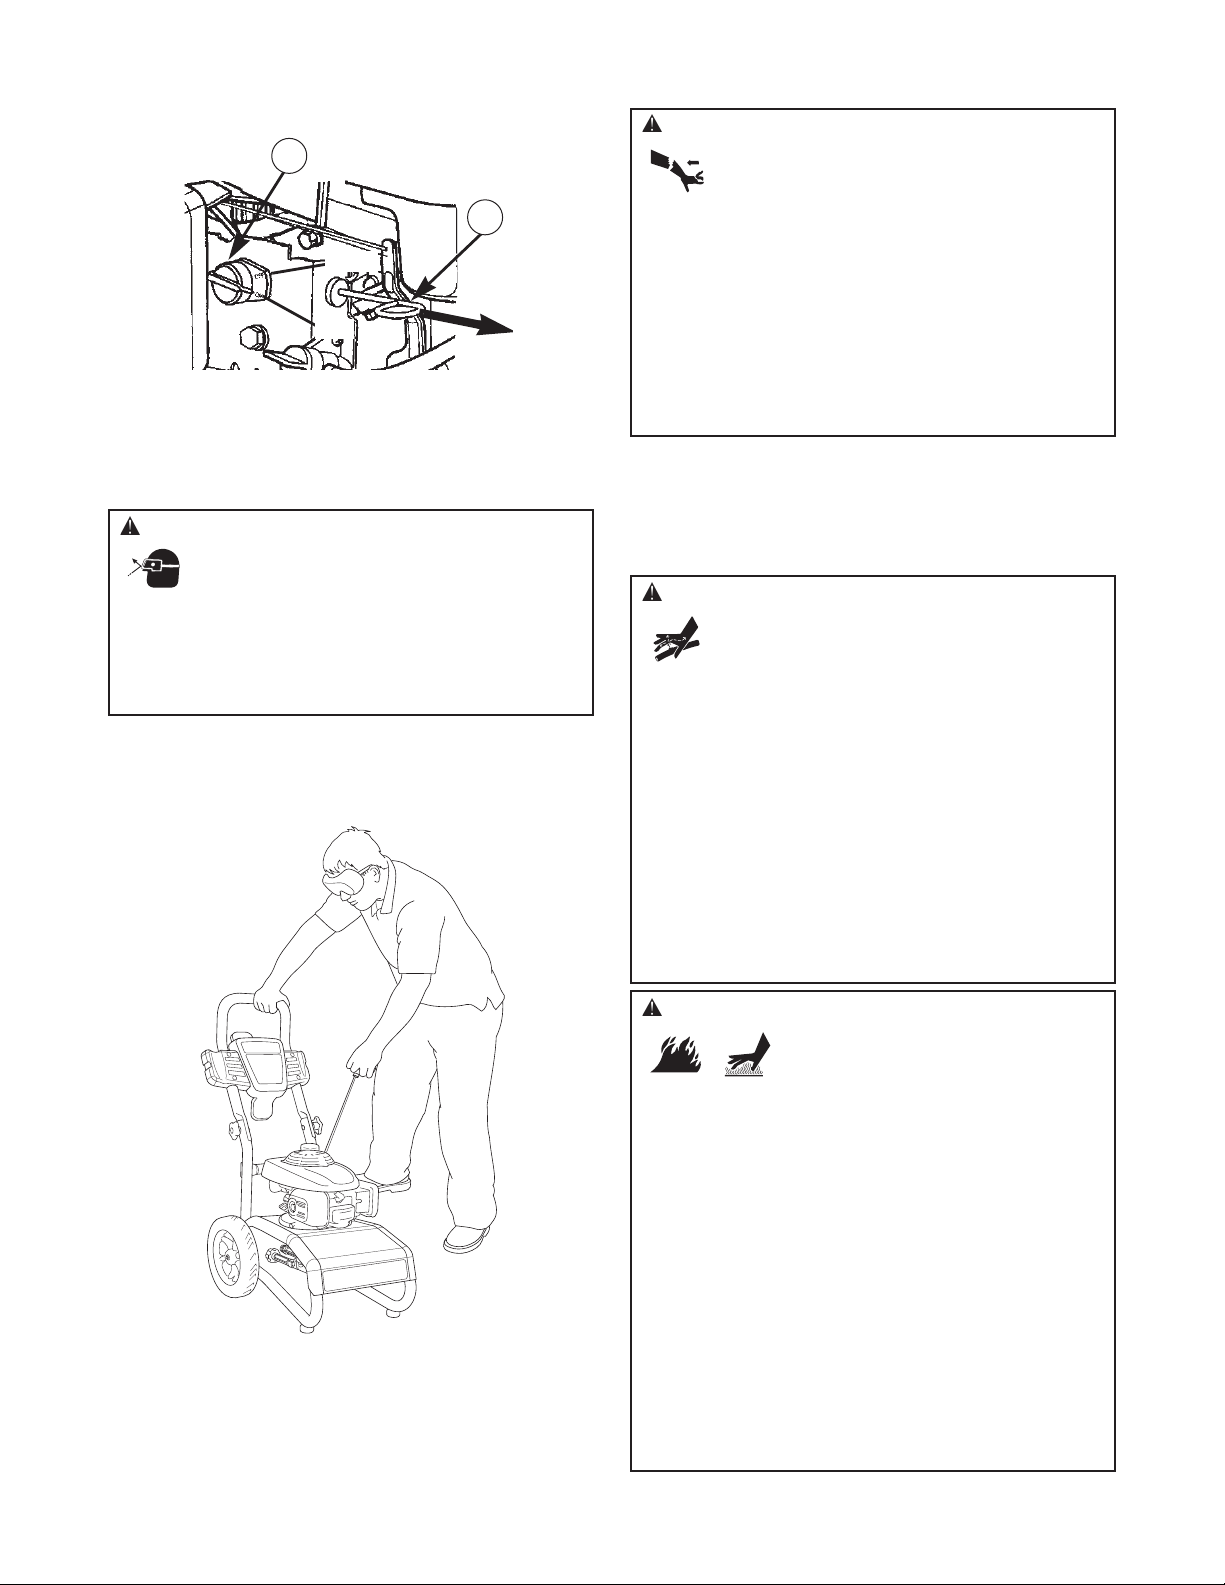
9. Pull choke rod (A) to “Closed” position.
NOTICE For a warm engine, be sure the choke rod (A) is in
the “Open” position.
10. Move engine stop switch (B) to “On” position.
NOTICE Before starting the pressure washer, be sure you
are wearing safety goggles as described below.
11. When starting engine, position yourself as
recommended and grasp starter grip handle and pull
slowly until you feel some resistance. Then pull rapidly
to start engine.
12. Return recoil starter slowly. DO NOT let rope “snap
back” against starter.
13. When engine starts, slowly move choke rod to “Open”
position as engine warms. If engine falters, move choke
rod to “Closed” position, then to “Open” position.
ON
OFF
B
A
Closed
WARNING Risk of eye injury.
Spray could splash back or propel objects
resulting in serious injury.
• Always wear indirect vented (chemical splash) safety goggles
marked to comply with ANSI Z87.1 when using or in vicinity of
this equipment.
• NEVER substitute safety glasses or dry-condition goggles for
indirect vented safety goggles.
WARNING Starter cord kickback (rapid retraction) will
pull hand and arm toward engine faster than you
can let go which could cause broken bones,
fractures, bruises, or sprains resulting in serious
injury.
• NEVER pull starter cord without first relieving spray gun
pressure.
• When starting engine, pull cord slowly until resistance is felt
and then pull rapidly to avoid kickback.
• After each starting attempt, where engine fails to run, always
point spray gun in safe direction, press red button and squeeze
spray gun trigger to release high pressure.
• Firmly grasp spray gun with both hands when using high
pressure spray to avoid injury when spray gun kicks back.
WARNING The high pressure stream of water that
this equipment produces could cut through skin
and its underlying tissues, resulting in serious
injury and possible amputation.
Spray gun traps high water pressure, even when engine is
stopped and water is disconnected, which could result in
serious injury.
• DO NOT allow CHILDREN to operate pressure washer.
• Keep high pressure hose connected to pump and spray gun
while system is pressurized.
• NEVER aim spray gun at people, animals, or plants.
• DO NOT secure spray gun in open position.
• DO NOT leave spray gun unattended while machine is running.
• NEVER use a spray gun which does not have a trigger lock or
trigger guard in place and in working order.
• Always be certain spray gun, nozzles and accessories are
correctly attached.
WARNING Exhaust heat/gases could ignite
combustibles, structures or damage fuel
tank causing a fire, resulting in death,
serious injury and/or property damage.
Contact with muffler area could cause burns resulting in
serious injury.
• DO NOT touch hot parts and AVOID hot exhaust gases.
• Allow equipment to cool before touching.
• Keep at least 5 feet (1.5 m) of clearance on all sides of pressure
washer including overhead.
• It is a violation of California Public Resource Code, Section
4442, to use or operate the engine on any forest-covered,
brush-covered, or grass-covered land unless the exhaust
system is equipped with a spark arrester, as defined in Section
4442, maintained in effective working order. Other states or
federal jurisdictions may have similar laws.
Contact the original equipment manufacturer, retailer, or dealer
to obtain a spark arrester designed for the exhaust system
installed on this engine.
• Replacement parts must be the same and installed in the same
position as the original parts.
Page 14
How to Stop Your Pressure Washer
1. Release spray gun trigger and let engine idle for two
minutes.
2. Move engine stop switch to “Off” position.
3. ALWAYS point spray gun in a safe direction, push red
button and squeeze spray gun trigger to release retained
high water pressure.
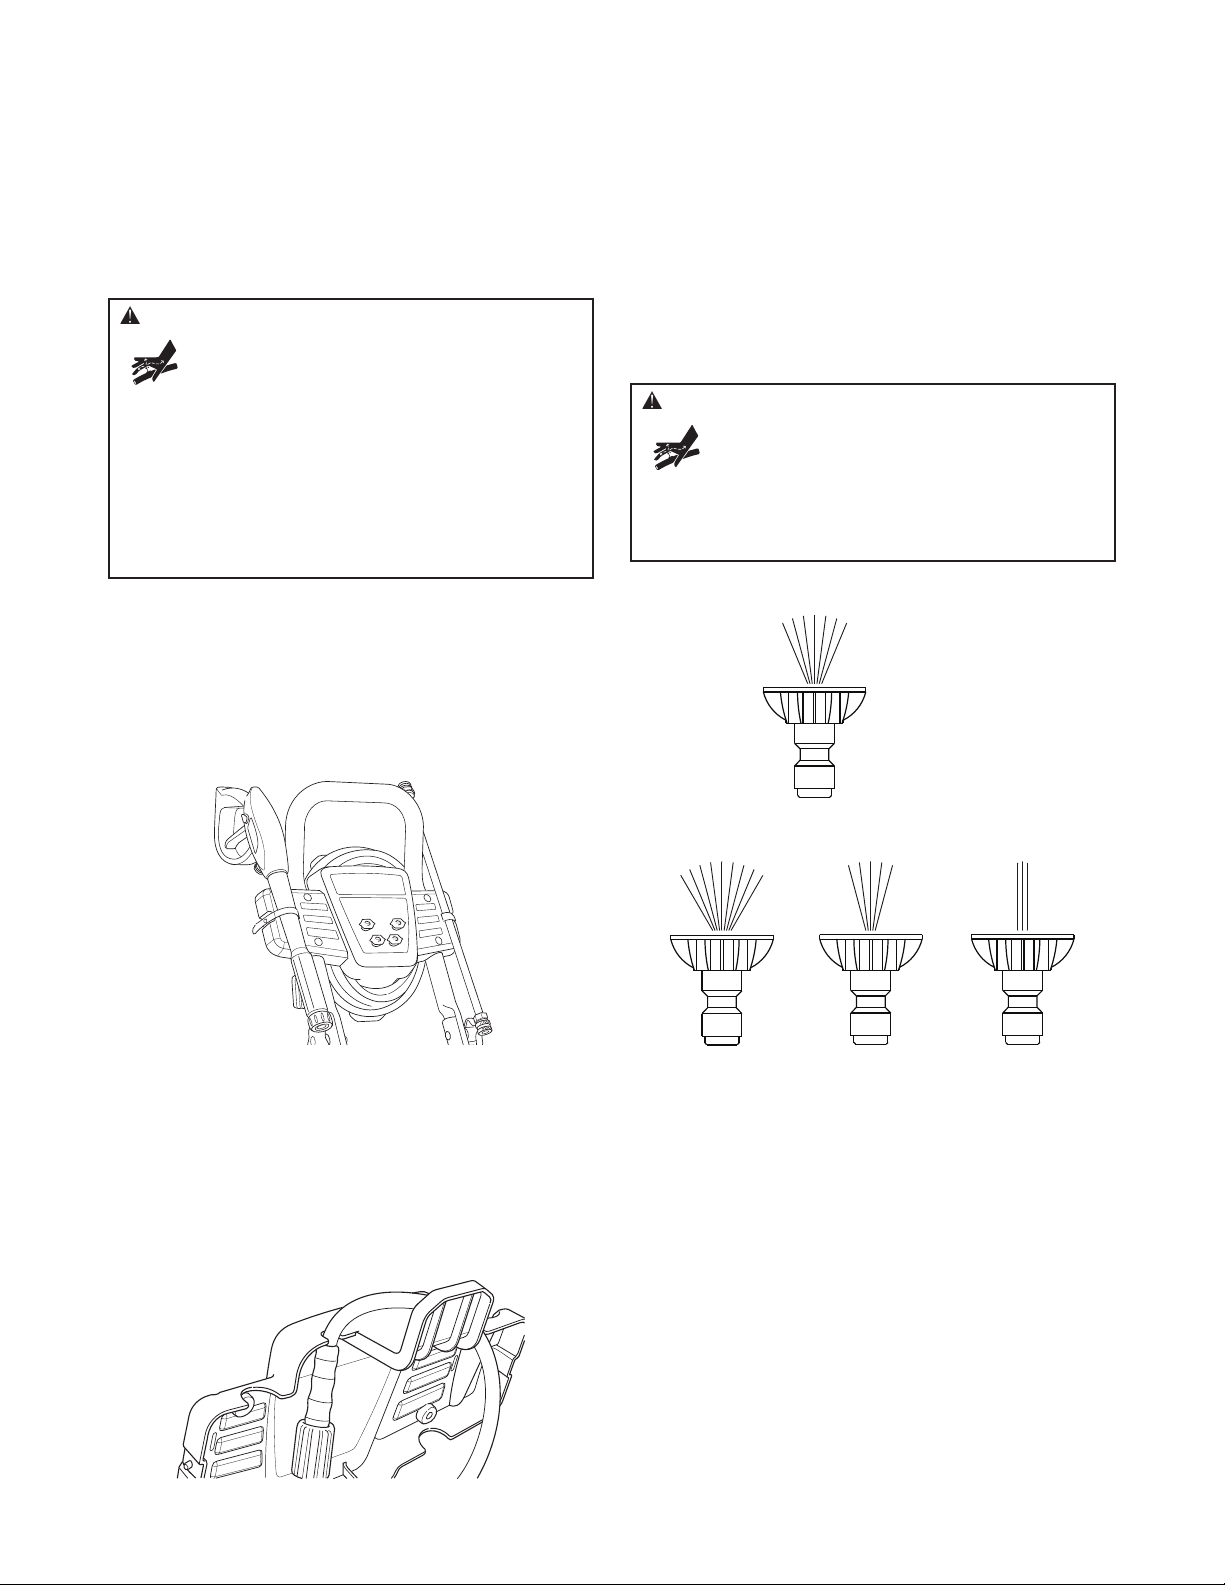
How to Use Accessory Tray
The unit is equipped with an accessory tray with places to
store your spray gun, nozzle extension, high pressure hose
and quick connect spray tips.
1. Place spray gun in wide groove on accessory tray as
shown. Pull rubber strap tight around spray gun and
place hole in strap over tab on accessory tray.
2. Place nozzle extension in narrow groove on accessory
tray. Pull rubber strap tight around nozzle extension and
place hole in strap over tab on accessory tray.
3. Insert multi–colored spray tips in holes provided on
front of accessory tray.
4. Place one end of high pressure hose in groove at top of
accessory tray and wrap high pressure hose around
hooks as shown.
How to Use Spray Tips
The quick–connect on the nozzle extension allows you to
switch between four different quick connect spray tips. Spray
tips can be changed while pressure washer is running once
spray gun trigger is locked. The spray tips vary the spray
pattern as shown.
Follow these instructions to change spray tips:
1. Pull back collar on quick–connect and pull current spray
tip off. Store spray tips in holder provided on the
accessory tray.
2. Select desired spray tip:
• For delicate rinse (lower pressure and higher flow),
for gentle cleaning of cars/trucks, boats, RV’s, patio
furniture, lawn equipment, etc., select white 40°
spray tip.
• For general rinsing (medium pressure and medium
flow), ideal for most all purpose cleaning such as
home siding, brick patios, wood decks, driveways
and sidewalks, garage floors, etc., select yellow
15° spray tip.
14
WARNING The high pressure stream of water that
this equipment produces could cut through skin
and its underlying tissues, resulting in serious
injury and possible amputation.
Spray gun traps high water pressure, even when engine is
stopped and water is disconnected, which could result in
serious injury.
• Keep high pressure hose connected to pump and spray gun
while system is pressurized.
• ALWAYS point spray gun in safe direction, press red button
and squeeze spray gun trigger to release high pressure, every
time you stop engine.
WARNING The high pressure stream of water that
this equipment produces could cut through skin
and its underlying tissues, resulting in serious
injury and possible amputation.
• NEVER change spray patterns without the trigger locked on the
spray gun.
• DO NOT twist spray tips while spraying.
40° White
2050 PSI
2.3 GPM
15° Yellow
2150 PSI
2.2 GPM
0° Red
2600 PSI
2.1 GPM
Black
Use to apply
detergent
Low Pressure
High Pressure
Page 15
15
• For maximum rinsing (higher pressure and lower
flow), for stubborn or hard to reach surface such as
second story surfaces, paint removal, oil stains, rust
removal or other stubborn substances (tar, gum,
grease, wax, etc.), select red 0° spray tip.
• To apply detergent, applies project specific cleaners
to help break down stubborn dirt and grime on a
variety of surfaces, select black detergent spray tip.
3. Pull back on collar, insert new spray tip and release
collar. Tug on spray tip to make sure it is securely in
place.
Usage Tips
• For most effective cleaning, keep spray tip from 8 to
24 inches (20 to 61 cm) away from cleaning surface.
• If you get spray tip too close, especially using a high
pressure spray tip, you may damage surface being
cleaned.
• Do Not get closer than 6 inches (15 cm) when cleaning
tires.
Cleaning and Applying Detergent
To apply detergent, follow these steps:
To apply undiluted detergent using the blue PerfectMix™
siphon, follow these steps:
1. Review use of spray tips.
2. Attach PerfectMix™ siphon hose to pump and
PerfectMix™ concentrate bottle.
NOTICE Contact with the hot muffler could damage
detergent siphoning tube.
• When inserting the siphon into a detergent solution bottle, route
the tube so as to keep it from inadvertently contacting the hot
muffler.
3. Make sure black detergent spray tip is installed.
NOTICE Detergent cannot be applied with the high pressure
spray tips (White, Yellow or Red).
4. Make sure garden hose is connected to water inlet.
Check that high pressure hose is connected to spray gun
and pump. Turn on water.
NOTICE You must attach all hoses before you start the
engine.
• Starting the engine without all the hoses connected and without
the water turned ON could damage the pump.
• Damage to equipment resulting from failure to follow this
instruction will void warranty.
5. Start engine following instructions How to Start Your
Pressure Washer.
6. Apply detergent to a dry surface, starting at lower
portion of area to be washed and work upward, using
long, even, overlapping strokes.
7. Allow detergent to "soak in" for 3-5 minutes before
washing and rinsing. Reapply as needed to prevent
surface from drying. DO NOT allow detergent to dry on
(prevents streaking).
Pressure Washer Rinsing
For Rinsing:
1. Remove black detergent spray tip from nozzle extension.
2. Select and install desired high pressure spray tip
following instructions How to Use Spray Tips.
3. Keep the spray gun a safe distance from the area you
plan to spray.
4. Apply a high pressure spray to a small area, then check
the surface for damage. If no damage is found, it is okay
to continue cleaning.
5. Start at the top of the area to be rinsed, working down
with same overlapping strokes as you used for washing
and applying detergent.
Automatic Cool Down System (Thermal Relief)
If you run the engine on your pressure washer for
3-5 minutes without pressing the trigger on the spray gun,
circulating water in the pump can reach temperatures above
125°F. The system engages to cool the pump by discharging
the warm water onto the ground.
WARNING Chemical Burn Hazard.
Chemicals could cause burns resulting in death,
serious injury, and/or property damage.
• DO NOT use caustic liquid with pressure washer.
• Use ONLY pressure washer safe detergents /soaps. Follow all
manufacturers instructions.
WARNING Kickback from spray gun could cause you
to fall resulting in death or serious injury.
• Operate pressure washer from a stable surface.
• Be extremely careful if you must use the pressure washer from
a ladder, scaffolding, or any other similar location.
• Firmly grasp spray gun with both hands when using high
pressure spray to avoid injury when spray gun kicks back.
Page 16

16
Pressure Washer Specifications
Max Outlet Pressure . . . . . . . . . . . . . 2,600 PSI @ 2.1 GPM*
Max Flow Rate . . . . . . . . . . . . . . . . . 2,050 PSI @ 2.3 GPM*
Detergent Mix . . . . . . . . . . . . . . . . . . . . . . . . Use as directed
Water Supply Temperature . . . . . . . . . . Not to exceed 100°F
Engine Specifications
Bore . . . . . . . . . . . . . . . . . . . . . . . . . . . . . . . 2.5 in. (64 mm)
Stroke . . . . . . . . . . . . . . . . . . . . . . . . . . . . . 2.0 in. (50 mm)
Displacement . . . . . . . . . . . . . . . . . . . . . 9.8 cu. in. (161 cc)
Spark Plug
Resistor . . . . . . . . . . . . . . . . . . . . . . . . . . . . NGK BPR6ES
Set Gap To: . . . . . . . . . . . 0.028-0.031 in (0.70-0.80 mm)
Intake Valve Clearance . . . . . . . . . . . 0.15 ± 0.04 mm (cold)
Exhaust Valve Clearance . . . . . . . . . . 0.20 ± 0.04 mm (cold)
Fuel Capacity . . . . . . . . . . . . . . . . . . . . . . . 1.2 Quarts (1.1 l)
Oil Capacity . . . . . . . . . . . . . . . . . . . . . . . . 20 Ounces (0.6 l)
* This pressure washer is rated in accordance to the
Pressure Washer Manufacturers Association (PWMA)
standard PW101-2010 (Testing and Rating Performance of
Pressure Washers).
SPECIFICATIONS
Page 17

OWNER’S RESPONSIBILITIES
Follow the hourly or calendar intervals, whichever occurs
first. More frequent service is required when operating in
adverse conditions noted below.
1
Clean if clogged. Replace if perforated or torn.
2
Service more often under dirty or dusty conditions.
3
These items should be serviced by your servicing dealer.
General Recommendations
Regular maintenance will improve the performance and
extend the life of the pressure washer. See any Sears or
other qualified service dealer for service.
The pressure washer warranty does not cover items that
have been subjected to operator abuse or negligence. To
receive full value from the warranty, the operator must
maintain pressure washer as instructed in this manual
including proper storage as detailed in Storage.
Some adjustments will need to be made periodically to
properly maintain your pressure washer.
All service and adjustments should be made at least once
each season. Follow the requirements in the Maintenance
Schedule chart above.
NOTICE Once a year you should clean or replace the spark
plug and replace the air filter. A new spark plug and clean air
filter assure proper fuel-air mixture and help your engine run
better and last longer.
Pump Oil
DO NOT attempt any oil maintenance on this pump. The
pump is pre-lubricated and sealed from the factory, requiring
no additional maintenance for the life of the pump.
Emissions Control
Maintenance, replacement, or repair of the emissions
control devices and systems may be performed by any nonroad engine repair establishment or individual. However,
to obtain ”no charge” emissions control service, the work
must be performed by a factory authorized dealer. See the
Emissions Warranty.
Before Each Use
1. Check engine oil level.
2. Clean debris.
3. Check water inlet screen for damage.
4. Check high pressure hose for leaks.
5. Check gun and nozzle extension for leaks.
6. Purge pump of air and contaminants.
PRESSURE WASHER MAINTENANCE
Clean Debris
Daily or before use, clean accumulated debris from pressure
washer. Keep linkage, spring and controls clean. Keep area
around and behind muffler free from any combustible debris.
Inspect cooling air slots and openings on the pressure
washer. These openings must be kept clean and
unobstructed.
Pressure washer parts should be kept clean to reduce the
risk of overheating and ignition of accumulated debris.
• Use a damp cloth to wipe exterior surfaces clean.
NOTICE Improper treatment of pressure washer could
damage it and shorten its life.
• DO NOT insert any objects through cooling slots.
• Use a soft bristle brush to loosen caked on dirt, oil, etc.
• Use a vacuum cleaner to pick up loose dirt and debris.
Check and Clean Inlet Screen
Examine garden hose inlet screen. Clean if it is clogged or
replace if it is torn.
MAINTENANCE
First 5 Hours
• Change engine oil
Every 8 Hours or Daily
• Check/clean water inlet screen
1
• Check high pressure hose
• Check detergent siphoning hose
• Check spray gun and assembly for leaks
• Clean debris
• Check engine oil level
Every 25 Hours or 3 Months
• Clean engine air cleaner
2
Every 50 Hours or 6 Months
• Change engine oil
2
Every 100 Hours or Yearly
• Check/adjust spark plug
• Inspect muffler and spark arrester
• Check/adjust idle speed
3
• Check/adjust valve clearance
3
• Clean fuel tank & filter
3
Every 250 Hours
• Clean combustion chamber
3
Every 250 Hours or 2 Years
• Replace engine air cleaner
• Replace spark plug
Every 2 Years
• Check fuel tube3(Replace if necessary)
17
Page 18
18
Check High Pressure Hose
High pressure hoses can develop leaks from wear, kinking,
or abuse. Inspect hose before each use. Check for cuts,
leaks, abrasions, bulging of cover, or damage or movement
of couplings. If any of these conditions exist, replace hose
immediately.
Check Detergent Siphoning Tube
Examine the filter on detergent tube (if equipped) and clean if
clogged. The tube should fit tightly on the barbed fitting.
Examine the tube for leaks or tears. Replace the filter or tube
if either is damaged.
Detergent Siphoning Check Ball
Occasionally check ball in detergent siphoning system may
become stuck from storage, dried soap, or minerals in water.
The check ball can be freed by performing the following:
NOTICE Before performing this procedure, be sure you are
wearing safety goggles as described below.
1. Shut off engine and turn off water supply.
2. ALWAYS point spray gun in a safe direction, press red
button and squeeze spray gun trigger to release retained
high water pressure.
3. Remove detergent siphoning hose from barbed fitting on
pump.
4. Using a firm, blunt object 7/64” in diameter or smaller,
by at least 1” long, such as an Allen wrench, slowly
insert the object into the barbed fitting until you meet
resistance. This resistance is the check ball.
5. Slowly push down until you feel the ball move slightly,
push no more than 1/8". Slight pressure may be required
to free the ball.
6. Repeat steps 4 and 5 if necessary.
7. Reinstall detergent siphoning hose onto barb fitting.
8. Treat with PumpSaver as described in Protecting the
Pump during storage to prevent reoccurrence.
Check Spray Gun
Examine hose connection to spray gun and make sure it is
secure. Test trigger by pressing it and making sure it springs
back into place when you release it. Do not depress red button
and test trigger. You should not be able to press trigger.
Replace spray gun immediately if it fails any of these tests.
Spray Tip Maintenance
A pulsing sensation felt while squeezing the spray gun trigger
may be caused by excessive pump pressure. The principal
cause of excessive pump pressure is a spray tip clogged or
restricted with foreign materials, such as dirt, etc. To correct
the problem, immediately clean the spray tip following these
instructions:
1. Shut off engine and turn off water supply.
2. ALWAYS point spray gun in a safe direction, press red
button and squeeze spray gun trigger to release retained
high water pressure.
3. Remove spray tip from end of nozzle extension.
4. Use a small paper clip to free any foreign material
clogging or restricting spray tip (A).
5. Remove nozzle extension from spray gun.
6. Using a garden hose, remove additional debris by back
flushing water through nozzle extension. Back flush
between 30 to 60 seconds.
7. Reinstall spray tip into nozzle extension.
WARNING The high pressure stream of water that
this equipment produces could cut through skin
and its underlying tissues, resulting in serious
injury and possible amputation.
• NEVER repair high pressure hose. Replace it.
• Replacement hose rating MUST equal or exceed maximum
pressure rating of unit.
WARNING Risk of eye injury.
Spray could splash back or propel objects
resulting in serious injury.
• Always wear indirect vented (chemical splash) safety goggles
marked to comply with ANSI Z87.1 when using or in vicinity of
this equipment.
• NEVER substitute safety glasses or dry-condition goggles for
indirect vented safety goggles.
WARNING The high pressure stream of water that
this equipment produces could cut through skin
and its underlying tissues, resulting in serious
injury and possible amputation.
Spray gun traps high water pressure, even when engine is
stopped and water is disconnected, which could result in
serious injury.
• Keep high pressure hose connected to pump and spray gun
while system is pressurized.
• ALWAYS point spray gun in safe direction, press red button
and squeeze spray gun trigger to release high pressure, every
time you stop engine.
WARNING The high pressure stream of water that
this equipment produces could cut through skin
and its underlying tissues, resulting in serious
injury and possible amputation.
Spray gun traps high water pressure, even when engine is
stopped and water is disconnected, which could result in
serious injury.
• Keep high pressure hose connected to pump and spray gun
while system is pressurized.
• ALWAYS point spray gun in safe direction, press red button
and squeeze spray gun trigger to release high pressure, every
time you stop engine.
A
Page 19
8. Reconnect nozzle extension to spray gun.
9. Make sure garden hose is connected to water inlet.
Check that high pressure hose is connected to spray gun
and pump. Turn on water.
10. Start engine following instructions How to Start Your
Pressure Washer.
11. Test pressure washer by operating with each quick
connect spray tip.
O–Ring Maintenance
Purchase an O–Ring Repair Kit, Sears item 75116, at your local
Sears or by calling 1-800-4-MY-HOME (469-4663) or online at
www.sears.com. It is not included with the pressure washer.
This kit includes replacement o-rings and a water inlet filter.
Refer to the instruction sheet provided in the kit to service
your unit’s o-rings.
ENGINE MAINTENANCE
Oil
Oil Recommendations
NOTICE When adding oil to the engine crankcase, use only
high quality 4-stroke automotive detergent oil rated with API
service classification SJ or SL rated SAE 10W-30 weight. DO
NOT use special additives.
1. Choose a viscosity according to table below.
NOTICE Other viscosities shown in the chart may be used
when the average temperature in your area is within the
recommended range.
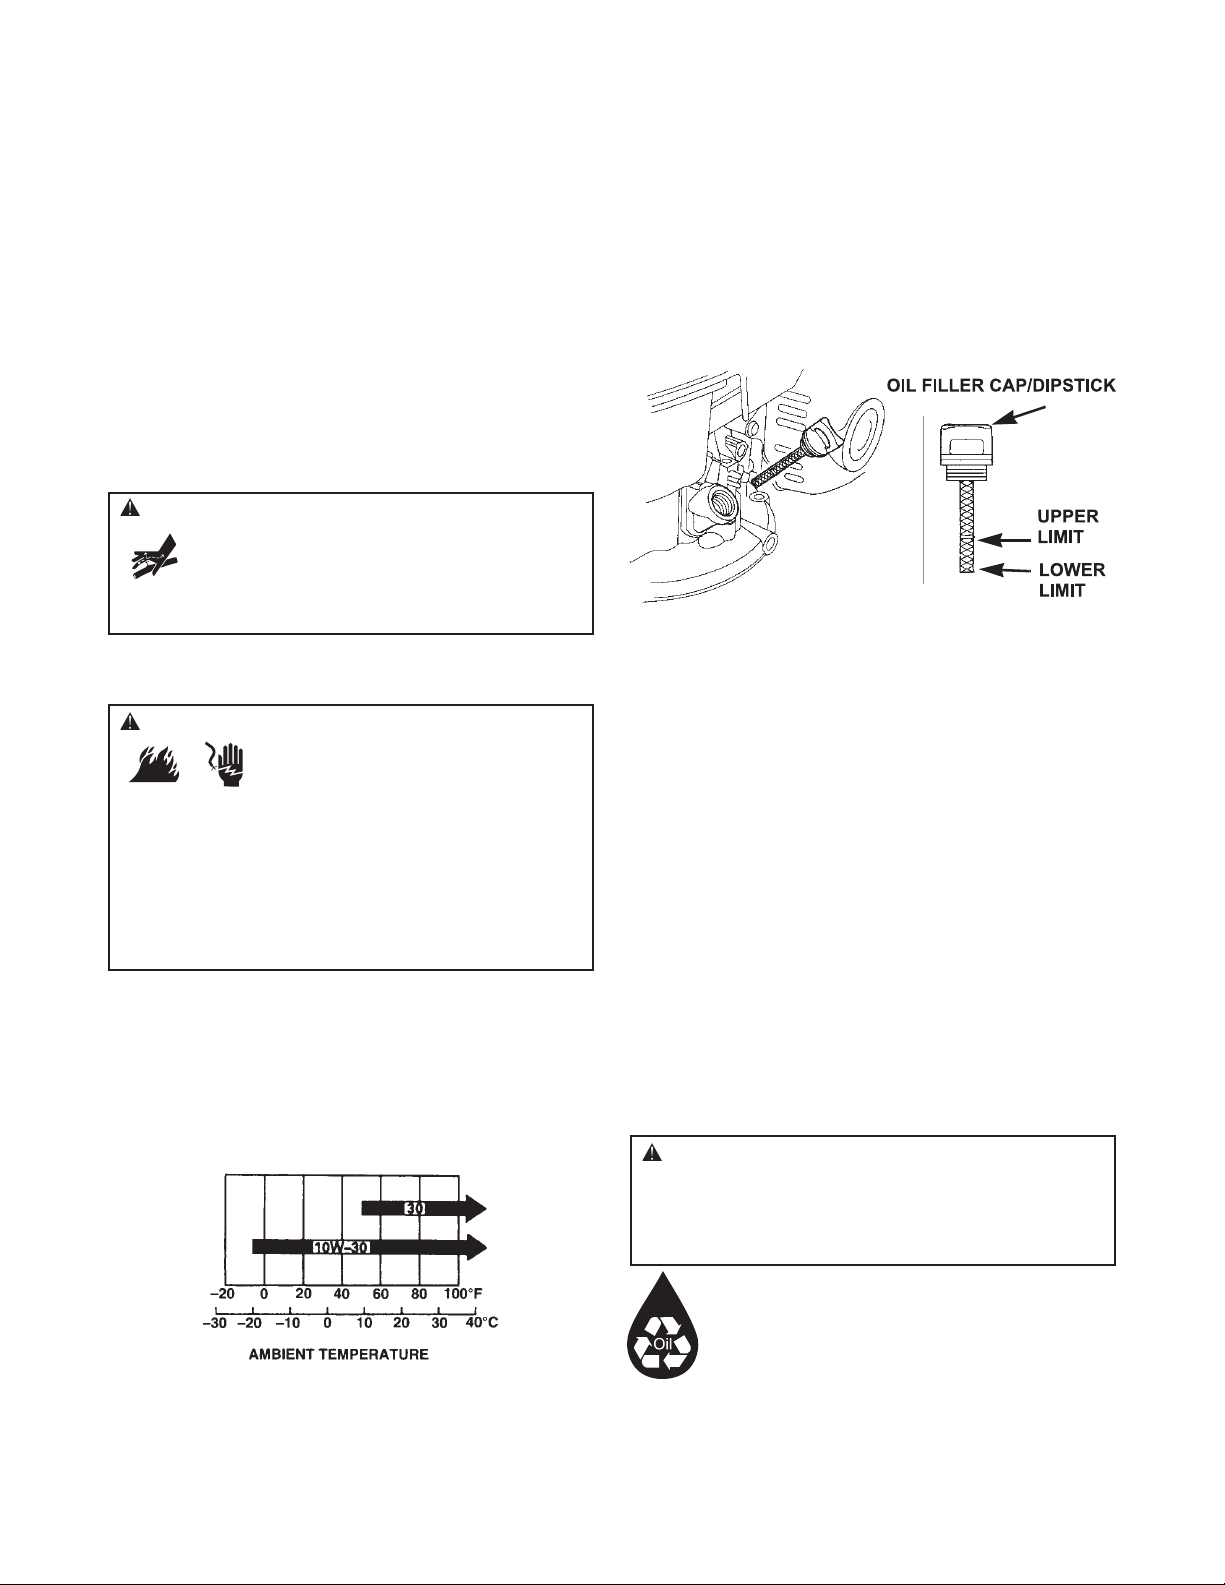
Checking Oil Level
Oil level should be checked prior to each use or at least every
8 hours of operation. Keep oil level maintained.
1. Place pressure washer on a level surface and clean area
around oil dipstick.
2. Remove oil dipstick and wipe dipstick with clean cloth.
Insert and remove dipstick without screwing it into the
filler neck.
3. Verify oil is at upper limit mark on dipstick. Replace and
tighten dipstick.
Add Engine Oil
1. Place pressure washer on a flat, level surface.
2. Clean area around oil fill and remove oil fill cap/dipstick.
3. Check oil level as described in Checking Oil Level.
4. If needed, slowly pour oil into oil fill opening. Pause to
permit oil to settle. Fill to upper limit mark on dipstick.
DO NOT overfill.
NOTICE Overfilling with oil could cause the engine to not
start, or hard starting.
• DO NOT overfill.
• If over the FULL mark on dipstick, drain oil to reduce oil level to
FULL mark on dipstick.
5. Replace oil fill cap/dipstick and fully tighten.
Changing Engine Oil
If you are using your pressure washer under extremely dirty
or dusty conditions, or in extremely hot weather, change oil
more often.
KEEP OUT OF REACH OF CHILDREN. DON'T
POLLUTE. CONSERVE RESOURCES. RETURN
USED OIL TO COLLECTION CENTERS.
19
WARNING The high pressure stream of water that
this equipment produces could cut through skin
and its underlying tissues, resulting in serious
injury and possible amputation.
• NEVER repair leaking connections with sealant of any kind.
Replace o-ring or seal.
WARNING Unintentional sparking could cause fire or
electric shock resulting in death or
serious injury.
WHEN ADJUSTING OR MAKING REPAIRS TO YOUR PRESSURE
WASHER
• Disconnect the spark plug wire from the spark plug and place
the wire where it cannot contact spark plug.
WHEN TESTING FOR ENGINE SPARK
• Use approved spark plug tester.
• DO NOT check for spark with spark plug removed.
CAUTION Avoid prolonged or repeated skin contact
with used motor oil.
• Used motor oil has been shown to cause skin cancer in certain
laboratory animals.
• Thoroughly wash exposed areas with soap and water.
Page 20

20
Change oil while engine is still warm from running, as
follows:
1. Drain fuel tank by running pressure washer until fuel
tank is empty.
2. Disconnect spark plug wire and keep it away from spark
plug.
3. Clean area around oil fill, remove oil fill cap/dipstick.
Wipe dipstick clean.
4. Tip your pressure washer toward the oil fill neck to drain
oil into a suitable container. When crankcase is empty,
return pressure washer to upright position.
5. Slowly pour recommended oil (approximately 18 oz.)
into oil fill opening. Pause to permit oil to settle. Fill to
upper limit mark on dipstick.
6. Replace and tighten dipstick.
7. Wipe up any remaining oil.
8. Reconnect spark plug wire to spark plug.
Service Air Cleaner
Your engine will not run properly and may be damaged if you
run it with a dirty air cleaner. Service more often if operating
under dirty or dusty conditions. Replacements are available
at your local Sears service center.
To service the air cleaner, follow these steps:
1. Press latch tabs (A) on top of air cleaner cover (B), and
remove cover.
2. Carefully remove air cleaner (C) from base (D).
3. Clean air cleaner by tapping it several times on a hard
surface to remove dirt, or blow compressed air (not to
exceed 30 psi) through air cleaner from clean side that
faces engine.
NOTICE NEVER try to brush off dirt. Brushing will force dirt
into the fibers.
4. Wipe dirt from air cleaner body and cover using a moist
rag. Be careful to prevent dirt from entering air duct (E)
that leads to the carburetor.
5. Install clean (or new) air cleaner in base. Air cleaner
must fit securely in base.
6. Reinstall air cleaner cover.
NOTICE You can purchase new air filter elements by calling
1-800-4-MY-HOME (469-4663).
Service Spark Plug
Changing the spark plug will help your engine to start easier
and run better.
1. Disconnect the cap from the spark plug and clean area
around spark plug.
2. Remove and inspect spark plug.
3. Replace spark plug if electrodes are worn, or if insulator
is cracked or chipped.
4. For replacement, use recommended spark plug, NGK
BPR6ES.
5. Check electrode gap with wire feeler gauge and set gap
at 0.028-0.031 inches (0.70-0.80 mm), if necessary.
6A. When reinstalling original spark plug, tighten 1/8-1/4
turn after the spark plug seats to compress the washer.
6B. When installing new spark plug, tighten 1/2 turn after
the spark plug seats to compress the washer.
7. Attach the spark plug cap to the spark plug.
NOTICE You can purchase a new spark plug by calling
1-800-4-MY-HOME (469-4663).
Carburetor
If you think your carburetor needs adjusting, see your
nearest Sears service center. Engine performance may be
affected at altitudes above 5000 feet. For operation at higher
elevations, contact your nearest Sears service center.
D
E
C
B
A
A
Page 21

Inspect Muffler and Spark Arrester
Inspect the muffler for cracks, corrosion, or other damage.
Remove the spark arrester, if equipped, and inspect for
damage or carbon blockage. If replacement parts are required,
make sure to use only original equipment replacement parts.
Clean and inspect the spark arrester as follows:
1. Remove the three 6 mm bolts (A) from the muffler
protector (B), and remove the muffler protector.
2. Remove the two special screws (C) from the spark
arrester, and remove the spark arrester (D) from
muffler (E).
3. Use a brush to remove carbon deposits from the spark
arrester screen. Be careful not to damage the screen.
NOTICE Replace spark arrester if it has breaks or holes.
4. Install clean (or new) spark arrester in reverse order of
removal.
AFTER EACH USE
Water should not remain in the unit for long periods of time.
Sediments or minerals can deposit on pump parts and
“freeze” pump action. Follow these procedures after every
use:
1. Shut off engine, turn off water supply, point gun in a
safe direction, press red button and squeeze trigger to
relieve trapped pressure and let engine cool.
2. Disconnect hose from spray gun and high pressure
outlet on pump. Drain water from hose, gun, and nozzle
extension. Use a rag to wipe off the hose.
3. Empty pump of all pumped liquids by pulling recoil
handle about 6 times. This should remove most liquid in
pump.
4. Coil high pressure hose on hose wrap provided on
accessory tray.
5. Store unit in a clean, dry area.
6. If storing for more than 30 days see Long Term Storage
on next page.
21
A
B
C
D
E
WARNING Exhaust heat/gases could ignite
combustibles, structures or damage fuel
tank causing a fire, resulting in death,
serious injury and/or property damage.
Contact with muffler area could cause burns resulting in
serious injury.
• DO NOT touch hot parts and AVOID hot exhaust gases.
• Allow equipment to cool before touching.
• Keep at least 5 feet (1.5 m) of clearance on all sides of pressure
washer including overhead.
• It is a violation of California Public Resource Code, Section
4442, to use or operate the engine on any forest-covered,
brush-covered, or grass-covered land unless the exhaust
system is equipped with a spark arrester, as defined in Section
4442, maintained in effective working order. Other states or
federal jurisdictions may have similar laws.
Contact the original equipment manufacturer, retailer, or dealer
to obtain a spark arrester designed for the exhaust system
installed on this engine.
• Replacement parts must be the same and installed in the same
position as the original parts.
WARNING The high pressure stream of water that
this equipment produces could cut through skin
and its underlying tissues, resulting in serious
injury and possible amputation.
Spray gun traps high water pressure, even when engine is
stopped and water is disconnected, which could result in
serious injury.
• Keep high pressure hose connected to pump and spray gun
while system is pressurized.
• ALWAYS point spray gun in safe direction, press red button
and squeeze spray gun trigger to release high pressure, every
time you stop engine.
WARNING Fuel and its vapors are extremely flammable
and explosive which could cause burns,
fire or explosion resulting in death,
serious injury and/or property damage.
WHEN STORING FUEL OR EQUIPMENT WITH FUEL IN TANK
• Store away from furnaces, stoves, water heaters, clothes
dryers, or other appliances that have pilot light or other ignition
source because they could ignite fuel vapors.
Page 22

22
WINTER STORAGE
NOTICE You must protect your unit from freezing
temperatures.
• Failure to do so will permanently damage your pump and render
your unit inoperable.
• Freeze damage is not covered under warranty.
To protect the unit from freezing temperatures:
1. Follow steps 1-4 in the previous section After Each Use.
2. Use pump saver, available at Sears, item 74403, to treat
pump. This minimizes freeze damage and lubricates
pistons and seals.
3. If pump saver is not available, connect a 3-foot section
of garden hose to water inlet adapter. Pour
RV–antifreeze (antifreeze without alcohol) into hose. Pull
recoil handle twice. Disconnect 3-foot hose.
4. Store unit in a clean, dry area.
LONG TERM STORAGE
If you do not plan to use the pressure washer for more than
30 days, you must prepare the engine and pump for long
term storage.
It is important to prevent gum deposits from forming in
essential fuel system parts such as the carburetor, fuel filter,
fuel hose or tank during storage. Also, experience indicates
that alcohol-blended fuels (called gasohol, ethanol or
methanol) can attract moisture, which leads to separation
and formation of acids during storage. Acidic gas can
damage the fuel system of an engine while in storage.
Protect Fuel System
Fuel Additive:
If adding a fuel additive, fill the fuel tank with fresh fuel. If
only partially filled, air in the tank will promote fuel
deterioration during storage.
• Add fuel additive following manufacturer’s instructions.
• Make sure you have water supply to pump inlet
connected and turned ON.
• Run the engine outdoors for several minutes to be sure
that treated fuel has replaced the untreated fuel in the
carburetor.
If fuel additive is not used, remove all fuel from tank and run
engine until it stops from lack of fuel.
Draining Fuel Tank and Carburetor:
If fuel additive is not used, remove all fuel from tank and
carburetor.
• Place an approved fuel container below carburetor and
use a funnel to avoid spilling fuel.
• Remove carburetor drain bolt (A), then move fuel valve
lever to “On” position.
• After all fuel has drained into container, reinstall drain
bolt. Tighten both securely.
Ch ange Engine Oil
While engine is still warm, drain oil from crankcase. Refill
with recommended grade. See Changing Engine Oil.
Oil Cylinder Bore
• Remove spark plug. Squirt about a tablespoon of clean
engine oil into the cylinder. Cover spark plug hole with
rag. Pull recoil handle slowly to distribute oil. Avoid spray
from spark plug hole.
• Install spark plug. DO NOT connect spark plug wire.
STORAGE
A
Page 23

Protect Pump
To protect the pump from damage caused by mineral
deposits or freezing, use PumpSaver, Sears item 74403, to
treat pump. This prevents freeze damage and lubricates
pistons and seals.
NOTICE PumpSaver is available as an optional accessory. It
is not included with the pressure washer. Contact your local
Sears service center to purchase PumpSaver.
NOTICE You must protect your unit from freezing
temperatures.
• Failure to do so will permanently damage your pump and render
your unit inoperable.
• Freeze damage is not covered under warranty.
To use PumpSaver, make sure the pressure washer is turned
off and disconnected from supply water. Read and follow all
instructions and warnings given on the PumpSaver container.
Other Storage Tips
1. DO NOT store fuel from one season to another unless it
has been treated as described in Protect Fuel System.
2. Replace fuel container if it starts to rust. Rust and/or dirt
in fuel can cause problems if it’s used with this unit.
3. Cover unit with a suitable protective cover that does not
retain moisture.
4. Store unit in a clean and dry area.
23
WARNING Storage covers could cause a fire
resulting in death, serious injury and/or property
damage.
• DO NOT place a storage cover over a hot pressure washer.
• Let equipment cool for a sufficient time before placing the cover
on the equipment.
Page 24

24
TROUBLESHOOTING
Problem Cause Correction
Pump has following problems: failure
to produce pressure, erratic pressure,
chattering, loss of pressure, low water
volume.
1. Low pressure spray tip installed.
2. Water inlet is blocked.
3. Inadequate water supply.
4. Inlet hose is kinked or leaking.
5. Clogged inlet hose strainer.
6. Water supply is over 100°F.
7. High pressure hose is blocked or
leaks.
8. Spray gun leaks.
9. Spray tip is obstructed.
10. Pump is faulty.
1. Replace with high pressure spray
tip.
2. Clear inlet.
3. Provide adequate water flow.
4. Straighten inlet hose, patch leak.
5. Check and clean inlet hose strainer.
6. Provide cooler water supply.
7. Clear blocks in outlet hose.
8. Replace spray gun.
9. Clean spray tip.
10. Contact Sears service facility.
Detergent fails to mix with spray.
1. Detergent siphoning tube is not
submerged.
2. Detergent siphoning tube is clogged
or cracked.
3. High pressure spray tip installed.
4. Detergent siphoning check ball
stuck.
1. Insert detergent siphoning tube into
detergent.
2. Clean or replace detergent
siphoning tube.
3. Replace with low pressure spray tip.
4. Free detergent siphoning check ball.
Engine will not start; starts and runs
rough or shuts down during operation.
1. Fuel valve is in “Off” position.
2. Engine stop switch in “Off” position.
3. Low oil level.
4. Dirty air cleaner.
5. Out of fuel.
6. Stale fuel.
7. Spark plug wire not connected to
spark plug.
8. Bad spark plug.
9. Water in fuel.
10. Overchoking.
11. Excessively rich fuel mixture.
12. Intake valve stuck open or closed.
13. Engine has lost compression.
1. Turn fuel valve to “On” position.
2. Place engine stop switch in “On”
position.
3. Fill crankcase to proper level.
4. Clean or replace air cleaner.
5. Fill fuel tank.
6. Drain fuel tank; fill with fresh fuel.
7. Connect wire to spark plug.
8. Replace spark plug.
9. Drain fuel tank; fill with fresh fuel.
10. Open choke fully and crank engine.
11. Contact Sears service facility.
12. Contact Sears service facility.
13. Contact Sears service facility.
Engine lacks power. Dirty air filter. Replace air filter.
Engine "hunts" or falters.
Choke is opened too soon. Move choke to halfway position until
engine runs smoothly.
Page 25

25
NOTES
Page 26

26
Item Part # Description
Article Pièce no. Description
1 317098GS BASE (BASE)
2 314787BNGS HANDLE (POIGNÉE)
3 317575GS BILLBOARD (PANNEAU D’AFFICHAGE)
B1797GS CLIP (AGRAFES)
4 314075GS KIT-QC NOZZLE (ENSEMBLE-BUSES
RACCORDS RAPIDES)
195983TGS NOZZLE-QC YELLOW (BUSE-RACCORDS
RAPIDES JAUNE)
195983AAGS NOZZLE-QC RED (BUSE-RACCORDS
RAPIDES ROUGE)
195983RGS NOZZLE-QC WHITE (BUSE-RACCORDS
RAPIDES BLANC)
198841GS NOZZLE-QC BLACK (BUSE-RACCORDS
RAPIDES NOIRE)
5 204658GS HOSE (BOYAU)
6 311553GS PUMP (POMPE)
7 315134GS AXLE (GLISSER)
8 7091585SM NUT (ÉCROU)
9 313835GS WHEEL (ROUE)
10 207784GS EXTENSION-QC (RALLONGE-RACCORDS
RAPIDES)
11 317099GS KIT-STRAP (ENSEMBLE-SANGLES)
12 206566GS WIREFORM (PIÈCE EN BROCHE)
13 204627GS GUN (PISTOLET)
14 196006GS HOSE (BOYAU)
15 192310GS MOUNT-VIBRATION (MONTANT-
ANTIVIBRATILE)
16 315033GS KIT-HARDWARE PUMP MOUNTING
(ENSEMBLE-QUINCAILLERIE,
MONTAGE DE POMPE)
Item Part # Description
Article Pièce no. Description
17 196002GS KIT-0-RING (ENSEMBLE-JOINT TORIQUE)
18 205910GS KIT-HANDLE (ENSEMBLE-POIGNÉE)
19 B2203GS KIT-HANDLE (ENSEMBLE-POIGNÉE)
900 § ENGINE (see pages 27-31) (MOTEUR (voir
pages 27 à 31)) (GCV160LAN5R)
Items Not Illustrated (Articles non illustrés)
Part # Description
Pièce no. Description
317557GS MANUAL-OPERATOR (MANUEL-
UTILISATION)
23139GS KEY (CLÉ)
192050GS E-RING (ANNEAU EN E)
314150GS OIL (HUILE)
189332GS PLUG-HOLE (BOUCHON-TROU)
208538GS DECAL-Spark (DÉCALQUE-Étincelle)
195015GS TAG-WARNING (ÉTIQUETTE-
AVERTISSEMENT)
Optional Accessories Not Illustrated (Accessoires en option non
illustrés)
67232 PerfectMix™ Multi-Purpose and Vehicle
Cleaner (Nettoyant polyvalent et à
véhicules PerfectMix™)
67231 PerfectMix™ Degreaser Cleaner (Nettoyant
dégraissant PerfectMix™)
67230 PerfectMix™ Mold and Mildew Cleaner
(Nettoyant de moisissure
PerfectMix™)
PARTS
CRAFTSMAN 2600 PSI Pressure Washer C950.672150
Nettoyeur à pression CRAFTSMAN de 2,600 psi C950.672150
Main Unit — Exploded View and Parts List (Unité principale — Vue éclatée et liste des pièces)
Page 27

27
CRAFTSMAN 2600 PSI Pressure Washer C950.672150
Nettoyeur à pression CRAFTSMAN de 2,600 psi C950.672150
Pump — Exploded View and Parts List (Pompe — Vue éclatée et liste des pièces)
Item Part # Description
Article Pièce no. Description
33 200275GS SCREW (VIS)
36 B2384GS FILTER-GARDEN HOSE (FILTRE-BOYAU
D’ARROSAGE)
A 200344GS KIT-CHECK VALVE (ENSEMBLE-
SOUPAPE L’VÉRIFIER)
B 200345GS KIT-WATER SEAL (ENSEMBLE-CACHET
D’EAU)
C 200346GS KIT-O-RING (ENSEMBLE-JOINT
TORIQUE)
D 315747GS KIT-UNLOADER (ENSEMBLE-
DÉCHARGEUR)
E 192914GS KIT-CHEMICAL INJ (ENSEMBLE-
INJECTION DE PRODUITS
CHIMIQUES)
Item Part # Description
Article Pièce no. Description
F 200349GS KIT-EASY START (ENSEMBLE-DÉBUT
FACILE)
G 200350GS SCREW-GRUB (VIS-FOUILLER)
H 201497GS FITTING (RACCORD)
J 201496GS KIT-WATER INLET (ENSEMBLE-ENTRÉE
D’EAU)
K 317057GS KIT-PLUG (ENSEMBLE-BOUCHON)
Items Not Illustrated
Articles non illustrés
Part # Description
Pièce no. Description
208673GS VALVE-THERMAL RELIEF (SOUPAPE-
DÉCHARGE THERMIQUE)
Page 28

28
ENGINE, Honda, GCV160LAN5R – Exploded View
MOTEUR, Honda, GCV160LAN5R - Vue éclatée
Page 29

29
ENGINE, Honda, GCV160LAN5R – Exploded View
MOTEUR, Honda, GCV160LAN5R - Vue éclatée
Page 30

30
Item Part # Description
Article Pièce no. Description
01 16212-ZL8-000 GASKET, INSULATOR (JOINT, ISOLATEUR)
02 16211-ZL8-000 INSULATOR, CARBURETOR (ISOLATEUR,
CARBURATEUR)
04 19651-Z0L-000 GUIDE, AIR (GUIDE, AIR)
05 16100-Z0L-863 CARBURETOR ASSY (BB65A B) (ENSEMBLE
CARBURATEUR (BB65A B))
06 16228-ZL8-000 GASKET, CARBURETOR (JOINT,
CARBURATEUR)
07 93500-05006-0H SCREW, PAN (5X6) (VIS, CARTER (5X6))
08 16166-ZM0-003 NOZZLE, MAIN (BUSE, PRINCIPAL)
09a 99101-124-0600 JET, MAIN (#60) (JET, PRINCIPAL (#60))
09b 99101-124-0620 JET, MAIN (#62) (JET, PRINCIPAL (#62))
09c 99101-124-0650 JET, MAIN (#65) (JET, PRINCIPAL (#65))
10 16155-ZM0-013 VALVE, FLOAT (SOUPAPE, FLOTTEUR)
11 16013-ZL1-003 FLOAT SET (FLOTTEUR)
12 16015-Z0L-881 CHAMBER SET, FLOAT (CHAMBRE,
FLOTTEUR)
13 16010-883-015 GASKET SET (JOINT)
14 16028-ZK7-S91 SCREW SET (VIS)
15 16024-ZE1-811 SCREW SET, DRAIN (VIS, VIDANGE)
16 15650-Z0L-000 GAUGE ASSY, OIL LEVEL (JAUGE, NIVEAU
D’HUILE)
17 15625-Z2L-801 GASKET, OIL FILLER CAP (JOINT, BOUCHON
DE REMPLISSAGE D’HUILE)
18 94301-08200 PIN, DOWEL (8X20) (TIGE, GOUJON (8X20))
19 11300-ZM0-V31 PAN ASSY, OIL (CARTER, HUILE)
20 91202-ZM0-V31 OIL SEAL (28X41.25X6) (JOINT D’HUILE
(28X41,25X6))
21 90121-952-000 BOLT, FLANGE (6X25) (BOULON, BRIDE
(6X25))
22 16510-ZM0-010 GOVERNOR ASSY (RÉGULATEUR)
23 90014-952-000 BOLT, FLANGE (6X14) (BOULON, BRIDE
(6X14))
24 16508-ZM0-010 SHAFT, GOVERNOR HOLDER (ARBRE,
SUPPORT DU RÉGULATEUR)
25 16513-ZE1-000 PIN, GOVERNOR WEIGHT (TIGE, POIDS DU
RÉGULATEUR)
26 16512-ZM0-000 HOLDER, GOVERNOR WEIGHT (SUPPORT,
POIDS DU RÉGULATEUR)
27 16511-ZL8-000 WEIGHT, GOVERNOR (POIDS, RÉGULATEUR)
28 90602-ZE1-000 CLIP, GOVERNOR HOLDER (ATTACHE,
SUPPORT DU RÉGULATEUR)
29 90451-ZE1-000 WASHER, THRUST (6MM) (RONDELLE,
POUSSÉE (6 MM))
30 16531-ZE1-000 SLIDER, GOVERNOR (POIDS, CURSEUR)
31 16541-Z8B-000 SHAFT, GOVERNOR ARM (ARBRE, BRAS DU
RÉGULATEUR)
32 94101-06800 WASHER, PLAIN (6MM) (RONDELLE,
RÉGULIÈRE (6 MM))
33 94251-08000 PIN, LOCK (8MM) (TIGE, VERROUILLAGE (8
MM))
34 12310-Z0J-000 COVER, HEAD (COUVERCLE, TÊTE)
35 90013-883-000 BOLT, FLANGE (6X12) (CT200) (BOULON,
BRIDE (6X12) (CT200))
36 98079-56846 SPARK PLUG (BPR6ES) (NGK) (BOUGIE
D’ALLUMAGE (BPR6ES) (NGK))
Item Part # Description
Article Pièce no. Description
37 12000-Z0L-840 CYLINDER ASSY (CYLINDRE)
38 14771-Z0J-000 RETAINER, VALVE SPRING (DISPOSITIF DE
RETENUE, RESSORT DE SOUPAPE)
39 14751-ZL8-000 SPRING, VALVE (RESSORT, SOUPAPE)
40 14721-ZL8-000 VALVE, EX (SOUPAPE, SO)
41 14711-Z0J-000 VALVE, IN (SOUPAPE, EN)
42 12209-ZM0-003 SEAL, VALVE STEM (JOINT, TIGE DE
SOUPAPE)
43 91201-ZL8-003 OIL SEAL (25.4X62X6) (JOINT D’HUILE
(25,4X62X6))
44 12355-ZL8-000 COVER, BREATHER (BREATHER VALVE ASSY)
(COUVERCLE, RENIFLARD (SOUPAPE DE
RENIFLARD))
45 90201-Z0T-800 NUT, SPECIAL (14MM) (ÉCROU, SPÉCIAL (14
MM))
46 19612-Z0L-000 PLATE, SIDE (PLATEAU, CÔTÉ)
47 13331-357-000 KEY, SPECIAL WOODRUFF (25X18) (CLÉ,
SPÉCIAL WOODRUFF (25X18))
48 31110-Z0J-004 FLYWHEEL (PHELON) (VOLANT (PHELON))
49 90018-ZE1-000 BOLT, FLANGE (6X23) (CT200) (BOULON,
BRIDE (6X23) (CT200))
50 51125-Z0L-003 HOLDER, WIRE (SUPPORT, FIL)
51 30500-Z0J-004 COIL ASSY, IGNITION (BOBINE, IGNITION)
52 13310-Z0L-650 CRANKSHAFT (MANIVELLE)
53 90402-ZL8-000 WASHER, THRUST (RONDELLE, POUSSÉE)
54 13010-Z0L-014 RING SET, PISTON (STD) (TEIKOKU)
(SEGMENT, PISTON (STD) (TEIKOKU))
55 90551-ZE0-000 CLIP, PISTON PIN (13MM) (ATTACHE, AXE DE
PISTON (13 MM))
56 13111-ZE0-000 PIN, PISTON (AXE, PISTON)
57 13101-Z2A-010 PISTON (PISTON)
58 13200-Z0J-000 ROD ASSY, CONNECTING (BIELLE)
59 90001-ZE1-000 BOLT, CONNECTING ROD (BOULON, BIELLE)
60 90201-ZM0-000 NUT, FLANGE (6MM) (ÉCROU, BRIDE (6 MM))
61 28400-ZL8-023ZC STARTER ASSY, RECOIL *R280*(POWER
RED) (DÉMARREUR, LANCEUR
*R280*(POWER RED))
62 28461-ZL8-003 GRIP, STARTER (POIGNÉE, DÉMARREUR)
63 28462-ZL8-003 ROPE, RECOIL STARTER (CORDE, LANCEUR)
64 19610-Z0L-851ZE COVER, FAN *R280* (POWER RED)
(COUVERCLE, VENTILATEUR
*R280*(POWER RED))
65 19619-ZL8-300 COLLAR, FAN COVER (COLLIER, COUVERCLE
DE VENTILATEUR)
66 90043-Z0J-900 BOLT, STUD (H=39.5MM) (BOULON, TIGE
(H=39.5MM))
67 17533-Z0L-000 RUBBER B, TANK MOUNTING (CAOUTCHOUC
B, MONTAGE DU RÉSERVOIR)
68 17516-Z0L-000 CLIP, TANK MOUNTING (ATTACHE, MONTAGE
DU RÉSERVOIR)
69 17511-Z0L-030 TANK, FUEL (RÉSERVOIR, ESSENCE)
70 17620-Z0J-800 CAP ASSY, FUEL TANK (BOUCHON,
RÉSERVOIR À ESSENCE)
71 17636-Z0L-010 GAUGE, FUEL LEVEL (JAUGE, NIVEAU
D’ESSENCE)
ENGINE, Honda, GCV160LAN5R – Parts List
MOTEUR, Honda, GCV160LAN5R - Nomenclature de pièces
Page 31

31
ENGINE, Honda, GCV160LAN5R – Parts List
MOTEUR, Honda, GCV160LAN5R - Nomenclature de pièces
Item Part # Description
Article Pièce no. Description
72 17534-Z0L-000 NUT, TANK MOUNTING (ÉCROU, MONTAGE
DU RÉSERVOIR)
73 17514-Z0L-000 SEAL, FUEL FILLER NECK (JOINT, GOULOT DE
REMPLISSAGE D’ESSENCE)
74 17532-Z0L-000 RUBBER A, TANK MOUNTING (CAOUTCHOUC
A, MONTAGE DU RÉSERVOIR)
75 16952-ZA8-800 FILTER, FUEL (FILTRE, ESSENCE)
76 95002-41200-08 CLAMP, TUBE (D12) (ATTACHE, TUBE (D12))
77 91427-Z8D-801 TUBE (FKM) (TUBE (FKM))
78 90013-883-000 BOLT, FLANGE (6X12) (BOULON, BRIDE
(6X12))
80 16950-Z0Y-003 PETCOCK ASSY (ROBINET)
81 93913-25220 SCREW, TAPPING (5X12) (VIS, TAPER (5X12))
82 95002-40800-08 CLAMP, TUBE (D8) (ATTACHE, TUBE (D8))
83 91424-Z8D-801 TUBE (FKM) (TUBE (FKM))
84 16500-Z8D-000 CONTROL ASSY (COMMANDE)
85 16674-Z8D-800 ROD, CHOKE (TIGE, ÉTRANGLEUR)
86 16555-Z0L-801 ROD, GOVERNOR (TIGE, RÉGULATEUR)
87 16562-ZM0-000 SPRING, THROTTLE RETURN (RESSORT,
RETOUR DE MANETTE DE POUSSÉE)
88 35120-Z8D-901 SWITCH ASSY, ENGINE STOP
(INTERRUPTEUR, ARRÊT DU MOTEUR)
89 16613-893-000 GROMMET, CHOKE ROD (ŒILLET, TIGE DE
L’ÉTRANGLEUR)
90 16551-ZM0-010 ARM, GOVERNOR (BRAS, RÉGULATEUR)
91 16581-Z8D-000 BASE, CONTROL (BASE, COMMANDE)
92 90017-883-000 BOLT, FLANGE (6X32) (BOULON, BRIDE
(6X32))
93 90015-ZE5-010 BOLT, GOVERNOR ARM (BOULON, BRAS DU
RÉGULATEUR)
94 16561-Z8B-V30 SPRING, GOVERNOR (RESSORT,
RÉGULATEUR)
95 94050-06000 NUT, FLANGE (6MM) (ÉCROU, BRIDE (6 MM))
96 14400-Z0J-014 BELT, TIMING (84HU7 G-200) (COURROIE,
DISTRIBUTION (84HU7 G-200))
97 14324-ZL8-000 SHAFT, CAM PULLEY (ARBRE, POULIE À
CAMES)
98 91301-ZM0-V31 O-RING (6.8X1.9) (JOINT TORIQUE (6,8X1,9))
99 14320-ZL8-010 PULLEY, CAMSHAFT (POULIE, ARBRE À
CAMES)
100 90206-001-000 NUT, TAPPET ADJ (ÉCROU, POUSSOIR
AJUST)
101 90012-333-000 SCREW, TAPPET ADJ (VIS, POUSSOIR AJUST)
102 14441-Z0J-000 ARM, EX VALVE ROCKER (BRAS, CULBUTEUR
DE SOUPAPE SO)
103 14461-ZL8-000 SHAFT, ROCKER ARM (ARBRE, BRAS
CULBUTEUR)
104 14431-Z0J-000 ARM, IN VALVE ROCKER (BRAS, CULBUTEUR
DE SOUPAPE EN)
105 17228-ZM0-000 GASKET, AIR CLEANER (JOINT, FILTRE À AIR)
106 15721-ZM0-000 TUBE, BREATHER (TUBE, RENIFLARD)
107 17220-ZM0-030 CASE ASSY, AIR CLEANER (BOÎTIER, FILTRE À
AIR)
108 90003-ZM0-010 BOLT, FLANGE (6X86) (CT200) (BOULON,
BRIDE (6X86) (CT200))
Item Part # Description
Article Pièce no. Description
110 17211-ZL8-023 ELEMENT, AIR CLEANER (ÉLÉMENT, FILTRE À
AIR)
111 17231-Z0L-050 COVER, AIR CLEANER (COUVERCLE, FILTRE À
AIR)
112 18321-Z0L-010 PROTECTOR, MUFFLER (PROTECTEUR,
SILENCIEUX)
113 90004-ZL8-000 BOLT, FLANGE (6X79) (CT200) (BOULON,
BRIDE (6X79) (CT200))
114 06180-Z0J-000 ARRESTER KIT, SPARK (PARE-ÉTINCELLES)
115 18350-ZL8-000 ARRESTER, SPARK (PARE-ÉTINCELLES)
116 90055-ZE1-000 SCREW, TAPPING (4X6) (VIS,
AUTOTARAUDEUSE (4X6))
117 18356-ZL8-000 PLATE, ARRESTER NUMBER (PLAQUE,
NUMÉRO DE PARE-ÉTINCELLES)
118 18310-Z0Y-000 MUFFLER. (SILENCIEUX)
119 18381-ZL8-305 GASKET, MUFFLER (JOINT, SILENCIEUX)
120 28451-Z0J-900 PULLEY, STARTER (POULIE, DÉMARREUR)
121 90043-ZL8-000 BOLT, STUD (H=42.5MM) (BOULON, TIGE
(H=42.5MM))
122 19511-Z0J-900 FAN, COOLING (VENTILATEUR,
REFROIDISSEMENT)
123 87531-Z0Y-M11ZA MARK, HONDA (TYPE 1) (MARQUE, HONDA
(TYPE 1))
124 87101-Z8B-000 MARK, EMBLEM (GCV160) (MARQUE,
ÉCUSSON (GCV160))
125 87169-Z8E-000 MARK, RECOIL COVER (MARQUE,
COUVERCLE LANCEUR)
126 87528-ZL8-000 MARK, CHOKE (MARQUE, ÉTRANGLEUR)
127 87524-Z8B-000 MARK, FUEL PETCOCK CAUTION (MARQUE,
AVERTISSEMENT ROBINET D’ESSENCE)
Page 32

32
EMISSION CONTROL SYSTEM WARRANTY
California, U.S. EPA, and Sears Emissions
Control Warranty Statement
Your Warranty Rights And Obligations
The California Air Resources Board, U.S. EPA, and Sears
Brands Management Corporation, U.S.A. (Sears) are pleased
to explain the emissions control system warranty on your
Model Year 2011-2012 engine/equipment. In California, new
small off-road engines and large spark ignited engines less
than or equal to 1.0 liter must be designed, built, and
equipped to meet the State’s stringent anti-smog standards.
Sears must warrant the emissions control system on your
engine/equipment for the periods of time listed below
provided there has been no abuse, neglect, or improper
maintenance of your engine or equipment.
Your emissions control system may include parts such as
the carburetor or fuel injection system, fuel tank, ignition
system, and catalytic converter. Also included may be hoses,
belts, connectors, sensors, and other emissions-related
assemblies. Where a warrantable condition exists, Sears will
repair your engine/equipment at no cost to you including
diagnosis, parts, and labor.
Manufacturer’s Warranty Coverage:
Small off-road engines and large spark ignited engines less
than or equal to 1.0 liter are warranted for two years. If any
emissions-related part on your engine/equipment is
defective, the part will be repaired or replaced by Sears.
Owner’s Warranty Responsibilities:
• As the engine/equipment owner, you are responsible for
the performance of the required maintenance listed in
your owner’s manual. Sears recommends that you
retain all receipts covering maintenance on your
engine/equipment, but Sears cannot deny warranty
solely for the lack of receipts or your failure to ensure
the performance of all scheduled maintenance.
• As the engine/equipment owner, you should however
be aware that Sears may deny you warranty coverage if
your engine/equipment or a part has failed due to
abuse, neglect, improper maintenance, or unapproved
modifications.
• You are responsible for presenting your
engine/equipment to a Sears distribution center,
servicing dealer, or other equivalent entity, as
applicable, as soon as a problem exists. The warranty
repairs should be completed in a reasonable amount of
time, not to exceed 30 days. If you have any questions
regarding your warranty rights and responsibilities, you
should contact Sears at (800) 469-4663.
Sears Emissions Control Warranty Provisions
The following are specific provisions relative to your
Emissions Control Warranty Coverage. It is in addition to the
Sears engine warranty for non-regulated engines found in
the Operator’s Manual.
1. Warranted Emissions Parts
Coverage under this warranty extends only to the parts
listed below (the emissions control systems parts) to
the extent these parts were present on the engine
purchased.
a. Fuel Metering System
• Cold start enrichment system (soft choke)
• Carburetor and internal parts
• Fuel pump
• Fuel line, fuel line fittings, clamps
• Fuel tank, cap and tether
• Carbon canister
b. Air Induction System
• Air cleaner
• Intake manifold
• Purge and vent line
c. Ignition System
• Spark plug(s)
• Magneto ignition system
d. Catalyst System
• Catalytic converter
• Exhaust manifold
• Air injection system or pulse valve
e. Miscellaneous Items Used in Above Systems
• Vacuum, temperature, position, time sensitive
valves and switches
• Connectors and assemblies
2. Length of Coverage
For a period of two years from date of original
purchase, Sears warrants to the original purchaser and
each subsequent purchaser that the engine is designed,
built, and equipped so as to conform with all applicable
regulations adopted by the Air Resources Board; that it
is free from defects in material and workmanship that
could cause the failure of a warranted part; and that it is
identical in all material respects to the engine described
in the manufacturer’s application for certification. The
warranty period begins on the date the engine is
originally purchased.
In the USA and Canada, a 24-hour hotline, 1-800-469-4663, has a menu of pre-recorded messages offering you product maintenance
information.
Page 33

33
The warranty on emissions-related parts is as follows:
• Any warranted part that is not scheduled for
replacement as required maintenance in the owner’s
manual supplied, is warranted for the warranty period
stated above. If any such part fails during the period of
warranty coverage, the part will be repaired or replaced
by Sears at no charge to the owner. Any such part
repaired or replaced under the warranty will be
warranted for the remaining warranty period.
• Any warranted part that is scheduled only for regular
inspection in the owner’s manual supplied, is warranted
for the warranty period stated above. Any such part
repaired or replaced under warranty will be warranted
for the remaining warranty period.
• Any warranted part that is scheduled for replacement as
required maintenance in the owner’s manual supplied, is
warranted for the period of time prior to the first
scheduled replacement point for that part. If the part fails
prior to the first scheduled replacement, the part will be
repaired or replaced by Sears at no charge to the owner.
Any such part repaired or replaced under warranty will be
warranted for the remainder of the period prior to the
first scheduled replacement point for the part.
• Add on or modified parts that are not exempted by the
Air Resources Board may not be used. The use of any
non exempted add on or modified parts by the owner
will be grounds for disallowing a warranty claim. The
manufacturer will not be liable to warrant failures of
warranted parts caused by the use of a non exempted
add on or modified part.
3. Consequential Coverage
Coverage shall extend to the failure of any engine
components caused by the failure of any warranted
emissions parts.
4. Claims and Coverage Exclusions
Warranty claims shall be filed according to the
provisions of the Sears engine warranty policy.
Warranty coverage does not apply to failures of
emissions parts that are not original equipment Sears
parts or to parts that fail due to abuse, neglect, or
improper maintenance as set forth in the Sears engine
warranty policy. Sears is not liable for warranty
coverage of failures of emissions parts caused by the
use of add-on or modified parts.
Look For Relevant Emissions Durability Period and Air
Index Information On Your Small Off-Road Engine
Emissions Label
Engines that are certified to meet the California Air Resources
Board (CARB) small off-road Emissions Standard must
display information regarding the Emissions Durability Period
and the Air Index. The engine manufacturer makes this
information available to the consumer on emissions labels.
The engine emissions label will indicate certification
information.
The Emissions Durability Period describes the number of
hours of actual running time for which the engine is certified
to be emissions compliant, assuming proper maintenance in
accordance with the Operating & Maintenance Instructions.
The following categories are used:
Moderate: Engine is certified to be emissions compliant for
125 hours of actual engine running time.
Intermediate: Engine is certified to be emissions compliant
for 250 hours of actual engine running time.
Extended: Engine is certified to be emissions compliant for
500 hours of actual engine running time.
For example, a typical walk-behind lawn mower is used 20 to
25 hours per year. Therefore, the Emissions Durability
Period of an engine with an intermediate rating would
equate to 10 to 12 years.
Small off-road engines are certified to meet the United States
Environmental Protection Agency (USEPA) Phase 2
emissions standards. For Phase 2 certified engines, the
Emissions Compliance Period referred to on the Emissions
Compliance label indicates the number of operating hours for
which the engine has been shown to meet Federal emissions
requirements.
For engines less than 225 cc displacement.
Category C = 125 hours
Category B = 250 hours
Category A = 500 hours
For engines of 225 cc or more displacement.
Category C = 250 hours
Category B = 500 hours
Category A = 1000 hours
Page 34

34
TABLE DES MATIÈRES
GARANTIE LIMITÉE DE CRAFTSMAN
Généralités : Les produits Craftsman sont garantis contre tout défaut de matériaux ou de fabrication pendant une période de temps précise,
telle qu’établie ci-dessous (la « période de garantie »). En outre, cette garantie est offerte uniquement à l’acheteur initial du produit
Craftsman. Les achats effectués par l’entremise d’un encan en ligne ou sur tout site Web autre que www.sears.ca sont exclus. La période
de garantie débute à la date de l’achat initial. Au cours de cette période, Sears Canada, Inc. s’engage, à sa seule discrétion, à réparer ou à
remplacer tout produit ou composant de produit défectueux dans des conditions d’utilisation normale. La réparation ou le remplacement
sera effectué pour le client sans frais de pièces ni de main-d’œuvre, à condition que le client prenne à sa charge les frais de transport.
Exclusions: La présente garantie ne couvre pas les défectuosités dues à l’usure normale, l’utilisation inappropriée ou abusive, la négligence
(y compris, mais sans s’y restreindre, l’utilisation d’essence éventée, la poussière, les abrasifs, l’humidité, la rouille, la corrosion ou tout
autre effet indésirable, imputable à un entreposage ou à des habitudes d’utilisation inappropriés), un mauvais entretien, le non-respect des
consignes ou directives d’entretien, l’utilisation de l’appareil contrairement aux instructions fournies dans le manuel d’entretien ou aux
consignes ou informations données à l’acheteur initial, au moment de l’achat ou au cours de communications subséquentes avec lui, un
accident ou encore une modification ou des réparations non autorisées, effectuées ou tentées par d’autres. Sont également exclus de la
couverture de la garantie – sauf indication fournie ci-dessous – les éléments suivants : travaux d’entretien, réglages, composants sujets à
l’usure, y compris mais sans s’y restreindre : les composants esthétiques, courroies, lames, adaptateurs de lame, ampoules, pneus, filtres,
barres de guidage, lubrifiants, sièges, poignées, logements de cordon de démarrage, chaînes et barres de scie, bobines et fils de tondeuse à
fouet, bougies, cordes de démarrage et dents, ainsi que les décolorations résultant de l’exposition aux rayons ultraviolets. Tout produit ne
portant pas son étiquette d’identification avec son numéro de modèle ou de série sera exclu de la protection offerte par la présente garantie.
Réparations : Les réparations sont garanties pendant une période de 90 jours. Si le produit défectueux est toujours couvert par la garantie,
la nouvelle garantie est de 90 jours à compter de la date de la réparation ou jusqu’à la fin de la période de garantie initiale, selon la plus
longue des deux échéances.
Restrictions : LES GARANTIES ET RECOURS DÉFINIS DANS LES PRÉSENTES SONT EXCLUSIFS ET REMPLACENT TOUTE AUTRE
GARANTIE, QU’ELLE SOIT VERBALE OU ÉCRITE (AUTRE QUE CELLES ÉNONCÉES DANS LES PRÉSENTES) OU QU’ELLE SOIT EXPRESSE,
IMPLICITE OU PRÉVUE PAR LA LOI, SANS SE RESTREINDRE À AUCUNE. LA PRÉSENTE GARANTIE VOUS CONFÈRE DES DROITS
JURIDIQUES PRÉCIS, POUVANT DIFFÉRER D’UNE PROVINCE À L’AUTRE.
SEARS NE POURRA EN AUCUN CAS ÊTRE TENUE RESPONSABLE DE TOUT DOMMAGE ACCESSOIRE, SPÉCIAL, INDIRECT OU
CONSÉCUTIF, QUI RÉSULTERAIT DE L’UTILISATION, DU MÉSUSAGE OU DE L’INCAPACITÉ D’UTILISER LE PRODUIT OU QUI
DÉCOULERAIT DE DÉFECTUOSITÉS DU PRODUIT. LES EXCLUSIONS DU PRÉSENT PARAGRAPHE NE S’APPLIQUENT PAS DANS LES
TERRITOIRES OÙ LA LOI NE PERMET PAS L’EXCLUSION DES DOMMAGES ACCESSOIRES OU CONSÉCUTIFS. DANS CES TERRITOIRES,
LE PRÉSENT PARAGRAPHE SERA SANS EFFET, MAIS LES AUTRES DISPOSITIONS DU PRÉSENT DOCUMENT DEMEURERONT VALIDES.
Sears conserve le droit exclusif de réparer ou de remplacer le produit ou encore d’offrir un remboursement complet de son prix d’achat, à sa
seule discrétion. CE RECOURS SERA LE SEUL ET UNIQUE RECOURS DONT VOUS DISPOSEREZ EN CAS D’INEXÉCUTION QUELLE QU’ELLE
SOIT DE LA GARANTIE.
GARANTIE . . . . . . . . . . . . . . . . . . . . . . . . . . . . . . . . . . . . . . . . 34-35
RÈGLES DE SÉCURITÉ . . . . . . . . . . . . . . . . . . . . . . . . . . . . . . 36-38
FONCTIONS ET COMMANDES . . . . . . . . . . . . . . . . . . . . . . . . . . . 39
ASSEMBLAGE . . . . . . . . . . . . . . . . . . . . . . . . . . . . . . . . . . . . . 40-43
OPÉRATION. . . . . . . . . . . . . . . . . . . . . . . . . . . . . . . . . . . . . . . 44-48
CARACTÉRISTIQUES DU PRODUIT . . . . . . . . . . . . . . . . . . . . . . . 49
ENTRETIEN . . . . . . . . . . . . . . . . . . . . . . . . . . . . . . . . . . . . . . . 50-55
RANGEMENT. . . . . . . . . . . . . . . . . . . . . . . . . . . . . . . . . . . . . . . . . 56
DÉPANNAGE . . . . . . . . . . . . . . . . . . . . . . . . . . . . . . . . . . . . . . . . . 57
GARANTIE DU DISPOSITIF ANTIPOLLUTION . . . . . . . . . . . . .58-59
COMMENT COMMANDER LES PARTIES . . . . PAGE POSTÉRIEURE
GARANTIE
Page 35

35
Responsabilités du client : En plus d’observer toutes les consignes et directives d’entretien, le client doit s’acquitter, entre autres, des
obligations suivantes : utiliser le produit conformément aux consignes de la notice d’entretien et aux directives ou informations
additionnelles fournies à l’acheteur au moment de l’achat ou à l’occasion de communications subséquentes; faire preuve d’un soin
raisonnable pour l’utilisation, le fonctionnement, l’entretien général, le maintien en bon état et l’entreposage du produit. Le manquement à
ces obligations entraînera une annulation de la garantie applicable.
Liste des périodes de garantie applicables : La liste ci-dessous indique la période de garantie applicable aux divers produits Craftsman
qu’elle couvre; la période accordée tient compte du type de produit ou de composants et du type d’utilisation prévue ou effective de l’appareil
ou du composant :
1. 90 jours – Produits Craftsman devant être ou étant effectivement utilisés à des fins commerciales, institutionnelles, professionnelles ou
lucratives.
2. 2 ans - Les produits de marque Craftsman suivants : tondeuses à conducteur porté, tracteurs de jardin, tondeuses à contrôle arrière,
motobêches, débroussailleurs, souffleuses à neige, souffleuses portatives, souffleuses dorsales, taille-bordures et produits électriques à
usage non commercial, non professionnel, non institutionnel ou non lucratif, sauf les composants faisant partie de systèmes de moteur
fabriqués par des tiers pour lesquels l’acheteur a reçu une garantie séparée ainsi que des renseignements sur le produit, au moment de
l’achat.
3. 1 an - Produits de marque Craftsman suivants : nettoyeur à pression, couteaux électriques, broyeuses de souches, ébranchoirs, scies à
chaîne à essence, scies à chaîne électriques, accessoires de taille-bordures, sacs et scies à long manche utilisées à des fins non
commerciales, non professionnelles, non institutionnelles et non lucratives.
4. 90 jours - Toutes les batteries défectueuses, qui seront remplacées pendant une période de garantie de 90 jours.
5. 60 jours - Une période de garantie additionnelle de 60 jours s’appliquera pour le réglage ou l’usure de produits ou de composants MAIS
CETTE GARANTIE EXCLUT L’USURE ET LE RÉGLAGE de produits utilisés à des fins commerciales, institutionnelles, professionnelles ou
lucratives. Les articles sujets à l’usure englobent, sans s’y restreindre : les courroies, lames, pneus, bougies, filtres à air, chaînes,
boulons de cisaillement, plaques de protection, barres de raclage, coupe-congères, cordons, dents, sacs collecteurs et poulies.
Étant donné que la période de garantie débute à la date d’achat et NON à la date à laquelle le produit est livré, l’emballage ouvert et l’appareil
assemblé ou utilisé la première fois, assurez-vous que votre produit ou composant est assemblé et mis à l’essai pour en vérifier le bon
fonctionnement, quel que soit le moment où vous prévoyez commencer à l’utiliser réellement. Les réclamations présentées après
l’expiration de la garantie ne seront pas acceptées.
Preuve d’achat et documents : La protection de la garantie est conditionnelle à la présentation par l’acheteur initial, à Sears Canada ou à son
fournisseur de service autorisé s’il y a lieu, de la facture ou de toute autre preuve d’achat appropriée indiquant la date de l’achat et désignant
le produit. Dans le cas où l’acheteur initial serait dans l’impossibilité de fournir une copie de sa facture, Sears Canada Inc. se réserve le droit
d’établir, à sa seule discrétion, quelle autre preuve écrite de la date d’achat initial et de la désignation du produit est acceptable.
SEARS CANADA INC., TORONTO, ONTARIO, CANADA M5B 2C3
Page 36

36
RÈGLES DE SÉCURITÉ
Lisez avec soin ce manuel et familiarisez-vous avec votre
pulvérisateur á pression. Connaissez ses applications, ses
limitations et les dangers qu'il implique.
Renseignements importants de sécurité
Symboles de sécurité et leur signification
Le symbole d’alerte de sécurité indique un risque potentiel de
blessure personnelle. Un mot signal (DANGER, ATTENTION ou
AVERTISSEMENT) est utilisé avec un symbole d'alerte pour vous
indiquer le degré ou le niveau du risque. Un symbole de sécurité
peut être utilisé pour représenter le type de risque. Le mot signal
AVIS est utilisé pour traiter les pratiques qui ne sont pas reliées aux
blessures personnelles.
Le mot signal DANGER indique un danger qui, s’il n’est pas
évité, causera la mort ou des blessures graves.
Le mot signal AVERTISSEMENT indique un risque qui, s’il n’est
pas évité, pourrait causer la mort ou des blessures graves.
Le mot signal ATTENTION indique un risque qui, s’il n’est pas
évité, pourrait causer des blessures mineures ou modérées.
Le mot AVIS est utilisé pour les pratiques qui ne sont pas reliées
aux blessures personnelles.
Feu
Explosion
Emanations Toxiques
Surface Chaude
Parties en mouvement
Choc Électrique
Surface Glissante
Chute
Effet de Recul
Projectile
Injection Fluide
Manuel d'Utilisation
Brûlures chimiques
Objets volant
AVERTISSEMENT L’échappement du moteur de ce produit
contient des produits chimiques que l’État de Californie
considère comme causant le cancer, des déformations à la
naissance ou d’autres dangers concernant la reproduction.
AVERTISSEMENT Ce produit contient du plomb et des
composés de plomb, produits chimiques reconnus par l’État de
la Californie comme causant des malformations congénitales ou
d’autres problèmes de reproduction. Nettoyez-vous les mains
après la manipulation de ce produit.
AVERTISSEMENT Le moteur, lorsqu'il fonctionne, produit
du monoxyde de carbone, un gaz toxique inodore et
incolore.
L’inhalation du monoxyde de carbone peut entraîner la
mort, des blessures graves, des maux de tête, de la fatigue, des
étourdissements, le vomissement, de la confusion, des crises
épileptiques, des nausées et l’évanouissement.
Certains produits chimiques et détergents peuvent être nocifs en
cas d’ingestion, et entraîner la mort, des blessures graves, des
nausées, un évanouissement ou un empoisonnement.
• Faites fonctionner cet appareil UNIQUEMENT à l’extérieur.
• Évitez que les gaz d'échappement entrent dans un espace
restreint, par une fenêtre, une porte, une prise d'aération ou
toute autre ouverture.
• NE faites PAS fonctionner ce produit à l'intérieur d'un bâtiment,
d’un abri de voiture, d’un porche, de l’équipement mobile, lors
d’applications marines ou dans un lieu clos, même si les
fenêtres et les portes sont ouvertes.
• Portez un respirateur ou un masque lorsqu'il y a risque d'inhalation
de vapeurs pendant l’utilisation de produits chimiques.
• Lisez toujours les directives d’utilisation du masque de façon à
vous assurer qu’il fournit la protection nécessaire contre
l’inhalation de vapeurs nocives pendant l’utilisation de produits
chimiques.
AVERTISSEMENT
Risque d’électrocution.
Tout contact avec une source d’alimentation de
courant peut entraîner la mort et des blessures
graves.
• NE pulvérisez JAMAIS près d’une source d’alimentation.
AVERTISSEMENT
L'utilisation du nettoyeur à haute
pression peut laisser des flaques d'eau et
rendre les surfaces glissantes pouvant
provoquer une chute et risquant d’entraîner
la mort et des blessures graves.
Un effet de recul du pistolet de pulvérisation peut causer une
chute risquant d’entraîner la mort et des blessures graves.
• Utilisez le nettoyeur à pression à partir d’une surface stable.
• La surface à nettoyer doit être inclinée et équipée
d'écoulements afin de réduire la possibilité de chutes dues aux
surfaces glissantes.
• Soyez très vigilant si vous devez utiliser le nettoyeur à pression
lorsque vous êtes dans une échelle, un échafaudage ou autre
emplacement similaire.
• Lorsque vous utilisez une vaporisation à haute pression,
saisissez fermement le pistolet de vaporisation avec les deux
mains afin d’éviter les risques de blessures entraînés par les
effets de recul.
Page 37

37
AVERTISSEMENT L’essence et ses vapeurs sont
extrêmement inflammables et explosives qui
pourraient causer des brûlures, un incendie
ou une explosion risquant d’entraîner la
mort, des blessures graves et/ou des dommages matériels.
LORS DE L'AJOUT OU DE LA VIDANGE DU CARBURANT
• Éteignez le moteur de la nettoyeur à pression et laissez-le
refroidir pendant au moins 2 minutes avant de retirer le
bouchon à essence. Desserrez lentement le capuchon pour
laisser la pression s'échapper du réservoir.
• Remplissez ou vidangez le réservoir d'essence à l'extérieur.
• NE remplissez PAS trop le réservoir. Laissez l'expansion de
l'essence.
• Attend le carburant renversé pour s'évaporer avant de démarrer
le moteur.
• Éloignez l'essence des étincelles, des flammes, des veilleuses,
de la chaleur et de toute autre source d'inflammation.
• Vérifiez si les conduits d'essence, le réservoir, le bouchon et les
raccords comportent des fissures ou des fuites. Remplacez au
besoin.
• N'ALLUMEZ PAS de cigarette ou ne fumez pas à proximité de
l'appareil.
LORS DU DÉMARRAGE DE L'ÉQUIPEMENT
• Assurez-vous que la bougie d'allumage, le silencieux, le
bouchon à essence et le filtre à air sont en place.
• NE démarrez PAS le moteur lorsque la bougie d'allumage est
enlevée.
LORSQUE L'ÉQUIPEMENT FONCTIONNE
• NE faites PAS fonctionner ce produit à l'intérieur d'un bâtiment,
d’un abri de voiture, d’un porche, de l’équipement mobile, lors
d’applications marines ou dans un lieu clos.
• NE penchez PAS le moteur ou l'équipement, vous risqueriez de
renverser de l'essence.
• NE vaporisez PAS de liquides inflammables.
LORS DU TRANSPORT, DU DÉPLACEMENT OU DE LA
RÉPARATION DE L’ÉQUIPEMENT
• Le réservoir d'essence doit être VIDE ou le robinet d'arrêt de
carburant doit être à la position fermée (OFF) pendant le
transport, du déplacement ou la réparation.
• NE penchez PAS le moteur ou l'équipement, vous risqueriez de
renverser de l'essence.
• Débranchez le câble de bougie.
LORSQUE VOUS ENTREPOSEZ L'ESSENCE OU UN ÉQUIPEMENT
AVEC UN RÉSERVOIR À ESSENCE
• Entreposez-le loin des appareils de chauffage, des fours, des
chauffe-eau, des sécheuses ou de tout autre appareil
électroménager disposant d'une veilleuse ou de toute autre
source d'inflammation risquant d'enflammer les vapeurs
d'essence.
AVERTISSEMENT La chaleur et les gaz d’échappement
peuvent enflammer des matériaux
combustibles et les structures ainsi que
causer des dommages au réservoir
d’essence et provoquer un incendie risquant d’entraîner la mort,
des blessures graves et/ou des dommages matériels.
Tout contact avec la zone du silencieux peut causer des brûlures
risquant d’entraîner des blessures graves.
• NE touchez PAS aux pièces chaudes et ÉVITEZ le contact avec
les gaz d’échappement.
• Laissez l'équipement refroidir avant de le toucher.
• Laissez un dégagement d’au moins 1,5 m (5 pi) tout autour de
la nettoyeur à pression, y compris au-dessus.
• L’utilisation ou le fonctionnement d’un moteur sur un terrain
boisé, couvert de broussailles ou gazonné constitue une violation
dans l’État de la Californie, en vertu de la section 4442 du
California Public Resources Code, à moins qu’il ne soit doté d’un
pare-étincelles tel que défini dans la section 4442 et maintenu en
bon état de fonctionnement. Il se peut que d’autres États ou
d’autres compétences fédérales aient des lois semblables.
Communiquez avec le fabricant, le détaillant ou le concessionnaire
original de l’appareil afin d’obtenir un pare-étincelles conçu pour le
système d’échappement installé sur ce moteur.
• Les pièces de rechange doivent être identiques aux pièces
d’origine et être installées à la même position.
AVERTISSEMENT Le jet d'eau à haute pression produit par
cet appareil peut couper la peau et ses tissus sousjacents et conduire à des blessures graves et même
une amputation.
Le pistolet de pulvérisation retient une pression d’eau élevée,
même lorsque le moteur est éteint et que l’eau est déconnectée,
ce qui peut causer des blessures graves.
• Communiquez immédiatement avec un médecin en cas de
coupure. NE la traitez PAS comme une simple coupure.
• N'autorisez JAMAIS des ENFANTS à se servir du nettoyeur à
pression.
• Ne réparez JAMAIS les tuyaux à haute pression. Remplacez.
• Ne réparez JAMAIS des raccords non étanches à l’aide de
scellant. Remplacez le joint torique ou le joint d’étanchéité.
• Ne connectez JAMAIS le boyau à haute pression à la rallonge
de buse.
• Gardez toujours le tuyau flexible à haute pression raccordé à la
pompe et au pistolet de pulvérisation lorsque le système est
sous pression.
• À chaque fois que vous arrêtez le moteur, dirigez TOUJOURS le
pistolet vers un endroit sécuritaire et appuyez sur le bouton
rouge et sur la détente du pistolet de pulvérisation pour libérer
la haute pression.
• N visez JAMAIS des personnes, des animaux ou des plantes
avec le pistolet pulvérisateur.
• NE verrouillez PAS le pistolet de pulvérisation dans la position
ouverte.
• NE laissez PAS le pistolet de pulvérisation sans surveillance
alors que l'appareil est en marche.
• N'utilisez JAMAIS un pistolet de pulvérisation qui n'est pas
muni d'un verrou d'arme ou d'un pontet installé et en ordre de
marche.
• Assurez-vous toujours que le pistolet de pulvérisation, les
buses et les accessoires sont bien fixés.
AVERTISSEMENT
Danger de brûlures chimiques.
Les produits chimiques peuvent causer des brûlures
risquant d’entraîner la mort, des blessures graves
et/ou des dommages matériels.
• NE PAS utiliser de liquide caustique avec le nettoyeur à haute
pression.
• Utilisez SEULEMENT des détergents/savons sans risque
d’endommagement pour le nettoyeur à pression.
Page 38

38
AVIS
Le jet à haute pression risque d'endommager les articles
fragiles, notamment le verre.
• NE PAS diriger le pistolet de pulvérisation vers les vitres lorsque la
buse rouge 0° est utilisée.
• N’visez JAMAIS des plantes avec le pistolet pulvérisateur.
AVIS
Le traitement inadéquat du nettoyeur à haute pression peut
l’endommager et réduire sa durée de vie utile.
• Si vous avez des questions à propos de l'utilisation prévue de cet
appareil, consultez votre détaillant.
• N'utilisez JAMAIS un appareil ayant des pièces brisées ou
manquantes ou sans bâti ou couvercles protecteurs.
• NE neutralisez AUCUN dispositif de sécurité de cette machine.
• NE modifiez PAS la vitesse régulée du moteur.
• N’utilisez PAS le nettoyeur à pression à des valeurs excédant la
pression nominale.
• NE modifiez PAS le nettoyeur à pression.
• Par temps froid, avant de démarrer le nettoyeur à pression,
vérifiez-en tous les éléments pour vous assurer qu'aucune glace
ne s'y est formée.
• N'utilisez JAMAIS le tuyau à haute pression comme poignée pour
déplacer l'appareil. Utilisez toujours la poignée de l'appareil.
• Cet appareil est conçu pour être utilisé uniquement avec des
pièces Sears approuvées. Si l'appareil est utilisé avec des pièces
qui NE sont PAS conformes aux caractéristiques minimales, tous
les risques et responsabilités incomberont à l'utilisateur.
AVERTISSEMENT Le démarreur et d’autres pièces rotatives
peuvent happer des mains, des cheveux, des
vêtements ou des accessoires et entraîner des
blessures graves.
• N'utilisez JAMAIS un nettoyeur à haute pression sans bâti ou
couvercles protecteurs.
• NE portez PAS de vêtements amples, de bijoux ou autres
accessoires qui peuvent se prendre dans le démarreur ou
d’autres pièces rotatives.
• Embouteiller des cheveux longs et enlève la bijouterie.
AVERTISSEMENT Une étincelle involontaire peut causer un
incendie et un choc électrique et entraîner la
mort et des blessures graves.
LORSQUE VOUS RÉGLEZ OU RÉPAREZ VOTRE NETTOYEUR À
PRESSION
• Débranchez toujours le câble de bougie et placez-le de façon à
ce qu'il ne soit pas en contact avec la bougie.
LORS DE TESTS D'ALLUMAGE DU MOTEUR
• Utilisez un vérificateur de bougies d'allumage approuvé.
• NE vérifiez PAS l'allumage lorsque la bougie d'allumage est enlevée.
AVERTISSEMENT Risque de blessures aux yeux ou
corporelles.
Le jet peut rejaillir sur vous ou propulser des
objets et entraîner des blessures graves.
• Portez toujours des lunettes de sécurité à aération indirecte
(contre les produits chimiques) spécifiées conformes à ANSI
Z87.1 lorsque vous utilisez ou que vous vous trouvez à
proximité de cet appareil.
• N’utilisez JAMAIS de lunettes de sécurité ou de lunettes de
sécurité pour condition sèche au lieu de lunettes de sécurité à
aération indirecte.
• Portez toujours des vêtements de protection tels que des chandails
à manches longues, des pantalons et des souliers fermés.
• N’utilisez JAMAIS le nettoyeur à haute pression avec les pieds
nus ou en portant des sandales ou des shorts.
ATTENTION Des vitesses de fonctionnement excessivement
élevées peuvent causer des blessures mineures ou endommager
le nettoyeur à haute pression.
Des vitesses excessivement lentes produisent une charge
importante.
• NE modifiez PAS la vitesse régulée du moteur. Le nettoyeur à
haute pression fournit une pression et un débit approprié
lorsqu’il fonctionne à une vitesse régulée du moteur.
• Ne modifiez PAS le nettoyeur à haute pression d'aucune façon.
AVERTISSEMENT Un effet de recul (rétroaction rapide) de la
corde du démarreur tirera votre main et votre bras vers
le moteur plus rapidement que vous ne pouvez relâcher
la corde; ce qui pourrait causer des fractures, des
ecchymoses ou des entorses risquant d’entraîner des blessures
graves.
• NE tirez JAMAIS sur la corde du démarreur sans avoir d’abord
libéré la pression du pistolet de pulvérisation.
• Lors du démarrage du moteur, tirez lentement sur la corde
jusqu’à ce que vous sentiez une résistance et tirez alors
rapidement afin d’éviter un effet de recul.
• Après chaque tentative de démarrage, alors que le moteur n’a pas
démarré, dirigez toujours le pistolet à pulvérisation vers un
endroit sécuritaire et appuyez sur le bouton rouge et sur la
détente du pistolet de pulvérisation pour libérer la haute pression.
• Lorsque vous utilisez une vaporisation à haute pression,
saisissez fermement le pistolet de vaporisation avec les deux
mains afin d’éviter les risques de blessures entraînés par les
effets de recul.
Page 39

39
FONCTIONS ET COMMANDES
B
A
C
D
R
N
F
Q
H
S
P
T
G
M
K
J
E
A - Pistolet de pulvérisation — Un dispositif de détente permet de
contrôler le jet d'eau sur la surface à nettoyer. Le pistolet est muni d'un
verrou de sécurité.
B - Plateau pour accessoires — Fournit un espace de rangement
pratique pour les accessoires.
C - Buses — Détergent, 0° 15° et 40° : pour les différentes applications
de nettoyage à haute pression.
D - Poignée pliable — La poignée et le plateau pour accessoires se plient
à plat sur le moteur refroidi pour économiser de l’espace de rangement.
E - Prise d'eau — Branchement pour le tuyau d'arrosage.
F - Prise haute pression — Vous permet de brancher le tuyau à haute
pression.
G - Filtre à air — Filtre de type sec qui limite la quantité de poussières et
de saletés dans le moteur.
H - Support de bouteille — La bouteille de solution de nettoyage se loge
ici, dans le support de la pièce en broche. Bouteille de liquide concentré
non fournie.
J - Vanna de combustible — Utilisé pour alimenter le moteur en essence
ou pour couper l’alimentation en essence du moteur.
K - Tige de l’étrangleur — Prépare un moteur froid pour le démarrage.
M - Interrupteur du moteur – Ce levier place le moteur en mode de
démarrage pour le lanceur et éteint le moteur en marche.
N - Siphon PerfectMix™ — Mélange le liquide concentré à la
pulvérisation du nettoyeur à haute pression.
P - Étiquette Avertissement/Directives d’utilisation — Identifie les
risques et la procédure appropriée pour le démarrage et l’arrêt du
nettoyeur à haute pression.
Q - Démarreur à recul — Utilisé pour démarrer le moteur manuellement.
R - Réservoir d'essence — Remplissez le réservoir avec de l'essence
ordinaire sans plomb. Laissez toujours de la place pour l'expansion de
l'essence.
S - Tuyau à haute pression — Raccordez une extrémité à la pompe à eau
et l’autre au pistolet de pulvérisation.
T - Rallonge de buse à raccord rapide — Cette rallonge vous permet de
changer les buses (quatre modèles différents).
Articles non montrés:
Bouchon de remplissage/Jauge d’huile — Vérifiez le niveau d’huile,
remplir et videz l’huile à moteur ici.
Pompe — Développe une pression élevée.
Système de refroidissement automatique — Fait circuler l'eau dans la
pompe lorsqu'elle atteint 51° à 68°C (125° à 155°F). L'eau chaude
s'écoulera de la pompe sur le sol. Ce système empêche la pompe interne
de s'abîmer.
Étiquettes d'identification — Indique le numéro de modèle et de série du
nettoyeur à haute pression. Veuillez avoir ces renseignements sous la
main lors d’appel de service.
CONNAÎTRE VOTRE NETTOYEUR À PRESSION
Lisez ce manuel d'utilisation ainsi que les règles de sécurité avant de faire fonctionner votre nettoyeur à pression.
Comparez les illustrations avec votre nettoyeur à pression pour vous familiariser avec l'emplacement des différents boutons et
réglages. Conservez ce manuel pour référence ultérieure.
Page 40

40
ASSEMBLAGE
Votre nettoyeur à pression exige que quelque assemblée et soit prêt
pour l'usage après il a été convenablement entretenu avec le pétrole et le
carburant recommandés.
Si vous avez des problèmes au cours de l'assemblage de votre
nettoyeur à pression ou si certaines pièces sont manquantes ou
endommagées, appelez la ligne d'assistance pour les nettoyeur à
pression au 1-800-222-3136.
Déballage du nettoyeur à pression
1. Enlevez tous les composants de la boîte d’expédition à
l’exception du nettoyeur à pression.
2. Ouvrez la boîte d’expédition en coupant tous les coins du haut
vers le bas.
3. Enlevez le nettoyeur à pression de la boîte d’expédition.
Contenu du carton
Vérifiez toutes les pièces et accessoires du nettoyeur à pression . Si
certaines des pièces énumérées ci-dessus sont manquantes ou
endommagées, appelez la ligne d'assistance pour les nettoyeur à
pression au 1-800-222-3136.
• Appareil principal
• Poignée
• Plateau pour accessoires avec dévidoir de boyau
• Sangles en caoutchouc(2)
• Tuyau à haute pression
• Pistolet pulvérisateur
• Rallonge de buse à raccord rapide
• Huile à moteur
• Support de la pièce en broche de bouteille
• Appareil/tube de siphonnement du détergent PerfectMix™
• Sac de pièces (comprenant les pièces énumérées ci-dessous)
• Manuel d'utilisation
• Sac contenant 4 buses multicolores
• Ensemble de quincaillerie d’assemblage de la
poignée/plateau pour accessoires (comprenant):
• Poignée de boulons, (2)
• Boulon de carrosserie, (1)
• Boutons en plastique pour poignée, (2)
• Bouton en plastique, (1)
• Agrafes, (4)
Familiarisez-vous avec chaque pièce avant d'assembler le nettoyeur
à pression . Vérifiez le contenu de la boîte à l'aide de l'illustration de
la page 39. Si une pièce est manquante ou endommagée, veuillez
joindre le service de dépannage du nettoyeur à pression au numéro
sans frais 1-800-222-3136.
ASSEMBLAGE DU NETTOYEUR À
PRESSION
Votre nettoyeur à pression Craftsman a été monté en grande partie
en usine. Cependant, vous devrez effectuer les tâches ci-dessous
avant d'utiliser votre nettoyeur à pression.
1. Fixez la poignée et le plateau pour accessoires à l’unité
principale.
2. Branchez le tube de siphonnement du détergent à la pompe.
3. Ajoutez de l'huile au carter du moteur.
4. Ajoutez de l'essence dans le réservoir.
5. Branchez le tuyau à haute pression au pistolet pulvérisateur et
à la pompe.
6. Branchez la source d'alimentation d'eau à la pompe.
7. Connectez la rallonge de buse sur le pistolet de pulvérisation.
8. Choisissez une buse à raccord rapide et installez-la sur la
rallonge de buse.
Fixez la poignée et le plateau pour accessoires
1. Placez l’assemblage de la poignée (A) sur le support de la
poignée relié à l’unité principale. Assurez-vous que les trous de
la poignée sont alignés avec ceux du support.
2. Insérez les boulons de carrosserie de poignée (B) dans les
trous à l’intérieur de l’unité, puis fixez un bouton en plastique
(C) depuis l’extérieur de l’unité. Serrez à la main.
AVIS En desserrant les deux boutons de la partie médiane du
boulon de fixation, la poignée supérieure peut être pliée vers l’avant
afin de la ranger sur le moteur refroidi. NE PAS plier la poignée
lorsque le moteur est chaud.
3. Insérez les sangles en caoutchouc (D) dans les rainures (E) à
l’arrière du plateau pour accessoires et serrez-les à partir de
l’avant.
B
A
E
D
C
Page 41

41
4. Placez le plateau pour accessoires (A) au-dessus des trous (B)
de la poignée (en regardant à partir de l’avant de l’appareil).
Poussez les trois agrafes (C) dans les trous jusqu’à ce qu’elles
reposent sur le plateau pour accessoires.
5. Insérez les buses multicolores et les autres accessoires fournis
dans les espaces prévus sur le plateau pour accessoires.
Consultez la section Comment utiliser le plateau pour
accessoires.
6. Fixez le support de bouteille (D) à la poignée à l’aide d’un
boulon de carrosserie (E) et d’un bouton en plastique noir (F).
Serrez à la main.
Système de savon PerfectMix™
Le nettoyeur à haute pression est muni d’un tuyau de siphonnement
de détergent.
Fixez le tube de siphonnement du détergent
PerfectMix™ à la pompe
Fixez l’extrémité du boyau du siphonnement de détergent
PerfectMix™ bleu (G) aux raccords du boyau à barbelure (H) sur la
pompe.
Fixez le tube de siphonnement du détergent
PerfectMix™ à la bouteille de concentré
Placez la bouteille PerfectMix™ (non fournie) sur le support de la
pièce en broche de la poignée. Enlevez le bouchon de la bouteille et
insérez le tube de siphonnement du détergent PerfectMix™. Vissez
le tube de siphonnement du détergent à la partie supérieure de la
bouteille (K). Alors que la bouteille de concentré n’est pas dans le
tube de siphonnement du détergent, placez une attache sur le
capuchon (J) pour fixer le tube de siphonnement du détergent au
support de la pièce en broche.
Ajoutez de l'huile à moteur
1. Placez le nettoyeur à pression sur une surface plane.
2. Nettoyez la surface autour de l’orifice de remplissage d’huile et
enlevez la jauge d’huile.
3. À l’aide d’un entonnoir pour huile (optionnel), versez lentement
le contenu de l’huile fournie dans l’orifice en vérifiant
fréquemment le niveau d’huile. NE REMPLISSEZ PAS EN
EXCÈS.
AVIS Un traitement inapproprié du nettoyeur à pression risque de
l'endommager et de raccourcir sa durée d'utilisation.
• NE tentez JAMAIS de démarrer le moteur sans d’abord vérifier s'il
a été entretenu de façon appropriée avec l’huile recommandée.
Cela risquerait d'entraîner un bris de moteur.
4. Replacez la jauge d’huile et serrez-la solidement.
E
D
F
G
H
K
J
A
B
C
Varilla de nivel de aceite
Límite más bajo
Superior de límite
Page 42

42
Ajoutez de l'essence
1. Utilisez de l’essence sans plomb ordinaire propre et fraîche
avec un indice d’octane d’au moins 86 avec l’équipement. NE
mélangez PAS l’huile avec l’essence.
2. Placez le nettoyeur à haute pression sur une surface plane.
Nettoyez la partie autour du bouchon du réservoir d’essence,
enlevez le bouchon.
3. Ajoutez lentement de l’essence sans plomb ordinaire dans le
réservoir d’essence jusqu’à la marque du bas de la limite de
niveau de carburant. Faites attention de ne pas le remplir en
excès.
4. Remettez le bouchon à essence et laissez l’essence déversée
s'évaporer avant de démarrer le moteur.
ATTENTION! Les carburants à l’alcool (appelés essence-alcool,
éthanol ou méthanol) attirent l’humidité, ce qui entraîne la
séparation et la formation d’acides durant l’entreposage. Les gaz
acides peuvent endommager le système d’alimentation du moteur
pendant l’entreposage.
Pour éviter les problèmes reliés au moteur, il est préférable de vider
le système d’alimentation avant un entreposage de 30 jours ou plus.
Vidangez le réservoir d’essence, démarrez le moteur et laissez-le
tourner jusqu’à ce les conduits d’essence et le carburateur soient
vides. Utilisez de l’essence fraîche la saison suivante. Consultez la
section Entreposage pour plus de renseignements.
N’utilisez JAMAIS de produits de nettoyage de moteur ou de
carburateur dans le réservoir à essence, ils pourraient causer des
dommages irréversibles.
Lubrifier des joints toriques
La lubrification des joints toriques est extrêmement importante pour
l’installation et le fonctionnement. L’utilisation d’un lubrifiant
(graisse de pétrole ou synthétique) au cours de l’assemblage facilite
la pose des joints toriques et procure une meilleure étanchéité. Elle
contribue également à protéger les joints toriques contre les
dommages causés par l’abrasion, le pincement et les coupures et
prolonge la durée de vie des joints toriques.
AVIS Appliquez TOUJOURS une petite quantité de lubrifiant sur les
joints toriques avant l’assemblage du tuyau d'arrosage à la pompe
(A), tuyau à haute pression (B), pistolet pulvérisateur (C), et rallonge
de buse (D).
Lubrifier toutes les connexions ci-dessous, suivre ces
instructions:
1. Inspectez et nettoyez les surfaces de connexion avant la
lubrification et l’assemblage.
2. Utilisez les lubrifiants en petite quantité pendant l’assemblage;
une couche légère suffit.
3. Utilisez une petite brosse ou un coton-tige pour appliquer la
graisse directement sur les joints toriques aux endroits qui
sont moins facilement accessibles (raccord QC, raccord M22).
D
C
A
B
AVERTISSEMENT L’essence et ses vapeurs sont
extrêmement inflammables et explosives qui
pourraient causer des brûlures, un incendie
ou une explosion risquant d’entraîner la mort,
des blessures graves et/ou des dommages matériels.
LORS DE L'AJOUT DU CARBURANT
• Éteignez le moteur de la nettoyeur à pression et laissez-le
refroidir pendant au moins 2 minutes avant de retirer le
bouchon à essence. Desserrez lentement le capuchon pour
laisser la pression s'échapper du réservoir.
• Remplissez le réservoir d'essence à l'extérieur.
• NE remplissez PAS trop le réservoir. Laissez l'expansion de
l'essence.
• Attend le carburant renversé pour s'évaporer avant de démarrer
le moteur.
• Éloignez l'essence des étincelles, des flammes, des veilleuses,
de la chaleur et de toute autre source d'inflammation.
• Vérifiez si les conduits d'essence, le réservoir, le bouchon et les
raccords comportent des fissures ou des fuites. Remplacez au
besoin.
• N'ALLUMEZ PAS de cigarette ou ne fumez pas à proximité de
l'appareil.
Niveau d’essence repère
Niveau d’essence maximum
Page 43

43
Raccorder le tuyau et la source d'eau à la pompe
AVIS NE faites PAS marcher la pompe sans que le nettoyeur à
pression soit connecté à la source d'eau ouverte.
• Vous devez suivre cet avertissement, au risque d'endommager la
pompe.
AVIS Enlevez et jetez les bouchons d'expédition de la sortie haute
pression de la pompe et de l'admission de l'eau avant de brancher
les boyaux.
1. Déroulez le tuyau à haute pression et fixez le à la base du
pistolet pulvérisateur. Serrez manuellement.
2. Fixez l'autre extrémité du tuyau à haute pression à la prise haute
pression sur la pompe. Serrez manuellement.
3. Avant de brancher votre tuyau d'arrosage à la prise d'eau,
inspectez la filtre intégré (A). Nettoyez la filtre intégré si elle
contient des débris, remplacez-la si elle est endommagée. NE
vous servez PAS du nettoyeur à pression si la filtre intégré
est endommagée.
4. Faites couler de l'eau dans le tuyau d'arrosage pendant
30 secondes pour nettoyer tous les débris. Fermez le robinet
d'eau.
AVIS NE siphonnez PAS de l'eau stagnante pour vous en servir.
Utilisez SEULEMENT de l'eau froide (à moins de 38°C (100ºF)).
AVIS L'utilisation d'un clapet anti-retour (reniflard ou soupape de
retenue) à la prise de la pompe peut endommager la pompe ou le
raccord d'entrée d'eau.
• Il doit y avoir une longueur d’au moins dix pieds (trois mètres) de
boyau d’arrosage libre entre l’entrée du nettoyeur à haute pression et tout dispositif, tel que reniflard ou soupape de sûreté.
• Les dommages infligés au nettoyeur à pression par suite de ne
pas avoir respecté cette consigne, ne seront pas couverts par la
garantie.
5. Connectez le tuyau d'arrosage (ne pas dépasser 50 pieds dans la
longueur) à la prise d'eau. Serrez manuellement.
6. Ouvrez l’eau, appuyez sur le bouton rouge (B) du pistolet et sur
la détente pour purger la pompe de l’air et des impuretés qui
s’y trouvent.
Liste de vérifications avant de démarrer le
moteur
Examinez l'assemblage de l'appareil pour confirmer que vous avez
effectué tout ce qui suit:
1. Assurez-vous d'avoir lu les Renseignements importants de
sécurité et Comment Utiliser Votre Nettoyeur à Pression avant
de l'utiliser.
2. Assurez-vous que la poignée est en place et bien fixée.
3. Vérifiez qu'il y a de l'huile dans le carter, jusqu'au niveau
approprié.
4. Ajoutez de l'essence dans le réservoir.
5. Vérifiez que les connexions du tuyau sont correctement serrées
(haute pression et eau) et qu'il n'y ait pas de coude, de
coupures ou d'endroits abîmés.
6. Fournissez de l'eau à une cadence appropriée.
A
B
AVERTISSEMENT
Le jet d'eau à haute pression produit
par cet appareil peut couper la peau et ses tissus
sous-jacents et conduire à des blessures graves et
même une amputation.
• Ne connectez JAMAIS le boyau à haute pression à la rallonge
de buse.
• Gardez toujours le tuyau flexible à haute pression raccordé à la
pompe et au pistolet de pulvérisation lorsque le système est
sous pression.
• Assurez-vous toujours que le pistolet de pulvérisation, les
buses et les accessoires sont bien fixés.
AVERTISSEMENT Risque de blessure aux yeux.
Le jet peut rejaillir sur vous ou propulser des
objets et entraîner des blessures graves.
• Portez toujours des lunettes de sécurité à aération indirecte
(contre les produits chimiques) spécifiées conformes à ANSI
Z87.1 lorsque vous utilisez ou que vous vous trouvez à proximité de cet appareil.
• N’utilisez JAMAIS de lunettes de sécurité ou de lunettes de
sécurité pour condition sèche au lieu de lunettes de sécurité à
aération indirecte.
Page 44

44
COMMENT UTILISER VOTRE NETTOYEUR
À PRESSION
Si vous avez des problèmes à faire fonctionner votre nettoyeur à
pression, n'hésitez pas à appeler le service d'assistance au
1-800-222-3136.
Emplacement de la nettoyeur à pression
Dégagement de la nettoyeur à pression
Placez la nettoyeur à pression dans un endroit bien ventilé qui
permet l'élimination des gaz d'échappement mortels. N'installez
PAS la nettoyeur à pression dans un endroit où les gaz
d'échappement (A) pourraient s'accumuler et pénétrer ou être
aspirés dans un édifice qui pourrait être occupé. Assurez-vous que
les gaz d'échappement ne puissent entrer par une fenêtre, une
porte, une prise d'aération ou une autre ouverture qui pourrait leur
permettre de s'accumuler dans un espace restreint. Tenez aussi
compte des vents dominants et des courants d'air au moment de
choisir l'endroit où vous installerez la nettoyeur à pression.
Mettre votre nettoyeur à pression en marche
Pour démarrer votre nettoyeur à haute pression la première fois,
suivez ces instructions pas à pas. Cette information qui vous aide à
mettre votre nettoyeur à haute pression en marche s'applique
également s'il est resté sans fonctionner pendant au moins une
journée.
1. Placer la rondelle de pression près d'un hors de la source
d'eau capable d'alimentation d'eau à un taux de flux plus grand
que 3.3 gallons (12.5 l) par la minute et aucun moins que
20 PSI (1.38 BARS) à la fin de rondelle de pression du tuyau
de jardin.
2. Vérifiez que le tuyau à haute pression est bien serré sur le
pistolet pulvérisateur et sur la pompe. Consultez les illustrations
de la rubrique Assemblage du Nettoyeur à Pression.
3. Vérifiez que l'appareil est en position horizontale.
4. Branchez le tuyau d'arrosage à la source d'eau sur la pompe
du nettoyeur à pression.
AVIS NE faites PAS marcher la pompe sans que le nettoyeur à
pression soit connecté à la source d'eau ouverte.
• Vous devez suivre cet avertissement, au risque d'endommager la
pompe.
5. Ouvrez l’eau, appuyez sur le bouton rouge du pistolet et sur la
détente pour purger la pompe de l’air et des impuretés qui s’y
trouvent.
6. Fixez la rallonge du gicleur au pistolet pulvérisateur. Serrez
manuellement.
7. Choisissez la buse que vous voulez utiliser, tirez la bague de la
rallonge de buse, insérez la buse, puis relâchez la bague.
Vérifiez si la buse est correctement installée en tirant dessus.
Consultez la section Comment utiliser les buses.
8. Tournez la vanne de combustible (B) à la position de marche.
OPÉRATION
B
A
AVERTISSEMENT
Le nettoyeur à pression, lorsqu'il
fonctionne, produit du monoxyde de carbone, un
gaz toxique inodore et incolore.
L’inhalation du monoxyde de carbone peut causer
des maux de tête, de la fatigue, des étourdissements, le
vomissement, de la confusion, des crises épileptiques, des
nausées, l’évanouissement ou la mort.
• Faites fonctionner le nettoyeur à pression SEULEMENT à l'extérieur.
• Évitez que les gaz d'échappement entrent dans un espace
restreint, par une fenêtre, une porte, une prise d'aération ou
toute autre ouverture.
• NE démarrez, ni ne faites fonctionner un moteur à l'intérieur ou
dans un espace fermé, même si les fenêtres ou les portes sont
ouvertes.
AVERTISSEMENT
La chaleur et les gaz d’échappement peuvent enflammer des matériaux combustibles et les structures ainsi que causer des
dommages au réservoir d’essence et entraîner
un incendie.
• Laissez un dégagement d’au moins 1,5 m (5 pi) tout autour de
la nettoyeur à pression, y compris au-dessus.
Page 45

45
9. Tirez la tige de l’étrangleur (A) à la position fermée.
AVIS Pour redémarrer un moteur à chaud, assurez-vous que la
tige de l’étrangleur (A) est à la position ouverte.
10. Placez l’interrupteur d’arrêt du moteur (B) à la position de
marche.
AVIS Avant de démarrer le nettoyeur à haute pression, assurezvous de porter des lunettes de sécurité tel que décrit ci-dessous.
11. Lors du démarrage du moteur, placez-vous tel que
recommandé, saisissez la poignée du démarreur et tirez
lentement jusqu'à ce que vous sentiez de la résistance. Tirez
alors rapidement pour démarrer le moteur.
12. Replacez lentement le lanceur. NE laissez PAS le cordon se
frapper contre le démarreur.
13. Lorsque le moteur est démarré, déplacez lentement la tige de
l’étrangleur vers la position ouverte pendant que le moteur se
réchauffe. Si le moteur hésite, déplacez la tige de l’étrangleur à
la position fermée, puis revenez à la position ouverte.
ON
OFF
B
A
Fermé
AVERTISSEMENT Risque de blessure aux yeux.
Le jet peut rejaillir sur vous ou propulser des objets et
entraîner des blessures graves.
• Portez toujours des lunettes de sécurité à aération indirecte
(contre les produits chimiques) spécifiées conformes à ANSI
Z87.1 lorsque vous utilisez ou que vous vous trouvez à
proximité de cet appareil.
• N’utilisez JAMAIS de lunettes de sécurité ou de lunettes de
sécurité pour condition sèche au lieu de lunettes de sécurité à
aération indirecte.
AVERTISSEMENT
Le jet d'eau à haute pression produit par
cet appareil peut couper la peau et ses tissus sousjacents et conduire à des blessures graves et même une
amputation.
Le pistolet de pulvérisation retient une pression d’eau élevée, même
lorsque le moteur est éteint et que l’eau est déconnectée, ce qui
peut causer des blessures graves.
• N'autorisez JAMAIS des ENFANTS à se servir du nettoyeur à
pression.
• Gardez toujours le tuyau flexible à haute pression raccordé à la
pompe et au pistolet de pulvérisation lorsque le système est
sous pression.
• N visez JAMAIS des personnes, des animaux ou des plantes
avec le pistolet pulvérisateur.
• NE verrouillez PAS le pistolet de pulvérisation dans la position
ouverte.
• NE laissez PAS le pistolet de pulvérisation sans surveillance
alors que l'appareil est en marche.
• N'utilisez JAMAIS un pistolet de pulvérisation qui n'est pas
muni d'un verrou d'arme ou d'un pontet installé et en ordre de
marche.
• Assurez-vous toujours que le pistolet de pulvérisation, les
buses et les accessoires sont bien fixés.
AVERTISSEMENT Un effet de recul (rétroaction rapide) de la
corde du démarreur tirera votre main et votre bras vers
le moteur plus rapidement que vous ne pouvez relâcher
la corde; ce qui pourrait causer des fractures, des
ecchymoses ou des entorses risquant d’entraîner des blessures
graves.
• NE tirez JAMAIS sur la corde du démarreur sans avoir d’abord
libéré la pression du pistolet de pulvérisation.
• Lors du démarrage du moteur, tirez lentement sur la corde
jusqu’à ce que vous sentiez une résistance et tirez alors
rapidement afin d’éviter un effet de recul.
• Après chaque tentative de démarrage, alors que le moteur n’a pas
démarré, dirigez toujours le pistolet à pulvérisation vers un
endroit sécuritaire et appuyez sur le bouton rouge et sur la
détente du pistolet de pulvérisation pour libérer la haute pression.
• Lorsque vous utilisez une vaporisation à haute pression,
saisissez fermement le pistolet de vaporisation avec les deux
mains afin d’éviter les risques de blessures entraînés par les
effets de recul.
Page 46

46
Comment arrêter votre nettoyeur à pression
1. Relâchez la détente du pistolet de pulvérisation et laissez le
moteur tourner au ralenti durant deux minutes.
2. Mettez l’interrupteur du moteur en position « Off ».
3. Dirigez TOUJOURS le pistolet à pulvérisation vers un endroit
sécuritaire et appuyez sur le bouton rouge et sur la détente du
pistolet de pulvérisation pour libérer la haute pression de l’eau.
Comment utiliser le plateau pour accessoires
L’unité est dotée d’un plateau pour accessoires servant à ranger le
pistolet de pulvérisation, la rallonge de buse et les buses à raccord
rapide. Des crochets sont aussi disponibles à l’arrière du plateau
pour accessoires pour y enrouler le boyau à haute pression.
1. Placez le pistolet de pulvérisation sur la rainure se trouvant sur
le plateau pour accessoires tel que montré. Tirez fermement la
sangle en caoutchouc autour du pistolet de pulvérisation et
placez le trou de la sangle sur la languette du plateau pour
accessoires.
2. Placez la rallonge de buse sur la rainure se trouvant sur le
plateau pour accessoires tel que montré. Tirez fermement la
sangle en caoutchouc autour de la rallonge de buse et placez le
trou de la sangle, sur la languette du plateau pour accessoires.
3. Insérez les buses multicolores dans les trous prévus à l’avant
du plateau pour accessoires.
4. Placez une extrémité du boyau à haute pression dans la rainure
se trouvant dans la partie supérieure du plateau pour
accessoires et enroulez le boyau à haute pression sur les
crochets tel que montré.
Comment utiliser les buses
Le raccord rapide de la rallonge de buse vous permet de changer
les quatre différentes buses. Les buses peuvent être changées pendant que le nettoyeur à haute pression est en marche, alors que le
verrou de la détente du pistolet de pulvérisation est engagé.
Chacune des buses donne un jet différent, tel qu’indiqué ci-dessus.
Pour changer les buses, veuillez suivre les directives suivantes :
1. Tirez la bague du raccord rapide et retirez la buse qui est déjà
en place. Rangez les buses dans le porte-accessoires sur le
plateau pour accessoires
AVERTISSEMENT La chaleur et les gaz d’échappement
peuvent enflammer des matériaux
combustibles et les structures ainsi que
causer des dommages au réservoir
d’essence et provoquer un incendie risquant d’entraîner la mort,
des blessures graves et/ou des dommages matériels.
Tout contact avec la zone du silencieux peut causer des brûlures
risquant d’entraîner des blessures graves.
• NE touchez PAS aux pièces chaudes et ÉVITEZ le contact avec
les gaz d’échappement.
• Laissez l'équipement refroidir avant de le toucher.
• Laissez un dégagement d’au moins 1,5 m (5 pi) tout autour de
la nettoyeur à pression, y compris au-dessus.
• L’utilisation ou le fonctionnement d’un moteur sur un terrain
boisé, couvert de broussailles ou gazonné constitue une violation
dans l’État de la Californie, en vertu de la section 4442 du
California Public Resources Code, à moins qu’il ne soit doté d’un
pare-étincelles tel que défini dans la section 4442 et maintenu en
bon état de fonctionnement. Il se peut que d’autres États ou
d’autres compétences fédérales aient des lois semblables.
Communiquez avec le fabricant, le détaillant ou le concessionnaire
original de l’appareil afin d’obtenir un pare-étincelles conçu pour le
système d’échappement installé sur ce moteur.
• Les pièces de rechange doivent être identiques aux pièces
d’origine et être installées à la même position.
AVERTISSEMENT
Le jet d'eau à haute pression produit par
cet appareil peut couper la peau et ses tissus sousjacents et conduire à des blessures graves et même une
amputation.
Le pistolet de pulvérisation retient une pression d’eau élevée, même
lorsque le moteur est éteint et que l’eau est déconnectée, ce qui
peut causer des blessures graves.
• Gardez toujours le tuyau flexible à haute pression raccordé à la
pompe et au pistolet de pulvérisation lorsque le système est
sous pression.
• À chaque fois que vous arrêtez le moteur, dirigez TOUJOURS le
pistolet vers un endroit sécuritaire et appuyez sur le bouton
rouge et sur la détente du pistolet de pulvérisation pour libérer
la haute pression.
AVERTISSEMENT
Le jet d'eau à haute pression produit par
cet appareil peut couper la peau et ses tissus sousjacents et conduire à des blessures graves et même une
amputation.
• Ne changez JAMAIS les buses sans avoir d’abord enclenché le
verrou de la détente du pistolet de pulvérisation.
• NE tournez PAS les buses pendant la pulvérisation.
Page 47

2. Choisissez la buse voulue:
• Utilisez la buse blanche pour un rinçage délicat (basse
pression et haut débit) et pour un nettoyage en douceur
des automobiles/camions, des bateaux, des VR, des
meubles de patio, des équipements d’entretien du gazon,
etc.
• Utilisez la buse jaune pour un rinçage général (pression
moyenne et débit moyen). Cette buse est idéale pour les
revêtements muraux de la maison, les patios en briques,
les terrasses en bois, les entrées de cours et les trottoirs,
les planchers de garage, etc.
• Utilisez la buse rouge pour un rinçage maximum (haute
pression et bas débit) pour les surfaces tenaces ou
difficiles d’accès telles que surfaces au deuxième étage,
enlèvement de peinture, taches d’huile, enlèvement de
rouille ou autres substances tenaces (goudron, gomme,
graisse, cire. etc.).
• Utilisez la buse noire pour détergent pour l'application de
détergent tels que des nettoyants de surface pour aider à
déloger les saletés et la poussière sur une grande
diversité de surfaces.
3. Tirez la bague, insérez la nouvelle buse, puis relâchez la bague.
Vérifiez si la buse est correctement installée en tirant sur elle.
Conseils d'utilisation
• Pour obtenir un nettoyage optimal, gardez la buse à une
distance de 20 à 61 cm (8 à 24 pouces) de la surface à nettoyer.
• Si la buse est trop près, vous risquez d'endommager la surface
à nettoyer.
• NE vous approchez PAS à moins de 15 cm (6 pouces) lors du
nettoyage de pneus.
Nettoyage et application de produits détergente
Pour appliquer des produits détergents, procédez comme
suit:
Pour appliquer du détergent non dilué à l’aide du siphon
PerfectMix™, procédez comme suit :
1. Révisez la partie sur l’utilisation de la buse.
2. Fixez le tuyau de siphonnement PerfectMix™ à la pompe et à la
bouteille de concentré PerfectMix™.
AVIS Tout contact avec le silencieux chaud peut endommager le
tube de siphonnement du détergent.
• Lorsque vous insérez le tube dans une bouteille de solution de
détergent, placez le tube de manière à ce qu'il n'entre pas en contact par mégarde avec le silencieux chaud.
3. Assurez-vous que la buse pour détergent est installée.
AVIS Les buses à haute pression (blanche, jaune et rouge) ne
peuvent pas être utilisées pour appliquer du détergent.
4. Assurez-vous que le boyau d’arrosage est connecté à l’entrée
d’eau. Vérifiez si le boyau à haute pression est connecté au
pistolet de pulvérisation et à la pompe. Ouvrez l’alimentation
d’eau.
AVIS Vous devez attacher tous les tuyaux avant de démarrer le
moteur.
• Démarrer le moteur sans avoir raccordé tous les boyaux et sans
avoir ouvert l'eau peut endommager la pompe.
• Vous devez suivre cet avertissement, au risque d'endommager la
pompe.
5. Démarrez le moteur selon les directives Comment démarrer
votre nettoyeur à pression.
6. Appliquez le détergent sur une surface sèche, en commençant
par la partie inférieure de la surface à nettoyer et travaillez vers
le haut, avec de longs mouvements réguliers et qui se
chevauchent.
7. Laissez le détergent "tremper" pendant 3 à 5 minutes avant de
laver et de rincer. Appliquez à nouveau, si besoin est, pour
éviter que la surface ne sèche. NE laissez PAS le détergent
sécher (pour éviter les traces).
47
40° blanche
2050 PSI
2.3 GPM
15° jaune
2150 PSI
2.2 GPM
0º rouge
2600 PSI
2.1 GPM
noire
L'usage pour
s'appliquer détergent
Basse Pression
Haute Pression
AVERTISSEMENT
Danger de brûlures chimiques.
Les produits chimiques peuvent causer des brûlures
risquant d’entraîner la mort, des blessures graves
et/ou des dommages matériels.
• NE PAS utiliser de liquide caustique avec le nettoyeur à haute
pression.
• Utilisez SEULEMENT des détergents/savons sans risque
d’endommagement pour le nettoyeur à pression.
Page 48

48
Rincer le nettoyeur à pression
Pour rincer:
1. Enlevez la buse noire de la rallonge de buse.
2. Sélectionnez la buse à haute pression désirée et installez-la en
suivant les directives décrites dans la section Comment utiliser
les buses.
3. Ne placez pas le pistolet pulvérisateur trop près de la surface
que vous désirez pulvériser.
4. Appliquez le jet à haute pression sur une petite surface, puis
vérifiez-la pour voir si elle n'est pas abîmée. Si elle n'est pas
abîmée, vous pouvez continuer.
5. Commencez en haut de l'endroit que vous devez rincer, en
descendant avec les mêmes mouvements qui se chevauchent
comme lorsque vous avez nettoyé.
Système de refroidissement automatique
(surpression thermique)
Si vous faites tourner le moteur de votre pulvérisateur pendant 3 à
5 minutes sans appuyer sur la gâchette du pistolet pulvérisateur,
l'eau qui circule dans la pompe peut atteindre une température de
51° à 68°C (125° à 155°F). Lorsque l'eau atteint cette température,
le système de refroidissement automatique se déclenche et
refroidit la pompe en vidant l'eau chaude sur le sol.
AVERTISSEMENT
Un effet de recul du pistolet de
pulvérisation peut causer une chute risquant
d’entraîner la mort et des blessures graves.
• Utilisez le nettoyeur à pression à partir d’une surface stable.
• Soyez très vigilant si vous devez utiliser le nettoyeur à pression
lorsque vous êtes dans une échelle, un échafaudage ou autre
emplacement similaire.
• Lorsque vous utilisez une vaporisation à haute pression, saisissez fermement le pistolet de vaporisation avec les deux mains
afin d’éviter les risques de blessures entraînés par les effets de
recul.
Page 49

49
CARACTÉRISTIQUES DU PRODUIT
Caractéristiques du nettoyeur à pression
Max pression nominale . . . . . . . . . .179,3 BARS @ 7,95 litres/min
(2,600 PSI @ 2,1 GPM)*
Max débit d'écoulement . . . . . . . . . . .141,3 BARS @ 8,7 litres/min
(2,050 PSI @ 2,3 GPM)*
Détergent . . . . . . . . . . . . . . . . . . . . . .Utilisez selon les instructions
Température De L'eau . . . . . . . .Ne doit pas dépasser 38ºC (100ºF)
Caractéristiques du moteur
Alésage . . . . . . . . . . . . . . . . . . . . . . . . . . . . . . . . . 64 mm (2,5 po.)
Course de piston . . . . . . . . . . . . . . . . . . . . . . . . . . 50 mm (2,0 po.)
Cylindre . . . . . . . . . . . . . . . . . . . . . . . . . . . . . . . . . 161 cc (9,8 po.)
Bougie d’allumage
Type : . . . . . . . . . . . . . . . . . . . . . . . . . . . . . . . . . . . NGK BPR6ES
Définir l’écartement à : . . . . . . . 0,70-0,80 mm (0,028-0,031 po)
Admission . . . . . . . . . . . . 0,15 ± 0,04 mm (0,004-0,007 po) (frío)
Échappement . . . . . . . . . . 0,20 ± 0,04 mm (0,006-0,009 po) (frío)
Capacité du réservoir de combustible . . . . . . .1,1 l (1,2 quarts US)
Capacité du huile . . . . . . . . . . . . . . . . . . . . . . . .0,6 l (20 onces US)
* Les caractéristiques nominales de ce nettoyeur à haute pression
sont conformes à la norme PW101-2010 de la Pressure Washer
Manufacturers Association (PWMA) (Tests et performance
nominale des nettoyeurs à haute pression).
Page 50

ENTRETIEN
RESPONSABILITÉS DU PROPRIÉTAIRE
Respectez le calendrier d'entretien du nettoyeur selon le nombre
d'heures de fonctionnement ou le temps écoulé, le premier des deux
prévalant. Lorsque l'appareil est utilisé dans les conditions adverses
décrites ci-dessous, il faut en faire l'entretien plus fréquemment.
1
Nettoyez l'appareil s'il est encrassé. Remplacez toute pièce perforée ou endommagée.
2
Remplacez les pièces plus fréquemment si vous utilisez l'appareil dans un milieu sale
ou poussiéreux.
3
Ces articles doivent être entretenus par votre détaillant local.
Recommandations General
Un entretien régulier améliorera la performance et prolongera la
durée de vie du nettoyeur à haute pression. Consultez un détaillant
autorisé Sears pour l’entretien.
La garantie du nettoyeur à pression ne couvre pas les éléments
soumis à l'abus ou à la négligence de l'opérateur. Pour obtenir la
pleine application de la garantie, il faut que l'opérateur fasse
l'entretien du nettoyeur à haute pression conformément aux
directives de ce manuel d'utilisation y compris son entreposage
adéquat selon les directives de la section Entreposage.
Pour assurer l'entretien adéquat du nettoyeur à haute pression, il
faut effectuer périodiquement certains réglages.
Il faut effectuer toutes les opérations d'entretien et les réglages au
moins une fois par saison. Suivez les instructions du Calendrier
d'entretien ci-dessus.
AVIS Une fois par année, vous devez nettoyer ou remplacer la
bougie d'allumage et remplacer le filtre à air. Une nouvelle bougie
d'allumage et un filtre à air propre permettent d'assurer que le
mélange essence-air est adéquat en plus de contribuer au meilleur
fonctionnement de votre moteur et d'augmenter sa durée de vie.
Entretien de la pompe à huile
NE tentez PAS d’effectuer d’entretien relatif à l’huile sur la pompe. Ce
modèle ne nécessite aucun entretien d’huile pour la pompe. La
pompe est pré-lubrifiée et scellée en usine, ne nécessitant aucune
lubrification supplémentaire au cours de la durée de vie de la pompe.
Contrôle des émissions
L'entretien, le remplacement ou la réparation des dispositifs et
systèmes antipollution peuvent être effectués par un établissement
de réparation de moteurs hors route ou par une personne qualifiée.
Pour obtenir un entretien « sans frais » du dispositif antipollution, le
travail doit être effectué par un détaillant autorisé Sears par le
fabricant. Voir la garantie du dispositif antipollution.
Avant chaque utilisation
1. Vérifiez le niveau d'huile du moteur.
2. Nettoyage des débris.
3. Vérifiez si la grille de la prise d'eau n'est pas abîmée.
4. Vérifiez si le tuyau à haute pression n'a pas de fuite.
5. Vérifiez si le pistolet pulvérisateur et de l'assemblage de la
rallonge réglable du gicleur n'ont pas de fuite.
6. Rincez le boyau d’arrosage pour déloger tous débris.
ENTRETIEN DU NETTOYEUR À PRESSION
Nettoyage des débris
Nettoyez les débris accumulés sur le nettoyeur à pression tous les
jours ou avant de l’utiliser. Gardez toujours la tringlerie, le ressort et
les commandes propres. Gardez la zone autour et derrière le
silencieux libre de débris combustibles. Inspectez les fentes d’air de
refroidissement et les ouvertures sur le nettoyeur à pression. Ces
ouvertures doivent demeurer propres et non obstruées.
Les parties du nettoyeur à haute pression doivent être gardées
propres afin de réduire le risque de surchauffe et d’inflammation
des débris accumulés.
• Utilisez un linge humide pour nettoyer les surfaces extérieures.
AVIS Un traitement inapproprié du nettoyeur à pression risque de
l'endommager et de raccourcir sa durée d'utilisation.
• N'INSÉREZ aucun objet dans les fentes de refroidissement.
• Utilisez une brosse à soies douces pour détacher les
accumulations de saletés, d’huile, etc.
• Utilisez un aspirateur pour ramasser les saletés et débris.
Vérifiez et nettoyez la grille de la prise d'eau
Inspectez la grille de la prise d'eau. Nettoyez-la si elle est bouchée
ou remplacez-la si elle est endommagée.
Cinq (5) premières heures
• Changer l’huile du moteur
Aux 8 heures ou Quotidien
• Vérifier/nettoyer la crépine d’eau d’arrivée
1
• Vérifier le tuyau à haute pression
• Vérification du tube de siphonnement du détergent
• Vérifier la présence de fuites dans le pistolet à
pulvérisation et l’assemblage
• Nettoyez les débris
• Vérifier le niveau d’huile du moteur
Aux 25 heures ou aux 3 mois
• Faire l’entretien du filtre à air
2
Aux 50 heures ou aux 6 mois
• Changer l’huile du moteur
2
Aux 100 heures ou 1 fois l’an
• Vérifier/ajuster la bougie d’allumage
• Inspectez le silencieux et l’écran pare-étincelles
• Vérifier/ajuster la vitesse du ralenti
3
• Vérifier/ajuster le jeu de soupape
3
• Nettoyer le réservoir à essence et le filtre
3
Aux 250 heures
• Nettoyer la chambre de combustion
3
Aux 250 heures ou aux 2 ans
• Remplacer le filtre à air du moteur
• Remplacer la bougie d'allumage
Aux 2 ans
• Vérifier le tube d’essence3(remplacer au besoin)
50
Page 51

51
Vérifiez le tuyau à haute pression
Le tuyau à haute pression peut avoir des fuites, s'il est usé, tordu ou
mal utilisé. Inspectez le tuyau avant chaque utilisation. Vérifiez tous
les tuyaux pour les coupures, les fuites, l'abrasion ou le gonflement
du couvercle, ou si certains raccords sont abîmés ou mobiles. Si
vous remarquez quelque chose, remplacez immédiatement le tuyau.
Vérifiez le tube de siphonnement du détergent
Examinez le tube de siphonnement et nettoyez-le s’il est encrassé.
Le tube doit s’ajuster fermement au raccord à barbelure. Examinez
le tube pour déceler des fuites ou craquelures. Remplacez le tube si
endommagé.
Bille de retenue de siphonnement de détergent
Il arrive occasionnellement que la bille de retenue du système de
siphonnement de détergent soit obstruée en raison de
l’entreposage, du savon asséché ou de minéraux dans l’eau. La bille
de retenue peut être libérée de ces matières en exécutant la
procédure suivante :
AVIS Avant d’effectuer cette procédure, assurez-vous de porter
des lunettes de sécurité tel que décrit ci-dessous.
1. Éteignez le moteur et fermez l’alimentation en eau.
2. Dirigez TOUJOURS le pistolet à pulvérisation vers un endroit
sécuritaire et appuyez sur le bouton rouge et sur la détente du
pistolet de pulvérisation pour libérer la haute pression de l’eau.
3. Retirez le tuyau de siphonnement de détergent du raccord à
barbelure sur la pompe.
4. En utilisant un objet contondant solide de 7/63 po de diamètre
ou plus petit et d’au moins 1 po de long, tel qu’une clé Allen,
insérez l’objet dans le raccord à barbelure jusqu’à ce que vous
ressentiez une résistance. La résistance que vous ressentirez
sera causée par la bille de retenue.
5. Poussez lentement vers le bas jusqu’à ce que vous ressentiez
la bille se déplacer légèrement; n'allez pas au-delà de 1/8 po.
Une légère pression peut être requise pour libérer la bille.
6. Répétez les étapes 4 et 5 au besoin.
7. Replacez le tuyau de siphonnement de détergent sur le raccord
à barbelure.
8. Appliquez un traitement avec PumpSaver tel que décrit dans
Protection de la pompe pour l’entreposage afin d’éviter de
nouvelles occurrences d’obstruction.
Vérifiez le pistolet à pulvérisation
Examinez le branchement du boyau au pistolet à pulvérisation et
assurez-vous que le branchement est solide. Faites l’essai de la
détente en appuyant sur le bouton rouge et en vous assurant que la
détente revient à sa position initiale lorsque vous la relâchez. Vous
ne devriez pas être en mesure d’actionner la détente sans avoir
appuyé sur le bouton rouge. Remplacez le pistolet à pulvérisation
immédiatement s’il échoue un de ces essais.
Entretien du gicleur
Si vous sentez un effet de pulsation en appuyant sur la détente du
pistolet de pulvérisation, c’est que la pression de la pompe est
peut-être trop élevée. Cela peut se produire si la buse est obstruée,
complètement ou en partie, par un corps étranger, comme des
saletés, etc. Pour remédier à ce problème, nettoyez immédiatement
la buse en suivant ces instructions :
1. Éteignez le moteur et fermez l’alimentation en eau.
2. Dirigez TOUJOURS le pistolet vers un endroit sécuritaire et
appuyez sur la détente du pistolet de pulvérisation pour libérer
la haute pression de l’eau.
3. Enlevez la buse de l’extrémité de la rallonge de buse.
4. Utilisez un trombone pour dégager tout élément pouvant
obstruer la buse (A).
AVERTISSEMENT
Le jet d'eau à haute pression produit par
cet appareil peut couper la peau et ses tissus sousjacents et conduire à des blessures graves et même une
amputation.
• NE réparez JAMAIS les tuyaux à haute pression. Remplacez.
• Le tuyau de remplacement DOIT résister à une pression égale
ou supérieure à la pression nominale de l’appareil.
AVERTISSEMENT
Le jet d'eau à haute pression produit par
cet appareil peut couper la peau et ses tissus sousjacents et conduire à des blessures graves et même une
amputation.
Le pistolet de pulvérisation retient une pression d’eau élevée, même
lorsque le moteur est éteint et que l’eau est déconnectée, ce qui
peut causer des blessures graves.
• Gardez toujours le tuyau flexible à haute pression raccordé à la
pompe et au pistolet de pulvérisation lorsque le système est
sous pression.
• À chaque fois que vous arrêtez le moteur, dirigez TOUJOURS le
pistolet vers un endroit sécuritaire et appuyez sur le bouton
rouge et sur la détente du pistolet de pulvérisation pour libérer
la haute pression.
AVERTISSEMENT Risque de blessure aux yeux.
Le jet peut rejaillir sur vous ou propulser des objets et
entraîner des blessures graves.
• Portez toujours des lunettes de sécurité à aération indirecte
(contre les produits chimiques) spécifiées conformes à ANSI
Z87.1 lorsque vous utilisez ou que vous vous trouvez à
proximité de cet appareil.
• N’utilisez JAMAIS de lunettes de sécurité ou de lunettes de
sécurité pour condition sèche au lieu de lunettes de sécurité à
aération indirecte.
AVERTISSEMENT
Le jet d'eau à haute pression produit par
cet appareil peut couper la peau et ses tissus sousjacents et conduire à des blessures graves et même une
amputation.
Le pistolet de pulvérisation retient une pression d’eau élevée, même
lorsque le moteur est éteint et que l’eau est déconnectée, ce qui
peut causer des blessures graves.
• Gardez toujours le tuyau flexible à haute pression raccordé à la
pompe et au pistolet de pulvérisation lorsque le système est
sous pression.
• À chaque fois que vous arrêtez le moteur, dirigez TOUJOURS le
pistolet vers un endroit sécuritaire et appuyez sur le bouton
rouge et sur la détente du pistolet de pulvérisation pour libérer
la haute pression.
A
Page 52

52
5. Détachez la rallonge du pistolet pulvérisateur.
6. À l’aide d’un tuyau d’arrosage, enlevez les débris
supplémentaires en rinçant la rallonge de buse. Rincez-la
pendant 30 à 60 secondes.
7. Réinstallez la buse dans la rallonge de buse.
8. Rebranchez la rallonge de buse sur le pistolet de pulvérisation.
9. Assurez-vous que le boyau d’arrosage est connecté à l’entrée
d’eau. Vérifiez si le boyau à haute pression est connecté au
pistolet de pulvérisation et à la pompe. Ouvrez l’alimentation
d’eau.
10. Engagez le verrou de la détente du pistolet de pulvérisation et
démarrez le moteur selon les directives Comment démarrer
votre nettoyeur à pression.
11. Testez le nettoyeur à pression en l’utilisant avec chaque buse à
raccord rapide.
Entretien du joint torique
Procurez-vous un nécessaire de réparation de joint torique, au
magasin Sears de votre localité, en téléphonant au numéro sans
frais 1-800-4-MY-HOME (469-4663) ou sur Internet à
www.sears.ca. Ce nécessaire n’est pas inclus avec le nettoyeur à
haute pression. Le nécessaire comprend des joints toriques de
rechange, une rondelle de caoutchouc et un filtre d’arrivée d’eau.
Pour remplacer les joints toriques de votre nettoyeur, consultez la
feuille d'instructions fournie avec le nécessaire.
ENTRETIEN DU MOTEUR
Huile
Recommandations relatives à l'huile
AVIS N’ajoutez au carter de moteur que de l’huile détergente
automobile pour moteurs à 4 temps de haute qualité ayant une
des cotes de service API suivantes : SJ ou SL, SAE 10W-30.
N’utilisez PAS d’additifs spéciaux.
1. Choisissez la viscosité de l’huile en fonction du tableau
suivant.
AVIS Les autres viscosités montrées au tableau peuvent être
utilisées lorsque la température moyenne de votre région se trouve
dans la gamme recommandée.
Vérification du niveau d’huile
Il est nécessaire de vérifier le niveau d’huile avant chaque utilisation
ou après chaque période de 8 heures d’utilisation. Gardez un niveau
d’huile constant.
1. Placez le nettoyeur à haute pression sur une surface plane et
nettoyez la surface autour de la jauge d’huile.
2. Enlevez la jauge d’huile et essuyez la jauge avec un linge
propre. Insérez et retirez jauge d’huile sans la tourner dans le
goulot de remplissage d’huile.
3. Vérifiez si l’huile atteint la marque de la limite supérieure de la
jauge d’huile. Replacez la jauge d’huile et serrez-la.
Ajouter de l’huile à moteur
1. Placez le nettoyeur à haute pression sur une surface plane.
2. Nettoyez la surface autour de l’orifice de remplissage d’huile et
enlevez le bouchon de remplissage d’huile et la jauge d’huile.
3. Vérifiez le niveau d’huile de la manière décrite dans Vérification
du niveau d’huile.
4. Au besoin, versez l’huile lentement dans l’orifice de
remplissage. Arrêtez pour laisser couler l’huile. Remplissez
jusqu’à la marque de limite supérieure de la jauge d’huile. NE
remplissez PAS en excès.
AVIS Un excès d’huile peut empêcher le moteur de démarrer ou
rendre le démarrage difficile.
• NE remplissez PAS en excès.
• Si l’huile dépasse le repère maximum (« FULL ») sur la jauge
d’huile, vidangez l’huile pour abaisser le niveau jusqu’au repère
maximum de la jauge.
5. Replacez le bouchon de remplissage/jauge d'huile et serrez-le
solidement.
Température ambiante
AVERTISSEMENT
Le jet d'eau à haute pression produit par
cet appareil peut couper la peau et ses tissus sousjacents et conduire à des blessures graves et même une
amputation.
• Ne réparez JAMAIS des raccords non étanches à l’aide de
scellant. Remplacez le joint torique ou le joint d’étanchéité.
AVERTISSEMENT Une étincelle involontaire peut causer un
incendie et un choc électrique et entraîner la
mort et des blessures graves.
LORSQUE VOUS RÉGLEZ OU RÉPAREZ VOTRE NETTOYEUR À
PRESSION
• Débranchez toujours le câble de bougie et placez-le de façon à
ce qu'il ne soit pas en contact avec la bougie.
LORS DE TESTS D'ALLUMAGE DU MOTEUR
• Utilisez un vérificateur de bougies d'allumage approuvé.
• NE vérifiez PAS l'allumage lorsque la bougie d'allumage est enlevée.
Bouchon de remplissage/jauge d’huile
Limite inférieure
Limite supérieure
Page 53

53
Vidange de l’huile moteur
Si vous utilisez votre nettoyeur à haute pression dans un endroit
très sale ou poussiéreux ou par temps très chaud, changez l’huile
plus fréquemment.
GARDEZ HOS DE PORTÉE DES ENFANTS. NE POLLUEZ
PAS. CONSERVEZ LE SURPLUS. RAPPORTEZ L'HUILE
USAGÉE AUX CENTRES DE RECYCLAGE.
Changez l'huile alors que le moteur est encore chaud, de la façon
suivante:
1. Videz le réservoir d'essence en faisant tourner le nettoyeur à
pression jusqu'à l'épuisement de l'essence.
2. Débranchez le fil de la bougie d'allumage et gardez-le éloigné
de la bougie d'allumage.
3. Nettoyez la surface autour de l'orifice de remplissage d'huile,
enlevez le bouchon de remplissage d'huile et la jauge d'huile.
Essuyez la jauge d'huile.
4. Inclinez votre nettoyeur à haute pression pour vidanger l'huile
par l'orifice de remplissage dans un contenant adéquat en vous
assurant d'incliner le nettoyeur du côté opposé à la bougie
d'allumage et au filtre à air. Une fois le carter vidé de son huile,
remettez le nettoyeur debout.
5. Videz lentement l’huile (environ 18 oz (0,5 l)) dans l’orifice de
remplissage d’huile, jusqu’à marque Full (premier trou) sur la
jauge de niveau d'huile.
6. Essuyez la jauge d'huile chaque fois que vous vérifiez le niveau
d'huile. NE remplissez PAS trop le carter d'huile.
7. Replacez-la et resserrez-la.
8. Essuyez toute huile restante.
9. Rebranchez le fil de la bougie d'allumage à la bougie d'allumage.
Entretien du filtre à air
Votre moteur ne fonctionnera pas adéquatement et pourrait
s’endommager si vous le faites fonctionner avec un filtre à air sale.
Remplacez le filtre plus souvent si vous utilisez le nettoyeur dans un
endroit sale ou poussiéreux. Vous trouverez des pièces de rechange
au centre de service Sears de votre région.
Pour faire l’entretien du filtre à air, procédez comme suit :
1. Appuyez sur les languettes de verrouillage (A) sur la partie
supérieure du couvercle du filtre à air (B) et retirez le
couvercle.
2. Retirez délicatement le filtre à air (C) de la base (D).
3. Nettoyez le filtre à air en le frappant doucement plusieurs fois
contre une surface dure afin de retirer la poussière ou souffler
de l’air comprimée (qui n'excède pas 30 lb/po2) dans le filtre à
air à partir du côté propre qui fait face au moteur.
AVIS Ne JAMAIS essayer de brosser pour retirer la saleté. Le
brossage entraînera une infiltration de la saleté dans les fibres.
4. Essuyez la saleté du boîtier du filtre à air et le couvercle à l’aide
d’un chiffon humide. Prenez soin d’éviter que de la saleté ne
s'introduise dans le conduit d’aération (E) qui mène au
carburateur.
5. Installez un ensemble d'élément filtrant propre (ou un
nouveau) dans la base. Le filtre à air doit s'adapter solidement
à la base.
6. Replacez le couvercle du filtre à air.
AVIS Vous pouvez acheter des éléments filtrants neufs en
téléphonant au 1-800-4-MY-HOME (469-4663).
D
E
C
B
A
A
ATTENTION Évitez tout contact cutané prolongé ou répété
avec l'huile moteur usagée.
• Il a été démontré que l'huile moteur usagée risque de
provoquer un cancer de la peau chez certains animaux de
laboratoire.
• Rincez consciencieusement les zones exposées avec de l'eau et
du savon.
Page 54

Entretien de la bougie d'allumage
Changez la bougie d'allumage le moteur démarrera plus facilement
et fonctionnera mieux.
1. Nettoyez la surface autour de la bougie d'allumage.
2. Enlevez la bougie d'allumage et examinez-la.
3. Si les électrodes sont usés ou si la porcelaine est craquée ou
écaillée. Utilisez la bougie de remplacement recommandée.
Consultez Spécifications.
4. Vérifiez l’écartement des électrodes à l’aide d’une jauge
d’épaisseur et ajustez l’écartement des électrode selon les
spécifications recommandées au besoin (voir Spécifications).
5. Installez la bougie d'allumage et serrez-la solidement.
AVIS Vous pouvez acheter une nouvelle bougie d’allumage en
téléphonant au 1-800-4-MY-HOME (469-4663).
Carburateur
Si vous croyez que votre carburateur a besoin d’un ajustement,
communiquez avec votre centre de service Sears le plus près. Des
altitudes de plus de 5 000 pieds peuvent avoir un effet sur la
performance du moteur. Pour une utilisation à des altitudes plus
élevées, communiquez avec votre centre de service Sears le plus
près.
Inspectez le silencieux et le pare-étincelles
Inspectez la présence de fissures, de corrosion ou d’autres
dommages sur le silencieux. Retirez le pare-étincelle, le cas échéant,
et inspectez la présence de dommages ou de blocage causé par le
carbone. Si vous devez remplacer des pièces, assurez-vous
d’utiliser uniquement des pièces de rechange d’origine.
Nettoyez et vérifiez le pare-étincelles comme suit :
1. Retirez les trois boulons de 6 mm (A) du protecteur de
silencieux (B) et retirez le protecteur du silencieux.
2. Retirez les deux vis spéciales (C) du pare-étincelles et enlevez
le pare-étincelles (D) du silencieux (E).
3. Utilisez une brosse pour enlever les dépôts de carbone de
l’écran du pare-étincelles. Faites attention pour ne pas
endommager l’écran.
AVIS Remplacez le pare-étincelles s’il présente des fissures ou
des trous.
4. Installez un pare-étincelles propre (ou neuf) dans l’ordre
inverse du retrait.
54
A
B
C
D
E
AVERTISSEMENT La chaleur et les gaz d’échappement
peuvent enflammer des matériaux
combustibles et les structures ainsi que
causer des dommages au réservoir
d’essence et provoquer un incendie risquant d’entraîner la mort,
des blessures graves et/ou des dommages matériels.
Tout contact avec la zone du silencieux peut causer des brûlures
risquant d’entraîner des blessures graves.
• NE touchez PAS aux pièces chaudes et ÉVITEZ le contact avec
les gaz d’échappement.
• Laissez l'équipement refroidir avant de le toucher.
• Laissez un dégagement d’au moins 1,5 m (5 pi) tout autour de
la nettoyeur à pression, y compris au-dessus.
• L’utilisation ou le fonctionnement d’un moteur sur un terrain
boisé, couvert de broussailles ou gazonné constitue une violation
dans l’État de la Californie, en vertu de la section 4442 du
California Public Resources Code, à moins qu’il ne soit doté d’un
pare-étincelles tel que défini dans la section 4442 et maintenu en
bon état de fonctionnement. Il se peut que d’autres États ou
d’autres compétences fédérales aient des lois semblables.
Communiquez avec le fabricant, le détaillant ou le concessionnaire
original de l’appareil afin d’obtenir un pare-étincelles conçu pour le
système d’échappement installé sur ce moteur.
• Les pièces de rechange doivent être identiques aux pièces
d’origine et être installées à la même position.
Page 55

55
Après chaque utilisation
L'eau ne doit pas demeurer dans le nettoyeur durant une longue
période de temps. Des sédiments ou des minéraux pourraient
s'accumuler sur les pièces de la pompe et bloquer son mouvement.
Suivez la procédure suivante après chaque utilisation:
1. Éteignez le moteur, fermez l’alimentation en eau, dirigez
pistolet vers un endroit sécuritaire et appuyez sur le bouton
rouge et sur la détente pour libérer la pression et laisse
refroidir le moteur.
2. Débranchez le tuyau du pistolet de pulvérisation et de la sortie
haute pression de la pompe. Vidangez l’eau du tuyau, du
pistolet et de la rallonge de buse. Utilisez un chiffon pour
essuyer le tuyau.
3. Videz la pompe de tout liquide en tirant sur la poignée du
lanceur environ 6 fois. Cette opération devrait suffire pour
enlever presque tout le liquide dans la pompe.
4. Placez le pistolet de pulvérisation, la rallonge de buse et les
buses dans le plateau pour accessoires.
5. Enroulez le tuyau à haute pression sur le dévidoir du boyau du
plateau pour accessoires.
6. Entreposez le nettoyeur dans un endroit propre et sec.
7. Si vous remisez le nettoyeur durant plus de 30 jours, consultez
la section Entreposage à long terme.
AVERTISSEMENT L’essence et ses vapeurs sont
extrêmement inflammables et explosives qui
pourraient causer des brûlures, un incendie
ou une explosion risquant d’entraîner la
mort, des blessures graves et/ou des dommages matériels.
LORSQUE VOUS ENTREPOSEZ L'ESSENCE OU UN ÉQUIPEMENT
AVEC UN RÉSERVOIR À ESSENCE
• Entreposez loin des fournaises, poêle, chauffe-eau, sécheuses ou
autres électroménagers munis d’une veilleuse ou d’une source
d’allumage car ils peuvent allumer les vapeurs d’essence.
AVERTISSEMENT
Le jet d'eau à haute pression produit par cet
appareil peut couper la peau et ses tissus sous-jacents et
conduire à des blessures graves et même une
amputation.
Le pistolet de pulvérisation retient une pression d’eau élevée, même
lorsque le moteur est éteint et que l’eau est déconnectée, ce qui
peut causer des blessures graves.
• Gardez toujours le tuyau flexible à haute pression raccordé à la
pompe et au pistolet de pulvérisation lorsque le système est
sous pression.
• À chaque fois que vous arrêtez le moteur, dirigez TOUJOURS le
pistolet vers un endroit sécuritaire et appuyez sur le bouton
rouge et sur la détente du pistolet de pulvérisation pour libérer
la haute pression.
Page 56

56
RANGEMENT
ENTREPOSAGE POUR L'HIVER
AVIS Vous devez protéger votre appareil contre le gel.
• Si vous ne le faites pas, vous pouvez causer des dommages
irréversibles à votre pompe qui la rendront inutilisable.
• Les dommages causés par le gel ne sont pas couverts par la
garantie.
Pour protéger l'appareil contre le gel:
1. Suivez les étapes 1 à 4 de la section précédente Après chaque
utilisation.
2. Utilisez Pump Saver, un produit disponible chez Sears, article
numéro 74403, pour traiter votre pompe. Ce produit vous
permet de réduire les dommages causés par le gel et de
lubrifier les pistons et les joints.
3. Si “Pump saver” n’est pas disponible, raccordez une section de
tuyau d'arrosage de 1 m (3 pi) de long à un raccord d'eau
d'arrivée. Versez de l'antigel de véhicule de plaisance (antigel
sans alcool) dans le tuyau. Tirez sur la poignée du lanceur
deux fois. Débranchez le tuyau de 1 m (3 pi).
4. Entreposez le nettoyeur dans un endroit propre et sec.
ENTREPOSAGE À LONG TERME
Si vous ne prévoyez pas utiliser le nettoyeur à pression durant plus
de 30 jours, vous devez préparer le moteur et la pompe pour
l’entreposage à long terme.
Pendant la période d’entreposage, il est important d’empêcher la
formation de dépôts de gomme dans les parties importantes du
système d’alimentation comme le carburateur, le filtre à essence, le
tuyau souple de carburant ou le réservoir. De plus, l’expérience a
démontré que les carburants à l’alcool (appelés gazohol, éthanol ou
méthanol) attire l’humidité, ce qui entraîne la séparation et la
formation d’acides durant l’entreposage. Les gaz acides peuvent
endommager le système d’alimentation du moteur pendant
l’entreposage.
Protection du système d’alimentation
Additif de carburant :
Si vous ajoutez un additif de carburant, remplissez le réservoir à
essence avec de l’essence fraîche. Si le réservoir n’est que
partiellement rempli, l’air présent augmentera la détérioration de
l’essence durant son entreposage.
• Ajoutez un additif de carburant en suivant les directives du
fabricant.
• Assurez-vous que l’alimentation en eau est connectée à l’entrée
de la pompe et qu’elle est ouverte.
• Laissez tourner le moteur à l’extérieur pendant plusieurs
minutes pour vous assurer que l’essence traitée a remplacé
l’essence non traitée dans le carburateur.
Si vous n’utilisez pas d’additif, videz le réservoir à essence et laissez
tourner le moteur jusqu'à ce qu’il tombe en panne d’essence.
Vidange du réservoir à essence et du carburateur :
Si vous n’utilisez pas d’additif, videz le réservoir à essence et le
carburateur.
• Placez un contenant à carburant approprié sous le carburateur
et utilisez un entonnoir pour éviter de déverser de l’essence.
• Retirez le bouchon de vidange du carburateur (A), puis placez le
levier de la vanne de combustible à la position de marche.
• Lorsque l’essence est entièrement vidangée dans le contenant,
replacez le boulon de vidange. Resserrez les deux pièces
solidement.
Changement de l'huile
Alors que le moteur est encore chaud, vidangez l'huile du carter.
Remplissez le carter à nouveau avec de l'huile de la qualité
recommandée. Consultez la section Vidange de l'huile moteur.
Huilage de l’alésage du cylindre
• Enlevez la bougie d’allumage. Versez environ une cuillerée à
soupe) d’huile à moteur propre dans le cylindre. Couvrez le trou
de bougie à l’aide d’un chiffon. Tirez lentement la poignée du
lanceur pour distribuer l’huile. Évitez les éclaboussures
provenant du trou de la bougie d’allumage.
• Installez une bougie. Ne branchez pas le câble de la bougie.
Protection de la pompe
Utilisez PumpSaver pour traiter la pompe contre les dommages
causés par de dépôts minéraux ou le gel. Vous préviendrez ainsi les
dommages causés par le gel et lubrifierez les pistons et les joints.
AVIS PumpSaver est un accessoire disponible en option. Il n’est
pas fourni avec le nettoyeur à pression. Contactez le détaillant agréé
de service après vente situé le plus près de chez vous pour vous
procurer PumpSaver.
AVIS Vous devez protéger votre appareil contre le gel.
• Si vous ne le faites pas, vous pouvez causer des dommages
irréversibles à votre pompe qui la rendront inutilisable.
• Les dommages causés par le gel ne sont pas couverts par la
garantie.
Pour utiliser PumpSaver, assurez-vous que le nettoyeur à haute
pression est en position d’arrêt et débranché de l’alimentation d’eau.
Veuillez lire les directives et les avertissements mentionnés sur le
contenant de PumpSaver.
Autres directives
1. N’entreposez PAS d’essence d’une saison à l’autre à moins
qu’elle ne soit traitée tel que décrit dans Protection du système
d’alimentation.
2. Remplacez le contenant à essence s’il commence à rouiller. Un
carburant contaminé peut causer des problèmes de moteur.
3. Couvrez l’appareil à l’aide d’une housse de protection adéquate
qui ne retient pas l’humidité.
4. Entreposez la nettoyeur à pression dans un endroit propre et sec.
A
AVERTISSEMENT Les couvercles de rangement peuvent
causer un incendie risquant d’entraîner la mort, des
blessures graves et des dommages matériels.
• NE placez JAMAIS une couverture de rangement sur un
nettoyeur à pression.
• Laissez l’appareil refroidir suffisamment avant de placer la
couverture de rangement dessus.
Page 57

57
DÉPANNAGE
Problème Cause Correction
La pompe a les problèmes suivants:
pas de pression, pression irrégulière,
pressure, claquement, perte de pression, faible débit d'eau.
1. Buse à basse pression installée.
2. Entrée d'eau bloquée.
3. Pas assez d'eau qui arrive.
4. Tuyau d'entrée tortillé ou avec
fuites.
5. Filtre de tuyau bouché.
6. Eau à plus de 38°C (100ºF).
7. Tuyau de sortie bloqué ou avec
fuites.
8. Le pistolet fuie.
9. La buse est bouchée.
10. La pompe est défectueuse.
1. Replacez la buse par la buse à
haute pression.
2. Dégager l'entrée d'eau.
3. Fournir un débit adéquat.
4. Redresser le tuyau, boucher la
fuite.
5. Vérifier et nettoyer le filtre du tuyau
d'entrée.
6. Ayez une eau plus froide.
7. Débloquez le tuyau de sortie.
8. Remplacer le pistolet.
9. Déboucher la buse.
10. Contacter négociant de service
autorisé.
Le détergent ne se mélange pas avec
le jet.
1. Le tube n'est pas submergé.
2. Le tube est bouché.
3. Buse à haute pression installée.
4. Vérifiez si la bille est emprisonnée
dans le système de siphonnement
du détergent.
1. Insérer le tube dans le détergent.
2. Nettoyer ou remplacer le tube.
3. Remplacez la buse par la buse à
basse pression.
4. Libérez la bille de retenue tel que
décrit dans Bille de retenue de
siphonnement de détergent.
Le moteur ne démarre pas, démarre et
a des ratés ou s’arrête.
1. Vanne de combustible en position
d’arrêt.
2. L’interrupteur d’arrêt du moteur est
à la position d’arrêt.
3. Bas niveau d'huile.
4. Filtre à air encrassé.
5. Panne d'essence.
6. Essence éventée.
7. Fil de bougie non branché à la
bougie.
8. Bougie défectueuse.
9. Eau présente dans l'essence.
10. Sur-étranglement.
11. Mélange d’essence trop riche.
12. Soupape d’admission bloquée en
position ouverte ou fermée.
13. Perte de compression du moteur.
1. Tournez la vanne de combustible à
la position de marche.
2. Placez l’interrupteur d’arrêt du
moteur à la position de marche.
3. Remplissez le carter au niveau requis.
4. Nettoyez ou remplacez le filtre à air.
5. Faites le plein du réservoir.
6. Vidangez le réservoir; faites le plein
avec de l'essence nouvelle.
7. Branchez le fil à la bougie.
8. Remplacez la bougie.
9. Vidangez le réservoir; faites le plein
avec de l'essence nouvelle.
10. Ouvrez l’étrangleur en entier et
démarrez le moteur.
11. Contactez le centre de service
Sears.
12. Contactez le centre de service
Sears.
13. Contactez le centre de service
Sears.
Manque de puissance du moteur. Filtre à air encrassé. Remplacez le filtre à air.
À-coups ou déclin du moteur.
Étrangleur ouvert trop tôt. Déplacez l’étrangleur à mi-chemin
jusqu’à ce que le moteur tourne en
douceur.
Page 58

58
GARANTIE DU DISPOSITIF ANTIPOLLUTION
Énoncé de garantie du dispositif antipollution
pour la Californie, l’U.S. EPA et Sears
Vos droits et obligations relatifs à la garantie
Le California Air Resources Board, l’U.S. EPA et Sears Brands
Management Corporation, U.S.A. (Sears) sont heureux de vous
expliquer la garantie couvrant le dispositif antipollution de votre
moteur/appareil de modèle 2011-2012. En Californie, les
nouveaux petits moteurs hors route et les gros moteurs à
bougie de 1,0 litre ou moins doivent être conçus, construits et
équipés de façon à respecter les normes anti-smog rigoureuses
de l’état. Sears doit garantir le dispositif antipollution de votre
moteur ou de votre équipement pour les périodes indiquées cidessous, à condition qu’il n’y ait pas eu d’abus, de négligence,
de mauvais entretien sur le moteur ou équipement.
Votre dispositif antipollution peut comprendre des pièces
comme le carburateur ou le système d’injection de
combustible, le réservoir d’essence, le système d’allumage et
le convertisseur catalytique. Il peut aussi y avoir des tuyaux,
des courroies, des connecteurs, des capteurs et d’autres
dispositifs reliés aux émissions. Dans le cas d’un défaut
couvert par la garantie, Sears réparera votre moteur ou votre
équipement sans frais, et ce, incluant le diagnostic, les
pièces et la main-d’ouvre.
Couverture de garantie du fabricant :
Les petits moteurs hors route et les gros moteurs à bougie
de 1,0 litre ou moins sont garantis pour une période de deux
ans. Si une pièce reliée au dispositif antipollution de votre
moteur ou de votre équipement est défectueuse, Sears la
réparera ou la remplacera.
Responsabilités du propriétaire relativement à la garantie :
• En tant que propriétaire de moteur/appareil, vous êtes
responsable de l’exécution de l’entretien requis indiqué
dans votre manuel d’utilisation. Sears recommande de
conserver tous les reçus reliés à l’entretien de votre
moteur ou de votre équipement; toutefois, Sears ne
peut refuser d’honorer la garantie uniquement parce
que vous êtes dans l’impossibilité de produire les reçus
ou que vous n’avez pas effectué toutes les étapes de
l’entretien prévu.
• Néanmoins, vous devez savoir, en tant que propriétaire
du moteur ou de l’équipement, que Sears peut renier la
garantie si votre moteur ou votre équipement ou,
encore, une pièce font défaut en raison d’abus, de
négligence, d’entretien inadéquat ou de modifications
non approuvées.
• Dès qu’un problème survient, vous avez la
responsabilité de faire examiner votre moteur ou votre
équipement dans un centre de distribution Sears, un
centre de service ou une autre entité équivalente, selon
le cas. Les réparations couvertes par la garantie doivent
être effectuées dans un délai raisonnable, n’excédant
pas 30 jours. Si vous avez des questions au sujet de
vos droits et responsabilités reliés à la garantie, veuillez
communiquer avec Sears au (800) 469-4663.
Dispositions de la garantie contre les défauts du dispositif
antipollution de Sears
Les dispositions qui suivent sont spécifiques à la couverture
de garantie contre les défauts du dispositif antipollution. Elle
est un ajout à la garantie sur les moteurs de Sears pour les
moteurs non régulés, figurant dans le manuel d'utilisation.
1. Pièces garanties
La couverture de cette garantie n'englobe que les pièces
énumérées ci-dessous (pièces du dispositif antipollution) dans la mesure où ces pièces étaient présentes
sur le moteur au moment de l'achat.
a. Système de contrôle d'alimentation en carburant
• Dispositif d'enrichissement pour démarrage à
froid (étrangleur à glissement)
• Carburateur et pièces internes
• Pompe à carburant
• Conduit d'essence, raccords de conduit
d'essence, brides de serrage
• Réservoir d'essence, bouchon et attache
• Absorbeur de vapeurs d’essence
b. Circuit d'entrée d'air
• Filtre à air
• Collecteur d'admission
• Ligne de purge et d’évacuation
c. Système d'allumage
• Bougie(s) d'allumage
• Système d'allumage à magnéto
d. Système de catalyseur
• Catalytic converter
• Collecteur d'échappement
• Système d'injection d'air ou soupape d'impulsion
e. Éléments divers utilisés dans les systèmes
précédemment mentionnés
• Soupapes et interrupteurs de dépression, de température, de position, à délai critique
• Connecteurs et dispositifs
2. Durée de la couverture
Pour une période de deux ans à compter de la date
d’achat originale, Sears garantit à l’acheteur initial et à
tous les acheteurs subséquents que le moteur a été
conçu, construit et équipé de façon à respecter toutes les
normes en vigueur adoptées par l’Air Resources Board;
qu’il est libre de tout défaut de matériel et de maind’ouvre qui pourrait entraîner la défectuosité d’une pièce
garantie; et, qu’il est identique d’un point de vue matériel
au moteur décrit dans la demande d’homologation du
fabricant. La période de garantie débute à la date d’achat
du moteur par le premier acheteur.
Aux États-Unis et au Canada, l'assistance téléphonique de 24 heures, au 1-800-469-4663, comprend un menu de messages préenregistrés qui procure des
renseignements sur l'entretien du produit.
Page 59

59
La garantie des pièces reliées au dispositif antipollution est la
suivante :
• Toute pièce garantie dont le remplacement ne fait pas
partie de l’entretien requis dans le manuel d’utilisation
doit être garantie pour la période de garantie indiquée
ci-dessus. Si une telle pièce s’avère défectueuse au
cours de la période de la couverture de garantie, Sears
devra la réparer ou la remplacer sans frais pour le
propriétaire. Toute pièce réparée ou remplacée en vertu
de la garantie sera garantie pour la durée restante de la
période de garantie.
• Toute pièce garantie qui fait partie de l’entretien
uniquement pour une inspection régulière dans le
manuel d’utilisation est garantie pour la période de
garantie indiquée ci-dessus. Toute pièce réparée ou
remplacée en vertu de la garantie sera garantie pour la
durée restante de la période de garantie.
• Toute pièce garantie dont le remplacement fait partie de
l’entretien requis dans le manuel d’utilisation est
garantie pour la période de temps avant le premier point
de remplacement prévu pour cette pièce. Si une telle
pièce s’avère défectueuse avant son remplacement
prévu, Sears devra la réparer ou la remplacer sans frais
pour le propriétaire. Toute pièce réparée ou remplacée
en vertu de la garantie sera garantie pour la durée
restante de la période avant le premier point de
remplacement prévu pour la pièce.
• Les pièces ajoutées ou modifiées ne faisant pas partie
d’une exemption par l’Air Resources Board ne doivent
pas être utilisées. L’utilisation de pièces ajoutées ou
modifiées par le propriétaire qui ne font pas partie d’une
exemption pourrait entraîner le refus d’une réclamation
au titre de la garantie. Le fabricant n’a pas la
responsabilité de garantir les défectuosités des pièces
garanties causées par l’utilisation de pièces ajoutées ou
modifiées qui ne font pas partie d’une exemption.
3. Couverture indirecte
La couverture englobe toute défectuosité de l’un des
composants du moteur causée à la suite d’une
défectuosité d’une des pièces reliées au dispositif
antipollution garanties.
4. Réclamations et exclusions de couverture
Les réclamations au titre de la garantie doivent être
présentées conformément aux dispositions de la
politique de garantie du moteur de Sears. La couverture
de garantie n’englobe pas les défectuosités des pièces
reliées au dispositif antipollution qui ne sont pas des
pièces originales de Sears ni les défectuosités de pièces
reliées à un abus, de la négligence ou un entretien
inapproprié tel que détaillé dans la politique de garantie
du moteur de Sears. Sears n’est pas responsable de
couvrir les défectuosités des pièces reliées au dispositif
antipollution causées par l’utilisation de pièces ajoutées
ou modifiées.
Consultez l’étiquette d’émissions de votre petit moteur
hors route au sujet de la période de durabilité des
émissions et l’indice de pollution atmosphérique
Les renseignements concernant la période de durabilité des
émissions et l’indice de pollution atmosphérique doivent être
fournis avec les moteurs qui répondent aux normes
d’émissions de petits moteurs hors routes de la California Air
Resources Board (CARB). Le fabricant du moteur doit fournir
ces renseignements aux consommateurs sur des étiquettes
d’émissions. L’étiquette des émissions du moteur fournit des
renseignements sur la certification.
La période de durabilité des émissions décrit le nombre
d’heures pendant lesquelles le moteur peut fonctionner en
respectant les normes relatives aux émissions, en supposant
que l’entretien est effectué conformément aux directives de
fonctionnement et d’entretien. Les catégories utilisées sont
les suivantes :
Modéré : Le moteur peut fonctionner pendant 125 heures
tout en respectant la norme relative aux émissions.
Intermédiaire : Le moteur peut fonctionner pendant 250
heures tout en respectant la norme relative aux émissions.
Prolongé : Le moteur peut fonctionner pendant 500 heures
tout en respectant la norme relative aux émissions.
Par exemple, l’utilisation d’une tondeuse poussée est
d’environ 20 à 25 heures par année. Par conséquent, la
période de durabilité des émissions d’un moteur de
catégorie intermédiaire équivaut à une période de 10 à
12 années.
Petits moteurs hors route doivent respectent les normes
relatives aux émissions de phase 2 de l’USEPA (United States
Environmental Protection Agency). Dans le cas des moteurs
homologués phase 2, la période de conformité des émissions
indiquée sur l’étiquette de conformité des émissions indique
le nombre d’heures de fonctionnement pendant lesquelles le
moteur a démontré qu’il respectait les exigences fédérales en
matière d’émissions.
Pour les moteurs de cylindrée inférieure à 225 cc:
Catégorie C = 125 heures
Catégorie B = 250 heures
Catégorie A = 500 heures.
Pour les moteurs de cylindrée égale ou supérieure à 225 cc:
Catégorie C = 250 heures
Catégorie B = 500 heures
Catégorie A = 1000 heures.
Page 60

60
Page 61

Quick Start Guide
Pressure Washer
Have Questions?
Do not return to store. We can help.
Call Customer Service Toll-Free 1-800-222-3136
Or visit our website www.sears.ca
WARNING Failure to read and follow the operator’s
manual and all operating instructions before
using could result in death, serious injury,
and/or property damage.
WARNING Fuel and its vapors are extremely
flammable and explosive which could cause
burns, fire or explosion resulting in death,
serious injury and/or property damage. Turn
pressure washer engine OFF and let it cool at least
2 minutes before removing fuel cap. Let spilled fuel
evaporate before starting engine. Always allow space for
fuel expansion.
WARNING Starter cord kickback (rapid retraction)
will pull hand and arm toward engine faster
than you can let go which could cause broken
bones, fractures, bruises, or sprains resulting
in serious injury. NEVER pull starter cord without first
relieving spray gun pressure. Pull starter cord slowly
until resistance is felt, then pull rapidly. Firmly grasp
spray gun with both hands when using high pressure
spray to avoid injury when spray gun kicks back.
WARNING Running engine gives off carbon
monoxide, an odorless, colorless, poison
gas. Breathing carbon monoxide could result
in death, serious injury, nausea or fainting.
Operate this product ONLY outdoors. DO NOT operate
this product inside any building or enclosure, even if
windows and doors are open.
WARNING High water pressure could cut through
skin resulting in serious injury. Spray gun
traps high water pressure, even when engine
is stopped and water is disconnected. NEVER
aim spray gun at people, animals, or plants. ALWAYS
point spray gun in safe direction, press red button and
squeeze spray gun trigger to release high pressure,
every time you stop engine.
WARNING Risk of eye injury. Spray could splash
back or propel objects resulting in serious
injury. Always wear indirect vented (chemical
splash) safety goggles marked to comply with
ANSI Z87.1 when using or in vicinity of this equipment.
NEVER substitute safety glasses or dry-condition
goggles for indirect vented safety goggles.
Items Included:
Operator’s Manual and Standard
Siphon Hose (not shown)
Add Engine Oil and Fuel
NOTICE Before starting the engine, check oil level and ensure that
engine is serviced as described in the Operator’s Manual.
NOTICE DO NOT use E85 fuel.
NOTICE DO NOT mix oil with fuel.
1. Move pressure washer outdoors to a flat, level surface.
2. Clean area around oil fill and remove oil fill cap/dipstick
3. Using oil funnel (optional), slowly pour entire contents of oil bottle
into oil fill.
4. Replace and fully tighten oil fill cap/dipstick.
5. Clean area around the fuel cap ( ), remove fuel cap.
6. Slowly add regular unleaded fuel to bottom of fuel level limit in neck
of fuel tank. Be careful not to overfill.
7. Replace fuel cap. Let any spilled fuel evaporate before starting
engine.
( ).
7
7
Move Pressure Washer
to Safe Operating Location
WARNING Running engine gives off carbon monoxide, an
odorless, colorless, poison gas. Breathing carbon
monoxide could result in death, serious injury, nausea or
fainting. Operate this product ONLY outdoors. DO NOT
operate this product inside any building or enclosure, even if windows
and doors are open.
1. Move pressure washer outdoors to a flat, level surface.
2. Running engines give off carbon monoxide. Keep at least 5 ft.
(1.5 m) clearance on all sides of pressure washer including overhead
to reduce the risk of exhaust heat or exhaust gases igniting nearby
combustible material.
8
Connect Spray Gun
NOTICE Remove and discard 2 shipping caps from high pressure outlet
and garden hose inlet connections.
1. Uncoil high pressure hose (T) and attach one end of hose to base of
spray gun (U). Tighten by hand. 9
2. Attach other end of high pressure hose (T) to high pressure outlet
(V) on pump. Tighten by hand.
10
7
8
Exhaust Port
Pointed away from
dwelling openings
9
U
10
11
T
T
V
You will need:
• Utility knife • Unleaded fuel • Garden hose, 50 feet (15 m) or less • Safety goggles (indirect vented type)
Unpack Pressure Washer
1. Remove everything from carton except pressure washer.
2. Open carton completely by cutting each corner from top to bottom.
3. Ensure you have all included items prior to assembly. If items are
damaged or missing, call 1-800-222-3136.
4. Prior to assembly, lubricate all o-ring connections as described in
operators manual.
Assemble Pressure Washer
1. Place handle (A) onto handle supports connected to main unit.
Make sure holes in handle align with holes on handle supports.
2. Insert handle carriage bolts (B) through holes from inside of unit
and attach a plastic knob (C) from outside of unit. Tighten by
1
hand.
NOTICE By loosening both knobs to the middle section of the
attachment bolt, the upper handle can fold forward to store flat atop the
cold engine. DO NOT fold the handle down while the engine is hot.
3. Insert rubber straps (D) through slots (E) in back of accessory tray
and pull tight from front.
4. Place accessory tray (F) over holes (G) on handle (viewing from
front of unit). Push the tree clips (H) into the holes until they sit flat
against the accessory tray.
5. Insert multi–colored quick connect spray tips and other supplied
accessories in spaces provided in accessory tray.
Accessory Tray, in operator’s manual.
6. Attach bottle bracket (J) to handle with carriage bolt (K) and black
plastic knob (L). Tighten by hand.
2
3
See How to Use
4
1
1
A
C
B
2
D
E
3
H
4
Attach PerfectMix™ Siphon to Pump
K
and Concentrate Bottle
1. Place PerfectMix™ bottle (P) (not included) in wire-form bracket on
handle. Remove cap from bottle and insert PerfectMix™ Siphon (M).
Screw siphon unit to top of bottle. Use clip on cap (Q) to snap siphon
to wire form bracket when siphon is not in a concentrate bottle.
2. Attach tube end of blue PerfectMix™ Siphon (R) to barbed tube
fitting (S) on pump.
6
5
J
5
W
CC
Y
Z
U
AA
BB
OFF
ON
X
Closed
Connect Water Supply
1. Inspect garden hose inlet screen (W) for damage. 11
NOTICE DO NOT use pressure washer if inlet screen is damaged or
missing, call 1-800-222-3136.
2. Clean screen if it contains debris or have it replaced if damaged.
3. Run cold water through garden hose for 30 seconds to clean out any
debris. Connect garden hose (X) (not to exceed 50 feet in length) to
water inlet (Y). Tighten by hand.
11
Start Pressure Washer
NOTICE You MUST connect and turn on water supply fully before
starting engine.
1. Put on safety goggles.
2. Turn on water supply.
WARNING Risk of eye injury. Spray could splash back or propel
objects resulting in serious injury. Always wear indirect
vented (chemical splash) safety goggles marked to
comply with ANSI Z87.1 when using or in vicinity of this
C
F
G
L
equipment. NEVER substitute safety glasses or dry-condition goggles
for indirect vented safety goggles.
3. Press red button (Z) on spray gun and pull trigger until water comes
out in a steady stream. Release trigger to locked position.
4. Attach nozzle extension (AA) to spray gun (U).
5. Pull back on collar of nozzle extension (BB), insert spray tip (CC) and
release collar. Tug on spray tip to make sure it is securely in place.
6. Turn fuel valve to “On” position.
7. Pull choke rod to “Closed” position.
8. Move engine switch to “On” position.
WARNING Starter cord kickback (rapid retraction) will pull hand
and arm toward engine faster than you can let go which
could cause broken bones, fractures, bruises, or sprains
resulting in serious injury. NEVER pull starter cord without
first relieving spray gun pressure. Pull starter cord slowly until
resistance is felt, then pull rapidly. Firmly grasp spray gun with both
hands when using high pressure spray to avoid injury when spray gun
kicks back.
9. When starting engine, position yourself as recommended and grasp
starter grip handle and pull slowly until you feel some resistance.
Then pull rapidly to start engine.
10. Return starter grip handle slowly. DO NOT let rope “snap back”
against starter.
11. After each starting attempt, where engine fails to run, always point
gun in safe direction, press red button and squeeze spray gun trigger
to release high pressure.
12. When engine starts, slowly move choke rod to “Open” position
as engine warms. If engine falters, move choke rod to “Closed”
position, then to “Open” position.
13. Point gun toward surface to be cleaned. Push red button and pull
trigger to begin spraying.
15
16
16
17
13
12
12
13
14
15
14
16
17
M
P
Q
6
R
© 2012 Every effort has been made to ensure that the information in this document is accurate and correct. However, we reserve the right to alter or otherwise improve the product and this document at any time without prior notice and without incurring obligation.
*This pressure washer is rated in accordance to the Pressure Washer Manufacturers Association (PWMA) standard PW101-2010 (Testing and Rating Performance of Pressure Washers).
S
Stop Pressure Washer
1. Let engine idle for 2 minutes.
2. Move engine switch to “Off” position.
3. Turn fuel valve to “Off” position.
4. Turn off water supply.
5. Point spray gun in safe direction, press red button, and squeeze
spray gun trigger to relieve retained high water pressure.
6. Disconnect garden hose from pump.
7. Disconnect high pressure hose from pump and gun for storage. For
long term storage instructions, see operator’s manual.
8. Remove safety goggles.
16
15
Page 62

Guide d’installation rapide
Nettoyeur à haute pression
Avez-vous des questions?
Ne retournez pas au magasin. Nous pouvons vous aider.
Téléphonez sans frais au Service à la clientèle au
1-800-222-3136 ou visitez notre site Web à
www.sears.ca
AVERTISSEMENT L’omission de lire et de se
conformer au manuel de l’utilisateur et
à toutes les directives d’utilisation avant
d’utiliser le produit peut entraîner la mort, des
blessures graves et des dommages matériels.
AVERTISSEMENT L’essence et ses vapeurs sont
extrêmement inflammables et explosives qui
pourraient causer des brûlures, un incendie
ou une explosion risquant d’entraîner la mort,
des blessures graves et/ou des dommages matériels.
ÉTEIGNEZ le moteur de la nettoyeur à haute pression et
laissez-le refroidir pendant au moins 2 minutes avant de
retirer le bouchon à essence. Laissez l’essence déversée
s’évaporer avant de démarrer le moteur. Laissez de
l’espace pour l’expansion de l’essence.
AVERTISSEMENT Un effet de recul (rétroaction
rapide) de la corde du démarreur tirera
votre main et votre bras vers le moteur plus
rapidement que vous ne pouvez relâcher
la corde; ce qui pourrait causer des fractures, des
ecchymoses ou des entorses risquant d’entraîner
des blessures graves. NE tirez JAMAIS sur la corde
du démarreur sans avoir d’abord libéré la pression
du pistolet de pulvérisation. Tirez lentement sur la
corde du démarreur jusqu’à ce que vous sentiez une
résistance, puis tirez rapidement. Lorsque vous utilisez
une vaporisation à haute pression, saisissez fermement le
pistolet de vaporisation avec les deux mains afin d’éviter
les risques de blessures entraînés par les effets de recul.
AVERTISSEMENT Le moteur, lorsqu’il fonctionne,
produit du monoxyde de carbone, un gaz
toxique inodore et incolore. L’inhalation du
monoxyde de carbone peut entraîner la mort,
des blessures graves, des nausées et l’évanouissement.
Faites fonctionner cet appareil UNIQUEMENT à
l’extérieur. NE faites PAS fonctionner ce produit à
l’intérieur d’un bâtiment ou dans un lieu clos, même si
les fenêtres et les portes sont ouvertes.
AVERTISSEMENT Pression d’eau élevée peut couper
la peau et conduire à des blessures graves. Le
pistolet de pulvérisation retient une pression
d’eau élevée, même lorsque le moteur est
éteint et que l’eau est déconnectée. N’visez JAMAIS des
personnes, des animaux ou des plantes avec le pistolet
pulvérisateur. À chaque fois que vous arrêtez le moteur,
dirigez TOUJOURS le pistolet vers un endroit sécuritaire
et appuyez sur le bouton rouge et sur la détente du
pistolet de pulvérisation pour libérer la haute pression.
AVERTISSEMENT Risque de blessure aux yeux. Le
jet peut rejaillir sur vous ou propulser des
objets et entraîner des blessures graves.
Portez toujours des lunettes de sécurité
à aération indirecte (contre les produits chimiques)
spécifiées conformes à ANSI Z87.1 lorsque vous utilisez
ou que vous vous trouvez à proximité de cet appareil.
N’utilisez JAMAIS de lunettes de sécurité ou de lunettes
de sécurité pour condition sèche au lieu de lunettes de
sécurité à aération indirecte.
Articles fournis:
Manuel de l’utilisateur et manuel de
l’utilisateur du moteur (Non montré)
Ajout de l’huile à moteur et de l’essence
AVIS Avant de démarrer le moteur, vérifiez le niveau d’huile et assurez-vous que
le moteur a subi l’entretien décrit dans le manuel de l’opérateur.
AVIS N’utilisez PAS de l’essence E85.
AVIS NE mélangez PAS l’huile à l’essence.
1. Déplacez le nettoyeur à haute pression à l’extérieur vers une surface plane.
2. Nettoyez la surface autour de l’orifice de remplissage d’huile et enlevez la bouchon/
jauge d’huile
( ).
7
3. À l’aide d’un entonnoir pour huile (optionnel), versez lentement le contenu
complet de la bouteille d’huile (18 oz) fournie dans l’orifice de remplissage
du moteur.
4. Replacez le bouchon/jauge de remplissage d’huile et serrez-le solidement.
5. Nettoyez la partie autour du bouchon du réservoir d’essence ( ), enlevez
le bouchon.
7
6. Ajoutez de l’essence SANS PLOMB fraîche et propre. Laissez de l’espace
dans le réservoir d’essence pour l’expansion de l’essence.
7. Replacez le bouchon à essence. Laissez l’essence déversée s’évaporer avant
de démarrer le moteur.
Déplacement du nettoyeur à haute pression vers
un emplacement sécuritaire
AVERTISSEMENT Le moteur, lorsqu’il fonctionne, produit du
monoxyde de carbone, un gaz toxique inodore et incolore.
L’inhalation du monoxyde de carbone peut entraîner la mort,
des blessures graves, des nausées et l’évanouissement.
Faites fonctionner cet appareil UNIQUEMENT à l’extérieur. NE faites
PAS fonctionner ce produit à l’intérieur d’un bâtiment ou dans un lieu
clos, même si les fenêtres et les portes sont ouvertes.
1. Déplacez le nettoyeur à haute pression à l’extérieur vers une surface plane.
2. Les moteurs en marche dégagent du monoxyde de carbone. Afin de réduire
le risque d’allumage de la chaleur et des gaz d’échappement aux environs de
matériau combustible, laissez un dégagement d’au moins 1.5 m (5 pi) tout
autour du nettoyeur à haute pression, y compris au-dessus.
8
Branchement du pistolet de pulvérisation
AVIS Enlevez et jetez les bouchons d’expédition de la sortie haute pression de la
pompe et de l’admission de l’eau avant de brancher les boyaux.
1. Déroulez le tuyau à haute pression (T) et fixez le à la base du pistolet
pulvérisation (U). Serrez manuellement.
2. Fixez l’autre extrémité du tuyau à haute pression (T) à la prise haute pression
(V) sur la pompe. Serrez à la main.
9
10
7
8
Orifice d’échappement
Pointé loin des
ouvertures de la bâtisse
9
U
10
V
11
T
T
Articles Requis :
• Couteau tout usage • De l’essence sans plomb • Lunettes de sécurité à aération indirecte • Tuyau d’arrosage, 15 m (50 pieds) ou moins
Déballage du nettoyeur á haute pression
1
1. Enlevez tous les composants de la boîte d’expédition à l’exception du
nettoyeur à haute pression.
A
B
2. Ouvrez la boîte d’expédition en coupant tous les coins du haut vers le bas.
3. Vérifiez que tous les articles fournis sont présents avant de débuter le
montage. Si des articles sont manquants ou endommagés, ne retournez pas
au magasin, appelez au 1-800-222-3136.
4. Avant le montage, lubrifiez les connexions de joints toriques tel que décrit
dans le manuel d’utilisation.
Assembler du nettoyeur á haute pression
2
C
1. Placez l’assemblage de la poignée (A) sur le support de la poignée relié à
D
l’unité principale. Assurez-vous que les trous de la poignée sont alignés avec
ceux du support.
1
E
2. Insérez les boulons de carrosserie de poignée (B) dans les trous à l’intérieur
de l’unité, puis fixez un bouton en plastique (C) depuis l’extérieur de l’unité.
Serrez à la main.
AVIS En desserrant les deux boutons de la partie médiane du boulon de
fixation, la poignée supérieure peut être pliée vers l’avant afin de la ranger sur le
moteur refroidi. NE PAS plier la poignée lorsque le moteur est chaud.
3. Insérez les sangles en caoutchouc (D) dans les rainures (E) à l’arrière du
plateau pour accessoires et serrez-les à partir de l’avant.
4. Placez le plateau pour accessoires (F) au-dessus des trous (G) de la poignée
(en regardant à partir de l’avant de l’appareil). Poussez les trois agrafes (H)
dans les trous jusqu’à ce qu’elles reposent sur le plateau pour accessoires.
5. Insérez les buses multicolores et les autres accessoires fournis dans les
espaces prévus sur le plateau pour accessoires. Consultez la manuel de
l’utilisateur section Comment utiliser le plateau pour accessoires.
1
3
2
3
H
F
G
6. Fixez le support de bouteille (J) à la poignée à l’aide d’un boulon de
carrosserie (K) et d’un bouton en plastique noir (L). Serrez à la main.
4
4
Fixez le tube de siphonnement du détergent
PerfectMix™ à la pompe et à la bouteille de
K
concentré
1. Placez la bouteille PerfectMix™ (P) (non fournie) sur le support de la pièce en
broche de la poignée. Enlevez le bouchon de la bouteille et insérez le tube de
siphonnement du détergent PerfectMix™ (M). Vissez le tube de siphonnement
du détergent à la partie supérieure de la bouteille. Alors que la bouteille de
concentré n’est pas dans le tube de siphonnement du détergent, placez une
attache sur le capuchon (Q) pour fixer le tube de siphonnement du détergent
au support de la pièce en broche.
5
2. Fixez l’extrémité du boyau du siphonnement de détergent PerfectMix™ bleu
(R) aux raccords du boyau à barbelure (S) sur la pompe.
6
J
5
M
P
Q
6
R
S
Raccordement de l’alimentation en eau
1. Avant de brancher votre tuyau d’arrosage à la prise d’eau, inspectez la fi ltre
intégré (W).
AVIS Si la crépine d’entrée d’eau est endommagée ou anquante, N’utilisez PAS
le nettoyeur à haute pression, appelez au
11
1-800-222-3136.
2. Nettoyez la fi ltre intégré si elle contient des débris, remplacez-la si elle est
endommagée.
3. Faites circuler de l’eau froide dans le tuyau d’arrosage pendant 30 secondes
pour y déloger tous débris. Le tuyau d’arrosage ne doit pas excéder 15 m
(50 pieds). Fermez l’alimentation en eau et connectez le tuyau d’arrosage
(X) à l’entrée d’eau (Y). Serrez à la main.
11
Y
12
Z
W
X
Démarrage du nettoyeur à haute pression
AVIS Vous DEVEZ connecter et ouvrir au maximum l’alimentation en eau avant
de faire démarrer le moteur.
1. Portez des lunettes de sécurité.
2. Ouvrez l’alimentation d’eau.
AVERTISSEMENT Risque de blessure aux yeux. Le jet peut
rejaillir sur vous ou propulser des objets et entraîner des
blessures graves. Portez toujours des lunettes de sécurité à
aération indirecte (contre les produits chimiques) spécifiées
conformes à ANSI Z87.1 lorsque vous utilisez ou que vous vous
trouvez à proximité de cet appareil. N’utilisez JAMAIS de lunettes de
sécurité ou de lunettes de sécurité pour condition sèche au lieu de
lunettes de sécurité à aération indirecte.
C
3. Appuyez sur le verrou de la détente (bouton rouge) (Z) du pistolet de
pulvérisation et tirez sur la détente jusqu’à ce que l’eau sorte en jet uniforme.
4. Fixez la rallonge du buse (AA) au pistolet pulvérisateur (U). Serrez
manuellement.
13
5. Choisissez la buse (CC) que vous voulez utiliser, tirez la bague de la rallonge
du buse (BB), insérez la buse, puis relâchez la bague. Vérifiez si la buse est
correctement installée en tirant dessus.
6. Déplacez le levier d’essence (T) sur « ON ».
7. Déplacez le levier d’étrangleur (U) à la position « CLOSED ».
8. Déplacez le l’interrupteur du moteur ON/OFF (V) sur « ON ».
14
15
16
16
AVERTISSEMENT Un effet de recul (rétroaction rapide) de la corde
du démarreur tirera votre main et votre bras vers le moteur
plus rapidement que vous ne pouvez relâcher la corde; ce
qui pourrait causer des fractures, des ecchymoses ou des
entorses risquant d’entraîner des blessures graves. NE tirez JAMAIS sur
la corde du démarreur sans avoir d’abord libéré la pression du pistolet
de pulvérisation. Tirez lentement sur la corde du démarreur jusqu’à
ce que vous sentiez une résistance, puis tirez rapidement. Lorsque
vous utilisez une vaporisation à haute pression, saisissez fermement le
pistolet de vaporisation avec les deux mains afin d’éviter les risques de
blessures entraînés par les effets de recul.
9. Lors du démarrage du moteur, placez-vous tel que recommandé. Saisissez
la poignée du démarreur et tirez lentement jusqu’à ce que vous sentiez de la
résistance. Tirez alors rapidement pour démarrer le moteur.
17
10. Ramenez la poignée du démarreur lentement. NE laissez PAS le cordon se
frapper contre le démarreur.
L
11. Si le moteur démarre mais cesse de fonctionner, relâchez le verrou de la
détente (bouton rouge). Dirigez toujours le pistolet de pulvérisation vers un
endroit sécuritaire et appuyez sur la détente pour libérer la haute pression
d’eau retenue.
12. Lorsque le moteur est démarré, déplacez lentement le levier d’étrangleur
vers la position « OPEN » pendant le moteur se réchauffe. Si le moteur
hésite, déplacez le levier d’étrangleur à la position « CLOSED », puis revenez
à la position « OPEN ».
13. Pointez le pistolet vers une surface devant être nettoyée. Appuyez sur le
bouton rouge et tirez sur la détente pour commencer la pulvérisation.
13
U
AA
14
CC
BB
12
15
T
16
V
U
OFF
ON
Closed
17
Arrêt du nettoyeur à haute pression
1. Relâchez la détente du pistolet de pulvérisation et laissez le moteur tourner
au ralenti durant deux minutes.
2. Déplacez le l’interrupteur du moteur ON/OFF (V) sur « OFF ».
3. Déplacez le levier d’essence (T) sur « OFF ».
15
4. Fermez l’eau.
5. Relâchez le verrou de la détente (bouton rouge). Dirigez toujours le pistolet
de pulvérisation vers un endroit sécuritaire et appuyez sur la détente pour
libérer la haute pression d’eau retenue.
6. Déconnectez le tuyau d’arrosage de la pompe.
7. Déconnectez le boyau à haute pression de la pompe ainsi que le pistolet
pour les entreposer. Reportez-vous à « Préparation de l’appareil pour
l’entreposage » de la section Entretien du Manuel de l’opérateur au sujet de
l’entreposage à long terme.
8. Enlevez les lunettes de sécurité.
16
© 2012 Tous droits réservés. Tout a été fait pour s’assurer que les renseignements contenus dans ce document soient exacts et à jour. Toutefois, nous nous réservons le droit de changer, de modifier ou d’améliorer le produit et ce document en tout temps, et ce, sans préavis.
*Les caractéristiques nominales de ce nettoyeur à haute pression sont conformes à la norme PW101-2010 de la Pressure Washer Manufacturer’s Association (PWMA) (Tests et performance nominale des nettoyeurs à haute pression).
317558, Rev -
 Loading...