

Page 1

Operator’s Manual
Form No. 90528394 NOV. ‘08 Printed in China
CAUTION:
Before using this product,
read this manual and follow
all its Safety Rules and
Operating Instructions.
HEDGE TRIMMER
Sears, Roebuck and Co., Hoffman Estates, IL 60179 USA
www.sears.com/craftsman
• Safety
• Operation
• Maintenance
• Español, 10
• Français, 17
U.S.A. Models 900.79441, 900.79442
Canada Models C935.51890, C935.51891
Page 2

2
TO REDUCE RISK OF INJURY:
• Before any use, be sure everyone using
this tool reads and understands all safety
instructions and other information
contained in this manual.
• Save these instructions and review
frequently prior to use and in instructing
others.
WARNING: When using electric
gardening appliances, basic safety
precautions should always be followed to
reduce risk of fire, electric shock, and
personal injury, including the following:
READ ALL INSTRUCTIONS.
CRAFTSMAN TWO YEAR FULL WARRANTY
If this Craftsman product fails due to a defect in material or workmanship within two
years from the date of purchase, return it to any Sears store or other Craftsman outlet
in the United States for free replacement.
This warranty applies for only 90 days if this product is ever used for commercial or
rental purposes.
This warranty gives you specific legal rights, and you may also have other rights which
vary from state to state.
Sears, Roebuck and Co., Hoffman Estates, IL 61079
HEDGE TRIMMER DIAGRAM
SEARS WARRANTY
WARNING: IMPORTANT SAFETY WARNINGS AND
INSTRUCTIONS
Bail Handle
Lock Button
Cord Retainer
Blade Guard
Trigger
SPECIFIC SAFETY WARNING
WARNING: Some dust created by this
product contains chemicals known to the
State of California to cause cancer, birth
defects or other reproductive harm.
Some examples of these chemicals are:
• compounds in fertilizers
• compounds in insecticides,
herbicides and pesticides
• arsenic and chromium from
chemically treated lumber
To reduce your exposure to these
chemicals, wear approved safety
equipment such as dust masks that are
specially designed to filter out
microscopic particles.
SAVE THESE INSTRUCTIONS
FOR FUTURE USE
Page 3

• AVOID DANGEROUS ENVIRONMENT
- Don’t use hedge trimmers in damp or
wet locations.
• DON’T USE IN RAIN.
• KEEP CHILDREN AWAY - All visitors
should be kept at a safe distance from
the work area.
• DRESS PROPERLY - Don’t wear loose
clothing or jewelry. They can be caught
in moving parts. Use of rubber gloves
and substantial footwear is
recommended when working outdoors.
Wear protective hair covering to contain
long hair.
• USE SAFETY GLASSES - Also use face
or dust mask if operation is dusty.
• GROUND FAULT CIRCUIT
INTERRUPTER (GFCI) protection
should be provided on the circuit(s) or
outlet(s) to be used for the hedge
trimmer. Receptacles are available
having built-in GFCI protection and may
be used for this measure of safety.
• USE RIGHT APPLIANCE - Do not use
appliance for any job except that for
which it is intended.
WARNING: To reduce the risk of electric
shock use only with an extension cord
intended for outdoor use, such as SW-A,
S0W-A, STW-A, STOW-A, SJW-A,
SJOW-A, SJTW-A or SJTOW-A.
• EXTENSION CORD. Make sure your
extension cord is in good condition.
When using an extension cord be sure it
is heavy enough to carry the current
your product will draw. An undersized
extension cord will cause a drop in line
voltage resulting in loss of power and
overheating. The following table shows
the correct size to use depending on
cord length and nameplate ampere
rating. If in doubt, use the next heavier
gage. The smaller the gage number, the
heavier the cord.
• AVOID UNINTENTIONAL STARTING -
Don’t carry plugged in hedge trimmer
with finger on switch. Be sure switch is
off when plugging in.
• DON’T ABUSE CORD - Never carry
hedge trimmer by cord or yank it to
disconnect from receptacle. Keep cord
from heat, oil, and sharp edges.
• DO NOT ATTEMPT to remove cut
material or hold material to be cut when
blades are moving. Make sure trimmer
switch is off when clearing jammed
material from blades. Do not grasp the
exposed cutting blades or cutting edges
when picking up or holding the hedge
trimmer.
CAUTION: Blades coast after turn off.
• DON’T FORCE HEDGE TRIMMER - It
will do the job better and with less
likelihood of a risk of injury at the rate for
which it was designed.
• DON’T OVERREACH
--
Keep proper
footing and balance at all times.
• STAY ALERT - Watch what you are
doing. Use common sense. Do not
operate hedge trimmer when you are
tired.
• DISCONNECT HEDGE TRIMMER from
the power supply when not in use or
when servicing or cleaning.
• STORE IDLE HEDGE TRIMMER
INDOORS - When not in use, hedge
trimmer should be stored indoors in a
dry and high or locked-up place- out of
reach of children.
• MAINTAIN HEDGE TRIMMER WITH
CARE - Keep cutting blades sharp and
clean for best performance and to
reduce the risk of injury. Inspect
extension cord periodically and replace if
damaged. Keep handles dry, clean and
free from oil and grease.
3
GENERAL SAFETY WARNINGS AND INSTRUCTIONS FOR
ALL TOOLS
Minimum Gage for Extension Cords (AWG) 120
VAC Tools
Total Cord Length 0-25 26-50 51-100 105-150
Amp Rating AWG AWG AWG AWG
More than 0 18 16 16 14
Not More than 6
More than 6 18 16 14 12
Not More than 10
More than 10 16 16 14 12
Not more than 12
More than 12 14 12 Not
Not more than 16 Recommended
Page 4

4
To reduce the risk of electric shock, this
equipment has a polarized plug (one
blade is wider than the other). This
equipment must be used with a suitable
polarized 2 wire or 3 wire extension cord.
Polarized connections will fit together
only one way. Make sure that the
receptacle end of the extension cord has
large and small blade slot widths. If the
plug does not fit fully into the extension
cord, reverse the plug. If it still does not
fit, obtain a suitable extension cord. If the
extension cord does not fit fully into the
outlet, contact a qualified electrician to
install the proper outlet. Do not change
the tool plug or extension cord in any way.
SAFETY WARNINGS AND INSTRUCTIONS:
POLARIZED PLUGS
ASSEMBLY TOOLS REQUIRED (NOT
SUPPLIED):
- Phillips Screwdriver
ATTACHING BAIL HANDLE TO
TRIMMER
The trimmer is shipped with the bail handle
tied to the trimmer. To attach the bail
handle:
• Cut the zip tie which holds the handle to
the trimmer.
• Remove the phillips head screws from
both sides of the trimmer housing or from
the carton.
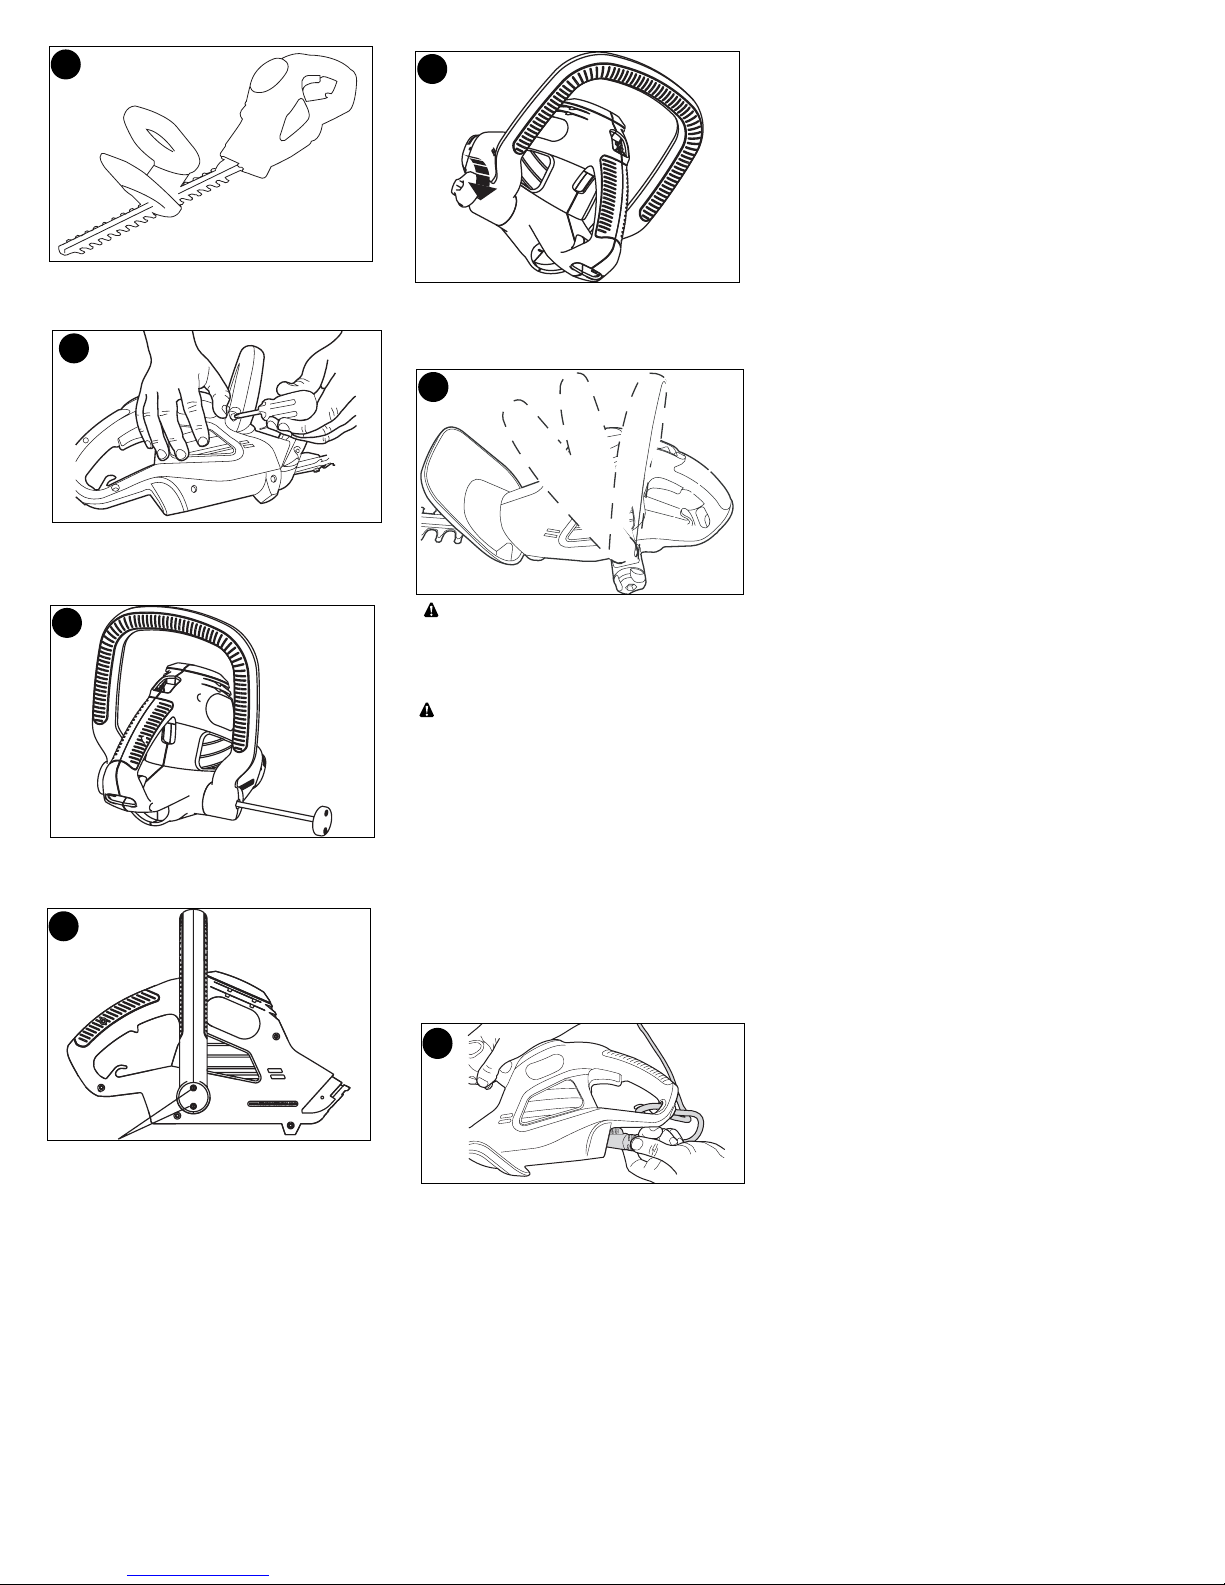
• For catalog numbers (79441, 51890)
position the handle/barrier assembly in
place by sliding it over the blade as
shown in figure 1. Push the handle up
onto the housing and click it into place as
shown in figure 2.
ASSEMBLY INSTRUCTIONS
1
• CHECK DAMAGED PARTS - before
further use of the hedge trimmer, a guard
or other part that is damaged should be
carefully checked to determine that it will
operate properly and perform its intended
function. Check for alignment of moving
parts, binding of moving parts, breakage
of parts, mounting and any other
condition that may affect its operation. A
guard or other part that is damaged
should be properly repaired or replaced
by an authorized service center unless
otherwise indicated elsewhere in this
manual.
DANGER: Laceration hazard. Keep
hands away from blades. Keep both
hands on handles when power is on.
CAUTION: Laceration hazard. Blades
coast after turn off.
SAFETY WARNINGS: DOUBLE INSULATION
Double insulated tools are constructed
throughout with two separate layers of
electrical insulation or one double
thickness of insulation between you and
the tool’s electrical system. Tools built
with this insulation system are not
intended to be grounded. As a result,
your tool is equipped with a two prong
plug which permits you to use extension
cords without concern for maintaining a
ground connection.
NOTE: Double insulation does not take
the place of normal safety precautions
when operating this tool. The insulation
system is for added protection against
injury resulting from a possible electrical
insulation failure within the tool.
Replacement parts: When servicing all
tools, USE IDENTICAL REPLACEMENT
PAR TS. Repair or replace damaged
cords.
Page 5
5
3
7
8
2
4
5
6
• Insert the phillips head screws into the
openings on both sides of the handle
and tighten securely (do not over
tighten) as shown in figure 3.
• For catalog number (79442, 51891)
attach the handle and insert the
threaded screw through the handle and
housing as shown in figure 4.
• Insert the two screws into the holes
shown in figure 5 and screw down. Do
not over tighten.
• Screw on the plastic knob to tighten
handle to unit (figure 6).
NOTE: The handle on the 79442, 51891 is
adjustable to three different positions as
shown figure 7. To move handle, unscrew
plastic knob, position handle as desired
and retighten knob.
WARNING: DO NOT OPERATE THE
HEDGE TRIMMER WITHOUT THE BAIL
HANDLE ATTACHED.
ATTACHING EXTENSION CORD TO
TRIMMER
WARNING: BE SURE HEDGE
TRIMMER IS NOT LOCKED ON.
An extension cord retainer is built into the
switch handle that prevents the tool from
coming unplugged. To use this feature,
simply double the extension cord about 8
inches (203 mm) from the end, and insert
it into the slot in the bottom of the handle
area. Hook the loop formed by doubling
the cord over the tab, as shown in figure
8. Gently tug on the cord to insure that it
is firmly retained in the trimmer’s handle.
Plug the receptacle end of the extension
cord into the plug blades in the trimmer
(figure 8).
SAVE THESE INSTRUCTIONS
FOR FUTURE USE.
Page 6

6
OPERATING INSTRUCTIONS
9
Lock Button
Trigger
10
11
12
TO TURN THE TOOL ON
Pull the LOCK BUTTON back with your
thumb and then squeeze the TRIGGER
with your fingers as shown in Figure 9.
(Once the tool is running you can
release the LOCK BUTTON.) To turn
the tool OFF, release the TRIGGER.
TO LOCK THE TOOL ON FOR
CONTINUOUS RUN
WITH THE TOOL RUNNING
, pull the
LOCK BUTTON ALL THE WAYback,
release the TRIGGER, then release the
LOCK BUTTON. The tool is now locked
ON. To turn the tool OFF, squeeze and
release the TRIGGER. NOTE: In order
to lock the tool on, it is important to first
release the trigger and then release the
lock button.
TRIMMING INSTRUCTIONS
1. EXTENSION CORD – (Figure 8 &
10) Always keep extension cord
behind trimmer and away from the
trimming operation. Never drape it
over a hedge being trimmed. If you
cut or damage the cord, unplug it at
the electrical outlet immediately,
before inspecting or repairing cord.
4. WORKING POSITION – (Figure 10)
Maintain proper footing and balance
and do not overreach. Wear safety
goggles, non-skid footwear and
rubber gloves when trimming. Hold
the tool firmly in both hands and turn
the tool ON. Always hold the trimmer,
with one hand on the switch handle
and one hand on the bail handle.
Never hold the tool by the blade guard.
3. TRIMMING NEW GROWTH -
(Figure 11) – A wide, sweeping motion,
feeding the blade teeth through the
twigs is most effective. A slight
downward tilt of the blade, in the
direction of motion gives the best
cutting.
CAUTION: Do not use the trimmer for
cutting stems greater than its capacity.
Use the trimmer only for cutting normal
shrubbery found around houses and
buildings.
79441, 51890 5/8 in. (8mm)
79442, 51891 5/8 in. (8mm)
4. LEVEL HEDGES (Figure 12) – To
obtain exceptionally level hedges, a
piece of string can be stretched along
the length of the hedge as a guide.
Page 7
With the unit unplugged, use only mild
soap and a damp cloth to clean the tool.
Never let any liquid get inside the tool;
never immerse any part of the tool into a
liquid.
IMPORTANT: To assure product SAFETY
and RELIABILITY, repairs, maintenance
and adjustment should be performed by
Sears service centers or other qualified
service personnel, always using identical
replacement parts.
WARNING: DO NOT use the hedge
trimmer with any type of accessory or
attachment. Such usage might be
hazardous.
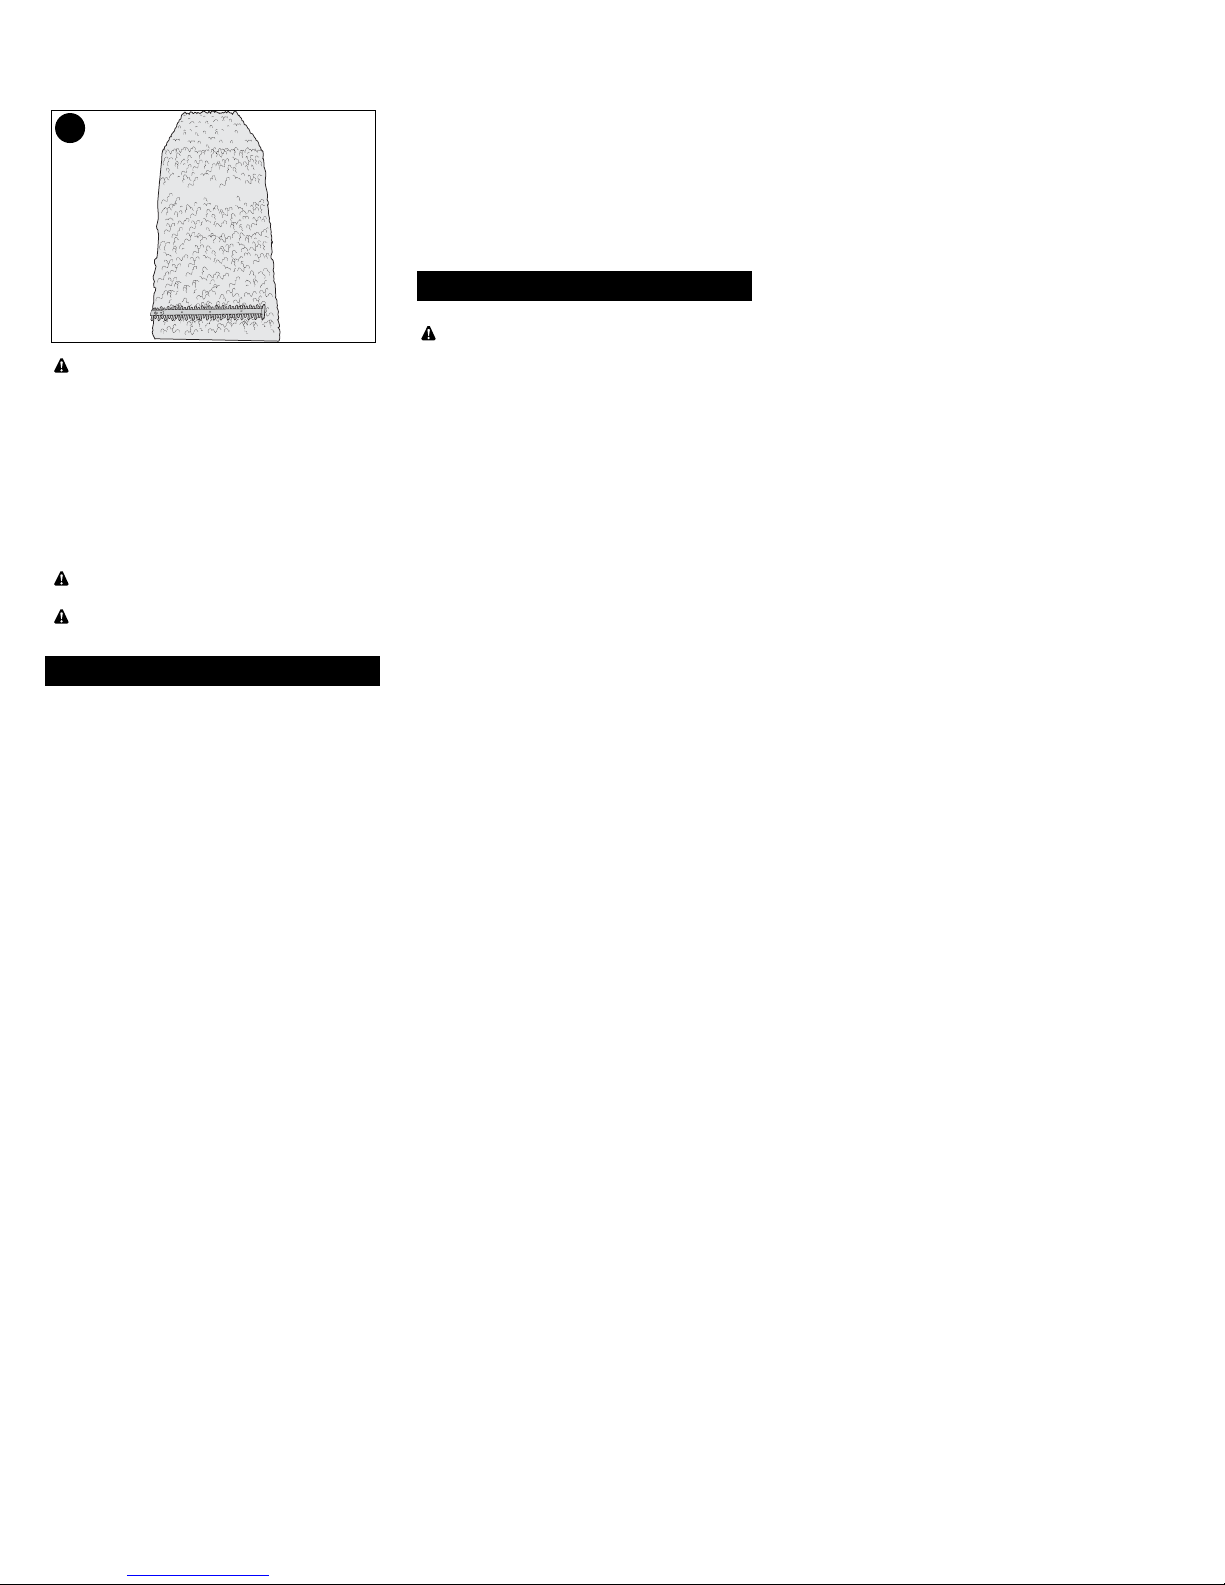
5. SIDE-TRIMMING HEDGES -
(Figure 13)
Begin at the bottom and sweep up.
WARNING
: To guard against injury
observe the following:
• Read instruction manual before using,
Save instruction manual.
• Keep hands on handles. Don’t overreach.
• Do not use under wet conditions.
• Do not use with damaged extension
cords.
• Do not unplug or store with switch
locked on.
DANGER: KEEP HANDS AWAY
FROM BLADES.
CAUTION: BLADE COASTS AFTER
TURN OFF.
The cutting blades are made from high
quality, hardened steel and with normal
usage, they will not require resharpening.
However, if you accidentally hit a wire
fence, stones, glass or other hard objects,
you may put a nick in the blade. There is
no need to remove this nick as long as it
does not interfere with the movement of
the blade. If it does interfere, unplug unit
and while wearing proper eye protection
use a fine toothed file or sharpening stone
to remove the nick.
If you drop the trimmer, carefully inspect it
for damage. If the blade is bent, housing
cracked, or handles broken or if you see
any other condition that may affect the
trimmer’s operation, contact your local
Sears Service Center for repairs before
putting it back into use.
Fertilizers and other garden chemicals
contain agents which greatly accelerate
the corrosion of metals. Do not store the
tool on or adjacent to fertilizers or
chemicals.
13
7
MAINTENANCE
ACCESSORIES
Page 8

8
NEED MORE HELP?
You’ll find the answer and more on managemyhome.com – for free!
Find this and all your other product manuals online.
Get answers from our team of home experts.
Get a personalized maintenance plan for your home.
Find information and tools to help with home projects.
Page 9

9
Parts page
Page 10

10
PARA REDUCIR EL RIESGO DE
LESIONES:
• Antes de cualquier uso, asegúrese que
cualquier persona que vaya a utilizar esta
herramienta lea y comprenda todas las
instrucciones de seguridad y la
información contenida en este manual.
• Conserve estas instrucciones y repáselas
con frecuencia antes de usar la
herramienta e instruir a otras personas.
ADVERTENCIA: Siempre que utilice
herramientas eléctricas de jardina debe
seguir ciertas precauciones básicas de
seguridad, a fin de reducir los riesgos de
incendio, choque eléctrico y lesiones
personales, entre las que se encuentran
las siguientes.
LEA TODAS LAS
INSTRUCCIONES.
GARANTIA SEARS
DIAGRAMA DEL CORTACERCO
ADVERTENCIA: ADVERTENCIAS E INSTRUCCIONES IMPORTANTES DE SEGURIDAD
Estribo de suspensión
Botón de seguridad
Retenedor
del cable de
extensión
Protector
de la hoja
Interruptor de
gatillo
DOS AÑOS DE GARANTÍA COMPLETA PARA LAS HERRAMIENTAS CRAFTSMAN
Si esta herramienta Craftsman falla debido a defectos en el material o en la fabricación
dentro del dos años de la fecha de compra, devuélvala a cualquier tienda Sears u otro
punto de venta de productos Craftsman en Estados Unidos para recibir gratis una
herramienta de reemplazo.
Esta garantía se aplica solo por 90 días si este producto se utiliza con fines
comerciales o de alquiler.
Esta garantía le concede derechos legales específicos; pueden existir otros derechos
que varían según el estado.
Sears, Roebuck and Co., Hoffman Estates, IL 60179
ADVERTENCIA DE SEGURIDAD ESPECIFICA
ADVERTENCIA: Parte del polvo
originado por este producto contiene
químicos que en el Estado de
California se consideran como
causantes de cáncer, defectos
congénitos u otros daños
reproductivos. Algunos ejemplos de
estos químicos son:
• compuestos en fertilizantes
• compuestos en insecticidas,
herbicidas y pesticidas
• arsénico y cromo de madera tratada
químicamente
Para reducir su exposición a estos
químicos, utilice equipo de seguridad
aprobado como máscaras contra polvo
diseñadas específicamente para filtrar
partículas microscópicas.
CONSERVE ESTE MANUAL
PARA FUTURAS
CONSULTAS.
Page 11

• EVITE AMBIENTES PELIGROSOS —
No utilice podadoras de setos en lugares
mojados o inundados.
• NO SE USE BAJO LA LLUVIA.
• CONSERVE ALEJADOS A LOS
NIÑOS. Todos los visitantes deben estar
a distancia segura de la zona de trabajo.
• VISTASE DE MANERA ADECUADA —
No utilice ropas sueltas ni joyas, pueden
quedar atrapadas en las partes móviles.
Se recomienda el uso de guantes y
calzado antiderrapante cuando trabaje a
la intemperie. Cúbrase el cabello si lo
tiene largo.
• UTILICE GAFAS DE SEGURIDAD —
También utilice una mascarilla contra
polvo si la operación que efectuará lo
produce.
• INTERRUPTOR DE CIRCUITO PARA
FALLAS EN LA TIERRA (GFCI) Se
debe proporcionar protección a los
circuitos o clavijas que se usarán con la
podadora de setos. Existen contactos
con protección GFCI integrada y se
pueden utilizar para esta medida de
seguridad.
• USE EL APARATO PROPIADAMENTE.
No utilice el aparato para ningún trabajo
para el que no ha sido diseñado.
ADVERTENCIA: Para reducir el riesgo
de choque eléctrico, utilícese solamente
con cables de extensión para
intemperie, como los siguientes: SW-A,
SOW-A, STW-A, STOW-A, SJW-A,
SJOW-A, SJTW-A o SJTOW-A.
• CORDONES DE EXTENSION.
Asegúrese que su extensión esté en
buenas condiciones. Cuando utilice una
extensión, asegúrese que tenga el
calibre suficiente para conducir la
corriente que su herramienta necesita.
extensión con calibre menor al
necesario causará una caída en el
voltaje de la línea, resultando en pérdida
de potencia y sobrecalentamiento. La
tabla siguiente muestra el calibre
correcto para usarse, de acuerdo con la
longitud de la extensión y el amperaje en
la placa de identificación. Si tiene dudas,
utilice el calibre siguiente. Mientras
menor sea el número del calibre, mayor
será la capacidad del cable. Sears pone
a su disposición extensiones aterrizadas
de 3 conductores para utilizarse con
aparatos para la intemperie.
• EVITE EL ENCENDIDO ACCIDENTAL
No cargue la podadora conectada con el
dedo en el interruptor. Asegúrese que el
interruptor esté en posición de apagado
antes de conectarla.
• NO MALTRATE EL CORDON
ELECTRICO. Nunca cargue la
podadora por el cable ni tire de éste para
desconectarlo de la toma de corriente.
Aléjelo de calor, aceite y bordes afilados.
• NO INTENTE quitar material cortado ni
sujetar el material que vaya a cortar
cuando las cuchillas estén en
movimiento. Asegúrese que el
interruptor esté en posición de apagado
antes de limpiar las cuchillas de material
atascado. No toque las cuchillas
expuestas ni los filos cuando levante o
sujete la podadora.
PRECAUCION: las cuchillas giran
después de apagar la podadora.
• NO FUERCE LA PODADORA — Hará
mejor el trabajo y con menos
probabilidades de ocasionar una lesión si
se utiliza dentro de los parámetros para
los que se diseñó.
• NO SE SOBREEXTIENDA. Siempre
conserve bien apoyados los pies, lo
mismo que el equilibrio.
• CONSERVESE ALERTA — Observe lo
que hace. Utilice el sentido común. No
opere la herramienta si se encuentra
cansado.
• DESCONECTE LA PODADORA de la
toma de corriente cuando no la use o
cuando le vaya a efectuar servicio.
• GUARDE BAJO TECHO LA
PODADORA CUANDO NO LA
EMPLEE — Cuando no se emplee, la
podadora debe permanecer guardada
en un lugar seco y elevado o bajo llave,
fuera del alcance de los niños.
• CUIDE LA PODADORA. Conserve las
cuchillas afiladas y limpias para obtener
mejores resultados y para reducir el
riesgo de lesiones. Revise las
extensiones periódicamente y cámbielas
11
Calibre mínimo para cordones de extensión
(AWG) 120 V ca herramientas
Longitud total en metros 0-7.62 -15.24 -30.48 -45.72
AMPERAJE AWG AWG AWG AWG
Más de 018 16 16 14
No más de 6
Más de 618 16 14 12
No más de 10
Más de 10 16 16 14 12
No más de 12
Más de 12 14 12 No
No más de 16 Recomendado
ADVERTENCIAS E INSTRUCCIONES DE SEGURIDAD PARA TODAS LAS HERRAMIENTAS
Page 12

12
si están dañadas. Conserve los mangos
secos, limpios y libres de aceite y grasa.
• REVISE LAS PARTES DAÑADAS —
Antes de seguir utilizando la podadora,
una guarda u otras partes que se
encuentren dañadas deben ser
cuidadosamente revisadas para
determinar si cumplen con su función.
Revise la alineación de las piezas
móviles, sus uniones, verifique que no
haya fracturas en las piezas o sus
montajes ni cualquier otra condición que
pueda afectar su operación. Una guarda
u otra parte dañadas deben ser
reparadas apropiadamente o
reemplazadas en un centro de servicio
autorizado a menos que se indique lo
contrario en el manual.
PELIGRO: Peligro de laceración.
Mantenga las manos lejos de las hojas.
Mantenga ambas manos en los mangos
cuando la podadora esté encendida.
PRECAUCIÓN: Peligro de
laceración. Al apagar la herramienta,
las hojas continúan en movimiento por
inercia.
ADVERTENCIAS E INSTRUCCIONES DE SEGURIDAD: DOBLE AISLAMIENTO
ADVERTENCIAS E INSTRUCCIONES DE SEGURIDAD: CLAVIJAS POLARIZADAS
Las herramientas con doble aislamiento
están construidas con dos capas
separadas de aislamiento eléctrico o una
capa de espesor doble entre usted y el
sistema eléctrico de la herramienta. Las
herramientas con doble aislamiento no
necesitan conectarse a tierra. Como
resultado, su herramienta está equipada
con una clavija de dos patas que le
permite utilizar extensiones sin
preocuparse por tener una conexión a
tierra.
NOTA: El doble aislamiento no
reemplaza las precauciones normales de
seguridad cuando se opere la
herramienta. El sistema de aislamiento le
proporciona protección añadida contra
las lesiones resultantes de posibles fallas
en el aislamiento eléctrico de la
herramienta.
PARTES DE REPUESTO: Solamente
emplee refacciones idénticas cuando
haga servicio. Repare o reemplace los
cordones eléctricos dañados.
Este equipo cuenta con una clavija
polarizada (con una pata más ancha que
la otra) para reducir el riesgo de choque
eléctrico. El equipo debe utilizarse con
una extensión adecuada de 2 o 3 cables.
Las conexiones polarizadas solamente
ajustan de una manera. Asegúrese que
la conexión hembra de la extensión
tenga una ranura grande y una más
pequeña. Si la clavija no se ajusta
completamente a la extensión, inviértala.
Si aún así no ajusta, consiga una
extensión adecuada. Si la extensión no
se ajusta por completo a la toma de
corriente comuníquese con un
electricista calificado para que le instale
la toma de corriente adecuada. Por
ningún motivo cambie la clavija en la
herramienta o en la extensión de
ninguna manera.
Page 13

13
HERRAMIENTAS NECESARIAS PARA
EL MONTAJE (NO INCLUIDAS):
- Destornillador Phillips
CÓMO COLOCAR EL ESTRIBO DE
SUSPENSIÓN A LA PODADORA
La podadora se envía con el estribo de
suspensión atado a ella. Para colocar el
estribo de suspensión:
• Corte la abrazadera plástica que sujeta
el estribo a la podadora.
• Retire los tornillos Phillips de ambos
lados de la cubierta de la podadora o de
la caja.
• Para los números de catálogo 79441,
51890: coloque el ensamblaje de
mango/barrera en su lugar, deslizándolo
sobre la hoja como se muestra en la
figura 1. Empuje el mango hacia arriba
en la cubierta hasta que encaje en su
lugar como se muestra en la figura 2.
• Inserte los tornillos Phillips en los
orificios que se encuentran en ambos
lados del estribo y ajuste bien (no ajuste
demasiado), como se muestra en la
figura 3.
• Para el número de catálogo (79442,
51891) coloque el mango e inserte el
tornillo roscado a través del mango y de
la cubierta, como se muestra en la figura
4.
• Inserte los dos tornillos dentro de los
orificios, como se muestra en la figura
5, y ajústelos. No ajuste en exceso.
• Enrosque la perilla de plástico para
ajustar el mango a la unidad (figura 6).
1
3
INSTRUCCIONES PARA EL MONTAJE
4
5
6
2
Page 14

14
El mango del interruptor tiene
incorporado un retenedor para el cable
de extensión, lo cual evita que la
herramienta se desenchufe. Para usar
este dispositivo, simplemente doble el
cable de extensión a unas 8 pulgadas de
su extremo, e insértelo en la abertura
que está en la parte inferior del área del
mango. Enganche el lazo que se formó,
doblando el cable sobre la lengüeta
según se ilustra en las Figura 8. Tire
suavemente del cable para verificar que
está firmemente retenido en el mango
del cortacerco. Enchufe el receptáculo
del cable de extensión en las clavijas del
cortacerco (Figura 8).
GUARDE ESTAS INSTRUCCIONES
PARA USO FUTURO
.
PARA PRENDER LA HERRAMIENTA
Tire el BOTÓN DE SEGURIDAD hacia
atrás con el pulgar y luego apriete el
INTERRUPTOR DE GATILLO con los
dedos como se demuestra en la
Figura 9.
(Una vez que la herramienta está
funcionando, ya puede liberar el BOTÓN
DE SEGURIDAD.) Para APAGAR la
herramienta, suelte el interruptor de
gatillo.
9
Botón de seguridad
Interruptor de Gatillo
8
NOTA: El mango en el modelo 79442,
51891 se ajusta en tres posiciones
diferentes, según se muestra en la
figura 7. Para mover el mango,
desenrosque la perilla de plástico,
coloque el mango en la posición
deseada y vuelva a ajustar la perilla.
ADVERTENCIA: NO OPERE EL
CORTASETOS SIN EL ESTRIBO DE
SUSPENSIÓN COLOCADO.
CONEXIÓN DEL CABLE DE
EXTENSIÓN AL CORTACERCO
ADVERTENCIA: ASEGÚRESE DE
QUE EL CORTASETOS NO QUEDE
BLOQUEADO EN ENCENDIDO.
INSTRUCCIONES DE OPERACION
PARA FIJAR LA HERRAMIENTA EN
PRENDIDO PARA FUNCIONAMIENTO
CONTINUO.
CON LA HERRAMIENTA
FUNCIONANDO, tire del BOTÓN DE
SEGURIDAD COMPLETAMENTE
HACIA ATRÁS, suelte el
INTERRUPTOR DE GATILLO, y luego
libere el BOTÓN DE SEGURIDAD. La
herramienta ha quedado funcionando de
manera fija. Para APAGAR la
herramienta, apriete y libere el GATILLO.
NOTA: Para que la herramienta quede
prendida en forma continua, es
importante soltar primero el interruptor de
gatillo y luego liberar el botón de
seguridad.
INSTRUCCIONES PARA
CORTAR CERCOS
1. CABLE DE EXTENSIÓN – (Figuras 8
y 10) Mantenga siempre el cable de
extensión detrás del cortacerco y alejado
de la operación de corte. No lo deje
nunca sobre un cerco que se está
cortando. Si usted corta o daña el cable,
desconéctelo del tomacorriente
inmediatamente, antes de inspeccionar o
reparar.
7
Page 15

15
2. POSICIÓN DE TRABAJO – (Figura 10)
Mantenga la pisada firme y el balance
apropiado todo el tiempo y no se
extralimite. Use protección para los
ojos, calzado protector antirresbalante
y guantes de goma mientras corta.
Mantenga la herramienta firmemente
con ambas manos y PRENDA la
herramienta. Sujete siempre el
cortacerco, con una mano sobre el
mango interruptor y una mano sobre el
asa. Nunca sujete la herramientaporel
protegehoja.
3. CORTE DE NUEVA VEGETACIÓN -
(Figura 11) – Lo más efectivo es un
movimiento de barrido amplio, con los
dientes de la hoja avanzando a través
de las ramitas. Una inclinación leve de
la hoja, en dirección del movimiento,
da el mejor resultado al cortar.
PRECAUCIÓN: No utilice la podadora
para cortar raíces que superen su
capacidad. Use la podadora solo para
cortar los arbustos comunes alrededor
de casas y edificios.
79441, 79442 5/8 pulg. (8mm)
4. CERCOS NIVELADOS (Figura 12) –
Para obtener cercos perfectamente
nivelados, se puede montar un cordel a
lo largo del cerco y usar éste como guía.
5. CORTE LATERAL (Figura 13) –
Comience por la parte inferior, y vaya
ascendiendo con movimiento de barrido.
Advertencia: Para protegerse contra
lesiones, observe lo siguiente:
• Lea el manual de instrucciones antes
de usar la podadora, conserve el
manual.
• Conserve las manos en los mangos.
no se sobre extienda.
• No se utilice en condiciones de mucha
humedad.
• No se utilice con luna extension
dañada.
• No se desconecte ni se guarde con el
interruptor asegurado en posicion de
encendido.
PELIGRO: MANTENGA LAS MANOS
ALEJADAS DE LAS HOJAS.
PRECAUCIÓN: LA CUCHILLA GIRA
DESPUES DE APAGAR LA PODADORA.
Las hojas de corte están hechas de
acero templado de gran calidad y no
requieren ser afiladas si se les da un
empleo normal. Sin embargo, si golpea
accidentalmente una cerca de alambre,
piedras, vidrios u otros objetos de dureza
similar, la hojas pueden resultar con
mellas. No hay necesidad de eliminar las
melladuras mientras no interfieran con el
movimiento de las hojas; si esto ocurre,
10
11
12
13
MANTENIMIENTO
Page 16

16
desenchufe la unidad y, utilizando
protección adecuada para los ojos,
elimine la muesca con una lima de
dientes finos o con una piedra de afilar.
Si accidentalmente suelta la podadora,
revísela con cuidado en busca de
daños. Si la hoja se dobla, se cuartea la
cubierta o se rompen el asa o la
empuñadura, o si encuentra alguna otra
condición que afecte la operación de la
podadora, póngase en contacto con su
centro de mantenimiento Sears local
antes de volver a utilizarla.
Los fertilizantes y otros productos
químicos para jardinería contienen
agentes que aceleran la corrosión en los
metales. No guarde la herramienta en
lugares adyacentes a fertilizantes u
otros productos químicos.
Con la unidad desconectada, utilice
únicamente jabón suave y un trapo
húmedo para limpiar la herramienta.
Nunca permita que se introduzcan
líquidos en la herramienta, ni sumerja
ninguna parte de ella en ningún líquido.
IMPORTANTE: Para garantizar la
SEGURIDAD y la CONFIABILIDAD del
producto, las reparaciones, el
mantenimiento y los ajustes deben ser
realizados por centros de servicio
autorizados u otras organizaciones de
servicio calificadas, que siempre utilicen
partes de repuesto idénticas.
ADVERTENCIA: El uso de cualquier
accesorio no recomendado para
emplearse con esta herramienta puede
ser peligroso.
ACCESORIOS
¿NECESITA MÁS AYUDA?
Encontrará respuestas y más en managemyhome.com en forma gratuita.
Encuentre éste y todos los otros manuales de productos en línea.
Obtenga respuestas de nuestro equipo de expertos en el hogar.
Reciba un plan de mantenimiento personalizado para su hogar.
Encuentre información y herramientas útiles para sus proyectos domésticos.
Page 17

17
LE MANUEL DE L'OPÉRATEUR
MISE EN GARDE :
S’assurer d’avoir bien lu et compris
toutes les directives contenues
dans le présent guide, y compris
les consignes de sécurité et les
modes d’emploi énumérés cidessous, avant d’utiliser l’outil.
TAILLE-HAIES
• Sécurité
• Fonctionnement
• Entretien
Sears Canada Inc., Toronto, Ontario M5B 2B8
www.sears.ca
Model 900.79441 Model 900.79442
C935.51890 C935.51891
Page 18

18
RÉDUCTION DES RISQUES DE
BLESSURES :
• Avant tout usage, s'assurer que tout
utilisateur de cet outil lise et
comprenne toutes les directives de
sécurité ainsi que l’information
comprise dans le présent manuel.
• Conserver ces directives et les
examiner fréquemment avant d’utiliser
l’appareil ou de donner des directives
aux autres.
AVERTISSEMENT : Si des outils de
jardinage sont utilisés, des précautions
de base en matière de sécurité doivent
être suivies afin de réduire le risque
d’incendie, de choc électrique et de
blessure corporelle, notamment les
suivantes :
LIRE TOUTES LES DIRECTIVES
DIAGRAMME DU TAILLE-HAIE
Poignée de manœuvre
Bouton de verrouillage
Dispositif de
retenue du cordon
Dispositif de
protection
Gâchette
GARANTIE CRAFTSMAN COMPLÈTE DE DEUX ANS
Si cet outil Craftsman ne fonctionne pas en raison de défauts de matériel ou de
fabrication, dans un délai de deux ans à compter de la date d’achat, le retourner à un
magasin Sears ou à tout autre revendeur Craftsman aux Canada pour un
remplacement sans frais.
La présente garantie ne couvre pas le fil de coupe qui est une pièce non récupérable.
À partir de la date d’achat, la présente garantie n’est valide que pour une période de
90 jours si ce produit n’est jamais utilisé à des fins commerciales ou de location.
Sears Canada Inc., Toronto, Ontario, M5B 2B8
GARANTIE SEARS
AVERTISSEMENT : AVERTISSEMENTS DE SÉCURITÉ ET
DIRECTIVES DE PREMIÈRE IMPORTANCE
CONSIGNE DE SÉCURITÉ PARTICULIÈRE
AVERTISSEMENT : Le produit génère
de la poussière qui peut renfermer des
produits chimiques. Selon l’état de la
Californie, ces produits chimiques
peuvent causer le cancer ainsi que des
malformations congénitales, et ils
présentent d’autres dangers au système
reproductif humain. Voici des exemples
de tels produits chimiques :
• les composés d’engrais;
• les composés d’insecticides,
d’herbicides et de pesticides;
• l’arsenic et le chrome provenant de
bois traité.
Afin de minimiser les risques, porter de
l’équipement de sécurité approuvé
comme des masques antipoussières
spécialement conçu pour filtrer les
particules microscopiques.
CONSERVER LES PRÉSENTES
DIRECTIVES À TITRE DE
RÉFÉRENCE
Page 19

• NE PAS UTILISER DANS UN
ENVIRONNEMENT DE TRAVAIL
DANGEREUX. Ne pas utiliser le taille-
haie dans des endroits humides ou
mouillés.
• PROTÉGER DE LA PLUIE.
• ÉLOIGNER LES ENFANTS. Tous les
visiteurs doivent être gardés à une
distance sûre de l’aire de travail.
• PORTER DES VÊTEMENTS
APPROPRIÉS. Éviter de porter des
vêtements amples et des bijoux qui
peuvent être happés par les pièces en
mouvement. Porter des gants de
caoutchouc et des chaussures à
semelle antidérapante pour travailler à
l’extérieur. Protéger la chevelure si elle
est longue.
• TOUJOURS PORTER DES LUNETTES
DE SÉCURITÉ. Il faut également porter
un masque respiratoire si le travail
produit de la poussière.
• Il faut installer un DISJONCTEUR
DIFFÉRENTIEL sur le ou les circuits ou
prises utilisés pour alimenter le taillehaie. Il existe des prises à disjoncteur
différentiel intégré et on peut s’en servir
par mesure de sécurité.
• UTILISER L’OUTIL APPROPRIÉ. –
Utiliser l’outil seulement aux fins pour
lesquelles il a été conçu.
AVERTISSEMENT : Afin de prévenir
les risques de secousses électriques,
utiliser seulement un cordon de rallonge
prévu pour l’extérieur (SW-A, SOW-A,
STW-A, STOW-A, SJW-A, SJOW-A,
SJTW-A ou SJTOW-A).
• CORDON DE RALLONGE - S’assurer
que le cordon de rallonge est en bon
état. Lorsqu’on se sert d’un cordon de
rallonge, s’assurer qu’il est de calibre
approprié pour la tension nécessaire au
fonctionnement de l’outil. L’utilisation
d’un cordon de calibre inférieur
occasionne une baisse de tension
entraînant une perte de puissance et la
surchauffe. Le tableau de la page
suivante indique le calibre approprié
selon la longueur du cordon et les
mentions de la plaque signalétique de
l’outil. En cas de doute, utiliser un
cordon de calibre supérieur. Le chiffre
indiquant le calibre est inversement
proportionnel au calibre du cordon.
rallonge trifilaires mis à la terre prévus
pour l’extérieur.
• ÉVITER LES DÉMARRAGES
ACCIDENTELS. Ne pas laisser le doigt
sur l’interrupteur lorsqu’on transporte le
taille-haie. S’assurer que l’interrupteur
est en position hors circuit lorsqu’on
branche l’outil.
• NE PAS MANIPULER LE CORDON DE
FAÇON ABUSIVE. Ne pas transporter
l’outil par le cordon ni tirer sur ce dernier
pour le débrancher de la prise. Éloigner
le cordon des sources de chaleur, des
flaques d’huile et des arêtes
tranchantes.
• NE PAS TENTER d’enlever des
matières coupées ni de débloquer le
couloir d’éjection lorsque la lame
tourne. S’assurer que le taille-haie est
hors tension avant de retirer les
matières coincées dans la lame. Ne
jamais saisir les lames à découvert ni
les arêtes tranchantes lorsqu’on prend
l’outil ou qu’on le tient.
MISE EN GARDE : Les lames
continuent de se déplace après avoir
éteint l’outil.
• NE JAMAIS FORCER L’OUTIL. Afin
d’obtenir un rendement sûr et efficace,
utiliser l’outil à son rendement nominal.
• NE PAS DÉPASSER SA PORTÉE.
Toujours demeurer dans une position
stable et garder son équilibre.
• DEMEURER VIGILANT. Travailler avec
vigilance et faire preuve de bon sens.
Ne pas se servir de l’outil lorsqu’on est
fatigué.
• DÉBRANCHER LE TAILLE-HAIE. –
Lorsqu’il ne sert pas, lorsqu’on le répare
ou avant de le nettoyer.
• RANGER LES TAILLE-HAIES
INUTILISÉS. Il faut ranger les outils
dans un endroit sec, situé en hauteur ou
fermé à clé, hors de la portée des
enfants.
19
Calibres minimaux
Tension Longueur totale du cordon en pieds
120 V 0 à 25 26 à 50 51 à 100 101 à 150
240 V 0 à 50 51 à 100 101 à 200 201 à 300
INTENSITÉ (AMPÈRES)
PLUS PAS
DE PLUS DE
Calibre moyen de fil (AWG)
0 - 6 18 16 16 14
6 - 10 18 16 14 12
10 - 12 16 16 14 12
12 - 16 14 12 Non recommandé
AVERTISSEMENTS ET DIRECTIVES DE SÉCURITÉ
GÉNÉRALES POUR TOUS LES OUTILS
Page 20

20
MESURES DE SÉCURITÉ : DOUBLE ISOLATION
Les outils à double isolation comportent
deux couches distinctes d’isolant électrique
ou une double épaisseur d’isolant qui
protègent l’utilisateur contre les risques
de blessures provenant du système
électrique de l’outil. Ce système de
double isolation élimine le besoin de
mettre les outils à la terre. En effet, l’outil
est muni d’une fiche à deux broches, ce
qui permet d’utiliser une rallonge ordinaire
sans avoir à se soucier d’assurer la mise
à la terre.
La double isolation ne dispense pas des
mesures de sécurité normales lors de
l’utilisation de l’outil. Elle vise à procurer
une protection supplémentaire contre les
blessures que peut entraîner une
défectuosité de l’isolant électrique à
l’intérieur de l’outil.
PIÈCES DE RECHANGE : Lors de
l’entretien, N’UTILISER QUE DES
PIÈCES DE RECHANGE IDENTIQUES.
Réparer ou remplacer les cordons
endommagés.
MESURES DE SÉCURITÉ : FICHE POLARISÉE
Afin de minimiser les risques de
secousses électriques, le produit
comporte une fiche polarisée (une lame
plus large que l'autre). Il faut utiliser une
rallonge polarisée appropriée, bifilaire
ou trifilaire, avec ce produit. Ce genre
de fiche n'entre que d'une façon dans
une prise polarisée. S'assurer que la
prise de la rallonge comporte des fentes
de dimensions appropriées. Lorsqu'on
ne peut insérer la fiche à fond dans la
prise de la rallonge, il faut tenter de le
faire après avoir inversé les lames de
côté. Si la fiche n'entre toujours pas
dans la prise, il faut se procurer une
rallonge appropriée. Lorsqu'on ne peut
insérer la fiche de la rallonge à fond
dans la prise, il faut communiquer avec
un électricien certifié. Il ne faut pas
neutraliser la fiche de l'outil ni celle de la
rallonge.
• PRENDRE SOIN DES OUTILS.
Conserver les outils propres et bien
affûtés pour qu’ils donnent un rendement
supérieur et sûr. Inspecter régulièrement
les cordons de rallonge et les remplacer
lorsqu’ils sont endommagés. S’assurer
que les poignées sont toujours propres,
sèches et libres de toute tache d’huile ou
de graisse.
• VÉRIFIER LES PIÈCES
ENDOMMAGÉES. Avant d’utiliser de
nouveau l’outil, bien vérifier un
protecteur endommagé ou toute autre
pièce défectueuse afin de déterminer si
elle fonctionnera de façon appropriée et
si elle remplira la fonction prévue.
Vérifier l’alignement et les attaches des
pièces mobiles, le degré d’usure des
pièces et leur montage, ainsi que tout
autre facteur susceptible de nuire au bon
fonctionnement de l’outil. Faire réparer
ou remplacer tout protecteur ou toute
autre pièce endommagée dans un
centre de service autorisé, sauf si le
présent guide fait mention d’un avis
contraire.
DANGER : risque de lacération. Tenir
les mains loin des lames. Garder les
deux mains sur les poignées durant le
fonctionnement de l’outil.
MISE EN GARDE : risque de
lacération. Les lames continuent de se
déplace après avoir éteint l’outil.
Page 21

21
OUTILS NÉCESSAIRES POUR
L’ASSEMBLAGE (non compris) :
- tournevis cruciforme
FIXATION DE L’ANSE AU TAILLE-HAIE
L’outil est livré avec l’anse attachée au
taille-haie. Fixation de l’anse :
• Couper l’attache qui retient l’anse au
taille-haie.
• Retirer les vis à tête cruciforme des deux
côtés du boîtier du taille-haie ou de
l’emballage.
• Pour les numéros de catalogue 79441,
51890 positionner l’anse en la glissant
au-dessus de la lame comme montré à
la figure 1. Repoussez la poignée sur le
boîtier, vers le haut pour qu’elle
s’enclenche en place comme montré à la
figure 2.
• Insérer les vis à tête cruciforme dans les
ouvertures des deux côtés de l’anse et
serrer solidement comme montré à la
figure 3 (ne pas trop serrer).
• Dans le cas du numéro de catalogue
79442, 51891, fixer l’anse et insérer la
vis filetée dans l’anse et le boîtier
comme montré à la figure 4.
• Insérer les deux vis dans les orifices
montrés à la figure 5 puis visser. Ne pas
trop serrer.
• Visser le bouton de plastique pour bien
fixer l’anse à l’appareil (figure 6).
REMARQUE : le modèle 79442, 51891
possède trois positions de réglage de
l’anse comme montré à la figure 7. Pour
déplacer l’anse à la hauteur désirée,
dévisser le bouton en plastique,
positionner l’anse puis resserrer le
bouton.
DIRECTIVES DE MONTAGE
1
3
4
5
6
2
Page 22

22
MISE EN MARCHE DE L’OUTIL
Tirer sur le BOUTON DE VERROUILLAGE
avec le pouce et appuyer sur la
GÂCHETTE avec les doigts, tel qu’illustré
à la figure 9.
(Relâcher le BOUTON DE
VERROUILLAGE une fois l’outil en
marche). Relâcher la gâchette pour
ARRÊTER l’outil.
VERROUILLAGE DE L’OUTIL EN MODE
DE FONCTIONNEMENT CONTINU
UNE FOIS L
’OUTIL EN MARCHE, tirer
sur le BOUTON DE VERROUILLAGE
JUSQU’AU FOND
, puis relâcher la
GÂCHETTE suivie du BOUTON DE
VERROUILLAGE pour verrouiller l’outil
en POSITION DE MARCHE. Pour
ARRÊTER l’outil, enfoncer et relâcher la
GÂCHETTE. REMARQUE : pour
verrouiller l’outil en position de marche,
ON DOIT relâcher la gâchette AVANT le
bouton de verrouillage.
MÉTHODE DE COUPE
1. RALLONGE (figures 8 et 10).
Toujours placer la rallonge derrière
soi en l’éloignant de la zone de
coupe. Ne jamais la déposer sur la
haie à tailler. Si on coupe ou on
endommage la rallonge, on doit la
débrancher immédiatement de la
prise murale avant de procéder à
l’inspection ou aux réparations
requises.
10
9
Gâchette
Bouton de verrouillage
AVERTISSEMENT : NE PAS UTILISER
LE TAILLE-HAIE SANS L’ANSE FIXÉE
EN POSITION.
RACCORDEMENT DE LA RALLONGE
AU TAILLE-HAIE
AVERTISSEMENT : S’ASSURER QUE
LE TAILLE-HAIE N’EST PAS
VERROUILLÉ EN POSITION DEMARCHE
Un dispositif de retenue de rallonge est
intégré dans la poignée de la gâchette pour
empêcher le débranchement de l’outil.
Pour utiliser ce dispositif, replier simplement
la rallonge en deux à environ 203 mm (8
po) de l’extrémité, puis l’insérer dans la
fente située dans la partie inférieure de la
poignée. Fixer la boucle ainsi formée en
repliant la rallonge sur l’onglet comme
montré à la figure 8. Tirer délicatement
sur la rallonge afin de s’assurer que celleci est fermement retenue par la poignée du
taille-haie. Insérer les lames du réceptacle
du taille-haie dans la fiche de la rallonge
(figure 8).
CONSERVER LES PRÉSENTES
DIRECTIVES À TITRE DE
RÉFÉRENCE
DIRECTIVES D’UTILISATION
8
7
Page 23

23
2. POSITION DE TRAVAIL (figure 10).
S’assurer que les pieds sont bien
ancrés au sol afin de maintenir son
équilibre en tout temps. Ne pas trop
étendre les bras. Porter des lunettes
de sécurité, des chaussures
antidérapantes et des gants de
caoutchouc. Tenir le taille-haie
fermement des deux mains avant de
la mettre en marche. Toujours tailler
en gardant une main sur la poignée à
gâchette et l’autre sur celle de
manoeuvre. Ne jamais saisir l’outil par
son dispositif de protection.
3. TAILLE DE JEUNES POUSSES
(figure 11). La méthode la plus
efficace est d’incliner légèrement les
lames vers le bas, dans le sens
d’avance, puis de les faire passer
directement sur les tiges et de tailler
en effectuant de larges mouvements
de balayage.
MISE EN GARDE : ne pas utiliser le
taille-haie pour couper des tiges au-delà
de sa capacité.
Utiliser le taille-haie uniquement pour
couper les arbustes standards entourant
les maisons et les édifices.
79441, 51890 8mm (5/8po.)
79442, 51891 8mm (5/8 po.)
4. NIVELAGE DES HAIES (figure 12).
Pour bien niveler les haies, il suffit de
tendre une ficellesur toute leur
longueur afin de guider la coupe.
5. TAILLE LATÉRALE DES HAIES
(figure 13). Commencer par le bas et
se diriger vers le hau.
AVERTISSEMENT : POUR ÉVITER
LES RISQUES DE BLESSURES,
RESPECTER LES CONSIGNES
SUIVANTES.
• LIRE LE GUIDE AVANT
L’UTILISATION; CONSERVER LE
GUIDE D’UTILISATION.
• LAISSER LES MAINS SUR LES
POIGNÉES. NE PAS DÉPASSER SA
PORTÉE.
• NE PAS UTILISER DANS DES
CONDITIONS MOUILLÉES.
• NE PAS UTILISER LORSQUE LE
CORDON EST ENDOMMAGÉ.
• NE PAS DÉBRANCHER NI RANGER
LORSQUE L’INTERRUPTEUR EST
VERROUILLÉ EN POSITION DE
MARCHE.
DANGER : TENIR LES MAINS
ÉLOIGNÉES DES LAMES.
MISE EN GARDE : LA LAME
CONTINUE DE BOUGER APRÈS
AVOIR MIS L’OUTIL HORS TENSION.
Les lames sont faites d’acier trempé de
qualité supérieure qui ne nécessite pas
d’affûtage suite à une utilisation dans
des conditions normales. Toutefois, la
lame peut s’émousser si on touche au fil
d’une clôture, à des pierres, à du verre
ou à tout autre objet dur. Il n’est pas
nécessaire d’enlever la faille si elle ne
nuit pas au mouvement de la lame.Si les
lames se coincent, débrancher l’appareil
et, tout en utilisant une protection
oculaire appropriée, utiliser une lime à
dents fines ou une pierre à affûter pour
enlever l’entaille.
En cas de chute, examiner attentivement
le taille-haie pour s’assurer qu’il n’est
12
13
ENTRETIEN
11
Page 24

24
Consulter ce mode d’emploi et les modes d’emploi d’autres produits en ligne.
L’équipe de spécialistes répond à toutes les questions.
Il est possible d’obtenir un calendrier d’entretien personnalisé pour la maison.
Trouver les informations et les outils nécessaires à tous les projets.
Besoin d’aide?
Il est possible de trouver les réponses et plus encore sur le site
managemyhome.com – gratuitement!
pas endommagé. Lorsque la lame est
croche, le boîtier est craqué, les
poignées sont brisées ou en cas de tout
autre dommage qui peut nuire au bon
fonctionnement de l’outil, en confier les
réparations au centre de service Sears
de la région avant de s’en servir de
nouveau.
Les engrais et autres produits chimiques
pour le jardinage contiennent des
ingrédients qui contribuent à accélérer
fortement la corrosion des métaux. Ne
pas ranger l’outil sur de tels produits ni
à proximité de ceux-ci.
IMPORTANT : Pour assurer la
SÉCURITÉ D’EMPLOI et la FIABILITÉ
de l’outil, n’en confier la réparation et les
rajustements qu’à un centre de service
Sears ou à un atelier d’entretien autorisé
n’utilisant que les seules pièces de
rechange Sears.
AVERTISSEMENT : L’utilisation de tout
accessoire non recommandé pour l’outil
peut être dangereuse.
ACCESSOIRES
Page 25

25
parts list
Page 26

26
Page 27

27
Page 28

28
 Loading...