

Page 1

Operator’s Manual
21” Snowthrower
Model No. C459-52831
®
CAUTION: Before using this
product, read this manual
and follow all safety rules
and operating instructions.
Sears Canada Inc., 290 Yonge Street, Toronto, On M5B 2C3
Visit our web: sears.ca
• SAFETY
• ASSEMBLY
• OPERATION
• MAINTENANCE
• PARTS LIST
769-04202A
5/26/2009
Page 2

02488
2
Page 3

TABLE OF CONTENTS
Sears Service . . . . . . . . . . . . . . . . . . . . . . . . . . . . . . 2
Warranty Statement .........................3
Safe Operation Practices . . . . . . . . . . . . . . . . . . . . . 4
Safety Symbols .............................6
Assembly . . . . . . . . . . . . . . . . . . . . . . . . . . . . . . . . .8
Operation . . . . . . . . . . . . . . . . . . . . . . . . . . . . . . . .10
Adjustments & Maintenance ..................12
Off-Season Storage . . . . . . . . . . . . . . . . . . . . . . . .13
Parts List .................................14
Troubleshooting . . . . . . . . . . . . . . . . . . . . . . . . . . .18
WARRANTY STATEMENT
LIMITED TWO (2) YEAR WARRANTY ON CRAFTSMAN SNOW THROWER
For two (2) years from date of purchase Sears Canada, Inc. will repair or replace, at Sears option, free of charge
parts which are defective as a result of material or workmanship.
COMMERCIAL OR RENTAL USE:
Warranty on Snow Thrower will be 90 days from date of purchase if used for commercial or rental purposes.
This Warranty does NOT cover:
Pre-delivery set-up. 1.
Expendable items which become worn during normal use, such as belts, spark plugs, air cleaners, and shear pins, as well damage to the 2.
engine resulting from operating snow thrower with insufficient oil.
Repairs necessary because of operator abuse or negligence, including the failure to operate and maintain 3.
the equipment according to the instructions contained in the Owner’s Manual. 4.
Tire replacement or repair caused by punctures from outside objects, such as nails, thorns, stumps or glass. 5.
Warranty service is available by returning the Craftsman Snow Thrower to the nearest Sears Service Centre/Department in Canada.
This warranty applies only while this product is in use in Canada.
This warranty is in addition to any statutory warranty and does NOT exclude or limit legal rights you may have but
shall run concurrently with applicable provincial legislation. Furthermore, some provinces do not allow limitations
on how long an implied warranty will last, so the above limitations may not apply to you.
Sears Canada, Inc., Toronto, Ontario M5B 2C3
MODEL NUMBER
Model Number .................................................................
Serial Number .................................................................
Date of Purchase .............................................................
Record the model number, serial number
and date of purchase above
3
Page 4
SAFETY INSTRUCTIONS
WARNING
This symbol points out important safety instructions
which, if not followed, could endanger the personal
safety and/or property of yourself and others. Read
and follow all instructions in this manual before
attempting to operate this machine. Failure to comply with these
instructions may result in personal injury. When you see this symbol,
HEED ITS WARNING!
Your Responsibility: Restrict the use of this power machine to
persons who read, understand, and follow the warnings and instructions in this manual and on the machine.
TRAINING
1. Read, understand, and follow all instructions on the machine and in the
manual(s) before attempting to assemble and operate. Keep this manual in
a safe place for future and regular reference and for ordering replacement
parts.
2. Be familiar with all controls and their proper operation. Know how to stop
the machine and disengage them quickly.
3. Never allow children under 14 years old to operate this machine. Children
14 years old and over should read and understand the instructions and safe
operation practices in this manual and on the machine and be trained and
supervised by an adult.
4. Never allow adults to operate this machine without proper instruction.
5. Thrown objects can cause serious personal injury. Plan your snow-throwing
pattern to avoid discharge of material toward roads, bystanders and the like.
6. Keep bystanders, helpers, pets and children at least 75 feet from the
machine while it is in operation. Stop machine if anyone enters the area.
7. Exercise caution to avoid slipping or falling, especially when operating in
reverse.
PREPARATION
Thoroughly inspect the area where the equipment is to be used. Remove all
doormats, newspapers, sleds, boards, wires and other foreign objects, which
could be tripped over or thrown by the auger/impeller.
1. Always wear safety glasses or eye shields during operation and while
performing an adjustment or repair to protect your eyes. Thrown objects
which ricochet can cause serious injury to the eyes.
2. Do not operate without wearing adequate winter outer garments. Do not
wear jewelry, long scarves or other loose clothing, which could become
entangled in moving parts. Wear footwear which will improve footing on
slippery surfaces.
3. Use a grounded three-wire extension cord and receptacle for all units with
electric start engines.
4. Adjust collector housing height to clear gravel or crushed rock surfaces.
5. Disengage all control levers before starting the engine.
6. Never attempt to make any adjustments while engine is running, except
where specifically recommended in the operator’s manual.
7. Let engine and machine adjust to outdoor temperature before starting to
clear snow.
DANGER
This machine was built to be operated according to the rules for
safe operation in this manual. As with any type of power equipment,
carelessness or error on the part of the operator can result in serious
injury. This machine is capable of amputating hands and feet and
throwing objects. Failure to observe the following safety instructions
could result in serious injury or death.
Safe Handling of Gasoline
To avoid personal injury or property damage use extreme care in handling
gasoline. Gasoline is extremely flammable and the vapors are explosive.
Serious personal injury can occur when gasoline is spilled on yourself or your
clothes, which can ignite. Wash your skin and change clothes immediately.
a. Use only an approved gasoline container.
b. Extinguish all cigarettes, cigars, pipes and other sources of ignition.
c. Never fuel machine indoors.
d. Never remove gas cap or add fuel while the engine is hot or running.
e. Allow engine to cool at least two minutes before refueling.
f. Never over fill fuel tank. Fill tank to no more than ½ inch below bottom
of filler neck to provide space for fuel expansion.
g. Replace gasoline cap and tighten securely.
h. If gasoline is spilled, wipe it off the engine and equipment. Move
machine to another area. Wait 5 minutes before starting the engine.
i. Never store the machine or fuel container inside where there is an open
flame, spark or pilot light (e.g. furnace, water heater, space heater,
clothes dryer etc.).
j. Allow machine to cool at least 5 minutes before storing
k. Never fill containers inside a vehicle or on a truck or trailer bed with a
plastic liner. Always place containers on the ground away from your
vehicle before filling.
l. If possible, remove gas-powered equipment from the truck or trailer and
refuel it on the ground. If this is not possible, then refuel such equip-
ment on a trailer with a portable container, rather than from a gasoline
dispenser nozzle.
m. Keep the nozzle in contact with the rim of the fuel tank or container
opening at all times until fueling is complete. Do not use a nozzle
lock-open device.
4
Page 5

SAFETY INSTRUCTIONS
OPERATION
1. Do not put hands or feet near rotating parts, in the auger/impeller housing
or chute assembly. Contact with the rotating parts can amputate hands
and feet.
2. The auger/impeller control lever is a safety device. Never bypass its
operation. Doing so makes the machine unsafe and may cause personal
injury.
3. The control levers must operate easily in both directions and automatically
return to the disengaged position when released.
4. Never operate with a missing or damaged chute assembly. Keep all safety
devices in place and working.
5. Never run an engine indoors or in a poorly ventilated area. Engine exhaust
contains carbon monoxide, an odorless and deadly gas.
6. Do not operate machine while under the influence of alcohol or drugs.
7. Muffler and engine become hot and can cause a burn. Do not touch.
8. Exercise extreme caution when operating on or crossing gravel surfaces.
Stay alert for hidden hazards or traffic.
9. Exercise caution when changing direction and while operating on slopes.
10. Plan your snow-throwing pattern to avoid discharge towards windows,
walls, cars etc. Thus, avoiding possible property damage or personal
injury caused by a ricochet.
11. Never direct discharge at children, bystanders and pets or allow anyone in
front of the machine.
12. Do not overload machine capacity by attempting to clear snow at too fast
of a rate.
13. Never operate this machine without good visibility or light. Always be sure
of your footing and keep a firm hold on the handles. Walk, never run.
14. Disengage power to the auger/impeller when transporting or not in use.
15. Never operate machine at high transport speeds on slippery surfaces.
Look down and behind and use care when backing up.
16. If the machine should start to vibrate abnormally, stop the engine,
disconnect the spark plug wire and ground it against the engine. Inspect
thoroughly for damage. Repair any damage before starting and operating.
17. Disengage all control levers and stop engine before you leave the operating position (behind the handles). Wait until the auger/impeller comes
to a complete stop before unclogging the chute assembly, making any
adjustments, or inspections.
18. Never put your hand in the discharge or collector openings. Always use
the clean-out tool provided to unclog the discharge opening. Do not unclog
chute assembly while engine is running. Shut off engine and remain
behind handles until all moving parts have stopped before unclogging.
19. Use only attachments and accessories approved by the manufacturer (e.g.
wheel weights, tire chains, cabs etc.).
20. When starting engine, pull cord slowly until resistance is felt, then pull
rapidly. Rapid retraction of starter cord (kickback) will pull hand and arm
toward engine faster than you can let go. Broken bones, fractures, bruises
or sprains could result.
21. If situations occur which are not covered in this manual, use care and
good judgment. Contact your Sears Service Center for assistance.
MAINTENANCE & STORAGE
1. Never tamper with safety devices. Check their proper operation regularly.
Refer to the maintenance and adjustment sections of this manual.
2. Before cleaning, repairing, or inspecting machine disengage all control
levers and stop the engine. Wait until the auger/impeller come to a
complete stop. Disconnect the spark plug wire and ground against the
engine to prevent unintended starting.
3. Check bolts and screws for proper tightness at frequent intervals to keep
the machine in safe working condition. Also, visually inspect machine for
any damage.
4. Do not change the engine governor setting or over-speed the engine. The
governor controls the maximum safe operating speed of the engine.
5. Snow thrower shave plates and skid shoes are subject to wear and
damage. For your safety protection, frequently check all components and
replace with original equipment manufacturer’s (OEM) parts only. “Use of
parts which do not meet the original equipment specifications may lead to
improper performance and compromise safety!”
6. Check controls periodically to verify they engage and disengage properly
and adjust, if necessary. Refer to the adjustment section in this operator’s
manual for instructions.
7. Maintain or replace safety and instruction labels, as necessary.
8. Observe proper disposal laws and regulations for gas, oil, etc. to protect
the environment.
9. Prior to storing, run machine a few minutes to clear snow from machine
and prevent freeze up of auger/impeller.
10. Never store the machine or fuel container inside where there is an open
flame, spark or pilot light such as a water heater, furnace, clothes dryer
etc.
11. Always refer to the operator’s manual for proper instructions on off-season
storage.
12. Check fuel line, tank, cap, and fittings frequently for cracks or leaks.
Replace if necessary.
13. Do not crank engine with spark plug removed.
Do not modify engine
To avoid serious injury or death, do not modify engine in any way. Tampering
with the governor setting can lead to a runaway engine and cause it to operate
at unsafe speeds. Never tamper with factory setting of engine governor.
Notice regarding Emissions
Engines which are certified to comply with California and federal EPA emission
regulations for SORE (Small Off Road Equipment) are certified to operate on
regular unleaded gasoline, and may include the following emission control
systems: Engine Modification (EM) Oxidizing Catalyst (OC), Secondary Air
Injection (SAI) and Three Way Catalyst (TWC) if so equipped.
Average Useful Life
According to the Consumer Products Safety Commission (CPSC) and the U.S.
Environmental Protection Agency (EPA), this product has an Average Useful
Life of seven (7) years, or 60 hours of operation. At the end of the Average
Useful Life, have the machine inspected annually by an authorized service
dealer to ensure that all mechanical and safety systems are working properly
and not worn excessively. Failure to do so can result in accidents, injuries or
death.
5
Page 6
SAFETY SYMBOLS
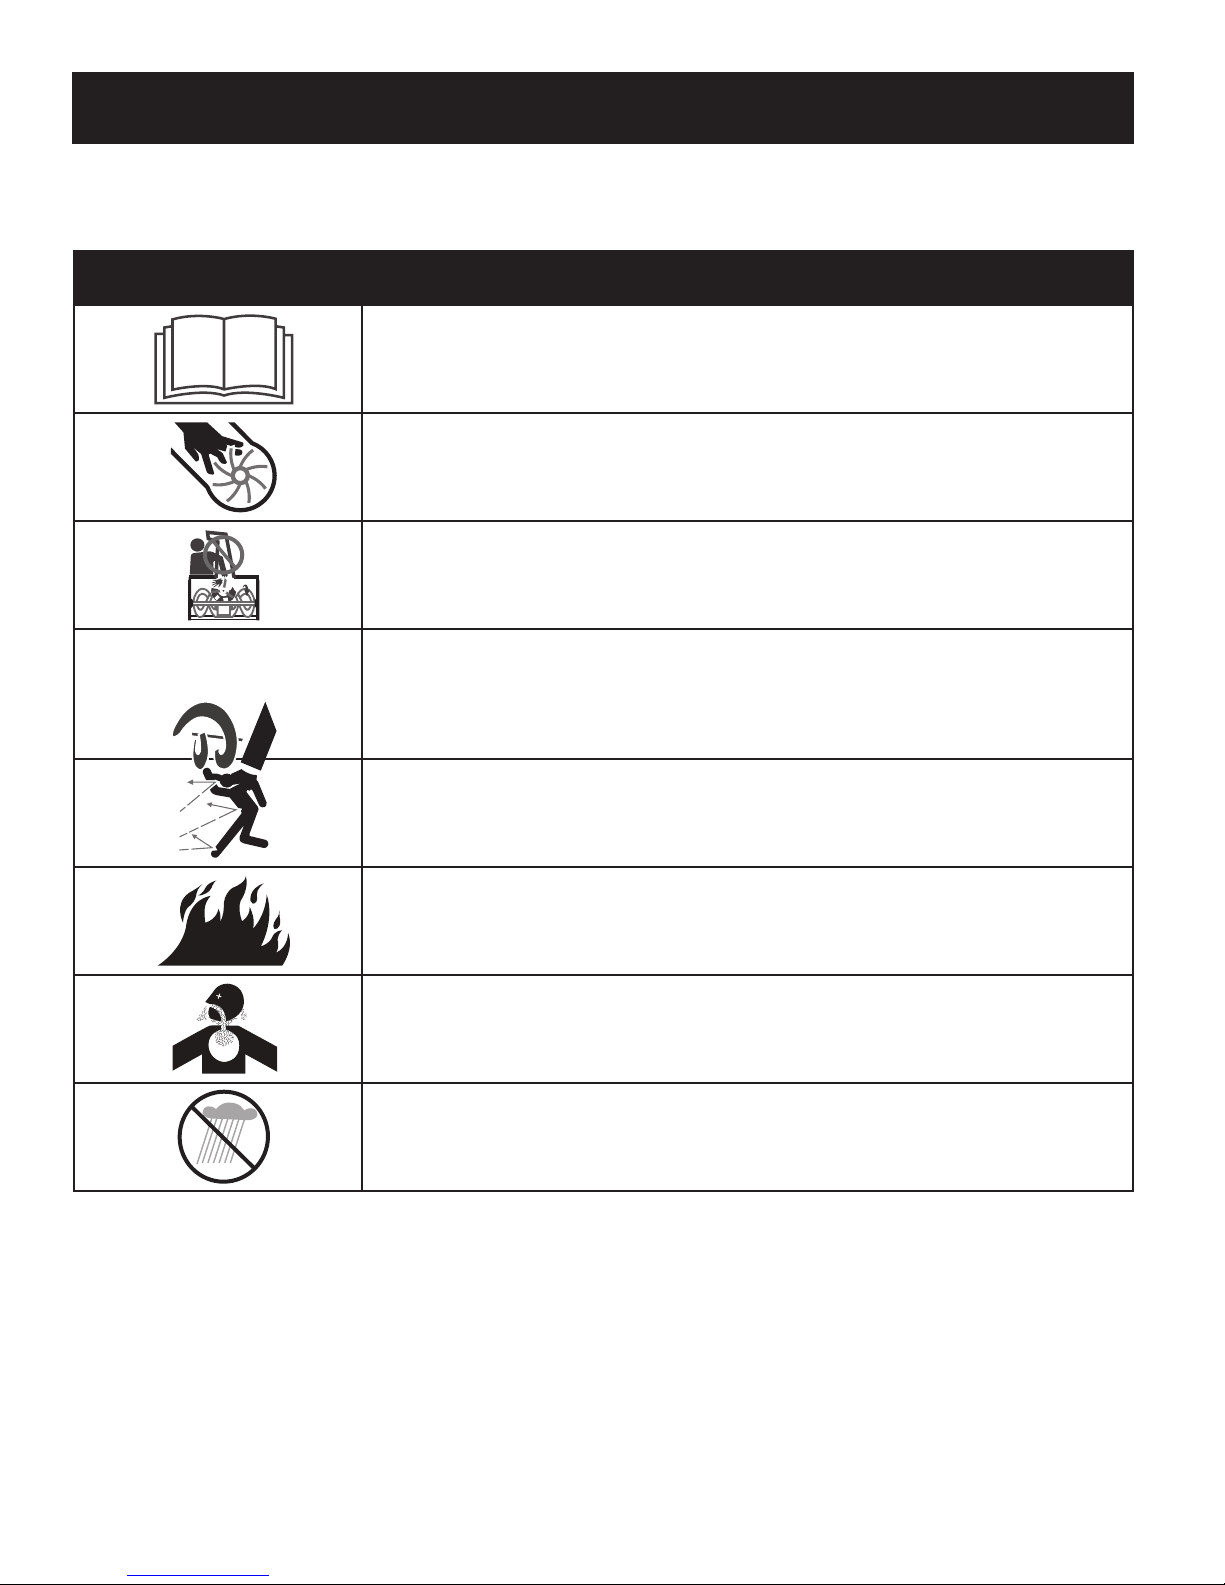
This page depicts and describes safety symbols that may appear on this product. Read, understand, and follow all instructions on the machine
before attempting to assemble and operate.
Symbol Description
READ THE OPERATOR’S MANUAL(S)
Read, understand, and follow all instructions in the manual(s) before attempting to assemble and
operate.
WARNING— ROTATING BLADES
Keep hands out of inlet and discharge openings while machine is running. There are rotating blades
inside.
WARNING— ROTATING BLADES
Keep hands out of inlet and discharge openings while machine is running. There are rotating blades
inside.
WARNING— ROTATING AUGER
Do not put hands or feet near rotating parts, in the auger/impeller housing or chute assembly. Contact
with the rotating parts can amputate hands and feet.
WARNING—THROWN OBJECTS
This machine may pick up and throw and objects which can cause serious personal injury.
WARNING—GASOLINE IS FLAMMABLE
Allow the engine to cool at least two minutes before refueling.
WARNING— CARBON MONOXIDE
Never run an engine indoors or in a poorly ventilated area. Engine exhaust contains carbon monoxide,
an odorless and deadly gas.
WARNING— ELECTRICAL SHOCK
Do not use the engine’s electric starter in the rain.
6
Page 7

NOTES
7
Page 8

Figure 1
ASSEMBLY
NOTE: All references to left or right side of the snow thrower is
from the operating position only.
Positioning the Upper Handle
1. Remove packing material, if present.
2. Raise the upper handle in the direction shown in Figure 1 until it
clicks into the operating position. Make sure not to pinch or crimp
the cable.
3. Tighten the knobs. See Figure 2.
Chute Assembly
The pitch of the chute assembly controls the angle at which the snow
is thrown. Adjust the chute assembly by following the instructions
below.
1. Loosen the wing knob found on the left side of the chute assembly
and pivot the upper chute upward or downward to the desired pitch.
Retighten the wing knob before operating the snow thrower.
2. Position the chute assembly opening by using the chute control
handle to throw the snow in the desired direction. See Figure 3.
IMPORTANT: Do not use the chute control handle to lift the snow
thrower
Figure 2
Figure 3
8
Page 9

Auger Control
Recoil Starter
Gasoline Cap
Chute Control Handle
Chute
Assembly
Shave Plate
Auger
Oil Fill
Ignition Key
Oil Fill
Primer
Gasoline
Cap
Electric
Starter
Outlet
Recoil
Starter
Oil Drain
Choke
Control
Throttle
Control
Electric
Starter
Button
ASSEMBLY
Be familiar with all the controls on the snow thrower and their proper
operation. Know how to stop the machine and disengage them
quickly.
Choke Lever
Activating choke control closes the choke plate on carburetor and aids
in starting engine. Refer to the engine manual packed with unit for
more detailed instructions.
Primer
Depressing primer forces fuel directly into engine’s carburetor to aid
in cold-weather starting. Refer to engine manual packed with unit for
more detailed instructions.
Ignition Key
The ignition key must be inserted and snapped in place in order for the
engine to start. Remove the ignition key to prevent unauthorized use of
equipment. Do NOT attempt to turn the key.
Recoil Starter
The starter handle is used to manually start the engine.
Electric Starter (If Equipped)
Used to start engine with a 120V power source.
NOTE: On certain models the electric starter is located on the right
side of the shroud.
Figure 4
Plug for Electric Start
Requires use of a three-prong outdoor extension cord and a 120V
power source.
Auger
When engaged, the augers rotation draws snow into the auger
housing and throws it out the discharge chute. Rubber paddles on the
augers also aid in propelling the unit as they come in contact with the
pavement.
Auger Control Handle
Located on the upper handle, the auger control handle is used to
engage and disengage drive to the auger. Squeeze the control handle
against the upper handle to engage auger; release it to disengage.
Discharge Chute / Chute Handle
Rotate the discharge chute to the left or right using chute handle.
The angle of the discharge chute controls the distance that the snow
is thrown. Tilt the discharge chute up for greater distance; tilt down
for less distance. Loosen the hand knob on the side of the discharge
chute to adjust. Tilt the chute to the desired position, and tighten the
knob.
Shave Plate
The shave plate maintains contact with pavement as the snow
thrower is propelled, allowing snow close to pavement’s surface to be
discharged.
9
Page 10

OPERATION
Read, understand, and follow all instructions and warnings on
the machine and in this manual before operating.
Before Starting
IMPORTANT: For complete and detailed engine starting, stopping
and storing instructions, it is recommended that you read the engine
manual also included with this unit.
Gas and Oil Fill-Up
1. Check oil and gasoline level and add if necessary. Follow related
instructions in the separate engine manual packed with your snow
thrower.
WARNING: Use extreme care when handling
gasoline. Gasoline is extremely flammable and
the vapors are explosive. Never fuel the machine
indoors or while the engine is hot or running.
Extinguish cigarettes, cigars, pipes and other
sources of ignition.
To Start Engine
1. Insert ignition key into slot. See Figure 5.
2. Now follow the instructions below as it pertains to your unit.
Electric Starter (if so equipped)
WARNING: The electric starter is equipped with
a grounded three-wire power cord and plug, and
is designed to operate on 120 volt AC household
current. It must be used with a properly grounded
three-prong receptacle at all times to avoid the
possibility of electric shock. Follow all instructions
carefully prior to operating the electric starter.
WARNING: DO NOT use electric starter in rain.
Figure 6
Determine that your home’s wiring is a three-wire grounded system.
Ask a licensed electrician if you are unsure. If you have a grounded
three-prong receptacle, proceed as follows. If you do not have the
proper house wiring, DO NOT use the electric starter under any
conditions.
2. Insert ignition key fully into slot. See Figure 5. Make sure it snaps
into place. DO NOT turn ignition key. The engine cannot start
unless the key is inserted into ignition switch.
3. Plug the extension cord into the electric switch box located on
the engine. See Figure 6. (On certain models the electric starter
is located on the right side of the shroud.) Plug the other end of
extension cord into a three-prong 120-volt, grounded, AC outlet in a
well-ventilated area.
4. Move throttle control to FAST (rabbit) position.
5. Move choke to the ON position (cold engine start). If engine is
warm, place choke in OFF position.
6. Push primer three to five (3-5) times, making sure to cover vent
hole when pushing. If engine is warm, push primer only once.
Always cover vent hole when pushing. Cool weather may require
priming to be repeated.
7. Push starter button to start engine. Once the engine starts,
immediately release starter button. Electric starter is equipped with
thermal overload protection; system will temporarily shut-down to
allow starter to cool if electric starter becomes overloaded.
8. As the engine warms, slowly rotate the choke control to OFF
position. If the engine falters, restart engine and run with choke at
half-choke position for a short period of time, and then slowly rotate
the choke into OFF position.
9. After engine is running, disconnect power cord from electric starter.
When disconnecting, always unplug the end at the wall outlet
before unplugging the opposite end from the engine.
Figure 5
10
Page 11

OPERATION
Recoil Starter
MPORTANT: Do not pull the starter handle with engine running.
WARNING: To avoid unsupervised engine operation,
never leave the engine unattended while running.
Turn the engine off after use and remove ignition
key.
1. Insert ignition key fully into slot. Make sure it snaps into place. DO
NOT turn ignition key. The engine cannot start unless the key is
inserted into ignition switch.
2. Move throttle control to FAST (rabbit) position.
3. Move choke to the ON position (cold engine start). If engine is
warm, place choke in OFF position.
4. Push primer three to five (3-5) times, making sure to cover vent
hole when pushing. If engine is warm, push primer only once.
Always cover vent hole when pushing. Cool weather may require
priming to be repeated.
5. Pull gently on the starter handle until it begins to resist, then pull
quickly and forcefully to overcome the compression. Do not release
the handle and allow it to snap back. Return rope SLOWLY to
original position. If required, repeat this step.
6. As the engine warms, slowly rotate the choke control to OFF
position. If the engine falters, restart engine and run with choke at
half-choke position for a short period of time, and then slowly rotate
the choke into OFF position.
Stopping the Engine
WARNING: To avoid unsupervised engine operation,
never leave the engine unattended while running.
Turn the engine off after use and remove ignition
key
Run engine for a few minutes before stopping to help dry off any
moisture on the engine.
1. Move throttle control to STOP position.
2. Remove the ignition key. Removing the key will reduce the possibility of unauthorized starting of the engine while equipment is not
in use. Keep the key in a safe place. The engine cannot start
without the ignition key.
3. Wipe all snow and moisture from the area around the engine as well
as the area in and around the drive control and auger control. Also,
engage and release both controls several times.
To Engage Augers
1. To engage the augers and start throwing snow, squeeze the auger
control against the handle. Release to stop the augers.
Engaging the Drive
1. Lifting up on the handle will allow the rubber on the augers to
propel the snow thrower forward. Pushing downward on the handle
will raise the augers off the ground and stop forward motion.
NOTE: Excessive upward pressure on the handle will result in
premature wear on the rubber auger blades which would not be
covered by warranty.
2. Run the engine for a few minutes before stopping to help dry any
moisture on the engine.
3. Clean the snow thrower thoroughly after each use.
11
Page 12

ADJUSTMENTS & MAINTENANCE
3IDE6IEW
WARNING: NEVER attempt to make any adjustments while the engine is running, except where
specified in the operator’s manual.
Shave Plate
1. To check the adjustment of the shave plate, place the unit on a level
surface. The wheels, shave plate and augers should all contact
level surface. Note that if the shave plate is adjusted too high, snow
may blow under the housing. If the shave plate wears out excessively, or the unit does not self-propel, the shave plate may be too
low and needs to be adjusted.
NOTE: On new units or units with a new shave plate installed, the
augers may be slightly off the ground.
WARNING: Run the engine completely dry of
gasoline before tipping snowthrower.
2. To adjust, tip the snow thrower back so that it rests on the handle.
3. Loosen the four lock nuts and bolts which secure the shave plate to
the housing. See Figure 7. Move the shave plate to desired position
and retighten the nuts and bolts securely.
4. Tip the snow thrower back to the operating position and pull the
starter handle a few times to see if it is difficult to pull.
5. If the starter is difficult to pull, remove the spark plug and pull the
handle several times to ensure that any oil trapped in the head is
removed.
1. Remove the carriage bolts and hex lock nuts which attach it to the
snow thrower housing.
2. Install new shave plate (or reverse), making sure the heads of the
carriage bolts are on the inside of the housing.
3. Adjust the shave plate according to instructions above
4. Tighten securely.
Control Cable
As a result of both the control cable and the drive belt stretching due to
wear, periodic adjustments may be necessary.
If the auger seems to hesitate when rotating while the engine
maintains a constant speed, an adjustment is necessary. Proceed as
follows:
The upper hole in the control handle provides for an adjustment in
cable tension. To adjust, disconnect the end of control cable from the
bottom hole in the control handle and reinsert it in the upper hole.
Insert the cable from the outside as shown in Figure 8. Test the snow
thrower to see if there is a noticeable difference.
Caution: Oil may come out of the spark plug hole when it is removed
and the starter handle is pulled.
6. Inspect the spark plug. If it is wet, clean off any oil before reinstalling.
Replacing Shave Plate
The shave plate is attached to the bottom of the auger housing and
is subject to wear. It should be checked periodically. There are two
wearing edges and the shave plate can be reversed. Refer to Figure 7.
To replace or reverse the shave plate proceed as follows:
Figure 8
Replacing Belt
WARNING: Before servicing, repairing, or inspecting, disengage the control bail and stop engine. Wait
until all moving parts have come to a complete stop.
Remove the belt cover by removing five hex screws. See Figure 9.
Then simply pull the belt off by grasping it from the bottom of the auger
pulley and pulling off. Once you remove the belt from the pulleys, you
can push down on the idler pulley to release the belt from under belt
keeper.
Figure 7
12
Page 13

ADJUSTMENTS & MAINTENANCE
To remove, pull belt here
Belt Keeper
Idler Pulley
To replace the belt follow these instructions and refer to Figure 10:
1. Push down on the Idler pulley.
2. Put belt on top of the auger pulley under belt keeper.
3. Thread belt around engine pulley.
4. Push belt over bottom of auger pulley.
5. Reinstall the belt cover removed earlier.
Engine
1. Refer to the separate engine manual for all engine maintenance
procedures.
2. Check engine and snow thrower frequently for loose hardware, and
tighten as needed.
Lubrication
Lubricate pivot points on the control handle and the extension spring
at the end of the control cable with a light oil once every season and
before storage of the snow thrower at the end of the season.
Replacing Auger Paddles
The snow thrower auger’s rubber paddles are subject to wear and
should be replaced if any signs of excessive wear is present.
IMPORTANT: Do NOT allow the auger’s rubber paddles to wear to the
point where portions of the metal auger itself can come in contact with
the pavement. Doing so can result in serious damage to your snow
thrower.
To change the rubber paddles, proceed as follows:
1. Remove the existing rubber paddles by unthreading the self-tapping
screws which secure them to the auger. See Figure 11.
2. Secure the replacement rubber paddles to the auger using the
hardware removed earlier.
Figure 9
Off-Season Storage
If unit is to be stored over 30 days, prepare for storage as instructed in
the separate engine manual packed with your snow thrower.
Clean snow thrower thoroughly.•
Lubricate as instructed in the Maintenance section of this manual.•
Refer to engine manual for correct engine storage instructions.•
Store the snow thrower in a clean, dry area.•
When storing any type of power equipment in a poorly ventilated •
or metal storage shed, care should be taken to rustproof the
equipment, especially springs, cables and all moving parts.
Figure 10
Figure 11
13
Page 14

PARTS LIST/PIÈCES DÉTACHÉES
1
2
13
12
20
14
19
4
27
21
3
18
17
7
6
10
23
26
5
24
24
25
23
22
9
23
26
8
6
16
11
15
29
28
30
NOTE: Snow thrower features/components vary by model. NOT all parts listed above and pictured on the previous page are standard equipment.
REMARQUE: Les caractéristiques/composants des souffleuses varient d’un modèle à un autre. Les pièces énumérées ci-dessus et illustrées sur la
page précédente ne sont pas TOUTES fournies en série.
14
Page 15

PARTS LIST/PIÈCES DÉTACHÉES
REF PART
NO. NO.
N° DE N° DE
RÉF PIÈCE DE SCRIP TION DE SCRIP TION
1 731-06452 Shroud Ass’y (Mod els w/elec tric start) Capot (Modèles avec démarreur électrique)
731-06458 Shroud Ass’y (Mod els w/o elec tric start) Capot (Modèles sans démarreur électrique)
2 710-04669 Hex Wash B-Tapp Scr #10 x .62" Lg. Vis taraudée no. 10 x 0,62 po de lg.
3 710-1205 Eyebolt 1/4-20 Boulon à oeil 1/4-20
4 720-0279 Han dle Knob As sem bly Bou ton
5 710-0895 Hex Tapp Scr 1/4 x .75" Lg. Vis taraudée à tête hex de 1/4 x 0,75 po de lg
6 712-04063 Flange Locknut 5/16-18 Gr. F, Ny lon Contre-écrou à embase 5/16-18 Qual. F, ny lon
7 710-1090 Hex Flg. Screw 5/16-18 x 1.25 Vis à tête hex. 5/16-18 x 1,25
8 731-04353 Lower Chute Ring Bague de goulotte d’éjection inferieur
9 732-04111 Chute Ad just ment Spring Ressort d’ajustement - goulotte d’éjection
10 731-04886 Chute Adapter 5" Dia Adaptateur de la goulotte 5 po de dia.
11 731-04127 Lower Chute 5" Dia Goulotte d’éjection inferieur dia. 5 po
12 731-04354B Up per Chute Goulotte supérieur
13 720-0284 Han dle Knob As sem bly Bou ton
14 731-04388A Chute Han dle Poignée - goulotte d’éjection
15 710-0451 Car riage Bolt 5/16-18 x .75 Boulon ordi naire 5/16-18 x 0,75
16 710-04071 Car riage Screw 5/16-18 x 1.0 Vis ordi naire 5/16-18 x 1,0
17 725-0157 Ca ble Tie Attache-câble
18 720-0284 Han dle Knob As sem bly Bou ton
19 710-04532 Car riage Bolt 5/16-18 x 2.0 Gr. 5 Boulon ordi naire 5/16-18 x 2,0 Qual. 5
20 749-04106A Gullwing Han dle Guidon supérieur
21 747-04159A Con trol Bail Étier de sus pen sion
22 731-1033 Shave Plate Grat toir
23 712-04064 Hex L-Flanged Nut 1/4-20 Gr. F Ny lon Contre-écrou à embase 1/4-20 Qual. F ny lon
24 710-0134 Car riage Bolt 1/4-20 x .62 Boulon ordi naire 1/4-20 x 0,62
25 710-3008 Hex Screw 5/16-18 x .75 Vis à tête hex. 5/16-18 x 0,75
26 736-0176 Flat Washer .25 ID x .93 OD x .125 Rondelle plate 0,25 DI x 0,93 DE x 0,125
27 746-04237 Con trol Ca ble Câble de la commande
28 749-04459 Up per Han dle Guidon supérieur
29 747-04165 Control Bail Étier de sus pen sion
30 749-04118B Lower Han dle Guidon inférieur
31A-2N1_2P51
5.22.09
15
Page 16

PARTS LIST/PIÈCES DÉTACHÉES
Electric star ter shown for reference only/
Le démarreur électrique est illustré comme référence seulement.
43
2
1
3
34
35
16
13
47
49
45
44
11
12
23
14
10
3
27
28
24
25
32
31
26
4
5
21
22
20
6
7
6
8
9
15
30
33
39
37
40
38
39
41
36
37
29
42
18
19
17
46
48
NOTE: Snow thrower features/components vary by model. NOT all parts listed above and pictured on the previous page are standard equipment.
REMARQUE: Les caractéristiques/composants des souffleuses varient d’un modèle à un autre. Les pièces énumérées ci-dessus et illustrées sur
la page précédente ne sont pas TOUTES fournies en série.
16
Page 17

PARTS LIST/PIÈCES DÉTACHÉES
REF PART
NO. NO.
N° DE N° DE
RÉF PIÈCE DE SCRIP TION DE SCRIP TION
1 710-04373A Hi-Lo Screw #12-16 x .75 Vis no. 12-16 x 0,75
2 790-00335 Elec tric Start Sup port Bracket Sup port
3 710-1005 Hex Tap Scr. 1/4-14 x .5" Lg. Vis taraudée 1/4-14 x 0,50 po de lg.
4 710-1810 Hex Hd. Cap Screw 3/8-24 x 1.75 Vis à tête hex. 3/8-24 x 1,75
5 736-0247 Flat Washer .406 x 1.25 x .157 Rondelle plate 0,406 x 1,25 x 0,157
6 756-04353A Pul ley Half 4L-V x 2.30 OD Moitié poulie 4L-V x 2,30 DE
7 754-04204 V-Belt Courroie trapezoïdale
8 750-04303 Spacer .875 ID x 1.185 OD Entretoise 0,875 DI x 1,185 DE
9 750-05084 Spacer .88 ID x 1.18 OD x .74" Lg. Entretoise 0,88 DI x 1,18 DE x 0,74 po de lg.
10 756-04232 V-Pul ley 1/2 x 6,0" OD Poulie, 1/2 x 6,0" DE
11 710-0409 Hex Bolt 5/16-24 x 1.75 Boulon hex. 5/16-24 x 1,75
12 736-0119 Lockwasher 5/16 Rondelle frein 5/16
13 726-0154 Push Mount Tie Tige de poussoir
14 790-00334 En gine Sup port Bracket Sup port du moteur
15 710-0654A Hex Wash HD Tap Scr 3/8-16 x .88 Vis autotaraudee 3/8-16 x 0,88
16 750-04297B Spacer .875 x .320 x 1.10 Entretoise 0,875 x 0,320 x 1,10
17 710-0896 Hex B-Tap Scr 1/4-28 x .25" Lg Vis taraudée à tête hexagonale 1/4-28 x 0,25
18 710-0653 Hex Wash HD Tapp Scr 1/4-20 x .375 Vis auto-taraudeuse hexagonale 1/4-20 x 0,375
19 790-00045C Belt Cover Couvercle de courroie
20 710-0106 Hex Screw 1/4-20 x 1.25 Gr. 5 Vis à tête hexagonale 1/4-20 x 1,25 Qual 5
21 750-04571 Shoul der Spacer Entretoise
22 684-04168 Idler Pul ley (1/4" hole) Poulie du tendeur (trou 1/4 po)
23 712-04063 Flange Locknut 5/16-18 Gr. F, Ny lon Contre-écrou à embase 5/16-18 Qual. F, ny lon
24 748-0234 Shoul der Spacer .25 Thk. Entretoise épaulée
25 790-00238A Idler Bracket Sup port du tendeur
26 712-04064 Flange Locknut 1/4-20 Gr. F, Ny lon Contre-écrou à embase 1/4-20 Qual. F, ny lon
27 790-00249 Bear ing Cup Roulement à cuvette
28 741-04188A Ball Bear ing .625 x 37 x 12.63 Roulement à billes 0,625 x 37,0 x 12,63
29 710-0642 Thd Form ing Scr. 1/4-20 x .75 Lg. Vis taraudée 1/4-20 x 0,75 lg.
30 736-0329 L-Wash 1/4 ID Rondelle frein 1/4 DI
31 738-0924A Hex Shld.Scr.1/4-28 x .375 Vis à épaulement 1/4-28 x 0,375
32 756-0625 Ca ble Guide Roller Guide du câble
33 736-0176 Flat Washer .25 ID x .93 OD x .125 Rondelle plate 0,25 DI x 0,93 DE x 0,125
34 712-0896 Hex Ins Jam L-Nut 1/4-28 Contre-écrou de blocage 1/4-28
35 732-0357A Ex ten sion Spring .33 OD x 1.12 Lg. Ressort d’extension 0,33 DE x 1,12 po de lg
36 684-04253 Au ger As sem bly En sem ble de la tarière
37 710-0896 Hex B-Tap Scr 1/4-28 x .25" Lg Vis taraudée à tête hexagonale 1/4-28 x 0,25
38 735-04033 Rub ber Pad dle Pale en caou tchouc
39 735-04032 Rub ber Spi ral-Cres cent Spirale en caou tchouc - crois sant
40 750-04758 Au ger Spacer RH Entretoise de la tarière - droite
41 750-04757 Au ger Spacer LH Entretoise de la tarière - gauche
42 726-0299 Push Cap x 1/2" Rod Écrou pour tige de 1/2 po
43 684-04315 Au ger Hous ing Logement des tarières
684-04314 Au ger Hous ing Logement des tarières
44 734-2010A Wheel, 9 x 2.125 dia. Lug Roue, 9 x 2,125 diam. Lug
45 736-0326 Flat Washer .510 ID x 1.0 OD x .125 Rondelle plate 0,510 DI x 1,00 DE x 0,125
46 734-04070 Wheel, 7.0 x 1.61 Roue, 7,0 x 1,61
47 729-04035 Al ter na tor Cap (op tional) Capuchon (en op tion)
48 736-0160 Flat Washer .53 ID x .93 OD x .050 Rondelle plate 0,53 DI x 0,93 DE x 0,050
49 731-07001 Hub Cap Grey Moyeu de cha peau-gris
31A-2N1_2P5_2
5.22.09
NOTE: For a proper working machine, use Factory Approved Parts. V-belts are designed to engage and disengage safely. A substitute (non
OEM) V-belt can be dangerous by not disengaging completely.
REMARQUE: N’utilisez que des courroies homologuées par l’usine. Les courroies trapézoïdales sont conçues pour un embrayage et un
débrayage sans danger. L’emploi d’une courroie de remplacement (sans l’étiquette d’équipement d’origine) peut s’avérer dangereux si cette
courroie ne se débraye pas complètement.
17
Page 18

TROUBLESHOOTING
This section addresses minor service issues. To locate the nearest Sears Service Center or to schedule service, simply contact Sears at
www.sears.ca.
CauseProblem Remedy
Engine fails to start
1. Choke not in ON position.
2. Spark plug wire disconnected.
3. Fuel tank empty or stale fuel.
4. Engine not primed.
5. Faulty spark plug.
6. Blocked fuel line.
7. Safety key not in ignition on engine.
8. Fuel shut-ff valve closed. (If Equipped)
1. Move choke to ON position.
2. Connect wire to spark plug.
3. Fill tank with clean, fresh gasoline.
4. Prime engine as instructed in
“Operating Your Snow Thrower”.
5. Clean, adjust gap, or replace.
6. Clean fuel line.
7. Insert key fully into the switch.
8. Open fuel shut-off valve.
Engine runs erratic
Engine overheats
Excessive
Vibration
Loss of power
Unit fails
to propel itself
1. Unit running on CHOKE.
2. Blocked fuel line or stale fuel.
3. Water or dirt in fuel system.
4. Carburetor out of adjustment.
1. Loose parts or damaged auger.
1. Spark plug wire loose.
2. Gas cap vent plugged.
3. Exhaust port plugged.
1. Drive control cable in need of adjustment.
2. Drive belt loose or damaged.
3. Friction wheel worn.
1. Move choke lever to OFF position.
2. Clean fuel line; fill tank with clean,
fresh gasoline.
3. Drain fuel tank. Refill with
fresh fuel.
4. Contact Service Center.
1. Contact Service Center.1. Carburetor not adjusted properly.
1. Stop engine immediately and
disconnect spark plug wire. Tighten
all bolts and nuts. If vibration
continues, have unit serviced by a
Service Center.
1. Connect and tighten spark plug
wire.
2. Remove ice and snow from gas
cap. Be certain vent is clear.
3. Contact Service Center.
1. Adjust drive control cable. Refer to
“Adjustments”.
2. Replace drive belt.
3. Replace friciton wheel.
Unit fails
to discharge snow
1. Chute assembly clogged.
2. Foreign object lodged in auger.
3. Auger control cable in need of adjustment.
4. Auger belt loose or damaged.
5. Shear pin(s) sheared.
18
1. Stop engine immediately and
disconnect spark plug wire. Clean
chute assembly and inside of
auger housing with clean-out tool
or a stick.
2. Stop engine immediately and
disconnect spark plug wire.
Remove object from auger with
clean-out tool or a stick.
3. Refer to “Auger Control Test” .
4. Refer to Maintenance section.
5. Replace with new shear pin(s).
Page 19

14
3. Voir l’Entretien.
tarière.
Dégagez le corps étranger de la
et débranchez le fil de la bougie.
2. Arrêter immédiatement le moteur
goulotte ou un bâton.
avec l’outil de dégagement de la
l’intérieur du logement de la tarière
Nettoyez la goulotte d’éjection et
et débranchez le fil de la bougie.
1. Arrêtez immédiatement le moteur
2. Remplacez la courroie d’entraînement.
Voir le Réglages.
1. Réglez le câble d’entraînement.
technique.
3. Adressez-vous à une station
du trou d’aération.
chapeau. Assurez-vous de la propreté
2. Dégagez la glace et la neige du
1. Branchez et serrez le fil de la bougie.
agréée.
machine par une station technique
vibrations persistent, faites vérifier la
tous les boulons et écrous. Si les
débranchez le fil de la bougie. Serrez
1. Arrêtez immédiatement le moteur et
abîmée ou ayant du jeu.
3. Courroie d’entraînement de la tarière
tarière.
2. Présence de corps étranger dans la
1. Goulotte d’évacuation bouchée.
2. Courroie d’entraînement abîmée ou ayant
1. Câble d’entraînement mal réglé.
3. Le port déchappement est bouché.
d’aération bouché.
2. Chapeau d’échappement du trou
1. Fil de la bougie desserré.
endommagée.
1. Pièces desserrées ou vis sans fin
la neige
La souffleuse n’évacue pas
pas
La souffleuse n’avance
Perte de puissance
Vibration excessives
technique.
1. Addressez-vous à une station
technique.
4. Adressez-vous à une station
essence fraîche.
d’essence. Faites le plein avec une
au carburateur pour vider le réservoir
3. Débranchez la canalisation d’essence
avec une essence propre.
2. Nettoyez la canalisation; faites le plein
1. Ouvrez le volet de départ.
8. Ouvrez le robinet.
7. Mettez la clé.
6. La nettoyer.
remplacez la bougie.
5. Nettoyez, réglez l’écartement ou
Souffleuse”.
4. Consultez le chapitre “Utilisation de la
et fraîche.
3. Faite le plein avec une essence propre
2. Branchez le fil de la bougie.
1. Ouvrez le volet de départ.
Solution
1. Carbureteur est mal réglé.Moteur surchauffe
4. Carburateur est mal réglé.
3. Eau ou saleté dans le système d’essence.
essence éventée.
2. Canalisation de carburant bouchée ou
départ fermé.
1. Machine fonctionnant avec le volet de
(le cas échéant)
8. Robinet d’arrivée de carburant fermé.
7. La clé de contact du moteur n’est pas mise.
6. Canalisation de carburant bouchée.
5. Bougie défectueuse.
correctement.
4. Bouton de l’amorceur n’étant pas employé
3. Réservoir vide ou essence éventée.
2. Fil de la bougie débranché.
1. Volet de départ fermé.
Cause(s)
Fonctionnement irrégulier
Le moteur ne démarre pas
Problème
svp contactez Sears au www.sears.ca.
Ce chapitre concerne des problèmes d’entretien mineurs. Pour localiser le centre de services Sears local ou pour céduler le service,
DÉPANNAGE
Page 20

Figure 11
Guide de courroie
Poulie tendeur
Tirez ici sur la
courroie pour la retirer.
Figure 10
Figure 9
13
ments et câbles, d’une couche d’huile légère ou de silicone.
Enduisez la machine en particulier les chaînes, ressorts, rouleabri métallique ou mal aéré, de bien la protéger contre la rouille.
Prenez soin, avant de remiser une machine à moteur dans un •
Entreposez la souffleuse dans un endroit sec et propre.•
Suivez les renseignements de lubrification.•
Enlevez tout les débris sur l’extérieur de la souffleuse.•
Consultez la notice d’utilisation du moteur.•
moteur qui accompagne votre souffleuse.
de la façon selon les instructions fournies dans la notice d’utilisation du
Si le moteur doit être entreposé pendant plus de 30 jours, préparez-le
Instructions de remisage
avec les vis taraudée.
2. Maintenez les nouvelles pales de caoutchouc en place sur la tarière
nent sur la souffleuse. Voir lf Figure 11.
1. Pour démonter les pales, enlevez les vis taraudée qui les maintienPour changer les pales en caoutchouc, procédez comme suit:
toucher le sol, car la souffleuse pourrait être gravement endommagée.
s’user au point où certaines parties de la tarière métallique peuvent
IMPORTANT: Ne laissez pas les aubes en caoutchouc de la tarière
devraient être remplacé dès l’apparition de signes d’usure.
Les pales en caoutchouc sur la tarière ont une tendance à s’user et
tchouc
Remplacement des pales en caou-
saison.
fois chaque saison et avant le remisage de la souffleuse à la fin de la
d’extension à la fin du câble d’embrayage avec une huile légère une
Lubrifiez les points de pivot sur la manette de commande et le ressort
Lubrification
serrée et resserrez-la selon le besoin.
2. Vérifiez fréquemment que toute la boulonnerie du moteur est bien
souffleuse pour tout ce qui concerne l’entretien du moteur.
1. Consultez la notice d’utilisation du moteur qui accompagne la
Moteur
5. Replacez le couvre-courroie retiré plus tôt.
4. Insérez la courroie sur la base de la poulie de la tarière.
3. Glissez la courroie sur la poulie motrice.
guide-courroie.
2. Placez la courrie sur le dessus de la poulie de la tarière, sous le
1. Abaissez la poulie de tension.
Figure 10.
Pour replacer la courroie, suivez ces instructions et consultez la
RÉGLAGES & ENTRETIEN
Page 21

12
Figure 8
tension pour dégager la poulie du guide-courroie.
Figure 7
de la poulie de la tarière. Il sera alors possible d’abaisser la poulie de
Figure 9. Enlevez la courrie en la dégageant simplement de la base
Enlevez les cinq vis hex. pour démonter le couvre-courroie. Voir la
complètement immobilisée.
la machine. Attendez que la tarière/ turbine se soit
réparation, un ajustement quelconque ou d’examiner
mande et arrêtez le moteur avant de faire une
AVERTISSEMENT:Débrayez la manette de com-
Replacement de la courroie
Vue de côte
nettoyez-la avant de la remonter.
6. Vérifiez la bougie d’allumage. Si la bougie est couverte d’huile,
est enlevée et la poignée de démarreur est tirée.
ATTENTION : L’huile peut sortir du trou de bougie d’allumage quand elle
attrapé dans la tête est enlevée.
tirer la poignée plusieurs fois pour s’assurer que n’importe quelle huile
5. Si le démarreur est difficile de tirer, enlever la bougie d’allumage et
tirer.
tirez la poignée de démarreur plusieurs fois de voir s’il est difficile de
4. Inclinez de nouveau la souffleuse à neige à la position d’utilisation et
pour voir s’il y a une différence considérable.
réinsèrent dans le trou supérieur. Voir la Figure 8. Évaluez la souffleuse
d’embrayage du trou de fond dans la manette de commande et le
dans la tension du câble. Pour ajuster, débrancher la fin de câble
Le trou supérieur dans la manette de commande prévoit un ajustement
moteur tourne au même régime. Procédez comme suit:
Il faut régler la courroie ou le câble si la tarière paraît d’hésiter alors que le
câble.
nécessaire du fait de l’étirement et de l’usure normale de la courroie et du
Un réglage périodique de la courroie et le câble d’embrayage peut s’avérer
basculer la souffleuse.
ce qu’il tombe en panne d’essence avant de faire
AVERTISSEMENT: Laissez tourner le moteur jusqu’à
Réglage de le câble d’embrayage
4. Serrez les écrous au fond avant le fonctionnement.
de cette notice d’utilisation.
3. Ajustez la plaque de raclage comme instruit dans la section Réglages
se trouve sur l’intérieur du logement.
2. Installez la plaque neuve assurant que la tête des boulons ordinaires
maintiennent sur la souffleuse.
1. Enlevez les quatre boulons ordinaire, et les écrous à six pans qui la
raclage, procedez comme suit:
un côté s’use. Voir la Figure 6-1. Pour remplacer ou renverser la plaque de
plaque de raclage a deux côtés d’usage et peut être renversé après que
La plaque de raclage s’usera et devrait être vérifié périodiquement. La
Remplacement de la plaque de raclage
d’utilisation.
sauf en cas d’instructions spéciales dans la notice
réglage quelconque pendant que le moteur tourne,
AVERTISSEMENT: N’essayez jamais d’effectuer un
pans et les boulons ordinaires.
plaque de raclage à la position voulue et serrez à fond les écrous à six
nent la plaque de raclage au logement. Voir la Figure 7. Ajustez la
3. Desserrez les écrous à six pans et les boulons ordinaire qui maintien-
guidon.
2. Pour ajuster, basculez la souffleuse en arrière pour qu’il repose sur le
modèles neufs ou sur les modèles équipés d’un plaque de raclage neuve.
REMARQUE: Les tarières peuvent être légèrement relevées sur les
ajusté trop bas.
excessive, ou la souffleuse n’auto-propulsera pas, la plaque peut être
peut être réglé tros haut. Si la plaque présente des signes d’usure
la neige souffle en dessous du logement de la souffleuse la plaque
touchent le sol simultanément lors de l’utilisation de la souffleuse. Si
plaque doit être réglée de manière que les roues, la plaque et la tarière
1. Pour vérifier le réglage, placez la souffleuse sur une surface plate. La
Réglage de la plaque de raclage
RÉGLAGES & ENTRETIEN
Page 22

11
3. Essuyez la neige et la condensation de la machine.
sécher.
quelques minutes avant de l’arrêter. Ceci permet le moteur de
2. Après avoir déblayé la neige, laissez le moteur tourner pendant
ne serait pas couverte selon la garantie.
prématurée des pales en caoutchouc de la tarière. L’usure résultante
REMARQUE: Une pression ascendante excessive cause une usure
arrêter le mouvement de la souffleuse.
en avant. Appuyez sur le guidon pour relever la tarière et pour
tarière d’entrer en contact avec le trottoir et propulsez la souffleuse
1. Soulevez-vous légèrement sur le guidon supérieur pour permettre la
Pour engager lla transmission
les tarières.
la commande de la tarière contre le guidon. Làchez-le pour arrêter
1. Pour engager les tarières et commencer à projeter la neige, serrez
Pour engager les tarières
commande lentement vers la position OFF.
le volet de départ à la position intermédiaire. Déplacez ensuite la
cale, remettez-le en marche et laissez-le tourner brièvement avec
commande du volet de départ vers la position OFF. Si le moteur
6. Au fur et à mesure que le moteur chauffe, tournez lentement la
LENTEMENT à sa position initiale. Au besoin, répétez l’opération.
pour qu’elle ne frappe pas le moteur. Laissez la poignée revenir
pour « surmonter » la compression. Ne lâchez pas la poignée
sentiez une légère résistance, puis tirez rapidement et fermement
5. Tirez doucement sur la poignée du démarreur jusqu’à ce que vous
plusieurs fois.
d’aération. Par temps froid, il peut être nécessaire d’amorcer
seulement une fois sur l’amorceur. Recouvrez toujours le trou
bien couvrir le trou d’aération. Si le moteur est chaud, appuyez
4. Appuyez sur l’amorceur de trois à cinq fois en faisant attention de
OFF.
froid). Si le moteur est chaud, placez le volet de départ à la position
3. Placez le volet de départ à la position ON (démarrage d’un moteur
2. Placez la commande de l’obturateur à la position Rapide (Lapin).
la clé n’est pas bien enfoncée dans le commutateur d’allumage.
bien. NE la tournez PAS. Le moteur ne peut pas démarrer tant que
1. Placez la clé de contact dans la fente. Vérifiez qu’elle s’emboîte
retirez la clé.
lance quand il tourne. Arrêtez-le après l’emploi et
surveillée, ne laissez jamais le moteur sans surveilAVERTISSEMENT : Pour éviter toute utilisation non
moteur tourne.
IMPORTANT : Ne tirez pas sur la poignée du démarreur quand le
près des manettes de commande. Déplacez celle-ci plusieurs fois.
3. Enlevez toute la neige et l’humidité du couvercle du carburateur et
rer sans la clé.
Rangez la clé dans un lieu sûr. Le moteur ne peut pas démar-
d’un démarrage non autorisé quand l’équipement n’est pas utilisé.
2. Retirez la clé de contact. Le fait de retirer la clé élimine le risque
1. Déplacez la commande de l’obturateur à la position STOP.
pour éliminer toute humidité accumulée sur le moteur.
Laissez le moteur tourner pendant quelques minutes avant de l’arrêter
retirez la clé.
lance quand il tourne. Arrêtez-le après l’emploi et
surveillée, ne laissez jamais le moteur sans surveilAVERTISSEMENT : Pour éviter toute utilisation non
Arrêt du moteur
Démarreur à lanceur
murale avant de la débrancher du démarreur même.
démarreur électrique. Débranchez toujours la rallonge de la prise
9. Quand le moteur tourne régulièrement, débranchez la rallonge du
commande lentement vers la position OFF.
le volet de départ à la position intermédiaire. Déplacez ensuite la
cale, remettez-le en marche et laissez-le tourner brièvement avec
commande du volet de départ vers la position OFF. Si le moteur
8. Au fur et à mesure que le moteur chauffe, tournez lentement la
au démarreur de refroidir en cas de surcharge.
thermique. Le système sera provisoirement arrêté pour permettre
trique est équipé d’un dispositif de protection en cas de surcharge
Lâchez le bouton dès que le moteur tourne. Le démarreur élec-
7. Enfoncez le bouton du démarreur pour faire démarrer le moteur.
UTILISATION
Page 23

10
plusieurs fois.
d’aération. Par temps froid, il peut être nécessaire d’amorcer
seulement une fois sur l’amorceur. Recouvrez toujours le trou
bien couvrir le trou d’aération. Si le moteur est chaud, appuyez
6. Appuyez sur l’amorceur de trois à cinq fois en faisant attention de
OFF.
froid). Si le moteur est chaud, placez le volet de départ à la position
5. Placez le volet de départ à la position ON (démarrage d’un moteur
4. Placez la commande de l’obturateur à la position Rapide (Lapin).
endroit bien aéré.
dans une prise de C.A. de 120 volts mise à la masse dans un
sur le côté droit du capot). Branchez l’autre extrémité de la rallonge
le moteur (sur certains modèles le démarreur électrique est situé
3. Branchez la rallonge dans la boîte de commutation électrique sur
commutateur d’allumage.
pas démarrer tant que la clé n’est pas bien enfoncée dans le
qu’elle s’emboîte bien. NE la tournez PAS. Le moteur ne peut
2. Placez la clé de contact dans la fente. Voir la Figure 6. Vérifiez
si le système ne convient pas.
d’une prise à 3 fiches mise à la masse. N’utilisez PAS le démarreur
licencié en cas de doute. Procédez comme suit si vous disposez
un système à 3 fils mis à la masse. Faites appel à un électricien
1. Vérifiez que l’installation électrique de votre domicile comprend
Figure 5
Figure 6
temps de pluie.
AVERTISSEMENT : N’utilisez pas le démarreur par
électrique.
toutes les instructions avant d’utiliser le démarreur
risque de décharge électrique. Suivez attentivement
prise à 3 fiches mise à la masse pour éviter tout
de 120 volts. Il doit toujours être branché dans une
fiche à brancher dans une prise de C. A. normale
équipé d’un cordon à 3 fils mis à la masse et d’une
AVERTISSEMENT : Le démarreur électrique est
(le cas échéant)
Démarrage électrique
fumez pas en faisant le plein d’essence.
le moteur tourne ou quand le moteur est chaud. Ne
jamais le plein d’essence à l’intérieur, pendant que
inflammable et les vapeurs sont l’explosif. Ne faites
nipulant de l’essence. L’essence est extrêmement
AVERTISSEMENT: Faites très attention en ma-
à votre machine.
2. Suivez maintenant les instructions ci-dessous comme il s’applique
1. Enfoncez la clé de contact. Voir la Figure 5.
Mise en marche du moteur
accompagne la souffleuse.
les instructions fournies dans la notice d’utilisation du moteur qui
1. Vérifiez le niveau d’huile et d’essence et ajouter au besoin. Suivez
Pleins d’essence et d’huile
moteur ainsi que son remisage.
complètes et détaillées concernant la mise en marche et l’arrêt du
du moteur, fournie avec la machine, pour obtenir des instructions
IMPORTANT: Nous vous conseillons de lire la notice d’utilisation
Avant le démarrage
la machine et dans ce notice avant le fonctionnement.
Lisez, comprenez, et suivez toutes les instructions et les consignes sur
UTILISATION
Page 24

Manette de commande
des tarières
Poignée du démarreur
Poignée de la goulotte
Goulotte d’éjection
Ta rière
Plaque de raclage
Poignée du
démarreur
Vidange de l’huile
Silencieux
Capuchon/Jauge à huile
Boîte de commutation électrique
Bouchon du
réservoir de
carburant
Amorceur
Clé de contact
Obturateur
Vo let de départ
Bouton du démarreur
électrique*
9
avance.
proche de la surface à déblayer au fur et à mesure que la souffleuse
Elle maintient le contact avec le sol et facilite le dégagement e la neige
Plaque de raclage
bouton..
pour l’ajuster. Inclinez la goulotte à la position voulue et resserrez le
plus près. Desserrez le bouton sur le côté de la goulotte d’évacuation
goulotte pour projeter la neige plus loin ou abaissez-la pour la projeter
détermine la distance à laquelle la neige est projetée. Redressez la
vers la droite ou vers la gauche. L’angle de la goulotte d’évacuation
Utilisez la manette de la goulotte d’éjection pour la faire tourner
d’évacuation
Goulotte d’évacuation/Poignée de la goulotte
embrayer les tarières, lâchez-la pour les débrayer.
les tarières. Serrez la manette contre le guidon supérieur pour
Elle se trouve sur le guidon supérieur et sert à embrayer ou à débrayer
Manette de commande des tarières
avancer la souffleuse quand elles touchent la surface à déblayer.
d’éjection. Les aubes en caoutchouc des tarières permette de faire
l’habitacle en tournant et la neige est ensuite évacuée par la goulotte
Lorsqu’elles sont enclenchées, les tarières amènent la neige dans
Tarière
source de courant de 120 V.
Exige l’utilisation d’une rallonge à 3 fiches pour l’extérieur et une
Prise pour démarrage électrique
sur le côté droit du capot.
REMARQUE : Sur certains modèles le démarreur électrique est situé
Pour faire démarrer un moteur avec une source de courant de 120 V.
Démarreur électrique(le cas échéant)
Pour faire démarrer le moteur manuellement.
Démarreur à lanceur
la souffleuse n’est pas utilisée. N’essayez pas de tourner la clé.
ment enfoncée pour mettre le moteur en marche. Retirez la clé quand
La clé de contact est un dispositif de sécurité. Elle doit être complète-
Clé de contact
temps froid. Consultez la notice d’utilisation du moteur.
dans le carburateur du moteur pour aider à faire démarrer le moteur en
L’enfoncement du bouton d’amorcage force le carburant directement
Amorçeur
qui accompagne la machine pour plus de renseignements.
ce qui facilite le démarrage. Consultez la notice d’utilisation du moteur
La manette du volet de départ permet de fermer le volet du carburateur
Manette du volet de départ
débrayer rapidement les commandes.
machine avant de vous en servir. Apprenez à arrêter la machine et à
Familiarisez-vous avec les commandes et la bonne utilisation de cette
Figure 4
MONTAGE
Page 25

8
Figure 3
Figure 2
goulotte.
IMPORTANT: Ne soulevez pas la machine par la poignée de la
voulu. Voir la Figure 3.
poignée de la goulotte d’éjection pour projeter la neige à l’endroit
2. Positionnez l’ouverture de la goulotte d’éjection à l’aide de la
souffleuse.
Reserrez le bouton en forme d’étoile avant le fonctionnement de la
supérieur vers le haut ou de haut en bas au direction désirable.
côté gauche de la goulotte d’éjection et faites pivoter la goulotte
1. Desserrez le bouton à en forme d’étoile qui se trouve sur le
abaissant la goulotte supérieur.
La distance de projection de la neige peut être modifiée en relevant ou
Installation de la goulotte
Figure 1
3. Serrez les bouton. Voir la Figure 2.
ne pas pincer le câble.
jusqu’à ce qu’il s’emboîte à la position de travail. Faites attention de
2. Relevez le guidon supérieur dans la direction indiquée à la Figure 1
1. Enlevez toute garniture d’expédition éventuelle.
Positionnez le guidon supérieur
déterminés du poste de conduite, derrière la souffleuse.
REMARQUE: Les côtés droit et gauche de la souffleuse sont
MONTAGE
Page 26

7
d’échappement contiennent du monoxyde de carbone, un gaz inodore et mortel.
Ne faites jamais fonctionner un moteur à l’intérieur ou dans un bâtiment mal ventilé. Les gaz
AVERTISSEMENT – MONOXYDE DE CARBONE
Laissez le moteur refroidir pendant au moins deux minutes avant de refaire le plein.
AVERTISSEMENT – L’ESSENCE EST UN PRODUIT INFLAMMABLE.
Cette machine peut ramasser et projeter des objets, ce qui peut causer des blessures graves.
AVERTISSEMENT – OBJETS PROJETÉS
turbine ou de la goulotte. Les pièces en mouvement peuvent amputer mains et pieds.
N’approchez pas les mains ou les pieds des pièces en mouvement, de l’habitacle des tarières/de la
AVERTISSEMENT – TARIÈRES EN MOUVEMENT
mouvement sont à l’intérieur.
N’approchez pas les mains de l’ouverture d’éjection pendant que la machine fonctionne. Des lames en
AVERTISSEMENT – LAMES EN MOUVEMENT
mouvement sont à l’intérieur.
N’approchez pas les mains de l’ouverture d’éjection pendant que la machine fonctionne. Des lames en
AVERTISSEMENT – LAMES EN MOUVEMENT
avant d’essayer d’assembler et d’utiliser la machine.
Veuillez lire et suivre toutes les instructions sur la machine et vous assurer de bien les comprendre
VEUILLEZ LIRE LA OU LES NOTICES D’UTILISATION.
Symbole Description
la machine et vous assurer de bien les comprendre avant d’essayer d’assembler et d’utiliser la machine.
Cette page illustre et explique les symboles de sécurité qui peuvent se trouver sur cette machine. Veuillez lire et suivre toutes les instructions sur
ÉTIQUETTES DE SÉCURITÉ
Page 27

6
des accidents et des blessures graves ou mortelles.
pas usés de façon excessive. Le non-respect de ces recommandations peut causer
tous les dispositifs mécaniques et de sécurité sont en bon état de marche et ne sont
la machine chaque année par une station technique agréée pour vous assurer que
de cette durée de vie utile moyenne, achetez une machine neuve ou faites inspecter
rée de vie utile moyenne de sept (7) ans, ou 60 heures de fonctionnement. Au terme
(EPA - Agence américaine de protection de l’environnement), ce produit a une du-
curité des produits de consommation) et la “U.S. Environmental Protection Agency”
D’après la Consumer Products Safety Commission (CPSC - Commission sur la sé-
Durée de vie utile moyenne
Three Way Catalyst (TWC) le cas échéant.
systèmes de contrôle des émissions de gaz suivants : Engine Modification (EM) et
pour fonctionner avec de l’essence sans plomb ordinaire et peuvent être dotés des
l’agence EPA fédérales pour SORE (petit équipement hors route) sont certifiés
Les moteurs certifiés conformes aux normes régulatrices de la Californie et de
Avis concernant les émissions de gaz
réglage de l’usine du régulateur.
entraîner son fonctionnement à des vitesses dangereuses. Ne modifiez jamais le
modification du réglage du régulateur peut provoquer l’emballement du moteur et
Pour éviter toute blessure grave ou fatale, ne modifiez pas du tout le moteur. Toute
Ne modifiez pas le moteur.
13. Ne faites pas tourner le moteur si la bougie n’est pas installée.
raccords ne sont pas fendillés et ne fuient pas. Remplacez-les au besoin.
12. Vérifiez souvent que la conduite, le réservoir, le capuchon d’essence et les
hors-saison.
11. Consultez toujours la notice d’utilisation quant aux instructions de remisage
fourneau, un sèche-linge ou autre appareil à gaz).
flamme, une étincelle ou une veilleuse (d’un chauffe-eau, un radiateur, un
10. Ne remisez jamais la machine ou les bidons d’essence à l’intérieur s’il y a une
avant de remiser la souffleuse.
neige de la tarière et éviter que l’ensemble de la tarière et de la turbine ne gèle
9. Laissez la machine fonctionner pendant quelques minutes pour éliminer la
risquent de nuire à la nature et à l’environnement.
8. Respectez les règlements concernant l’élimination des déchets et liquides qui
besoin.
7. Prenez soin des étiquettes de sécurité et d’instructions et remplacez-les au
d’utilisation de la machine.
réglages nécessaires. Consultez le chapitre «Réglages» dans la notice
6. Vérifiez fréquemment que les commandes fonctionnent bien et faites les
de mauvaises performances et compromettre la sécurité de l’utilisateur.
conformes aux spécifications de l’équipement d’origine peuvent donner lieu à
par des pièces authentiques seulement. L’utilisation de pièces qui ne sont pas
mesure de sécurité, vérifiez souvent tous les composants et remplacez-les
5. Les plaques de raclage et les patins de la souffleuse s’usent avec l’usage. Par
s’emballer, ce qui peut être dangereux.
4. Ne modifiez pas le réglage du régulateur et ne laissez pas le moteur
vous assurer qu’elle n’est pas endommagée.
machine en bon état de marche. Examinez soigneusement la machine pour
3. Vérifiez régulièrement que les boulons et vis sont bien serrés et maintenez la
réparation ou l’examen de la machine.
la terre pour empêcher tout démarrage accidentel pendant le nettoyage, la
complètement immobilisée. Débranchez le fil de la bougie et mettez-le à
les commandes et arrêtez le moteur. Attendez que la tarière/turbine se soit
2. Avant de nettoyer, de réparer ou d’examiner la machine, débrayez toutes
les réglages dans cette notice d’utilisation.
fonctionnent correctement. Consultez les chapitres concernant l’entretien et
1. Ne modifiez jamais les dispositifs de sécurité. Vérifiez souvent qu’ils
ENTRETIEN ET REMISAGE
Sears pour assistance.
abordées par cette notice d’utilisation. Contactez votre Centre de Service
21.
Faites toujours preuve de bon sens dans des situations qui n’ont pas été
des ecchymoses ou une entorse.
plus vite qu’il n’est possible de lâcher la corde. Ceci peut causer une fracture,
rapide de la corde du démarreur (recul) attire la main et le bras vers le moteur
vous sentiez une légère résistance, puis tirez plus rapidement. La rétraction
20. Pour mettre le moteur en marche, tirez lentement sur la corde jusqu’à ce que
poids de roues, chaînes, cabine etc.)
19. N’utilisez que des accessoires homologués par le fabricant de la machine. (ex.
soient immobilisées avant de déboucher la goulotte.
tourne. Arrêtez le guidon jusqu’à ce que toutes les pièces en mouvement se
goulotte. Ne débouchez pas la goulotte d’éjection pendant que le moteur
Utilisez toujours l’outil de dégagement pour déboucher l’ouverture de la
18. Ne placez jamais votre main dans la goulotte d’éjection ou près de l’admission.
un ajustement quelconque ou d’examiner la machine.
complètement immobilisée avant de déboucher la goulotte d’éjection, de faire
de conduite (derrière les guidons). Attendez que la tarière /turbine se soit
17. Débrayez toutes les commandes et arrêtez le moteur avant de quitter le poste
remettre en marche.
la machine n’est pas endommagée. Réparez tout dégât éventuel avant de la
le moteur si la machine commence à vibrer de façon anormale. Vérifiez que
16. Arrêtez le moteur, débranchez le fil de la bougie et mettez-le à la terre contre
Soyez prudent en reculant.
15. Ne déplacez jamais rapidement la souffleuse sur des surfaces glissantes.
transporter la machine et lorsqu’elle n’est pas utilisée.
14. Débrayez la commande de l’ensemble de la tarière et de la turbine pour
Marchez, ne courrez pas.
insuffisante. Gardez toujours un bon équilibre et tenez fermement le guidon.
13. N’utilisez pas la machine si la visibilité est mauvaise ou si la lumière est
12. Ne fatiquez pas la machine en essayant de déblayer la neige trop rapidement.
machine.
de compagnie et ne permettez jamais à quiconque de se tenir devant la
11. Ne dirigez jamais la neige vers des enfants, des spectateurs et des animaux
ou des dégâts matériels.
voitures, etc. car les débris peuvent ricocher et causer des blessures graves
10. Prévoyez de travailler en évitant de projeter la neige vers des fenêtres, murs,
9. Faites très attention en changeant de direction et en travaillant sur une pente.
gravier. Faites attention aux dangers non évidents et à la circulation.
8. Soyez extrêmement prudent à proximité des routes, allées ou chemins en
brûlures. Ne les touchez pas.
7. Le silencieux et le moteur deviennent très chauds et peuvent causer des
après avoir pris des médicaments.
6. Ne vous servez pas de la machine après avoir bu des boissons alcoolisées ou
inodore très dangereux.
gaz d’échappement du moteur contiennent du monoxyde de carbone, un gaz
5. Ne faites jamais fonctionner la machine dans un local clos ou mal aéré car les
bon état.
Laissez tous les dispositifs de sécurité en place et assurez-vous qu’ils sont en
4. Ne travaillez jamais sans la goulotte d’éjection ou si elle est endommagée.
lorsqu’elles sont relâchées.
les deux directions et revenir automatiquement à la position de débrayage
3. Toutes les manettes de commande doivent fonctionner facilement dans
l’emploi de la machine et pourrait causer des blessures corporelles.
dispositif de sécurité. Ne contournez jamais son rôle ce qui rendrait dangereux
2. La manette de commande de l’ensemble de la tarière et de la turbine est un
Les pièces en mouvement peuvent amputer mains et pieds.
dans l’habitacle de la tarière ou de la turbine ou dans la goulotte d’éjection.
1. Ne placez jamais vos mains ou vos pieds près d’une pièce en mouvement,
UTILISATION
IMPORTANT CONSIGNES DE SÉCURITÉ
Page 28

5
N’utilisez pas un pistolet de distribution à blocage en position ouverte.
réservoir d’essence ou l’ouverture du contenant pendant le remplissage.
m. Maintenez toujours le contact entre le pistolet de distribution et le bord du
d’essence.
contenant d’essence plutôt qu’avec le pistolet de distribution de la pompe
de l’équipement motorisé sur le camion ou la remorque en utilisant un
remorque et faites le plein au sol. Si ce n’est pas possible, faites le plein
l. Si possible, déchargez l’équipement motorisé du camion ou de la
contenants au sol, loin de tout véhicule, pour faire le plein.
camion ou une remorque à revêtement en plastique. Placez toujours les
k. Ne remplissez jamais les contenants d’essence dans un véhicule, un
remiser.
j. Laissez la machine refroidir pendant au moins 5 minutes avant de la
un fourneau, un sèche-linge ou autre appareil à gaz).
une flamme, une étincelle ou une veilleuse (d’un chauffe-eau, un radiateur,
i. Ne remisez jamais la machine ou les bidons d’essence à l’intérieur s’il y a
en marche.
machine. Déplacez la machine et attendez 5 minutes avant de la remettre
h. En cas de débordement, essuyez toute éclaboussure sur le moteur et la
g. Resserrez bien le capuchon d’essence.
environ pour permettre l’expansion du carburant.
f. Ne faites jamais déborder le réservoir. Laissez un espace d’un demi-pouce
plein.
e. Laissez le moteur refroidir pendant au moins deux minutes avant de faire le
pendant que le moteur tourne.
d. N’enlevez jamais le capuchon d’essence et n’ajoutez pas d’essence
c. Ne faites jamais le plein à l’intérieur.
incandescente.
b. Éteignez toute cigarette ou pipe, tout cigare ou toute autre source
a. Remisez le carburant dans des bidons homologués seulement.
immédiatement de vêtements.
votre peau ou sur vos vêtements s’enflammaient. Rincez votre peau et changez
risquent d’exploser. Vous pouvez être grièvement blessé si des éclaboussures sur
de l’essence. Il s’agit d’un produit extrêmement inflammable et les vapeurs
Pour éliminer tout risque de blessure grave, faites très attention en manipulant
Manipulation de l’essence
de commencer à déblayer.
7. Laissez le moteur et la machine s’habituer à la température extérieure avant
d’indications contraires de la part du fabricant).
6. N’essayez jamais de régler le moteur pendant qu’il tourne (à moins
5. Débrayez toutes les commandes avant de mettre le moteur en marche.
gravier ou en pierre concassée.
4. Réglez la hauteur de l’habitacle pour éviter tout contact avec les surfaces en
toutes les machines équipées d’un moteur à démarreur électrique.
3. Utilisez une rallonge à 3 fils et une prise de courant mises à la terre avec
votre stabilité sur des surfaces glissantes.
prendre dans les pièces en mouvement. Portez des chaussures qui améliorent
de bijoux, d’écharpes longues ou de vêtements amples qui risquent de se
2. Ne travaillez pas sans porter des vêtements d’hiver adéquats. Ne portez pas
et vous blesser aux yeux.
ant un réglage ou une réparation. Un objet peut en effet être projeté, ricocher
1. Portez toujours des lunettes de sécurité en utilisant la machine ou en effectu-
trébucher ou qui risquent d’être projetés par la tarière/turbine.
traîneaux, morceaux de bois, fils de fer et autres objets sur lesquels vous pourriez
Examinez soigneusement la zone à déblayer et enlevez tous les paillassons,
PRÉPARATION
7. Soyez toujours prudent pour ne pas glisser ou tomber, surtout en reculant.
Arrêtez la machine si quelqu’un s’approche.
distance d’au moins 75 pieds de la machine quand elle est en marche.
6. Gardez les spectateurs, les animaux de compagnie et les enfants à une
spectateurs, etc.
Prévoyez de travailler en évitant de projeter la neige vers la route, des
5. Les objets projetés par la machine peuvent causer des blessures graves.
tionnement de la machine de s’en servir.
4. Ne permettez jamais à des adultes ne connaissant pas bien le foncservir sous la surveillance étroite d’un adulte.
consignes de sécurité. Ils doivent apprendre à utiliser la machine et s’en
bien comprendre le fonctionnement de la machine et respecter les
la machine. Des adolescents plus âgés doivent lire la notice d’utilisation,
3. Ne permettez jamais à des enfants de moins de 14 ans de se servir de
débrayer rapidement les commandes.
machine avant de vous en servir. Apprenez à arrêter la machine et à
2. Familiarisez-vous avec les commandes et la bonne utilisation de cette
consultation ultérieure et pour commander des pièces de rechange.
marche. Conservez cette notice d’utilisation à un endroit sûr pour toute
figurent sur la machine et dans la notice d’utilisation avant de la mettre en
1. Assurez-vous de lire et de bien comprendre toutes les instructions qui
FORMATION
DANGERAVERTISSEMENT
et instructions qui figurent dans cette notice et sur la machine.
personnes qui peuvent lire, comprendre et respecter les avertissements
Votre responsabilité : Cette machine ne doit être utilisée que par des
graves et même mortelles.
non-respect de ces consignes peut causer des blessures corporelles
amputer mains et pieds et projeter des débris. Par conséquent, le
l’utilisateur peut entraîner des blessures graves. Cette machine peut
appareil motorisé, une négligence ou une erreur de la part de
sécurité qui figurent dans la notice d’utilisation. Comme avec tout
Cette machine doit être utilisée conformément aux consignes de
seulement votre personne et vos biens, mais aussi
pas respectées, peuvent mettre en danger non
de sécurité importantes qui, si elles ne sont
Ce symbole attire votre attention sur des consignes
CE SYMBOLE!
corporelles, RESPECTEZ L’AVERTISSEMENT QUI ACCOMPAGNE
Le non-respect de ces instructions peut entraîner des blessures
notice d’utilisation avant d’essayer de vous servir de cette machine.
ceux d’autrui. Prière de lire toutes les instructions figurant dans cette
IMPORTANT CONSIGNES DE SÉCURITÉ
Page 29

4
d’achat ci-dessus.
Inscrivez le numéro de modèle, le numéro de série et la date
Date d’achat ....................................................................
Numéro de série ..............................................................
Numéro de modèle ...........................................................
NUMÉRO DE MODÈLE
Sears Canada, Inc., Toronto, Ontario M5B 2B8
durée de la garantie tacite, ces restrictions peuvent ne pas s’appliquer dans votre cas.
mais s’appliquera en complément de toutes les lois provinciales applicables. En outre, certaines provinces n’autorisant pas la restriction de la
Cette garantie est offerte en plus de la garantie légale et n’exclut pas et ne limite pas les servitudes légales auxquelles vous pouvez avoir droit,
Cette garantie est valable seulement tant que cet équipement est utilisé au Canada.
Pour obtenir un service sous garantie, il suffit de retourner la souffleuse Craftsman au service de réparations Sears le plus proche au Canada.
GARANTIE
anglaise de cette notice d’utilisation
Pièces détachées (voir la page 21 de la version
Dépannage . . . . . . . . . . . . . . . . . . . . . . . . . . . . . . . 20
Remisage hors saison .......................19
Entretien . . . . . . . . . . . . . . . . . . . . . . . . . . . . . . . . . 16
Réglage ..................................14
verre).
Le remplacement ou la réparation des pneus en raison de crevaison par des objets externes (clous, épines, souches d’arbre ou éclats de 4.
spectant pas les instructions fournies dans la notice d’utilisation.
Les réparations nécessaires en raison de l’utilisation abusive ou négligente, y compris l’utilisation et l’entretien de l’équipement ne re-3.
au moteur résultant de l’utilisation de la souffleuse avec une quantité d’huile insuffisante.
Les pièces courantes à usure normale comme les courroies, les bougies, les filtres à air et les goupilles de cisaillement, ainsi que tout dégât 2.
La mise au point précédant la livraison1.
Cette garantie ne couvre pas :
Cette souffleuse est garantie pour une période de 90 jours à compter de la date d’achat si elle est utilisée dans un but commercial ou locatif.
EMPLOI COMMERCIAL OU LOCATIF :
vice de matière ou de fabrication pendant une période de deux (2) à compter de la date d’achat.
Sears Canada, Inc. s’engage à réparer ou à remplacer, au choix de Sears et gratuitement, les pièces qui s’avèrent défectueuses en raison d’un
GARANTIE LIMITÉE DE DEUX (2) ANS DE LA SOUFFLEUSE CRAFTSMAN
Utilisation . . . . . . . . . . . . . . . . . . . . . . . . . . . . . . . . 10
Montage . . . . . . . . . . . . . . . . . . . . . . . . . . . . . . . . . .8
Symboles de sécurité ........................6
Important consignes de sécurité . . . . . . . . . . . . . . . 4
Garantie . . . . . . . . . . . . . . . . . . . . . . . . . . . . . . . . . .3
Service de Sears ............................2
TABLE DES MATIÈRES
Page 30

3
d’achat ci-dessus.
Inscrivez le numéro de modèle, le numéro de série et la date
Date d’achat ....................................................................
Numéro de série ..............................................................
Numéro de modèle ...........................................................
NUMÉRO DE MODÈLE
Sears Canada, Inc., Toronto, Ontario M5B 2C3
durée de la garantie tacite, ces restrictions peuvent ne pas s’appliquer dans votre cas.
mais s’appliquera en complément de toutes les lois provinciales applicables. En outre, certaines provinces n’autorisant pas la restriction de la
Cette garantie est offerte en plus de la garantie légale et n’exclut pas et ne limite pas les servitudes légales auxquelles vous pouvez avoir droit,
Cette garantie est valable seulement tant que cet équipement est utilisé au Canada.
Pour obtenir un service sous garantie, il suffit de retourner la souffleuse Craftsman au service de réparations Sears le plus proche au Canada.
GARANTIE
anglaise de cette notice d’utilisation
Pièces détachées (voir la page 21 de la version
Dépannage . . . . . . . . . . . . . . . . . . . . . . . . . . . . . . . 20
Remisage hors saison .......................19
Entretien . . . . . . . . . . . . . . . . . . . . . . . . . . . . . . . . . 16
Réglage ..................................14
verre).
Le remplacement ou la réparation des pneus en raison de crevaison par des objets externes (clous, épines, souches d’arbre ou éclats de 4.
spectant pas les instructions fournies dans la notice d’utilisation.
Les réparations nécessaires en raison de l’utilisation abusive ou négligente, y compris l’utilisation et l’entretien de l’équipement ne re-3.
au moteur résultant de l’utilisation de la souffleuse avec une quantité d’huile insuffisante.
Les pièces courantes à usure normale comme les courroies, les bougies, les filtres à air et les goupilles de cisaillement, ainsi que tout dégât 2.
La mise au point précédant la livraison1.
Cette garantie ne couvre pas :
Cette souffleuse est garantie pour une période de 90 jours à compter de la date d’achat si elle est utilisée dans un but commercial ou locatif.
EMPLOI COMMERCIAL OU LOCATIF :
vice de matière ou de fabrication pendant une période de deux (2) à compter de la date d’achat.
Sears Canada, Inc. s’engage à réparer ou à remplacer, au choix de Sears et gratuitement, les pièces qui s’avèrent défectueuses en raison d’un
GARANTIE LIMITÉE DE DEUX (2) ANS DE LA SOUFFLEUSE CRAFTSMAN
Utilisation . . . . . . . . . . . . . . . . . . . . . . . . . . . . . . . . 10
Montage . . . . . . . . . . . . . . . . . . . . . . . . . . . . . . . . . .8
Symboles de sécurité ........................6
Important consignes de sécurité . . . . . . . . . . . . . . . 4
Garantie . . . . . . . . . . . . . . . . . . . . . . . . . . . . . . . . . .3
Service de Sears ............................2
TABLE DES MATIÈRES
Page 31

2
199261 07.21.05 BY Printed in U.S.A.
Faites-le réparer, à domicile ou à l'atelier!
Téléphonez au:
1-800-LE-FOYER
(1-800-533-6937)
24 heures par jour, 7 jours par semaine
Pour la réparation des appareils électromémagers de grandes marques
à votre domicile … peu importe le fabricant ou le détaillant!
Pour connaître l'emplacement du Service des pièces et de l'entretien
Sears le plus proche afin d'apporter à l'atelier des produits tels que
des aspirateurs, tondeuses à gazon ou appareils électroniques.
Pour connaître le no. de téléphone du Service des pièces et de l'entretien
Sears afin de commander les pièces de rechange, accessoires et
manuels d'instructions requis pour effectuer vous-même les réparations.
www.sears.ca
Pour acheter ou demander des renseignements
sur un contrat d'entretien Sears, téléphonez au:
1-800-361-6665
de 9 h à 23 h du lundi au vendredi (HNE), de 9 h à 16 h le samedi
For service in English:
1-800-4-MY-HOME®
(1-800-469-4663)
www.sears.ca
Page 32

5/26/2009
769-04202A
Visitez notre site web: sears.ca
Sears Canada Inc., 290 Yonge Street, Toronto, On M5B 2C3
machine.
• PIÈCES DÉTACHÉES
• ENTRETIEN
• UTILISATION
• MONTAGE
• SÉCURITÉ
avant de mettre en marche la
sécurité et les instructions
attentivement les régles de
ATTENTION: Lisez
Modèle No. C459-52831
Souffleuse de 21 po
®
Notice d’utilisation
 Loading...