

Page 1
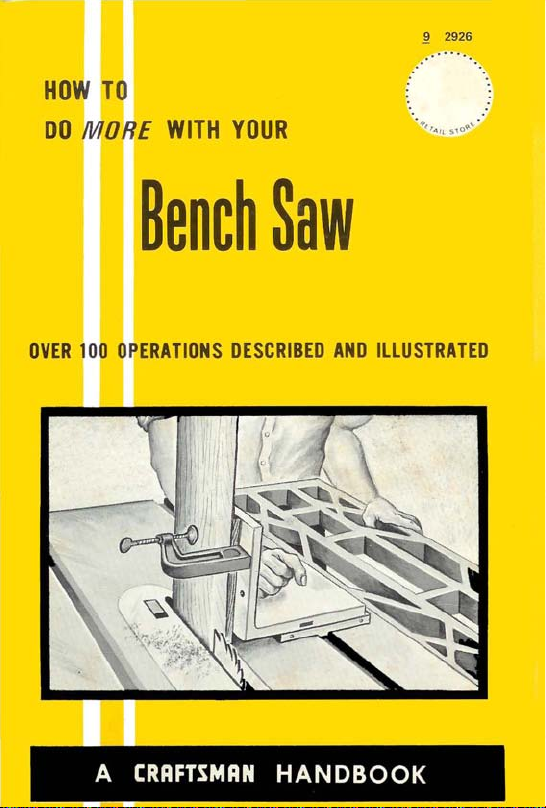
HOW
DO
M
TO
ORE
WITH
YOUR
11
2926
OVER
Bench
100
OPERATIONS
A
CRAFTSMAN
Saw
DESCRIBED
AND
HANDBOOK
IllUSTRATED
Page 2

BwA-Ji,
~
A~IIN'
FOR SAWING
Use
the
correct
Just
a few
are shown here.
FOR CUTTING
Use
the universal jig
ing
of
.workpiece.
VARIOUS
blade
of the various blades
Also
see page 8.
TRUE
for exact
FOR CUTTING EXA
TAPERS
Use
the
adjustable
tap
MATERIALS
for
the material
and
DADO TENONS
positioning and hold-
CT
MEASUREMENT
er jig.
and
their
the
job.
purposes
FO
R GROOVES, RABBETS, CHAMFERS
Use a
dado
set
or
FOR EDGE
MOLDING,
TONGUE-ANDAND
DECORATING
Use
either
the
...
the
iliary,
with an
hold-down
single-
assortment
homemade
attachment
an adjustable
GROOVE
or
fence)
da<;lo.
CUTTING
JOINTS
triple-cutter mol
of
cutters. You also need
(to
attach
and/or
the
universal jig.
to
ding
an
head
aux
-
FOR SANDING
AND/OR
Use a sanding wheet
discs
cemented
BEVEL
to
its two faces .
EDGES
ANGLES
...
FOR ACCURATE, EASIER CROSSCUTTING
U
se a hold-down
large w
orkpieces,
of
the
table
on
equip
extensions.
your
miter
your
saw
gauge .
with
..
one
and.
Or
for
both
AT
with
TRUE
two
different
MITER
grit
Page 3
REVISED
INDEX
1969
GENERAL
Descriptive
Saw
ACCESSORIES
HAVE
Pertinent
increasing
accessories.
PROPER
PROCEDURES
General
actions
an
SELECTION
STANDARD
Ripping.
Work,
Miter
Extension -Stops
Blocks.
MAKING
Bevel
Ripping.
SPECIAL
Making
End
Curves -Coves -Bawls;
a
Miter
THE
The
Handling -Regularly
Grooves -Wide
and
Rabbets -Rounding
Square
MOLDING
OPERATIONS
Molding
Straight
Circular
and
Ornamental
-
Coves
Power
30
DIFFERENT
Completely
for
joints.
FASTENERS
G
tuing,
TABLES
INFORMATION
Data -Selection
and
Motor.
.............
circular
Resewing,
Gage,
Cuts -Miter
Cuts;
DADO
Tools -Adjustments -Work
Stopped
Stock.
Raised
Saw.
making
YOU
facts
about
and
safer-operation
OPERATING
................
information
and
handling
saw.
OF
SAW
SAW
Narrow
ANGLE
SAW
Center
Board -Cutting
Set-Up -Patterns
Edges -Strip
and
.••
nailing,
....•.•.......•••.....
OPERATIONS.
Work,
Crosscutting,
Auxiliary
CUTS
OPERATION
Cuts,
Cutting
Rabbets
SAWS.
Grooves -Gains
Grooves -Tenons-
AND
SANDING
.•...•..•••••.•
Curved
Panels -Dowels
Work -Spiral
and
Sanding
WOOD
illustrated
thirty
different
...•.•...•.....•
bolting,
of
SHOULD
,
•.....•..
work
about
proper
of
work
pieces
BLADES
Lang
and
Table
and
Clearance
•.......•
Cuts -Taper
.•.••
Edge
Cuts,
-
Using
Tenons.
_.
_
.i
.••..••
Spaced
and
Tapering
-
Moldings
Work -Tenons
-
Turnings
with
JOINTS
instructions
woad
screwing.
..•.
-
..
Page
4-5
6-7
9-11
13-17
18-20
21-23
24-29
29-31
32
12
3
8
The
Bench
An
Illustrated
of
Operation
for the
SET-UP - ACCESSORIES - PROPER
HOME
SHOP
ALL
STANDARD
SAWING
DADO
MOLDING
SANDING
...
Saw
Manual
CRAFTSMAN
OWNER
AND
SPECIAL
OPERATIONS.
OPERATIONS
OPERATIONS
OPERATIONS
TABLES
HANDLING
Catalog
-<
~.~
A
MIDWEST
No.
9-2926
A
TECHNICAL
215
CRAFTSMAN
PUBLICATION
Form
No.
B71
123208 A 000
HANDBOOK
ILLUSTRATIONS
Copyrighted
SEARS.
ROEBUCK
1969
and CO.
Printed
in
U.S.A.
Page 4
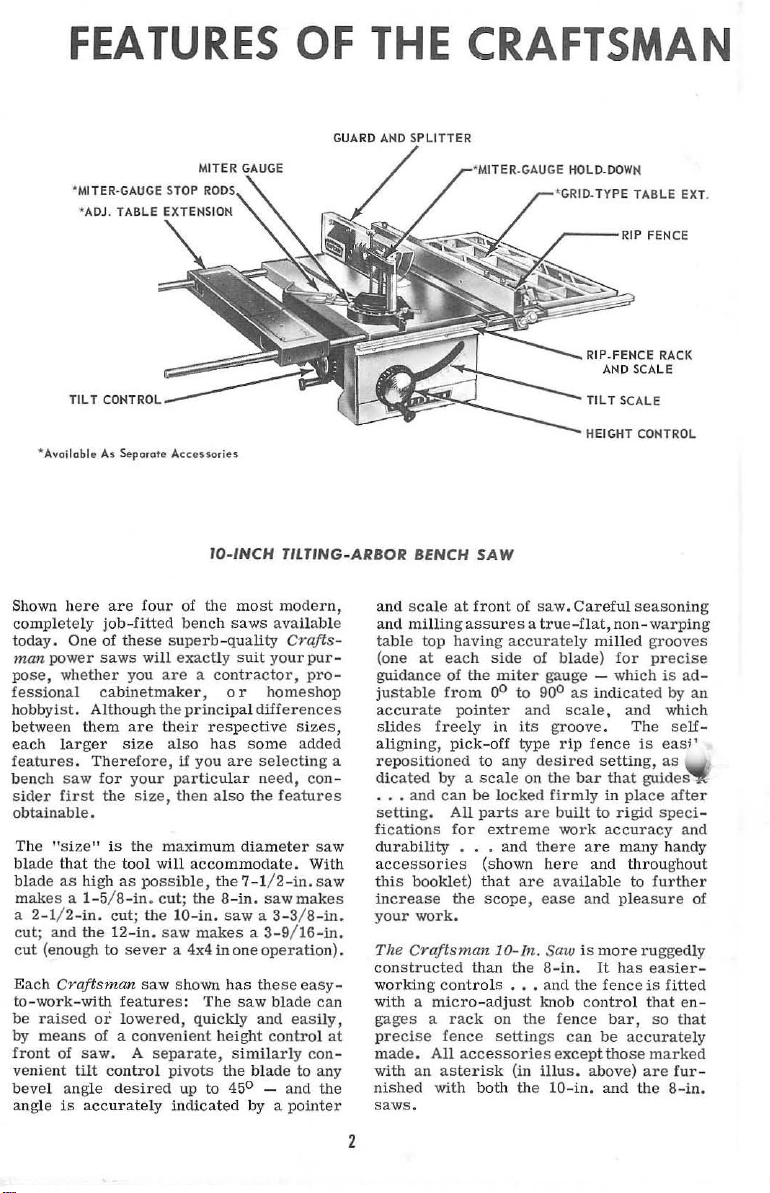
FEATURES
OF
THE
CRAFTSMAN
'M
TIL T
'A"oilable
Shown
here
compl
ete
y.
power
whe
ional
etween
lar
ch
saw
first
"size"
that
as
s a
2-1/2-i
; and
(enough to
Craftsman
work-with
raised
eans
of
angle
is
ly
One
tilt
toda
man
pose,
f
ess
hobbyist.
b
each
features.
ben
sider
obtainable.
The
blade
blade
make
a
cut
cut
Each
tobe
by m
front
venient
bevel
angle
ITER
-GAUGE
SlOP
CONTROL
As
of
saws
ther
cabinetmaker
Although
them
ger
Therefore,
for your
the size, then
the
high
1-5/8-in. cut;
n.
the 12-in.
or
of a convenient
saw. A separate,
accurately
Separ
are
job
-fi
these
you
are
size
is
the
tool
as
cut;
sever
feature
lower
control
desired
ate
four of the
tted
will
the
will
possible,
the IO-in.
saw
.--
Accessories
bench
superb-quality
exactly
are a contractor,
, 0 r
principal
their
also
if
you
particular
maximum
accommodate.
the 8-i
saw
makes a 3-9
a 4x4
shown
s:
The
ed,
quickly
pivots
up to 45
indicated
IO-/NCH
TILTING-ARBOR
most
modern,
saws
available
Crafts-
suit
your
pur
pro-
homeshop
differences
respective
has
are sel
also the
the7-1/2-in.saw
saw a 3-3/8-in.
in
one
has
height
similarly con-
the
some
need,
features
diamet
n.
saw
operation).
the
saw
blade
and
control
blade to
0
-
by a
sizes,
added
ecting
con
er
With
makes
/ 16-in.
se
easy
easily,
and
pointer
-
a
-
saw
-
can
at
any
the
r'MllrB',G,'U';'
BENCH
and
scale
and
table
(one
guidance
ju
stab
accurate
slides freely
aligning,
repo
dicated
•••
setting. All
fications
durability
acc
this booklet)
increase
your
The
constructed
working
with a
gages a rack
preci
mad
with
nished
saws.
at
milling
assures a true-nat,
top
having
at
eac
of
the
le
from
pointer
pick-off
sitioned
by a sca
and
can
for
•••
essories
the
work.
Craftsman
contro
micro-adjust
se
fence
e.
All
accessories except those
an
asterisk
with both
r-"',RII',TYPE
SAW
front
of
accurate
h side
of
miter
00 to 900 as
and
in
its
type
to
any
le
on
be
lock
ed
parts
are
extreme
and
(shown
that
are
scope,
lO-ln.
than
the 8-in.
ls •
..
on
the
settings can
(in
the
HOLD.
DOWN
~--RIP
RIP.FENCE RACK
AND
TILT SCALE
HEIGHT
saw.
Careful
non-warping
ly
mill
blade)
gauge -which
groove.
desired
the
firm
built
there
here
ava
ease
Saw
and
knob
fence
illu
la-in.
for
indicated
scale,
rip
fence
setting,
bar
that
ly
in
to
rigid
work
accuracy
are
many
and
ilable
and
ple
is
more
It
has
the
fence
control that en-
bar,
be
s.
above)
and
TABLE
FENCE
SCALE
COHTROL
seasoni
ed
grooves
precise
is
by
and
which
The
is
easi'
as
guides
place
speci
handy
throu
gho
to
further
asure
ruggedly
easier
is
fitted
so
accurate
marked
are
the 8-in.
EXT.
ad-
an
seU
after
and
that
fur-
ng
-
-
ut
of
-
ly
2
Page 5
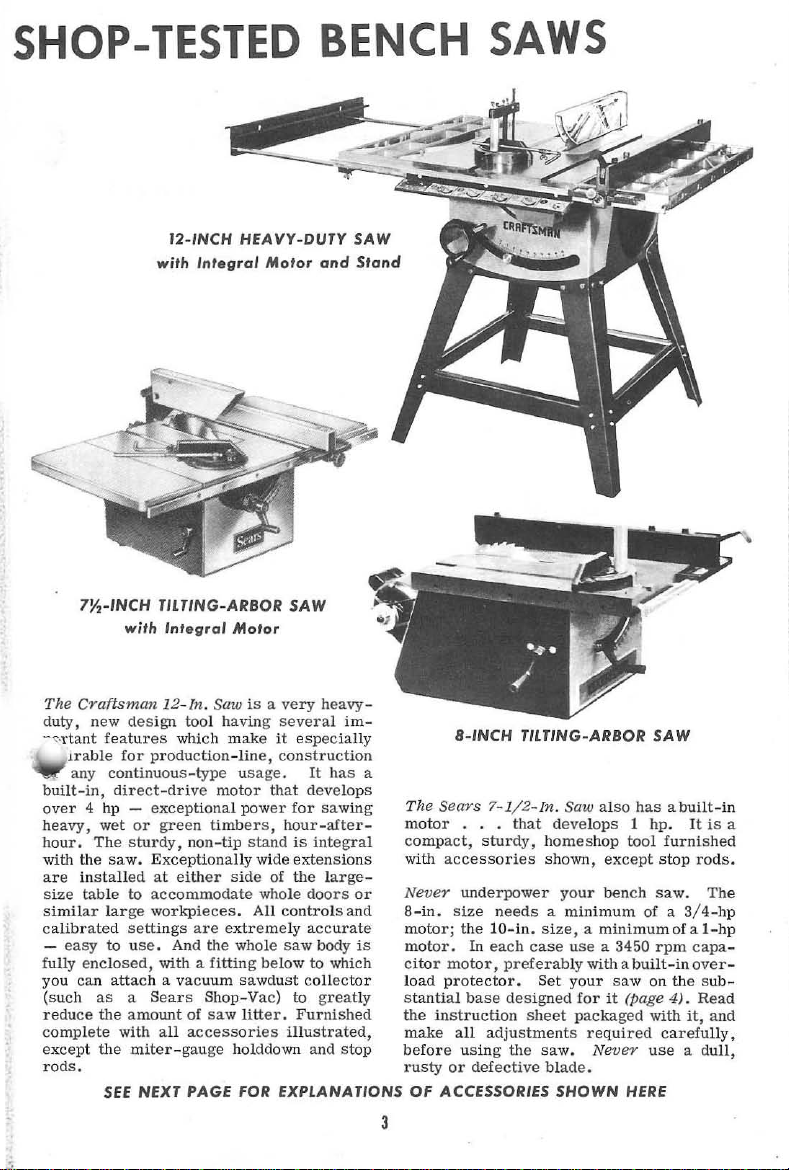
SHOP-TESTED
BENCH
SAWS
12-1NCH
with
7j1,-lNCH
The
Craftsman
duty, new
--;-'1'tant
uable
any
built-in,
over
4 hp -
heavy,
wet
hour.
The
with
the
are
installed
size
table
similar
TILTING-ARBOR
with
Integral
12-1n.
design
featur
es
for
production
continuous-type usage.
direct-drive
exceptional
or
green
sturdy,
saw.
Exceptionally
at
to
accommodate
large
workpieces.
calibrated settings
-
easy
to
use.
f
ully enclosed,
you
can
(such
reduce
complete
except
rods.
attach a vacuum
as a Sears
the
the
SEE
And
with a
amo
unt
with a
ll
miter-gauge
NEXT
HEAVY-DUTY
'nfegral
Motor
Saw
tool
which
is a very
having
make
-lin
motor
e,
power
timbers,
non-tip
stand
wide
either
side
whole
All
are
extremely accurate
the
whole
fitting
below
sawdust
Shop-Vac)
of
saw
litter.
accessories
holddown
PAGE
FOR
SAW
Motor
and
Stand
SAW
heavy
several im-
it
especially
construction
It
has
that
develops
for
sawing
hour-after-
is
integral
extensions
of
the
large-
doors
controls
saw
to
illustrated,
EXPLANATIONS
or
and
body
to which
collector
greatly
Furnished
and
stop
is
-
a
8-/NCH
The
Sears
motor
compact,
with
accessories
Never
8-in.
size
motor;
motor.
citor
motor,
load
protector.
stantial
the
instruction
make all
before
rusty
or
OF
ACCESSORIES SHOWN HERE
TIlTING
7-1/2-In.
. . .
that
sturdy,
underpower
needs a minimum
the
10-in.
In
each
case
preferab
base
designed
sheet
adjustments
using
the
defective
3
-ARBOR
Saw al
develops 1 hp.
homeshop
shown,
your
size, a minimumofal-hp
use
ly with a
Set
your
for
packaged
required
saw.
blade.
so
except
bench
a 3450
saw
it
(page
Never
tool
built-in
SAW
has a built-in
It
furnishe
stop
rods.
saw.
of a 3/4-hp
rpm
capa
over
on
the
sub
4).
Read
with
it,
carefully,
use a dull,
is
The
and
a
d
-
-
-
Page 6

BENCH
SAW
ACCESSORIES
IMPROVE
Two
types _ either
your
bench-saw
(on bors)
fence
..
width
of
as
needed;
cn
be
used
workpiece
Furnished
Blade,
Joints
shown on
~or
holding
production.
TABLE
01
which
table -ore
the
up
to
the
that
can be handle.!
UNIVERSAL
complete
to
(I<:cu'ole[y make
poges
any
odd-shaped
, ,
safely.
EXTENSIONS
can
be
shown.
Grid
type
outer
with on
24·29.
TAPER
(Shop-Tested
attached
to
The
Adjustable
includes
Either
easily,
on
limit.
JIG
8.in.
of
Also
the
13).
very
Tenoning
most
work (p.
JIG
the
extension
will
30
Wood
useful
Speeds
Accessories
right_ Or
left-side
type
slides
rock so
g.eotly
increase
outward
thot
the
Shown
01
Easily
(fastened
gers"
for
narrow_work
Are
For
10-
ON-Off
Finger.Hip
prepored
boss
saw
•••
ond
safe
erations.
light,
etc.
HOLD-DOWN
mounted
to
to
bench_sow
hold
work
surer,
securely
safer
sowing. A must
and
preci~ion
SPECIAL INSERTS
and
a-Inch
SWITCH
rocker
switch
under
front
for
instont,
control
of
"Extra"
011
outlet
ATTACHMENT
an
auxiliary
fence),
the
in
and
down
operations.
~
mounts
edge
convenient
sowing
for
(I
work.
fence
"fin-
..•
for many
op-
j
15
on
of
Fast,
"ccurate,
lightweight
...
up
to
DADO,
Page
measured
aluminum - will
15",
both
single
MOLDING,
18
topers
require a jig.
guarantee
and
double
SANDING
Page
21
you
the
best
(see
page
12).
ACCESSORIES
This
Page 23
One _ in
tapers
ever
If you
molding
are
blade
fACE
Only
one
eye
protectors
Never
without
of
face
safeguard
intend
cuttillg
absolutely
clearollce
SHIElD
of
many
use
your
wearing
shield
your
or
eyes.
to
do
(p.
necessary
and
safe
models
is
shown.
bench
some
goggles
dado
21
type
saw
work (p.
J.
these
..
coverage
of
to
special
, to
of
18)
provide
the
"welr",
and/or
illserts
for
Page 7
USE
.,Other
OF
TOOL
Models Where Applicable)
ADD
TO
SAFETY
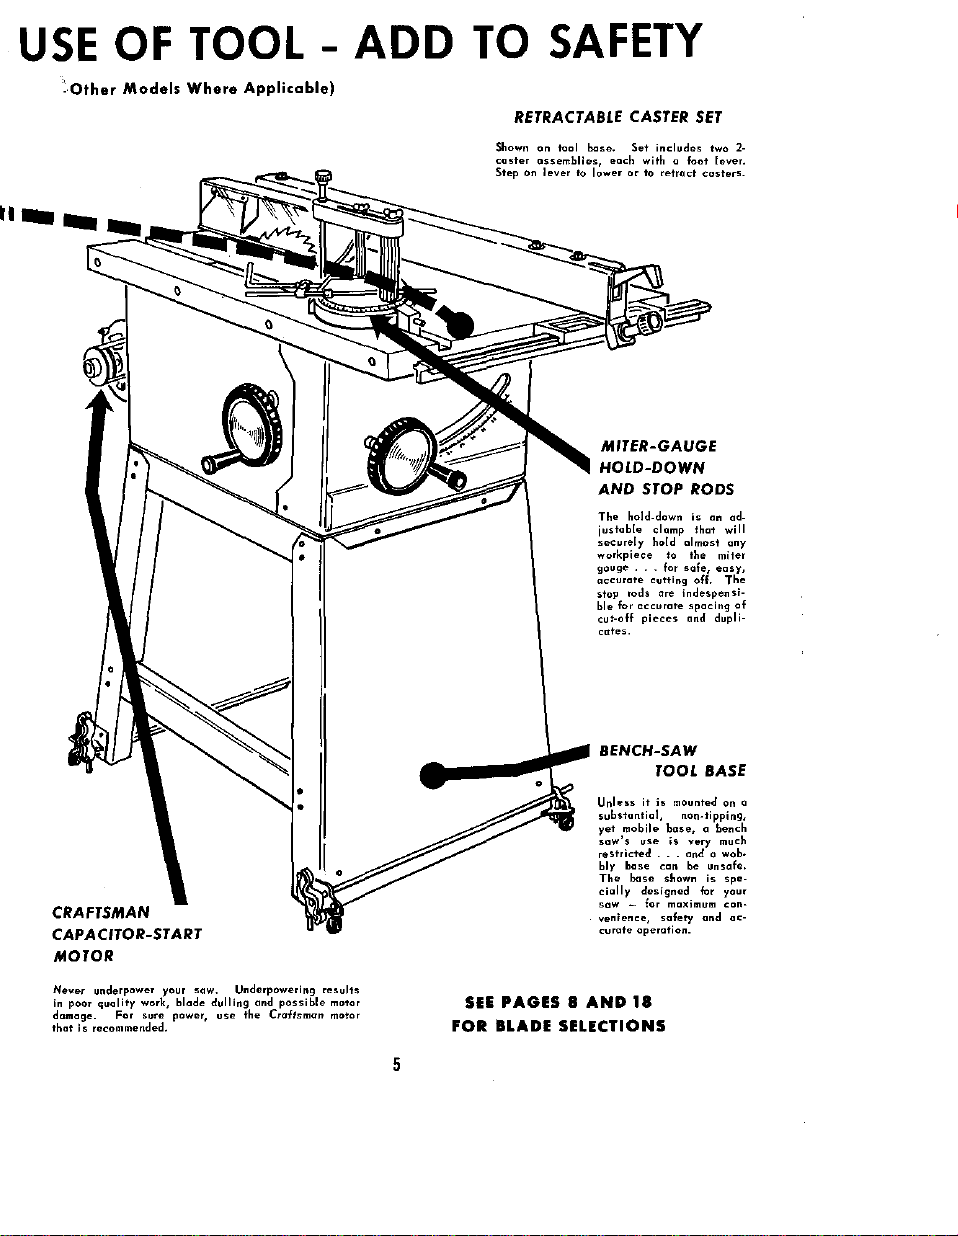
RETRACTABLE CASTER
Shown
On
tool
(lssemblies,
lever
to
base.
lower
coster
Step
On
Set
each
or
AND
The
hold_dawn
justable
securely
workpiece
gouge
...
accurate
stop
tocls are
ble
for
cut-off
cotes.
SET
includes
retract
foot
two
costers.
with"
to
STOP RODS
is
on
clomp
that
hold
almost
to
the
for
sale,
cutting
off.
indespensi-
accurate
spacing
pieces
and
lever.
ad.
will
ony
miter
easy,
The
dupli.
2-
of
CRAFTSMAN
CAPACITOR-START
MOTOR
Nev"r
in
poor
damage.
the,
underpower
quality
is
recommended.
For
work,
sure
),our
blade
powe"
saw.
dulling
Underpowering
oml
use
the
possible
Craffsman
.esulfs
motor
motor
BENCH-SAW
TOOL BASE
Unl""s
it
is
mobile
use
bose
base
designed
operation.
18
mounted on "
non_tipping,
base,
is
very
...
and"
can
be
shown
maximum
safety
a bench
much
wob.
unsafe.
is
spe-
for
your
can·
and
aC-
SEE
PAGES 8 AND
FOR
BLADE
substontinl,
yel
sow's
restricted
bly
The
cially
saw _ for
venience,
curate
SELECTIONS
5
Page 8
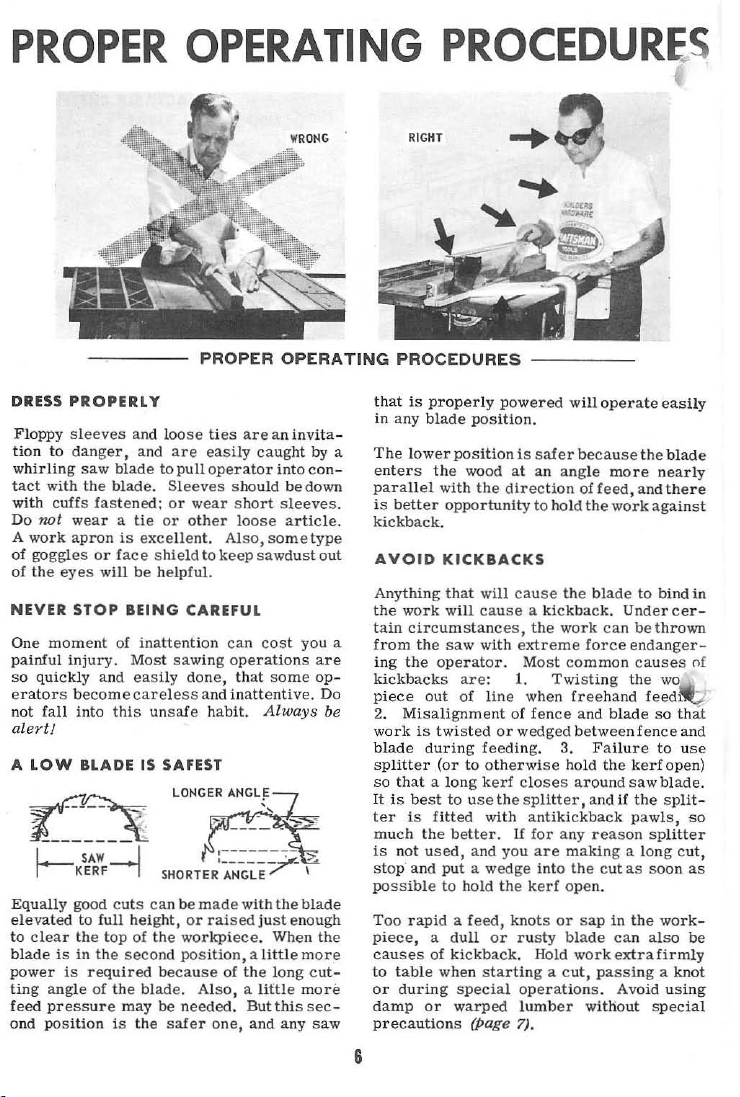
PROPER
OPERATING
PROCEDURES
DRESS
PROPERLY
Floppy
sleeves
tion
to
with
cuffs
work
goggles
the
eyes
moment
injury.
quickly
fall
danger,
wear a tie
apron
STOP
become
whirling
tact
with
Do twt
A
of
of
NEVER
One
painful
so
erators
not
alert!
A
LOW
~
1-
r-KERF
Equally
elevated
to
clear
bl
ade
is
power
is
ting
angle
feed
pressure
position
ond
and
and
saw
blade
the
faste
or
will
and
inlo
BLADE
to
blade. Sleeves
ned;
is
excelle
face shie
be helpful.
BEING
of
inattention
Most
easily
careless
this
unsafe
IS SAFEST
SAW-1
good
cuts can be
to
full
height,
the
top
of
the
of
second
the
may
is
the
the
because
blade.
be
in
required
RIGHT
PROPER
loose
ties
are
easily
pull
operator
or
wear
or
other
nt. Al
ld to
keep
CAREFUL
sawing
done,
and
habit.
LONGdR
~. ------~
,-
SHORTER'~NGLET
made
or
rai
workpiece
position, a little
Also, a liftle
needed.
safer
one,
OPERATING
are
an
invita
caught
by a
into
bedown
sleeves
article.
sawdust
cost
you a
some
Always
--:-
con
out
are
op-
Do
be
;;>-
should
short
loose
so,sometype
can
operations
that
inattentive.
ANGL~E,
----
\
with
the
just
enough
. When
the long
But
this
and
any
blade
the
more
cut-
more
sec
saw
s ed
of
that
in
The
-
enters
parallel
.
is
kickback.
AVOID
Anything th
the
tain
from
ing
kickbacks
piece
2.
work
blade
splitter
so
It
is
ter
much
is
stop· and
possible
Too
piece, a dull
causes
to
or
-
damp
precautions
PROCEDURES
is
properly
any
blade
lower
position
the
with
better
opportunity
KICKBACKS
at
work
will
circumstances,
the
saw
the
operator.
are:
out
of
Misalignment
is
twisted
during
(or
that
a l
ong
best
to
is
fitted
the
better. U for
not
used,
put a wedge
to
rapid a feed,
of
kickback.
tab
le when
during
special operations.
or
warped
...
powered
position.
is
wood
to
use
and
hold
(page 7).
safer
at
an
direction
to
the
extreme
Most
1.
when
of
fence
wedged
closes
splitter,
antikickback
you
are
into
the
kerf
knots
rusty
Hold
lumber
angle
hold
the
work
common
Twisting
3.
hold
any
making a long
open
or
blade
the
will cause
cause a kickback.
with
line
or
feeding.
otherwise
kerf
the
with
or
starting a cut,
will
operate
because
of
feed,
the
blade
force
freehand
and
between
Failure
around
and
reason
the
cut
.
sap
workextrafirmly
passing a knot
witliout
more
work
Undercer
can
endangerthe
blade
the
saw
if
as
tn
can
Avoid
easily
the
nearly
and
against
to
bind
be
thrown
causes
wo
feedr
so that
fence
to
kerf
blade.
the
split
pawls,
splitter
soon
the
work
also
special
blade
there
open)
using
in
-
nf
and
use
-
so
cut,
as
-
be
6
Page 9

contrivance
supported
supp
NO
STRAIGHT
EDGE
N°'fI
~
\;!
,
orted
blade
AVOID
when
be
sure
end
of
the
end
free
the
cut
AWKWARD
to
work,
to
fall
is
complete.
HAND
place
it
against
leaving
away
from
POSITIONS
the
the
un-
the
Warped
cause
table
permits
ing
process.
will
slide
tendency
KEEP
Always
between
ti
ng
your
the
safe
hand to
available
'."'ur
palm.
ur
hand
a
outer
steady,
and
anchor
and
kickba
ck,
or
against
binding
on
to bind
HANDS
be
certain
the
blad
hand into
slde,make
push
work
is
equal
For
for
fingers over
and
tuck
it
against
crooked
especially
fence
or
Always
table
the
CLEAR
that
e and
it
through,
to
added
the
push
the
thumb
wor
kpi
in a manner
twisting
make
and
along
saw
blade.
OF
there
the
fen
this
position. To
a
rule·notlo
the
maximum
safety,
through,
the
fence
in
end
of
eces
can
if
placed
during
fence
THE
is
ample
ce,
unless
to
behind
the
that
BLADE
before
use
the
width
when using
hook
keep
the
certain
workpiece.
also
on
the
that
feed-
work
without
room
get-
be
on
your
space
of
the
hand
palm
When
crosscutting,
even
for
cutting
backs
type
groove,
left
behind
hand
push
h
gauge
SUPPORT
and
are
of
hand
gauge
to
gauge
is
as
involves
stand
used,
straight
especially
operation.
at
on
workpiece
at
hold
work
and
keep
possible.
WORK
use
cuts.
more
likely
If
the
left
center
agai
work
it
AGAINST
the
Freehand
risk
to
using
side
with
of
gauge.
nst
to
the
as close
miter
gauge,
cross-
because
occur
in
the
left-hand
of
blade.
Place
thumb
hooked
Use
gauge,
and
saw.
If
to
center
WOBBLING
kick-
this
this
to
right
of
If
work
used,
around
from
you
is too n
use a push
the
behind
walk
around
YES~
.
~..
NEVER
When us
BIND
ing a miter-gauge
saw
to
J " I
.
arrow
and
finish
the
:.
FREE
for
stic
k (Page 9),
pull
the
saw.
\-
END
hand to
the
cut.
OF
stop
work
Hold
WORK
rod
use
GVARI)
be
safely
or walk
through
work
or
sim
AND
as
ilar
SPLITT
Never
saw
to
few
that
out
TWO
Dontt
of
Dontt
feet
hazard,
shou
7
ER
WHENEveR
advance
without
keep
minutes
will
danger
OBVIOUS
reach
free
let
might
ld
not
an
first
it
from
to
allow
work
of
being
up
to
wood -
floor
become
slip.
especially
be
allowed
f>QSSIBLE
unwieldy
providing a good
being
arrange
upset
DON'TS
saw
until
Sawdus
upset.
some
to
slide
or
blade
blade
littered
t is a
after
to
accumulate.
workpiece
kicked
to
being
to
support
It
takes
but
safe
support
on
table
with-
back
grab a piece
has
stoppe
so
that
definite
damp,
the
a
.
d.
your
fire
and
Page 10
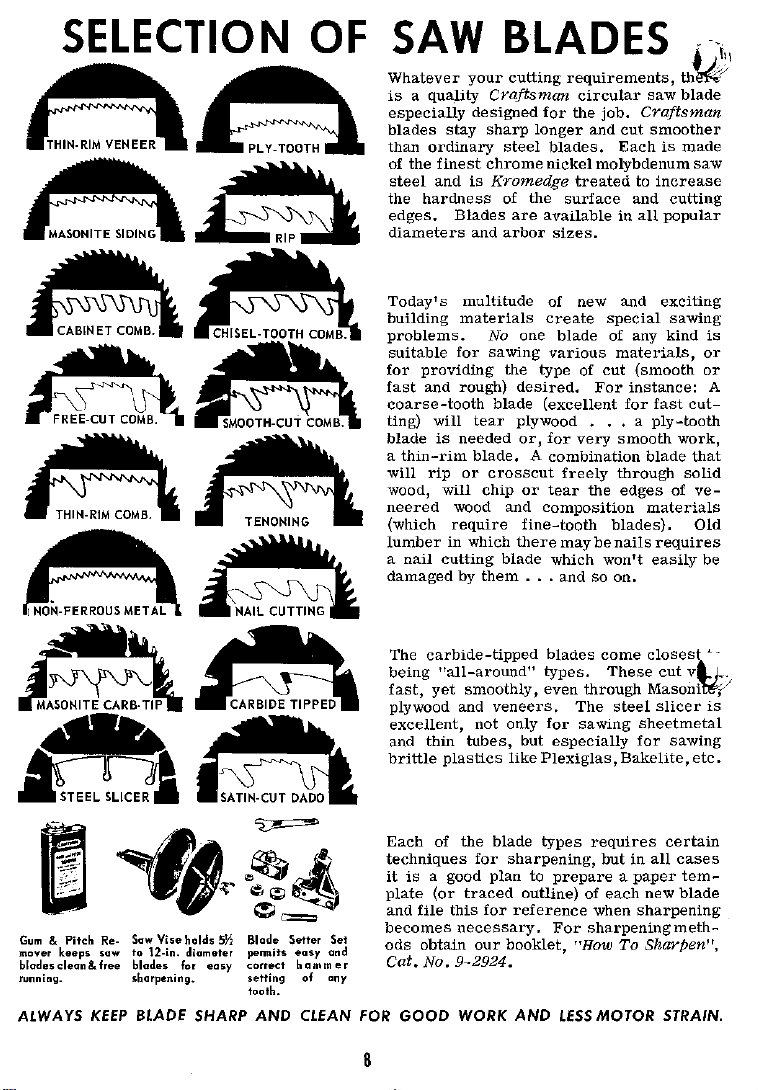
SELECTION
OF
SAW
Whatever
is a quality
especially
blades
than
of
steel
the
edges.
diameters
ordinary
the
finest
and
hardness
your
designed
stay
is
Blades
and
BLADES
cutting
the
are
for
longer
available
requirements,
circular
the
job.
and
blades,
nickel
molybdenum
treated
surface
sizes.
cut
Each
and
in
Craftsman
sharp
steel
chrome
Kromedge
of
arbor
-'("
th~
saw
blade
Craftsman
smoother
is
made
saw
to
increase
cutting
all
popular
Gum & Pitch
moVer
keeps
blades
<:Ieon
running.
ALWAYS
Re- Saw Vise holds
sow
to
12-in.
& free blades for
sharpening.
KEEP
BLADE
5J1
diameter
easy
SHARP
Blade Setter Set
permits
easy
correct
setting
tooth.
AND
ond
hammer
of
any
CLEAN FOR
Today's
building
problems.
suitable
for
fast
multitude
materials
for
providing
and
rough)
coarse-tooth
ting) will
blade
is
a
will
wood,
neered
(which
lumber
a
damaged
The
being
fast,
needed
thin-rim
rip
or
will
wood
require
in which
nail
cutting
by
carbide-tipped
"all-around"
yet
smoothly,
plywood and
excellent,
and
thin
brittle
plastics
Each
of
the
techniques
it
is
a good
plate
(or
file
obtain
No.
traced
this
necessary.
9-2924.
WORK
and
becomes
ods
Cat.
GOOD
of
new
No
sawing
blade
tear
one
the
type of
desired.
plywood
or J for
create
(excellent
special
blade
of
various
cut
For
•.• a ply-tooth
very
blade. A combination
crosscut
chip
blade
them
veneers,
not
tubes,
blade
for
plan
for
our
freely
or
tear
and
composition
fine-tooth
there
may
which
...
and
blades
types.
even
only
for
but
especially
like
Plexiglas,
types
sharpening,
to
prepare a paper
outline) of
reference
For
booklet,
AND
"How
LESS
the
blades).
be
nails
won't
so
on.
come
These
through
The
steel
sawing
requires
but
each
when
sharpening
MOTOR
and
exciting
sawing
any
kind
materials,
(smooth
instance:
for
fast
smooth
work,
blade
through
edges
of
materials
requires
easily
closes~'
cut
Masoni
slicer
sheetmetal
for
sawing
Bakelite,
certain
in
all
cases
new
sharpening
meth-
To
Sharpen",
STRAIN.
is
or
or
A
cut-
that
solid
veOld
be
v .
'/
is
etc,
tem-
blade
8
Page 11

STANDARD
SAW
OPERATIONS
IMPORTANT:
for
the
sake
",-,liNG
~ping
It
as
at
work
a
contact
make
will
vide a
even
auxiliary
serve
cut-out
iary
is
the
operations.
to
saw
is
kerf
to do
is
generally
a guide to
the
correct
is
reasonably
solid
not
straight
if
as
guide
warped,
use
of
the
splitter
spring
blade.
not
used,
just
so.
is
the
pushed
with
contact
wobble
this
means
straightedge
a guide.
near
board
turn
saw
should
closed
If,
as
of
clarity
sawing
done
position
width
along
straight
the
fence.
with
during
edge to go
center)
to
the
gua:rd
always
Wood
behind
for
stop
and
soon
as
We
have omitted
...
but
of wood with
with
the
help
and
maintain
for
the
cut.
the
fence,
edge to
Also,
the
the
operation.
against
temporary
board
If
a
molding
is
used,
the
fence.
hollow
side
is
recommended;
be
cut
with
the
reason,
insert
the
saw
cut
any
the
the
grain.
of
the
the
Because
it
must
sliding
work
that
thefence,
the
work
fence
an
auxil-
workpiece
up.
in
ripping
grain
and
bind
the
splitter
in
long
enough
fence
work
have
must
Proof an
(with
tends
saw guard and splitter
the
it
Best
blade
to
fingers
thumb
operators
pull
piece
pulling
and
front.
from
that
the
table
the
HANDLING
you should always use this safety attachment, whenever possible.
make
table, -so
nailing
to
clamp
If
used
the
a wedge
is
in
some
practice
with
right
over
behind
generally
end
of
is
long enough.
work
To
table,
has
cleared
from
in
of
the
when
pushing
hand
fence
to
end
of
board
work
through,
from
behind
lift
partially
stop
the
the
back
of
NARROW
following illustrations
is
to
anchor
to
walk
Never
saw.
blade
blade.
WORK
end of
workpast
lock
one
hand,
push
it.
around
whenever
backtrack
blade
toward
completed
Finished
can
be
lifted
or
and
Skilled
saw
work-
work
work
two
tuck
and
by
the
off
.~t
the
~using
,.,.
measuring
fence.
right-hand
right
of
sawdust
kickback.
blade,
using
tendency
it
into
blade.
left
hand to a
push
work
Weight of
hold
it
that
blade
hold-down
the
cut,
board
of
(If
splitter
not
necessary).
blades
fence
the
scale
Fence
side
center
and
to
Start
left
to
kick
through
cut
down on
will tend to
attachment
or
stop
to
keep
has
to
the
back
to
desired
on
distance
is
almost
of
blade.
to avoid
be
clear
saw
and
hand to
back;
As
cut
nears
safe
distance
with
portion
table;
and
workpiece
antikickback
Never
to hold
~
GOOD
USE
cut,
blade
little
sprayed
in
case
work
it
down
hand
blade,
hand
will
generally
up,
set
down on
pawls,
across
down.
GUARD
OF
either
bar,
and
used
on
to
the
with
of a
to
the
against
to
push
move
and
alone.
so
light
up
the
starting
on end
table.
this
the
AND
SPLITTER
or
is
HOLD.DOWN ATTACHMENT
width of
the
fence. guide
between
always
Stand a
being
of
work
advance
hold
and
right
completion,
from
right
of
board
but
if
workis
kick
it
(p.
4)
before
place a weight
reach
work
USE
When
there
palm
between·fence
tempt
to
push
stick
or
pull
work
HANDLING
Do
not
that
the
on
table
support
and,
if
board
port
in
horses
make a roller
9
WHENEVER POSSIBLE
is
less
push
work
like
that
through
LONG
leave a long
spring
of
catch
is
proper
support
the
sawing.
end
very
of
saw.
height
when
to
front
of
than
the
and
blade,
through
WORK
shown
from
board
board
Use
of
board
long,
will
by
behind
causes
use
Ordinary
(see page 11).
width of
do
1Wt
hand.
in
unsupported
do;
Use
illustration,
saw.
it
to
some
sort
behind
blade;
another
wooden
or
you
your
at-
a
so
shift
of
sup-
can
Page 12

RESAWING
Resawing
thinner
sawed
pas
Boards
plet
saw
When
quired,
about
the
kerf
ond
the
are
it
will
Position
Then
same
the
kickback
push
back
If
the
cuts
resawing
is
ones. Narrow
in one
ses,
one
up
ely
resawed
will
handle
two
cuts
these
1/ 2
inch
board.
will
close
cut,
with
kerf
closes,
no lon
ger
cut
into th
the
turn
the
face
is
seco
nd cut. Hold
...
stick,
side
of
board
from
the
or
the
of which will
ready made).
the
pass;
along
to
4-3/4
boards
from
shou
at
If
the
and bind
danger
parallel
em
fence
board
sti
ll
and
by
saw.
is
too wide,
opposite
board
track
ripping
of
thick
boards
hut
wide
ones
each
edge of the
in.
an
8-in
wide
. saw;
on
up to
opposite
ld
be
the
made
approximate cent
first
cut
the
of
kickback. Also,
the
two
sides
to the
to
spoil
their
and
make
end
(or
aga
inst
the
board
finish
pulling
securely
each cut
work
make
edges,
on a
band
nicely
in
boards
can
require
can be
the
6-1
/ 4
edges
to
is
too
deep.
saw
on
of
blade
appearance.
the
first
end (so
fence) to
by
through
two
maximum
then
saw
(the
the cuts al
into
be
retwo
board.
com-
lO-in.
in.
wide.
ar e
re-
overlap
er
the
the sec-
the
cut
...
and
cut.
that the
make
agai
nst
using
from
finish
blade
the
the
placed
cutting.
to guide
is
held
contact
a
miter-gauge
If
the left
hand
of
with
gauge
free
if
hand
reversed.
a
Ordinarily J the
groove with the s
work
table
Howe
not strike the
right-hand
permit
NORMAL
grain.
long way J
across
Therefore,
the
in
position
with
-hand
is
used
the
gauge and
into
to
assist
groove
MITER
is
so
in
front
ver,
make
reversing
CROSSCUTTING
As
planks
the
the
work
the
gauge
hold-down,
gro
to hold
the
blade.
as
is
used,
GAUGE
gauge
lide
wide
that
of saw,
certain
blade
table
groove
the
are
cut
long
edge
table
the
miter
to
the
saw,
by
keeping it
(preferably
ove
the
to
push
The
required.
the
hand
REVERSED
is
placed
in
front.
it
completely
reverse
that
- on
gauge.
top
p.
is
work
your
some
is
with
of
5).
used,
the
the
work
when
cross-
gauge
is
and
the
firmly
by us
the
in
contact
the
work
right
hand is
If
the
poSitions
in
the
When
covers
the
gauge.
gauge
saws
too clo
grain
used
work
ing
left
and
right-
are
table
the
will
the
se
is
in
to
CROSSCUTTING
Crosscutting is
the
sawing
of wood
across
10
Square
gauge
bl
ade).
of
the
the
cut
to
pre
held
again
to
bind
st
crosscutting
set
at
zero
The splitter
saw
guard
slowly and hold
vent
kickback
workpieces
table
when
the
blade
and
is
done with
(at a
right
is
not
is
will
needed,
recomm
work
or
firmly
chatter.
sometimes vibra
crosscutting.
dull
the teeth.)
the
angle
ended.
This
miter
to
but
Start
to
table
(Loose
tends
the
use
ly
te
Page 13

HANDLING
Work
)\
·ct
e
you s hould
of
the
USING MITER-GAUGE EXTENSION
To
prevent
rosscutting
c
gauge
gauge hold-down
s
imply a long-eno
bolted
electric
further
USE
OF
Cr
osscutting
that
to
push, and
boards
table
extension
to
the
tape
preve
STOPS
LARGE
WORK
PIECES
hangs
over
the
cut, str
or for
fit
yo
ur
extensions
AND
HOLD
a long
board
it,
you
together
(p.
ugh,
miter-gauge
stuck
along
nt Slippin
& CLEARANCE BLOCKS
Duplicate
table
aight.
crosscutting
saw
with
(p.
4).
DOWN
from
should
also
with
5J.
The
straightedge
face. A strip
the
board
g.
Cut-Off
side(s)
For
ripping
long
one
or
twisting
use a miter-
the
miter-
extensio
board,
face
PariS
is
ones
both
while
n is
of
will
Crosscutting
When
it
ce
is
being
the pie
remaining),
can
be
used
the
miter
the
the
gauge
piece
piece
hold
bind
kickback.
USING
FENCE
The
clearance
so
that
against
operation
contact
the
noted,
it
the
begins.
with
blade.
the
duplicated
Duplicate
desired
cut
the
fence
for a stop.
or
being
to
AND
block
can
be
miter
the
If
the
block
at
any
Remaining
to
establish
off (ins
and a clearance
Nev
miter-gauge
cut
off,
the
blade
A
CLEARANCE
is
clamped
used
to
gauge,
before
This
block
work
when
position
and
fence
lat
er
date.
the
tead
of
er
use a stop
extension
as
and
locate
must
work
of
the
set
Parts
length
the
this
result
to
the
the
the
not
is
fence
-up
of
piece
block
on
to
would
in
a
BLOCK
fence
work
sawing
make
fed
to
is
can
be
USING
THE
MITER-GAUGE
To
reduce
o
ne
m
iter
s
hort
stop
set to
s
ame.
If
the
is
no
te
nsion
be
screwed
s
erve
against
various
identical length, a stop
gauge
is used. When
enough, the
rod
attachment
position
each
workpieces
stop
rod,
(as
then
preceding).
or
clamped
as a stop.
the
stop
length
workpieces
fastened
the
handiest
(p.
5).
stop
This
workpiece
are
too
long,
use a miter-gauge
A wood
to
workpiece
position
the
it
USE
Each
to
STOP ROD
all
to
pieces
to
use
is
rod
can
exactly
or
if
there
block
extension
is held
for
cutti
GUARD
AND
to
the
are
the
be
the
excan
to
ng.
SPLITTER
11
WHENEVER
USING
Another
to
the
front
OPPOSite
A
HOMEMADE
ROLLER
SUPPORT
FOR
RIPPING
LONG
WORK
PIECES
POSSIBI.E
A
method
corner
the
miter
WOOD
is
to
of
gauge_
STOP BLOCK
clamp a piece
the
table
on
of wood
the
side
Page 14

BEVEL
MAKING
CUTS
ANGLE CUTS
TAPER RIPPING
B
evels
from
10 to
saw
arbor
blade
rippin
table
use
the
miter-
MITER
Miter
the
of
the r e
Unle
creep
is
into the
of
the
blade. To eliminate
(and
tilt
ed
g and cross
remains level.
the fe n
ce;
miter-
gauge hold-down.
CUTS
s ar e
crosscuts
workpiece.
quired
ss
th e
work
while ma
saw
teeth,
gauge extensi
45°
blade).
are
much
cutting
when
gauge -preferably
angle
or
on (pa
bevel
at
The
to
make
is
very
king a miter
blade,
the
taper
creep,
ge
miter-gauge hold-down.
are
cut
by
Operation
the same as standard
oper
When b
an
miter
tightly held
and
of
11)
togeth
tilting the
s with
ations,
as
evel rippi
crosscutting, use
angle to the edge
the
is due to the s
a hollow -ground
with
gauge
is set at
cut.
,
cut.
it
This creep
use a miter-
er
with the
will
the
the
ng,
the
et
12
JIG
SAW
WORK-
TAPER
FIRST SIDE
arms
the
ready
fence
touches corner
and
the
cut one
Befor
op
to
TO BE : f
Ripped tapers
(pa
ge
4) .
pe r
in
all
te
until the
at
er des
to
so
work
e c
the
ow
i-
1<
~
on
sides,
for
First,
foot.
the
illustration.
one side,
rmining the
the
12-inch
ired.
cut
the
that
inner
toge
ther
If
a s
quare
adjacent
utting the
jig to
the
J-
•
•
I t
I
l4
<\:
taper
shown
be
poSi
when us ing th e fo
TAPER
CAlCUlATION
TAPERPERFOOT
After dete
the
jig
tap
cut.
en
all
CUT
are
cut
determin
This
instead
multiply
rmula.
W
Ii·
with an
e the
is
easily figu
If
by 12
T
AHa
adjusta
the
taper
of
on
instead
CAlCUlATION
24" I I
I'
W_ X 6
_ - L
distance
first
of
side
twice
tapers alr
TOUCHING
FENCE
'-1
-x
="""'24><
taper per
between the
mark
Lock
taper.
edge
work,
past
the
piece
in
the same manner.
remaining side or sides,
the
WORK
SAW
-~=
6
foo
is
the
the
jig.
Position
of saw blade
then slide
blad
e to
is
being tapered,
previous se
eady cut.
ble
amount
red,
is to
two
of
" 63/
t, open
two
sa
me t .J
It
is no
just
the
make
tting
TWICE
CALCU.
LATED
TAPER
SECOND
SIDE
jig
of
as
op-
6
,,,
f
.}
the
jig
Page 15

SPECIAL
HANDLING
It
is
often
on an
odd
the
fence
very
ard,
as
guide
table
faces
s,
the
rev
ers
TTING
- s
useful
illustrated,
str
grooves.
of
and similar
are
by
is
bo
the
the
the
dowe ls
boards
head
(by
CU
ODD-SHAPED
necessary
hap
ed
board that
or
miter
for
jobs
ip
at
bottom
the
boards
cOWltersunk
fixture
can
ing
bolts)
T!WE
STRAIGHT
SAW
WORK
to
make
a s
traight
cannot
this
stock.
r
eceive
EDGES
be gu
kind.
made.
for
upside
gauge. A cut-off
of
is
easily
a good sliding
Matching V -groov
are
useful
round
to
be
turned
for
freehand use
cut
ided
board
The
Make
fit
es
holding
If
both
the
bolt
down
.
OPERATIONS
guide
so
it
will
contact
board,
with
but not
fence
so
as
the
cut.
two
aux
ragged
and
If
edge
to
ili
trued
more
of
workpieces, then
edges.
from
guide.
CUTTING
trim
ary
board,
in
in
cut-off
Position
off
of
the
board
along
true,
straight
A
board
ilarly
trimmed
straight
be
trimed
auxiliary
PATTERN
the
top
the
approx.
slide
guide
edges can
to
have
than
3/4 in.
use a thicker
board
of
the
to
1/4in.
cut-off
make
be
sim
paralle
must
the
workpieces.
two
a
l
Wh
en
reversed,
board
can
One s
uch
joi
nti
ng.
gether in
1
/2 in. of
at
one side.
or
more thick.
f'
be
use
i s
Lock
the
cut
the
ragged
Clamp an
as
not
ed
used
for
for
trimming veneer
both
pieces
-off
board
edge
aux
to the f
ence.
above, the
other
operations.
of
veneer
with approx.
of
each exposed
ili
ary
guide, 1 in.
Position
cut-off
for
to
t.hi s
-
13
Odd-shaped,
c
ut
with
fence
sired
make
must
edge
outer
flu
If
to
be
gether,
a
piec
the
guid
shape,
firm
have a curv
so that the
faces
sh.
a wooden
the
workpiece.
us ed to hold
and
material
e.
MATCHING
If
it
is
work
(top
already
the
between
the pa
desired
(bo
piece),
described,
blad
each
ttern
ttom
e by the
straight-sided pieces
aid
of a pattern
e. The
contact
that cannot
.
but
of
patt
is
very
EDGES
pie
use
edge
pattern
should
with the
ed
rabb
blade
the
blad
ern
is used,
The
workpiece
useful
OF
to
hav
ce)
larger
the
pattern
but set
amount
of
the
be
et
at
will
e a nd
cut-off
when
be
nailed
OffSET
e a
the guide
of
second
and
auxiliary
can
be
any
thick
enough to
guide. The
bottom
of
recess
guide
nail
it
board
can also
and
pattern
pattern
to
the
WORK
seco
nd
piece
than
the
saw
ing
out
offset
desired
pie
can
de-
guide
outer
and
the
will
lightly
to-
is
work-
pattern
set
-up
over
ce
and
be
be
of
of
Page 16

MAKING
CENTER
(fjjJ
-
If
a l
ong slot
is to be cut,
boa
rd
the
cut.
to
the
front
end
at
one
of
board
back
of board slowly down ov
until
blade
table.
end
of
lifting board
down on
Always c la
table
in
of
side
or
on
table
cuts
Push
desired
through
it
top
front
board
in
back
against
through
or
pull
cut,
from
CUTS
the cent
is
nece
of
the
mp some
of
against
of the
board
then
table.
ssary
saw
the bl
the
and
stop
er
of a
to
blade
type
ade,
to hold t
kickback.
saw.
Place
stop,
then
er
board
until
blade
the
saw
board
drop
the
to
start
of a stop
Stand
front
lower
the
blade
is flat
is
before
he
on
at
You
can
This
is
(at
approx.
end.
Clamp
end bears
front
edge
the
fence.
MAKING
easily
make
it
CUTS
to
a wood
the
the
to
simply a length
a 450 angle)
against
of blade,
END
of
and s
table
work
keep
spring
wood,
lotted
so the
just
work
hold
-in.
miter
cut
at
O!'~
SlO!~\;"",
behind
~
against
MAKING
Edge
cutting,
ful support
peci
ally
secure
it
bottom
erabl
tru
an aux
sufficient
two-thirds
y, always use
SAW
DESIGN
EDGE
CUTS
like
of
the
e of
high,
ili
ary
height
CUTS APPROX .
W'
APART
FOR
A
resawing,
workpiec
guide to
to
of
a ho
HOMEMADE
requires
e.
thin
boards. Always
the
support
the
work
ld-in, as
This
fence
at l
. Al
so, pref
shown.
HOLD-IN
care-
is
to give
east
es-
the
End cuts
becau
se
tom
does
with the
are best
but
cuts
fence.
Note
high,
and th
left
hand
CUTTING A RABBET
-
A
rabbet
angles,
piece
edge. First mark
are
more difficult
the small
not
table.
made wit
can
away
requires
to
remove a corner
portion
give a firm
Specialendcuts,Uketenons,
h a
universal jig
be
made
the
using an
auxiliary
stick
the
blad
two
saw
that
at a push
from
than
edge
of board at
sliding con
(page
auxilia
fence
cuts
size
is
at
the
is used to
e.
from
the
cut
bot-
tact
I
quite
keep
r ight
work
of the
s
-
14
Page 17

FIRST SETTING FIRST
rabbet
on one end of
s
etting the
the
touch
make
first.
to m
CUTTING
blade
the
center
the
Then reset
ake
the
required
so
that
of
cut
into the
second
CURVES
saw
the
the
the
cut.
Though intended fo r s
bench
saw
can
the
not
exceeding
One
pattern
other
for
an
ed. These
tu
re
desired.
the
same
pattern
d co
ntact when
length
;!X
fu
nly be used when
on
e edge
the
cut
patter
match
be guided
only one
point
be
1/2-in.
for a co
ncave
a convex (outside) c
are
made
The
concave
as
the
can
be any length
acting
the
to a
concave curve
n (a s
by
the
pattern
of
contact.)
CUT
the
work
blade
top
of
mark
flat
side
saw
in similar
trai
ght
used
to
cut
curvature
(inside)
to
the
degree
pattern
workpiece.
as
workpiece
trai
ght
as
WORK
,.w
·SECOND
as
a guide
heights .
the
teeth
for the
cut
of
the
board
manner
line
work
slow curves
per
curve,
urv
e is
need-
of c
urva-
must
The
that
will give
a guide; and
alre
ady
that
edge
could
there
would be
CUT
for
Set
just
and
only
foot.
and
be
con-
can
has
will
not
,
with
the
with
the
work
in con
slowly.
for
shaping
set
-up
and
CUTTING
Coves
are
the
work
light
cuts
full
depth
ses, the
u
rounded
To
make
two
identical
neously
rounds
of s
duce
the
ends
off squarely.
to
produce
Last,
halve each
uarter
q
outSide,
center
of
tact
the
the
the
axis.
with
convex
other
blade
If
procedure
COVES
rounded
at
an
angel
grooves
of about
is
reached.
most
popular
table corners.
TWO
TURNED
HAt
VES
four
rounded
boards
turned
on a
uitable
m to
lengt h.
desired
Now
the
desired
piece
roundS, cu
for
the four
curve exactl
Rig a hold-in
the
pattern. Feed
pattern
edg
e of
are
the same.
made
to
the saw
1/8
in. at a
Cove c
being the
DIVIDE IN
ONE
TW~
FINISHED
corners,
which can
lathe
to
produce
After
length
s
cove
inside
to
end up with four
rved
ins
ide
table edges.
y in
to
is
to be
the
work,
by
f
blade,
time
uts
have many
making
f1fY
'~
COVE
CUT
start
be simulta-
two half
turning,
by
c
utting
cut
eachpiece
curvature.
as
well
line
keep
work
used
the
eed
ing
taking
until
HALF
with
rethe
of
as
A
CONCAVE
Set
the
work.
blade
Clamp
CUT
to
the
barely
concave
A
CONVEX
project
pattern
through
to
the
fence
CUT
the
To
cove cut,
width.
of wood and
rosspie
c
15
first
Then
secure these
ces,
to
take
make an
decide
on
two
the
straightedge strips
together
oblong
frame
depth
by
having
and
two
Page 18

the
two
inner
lel
and
the
blade
actly
frame
touc h
of
setting.
alo
strip.
guide
exactly
desired
the blade. Whirl
ng the
width of
so
its
the
depth of
over
es
the
Draw a pencil
inner
This
line
must
be
edges
of
the
same
the
height above
the
blade
and
tips
of
the
blade
edge
of
gives
set.
the
long
distance
cove.
the
desired
turn
front
by hand
line on
the
left-hand
the
angle
strips
Position
table
cove.
it
until
and
at
paral-
apart
is
Place
it
rear
teeth
to check
the
table
frame
which
as
the
ex-
just
the
CUTTING
BOWLS
Use a straightedge
this
to
tab
le
is
parallel
from
is
on a
when
to
project
and
to blade
at a time
cove
at left
line
work
make
is
finished
the
along
edge
enough
work
blade
bl
ade
1/8
in.,
slowly
1/8
in.
until
board
of
to
the
blade
with
is
placed
above
first
and
.
as
blade
so
pencil
so
that
the
exact center
against
table
cut
by
the
guide.
continue
aguide.
that
the
line
centerline
guide. Set
no
more
feeding
Raise
making
Clamp
inner
and
of
than
work
blade
cuts
far
of
the
Bowl-like
manner
of any
to
The
nearly
is
form a "V"
these
is
the
cut.
an
Take
one
FOR
CUTTING
as a cove
boWl
the
width,
smaller
semicircular.
used,
two
in
back
positioned
blade
If
a
arm
to
1/8-in.
complete
ROUND
cuts can
will
square
hold a
SQUARE
be
cut.
cut
will
for
anyone size
blade
s will
boards clamped
will
serve
of
the
blade
against the
be at the
workpiece
pivot
cuts
at a time,
turn
for
WORK
made
in much
However,
be
in fixed
of
make
If
a
round
to
as
a guide.
so
that.
m,
th e
center
ofthe
at center
is
of
revolving work
each
cut
until
..
~
-
\
FOR SQUARE
MITERS
BO,6.RD
TURNED
OVER
the
the
proportion
saw
blade
cuts
workpiece
the
table
Arrang
when
top
center
desir
used,
rig
workpiec
finished.
•
WORK
same
depth
.
mor
e
to
e
wor
k
of
ed
up
e.
,<>~--
The
fini s hed cove will not be p
Actual s
shown in the
cove
stock.
by
saw
hapes for variou
round
first
cuts.
illustr
with sandpaper
Tim
e can be saved
cutting out a "V"
ation.
erfectl
s guide angl
If
desired,
wrapped
in
making coves
with
two
y round.
es
are
work
on
round
bevel
FIRST END
The
ordinary
boa
rd
45°. To
board, turn
calUlot be
miter
to 450 in
allowed
jOints will be
son,
cabinet
miter-gauge
16
SECOND
s is
(squar e)
cut
cut
the o
the boa
turn
gauge to the opposite sid e and r e
the
opposite
to c
reep
out
joint
hold-down
mit
with
ed
of s
s ar e be s t
er f
the mite r gauge s
PPO
site
rd
ups i
de
ups
ide down, move the
dire
ction.
(p
age 11), th e
quar
e.
or a miter
or
jOining two
end of the same
clown. U
If
resultin
For
thi s
made
using
END
et
boar
set
work
rea
board
at
d
it
is
g
-
the
.
Page 19

RESULTS
•
~
CRffPI
A
¥p
CUTTING TENONS
CHEEK
A
2-
When
first,
accurately.
and the
SHO
There
(or edge)
the
tion
side
around
moving
.it
rately, but
.
dl!'
ubject
width
~~~
'
d
c\~
('II
~
\ EDGE CUT CHEEK
SIDED
TEN
cutting
using a stop
two
edge
ULDER CUT
are
three
cuts. The
work
to a
the
jig
so
away
from
and
cut
the
jig. This
to
the
.
~
II
1/
the
position
the
two
CHE
of
making
jig
(p
. 4)
Then
cheek,
tenon
of
the
'\ \
shoulder
these
cheek
EK
CUT
is
to
and
cheek
turn
the
without
the
tenon ac-
will
workpiece
clamp
on
HOULDER5
ON A 4 -SIDED TENON
tenons,
Then
block
make
cuts
.
methods
universal
as
to
cut
the
jig.
the
the
width of
accuracy
make
to
simplest
Qutthe
other
centers
cuts
cuts
cuts
cheek
posi-
the
work
be
ACCURATE CENTERING;
Accurate
a
backing
of
saw
however, is
the
Accurately
be
collar
blades
a
tenon
ing
table
the
width
block. This
the
desired
kerf.
Accurate
workpiece
cut
jig
centered,
by
using
between. Exact
can
be
can
be
the
work
groove, after
.
tenons
tenon
now
subject
width.
two
equal
obtained
accurately
in
the
jig
plus
centering
exact
carefully
ACCURAT
can
be
should
the
to
the
width
size
spacing
with
paper
center
to
slide
E WIDTH
cut
by
be
the
width
of
the
tenon,
accuracy
tenons
blades
with a
between
discs;
ed
by
clamp-
it
along
positioning
using
width
of
the
can
the
and
the
of
A
HOMEMAD
USE
GUARD
AND
E
MITER
SPLITTER
17
BOARD
A
simple
mitered
time
Guide
miter-gauge
square
plus
then
WHENEVER
strips
, with
strips
cut
1/4 in. to
miter
POSSIBLE
miter
board
is
should
miter
desired
the
for
jig.
be
gauge
are
saw
the
underneath
grooves. Workpieces
to
the
allow
cut
in
shown.
cut
at
set
to
over-all
kerfs,
the
slide
should
The
at
length
and
same
450•
in
are
two
the
be
Page 20

HOW
A
Typical
SATIN-CUT
A
DADO
Head
THE
HEAD WORKS
Set
DADO
, I
&
HEAVY-DUTY
'
,;'
"
~
...
HEAD
NEW
ADJUSTABLE
The
Dado
Head
A
dado
insert
the
standard
generally
saw
blades.
must
blade
s with a
should
be
be
table
smaller
made
checked
Set-Up
(p. 4)
in
Each
by
mark
on
SET
must
be used
insert.
diameter
setting
aligning
on
the
scrap
Dado
of
the
work.
lumber.
than
the
to
replace
blades
standa
dado
top of
Settings
are
rd
head
the
OUTSIDE
BLADE
The
dado
saw
blades for
he
ad
consists
blades and a number
blades for use
A
typical
side
blades.
one 1/1
6-in.
sortment
1/8
in.
blades);
small
chipper)
in
increments
maximUm (with
side
blades
combination
planer
s
two
outside
al
one
as they
BLADE
CHIPPE"1m
OUTSI
DE
BLADE
PAPER
DISC
PROPER
cutting
head contai
four
thick chip
you
can
(1
outside
5/ 16 in.
•.•
of 1/16
cut
blade; the
to
s mooth
blades.
will
SPACING
(or
of two
between
the
in
head)
grooves
of
ns
1/8
-in.
cut
blade);
(2
outside
and
complete
the
out
the area
Chipper
tear
A
CHIPPER BL
is a
and
full-circle
two-
toothed
the
outside
two 1/
8-in.
thick
per.
grooves
1/4 in.
blades
in
additional
in.
up
same
chipper
scmmolbeuse
the
work.
DADO
special set
c1ados.
chippers,
With
to 13/16
set).
manner
blades
ADE
outside
chipper
blades.
thick
this
as
follows:
(2
outside
and
wiclths
The
act
between
INSERT
This
out-
and
as-
the
in.
out
as a
as
the
of
-
d
Chipper
wider
positioned
blad
adjacent
blades apart
cannot
Fractional
Fra
dado
washers
the
variations
Such
ing a tight
teeth
than
es,
and
be
ctio
nal
head can
to
chippers.
adjustments
A TYPICAL
are
their blades.
in
the
gullets
staggered
chipper
determined.
fit
teeth,
so
that a true
Thickness
adjustments
be
separate
In
up to 1
/16
are
for a grooved
swaged,
Adjustments
made
the
this
often
OPERATION
of
with r
they
in
the
outside
manner
in.
by
can
useful
and
Unless
adjacent out
espect
will
thickne
joint.
therefore
they
are
Side
to o
ther
hold
width of
using
blades
be
the
cut
ss
of
a
pape-
frOlL
sec
j
ur-
thicknes~
obtained.
in
18
Page 21

HOW
ADJUSTABLE
This
is a
t of
sing
hub
blade
Jjustable
Qun
the width of groove
"d
ialing"
blade on saw
1/ 4 to 13/ 16-
HANDLING
Operations
as
with
the hub -
WORKPIECES
with
a
standard blade.
remembered,
bigger
creased.
the
workpiece
hand,
the
likelihood
anti-kickback
or
bite
As
by
should
use
le
1/4-in.
with
wobble . . .
arbo
r -
in.
ca
n
a
dado
however,
in
the
of
kickback
the
splitter,
pawls,
be held down
of
the hOld- down
DADO
thick
which
you
that
is c
prior
groove
be
set.
are
that
workpiece;
is
and
cannot
IP.4).
REGULARLY SPACED GROOVES
Regular
using the stop
I
.ge
~
starting
clamped
so
operation
in
pattern. A third
stick
extension),
desired spacin
the inch
spacing
the
last-cut
to
use a notched
positions.
to
that
work
begin
regular
to
steps,
the
mark
rod
the
table well
is free
s . The
miter
and
position
g of
s on the s
of
grooves
on the
groove.
This
from
or
according
method
gauge
grooves
miter
Another
stop block
block
ahead
it
block
is
to
(or
the
by
tick.
WORKS
blade
on
can
vary
thus
varying
ut.
Simply by
to
tightening
widths
from
much
the
same
It
must
a dado
takes
and
that
therefore
consequently
be
used,
firm
ly by
attachment
can
be done by
gauge to en -
method
to
fix
the
shou
ld
of
the
bla
before cutting
can
be
notched
to any
desired
clamp a yard
miter-gauge
work
for
any
referring
an
the
be
a
in-
the
be
de
-
to
USING A STOP BLOCK
When m
additional
than
cuts
side
and
left-ed
GAINS
A
stopped
Both
A
oving
cuts,
the
thickness
will
overlap.
of
dad
o will
the left side
ge
cut.
AND
STOPPED
gain
is a groove that
grooves are closed
are
used
gain
is
started
but a stop block
cut.
To
side
of
groove.
of
Always
locate this block,
dado
lin
and
es
dado
Butt
work,
and
stop
saw
up
clamp
the
workpiece
move
Also
establish
of
in
making
like an
is
used
pOSition
with
the bl
before
it
of
the
remember
the
dado
GROOVES
is
jOints.
to
it
the
desired
ock
up
it
to
the
remOVing
over
ju
st a little
dado
right-edge
will
closed
at
ordinary
fix
the
place
so
that
against
table
so
that
establish
at
one
both
end
work
back
end
back
or
the
to
make
less
that
the
right
cut,
end;
ends.
groove,
of
the
al.ong-
edge
of
the
end
fence
work
.
.
WIDE
GROOV
When a
groove
ed,
it
must
Best
method
(top-right)
be
for
ES
wid
cut
is
to
spacing
er
in two
use
than
a notch
the
the
dado
or
more
ed stop
passes.
USE
GUARD
is
need-
passes.
block
AND
19
SPLITTER
To
cut a stopped groove,
block
and
a s
starting
block,
front
lower
WHENEVER
block
and
of
work
POSS/OLE
tarting
is
work
onto
is
clamped
against
block
located
the
dado
both
mustbeused.
just
to
table
sta
rting block,
as
the
like
or
fence.
shown.
end
the
stop
The
end
Butt
and
Page 22

DADO
TENONS
Use the
is s
cut
ou
DADO
Rabbets are
till
first
tward
wide
st dado
wider
then widen
for late r
RABBETS
cut
than
cuts.
using
Use a dado a little
insure a clean
on
the edge
an
auxiliary fence,
fen
ce
(p.
ROUNDING
TAPERING SQUARE
21),
edge.
away
must
AND
from the
combination.
the
head,
the
tenon by
the fence
wider
than
Prefer
ably
fence;
cut
Qut
be
used
.
WORK
make
advancing
as a guide.
the rabb
make
otherwis
lik
e a
if
tenon
inside
et
to
the
cut
molding
Mount
area) that
able end
over
workpiece
the
the
the
po
sition.
dado
piece
the
epeat
r
If
greater width
over
For
workpi
be
using a lathe),
knif
e
the
workpiece
is
to
of
the
the
dado
exac
axis
o(
the
first
cut is to
dado. Clamp
Now
up s lowly
is
being
wood
about
until
full
and
repeat
tapering
ece
as
adjust
required
pointed, cut
e.
with
round
e.
the
above
be
fixture
t the
the end
ed
at
Locate
centerline
and
the
made dir
to t
saw
if
until
be
fixtur
with
tly
dado, and
star
(especially
rounded),
1/ 8 to 1/ 4 i
depth
of
cut
is needed, move
all
steps.
the
fixture to
.
If
nearly
finish
tap
through
wood
then
(or
middle
the nonadjust-
the
fixtu
of
parallel
area
in
which
ectly
over
able
in
and
raise
a
square
work-
it cuts
n.
Conti
nue to
is
reached.
the
fixture
tilt
er ed end
(as
cut
when
with a
the
the
with
this
the
into
the
is
r e
to
Perf
ect
row
ld and
as
row
lcl
c
ut
illu
needed.
tabl
One
it
also
the
in
g. The
and tapered-round
on the bench
strated, and a dado, are
This
e,
and hold s
end
is
for
differ e
adjustab
workpi
swivel cent
j
ustable en
Cit over
the
tapered-round cuts
saw. A fixture
fixture
the
adjustable
ece can
other
er
d.
workpi
nt
length workpi
le
vertically
be
end
that
will
The
bed
dado.
ten
clamp
ece
horiz
ontally
so
that
rasied
is
fixed,
self-align
piece
ons)
like the
all
s to
as
in a
eces,
one
up (or
and has a
with
is
cut out
(such
can
that
the
lathe.
to
adapt
and
end
taper-
the ad-
be
one
are
saw
is
of
to
STRAIGHT OR TAPER
20
ROUNDING
JIG
Page 23

MOLDING
AND
THE
SET
UP
Either
the 3-or l-cutter
can
be mounted in
mold
vario
ings.
dado
mus'l
be
(and,
...
fence
down
To u
mu
cut-out
the
I-
in.
bol
ts
to
attaching
usly
The
grooving
use a molding
guided
freehand,
preferably
or
along
it
is
attachment
se
the
be
fence
fitted
st
to
molding
thick
to
the
make
the
it
SELECTING
Hu
ndreds
selection
two
be
separated
designs,
of
of
or
more different
planned
to
by
keep a
shapes. Use
tracing
paper
your
various
can then
around
you can
be
so
that, when y
see
SANDING
type
plac
patterned
operation
and
the
the
advisab
with a
provide
cutters.
and
be
e of a
grooves
is
much
edging. However,
insert
(p.
with
4).
the
miter-gauge
fence.
le to al
(p.
for
clearance
4),
as
edge
molding
When
so
use
illustrated.
or
end
facing
for
Facing
attached
with
fence. Use your largest cutters
molding
cut-out
to
YOUR
designs
knives
overlap,
uncut
the
the
fence.
PATTERNS
by
file
4-in.
- and
knive
s . Two
stacked
result
in
the
can
be cut
combining
knive
to
just
wood.
record
squares
mak
together
ou
look
s of
facing,
s.
The
meet,or
To
help
of
of
e ink
or
more
through
different des
head
saw
blade
and
edg-
the same
Work
miter
gauge
hold-down)
using
the
hold-
molding
having
the
swing
shou
ld
flush-head
before
with a s
mall
the
cuts
cuts
to
you plan
your
knife
vellum
outlines
papers
and moved
them
igns.
as
you
can
the
be
can
be
or
OPERATIONS
W
INDO
W
SASH
9·3211
.......
, 518"
_9-3204
I"
a.I
liP
~
1/ 4"
_
1/4"
RAIL
GIld
STOP
WEDGE TONGUe
AND
9·2303
Ole
lIIode
in
sets
Wedge Tongue and
When
orderins
the
nurn
erol 3
SPLITTER
GROOVE
01
3 lor the
G'oo~e
.ing
oS a suffi"
WHENEVER
of
of
COVEond
BEAD
to
~
a.i
it
All c
He..d,
consists
I-Cutt
catalog
,
9-3212
PLANER-
JOINTER,
9-2302
CABINET
ODOR
9-2353
QUARTER
ROUND,
ond 112"
9-2351
3-BEAO
EacS.
9
-2352
CUPBOARD
DOOR
END_FEM.
9-3213
GLUE
JOINT
9-3201
OGEE
WINDOW
DOOR
9-3202
uN
er
bill
exce
pt
t~e
016 bits.
er Head
add
au",b-er Ii.: 9-32113, elc.).
USE
GUARD
AND
FLUTE,
0
90
CLOVER
LEAf
,
..
SCR
EEN
MOLD
9·2354
'ASE
MOLDING
9-2355
flUTE, 1.1
RADIUS
9-3206
1/
ond
(
DROP
9-3207
CUPBOARD
DOOR
END_M
9·3210
1/
3/S" ond 3/ 16" -
and 1/4"
9·3208
COVE,
9-3209
le bits lor
4-ROUHD
COVE,
LEAF)
RAIL
ALE
4-ROUNDS,
BEAD
S/S"
SET
3-Culler
Set which
to the
POSSIBLE
/2"
5/ 16"
th
I
21
Page 24

TRACING A DESIGN
RIP
AND
CROSSCUT
MOLDING
FOUR SIDES
STRIP
JIG
MOLDING
Work
manner
molding fence
eve
of
the
when
s
irable
operation
This
next
thickness
Avoid
cause
the
around,
then
the
STRIP
Strip
molding a s
the
mold
sired.
ever,
str
ipping
size
the
groove.
the
swing
the
fenc e and fe
STRAIGHT
is
fed
as
n when
mit
er gauge.
work
must
to
move
is
is less
to
fence,
will
cross-grain
it
is
difficult
end
of
make
splinters
with-grain
MOLDINGS
moldings
izeable board,
ed
edge in
If
thin
it must be fed to the
guide.
need
ed
to
of
to th e
molding head
to a
saw
blade,
is
always us
molding end
on
desirable
Sometimes,
be
placed
the
fence
side
of
work
however J as
than cuttingalonged
cause
imp
molding
cut.
the
wil
cuts.
two
are
to ke e p
l
be
If
cross-grain
often
the
as
(strip)
Groove
contain
Make a
the
cut-out
knives.
ed
the
the
strip
EDGES
except
ed
grain
on
edge,
back
so that
away
variations
erfe
ct
if
from splinterin
work
cut
off whe n
made
then
thin a
stock
is used,
knives
the
guide
strip,
in
the
Clamp
stock
in
the
as
with
espe
from
results.
po
ssib
is
molded
cuts
by
saw
strip
through
to
the
then
cover
the
through
sam
that
a gui
the
ciaUy
it
is
cutting
fence.
in
le,
first,
makin
ed
ing
as
how-
exact
cover
guide
the
de,
aid
de-
ge
work
be-
all
ge
off
de-
a
for
to
it.
CIRCULAR
e
g
Circular
g
gular
V -groove;
an
Curved
mark
cutter
tain
or
three
s
ince the
fence
TENONS AND
Straight
a dado, will
arbor
the sides
grain cuts first,
auxiliary
blocks
work
on
will
best
is
knives,
is
AND
work
clam
or
by
arm
must be f
the
fence
help
results,
times.
knives can
set.
RAISED
cut
excellent
tilted,
of
raised
CURVED
can
be guided by two
ped
to
use
of a
fastened
or
guide to show
to guide
go
around
Overcutting
cut
PANELS
used
in the
these
same
panels.
as
when mol
COVES, JOINTING AND PLANING
A
series
of
form
will
is
used
board
with
parallel
traight-
s
overlappi
a smooth s
to
position
s on edge;
, li ght
edge
ng
traight
the cuts.
planing is a series
cut
s - and both
kniv
es.
WORK
the
fence
to
pivot
pin
to
ed
the
freehand;
center
the
work.
the
work
is impoSSibj .',
only
as
same
manner
tenons.
kniv
When the
es
Makethecross
ding.
semi-circular
cove when
Joi
ntingis
are
done with
trian-
form
held by
fence.
but
To
ob-
two
wide
will
cut
cut
fence
done
a
a
of
~
as
-
s
of
22
Page 25

ORNAMENTAL MOLDINGS
U
se
an auxiliary exten
miter
gauge
guide
pin
the
proper
cuts
Sy
knives
CUTTING
Use
of a
cut.
be
SO pos
previous
place
are
to
cutting
and
, a
great
DOWELS
semi-circular
thickness
After
both
broken
from stock
(P.
cut
for
be
cross
many
equa
sides
11)
.
itioned
to
the next
made,
kni
l to
sion
This exte
that
stop
piN
-cu
tting
patterns
ves
diameter
are
cut,
and sanded
1
'[flU
AND
clamped
nsion hold s a
it
will
the
work
cut.
must
slant a ls
with
can
and s
quare
of
dowel can
GUICE
PANELS
to
locate
at
If
mit
different
be
mad
stock
the
knife
then
smooth.
the
in
the
er
o.
e.
Spiral
turnings
as follo
ws:
a
uxiliary exten
standard saw
se
t
will
is
s
piral,
increased.
along
vance
surp
A
pin
ride
for
Select a knife
spiral
fence
Feed
rout
with
determine length
the
pitch bec
When
fenc
e,
it
to
risingly
put
into
in
the
groove
further
you
have
to
obta
work
along fence
out
the
sandpaper.
SPIRAL
TURNINGS
on
round
Make set-up
sion
blade.
the
blade
cut a spiral groove
near
the
cutting
that
in
the
spirals.
stock
as
on
the
miter
Angle
omin
g l
work
is held
will
revolve it
to
accurate.
fence
can
and guide
with
will
rout
prepared,
pattern
(guided by pin) to
Round off
shown.
at
(pitch) of
ess
now
the
molding knives.
and
of
can
be
made
using
gauge
and
which gauge
as
ang
lightly
and
and ad-
that
wi
be
used
workpiece
out
the
width
adjust
cut
needed.
rough
edg
an
each
le
is
fed
ll
be
to
the
es
a
PL.ATE CEMENT SANDPAPER
A
sa
ndin g
plate,
saw
blade,
a
power
ta
ge of
sa
nding.
are
available
the
plate
u
sed
by any
in
this
disc
excellent
Sandpaper
s . The
...
of
book.
will
and
the
for
methods
mounted
provide all
sander
work
••.
miter-
diSCS, in
quick
regu
can
described
SANDING OPERATIONS
DISC
in
place
of
the
plus the
and beve
easy
la r
table insert
be
held
advantages
various
ceme
your
advan-
l-an
grits
ntin
and guided
elsewhere
of
gle
g to
is
,
USE
GUARD
AND
SPLITTER
WHENEVER
POSSIBLE
23
Page 26

30
WOOD
JOINTS
I,
HOW
MAKING
1.
2.
Single
miter
(page
fit.
as
a 450 beve
3.
Mitered
are
rect
pared
boards can
of
sides -then
Answer
THR
Five
S
SEVEN
EIGHT
NI
TEN
THE
SINGLE
SINGLE MITER,
(square)
gage set
17).
The
"on
POLYGON
MITERS
angl
cut
by
setting
angl
e;
miter
polygon
s , d
is
gage setting
COMMON
EE
SIDES ........... .
SIDES
IX
SIDES.
SIDES
SIDES
NE
SIDES.
SIDES
TO
30
MITER,
miter
at
Cuts
edge"
l.
es
of
or
by
board.
be
purchased.)
ivide 180
subtract
POLYGON
...
......
..
JOINTS
FLAT
ON
EDGE
joints are cut
45°
or
with
must
be
mit
er
less
or
the
miter
use
of a
(Adjustable
by
this
in degrees
ANGLE
.......
.......
.......
......
.....
.
...
MAKE
with
a miter
exact
also
board
for a neat
can be
the
cut
o
more
than
at
the
miter
number
.
GREES
45°
cor-
pre-
gles
gage
specially
To
find a n
the
figure from 90.
S
30.
DEGREES
.. 54.
DEGREES
.60.
DEGREES
...
64.3
DEGREES
(APPROX.)
67.S
DEGREES
70.
DEGREES
n. DE
AND
4.
This
The
taper
of
by
multipli
ft.
of
5.
To
take a slip fea
pieces together
. .
~
USE
COMPOUND
is a combination miter
bevel
s a
taper
two to
ed by two
J
etc
.
12"
10"
TAPER
SLIP
FEATHER
groove a mitered
MITER
angles
re
shown
CALCULATION
for
given
in
for
obtain
amounts for
to
8"
6"
MITER
ther. clamp the two wo r j .
onto a tenon
THEM
and
some
commonly
the
Tabl
one
foot
can
get
amounts for
4"
2'·
corner
so
ing
e.
be
six
that
bevel
used
Amounts
divided
in. -
12"
it
jig.
cut.
or
two
will
TJIli
POLYGON MIT
ERS
24
SLIP
FEATHER
MITER
Page 27

slip
feather
into
the
-
SPLINED
On-edge
for
greater
metal
length
keep
to cut
around
blade.
heel
than
should not be too
7.
BOX
I A good
head
dado
as
the
cutting a suitable
The
two
~\d
are
'e width of
(a
groove,
JOINT
miters
strengt
or
wood, and should
ofthe
joint. To
the
saw
tilted
the
bevel
from
the
The
groove
to
the
JOI
NT
strong
joint
approximately
wood.
Prepare
cuts
are
exactly
each cut.
triangular
to
are
(or
right
point of
deep.
made
the
wedge)
reinforce
often joined with a
h.
The
cut
the
at
the
s:une
miter)
to
the
should be
the
for
small
the
a guide
board,
with
same
distance
Line
the
miter
spline
run
spUne
angle
but
move
left
side
closer
bevel
boxes.
same
fence
as
illustrated.
the
dado
"A"
is
glued
joint.
spline
can
the
full
grooves,
used
work
of
the
to
the
edge,
and
Use
thickness
by
edge
head,
apart
15
at
the
be
as
a
center
tered
between
into
the
Secure
the
position
to
make
To
start
against
o
ne
in
the
other
first
cut
both
boards
just
made
the
seco
one
notch
joint
is
If
the
gage
so
c
ut
is
can
be
setting
When
distance
dado
is
Guide
pushed
when
lining
8.
END
9.
TEE
10.·
MIDDLE
of
the
second
the
the
the
the
line
in
(through
nd
finished
guide
tnat
made
used
between
the
pin
should be
to
LAP
LAP
first
cut,
the
two
cut
guide
fence
in which
first
cut.
box
joint,
guide
fence,
with
line
line
with
both
to
the
right
over
the
cut.
Continue
at a time
.
fence
is
it
is
adjustable,
large
enough,
for
var
the
fence,
the
same
as
the
right
up
the
next
JOINT
JOINT
LAP
JOINT
and
line
"B"
is
cuts.
Fit a square
to
serve
to
the
miter
the
fence
place
having the
"A"
and
line
"B".
boards).
to
engage
guide
pin,
to
and
fastened
ious
guide
the
sma
against
move
make
and
the
size
adjust
it
pin
width
ll,
and
it
cut.
riE~
CORRECT
SHALLOW
as
was
both
the
Make
Now
the
and
cuts
to
the
same
box
so
and
of
the
boards
each
cen-
peg
a guide.
gage in
placed
boards
edge
of
edge
of
the
move
groove
make
boards
until
miter
the
first
set-up
joints
that
the
side
of
dado.
are
time
OEEP
.
BOX JCIHT
SPLIHED JOIHT
25
Page 28

These
"halved"
head,
dado
cut
in
the
head
a dado
to
the
seco
block
must
piece,
minus
Insert
the
gage and
fix
the
width of
sho
uld
be
nest
board.
11.
MIDDLE
WITH
To
make
s~t
the
other
board.
each
approx.
board.
1/2
~idth
cut
in
second
remaining
first
board.
shelf
held
strong
ly
12.
SIMPLE
The
tenon
(page 18)
blade
(Page 17).
cut
with a
or
same
is
nd
by
be
the
the
block
the
end
exactly
LAP
GROOVE
each
dado
head
1/5
Depth
of
other
between
This
by two s id
braced.
MORTISE
can
or
in
mortising
joints
can
all
the
manner
used,
end lap
the
pieces
as a trunnion
first
piece
usingaspacinghlock.
same
width
as
width of
between a st
of
the
one
ON
cut
to
Cut
to 1/ 4
of
both edge
board;
board
the
the
cut
-half
EDGE
in
the
the
is
the
op on
piece
to
be
thickness
the
grooved
thickness
two
grooves
the
thickness
cuts
and
exact
two
grooves
width
is a steady
es
which
AND
TENON
be
cut
with a dado
several
The
chisel
ways
mortise
on
with a
the
be
cut
can
is
the
second
dado
the
being
made.
of
is
exactly
thickness
of
joint
are
standard
is
generally
drill
press.
with
be
. If
fitted
This
head.
miter
cut,
to
Depth
thin-
board,
of
the
first,
of
the
of
wood
of
the
for
not
head
a
13.
BARE-FACED
This
is
generally
joined
sk
irt
14. HAUNCHED
This
with
just
lon g enough to
and
is
15. CONCEALED
The
a
strength
(as
in
make
wood
and
cut
mortise.
16. LONG
SHOULDERS
This
type
of
tenon has
used
to a
thicker
pieces
to
tenon
is
often used
grooved
cut
out
after
can
c e a
without
the
case
the
groove
at
an
angle
the
AND
is a single
TENON
just
when a
one,
the
TENON
as
legs.
for
framework.
bottom
the
tenon
HAUNCHED
led haunch
showing a break
of
the
haunched tenon).
for
the
haunch,
to
the
groove
SHORT
TENON
tenon
drill
before
with a
one
cheek.
narrow
in
jOining
board
joining a piec
The
haunch
in
the
groove,
is
formed.
TENON
provides
at
the
clamp
press
cutting
rabbet
cut
It
is
table
e
is
extra
end
To
the
table,
the
o·
MIDDLE
LAP
ON
EDGE
WITH GROOVE
26
Page 29

of the shou
edging on
made
:".
I .
..
.
is
additional
required.
"'
quick ly
18. WEDGED
Both
and the blind wedged tenon (for which
m
ortise
te
nons with wedge s lots added.
wedges
instead
must
at
each e
n
ess
one s lot.
19.
This
formed
ings.
angle.
back
(or tenon) a
h
eight
mak
wood
nearest the
20. MITERED TENONS
Th
e en
f O bevel
lder
the oth
in
the two
OPEN
MORTlSE
is use
d in rough box work when
strength
The
morti
cut
with a dado h
TENO
the
through
is
not
sho
uld be s lightly bowed
of
stra
be
of one wedge
MOULD
is a simple
from
of
e a
adjace
ight
flared
nd
should equal the
ED
AND
in t
wo
Eac
To
ds
boards
h moulding
sta
rt
the inside
distance
the
moulding above
mark.
nt to th
end of the
of
the
so
that
out
at
one
side
to
er
board.
boards
TENON
of a simple
se
NS
wedged tenon (illustrated)
cut
thr ough)
tapered;
at
minus
RABBETED
mortise
the
se
miter
edge
equ
The
saw
is
board.
se
teno ns
they
mate
The rabbet
are
equal
in
for
each
having edge
is
form a miter
tenon is not
this
jOint
ead
.
are
As
at
and
the
end. Th e Clare
maximum
the
thickness
TENON
and tenon
miter
cut
cuts,
of the
al
to
the
the
board
sho
uld
on
are
enter
cut with a
mark,
measure
the
with an
cuts
dept
h.
the
can
be
the
simp
le
shown,
one side
mortise
thick-
of
joint
mould-
at
a 45°
mortise
ver
tical
, and
the
side
joint
A
DRILL
PRESS
SET-UP
FOR
MORTISING WITH
MORTISING CHISEl ATTACHMENT
inside
of
the
morti
sed
be
formed a
allow
bevels.
tenons
bit longer
for
the saw k
Mitered
are
necessarily short
piece. Tenons
than
erf
ends
are
when
THE
nece
useful
and
should
ssary,
cutting
when
thick.
to
the
the
~~~
~-
27
~Ilt
-
~
"
J'~
~
...
"""
TENON
Page 30

21. DADO
Thil)
the dado
of a
BOX
is a simple joint
head.
drawer
with the dado
rabbet
cut.
22.
MILLED
This is
the
at
lap
strong
neater
the
23.
This
miter
corner.
the
24. RABBET
To
First,
end
cu
equa
used
cross
are
end.
all
grain
of
the
joint
appearing
end
lap
very
O()UBLE DADO
-.l
LOCK
MITER
combines
corner
The
miters (as
make this
cut
the
entire
tti
ly off
ng into
l to haU the
board. Then
CORNER
Often
to
the
sid
groove
DADO
BOX
when
it
edge
If
the two
about equal
is
provi
joint
thin.
JOINT
the
appearance
with
the strength
grooves
shown in
MITER
JOINT
standard
two 45°
the
the
first
second
thickness
cut a rabbet
quickly
used
es,
it
should
to
m3,d
fit
narrower than
CORNER
is
desired
at
the
grooves
side
to
instead
and
thickness, a very
ded . A
is
weaker,
obtained
by
of a
of a dado
are
cut
illustration
saw
blade
cutting
first,
the
miters,
board,
board
to a
of the
in
the
first
e with
the
back
be
made
the
expose
of
the
end
but
making
perfect
then
).
joint:
the
but only
depth
first
board
that
is
as
wide
en
d)
as
as
th e
ready
partial
25
. HOUSED DADO
This
is a firm,
ing
she
cut
with a
one
piece
26. COGGED
Reinf
orci
the
first
sta
miter
lves
ng
second
board.
rted
cut
in end
dado
and a
JOINT
strips
(measured
in the
easily
head,
rabbet
frame members
j
oi
nt.
The
reinforcing
dado
press or
27.
Because of
mounted
mor
e weight
full
ju
st
dado
widt h, th
a
dovetail
groove,
strip, 'is
head.
Use a mortising
a hand
chisel
DOVETAIL
DADO
the s
by
means
than
dovetail joint;
as
well. The
head
set
to
en
routed
router
formed. A beveled
cuts
by
a
standard
from
board
Take
out
seco
made
at
the
JOINT
made
pieces.
by
making a groove
in the
are
often
by
means
generally
quickly cut
chisel
to
make
trai
ght
of
thi
s jOint
if
mounted
but will lock
mortise
the
narrowest
out
on
guided
by
rabbet (made
blade)
forms
tip
of
the
board
mitered
as
deep
wedge a
by
the
and haU
nd
start.
joint
for
sea
It
is
quickly
other.
fitted
to
of
placed
main
this simp
in
the
with a
on
the
drill
the
slot
s.
bottom, shelves
will
means of
is
cut
in
carry
place
with a
by
desired
the
top side
the
edge
with
being
with two
the
tenon
l-
t-
in
le
a
28
DADO BOX
CORN
ER
Page 31

28.
SIMPLE
BLOCK)
The
simplest
right
as
illustrated.
reinforced
triangular
angle
29.
LOCK
:r
R
This
tions
.
made with a dado
cuts
should
tration.
tween the tongues and
boar(ls
together.
DRA
WER (GLUE
JOINT
angles
braces,
'YJ\
makes a very
way
is
to
cut a rabbet
Such
by
nailing
glue
blocks,
as
shown.
JOINT
...
:
.
3~Ir
1
All
of
the
cuts
head.
be
made
Allow
just a little
must
be
assembled
to jOint
firm
two
joints
the
boards,
or
by
joint
necessary can
The
ord
is
shown
grooves,
by
boards
in
one
are
by
addi
in
all
er
in
the
freedom
as
sliding
board,
generally
adding
ng
metal
direc
in
which
illus-
be-
the two
them
30.
TONGUE
JOINT
This
is
the
flooring
a
dado
either
ordinary
easiest
rounded
at
PLYWOOD
Wherever
solid
draw
er
to a drawer
si
mpl
e "DRAWER
in
the
wood,
"RABBET
BLOCK
blocks
the
miter
inner
-
edge
be
will
and "HOUSED DADO" jOints
used
to
(5/ S
inch
all
those
c
utting
an
edge.
commonest type
and
siding.
head,
with
rabbets.
if
the
edges
off.
JOINTS
ply
wood
at a right
side
or
front
solid
wood.
use
either a "SIMPLE
MITER"
JOINT"
.
If
either
from
side -then
be
join
or
more)
jOints,
across
AND
GROOVE
The
and
the
the
dado
Boards
of
the
wood (of
bottom
of solid
JOINT"
If
both
or
with
miter
the
outer side
any splintering
inside. "DOVETAIL
plywood s
side
however,
the
plies
~
.,.,\
groove
tongue
head,
or
will
slide
ton
gue
any thi
ckness) joins
angle ( as
of
plywood
wood),
with
pieces
a "S
IMPLE
or
without the gl
joint
is
may
hel
ves
members.
which
in,
at,
of
is
can
are
best
the
are
lVIIT
toward
to
or
joint
cut
be
like
together
slightly
when a
is
jointed
use
rabbet
of
ER " , a
GLUE
used,
along
DADO'
both
thicke
Avoid
require
close
for
with
cut
two
a
ply-
ue
cut
the
the
be
r
to
"
UING
'.'
se
glue
for
you
add
ject
where
Before
check their
cable,
simply
or
with
(
if
these
driven
temporarily
assembly
opportunity
adjustments
If the
project
each
(wi
quickly know how
(this
will
wards,
nails
neatness
gluing,
fit
clamp
won
part
way
in
of
in
th a soft
speed
knock
all
and/
pre-assemble
hold
s -
't
hold
this
making
fit,
has
the
USING
jOints
possible
or
screws),
of
fini
and
appearance.
them
or
you
spo
il
in
at
just
the
pal
manner
any n
over
-all
many
pencil)
to
reassemble them
up
the gluing work). After-
parts
down
in any
sh
is
important.
aU
the
If
together
can
use
later app
ts
part
thin
enough places
together.
will
give
eeded last
appea
ran
s,
best
so
that
for
gluing.
FASTENERS
Follow
the
(even
pro
parts
practi-
by
hand,
nails
earance)
Pre-
you
minute
ce,
etc.
mark
you
will
later
if
to
to
an
-
29
dations
cuts"
Preferably
dry area,
with a brush,
only.
applying
glue -rather
requ
the
(molasses
pieces
to
hold
joints
gether.
chisel.
and
ing"
Let
if
This
ired
pieces
and
must
Never
smear
as
possible.
the
glue
glue
closely.
you
do all glui
free
makes a stronger
it
to
by
the
set
thic
apply
them
be
Scrape
the
dry
manufacturer's
There
want
to proc,luce good
ng
from
drafts.
to
one
piece
both
pieces.
too
much
type
of
until
k).
firmly
pressed
use
jOint. Do
glue
the
Finally,
clamps,
together.
and
off
excess
water -this will
naturally.
recommen-
are
no
in a warm
Apply
of
each
bond t
Use
used,
glue
assemb
nails
held
little
Don't
too
is
or
tightly
glue
plenty
little.
All
"smear-
than
as
"short-
work
(70;,
the glue
jOint
han
of
If
now
let
"tacky"
le
the
screws
glued
to-
with
weaken
attempt
.
a
Page 32

to
hurry
it
dry,
excess
the
joint
remove
fully
off
chisel -then,
sa
nd
NAILING
by
heating
any
glue
carefully
if
ne
edge to a
or
clamps
cessary,
neat
airing
it. When
used.
Scrape
with a
carefully
appearance.
sharp
hand
Rough-type
etc.)
fastest,
Then,
of
some
for
clamps (whil e
may not
ance
Select
even rough
discouraging
"good"
Use
nails
enough
And
don't
A few well
holding than a whole
without thought.
each
joint -that
it
might
right
the
stress
in
at
the
in
tend to
nail. In fa
~lose
toward
another
..
STRESS STRESS
projects
generally
too,
standpoint.
your
project
to
angles
an
direction
separa
tog
each oth
with g
call
most
nailing
glue jOints - will
be
objectionab
nails
jobs.
long enough to hold and
last;
use
placed
pull
to
. Whenever poSSible,
angle
ct,
ether
-.-TRESS
j-
.-
f.
f
+-
for
practicable
will
the
glue
carefully
There
than to
by
poor
but no
bigger
too
many.
nails
lot
Study
is,
the
apa
rt
- then
these
stresses
so
that a straight-out
in which
te
cannot
"'toe-n.ailing" (using two
with
their
er)
will
reat strength.
.
STRESS
...
(construction
improve
,
nails
type
eliminate
is
drying)
le
from
for
is
nothing
ruin
an
nailing
than
will do a l
of
nails driven
the
"stresses"
directions
"plant"
the
easily
points
fasten
Also,
,
~~
'.
~
..
work,
as
being
of.
fasteners.
the
strength
the
- and
the
appear
any
job
more
otherwise
technique.
strong
necessary.
ot more
in which
nails
to
"absorb"
drive
boards
dislodge
nails
angled in
one piece
remov
STRESS
.....
,
"
the
need
_
in
of
at
nail
pull
will
the
to
-
-
•
ing
the
heads
from
tween two
that
manner.
Whenever
the
or
hole
1/ 32 inch s ma:ller than the nail.
through
piec
penetrate
when
hard
it
drive
Embedding a nail
will
this
ing
use
down a
your
the
of
variou
Choose
point i s cupped),
the
with
with glu e.
- then
BOLTING
pieces
cannot
there
wood -
right
through a gra
for
your
the
e about half
it.
workin
woods,
will avoid
it.
make a neater
is
important)
of
the
nail
finishing
lm
ost
hammer
head
·'under"
th
e head. Na
s s
izes (1/ 32
one th
hol e.
After
plastic
Fill
sand
nails
will often
be
provided
is any
as
when
nailing clo
riail.
Select
first
piece
the
distance
Drilling
g with
WOOd,
it
oak
or
when
bending
head
appearance
- and will
head.
nails.
flush
with
- then
use a nail set to
approximately
il
sets
to
at
will
fit
but
which
countersinking,
putty
to
slightly
smooth
.
is
using
For
Drive the
to
embed
them
absorb a stress
for
in any other
danger
of s
plitting
se
in
and into
especially
and s
of
about 4/ 32 inch).
the
or
above
to an edge
or
knot -
drill
the
sec
the
nail
helpful
imilar
large
nails
nail
as
(wherever
nail
surface
the
ava
ilable
nail head
not
enlarge
fill
the
the
surface
drill
drive
mixed
a twist
the
(countersinking)
eliminate ru'
countersinki
the
are
w·i1l
sawdust
be-
bit
Drill
ond
will
very
-
you
head
wit
width
in
(the
hole
a
h
It
is
often
advisa
or
bolt
s to join
considerable stress. All
course,
be
ble
pieces
pre-drilled.
30
to
use
machine sc
which
hol
Use a twist drill
must
es
mus
rews
stand
t,
of
Page 33

or
power
in which
Countersink
0 -
SCREWING
Preferably,
screw
screws
to
split
qui
dilling
and
in half
cannot
pre-drill
you
hammers a screw
The
use
wood
your
screw
the
.(,
split
red
is
hammer
a
the
top
of
fill
over
or
. Even
hardwood.
as
best
Craftsman
the
putty.
always
driven
in without
the
wood; they will
to
drive a screw
is
considerab
likely
or
ruin
countersink a screw
the
hole
it
in (and a good
way to
bit
to
make a through
or
bolt
head,
the
hole
bolt
pre-drill
in
large
Then,
as
not to
the
head. And
properly -thatis,
in
O.
drill a screw
Screw
will
if
desired,
to
proper
head with a wooden
softwood
pre-drilling
nearly
too,
the
in without
le .
..
is
twist
unless
workman
Pilot
hole
fit
snugly.
by
enlarg-
depth -
the
hole
for
boards,
are
always
force
pre-
tiring
...
the
sc
rew
again,
you
you do
unless
never
hole
(illustrated).
is
apt
re-
to
a
H
~
~
ROSE
COUIIITERSIIIIK
In a
single
body and
flat-head
tended.
you
will not
one
of
the
er
than
pilots
come
the
various
screws.
you
must
for
each
made
by
operation,
countersink
screw
If
using
countersink,
screw
to
the
top
in an
popular
If
you
use
three
hole -to
a
pilot.
this
hole
for whi
ch
a round
pilots
- and
of
the
assortment,
sizes
use a twist
different
match
SCREW
PILOT
drills
the
for
the
the
pilot
head screw
you
can
still
drill
no
body
part.
marked
of
flat-head
drill
instead,
size
the
single
root,
size
is
in-
that
use
deep-
The
for
drills
hole
Power
for
the craftsman
give you
proper
operations, short-cuts and special operations.
and described. Ask
complete, up-to-
handl ing
Tool
of
each
tool -including
for
these handbooks:
The
•
•
•
•
•
•
•
•
•
•
Bench Saw
The
Drill Press
The
Wood Lathe
The Jig Saw
The
Jointer,
How
to
Sharpen
Power Tools - How
Radial Arm Saws
The
Power
Router
The
Rotary
Handbooks
the-minute
and
Band Saw
Shaper
Electric Grinder
and Bench
to
31
instructions
hundreds
All
Sander
Use Them
for
fully
set-
up
of
standard
illustrated
and
Page 34

TILT
--
AND
MITER-GAGE SETTINGS FOR
COMPOUND
ANGLES
'~M
""¥",,
I Bult
H11
1."-'
ANGlE\~J
'
99
Work
Angle
5°
10
°
15°
20°
25° 10 67
30°
35°
40°
45
°
50°
I
55°
60°
FIGURES
MITER
GAGE SCALE
NORMAL
Figure
Triangle
Square
Pentagon
Hel(ogon
Heptagon
Tilt
Blade
14)\
1911
2411
30
36
42
48
ARE
IN
POSITION.
Sides
3
4
5
6
7
._
.
Joint Joinl Joint Join'
.~..
Miter
6_
Miter
6 W
l\
HI
3*
6%
DEGREES
Ripping
(Till
Blode)
45°
36
°
30°
25.83°
Miter
Gage
85
8014
75l\
71
63)\
601,4
571,4
54*
52l\
50%
4.
AND
PROVIDING
BEVELS
Crosscutting
(Set
Tilt
Blade
44%
4414
43%
42
40
37*
351,4
32%
30
27
24
21
Gage)
30°
45°
54°
60°
64.17
Miter
Gage
85
80)4
75)\
71
67
63l\
6014
57!4
54*
5211
50*
ARE
TILT
Miter
4.
FOR
DIRECT
STARTS
AND
° Dodecagon 12
AT
MITERS
Figure
Octogon
Honogon
Decagon
Undecogon
Tilt
Blade
29*
29l\
29
28%
27%
26
24l\
22%
21
"
16*
1411
SETTING
0°
AND
Sides
8
•
10
n
Miter
Gage
87)\
84)\
8H4
79
76l\
74
71*
6.*
67*
661,4
64*
63l\
TO
MITER
Ripping
(Tilt
22.5°
20°
18°
16.62 °
15°
Blade
221,4
22
21
21
201,4
1
17
15*
141,4
12*
11
Til T SCALE
GAGE
Blade)
Tilt
l\
191,4
a!4
AT
90°
Crosscutting
(Set
Miter
Gogo}
67
.5
70°
72 °
73.38
75°
8S~.
Miter
Miter
Gage
88
86
84
82
80
7814
76*
75
73*
7211
71
!4
70)4
AND
IN
0
°
Thickness
of
Work
3/8
inch 1/ 8
1/2
inch
3/4
inch
7/8
Inch
1 Inch
1-1/8
inch 3/ 8
1-1/4
inch 3/8
1-1/2
Inch
1-3/4
inch
Thes
e are
pecially
maximum
In
tho lorgll' si%os,
tenon
SAW
SPEEDS
DIAMETER
OF
BLADE
6
7
8
10
12
TENON
Th
ickn
ess
of Tenon Mortise
inch
Inch
1/
8
inch
1/4
or
5/16
1/ 4
5/
16
Inch 5/ 16 inch hollow
inch
or
7/
16
Inch
1/2
9/16
Inch
thicknesses.
ARBOR
SPEED
6300
RPM
5400
RPM
4700
RPM
3800
RPM
3200
RPM
DIMENSIONS
Inch
Inch
The
next
sl%e
1/4
1/4
31B
3/8
1/2
31B
smaller
inch router bit
lIB
inch router bit
lIB
inch hollow
or
inch hollow
or
inch hollow
Inch
Is often
COHesponding
5/ 16 Inch
7/ 16 inch
chisel
chisel
chisel
chisel
chisel
chisel
chisel
(two rows)
.otisfoctory,
es-
Page 35

POWER
TOOL
INSTITUTE.
INC.
SAFETY RULES FOR POWER
TOOL
S
2. KNOW YOUR
~sR
ead
owner's
applications
specific
tool.
2. GROUNO
DOUBLE·
If
it
trical receptacle.
commodate
er wire
ground. Never
3. KEEP GUARDS
and
4.
KEEP WORK
Cluttered
5.
AVOID
tool
should
in
working
potential
is
POWER
manual
and
limitations
hazards
ALL
TOOLS - UNLESS
INSULATEO
equipped
be
two-prong
must
plugged
If
be
remove
IN
order
with
into a three-hole
adapter
attached
third
PLACE
.
AREA
areas
and
benches
DANGEROUS
ENVIRONMENT
Don
't use pow
t
ions -keep work
6.
KEEP CHI
-
All
visitors
from work
7. STORE
When not in use,
dr
y, high
of children
LDREN
should
area.
IDLE
or
locked-up
.
er
tool
area well lit.
be
TOOLS
tools
AWAY
8. DON'T FORCE TOOL
It w
ill
do
the
job
rate
for
which it was
better
designed
TOOL
carefully.
as
well
peculiar
three-prong
is used
receptacle,
to
prong.
CLEAN
inv ite
in damp
place -out
kept
sho
uld
and safer
or w
safe
be sto red in
.
Learn its
as
the
to
this
plug,
elec-
to
ac-
the
adapt-
a
known
accidents.
et
loca-
distance
of
reach
at
the
10. WEAR PROPER AP
No
loose
in moving
wear are
door
11
. USE
with m
c
12.
DON'T
Never
connect
heat,
utting
clothing
recommended when
s.
SAFETY GL
ost
operation
ABUSE CORD
carry
from receptacl
oil
and
13.SECURE
Use
clamp
s o r a vise to hold work: It
using y
to
operate
OVERREA
ep
proper
s.
14.
than
hands
DON'T
Ke
t
ime
15. MAINTAIN
Keep
tools
best
and
not
hanging
utters, etc
WRENCHES
habit
ting
turning
safest
accessories such 'as blades,
wrenches
tions for
sories.
16
. DISCONNECT TOOLS
When
c
c
17. REMOVE ADJUS
AND
Form
adjus
before
or jewe
parts.
Rubbe
tools
. Also f
is du
tool
by cord
sharp
edge
WOR
K
our
han
tool.
footing
TOOL
sharp
at
performan
lubricating
in
use, befor
.
of
checking
it on,
are
PAREL
lry
to
r gloves
get
and
working
ASSES
ace
or
or yank it
e.
Keep
s.
dust mask
cord
it
frees
sty.
d and
CH
and
balan
ce
S WITH CARE
all times, a
and
TING
nd
ce. Follow instruc-
ch anging acces-
e se rvicin
KEYS
to
see t
hat keys
removed from
caught
foot-
out
to
dis-
from
's
safer
both
at
cle
an
for
g; when
bits
and
tool
-
if
all
,
9. USE
Don't
the
RIGHT
force
job
of
TOOL
small
a heavy
SEARS, ROEBUCK
AND
tool
or attachme
duty tool.
AND
nt
CO.
to
SOLD
SIMPSONS-SEARS
18. AVOID
do
BY
Don
't
switch,
- CHICAGO, I
LIMITED
ACCIDENTAL
carry
plugged
LL.
60607 - U.S.A.
-:-
TORONTO
STARTIN
in tool wit
G
h finger on
Page 36

A(<<m-./~$~e-tWlQIt4Uf1
~w
r
~
THE
RIGHT
If
your
awkward
than good
Base
designed especially
a firm,
cupies a minimum
necessary.
A
BELT
Speedi
ng
they
can
near. Use
your
tool.
colton'pick
TOOL
tool
is
to
reach, it
work
substantial.
GUARO
belts
and
grab
any
the Cra
and
in' "hands
mounted
may
. Sears
proper
space
pulle
thing
ftsman
save
yourself
",
BASE
so it w obbles
produce
offers
for
each bench
height
and
is
ys
have
that
Belt
a
Craftsman
easy
1
grabby
flaps
Guard
from
THE
RIGHT
You
wou
th
your
tool with
smooth. clean cutting? Power
Craftsman
or
more
base
to
move
habits
or
floats
designed
such
is
mishaps
Tool
tool
that
oc-
when
AN
ON-OFF SWITCH
Why
do
out-of-the-way
bu ilt-in sw
On-Oft SWitc
close
at
,
too
for
grabby,
A FACE
No
sensible
barefaced.
shower
tooP
better
than
so
much,
MOTOR
ldn
't ex pect a child to lift a man
en why
Mot
haEardou
itch
hand
.
#
expec
the
or designed
swi
you
h t o
SHIELD
knight
Why
flying
yee
either.
should
missels tossed
olden
of
With a Craftsm
t an u
spe
ed
for the
s gy m nas ti
tch ? I f
can
easily
your to
ever
you
an
Face
knight
nd
ersiLe
cs
att
go
Yo u r
job.
trying
ach
bare
off
Shield
and
motor
er
needed
tool with
to reach an
doesn
th is Cr
faced
by
a
you
won't
and pow
your tool
ol or the base
faced a javelin
's
load
to
rUI-
f(
th~
't
have
a
afts
man
,\
....
"."f"
)!
thrust
into
the
high~speed
can
see
perspire
WHY
LIMIT
YOUR
TOOL'S
First
off
rough sawing, and
saw
ing
of
tenoning, etc. Only
the job best.
be done c
and work-holding
iv
ersal and
Un
Ho
ld·Down. Then, third,
w
orkpieces
F
inally, think
you
can
Set
and a Sanding
Your
bench
awing
,
if
s
man
Accessories
CAPACITY
, it
takes different
veneers
Second, some work
orrectly
Tap
er Jigs o n t
you w.ill
of
do
with a Dado
Plate.
saw
wilt
you
outfit
designed
THERE'S A CRAFTSMAN KNOW-HOW
TO A
for smoo
or plyw
and safely b y usi
attachmen
need
the
do
blad es f or f ast ,
th cab met work
oods
the right Blade
ts, such
he
Mi ler-G,lUge
to
sUP!-lort large
a Tab le ExtellSlOIl.
additional operati
Set
, a Mo
ldi
lots
more
it
with che
for it.
chCJIJ
right
HANDBOOK
"ONE-ARM"
or
fo r
wi ll
do
can
only
ng jigs
as
th e
ons
ng
Cutr
er
si
mpl
e
Crafts-
FOR EV
ER
JOB?
Y POWER TOOL
 Loading...