

Craftsman 987.799600 Owner's Manual
IMPORTANT
MANUAL
DO NOT THROW AWAY
SEARS
OWNER'S
MANUAL
MODEL NO.
987.799600
A Caution:
Read and Follow
All Safety Rules
and
Instructions
Before Operating
This
Equipment.
SIEARS
[RAFTSMAN™
5 Horsepower
CHIPPER/VAC
Safety
Assembly
Operation
Customer Responsibilities
Repair Parts
SEARS, ROEBUCK AND CO., HOFFMAN ESTATES, IL 60179 U.S.A.
FORM 1769199 (12/93)

II.
•
Limited Warranty
For One Year from date of purchase, when this ChipperlVac is maintained, lubricated, and tuned up
according to the operating and maintenance instructions
in
the Owner's Manual, Sears will repair free of
charge any defect
in
material or workmanship.
This warranty excludes the collection bag, spark plug, air cleaner, and chipper blade which are
expendable parts and become worn during normal use.
If
this ChipperlVac is used for commercial or rental purposes, this warranty applies for only 30 days from
the date of purchase.
WARRANTY SERVICE
IS
AVAILABLE BY CONTACTING THE NEAREST SEARS SERVICE
CENTER/DEPARTMENT
IN
THE UNITED STATES. This warranty applies only while this product is
in
useinthe United States.
This warranty gives you specific legal rights, and you may also have other rights which vary from state to
state.
SEARS, ROEBUCK AND CO.,
D/817WA - HOFFMAN ESTATES,
IL
60179
WARNINGTOCALIFORNIA
OWNERS
AND
OTHER
POWER
EQUIPMENT
OPERATORS
Under
California
law,
and
under
the
lawsofseveral
other
states,
you
are
not
permiUedtooperateaninternal
combustion
engine
using
hydrocarbon
fuelsonany
forest
covered,
brush
covered,orgrass
covered
land,oron
land
covered
with
grain,
hay,orother
flammable
agricultural
crop,
withoutanengine
spark
arresterincontinuous
effective
working
order.
The
engineonyour
power
equipment
like
most
outdoor
power
equipment,isan
internal
combustion
engine
that
burns
gasoline,ahydrocarbon
fuel.
Therefore,
your
power
equipment
mustbeequipped
withaspark
arrester
muffler
in
continuous
effective
working
order.
The
spark
arrester
mustbeaUachedtothe
engine
exhaust
systeminsuchamanner
that
flamesorheat
from
the
system
will
not
ignite
flammable
material.
Failureofthe
owner/operatorofthe
equipment
to
comply
with
this
regulationisa
misdemeanor
under
California
law,
and
may
alsobea
violationofother
state
and/or
federal
regulations,
laws,
ordinances,orcodes.
Contact
your
local
fire
marshalorforest
service
for
specific
information
about
what
regulations
applyinyour
area.
NOTE:
This
ChipperNacisnot
equipped
withaspark
arresteronits
mufflerasstandard
equipment.
You
must
provide
the
spark
arrester.Aspark
arrester
for
the
mufflerisavailable
through
your
Sears
Service
Center.
TO
PREVENT
PERSONAL
INJURYORPROPERTY
DAMAGE
•
Cutting
blades
begintorotate
when
engine
starts
and
slow
down
gradually
after
the
engineisshut
off.
Do
not
allow
handsorany
other
partofthe
bodyorclothing
inside
the
vacuum
inlet,
chipper
chute,
discharge
opening,
blower
deflector,ornear
any
moving
part
.
•
Before
inspection,
cleaning,orservicing
machine,
shut
off
engine,
disconnect
spark
plug
wire,
and
make
sure
that
all
moving
parts
have
cometoa
complete
stop.
This machine meets voluntary safety standard
B71.6-1990, which
is
sponsored by the Outdoor
Power Equipment Institute, Inc., and is published
by the American Standards Institute, Inc.

TableofContents
Model/Serial Number & Specifications 2
Safety 3-5
Training 3
Preparation 3
Operation 4
Customer Responsibilities and Storage 5
Safety Decals 5
Accessories 6
Unpacking the ChipperlVac 6
Assembly 7-9
Operation 10-22
Features and Controls 10
Engine Operation
11
General Operation 12
Vacuuming and Chipping Operation 13
Materials to Avoid 13
Walk-Behind Vacuuming 14-15
Vacuum Hose Operation 16-18
Blower Operation 19-20
Chipper Operation 20-21
Clearing Jams and Clogs
21
Removing and Installing Shredder Screen 22
Customer Responsibilities 23-30
Important Service Message
23
Service Recommendations 23-24
Check and Change Engine Oil 23
Service the Air Cleaner 24
Clean the Cooling System 24
Inspect Engine Spark Arrester 24
Service the Spark Plug 24
Carburetor and Ignition System Information 25
Lubrication 25
Check Bolts and Nuts for Tightness 25
Replace the Chipper Cutting Blade 25-27
Torque Specifications 27
Off-Season Storage 28
Troubleshooting 29-30
Decals
31
Parts List 32-35
Index
36
A
LOOK FOR THIS SYMBOL TO POINT
OUT IMPORTANT SAFETY
PRECAUTIONS. IT MEANS ATTENTION!!! BECOME ALERT!!!
YOUR SAFETY IS INVOLVED.
1
Model/Serial
Number&Specifications
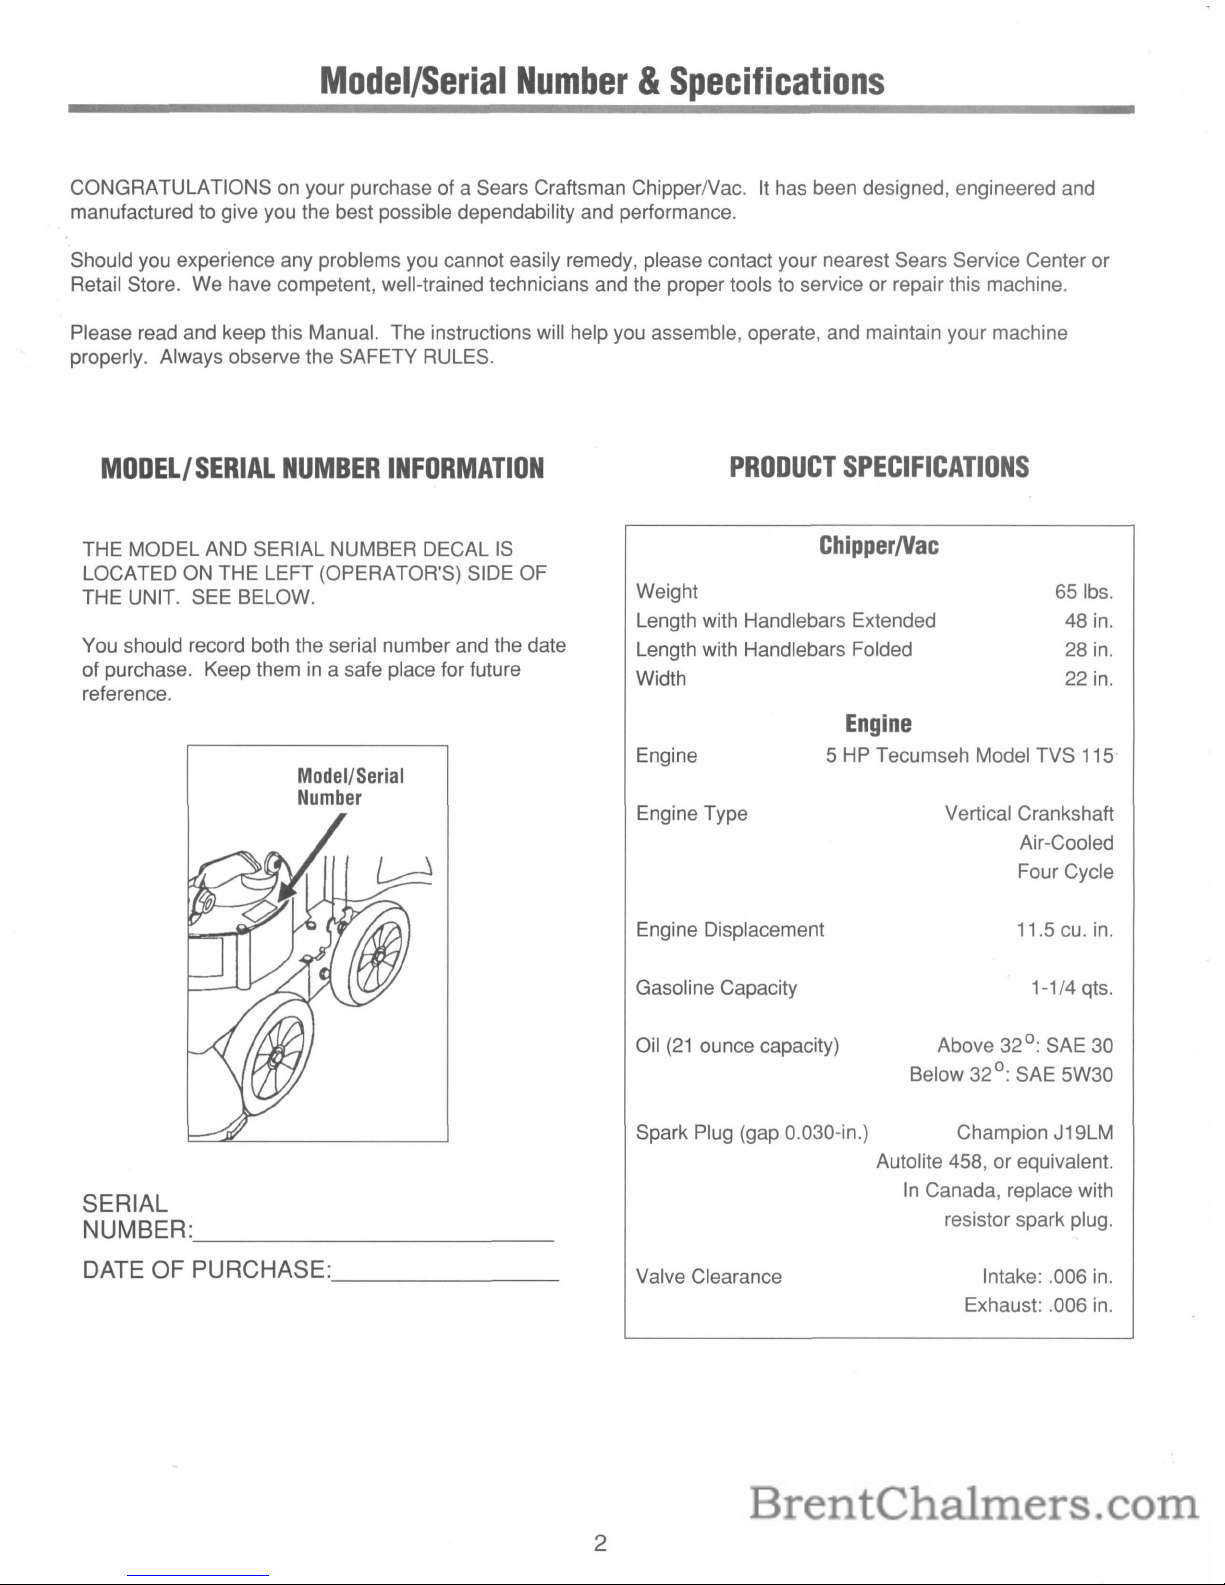
CONGRATULATIONSonyour purchase of a Sears Craftsman ChipperlVac.Ithas been designed, engineered and
manufactured to give you the best possible dependability and performance.
Should you experience any problems you cannot easily remedy, please contact your nearest Sears Service Center or
Retail Store. We have competent, well-trained technicians and the proper tools to service or repair this machine.
Please read and keep this Manual. The instructions will help you assemble, operate, and maintain your machine
properly. Always observe the SAFETY RULES.
MODELl
SERIAL
NUMBER
INFORMATION
PRODUCT
SPECIFICATIONS
THE MODEL AND SERIAL NUMBER DECAL
IS
LOCATED ON THE LEFT (OPERATOR'S) SIDE OF
THE UNIT. SEE BELOW.
You should record both the serial number and the date
of purchase. Keep them
in
a safe place for future
reference.
ChipperNac
Weight
Length with Handlebars Extended
Length with Handlebars Folded
Width
651bs.
48 in.
28 in.
22 in.
Spark Plug (gap 0.030-in.) Champion J19LM
Autolite 458, or equivalent.
In
Canada, replace with
resistor spark plug.
Oil
(21
ounce capacity)
Model/Serial
Number
SERIAL
NUMBER: _
DATE OF PURCHASE: _
2
Engine
Engine Type
Engine Displacement
Gasoline Capacity
Valve Clearance
Engine
5
HP
Tecumseh Model TVS 115'
Vertical Crankshaft
Air-Cooled
Four Cycle
11.5 cu. in.
1-1/4qts.
Above
32°:
SAE 30
Below
32°:
SAE 5W30
Intake: .006 in.
Exhaust: .006
in.
Safety
Please read and follow all of the safety instructionsinthis Safety Section. Failure to comply can resultinserious
personal injury or property damage.
If
you have questions, or are not completely sure about any of the information
found here or elsewhere
in
this Manual, please call your local Sears Service Center for assistance before you operate
your equipment.
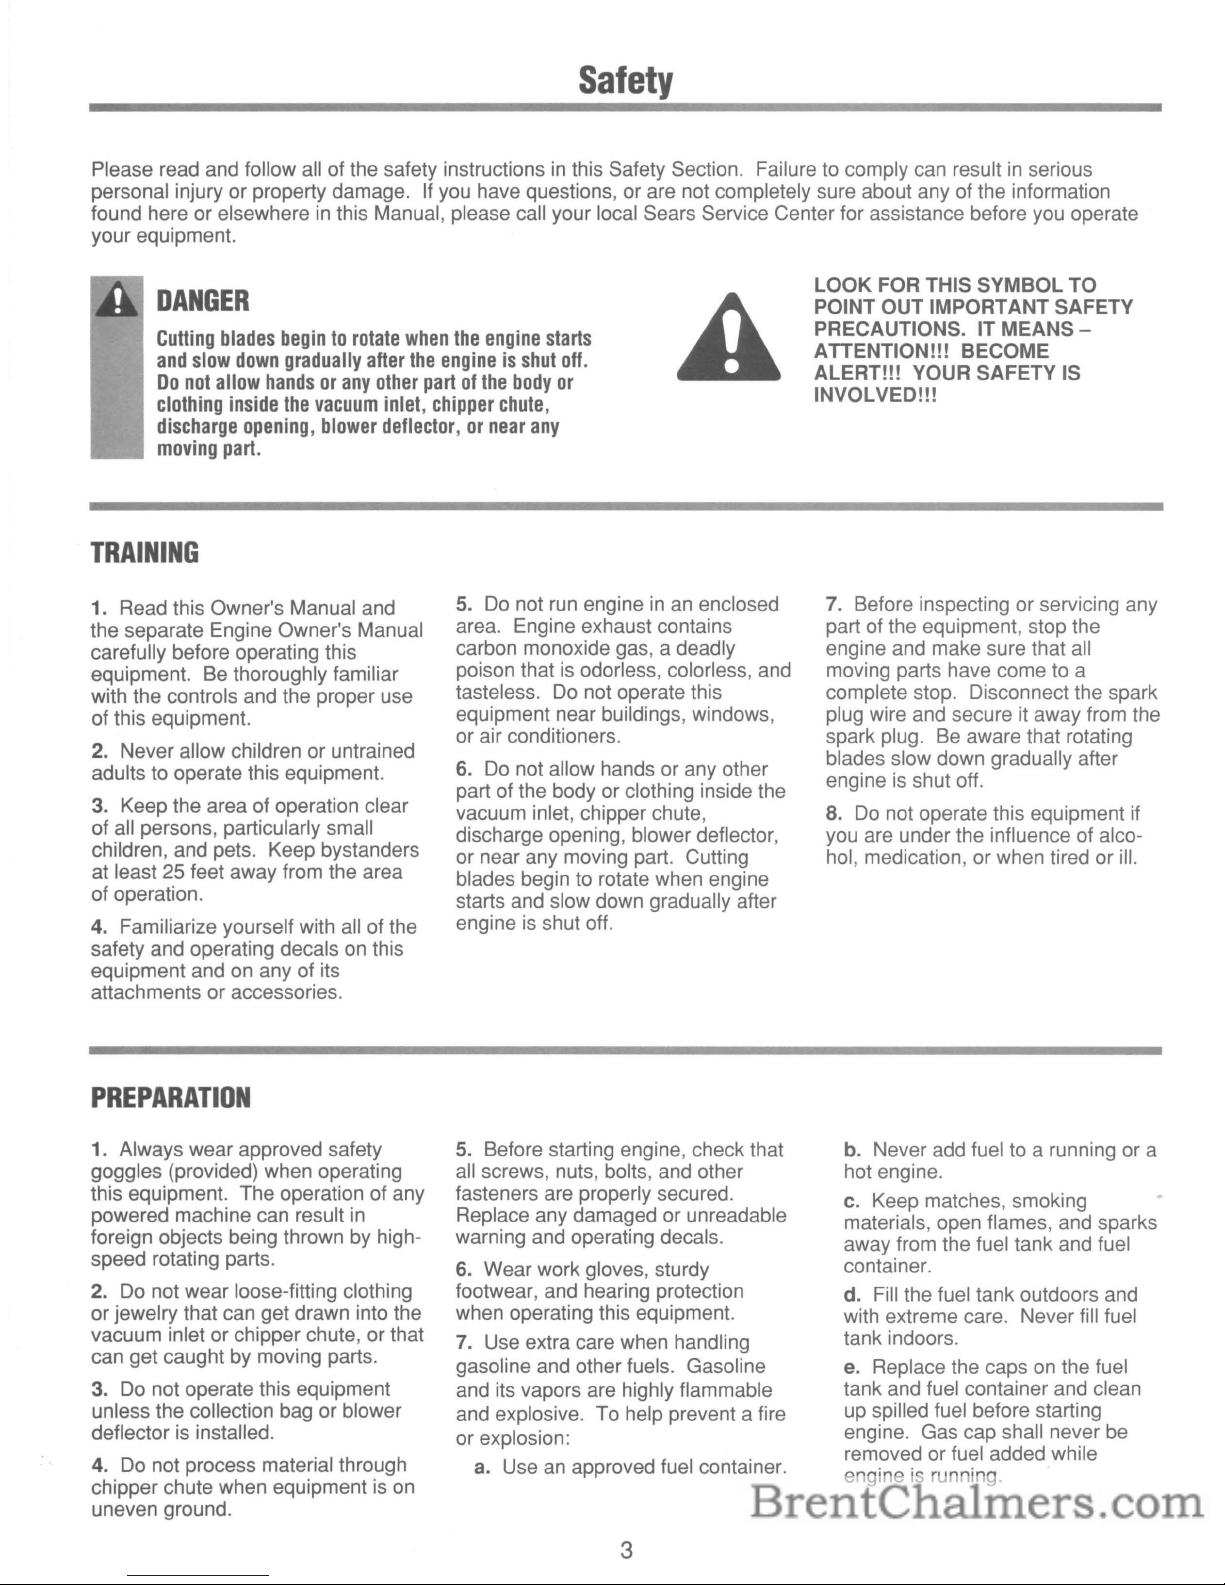
DANGER
Cutting
blades
begintorotate
when
the
engine
starts
and
slow
down
gradually
after
the
engineisshut
off.
Do
not
allow
handsorany
other
partofthe
body
or
clothing
inside
the
vacuum
inlet,
chipper
chute,
discharge
opening,
blower
deflector,ornear
any
moving
part.
A
LOOK FOR THIS SYMBOL TO
POINT OUT IMPORTANT SAFETY
PRECAUTIONS. IT MEANS ATTENTION!!! BECOME
ALERT!!! YOUR SAFETY IS
INVOLVED!!!
TRAINING
1. Read this Owner's Manual and
the separate Engine Owner's Manual
carefully before operating this
equipment. Be thoroughly familiar
with the controls and the proper use
of this equipment.
2.
Never allow children or untrained
adults to operate this equipment.
3. Keep the area of operation clear
of all persons, particularly small
children, and pets. Keep bystanders
at least 25 feet away from the area
of operation.
4. Familiarize yourself with all of the
safety and operating decals
on
this
equipment and on any of its
attachments or accessories.
PREPARATION
1. Always wear approved safety
goggles (provided) when operating
this equipment. The operation of any
powered machine can result
in
foreign objects being thrown by highspeed rotating parts.
2.
Do not wear loose-fitting clothing
or jewelry that can get drawn into the
vacuum inlet or chipper chute, or that
can get caught by moving parts.
3.
Do
not operate this equipment
unless the collection bag or blower
deflector is installed.
4. Do not process material through
chipper chute when equipment
is
on
uneven ground.
5.
Do
not run engineinan
enclosed
area. Engine exhaust contains
carbon monoxide gas, a deadly
poison that
is
odorless, colorless, and
tasteless.
Do
not operate this
equipment near buildings, windows,
or air conditioners.
6.
Do
not allow hands or any other
part of the body or clothing inside the
vacuum inlet, chipper chute,
discharge opening, blower deflector,
or near any moving part. Cutting
blades begin to rotate when engine
starts and slow down gradually after
engine
is
shut off.
5.
Before starting engine, check that
all screws, nuts, bolts, and other
fasteners are properly secured.
Replace any damaged or unreadable
warning and operating decals.
6. Wear work gloves, sturdy
footwear, and hearing protection
when operating this equipment.
7.
Use extra care when handling
gasoline and other fuels. Gasoline
and its vapors are highly flammable
and explosive. To help prevent a fire
or explosion:
a.
Useanapproved fuel container.
3
7.
Before inspecting or servicing any
part of the equipment, stop the
engine and make sure that all
moving parts have come to a
complete stop. Disconnect the spark
plug wire and secure it away from the
spark plug. Be aware that rotating
blades slow down gradually after
engine
is
shut off.
8.
Do
not operate this equipment if
you are under the influence of alcohol, medication, or when tired or ill.
b. Never add fuel to a running or a
hot engine.
c. Keep matches, smoking
materials, open flames, and sparks
away from the fuel tank and fuel
container.
d. Fill the fuel tank outdoors and
with extreme care. Never fill fuel
tank indoors.
e. Replace the caps
on
the fuel
tank and fuel container and clean
up spilled fuel before starting
engine. Gas cap shall never be
removed or fuel added while
engine
is
running.

1.
Leave 1/2 inch air space at top of
fuel tank to
aliON
for expansion of
fuel.
OPERATION
1. Before starting this equipment,
make certain that the chipper chute,
vacuum inlet, discharge opening,
and blower deflector are empty.
Disconnect spark plug wire before
making these checks.
2.
Never carry passengersonthis
equipment. They could fall off and
be seriously injured, or they could
interfere with safe operation.
3.
Do
not allow hands or any other
part of the body or clothing inside the
vacuum inlet, chipper chute,
discharge opening, blower deflector,
or near any moving part.
4. Before vacuuming, inspect the
area where the equipment is to be
used and remove all metal, bottles,
cans, or other foreign objects.
5.
Do not vacuum any burning or
smoldering materials such as cigars,
cigarettes, ashes, or cinders.
6.
When vacuuming or chipping,
be
extremely careful that pieces of
metal, rocks, bottles, cans, or other
foreign objects are not inclUded.
7.
Do
not use vacuum or blower
on
areas that have been recently
treated with fertilizers, pesticides, or
herbicides. Follow chemical
manufacturer's safety instructions
regarding contact with treated areas.
8.
Do
not vacuum flammable liquids
such as gasoline, kerosene, diesel
fuel, paint thinner, etc.
9.Ifequipment strikes any foreign
object or starts making an unusual
noise or vibration, immediately shut
off engine and allow all
mOVing
parts
to come to a complete stop.
Disconnect the spark plug wire and
secure
it
away from the spark plug.
Then take the following steps:
a.
Inspect for damage.
Safety
g.
Do
not store the machine or fuel
container where there
isanopen
flame or spark, or where ignition
sources such as hot water and space
heaters, furnaces, clothes dryers,
stoves, or electric motors are present.
b. Replace or repair any damaged
parts.
c. Check for and tighten any loose
parts.
10.
If
equipment jams or becomes
clogged, immediately shut off the
engine and allow all moving parts to
come to a complete stop. Disconnect
the spark plug wire and secure
it
away from the spark plug. Use only a
wooden stick
to
clear away debris.
11. Before adding or changing any
attachments or before switching
between vacuum and blower operation stop the engine and allow all
moving parts
to
come to a complete
stop. Disconnect the spark plug wire
and secure it away from the spark
plug.
12. Keep all guards, covers, and
shields
in
place andingood working
condition.
13. Always stand clear of discharge
area when operating equipment with
blower deflector installed. Material
exits at a high speed from the blower
deflector.
14.
Do
not operate the chipper with
the blower deflector installed.
15.
Do
not operate the chipper if the
chipper chute flap
is
damaged or
missing.
16. Keep your face and body safely
away from the chipper chute. When
chipping, stand
on
either side of
chute and keep arms perpendicular
(at a
90°
angle)tochute inlet.
17.
Do
not overreach when feeding
material into the chipper chute. Keep
proper balance and footing at all
times.
18. Check collection bag frequently
for deterioration or wear and replace
worn bags. Use only original-
equipment replacement bags.
4
Bags manufactured by others could
present a safety hazard.
19. Before removing and installing
collection bag, stop the engine and
allow all moving parts to come to a
complete stop. Disconnect the spark
plug wire and secure it away from
the spark plug.
20. Empty the collection bag after
each use. Decomposing debris
could generate enough heat to catch
fire.
21. Exercise extreme caution on
slopes and avoid excessively steep
slopes.
22. Never operate this equipment
on
a slippery surface.
23. Look behind and use care when
operating
in
reverse.
24.
Do
not allow any part of the
engine, especially around the cooling
fins and muffler to become clogged
with leaves, oil, grease, or any other
combustible material.
25. Watch for traffic when operating
near, or when crossing roadways.
26. Never leave the equipment
unattended when the engine
is
running. Stop the engine, disconnect
spark plug wire, and secure it away
from the spark plug before leaving
the equipment.
27. Use only attachments and
accessories that are approved for
use with this equipment.
28. Operate equipment only
in
daylight oringood artificial light.
29.
Do
not tamper with the engine
governor settings. The governor
controls the maximum safe operating
speed and protects the engine and
all moving parts from damage
caused by excessive speed.
Request help at the nearest Sears
service location if a problem exists.

30. This equipmentisprovided with
a safety interlock system which
prevents the engine from starting
unless the collection bag or blower
deflector
is
installed. The system
is
Safety
also designed to shut off the engine
if the operator attempts to remove
the collection bag or blower deflector
while the engine
is
running. Never
attempt to disconnect or otherwise
defeat the purpose of this system. If
the interlock fails to operate properly,
shut off the engine and do not
operate this equipment until the
system
is
repaired andisfunctioning
properly.
CUSTOMER
RESPONSIBILITIES
AND
STORAGE
1. When equipmentisstopped for
servicing, inspection, storage, or to
change
an
attachment or accessory,
make sure the spark plug wire
is
disconnected from the spark plug.
Allow the engine to cool before
making any inspections,
adjustments, etc.
2. Maintain equipment and all
attachments and accessories
in
safe
working condition.
3.
Never perform any maintenance
while engine
is
running or when
spark plug wire
is
connected to spark
plug, except where specifically
instructed to do so.
4. Never store this equipment with
fuel
in
the fuel tank inside a building
where fumes may reach
an
open
flame or spark, or where ignition
sources are present such
as
hot
SAFETY
DECALS
Make certain that all safety decals on
this equipment are kept clean and
in
good condition. The decals are
shown on Page
31
of this Manual.
water and space heaters, furnaces,
clothes dryers, stoves, electric
motors, etc.
5.
Allow engine to cool before
storing
in
any enclosure.
6.
Store gasolineina cool, wellventilated area, safely away from any
spark- or flame-producing
equipment. Store gasoline
in
an
approved container, safely out of the
reach of children.
7.
Use only original equipment
replacement parts. Parts
manufactured by others could
present a safety hazard even though
they may fit
on
this equipment.
5
8.
Store this equipment where
children will not have access.
Always disconnect the spark plug
wire from the spark plug to prevent
accidental starting.
9.
Check collection bag frequently
for deterioration or wear and replace
worn bags. Use only original
equipment replacement bags. Bags
manufactured by others could
present a safety hazard.
10. Refer to the Engine Owner's
Manual and to "Off Season Storage"
in
this Manual for important storage
instructions
if
equipmentisto
be
stored foranextended period.
Accessories
VACUUM
HOSE
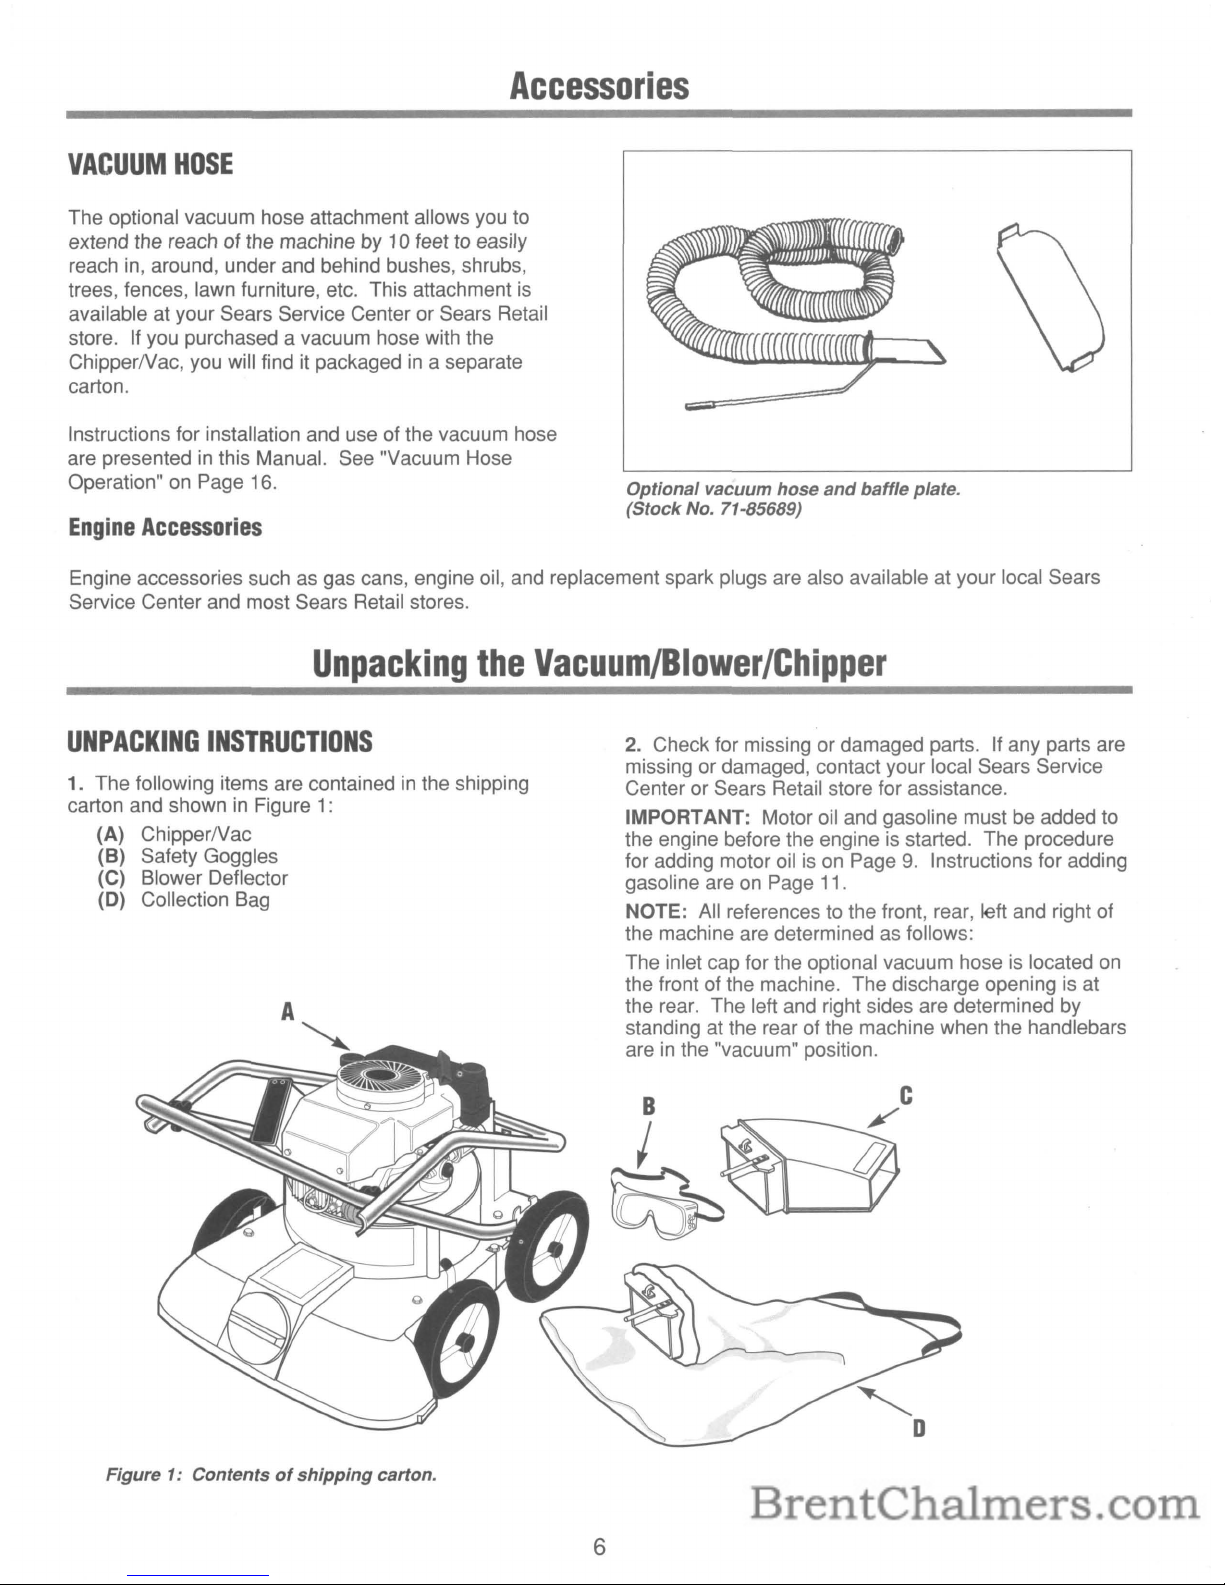
The optional vacuum hose attachment allows you to
extend the reach of the machine by 10 feet to easily
reach in, around, under and behind bushes, shrubs,
trees, fences, lawn furniture, etc. This attachment is
available at your Sears Service Center or Sears Retail
store. If you purchased a vacuum hose with the
ChipperNac, you will find it packaged
in
a separate
carton.
Instructions for installation and use of the vacuum hose
are presented
in
this Manual. See "Vacuum Hose
Operation" on Page 16.
Engine
Accessories
Optional vacuum hose
and
baffle plate.
(Stock No. 71-85689)
Engine accessories such as gas cans, engine oil, and replacement spark plugs are also available at your local Sears
Service Center and most Sears Retail stores.
Unpacking
the
Vacuum/Blower/Chipper
UNPACKING
INSTRUCTIONS
1. The following items are containedinthe shipping
carton and shown
in
Figure 1:
(A) ChipperNac
(B) Safety Goggles
(C) Blower Deflector
(0)
Collection Bag
Figure 1: Contentsofshipping
carton.
6
2. Check for missing or damaged parts. If any parts are
missing or damaged, contact your local Sears Service
Center or Sears Retail store for assistance.
IMPORTANT: Motor oil and gasoline must be added to
the engine before the engine is started. The procedure
for adding motor oil is on Page
9.
Instructions for adding
gasoline are
on
Page 11.
NOTE: All references to the front, rear, left and right of
the machine are determined as follows:
The inlet cap for the optional vacuum hose is located
on
the front of the machine. The discharge opening is at
the rear. The left and right sides are determined by
standing at the rear of the machine when the handlebars
are
in
the "vacuum" position.
B
I
~
Assembly
ASSEMBLY
FOR
WALK-BEHIND
VACUUMING
Your machine has been partially assembled at the
factory. The remaining assembly steps, which are
described below, should be done on a clean, level
surface.
This assembly procedure readies the machine for use for
walk-behind vacuuming. Instructions for converting the
machine for other uses begin on Page 16. Remember to
add oil to the engine before starting the machine. See
"Add Oil to Engine" on Page
9.
CAUTION
To
prevent
personal
injuryorproperty
damage,donot
connect
the
spark
plugorstart
the
engine
until
all
assembly
steps
are
complete
and
you
have
read
and
understood
the
safety
and
operating
instructions
in
this
Manual.
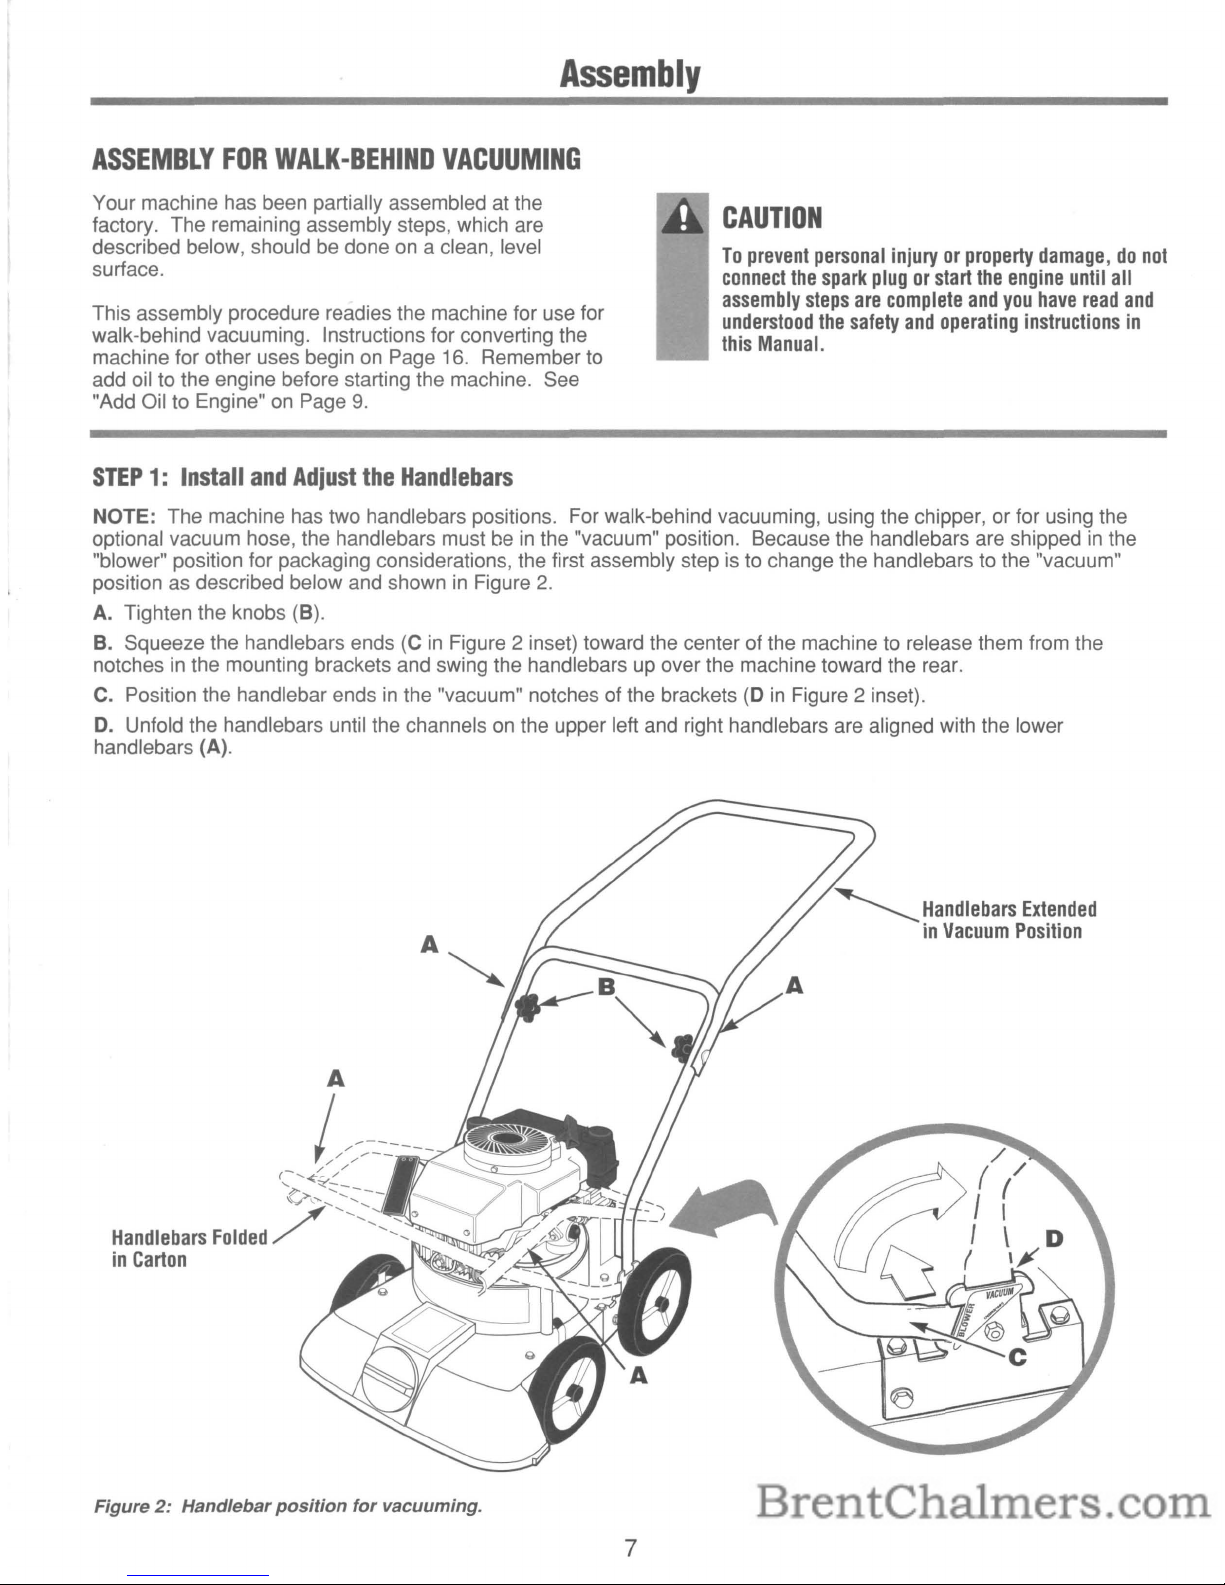
STEP1:Install
and
Adjust
the
Handlebars
NOTE: The machine has two handlebars positions. For walk-behind vacuuming, using the chipper, or for using the
optional vacuum hose, the handlebars must
beinthe "vacuum" position. Because the handlebars are shippedinthe
"blower" position for packaging considerations, the first assembly step is to change the handlebars to the "vacuum"
position as described below and shown
in
Figure
2.
A. Tighten the knobs (B).
B. Squeeze the handlebars ends
(CinFigure 2 inset) toward the center of the machine to release them from the
notches
in
the mounting brackets and swing the handlebars up over the machine toward the rear.
C. Position the handlebar ends
in
the "vacuum" notches of the brackets(0in
Figure 2 inset).
O.
Unfold the handlebars until the channels on the upper left and right handlebars are aligned with the lower
handlebars (A).
~
Handlebars
Extended
in
Vacuum
Position
Figure2:Handlebar
position
for
vacuuming.
7
Assembly
STEP2:InstallorRemove
Collection
Bag
For walk-behind vacuuming, install the collection bag as
described below. To empty the bag or to convert the
machine for use with the blower deflector, remove the
collection bag
as
describedinStep
B.
DANGER
•
Before
installing/removing
the
collection
bag,
stop
the
engine
and
make
sure
that
all
moving
parts
have
cometoa
complete
stop.
Disconnect
the
spark
plug
wire
and
secureitaway
from
the
spark
plug.
•
Check
the
collection
bag
frequently
for
deterioration
and
wear
and
replace
worn
bags.
A.
Install
the
Collection
Bag
1.
Stop the engine
and
make sure that
all
moving
parts
have come to a complete stop. Disconnectthe
spark
plug
wire
and
secureitaway from the spark
plug.
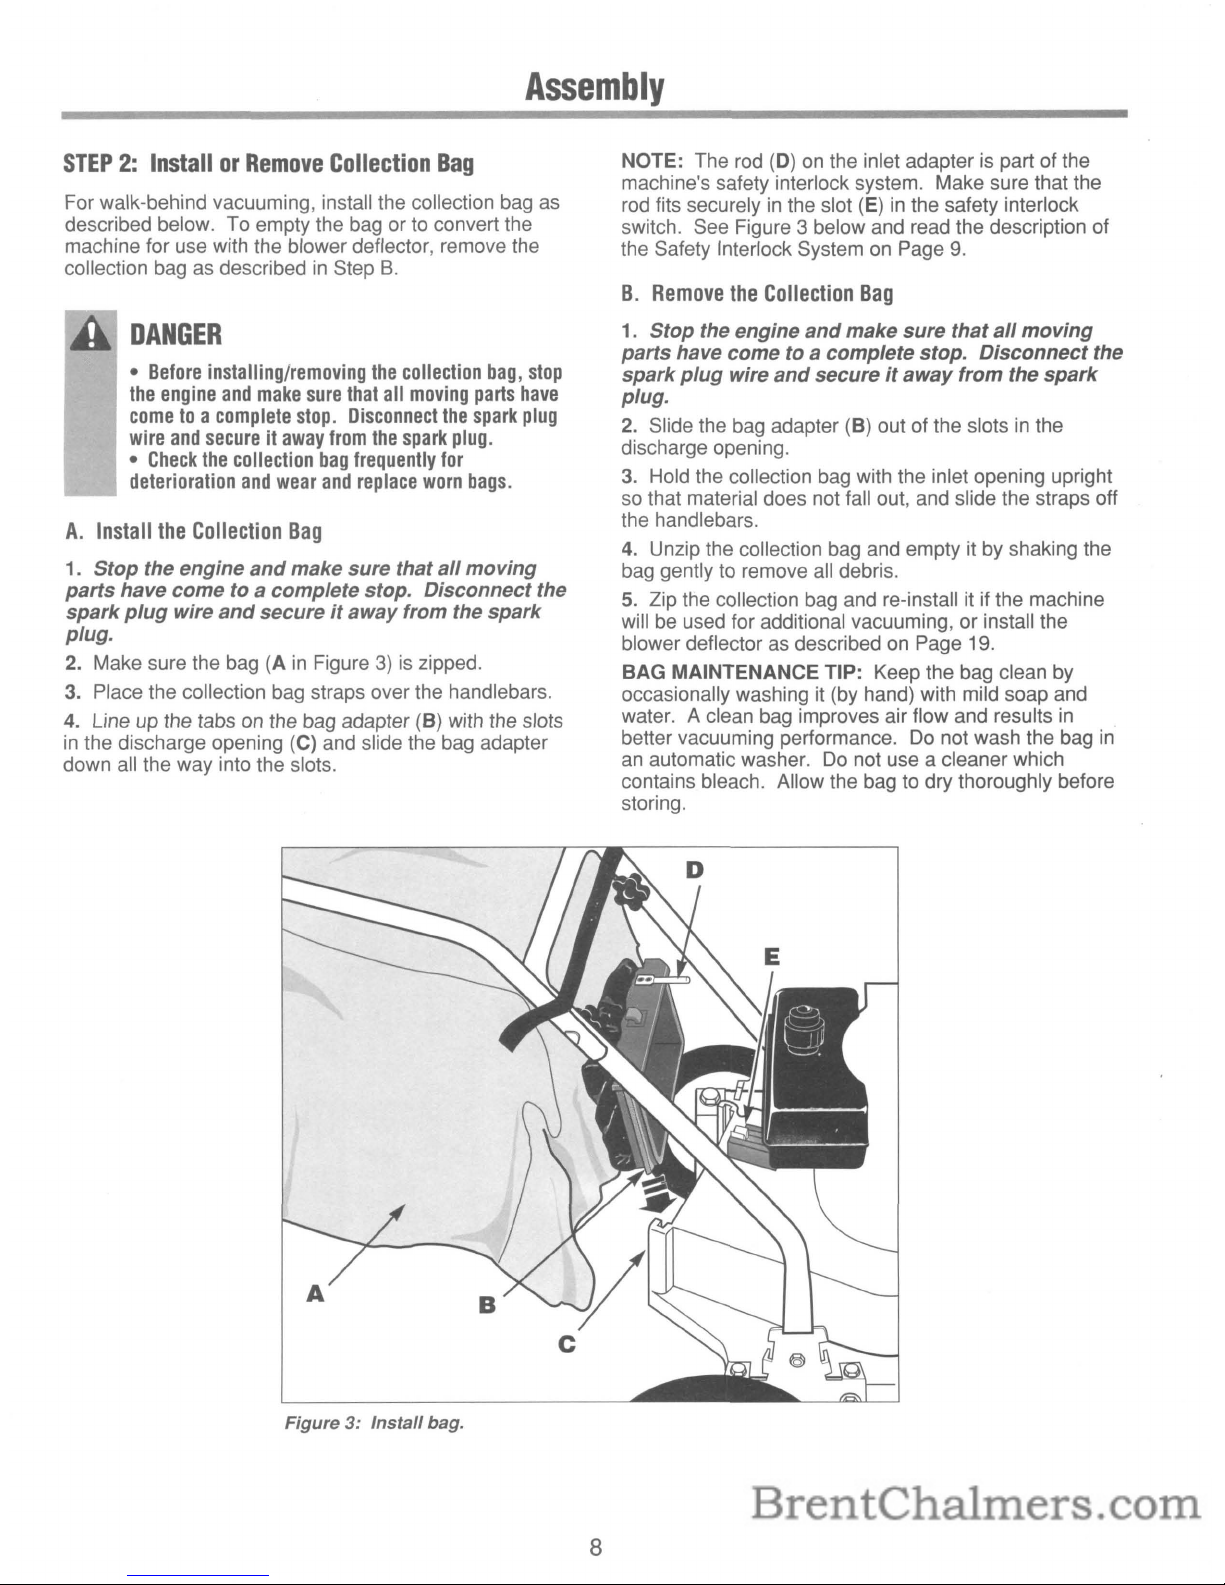
2.
Make sure the bag (AinFigure3)is
zipped.
3.
Place the collection bag straps over the handlebars.
4.
Line up the tabs on the bag adapter (B) with the slots
in
the discharge opening (C) and slide the bag adapter
down all the way into the slots.
NOTE: The rod (0) on the inlet adapter
is
part of the
machine's safety interlock system. Make sure that the
rod fits securely
in
the slot (E)inthe safety interlock
switch. See Figure 3 below and read the description of
the Safety Interlock System on Page
9.
B.
Remove
the
Collection
Bag
1.
Stop the engine
and
make sure that
all
moving
parts
have come to a complete stop. Disconnect the
spark
plug
wire
and
secureitaway from the
spark
plug.
2.
Slide the bag adapter (B) out of the slotsinthe
discharge opening.
3.
Hold the collection bag with the inlet opening upright
so that material does not fall out, and slide the straps off
the handlebars.
4.
Unzip the collection bag and empty it by shaking the
bag gently to remove all debris.
5.
Zip the collection bag and re-install itifthe machine
will
be
used for additional vacuuming, or install the
blower deflector as described on Page 19.
BAG MAINTENANCE TIP: Keep the bag clean by
occasionally washing it (by hand) with mild soap and
water. A clean bag improves air flow and results
in
better vacuuming performance. Do not wash the bag
in
an
automatic washer.
Do
not use a cleaner which
contains bleach. Allow the bag to dry thoroughly before
storing.
Figure3:Install
bag.
8
Assembly
Safety
Interlock
System
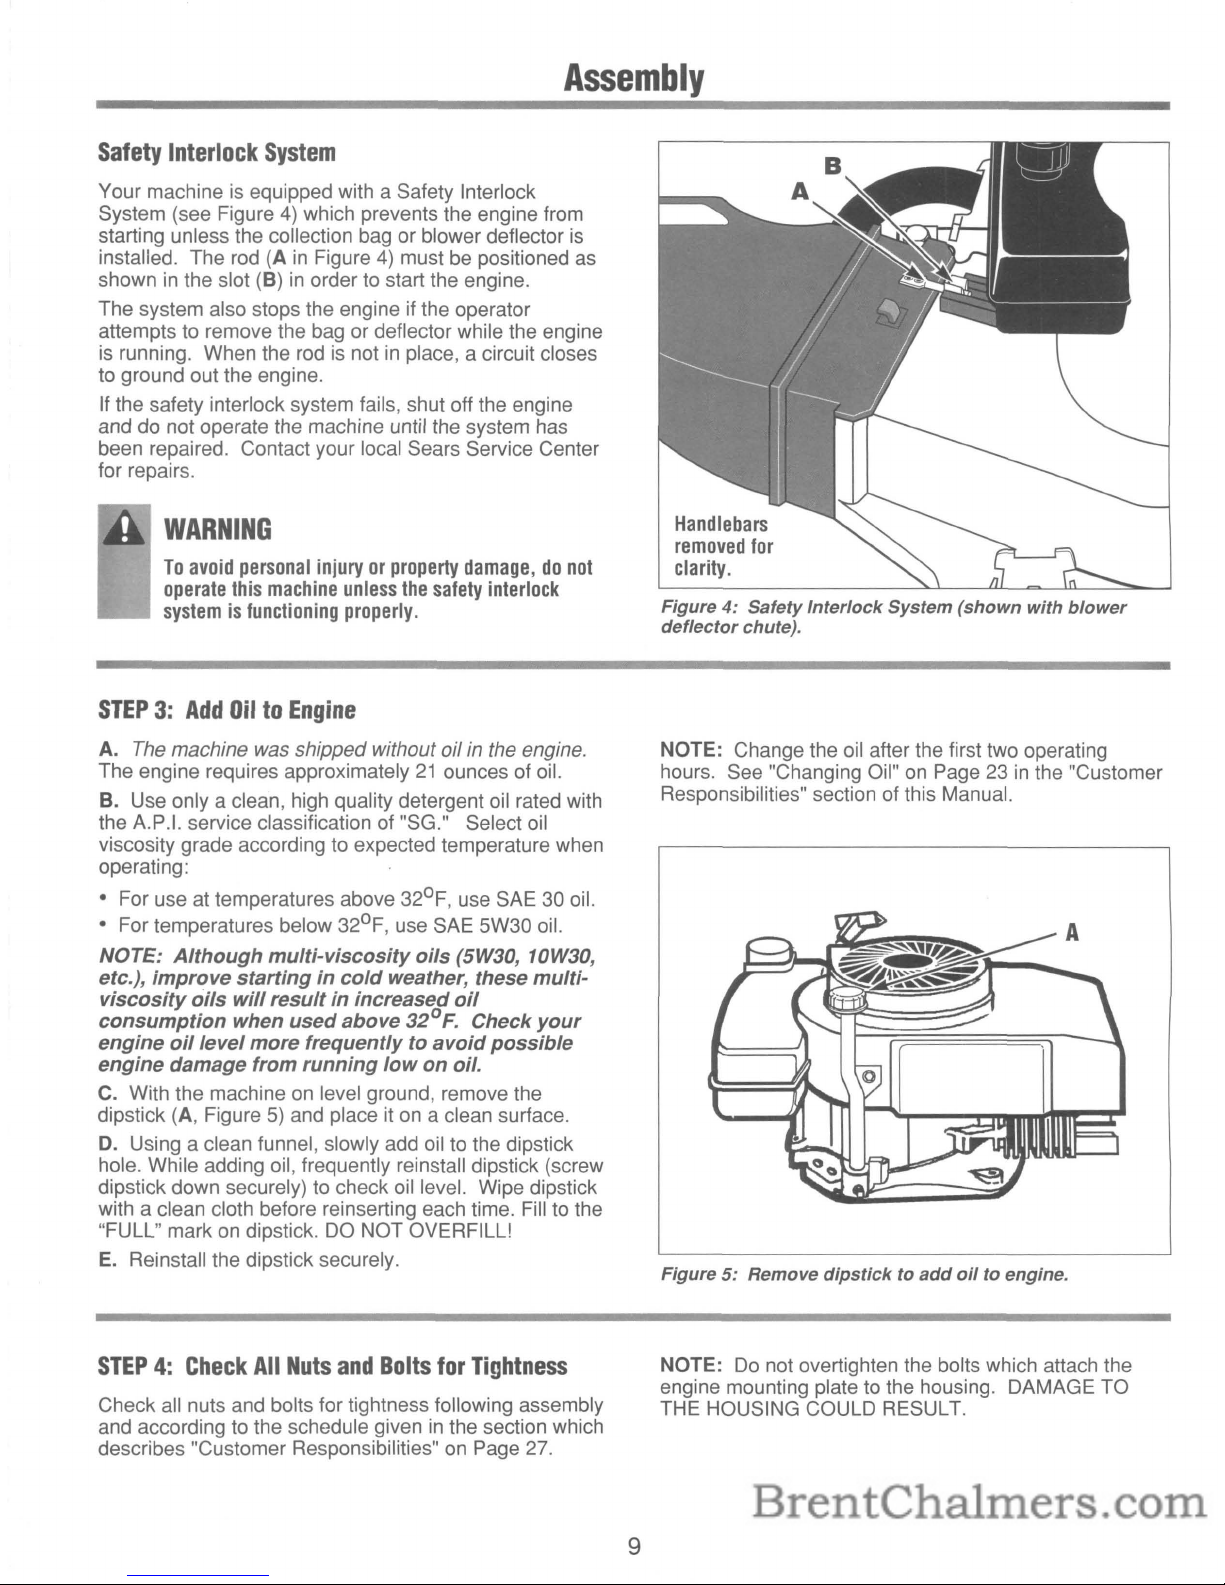
Your machineisequipped with a Safety Interlock
System (see Figure
4)
which prevents the engine from
starting unless the collection bag or blower deflector
is
installed. The rod (AinFigure4)must be positioned
as
showninthe slot (B)inorder to start the engine.
The system also stops the engine
if
the operator
attempts to remove the bag or deflector while the engine
is running. When the rod
is
notinplace, a circuit closes
to ground out the engine.
If the safety interlock system fails, shut off the engine
and do not operate the machine until the system has
been repaired. Contact your local Sears Service Center
for repairs.
WARNING
To
avoid
personal
injuryorproperty
damage,donot
operate
this
machine
unless
the
safety
interlock
systemisfunctioning
properly.
STEP3:Add
OiltoEngine
A.
The machine was shipped without oil in the engine.
The engine requires approximately21ounces of oil.
B. Use only a clean, high quality detergent oil rated with
the
A.P.1.
service classification of "SG." Select oil
viscosity grade according to expected temperature when
operating:
• For use at temperatures above 32
0
F,
use SAE30oil.
• For temperatures below 32
0
F,
use SAE 5W30 oil.
NOTE:
Although
multi-viscosity
oils
(5W30, 10W30,
etc.),
improve
startingincold
weather, these
multi-
viscosity
oils
will
resultinincreased
oil
consumption
when
used
above 320F.
Check
your
engine
oil
level
more
frequentlytoavoid
possible
engine
damage from
running
lowonoil.
C.
With the machine on level ground, remove the
dipstick (A, Figure
5)
and place it on a clean surface.
D.
Using a clean funnel, slowly add oil to the dipstick
hole. While adding oil, frequently reinstall dipstick (screw
dipstick down securely) to check oil level. Wipe dipstick
with a clean cloth before reinserting each time. Fill to the
"FULL" mark on dipstick.
DO
NOT OVERFILL!
E.
Reinstall the dipstick securely.
STEP4:Check
All
Nuts
and
Bolts
for
Tightness
Check all nuts and bolts for tightness following assembly
and according to the schedule given
in
the section which
describes "Customer Responsibilities"
on
Page 27.
9
Handlebars
removed
for
clarity.
Figure4:Safety
Interlock
System
(shown
with
blower
deflector
chute).
NOTE: Change the oil after the first two operating
hours. See "Changing Oil"
on
Page 23inthe "Customer
Responsibilities" section of this Manual.
Figure5:Remove
dipsticktoadd
oil
to engine.
NOTE:
Do
not overtighten the bolts which attach the
engine mounting plate to the housing. DAMAGE TO
THE HOUSING COULD RESULT.

Operation
FEATURES
AND
CONTROLS
Figure 6 identifies the following key features and controls
on
your machine:
(A) Collection Bag
(8)
Engine Control Lever
(C) Engine Primer
(0)
Air Cleaner
(E) Chipper Chute
(F)
FuelTank
(G) Recoil Starter Rope
(H) Blower Deflector
(I) Safety Interlock Rod
(J) Vacuum Hose (optional)
(K) Baffle Plate (used with optional vacuum hose)
(L) Vacuum Inlet Cap
(M) Spark Plug
(N) Vacuum Height Adjustment Lever
DANGER
Rotating
Cutting
Blades
Will
Cause
Serious
Personallnjuryl
Do
not
allow
handsorany
partofthe
bodyorclothing
inside
the
vacuum
inlet,
chipper
chute,
discharge
opening,orblower
deflector
opening
when
the
engineisrunning.
Before
inspectingorservicing
any
partofthe
machine,
stop
the
engine
and
make
sure
that
all
moving
parts
have
cometoa
complete
stop.
Disconnect
the
spark
plug
wire
and
secureitaway
from
the
spark
plug.
NOTE: The Shredder Screen is not showninFigure
6.
Informationonremoving and installing the Shredder
Screen
is
foundonPage 22.
Figure 6: Features
and
Controls.
10
 Loading...