

Page 1

Operator's Manual
40v Max* Lithium Chain Saw
Model- 98023
z_CAUTION: Read, understand and follow
all Safety Rules and Operating Instructions
in this manual before using this product.
Sears Brands Management Corporation,
Hoffrnan Estates, IL 60179 U.S.A.
See the full line of Craftsman ®products
at craftsman.corn
• SAFETY
• OPERATION
• MAINTENANCE
• TROUBLESHOOTING
• ESPA_!OL PG. 18
*Maximum initial battery pack
voltage (measured without a
workload) is 40 volts. The nominal
voltage is 36.
*El m&ximo voltaje inicial del
paquete de baterias (medido sin
una carga de trabajo) es 40 voltios.
Si se mide con una carga de
trabajo, el voltaje nominal es 36.
Part No. 90616763 September 2014
Page 2
CRAFTSMANLiMiTED WARRANTY
FOB FOUR YEARS from the date of sale, this product is warranted against defects
in material or workmanship.
FOB TWO YEARS from the sale date, a supplied battery pack or charger is
warranted against material or workmanship defects.
WITH PROOF OF SALE, a defective product will be replaced free of charge.
For warranty coverage details to obtain free replacement, visit the web page:
www.craftsman.com/warranty
This warranty does not cover the cutting chain, which is an expendable part that
can wear out from normal use within the warranty period.
This warranty is void if this product is ever used while providing commercial
services or if rented to another person.
This warranty gives you specific legal rights, and you may also have other rights
which vary from state to state.
Sears Brands Management Corporation, Hoffman Estates, tL 60179
SYMBOL SIGNAL MEANING
/_ SAFETY ALERT SYMBOL: Indicates DANGER, WARNING, OR CAUTION.
May be used in conjunction with other symbols or pictographs.
Z_ DANGER: Indicates hazardous situation which, if not avoided, will result in death or serious injury.
/_ WARNING: Indicates hazardous situation which, if not avoided, could result in death or
serious injury.
Z_ CAUTION: Indicates a hazardous situation which, if not avoided, could result in minor or
moderate injury or property damage.
General Power Tool Safety Warnings
z_WARNING: Read all safety warnings and all instructions. Failure to
follqw th.e.warnings and instructions may result in electric shock, fire and/or
serious _n]ury.
z_WARNING: Some dust created by power sanding, sawing, grinding, drilling, and other
construction activities contains chemicals known to the State of California to cause cancer,
birth defects or other reproductive harm. Some examples of these chemicals are:
• lead from lead-based paints,
• crystalline silica from bricks and cement and other masonry products, and
• arsenic and chromium from chemically-treated lumber.
Your risk from these exposures varies, depending on how often you do this type of work. To reduce
your exposure to these chemicals: work in a well ventilated area, and work with approved safety
equipment, such as those dust masks that are specially designed to filter out microscopic particles.
+ Avoid prolonged contact with dust from power sanding, sawing, grinding, drilling, and other
construction activities. Wear protective clothing and wash exposed areas with soap and
water. Allowing dust to get into your mouth, eyes, or lay on the skin may promote absorption of
harmful chemicals.
SAVE ALL WARNINGS AND INSTRUCTIONS FOR FUTURE REFERENCE
The term "power tool" in the warnings refers to your mains-operated (corded)
power tool or battery-operated (cordless) power tooL
Page 3
SAVE THESE iNSTRUCTiONS
1) WORK AREA SAFETY
a) Keep work area clean and well lit. Cluttered or dark areas invite accidents.
b) Do net operate power tools in explosive atmospheres, such as in the presence of flammable
liquids, gases or dust. Power tools create sparks which may ignite the dust or fumes.
c) Keep children and bystanders away while operating a power tool. Distractions can cause
you to lose control
2) ELECTRICAL SAFETY
a) Power tool plugs must match the outlet. Never modify the plug in any way. Do not use
any adapter plugs with earthed (grounded) power tools. Unmodified plugs and matching
outlets will reduce risk of electric shock.
b) Avoid body contact with earthed or grounded surfaces such as pipes, radiators, ranges and
refrigerators. There is an increased risk of electric shock if your body is earthed or grounded.
c) Do not expose power tools to rain or wet conditions. Water entering a power tool will
increase the risk of electric shock.
d) Do not abuse the cord. Never use the cord for carrying, pulling or unplugging the power
tool. Keep cord away from heat, oil, sharp edges or moving parts. Damaged or entangled
cords increase the risk of electric shock.
e) When operating a power tool outdoors, use an extension cord suitable for outdoor use.
Use of a cord suitable for outdoor use reduces the risk of electric shock.
f) if operating a power tool in a damp location is unavoidable, use a ground fault circuit
interrupter (GFCI) protected supply. Use of a GFCI reduces the risk of electric shock.
3) PERSONAL SAFETY
a) Stay alert, watch what you are doing and use common sense when operating a power tool. Do
not use a power tool while you are tired or under the influence of drugs, alcohol or medication.
A moment of inattention while operating power tools may result in serious personal injury.
b) Use personal protective equipment. Always wear eye protection. Protective equipment
such as dust mask, nonskid safety shoes, hard hat, or hearing protection used for appropriate
conditions will reduce personal injuries.
c) Prevent unintentional starting. Ensure the switch is in the off position before connecting to
power source and/or battery pack, picking up or carrying the tool. Carrying power tools with
your finger on the switch or energizing power tools that have the switch on invites accidents.
d) Remove any adjusting key or wrench before turning the power tool on. A wrench or a key
left attached to a rotating part of the power tool may result in personal injury.
e) Do not overreach. Keep proper footing and balance at all times. This enables better control
of the power toot in unexpected situations.
f) Dress properly. Do not wear loose clothing or jewelry. Keep your hair, clothing and gloves away
from moving parts. Loose clothes, jewelry or long hair can be caught in moving parts.
g) If devices are provided for the connection of dust extraction and collection facilities, ensure these
are connected and properly used. Use of dust collection can reduce dust-related hazards.
4) POWER TOOL USE AND CARE
a) Do not force the power tool. Use the correct power tool for your application. The correct
power toot will do the job better and safer at the rate for which it was designed.
b) Do not use the power tool if the switch does not turn it on and off. Any power toot that
cannot be controlled with the switch is dangerous and must be repaired.
c) Disconnect the plug from the power source and/or the battery pack from the power tool
before making any adjustments, changing accessories, or storing power tools. Such
preventive safety measures reduce the risk of starting the power toot accidentally.
d) Store idle power tools out of the reach of children and do not allow persons unfamiliar
with the power tool or these instructions to operate the power tool. Power tools are
dangerous in the hands of untrained users.
e) Maintain power tools. Check for misalignment or binding of moving parts, breakage of parts and
Page 4
anyotherconditionthatmayaffectthepowertool'soperation. If damaged, have the power tool
repaired before use. Many accidents are caused by poorly maintained power tools.
f) Keep cutting tools sharp and clean. Properly maintained cutting tools with sharp cutting
edges are less likely to bind and are easier to control
g) Use the power tool, accessories and tool bits, etc. in accordance with these instructions,
taking into account the working conditions and the work to be performed. Use of the power tool
for operations different from those intended could result in a hazardous situation.
5) BATTERY TOOL USE AND CARE
a) Recharge only with the charger specified by the manufacturer. A charger that is suitable for
one type of battery pack may create a risk of fire when used with another battery pack.
b) Use power tools only with specifically designated battery packs. Use of any other battery
packs may create a risk of injury and fire.
c) When battery pack is not in use, keep it away from other metal objects like paper clips,
coins, keys, nails, screws, or other small metal objects that can make a connection from
one terminal to another. Shorting the battery terminals together may cause burns or a fire.
d) Under abusive conditions, liquid may be ejected from the battery, avoid contact, if
contact accidentally occurs, flush with water, if liquid contacts eyes, additionaUy seek
medical help. Liquid ejected from the battery may cause irritation or burns.
6) SERVICE
a) Have your power tool serviced by a qualified repair person using only identical
replacement parts. This will ensure that the safety of the power toot is maintained.
CHAINSAW SAFETYWARNINGS:
• Keep all parts of the body away from the saw chain when the chain saw is operating. Before
you start the chain saw, make sure the saw chain is not contacting anything. A moment of
inattention while operating chain saws may cause entanglement of your clothing or body with the
saw chain.
• Always hold the chain saw with your right hand on the rear handle and your left hand on
the front handle. Holding the chain saw with a reversed hand configuration increases the risk of
personal injury and should never be done.
• Hold the power tool by insulated gripping surfaces only, because the saw chain may
contact hidden wiring. Saw chains contacting a "live" wire may make exposed metal parts of the
power toot "live" and could give the operator an electric shock.
• Wear safety glasses and hearing protection. Further protective equipment for head, hands,
legs and feet is recommended. Adequate protective clothing will reduce personal injury by flying
debris or accidental contact with the saw chain.
• Do not operate a chain saw in a tree. Operation of a chain saw while up in a tree may result in
personal injury.
• Always keep proper footing and operate the chain saw only when standing on fixed, secure
and level surface. Slippery or unstable surfaces such as ladders may cause a loss of balance or
control of the chain saw.
• When cutting a limb that is under tension be alert for spring back. When the tension in the
wood fibers is released the spring loaded limb may strike the operator and/or throw the chain saw
out of control
• Use extreme caution when cutting brush and saplings. The slender material may catch the
saw chain and be whipped toward you or puff you off balance.
• Carry the chain saw by the front handle with the chain saw switched off and away from your body.
When transporting or storing the chain saw always fit the scabbard. Proper handling of the chain
saw will reduce the likelihood of accidental contact with the moving saw chain.
• Follow instructions for lubricating, chain tensioning and changing accessories. Improperly
tensioned or lubricated chain may either break or increase the chance for kickback.
• Keep handles dry, clean, and free from oil and grease. Greasy, oily handles are slippery
causing loss of control
• Cut wood only. Do not use chain saw for purposes not intended. For example: do not use
Page 5
chainsawforcuttingplastic, masonry or non-wood building materials. Use of the chain saw
for operations different than intended could result in a hazardous situation.
CAUSESAND OPERATORPREVENTIONOFKICKBACK:
Kickback may occur when the nose or tip of the guide bar touches an object, or when the wood
closes in and pinches the saw chain in the cut.
Tip contact in some cases may cause a sudden reverse reaction, kicking the guide bar up and back
towards the operator.
Pinching the saw chain along the top of the guide bar may push the guide bar rapidly back towards
the operator.
Either of these reactions may cause you to lose control of the saw which could result in serious
personal injury. Do not rely exclusively upon the safety devices built into your saw. As a chain saw
user, you should take several steps to keep your cutting jobs free from accident or injury.
Kickback is the result of tool misuse and/or incorrect operating procedures or conditions and can be
avoided by taking proper precautions as given below:
• Maintain a firm grip, with thumbs and fingers encircling the chain saw handles, with both
hands on the saw and position your body and arm to allow you to resist kickback forces.
Kickback forces can be controlled by the operator, ff proper precautions are taken. Do not let go of
the chain saw.
• Do not overreach and do not cut above chest height. This helps prevent unintended tip contact
and enables better control of the chain saw in unexpected situations.
• Only use replacement bars and chains specified by the manufacturer. Incorrect replacement
bars and chains may cause chain breakage and/or kickback.
• Follow the manufacturer's sharpening and maintenance instructions for the saw chain.
Decreasing the depth gauge height can lead to increased kickback.
THE FOLLOWINGPRECAUTIONSSHOULDBE FOLLOWEDTO MiNiMiZE KICKBACK:
(1.) Grip Saw Firmly. Hold the chain saw firmly with both hands when the motor is running. Use a
firm grip with thumbs and fingers encircling the chain saw handles. Chain saw will pull forward when
cutting on the bottom edge of the bar, and push backward when cutting along the top edge of the bar.
(2.) Do not over reach.
(3.) Keep proper footing and balance at all times.
(4.) Don't let the nose of the guide bar contact a log, branch, ground or other obstruction.
(5.) Don't cut above shoulder height.
(6.) Use devices such as low kickback chain and reduced kickback guide bars that reduce the risks
associated with kickback.
(7.) Only use replacement bars and chains specified by the manufacturer or the equivalent.
(8.) Never let the moving chain contact any object at the tip of the guide bar.
(9.) Keep the working area free from obstructions such as other trees, branches, rocks, fences,
stumps, etc. Eliminate or avoid any obstruction that your saw chain could hit while you are cutting
through a particular log or branch.
(10.) Keep your saw chain sharp and properly tensioned. A loose or dull chain can increase the
chance of kickback. Check tension at regular intervals with the motor stopped and tool unplugged,
never with the motor running.
(11.) Begin and continue cutting only with the chain moving at full speed. If the chain is moving at a
slower speed, there is a greater chance for kickback to occur.
(12.) Cut one log at a time.
(13.) Use extreme caution when re-entering a previous cut. Engage ribbed bumpers into wood and
allow chain to reach full speed before proceeding with cut.
(14.) Do not attempt plunge cuts or bore cuts.
(15.) Watch for shifting logs or other forces that could close a cut and pinch or fall into chain.
KICKBACKSAFETYFEATURES
zLWARNING: The following features are included on your saw to help reduce the hazard of
kickback; however such features will not totally eliminate this dangerous reaction. As a chain saw user
Page 6
donotrelyonlyonsafetydevices.Youmustfollowallsafetyprecautions,instructions,and
maintenanceinthismanualtohelpavoidkickbackandotherforceswhichcanresultinseriousinjury.
• Reduced-KickbackGuideBar,designedwithasmallradiustipwhichreducesthesizeof
thekickbackdangerzoneonbartip.Areduced-kickbackguidebarisonewhichhasbeen
demonstratedtosignificantlyreducethenumberandseriousnessofkickbackswhentestedin
accordancewithsafetyrequirementsforelectricchainsaws.
• Low-KickbackChain,designedwithacontoureddepthgaugeandguardlinkwhichdeflect
kickbackforceandallowwoodtograduallyrideintothecutter.Alow-kickbackchainisachain
whichhasmetkickbackperformancerequirementsofANSIB175.1-2012.
• Donotoperatechainsawwhilein a tree, on a ladder, on a scaffold, or from any unstable
surface.
• Hold tool by insulated gripping surfaces when performing an operation where the cutting
tool may contact hidden wiring. Contact with a "live" wire will make exposed metal parts of the
tool "live" and shock the operator.
• Do not attempt operations beyond your capacity or experience. Read thoroughly and
understand completely all instructions in this manual.
• Before you start chain saw, make sure saw chain is not contacting any object.
• Do not operate a chain saw with one hand! Serious injury to the operator, helpers, or
bystanders may result from one handed operation. A chain saw is intended for two-handed use
only.
• Keep the handles dry, clean, and free of oil or grease.
• Do not allow dirt, debris, or sawdust to build up on the motor or outside air vents.
• Stop the chain saw before setting it down.
• Do not cut vines and/or small under brush.
• Use extreme caution when cutting small size brush and saplings because slender material
may catch the saw chain and be whipped toward you or pull you off balance.
zLWARNING: Use of this tool can generate and/or disburse dust, which may cause
serious and permanent respiratory or other injury. Always use NIOSH/OSHA approved respiratory
protection appropriate for the dust exposure. Direct particles away from face and body.
CHAINSAW NAMESAND TERMS
Bucking - The process of cross cutting a felled tree or log into lengths.
Motor Brake - A device used to stop the saw chain when the trigger is released.
Chain Saw Powerhead - A chain saw without the saw chain and guide bar.
Drive Sprocket or Sprocket - The toothed part that drives the saw chain.
Felling - The process of cutting down a tree.
Felling Back Cut - The final cut in a tree felling operation made on the opposite side of the tree
from the notching cut.
• Front Handle - The support handle located at or toward the front of the chain saw.
• Front Hand Guard - A structural barrier between the front handle of a chain saw and the guide bar,
typically located close to the hand position on the front handle.
• Guide Bar - A solid railed structure that supports and guides the saw chain.
• Guide Bar Scabbard - Enclosure fitted over guide bar to prevent tooth contact when saw is not in use.
• Kickback - The backward or upward motion, or both of the guide bar occurring when the saw chain
near the nose of the top area of the guide bar contacts any object such as a log or branch, or when
the wood closes in and pinches the saw chain in the cut.
• Kickback, Pinch - The rapid pushback of the saw which can occur when the wood closes in and
pinches the moving saw chain in the cut along the top of the guide bar.
• Kickback, Rotational - The rapid upward and backward motion of the saw which can occur when
the moving saw chain near the upper portion of the tip of the guide bar contacts an object, such as
a log or branch.
• Limbing - Removing the branches from a fallen tree
• Low-Kickback Chain - A chain that complies with the kickback
performance requirements of ANSI B175.1-2012 (when tested on
a representative sample of chain saws.)
Page 7
• NormalCuttingPosition-Thosepositionsassumedin
performingthebuckingandfellingcuts.
• NotchingUndercut-Anotchcutinatreethatdirectsthetree'sfall.
• RearHandle-Thesupporthandlelocatedatortowardtherearofthesaw.
• Reduced Kickback Guide Bar - A guide bar which hasbeen demonstratedto reduce kickback significantly.
• Replacement Saw Chain - A chain that complies with kickback performance requirements of ANSI
B175.1-2000 when tested with specific chain saws. It may not meet the ANSI performance
requirements when used with other saws.
• Saw Chain - A loop of chain having cutting teeth, that cut the wood,and that is driven by the motor
and is supported by the guide bar.
• Ribbed Bumper - The ribs used when felling or bucking to pivot the saw and maintain position
while sawing.
• Switch - A device that when operated will complete or interrupt an electrical power circuit to the
motor of the chain saw.
• Switch Linkage - The mechanism that transmits motion from atrigger to the switch.
• Switch Lockout - A movable stop that prevents the unintentional operation of the switch until
manually actuated.
iNTENDEDUSE
Your Craftsman _ Chain Saw is ideal for pruning applications and cutting small logs up to 12
inches (305 mm)in diameter. This tool is intended for consumer use only.
SAVE THESE INSTRUCTIONS
SYMBOLS
The label on your tool may include the following symbols. The symbols and their definitions are as follows:
V.................. volts
Hz ................ hertz
min .............. minutes
- - =or DC... direct current
(_) ................ Class I Construction
(grounded)
[] ................ Class II Construction
(double insulated)
m/s .............. meters per second
mm .............. millimeters
................ Use proper respiratory protection
O ................ Use proper hearing protection
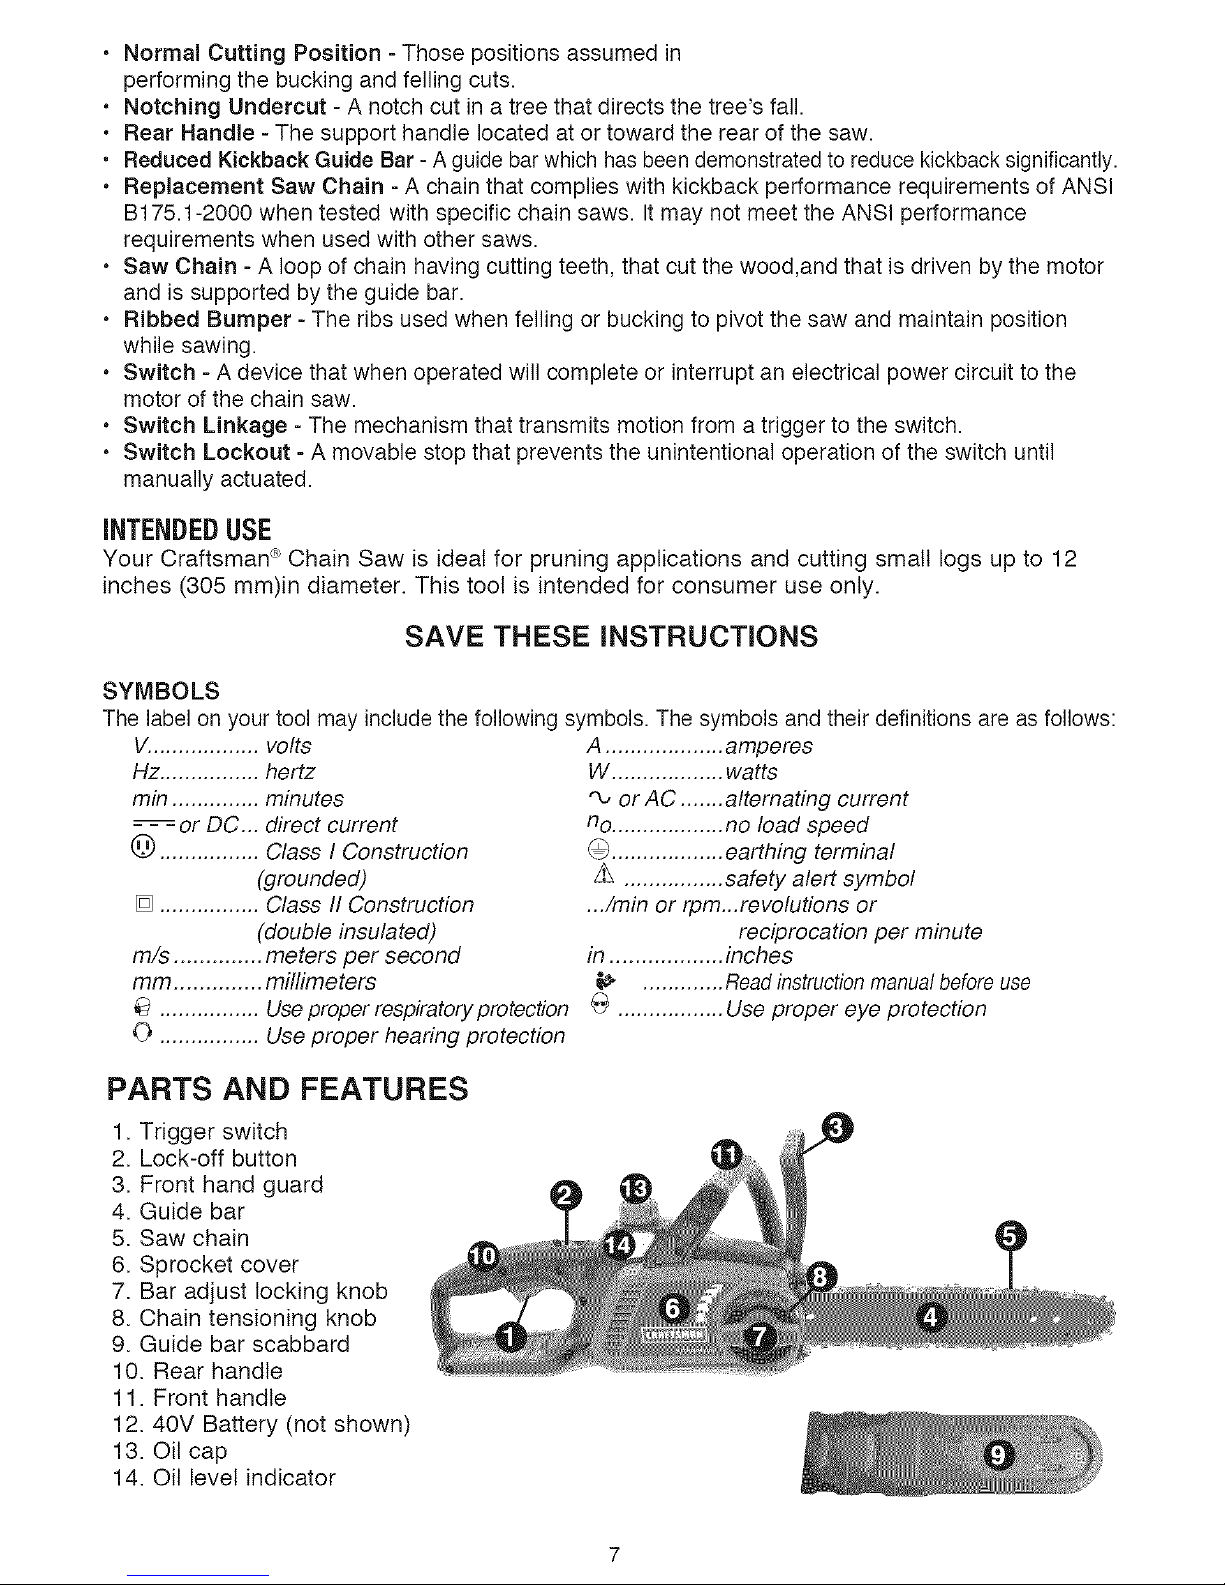
PARTS AND FEATURES
1. Trigger switch
2. Lock-off button
3. Front hand guard
4. Guide bar
5. Saw chain
6. Sprocket cover
7. Bar adjust locking knob
8. Chain tensioning knob
9. Guide bar scabbard
10. Rear handle
11. Front handle
12.40V Battery (not shown)
13. Oil cap
14. Oil level indicator
A ................... amperes
W .................. watts
"_-,or AC ....... alternating current
no .................. no load speed
0 .................. earthing terminal
z_ ................ safety alert symbol
.../min or rpm...revotutions or
reciprocation per minute
in .................. inches
............. Read instruction manual before use
G ................. Use proper eye protection
Page 8

iMPORTANT SAFETY iNSTRUCTiONS FOR BATTERY CHARGERS
SAVE THESE INSTRUCTIONS: THiS MANUAL CONTAINS IMPORTANT SAFETY
INSTRUCTIONS FOR BATTERY CHARGERS,
• Before using charger, read all instructions and cautionary markings on charger, battery pack, and
product using battery pack.
z_WARN_NG: SHOCK HAZARD. Do not allow any liquid to get inside charger.
z_OAUT_ON: BURN HAZARD. To reduce the risk of injury, charge only designated Craftsman _'
batteries. Other types of batteries may burst causing personal injury and damage.
z_OAUT_ON: Under certain conditions, with the charger plugged in to the power supply, the
charger can be shorted by foreign material. Foreign materials of a conductive nature such as, but not
limited to, steel wool, aluminum foil, or any buildup of metallic particles should be kept away from
charger cavities. Always unplug the charger from the power supply when there is no battery pack in
the cavity. Unplug charger before attempting to clean.
z_WARNING: THE CHARGER SUPPLIED WITH THIS PRODUCT tS INTENDED TO BE
PLUGGED IN SUCH THAT tT tS CORRECTLY ORIENTATED tN A VERTICAL OR FLOOR
MOUNT POSITION,
• DO NOT attempt to charge the battery pack with any chargers other than the ones in this
manual. The charger and battery pack are specifically designed to work together.
• These chargers are not intended for any uses other than charging designated Craftsman _>
rechargeable batteries. Any other uses may result in risk of fire, electric shock or electrocution.
• Do not expose charger to rain or snow.
• Pull by plug rather than cord when disconnecting charger. This will reduce risk of damage to
electric plug and cord.
• Make sure that cord is located so that it will not be stepped on, tripped over, or otherwise
subjected to damage or stress.
• Do not use an extension cord unless it is absolutely necessary. Use of improper extension cord
could result in risk of fire, electric shock, or electrocution.
• An extension cord must have adequate wire size (AWG or American Wire Gauge) for safety.
The smaller the gauge number of the wire, the greater the capacity of the cable, that is 16gauge has
more capacity than 18gauge. When using more than one extension to make up the total length, be
sure each individual extension contains at least the minimum wire size.
Minimum Gauge for Cord Sets
Volts Total Length of Cord in Feet
120V 0-25 26-50 51-100 101-150
(0-7,6m) (7,6-15,2m) (15,2-30,4m)(30,4-45,7m)
240V 0-50 51-100 101-200 201-300
(0-15,2m) (15,2-30,4m)(30,4-60,9m)(60,9-91,4m)
Ampere Rating
More Not more American Wire Gauge
Than Than
0 - 6 18 16 16 14
6 - 10 18 16 14 12
10 - 12 16 16 14 12
12 - 16 14 12 Not Recommended
• Do not place any object on top of charger or place the charger on a soft surface that might
block the ventilation slots and result in excessive internal heat. Place the charger in a
position away from any heat source. The charger is ventilated through slots in the top and the
bottom of the housing.
• Do not mount charger on wall or permanently affix charger to any surface. The charger is
intended to use on a flat, stable surface (i.e., table top, bench top).
• Do not operate charger with damaged cord or plug = have them replaced immediately.
• Do not operate charger if it has received a sharp blow, been dropped, or otherwise damaged
in any way. Take it to an authorized eervice center.
• Do not disassemble charger; take it to an authorized service center when service or repair is
required. Incorrect reassembly may result in a risk of electric shock, electrocution or fire.
8
Page 9
• Disconnect the charger from the outlet before attempting any cleaning, This will reduce the risk
of electric shock. Removing the battery pack will not reduce this risk.
• NEVER attempt to connect 2 chargers together,
• The charger is designed to operate on standard household electrical power (120 Volts). Do
not attempt to use it on any other voltage.
iMPORTANT SAFETY iNSTRUCTiONS FOR BATTERY PACKS
z_WARNING: For safe operation, read this manual and manuals originally suppfied with toot
before using the charger.
The battery pack is not fully charged out of the carton. Before using the battery pack and charger,
read the safety instructions below. Then follow charging procedures outlined.
READ ALL INSTRUCTIONS
• Do not incinerate the battery pack even if it is severely damaged or is completely worn out.
The battery pack can explode in a fire. Toxic fumes and materials are created when battery packs
are burned.
• Do not charge or use battery in explosive atmospheres, such as in the presence of flammable
liquids, gases or dust. Inserting or removing the battery from the charger may ignite the dust or fumes.
• tf battery contents come into contact with the skin, immediately wash area with mild soap
and water, ff battery liquid gets into the eye, rinse water over the open eye for 15 minutes or
until irritation ceases. If medical attention is needed, the battery electrolyte for Li-ion batteries is
composed of a mixture of liquid organic carbonates and lithium salts.
• Contents of opened battery cells may cause respiratory irritation. Provide fresh air. If symptoms
persist, seek medical attention.
z_WARNING: BURN HAZARD. BATTERY LIQUID MA Y BE FLAMMABLE IF EXPOSED TO
SPARK OR FLAME.
• Charge the battery packs only in Craftsman _' chargers.
• DO NOT splash or immerse in water or other liquids. This may cause premature cell failure.
• Do not store or use the tool and battery pack in locations where the temperature may reach
or exceed 105°F (40°C) (such as outside sheds or metal buildings in summer).
z'_WARNING: Never attempt to open the battery pack for any reason. If battery pack case is
cracked or damaged, do not insert into charger. Do not crush, drop or damage battery pack. Do not
use a battery pack or charger that has received a sharp blow, been dropped, run over or damaged in
any way (i.e., pierced with a nail, hit with a hammer, stepped on). Damaged battery packs should be
returned to service center for recycling.
z_WARNING: Fire hazard. Do not store or carry battery so that metal objects can contact
exposed battery terminals. For example, do not place battery in aprons, pockets, tool boxes,
product kit boxes, drawers, etc., with loose nails, screws, keys, etc. Transporting batteries can
possibly cause fires if the battery terminals inadvertently come in contact with conductive
materials such as keys, coins, hand tools and the like. The US Department of Transportation
Hazardous Material Regulations (HMR) actually prohibit transporting batteries in commerce or on
airplanes (i.e., packed in suitcases and carry-on luggage) UNLESS they are properly protected from
short circuits. So when transporting individual batteries, make sure that the battery terminals are
protected and weft insulated from materials that could contact them and cause a short circuit.
NOTE: M-ION batteries should not be put in checked baggage.
STORAGE RECOMMENDATIONS
1. The best storage place is one that is cool and dry away from direct sunlight and excess heat or cold.
2. Long-term storage will not harm the battery pack or charger, unless the battery is depleted.
CHARGING PROCEDURE
Craftsman cechargers are designed to charge Craftsman <°'_battery packs.
1. Plug the charger into an appropriate outlet before inserting the battery pack.
2. Insert the battery pack into the charger.
Page 10
3.ThegreenLEDwillflashindicatingthatthebatteryisbeingcharged.
4.ThecompletionofchargeisindicatedbythegreenLEDremainingoncontinuously.Thepackis
fullychargedandmaybeusedatthistimeorleftonthecharger.
Recha_e discharged batteries as soon as possible after use or battery life may be greatly diminished.
LEAVING THE BATTERY IN THE CHARGER
The charger and battery pack can be left connected with the green LED glowing indefinitely. The
charger will keep the battery pack fresh and fully charged.
iMPORTANT CHARGING NOTES
1. Longest life and best performance can be obtained if the battery pack is charged when the air
temperature is between 60°F and 80°F (16°. 27°C). DO NOT charge the battery pack in an air
temperature below +40°F (+4.5°C), or above +105°F (+40.5°C). This is important and will prevent
serious damage to the battery pack.
2. The charger and battery pack may become warm to touch while charging. This is a normal
condition, and does not indicate a problem. To facilitate the cooling of the battery pack after use,
avoid placing the charger or battery pack in a warm environment such as in a metal shed, or an
uninsulated trailer.
3. If the battery pack does not charge properly:
a. Check current at receptacle by plugging in a lamp or other appliance
b. Check to see if receptacle is connected to a light switch which turns power off when you turn
out the lights.
c. Move charger and battery pack to a location where the surrounding air temperature is
approximately 60°F and 80°F (16°. 27°C).
d. If charging problems persist, take the tool, battery pack and charger to your local service center.
4. The battery pack should be recharged when it fails to produce sufficient power on jobs which were
easily done previously. DO NOT CONTINUE to use under these conditions. Follow the charging
procedure. You may also charge a partially used pack whenever you desire with no adverse affect
on the battery pack.
5. Foreign materials of a conductive nature such as, but not limited to, steel wool, aluminum foil,
or any buildup of metallic particles should be kept away from charger cavities. Always unplug the
charger from the power supply when there is no battery pack in the cavity. Unplug charger before
attempting to clean.
6. Do not freeze or immerse charger in water or any other liquid.
z WARNING: SHOCK HAZARD. Do not allow any liquid to get inside charger. NEVER ATTEMPT
TO OPEN THE BATTERY PACK FOR ANY REASON. IF THE PLASTIC HOUSING OF THE BATTERY
PACK BREAKS OR CRACKS, RETURN TO A SERVICE CENTER FOR RECYCLING.
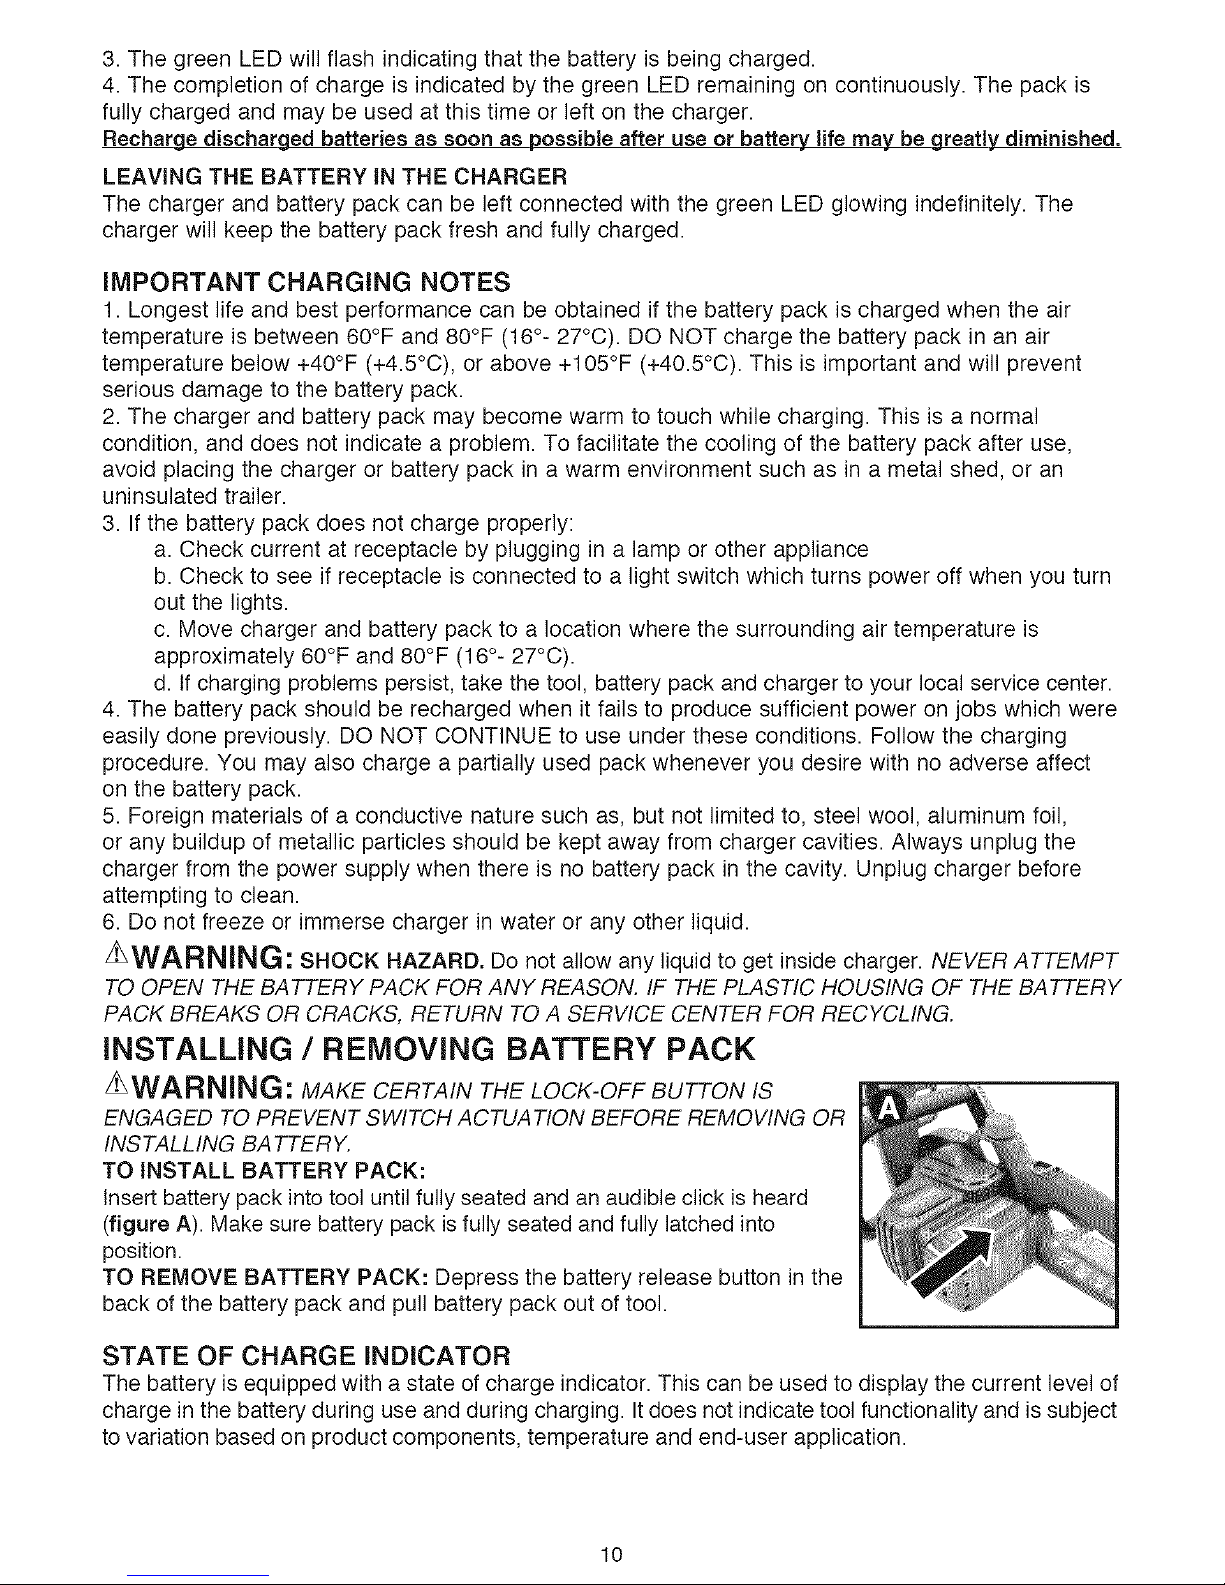
INSTALLING / REMOVING BATTERY PACK
zhWARNING: MAKE CERTAIN THE LOCK-OFF BUTTON IS
ENGAGED TO PREVENT SWITCH ACTUATION BEFORE REMOVING OR
INSTALLING BATTERY.
TO INSTALL BATTERY PACK:
Insert battery pack into tool until fully seated and an audible click is heard
(figure A). Make sure battery pack isfully seated and fully latched into
position.
TO REMOVE BATTERY PACK: Depress the battery release button in the
back of the battery pack and pull battery pack out of tool.
STATE OF CHARGE iNDICATOR
The battery is equipped with a state of charge indicator. This can be used to display the current level of
charge in the battery during use and during charging. Itdoes not indicate tool functionality and is subject
tovariation based on product components, temperature and end-user application.
lO
Page 11
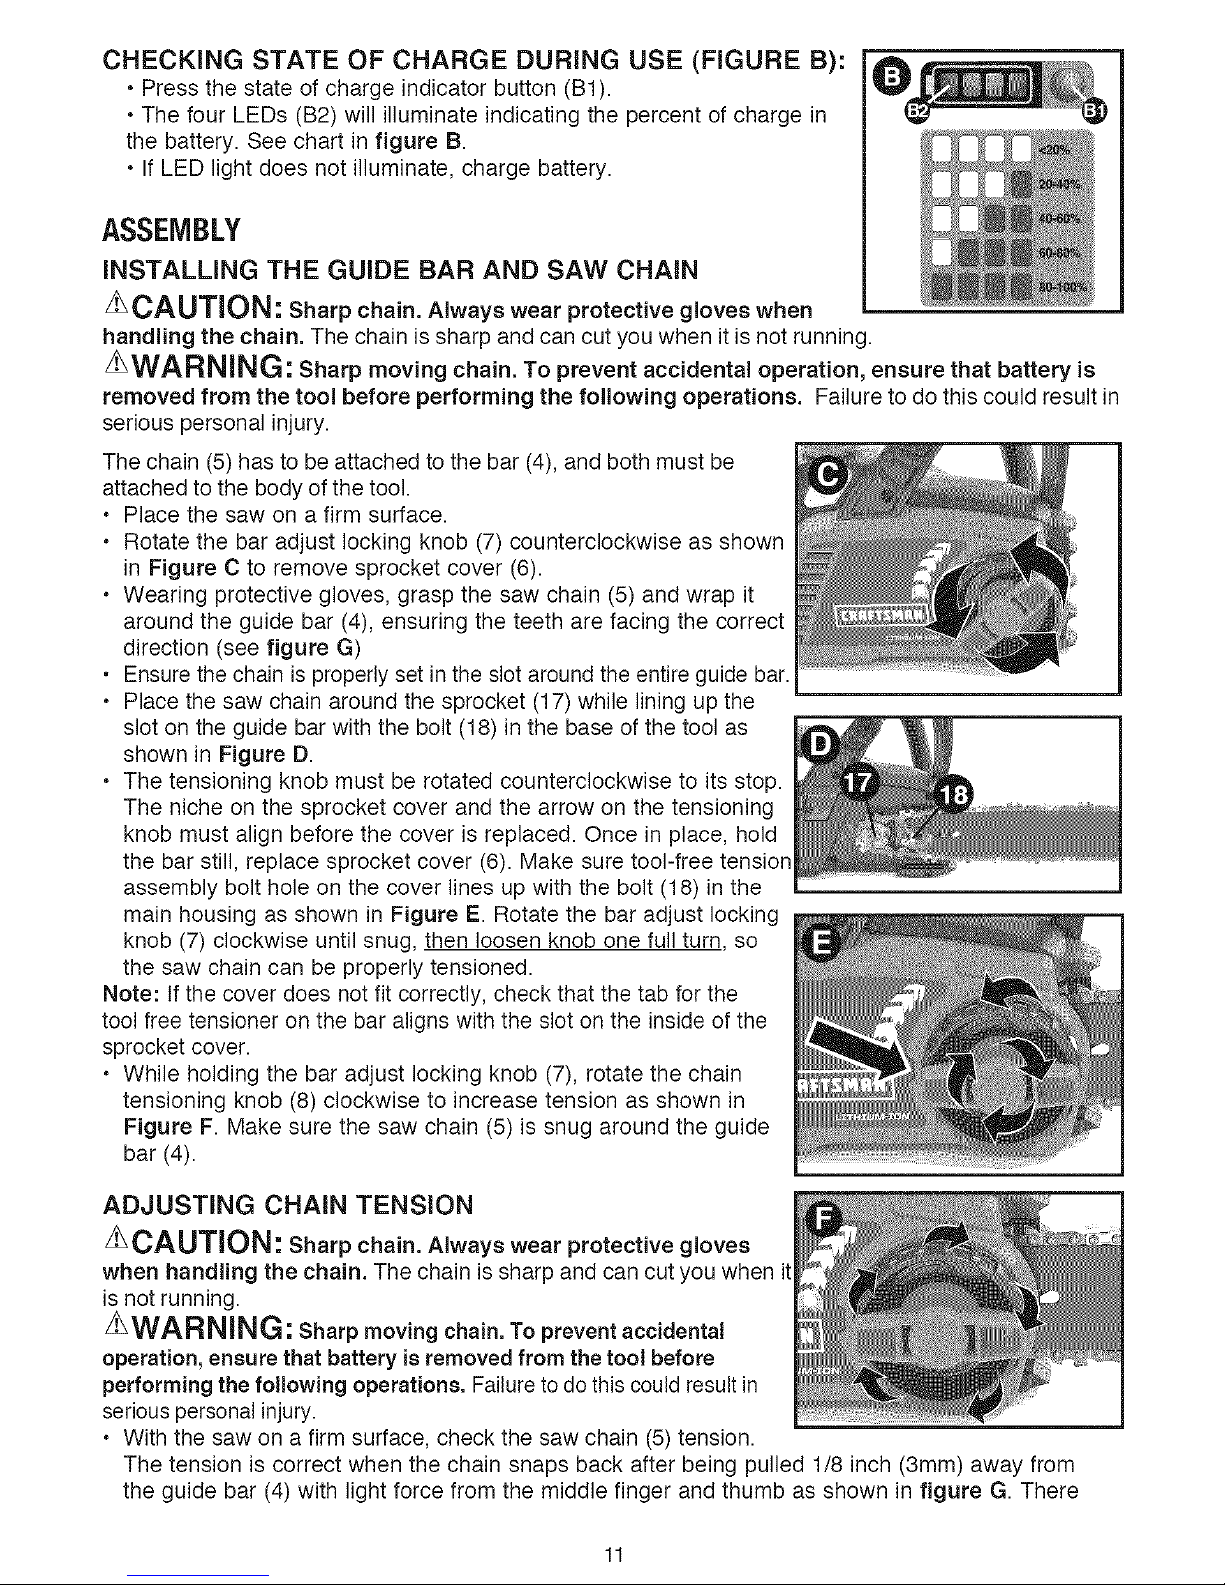
CHECKING STATE OF CHARGE DURING USE (FIGURE B):
• Press the state of charge indicator button (Bt).
• The four LEDs (B2) will illuminate indicating the percent of charge in
the battery. See chart in figure B.
• If LED light does not illuminate, charge battery.
ASSEMBLY
iNSTALLiNG THE GUIDE BAR AND SAW CHAIN
z_CAUTION: Sharp chain. Always wear protective gloves when
handling the chain. The chain is sharp and can cut you when it is not running.
z_WARNING: Sharp moving chain. To prevent accidental operation, ensure that battery is
removed from the tool before performing the following operations. Failure to do this could result in
serious personal injury.
The chain (5) has to be attached to the bar (4), and both must be
attached to the body of the tool.
• Place the saw on a firm surface.
• Rotate the bar adjust locking knob (7) counterclockwise as shown
in Figure C to remove sprocket cover (6).
• Wearing protective gloves, grasp the saw chain (5) and wrap it
around the guide bar (4), ensuring the teeth are facing the correct
direction (see figure G)
• Ensure the chain isproperly set in the slot around the entire guide bar.
• Place the saw chain around the sprocket (t 7) while lining up the
slot on the guide bar with the bolt (18) in the base of the tool as
shown in Figure D.
• The tensioning knob must be rotated counterclockwise to its stop.
The niche on the sprocket cover and the arrow on the tensioning
knob must align before the cover is replaced. Once in place, hold
the bar still, replace sprocket cover (6). Make sure tool-free tension
assembly bolt hole on the cover lines up with the bolt (18) in the
main housing as shown in Figure E. Rotate the bar adjust locking
knob (7) clockwise until snug, then loosen knob one full turn so
the saw chain can be properly tensioned.
Note: tf the cover does not fit correctly, check that the tab for the
tool free tensioner on the bar aligns with the slot on the inside of the
sprocket cover.
• While holding the bar adjust locking knob (7), rotate the chain
tensioning knob (8) clockwise to increase tension as shown in
Figure F. Make sure the saw chain (5) is snug around the guide
bar (4).
ADJUSTING CHAIN TENSION
_CAUTION: Sharp chain, Always wear protective gloves
when handling the chain. The chain is sharp and can cut you when it
is not running.
zLWARNING: Sharp moving chain. To preventaccidental
operation, ensure that battery isremoved from the tool before
performingthe following operations. Failure todo this could resultin
seriouspersonal injury.
• With the saw on a firm surface, check the saw chain (5) tension.
The tension is correct when the chain snaps back after being pulled 1/8 inch (3mm) away from
the guide bar (4) with light force from the middle finger and thumb as shown in figure G. There
11
Page 12

shouldbeno"sag"betweentheguidebarandthechainonthe
undersideasshowninfigureH.
• Toadjustsawchaintension,loosenbaradjustlockingknob(7)
onefullturnandfollowinstructionsfor"InstallingtheGuideBar
andSawChain."
• Donotover-tensionthechainasthiswillleadtoexcessivewear
andwillreducethelifeofthebarandchain.
• Oncechaintensioniscorrect,securelytightenbaradjust
lockingknob.
• Whenthechainisnew,checkthetensionfrequently(after
removingbattery)duringthefirst2hoursofuseasanewchain
stretchesslightly.
REPLACING THE SAW CHAIN
z_CAUTION: Sharp chain. Always wear protective gloves
when handling the chain. The chain is sharp and can cut you
when it is not running.
z_WARNING: Sharpmoving chain. To preventaccidental
operation, ensure that battery isremoved from the tool before
performingthe following operations. Failure todo this could resultin
seriouspersonal injury.
• Rotate the bar adjust locking knob (7) counterclockwise to
release chain tension.
• Remove sprocket cover (6) as described in "Installing the Guide
Bar and Saw Chain" section.
• Lift the worn saw chain (5) out of the groove in the guide bar (4).
• Place the new chain in the slot of the guide bar, making sure the
saw teeth are facing the correct direction by matching the arrow
on the chain with the graphic on the sprocket cover (6) shown in
figure 1.
• Follow instructions for "Installing the Guide Bar and Saw
Chain."
• Replacement chain and bar are available from most Craftsman@outlets. Use Craftsman@replacement
chain, service part number 90609786 and replacement 12" bar, service part number 90609781.
AUTO OiLiNG SYSTEM
This chain saw is equipped with an auto oiling system that keeps the saw chain and guide bar constantly
lubricated. The oil level indicator (16) shows the level of the oil in the chain saw. If the oil level is less than
a quarter full, remove the battery from the chain saw and refill with the correct type of oil.
NOTE: Use a high quality bar and chain oil for proper chain and bar lubrication. As a temporary
substitute, a non-detergent SAE30 weight motor oil can be used. The use of a vegetable based bar
and chain oil is recommended when pruning trees. Mineral oil is not recommended because it may
harm trees. Never use waste oil or very thick oil. These may damage your chain saw.
FILLING THE OiL RESERVOIR
• Remove the oil cap (13) and fill the reservoir with the recommended chain oil until the oil level has
reached the top of the oil level indicator (14).
• Refit the oil cap.
• Periodically switch the chain saw off and check the oil level indicator to ensure the bar and chain
are being properly oiled.
TRANSPORTING SAW
• Alwaysremovethe batteryfromthetoolandcovertheguide bar
(4)withthe scabbard(9) (figureJ) whentransportingthesaw.
OPERATING THE CHAIN SAW
12
Page 13

zLWARNING: Read and understand all instructions. Failure to follow all instructions listed
below may result in electric shock, fire and/or serious personal injury.
• Guard Against Kickback which can result in severe injury or death. See Important Safety
Instructions "Guard Against Kickback", to avoid the risk of kickback.
• Do not overreach. Do not cut above chest height. Make sure your footing is firm. Keep feet
apart. Divide your weight evenly on both feet.
• Use a firm grip with your left hand on the front handle (11) and your right hand on the rear
handle (10) so that your body is to the left of the guide bar.
• Do not hold chain saw by front hand guard (3). Keep elbow of left arm locked so that left arm is
straight to withstand a kickback.
zLWARNING: Never use a cross-handed grip (left hand on the rear handle and right hand on
the front handle).
z_WARN(NG: Never allow any part of your body to be in line with the guide bar (4) when
operating the chain saw.
• Never operate while in a tree, in any awkward position or on a ladder or other unstab(e
surface. You may lose control of saw causing severe injury.
• Keep the chain saw running at full speed the entire time you are cutting.
• Allow the chain to cut for you. Exert only light pressure. Do not put pressure on chain saw at
end of cut.
ON / OFF
• Always be sure of your footing and grip the chain saw firmly with
both hands with the thumb and fingers encircling both handles.
• To turn the tool ON, depress the lock off button (2) and squeeze
the trigger switch (t) as shown in figure K. (Once the tool is
running you can release the lock off button.)
• To turn the tool OFF, release the trigger switch.
COMMON CUTTING TECHNIQUES
FELLING
The process of cutting down a tree. Be sure battery is fully
charged before felling a tree so you can finish on a single charge.
Do not fell trees in high wind conditions.
!LWARNING: Felling can result in injury. Itshould only be performed by a trained person.
• (Figure L) A retreat path should be planned and
cleared as necessary before cuts are started. The
retreat path should extend back and diagonally to
the rear of the expected line of fall.
• Before felling is started, consider the natural lean
of the tree, the location of larger branches and the
wind direction to judge which way the tree will fall.
Have wedges (wood, plastic or aluminum)
and a heavy mallet handy.
Remove dirt, stones, loose bark, nails, staples, and
wire from the tree where the felling cuts are to be
made.
• Figure M- Notching Undercut - Make the notch 1/3 of
the diameter of the tree, perpendicular to the direction
of the fall. Make the lower horizontal notching cut
first. This will help to avoid pinching of either the saw
chain or the guide bar when the second notch cut is
being made.
• (Figure M) Felling Back Cut - Make the felling
back cut at least 2 inches (51mm) higher than the
horizontal notching cut. Keep the felling back cut
13
O
45°_ TREE
DiRECTiON
OF
FALL
-===m -
@
DiRECTiON
OFFALL
NOTCH
FELLINGBACK
CUT
2(Scm)
Page 14

paralleltothehorizontalnotchingcut.Makethefellingbackcutsoenoughwoodislefttoactasa
hinge.Thehingewoodkeepsthetreefromtwistingandfailinginthewrongdirection.Donotcut
throughthehinge.
• (FigureIVl)Asthefellingcutgetsclosetothehingethetreeshouldbegintofall.Ifthereisany
chancethatthetreemaynotfallinthedesireddirectionoritmayrockbackandbindthesaw
chain,stopcuttingbeforethefellingcutiscompleteandusewedgestoopenthecutanddropthe
treealongthedesiredlineoffall.Whenthetreebeginstofallremovethechainsawfromthecut,
stopthemotor,putthechainsawdown,thenuse
theretreatpathplanned.Bealertforoverheadlimbs_=_
failingandwatchyourfooting.
LIIVIBING
Removingthebranchesfromafallentree.When
limbing,leavelargerlowerlimbstosupportthelog
offtheground.Removethesmalllimbsinonecut.
Branchesundertensionshouldbecutfromthebottom
ofthebranchtowardsthetoptoavoidbindingthe
chainsawasshowninfigureN.
Trimlimbsfromoppositesidekeepingtreestem
betweenyouandsaw.Nevermakecutswithsaw
betweenyourlegsorstraddlethelimbtobecut.
BUCKING
!_WARNING: Recommend that first time users
should practice cutting on a saw horse,
Cutting a felled tree or log into lengths. How you
should cut depends on how the log is supported. Use
a saw horse (figure O) whenever possible.
Always start a cut with the chain running at full speed.
• Place the bottom spike (t 9) of the chain saw behind
the area of the initial cut as shown in figure P.
• Turn the chain saw on then rotate the chain and bar
down into the tree, using the spike as a hinge.
• Once the chain saw gets to a 45 degree angle, level
the chain saw again and repeat steps until you cut
fully through.
• When the tree is supported along its entire length,
make a cut from the top (overbuck), but avoid cutting
the earth as this will dull your saw quickly.
• Figure Q- When supported at one end
First, cut 1/3 the diameter from the underside
(underbuck). Then make the finished cut by
overbucking to meet the first cut.
• Figure R- When supported at both ends
First, cut 1/3 down from the top overbuck. Then
make the finished cut by underbucking the lower 2/3
to meet the first cut.
• When on a slope
Always stand on the uphill side of the log. When
"cutting through", to maintain complete control
release the cutting pressure near the end of the
cut without relaxing your grip on the chain saw
handles. Don't let the chain contact the ground. After
completing the cut, wait for the saw chain to stop
before you move the chain saw. Always stop the
i
i
®
OUTFROMTOP(OVERBUOK)
AVOIDCUTTINGEARTH
2nd CUTOVERBUCK
(2/3DIAMETER)TOMEET1st
CUT(TOAVOIDPiNCHiNG)
1st CUTUNDERBUCK
(1/3 DIAMETER)
AVOIDSPLINTERING
1st CUTOVERBUCK
(1/3 DIAMETER)
14
Page 15

motor before moving from cut to cut.
CAREAND MAINTENANCE
Use only mild soap and damp cloth to clean the tool. Do not use solvents to clean the plastic housing of
the saw. Never let any liquid get inside the tool; never immerse any part of the tool into a liquid.
IMPORTANT: To assure product SAFETY and RELIABILITY, repairs, maintenance and adjustment
should be performed by authorized service centers or other qualified service organizations, always
using identical replacement parts.
Regular maintenance ensures a long effective life for your chain saw.
CHAIN AND BAR
After every few hours of use, remove the guide bar and chain and clean thoroughly using a soft
bristle brush. Ensure oiling hole on bar is clear of debris.
SAW CHAIN SHARPENING
z_CAUTION: Sharp chain. Always wear protective gloves when handling the chain. The
chain issharp and can cut you when it is not running.
zhWARNING: Sharp moving chain. To prevent accidental operation, ensure that battery is
removed from the tool before performing the following operations. Failure to do this could result in
serious personal injury.
NOTE: The cutters will dull immediately if they touch the ground or a nail while cutting.
To get the best possible performance from your chain saw it is important to keep the teeth of the chain
sharp. Follow these helpful tips for proper saw chain sharpening:
1. For best results use a4.5ram file and a file holder or filing guide to sharpen your chain. This will
ensure you always get the correct sharpening angles
2. Place the file holder fiat on the cutter (20) and
depth gauge of the cutter.
3. (Figure S) Keep the correct cutter filing angle line of
30° on your file guide parallel with your chain (file at
60° from chain viewed from above).
4. Sharpen cutters on one side ofthe chain first. File
from the inside of each cutter to the outside. Then
turn your saw around and repeatthe processes
(2,3,4) for cutters on the other side of the chain.
NOTE: Use a fiat file to file the tops of the rakers (21)
(portion of chain link in front of the cutter) so they are
about .025 inch (.635 mm) below the tips of the cutters
as shown in Figure T.
5. Figure U- Keep all cutter lengths equal.
6. If damage is present on the chrome surface of
the cutter or side plates (22), file back until such
damage is removed.
z_CAUTION: After filing, the cutter will be sharp,
use extra caution during this process.
NOTE: Each time the chain is sharpened, it loses some
of the low kickback qualities and extra caution should be
used. Itis recommended that a chain be sharpened no
more than four times.
ACCESSORIES
z_WARNING: The use of accessories not
/ f _ /-%
.025 in.
.635mm
e
A A=B B
15
Page 16

recommendedinthismanualmaybehazardous.
• ReplacementchainandbarareavailablefrommostCraftsman®outlets.UseCraftsman®replacement
chain,servicepartnumber90609786andreplacement12"bar,servicepartnumber90609781.
The use of accessories not recommended in this manual may be hazardous.
THE RBRC TM SEAL
The RBRCTM (Rechargeable Battery RecyclingCorporation) Seal on the LI-ION battery
(or battery pack) indicates that the costs to recycle the battery (or battery pack) at the
end of its useful life have already been paid by Craftsman _.
RBRCTM in cooperation with Craftsman _'and other battery users, has established
programs in the United States to facilitate the collection of spent LI-ION batteries.
Help protect our environment and conserve natural resources by returning the spent
LI-ION battery to an authorized Craftsman Ceservice center or to your local retailer for recycling. You
may also contact your local recycling center for information on where to drop off the spent battery.
RBRCTM is a registered trademark of the Rechargeable Battery Recycling Corporation.
This Class B digital apparatus complies with Canadian ICES-O03.
This device complies with part 15 of the FCC rules. Operation is subject to the following two
conditions: (1) This device may not cause harmful interference, and (2) this device must accept
any interference received, including interference that may cause undesired operation.
NOTE: This equipment has been tested and found to comply with the limits for a Class B digital
device, pursuant to Part 15 of the FCC Rules. These limits are designed to provide reasonable
protection against harmful interference in a residential installation. This equipment generates,
uses and can radiate radio frequency energy and, if not installed and used in accordance with
the instructions, may cause harmful interference to radio communications. However, there is no
guarantee that interference will not occur in a particular installation.
If this equipment does cause harmful interference to radio or television reception, which can
be determined by turning the equipment off and on, the user is encouraged to try to correct the
interference by one or more of the following measures:
• Reorient or relocate the receiving antenna.
• Increase the separation between the equipment and receiver.
• Connect the equipment into an outlet on a circuit different from that to which the receiver is
connected.
• Consult the dealer or an experienced radio/TV technician for help.
Changes or modifications to this unit not expressly approved by the party responsible for
compliance could void the user's authority to operate the equipment. This Class B digital
apparatus complies with Canadian ICES-O03.
16
Page 17

Problem
Tool will not start.
Unit will not
charge.
+
+
TROUBLESHOOTING
Possible Cause
Battery not installed properly. •
Battery not charged. •
Bar / chain •
overheated.
+
Chain is loose. •
Poor cut quality. •
+
Unit runs but does •
not cut.
Unit stops while •
cutting. •
+
Unit does not oil. •
+
• Lock-out button not actuated.
• Battery not inserted into charger.
+
o
Lubrication needed.
Chain tension set
incorrectly.
Chain tension set
incorrectly.
Chain needs
replacement.
• Chain too tight. •
+
+ +
+ +
• Chain installed backwards. •
+
Lithium battery depleted.
Voltage limit protection
exceeded.
Battery too hot.
Oil reservoir emptied.
Oiling hole on guide bar clogged.
+
+
+
+
Possible Solution
Check battery installation.
Check battery charging
requirements.
Push lock off button/actuate trigger.
Insert battery into charger until
green LED appears. Charge up to
5 hours if battery totally drained.
Refer to "adjusting chain
tension" section.
Refer to "chain oiling" section.
Refer to "adjusting chain
tension" section.
Refer to "adjusting chain
tension" section.
Note: Excessive tension leads
to excessive wear and reduction
in life of bar & chain. Lubricate
before each cut. Refer to
"replacing the chain" section.
Refer to sections for installing
and removing chain.
Charge battery.
Unit is being forced. Restart and
apply less pressure.
Allow battery to coot for 30
minutes before proceeding.
Refill reservoir.
Clean guide bar, sprocket and
sprocket cover. Refer to "care
and maintenance" section.
17
Page 18

UN ANO DE GARANT[A LIMITADA PARA LOS PRODUCTOS CRAFTSMAN
Este producto esta garantizado contra defectos de material o mano de obra
DURANTE UN ANO a partir de la fecha de compra. Se reemplazara un producto
defectuoso sin cargo al presentar el comprobante de compra.
Para conocer detalles sobre la cobertura de la garantfa para obtener un reemplazo
gratuito, visite el sitio web: www.craftsman.com
Esta garantfa no cubre la hoja, que es una pieza consumible que puede
desgastarse con el uso normal dentro del perfodo de garantfa.
Esta garantfa queda nula si el producto se utiliza alguna vez para proporcionar
servicios comerciales o si se alquila a otra persona.
Esta garantfa le concede derechos legales especfficos yes posible que ademas
usted tenga otros derechos que vaden de un estado a otto.
Sears Brands Management Corporation, Hoffman Estates, tL 60179
SIGNIFICADO DE SIMBOLO SENAL
S[MBOLO DE ALERTA DE SEGURIDAD: IndicaPELIGRO, ADVERTENCIA
O ATENCION. Se puede utitizan en conjunto con otros simbolos o pictografias.
zL PELIGRO: Indica una situaci6n de petigro, que de no evitarse, podrfa provocar la
muerte o lesiones graves.
ADVERTENCIA: Indica una situaci6n de petigro, que de no evitarse, podrfa provocar
la muerte o lesiones graves.
ATENCION: Indica una situaci6n de peligro, que de no evitarse, podrfa provocar
lesiones menores o moderadas o dados a la propiedad.
ADVERTENCIAS GENERALES DE SEGURIDAD PARA
HERRAIVllENTAS ELECTRICAS
_ADVERTENCIA: Lea todas las advertencias de seguridad e instrucciones El
incumplimiento de las advertencias e instrucciones puede provocar descargas el6ctricas,
incendios o lesiones graves.
zLADVERTENClA: parte del polvo producido por las herramientas el6ctdcas al Iijar, aserrar,
esmedlat, taladrar y realizar otras actividades de la construcci6n, contiene productos qufmicos
reconocidos pot el Estado de California como causantes de c_ncer, defectos de nacimiento u otros
problemas reproductivos. Algunos de estos productos quimicos son:
•el plomo de las pinturas de base plomo,
• la silice cristalina de ladrillos, el cemento y otros productos de mamposteria, y
•el arsenico y el cromo de la madera con tratamiento quimico.
El riesgo derivado de estas exposiciones varia segQnla frecuencia con la que se realice este tipo de
trabajo. Para reducir la exposici6n a estos productos quimicos: trabaje en &reas bien ventiladas y
trabaje con equipos de seguridad aprobados, como las mascaras para polvo especialmente diseNadas
para filtrar las particulas microsc6picas.
• Evite el contacto prolongado con el polvo procedente del Iijado, serrado, esmerilado y
taladrado electricos, asf como de otras actividades del sector de la construcci6n. Lleve ropa
protectora y lave con agua y jab6n las zonas expuestas. Sipermite que elpotvo se introduzca en
la boca u ojos o quede sobre lapiel, puede favorecer la absorcion de productos quimicos peligrosos.
CONSERVE TODAS LAS ADVERTENCIAS E INSTRUCCIONES
PARA FUTURAS CONSULTAS.
El termino "herramienta electrica" incluido en las advertencias hace referencia alas herramientas
el¢ctricas operadas con corriente (con cable el¢ctrico) o alas herramientas el¢ctricas operadas con
baterias (inal&mbricas).
18
Page 19

LEA TODAS LAS INSTRUCCIONES.
1) Seguridad en el area de trabajo
a) IVlantenga el area de trabajo limpia y bien iluminada. Las areas abarrotadas y oscuras
propician accidentee.
b) No opere herramientas electricas en atm6sferas explosivas, como ambientes donde
se encuentran Ifquidos, gases o polvo inflamables. Las herramientae electricas originan
chispae que pueden encender el polvo o los vapores.
c) Mantenga a los nifios y espectadores alejados de la herramienta electrica en
funcionamiento. Lae distracciones pueden provocar la perdida de control
2) Seguridad electrica
a) Los enchufes de la herramienta electrica deben adaptarse al tomacorriente. Nunca
modifique el enchufe de ninguna manera. No utilice ningen enchufe adaptador con
herramientas electricas con conexi6n a tierra. Los enchufee no modificados y que se
adaptan a los tomacorrientee reduciran el rieego de descarga electrica.
b) Evite el contacto corporal con superficies puestas a tierra, como pot ejemplo tuberfas,
radiadores, tangos y refrigeradores. Existe mayor rieego de deecarga electrica si su cuerpo
eeta puesto a tierra.
c) No exponga las herramientas electricas a la Iluvia o a condiciones de humedad. Si
ingresa agua a una herramienta electrica, aumentara et riesgo de deecarga electrica.
d) No maltrate al cable. Nunca utilice el cable para transportar, tirar o desenchufar la
herramienta electrica. Mantenga el cable lejos del calor, aceite, bordes afilados o piezas
m6viles. Los cables da_ados o enredadoe aumentan el rieego de deecarga electrica.
e) AI operar una herramienta electrica en el exterior, utilice un cable prolongador adecuado
para tal uso. Utilice un cable adecuado para uso en exteriores a fin de reducir el riesgo de
descarga electrica.
f) Si el uso de una herramienta electrica en un lugar hemedo es imposible de evitar, utilice
un suministro protegido con un interruptor de circuito pot falla a tierra (GFCt). El uso de
un GFCI reduce el riesgo de descargae electricae.
3) Seguridad personal
a) Permanezca alerta, controle Io que esta haciendo y utilice el sentido com_n cuando
emplee una herramienta electrica. No utilice una herramienta electrica si eeta cansado o
bajo el efecto de drogas, alcohol o medicamentos. Un momento de deecuido mientrae se
opera una herramienta electrica puede provocar leeiones personalee graves.
b) Utilice equipos de protecci6n personal. Siempre utilice protecci6n para los ojos. En las
condiciones adecuadas, el uso de equipos de proteccion, como mascaras para polvo, calzado
de seguridad antideelizante, caecos o proteccion auditiva, reducira las lesiones pereonalee.
c) Evite el encendido por accidente. Aseg_rese de que el interruptor este en la posici6n
de apagado antes de conectarlo a la fuente de energfa o paquete de baterfas, o antes
de levantar o transportar la herramienta. Traneportar herramientae electricas con el dedo
apoyado en el interruptor o enchufar herramientae electricas con el interruptor en la posicion
de encendido puede propiciar accidentes.
d) Retire las clavijas de ajuste o llaves de tuercas antes de encender la herramienta
electrica. Una Ilave de tuercae o una clavija de ajuste que ee deje conectada a una pieza
giratoria de la herramienta electrica pueden provocar leeiones pereonalee.
e) No se estire. Conserve el equilibrio adecuado y mantengase parado correctamente en
todo momento. Esto permite un mejor control de la herramienta electrica en situaciones
inesperadae.
f) Use la vestimenta adecuada. No use ropas holgadas ni joyas. Mantenga el cabello, la
ropa y los guantes alejados de las piezas en movimiento. Lae ropas holgadae, laejoyas o
el cabello largo pueden quedar atrapadoe en /as piezas en movimiento.
g) Si se suministran dispositivos para la conexi6n de accesorios con fines de recolecci6n
y extracci6n de polvo, asegerese de que esten conectados y que se utilicen
correctamente. El uso de disposifivos de recoteccion de polvo puede reducir los peligros
relacionados con el polvo.
4) Uso y mantenimiento de la herramienta electrica
19
Page 20

a)Nofuercela herramienta electrica. Utilice la herramienta electrica correcta para el
trabajo que realizar& La herramienta electrica correcta hard el trabajo mejor y mas seguro a
la velocidad para la que fue disefiada.
b) No utilice la herramienta electdca si no puede encenderla o apagarla con el interruptor.
Toda herramienta electrica que no puede ser controtada mediante el interruptor es peligrosa y
debe ser reparada.
c) Desconecte el enchufe de la fuente de energfa y/o el paquete de batedas de la
herramienta electrica antes de realizar ajustes, cambiar accesorios o almacenar
herramientas electdcas. Estas medidas de seguridad prevenfivas reducen el riesgo de
encender la herramienta electrica en forma accidental
d) Guarde las herramientas electricas que no estan en uso fuera del alcance de los niSos
y no permite que otras personas no familiarizadas con ella o con estas instrucciones
operen la herramienta. Las herramientas electricas son peligrosas en las manos de usuarios
no entl'enados.
e) IVlantenimiento de las herramientas electricas. Controle que no haya piezas mbviles
real alineadas o trabadas, piezas rotas y toda otra situaci6n que pueda afectar el
funcionamiento de las herramientas electricas. Si encuentra daSos, haga reparar la
herramienta electrica antes de utilizarla. Se producen muchos accidentes a causa de las
herramientas electricas que carecen de un mantenimiento adecuado.
f) IVlantenga las herramientas de corte afiladas y limpias. Las herramientas de corte con
mantenimiento adecuado, con los bordes de corte afilados son menos propensas a trabarse y
son mas faciles de controtar.
g) Utilice la herramienta electrica, los accesorios y las brocas de la herramienta, etc. de
acuerdo con estas instrucciones y teniendo en cuenta las condiciones de trabajo y el
trabajo que debe realizarse. El uso de la herramienta electrica para operaciones diferentes
de aquellas para las que fue disefiada podria originar una situacion peligrosa.
5) Uso y mantenimiento de la herramienta con batedas
a) Recargue solamente con el cargador especificado pot el fabdcante. Un cargador
adecuado para un tipo de paquete de baterias puede originar riesgo de incendio si se utiliza
con otto paquete de baterias.
b) Utilice herramientas electdcas sSIo con paquetes de batedas especfficamente
diseSados. El uso de cualquier otto paquete de baterias puede producir riesgo de incendio y
lesiones.
c) Cuando no utilice el paquete de batedas, mantengalo lejos de otros objetos metalicos
como sujetapapeles, monedas, Ilaves, clavos, tornillos u otros objetos metalicos
pequefios que puedan realizar una conexi6n desde un terminal al otto. Los cortocircuitos
en los terminales de la bateria pueden provocar quemaduras o incendio.
d) En condiciones abusivas, el liquido puede ser expulsado de la bateda. Evite su
contacto. Si entra en contacto accidentalmente, enjuague con agua. Si el liquido entra
en contacto con sus ojos, busque atenci6n medica. El liquido expulsado de la bateria
puede provocar irritacion o quemaduras.
6) IVlantenimiento
a) Haga que una persona de reparaciones calificada realice el mantenimiento de su
herramienta electdca y utilice piezas de repuesto identicas solamente. Esto garantizara la
seguridad de la herramienta electrica.
INSTRUCCIONES DE SEGURIDAD Y ADVERTENCIAS PARA LAS
SIERRAS DE CADENA
• Cuando la motosierra este funcionando, mantenga todas las partes del cuerpo alejadas de la
cadena de la sierra. Antes de arrancar la motosierra, aseg(Jrese de que la cadena de la sierra
no este en contacto con nada. Un momento de descuido al utilizar motosierras puede provocar
que su ropa o su cuerpo queden atrapados en la cadena de la sierra.
• Siempre mantenga la motosierra con su vareo sobre el mango trasero y la mano izquierda
en el mango delantero. Sosteniendo la motosierra con una configuracion invertida mano aumenta
el riesgo de lesiones personales y nunca debe hacerse.
• Sostenga la herramienta electrica enicamente pot las superficies de agarre aisladas, debido
2o
Page 21

aquela cadena de la sierra puede entrar en contacto con cables electricos ocultos o su
propio cable. El contacto de la cadena de la sierra con un cable con corriente electrica puede
provocar que las partes metalicas expuestas de la herramienta electrica tambien conduzcan la
corriente y que el operador sufra una descarga electrica.
• Use anteojos de seguridad y protecci6n para los oidos. Se recornienda el uso de equipos
de protecci6n adicionales para la cabeza, las rnanos, las piernas y los pies. La ropa de
proteccion adecuada reducira las lesiones personales producidas por la proyeccion de fragmentos
o el contacto accidental con la cadena de la sierra.
• No utilice una rnotosierra rnientras se encuentre en un arbol. El uso de una motosierra al
estar subido a un arbot puede provocar lesiones personales.
• Siernpre rnantenga una posici6n firrne y adecuada, y utilice la rnotosierra _nicarnente cuando
este parado sobre una superlicie fija, firrne y nivelada. Las superficies resbalosas o inestabtes,
como las escaleras, pueden provocar una perdida det equilibrio o del control de la motosierra.
• AI cortar una rarna que este bajo tensi6n, rnantengase alerta al efecto de resorte. Cuando
se libera la tension de/as fibras de la madera, la rama puede gotpear al operador con el efecto de
resorte y/o hacer que se pierda el control de la motosierra.
• Tenga extrerno cuidado cuando cotte peque£1as rnalezas y arboles j6venes. El material largo y
delgado puede quedar atrapado en la cadena de la sierra y azotarle o hacerle perder el equilibrio.
• Transporte la rnotosierra sosteniendo el mango delantero con la herrarnienta apagada y
alejada de su cuerpo. AI transpottar o guardar la rnotosierra, siernpre coloque la cubierta
de la barra guia. El manejo apropiado de la motosierra reducira la probabilidad de un contacto
accidental con la cadena de la sierra en movimiento.
• Siga las instrucciones para lubricar, tensar la cadena y carnbiar los accesorios. Una cadena
mal tensada o mal lubricada puede romperse o aumentar la posibilidad de retroceso.
• IVlantenga los mangos secos, Iirnpios y libres de aceite y grasa. Los mangos con grasa o
aceite pueden resbalarse y provocar la perdida de control
• Corte rnadera _nicarnente. No utilice la rnotosierra para fines no previstos. Por ejernplo, no
utilice la rnotosierra para cortar plastico, rnarnposteria o rnatedales de construcci6n que no
sean de rnadera. El uso de la motosierra para aplicaciones distintas de las previstas puede dar
origen a una situacion peligrosa.
CAUSAS DEL RETROCESO Y SU PREVENCI(DN POR PARTE DEL
OPERADOR:
El retroceso puede producirse cuando la nariz o la punta de la barra guia tocan un objeto o cuando
la madera se cierra y pellizca la cadena de la sierra durante el corte.
En algunos casos, el contacto con la punta puede provocar una repentina reacciOn inversa,
empujando la barra guia hacia arriba y hacia atr&s en direcciOn al operador.
El pellizco de la cadena de la sierra a Io largo de la parte superior de la barra guia puede empujar la
barra guia rapidamente hacia atras en direcciOn al operador.
Cualquiera de estas reacciones puede resultar en que usted pierda el control de la sierra, Io cual
puede resultar en graves lesiones personales. No confie exclusivamente en los dispositivos de
seguridad incorporados en su sierra. En su condiciOn de usuario de una motosierra, usted debe
realizar varias acciones para mantener sus trabajos de corte libres de accidentes o lesiones.
El retroceso es el resultado del mal uso de la herramienta y/o de procedimientos o condiciones de
funcionamiento incorrectos y se puede evitar tomando las debidas precauciones que se indican a continuaciOn:
• IVlantenga un agarre firrne, con los pulgares y los dedos rodeando los mangos de la
rnotosierra, con arnbas rnanos sobre la sierra y con su cuerpo y brazo ubicados de rnanera
que le perrnitan resistir las fuerzas de retroceso. Si se toman las debidas precauciones, el
operador puede controtar /as fuerzas de retroceso. No suelte la motosierra.
• No se estire dernasiado y no corte por encirna de la altura de los hornbros. Esto ayuda a
evitar un contacto no deseado con la punta y hace posible un mejor control de la motosierra en
situaciones imprevistas.
• Utilice _nicarnente barras y cadenas de repuesto especificadas por el fabdcante. El reemplazo
incorrecto de las barras y cadenas de repuesto puede provocar rotura de la cadena y/o el retroceso.
• Siga las instrucciones de afilado y rnantenirniento del fabricante para la cadena de la sierra. La
reducciSn de la altura del calibrador de profundidad puede resultar en un incremento del retroceso.
21
Page 22

SE DEBEN TOIVlAR LAS SIGUIENTES PRECAUCIONES PARA
DISlVlINUIR EL RETROCESO:
(1.) Sujete la sierra con firmeza. Sujete la sierra de cadena con firmeza con ambas manos cuando
el motor este en funcionamiento. Sujete firmemente con los pulgares y dedos los mangos de la
sierra de cadena. La sierra de cadena tirara hacia adelante cuando corte sobre el borde inferior
de la barra y empujara, hacia atras cuando corte a Io largo del borde superior de la barra.
(2.) No se estire demasiado.
(3.) Conserve el equilibrio adecuado y mantengase parado correctamente en todo momento.
(4.) No permita que la boquilla de la barra de guia entre en contacto con un tronco, una rama, el
piso u otra obstrucciOn.
(5.) No realice cortes por encima de laaltura del hombro.
(6.) Utilice dispositivos como cadena de retroceso bajo y barras de guia de retroceso reducido que
disminuyen los riesgos relacionados con el retroceso.
(7.) SOlo utilice como reemplazo las barras y cadenas que especific6 el fabricante o el equivalente.
(8.) Nunca permita que la cadena en movimiento entre en contacto con ningQn objeto en la punta de
la barra de guia.
(9.) Mantenga el &reade trabajo libre de obstrucciones como otros arboles, ramas, rocas, cercos,
troncos cortados, etc. Elimine o evite cualquier obstrucciOn que su cadena de sierra pueda
golpear mientras esta cortando un tronco o rama en especial.
(10.) Mantenga la cadena de la sierra filosa y tensionada correctamente. Una cadena suelta o sin
filo aumentara las posibilidades de retroceso. Verifique la tension en intervalos regulares con el
motor apagado y sin la bateria, nunca los haga con el motor en funcionamiento.
(11.) Comience y contint_e el corte sOlocon el movimiento de la cadena a la maxima velocidad. Si la
cadena se mueve a una velocidad menor, es mas probable que se produzca un retroceso.
(12.) Corte los troncos de a uno.
(13.) Tenga mucha precauciOn al reanudar un corte anterior. Trabe los parachoques acanalados en
la madera y deje que la cadena alcance la velocidad ma.xima antes de comenzar a cortar.
(14.) No intente realizar cortes de rebajado o en dia.metro.
(15.) Tenga cuidado con lostroncos que se desplazan u otras fuerzas que pueden cerrar un corte y
morder la cadena o caer sobre ella.
CARACTERJSTICAS DE SEGURIDAD DURANTE EL RETROCESO
,_ADVERTENCIA: las siguientes caracteristicas se incluyen en su sierra para ayudar a
reducir el peligro durante el retroceso; sin embargo, estas caracteristicas no eliminaran
completamente esta riesgosa reacciOn. Como usuario de la sierra de cadena, no confie solamente en
los dispositivos de seguridad. Debe seguir todas las precauciones de seguridad, las instrucciones y el
mantenimiento segQnse describe en este manual para ayudar a evitar el retroceso y otras fuerzas que
pueden provocar lesiones de gravedad.
• Freno de cadena diser_adopara apagar la motosierra de inmediatosi el retroceso es demasiado grande.
• Barra de gu{a de retroceso reducido, disefiada con una pequefia punta de empuje que reduce el
tamafio de la zona de retroceso en la punta de la barra. Una barra de guia de retroceso reducido es
una que demostr6 reducir significativamente la cantidad y la gravedad de los retrocesos cuando se
la pone a prueba segQnlas normas de seguridad para las sierras de cadena el¢ctricas.
• Cadena de retroceso bajo, disefiada con un calibre de profundidad contorneado y un enlace
de guarda que desvia la fuerza de retroceso y permite que la madera se deslice gradualmente
en la cortadora. Una cadena de retroceso bajo es una cadena que cumple con los requisitos de
rendimiento de retroceso ANSI B175.1-2012.
• No opere la sierra de cadena mientras esta en un arbol, en una escalera, en un andamio o
desde cualquJer superficie Jnestable.
• Sostenga la herramJenta por las superficies de agarre aisladas cuando realJce una
operaci6n en la que la herramJenta de corte pueda tocar cables electrJcos ocuJtos. El
contacto con un cable con "corriente electrica" har& que las partes met&licas expuestas de la
herramienta tengan "corriente electrica" y el operador sufra una descarga electrica.
• No Jntente realJzar operacJones que superan su habJlidad o experJencJa. Lea atentamente y
comprenda completamente todas las instrucciones de este manual.
22
Page 23

• Antes de encender la sierra de cadena, asegQrese de que la cadena de la sierra no este en
contacto con ning0n objeto.
• iNo opere la sierra de cadena con una sola mano! La operaci6n con una sola mano puede
provocaMe lesiones graves al operador, asistente o espectadores. La sierra de cadena est&
diseNa para su uso con las dos manos.
• Mantenga los mangos secos, limpios y Iibres de aceite o grasa.
• No permita que se acumule suciedad, desechos o aserrin en el motor o fuera de los
orificios de ventilaci6n.
• Apague la sierra de cadena antes de depositada sobre una superflcie.
• No corte enredaderas y/o malezas pequeSas.
• Tenga e×tremo cuidado cuando corte pequerlas malezas y arboles j6venes ya que el material
delgado puede trabar lacadena de la sierra, volverse hacia usted y golpearlo o sacarlo de balance.
z_ADVERTENCIA: el uso de esta herramienta puede generar o dispersar particulas de
poivo, que pueden causar lesiones respiratorias permanentes y graves u otras lesiones. Use
siempre protecciOn respiratoria apropiada para la exposiciOn al polvo aprobada por el Instituto
Nacional de Salud y Seguridad Ocupacional de EE.UU. y la AdministraciOn de Salud y Seguridad
Ocupacional de EE.UU. (NIOSH y OSHA respectivamente, por sus siglas en ingles). Aleje la cara y el
cuerpo del contacto con las particulas.
NOMBRES Y TI_RMINOS DE LAS SIERRAS DE CADENA
Aserrado: el proceso de realizar cortes transversales en un &rbol caido o troncos en trozos.
Cabezal electrico de la sierra de cadena: una sierra de cadena sin la cadena de la sierra y la
barra de guia.
Rueda dentada de accionamiento o rueda dentada: la pieza dentada que acciona la cadena
de lasierra.
Tala: el proceso de destroncar un &rbol.
Corte de destronque: el corte final en una operaci6n de tala de &rboles realizada en el lado
opuesto del &rbol del corte de entallado.
Mango delantero: el mango de apoyo ubicado en o hacia el frente de la sierra de cadena.
Protector delantero de la mano: una barrera estructural entre el mango delantero de una sierra
de cadena y la barra de guia, habitualmente se encuentra cerca de la posici6n de la mano en el
mango delantero y a veces se utiliza como una palanca de activaci6n para un freno de cadena.
Barra de guia: una estructura resistente con rieles que soporta y guia la cadena de la sierra.
Funda de la barra de guia: cubierta que se coloca en la barra de guia para evitar el contacto
con la pieza dentada cuando no se utiliza la sierra.
Retroceso: el movimiento hacia atr&s o adelante, o ambos, de la barra de guia que se produce
cuando la cadena de la sierra cerca de la boquilla en el &rea superior de ella entra en contacto con
un objeto como un tronco o una rama, o cuando la madera se acerca y muerde la cadena de la
sierra durante el corte.
Retroceso, Pliegue: el r&pido movimiento hacia atr&s de la sierra que puede generarse cuando
la madera se acerca y muerde la cadena de la sierra en movimiento durante el corte a Io largo
de laparte superior de la barra de guia.
Retroceso giratoMo: el r&pido movimiento hacia arriba y abajo de la sierra que puede
generarse cuando la cadena de la sierra en movimiento cerca de la parte superior de la punta de
la barra de guia entra en contacto con un objeto, como un tronco o una ram&
Escamonda: extracci6n de las ramas de un &rbol caido
Cadena de retroceso bajo: unacadena que cumple con los requisitos de rendimiento de
retroceso de ANSI B175.1-2012 (al probarse en una muestra representativa de sierras de cadena).
Posici6n de corte normal: las posiciones adoptadas al realizar los cortes de aserrado y tala.
Muesca de entallado: un corte de entallado en el &rbolque dirige la caida del mismo.
Mango trasero: mango de apoyo ubicado en o hacia la parte trasera de la sierra de cadena.
Barra de guia de retroceso reducido: una barra de guia que ha demostrado que reduce el
retroceso significativamente.
Cadena de la sierra de repuesto: una cadena que cumple con los requisitos de rendimiento de
ANSI B175.1-2012 al probarse con sierras de cadena especificas. Posiblemente no cumpla con
los requisitos de rendimiento ANSI al utilizarse con otras sierras.
23
Page 24

Cadena de la sierra: un bucle de la cadena que posee dientes de corte para realizar cortes en
madera y que est& accionado por el motor y apoyado sobre la barra de guia.
Parachoques acanalado: los canales se utilizan durante la tala o aserrado para girar la sierra y
mantener la posiciOn mientras corta.
tnterruptor: un dispositivo que durante el funcionamiento completar& o interrumpir& un circuito
el¢ctrico al motor de la sierra de cadena.
Mecanismodel interruptor: el mecanismoquetransmiteel movimientodesde undisparadoral interruptor.
Seguro del interruptor: un tope mOvil que evita el funcionamiento accidental del interruptor
hasta que se Ioacciona en forma manual.
USO PREVISTO
Su motosierra Craftsman _>es ideal para aplicaciones de poda y para cortar troncos pequefios con
un di&metro de hasta 305 mm (12 pulg.). Esta herramienta est& disefiada solo para uso personal.
CONSERVE ESTAS INSTRUCClONES
SiMBOLOS
• La etiqueta de su herramienta puede incluir los siguientes simbolos. Los simbolos y sus
definiciones son los siguientes:
V................. voltios
Hz ............... hertz
min .............. minutos
- - - o DC.... corriente directa
@ ................ Construcci6n Clase I
(mis _ la terre)
[] ............... ConstrucciSn de clase II
.../min .......... revoluciones o minuto
m/s .............. metros por segundo
mm.............. milimetros
A............... amperios
W.............. vatios
o AC .... corriente alterna
no ............. no velocidad sin carga
.............. terminal a tierra
z_ ............ simbolo de alerta
seguridad
in ............... pulgadas
....... Lea el manual de instrucciones antes del uso
Use protecci6n adecuada para las vias respiratorias
iiiiiiiiiii Use protecciSn adecuada para los ojos
0 ........... Use protecci6n adecuada para los oidos
DESCRIPClON FUNClONAL
1. Interruptor de gatillo
2. Bot6n de btoqueo en
apagado
3. Protector delantero para
la mano
4. Barra guia
5. Cadena de la motosierra
6. Cubierta de la rueda
dentada
7. Perilla de bloqueo de
ajuste de la barra
8. Perilla tensora de la
cadena
9. Funda de la barra guia
10. Mango trasero
11. Mango delantero
12. Bateria
13. Tapa del aceite
14. Indicador del nivet de
aceite
24
Page 25

INSTRUCCIONES DE SEGURIDAD IlVlPORTANTES PARA LOS
CARGADORES DE BATERIAS
CONSERVE ESTAS INSTRUCCIONES: Este manual contiene instrucciones de seguridad
importantes para los cargadores de baterias.
• Antes de utilizar el cargador, lea todas las instrucciones y las prevenciones en el cargador, en el
paquete de baterias yen el producto que utiNzael paquete de baterias.
z_ADVERTENOIA: Riesgo de descarga electrica. No permita que ningQn Ifquido entre
en el cargador.
z_PREOAUCI(DN: Riesgo de quemaduras. Para reducir el riesgo de lesiones, cargue
solamente baterfas Craftsman<°L Otros tipos de baterfas pueden estallar y provocar da_os
personales y materiales.
z_PRECAUCI(DN: En determinadas circunstancias, con el cargador enchufado en el
tomacorriente, algunos materiales extra_os pueden provocar un cortocircuito en el cargador. Se
deben mantener lejos de las cavidades del cargador los materiales extraSos de naturaleza
conductora, entre los que se incluyen Lalana de acero, el papel de aluminio o cualquier
acumulaci6n de particulas metalicas. Estos son s61o algunos ejemplos y no constituyen una lista
taxativa. Siempre desenchufe el cargador del tomacorriente cuando no haya un paquete de
baterias en la cavidad. Desenchufe el cargador antes de intentar limpiarlo.
• El cargador suministrado con este producto esta disefiado para set enchufado
correctamente en posici6n vertical u horizontal.
• NO intente cargar el paquete de bater{as con otros cargadores que no scan de la marca.
Los cargadores y los paquetes de baterfas estgn disedados especificamente para trabajar
juntos.
• Estos cargadores estan disefiados para utilizarse exclusivamente con las baterfas
recargables Craftsman _'_designadas. Otros usos pueden provocar riesgo de incendio,
descarga el#ctrica o electrocuci6n.
• No exponga el cargador a la Iluvia ni a la nieve.
• Para desconectar el cargador o los cables para cadena de margarita, tire del enchufe en
lugar del cable. Esto reducirb el riesgo de daflar el enchufe o el cable.
• Aseg_rese de que el cable este ubicado de modo que no Io pise o se tropiece con el y que
no este sujeto a dafios o tensiones de alguna otra forma.
• No utilice un cable prolongador a menos que sea absolutamente necesario. El uso de
un cable prolongador incorrecto puede provocar riesgo de incendio, descarga el_ctrica o
electrocuci6n.
, Para garantizar la seguridad, un cable prolongador debe tenet un tamafio de cable
adecuado (AWG o Calibre de conductor de Estados Unidos). Cuanto mbs pequedo sea
el n_mero de calibre del conductor, mayor ser_ la capacidad del cable; es decir, un calibre 16
tiene mgs capacidad que un calibre 18. Cuando se utiliza mgs de una prolongaci6n para Iograr
la Iongitud total, asegOrese de que cada prolongaci6n tenga la medida minima del conductor.
Tamafio mfnimo recomendado del conductor para los cables de extensi6n
Calibre minimal dee cordons de rallonge
Tension
120V
240V
Intensite (A)
Au Au
moins plus
0 - 6
6 - 10
10 - 12
12 - 16
Longueur totale du cordon en piede
0-25 26-50 51-100 101-150
(0-7,6m) (7,6-15,2m) (15,2-30,4m) (30,4-45,7m)
0-50 51-100 101-200 201-300
(0-15,2m) (15,2-30,4m)(30,4-60,em)(60,9-91,4m)
Calibre moyen des ills (AWG)
18 16 16 14
18 16 14 12
16 16 14 12
14 12 Nonrecommande
• No coloque objetos en la parte superior del cargador ni coloque el cargador en una
superficie blanda que pueda bloquear las ranuras de ventilaci6n y provocar un calor
interno excesivo. Coloque el cargador en una posici6n alejada de cualquier fuente de
calor. El cargador se ventila a trav_s de ranuras en la parte superior e inferior de la cubierta.
Page 26

• Nomonteel cargador en la pared ni Io instale en forma permanente sobre ninguna
superficie. El cargador est& disedado para ser utitizado sobre una superficie plana y estable
(p. ej., un banco o una mesa).
• No opere el cargador con cables o enchufes daSados: reemplbcelos de inmediato.
• No opere el cargador si este ha recibido un golpe fuerte, se ha caido, o se ha da_ado de
cualquier otra manera. Ll_velo a un centro de mantenimiento autorizado.
• No desarme el cargador; tlevelo a un centro de mantenimiento autorizado cuando se
requiera mantenimiento o una reparaci6n. El armado incorrecto puede implicar un riesgo de
descarga el_ctrica, electrocuciSn o incendio.
• Antes de Iimpiarlo, desconecte el cargador del tomacorriente. Esto reducir& el riesgo de
descarga el6ctrica. Quitar el paquete de baterias no reducir& este riesgo.
• NUNCA intente conectar 2 cargadores juntos.
• El cargador esta diseSado para operar con corriente el6ctrica domestica estandar (120
voltios). No intente utilizarlo con otto voltaje.
INSTRUCCIONES DE SEGURIDAD llVlPORTANTES PARA LOS
PAQUETES DE BATERIAS
2_ADVERTENClA: Para un funcionamiento seguro, lea este y todos los manuales de
instrucciones incluidos con la herramienta antes de usar el cargador.
El paquete de baterias inctuido en la caja no est& completamente cargado. Antes de utilizar el
paquete de baterias y el cargador, lea tas instrucciones de seguridad a continuaci6n. Luego
siga los procedimientos de carga descritos.
LEA TODAS LAS INSTRUCCIONES
• No incinere el paquete de baterias, aun si tiene daSos importantes o esta
completamente desgastado. El paquete de baterias puede explotar en el fuego. Cuando se
queman paquetes de bater/as, se generan vapores y materiales tSxicos.
• No cargue ni use la bater{a en atm6sferas explosivas, como ambientes en los que
hay liquidos, gases o polvo inflamables. Insertar o retirar la bater/a del cargador puede
encender el polvo o los vapores.
• Si el contenido de las baterias entra en contacto con la piel, lave el area de inmediato
con agua y jab6n suave. Si el Iiquido de la bater/a entra en contacto con los ojos, enjuague
con agua manteniendo los ojos abiertos durante 15 minutos o hasta que la irritaciSn cese. Si
se necesita atenciSn m_dica, el electrolito de/as bater/as de LI-ION contiene una mezcla de
carbonatos orgbnicos l/quidos y sales de litio.
• El contenido de las cetutas de la bater_a abierta puede generar irritaci6n respiratoria.
Respire aire fresco. Si los sintomas persisten, busque atenciSn m_dica.
zhADVERTENCIA: Peligro de quemaduras. El liquido de la bateria puede encenderse si
se expone a chispas o llamas.
• Cargue los paquetes de baterias sSIo con cargadores de Craftsman _.
• NO salpique o sumerja en agua u otros liquidos. Esto puede causar una fafla prematura de
las c_lulas.
• No almacene ni utilice la herramienta y el paquete de baterias en lugares en los que la
temperatura pueda alcanzar o superar los 40 °C (105 °F) (como en toldos al aire Iibre o
construcciones de metal en verano).
z_ADVERTENCIA: Nunca intente abrir el paquete de baterias por ningbn motivo. Si la
caja del paquete de baterias estb agrietada o dadada, no la introduzca en el cargador. No
comprima, deje caer ni dade el paquete de baterias. No utilice un paquete de baterias o un
cargador que haya recibido un golpe fuerte, se haya caido, est_ agotado o dadado de alguna
forma (por ejemplo, perforado con un clavo, golpeado con un martillo, pisado). Los paquetes de
baterias dadados deben devolverse al centro de mantenimiento para su reciclado.
z_ADVERTENCIA: Riesgo de incendio. No guarde o transporte la bateria de ninguna
manera que permita que los terminales e×puestos de la bateria entren en contacto con
objetos metalicos. Por ejemplo, no coloque la bateria en delantales, bolsfllos, cajas de
herramientas, cajas de juegos de productos, cajones, etc. con clavos, /laves, tomillos sueltos,
etc. Transportar baterias puede provocar incendios si los terminales de la bateria entran
26
Page 27

en contacto accidentalmente con materiales conductores como llaves, monedas,
herramientas de mano u objetos simitares. Las Normas para Materiales Peligrosos del
Departamento de Transporte de los EE.UU. (HMR) concretamente prohiben transportar baterias
comercialmente o en aviones (es decir, empacadas en maletas y equipaje de mano) A MENOS
que est_n debidamente protegidas de cortocircuitos. Por Io tanto, cuando transporte bater/as
individuales, asegbrese de que los terminales de la bateria est_n protegidos y bien aisfados de
materiales que puedan hacer contacto y causar un cortocircuito. NOTA: Las baterias de Jones
de M-ION no deben colocarse dentro del equipaje registrado.
RECOMENDACIONES CON RESPECTO AL ALMACENAMIENTO
1. El mejor lugar de almacenamiento es uno que sea fresco y seco fuera de la luz solar directa
y de un exceso de calor o frio.
2. El almacenamiento prolongado no dadar& el paquete de baterias o el cargador.
PROCEDIMIENTO DE CARGA
El cargador est&ndar provisto cargar& una bateria completamente agotada en
aproximadamente 4-5 horas.
1. Enchufe el cargador en un tomacorriente adecuado antes de insertar el paquete de baterias.
2. Introduzca el paquete de baterias en el cargador.
3. La luz LED verde titilar& para indicar que la bateria se est& cargando.
4. La finatizaci6n de ta carga se indica mediante la luz LED verde que permanece encendida
de manera continua. El paquete est& completamente cargado y puede utitizarse en este
momento o dejarse en el cargador.
Despues del uso, recargue las baterias descargadas a la brevedad posible o de Io
contrario la vida _til de las baterias podria acortarse en gran medida. Para obtener la
maxima vida _til de las baterias, no permita que estas se descarguen completamente. Se
recomienda recargar las baterias despues de cada uso.
PERMANENCIA DE LA BATERiA EN EL CARGADOR
El cargador y el paquete de baterias pueden dejarse conectados con la luz LED verde brillando
indefinidamente. El cargador mantendr& el paquete de baterias como nuevo y completamente
cargado.
NOTAS IMPORTANTES SOBRE LA CARGA
1. Obtendr& una duraci6n m_.s protongada y un mejor rendimiento si el paquete de baterias se
carga cuando la temperatura ambiente est,. entre 16 °C y 27 °C (60 °F y 80 °F). NO cargue
el paquete de bateria con una temperatura ambientat por debajo de +4.5 °C
(+40 °F) o por encima de +40.5 °C (+105 °F). Esto es importante y evitar& daSos graves en
el paquete de baterias.
2. El cargador y el paquete de baterias pueden estar calientes al tacto durante ta carga. Esto
es una condici6n normal y no indica un problema. Para facilitar el enfriado del paquete
de baterias despu6s de su uso, evite colocar el cargador o el paquete de baterias en un
ambiente c&tido, como debajo de un toldo de metal o en un remolque sin aislamiento.
3. Si el paquete de baterias no se carga adecuadamente:
a. Revise el tomacorriente enchufando una I&.mpara u otro aparato
b. Verifique si el tomacorriente est& conectado a un interruptor que corta la energia cuando
usted apaga las tuces.
c. Mueva el cargador y el paquete de baterias a un lugar donde la temperatura ambiental sea
de aproximadamente 16 °C a 27 °C (60 °F a 80 °F).
d. Si los problemas de carga persisten, tleve la herramienta, el paquete de baterias y el
cargador al centro de mantenimiento local.
4. Se debe recargar el paquete de baterias cuando no produce energia suficiente para tareas
que previamente realizaba con facilidad. NO CONTINUE utilizando la herramienta en estas
condiciones. Siga el procedimiento de carga. Tambi6n se puede cargar un paquete de
baterias parcialmente usado cuando se desee, sin ningOn efecto negativo sobre 6stas.
5. Se deben mantener tejos de las cavidades del cargador los materiales extraSos de
naturaleza conductora, entre los que se incluyen la lana de acero, el papel de aluminio
o cualquier acumutaci6n de particutas met&licas. Estos son s61oalgunos ejemptos y no
constituyen una lista taxativa. Siempre desenchufe el cargador del tomacorriente cuando
no haya un paquete de baterias en la cavidad. Desenchufe el cargador antes de intentar
limpiarlo.
6. No congele ni sumerja el cargador en agua ni en ningOn otto liquido.
27
Page 28

zLADVERTENClA: Riesgo de descarga electrica. No permita que ningQn lfquido entre
en el cargador. Nunca intente abrir el paquete de baterias por ningbn motivo. Si la caja
protectora de plbstico del paquete de baterias se rompe o agrieta, devu_lvala a un centro de
mantenimiento para su reciclado.
INSTALACION Y EXTRACCION DEL PAQUETE DE BATER[AS DE
LA HERRAMIENTA
zLPRECAUCION: Asegbrese de que el botSn de bloqueo est#
trabado para evitar el accionamiento del interruptor antes de extraer o
instalar la bateria.
PARA INSTALAR EL PAQUETE DE BATER[AS: Inserte el
paquete de baterias en la herramienta hasta que se escuche un ctic,
como se muestra en la Figura A. AsegOrese de que et paquete de
baterias est6 comptetamente asentado y enganchado en su lugar.
PARA EXTRAER EL PAQUETE DE BATER|AS: Oprima el
bot6n de liberaci6n de la baterfa de la parte posterior del paquete de
baterfas y tire del mismo hasta extraerlo de ta herramienta.
INDICADOR DEL ESTADO DE LA CARGA
La baterfa estA equipada con un indicador de estado de la carga. Esto se puede utiNzarpara
visuatizar el nivet actual de carga de la baterfa durante el uso y durante la carga. No indica el
nivel de funcionalidad de la herramienta y puede variar de acuerdo alas piezas del producto, la
temperatura y la aplicaci6n que el usuario le d&
VERIFICACION DEL ESTADO DE CARGA
DURANTE EL USO (FIGURA de laB):carga (B1).
• Oprima el bot6n del indicador de estado
• Los cuatro LED (B2) se encender&n para indicar el porcentaje de
carga de la bateria. Consulte el recuadro en ta Figura B.
• Si la luz LED no enciende, cargue la baterfa.
ENSAIVlBLAJE
INSTALACION DE LA BARRA GU[A Y LA CADENA DE LA
IVlOTOSIERRA
zLPRECAUCION: Cadena filosa, Siempre use guantes de protecci6n cuando manipule la
cadena. La cadena es filosa y puede cortarle cuando no estA funcionando.
_ADVERTENClA: cadena filosa en movimiento. Pars evitar el funcionamiento
accidental, aseg_rese de que la baterfa esta desconectada de la herramienta antes de
realizar las siguientes operaciones. El incumpNmiento de esta instrucci6n puede provocar
graves tesiones personates.
La cadena debe instalarse en la barra y ambas deben instalarse en el cuerpo de la herramienta.
• Coloque la motosierra sobre una superficie firme.
• Gire hacia la izquierda la perilla de btoqueo de ajuste de la barra (7) como se muestra en la
Figura C para quitar la cubierta de ta rueda dentada (6).
Usando guantes de protecci6n, sujete ta cadena de la
motosierra (5) y col6queta alrededor de la barra gufa (4),
asegur&ndose de que los dientes apunten en la direcci6n
correcta (consulte la Figura G).
• AsegQrese de que la cadena est6 bien instatada en la ranura
alrededor de toda la barra guia.
Coloque la cadena de la motosierra alrededor de la rueda
dentada (17) y simutt&neamente aNnee la ranura de la barra
gufa con el perno (18) en la base de la herramienta como se
muestra en la Figura D.
28
Page 29

• Debe girarse hacia la izquierda la peritla tensora hasta que
se detenga. Las flechas en ta cubierta de la rueda dentada y
la peritla tensora deben atinearse antes de volver a colocar
la cubierta. Una vez en su lugar, sujete la barra con firmeza
YAVUelvaa colocar la cubierta de la rueda dentada (6).
seg@rese de que et agujero para el perno del ensamblaje
tensor sin herramientas en la cubierta se alinee con et perno
(18) en la carcasa principal como se muestra en la Figura E.
Gire hacia la derecha la perilla de bloqueo de ajuste de la
barra (7) hasta que est6 ajustada; luego, aftoje la perilta una
vuelta compteta, de manera que la cadena de la motosierra
£ueda tensarse debidamente.
NOTA: Si la cubierta no calza correctamente, revise que la
lengQeta para el ensambtaje tensor sin herramientas en la
barra se alinee con la ranura en el interior de la cubierta de la
rueda dentada.
• Mientras sujeta la peritla de bloqueo de ajuste de la barra
(7), gire hacia la derecha la perilla tensora de la cadena (8)
_ara incrementar la tensi6n como se muestra en la Figura
• Aseg@rese de que la cadena de ta motosierra (5) est6
ajustada atrededor de la barra guia (4).
AJUSTE DE TENSION DE LA CADENA
_PRECAUCI6N: Cadena filosa. Siempre use guantes
de protecci6n cuando manipule la cadena. La cadena es
fitosa y puede cortarle cuando no est& funcionando.
_ADVERTENCIA: cadena filosa en movimiento. Para
evitar el funcionamiento accidentat, aseg_rese de que la
bateria esta desconectada de la herramienta antes de
realizar las siguientes operaciones. El incumplimiento de esta
instrucci6n puede provocar graves lesiones personates.
• Con la motosierra sobre una superficie firme, verifique la tensi6n de la cadena de la
motosierra (5). La tensi6n es la correcta cuando la cadena
vuetve a ajustarse en su lugar despu6s de tirar de ella
separ&ndola 3 mm (1/8 pulg.) de la barra guia (4) con una
leve fuerza del dedo medio y el pulgar como se muestra en
la Figura G. No debe existir "pandeo" entre la barra guia
y la cadena que se encuentra en la parte inferior como se
muestra en ta Figura H.
• Para ajustar la tensi6n de la cadena de la motosierra, afioje
la perilta de btoqueo de ajuste de ta barra (7) y siga las
instrucciones para la "lnstalaci6n de la barra guia y
de la motosierra'.
.oNo sobretense la cadena ya que esto provocar& un desgaste
excesivo y reducir& la vida @tilde ta barra y ta cadena.
• Una vez que la tensi6n de la cadena sea la correcta, apriete
la perilla de btoqueo de ajuste de la barra.
• Cuando la cadena sea nueva, verifique la tensi6n con
frecuencia (despu6s de desenchufar la herramienta) durante
las primeras 2 horas de uso ya que una cadena nueva se
estira levemente.
REEIVlPLAZO DE LA CADENA DE LA
IVlOTOSIERRA
zhPRECAUCI6N: Cadena filosa. Siempre use guantes
de protecci6n cuando manipule la cadena. La cadena es
filosa y puede cortarle cuando no est&.funcionando.
ztADVERTENOIA: Cadena m6vil filosa. Para evitar el funcionamiento accidental,
aseg_rese de que la herramienta este desenchufada antes de reatizar las siguientes
operaciones. El resultado de no hacerlo pueden set lesiones personales graves.
29
Page 30

o
o
o
o
o
o
Gire hacia la izquierda la perilla de bloqueo de ajuste de la barra (7) para reducir la tensi6n
de la cadena.
Quite la cubierta de la rueda dentada (6) como se describe
en la secci6n "lnstalaci6n de la barra guia y la cadena de la
motosierra'.
Levante la cadena de la motosierra (5) desgastada fuera de
la ranura en la barra guia (4).
Coloque la cadena nueva en la ranura de la barra guia,
asegur_.ndose de que los dientes de la cadena apunten
en ta direcci6n correcta haciendo coincidir la flecha en ta
cadena con el gr&fico en la cubierta de la rueda dentada (6)
como se muestra en la FJgura I.
Siga las instrucciones para la "lnstalaci6n de la barra guia y
la cadena de la motosierra'.
Barra y la cadena de reemptazo est&n disponibtes de mayoria outlets Craftsman ®. Cadena
de reemplazo uso Craftsman ®,servicio nOmero de parte 90609786 y reemplazo de 12" de la
barra, nQmero de pieza de servicio 90609781.
SISTEIVlADEAUTOLUBRICACI()N
Esta motosierra est,. equipada con un sistema de autolubricaci6n que mantiene la cadena
de la motosierra y la barra guia constantemente lubricadas. El indicador del nivel de aceite
(16) muestra el nivel del aceite en la motosierra. Si el nivel de aceite es inferior a un cuarto,
extraiga la bateria de la motosierra y llene con el tipo correcto de aceite
NOTA: Use una barra de alta calidad y aceite para cadena apropiada y lubricaci6n de la
barra de cadena. Como un sustituto temporal, puede utitizarse un detergente sin aceite de
motor SAE30.EI uso de una barra de base vegetal y aceite de cadena se recomienda al podar
&rboles. Aceite minera! no se recomienda porque puede dadar los &rboles. Nunca utitice aceite
o aceite muy espeso. Estos pueden dadar su sierra de cadena.
LLENAD0DELDEP(_SIT0DEACEITE
• Quite la tapa del aceite (13) y Itene el dep6sito con el aceite para cadena recomendado hasta
que el nivel de aceite haya atcanzado la parte superior del indicador del nivel de aceite (14).
• Vuelva a colocar la tapa det aceite.
• Peri6dicamente, apague la motosierra y verifique el indicador del nivel de aceite para
asegurarse de que la barra y la cadena se lubrican debidamente.
TRANSPORTE DE LA MOTOSIERRA
• Siempre extraiga la bateria de la herramienta y cubra la
barra guia (4) con la funda (9) (FJgura J) cuando transporte
la motosierra.
USO DE LA MOTOSIERRA
z_ADVERTENCIA: Lea y comprenda todas las instrucciones. El incumplimiento de
cualquiera de las instrucciones enumeradas a continuaci6n puede provocar una descarga
el6ctrica, un incendio y/o lesiones personales graves.
• Protejase del retroceso; este puede provocar lesiones graves o la muerte. Consulte
"Prot6jase contra el retroceso" en las Instrucciones de seguridad importantes, para evitar el
riesgo det retroceso.
• No ae estire. No corte pot encima de la altura del pecho. Aseg_rese de estar parado
correctamente. Mantenga sus pies separados. Distribuya su peso en forma uniforme sobre
ambos pies.
• Sujete firmemente el mango delantero (11) con au mano Jzquierda y el mango trasero
(10) con su mano derecha de modo que su cuerpo est6 a la izquierda de la barra guia.
• No aujete la motosJerra pot el protector delantero para la mano (3). Mantenga el codo del
brazo izquierdo fijo para que el brazo izquierdo est_ derecho a fin de resistir un retroceso.
z_ADVERTENCIA: Nunca sujete la motosJerra con las manos en posJci6n cruzada
(mano izquierda en el mango trasero y mano derecha en el mango delantero).
z_ADVERTENCIA: Nunca permJta que alguna parte del cuerpo est6 en linea con la
barra guia (4) al utitizar la motosierra.
3o
Page 31

• Nunca la utilice mientras esta en un arbol, en alguna posici6n complicada o en una
escalera u otra superficie inestable. Puede perder el control de la motosierra, la que le
provocar& lesiones graves.
• Mantenga la motosierra funcionando a maxima velocidad todo el tiernpo que este
cortando.
• Permita que la cadena reatice eJcorte pot usted. Solo aplique una leve presi6n. No
aplique presi6n sobre la motosierra al final del corte.
ENCENDIDO/APAGADO
• Siempre asegQrese de estar parado correctamente y sujete
la motosierra firmemente con ambas manos, con el putgar y
los dedos alrededor de ambos mangos.
• Para encender la herramienta, oprima el bot6n de btoqueo
en apagado (2) y apriete el interruptor de gatillo (1) como
se muestra en la Figura K. (Una vez que la herramienta
est6 funcionando usted puede soltar el bot6n de bloqueo en
apagado).
• Para apagar la herramienta, suelte el interruptor de gatitlo.
TECNICASDECORTECOMUNES
TALA
La tala es el proceso de cortar un &rbol. AsegQrese de que la bateria est6 totalmente cargada
antes de talar un &rbot para que pueda terminar en una sola carga. No tale &rboles cuando
haya vientos fuertes.
_ADVERTENCIA: La tala puede provocar lesiones. Solo debe realizarla una persona
capacitada.
• (Figura L) Debe ptanificarse y despejarse una
via de retirada segQn sea necesario antes
de iniciar los cortes. La via de retirada debe
extenderse hacia atr&s yen diagonal con
respecto a la parte posterior de la linea de caida
prevista.
• Antes de iniciar la tala, tenga en cuenta la
inclinaci6n natural del &rbol, la ubicaci6n de las
ramas m&s grandes y ta direcci6n del viento para
juzgar hacia d6nde caer& el &rbol. Tenga a mano
cudas (de madera, pt&stico o aluminio) y un
mazo pesado.
Retire la suciedad, piedras, cortezas sueltas,
clavos, grapas y alambre det &rbol donde se
reatizar&n los cortes de tala.
• (Figura M) Muesca de entallado: haga
una muesca de 1/3 del di&metro det &rbol,
perpendicular a la direcci6n de caida. Primero
reatice el corte de entallado horizontal inferior.
Esto ayudar& a evitar el peltizcamiento de la
cadena de la motosierra o de la barra guia al
realizar la segunda muesca.
• (Figura M) Corte auxiliar de tala: haga el corte
auxiliar de tala al menos 51 mm (2 pulg.) m&s
RETIRADA
45°X
DIRECCION
DE LA
CAiDA
-mi_-
ARBOL
®
DIRECCION CORTE DE
DE DESTRONQUE
LA CAiDA
MUESCA
___ 5 cm (2
T- PULGADAS)
BISAGRA
alto que el corte de entaltado horizontal. Mantenga el corte auxiliar de tala paralelo al
corte de entatlado horizontal. Realice el corte auxiliar de tala de manera que haya madera
suficiente para que funcione como una bisagra. La madera de bisagra evita que el &rbol gire
y caiga en la direcci6n incorrecta. No corte la bisagra.
• (Figura M) A medida que se acerca el corte de tata a la bisagra el &rbol deberia comenzar
a caerse. Si existe alguna posibilidad de que el &rbol no caiga en la direcci6n deseada o se
balancee hacia atr&s y trabe la cadena de la sierra, detenga et corte antes de que el corte
de tala se complete y utilice cudas para abrir et corte y tirar el &rbol hacia a linea de caida
deseada. Cuando el &rbol comience a caer retire la sierra de cadena del corte, detenga
el motor, deposite la sierra de cadena en et piso y luego utilice el trayecto de retirada
planificado. Est6 atento a la caida de ramas y tambi6n mire cuidadosamente donde camina.
31
Page 32

DESRAIVlADO
Eliminaci6n de las ramas de un &rbol caido
reatice un desramado, deje las ramas inferiores
m_.sgrandes para soportar el tronco separado det
piso. Elimine las ramas pequeSas en un solo corte.
Las ramas bajo tensi6n deben cortarse desde
abajo hacia arriba para evitar que la motosierra se
trabe como se muestra en la Figura N.
Recorte las ramas desde el lado opuesto
manteniendo et tronco del &rbol entre usted y la motosierra. Nunca realice cortes con la
motosierra entre las piernas ni se monte a horcajadas sobre la rama que cortar&.
ASERRADO
zLADVERTENCIA: Se recornienda que los usuarios de prirnera vez deben practicar
el corte en un caballo de la sierra.
El aserrado es el corte de un &rbol talado o tronco en trozos. La forma del corte depende de
la manera en que se apoya el tronco. Utilice un
caballete (Figura O) siempre que sea posibte.
Siempre inicie un corte con la cadena funcionando
a velocidad m&xima.
• Coloque la pQa inferior (19) de la motosierra
detr&s del &rea del corte iniciat como se muestra
en la Figura P.
• Encienda la motosierra y luego gire la cadena y
la barra hacia abajo en el &rbot, utilizando la pQa
como una bisagra.
• Una vez que la motosierra alcance un &ngulo de
45 grados, vuelva a nivelar la motosierra y repita
los pasos hasta completar el corte.
• Cuando el &rbol est6 apoyado a todo Io largo,
realice un corte desde la parte superior (aserrado
superior), pero evite cortar en la tierra ya que
esto desafitar& su motosierra r_.pidamente.
• (Figura Q) Cuando esta apoyado sobre un
extremo
Primero, corte 1/3 det di&metro de la parte inferior
(underbuck). Luego, realice el corte de acabado
cortando hacia arriba para Ilegar al primer corte.
• (Figura R) Cuando esta apoyado sobre ambos
extreRqos
Primero, corte 1/3 hacia abajo desde la parte
superior Despu6s, realice el corte de acabado
cortando hacia abajo los 2/3 inferiores para Ilegar
at primer corte.
• Cuando esta en una pendiente
Siempre p&rese cuesta arriba det tronco. Cuando
"corte" para mantener un control total libere la
presi6n de corte cerca del final del corte sin
relajar la sujeci6n de los mangos de la sierra
de cadena. No permita que la sierra entre en
contacto con el piso. Despu6s de finalizar el
corte, espere que la cadena de la sierra se
detenga antes de mover la sierra de cadena.
Siempre detenga el motor antes de trasladarse de
un &rbol a otro.
CUIDADO Y MANTENIMIENTO
Para limpiar la herramienta, s61o utilice jab6n suave
y un paso hQmedo. No utitice solventes para limpiar
la cubierta pl&stica de la sierra. Nunca permita que
penetre liquido dentro de la herramienta ni sumerja
ninguna de las piezas en un liquido.
CORTEDELA PARTE
SUPERIORDELTRONCO
(OVERBUCK)PEROEVITE
CORTARLA TIERRA
®
EL2d0 C0RTE DE LA PARTE
SUPERIOR DEL TRONC0
(OVERBUCK) (2/3 DEL
DIAMETRO) A FIN DE LLEGAR
AL ler CORTE (PARA EVITAR
OUE LA MADERA MUERDA LA
CADENA)
ELler CORTEDELA PARTE
IINFERIORDELTRONCO(1/3 DEL
DI_,METRO)PARAEVITARLAS
ASTILLAS
EL ler CORTE DE LA
PARTE SUPERIOR
DE,LTRONCO (1/3 DEL
DIAMETRO) PARA EVlTAR
LAS ASTI LLAS
EL 2do CORTEDE LA
PARTE INFERIOR DEL
TRONCO (U,NDERBUCK)
(2/3 DEL DIAMETRO) A
FIN DE LLEGAR AL let
CORTE (PARA EVITAR
QUE LA MADERA
MUERDA LA CADENA)
32
Page 33

IMPORTANTE: para asegurar la SEGURIDAD y la CONFIABILIDAD det producto, las
reparaciones, el mantenimiento y los ajustes se deben realizar en los centros de mantenimiento
autorizados o con otro personal de mantenimiento calificado, utilizando siempre piezas de
repuesto id6nticas.
El mantenimiento regular asegura una vida larga y eficaz para su sierra de cadena.
CADENA Y BARRA
Despu6s de varias horas de uso, extraiga la barra guia y la cadena y limpielas a fondo utilizando
un cepilto de cerdas suaves. AsegQrese de que el orificio de lubricaci6n est6 libre de residuos
AFILADO DE LA CADENA DE LA SIERRA
z_PRECAUCl6N" cadena filosa. Siempre utilice guantes de protecci6n cuando
maneje la cadena. La cadena es filosa y puede cortarlo cuando no est& en funcionamiento.
zLADVERTENClA: cadena filosa en rnovimiento. Para evitar el funcionarniento
accidental, aseg_rese de que la bateria esta desconectada de la herrarnienta antes de
realizar las siguientes operaciones. El incumplimiento de esta instrucci6n puede provocar
graves lesiones personales.
NOTA: las cuchillas te quitar& inmediatamente si tocan el suelo o un clavo durante el corte.
Para obtener el mejor rendimiento posible de lacadena
de la sierra es importante mantener los dientes de la
cadena filosos. Siga estos consejos Qtiles para el afilado
de la cadena de sierra apropiado:
1.Para obtener mejores resuttados utilice una lima
de 4,5 mm y un sujetador de lima o una guia de
limado para afitar su cadena. Esto seguramente
har& que siempre obtenga los &ngulos de afilado
correctos.
2.Cotoque el sujetador de lima en forma plana
sobre la parte superior de la ptaca y del calibre de
profundidad de la cortadora (20).
3.(Figura S) Mantenga la linea del &nguto de limado
de la ptaca superior (20) de 30° de su guia de
limado paralela a su cadena (lima a 60° de la
cadena vista desde arriba).
4.Afile las cortadoras primero det lado de la cadena.
Lime desde la cara interna de cada cortadora
hacia afuera. Despu6s gire la sierra y repita los
procesos (2,3,4) para las cortadoras del otro lado
de la cadena.
NOTA: Utitice una lima ptana para limar las partes
superiores de los rastrilladores (21) (parte del
eslab6n de la cadena delante del cortador) de
manera que est6n a alrededor de 0,64 mm (0,025
putg.) por debajo de las puntas de los cortadores
como se muestra en la Figura T.
5.(Figura U) Mantenga todas las longitudes de la
cortadora iguales.
6.Si las superficies cromadas de las ptacas
@
.025 in.
.635mm
O
A A=B B
superiores o taterales (22) presentan daSos, lime otra vez hasta eliminar el daSo.
z_PRECAUO_(_N" despu6s del limado, la cortadora estar& filosa, tenga extremo cuidado
durante este proceso.
NOTA: cada vez que se afita la cadena, pierde algo de las cuatidades de bajo retroceso y se
debe tener extremo cuidado. No se recomienda afilar la cadena m&s de cuatro veces.
33
Page 34

ACCESORIOS
zLADVERTENClA: el uso de accesorios no recomendados en este manual puede ser
peligroso.
• Barra y la cadena de reemplazo est&n disponibtes de mayoria outlets Craftsman c_.Cadena
de reemplazo uso Craftsman _, servicio nQmero de parte 90609786 y reemplazo de 12" de la
barra, nQmero de pieza de servicio 90609781.
El uso de accesorios no recomendados en este manual ouede ser petigroso.
EL SELLO RBRC TM
EL SELLO RBRC TM (Corporaci6n de reciclado de baterias recargables) que se
encuentra en la bateria de iones de litio (o paquete de baterias) indica que los
costos de recictar la bateria (o el paquete de baterias) al final de su vida Qtil ya
fueron pagados por Craftsman_L
RBRC TM en cooperaci6n con Craftsman <°_y otros usuarios de baterias, ha establecido
programas en los Estados Unidos para facilitar la recolecci6n de baterias de iones de litio
agotadas. Ayude a proteger nuestro medio ambiente y a conservar los recursos naturales:
devuelva las baterias de iones de litio agotadas a un centro de mantenimiento autorizado
de Craftsman _ o a un comerciante minorista local para que se recicten. Tambi6n puede
comunicarse con el centro local de reciclado para obtener informaci6n sobre d6nde dejar las
baterias agotadas. RBRC TM es una marca comercial registrada de la Corporaci6n de reciclado
de baterias recargables.
Este aparato digital Clase B cumple con la norma canadiense ICES-003.
Este mecanismo cumpte con ta parte 15 de las normas de la Comisi6n Federal de
Comunicaciones de Estados Unidos (FCC). La operaci6n est& sujeta alas dos condiciones
siguientes: (1) Este mecanismo posibtemente no cause interferencia perjudicial; y (2) este
mecanismo puede aceptar cuatquier interferencia recibida, incluso interferencia que podria
provocar una operaci6n no deseada.
NOTA: Este equipo ha sido probado y se encontr6 que cumple con los limites para dispositivo
digital Clase B, segQn la parte 15 de las normas de la FCC. Estos limites est&n disefiados
para brindar protecci6n razonable contra interferencia perjudiciai en una instalaci6n residencial.
Este equipo genera, usa y puede irradiar energia en frecuencia de radio y, si no se instala
y se usa de acuerdo con tas instrucciones, puede provocar interferencia perjudicial en las
comunicaciones de radio. Sin embargo, no hay garantia de que la interferencia no ocurra en
una instalaci6n en particular. Si este equipo provoca interferencia perjudicial en la recepci6n de
radio o televisi6n, Io que se puede determinar at apagar y encender el equipo, el usuario debe
tratar de corregir la interferencia mediante una o m_.s de las siguientes medidas:
• Cambiar la orientaci6n o la ubicaci6n de la antena de recepci6n.
• Aumentar la separaci6n entre el equipo y el receptor.
• Conectar el equipo a un tomacorriente sobre un circuito diferente de aquel al que est&
conectado el receptor.
• Consuitar at vendedor o pedir la ayuda de un t6cnico en radio y televisi6n con
experiencia.
Los cambios o tas modificaciones que se le realicen a esta unidad sin aprobaci6n expresa del
tercero responsable det cumptimiento pueden anular la autorizaci6n del usuario para operar el
equipo. Este aparato digital de la clase B se conforma con ICES-003 canadiense.
34
Page 35

DETECCI()N DE PROBLEMAS
Problema
• La herramienta
no enciende.
• La unidad no
carga.
o
o
o
Causa posible
La bateria no est& bien
instalada.
La bateria no carga.
No actOa el bot6n de
desbloqueo.
La bateria no est& insertada en
el cargador.
SolucJ6n posible
• Verifique la instalaci6n de la
bateria.
• Verifique los requisitos de carga
de la bateria.
• Presione el bot6n de bloqueo/
active el disparador.
• La tensi6n de la cadena no es la
correcta.
• La cadena debe reemplazarse.
Inserte la bateria en el cargador
hasta que se encienda la luz
verde (LED).
Cargue hasta 5 horas si la
bateria est& totalmente agotada.
• Barra/cadena • La cadena est& demasiado • Consulte la secci6n "Ajuste de
sobrecalentada, ajustada, tensi6n de la cadena".
• La cadena est& • Necesita lubricaci6n. • Consulte la secci6n "lubricaci6n
suelta. • La tensi6n de la cadena no es la de la cadena'.
correcta. • Consulte la secci6n "Ajuste de
tensi6n de la cadena'.
• Mala calidad de •
corte.
Consulte la secci6n "Ajuste de
tensi6n de la cadena".
Nora: la tensi6n en demasia
produce un desgaste excesivo y
una reducci6n en la vida Qtil de
la barra y la cadena. Lubrique la
cadena antes de cada corte.
Consulte la secci6n "reemplazo
de la cadena".
• La unidad • La cadena est& instalada al • Consulte las secciones sobre
funciona pero no rev_s, la instalaci6n y el retiro de la
corta, cadena.
o
o
• La unidad se
detiene durante el
corte.
• Se agot6 la bateria de Jonesde
litio.
• Se excedi6 el limite de vottaje de
protecci6n.
• la bateria de iones de litio
demasiado caliente.
• La unidad no se
lubrica.
Se vaci6 el dep6sito de aceite.
Se obstruy6 el orificio de
lubricaci6n en la barra guia.
Cargue la bateria.
Se est,. forzando la unidad.
Vuelva a arrancarla y aplique
menos presi6n.
Deje que la bateria de iones de
litio se enfrie durante 30 minutos
antes de proceder.
Rellene el dep6sito.
Limpie la barra guia, la rueda
dentada y lacubierta de la rueda
dentada. Consulte la secci6n
"Cuidado y mantenimiento".
35
Page 36

®
Product questions or problems?
1-888-3 1-45
Customer Care Hot Line
Get answers to questions, troubleshoot problems,
order parts, or schedule repair service.
Para respuestas a preguntas o problemas, y ordenar
TM
(R_Registered Trademark / Trademark of KCD tP, LLC in the United States, or Sears Brands, LLC in other countries
TM
(R)Marca Registrada / Marca de Fabrica de KCD IP, LLC en Estados Unidos, o Sears Brands, LLC in otros paises
36
 Loading...