

Craftsman 944.360300 Owner's Manual
Model No.
944.360300
CAUTION:
Read and follow all
Safety Rules and Instructions
before operating this equipment
®
Owner’s Manual
6.75 HORSEPOWER
22" REAR DISCHARGE
POWER PROPELLED
ROTARY LAWN MOWER
• Safety
• Assembly
• Operation
• Maintenance
• Repair Parts
Sears Canada, Inc., T oronto, Ontario M5B 2B8
172447 02.11.00 VB Printed in U.S.A.
NEED A PART?
SEARS HAS ACCESS TO OVER 800,000 PARTS
WHETHER IT'S A SPARK PLUG OR LAWNMOWER BLADE.
SEARS PARTS AND SERVICE CAN SUPPLY YOU WITH
TOP QUALITY REPAIR PARTS FOR ALL YOUR PRODUCTS.
JUST CALL:
1-800-4MY-HOME
2
Warranty ...............................................2
Safety Rules ......................................... 2
Assembly ..............................................4
Operation .............................................. 6
Maintenance Schedule ........................ 10
Maintenance.........................................10
Product Specifications .......................... 11
Service and Adjustments ...................... 1 4
Storage .................................................1 5
Troubleshooting ................................... 17
Repair Parts .......................................... 1 9
Parts Ordering ......................Back Cover
SAFETY RULES
WARRANTY
TABLE OF CONTENTS
TRAINING:
• Read this operator’s manual carefully.
Become familiar with the controls and
know how to operate your mower
properly. Learn how to quickly stop
mower.
• Do not allow children to use your mower.
Never allow adults to use mower without
proper instructions.
• Keep the area of operation clear of all
persons, especially small children and
pets.
• Use mower only as the manufacturer
intended and as described in this
manual.
• Do not operate mower if it has been
dropped or damaged in any manner.
Always have damage repaired before
using your mower.
• Do not use accessory attachments that
are not recommended by the manufacturer. Use of such attachments may be
hazardous.
• The blade turns when the engine is
running.
PREPARATION:
• Always thoroughly check the area to be
mowed and clear it of all stones, sticks,
wires, bones, and other foreign objects.
These objects will be thrown by the
blade and can cause severe injury.
LIMITED TWO (2) YEAR WARRANTY ON CRAFTSMAN POWER MOWER
For two (2) years from date of purchase Sears Canada, Inc. will repair or replace at Sears
option free of charge parts which are defective as a result of material or workmanship.
COMMERCIAL OR RENTAL USE:
Warranty on Power Mower (Gas) will be ninety (90) days from date of purchase if used for
commercial or rental purposes.
This Warranty does
NOT cover:
1. Pre-delivery set-up.
2. Expendable items which become worn during normal use, such as rotary mower blades,
blade adapters, belts, filters and spark plugs.
3. Repairs necessary because of operator abuse or negligence, including bent crankshafts
and the failure to operate and maintain the equipment according to the instructions contained in the Owner’s Manual.
Warranty service is available by returning the Craftsman Power Mower to the nearest Sears
Service Centre/Department in Canada. This warranty applies only while this product is in use
in Canada.
This warranty is in addition to any statutory warranty and does not exclude or limit legal rights
you may have but shall run concurrently with applicable provincial legislation. Furthermore,
some provinces do NOT allow limitation on how long an implied warranty will last so the above
limitations may not apply to you.
SEARS CANADA, INC., TORONTO, ONT ARIO M5B 2B8
Safety standards require operator
presence controls to minimize the
risk of injury. Your unit is equipped
with such controls. Do not attempt to
defeat the function of the operator
presence controls under any
circumstances.
27
MODEL NO. 143.006700
CRAFTSMAN 4-CYCLE ENGINE
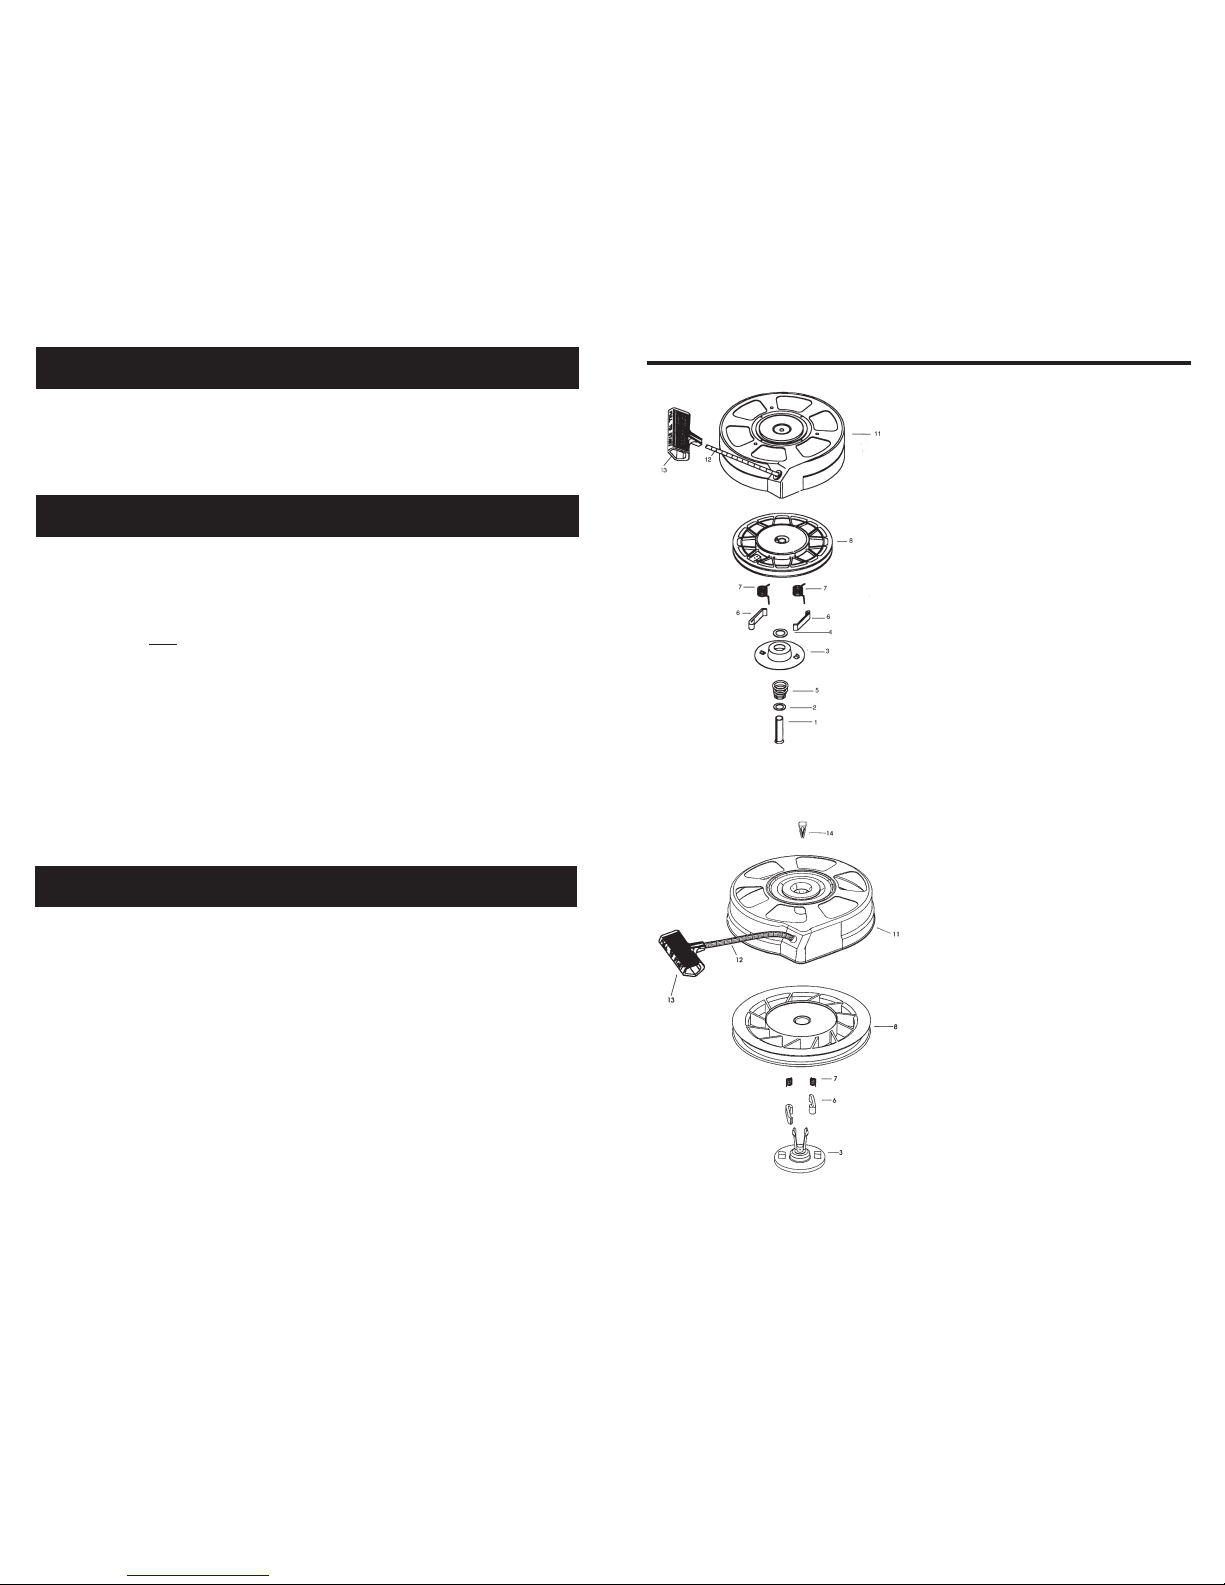
KEY PART
NO. NO. DESCRIPTION
— — 590702 Recoil Starter
1 590599A Spring Pin (Incl. 4)
2 590600 Washer
3 590696 Retainer
4 590601 Washer
5 590697 Brake Spring
6 590698A Starter Dog
7 590699 Dog Spring
8 590700 Pulley & Rewind Spring Ass’y.
11 590703 Starter Housing Ass’y. (40
degree grommet)
12 590535 Starter Rope
( 98" X 9/64" dia.)
13 590701 Starter Handle
KEY PART
NO. NO. DESCRIPTION
— — 590739 Rewind Starter
3 590740 Retainer
6 590616 Starter Dog
7 590617 Dog Spring
8 590618A Pulley & Rewind Spring Ass’y
11 590638 Starter Housing Ass’y
(40 degree grommet)
12 590535 Starter Rope
(Length 98" x 9/64" dia.)
13 590701 Starter Handle
14 590760 Spring Clip
3
• Always wear safety glasses or eye
shields when starting and while using
your mower.
• Dress properly. Do not operate mower
when barefoot or wearing open sandals.
Wear only solid shoes with good traction
when mowing.
• Check fuel tank before starting engine.
Do not fill gas tank indoors, when the
engine is running or when the engine is
hot. Allow the engine to cool for several
minutes before filling the gas tank. Clean
off any spilled gasoline before starting
the engine.
• Always make wheel height adjustments
before starting your mower. Never
attempt to do this while the engine is
running.
• Mow only in daylight or good artificial
light.
OPERATION:
• Keep your eyes and mind on your
mower and the area being cut. Do not let
other interests distract you.
• Do not mow wet or slippery grass. Never
run while operating your mower. Always
be sure of your footing — keep a firm
hold on the handles and walk.
• Do not put hands or feet near or under
rotating parts. Keep clear of the discharge opening at all times.
• Always stop the engine whenever you
leave or are not using your mower, or
before crossing driveways, walks, roads,
and any gravel—covered areas.
• Never direct discharge of material
toward bystanders nor allow anyone
near the mower while you are operating
it.
• Before cleaning, inspecting, or repairing
your mower, stop the engine and make
absolutely sure the blade and all moving
parts have stopped. Then disconnect the
spark plug wire and keep it away from
the spark plug to prevent accidental
starting.
• Do not continue to run your mower if you
hit a foreign object. Follow the procedure
outlined above, then repair any damage
before restarting and operating you
mower.
• Do not change the governor settings or
overspeed the engine. Engine damage
or personal injury may result.
• Do not operate your mower if it vibrates
abnormally. Excessive vibration is an
indication of damage; stop the engine,
safely check for the cause of vibration
and repair as required.
• Do not run the engine indoors. Exhaust
fumes are dangerous.
• Never cut grass by pulling the mower
towards you. Mow across the face of
slopes, never up and down or you
might lose your footing. Do not mow
excessively steep slopes. Use caution
when operating the mower on uneven
terrain or when changing directions —
maintain good footing.
• Never operate your mower without
proper guards, plates, grass catcher or
other safety devices in place.
MAINTENANCE AND STORAGE:
• Check the blade and the engine
mounting bolts often to be sure they are
tightened properly.
• Check all bolts, nuts and screws at
frequent intervals for proper tightness to
be sure mower is in safe working
condition.
• Keep all safety devices in place and
working.
• To reduce fire hazard, keep the engine
free of grass, leaves or excessive
grease and oil.
• Check grass catcher often for deterioration and wear and replace worn bags.
Use only replacement bags that are
recommended by and comply with
specifications of the manufacturer of
your mower.
• Always keep a sharp blade on your
mower.
• Allow engine to cool before storing in
any enclosure.
• Never store mower with fuel in the tank
inside a building where fumes may
reach an open flame or an ignition
source such as a hot water heater,
space heater, clothes dryer, etc.
Look for this symbol to point out
important safety precautions. It means
CAUTION!!! BECOME ALERT!!! YOUR
SAFETY IS INVOL VED.
CAUTION: Always disconnect spark
plug wire and place wire where it cannot
contact spark plug in order to prevent
accidental starting when setting up,
transporting, adjusting or making repairs.
26
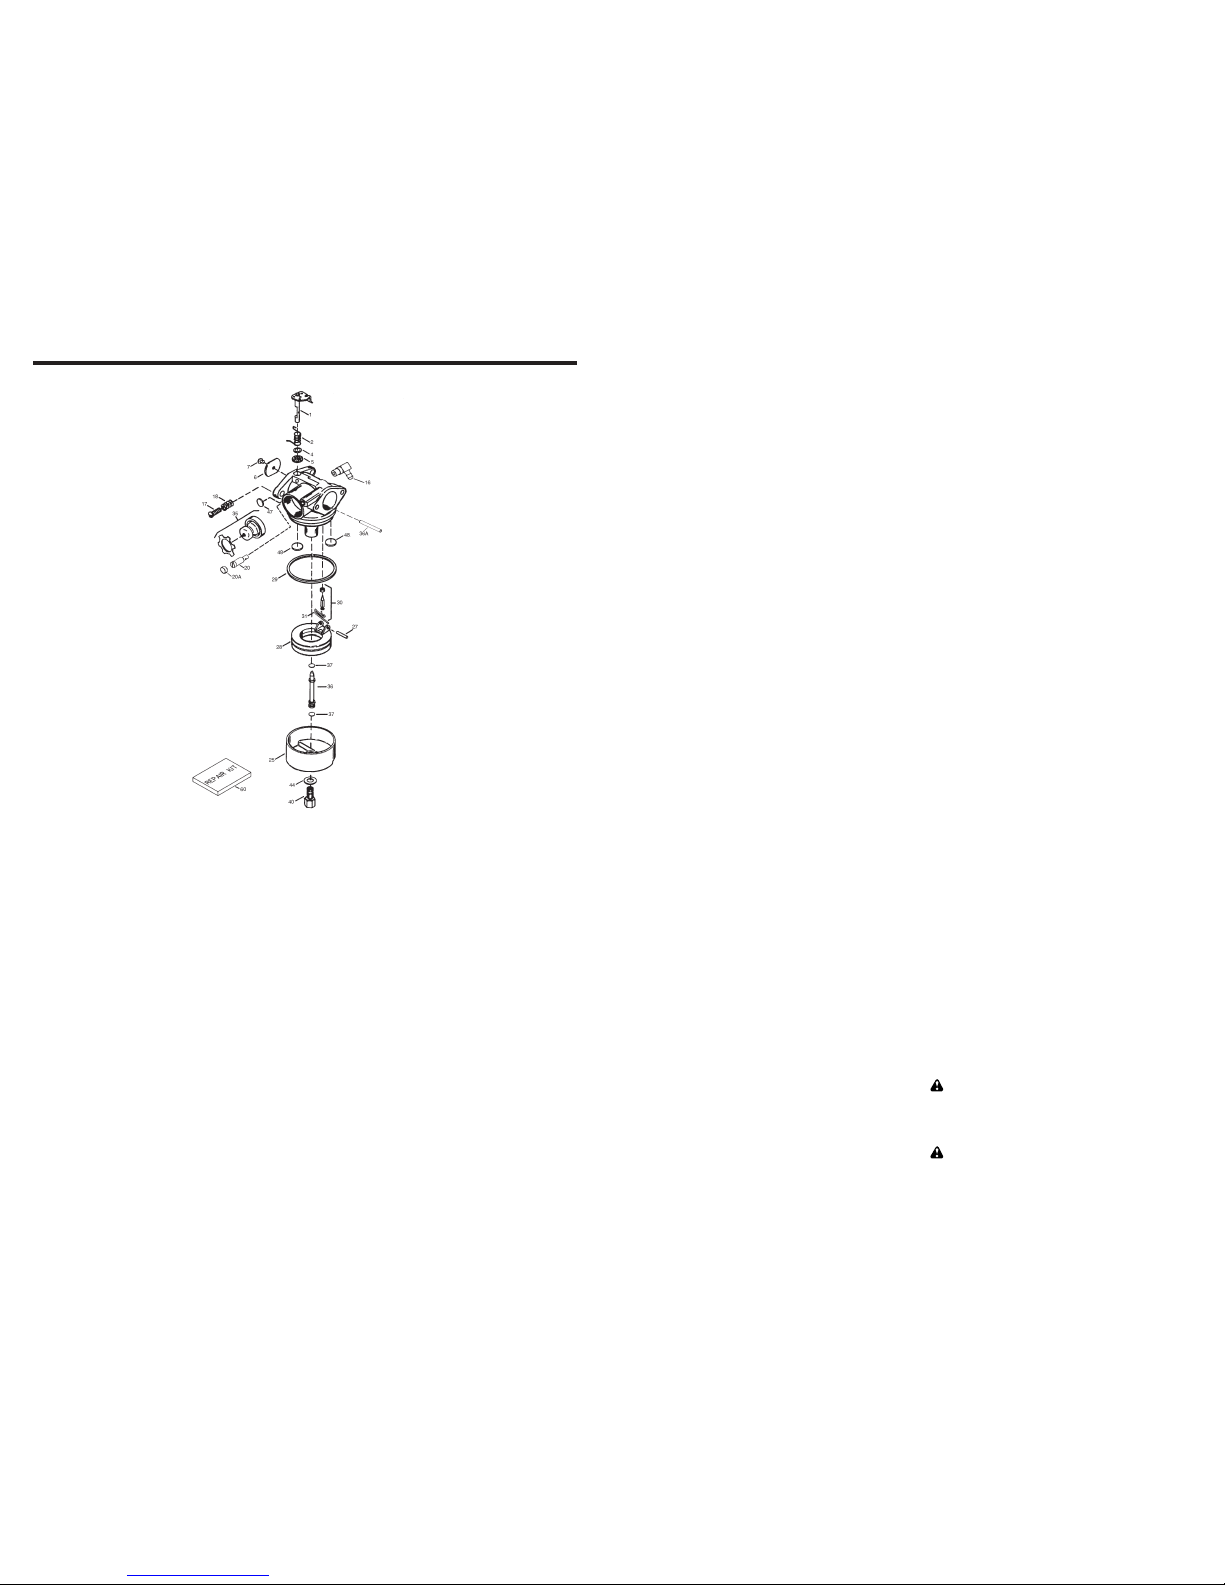
MODEL NO. 143.006700
CRAFTSMAN 4-CYCLE ENGINE
KEY PART
NO. NO. DESCRIPTION
— — 640271 Carburetor (Incl. 184 of Engine Parts List)
1 631615 Throttle Shaft & Lever Assembly
2 631767 Throttle Return Spring
4 631184 * Dust Seal Washer
5 631183 * Dust Seal (Throttle)
6 640070 Throttle Shutter
7 650506 * Shutter Screw
16 631807 Fuel Fitting
17 651025 Throttle Crack Screw/Idle Speed Screw
18 630766 Tension Spring
20 640027 Idle Restrictor Screw
20A 640200 Idle Restrictor Scrwe Cap (Black)
25 631867 Float Bowl
27 631024 * Float Shaft
28 632019 Float
29 631028 * Float Bowl “O” Ring
30 631021 * Inlet Needle, Seat, & Clip (Incl. 31)
31 631022 Spring Clip
35 640259 Primer Bulb/Retainer Ring
36 640080 Main Nozzle Tube
36A 632766 Carburetor Tube
37 632547 * “O” Ring, Main Nozzle Tube
40 640030 High Speed Bowl Nut
44 27110A * Bowl Nut Washer
47 630748 * Welch Plug, Idle Mixture Well
48 631027 * Welch Plug, Atmospheric Vent
60 632760B Repair kit (Incl. Items Marked *)

4
Mowing
position
Lift up
Lift up
Lower handle
Operator presence control
bar
Upper handle
ASSEMBLY
Read these instructions and this manual in its
entirety before you attempt to assemble or
operate your new lawn mower.
IMPORTANT: This lawn mower is shipped
WITHOUT OIL OR GASOLINE in the engine.
Your new lawn mower has been assembled
at the factory with the exception of those parts
left unassembled for shipping purposes. All
parts such as nuts, washers, bolts, etc.,
necessary to complete the assembly have
been placed in the parts bag. To ensure safe
and proper operation of your lawn mower, all
parts and hardware you assemble must be
tightened securely. Use the correct tools as
necessary to ensure proper tightness.
TO REMOVE LAWN MOWER FROM
CARTON
• Remove loose parts included with mower.
• Cut down two end corners of carton and
lay end panel down flat.
• Remove all packing materials except
padding between upper and lower handle
and padding holding operator presence
control bar to upper handle.
• Roll lawn mower out of carton and check
carton thoroughly for additional loose parts.
HOW TO SET UP YOUR LA WN MOWER
TO UNFOLD HANDLE
IMPORTANT: Unfold handles carefully so as
not to pinch or damage control cables.
• Raise handles until lower handle section
locks into place in mowing position.
• Remove protective padding, raise upper
handle section into place on lower handle
and tighten both handle knobs.
• Remove handle padding holding operator
presence control bar to upper handle.
• Your lawn mower handle can be adjusted
for your mowing comfort. Refer to "Adjust
Handle" in the Service and Adjustment
section of this manual.
25
MODEL NO. 143.006700
CRAFTSMAN 4-CYCLE ENGINE
KEY PART
NO. NO. DESCRIPTION
1 37465 Cylinder (Incl. 2 & 20)
2 26727 Dowel Pin
6 33734 Breather Element
7 36557 Breather Ass’y. (Incl. 6 & 12A)
12 36775 Breather Tube
12A 36558 Breather Cover & Tube (Incl.
12B)
12B 36694 Breather Tube Elbow
14 28277 Washer
15 30589 Governor Rod (Incl. 14)
16 34839A Governor Lever
17 31335 Governor Lever Clamp
18 651018 Screw, Torx T-15, 8-32 x 19/
64"
19 36281 Extension Spring
20 32600 Oil Seal
30 37464 Crankshaft
40 40027 Piston, Pin & Ring Set (Std.)
41 40042 Piston & Pin Ass’y. (Std.) (Incl.
43)
42 40006 Ring Set (Std.)
43 20381 Piston Pin Retaining Ring
45 36777 Connecting Rod Ass’y. (Incl.
46)
46 32610A Connecting Rod Bolt
48 27241 Valve Lifter
50 37460 Camshaft (MCR)
52 29914 Oil Pump Ass’y.
69 35261 * Mounting Flange Gasket
70 34311E Mounting Flange (Incl. 72 thru
83)
72 30572 Oil Drain Plug (Incl. 73)
73 28833 Drain Plug Gasket
75 27897 Oil Seal
80 30574A Governor Shaft
81 30590A Washer
82 30591 Governor Gear Ass’y. (Incl. 81)
83 30588A Governor Spool
86 650488 Screw, 1/4-20 x 1-1/4"
89 611004 Flywheel Key
90 611112 Flywheel
92 650815 Belleville Washer
93 650816 Flywheel Nut
100 34443B Solid State Ignition
101 610118 Spark Plug Cover
103 651007 Screw, Torx T-15, 10-24 x 15/
16"
110 37047 Ground Wire
119 36787 * Cylinder Head Gasket
120 36825 Cylinder Head
125 36779 Exhaust Valve (Std.) (Incl.
151)
36780 Exhaust Valve (1/32" OS)
(Incl. 151)
126 36782 Intake Valve (1/32" OS) (Incl.
151)
37289 Intake Valve (Std.) (Incl. 151)
13 0 6 021 A Screw, 5/16-18 x 1-1/2"
135 35395 Resistor Spark Plug (RJ19LM)
150 31672 Valve Spring
151 31673 Valve Spring Cap
151A 40017 Intake Valve Seal
169 36783 * Valve Cover Gasket
172 36784 Valve Cover
KEY PART
NO. NO. DESCRIPTION
174 30200 Screw, 10-24 x 9/16"
178 29752 Nut & Lock Washer, 1/4-28
182 6201 Screw, 1/4-28 x 7/8"
184 26756 * Carburetor To Intake Pipe
Gasket
185 37466 Intake Pipe
186 32653 Governor Link
189 650839 Screw, 1/4-20 x 3/8"
191 36559A S.E. Brake Bracket (Incl. 195)
195 610973 Terminal
207 34336 Throttle Link
216 33086 R.P.M. Adjusting Lever
223 650451 Screw, 1/4-20 x 1"
224 36786 * Intake Pipe Gasket
238 650932 Screw, 10-32 x 49/64"
239 34338 * Air Cleaner Gasket
241 36919 Air Cleaner Collar
245 36905 Air Cleaner Filter
250 36920 Air Cleaner Cover
260 36980 Blower Housing
261 30200 Screw, 10-24 x 9/16"
262 650831 Screw, 1/4-20 x 1/2"
263A 37184 Starter Grill
275 37462 Muffler
277 650988 Screw, 1/4-20 x 2-5/16"
285 35000A Starter Cup
287 650926 Screw, 8-32 x 21/64"
290 29774 Fuel Line
292 26460 Fuel Line Clamp
298 28763 Screw, 10-32 x 35/64"
300 36916 Fuel Tank (Incl. 292 & 301)
301 36246 Fuel Cap
305 35647 Oil Fill Tube
306 36996 “O”-Ring P
307 35499 “O”-Ring
309 650562 Screw, 10-32 x 1/2"
310 35648 Dipstick
313 34080 Spacer
347 651038 Screw, 10-32 x 51/64"
355 590701 Starter Handle
370A 36261 Lubrication Decal
370C 37318 Primer Decal (3 X)
370R 37317 Warning Decal
380 640271 Carburetor (Incl. 184)
390 590739 Rewind Starter
400 36792B Gasket Set (Incl. Items
Marked *)
416 36085 Spark Arrestor Kit (Incl.
417)(Optional)
417 650760 Screw, 8-32 x 3/8" (Optional)
900 — — — Replacement Engine NONE
900 — — — Replacement S/B 750859,
order from 71-999
— — — — — RPM High 2900 to 3200
NOTE: This engine could have been built with
590702 starter.
NOTE: All component dimensions given in U.S.
inches 1 inch = 25.4 mm
5
TO ASSEMBLE & ATT ACH GRASS
CATCHER
• Put grass catcher frame into grass bag
with rigid part of bag on the bottom.
Make sure the frame handle is outside
of the bag top.
• Slip vinyl bindings over frame.
NOTE: If vinyl bindings are too stiff, hold
them in warm water for a few minutes. If
bag gets wet, let it dry before using.
• Lift the rear door on the mower housing
and place the grass catcher frame onto
the formed tabs on the rear door hinge
bracket.
• The grass catcher is secured to the
lawn mower housing when the rear
door is lowered onto the grass catcher
frame.
CAUTION: Do not run your lawn mower
without clipping deflector or approved
grass catcher in place. Never attempt to
operate the lawn mower with the rear
door removed or propped open.
Grass
catcher
handle
Catcher
frame
handle
Vinyl
binding
Frame
opening
Handle bracket
hook
Rear door
Catcher
frame side
hook
TO INSTALL ATTACHMENTS
Your lawn mower was shipped ready to
be used as a mulcher. To convert to
bagging or discharging:
• Open rear door and remove mulcher
plug. Store mulcher plug in a safe
place.
• You can now install catcher or optional
clipping deflector.
• To return to mulching operation, install
mulcher plug into discharge opening of
mower.
CAUTION: Do not run your lawn
mower without mulcher plug in place or
approved clipping deflector or grass
catcher in place. Never attempt to
operate the lawn mower with the rear
door removed or propped open.
Mulcher plug
24
MODEL NO. 143.006700
CRAFTSMAN 4-CYCLE ENGINE
 Loading...