

Craftsman 944.360030 Owner's Manual
_)wner's Manual "
CRAFTSMAN+
t.0 HORSEPOWER
Z0"SIDE DISCHARGE
::IOTARY LAWN MOWER
Vlodel No.
)44.360030
Safety
Assembly
Operation
Maintenance
Repair Parts
CAUTION:
_ead and follow all
Safety Rules and Instructions
:}eforeoperating this equipment
Sears Canada, Inc., Toronto, Ontario M5B 2B8
Warranty .......................... "................... 2
Safety Rules ......................................... 2
Assembly .............................................. 4
Operation. ............................................. 5
Maintenance Schedule ........................ 8
Maintenance ......................................... 8
Product Specifications .......................... 9
Service and Adjustments ....... _.............. 12
Storage ................................................. 13
Troubleshooting ................................... 14
Repair Parts ............. ,........... ,................ 16
Parts Ordedng ...................... Back Cover
LIMITED TWO YEAR WARRANTY ON CRAFTSMAN POWER MOWER
For two years from date of purchase, when this Craftsman Lawn Mower is maintained,
lubricated, and tuned up according to the operating and maintenance instructions in
the owner's manual, Sears will repair free of charge any defect in material or workman-
ship.
If this Craftsman Lawn Mower is used for commercial or rental purposes, this warranty
applies for only 90 days from the date of purchase.
This Warranty does not cover:
• Expendable items which become worn during normal use, such as rotary mower
blades, blade adapters, belts, air cleaners and spark plug.
• Repairs necessary because of operator abuse or negligence, including bent
crankshafts and the failure to maintain the equipment according to the instructions
contained in the owner's manual.
Warranty service is available by returning the Craftsman power mower to the nearest
Sears Service Center/Department in the United States. This warranty applies only
while this product is in use in the United States.
This Warranty gives you specific legal rights, and you may also have other rights which
vary from state to state.
SEARS CANADA, INC., TORONTO, ONTARIO M5B 2B8
Safety standards require operator
presence controls to minimize the
risk of injury. Your unit is equipped
with such controls. Do not attempt to
defeat the function of the operator
presence controls under any
circumstances.
TRAINING:
• Read this operator's manual carefully.
Become familiar with the controls and
know how to operate your mower
properly. Learn how to quickly stop
mower.
• Do not allow children to use your mower.
Never allow adults to use mower without
proper instructions.
• Keep the area of operation clear of all
persons, especially small children and
pets.
• Use mower only as the manufacturer
intended and as described in this
manual.
Do not operate mower if it has been
dropped or damaged in any manner.
Always have damage repaired before
using your mower.
Do not use accessory attachments that
are not recommended by the manufac-
turer. Use of such attachments may be
hazardous.
The blade turns when the engine is
running.
2
PREPARATION:
• Always thoroughly check the area to be
mowed and clear it of all stones, sticks,
wires, bones, and other foreign objects.
These objects will be thrown by the
blade and can cause severe injury.
• Always wear safety glasses or eye
shields when starting and while using
your mower.
• Dress propedy. Do not operate mower
when barefoot or wearing open sandals.
Wear only solid shoes with good traction
when mowing.
• Checkfuel tank before startingengine.
Do notfill gastank indoors,when the
engine is runningor when the engine is
hot. Allowthe engineto cool for several
minutesbeforefilling the gas tank. Clean
off any spilledgasoline before starting
the engine.
• Always make wheel height adjustments
before starting your mower. Never
attempt to do this while the engine is
running.
• Mow only in daylight or good artificial
light.
OPERATION:
• Keep your eyes and mind on your
mower and the area being cut. Do not let
other interests distract you.
• Do not mow wet or slippery grass. Never
run while operating your mower. Always
be sure of your footing -- keep a firm
hold on the handles and walk.
• Do not put hands or feet near or under
rotating parts. Keep clear of the dis-
charge opening at all times.
• Always stop the engine whenever you
leave or are .not using your mower, or
before crossing driveways, walks, roads,
and any gravel--covered areas.
• Never direct discharge of material
toward bystanders nor allow anyone
near the mower while you are operating
it.
• Before cleaning, inspecting, or repairing
your mower, stop the engine and make
absolutely sure the blade and all moving
parts have stopped. Then disconnect the
spark plug wire and keep it away from
the spark plug to prevent accidental
starting.
• Do not continue to run your mower if you
hit a foreign object. Follow the procedure
outlined above, then repair any damage
before restarting and operating you
mower.
• Do not change the govemor settings or
overspeed the engine. Engine damage
or personal injury may result.
• Do not operate your mower if it vibrates
abnormally. Excessive vibration is an
indication of damage; stop the engine,
safely check for the cause of vibration
and repair as required.
• Do not run the engine indoors. Exhaust
fumes are dangerous.
• Never cut grass by pulling the mower
towards you. Mow across the face of
slopes, never up and down or you
might lose your footing. Do not mow
excessively steep slopes. Use caution
when operating the mower on uneven
terrain or when changing directions --
maintain good footing.
• Never operate your mower without
proper guards, plates, grass catcher or
other safety devices in place.
MAINTENANCE AND STORAGE:
• Check the blade and the engine
mounting bolts often to be sure they are
tightened propedy.
• Check all bolts, nuts and screws at
frequent intervals for proper tightness to
be sure mower is in safe working
condition.
• Keep all safety devices in place and
working.
• To reduce fire hazard, keep the engine
free of grass, leaves or excessive
grease and oil.
• Check grass catcher often for deteriora-
tion and wear and replace worn bags.
Use only replacement bags that are
recommended by and comply with
specifications of the manufacturer of
your mower.
• Always keep a sharp blade on your
mower.
• Allow engine to cool before storing in
any enclosure.
• Never store mower with fuel in the tank
inside a building where fumes may
reach an open flame or an ignition
source such as a hot water heater,
space heater, clothes dryer, etc.
ALook for this symbol to point out
important safety precautions. It means
CAUTIONt!t BECOMEALERT!!! YOUR
SAFETY IS INVOLVED.
4_CAUTION: Always disconnect spark
plug wire and place wire where it cannot
contact spark plug in order to prevent
accidental starting when setting up,
transporting, adjusting or making repairs.
AWARNING
The engine exhaust from this product
contains chemicals known to the State of
California to cause cancer, birth defects,
or other reproductive harm.
3
Reed these instructionsand this manual in its
entiretybefore you attempt to assemble or
operate your new lawn mower.
IMPORTANT: This lawn mower isshipped
WITHOUT OIL OR GASOLINE in the engine.
Your new lawn mower has been assembled
at the factory with the exception ofthceepads
left unassembled for shipping puq0oses. All
partssuch as nuts,washers, bolts,etc.,
necessary to complete the assembly have
been placed in the parts bag. To ensure safe
and proper operation of your lawn mower, all
pads and hardware you assemble must be
tightened securely. Use the correct tools as
necessary to ensure proper tightness.
TOREMOVE LAWNMOWER FROM
CARTON
• Remove loose parts included with mower.
• Cut down two and comers of carton and
lay end panel down flat.
• Remove all packing materials except
padding between upper and lower handle
and padding holding operator presence
control bar to upper handle.
• Rolllawn mower out of carton and check
carton thoroughlyfor additional loose parts.
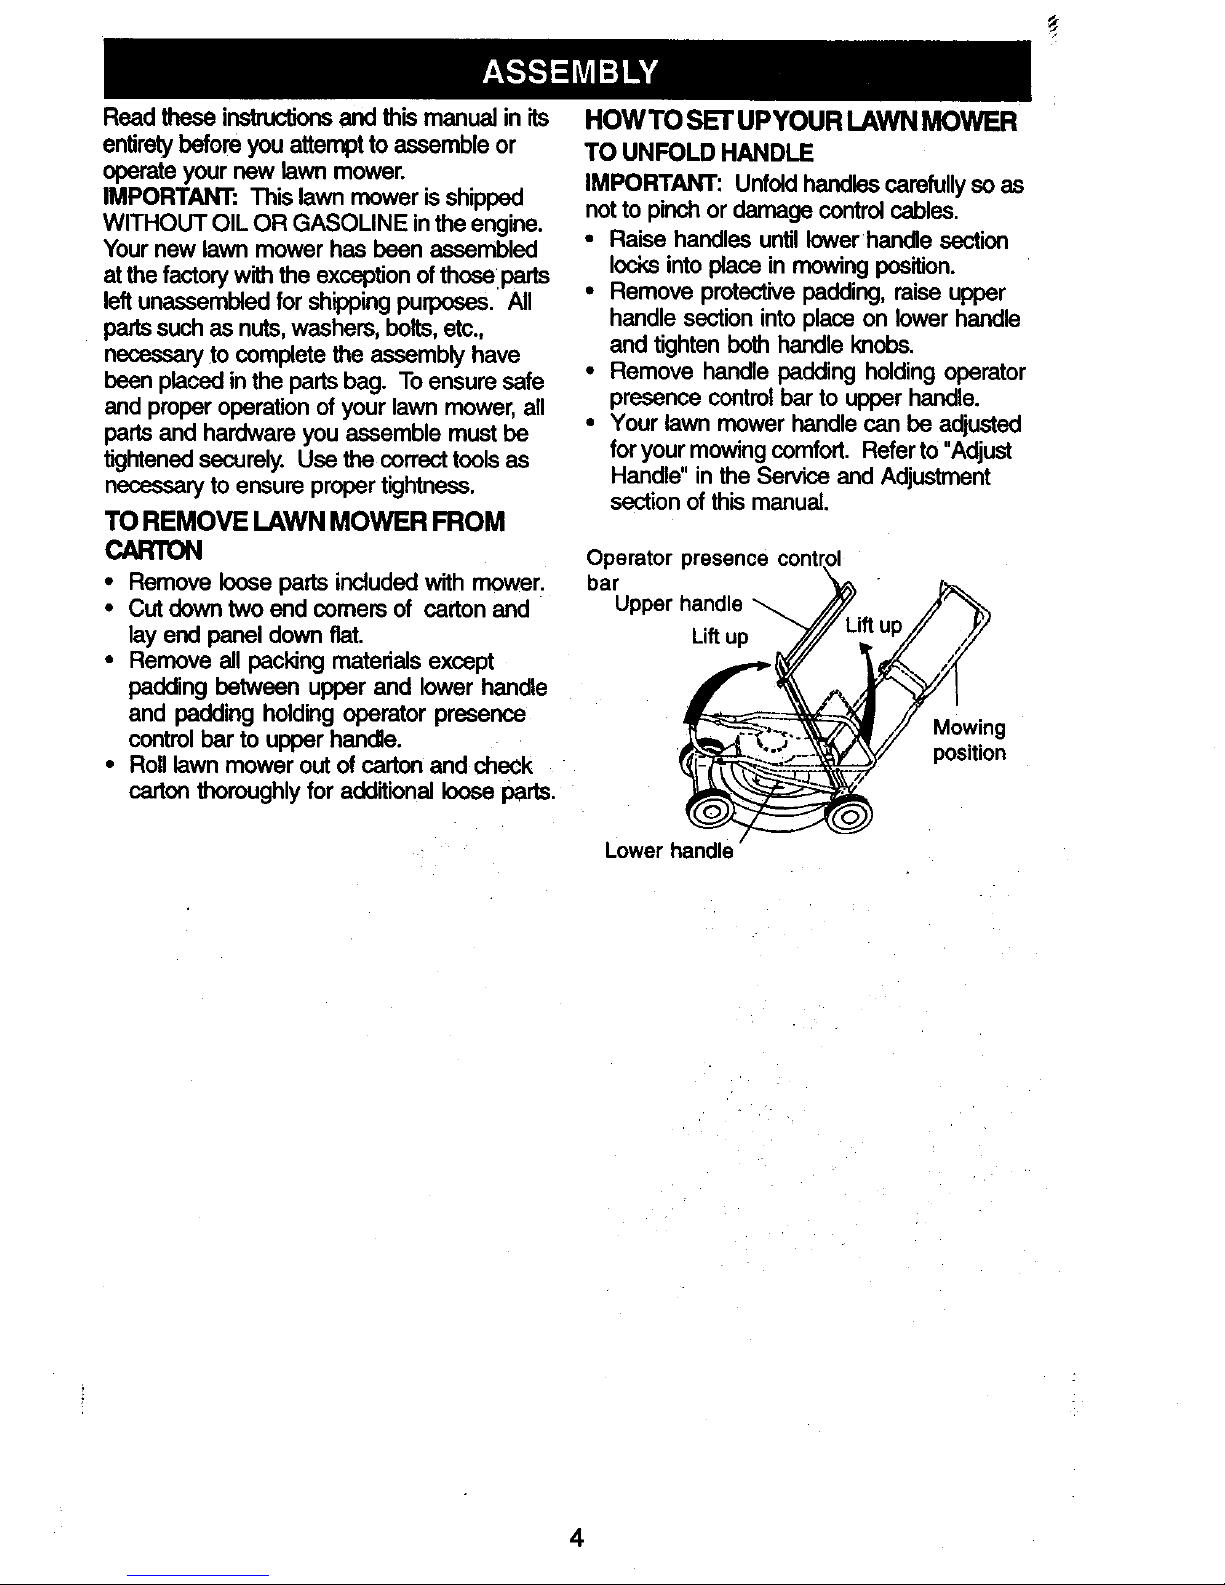
HOWTO SETUPYOUR LAWN MOWER
TO UNFOLD HANDLE
IMPORTANT: Unfold handles carefully so as
not to pinch or damage control cables.
• Raise handles until lower handle section
locks intoplace in mowing position.
• Remove protective padding, raise upper
handle section into place on lower handle
and tighten both handle knobs.
• Remove handle padding holding operator
presence control bar to upper handle.
• Your lawn mower handle can be adjusted
for your mowing comfort. Refer to "Adjust
Handle" in the Service and Adjustment
section of this manual.
Operator presence
bar
Lift up
Mowing
position
Lower handle
4
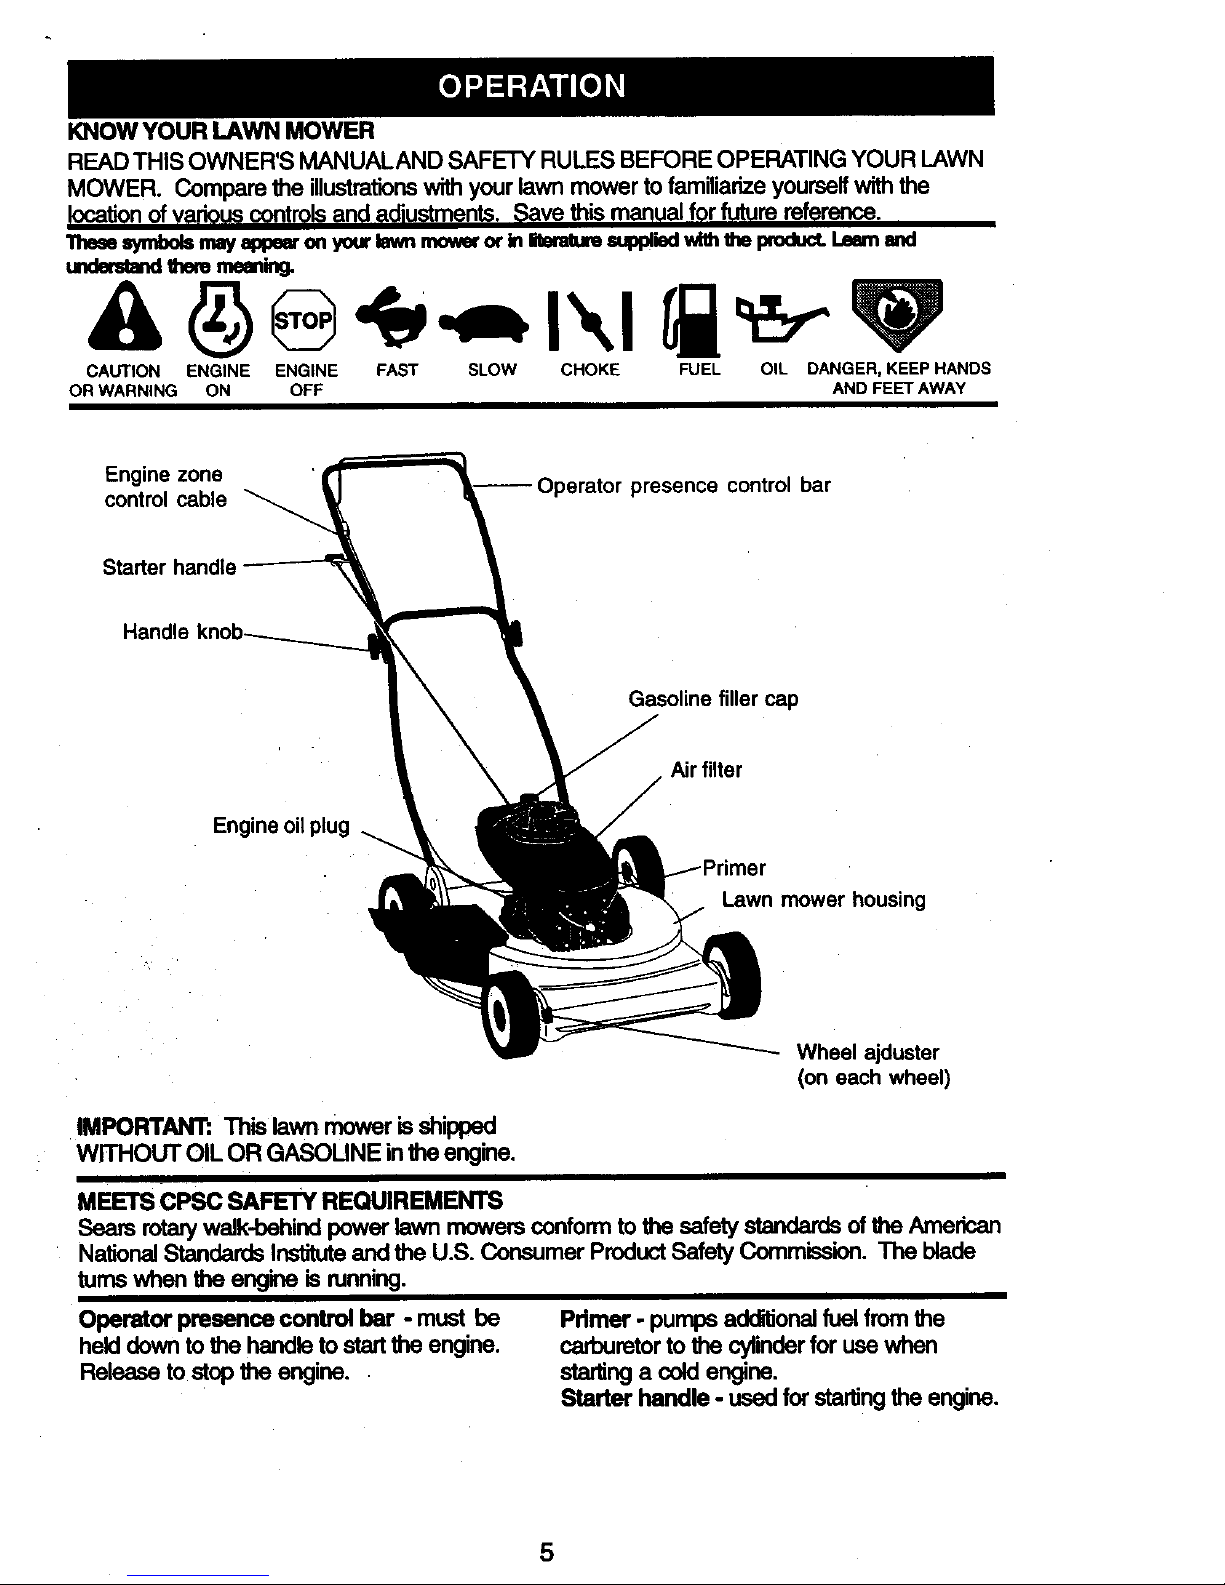
KNOW YOUR LAWN MOWER
READ THIS OWNER'S MANUALAND SAFETY RULES BEFORE OPERATING YOUR LAWN
MOWER. Compare the illustrationswithyour lawn mower to familiarize yourself with the
Iocat_n of v@riqu_ controlsand _td_u_ments. ,_ave this manual for future referance.
l"heeesymbolsmayappearonyourlawnmotor or InliteraturesuppliedwiththeIXOduc&_ _
undastandtheremeaning.
CAUTION ENGINE ENGINE FAST SLOW CHOKE FUEL OIL DANGER, KEEP HANDS
OR WARNING ON OFF AND FEET AWAY
Engine zone
control cable
--Operator presence control bar
Starter handle
Handle
Gasoline filler cap
Airfilter
Engine oil plug
Lawn mower housing
Wheel ajduster
(on each wheel)
IMPORTANT: Thislawn moweris shipped
WITHOUT OIL OR GASOUNE intheengine.
MEETS CPSC SAFETY REQUIREMENTS
Sears rotarywalk-behind power lawn mowers conform to the safety standards of the American
National Standards Instituteand the U.S. Consumer Product Safety Commission. The blade
turns when the engine is running.
Operator presence control bar - must be
held down to the handle to start the engine.
Release to stop the engine. •
Pdmer - pumps adddionalfuel from the
carburetor to the cylinderfor use when
starling a cold engine.
Starter handle - used for startingthe engine.
5

The operation of any lawn
mower can result in foreign
objects thrown into the eyes,
which can result in severe eye damage.
Always wear safety glasses or eye shields
while operating your lawn mower or
performing any adjustments or repairs.
We recommend a wide vision safety mask
over spectacles or standard safety
glasses.
HOWTO USEYOUR LAWN MOWER
ENGINE SPEED
The engine speed was set at the factory for
optimum performance. Speed isnot adjust-
able.
ENGINE ZONE CONTROL
_CAUTION: Federal regulations require an
engine controlto be installedon this lawn
mower in order to minimize the riskof blade
contact injury.Do not under any
circumstancesattempt to defeat the function
of the operator control.The blade turns when
the engine is running.
• Your lawn mower is equipped with an
operator presence control bar which
requires the operator to be positioned
behind the lawn mower handle to start and
operate the lawn mower.
TO ADJUST CUTTING HEIGHT
• Raise wheels for low cut and lower wheels
for high cut.
• Adjust cutting height to suit your require-
merits. Medium positionis best for most
lawns.
• To change cutting height, squeeze adjuster
lever toward wheel. Move wheel up or
down to suit your requirements. Be sure all
wheels are inthe same setting.
NOTE: Adjuster is properly positioned when
platetab inserts intohole in lever. Also, 9-
positionadjusters (if so equipped) allow lever
to be positionedbetween the plate tabs.
Plate Tab
Lower Wheels for High Cut..._ / jL_
Lever
Raise Wheels for Low Cut
TO CONVERT TO DISCHARGING MOWER
Your mower is shipped ready to be used as a
mulcher. To convert to bagging or discharg-
ing:
• Liftdischarge guard and remove mulcher
plate.
• Mower can now be used for side discharg-
ing or optional grass catcher can be
attached.
• To retum to mulching operation, simply
reinstallmulcher plate as shown.
ACAUTION: Do notrunyour lawn mower
without discharge guard, approved grass
catcher or mulcher plate in place.
Discharge
uard
Mulcher plate
BEFORE STARTING ENGINE
OIL
Your lawn mower is shipped without oil in
the engine.
• Be sure mower is level and area around oil
fillis clean.
• Remove engine oil plug and fill to the top
of slot in filler hole.
NOTE: Allow oilto settledown into engine for
accurate reading.
• Engine holds 20ozs. of oil. Fortypeand
grade of oilto use, see "ENGINE" in
Maintenance section of this manual.
• Pour oilslowly. Do not over fill.
• Check oil levelbefore each use. Add oil if
needed.
• Change the oilafter every 25 hours of
operation or each season. You may need
to change the oil more often under dusty,
dirty conditions.
ADD GASOUNE
• Fillfuel tank. Use fresh, clean, regular
unleaded gasoline with a minimum of 87
octane. Do not mix oilwithgasoline.
Purchase fuel in quantitiesthat can be
used within30 days to assure fuel
freshness.
AWARNING: Experience indP_atesthat
alcohol blended fuels (called gasohol or
using ethanol or methanol) can attract
moisture which leads to separation and
formation ofacids duringstorage. Acidic gas
can damage the fuel system of an engine
while in storage. To avoid engine problems,
the fuel system should be emptied before
storage of 30 days orlonger. Drain the gas
tank, startthe engine and let it run untilthe
fuel lines and carburetor are emp_. Use
6 fresh fuel next season. See Storage
Instructionsfor additionalinformation.Never
useengine or carburetor cleaner products in
the fuel tank or permanent damage may
occur.
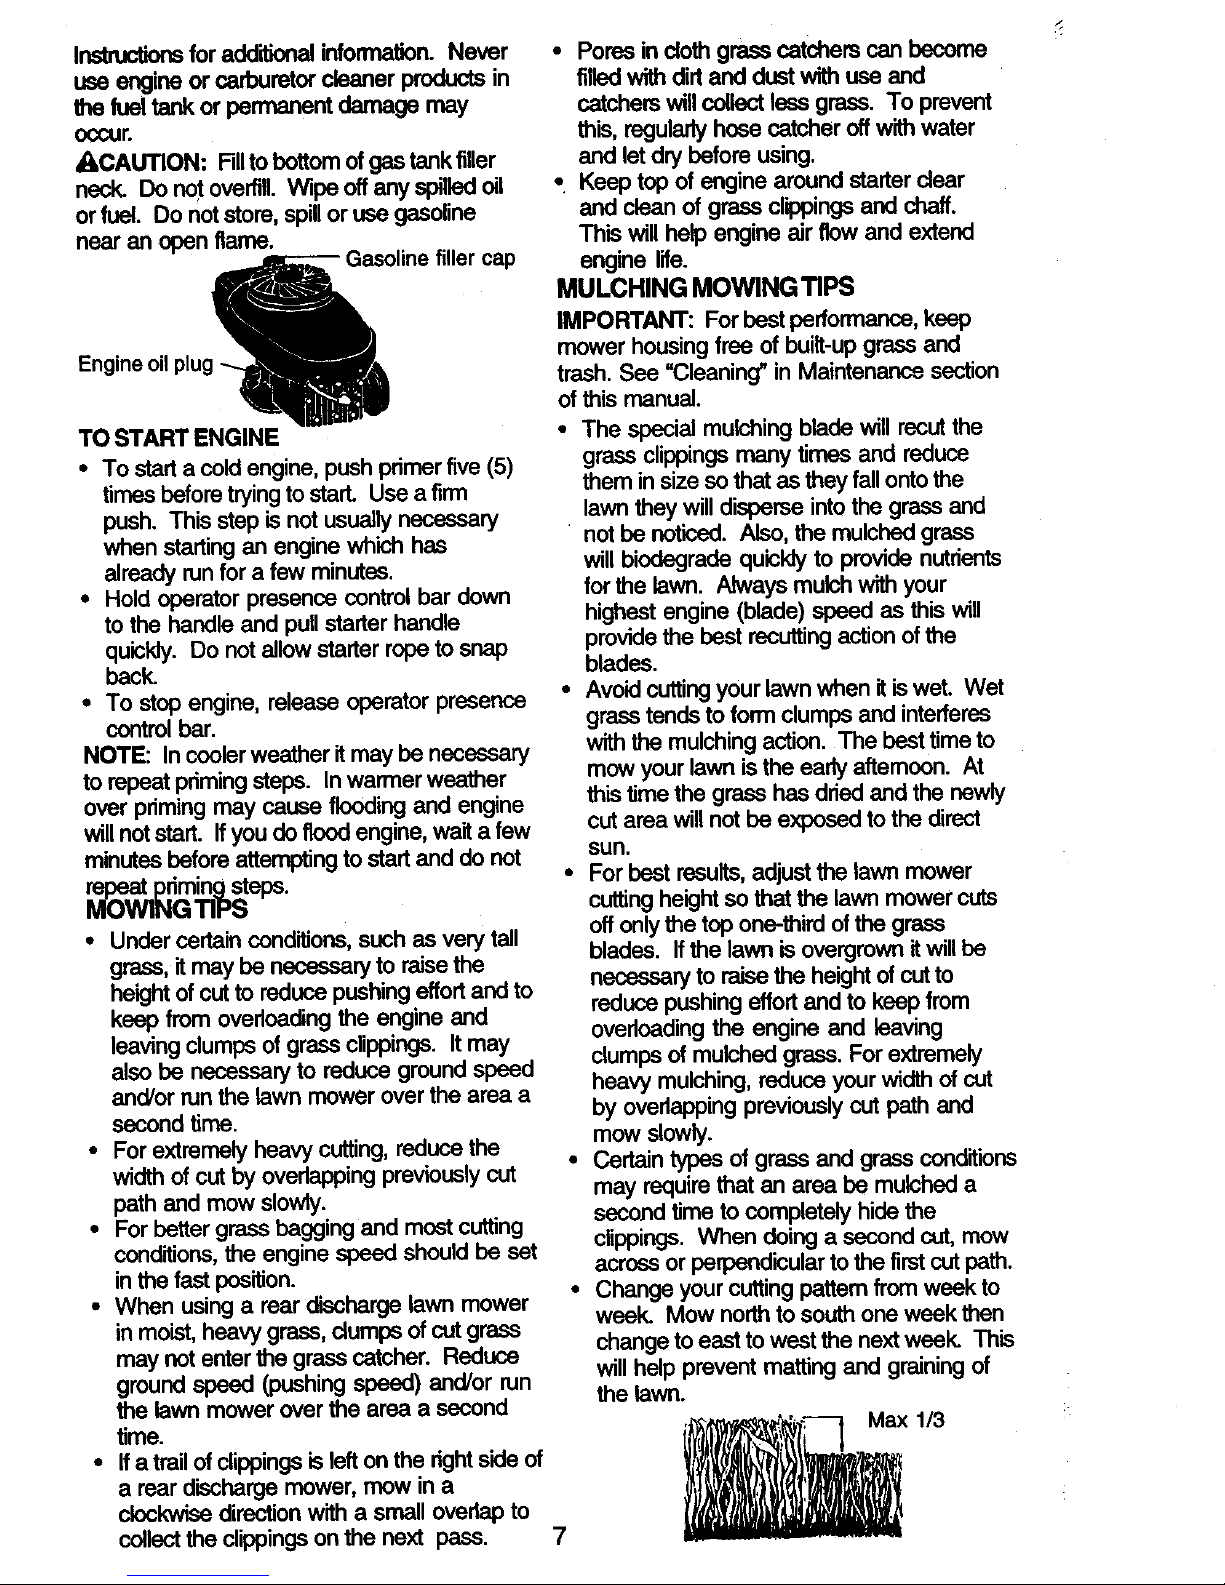
ACAUTION: Filltobottom of gas tank filler
neck. Do not overfill. Wipe offany spilledoil
or fuel. Do notstore, spillor use gasoline
near an open flame.
Gasolinefiller cap
Eng ne oi plug/
TO START ENGINE
• To starta coldengine, push primerfive (5)
times before tryingto start. Use a firm
push. This step is not usually necessary
when starting an engine which has
already run for a few minutes.
• Hold operator presence control bar down
to the handle and pull starter handle
quickly. Do not allow starter rope to snap
back.
• To stop engine, release operator presence
control bar.
NOTE: In cooler weather it may be necessary
to repeat priming steps. In warmer weather
over priming may cause flooding and engine
will not start. If you do flood engine, wait a few
minutes before attempting to start and do not
O_O_IWI_Gming steps"
TIPS
• Under certain conditions, such as very tall
grass, it may be necessary to raise the
height ofcut to reduce pushingeffort and to
keep from overloading the engine and
leaving clumps of grass clippings. It may
also be necessary to reduce ground speed
and/or run the lawn mower over the area a
second time
• For extremely heavy cutting, reducethe
width of cut by overlapping previouslycut
path and mow slowly.
• For batter grass bagging and most cutting
conditions,the engine speed should be set
inthe fast position.
• When using a rear discharge lawn mower
in moist, heavy grass, dumps of cut grass
may not enter the grass catcher. Reduce
ground speed (pushing speed) and/or run
the lawn mower over the area a second
time.
• Ifa trailof clippingsis lefton the rightside of
a rear discharge mower, mow in a
clockwise directionwith a small ovedap to
collect the clippingson the next pass
• Pores in cloth grass catchers can become
filledwith dirt and dustwith use and
catchers will collect less grass. To prevent
this, regularly hose catcher off with water
and let dry before using.
* Keep top of engine around starter dear
and clean of grass cr=ppingsand chaff.
This will help engine air flow and extend
engine life.
MULCHING MOWING TIPS
IMPORTANT: Forbest performance, keep
mower housingfree of built-upgrass and
trash. See "Cleaning" in Maintenance section
of this manual.
• The special mulching blade will recut the
grass clippings many times and reduce
them in size so that as they fall ontothe
lawn they will disperse into the grass and
not be noticed. Also, the mulched grass
will biodegrade quicklyto provide nutrients
forthe lawn Always mulch with your
highest engine (blade) speed as this will
providethe best recurringaction ofthe
blades
• Avoidcuttingyour lawn when it is wet. Wet
grass tends to form clumps and interferes
with the mulching action The best time to
mow your lawn isthe early aftemoon. At
this time the grass has dried and the newly
cut area will not be exposed to the direct
sun.
• For best results,adjustthe lawn mower
cuttingheight so that the lawn mower cuts
off onlythe top one-third ofthe grass
blades. Ifthe lawn is overgrown it will he
necessary to raisethe height of cut to
reduce pushing effortand to keep from
overlcading the engine and leaving
clumps of mulched grass. For extremely
heavy mulching, reduce your width of cut
by overlapping previously cut path and
mow slowly.
• Certain t_es of grass and grass conditions
may require that an area be mulched a
second time to completely hide the
clippings. When doing a second cut, mow
across or perpendicular to the firstcut path.
• Change your cuttingpattem from week to
week. Mow northto south one week then
change to east to west the next week. This
will help prevent matting and grainingof
the lawn.
, '._ Max 113
7
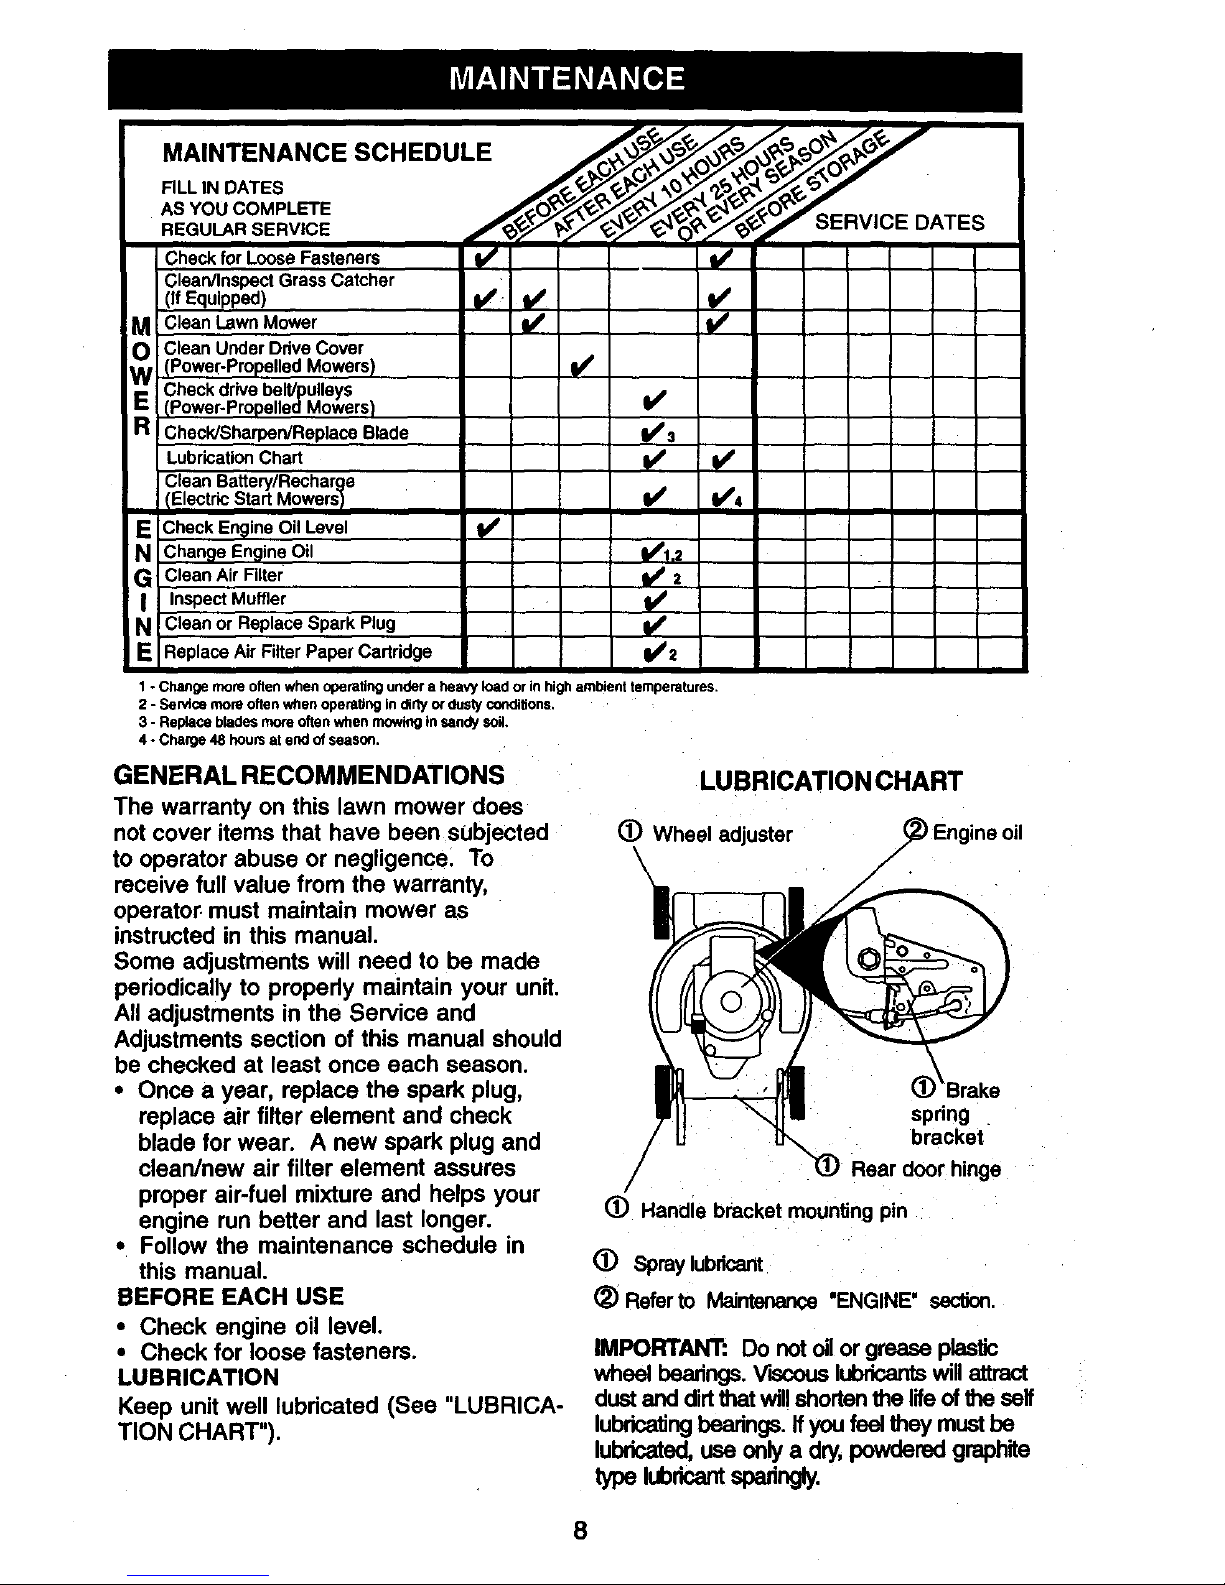
AS YOU COMPLETE J__'_O_l::=_,llr'l= r',
CheckforLooseFasteners I,/ ll/
Glean/InspectGrassCatcher I1_/_
(If Equipped) !,/
a clean LawnMower
o
CleanUnderDriveCover
E_ (Power-Propelled Mowers) I/'Checkdrivebelt/pulleys
(Power-PropelledMowers) I,/
R Check/Sharpen/Replace Blade 1/'3
Lubrication Chart I1_ q,/
Clean Battery/Recharge
/Electric Start Mowers I I/ b/'4
RECheck Ermine Oil Level 1/
Change Engine Oil 1_1.2
Gi Clean Air Filtei: _2
Inspect Muffler
N Clean or ReplaceSparkPlug
ReplaceAir FilterPaperCartridge I/2
1 - Change more oftenwhen operatingundera heavy load or in highambient temperatures.
2 - Sen_ce moreoftenwhen operaUngindirtyo_dustyconditions,
3 - Replace bladesmoreoftenwhenrnowk_gin sandy soil,
4- Charge 48 heum atend of season.
GENERAL RECOMMENDATIONS
The warranty on this lawn mower does
not cover items that have been subjected
to operator abuse or negligence. To
receive full value from the warranty,
operator, must maintain mower as
instructed in this manual.
Some adjustments will need to be made
periodically to propedy maintain your unit.
All adjustments in the Service and
Adjustments section of this manual should
be checked at least once each season.
• Once a year, replace the spark plug,
replace air filter element and check
blade for wear. A new spark plug and
clean/new air filter element assures
proper air-fuel mixture and helps your
engine run better and last longer.
• Follow the maintenance schedule in
this manual.
BEFORE EACH USE
• Check engine oil level.
• Check for loose fasteners.
LUBRICATION
Keep unit well lubricated (See "LUBRICA-
TION CHART").
LUBRICATION CHART
(i:) Wheel adjuster _ Engineoil
\
\Brake
spring
bracket
/ _) Rear door hinge
/
(_) Handle bracket mountingpin
(_) Spray lubricant
(_) Refer to Maintenance "ENGINE' section.
IMPORTANT: Do not oll or grease plastic
wheel bearings. VLscouslubricantswillattract
dustand dirtthat willshorten the lifeof the self
lubricatingbearings. Ifyou feel they must be
lubricated, use only a dry, powdered graphite
typelubrP ntopa ncJy.
8
 Loading...