

Craftsman 944.359220 Owner's Manual

Owner's Manual
ICRIIFTSMRN°I
ROTARY LAWN MOWER
24 Volt DC Cordless Motor
Power-Propelled
21" Multi-Cut
Model No.
944.359220
CAUTION'.
Read and follow all
Safety Rules and Instructions
before operating this equipment
Sears Canada, Inc., Toronto, Ontario M5B 2B8
MOWER SAFETY GUiDELiNES
• The information this manual contains will
alert you to potential hazards and prevent
possible problems.
• It may not be practical or possible to warn
about all the hazards associated with op-
erating or maintaining your lawn mower
in this manual and we would advise you
to use your own good judgment.
• Familiarize yourselfwith your lawn mower,
know all the lawn mower controls and how
to operate them.
• Know howto quicklyshutoffyour lawn
mower in case of emergency.
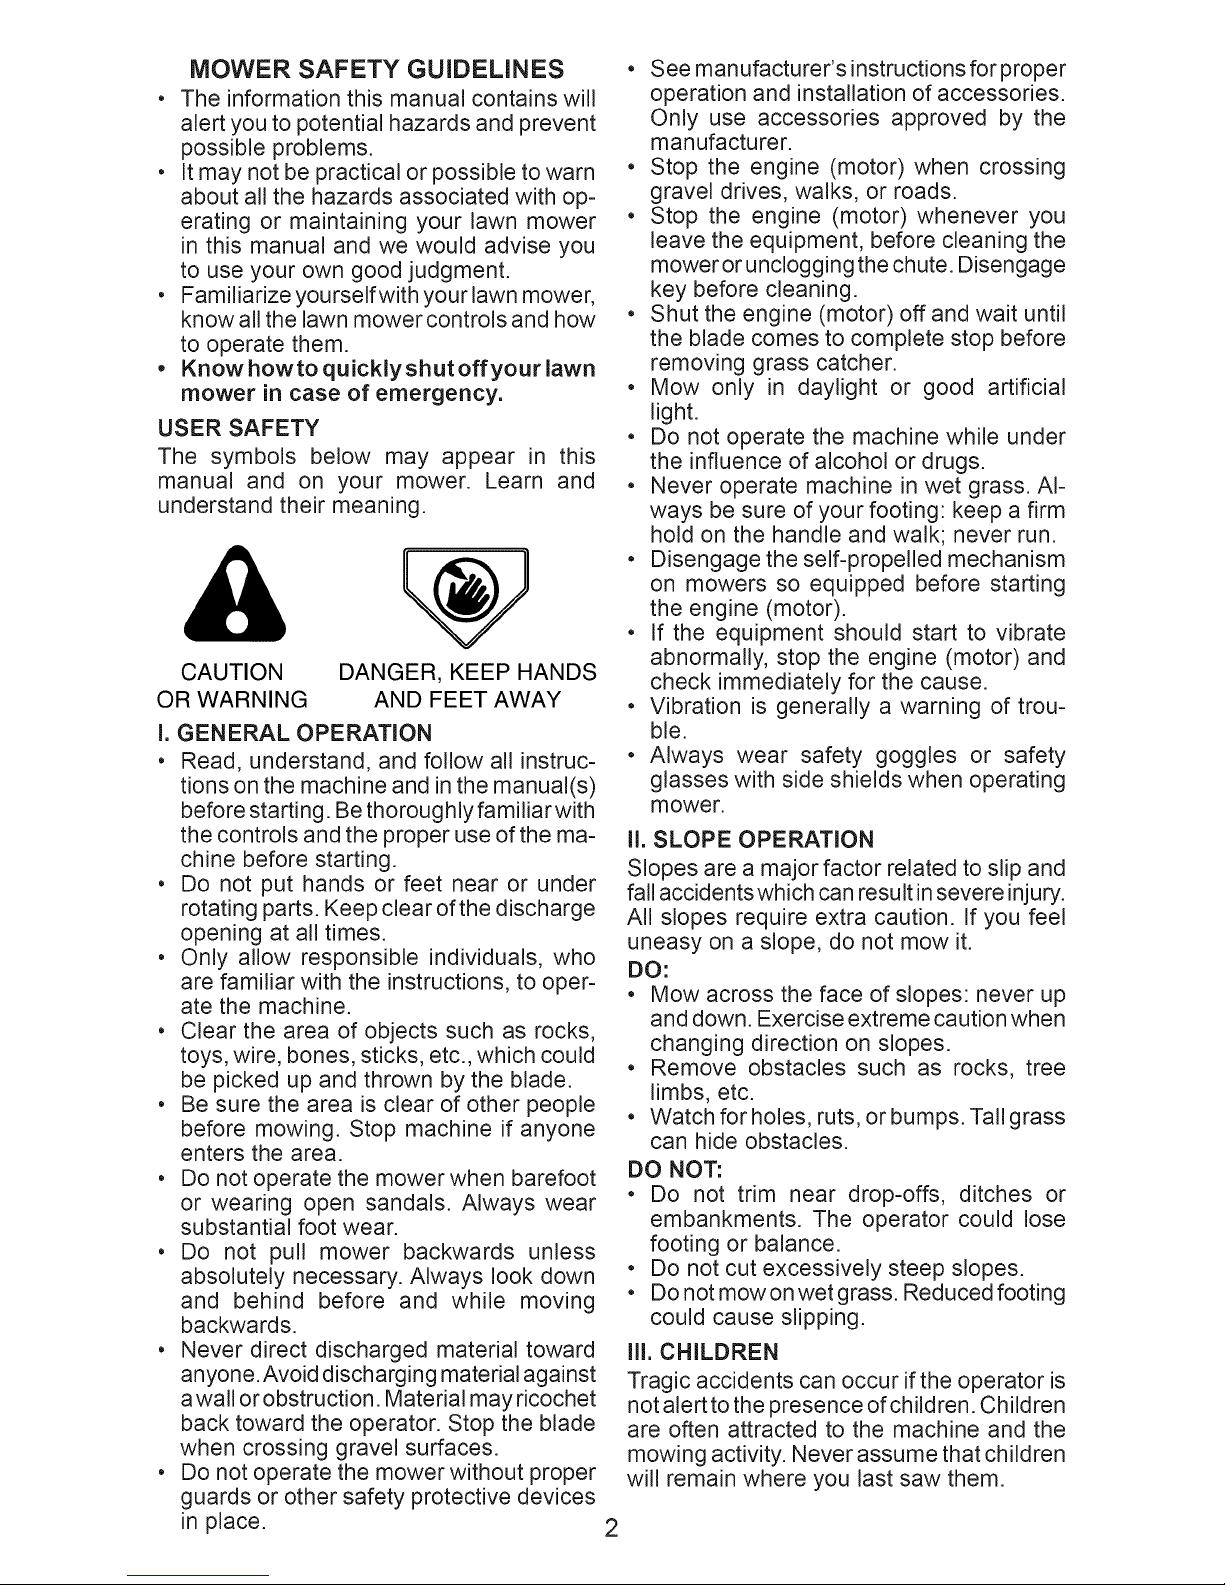
USER SAFETY
The symbols below may appear in this
manual and on your mower. Learn and
understand their meaning.
CAUTION
OR WARNING
I. GENERAL OPERATION
• Read, understand, and follow all instruc-
tions on the machine and in the manual(s)
before starting. Be thoroughly familiarwith
the controls and the proper use of the ma-
chine before starting.
• Do not put hands or feet near or under
rotating parts. Keep clear of the discharge
opening at all times.
• Only allow responsible individuals, who
are familiar with the instructions, to oper-
ate the machine.
• Clear the area of objects such as rocks,
toys, wire, bones, sticks, etc., which could
be picked up and thrown by the blade.
• Be sure the area is clear of other people
before mowing. Stop machine if anyone
enters the area.
• Do not operate the mower when barefoot
or wearing open sandals. Always wear
substantial foot wear.
• Do not pull mower backwards unless
absolutely necessary. Always look down
and behind before and while moving
backwards.
• Never direct discharged material toward
anyone. Avoid discharging material against
awall or obstruction. Material may ricochet
back toward the operator. Stop the blade
when crossing gravel surfaces.
• Do not operate the mower without proper
guards or other safety protective devices
in place.
DANGER, KEEP HANDS
AND FEET AWAY
• See manufacturer's instructions for proper
operation and installation of accessories.
Only use accessories approved by the
manufacturer.
• Stop the engine (motor) when crossing
gravel drives, walks, or roads.
• Stop the engine (motor) whenever you
leave the equipment, before cleaning the
mower or unclogging the chute. Disengage
key before cleaning.
• Shut the engine (motor) off and wait until
the blade comes to complete stop before
removing grass catcher.
• Mow only in daylight or good artificial
light.
• Do not operate the machine while under
the influence of alcohol or drugs.
• Never operate machine in wet grass. Al-
ways be sure of your footing: keep a firm
hold on the handle and walk; never run.
• Disengage the self-propelled mechanism
on mowers so equipped before starting
the engine (motor).
• If the equipment should start to vibrate
abnormally, stop the engine (motor) and
check immediately for the cause.
• Vibration is generally a warning of trou-
ble.
• Always wear safety goggles or safety
glasses with side shields when operating
mower.
II. SLOPE OPERATION
Slopes are a major factor related to slip and
fall accidents which can result insevere injury.
All slopes require extra caution. If you feel
uneasy on a slope, do not mow it.
DO:
• Mow across the face of slopes: never up
and down. Exercise extreme caution when
changing direction on slopes.
• Remove obstacles such as rocks, tree
limbs, etc.
• Watch for holes, ruts, or bumps. Tall grass
can hide obstacles.
DO NOT:
• Do not trim near drop-offs, ditches or
embankments. The operator could lose
footing or balance.
• Do not cut excessively steep slopes.
• Do not mow on wet grass. Reduced footing
could cause slipping.
III. CHILDREN
Tragic accidents can occur if the operator is
not alert to the presence of children. Children
are often attracted to the machine and the
mowing activity. Never assume that children
will remain where you last saw them.
2

• Keep children out of the trimming area
and under the watchful care of another
responsible adult.
• Remove and store the key out of the reach
of children when not in use.
• Be alert and turn machine off if children
enter the area.
• Before and while walking backwards,
look behind and down for small children.
Use extra care when approaching blind
corners, shrubs, trees, or other objects
that may obscure vision.
• The mower is not a toy. It can be very
dangerous; small children should not use
this mower. Only responsible adults who
have read the manual and understood all
instructions should operate this mower.
IV. GENERAL SERVICE
• Never run a machine inside a closed
area.
• Never make adjustments or repairs with
the engine (motor) running.
• Keep nuts and bolts, especially blade at-
tachment bolts, tight and keep equipment
in good condition.
• Never tamper with safety devices. Check
their proper operation regularly.
• Keep machine free of grass, leaves, or
other debris build-up. Allow machine to
cool before storing.
• Stop and inspect the equipment if you
strike an object. Repair, if necessary,
before restarting.
• Never attempt to make wheel height
adjustments while the engine (motor) is
running.
• Grass catcher components are subject to
wear, damage, and deterioration, which
could expose moving parts or allow objects
to be thrown. Frequently check compo-
nents and replace with manufacturer's
recommended parts when necessary.
• Mower blade is sharp and can cut. Wrap
the blade or wear gloves, and use extra
caution when servicing it.
• Do not attempt to change the engine elec-
tronic settings or over speed the engine.
• Maintain or replace safety and instruction
labels, as necessary.
• Only use accessories or parts approved
by the manufacturer. Non-approved parts
or accessories can cause serious injury
or damage and will void the warranty.
• This lawnmower is not to be used for
commercial use; Use only on personal
property. It should only be used on pri-
vate lawns and should not be used to cut
public parks, playing fields, farms, forests
or a large number of lawns.
V. BATTERY & CHARGER SAFETY
,_ CAUTION: Before using batteries
or charger please read all instructions.
Serious injury, electrical shock or prop-
erty damage may occur if all warnings
and instructions are not understood and
followed. Only use batteries provided or
approved by the manufacturer.
, The batteries are sealed units and can not
be opened or taken apart. When a battery
is no longer holding a charge take it to a
local recycling center.
, Be extra cautious to reduce risk of drop-
ping a metal tool onto the battery. It might
spark or short circuit the battery or other
electrical parts and may cause an explo-
sion. Keep the area around the charger
and batteries clean.
, Remove personal metal items such as
rings, bracelets, necklaces, and watches
when working with a lead-acid battery.
, Do not touch un-insulated parts of the
battery, contacts or terminals.
, Do not leave the batteries outside in the
elements. Always store the batteries in a
dry area where the temperature does not
drop below 320 F or 0° C.
, The Charger and batteries should be kept
in a dry area away from children, pets,
heat and moisture.
, Only Charge batteries with standard 110V
household current.
, Do notattemptto rewire orotherwise short
circuit the batteries.
, Use the charger only in a well ventilated
area. Do not charge batteries in a sealed
container.
• Use only manufacturer-approved charger
to charge the lawnmower batteries.
, Charge only manufacturer-approved bat-
teries with this charger. Charging other
batteries or products may cause personal
injury or property damage.
, If the cord or other parts are damaged
replace them immediately before using
the charger.
, To reduce risk of damage to electric plug
and cord, unplug the charger by the plug
and not by the cord when disconnecting
charger.
, Use the charger in a location where it will
not be stepped on, tripped over or other-
wise subjected to damage or stress.
, Do not disassemble charger; take it to a
qualified service agent or replace charger
when service or repair is required.
, To reduce risk of electric shock, unplug
charger from outlet before attempting any
maintenance or cleaning.
Never alter the charger or cord.
e
GENERAL: Craftsman products are warranted to be free from defects in materials
or workmanship for a specific time period as set-out below (the "Warranty Period").
Warranties extend to the original purchaser of a Craftsman product only. Purchases
made through an online auction or through any website other than www.sears.ca are
excluded. The relevant Warranty Period commences on the original date of purchase.
Within this period, Sears Canada, Inc. will, at its sole option, repair or replace any products
or components which fail in normal use. Such repairs or replacement will be made at no
charge to the customer for parts or labor, provided that the customer shall be responsible
for any transportation cost.
EXCLUSIONS: This warranty does not cover failures due to normal wear, abuse, misuse,
neglect (including but not limited to the use of stale fuel, dirt, abrasives, moisture, rust,
corrosion, or any adverse reaction due to improper storage or use habits), improper
maintenance or failure to follow maintenance guidelines and/or instructions, failure to
operate the product in accordance with the owner's manual or any additional instructions
or information provided at the time of purchase or in subsequent communications with
the original purchaser, accident or unauthorized alterations or repairs made or attempted
by others. Also excluded from warranty coverage - except as provided below - are the
following: maintenance, adjustments, components subject to wear including but not
limited to: cosmetic components, belts, blades, blade adapters, bulbs, tires, filters, guide
bars, lubricants, seats, grips, recoil assy's, saw chains and bars, trimmer lines and spools,
spark plugs, starter ropers and tines, and discoloration resulting from ultraviolet light. Any
product missing the model and/or serial number identification label will be disqualified
from coverage under this warranty.
REPAIRS: Repairs have a 90 day warranty. If the defective product is still within the
Warranty Period, then the new warranty is 90 days from the date of repair or to the end of
the original Warranty Period, whichever period is longer.
DISCLAIMERS: THE WARRANTIES AND REMEDIES CONTAINED HEREIN ARE
EXCLUSIVE AND IN LIEU OF ALL OTHER WARRANTIES, WHETHER ORAL OR
WRITTEN (OTHER THAN AS STATED HEREIN), AND WHETHER EXPRESS, IMPLIED
OR STATUTORY, INCLUDING BUT NOT LIMITED TO ANY. THIS WARRANTY
GIVES YOU SPECIFIC LEGAL RIGHTS, WHICH MAY VARY FROM PROVINCE TO
PROVINCE.
IN NO EVENT SHALL SEARS BE LIABLE FORANY INCIDENTAL, SPECIAL, INDIRECT
OR CONSEQUENTIAL DAMAGES, WHETHER RESULTING FROM THE USE, MISUSE
OR INABILITY TO USE THE PRODUCT OR FROM DEFECTS IN THE PRODUCT. THE
EXCLUSIONS IN THIS PARAGRAPH SHALL NOT APPLY IN JURISDICATIONS WHERE
APPLICABLE LAW DOES NOT ALLOW FOR THE EXCLUSION OF INCIDENTAL OR
CONSEQUENTIAL DAMAGES. IN SUCH JURISDICTIONS, THIS PARAGRAPH SHALL
NOT APPLY, BUT THE REMAINING PROVISIONS OF THIS DOCUMENT SHALL
REMAIN VALID.
Sears retains the exclusive right to repair or replace the product or offer a full refund of
the purchase price at its sole discretion. SUCH REMEDY SHALL BE YOUR SOLE AND
EXCLUSIVE REMEDY FOR ANY BREACH OF WARRANTY.
CUSTOMER RESPONSIBILITIES: In additional to complying with all suggested
maintenance guidelines and instructions, customers' obligations shall include but shall
not be limited to: operating the product in accordance with the owner's manual or any
additional instructions or information provided at the time of purchase or in subsequent
communications to the purchaser from time to time, exhibit reasonable care in the use,
operation, maintenance, general upkeep and storage of the product. Failure to comply
with these requirements will void any applicable warranty.
4
LIST OF APPLICABLE WARRANTY PERIODS: The following list contains the applicable
Warranty Period for your Craftsman product and is based on a combination of the type of
product or component and the intended and actual use of the product or component:
.
90 DAYS: Craftsman products intended for use or actually used for commercial,
institutional, professional or income-producing purposes
.
2 YEARS: Craftsman riding lawn mowers, yard and garden tractors, walk behind
mowers, tillers, brush cutters, snow blowers, handheld blowers, backpack blowers,
hedge trimmers and electrical products for noncommercial, nonprofessional, non-
institutional, or non-income-producing use, except for those components which are
part of engine systems manufactured by third party engine manufacturers for which
the purchase has received an separate warranty with product information supplied at
the time of purchase.
.
1 YEAR: Craftsman power cutters, stump grinders, pole pruners, gas chain saws,
electric chain saws, trimmer attachments, baggers and pole saws for noncommercial,
nonprofessional, non-institutional, or non-income-producing use.
.
90 DAYS: All defective batteries, which will be replaced during this 90-day Warranty
Period.
.
60 DAYS: Additional Warranty Period of 60 days will apply to adjustments and worn
products or components BUT DOES NOT INCLUDE WEAR OR ADJUSTMENTS
for products used for commercial, institutional, professional or income-producing
purposes. Wear items include but are not limited to: belts, blades, tires, spark plugs,
air filters, chains, shear bolts, skid plates, scraper bars, drift cutters, ropes, tines,
collection bags and pulleys.
As the Warranty Period runs from the date of purchase and NOT from the date that a
product is delivered, opened, assembled or first used, plea se ensure during this time
period that your product or component has been assembled and tested for correction
operation regardless of when you intend to actually use it. Claims made after the
Warranty Period has expired will not be honored.
PROOF OF PURCHASE/DOCUMENTATION: Warranty coverage is conditioned upon
the original purchaser furnishing Sears Canada or its authorized third party service
provider if applicable, with the original sales receipt or other adequate written proof of
the original purchase date and identification of the product. In the event that the original
purchaser is unable to provide a company of the original sales receipt, Sears Canada
Inc. reserves the right to determine in its sole discretion what other written proof of the
original purchase date and identification of the product is acceptable.
Safety Rules ......................................... 2-3
Warranty ............................................... 4-5
Assembly/Pre-Operation ...................... 6-7
Operation ............................................ 8-11
Maintenance ..................................... 12-14
Service and Adjustments .................. 14-15
Storage ............................................. 15-16
Troubleshooting ..................................... 17
Repair Parts ...................................... 18-21
Sears Service .......................... Back Cover
5

Read these instructions and this manual in its entirety before you attempt to assemble
or operate your new lawn mower.
Your new lawn mower has been assembled at the factory with the exception of those
parts left unassembled for shipping purposes. All parts such as nuts, washers, bolts, etc.,
necessary to complete the assembly have been placed in the parts bag. To ensure safe
and proper operation of your lawn mower, all parts and hardware you assemble must be
tightened securely. Use the correct tools as necessary to ensure proper tightness.
TO REMOVE MOWER FROM
CARTON
1. Remove loose parts included with
mower.
2. Cut down two end corners of carton
and lay end panel down flat.
3. Remove al! packing materials except
padding between upper and lower
handle and padding holding operator
presence control bar to upper handle.
4. Roll mower out of carton and check
carton thoroughly for additional loose
parts.
NOW TO SET UP YOUR MOWER
TO UNFOLD HANDLE
IMPORTANT: Unfold handle carefully so
as not to pinch or damage control cables.
1. Raise lower handle section to operat-
ing position and align hole in handle
with one of three height positioning
holes.
2. Insert handle bolt through handle and
bracket and secure with knob.
3. Repeat for opposite side of handle.
4. Remove protective padding, raise up-
per handle section into place on lower
handle and tighten both handle knobs.
5. Remove any packing material from
around control bar.
Your lawn mower handle can be adjusted
for your mowing comfort. Refer to "AD-
JUST HANDLE" in the Service and Adjust-
ments section of this manual.
Operator MOWING
presence POSITION
control bar
LIFT
UP
Handle
bracket
Knob
\
! \ \
//// ////
Upper
handle
Handle
knob
Lower handle
"Bolt
6
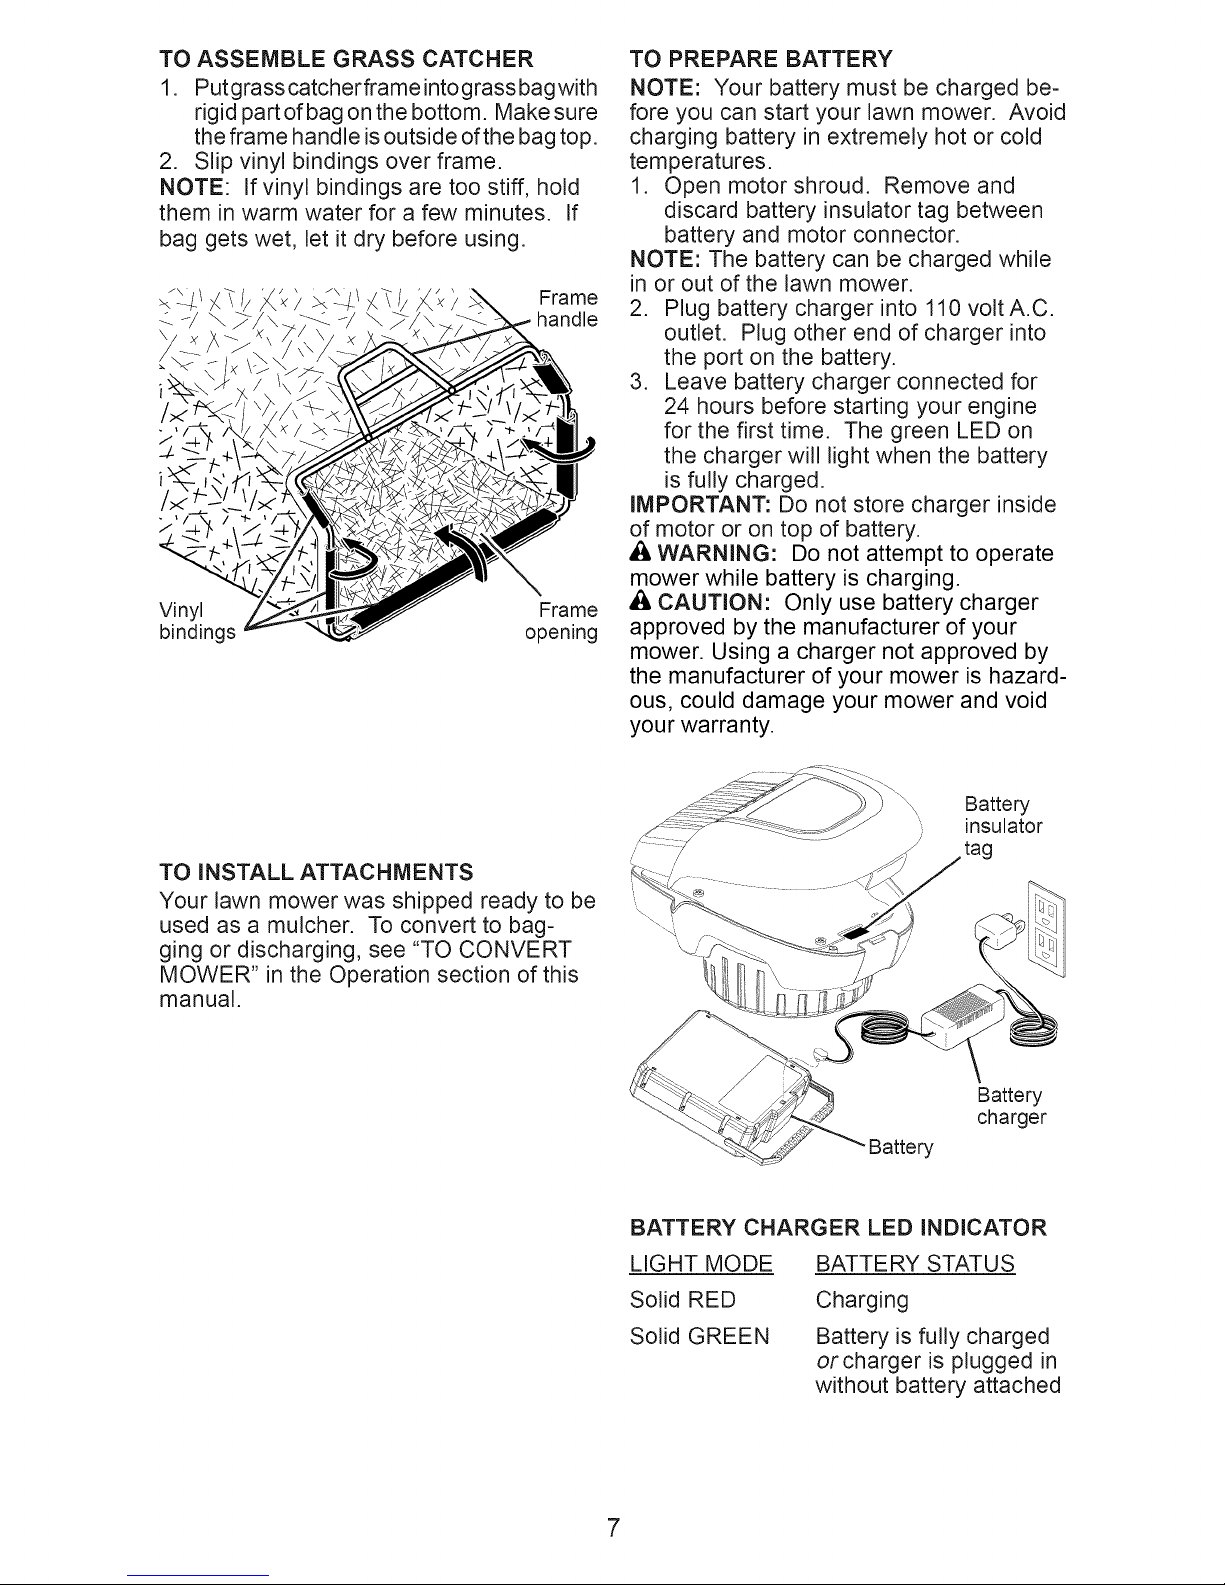
TO ASSEMBLE GRASS CATCHER
1. Putgrass catcherframe intograss bagwith
rigid part of bag on the bottom. Make sure
the frame handle is outside of the bag top.
2. Slip vinyl bindings over frame.
NOTE: If vinyl bindings are too stiff, hold
them in warm water for a few minutes. If
bag gets wet, let it dry before using.
Frame
Vinyl Frame
bindings opening
TO PREPARE BATTERY
NOTE: Your battery must be charged be-
fore you can start your lawn mower. Avoid
charging battery in extremely hot or cold
temperatures.
1. Open motor shroud. Remove and
discard battery insulator tag between
battery and motor connector.
NOTE: The battery can be charged while
in or out of the lawn mower.
2. Plug battery charger into 110 volt A.C.
outlet. Plug other end of charger into
the port on the battery.
3. Leave battery charger connected for
24 hours before starting your engine
for the first time. The green LED on
the charger will light when the battery
is fully charged.
IMPORTANT: Do not store charger inside
of motor or on top of battery.
_I, WARNING" Do not attempt to operate
mower while battery is charging.
_I, CAUTION: Only use battery charger
approved by the manufacturer of your
mower. Using a charger not approved by
the manufacturer of your mower is hazard-
ous, could damage your mower and void
your warranty.
TO INSTALL ATTACHMENTS
Your lawn mower was shipped ready to be
used as a mulcher. To convert to bag-
ging or discharging, see "TO CONVERT
MOWER" in the Operation section of this
manual.
Battery
insulator
tag
Battery
charger
Battery
BATTERY CHARGER LED INDICATOR
LIGHT MODE
Solid RED
Solid GREEN
BATTERY STATUS
Charging
Battery is fully charged
orcharger is plugged in
without battery attached
7
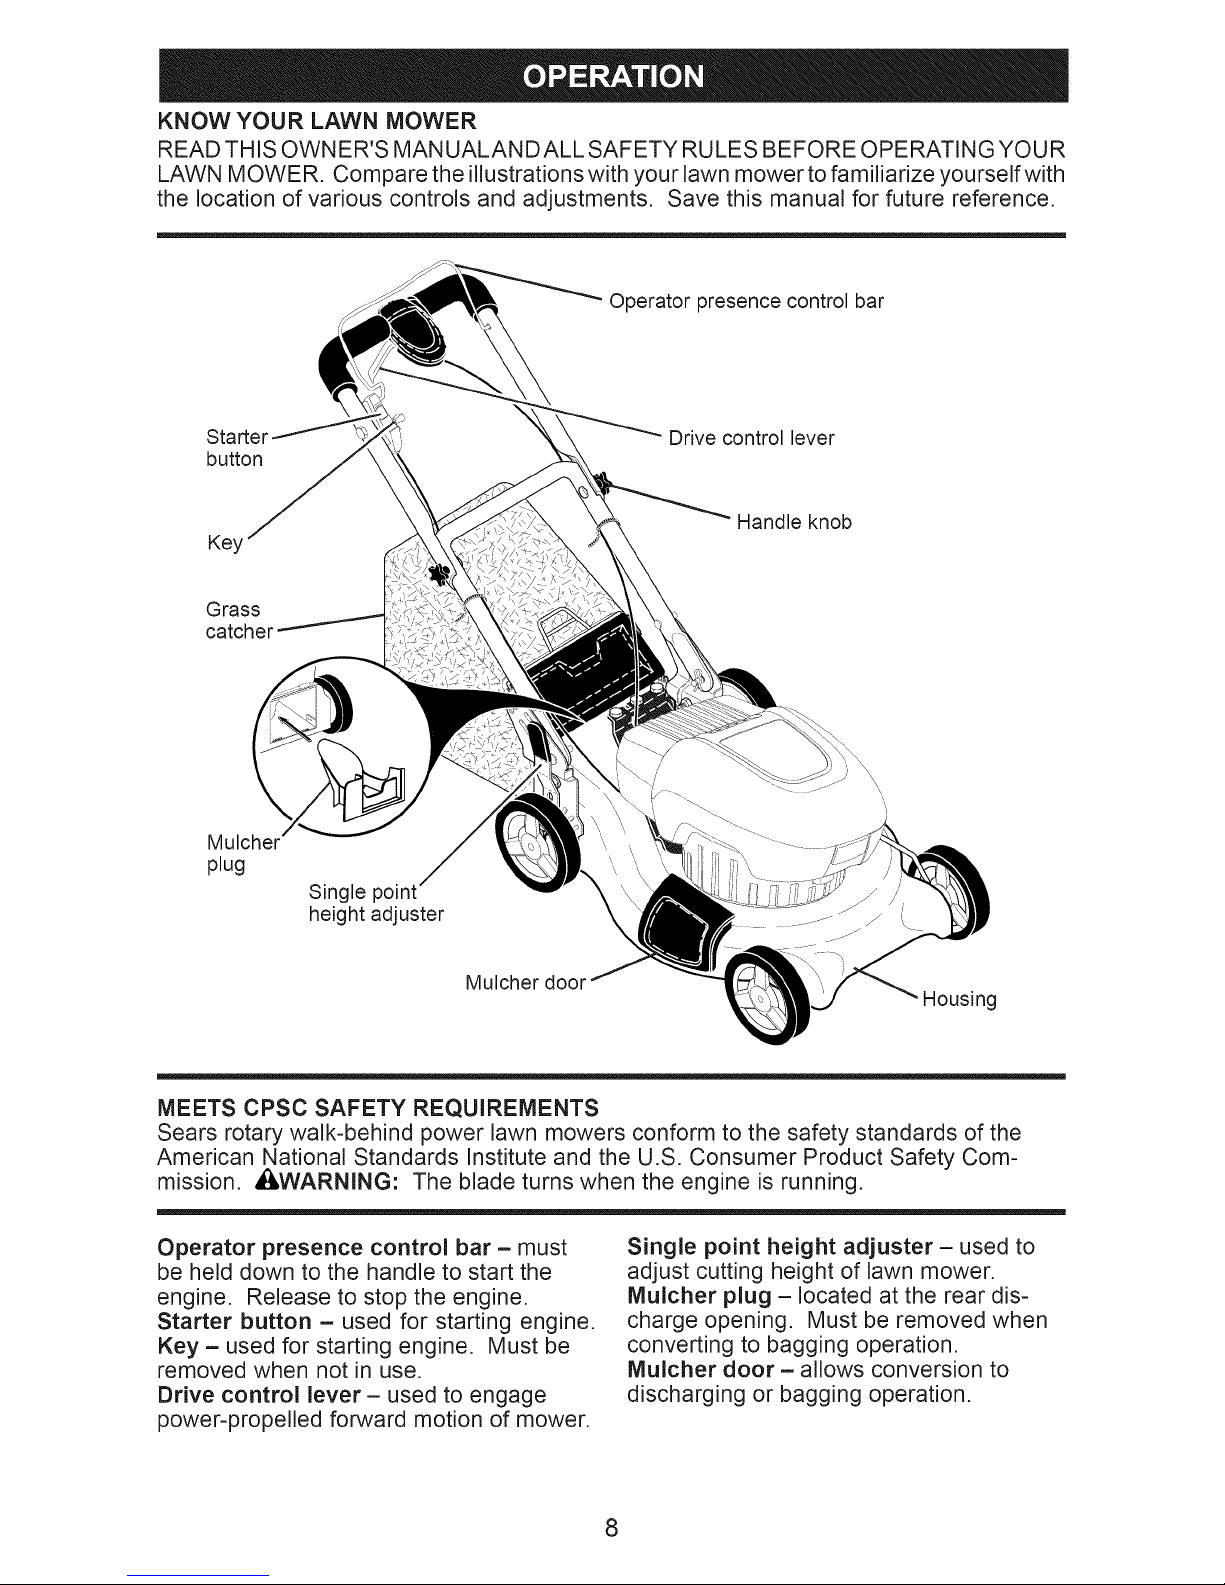
KNOW YOUR LAWN MOWER
READ THIS OWNER'S MANUALANDALL SAFETY RULES BEFORE OPERATING YOUR
LAWN MOWER. Compare the illustrations with your lawn mower to familiarize yourself with
the location of various controls and adjustments. Save this manual for future reference.
Operator presence control bar
Starter Drive control lever
button
Handle knob
Key
Grass
catcher
Mulcher
plug
Single point
height adjuster
Mulcher door
Housing
MEETS CPSC SAFETY REQUIREMENTS
Sears rotary walk-behind power lawn mowers conform to the safety standards of the
American National Standards Institute and the U.S. Consumer Product Safety Com-
mission. ,_WARNING: The blade turns when the engine is running.
Operator presence control bar - must
be held down to the handle to start the
engine. Release to stop the engine.
Starter button - used for starting engine.
Key - used for starting engine. Must be
removed when not in use.
Drive control lever- used to engage
Single point height adjuster- used to
adjust cutting height of lawn mower.
Mulcher plug - located at the rear dis-
charge opening. Must be removed when
converting to bagging operation.
lViulcher door - allows conversion to
discharging or bagging operation.
power-propelled forward motion of mower.
8
 Loading...