

Craftsman 922217 Owner's Manual
Owner's Manual
II:RRFTSMRN'I
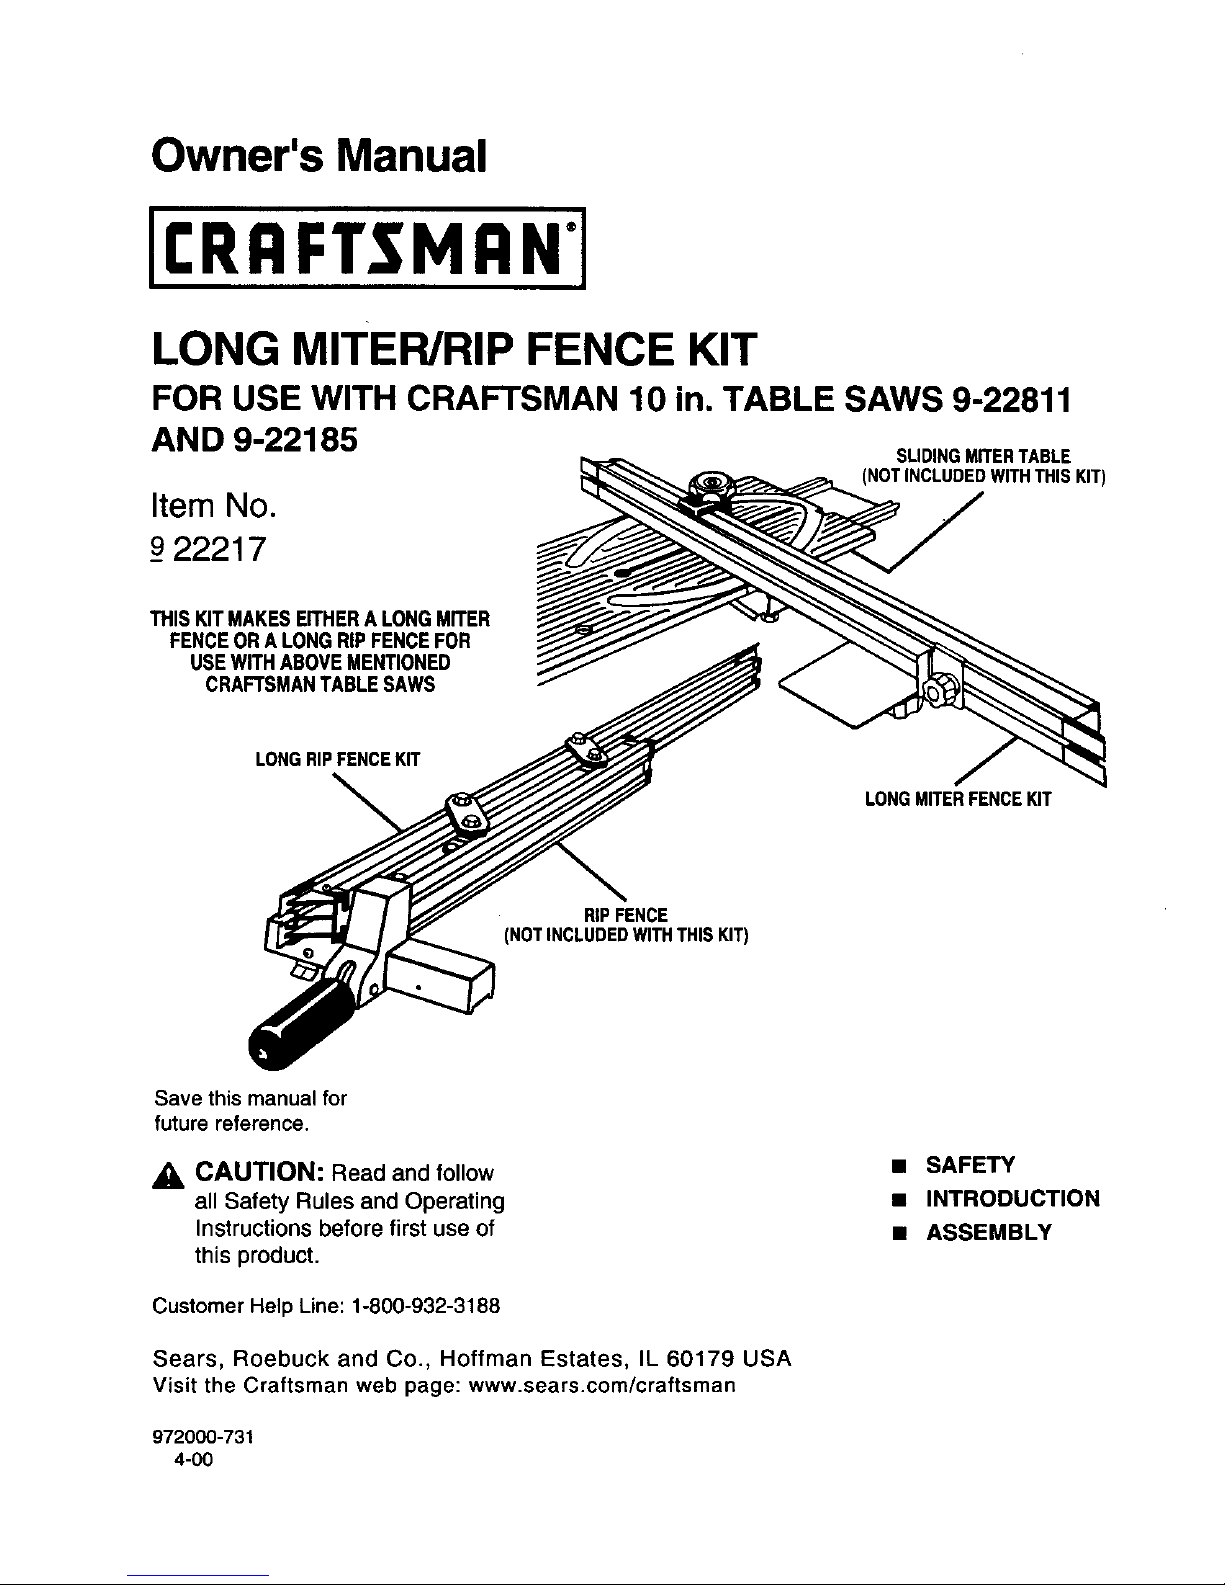
LONG MITER/RIP FENCE KIT
FOR USE WITH CRAFTSMAN 10 in. TABLE SAWS 9-22811
AN D 9-22185 SLIDINGMITERTABLE
(NOTINCLUDEDWITHTHISKIT)
Item No.
_922217
THIS KIT MAKESEITHERA LONGMITER
FENCEOR A LONGRiPFENCEFOR
USEWITHABOVEMENTIONED
CRAFTSMANTABLESAWS
LONGRIPFENCEKIT
LONGMITERFENCEKIT
RIPFENCE
(NOTINCLUDEDWITHTHISKIT)
Save this manual for
future reference.
CAUTION: Read and follow
all Safety Rules and Operating
Instructions before first use of
this product.
Customer Help Line: 1-800-932-3188
Sears, Roebuck and Co., Hoffman Estates, IL 60179 USA
Visit the Craftsman web page: www.sears.com/craftsman
• SAFETY
• INTRODUCTION
• ASSEMBLY
READ ALL INSTRUCTIONS
a READ THESE INSTRUCTIONS AND INSTRUC-
TIONS FOR YOUR TABLE SAW THOROUGHLY
BEFORE USING ACCESSORY.
• KNOW YOUR POWER TOOL. Read the owner's
manual for your Table Saw carefully. Learn the
saw's applications and limitations as well as the
specific potential hazards related to this tool.
• KEEP THE WORK AREA CLEAN. Cluttered work
areas and work benches invite accidents. DO NOT
leave tools or pieces of wood on the saw while it is
in operation.
a ALWAYS WEAR SAFETY GLASSES. Everyday
eyeglasses have only impact-resistant lenses; they
are NOT safetyglasses.
a ALWAYS DISCONNECT SAW FROM POWER
SUPPLY BEFORE MAKING ADJUSTMENTS OR
ADDING ACCESSORIES. Make sure the switchis
off when reconnectingto power supply.
a SAVE THESE INSTRUCTIONS. Refer tothem
frequently and use to instructother users. If you
loan someone this accessory, loan them these
instructions also.
Look for this symbol to point out important safety precautions. It
means attention!!! Your safety is involved.
Read these instructions completely before assembling
or using the long miter/rip fence kit.
This new long miter/rip fence kit has been designed
for use with Craftsman 10 in. table saws _922811and
_922185.The kit has been engineered and manufac-
tured to Sears high standards for dependability, ease
of operation, and operator safety. This kit provides
additional support and control for making safe and
accurate miter cuts on tong pieces of work. It also
provides additional support and control for making
safe and accurate rip cuts in long pieces of work.
Properly cared for, it will provide years of dependable,
trouble-free performance.
_k WARNING: Beforeattempting to use this
accessory, familiarize yourself withalloperating
features and safety requirementsfor the
accessoryand the table saw.
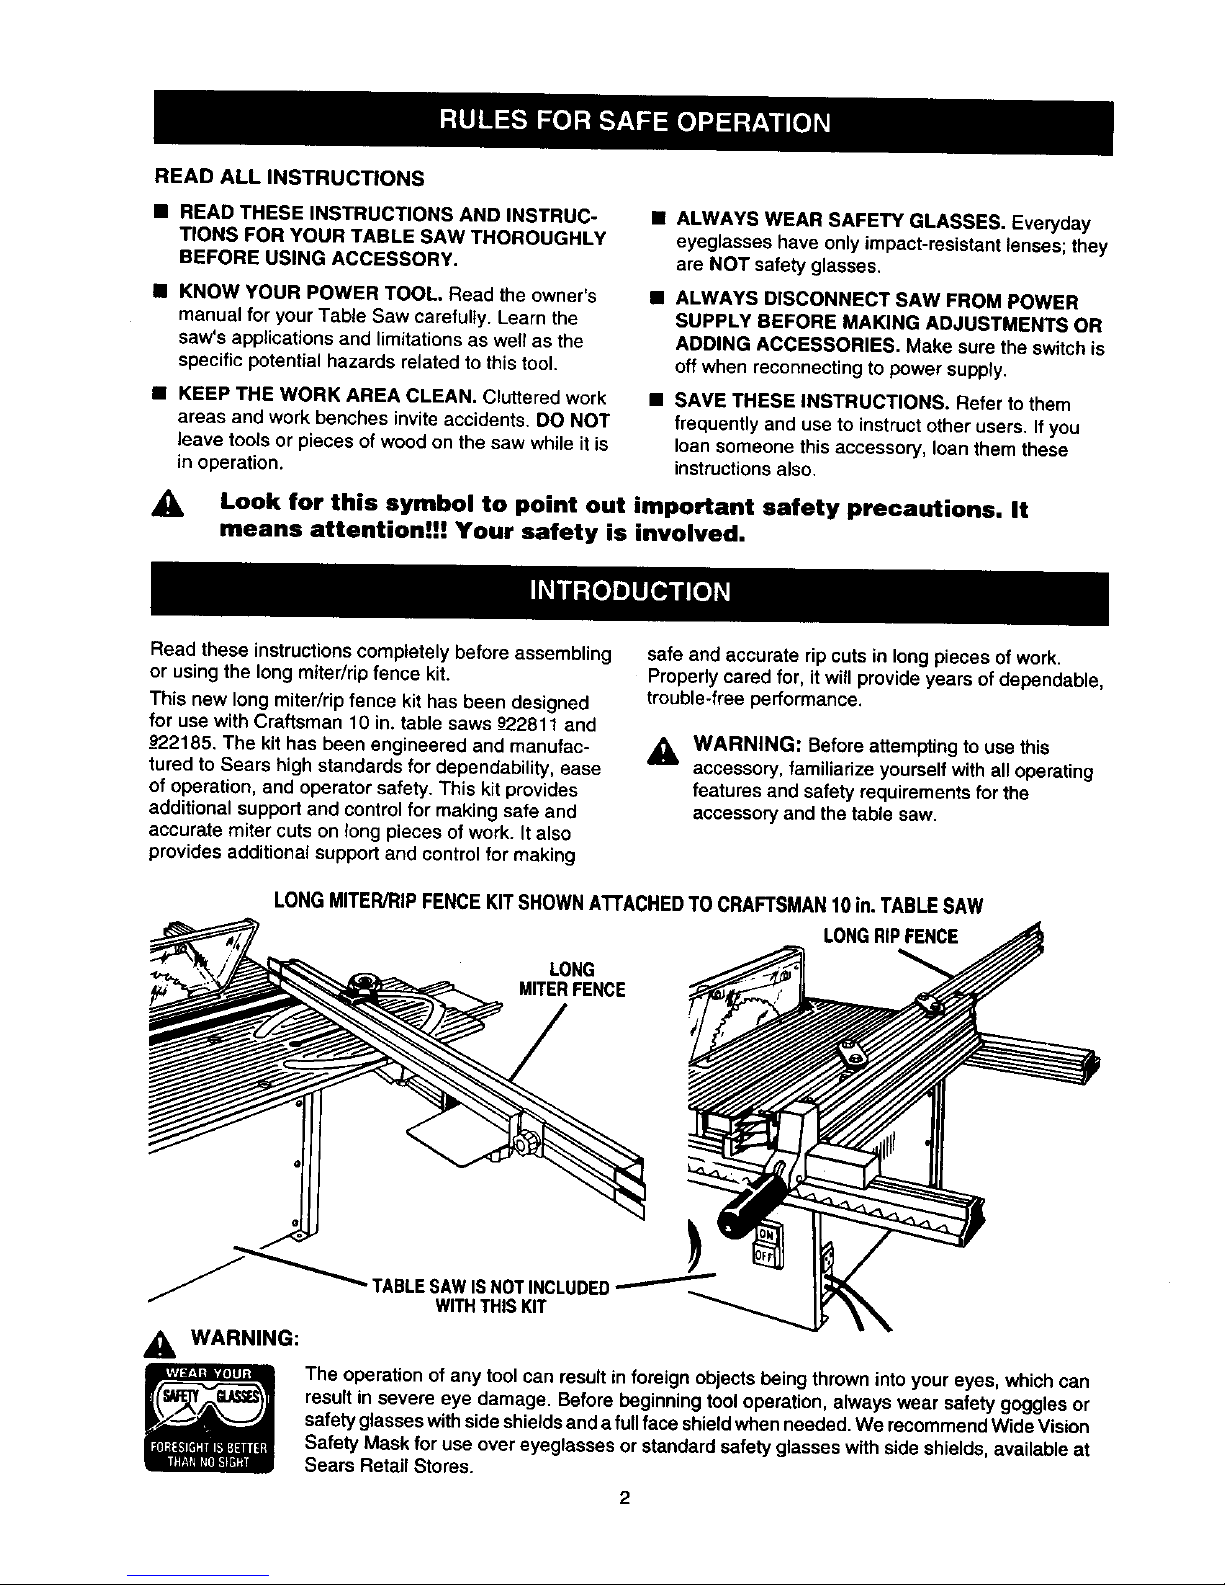
LONGMITER/RIPFENCEKITSHOWNATTACHEDTO CRAFTSMAN10 in. TABLESAW
LONGRIPFENCE
LONG
MITERFENCE
TABLESAWISNOTINCLUDED
WITHTHISKIT
WARNING:
The operation of any tool can result inforeign objects being thrown into your eyes, which can
result insevere eye damage, Before beginning tool operation, always wear safety goggles or
safety glasses with side shields and afull face shield when needed. We recommend Wide Vision
Safety Mask for use over eyeglasses or standard safety glasses with side shields, available at
Sears Retail Stores.
2
_1, WARNING: Use recommended accessories.
The use of improperaccessoriesmay create a
riskof injury.Do not use this longmiter/ripfence
kitfor any purpose other than as an accessoryto
the recommended table saw. Failureto heed this
warning can resultin serious personalinjury.
UNPACKING AND CHECKING PARTS
Your new longmiter/rip fence kit includes a 41 in.
extension rail, plus the necessary gages, brackets,
and connecting hardware required to assemble a long
miter fence and attach it to the sliding miter table of
your table saw. It also includes connectors and
hardware required for attaching a long rip fence to
your saw.
Note: When used as a long miter fence this kit
temporarilyreplacesthe miter fence supplied with your
saw.When used as a longripfence itattaches tothe
ripfence suppliedwithyoursaw.
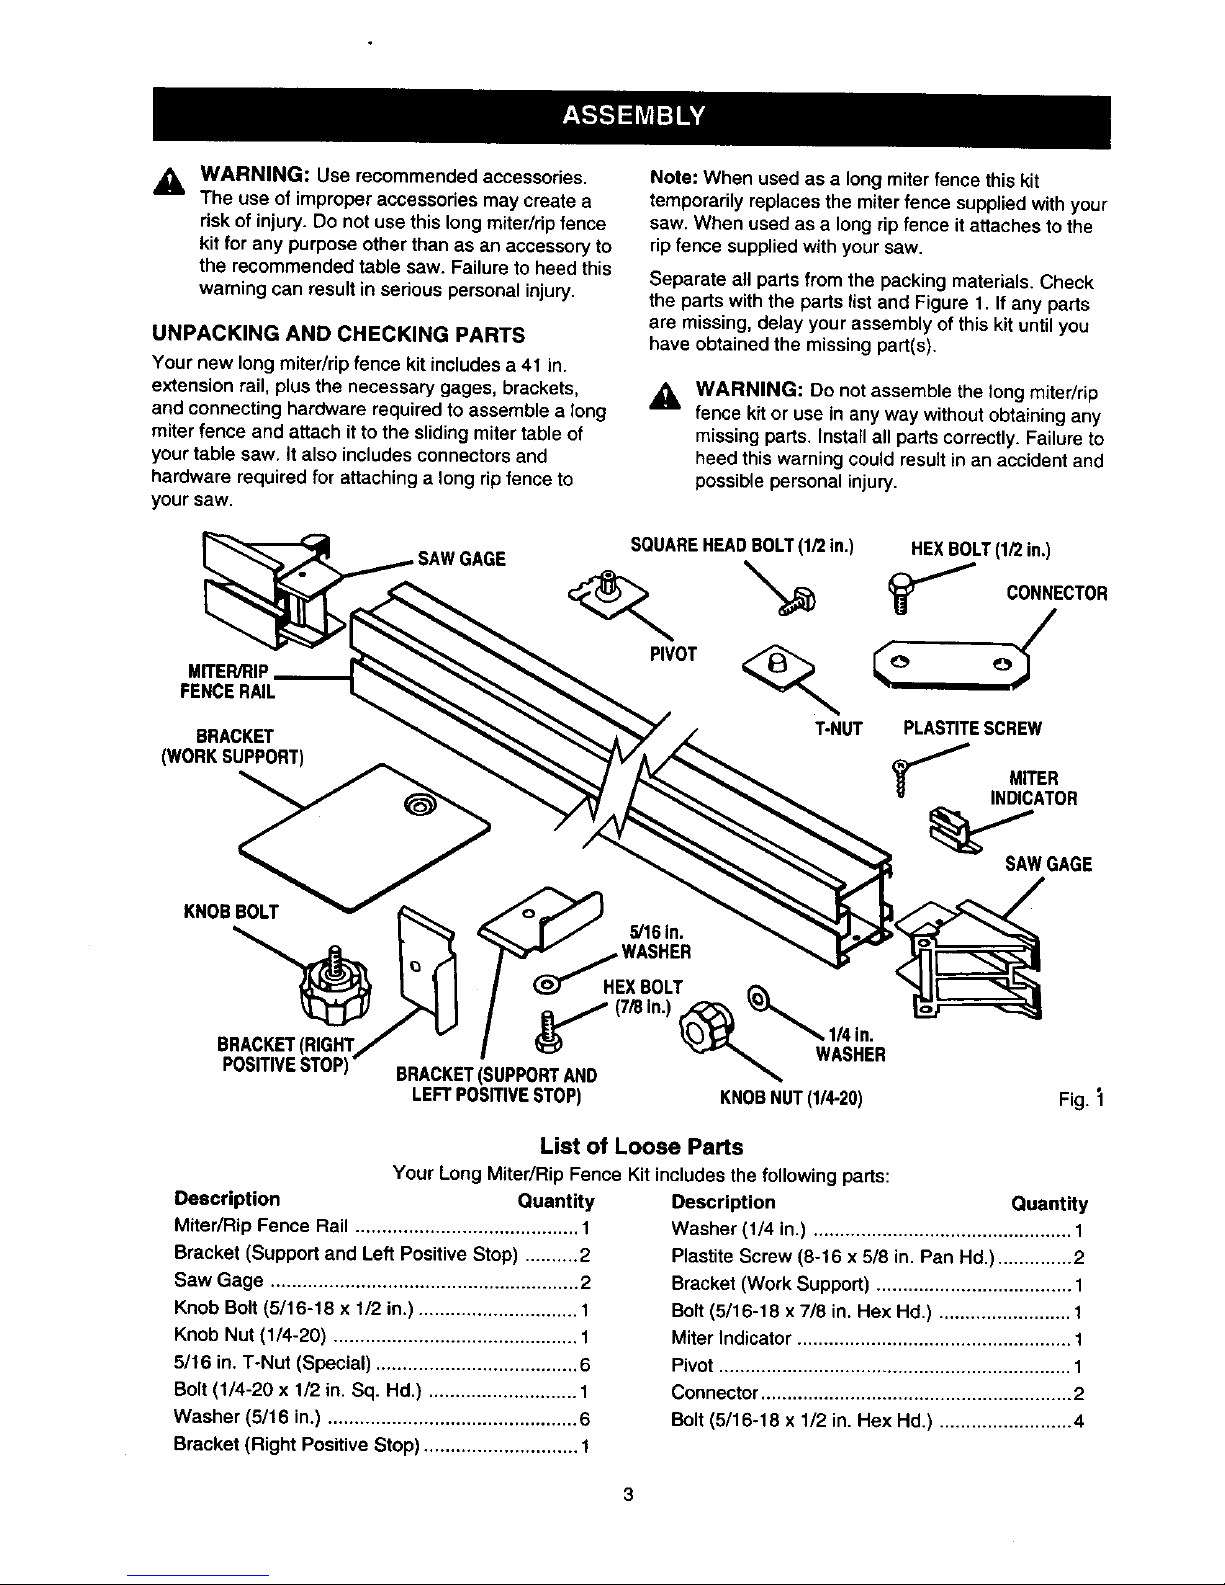
Separate all parts from the packing materials. Check
the parts with the parts list and Figure 1. If any parts
are missing, delay your assembly of this kit untilyou
have obtained the missing part(s).
_i, WARNING: Do notassemble the long miter/rip
fence kitor use inany waywithout obtainingany
missingpads. Installall partscorrectly.Failureto
heed thiswarningcould resultinan accident and
possiblepersonalinjury.
....... SQUAREHEADBOLT(1/2in.) HEXBOLT1/2 n
BRACKET _ _ _ _ / T-NUT PLASTITESCREW
(WORKSUPPORT) A _ _ _/_'A _ - / MITER
SAWOAOE
KNOSOOLT
L _ '_._ _ 5/161n. _ _..,_b'_i_
L 1 I I _ HEXBOLT _ ":t1|
SRACKET B,O.,/v r
POSITIVESTOP) BRACKETISUPPORTAND _ "'"
LEFTPOSITIVESTOP) KNOBNUT(1/4-20) Fig. _1
List of Loose Parts
Your Long Miter/Rip Fence Kitincludesthe followingpads:
Description Quantity
Miter/Rip Fence Rail .......................................... 1
Bracket (Support and Left Positive Stop) .......... 2
Saw Gage .......................................................... 2
Knob Bolt (5/16-16 x 1/2 in.) .............................. 1
Knob Nut (1/4-20) .............................................. 1
5/16 in, T-Nut (Special) ...................................... 6
Bolt(1/4-20 x 1/2 in.Sq. Hd.) ............................ 1
Washer (5/16 in.) ............................................... 6
Bracket (Right Positive Stop)............................. 1
Description Quantity
Washer (1/4 in.) ................................................. 1
Plastite Screw (8-16 x 5/8 in. Pan Hd.) .............. 2
Bracket (Work Support) ..................................... 1
Bolt (5/16-18 x 718 in. Hex Hal.) ......................... 1
Miter Indicator .................................................... 1
Pivot ................................................................... 1
Connector ........................................................... 2
Bolt (5/16-18 x 1/2 in. Hex Hd,) ......................... 4
3
 Loading...